quick introduction to graphics in r introduction to the r...
TRANSCRIPT

Quick Introduction to Graphics in R Introduction to the R language
CCCB course on R and Bioconductor, May 2012,
Aedin Culhane [email protected]
May 16, 2012
To start let’s look at the basic plots that can be produced in R using the demo() function
> demo(graphics)
On startup, R initiates a graphics device driver which opens a special graphics window for the displayof interactive graphics. If a new graphics window needs to be opened either win.graph() or windows()command can be issued.
Once the device driver is running, R plotting commands can be used to produce a variety of graphicaldisplays and to create entirely new kinds of display.
Plotting commands divided into three basic groups
1. High-level plotting functions create a new plot on the graphics device, possibly with axes,labels, titles and so on.
2. Low-level plotting functions add more information to an existing plot, such as extra points,lines and labels.
3. Interactive graphics functions allow you to interactively add information to, or extract infor-mation from the plots
In addition, R maintains a list of graphical parameters which can be manipulated to customize yourplots.
1

I Standard Plots
Note most plotting commands always start a new plot, erasing the current plot if necessary. We’lldiscuss how to change the layout of plots so you can put multiple plots on the same page a bit later
I.1 The R function plot()
The plot() function is one of the most frequently used plotting functions in R.
IMPORTANT: This is a generic function, that is the type of plot produced is dependent on the classof the first argument.
• Plot of Vector(s)
1. One vector x (plots the vector against the index vector)
> x<-1:10
> plot(x)
2. Scatterplot of two vectors x and y
> set.seed(13)
> x <- -30:30
> y <- 3*x + 2 + rnorm(length(x), sd=20)
> plot(x, y)
• Plot of data.frame elements If the first argument to plot() is a data.frame, this can be as simplyas plot(x,y) providing 2 columns (variables in the data.frame).
Lets look at the data in the data.frame airquality which measured the 6 air quality in NewYork, on a daily basis between May to September 1973. In total there are 154 observation(days).
> airquality[1:2,]
Ozone Solar.R Wind Temp Month Day
1 41 190 7.4 67 5 1
2 36 118 8.0 72 5 2
> plot(airquality) # all variables plotted against each other pairs()
Multiple plots in the same window, attach/detach
> par(mfrow=c(2,1))
> plot(airquality$Ozone, airquality$Temp, main="airquality$Ozone,airquality$Temp")
> attach(airquality)
> plot(Ozone, Temp, main="plot(Ozone, Temp)")
> detach(airquality)
2

I.2 Other useful graphics functions
• boxplot(x) a boxplot show the distribution of a vector. It is very useful to example the distri-bution of different variables.
> boxplot(airquality)
●
●
●●●
Ozone Solar.R Wind Temp Month Day
050
100
150
200
250
300
Note if you give plot a vector and factor plot(factor, vector) or plot(vector factor) it will producea boxplot.
> par(mfrow=c(2,2))
> boxplot(airquality$Ozone~airquality$Month, col=2:6, xlab="month", ylab="ozone", sub="boxplot(airquality$Ozone~airquality$Month")
> title("Equivalent plots")
> plot(factor(airquality$Month), airquality$Ozone, col=2:6,xlab="month", ylab="ozone", sub=
+ "plot(factor(airquality$Month), airquality$Ozone")
> plot(airquality$Ozone~factor(airquality$Month), col=2:6, sub="plot(airquality$Ozone~factor(airquality$Month)")
3

●
●
●
●●
●
5 6 7 8 9
050
100
150
boxplot(airquality$Ozone~airquality$Monthmonth
ozon
eEquivalent plots
●
●
●
●●
●
5 6 7 8 9
050
100
150
plot(factor(airquality$Month), airquality$Ozonemonth
ozon
e
●
●
●
●●
●
5 6 7 8 9
050
100
150
plot(airquality$Ozone~factor(airquality$Month)factor(airquality$Month)
airq
ualit
y$O
zone
• barplot Plot a bar plot of the mean ozone quality by month. First use tapply to calculate themean of ozone by month
> OzMonthMean<-tapply(airquality$Ozone, factor(airquality$Month), mean, na.rm=TRUE)
> par(mfrow=c(1,2))
> barplot(OzMonthMean,col=2:6, main="Mean Ozone by month")
4

5 6 7 8 9
Mean Ozone by month
010
2030
4050
• pie chart
> pie(OzMonthMean, col=rainbow(5))
5

5
6
7
8
9
• hist(x)- histogram of a numeric vector x with a few important optional arguments: nclass=
for the number of classes, and breaks= for the breakpoints
> xt <- rt(100, 3)
> hist(xt)
> plot(density(xt))
• Rvenn - draw a venn diagram. Input is a list. It will draw a venn diagram showing the intersectbetween 2-6 vectors in a list.
> require(gplots)
> sample(LETTERS,10)
[1] "A" "P" "J" "N" "Z" "W" "X" "O" "Y" "D"
> tt<-lapply(1:3,function(x) sample(LETTERS,10))
> names(tt)<-c("Lucy", "Sally", "Kate")
> tt
$Lucy
[1] "D" "M" "R" "F" "A" "J" "V" "O" "Z" "X"
6

$Sally
[1] "G" "W" "O" "Q" "I" "T" "Z" "P" "F" "N"
$Kate
[1] "Q" "S" "L" "P" "B" "T" "K" "A" "Z" "N"
> venn(tt)
Kate
SallyLucy
4
3
4
6
1
2
1
Plot 4 intersections
> tt<-lapply(1:4,function(x) sample(LETTERS,10))
> names(tt)<-paste("List", 1:4)
> venn(tt)
>
7

List 1
List 2 List 3
List 4
3
2 2
3
2
1
0
0
3
3
3
01
0
0
Color plots
> require(venneuler)
> IntersectMatrix<-function(tt) {
+ allElements<-unique(unlist(tt))
+ outMat<-sapply(1:length(tt), function(i) allElements%in%tt[[i]])
+ rownames(outMat)= allElements
+ colnames(outMat)= names(tt)
+ return(outMat)
+ }
> xx<-IntersectMatrix(tt)
8

> print(xx[1:4,])
List 1 List 2 List 3 List 4
J TRUE FALSE FALSE TRUE
X TRUE FALSE TRUE TRUE
A TRUE FALSE TRUE TRUE
M TRUE TRUE TRUE FALSE
> plot(venneuler(xx))
List 1
List 2
List 3
List 4
It will even plot 5 intersections
> tt<-lapply(1:5,function(x) sample(LETTERS,10))
> names(tt)<-sapply(tt, function(x) paste(sort(x), collapse=""))
> venn(tt)
>
9
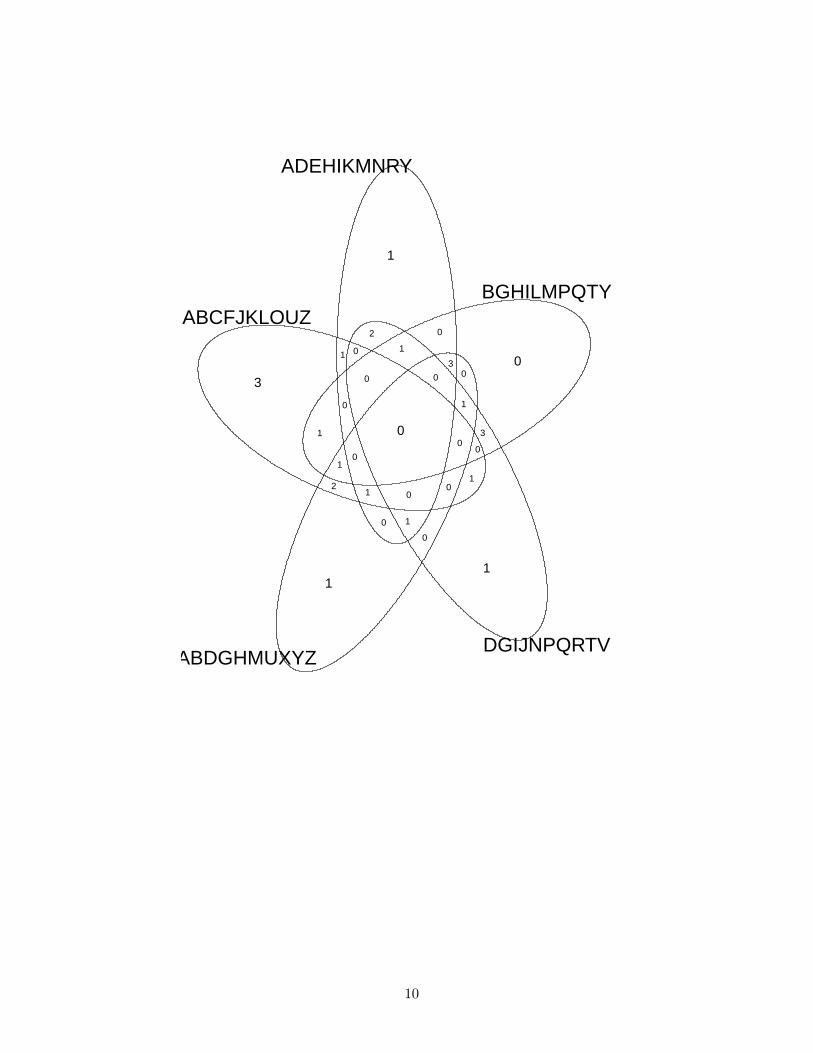
ABCFJKLOUZ
ADEHIKMNRY
BGHILMPQTY
DGIJNPQRTVABDGHMUXYZ
3
1
0
11
1
1
12
02
0
3
0
0
0
0
1
0
1
0
1
3
1
1
0
0
0
0
0
0
10
I.3 Arguments to plot
axes=FALSE Suppresses generation of axes-useful for adding your own custom axes with theaxis() function. The default, axes=TRUE, means include axes.
type= The type= argument controls the type of plot produced, as follows:
type=”p” Plot individual points (the default)
type=”l” Plot lines
type=”b” Plot points connected by lines (both)
type=”o” Plot points overlaid by lines
type=”h” Plot vertical lines from points to the zero axis (high-density)
type=”n” No plotting at all. However axes are still drawn (by default) and the coordinate system isset up according to the data. Ideal for creating plots with subsequent low-level graphicsfunctions.
xlab=string
ylab=string Axis labels for the x and y axes. Use these arguments to change the default labels,usually the names of the objects used in the call to the high-level plotting function.
main=string Figure title, placed at the top of the plot in a large font.
sub=string Sub-title, placed just below the x-axis in a smaller font.
Some Examples of Plotting using different plot types and axes
> xp <- 1:100/100
> yp <- 3*xp^2 - 2*xp + rnorm(100,sd=.2)
> par(mfrow=c(3,2))
> for (i in c("l", "b", "o", "h")) plot(xp, yp, type = i, main=paste("Plot type:", i))
> plot(xp, yp, type=’o’,
+ xlab=’index’, ylab=’values’,
+ main=’R simple plot’)
> plot(xp,yp, type=’l’, axes=FALSE)
> axis(1)
> axis(2, at=c(-0.6, 0, 0.6, 1.2), col=’blue’)
> axis(3, at=c(0, 0.25, 0.5, 0.75, 1.0), col=’red’)
> axis(4, col = "violet", col.axis="dark violet", lwd = 2)
>
11

0.0 0.2 0.4 0.6 0.8 1.0
−0.
50.
5Plot type: l
xp
yp
●●●●
●
●●●●●●
●●●●●
●
●
●●●
●●●
●●●
●
●●●●
●
●
●
●●
●●
●●
●●
●
●
●●●●●●●
●●●
●
●
●
●●●●
●●●
●●●●●●
●
●●
●
●
●●●
●
●●
●
●
●
●●●●
●●
●●
●●●
●
●
●●
0.0 0.2 0.4 0.6 0.8 1.0
−0.
50.
5
Plot type: b
xp
yp●●
●●
●
●●●●●●
●●●●●
●
●
●●●
●●●
●●●
●
●●●●
●
●
●
●●
●●
●●
●●
●
●
●●●●●●●
●●●
●
●
●
●●●●
●●●
●●●●●●
●
●●
●
●
●●●
●
●●
●
●
●
●●●●
●●
●●
●●●
●
●
●●
0.0 0.2 0.4 0.6 0.8 1.0
−0.
50.
5
Plot type: o
xp
yp
0.0 0.2 0.4 0.6 0.8 1.0
−0.
50.
5
Plot type: h
xp
yp
●●●●
●
●●●●●●
●●●●●
●
●
●●●
●●●
●●●
●
●●●●
●
●
●
●●
●●
●●
●●
●
●
●●●●●●●
●●●
●
●
●
●●●●
●●●
●●●●●●
●
●●
●
●
●●●
●
●●
●
●
●
●●●●
●●
●●
●●●
●
●
●●
0.0 0.2 0.4 0.6 0.8 1.0
−0.
50.
5
R simple plot
index
valu
es
xp
yp
0.0 0.2 0.4 0.6 0.8 1.0
−0.
60.
6
0.00 0.25 0.50 0.75 1.00
−0.
50.
5
12

II Editing the default plot with low-level plotting commands
Sometimes the standard plot functions don’t produce exactly the kind of plot you desire. In thiscase, low-level plotting commands can be used to add edit or extra information (such as points, linesor text) to the current plot. Some of the more useful low-level plotting functions are:
points(x, y)
lines(x, y) Adds points or connected lines to the current plot.
text(x, y, labels, ...) Add text to a plot at points given by x, y. Normally labels is an integer orcharacter vector in which case labels[i] is plotted at point (x[i], y[i]). The default is 1:length(x).Note: This function is often used in the sequence
The graphics parameter type=”n” suppresses the points but sets up the axes, and the text()
function supplies special characters, as specified by the character vector names for the points.
abline(a, b) Adds a line of slope b and intercept a to the current plot.
abline(h=y) Adds a horizontal line
abline(v=x) Adds a vertical line
polygon(x, y, ...) Draws a polygon defined by the ordered vertices in (x, y) and (optionally) shadeit in with hatch lines, or fill it if the graphics device allows the filling of figures.
legend(x, y, legend, ...) Adds a legend to the current plot at the specified position. Plottingcharacters, line styles, colors etc., are identified with the labels in the character vector legend.At least one other argument v (a vector the same length as legend) with the correspondingvalues of the plotting unit must also be given, as follows:legend( , fill=v) Colors for filled boxeslegend( , col=v) Colors in which points or lines will be drawnlegend( , lty=v) Line styleslegend( , lwd=v) Line widthslegend( , pch=v) Plotting characters
title(main, sub) Adds a title main to the top of the current plot in a large font and (optionally) asub-title sub at the bottom in a smaller font.
axis(side, ...) Adds an axis to the current plot on the side given by the first argument (1 to 4,counting clockwise from the bottom.) Other arguments control the positioning of the axiswithin or beside the plot, and tick positions and labels. Useful for adding custom axes aftercalling plot() with the axes=FALSE argument.
To add greek characters, either specifiy font type 5 (see below) or use the function expression
> plot(x, cos(x), main=expression(paste("A random eqn ",bar(x)) == sum(frac(alpha[i]+beta[z], n))), sub="This is the subtitle")
Example using points lines and legend
13

> attach(cars)
> plot(cars, type=’n’, xlab=’Speed [mph]’, ylab=’Distance [ft]’)
> points(speed[speed<15], dist[speed<15], pch=’s’, col=’blue’)
> points(speed[speed>=15], dist[speed>=15], pch=’f’, col=’green’)
> lines(lowess(cars), col=’red’)
> legend(5,120, pch=c(’s’,’f’), col=c(’blue’, ’green’), legend=c(’Slow’,’Fast’))
> title(’Breaking distance of old cars’)
> detach(2)
To add formulae or greek characters to a plot
> par(mfrow=c(2,1))
> # Mean and Median Plot
> x <- rexp(100, rate = .5)
> hist(x, main = "Mean and Median of a Skewed Distribution")
> abline(v = mean(x), col=2, lty=2, lwd=2)
> abline(v = median(x), col=3, lty=3, lwd=2)
> ex1 <- expression(bar(x) == sum(over(x[i], n), i==1, n), hat(x) == median(x[i], i==1,n))
> legend(4.1, 30, ex1, col = 2:3, lty=2:3, lwd=2)
> x <- seq(-pi, pi, len = 65)
> plot(x, sin(x), type="l", col = "blue", xlab = expression(phi), ylab = expression(f(phi)))
> lines(x, cos(x), col = "magenta", lty = 2)
> abline(h=-1:1, v=pi/2*(-6:6), col="gray90")
> ex2 <- expression(plain(sin) * phi, paste("cos", phi))
> legend(-3, .9, ex2, lty=1:2, col=c("blue", "magenta"), adj = c(0, .6))
14

Mean and Median of a Skewed Distribution
x
Fre
quen
cy
0 2 4 6 8 10
020
40
x = ∑i=1
n xi
n
x̂ = median(xi, i = 1, n)
−3 −2 −1 0 1 2 3
−1.
00.
01.
0
φ
f(φ)
sinφcosφ
III Default parameters - par
When creating graphics, particularly for presentation or publication purposes, R’s defaults do notalways produce exactly that which is required. You can, however, customize almost every aspect ofthe display using graphics parameters. R maintains a list of a large number of graphics parameterswhich control things such as line style, colors, figure arrangement and text justification among manyothers. Every graphics parameter has a name (such as ’col’, which controls colors,) and a value(a color number, for example.) Graphics parameters can be set in two ways: either permanently,affecting all graphics functions which access the current device; or temporarily, affecting only a singlegraphics function call.
The par() function is used to access and modify the list of graphics parameters for the currentgraphics device. See help on par() for more details.
To see a sample of point type available in R, type
example(pch)
15

III.1 Interactive plots in R Studio - Effect of changing par
In RStudio the manipulate function accepts a plotting expression and a set of controls (e.g. slider,picker, or checkbox) which are used to dynamically change values within the expression. When avalue is changed using its corresponding control the expression is automatically re-executed and theplot is redrawn.
> library(manipulate)
> manipulate(plot(1:x), x = slider(1, 100))
> manipulate(
+ plot(cars, xlim = c(0, x.max), type = type, ann = label, col=col, pch=pch, cex=cex),
+ x.max = slider(10, 25, step=5, initial = 25),
+ type = picker("Points" = "p", "Line" = "l", "Step" = "s"),
+ label = checkbox(TRUE, "Draw Labels"), col=picker("red"="red", "green"="green",
+ "yellow"="yellow"), pch=picker("1"=1,"2"=2,"3"=3, "4"=4, "5"=5, "6"=6,"7"=7,
+ "8"=8, "9"=9, "10"=10,"11"=11, "12"=12,"13"=13, "14"=14, "15"=15, "16"=16,
+ "17"=17, "18"=18,"19"=19,"20"=20, "21"=21,"22"=22, "23"=23,"24"=24),
+ cex=picker("1"=1,"2"=2,"3"=3, "4"=4, "5"=5,"6"=6,"7"=7,"8"=8, "9"=9, "10"=10))
●●
●
●●
●●●●
●
●
●●●● ●
●●
●
●
●
●
●
●●
●
●●
●●
●●
●
●●
●
●
●
●
●●●● ●
●
●
●●
●
●
5 10 15 20 25
040
8012
0
type = p, col=red, pch=19, cex=1
speed
dist
●
●
●
●
●
●
●
●
●
●
●
●
●●●
●
●●
●
●
●
●
●
●
●
●
●
●
●
●
●
●
●
●
●
●
●
●
●
●●●
●●
●
●
●●
●
●
5 10 15 20 25
040
8012
0
type = p, col=blue, pch=21, cex=0.5
speed
dist
5 10 15 20 25
040
8012
0
type = p, col=green, pch=17, cex=2
speed
dist
5 10 15 20 25
040
8012
0
type = line, col=orange
speed
dist
16

III.2 R Colors
Thus far, we have frequently used numbers in plot to refer to a simple set of colors. There are 8colors where 0:8 are white, black, red, green, blue, cyan, magenta, yellow and grey. If you provide anumber greater than 8, the colors are recycled. Therefore for plots where other or greater numbersof colors are required, we need to access a larger palette of colors.
> plot(1:12, col=1:12, main="Default 9 Colors", ylab="",xlab="", pch=19, cex=3)
> text(1:12, c(1:12)+.75, c(1:8, 1:4))
●●
●●
●●
●●
●●
●●
2 4 6 8 10 12
24
68
1012
Default 9 Colors
1
2
3
4
5
6
7
8
1
2
3
4
R has a large list of over 650 colors that R knows about. This list is held in the vector colors(). Havea look at this list, and maybe search for a set you are interested in.
> colors()[1:10]
[1] "white" "aliceblue" "antiquewhite"
[4] "antiquewhite1" "antiquewhite2" "antiquewhite3"
17

[7] "antiquewhite4" "aquamarine" "aquamarine1"
[10] "aquamarine2"
> length(colors())
[1] 657
> grep("yellow", colors(), value=TRUE)
[1] "greenyellow" "lightgoldenrodyellow"
[3] "lightyellow" "lightyellow1"
[5] "lightyellow2" "lightyellow3"
[7] "lightyellow4" "yellow"
[9] "yellow1" "yellow2"
[11] "yellow3" "yellow4"
[13] "yellowgreen"
R are has defined palettes of colors, which provide complementing or contrasting color sets. Forexample look at the color palette rainbow.
> example(rainbow)
For a more complete listing of colors, along with the RGB numbers for each colors, the follow scriptgenerates a several page pdf document which maybe a useful reference document for you.
> source("http://research.stowers-institute.org/efg/R/Color/Chart/ColorChart.R")
A very useful RColorBrewer http://colorbrewer.org. This package will generate a ramp color toprovide color plattes that are sequential, diverging, and qualitative ramped, for example:
• Sequential palettes are suited to ordered data that progress from low to high. Lightness stepsdominate the look of these schemes, with light colors for low data values to dark colors for highdata values.
• Diverging palettes put equal emphasis on mid-range critical values and extremes at both endsof the data range. The critical class or break in the middle of the legend is emphasized withlight colors and low and high extremes are emphasized with dark colors that have contrastinghues.
• Qualitative palettes do not imply magnitude differences between legend classes, and hues areused to create the primary visual differences between classes. Qualitative schemes are bestsuited to representing nominal or categorical data.
To see more about RColorBrewer run the example
18

> library(RColorBrewer)
> example(brewer.pal)
I use RColorBrewer to produce nicer colors in clustering heatmaps. For example if we look at theUS state fact and figure information in the package state, which contains a matrix called state.x77containing information on 50 US states (50 rows) on population, income, Illiteracy, life expectancy,murder, high school graduation, number of days with frost, and area (8 columns). The defaultclustering of this uses a rather ugly red-yellow color scheme which I changed to a red/brown-blue.
> library(RColorBrewer)
> hmcol <- colorRampPalette(brewer.pal(10, "RdBu"))(500)
> heatmap(t(state.x77), col=hmcol, scale="row")
Ala
ska
Texa
sM
onta
naC
alifo
rnia
Col
orad
oW
yom
ing
Ore
gon
New
Mex
ico
Nev
ada
Ariz
ona
Wes
t Virg
inia
Mai
neS
outh
Car
olin
aR
hode
Isla
ndD
elaw
are
Mas
sach
uset
tsN
ew J
erse
yH
awai
iC
onne
ctic
utM
aryl
and
Ver
mon
tN
ew H
amps
hire
Nor
th D
akot
aW
ashi
ngto
nO
klah
oma
Mis
sour
iS
outh
Dak
ota
Neb
rask
aM
inne
sota
Kan
sas
Uta
hId
aho
New
Yor
kO
hio
Pen
nsyl
vani
aIn
dian
aV
irgin
iaK
entu
cky
Tenn
esse
eA
rkan
sas
Ala
bam
aN
orth
Car
olin
aLo
uisi
ana
Mis
siss
ippi
Geo
rgia
Iow
aW
isco
nsin
Flo
rida
Mic
higa
nIll
inoi
s
Frost
Illiteracy
Murder
HS Grad
Life Exp
Population
Income
Area
19

IV Interacting with graphics
R also provides functions which allow users to extract or add information to a plot using a mouse vialocator() and verb+identify() functions respectively.
Identify memebers in a hierachical cluster analysis of distances between European cities
> hca<-hclust(eurodist)
> plot(hca, main="Distance between European Cities")
Ath
ens
Rom
eG
ibra
ltar
Lisb
onM
adrid
Sto
ckho
lmC
open
hage
nH
ambu
rgM
ilan
Gen
eva
Lyon
sB
arce
lona
Mar
seill
esM
unic
hV
ienn
aC
olog
neB
russ
els
Hoo
k of
Hol
land
Che
rbou
rgC
alai
sP
aris
010
0020
0030
0040
00
Distance between European Cities
hclust (*, "complete")eurodist
Hei
ght
> (x<-identify(hca))
> x
> plot(1:20, rt(20,1))
> text(locator(1), ’outlier’, adj=0)
Waits for the user to select locations on the current plot using the left mouse button.
20

> attach(women)
> plot(height, weight)
> identify(height, weight, women)
> detach(2)
Allow the user to highlight any of the points (identify(x,y,label)) defined by x and y (using theleft mouse button) by plotting the corresponding component of labels nearby (or the index numberof the point if labels is absent).
Right mouse click, to ”stop”.
21

IV.1 Exercise - Plotting
Using the women dataset
1. Set the plot layout to be a 2 x 2 grid (ie 2 rows, 2 columns)
2. Draw weight on the Y axis and height on the X axis.
3. Switch the orientation, Draw weight on the X axis and height on the Y axis.
4. Drawing a new plot, set the pch (point type) to be a solid circle, and color them red. Add atitle ”study of Women” to the plot
5. Drawing another plot, set the pch (point type) to be a solid sqaure, Change the X axis labelto be ”Weight of Women” and make the point size (using the paramter cex) larger to 1.5
●●
●●
●●
●●
●●
●
●
●
●
●
58 62 66 70
120
140
160
height
wei
ght
●●
●●
●●
●●
●●
●●
●●
●
120 130 140 150 160
5862
6670
weight
heig
ht
●●
●●
●●
●●
●●
●●
●●
●
120 130 140 150 160
5862
6670
Study of Women
weight
heig
ht
120 130 140 150 160
5862
6670
Weight of Women (lbs)
heig
ht o
f wom
en (
inch
es)
22

V Saving plots
R can generate graphics (of varying levels of quality) on almost any type of display or printing device.Before this can begin, however, R needs to be informed what type of device it is dealing with. This isdone by starting a device driver. The purpose of a device driver is to convert graphical instructionsfrom R (”draw a line,” for example) into a form that the particular device can understand. Devicedrivers are started by calling a device driver function. There is one such function for every devicedriver: type help(Devices) for a list of them all.
The most useful formats for saving R graphics:
postscript() For printing on PostScript printers, or creating PostScript graphics files.
pdf() Produces a PDF file, which can also be included into PDF files.
jpeg() Produces a bitmap JPEG file, best used for image plots.
Note there is a big difference between saving files in jpeg or postscript files. Image files save injpg, bmp, gif etc are pixel image files, these are like photographes, where you can just select a lineand change its color. By contact vector graphic, such as postscript, or windows meta files can beimported into drawing packages such as Adobe illustrator (or some even into powerpoint), you candouble click on an axes, and since its a vector graphic you can change the color of the line easily.
When in doubt, I save files an postscript format (eps), as several journals request this format. EPSfiles can be open directly in adobe illustrator or other vector editing graphics packages.
We will demonstrate these different formats in class.
To list the current graphics devices that are open use dev.cur. When you have finished with a device,be sure to terminate the device driver by issuing the command dev.off().
If you have open a device to write to for example pdf or png, dev.off will ensures that the devicefinishes cleanly; for example in the case of hardcopy devices this ensures that every page is completedand has been sent to the printer or file.
Example:
> myPath <- file.path("P:/Bio503/Plots")
> pdf(file=paste(myPath,’nicePlot.pdf’, sep=’’))
> x <- seq(0,2*pi,length=100)
> y <- sin(3*x) + cos(x) + rnorm(100,sd=.2)
> plot(x,y)
> dev.off()
V.1 Useful Graphics Resources
If you have plots saved in a non-vector format, we have found the web-site VectorMagic from Stanfordhttp://vectormagic.stanford.edu/ to be very useful. It will convert bmp or jpeg files to vecctorformat.
23

The free software ImageMagick http://www.imagemagick.org can be downloaded and is also usefulfor converting between image format.
VI More on R graphics
One of the strengths of R is the variety and quality of its graphics capabilities. Lets looks at someof the news worthy graphics from R
1. Google visualization
http://code.google.com/apis/visualization/documentation/gallery/motionchart.html
and how to run in R
See http://blog.revolutionanalytics.com/graphics/ for some exampels of R code
> #install.packages("googleVis")
> library(googleVis)
> M <- gvisMotionChart(Fruits, "Fruit", "Year")
> plot(M)
> cat(M$html$chart, file="tmp.html")
2. Lattice http://lmdvr.r-forge.r-project.org/figures/figures.html
3. From R you ready -InfoMaps http://ryouready.wordpress.com/ blogs on creating InfoMapsuseful for spatial data analysis
http://ryouready.wordpress.com/2009/11/16/infomaps-using-r-visualizing-german-unemployment-rates-by-color-on-a-map/
4. Rggobi http://www.ggobi.org/rggobi/ 3D visualization of multidimensional data http://
www.ggobi.org/rggobi/introduction.pdf
5. Graph theory and visualization of data as a graph
using the package network
> #install.packages(network)
> library(network)
> m<-matrix(rbinom(100,1,1.5/9),10)
> diag(m)<-0
> g<-network(m)
> #Plot the graph
> plot(g)
> #Load Padgett’s marriage data
> data(flo)
> nflo<-network(flo)
> #Display the network, indicating degree and flagging the Medicis
> plot(nflo, vertex.cex=apply(flo,2,sum)+1, usearrows=FALSE,
+ vertex.sides=3+apply(flo,2,sum),
+ vertex.col=2+(network.vertex.names(nflo)=="Medici"))
>
24

using the package igraph
> #install.packages("igraph")
> library(igraph)
> adj.mat <- matrix(sample(c(0,1), 9, replace=TRUE), nr=3)
> g <- graph.adjacency(adj.mat)
> plot(g)
6. For a discussion on different graph packages see
using Rgraphviz http://www2.warwick.ac.uk/fac/sci/moac/students/peter_cock/r/rgraphviz/or see the many examples on the bioconuductor website
a recent discussion online about the topic: http://stats.stackexchange.com/questions/
6155/graph-theory-analysis-and-visualization
R cytoscape http://db.systemsbiology.net:8080/cytoscape/RCytoscape/vignette/RCytoscape.html
7. Additional demos available in the graphics package: demo(image), demo(persp) and exam-ple(symbol).
25

VII Advanced plotting using lattice library
Lattice plots allow the use of the layout on the page to reflect meaningful aspects of data structure.They offer abilities similar to those in the S-PLUS trellis library.
An incomplete list of lattice Functions
splom( ~ data.frame) # Scatterplot matrix
bwplot(factor ~ numeric , . .) # Box and whisker plot
dotplot(factor ~ numeric , . .) # 1-dim. Display
stripplot(factor ~ numeric , . .) # 1-dim. Display
barchart(character ~ numeric,...)
histogram( ~ numeric, ...) # Histogram
densityplot( ~ numeric, ...) # Smoothed version of histogram
qqmath(numeric ~ numeric, ...) # QQ plot
splom( ~ dataframe, ...) # Scatterplot matrix
parallel( ~ dataframe, ...) # Parallel coordinate plots
26