quick start guide (english) - cactus v6 iis quick start guide (en).pdf · remote power control...
TRANSCRIPT
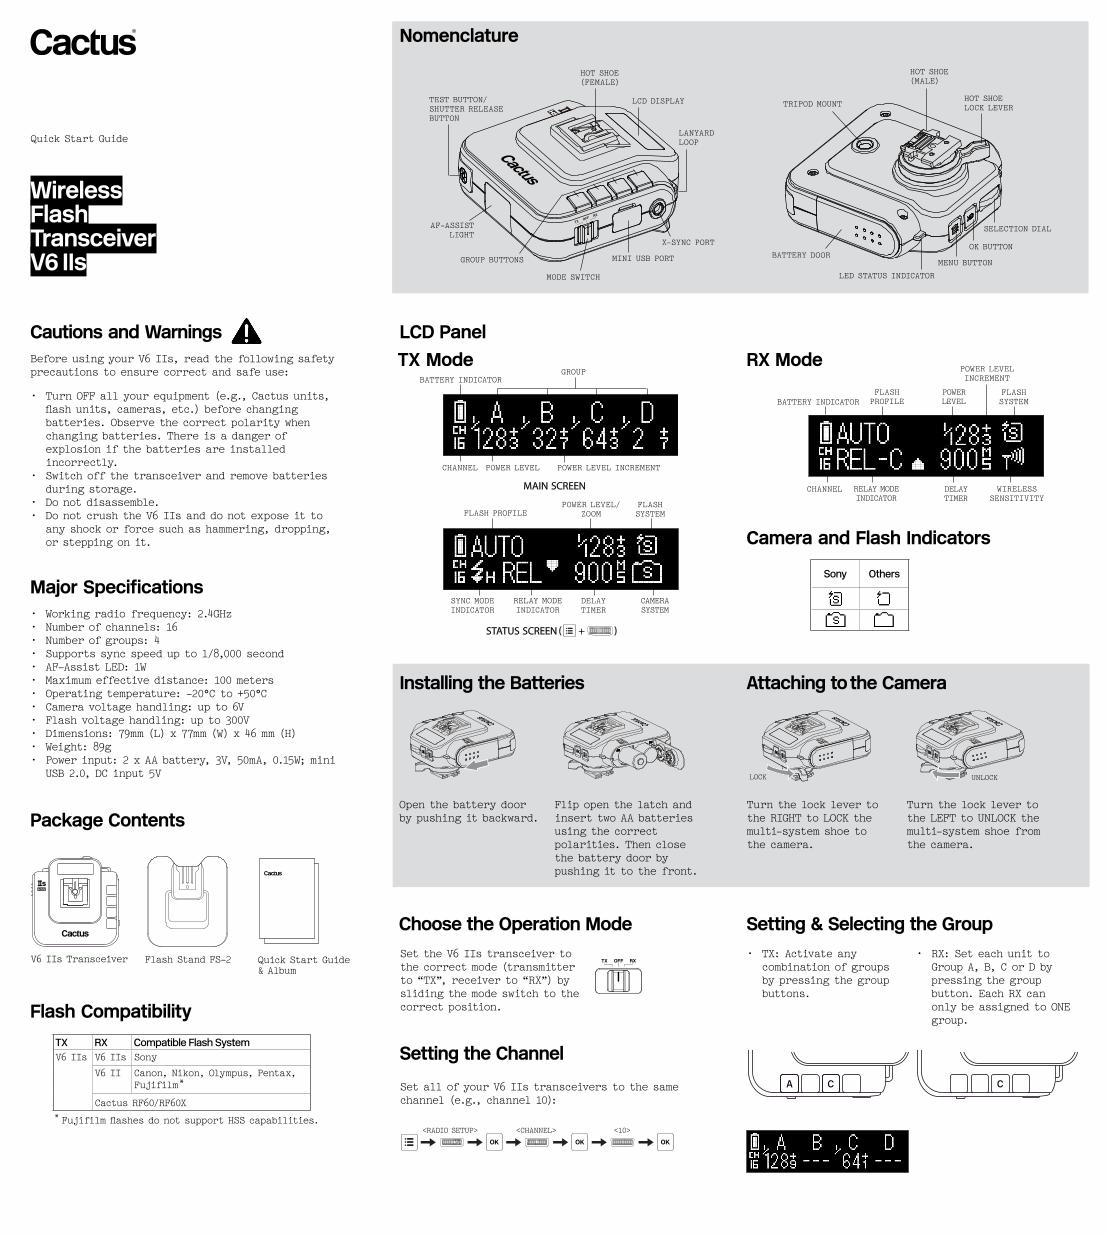
Setting the Channel
Major Specifications•Workingradiofrequency:2.4GHz•Numberofchannels:16•Numberofgroups:4•Supportssyncspeedupto1/8,000second•AF-AssistLED:1W•Maximumeffectivedistance:100meters•Operatingtemperature:-20°Cto+50°C•Cameravoltagehandling:upto6V•Flashvoltagehandling:upto300V•Dimensions:79mm(L)x77mm(W)x46mm(H)•Weight:89g•Powerinput:2xAAbattery,3V,50mA,0.15W;mini
USB2.0,DCinput5V
Installing the Batteries
Openthebatterydoorbypushingitbackward.
FlipopenthelatchandinserttwoAAbatteriesusingthecorrectpolarities.Thenclosethebatterydoorbypushingittothefront.
Attaching to the Camera
UNLOCK
TurnthelocklevertotheRIGHTtoLOCKthemulti-systemshoetothecamera.
LOCK
TurnthelocklevertotheLEFTtoUNLOCKthemulti-systemshoefromthecamera.
Nomenclature
HOTSHOE(MALE)
HOTSHOELOCKLEVER
BATTERYDOOR
TRIPODMOUNT
LEDSTATUSINDICATOR
MENUBUTTON
OKBUTTON
SELECTIONDIAL
LCDDISPLAY
HOTSHOE(FEMALE)
X-SYNCPORT
MINIUSBPORT
MODESWITCH
AF-ASSISTLIGHT
LANYARDLOOP
TESTBUTTON/SHUTTERRELEASEBUTTON
GROUPBUTTONS
LCD Panel
CHANNEL POWERLEVEL POWERLEVELINCREMENT
BATTERYINDICATORGROUP
MAIN SCREEN
STATUS SCREEN ( + )
TX Mode RX ModeCautions and Warnings BeforeusingyourV6IIs,readthefollowingsafetyprecautionstoensurecorrectandsafeuse:
•TurnOFFallyourequipment(e.g.,Cactusunits,flashunits,cameras,etc.)beforechangingbatteries.Observethecorrectpolaritywhenchangingbatteries.Thereisadangerofexplosionifthebatteriesareinstalledincorrectly.
•Switchoffthetransceiverandremovebatteriesduringstorage.
•Donotdisassemble.•DonotcrushtheV6IIsanddonotexposeitto
anyshockorforcesuchashammering,dropping,orsteppingonit.
Choose the Operation ModeSettheV6IIstransceivertothecorrectmode(transmitterto“TX”,receiverto“RX”)byslidingthemodeswitchtothecorrectposition.
Setting & Selecting the Group•TX:Activateany
combinationofgroupsbypressingthegroupbuttons.
•RX:SeteachunittoGroupA,B,CorDbypressingthegroupbutton.EachRXcanonlybeassignedtoONEgroup.
CAMERASYSTEM
POWERLEVEL/ZOOMFLASHPROFILE
FLASHSYSTEM
SYNCMODEINDICATOR
RELAYMODEINDICATOR
DELAYTIMER
WIRELESSSENSITIVITY
CHANNEL
BATTERYINDICATORFLASHPROFILE
POWERLEVELINCREMENT
POWERLEVEL
DELAYTIMER
RELAYMODEINDICATOR
FLASHSYSTEM
SetallofyourV6IIstransceiverstothesamechannel(e.g.,channel10):
WirelessFlash TransceiverV6 IIs
QuickStartGuide
Package Contents
V6IIsTransceiver FlashStandFS-2 QuickStartGuide&Album
Flash CompatibilityTX RX Compatible Flash SystemV6IIs V6IIs Sony
V6II Canon,Nikon,Olympus,Pentax,Fujifilm
CactusRF60/RF60X
*FujifilmflashesdonotsupportHSScapabilities.
Camera and Flash Indicators
Sony Others
*
<RADIOSETUP> <CHANNEL> <10>

Remote Power ControlFunction KeyAdjustingallgroups
Adjustingasinglegroup(e.g.,groupA)
+
Hold ,then
Adjustingtheon-cameraflash +
Remote Zoom ControlFunction KeyTogglingtoandfromthezoomcontrolpanel
Adjustingallgroups
Adjustingasinglegroup(e.g.,groupA)
+
Hold ,then
Adjustingtheon-cameraflash +
TTL Pass-through
•TheV6IIstransceivercomeswithapairofhotshoesthatsupportsTTLpass-throughwithSonycamerasandsystemflashes.
•TurnON/OFFTTLpass-throughmode:Hold
•TheLCDdisplaywillshowtheTTLpass-throughindicatoratthelowerlefthandcornerinTTLpass-throughmode.
Corporate Office:
HARVESTONELIMITED11D,BLK2,KOONWAHMIRRORFACTORY(6TH)IND.BLDG.,7-9HOTINST,TUENMUN,HONGKONG
PLEASECONTACTYOURLOCALDEALERFORCUSTOMERSERVICE.
©HARVESTONELTD.2016(1stEDITION)
Camera Shutter Release1.ConnecttheV6IIsRXto
yourcamerausinganappropriateshutterreleasecable.
2.MatchthechannelandthegroupoftheTXandtheRX.
Functions Status LEDHalf-press Auto-focus Orange
Fullpress Releasetheshutter
Green
RXTX
Relay ModeCameraShutter+Flash
TX RX1 RX2Handheld Mountoncamera’s
hotshoeandconnectusingacorrespondingshuttercable.
Connecttoflashunit.
Nosetuprequired.
RX1
RX2
TX
www.cactus-image.com/v6iis.html
Flash Setup1.TurnonyourflashandswitchittotheTTLmode.
2.SwitchontheV6IIs.DecidewhethertoapplyanAutoFlashProfile(default)oraflash-specificprofile.
•AutoFlashProfile<AUTO>:workswithallSonycompatibleflashes.
•Flash-specificprofile(e.g.,<SONYF60M>):workswiththeselectedflashmodelwithmoreaccuratepoweroutput.
Menu at a Glance
Working with RF60 and V6 II
V6 IIs RF 60X / RF60 V6 IIOn-camera Off-camera Off-cameraSwitchtoTXmode SwitchtoSlave SwitchtoRXmode
Setalldevicestothesamechannel.
ConnecttoSonycameraswithMIshoe.
Standalonewithbuilt-inV6wirelessmodule.
ConnecttoCanon,Nikon,Olympus,FujifilmorPentaxTTLflashes.
CAMERA
RF60
V6 IIs
V6 II
Selection Dial Setup (TX)
Functions Key
DialDirection(Clockwise/Anti(counter)-clockwise)
DialLock/Unlock
Hold onthemainscreenfor2sec.
TemporaryUnlock*
Press onceandturnthedialwithin2sec.
*TheTemporaryUnlockoftheselectiondialcanbedisabledinthe<PREFERENCES>menu.
FUNCTIONS TX RX-SYNCMODE-DELAY-RELAY-GROUPSEQUENCE-SPORTSSHUTTER-TTLPASSTHROUGH
√√√√
√
√√
√
FLASH SETUP TX RX-FLASHSYSTEM-FLASHPROFILE
√√
√√
TX
RX
PREFERENCESFUNCTIONS POWERSETUP
RADIOSETUP
FLASHSETUP
PREFERENCESFUNCTIONS RADIOSETUP
POWER SETUP TX RX-POWERMODE-EVSTEP-LOPOWER
√√√
RADIO SETUP TX RX-CHANNEL-RADIOID-MULTI-MASTER-WORKRANGE
√√√√
√√
PREFERENCES TX RX-AF-ASSIST(TX/RX)-BACKLIGHTPOWER-BACKLIGHTTIME-DAYLIGHTMODE-SWAPCONTROL-DIALDIRECTION-TEMPORARYUNLOCK-SLEEP-FACTORYRESET
√√√√√√√√√
√√√√
√
√√
Visitourwebsitetodownloadtheusermanualandcheckforthelatestfirmwareupdates.
FLASHSETUP
<FLASHSETUP> <FLASHPROFILE>
<FUNCTIONS> <RELAY>
<ON>
<PREFERENCES> <DIALDIRECTION>
High Speed Sync (1): Normal HSS1.TurnontheHSS/FPsettingoftheremoteTTL
flashesattachedtotheV6IIsRX.
2.ChooseNormalHSSfromtheV6IIsTXmenu.
<FUNCTIONS> <SYNCMODE> <NORMALHSS>
High Speed Sync (2): Power Sync1.ChoosePowerSyncfromtheV6IIsTXmenu.
2.Adjustthesynctime,ifnecessary.
•TurnthedialtotheLEFTtoexpeditethesynctimeifyoufindadarkbandattheBOTTOMofthepicture.
•TurnthedialtotheRIGHTtodelaythesynctimeifyoufindadarkbandattheTOPofthepicture.
<FUNCTIONS> <SYNCMODE> <POWERSYNC>
<FUNCTIONS> <SYNCMODE>
+