quick start guide for pc and maccdn.heartmath.com/manuals/emwave-2-qsg_3-6-14.pdf · quick start...
TRANSCRIPT

Quick Start Guide for PC and Mac
®
emWave 2 QSG flat 3-6-14 .indd 1 3/6/14 10:55 AM

2
Welcome to the world of emWave® Technology.
The patented emWave Technology is designed to help you transform emotional stress, build resilience and increase intuition and perfor-mance in all areas of your life.
emWave Technology developed by Doc Childre, is a unique training system based on years of research on emotional stress and perfor-mance. It objectively monitors your heart rhythms and displays your physiological level of coherence. Coherence is an optimal state in which the heart, mind and emotions are operating in-sync and in bal-ance which has been proven to have numerous mental, emotional, and physical benefits. With practice you learn how to shift into coherence at will, and readily see and experience changes in your heart rhythm patterns and sense of well-being as you practice the Quick Coherence® and other HeartMath® techniques.
emWave 2 QSG flat 3-6-14 .indd 2 3/6/14 10:55 AM

3
Table of ContentsBasics.....................................................................................4 About Quick Start Guide............................................................4 emWave2.....................................................................4 Installing the Software on a Mac................................................5 Installing the Software on a PC.................................................7 Charging emWave2 ..................................................................9 Using emWave2 on the go........................................................12
Run a Session on your Computer...........................................10How To Use Advanced Mode ................................................15
Additional Help Files...................................................................18HeartCloud™.........................................................................19
Usage, Copyright, Patents, License and WarrantyPlease review Legal Notices: Usage, Copyright, Patents, License and Warranty in the emWave® software.
emWave is a registered trademark of Quantum Intech, Inc. HeartMath is registered trademark of the Institute of HeartMath.
Quick Coherence is a registered trademark of Doc Childre. HeartCloud is a trademark of Quantum Intech, Inc.
Inner Balance is a trademark of Quantum Intech, Inc.
emWave 2 QSG flat 3-6-14 .indd 3 3/6/14 10:55 AM

4
Basics
About this Quick Start Guide
This Quick Start Guide covers software installation on Mac and Windows operating systems plus emWave2 device setup. It is not intended to cover all the topics or the full functionality of emWave2. For more extensive information, access the Library and Help menu within the software or visit our online support center at:
http://support.heartmath.com
emWave2®
This software is single User and only syncs with a single emWave2 hand-held device. Install the software as directed in this manual and when you are ready to run a session, attach your emWave2 device using the USB Charging/Connector Cable and run a session by clicking on the start button in the software.
emWave 2 QSG flat 3-6-14 .indd 4 3/6/14 10:55 AM
5
Installing the Software on a Mac
Mac System RequirementsMac OS® X 10.7 Lion or laterSome features may not be available on older Operating SystemsCore™2 Duo at 1.8GHz or fasterOne available USB PortInternet Access Required for HeartCloud Access
If your Mac does not have a CD-ROM drive, you can download the emWave2 Mac installer by going to this URL: http://www.heartmath.com/support/downloads. emWave2 installer for Mac.When you’re ready to install the software, insert the emWave2 software CD into your CD-ROM drive.
The emWave2 folder opens with Release Notes and the installation package displayed. If the folder does not display, open a new finder window and under Devices double-click on emWave2.
Double-click the Install emWave2 for Mac.pkg icon.
emWave 2 QSG flat 3-6-14 .indd 5 3/6/14 10:55 AM

6
Next you will see Welcome to the emWave2 Installer which will guide you through the Installation process. Press continue and read the Release Notes and License Agreement. When you press continue, a pop-up will ask if you accept the License, Disagree or Agree. Press Agree to Continue. Installation Type is the next step. A Standard Install on “Macintosh HD” is the default Install Location. Click Install to continue.
The installer requires that you type your Adminstrator password and press OK to continue. Follow the on-screen installation instructions.
The emWave2 will now configure your installation and copy the files to your computer. Once installation is complete we suggest you review the emWave Software and emWave2 Handheld Tours in the library, which will help you set up the hardware and start a session. The Library also includes resources, tutorials, practice plan, science, links to free training videos and much more.
Note: after installation you may be prompted to download updates. In order to have the most current version of this application, it is strongly recommended that you download the updates.
emWave 2 QSG flat 3-6-14 .indd 6 3/6/14 10:55 AM

7
Installing the Software on a PC
Windows System Requirements Microsoft Windows® 7 or later Some features may not be available on older Operating Systems 1.0 GHz or faster processor — recommend Intel® Core™2 Duo at 2.0GHz or faster 1 GB RAM — recommended 2GB or more One available USB Port Internet Access Required for HeartCloud Access If your PC does not have a CD-ROM drive, you can download the emWave2 Windows installer by going to this URL: http://www.heartmath.com/support/downloads. When you’re ready to install the software, insert the emWave2 software CD into your CD-ROM drive.
emWave 2 QSG flat 3-6-14 .indd 7 3/6/14 10:55 AM
8
If the installer does not automatically open from the CD-ROM...Go to Computer and double click the CD-ROM icon. Double click on the Setup emWave2.exe applicationThe Install program for emWave2 will open. Click Next to begin the installation. Read the License Agreement. To continue you must accept the terms by clicking on the Agree button below the terms.The Installer is a simple application that will only take a few minutes to install the program. Once installation is complete we suggest you review the emWave Software and emWave2 Handheld Tours in the library, which will help you set up the hardware and start a session. Note: after installation you may be prompted to download updates. In order to have the most current version of this application, it is strongly recommended that you download the updates.Attach your emWave2 handheld unit to your computer using the USB Charging/Connector Cable. For best results, charge your emWave for 2 hours before initial use.
emWave 2 QSG flat 3-6-14 .indd 8 3/6/14 10:55 AM

9
Charging emWave2…The emWave2 is a USB device that synchronizes and charges through a USB port. You can use any powered USB port or USB charger to charge the device.
The emWave2 does not ship with a USB wall charger but they can be pur-chased separately either from HeartMath or other electronics resellers. A USB cable is included and serves the dual purpose of charging the emWave2 from a USB Port and providing the interface to the emWave software program.
To charge your emWave2 device, connect the unit to a powered up computer. To confirm proper connection, you must see 5 blue light bars at the bottom of the Heart Action Strip. The 5 blue bars indicate charge status and connectiv-ity. If the 5 blue bars are cycling up and down, the unit is charging. As the unit reaches a higher charge, the lights will become solid. Once all 5 blue bars are solid (not blinking), your emWave2 device is fully charged. This process takes about 2 hours if starting with a fully drained battery and provides over 6 hours of battery life.
If you do not see 5 blue bars at the bottom of the heart action strip when con-nected to the computer, your unit is not properly connected and the battery is not receiving a charge. If this occurs, make sure your computer is fully powered up. If it has gone into sleep or hibernation mode, then power to the USB ports has stopped or been significantly reduced. If the computer is fully powered, try unplugging and plugging your emWave2 device back in or try a different USB port on the computer.
The emWave2 uses a high quality Lithium Ion rechargeable battery controlled by an onboard battery management micro controller. You cannot over charge your battery.
emWave 2 QSG flat 3-6-14 .indd 9 3/6/14 10:55 AM

10
Computer InterfaceYou can run, store, review and print session results through the computer interface. The computer interface shows your heart rate variability and coherence levels plus gives you detailed information on the science behind emWave.
For more detailed information on using your emWave2 refer to the emWave Software and emWave2 Handheld Tours located within the Library.
emWave 2 QSG flat 3-6-14 .indd 10 3/6/14 10:55 AM

11
To run a session on your computer: 1. Open the emWave2 software.2. Do not turn on the handheld device.3. Attach your emWave2 device to the computer via the USB connec-
tor cable.-Make sure your device is recognized by confirming 5 blue lights are visible in the heart action strip.
4. Attach the ear sensor to your handheld device or place your thumb gently on the pulse sensor button.
5. Click the start button located at the bottom of the emWave2 soft-ware’s main session screen. When you are finished, click the stop button.
6. Your session is automatically saved within the emWave2 applica-tion’s database and accessible on the Review Progress screen.
Important Notes:- Do not unplug your unit until your session is completely stopped and
you are done using the device with your computer.- When your emWave2 is plugged in, it should only be controlled via
the computer application. Do not use the device’s controller button to start, stop or to perform any other function while running a session on, or syncing sessions to the emWave2 software.
emWave 2 QSG flat 3-6-14 .indd 11 3/6/14 10:55 AM
12
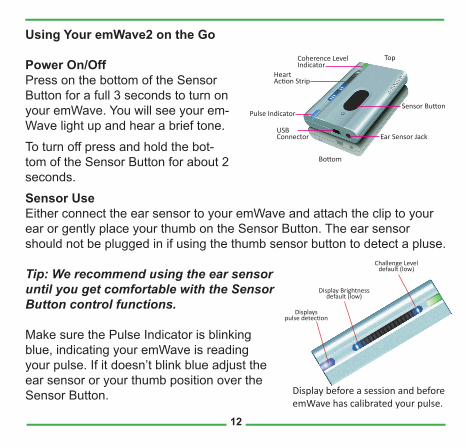
Using Your emWave2 on the Go
Power On/Off Press on the bottom of the Sensor Button for a full 3 seconds to turn on your emWave. You will see your em-Wave light up and hear a brief tone.
To turn off press and hold the bot-tom of the Sensor Button for about 2 seconds.
Sensor UseEither connect the ear sensor to your emWave and attach the clip to your ear or gently place your thumb on the Sensor Button. The ear sensor should not be plugged in if using the thumb sensor button to detect a pluse.
Tip: We recommend using the ear sensor until you get comfortable with the Sensor Button control functions.
Make sure the Pulse Indicator is blinking blue, indicating your emWave is reading your pulse. If it doesn’t blink blue adjust the ear sensor or your thumb position over the Sensor Button.
TopCoherence Level Indicator
Heart Action Strip
Bottom
Pulse Indicator
USB Connector Ear Sensor Jack
Sensor Button
Challenge Leveldefault (low)
Display Brightnessdefault (low)
Displayspulse detection
Display before a session and before emWave has calibrated your pulse.
emWave 2 QSG flat 3-6-14 .indd 12 3/6/14 10:55 AM

13
Changing SettingsSetup ModeAfter you Power On and before a pulse is detected, you can change:
Challenge Level - default level 1 (low)To change the challenge level, click the top of the Sensor Button to cycle through four levels. One blue light at the top of the Heart Action Strip indi-cates the lowest challenge level and four blue lights indicate the highest.
Display Brightness - default level 1 (low)To change brightness, click the bottom of the Sensor Button. One blue light at the bottom of the Heart Action Strip indicates the dimmest and four blue lights indicates the brightest.
During Stress Relief SessionA session begins when you see the Breath Pacer (blue lights) move up and down on the Heart Action Strip. After a session begins you can change:
Sound Level - default level 1 (low) To change the volume of your emWave2’s sounds, click the bottom of the Sensor Button to cycle through the four levels from silent to high. Each time you click you will hear a tone that corresponds to that sound level; no sound indicates that sound is off.
emWave 2 QSG flat 3-6-14 .indd 13 3/6/14 10:55 AM
14
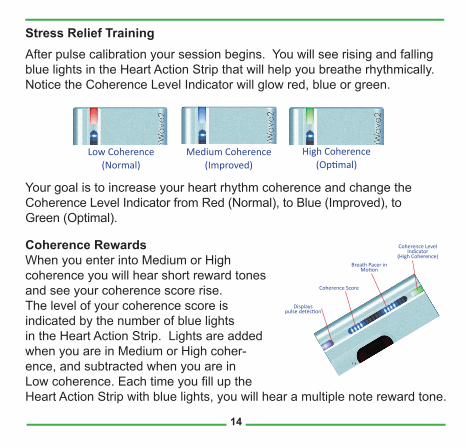
Stress Relief TrainingAfter pulse calibration your session begins. You will see rising and falling blue lights in the Heart Action Strip that will help you breathe rhythmically. Notice the Coherence Level Indicator will glow red, blue or green.
Your goal is to increase your heart rhythm coherence and change the Coherence Level Indicator from Red (Normal), to Blue (Improved), to Green (Optimal).
Coherence RewardsWhen you enter into Medium or High coherence you will hear short reward tones and see your coherence score rise. The level of your coherence score is indicated by the number of blue lights in the Heart Action Strip. Lights are added when you are in Medium or High coher-ence, and subtracted when you are in Low coherence. Each time you fill up the Heart Action Strip with blue lights, you will hear a multiple note reward tone.
Low Coherence(Normal)
Medium Coherence(Improved)
High Coherence(Optimal)
Breath Pacer in Motion
Coherence Score
Displayspulse detection
Coherence Level Indicator
(High Coherence)
emWave 2 QSG flat 3-6-14 .indd 14 3/6/14 10:55 AM

15
How to Use Advanced ModeOnce you are comfortable in basic mode and you want to increase your emWave experience, you can give Advanced Mode a try. Follow these steps to use this mode:
Entering Advanced Mode: Press and hold the top of the Sensor Button(closest to the word ‘emWave2’) for at least 10 seconds. You will hear fivebeeps and the lights will flash. You have now entered the Advanced Mode, which has three different displays. The Advanced Mode also saves your settings for display, challenge level, brightness and volume.
HRV Display: The first display you access in Advanced Mode is the HRV Display. This display shows your heart rate speeding up and slowing down (Heart Rate Variability) in real time. The smoother the lights transition between going up and down in the Heart Action Strip, the more coherent you are. The lights at the top and bottom of the Heart Action Strip show how much range your heart rate has. These range indicator lights are dimly lit, with the more brightly lit HRV wave moving up and down over them. – 1 bar indicates a 20 bpm (beat per minute) range (e.g. 60-80 bpm range), 2 bars indicate 15 bpm, 3 bars indicate 10 bpm and 4 bars indicate 5 bpm. As your HRV range increases,you’ll see fewer lights at the top and bottom of the Heart Action Strip.
emWave 2 QSG flat 3-6-14 .indd 15 3/6/14 10:55 AM

16
Breath Pacer Display: The second display in AdvancedMode is the Breath Pacer display, which lets you run simple sessions while saving all the settings from your last session. To access the second display in Advanced Mode, press and hold the top of the sensor button for three (3) seconds. You will hear one distinct beep when activated.
Stealth Display: Press and hold the top of the sensor button for another three (3) seconds. You will notice that all the lights will go off, except for the coherence light at the top. This mode can be especially useful in situations where you don’t want to attract attention. You can even turn the sound off, by clicking on the bottom of the sensor button and cycling through the sound levels so only you will know that your emWave2 is on. You are monitoring your coherence with the single light at the top of your unit.
emWave 2 QSG flat 3-6-14 .indd 16 3/6/14 10:55 AM

17
Getting Back to Basic Mode: To get your unit out ofAdvanced Mode simply press and hold the top of the sensor button (closest to the word ‘emWave2’) for at least 10 seconds. You will hear four tones. Your unit has been reset into the ‘Basic Mode’. It will now run sessions in basic mode again.
Note: Sometimes people accidentally put their unit into advanced mode. Return to basic mode as instructed above.
emWave 2 QSG flat 3-6-14 .indd 17 3/6/14 10:55 AM

18
Additional Help
Help Files
emWave2 is designed with extensive self-contained Help Files that cover a variety of detailed topics to assist in your use of the product. To access the Help Files click on the help icon. To find a topic you can look through the Contents and Index or use the Search function.
Online Support Center
The online support center provides extensive information to answer your questions.
To access the online support center go to the Help menu and click Support Online.
In the support site, use the Knowledgebase or search function to find the answer to your question.
Note: Fill out the form at the bottom of the page if you want to submit any questions to the online support center.
emWave 2 QSG flat 3-6-14 .indd 18 3/6/14 10:55 AM

19
HeartCloud™ is a cloud technology platform available for the hundreds of thousands of HeartMath technology products users. HeartCloud offers users of emWave Pro®, the emWave2® and the Inner Balance™ App/Sensor gamification and session data to build on their experience using HeartMath’s heart rate variability (HRV) monitoring and coherence training technologies. Users now also have the added benefit of synching their HeartMath technology devices and accessing all their session data in one location via the HeartCloud.
emWave 2 QSG flat 3-6-14 .indd 19 3/6/14 10:55 AM

emWave2-QSG-0314
14700 West Park AveBoulder Creek, CA 95006
www.heartmath.com
© Copyright Quantum Intech, Inc. 2014
emWave 2 QSG flat 3-6-14 .indd 20 3/6/14 10:55 AM