quick start guide - rm
TRANSCRIPT

Quick Start Guide
RM Unify Quick Start Guide

2
Welcome to RM Unify RM Unify is your Launch Pad to the Cloud – a single sign-on system, application library and management console designed specifically for education. RM Unify enables your school to access online services easily. With one username and password for each user, a library packed full of online services and simple user management, it is a solution designed specifically for the way schools work. This short guide is written for the network administrator or authorised staff member who will set up and manage RM Unify at a school or college. It outlines how to set up your users, find your way around the RM Unify Management Console, get and install apps from the App Library, and provide different groups of users with a ‘Launch Pad’ of apps and shortcuts.
What’s in this guide
RM Unify subscriptions ...................................................................................................... 3
Setting up RM Unify users ................................................................................................. 3
Logging on to RM Unify ..................................................................................................... 4
The Management Console ................................................................................................ 5
Managing users ............................................................................................................. 6
Managing groups ........................................................................................................... 7
Setting up Launch Pads .................................................................................................... 8
Creating a custom shared Launch Pad .......................................................................... 8
App Library ........................................................................................................................ 9
RM Unify and your existing apps .................................................................................. 10
Buying an app .............................................................................................................. 10
Installing an app ........................................................................................................... 12
Saved Password apps ................................................................................................. 12
Managing apps ............................................................................................................ 14
Editing and using Launch Pads ....................................................................................... 15
Editing a Launch Pad ................................................................................................... 15
Adding tiles to your Shared Launch Pad ...................................................................... 16
Disabling Personal Launch Pads ................................................................................. 17
Using Launch Pads ...................................................................................................... 18
Further help and information ............................................................................................ 20
© RM Education 2013–4

3
RM Unify subscriptions There are two levels of subscription:
RM Unify Basic (free)
• Accounts for students, staff, governors and other users • Create accounts manually from CSV files • Access to the RM Unify App Library • Free apps (Including RM Books) • Add up to 5 of your own web links • Custom schoolname.rmunify.com URL • Access to RM Knowledge Library (online library with help articles) and RM Unify Blog
RM Unify Premium
All of the above, plus:
• Create and maintain accounts automatically, by integrating with your Active Directory • Add unlimited web links • Free integration with Microsoft Office 365 or Google Apps, with user single sign-on • Free integration of your existing app subscriptions, where available via RM Unify or
by using ‘Saved Password apps’ • Custom Launch Pads – shared Launch Pads created by the admin user for year
groups as required • My Launch Pad – an optional personalised Launch Pad • Free support by phone and WebChat with an RM engineer.
You can check your subscription level by clicking the ‘RM Unify Subscription’ text link in your Management Console Dashboard (page 5).
Setting up RM Unify users To create its user accounts, RM Unify can take user account information from a range of sources:
• the school network’s Active Directory • an uploaded CSV file.
It can then provision user accounts into any application or service in the App Library. For information about how to add users and map them to RM Unify roles, please refer to the RM Unify AD Sync Release Note or RM Unify CSV Extraction Tool Release Note.

4
Logging on to RM Unify
1. Browse to your school or college establishment’s RM Unify logon page (for example, it may be something like myschoolname.rmunify.com).
2. Enter your user credentials. Under Username, enter either:
o your RM Unify email address (the Office 365 or Google Apps email address stored for your RM Unify account)
o your username@scope where scope is an RM Unify identifier for your school or college – the same as myschoolname above.
To perform the management tasks described in this guide, you need to log on as an RM Unify Administrator.
3. Click Sign in. You’ll see your user’s Launch Pad, with the main RM Unify menu at the top.

5
The Management Console The RM Unify Management Console makes administration of all your user accounts efficient and simple. It’s only visible to RM Unify Administrator users. RM Unify can take user account information from the school network’s Active Directory, from the RM Learning Platform (or Glow), or from an uploaded CSV file. It can then provision accounts into any application or service in the App Library. Click Management Console in the RM Unify menu to go to the Management Console Dashboard.
• User Summary shows the number of current users in each RM Unify role.
• Synchronisation Status shows when your RM Unify accounts were last synchronised with your local accounts.
• Change User Password allows you to change a user’s password. (Note: If you’re a Premium user with AD Sync, you cannot change passwords here. Change them on your local network instead.)
• Under Sync, the ‘Sync users from CSV’ link lets you update user account information from a CSV file. (AD Sync normally requires no further action once it has been set up, as it monitors your Active Directory for any changes in user details.)

6
From the Dashboard you can manage users, groups and Launch Pads. We’ll look at each of these in a little more detail.
Managing users
Under User Summary on the Dashboard, click a role (e.g., Student) to display a list of these users.
• To change the year group of a single user (students only), click their Actions button and choose Change Year Group.
• To change the year group of multiple users (students only), tick their boxes; then click the top Actions button and choose Change Year Group.
• To give Administrator rights to a user (staff only), click their Actions button and choose Give admin user rights. You can Revoke a user’s admin rights in a similar way.
• To view or edit a user’s information, click Actions and choose View details. Here an administrator can view all attributes for the user, check that their ID details are correct, and troubleshoot any issues that may arise with access to apps.
Note that some attributes may not be listed, if no data is available or the set-up is incomplete, for example: o Password Last Set isn’t displayed if RM
Unify has not received a password. o First logged on isn’t displayed if the user
has not successfully logged on yet. o A student’s Year Group isn’t shown if Year
Groups haven’t yet been set up (see page 7) – even if the Year of Entry value for the student has been extracted from CC4.
The information displayed for a user is subject to regional variations.
7
Managing groups
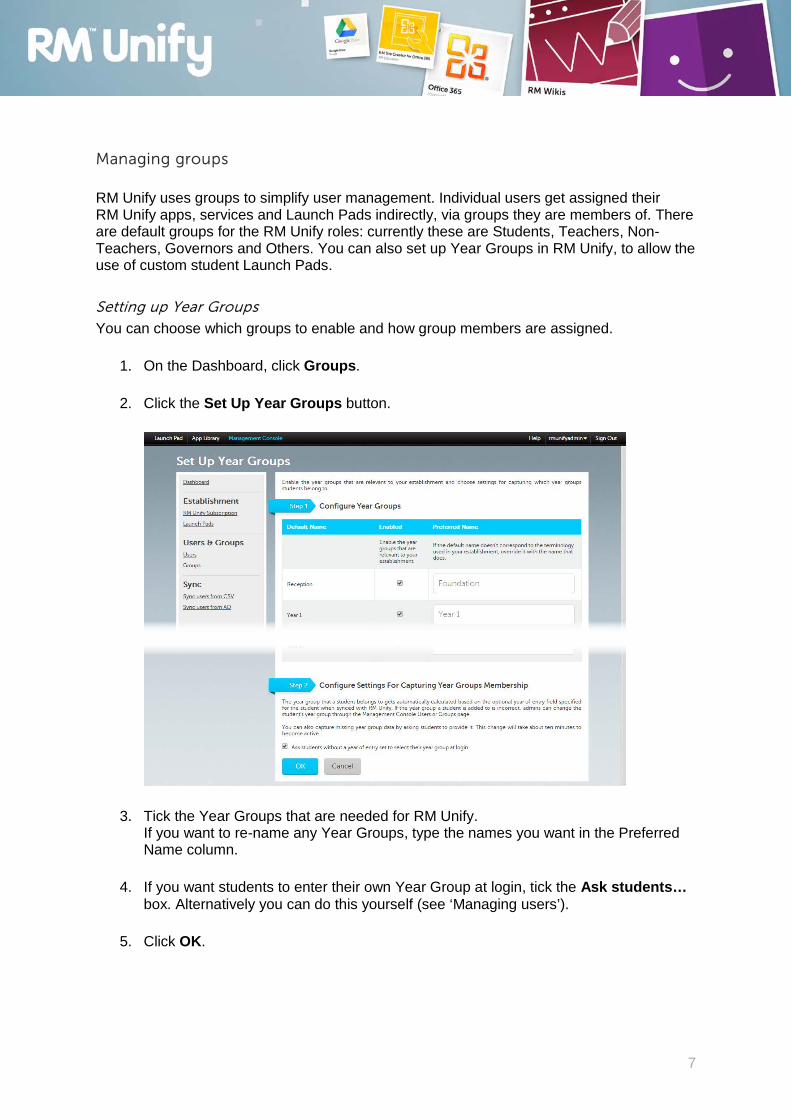
RM Unify uses groups to simplify user management. Individual users get assigned their RM Unify apps, services and Launch Pads indirectly, via groups they are members of. There are default groups for the RM Unify roles: currently these are Students, Teachers, Non-Teachers, Governors and Others. You can also set up Year Groups in RM Unify, to allow the use of custom student Launch Pads. Setting up Year Groups
You can choose which groups to enable and how group members are assigned.
1. On the Dashboard, click Groups.
2. Click the Set Up Year Groups button.
3. Tick the Year Groups that are needed for RM Unify. If you want to re-name any Year Groups, type the names you want in the Preferred Name column.
4. If you want students to enter their own Year Group at login, tick the Ask students… box. Alternatively you can do this yourself (see ‘Managing users’).
5. Click OK.

8
Setting up Launch Pads RM Unify uses Launch Pads to give users single-click access to the apps and services that are appropriate for them. There are three different types of Launch Pad:
• Shared Launch Pads for the default RM Unify user roles (Students, Teachers, Non-Teachers, Governors and Others) are created automatically by default.
• You can also use groups to create custom shared Launch Pads that are more finely-tuned, e.g. for a Year Group or Key Stage.
• My Launch Pad – each user can also create their personal custom Launch Pad (Premium subscriptions only).
Users can choose to use either their Shared Launch Pad(s) or their My Launch Pad.
Creating a custom shared Launch Pad In this example we’ll create a Key Stage 1 Launch Pad, for the Year 1 and 2 students.
1. On the Dashboard, click Launch Pads.
2. Click the Actions button and choose Create.
3. Under Title, enter a suitable descriptive name for the new Launch Pad.
4. Tick the groups that should see this Launch Pad.
5. Click OK.
Your new Launch Pad is created, but it’s still blank, with no apps and services on it. You will need to add apps to it in the App Library, and then maybe adjust the arrangement of tiles, before it will be ready for your users. The following sections will show you how.

9
App Library
Introduction
The App Library provides a secure and convenient environment where you can read about and choose Cloud-based applications and services for education from a growing list of suppliers.
In the App Library, as an admin user you can:
• Buy licenses for apps that require payment. • Install the apps you’ve bought, and install free apps. • Manage the apps you’ve installed.
A blue corner banner across each tile indicates the status of that app or service. Apps that are chargeable are marked ‘Buy’; free apps, or chargeable apps you have bought, are marked ‘Install’ or ‘Set up’. Once installed or set up, apps are marked ‘Manage’. See also ‘Saved Password apps’ on page 12.

10
For non-admin users, who are not permitted to manage apps, tiles in the App Library are marked ‘View’.
RM Unify and your existing apps
It’s quite straightforward to buy new apps through RM Unify. But what can you do if your school already has licences for educational software that you’d like to use with RM Unify? And can you migrate existing user accounts on that software to RM Unify? With existing licences, the answer depends on the app supplier. Some suppliers enable an existing software licence to be used with RM Unify, via an ‘app connector’, which passes licence information to RM Unify. Examples of this are Office 365 and I Am Learning. However if the app you want doesn’t support an app connector, you won’t be able to use it through RM Unify under your current licence – the only options will be to use it outside RM Unify or to make a fresh purchase through RM Unify. Examples of this are Blippit and SchoolIP. With existing user accounts, the answer again depends on the app supplier. Some suppliers (for example, RM Easimaths and Clickview 24/7 Cloud) support ‘user matching’, whereby username and password information for the app can be uploaded and matched with RM Unify accounts. Other app suppliers (for example, 3Fifteen and Renaissance Learning) allow you to match your RM Unify account to existing accounts within their app. If the app you want doesn’t support user matching, we may have created a free Saved Password app which provides access to it through RM Unify. This provides partial integration, but the user accounts will still need to be managed within the app, rather than through RM Unify. Also, every user will need to enter their username and password for the app on the first occasion they use it. Saved Password apps are available for RM Unify Premium subscriptions only; currently we provide them for Moodle, Prezi, GCSE Pod v2, TES Resources and CC4 Anywhere. We’d like to add more Saved Password apps where there is a demand. If you subscribe to an existing online service that isn’t in our App Library, you can request a Saved Password app for it by emailing [email protected], and the RM Unify team will get back to you. To install an existing app, follow the ‘Buying an app’ procedure in the App Library. You will be prompted to enter existing licence details and given instructions for uploading existing user accounts where these are supported by the app, or informed where this is not possible. See also ‘Setting up a Saved Password app’ on page 13. For more information about integrating existing apps, please refer to TEC3175295 in the RM Knowledge Library.
Buying an app
The example below shows a fresh purchase. If you have an existing licence or existing user accounts, the exact details of the installation will vary from app to app.
1. Log on to RM Unify as an RM Unify Administrator. An RM.com account is required to complete the purchase. You can register here.

11
2. From the top menu choose App Library.
3. Locate the app you want to buy and click its tile. An information page for the app is displayed. This includes a privacy statement, which you will need to agree to if you want to buy the app.
To proceed, click Buy.
4. On the next page, click the I agree to the privacy statement… check box, select the licence option you want, and click Buy. You are taken to the RM Unify shopping basket.
5. Follow the on-screen prompts to complete your order.
6. When you’ve finished, click Return to Unify to go back to the App Library. The new app will not be available until it is authorised. During this time a progress bar is displayed. When the ‘Buy’ button has changed to ‘Install’, follow the instructions below to install it.

12
Installing an app
1. Click the tile of the app you want to install.
2. On the next page, select the user roles that should be able to use this app.
When you have selected a role, you can also add the app to the Launch Pad for that role. You might want to hide the app for now – if not, tick the box to show the tile on that role’s Launch Pad. (You can go back and change these settings later.) Click Save.
3. Close the app information page to return to the App Library.
Saved Password apps
Saved Password apps provide a way for you to integrate services which you are already using into RM Unify. They prompt the user to enter their username and password once, but then give the user single sign-on access to the app thereafter. Saved Password apps are available to RM Unify Premium subscribers.

13
In the App Library, Saved Password app tiles are distinguished by a ‘key’ icon and a plain white background:
Setting up a Saved Password app
To use a Saved Password app, you will need to set up the app with its required configuration, and then add it to the appropriate Launch Pad(s):
1. In the App Library, click the Shared Password app you want to add.
2. On the app information page, click Setup.
3. On the next page, carefully read the information which explains how passwords are stored safely and securely. To proceed, you must tick the click the I have read and understood the above information check box and click Next.
4. Follow the on-screen instructions to configure the app as required (details will vary).
5. Locate the app in the App Library. It will now show a ‘Manage’ corner banner.
6. Assign the app to the required user roles and Launch Pads, as when you install an
ordinary app. When you have finished, click Save and close the app information window.
The app is now ready for use. However users will need to enter their credentials for that app before using it for the first time. Using a Saved Password app
To run a Shared Password app for the first time, users must complete an additional step.
1. On the Launch Pad, click the app.
A page like this is displayed.

14
2. Enter your username and password for this application, and click Save.
3. Click Launch. RM Unify will now remember these login credentials, so you won’t need to enter them again. If the login credentials for this application change in the future, you can update them as follows: 1. Find the app tile on the Launch Pad and click its ‘i’ button.
2. Click Edit Settings.
3. Make any required changes to the username and password details, and click Save.
Managing apps
You can change the role and Launch Pad settings for your apps (including Shared Password apps) at any time. Some apps have additional settings that can be managed.
1. Click the tile of the app you want to manage.
2. On the app management page, click Manage.

15
3. On the next page, make the changes you want to this app’s settings. For example, you may want to make it available to another role, or add it to a custom Launch Pad.
(As well as these installation settings, some app management pages may show a tab for ‘Other Settings’, e.g. for setting a login URL page.)
4. Click Save. You may be prompted to confirm your changes.
5. Close the app management page to return to the App Library.
Editing and using Launch Pads A Launch Pad is a tiled page that gives your users single sign-on access to the educational websites and services that are used and recommended by your school. Different groups of users can have their own Launch Pads, showing apps and services appropriate to them. By default, a Launch Pad is provided for each RM Unify role – Student, Teaching Staff, Non-Teaching Staff, Governor and Other. For your students, you may have created custom Launch Pads instead, based on Year Groups (see page 8). In addition, a personal ‘My Launch Pad’ is available for users (RM Unify Premium only).
Editing a Launch Pad
Administrators can edit shared Launch Pads. Other users can only edit ‘My Launch Pad’.

16
1. From the RM Unify menu choose Launch Pad.
2. If there is a choice (RM Unify Premium only), choose to edit either My Launch Pad or a Shared Launch Pad.
3. Click the Edit Launch Pads icon (left of the RM Unify logo at the bottom).
4. Choose the default or custom Launch Pad that you want to edit, if there is a choice.
The selected Launch Pad is displayed in a grid format.
5. To rearrange the tiles on the grid, simply drag and drop them as required. On this page it’s also possible to remove a tile from the Launch Pad (but not to add one). If you click the cross in the top right corner, that app tile is removed from the Launch Pad.
6. When you’ve finished, click Save Changes to save your edited Launch Pad, or Cancel to cancel the changes.
Adding tiles to your Shared Launch Pad
From the Launch Pad view, administrators can add additional tiles to their Shared Launch Pad, including Internet shortcuts (Shared Tiles). Non-admin users can only add tiles to ‘My Launch Pad’ (page 18).

17
To add a Shared Tile:
1. Go to your Shared Launch Pad.
2. Click the Add button on an empty space.
3. In the Add popup window, choose Shared Tile.
4. Give your shortcut a helpful title (and subtitle, if you like), and enter the URL address. Click Check URL to make sure the link works. To make this tile easier to find, you can also upload a small image from your computer and generate a thumbnail picture for the tile.
5. When you have finished, click OK to add the new tile.
Disabling Personal Launch Pads
With an RM Unify Premium subscription, if you don’t want users to have their own ‘My Launch Pad’, you can disable this feature:
1. From the RM Unify menu choose Management Console. 2. Under Establishment, choose Launch Pads.

18
3. Click Settings. 4. Un-tick the ‘Enable Personal Launch Pads’ checkbox and click Save.
This prevents Personal Launch Pads from being displayed to users. You can re-enable them at any time, in the same way.
Using Launch Pads
Choosing a Launch Pad
Users may have a choice of Launch Pads (Premium subscriptions only). • From the RM Unify menu choose Launch Pad. Choose either My Launch Pad or
Shared Launch Pad.
Setting up My Launch Pad
You can decide what tiles you want on you My Launch Pad. It will be empty until you add the first app tile. To add a tile:

19
6. Click the Add button on an empty space. An Add popup window is displayed.
7. To choose an app, click App from Library.
You are taken to the App Library. Note that you may not be able to see all possible apps; this depends on your User Type.
8. Find the app you want to add, and click on its tile. You’ll see an information page about this app. If this app is available to add, it shows an Add to My Launch Pad button.
9. Click Add to My Launch Pad. The app is added to My Launch Pad.
10. Click the cross to close the app information window.
You can add more app tiles in the same way. 11. When you have finished, from the RM Unify menu choose Launch Pad.
12. You can also add personal tiles to your Launch Pad, to create handy shortcuts to
Web pages (or to anything else that your browser can access). To do this:
1. Click the Add button on an empty space. 2. In the Add popup window, choose Personal Tile.

20
3. Give your shortcut a helpful title (and subtitle, if you like), and enter the URL
address. Click Check URL to make sure the link works. To make this tile easier to find, you can also upload a small image from your computer and generate a thumbnail picture for the tile. When you have finished, click OK to add the new tile.
You can edit My Launch Pad at any time, to rearrange the tiles or delete any you don’t want (see ‘Editing a Launch Pad’ on page 15).
Further help and information If you encounter an issue when using RM Unify, help is at hand from our support team. Click Help from the menu to access the support options available for your RM Unify subscription type. • If you’re an RM Unify Basic customer, you get access to online help articles in the
RM Knowledge Library. • If you’re an RM Unify Premium customer, you also get:
• Unlimited telephone support, Monday – Friday, 08:00–18:00, except for public
holidays – 08450 700300 • RM WebChat support – live chat with an RM Unify support engineer.
Finally, here’s how to keep up to date with the latest RM Unify developments:
• RM Unify Blog – All scheduled releases are communicated here, with comprehensive Release Notes attached. www.rmunify.blogs.rm.com/RM-Unify-Blog
• Our Trello board – Add new ideas for product improvements, and track the progress of developments. www.trello.com/b/qpuOCQTg/rm-unify
• On Twitter - Follow @rmunify for the latest news on Apps and system improvements.