quickbooks desktop 2019 - labpub.com · job profitability. for companies that deal with jobs,...
TRANSCRIPT
QUICKBOOKS DESKTOP 2019
L E A R N I N G O B J E C T I V E S
ÝÝ Create an estimate for a job or customer and convert it to a progress invoice
ÝÝ Apply the time tracking feature and create a paycheck based on tracked time
ÝÝ Enter customer deposits on account
ÝÝ Assign finance charges to overdue accounts
ÝÝ Run appropriate job-related reports for estimates and time tracking
9 Job Costing, Creating Estimates, and Time Tracking
QuickBooks lets you create estimates for your
jobs or for your customers if you don’t have
jobs assigned to them. Once you’re awarded
a job based on an estimate, QuickBooks makes it easy
to convert the estimate to an invoice, so you don’t have
to reenter the information. Job costing is an important
aspect for many businesses. In this chapter, you will use
jobs in QuickBooks to track profitability by those jobs. You
will also use progress invoicing and deal with customer
deposits. You will also explore the time-tracking feature,
which allows you to track time spent by employees on
each job, resulting in more accurate payroll expenses
for job costing. Finally, we will take a look at one of the
QuickBooks apps that aids you in time tracking and
employee scheduling, TSheets.
QuickBooks Desktop 2019 © 2019 Labyrinth Learning – Not for Sale or Classroom Use
Labyrinth Learning http://www.lablearning.com
EVALUATIO
N ONLY

310 QuickBooks Desktop 2019 Chapter 9: Job Costing, Creating Estimates, and Time Tracking
Ý Project: Average Guy DesignsGuy Marshall will be bidding for a job for the City of Bayshore to completely redo its branding, including new logo, stationery, report covers, brochures, and other business documents.
For this job, you will first create an estimate to be submitted with the proposal. When the job is awarded, you will convert the estimate to an invoice and bill the city as portions of the job are completed using QuickBooks’ progress invoicing feature. You will receive payment from the city and handle customer deposits for unearned income.
In addition, time tracking will be used for those employees who worked on another job, and a paycheck will be created using the time data. Finance charges will be assessed for customers. You will then run job reports for analyzing this and other jobs, estimates, and time tracking data for the company. Finally, Guy will explore the possibility of using TSheets to track his employee time more precisely.
Job CostingTo keep track of the income and expenses involved in this and all jobs that Average Guy Designs does, individual jobs are created for each customer. When applied via sales and purchase forms, job costing provides a method for determining profitability of each job and will help in creating future plans.
Job information is stored with the customer data in the Customers & Jobs List, which is a compo-nent of the Customer Center. If you have multiple projects for an individual customer, you can create separate jobs for that customer. If you will perform just one job for a customer, you can track that information in the customer’s record on the Job Info tab. As you create your estimates and invoices or incur any expenses for that job, you enter them for the job and not the customer directly.
For Average Guy Designs, all customers have a job associated with them, so you must always choose a job on a form, not just the customer.
Time tracking is a feature that allows a company to track employee time and create paychecks and invoices based on the data collected. You can also charge employees’ time to jobs.
Job ProfitabilityFor companies that deal with jobs, especially businesses such as construction companies, it is important to be able to look at the profitability of each job. To conduct job costing in QuickBooks, you need to take three basic steps:
1. Set up your data in the Customers & Jobs List.
2. Enter all job revenues and expenses.
3. Use QuickBooks reports to analyze job data.
The first two steps are covered if you set up your customers and jobs correctly and then enter them properly on sales and purchase forms. We will look at the QuickBooks job costing reports later in this chapter.
QuickBooks Desktop 2019 © 2019 Labyrinth Learning – Not for Sale or Classroom Use
Labyrinth Learning http://www.lablearning.com
EVALUATIO
N ONLY

Job Costing 311
Creating an Estimate for a JobQuickBooks creates a non-posting account when you create an estimate, which allows you to track outstanding estimates (the same as it does for purchase orders and sales orders). This account is displayed at the bottom of your Chart of Accounts. The non-posting account is created because estimates, like purchase orders, do not affect anything behind the scenes and, therefore, do not affect actual QuickBooks accounts.
You can create estimates for customers or each job you do for a customer. You can also create multiple estimates for a customer or a job. If a customer does not have jobs created for it, there will be a Job Info tab in the Edit Customer window. However, if even one job has been created for a customer, that Job Info tab is no longer available, and you will work with the individual jobs that have been created for the customer. Estimates must be turned on in the Company Prefer-ences window.
FLASHBACK TO GAAP: MATCHING
Remember that expenses need to be matched with revenues. A sink bought for a bathroom remodel should be a job cost for that remodel. This principle allows for a better evaluation of the profitability and performance.
Creating a Change OrderA change order occurs after an estimate has been entered. If a customer wants a change to an estimate and if you are using the Contractor version or the Accountant’s version of QuickBooks Desktop, when you make any change to an estimate it will ask you if you want to add it as a change order to the estimate. The changes will be listed under the original estimate. If you are using a different version, you can make changes to estimates, but they will not be called out as change orders. The change order feature will detail the amount of each change, exactly what changed, and the net change to the amount of the estimate. It will also document the change order for you in the description field of the estimate window.
Add Change Order window and estimate with change order added (not available in all ver-sions of QuickBooks)
Customers→Customer Center: [choose customer]→New Customers & Jobs button→ Add Job
Edit→Preferences: Jobs & Estimates→Company Preferences tab
Customers→Create Estimates
Customers→Create Invoices [then choose the desired customer and estimate]
QuickBooks Desktop 2019 © 2019 Labyrinth Learning – Not for Sale or Classroom Use
Labyrinth Learning http://www.lablearning.com
EVALUATIO
N ONLY
312 QuickBooks Desktop 2019 Chapter 9: Job Costing, Creating Estimates, and Time Tracking
DEVELOP YOUR SKILLS 9-1
In this exercise, you will turn on the preference for progress invoicing and create an estimate for a new customer. The password for all files unless otherwise stated is Password1. Leave the company file open unless otherwise instructed.
1. Start QuickBooks 2019 and toggle to Pro, if necessary.
2. Open DYS_Chapter09 (Company) or restore DYS_Chapter09 (Portable) from your file storage location and save your file as: DYS_Chapter09 Average Guy Designs
It may take a few moments for the portable company file to open.
Turn On Progress Invoicing3. Choose Edit→Preferences.
4. Choose the Jobs & Estimates category and then display the Company Preferences tab.
5. Choose Yes under Do you do Progress Invoicing?, click OK, and then click OK in the Warning window.
QuickBooks needs to close and reopen the file to incorporate this preference.
Create a New CustomerThe City of Bayshore is not yet set up as a customer, so you will create a new customer and job for the City of Bayshore.
6. Choose Customers→Customer Center and then press [Ctrl]+[N] to open a New Customer window.
7. Use this information to create the new customer:
• Customer Name: City of Bayshore
• Company Name: City of Bayshore
• Full Name: Mr. James Richards
• Main Phone: (415) 555-2496
• Address: 1706 Duck Pond Lane [Enter] Bayshore, CA 91547
8. Click , click OK in the Add Shipping Address Information window, and then click OK in the New Customer window.
You will see your new customer selected on the Customer & Jobs list.
Create a New Job for the Customer9. Click the New Customer & Job button and then choose Add Job.
10. Type Branding in the Job Name field.
11. Click the Job Info tab and use this information to complete the New Job form, clicking OK when finished:
• Job Description: Create new city-wide branding campaign
• Job Type: Government (Quick Add it as a Job Type)
• Job Status: Pending
QuickBooks Desktop 2019 © 2019 Labyrinth Learning – Not for Sale or Classroom Use
Labyrinth Learning http://www.lablearning.com
EVALUATIO
N ONLY
Job Costing 313
Create an Estimate for a JobThe newly created job now appears indented under City of Bayshore in the Customers & Jobs List. It is selected, and now you’re ready to create a new transaction for that job.
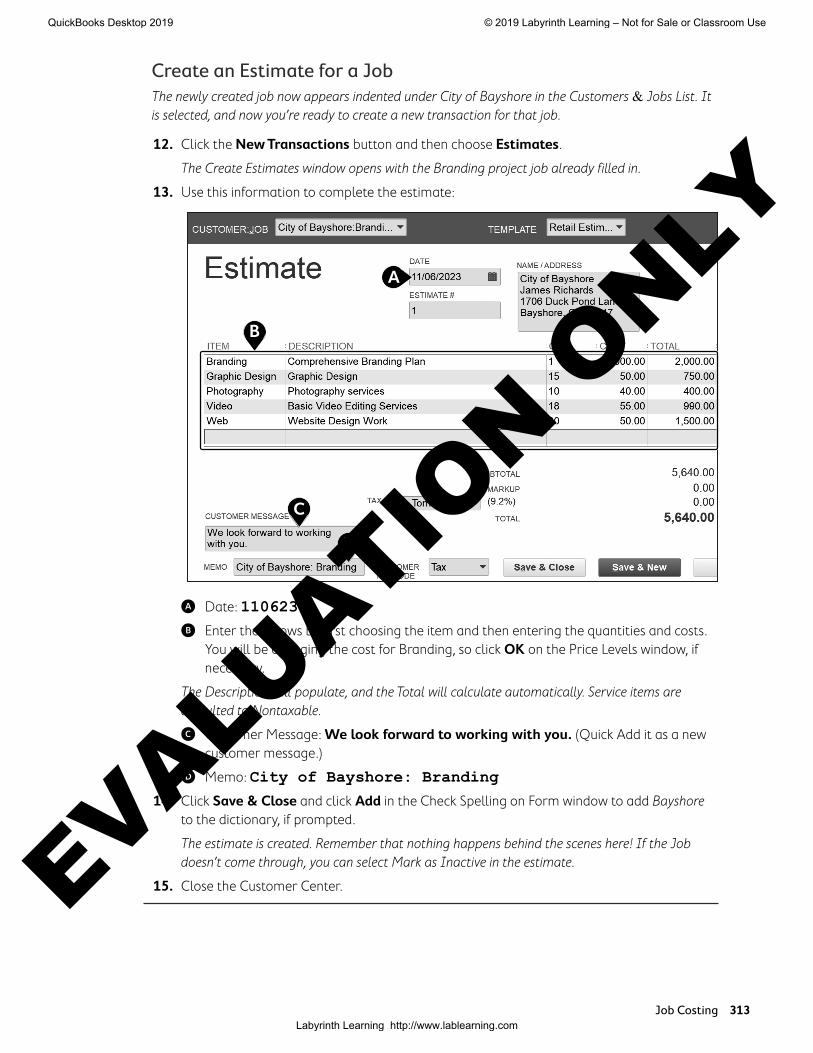
12. Click the New Transactions button and then choose Estimates.
The Create Estimates window opens with the Branding project job already filled in.
13. Use this information to complete the estimate:
B
D
C
A
A Date: 110623
B Enter these rows by first choosing the item and then entering the quantities and costs. You will be changing the cost for Branding, so click OK on the Price Levels window, if necessary.
The Description will populate, and the Total will calculate automatically. Service items are defaulted to Nontaxable.
C Customer Message: We look forward to working with you. (Quick Add it as a new customer message.)
D Memo: City of Bayshore: Branding
14. Click Save & Close and click Add in the Check Spelling on Form window to add Bayshore to the dictionary, if prompted.
The estimate is created. Remember that nothing happens behind the scenes here! If the Job doesn’t come through, you can select Mark as Inactive in the estimate.
15. Close the Customer Center.
QuickBooks Desktop 2019 © 2019 Labyrinth Learning – Not for Sale or Classroom Use
Labyrinth Learning http://www.lablearning.com
EVALUATIO
N ONLY
314 QuickBooks Desktop 2019 Chapter 9: Job Costing, Creating Estimates, and Time Tracking
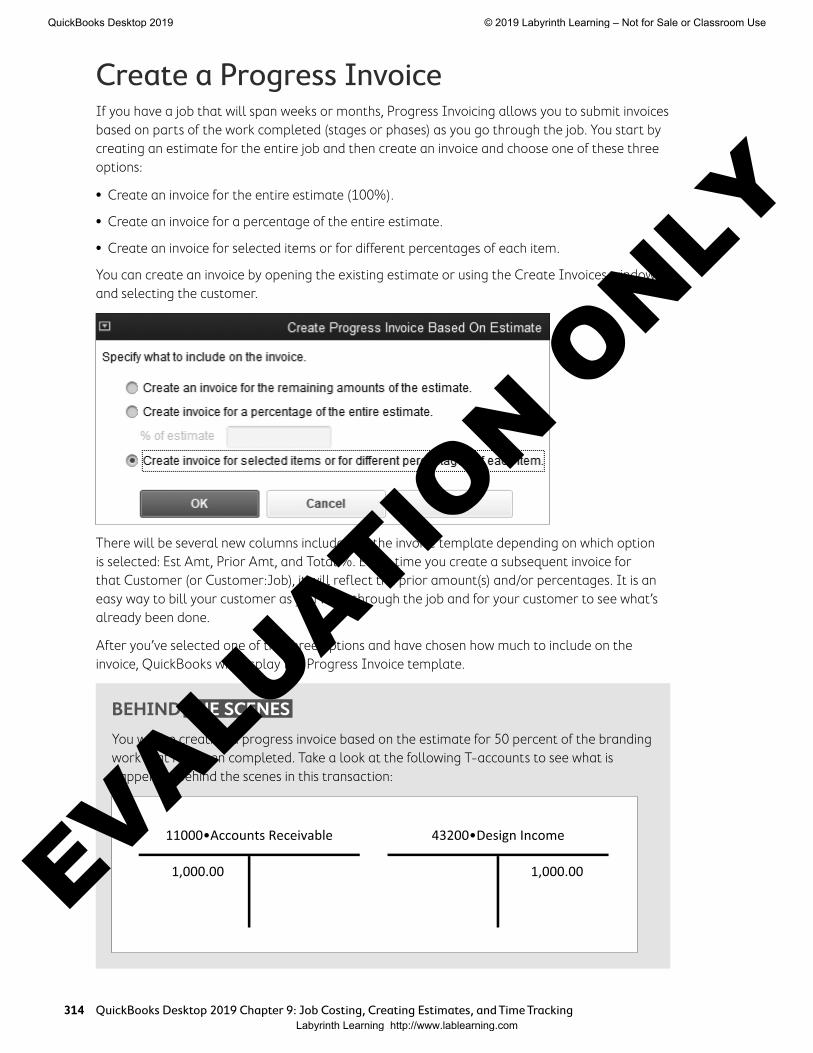
Create a Progress InvoiceIf you have a job that will span weeks or months, Progress Invoicing allows you to submit invoices based on parts of the work completed (stages or phases) as you go through the job. You start by creating an estimate for the entire job and then create an invoice and choose one of these three options:
• Create an invoice for the entire estimate (100%).
• Create an invoice for a percentage of the entire estimate.
• Create an invoice for selected items or for different percentages of each item.
You can create an invoice by opening the existing estimate or using the Create Invoices window and selecting the customer.
There will be several new columns included on the invoice template depending on which option is selected: Est Amt, Prior Amt, and Total %. Every time you create a subsequent invoice for that Customer (or Customer:Job), it will reflect the prior amount(s) and/or percentages. It is an easy way to bill your customer as you work through the job and for your customer to see what’s already been done.
After you’ve selected one of the three options and have chosen how much to include on the invoice, QuickBooks will display the Progress Invoice template.
BEHIND THE SCENES
You will be creating a progress invoice based on the estimate for 50 percent of the branding work that has been completed. Take a look at the following T-accounts to see what is happening behind the scenes in this transaction:
x1,000.00 x1,000.00
11000•Accounts Receivable 43200•Design Income
QuickBooks Desktop 2019 © 2019 Labyrinth Learning – Not for Sale or Classroom Use
Labyrinth Learning http://www.lablearning.com
EVALUATIO
N ONLY
Create a Progress Invoice 315
Customers→Create Invoices [then choose the desired customer and estimate]
Customers→Create Estimates: [find estimate]→Create Invoice button
DEVELOP YOUR SKILLS 9-2
Guy has been awarded the City of Bayshore Branding Job and has already started working on it. In this exercise, you will edit the Customer:Job record to change the status to In progress and then use the job estimate created earlier to create the progress invoice. The first step is to open the Edit Job window for the City Branding Project and change the status of the job on the Job Info tab.
1. Choose Customers→Customer Center.
2. Double-click the Branding job for the City of Bayshore to open it for editing.
3. Click the Job Info tab and then use this information to edit the job:
• Job Status: In progress
• Start Date: 110823• Projected End Date: 122223
4. Click OK to save the Job and then close the Customer Center window.
Create the InvoiceNow you will create a progress invoice based on the estimate. Average Guy Designs has completed 50 percent of the branding portion of the job.
5. Choose Company→Home Page and click the Create Invoices task icon in the Customers area of the Home Page.
6. Choose the City of Bayshore:Branding Job as the Customer:Job.
The Available Estimates window appears, displaying all the available estimates for the job.
7. Click the 11/06/2023 estimate for $5,820.00 in the Available Estimates window and then click OK.
The Create Progress Invoice Based On Estimate window appears with three choices.
8. Click the circle to the left of Create invoice for selected items or for different percent-ages of each item and then click OK.
The Specify Invoice Amounts for Items on Estimate window appears.
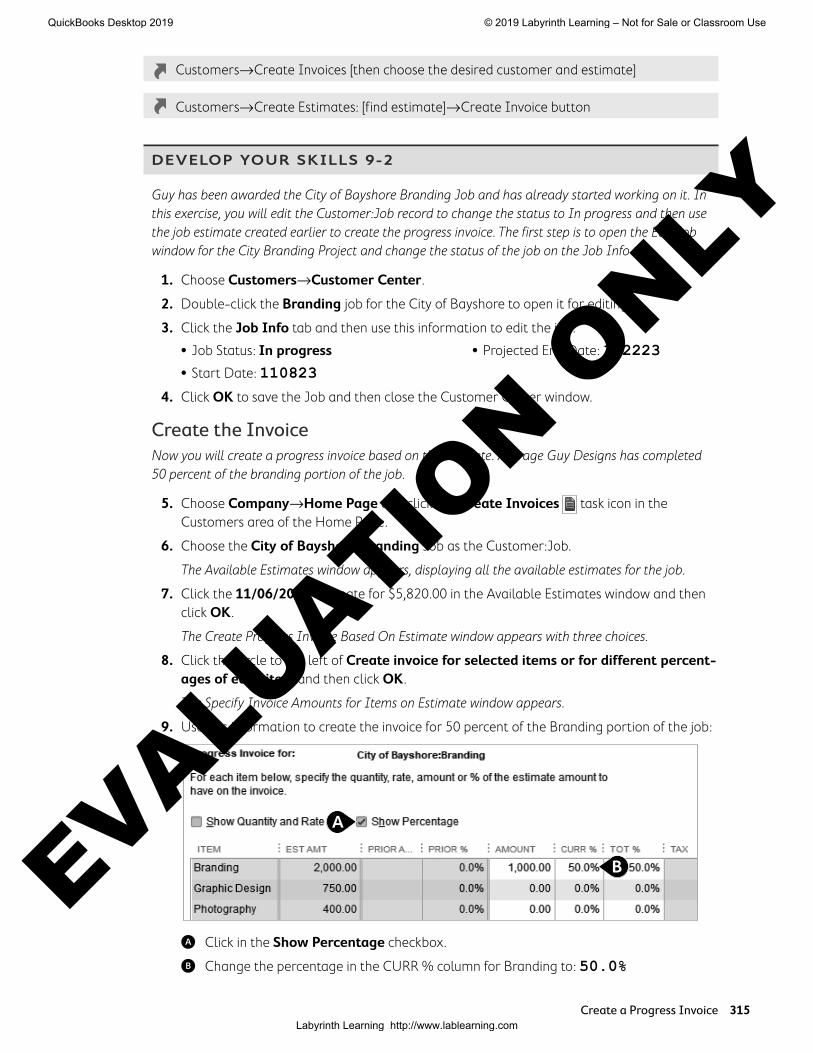
9. Use this information to create the invoice for 50 percent of the Branding portion of the job:
A
B
A Click in the Show Percentage checkbox.
B Change the percentage in the CURR % column for Branding to: 50.0%
QuickBooks Desktop 2019 © 2019 Labyrinth Learning – Not for Sale or Classroom Use
Labyrinth Learning http://www.lablearning.com
EVALUATIO
N ONLY
316 QuickBooks Desktop 2019 Chapter 9: Job Costing, Creating Estimates, and Time Tracking
10. Click OK and then OK in the Zero Amount Items window.
The Create Invoices window displays using the Progress Invoice template. Fifty percent of the Branding charge is filled in for you. You can change the Company Preferences to not print items with zero amounts, but do not delete the items on the invoice with zero amounts.
11. Use this information to complete the invoice:
• Date: 111323
• Invoice #: 10030
• Memo: City Bayshore: Branding 11/13
BEHIND THE SCENES BRIEF
11000•Accounts Receivable DR 1,000.00; 43200•Design Income CR <1,000.00>
12. Click Save & Close.
The progress invoice is recorded. The next time you choose to create an invoice based off the estimate for the Branding job, the 50 percent that you just invoiced for will show as a prior amount.
Unearned IncomeThere will be some cases in which you require a deposit on a job or a customer prepayment. Funds received as a deposit or sold as a gift certificate are considered unearned income because no work has been performed and no product has been sold. You may also hear this called unearned revenue or deferred revenue. You shouldn’t credit unearned income to an income account. The proper way to deal with it is to hold it in a liability account such as Customer Deposits or Unearned Revenues. After you have delivered the goods or performed the service, you can then decrease the liability account and credit, or increase, an income account.
Customer DepositsCustomer deposits and gift certificates are tracked the same way in QuickBooks. And they both require you to go through the three steps of setting up, collecting, and recording. We will deal specifically with customer deposits, but you can apply the same principles if you need to account for gift certificates.
It will take three steps for this process:
1. Set Up to Track Customer Deposits: The first step in dealing with unearned income is to set up an Other Current Liability account and two items (an Other Charge and a Payment type). The Other Current Liability account is necessary because, by accepting a customer deposit or a payment for a gift certificate, you essentially are accepting both as a liability. The deposit will then be turned into a payment and the gift certificate will eventually be redeemed for goods or services. By setting up a liability account, you will be able to show that you are holding the funds in a separate account until the income becomes “earned.” You need the two new items so they can be used on an Invoice.
QuickBooks Desktop 2019 © 2019 Labyrinth Learning – Not for Sale or Classroom Use
Labyrinth Learning http://www.lablearning.com
EVALUATIO
N ONLY

Passing on Expenses to Customers 317
2. Receiving a Customer Deposit: You will then use an invoice to record the receipt of the deposit, selecting the new items and directing the funds to a liability account. In essence, you are “liable” for doing something in return for the funds you are receiving. You will not record the income until the service is performed, the product is delivered, or the gift certifi-cate is redeemed. This will not affect an income account or Accounts Receivable because the balance owing on the invoice will be zero.
3. Turning a Deposit into a Payment: After you have delivered on your promise and have traded goods or services for the deposit or gift certificate, you will use an invoice to record the income. The invoice will increase an income account and then reduce the liability account when the income becomes “earned” and you are no longer liable to perform or deliver.
Passing on Expenses to CustomersIf you recall, when you enter a bill or make a purchase using cash or a credit card, you may be acquiring equipment or supplies whose costs you want to pass on to a customer. QuickBooks allows you to easily indicate which expenses are to be billed to a customer by providing a “Bill-able?” column in the Enter Bills window. When you make an item billable to a specific customer, the next time you invoice that customer you will be asked if you’d like to add the outstanding billable time and costs to the invoice.
The Choose Billable Time and Costs window allows you to select what time, expenses, mile-age, and/or items you wish to pass on to a customer and include on their invoice.
QuickBooks Desktop 2019 © 2019 Labyrinth Learning – Not for Sale or Classroom Use
Labyrinth Learning http://www.lablearning.com
EVALUATIO
N ONLY
318 QuickBooks Desktop 2019 Chapter 9: Job Costing, Creating Estimates, and Time Tracking
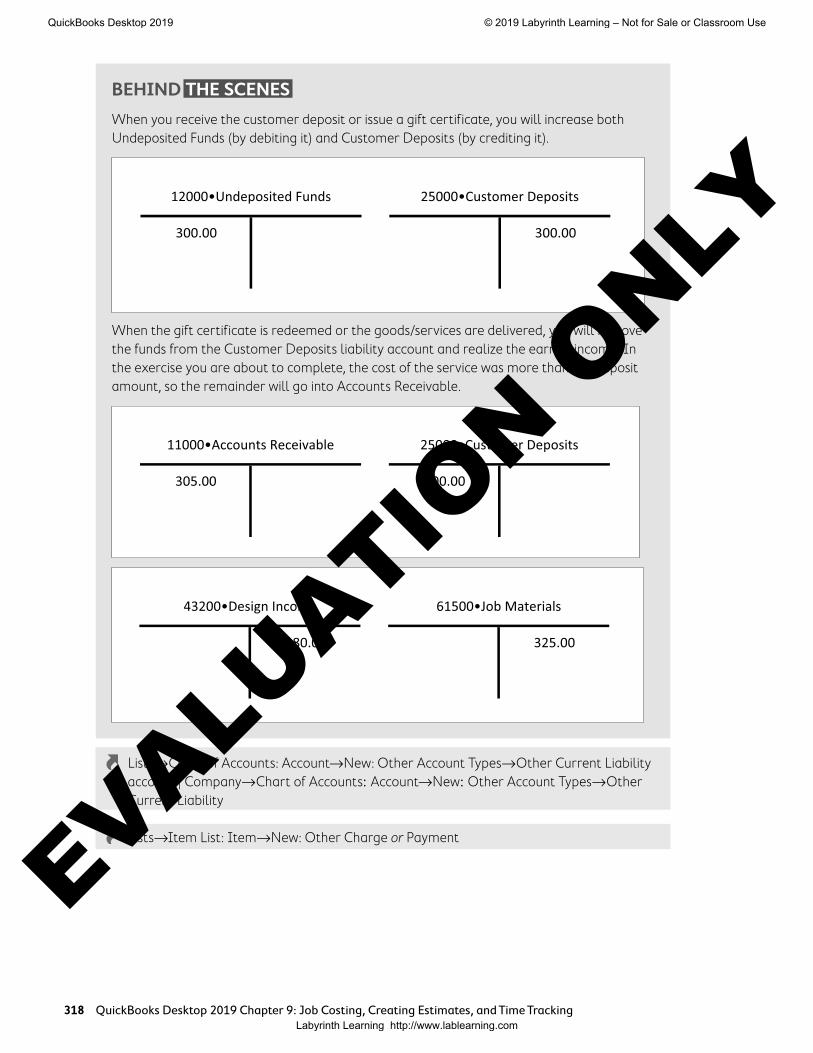
BEHIND THE SCENES
When you receive the customer deposit or issue a gift certificate, you will increase both Undeposited Funds (by debiting it) and Customer Deposits (by crediting it).
300.00 300.00
12000•Undeposited Funds 25000•Customer Deposits
When the gift certificate is redeemed or the goods/services are delivered, you will remove the funds from the Customer Deposits liability account and realize the earned income. In the exercise you are about to complete, the cost of the service was more than the deposit amount, so the remainder will go into Accounts Receivable.
305.00 300.00
11000•Accounts Receivable 25000•Customer Deposits
280.00 325.00
43200•Design Income 61500•Job Materials
Lists→Chart of Accounts: Account→New: Other Account Types→Other Current Liability account | Company→Chart of Accounts: Account→New: Other Account Types→Other Current Liability
Lists→Item List: Item→New: Other Charge or Payment
QuickBooks Desktop 2019 © 2019 Labyrinth Learning – Not for Sale or Classroom Use
Labyrinth Learning http://www.lablearning.com
EVALUATIO
N ONLY
Passing on Expenses to Customers 319
DEVELOP YOUR SKILLS 9-3
In this exercise, you will prepare to track customer deposits, receive a deposit for a customer, and turn the deposit into a payment. Before you can deal with unearned income, you must set up the proper account and items.
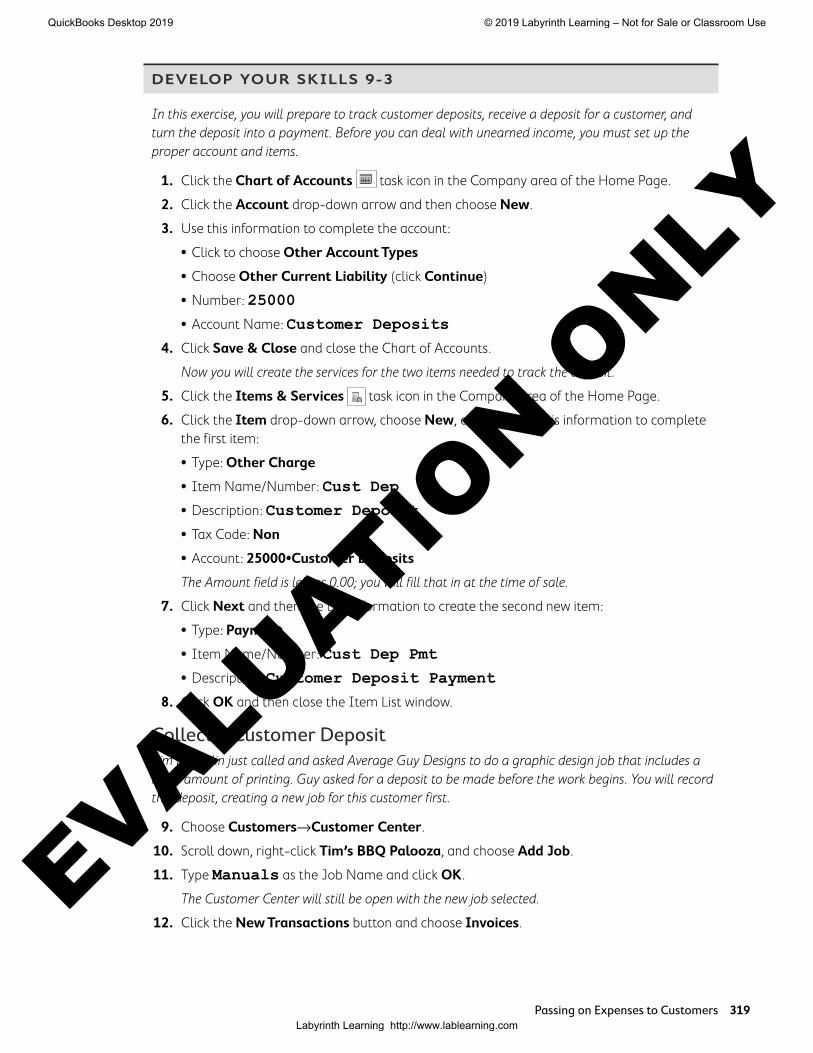
1. Click the Chart of Accounts task icon in the Company area of the Home Page.
2. Click the Account drop-down arrow and then choose New.
3. Use this information to complete the account:
• Click to choose Other Account Types
• Choose Other Current Liability (click Continue)
• Number: 25000
• Account Name: Customer Deposits
4. Click Save & Close and close the Chart of Accounts.
Now you will create the services for the two items needed to track the deposit.
5. Click the Items & Services task icon in the Company area of the Home Page.
6. Click the Item drop-down arrow, choose New, and then use this information to complete the first item:
• Type: Other Charge
• Item Name/Number: Cust Dep
• Description: Customer Deposit
• Tax Code: Non
• Account: 25000•Customer Deposits
The Amount field is left as 0.00; you will fill that in at the time of sale.
7. Click Next and then use this information to create the second new item:
• Type: Payment
• Item Name/Number: Cust Dep Pmt
• Description: Customer Deposit Payment
8. Click OK and then close the Item List window.
Collect a Customer DepositTim Laughlin just called and asked Average Guy Designs to do a graphic design job that includes a large amount of printing. Guy asked for a deposit to be made before the work begins. You will record this deposit, creating a new job for this customer first.
9. Choose Customers→Customer Center.
10. Scroll down, right-click Tim’s BBQ Palooza, and choose Add Job.
11. Type Manuals as the Job Name and click OK.
The Customer Center will still be open with the new job selected.
12. Click the New Transactions button and choose Invoices.
QuickBooks Desktop 2019 © 2019 Labyrinth Learning – Not for Sale or Classroom Use
Labyrinth Learning http://www.lablearning.com
EVALUATIO
N ONLY
320 QuickBooks Desktop 2019 Chapter 9: Job Costing, Creating Estimates, and Time Tracking
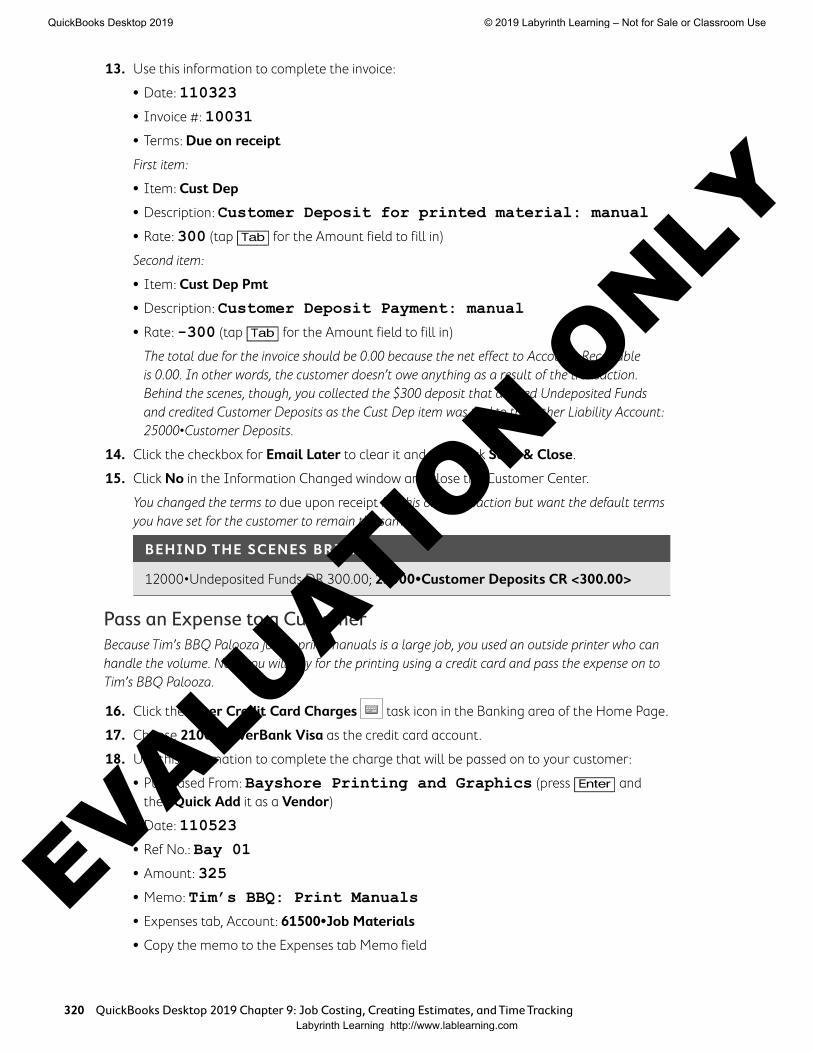
13. Use this information to complete the invoice:
• Date: 110323
• Invoice #: 10031
• Terms: Due on receipt
First item:
• Item: Cust Dep
• Description: Customer Deposit for printed material: manual
• Rate: 300 (tap [Tab] for the Amount field to fill in)
Second item:
• Item: Cust Dep Pmt
• Description: Customer Deposit Payment: manual
• Rate: -300 (tap [Tab] for the Amount field to fill in)
The total due for the invoice should be 0.00 because the net effect to Accounts Receivable is 0.00. In other words, the customer doesn’t owe anything as a result of the transaction. Behind the scenes, though, you collected the $300 deposit that debited Undeposited Funds and credited Customer Deposits as the Cust Dep item was tied to the Other Liability Account: 25000•Customer Deposits.
14. Click the checkbox for Email Later to clear it and then click Save & Close.
15. Click No in the Information Changed window and close the Customer Center.
You changed the terms to due upon receipt for this one transaction but want the default terms you have set for the customer to remain the same.
BEHIND THE SCENES BRIEF
12000•Undeposited Funds DR 300.00; 25000•Customer Deposits CR <300.00>
Pass an Expense to a CustomerBecause Tim’s BBQ Palooza job to print manuals is a large job, you used an outside printer who can handle the volume. Next you will pay for the printing using a credit card and pass the expense on to Tim’s BBQ Palooza.
16. Click the Enter Credit Card Charges task icon in the Banking area of the Home Page.
17. Choose 21000•RiverBank Visa as the credit card account.
18. Use this information to complete the charge that will be passed on to your customer:
• Purchased From: Bayshore Printing and Graphics (press [Enter] and then Quick Add it as a Vendor)
• Date: 110523
• Ref No.: Bay 01
• Amount: 325
• Memo: Tim’s BBQ: Print Manuals
• Expenses tab, Account: 61500•Job Materials
• Copy the memo to the Expenses tab Memo field
QuickBooks Desktop 2019 © 2019 Labyrinth Learning – Not for Sale or Classroom Use
Labyrinth Learning http://www.lablearning.com
EVALUATIO
N ONLY
Passing on Expenses to Customers 321
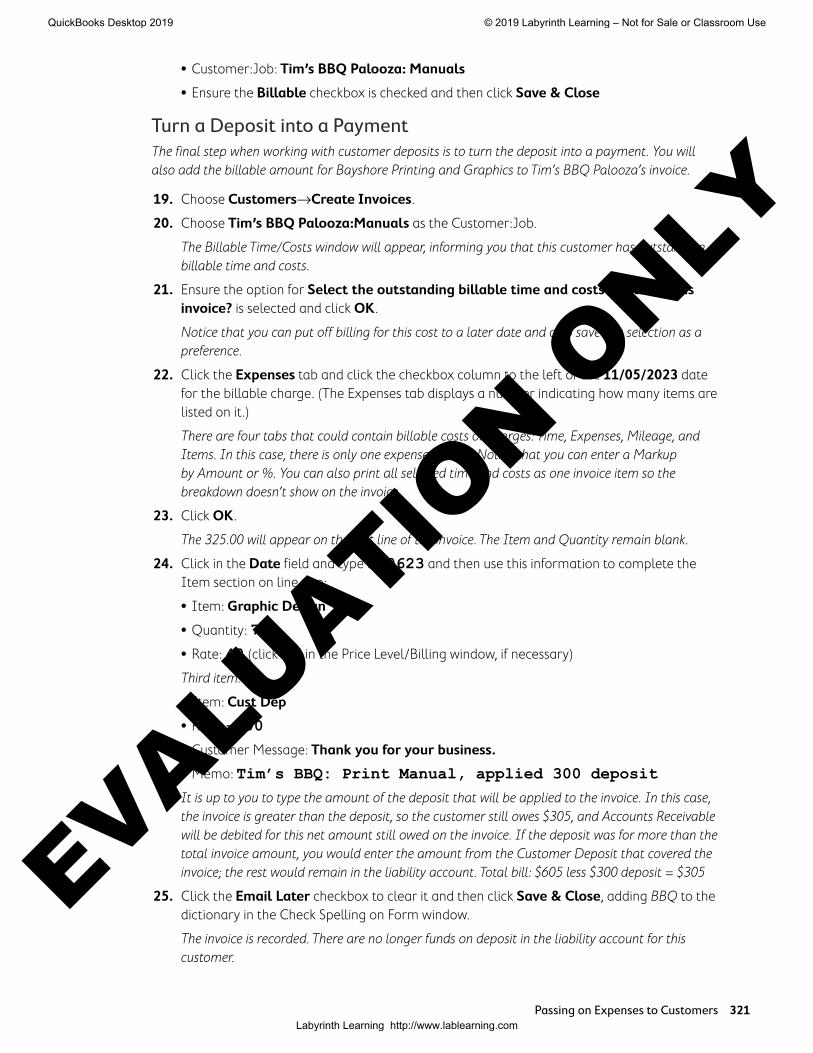
• Customer:Job: Tim’s BBQ Palooza: Manuals
• Ensure the Billable checkbox is checked and then click Save & Close
Turn a Deposit into a PaymentThe final step when working with customer deposits is to turn the deposit into a payment. You will also add the billable amount for Bayshore Printing and Graphics to Tim’s BBQ Palooza’s invoice.
19. Choose Customers→Create Invoices.
20. Choose Tim’s BBQ Palooza:Manuals as the Customer:Job.
The Billable Time/Costs window will appear, informing you that this customer has outstanding billable time and costs.
21. Ensure the option for Select the outstanding billable time and costs to add to this invoice? is selected and click OK.
Notice that you can put off billing for this cost to a later date and also save this selection as a preference.
22. Click the Expenses tab and click the checkbox column to the left of the 11/05/2023 date for the billable charge. (The Expenses tab displays a number indicating how many items are listed on it.)
There are four tabs that could contain billable costs or charges: Time, Expenses, Mileage, and Items. In this case, there is only one expense charge. Notice that you can enter a Markup by Amount or %. You can also print all selected time and costs as one invoice item so the breakdown doesn’t show on the invoice.
23. Click OK.
The 325.00 will appear on the first line of the invoice. The Item and Quantity remain blank.
24. Click in the Date field and type 110623 and then use this information to complete the Item section on line two:
• Item: Graphic Design
• Quantity: 7
• Rate: 40 (click OK in the Price Level/Billing window, if necessary)
Third item:
• Item: Cust Dep
• Rate: -300
• Customer Message: Thank you for your business.
• Memo: Tim’s BBQ: Print Manual, applied 300 deposit
It is up to you to type the amount of the deposit that will be applied to the invoice. In this case, the invoice is greater than the deposit, so the customer still owes $305, and Accounts Receivable will be debited for this net amount still owed on the invoice. If the deposit was for more than the total invoice amount, you would enter the amount from the Customer Deposit that covered the invoice; the rest would remain in the liability account. Total bill: $605 less $300 deposit = $305
25. Click the Email Later checkbox to clear it and then click Save & Close, adding BBQ to the dictionary in the Check Spelling on Form window.
The invoice is recorded. There are no longer funds on deposit in the liability account for this customer.
QuickBooks Desktop 2019 © 2019 Labyrinth Learning – Not for Sale or Classroom Use
Labyrinth Learning http://www.lablearning.com
EVALUATIO
N ONLY

322 QuickBooks Desktop 2019 Chapter 9: Job Costing, Creating Estimates, and Time Tracking
26. Choose Company→Chart of Accounts and then double-click 25000•Customer Deposits to see how the money increased and then decreased from that account. Now you have a record of the deposit.
27. Close the register and the Chart of Accounts window.
BEHIND THE SCENES BRIEF
25000•Customer Deposits DR 300.00; 11000•Accounts Receivable DR 305.00; 43200•Design Income CR <280.00>; 61500•Job Materials CR <325.00>
Assessing Finance Charges and Producing StatementsIf you are invoicing customers, you will inevitably find that not all of your customers pay their invoices on time. You may wish to assess finance charges, or, in some states, you may need to call them “Late Fee” or “Service Charge” for these late-paying customers.
Warning! Finance charge (lending) laws will vary! Research your jurisdiction to know whether you can assess finance charges on overdue balances. Do not use the specifics provided in this book; rather, find out the laws that apply to your location and apply them appropriately.
QuickBooks allows you to set several finance charge preferences in the Finance Charge category on the Company Preferences tab.
Set the Annual Interest Rate.
Note you can set the minimum amount to be charged.
You can choose to allow a grace period, if desired.
Set up the other liability account, if necessary.
Check with your jurisdiction before setting this option.
Decide on calculationmethod after researching local jurisdiction regulations.
Determine whether you want to mark the invoices “To be printed.”
The finance charge account is an Other Income account as the income received is not the result of your normal business practices (unless you are a bank).
QuickBooks Desktop 2019 © 2019 Labyrinth Learning – Not for Sale or Classroom Use
Labyrinth Learning http://www.lablearning.com
EVALUATIO
N ONLY

Assessing Finance Charges and Producing Statements 323
Note! If assessing a finance charge, a statement with payment terms should be clearly noted on the invoice. Include such wording as “Accounts not paid within terms are subject to a ___% monthly finance charge and a $___ late fee. Grace period 5 days.” (Provided for example only, so do your research for your own company.)
Edit→Preferences: Finance Charge→Company Preferences
Customers→Assess Finance Charges
Customers→Enter Statement Charges
Customers→Create Statements
DEVELOP YOUR SKILLS 9-4
In this exercise, you will set the company preferences to incur a finance charge with a minimum charge for any customers with an overdue balance.
1. Choose Edit→Preferences and click the Finance Charge category. Then click the Company Preferences tab.
2. Use this information to complete the charges:
• Annual Interest Rate (%): 10%
• Minimum Finance Charge: 5.00
• Finance Charge Account: 70000 Other Income (tap [Tab] and then click Set Up)
3. Add a new account using this information:
• Account Type and Name: Other Income
• Description: Finance Charges
4. Click Save & Close and click OK to set the preferences.
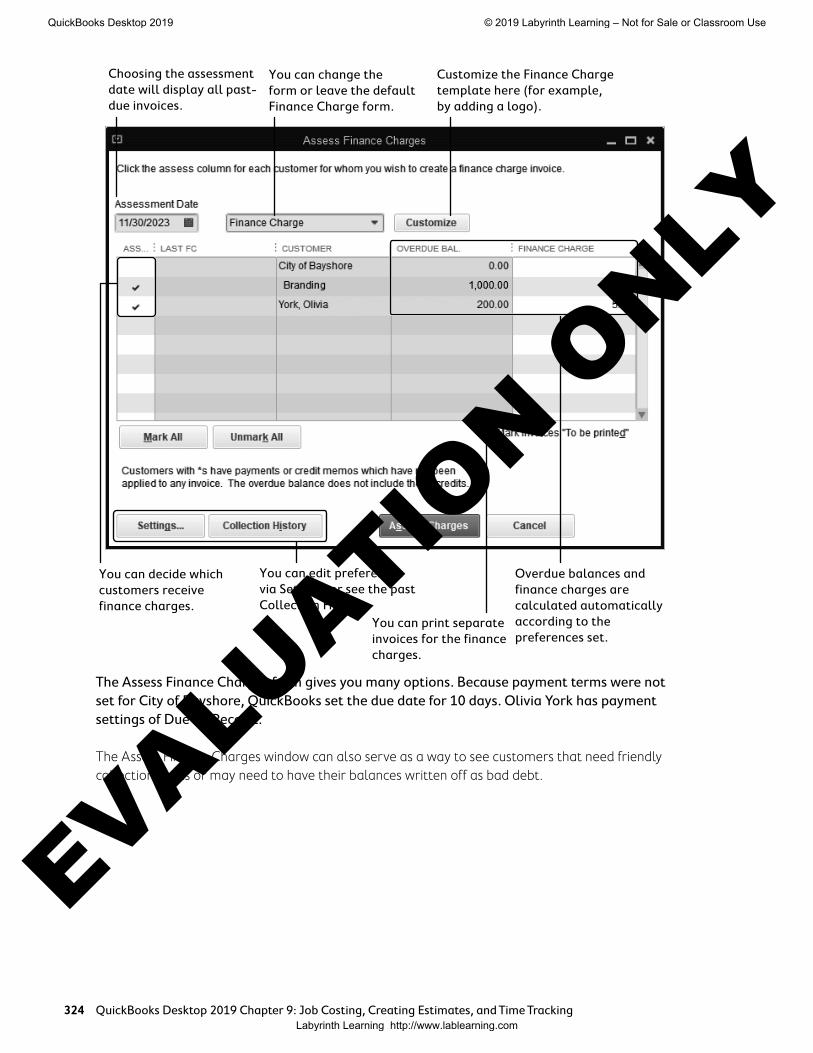
The Assess Finance Charges WindowThe Assess Finance Charges window does more than provide you with a means to determine which customers are overdue and should be charged a finance charge. It also calculates the charge due (based on the preferences set) and gives you a quick way to view the preferences and customize the finance charge invoice template.
QuickBooks Desktop 2019 © 2019 Labyrinth Learning – Not for Sale or Classroom Use
Labyrinth Learning http://www.lablearning.com
EVALUATIO
N ONLY
324 QuickBooks Desktop 2019 Chapter 9: Job Costing, Creating Estimates, and Time Tracking
Choosing the assessment date will display all past- due invoices.
You can change the form or leave the default Finance Charge form.
Customize the Finance Charge template here (for example, by adding a logo).
Overdue balances and finance charges are calculated automatically according to the preferences set.
You can decide which customers receive finance charges.
You can print separate invoices for the finance charges.
You can edit preferences via Settings or see the past Collection History.
The Assess Finance Charges form gives you many options. Because payment terms were not set for City of Bayshore, QuickBooks set the due date for 10 days. Olivia York has payment settings of Due on Receipt.
The Assess Finance Charges window can also serve as a way to see customers that need friendly collections calls or may need to have their balances written off as bad debt.
QuickBooks Desktop 2019 © 2019 Labyrinth Learning – Not for Sale or Classroom Use
Labyrinth Learning http://www.lablearning.com
EVALUATIO
N ONLY

Assessing Finance Charges and Producing Statements 325
BEHIND THE SCENES
When you assess finance charges, QuickBooks will debit Accounts Receivable and the appropriate accounts receivable customer subregister (you can see the example for Olivia York below), as well as indicate the account credited by the charge (in this case, 70000•Other Income).
5.00 5.00
5.00
Olivia York
11000•Accounts Receivable 70000•Other Income
DEVELOP YOUR SKILLS 9-5
In this exercise, you will choose to assess finance charges on all overdue invoices and send statements to affected customers.
1. Click the Finance Charges task icon in the Customers area of the Home Page.
The Assess Finance Charges window will be displayed.
2. Type 113023 as the Assessment Date and tap [Tab].
All customers with open invoices that are past due as of November 30 display, along with the calculated finance charge.
3. Click Assess Charges in the Assess Finance Charges window for all Customers listed.
The finance charges are now reflected in Accounts Receivable for each customer assessed.
BEHIND THE SCENES BRIEF
11000•Accounts Receivable DR 10.00 (each customer’s subregister is also debited for the finance charge amount); 70000•Other Income CR <10.00>
QuickBooks Desktop 2019 © 2019 Labyrinth Learning – Not for Sale or Classroom Use
Labyrinth Learning http://www.lablearning.com
EVALUATIO
N ONLY

326 QuickBooks Desktop 2019 Chapter 9: Job Costing, Creating Estimates, and Time Tracking
Remove a Finance ChargeAfter finance charges have been applied, you may decide not to charge a specific customer a finance fee especially if it’s a good customer or one whom you might expect to get a volume of work from. You can use the Statement Charges window to do this. You can still decide to charge a finance fee in the future for this customer.
DEVELOP YOUR SKILLS 9-6
In this exercise, you will delete the finance charge assessed to the City of Bayshore because you are expecting a lot of additional business from them. You will do this through the customer’s register.
1. Click the Statement Charges task icon in the Customers area of the Home Page.
When you choose to enter a statement charge, you will view the Accounts Receivable register for a customer. It is important that you choose the correct customer. If there were multiple charges, you would click the drop-down arrow for the Customer:Job field and choose the job.
2. Choose City of Bayshore:Branding as the Customer:Job.
3. Right-click anywhere within the two lines of the City of Bayshore:Branding FC 1 finance charge transaction, choose Delete Invoice, and then click OK in the Delete Transaction window.
BEHIND THE SCENES BRIEF
70000•Other Income DR 5.00; 11000•Accounts Receivable CR <5.00>
4. Close the City of Bayshore:Branding - Accounts Receivable window.
Creating Statements for CustomersThere are many instances when you may wish to send your customer a statement rather than an invoice. You may have one customer for which you do multiple jobs within a billing period and you wish to bill them with an itemized statement. Another example would be to create a statement to bill a customer for a finance charge. Statements can be produced for an individual customer or in a batch for multiple customers.
Tip! You can send an invoice reflecting assessed finance charges to your customers. Just ensure there is a checkmark in the “To be printed” checkbox in the Preferences window.
Statements can be printed individually for each customer as needed or can be run as a batch and then you select which statements to print. There are a number of options to set to determine which statements you want to print and how they will print.
✔ Best PracticeThe more common way to alert customers to finance charges that they owe is to produce a statement that reflects the finance charge, outstanding invoices, and aging information.
QuickBooks Desktop 2019 © 2019 Labyrinth Learning – Not for Sale or Classroom Use
Labyrinth Learning http://www.lablearning.com
EVALUATIO
N ONLY
Assessing Finance Charges and Producing Statements 327
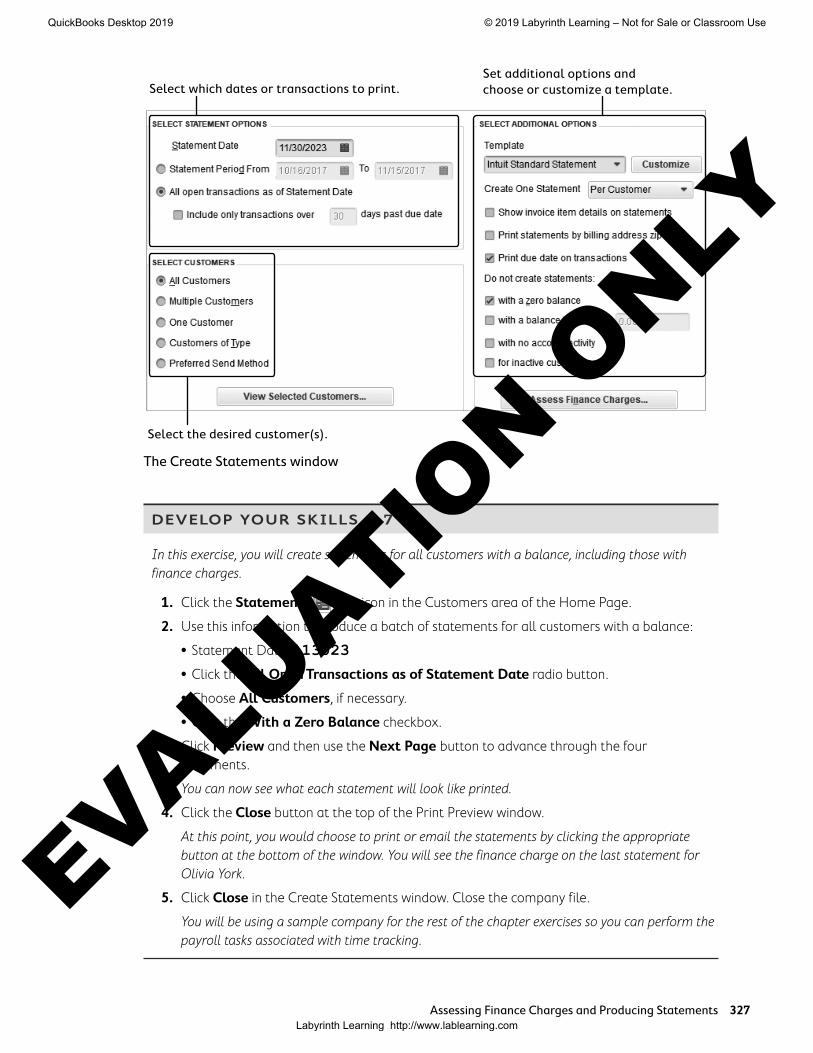
Select which dates or transactions to print.
Select the desired customer(s).
Set additional options and choose or customize a template.
The Create Statements window
DEVELOP YOUR SKILLS 9-7
In this exercise, you will create statements for all customers with a balance, including those with finance charges.
1. Click the Statements task icon in the Customers area of the Home Page.
2. Use this information to produce a batch of statements for all customers with a balance:
• Statement Date: 113023
• Click the All Open Transactions as of Statement Date radio button.
• Choose All Customers, if necessary.
• Click the With a Zero Balance checkbox.
3. Click Preview and then use the Next Page button to advance through the four statements.
You can now see what each statement will look like printed.
4. Click the Close button at the top of the Print Preview window.
At this point, you would choose to print or email the statements by clicking the appropriate button at the bottom of the window. You will see the finance charge on the last statement for Olivia York.
5. Click Close in the Create Statements window. Close the company file.
You will be using a sample company for the rest of the chapter exercises so you can perform the payroll tasks associated with time tracking.
QuickBooks Desktop 2019 © 2019 Labyrinth Learning – Not for Sale or Classroom Use
Labyrinth Learning http://www.lablearning.com
EVALUATIO
N ONLY
328 QuickBooks Desktop 2019 Chapter 9: Job Costing, Creating Estimates, and Time Tracking
Time Tracking and Mileage FeaturesThe Time Tracking feature allows you to create weekly timesheets so you can break down the hours by customer/job or to record single activities for a customer/job. In addition to these payroll benefits, time tracking also allows you to:
• Invoice customers for number of hours worked
• Automatically fill in the hours worked on paychecks
• Track time for subcontractors by automatically filling in time data on bills and checks
• Track payroll costs by job, class, or type of work performed
• Track billable versus non-billable time
After you have used time data, you can run reports such as the Time by Job Summary to view how many hours were put into each job. Time tracking also allows you to allocate the appro-priate payroll costs to a job, making your job costing reports more accurate and meaningful.
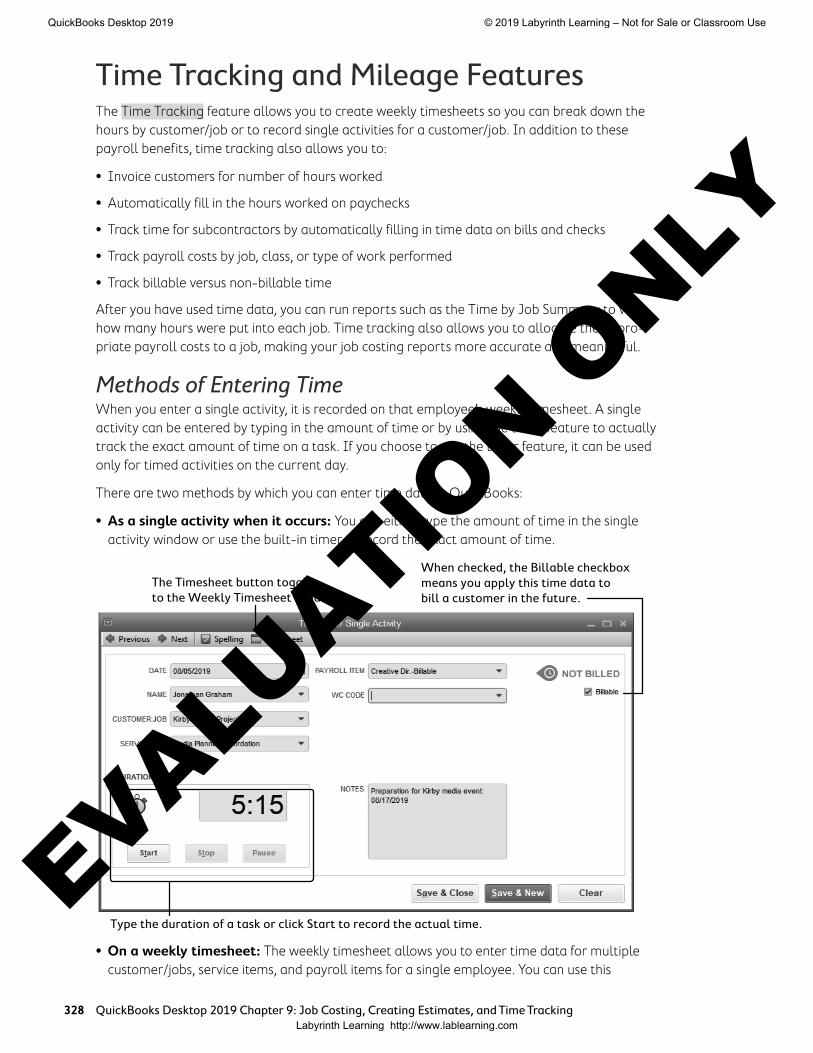
Methods of Entering TimeWhen you enter a single activity, it is recorded on that employee’s weekly timesheet. A single activity can be entered by typing in the amount of time or by using the timer feature to actually track the exact amount of time on a task. If you choose to use the timer feature, it can be used only for timed activities on the current day.
There are two methods by which you can enter time data in QuickBooks:
• As a single activity when it occurs: You can either type the amount of time in the single activity window or use the built-in timer to record the exact amount of time.
The Timesheet button toggles to the Weekly Timesheet window.
When checked, the Billable checkbox means you apply this time data to bill a customer in the future.
Type the duration of a task or click Start to record the actual time.
• On a weekly timesheet: The weekly timesheet allows you to enter time data for multiple customer/jobs, service items, and payroll items for a single employee. You can use this
QuickBooks Desktop 2019 © 2019 Labyrinth Learning – Not for Sale or Classroom Use
Labyrinth Learning http://www.lablearning.com
EVALUATIO
N ONLY
Time Tracking and Mileage Features 329
information to create paychecks when you process payroll. You can use the “Billable” column on a Timesheet to determine whether the time is billable. If a checkmark is in this field, the customer can be billed for the time. If an invoice icon appears, then the time has already been invoiced.
Fields Available in Both Time Data Entry WindowsRegardless of whether you choose to enter time as single activities or on a weekly timesheet, each window provides the following fields:
• Customer:Job: Information entered in this field allows you to bill a customer for the time and to keep track of information required for accurate job costing.
• Service Item: Information entered in this field allows you to track services performed.
• Payroll Item: Information entered in this field allows you to create paychecks from your time data.
• Billable: If you choose this field, the information is made available for you to bill the customer for the time.
• Notes: Information entered in this field is displayed in the description field on reports and invoices.
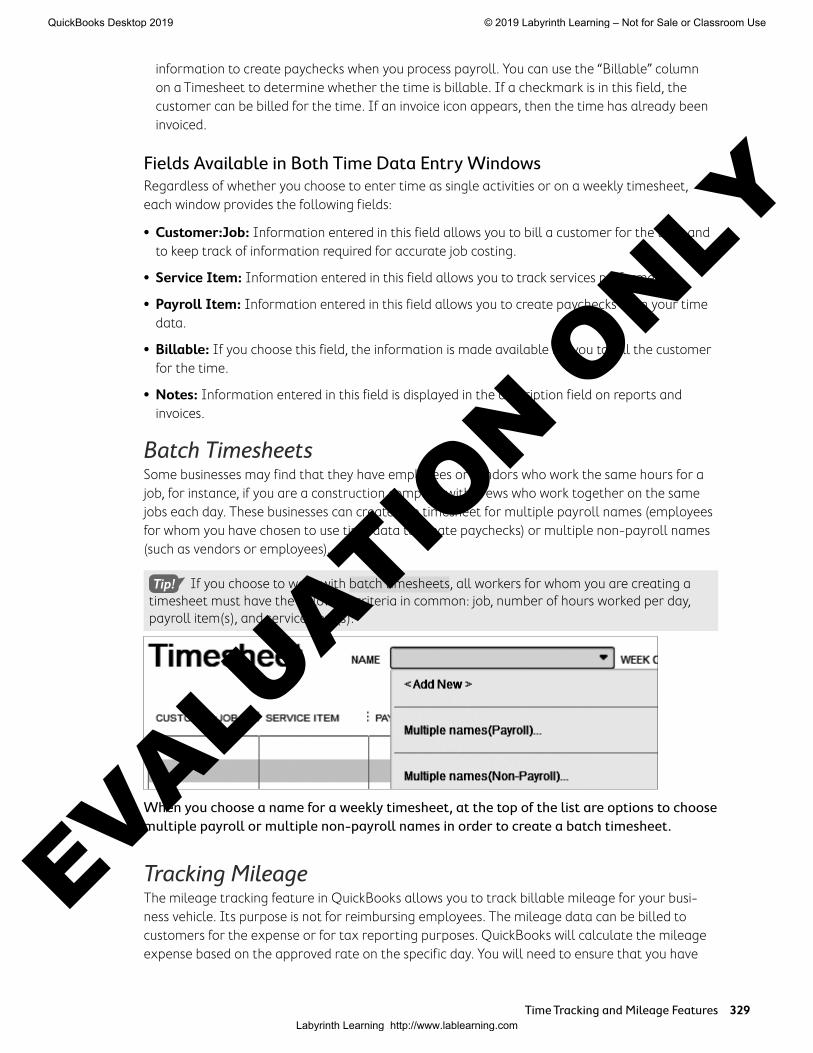
Batch TimesheetsSome businesses may find that they have employees or vendors who work the same hours for a job, for instance, if you are a construction company with crews who work together on the same jobs each day. These businesses can create one timesheet for multiple payroll names (employees for whom you have chosen to use time data to create paychecks) or multiple non-payroll names (such as vendors or employees).
Tip! If you choose to work with batch timesheets, all workers for whom you are creating a timesheet must have the following criteria in common: job, number of hours worked per day, payroll item(s), and service item(s).
When you choose a name for a weekly timesheet, at the top of the list are options to choose multiple payroll or multiple non-payroll names in order to create a batch timesheet.
Tracking MileageThe mileage tracking feature in QuickBooks allows you to track billable mileage for your busi-ness vehicle. Its purpose is not for reimbursing employees. The mileage data can be billed to customers for the expense or for tax reporting purposes. QuickBooks will calculate the mileage expense based on the approved rate on the specific day. You will need to ensure that you have
QuickBooks Desktop 2019 © 2019 Labyrinth Learning – Not for Sale or Classroom Use
Labyrinth Learning http://www.lablearning.com
EVALUATIO
N ONLY

330 QuickBooks Desktop 2019 Chapter 9: Job Costing, Creating Estimates, and Time Tracking
the latest IRS mileage reimbursement rates entered. To track mileage for a particular vehicle, you need to enter the vehicle into the Vehicle List first.
To view your mileage information after you have started tracking it, QuickBooks provides mileage reports from which you can choose to display your data. You can also choose to pass on the mileage expense to your customers and create reports to view the amount that has been billed.
Billable Vehicle Mileage will be pulled into an invoice for this customer.
Employees→Enter Time→Use Weekly Timesheet or Time/Edit Single Activity
Company→Enter Vehicle Mileage
Lists→Customer & Vendor Profile Lists→Vehicle List: Vehicle→New
Lists→Item List: Item→New
Reports→Jobs, Time & Mileage | Reports→Report Center: Jobs, Time & Mileage
DEVELOP YOUR SKILLS 9-8
In this exercise, you will track time to be used to create paychecks for a company and will first record time spent on two jobs. You will be opening a sample file in order to be able to work in a file with active payroll. The date will automatically be set to December 15, 2018. The Password is Password1.
1. Open DYS_Chapter09-PR (Company) or restore DYS_Chapter09-PR (Portable) from your file storage location and save your file as: DYS_Chapter09-PR Average Guy Designs
2. Click OK to acknowledge that you are using a sample company file.
3. Click the Enter Time task icon in the Employees area of the Home Page and then choose Time/Enter Single Activity.
4. Use this information to enter the employee’s billable time:
• Date: 080519
• Name: Jonathan Graham (Employee)
• Customer Job: Kirby Stores:Project #15
QuickBooks Desktop 2019 © 2019 Labyrinth Learning – Not for Sale or Classroom Use
Labyrinth Learning http://www.lablearning.com
EVALUATIO
N ONLY

Time Tracking and Mileage Features 331
5. Service Item: Media Planning: Coordination (Payroll Item should default to Creative Dir.–Billable)
• Duration: 5:15
• Billable: Ensure that it’s checked
• Notes: Preparation for Kirby media event: 8/17/19
6. Click Save & Close.
Note! If you enter the duration with a colon, as in this example, it calculates the time in minutes and seconds. Alternatively, if you use a decimal instead of a colon, it will calculate it as a fraction of a minute.
Enter Time Using a Weekly TimesheetYou will now enter the rest of Jonathan’s time for the week.
7. Click the Enter Time task icon in the Employees area of the Home Page and then choose Use Weekly Timesheet.
8. In the Name field, type jo and tap [Tab] to fill in Jonathan Graham (Employee). You will see a prior timesheet.
9. Use these steps to set the time frame for the timesheet:
• Click the calendar icon to the right of the Week Of date range.
• Use the right arrow button to the right of December 2018 to advance to August 2019.
• Click the 5 (Monday).
QuickBooks sets the week of Aug 5 to Aug 11, 2019, as the date range for the timesheet. Notice that the time data you just entered as a single activity appears on the weekly timesheet for the week of 08/05/2019. There is another entry for 3 hours on Tuesday the 6th.
10. Use this information to complete the remainder of the time data for the week:
Customer Job Service Item M Tu W TH F
Peacock Research Project #14
Film Production:Editing
3:00 6:00 8:00
Kirby Stores:Project #15 Event Planning:Meetings
1:30 1:00
Kirby Stores:Project #15 Event Planning:Research
4:00
Kirby Stores:Project #15 Event Planning:Lay Out
7:00
Note! Be careful! If you hit [Enter], it will save what you’ve entered and display a new, blank time sheet. If this happens to you, repeat steps 7 and 8.
11. The Payroll Item Creative Dir.-Billable will fill in automatically for each line; ensure Billable is checked for all items.
Your entries should match those in the following illustration. Total hours should be 38:45 on the Total row at bottom of screen.
QuickBooks Desktop 2019 © 2019 Labyrinth Learning – Not for Sale or Classroom Use
Labyrinth Learning http://www.lablearning.com
EVALUATIO
N ONLY

332 QuickBooks Desktop 2019 Chapter 9: Job Costing, Creating Estimates, and Time Tracking
12. Click Save & Close.
Using Time Tracking Hours for Paychecks and InvoicesYou can use time data for employees to create their paychecks and for vendors to create their bills by entering the time using the single or weekly timesheets. Using Time Tracking for either employees or vendors will also allow you to invoice your customers for any billable time.
Allocating time spent by salaried employees or vendors on a job should help in producing more accurate job cost reports. By marking the time as Billable on the timesheets, the hours will automatically be imported when creating the paychecks or bills.
When you create an invoice, you can choose to pass billable time to customers, just as you did with an expense earlier in this chapter. You will be prompted that there is billable time, including billable mileage if you are tracking that as well. Regardless of which type of cost you are passing on to the customer, the process is virtually the same—and you can even choose to specify a markup amount for the hours.
Employees→Pay Employees
Customers→Create Invoices
DEVELOP YOUR SKILLS 9-9
In this exercise, you will create a paycheck for Jonathan based on the time data that was entered and then invoice one of the customers.
1. Click the Pay Employees task icon in the Employees area of the Home Page.
2. Click the Pay Employees button in the middle of the Employee Center: Payroll Center window.
The Enter Payroll Information window displays. Look at the Creative Dir-Billable column for Jonathan Graham (you may have to resize the columns to read the headers) and notice that the amount is in blue, which indicates it is for the amount of billable time that you have entered.
QuickBooks Desktop 2019 © 2019 Labyrinth Learning – Not for Sale or Classroom Use
Labyrinth Learning http://www.lablearning.com
EVALUATIO
N ONLY
Using Time Tracking Hours for Paychecks and Invoices 333
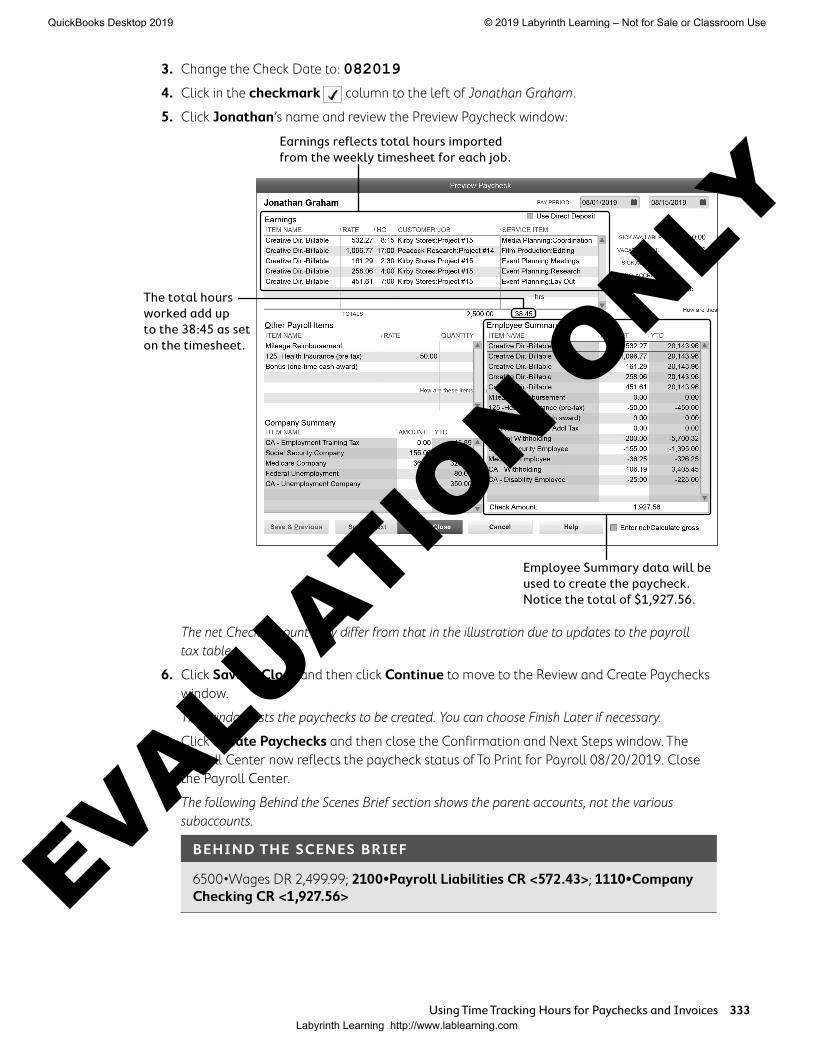
3. Change the Check Date to: 082019
4. Click in the checkmark column to the left of Jonathan Graham.
5. Click Jonathan’s name and review the Preview Paycheck window:
Earnings reflects total hours imported from the weekly timesheet for each job.
Employee Summary data will be used to create the paycheck. Notice the total of $1,927.56.
The total hours worked add up to the 38:45 as set on the timesheet.
The net Check Amount may differ from that in the illustration due to updates to the payroll tax table.
6. Click Save & Close and then click Continue to move to the Review and Create Paychecks window.
This window lists the paychecks to be created. You can choose Finish Later if necessary.
7. Click Create Paychecks and then close the Confirmation and Next Steps window. The Payroll Center now reflects the paycheck status of To Print for Payroll 08/20/2019. Close the Payroll Center.
The following Behind the Scenes Brief section shows the parent accounts, not the various subaccounts.
BEHIND THE SCENES BRIEF
6500•Wages DR 2,499.99; 2100•Payroll Liabilities CR <572.43>; 1110•Company Checking CR <1,927.56>
QuickBooks Desktop 2019 © 2019 Labyrinth Learning – Not for Sale or Classroom Use
Labyrinth Learning http://www.lablearning.com
EVALUATIO
N ONLY
334 QuickBooks Desktop 2019 Chapter 9: Job Costing, Creating Estimates, and Time Tracking
Create an Invoice from Time DataYou will now create an invoice for Kirby Stores that includes the time costs for the work completed.
8. Click the Create Invoices task icon in the Customers area of the Home Page.
If you are using a Premier version of the software, the Home Page task icon will be called Invoices, and once you click it you will need to choose Invoice for Time & Expense. You will then need to click OK in the Choose Multiple Customers to Invoice for Time and Expenses window.
9. Click the Customer:Job field drop-down arrow and choose Kirby Stores:Project #15.
The Billable Time/Costs window appears.
10. Click OK in the Billable Time/Costs window to choose the default of selecting the outstand-ing billable time and costs to add to this invoice.
The Time tab of the Choose Billable Time and Costs window displays.
11. Click the Select All button and then click OK.
The Create Invoices window displays with the total hours for each item.
12. Change the Invoice Date to: 081619
13. Enter these rates on the appropriate Item line in the Rate column tapping the down arrow [¥] after each entry:
• Media Planning Coordination: 65
• Event Planning Meetings: 55
• Event Planning Research: 65
• Event Planning Layout: 75
These rates needed to be entered because they were not entered on the items in the item list. This enables you to set the rate as needed.
14. Click the Memo field and type: Kirby Proj. 15 Billable Hrs.
15. Click Save & Close and then close the Check Spelling on Form window, if necessary.
BEHIND THE SCENES BRIEF
1210•Accounts Receivable DR 1,458.75; 4200•Event Income CR <1,458.75>
16. Click the Receive Payments task icon in the Customers area of the Home Page.
17. Use this information to complete the payment receipt:
• Received From: Kirby Stores:Project#15
• Payment Amount: 1458.75
• Date: 082219
• Payment: Check
• Check # 2468
• Memo: Kirby:Proj#15 billable hrs.
QuickBooks Desktop 2019 © 2019 Labyrinth Learning – Not for Sale or Classroom Use
Labyrinth Learning http://www.lablearning.com
EVALUATIO
N ONLY

Jobs, Time & Mileage Tracking Reports 335
18. Click Save & Close.
The Record Deposits notification just changed to 1.
BEHIND THE SCENES BRIEF
1500•Undeposited Funds DR 1,458.75; 1210•Accounts Receivable CR <1,458.75>
Jobs, Time & Mileage Tracking ReportsQuickBooks’ job costing, estimating, and time tracking features include many preset reports that you can run to learn more about your business. Not all of the Jobs, Time & Mileage reports are in all versions of QuickBooks. There are other reports available if you use a Premier version of QuickBooks that is specialized for your type of company. Like other reports, these standard reports can be customized.
When you choose the Jobs, Time & Mileage category in the Report Center, you can view all of the reports available in your version of QuickBooks. Here are just three that are available in all versions.
Reports→Jobs, Time & Mileage | Reports→Reports Center→Jobs, Time & Mileage
QuickBooks Desktop 2019 © 2019 Labyrinth Learning – Not for Sale or Classroom Use
Labyrinth Learning http://www.lablearning.com
EVALUATIO
N ONLY

336 QuickBooks Desktop 2019 Chapter 9: Job Costing, Creating Estimates, and Time Tracking
DEVELOP YOUR SKILLS 9-10
In this exercise, you will produce a variety of Job-related reports for Average Guy Designs.
1. Choose Reports→Jobs, Time & Mileage→Job Progress Invoices vs. Estimates.
The Job Progress Invoices vs. Estimates report displays.
2. Close the Job Progress Invoices vs. Estimates window.
Report on Time TrackingThe next report will show the time spent on each job.
3. Choose Reports→Jobs, Time & Mileage→Time by Job Summary.
4. Type a to set the date range to All.
The Time by Job Summary report displays for all dates. Notice the time for which you invoiced Kirby Stores for the Project #15 job, as shown in this illustration.
5. Close the Time by Job Summary window, choosing not to memorize the report.
QuickBooks Desktop 2019 © 2019 Labyrinth Learning – Not for Sale or Classroom Use
Labyrinth Learning http://www.lablearning.com
EVALUATIO
N ONLY

Time Tracking with TSheets 337
Report on Job CostingThe third report will show the profitability of each job.
6. Choose Reports→Jobs, Time & Mileage→Job Profitability Summary.
The Job Profitability Summary report displays with the default date range of all dates. Note the profitability so far for the Kirby Stores.
7. Close the Job Profitability Summary window.
Time Tracking with TSheetsYou may find that the time tracking that is standard in QuickBooks Desktop doesn’t meet your company’s needs. Well, you are in luck as there is an “app for that” that Intuit now owns that works seamlessly with QuickBooks, TSheets. There is an additional fee to utilize TSheets, but you may find that the cost is worth it due to the benefits it offers. Let’s look at some of those benefits.
Precision & Reduced Payroll Processing TimeGone are the days of rounding up on timesheets with TSheets. Employees can clock in and out right from their mobile devices and receive reminders regarding breaks, overtime, and clocking
QuickBooks Desktop 2019 © 2019 Labyrinth Learning – Not for Sale or Classroom Use
Labyrinth Learning http://www.lablearning.com
EVALUATIO
N ONLY
338 QuickBooks Desktop 2019 Chapter 9: Job Costing, Creating Estimates, and Time Tracking
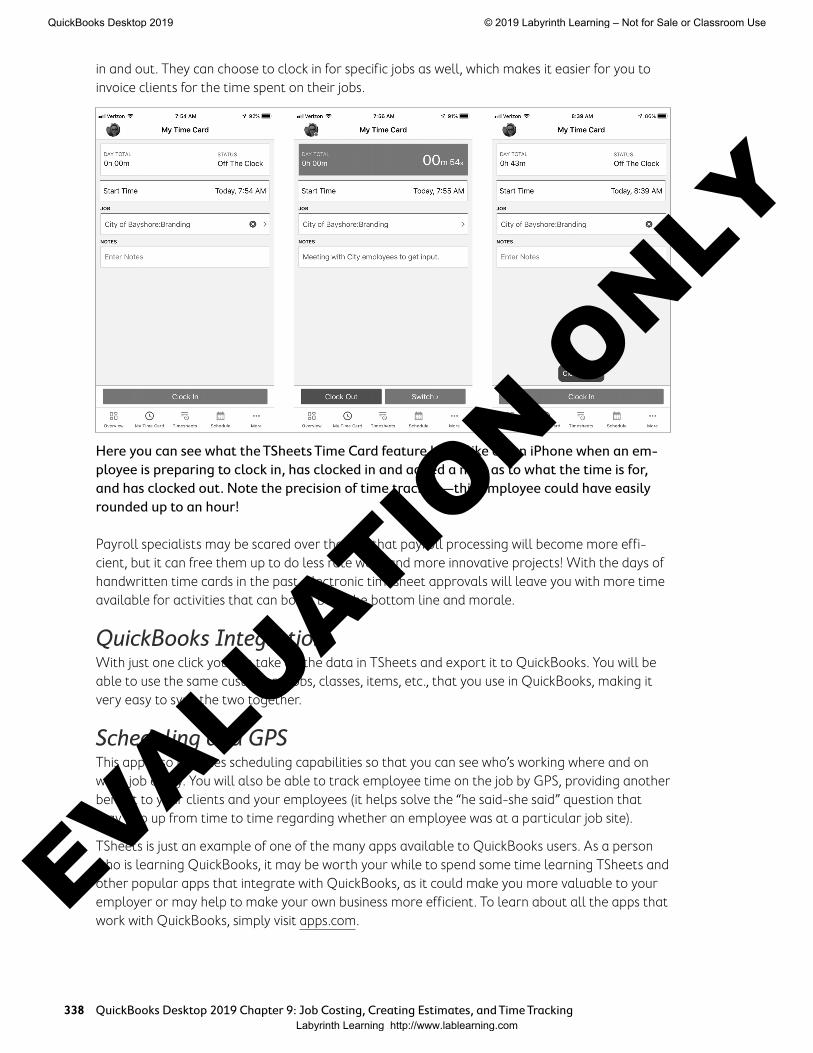
in and out. They can choose to clock in for specific jobs as well, which makes it easier for you to invoice clients for the time spent on their jobs.
Here you can see what the TSheets Time Card feature looks like on an iPhone when an em-ployee is preparing to clock in, has clocked in and added a note as to what the time is for, and has clocked out. Note the precision of time tracked—this employee could have easily rounded up to an hour!
Payroll specialists may be scared over the fact that payroll processing will become more effi-cient, but it can free them up to do less rote work and more innovative projects! With the days of handwritten time cards in the past, electronic timesheet approvals will leave you with more time available for activities that can boost both the bottom line and morale.
QuickBooks IntegrationWith just one click you can take all the data in TSheets and export it to QuickBooks. You will be able to use the same customers, jobs, classes, items, etc., that you use in QuickBooks, making it very easy to sync the two together.
Scheduling and GPSThis app also provides scheduling capabilities so that you can see who’s working where and on what job easily. You will also be able to track employee time on the job by GPS, providing another benefit to your clients and your employees (it helps solve the “he said-she said” question that may pop up from time to time regarding whether an employee was at a particular job site).
TSheets is just an example of one of the many apps available to QuickBooks users. As a person who is learning QuickBooks, it may be worth your while to spend some time learning TSheets and other popular apps that integrate with QuickBooks, as it could make you more valuable to your employer or may help to make your own business more efficient. To learn about all the apps that work with QuickBooks, simply visit apps.com.
QuickBooks Desktop 2019 © 2019 Labyrinth Learning – Not for Sale or Classroom Use
Labyrinth Learning http://www.lablearning.com
EVALUATIO
N ONLY
Tackle the Tasks 339
Tackle the TasksNow is your chance to work a little more with Average Guy Designs and apply the skills that you have learned in this chapter to accomplish additional tasks. You will continue to use the company file you used in the last Develop Your Skills exercises. Enter these tasks, referring to the concepts in the chapter as necessary. If you are using the trial software for this course on your computer or in a lab at school, you must toggle to the Pro edition every time you start QuickBooks.
Create an Estimate for a New Job
Create a new job for Chancey and Co. called Marketing Video, as you will be bidding on the opportunity to create a new marketing video.
Create an estimate for Chancey and Co.:Marketing Video job on 08/23/2019 for Film Production: 2 hours of contract review, 20 hours of research, 10 hours of meetings, 30 hours of coordination, 25 hours on location, and 40 hours of editing. The hourly rate for all is $45/hour. Enter a memo: Chancey Marketing Video proposal.
Create a Progress Invoice Based on an Estimate
You have been awarded the Marketing Video job for Chancey and Co., so edit the job to show this. The dates for the start and projected end of the job will be 09/01/2019 and 12/01/2019, respectively. The job type is Production Services and its description is New Product Marketing.
Create a progress invoice dated 09/25/2019 for 50 percent of the entire estimate. Set the terms for the invoice as Net 15 (do not make the change permanent). Choose to not apply the available credits to the invoice.
Run a QuickReport to see the transactions.
Receive a Customer Deposit
Bowden Agency would like you to do some print production work for them and to print a large number of items for which you will collect a deposit up front.
Receive a deposit from Bowden Agency using a new job, Project #17, on 09/17/2019 for $500 for the printing. The account (2200•Client Deposits) and Payment Item (Payment) already exist.
You will have to set up Cust Dep (Other Charge item, charge to the Client Deposit account), Description: Customer Deposit;
Invoice memos:
Cust Dep: Customer Deposit for Printing
Payment: Payment of Deposit
(cont’d.)
QuickBooks Desktop 2019 © 2019 Labyrinth Learning – Not for Sale or Classroom Use
Labyrinth Learning http://www.lablearning.com
EVALUATIO
N ONLY

340 QuickBooks Desktop 2019 Chapter 9: Job Costing, Creating Estimates, and Time Tracking
Apply a Customer Deposit as a Payment
Create a bill for Business Supply Center on 09/26/2019 for Printing and Reproduction for $500, billable to Bowden Agency:Project #17.
Create an invoice for the completed Bowden Agency: Project #17 and be sure to Select the outstanding billable time and costs to add to this invoice.
Set the date to 09/28/2019 and add these items to the invoice: Print Production: coordination for 10 hours, 40 hours of editing both at an hourly rate of $50.
Apply the $500 customer deposit to the invoice with terms of Net 10 (do not make the change in terms permanent).
Run a Profit & Loss by Job report for dates 09/01/2019–9/30/2019 to see the $2,500 net income from this job.
Create an Invoice from Billable Time
Create an invoice for Peacock Research Project #14 for the 3 billable film editing time entries in August only. Date the invoice 09/30/2019. (Hint: The total amount you are passing on is $1,445.)
QuickBooks Desktop 2019 © 2019 Labyrinth Learning – Not for Sale or Classroom Use
Labyrinth Learning http://www.lablearning.com
EVALUATIO
N ONLY
Self-Assessment 341
Self-AssessmentCheck your knowledge of this chapter’s key concepts and skills using the Self-Assessment quiz here, in your ebook, or in your eLab course.
1. You can create estimates only for jobs, not for customers. True False
2. If you choose to create a progress invoice, it must be for a percentage of all items. You cannot create one for selected items from the estimate. True False
3. You can enter time data as either a single activity or on a weekly timesheet. True False
4. When you pass on billable time to a customer, you select the cost for the time on the Expenses tab of the Choose Billable Time and Costs window. True False
5. QuickBooks allows users to track outstanding estimates by utilizing a non-posting account. True False
6. Unearned income refers to the funds you are holding in the Undeposited Funds account. True False
7. When you receive funds for a gift certificate, you hold them in an Other Current Liability account. True False
8. In QuickBooks, you can use the mileage tracking feature to track mileage to be reimbursed to employees for the use of their own cars. True False
9. You should use the specific finance charge settings outlined in this book for your own company. True False
10. The most common way to bill customers for finance charges is to create and send separate invoices. True False
11. Which report would you produce to determine which job is most profitable?
A. Job Profitability Detail
B. Job Estimates vs. Actuals Summary
C. Time by Job Summary
D. Job Profitability Summary
12. Which of these is NOT a step you need to take to conduct job costing in QuickBooks?
A. Enter all job revenues and expenses
B. Create an estimate for the job
C. Use QuickBooks reports to analyze job data
D. Set up your data in the Customers & Jobs List
(cont’d.)
QuickBooks Desktop 2019 © 2019 Labyrinth Learning – Not for Sale or Classroom Use
Labyrinth Learning http://www.lablearning.com
EVALUATIO
N ONLY

342 QuickBooks Desktop 2019 Chapter 9: Job Costing, Creating Estimates, and Time Tracking
13. To enter mileage for a vehicle in QuickBooks, you first need to:
A. Enter the current IRS mileage rate.
B. Add the vehicle in the Other Names list.
C. Create a new non-inventory item in the Item List.
D. None of these options
14. Which of these is NOT something you need to set up to track customer deposits in QuickBooks?
A. An inventory-part item
B. An Other Current Liability account
C. An other charge item
D. A payment item
QuickBooks Desktop 2019 © 2019 Labyrinth Learning – Not for Sale or Classroom Use
Labyrinth Learning http://www.lablearning.com
EVALUATIO
N ONLY
Reinforce Your Skills 343
Reinforce Your SkillsAngela Stevens has just hired you as a senior bookkeeper for Quality-Built Construction. You will be entering estimates, creating progress invoices, and performing other tasks such as receiving customer deposits and entering time tracking data to ensure proper billing and job costing. You will be working with a QuickBooks sample file to avoid having to purchase a payroll subscription. The password for all files is Password1. Leave the company file open unless otherwise instructed. If you are using the trial software on your computer or in a lab at school, remember to toggle to the Pro edition every time you start QuickBooks.
REINFORCE YOUR SKILLS 9-1
Create a Job and an Estimate for a Customer
In this exercise, you will enter a new customer and a job for the customer, who has asked you for an estimate for a kitchen remodel. Preferences must be set before you can create estimates and conduct progress invoicing.
1. Start QuickBooks 2019.
2. Open RYS_Chapter09 (Company) or restore RYS_Chapter09 (Portable) from your file storage location and save your file as: RYS_Chapter09 Quality-Built Construction
3. Choose Edit→Preferences.
4. Click the Jobs & Estimates category and then click the Company Preferences tab.
5. Ensure that both the Create Estimates and Progress Invoicing features are turned on and then click OK.
Create a Customer and a JobNext you will enter a new customer and job.
6. Choose Customers→Customer Center.
7. Click the New Customer & Job button and choose New Customer.
8. Type Bates, Tania as the Customer Name and click OK.
Bates, Tania should be selected.
9. Click the New Customer & Job button and choose Add Job.
10. Type Remodel Kitchen as the Job Name.
11. Click the Job Info tab and then use this information to enter the job information:
• Job Description: Complete kitchen remodel
• Job Type: Remodel
• Job Status: Pending
12. Click OK to save the new job.
The new job appears on the Customers & Jobs List; it is selected.
QuickBooks Desktop 2019 © 2019 Labyrinth Learning – Not for Sale or Classroom Use
Labyrinth Learning http://www.lablearning.com
EVALUATIO
N ONLY

344 QuickBooks Desktop 2019 Chapter 9: Job Costing, Creating Estimates, and Time Tracking
Create an Estimate for a JobNow that you have a job set up for the kitchen remodel, you will create an estimate for it. The Remodel Kitchen job should still be selected.
13. Click the New Transactions button and then choose Estimates.
14. Type 010720 as the Date.
15. Type 20-0001 as the Estimate No.
16. Enter this information starting on the first Item row, typing the quantity and estimate cost displayed.
The estimate should total $5,525.
17. Type Bates: Kitchen remodel in the Memo field.
18. Click Save & Close for the estimate and then close the Customer Center.
REINFORCE YOUR SKILLS 9-2
Create a Progress Invoice Based on an Estimate
In this exercise, you will create a progress invoice to charge for the remodel plans that have been completed.
1. Choose Customers→Create Invoices and then choose Bates Tania: Remodel Kitchen as the Customer:Job.
2. Click the estimate for 01/07/2020 in the Available Estimates window and click OK.
3. Choose to create the invoice for selected items or different percentages and then click OK.
4. Click the Show Quantity and Rate and Show Percentage checkboxes to deselect them if necessary.
5. Type 1200 in the Amount column for the first line (01.4 Remodel Plans) and click OK. (You can adjust the column widths by dragging between the column borders.)
6. Click OK in the Zero Amount Items window.
Note that, after that selection is made, everything will fill into the Create Invoices window.
7. Choose Due On Receipt as the terms and set the date to: 012220
8. Click Save & Close and choose not to have the terms permanently changed.
QuickBooks Desktop 2019 © 2019 Labyrinth Learning – Not for Sale or Classroom Use
Labyrinth Learning http://www.lablearning.com
EVALUATIO
N ONLY

Reinforce Your Skills 345
REINFORCE YOUR SKILLS 9-3
Collect a Customer Deposit
In this exercise, you will help Angela to collect a deposit from Tania Bates for $2,000 toward the remainder of the work. These funds will be held in a liability account until they are earned, at which time you will create a progress invoice to record the income. There is already a Customer Deposits account set up, so you will begin by creating the two items you will use for the actual deposit.
1. Choose Lists→Item List.
2. Choose Item→New→Other Charge named: Cust Dep
3. Leave the Description blank so you can fill it in on each invoice, change the Tax Code to Non and direct it to the 2200•Customer Deposits account, and click Next.
The New Item window appears.
4. Choose to create a new Payment item named: Payment
5. Type Customer Payment as the Description for the new item and then click OK.
6. Close the Item List.
Collect the Deposit7. Choose Customers→Create Invoices and then choose Bates, Tania: Remodel Kitchen
as the Customer:Job.
8. Click Cancel in the Available Estimates window as you are not ready to invoice for the remaining work.
9. Ensure the date is set to 01/22/2020 and then enter the deposit and payment using this illustration.
10. Type Customer Deposit: Remodel Kitchen in the Description field.
11. Type Bates: remodel $2,000 deposit in the Memo field and then click Save & New.
Apply the Customer Deposit to a Progress InvoiceAngela has now completed the kitchen remodel and will invoice Tania to record the earned income, utilizing the deposit. The Create Invoices window should still be open. If not, choose Customers→Create Invoices.
12. Choose Bates, Tania: Remodel Kitchen as the Customer:Job.
13. Click the estimate for 01/07/2020 in the Available Estimates window and click OK.
14. Click OK to Create an invoice for the remaining amounts of the estimate.
15. Set the date of the invoice to 02/22/2020 and enter 02-1055 in the Invoice # field.
16. Scroll down in the item area of the invoice and then enter the customer deposit in the line below 25 Cleanup, choosing Cust Dep as the Item.
QuickBooks Desktop 2019 © 2019 Labyrinth Learning – Not for Sale or Classroom Use
Labyrinth Learning http://www.lablearning.com
EVALUATIO
N ONLY

346 QuickBooks Desktop 2019 Chapter 9: Job Costing, Creating Estimates, and Time Tracking
17. Type Customer Deposit Applied for the Description and type -2000 in the Amount column.
The Balance Due should be $2,325 after deducting the $2,000 deposit.
18. Click Save & Close.
REINFORCE YOUR SKILLS 9-4
Assess Finance Charges
In this exercise, you will assess finance charges for customers with overdue invoices. The finance charge preferences have already been set up for the company, so you will not need to complete that step.
1. Choose Customers→Assess Finance Charges.
2. Type 013120 as the Assessment Date and then tap [Tab].
Two invoices are selected to have finance charges assessed.
3. Click Assess Charges.
REINFORCE YOUR SKILLS 9-5
Enter Time Tracking Data and Produce a Paycheck
In this exercise, you will enter time spent on a job by Clark Mitchell and then create a paycheck for him.
1. Choose Employees→Enter Time→Use Weekly Timesheet.
2. Use this information to enter the time worked for the week of Jan 27 to Feb 2, 2020:
3. Click Save & New.
4. Use this information to enter the time worked for the week of Feb 3 to Feb 9, 2020:
5. Click Save & Close.
6. Choose Employees→Pay Employees.
7. Use the calendar icon to change the Pay Period Ends date to 02/09/2020 and click Yes in the Pay Period Change window.
8. Change the Check Date to 02/11/2020.
9. Click in the checkmark column to the left of Mitchell, Clark and then click Continue.
10. Review the paycheck you are about to create using time data and then click Create Paychecks.
11. Close the Confirmation and Next Steps window.
QuickBooks Desktop 2019 © 2019 Labyrinth Learning – Not for Sale or Classroom Use
Labyrinth Learning http://www.lablearning.com
EVALUATIO
N ONLY
Reinforce Your Skills 347
REINFORCE YOUR SKILLS 9-6
Display Reports for Estimates and Time Tracking
In this exercise, you will help Angela to create estimate and time tracking reports.
1. Choose Lists→Chart of Accounts.
2. Click in the Look for Account Name or Number field, type Estimates, and click Search.
3. Right-click the Estimates account and choose QuickReport: 4•Estimates from the bottom of the pop-up menu.
4. Set the date range to All.
On the report, review the estimates that have been created; the one you entered is at the bottom.
5. Close the Account QuickReport and the Chart of Accounts windows.
View the Progress Invoicing of an EstimateYou will now run a report that will show you the percentage of the estimates that have been invoiced.
6. Choose Reports→Jobs, Time & Mileage→Job Progress Invoices vs. Estimates.
7. Type a to set the date range to All.
Notice the estimate you created and the amount that has been invoiced.
8. Close the Job Progress vs. Estimates window, choosing not to memorize the report.
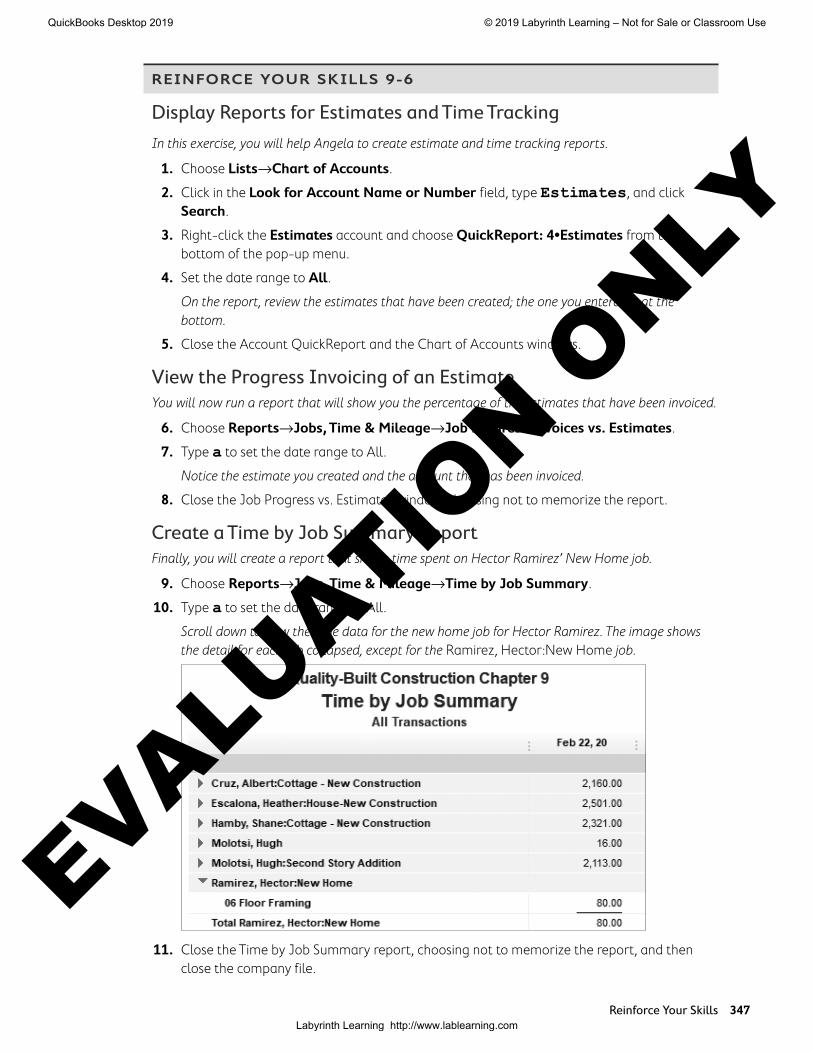
Create a Time by Job Summary ReportFinally, you will create a report that shows time spent on Hector Ramirez’ New Home job.
9. Choose Reports→Jobs, Time & Mileage→Time by Job Summary.
10. Type a to set the date range to All.
Scroll down to view the time data for the new home job for Hector Ramirez. The image shows the detail for each job collapsed, except for the Ramirez, Hector:New Home job.
11. Close the Time by Job Summary report, choosing not to memorize the report, and then close the company file.
QuickBooks Desktop 2019 © 2019 Labyrinth Learning – Not for Sale or Classroom Use
Labyrinth Learning http://www.lablearning.com
EVALUATIO
N ONLY

348 QuickBooks Desktop 2019 Chapter 9: Job Costing, Creating Estimates, and Time Tracking
Apply Your SkillsYou have decided that it is advantageous to do estimates and progress invoicing for Wet Noses Veterinary Clinic as well as to start job tracking. You realize the importance of this aspect of doing business to ensure you are really profitable on the jobs you are taking on. Now you will take the necessary steps to start using these features. The password for all files unless otherwise stated is Password1. After starting QuickBooks, remember to toggle to Pro as necessary.
APPLY YOUR SKILLS 9-1
Set the Preferences and Create a New JobIn this exercise, you will set the necessary preferences to be able to use QuickBooks’ estimating and progress invoicing features. Then you will create a new “job” for Amy Ridgeway’s new kitten, Autumn.
1. Start QuickBooks 2019.
2. Open AYS_A1_Chapter09 (Company) or restore AYS_A1_Chapter09 (Portable) from your file storage location and save your file as: AYS_A1_Chapter09 Wet Noses Clinic
3. Edit the Preferences to create estimates and do progress invoicing for the company.
Create a New JobNow that the preferences have been set, you will create the job for Amy’s new kitten.
4. Create a new job for Amy Ridgeway called: Cat-Autumn
Dr. James has decided that it is not important for her to track “job status” for her customers, so you will leave the fields on the Job Info tab blank.
5. Leave the company file open.
QuickBooks Desktop 2019 © 2019 Labyrinth Learning – Not for Sale or Classroom Use
Labyrinth Learning http://www.lablearning.com
EVALUATIO
N ONLY

Apply Your Skills 349
APPLY YOUR SKILLS 9-2 QG
Create an Estimate for a JobIn this exercise, you will create an estimate for Amy Ridgeway so she can see the full cost for all of the services for her new kitten. She needs to bring in the kitten to be spayed, tested for FIV and feline leukemia, and vaccinated, but she is concerned about the total cost and needs to budget the services.
1. Create an estimate on 071523 for Amy Ridgeway: Cat-Autumn, using the items dis-played in the illustration. Click OK in the Tax Codes window, if necessary.
Remember that all service and non-inventory items are not taxable; only inventory items are taxable.
2. Click Save & Close.
3. Run the Estimates by Job report for the dates 07/01/2023 to 07/31/2023.
4. Click the Excel button and export this list to a new worksheet, saving the work-sheet to your file storage location as: CH9_A2 Estimates by Job
5. Close the report, choosing not to memorize it, and close Excel. Leave the company file open for the next exercise.
APPLY YOUR SKILLS 9-3 QG
Create a Billable ExpenseIn this exercise, you will create a bill to be charged back to Amy for the expense of the anesthe-siologist hired to perform the spaying procedure for Amy’s cat. You have already informed Amy of this charge.
1. Create a bill for Peters, Samantha, a new vendor, using a new expense account numbered 66600 and the Account Name Medical Professionals and this information to complete the bill:
• Date: 071823
• Ref. No.: Anes 01
• Amount Due: 250
QuickBooks Desktop 2019 © 2019 Labyrinth Learning – Not for Sale or Classroom Use
Labyrinth Learning http://www.lablearning.com
EVALUATIO
N ONLY
350 QuickBooks Desktop 2019 Chapter 9: Job Costing, Creating Estimates, and Time Tracking
• Terms: Net 30
• Memo: Ridgeway, Cat-Autumn, Spay
• Copy the bill memo to the Expense tab Memo field
• Customer: Ridgeway: Cat-Autumn
• Ensure the Billable column is checked
2. Click Save & Close and click Yes to accept the payment terms.
3. Close the company file.
Create an Invoice from the EstimateAmy Ridgeway has decided to get Autumn the care she needs in phases. Now you will create a progress invoice for the first set of items.
4. Create an invoice based on the 07/15/2023 estimate for Amy Ridgeway: Cat-Autumn, choosing the option that will allow you to determine which items to invoice.
5. In the Specify Invoice Amount for Items on Estimate window, click in the Show Percentage checkbox and then type 100 in the Curr % column to include these items: New Patient, Spay Cat, IV Fluids, Pain Meds, and Vaccine on the invoice.
6. Click OK.
Tip! After you enter 100 in the Curr % column for the first item, you can use the down arrow [¥] key to move down the column to enter the percentages for the other four items.
7. Read the warning message; click OK in the Zero Amount Items window.
The Billable Time/Costs window appears because the anesthesiologist was entered as billable against this job.
8. Click OK to select the outstanding billable time and costs to add to the invoice.
9. Click the Expenses tab and click in the checkmark column to the left of 07/18/2023 for Peters, Samantha and then click OK.
10. Scroll down to see the entry on the last line of the invoice and then set the date to 07/19/2023 and the invoice # to 180.
11. Click Save & Close on the invoice.
The invoice is created for the customer. The rest of the estimate will still be available, from which you can create future invoices.
12. Run the Job Estimates vs. Actuals Detail report for Ridgeway, Amy:Cat-Autumn.
13. Click the Excel button and export this list to a new worksheet, saving the work-sheet to your file storage location as: CH9_A3 Job Estimates vs. Actuals
14. Run the Job Profitability Detail report for Amy Ridgeway’s cat, Autumn.
15. Click the Excel button and export this list to a new worksheet, saving the work-sheet to your file storage location as: CH9_A3 Job Profitability
QuickBooks Desktop 2019 © 2019 Labyrinth Learning – Not for Sale or Classroom Use
Labyrinth Learning http://www.lablearning.com
EVALUATIO
N ONLY

Extend Your Skills 351
Extend Your SkillsBefore You Begin: Open EYS_Chapter09 (Company) or restore EYS_Chapter09 (Portable) from your file storage location.
You have been hired by Arlaine Cervantes to help her with her organization’s books. She is the founder of Niños del Lago, a nonprofit organization that provides impoverished Guate-malan children with an engaging educational camp experience. You have just sat down at your desk and opened a large envelope from her with a variety of documents and noticed that you have several emails from her as well. It is your job to sort through the papers and emails and make sense of what you find, entering information into QuickBooks whenever appropriate and answering any other questions in a word-processing document saved as: EYS1_Chapter09_LastnameFirstinitial
Remember, you are digging through papers on a desk, so it is up to you to determine the correct order in which to complete the tasks.
• Handwritten receipt: Dated 9/19/2019 for a $500.00 donation from Matthew Drill to purchase food for a camp to be offered in December 2019. Sticky note from Arlaine on the receipt: Can you please figure out a way to account for this donation since the food will not be purchased and consumed until December?
• Handwritten estimate for Expanding Opportunities Together: Dated 9/17/2019 for 50 scarves and 35 handbags. (Expanding Opportunities Together is another nonprofit that is looking to help us raise funds by purchasing and reselling the goods we get from the women in Guatemala.) Each of the products was on a separate line, and both at 25 percent off regular retail.
• Message from Arlaine: “We should probably think about what we should do if customers do not pay their bill on time…. Can we assess finance charges in QuickBooks? If so, please set it up so we charge 12 percent interest on overdue invoices. I think we need to have a nice grace period, though, so please set that at 30 days. Don’t worry about charging a minimum finance charge or charging interest on overdue finance charges.”
• Printed email: Received the contract from Expanding Opportunities Together. Could you please bill them for 50 percent up front?
• Scribbled note from Arlaine: Is there a report you can create for me that will show how much of the estimate has been invoiced?
QuickBooks Desktop 2019 © 2019 Labyrinth Learning – Not for Sale or Classroom Use
Labyrinth Learning http://www.lablearning.com
EVALUATIO
N ONLY