quickstart for backdrop designer - digital anarchy · the basics of backdrop designer in this...
TRANSCRIPT

12 easy steps for creating a digital backdrop.
Quickstart for Backdrop Designer
Design your own backgrounds.
[ from: Digital Anarchy] f/x tools for revolutionaries
www.digitalanarchy.com
2
Backdrop Designer : Quickstart Guide
© 2007, digital anarchy : f/x tools for revolutionaries | create your own backgrounds
The Basics of Backdrop DesignerIn this Quickstart Guide, we will discus the basics of Backdrop Designers. This tutorial will give you a good overview of the creation process. There are really only eight simple steps involved in making a backdrop. If youʼre in a hurry or simply love our presets exactly the way they ship, then you can boil down the necessary steps to four. Wow!
Table of ContentsStep 01: Open Backdrop Designer 3
Step 02: Select Texture preset 3
Step 03: Select Shadow preset 4
Step 04: Evaluate the results 4
Step 05: Adjust Shadow Opacity 5
Step 06: Transform the Shadow 5
Step 07: Adjust Shadow Blur 6
Step 09: Mutate the Texture 7
TIP: The Undo function 8
Step 10: Adjust Texture Blur 9
Step 11: Adjust Texture color 9
Step 12: Load & replace 10
TIP: Set sliders to default 11
Step 13: Save a preset combo 12
Step 14: Render the backdrop 12

Backdrop Designer : Quickstart Guide
3 © 2007, digital anarchy : f/x tools for revolutionaries | create your own backgrounds
Step 01: Open Backdrop DesignerOpen up a Photoshop file, and select the layer to which you want to add your Backdrop graphic. Alternately, create a new Photoshop file that is 640x480 pixels, at 150 dpi.
In Photoshop, go to the Filter menu, then the Digital Anarchy submenu. Choose Backdrop Designer. A custom interface will open, but technically you are still in Photoshop.
Backdrop Designer is ʻresolution independentʼ. This means that its output will take on the physical dimensions and the pixel-based resolution of your image, always with a high quality render.
You may notice that the Preview Window is proportinal to the height and width of your Photoshop file. This is great, because it gives a true preview of what your final result will be.
Step 02: Select Texture presetOn the left side of the screen, click on the LOAD button that is next to the Texture Window. This brings up the Texture Preset Manager.
In the Texture Preset Manager, the graphics are divided into categories according to attributes like style, color, realism, and softness. These categories include Pastels, Orange, Aquas and Earth.
For this exercise, scroll down the left side until you get to the ʻOld Mastersʼ category (one of our favorites!). Select the preset thatʼs second over in the first row, called ʻRusty Smokeʼ. Click the OK checkmark button, or press your Return or Enter key.

4
Backdrop Designer : Quickstart Guide
© 2007, digital anarchy : f/x tools for revolutionaries | create your own backgrounds
In the Preview Window, you will see the ʻRusty Smokeʼ texture you just selected. It is visually affected by a Shadow. By default, the last shadow that was applied by Backdrop Designer will show up in the Shadow window.
Step 03: Select Shadow presetOn the right side of the screen, click the LOAD button thatʼs next to the Shadow Window. This takes you into the Shadow Preset Manager, which is also organized into categories according to attributes.
All of these presets are grayscale images, meaning, they are made of black, white, and the gray values inbetween. There are no colors.
Scroll down to the ʻFabrics-1ʼ category, and select the second Shadow in the third row, called ʻTwice Hungʼ. Many of the Shadow presets are organized by material simulation, or light effects (like Hot Spots), or cast objects (Fences, Windows). Click OK or hit the Return/Enter key.
Step 04: Evaluate the resultsIn the Preview Window, our ʻTwice Hungʼ Shadow is now applied to the ʻRusty Smokeʼ Texture. This shadow is a Distortion Shadow, meaning, its gray values distort the underlying colored texture.
If you like the graphic that youʼve created then... Youʼre finished! Skip to Step 11, save your combination as a new preset, and apply the backdrop to your Photoshop file.
If you want to customize this backdrop, then do the following steps in the order you prefer, and do only the ones that fit the changes you need.
+ =ShadowTexture Combo

Backdrop Designer : Quickstart Guide
5 © 2007, digital anarchy : f/x tools for revolutionaries | create your own backgrounds
Step 05: Adjust Shadow OpacitySense of depth is primarily created through the shadows/highlights of the backdrop. That makes the sharpness and opacity of this Shadow important.
In the Shadow Window, increase the Opacity slider to 100. Notice that the Shadow image gets darker overall, but especially in the shadowy areas.
Imagine the Shadow as a layer sitting over the Texture. Increasing its Opacity is like increasing the opacity of a layer in Photoshop thatʼs above another layer.
If you increase Opacity, the Shadow layer dominates the lower Texture layer. Decreasing Opacity means the Texture shows through the Shadow.
The Shadow will never blot out the underlying Texture (unless you set Texture Brightness to 100%). This is because, behind the scenes, Backdrop Designer is using a blend mode to combine the Shadow and Texture.
Step 06: Transform the Shadow The Shadow Window has a set of Transform tools. Their functions are pretty basic (Rotate, Scale, Move) and can provide an easy change to the presetʼs attributes.
In particular, the Scale Tool can completely change the look of your Shadow. A Shadow can have dramatically different looks at different scales.
NOTE: The Texture Window and the Preview Window also have transform controls. Their functions work the same as the Shadow transform tools.
Opacity at 50 (top) Opacity at 100 (below)
Weʼve scaled the Shadow down a bit and shifted it to the left with the Move tool. Looks similar to the original, maybe a little sharper.

6
Backdrop Designer : Quickstart Guide
© 2007, digital anarchy : f/x tools for revolutionaries | create your own backgrounds
Blur at 30 (top) Blur at 100 (below)
Step 07: Adjust Shadow BlurThe Blur control softens up the Shadow, making its edges less sharp and blending shades of gray together. Adjusting Blur value is similar in principle to applying a Gaussian Blur in Photoshop.
Set Blur to 100. Notice that the seams in our Shadow layer smooth out. In general, the shadows do not appear as dark as they were before the adjustment. If we were using the Shadow for distortion, changing the Blur level would also affect the amount of distortion.
Step 08: Adjust Shadow Bend The Texture preset that weʼre using is pretty abstract. Abstract textures donʼt really have well-defined features, so distorting them just makes them look… more abstract.
You can use the Bend Editor to create the illusion that a Texture is wrapping around the shadowy areas. The Bend Editor controls the amount of distortion provided by the Shadow, or bump map.
The Shadow has been scaled down 300%. Now the Backdrop looks more like crushed plastic or silk.
The Shadow has been scaled up about 300% and rotated clockwise about 20 degrees. Now the Backdrop is vertical, soft and calm.
Backdrop Designer : Quickstart Guide
7 © 2007, digital anarchy : f/x tools for revolutionaries | create your own backgrounds
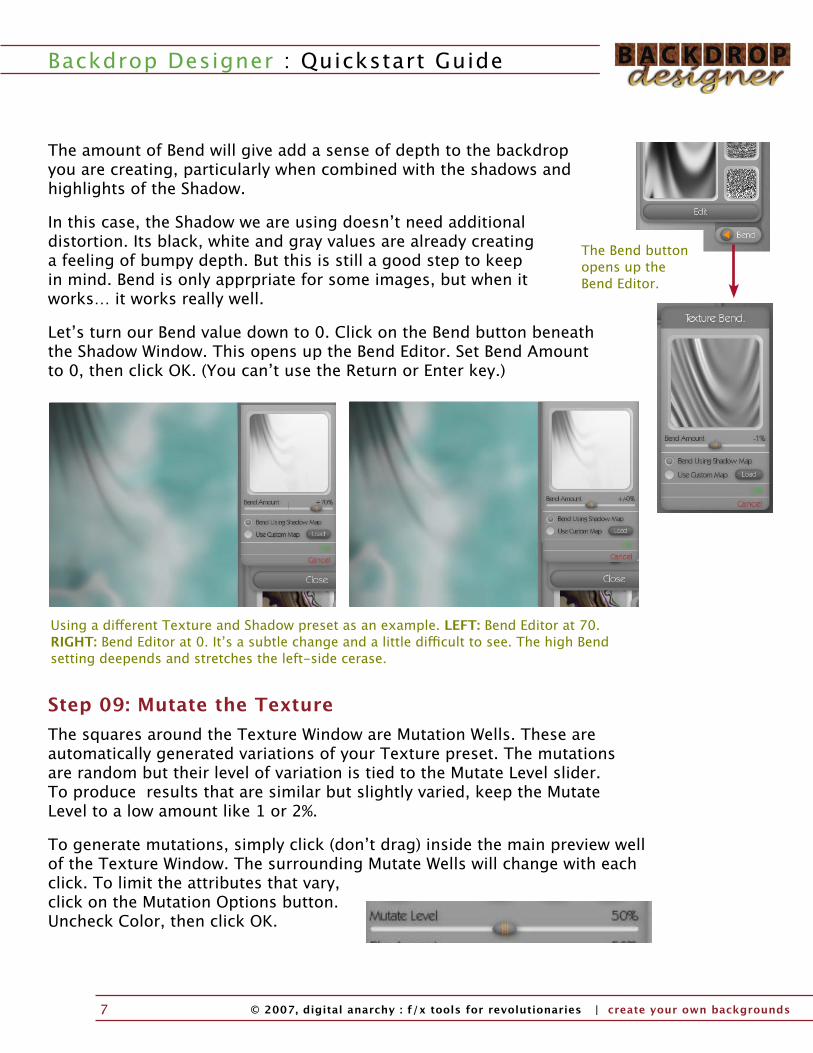
The Bend button opens up the Bend Editor.
The amount of Bend will give add a sense of depth to the backdrop you are creating, particularly when combined with the shadows and highlights of the Shadow.
In this case, the Shadow we are using doesnʼt need additional distortion. Its black, white and gray values are already creating a feeling of bumpy depth. But this is still a good step to keep in mind. Bend is only apprpriate for some images, but when it works… it works really well.
Letʼs turn our Bend value down to 0. Click on the Bend button beneath the Shadow Window. This opens up the Bend Editor. Set Bend Amount to 0, then click OK. (You canʼt use the Return or Enter key.)
Step 09: Mutate the TextureThe squares around the Texture Window are Mutation Wells. These are automatically generated variations of your Texture preset. The mutations are random but their level of variation is tied to the Mutate Level slider. To produce results that are similar but slightly varied, keep the Mutate Level to a low amount like 1 or 2%.
To generate mutations, simply click (donʼt drag) inside the main preview well of the Texture Window. The surrounding Mutate Wells will change with each click. To limit the attributes that vary, click on the Mutation Options button. Uncheck Color, then click OK.
Using a different Texture and Shadow preset as an example. LEFT: Bend Editor at 70. RIGHT: Bend Editor at 0. Itʼs a subtle change and a little difficult to see. The high Bend setting deepends and stretches the left-side cerase.

8
Backdrop Designer : Quickstart Guide
© 2007, digital anarchy : f/x tools for revolutionaries | create your own backgrounds
Now that you have turned off color changes, Mutate will produce results that are very similar to the original texture. These variations are quite often usable and may give you the tweak you were looking for. To select a Mutate texture, just click inside that Well. The Mutate texture will load in the Texture Window.
NOTE: The Shadow Window and the Preview Window also have mutation controls. Their functions work the same as the Texture Mutation Wells.
TIP: The Undo functionDonʼt like what you just did? Backdrop Designer supports one level of Undo. If you have made a choice you donʼt like, that function can often be undone with Control-Z/Win [Apple-Z/Mac].
Some functions are undoable; others are not. You can undo/redo your last preset load. You can undo/redo a mutation that has been selected.
Unfortunately, you canʼt undo changes in the Texture/Shadow attributes. If you change the level of Texture Blur, for instance, you will need to adjust by hand to get back the previous setting. You cannot undo/redo saving or deleting a preset.
LEFT: Mutate Level is set to 1% and all Mutation attributes are active.
RIGHT: Mutate Level is still at 1% but Mutate Color was turned off. The variations are very close to the original Texture and can provide an interesting ʻhappy accidentʼ change.
Backdrop Designer : Quickstart Guide
9 © 2007, digital anarchy : f/x tools for revolutionaries | create your own backgrounds
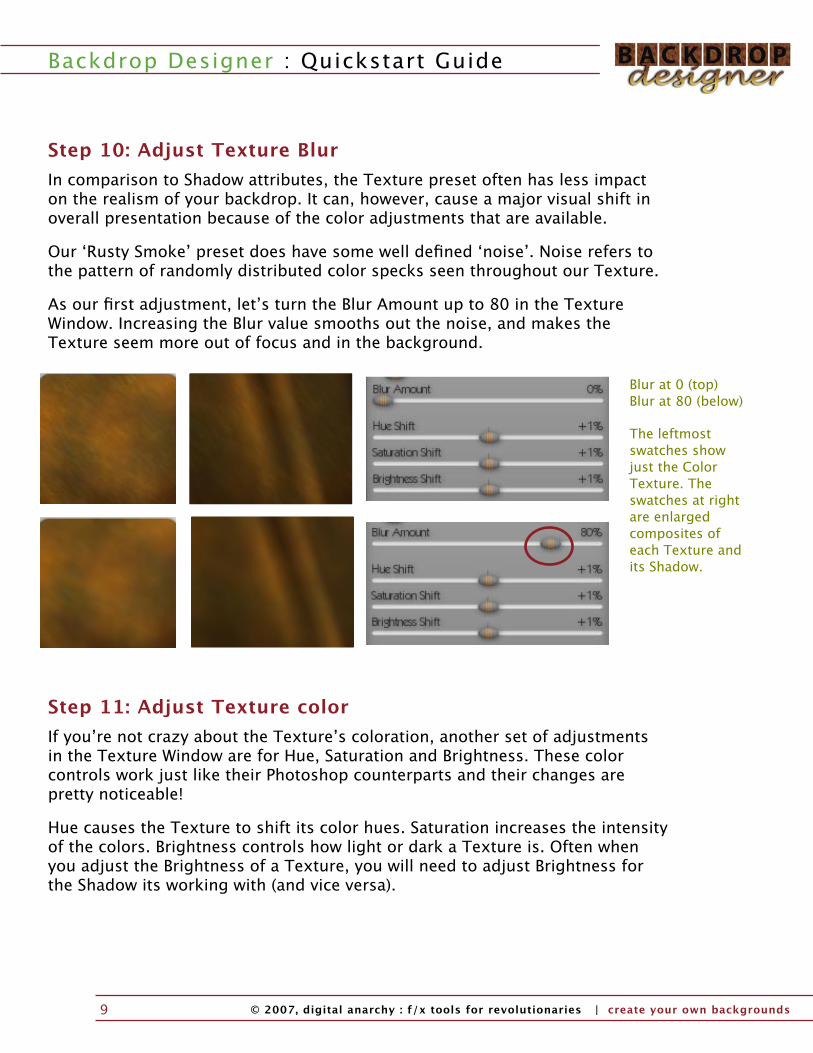
Step 10: Adjust Texture BlurIn comparison to Shadow attributes, the Texture preset often has less impact on the realism of your backdrop. It can, however, cause a major visual shift in overall presentation because of the color adjustments that are available.
Our ʻRusty Smokeʼ preset does have some well defined ʻnoiseʼ. Noise refers to the pattern of randomly distributed color specks seen throughout our Texture.
As our first adjustment, letʼs turn the Blur Amount up to 80 in the Texture Window. Increasing the Blur value smooths out the noise, and makes the Texture seem more out of focus and in the background.
Step 11: Adjust Texture colorIf youʼre not crazy about the Textureʼs coloration, another set of adjustments in the Texture Window are for Hue, Saturation and Brightness. These color controls work just like their Photoshop counterparts and their changes are pretty noticeable!
Hue causes the Texture to shift its color hues. Saturation increases the intensity of the colors. Brightness controls how light or dark a Texture is. Often when you adjust the Brightness of a Texture, you will need to adjust Brightness for the Shadow its working with (and vice versa).
Blur at 0 (top) Blur at 80 (below)
The leftmost swatches show just the Color Texture. The swatches at right are enlarged composites of each Texture and its Shadow.
10
Backdrop Designer : Quickstart Guide
© 2007, digital anarchy : f/x tools for revolutionaries | create your own backgrounds
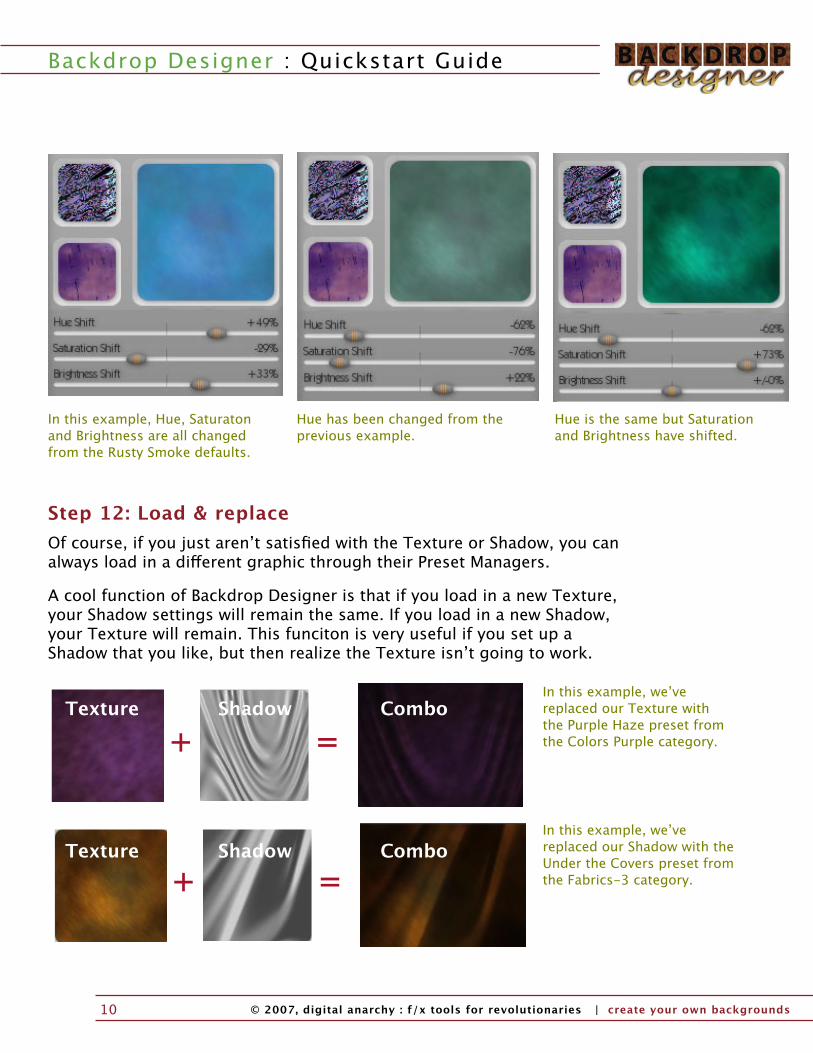
Step 12: Load & replaceOf course, if you just arenʼt satisfied with the Texture or Shadow, you can always load in a different graphic through their Preset Managers.
A cool function of Backdrop Designer is that if you load in a new Texture, your Shadow settings will remain the same. If you load in a new Shadow, your Texture will remain. This funciton is very useful if you set up a Shadow that you like, but then realize the Texture isnʼt going to work.
In this example, Hue, Saturaton and Brightness are all changed from the Rusty Smoke defaults.
+ =
+ =
In this example, weʼve replaced our Texture with the Purple Haze preset from the Colors Purple category.
In this example, weʼve replaced our Shadow with the Under the Covers preset from the Fabrics-3 category.
Hue has been changed from the previous example.
Hue is the same but Saturation and Brightness have shifted.
ShadowTexture Combo
ShadowTexture Combo

Backdrop Designer : Quickstart Guide
11 © 2007, digital anarchy : f/x tools for revolutionaries | create your own backgrounds
TIP: Set sliders to defaultSometimes when you load in a Texture preset, the texture doesnʼt look like its thumbnail preview in the Preset Manager. For instance, the colors may look completely different. This is because the Texture sliders arenʼt at their defaults.
Changing the Texture sliders to customize your last preset is a pretty common. For the next preset to look correct, you need to set these sliders back to their defaults. Thatʼs easy to fix!
Set Blur Amount to 50%. Set Hue Shift, Saturation Shift and Brightness Shift to 0%. (The Mutate Level slider is unrelated; see Step 07.) Now your preset looks as it should.
LEFT: Our Old Masters> Rusty Smoke preset loaded in with a pink tone. Yuck! Notice where the Blur, Hue, Saturation and Brightness sliders are.
RIGHT: Weʼve moved the four sliders to their default -or neutral- positions. The Texure preset immediately previews correctly.
12
Backdrop Designer : Quickstart Guide
© 2007, digital anarchy : f/x tools for revolutionaries | create your own backgrounds
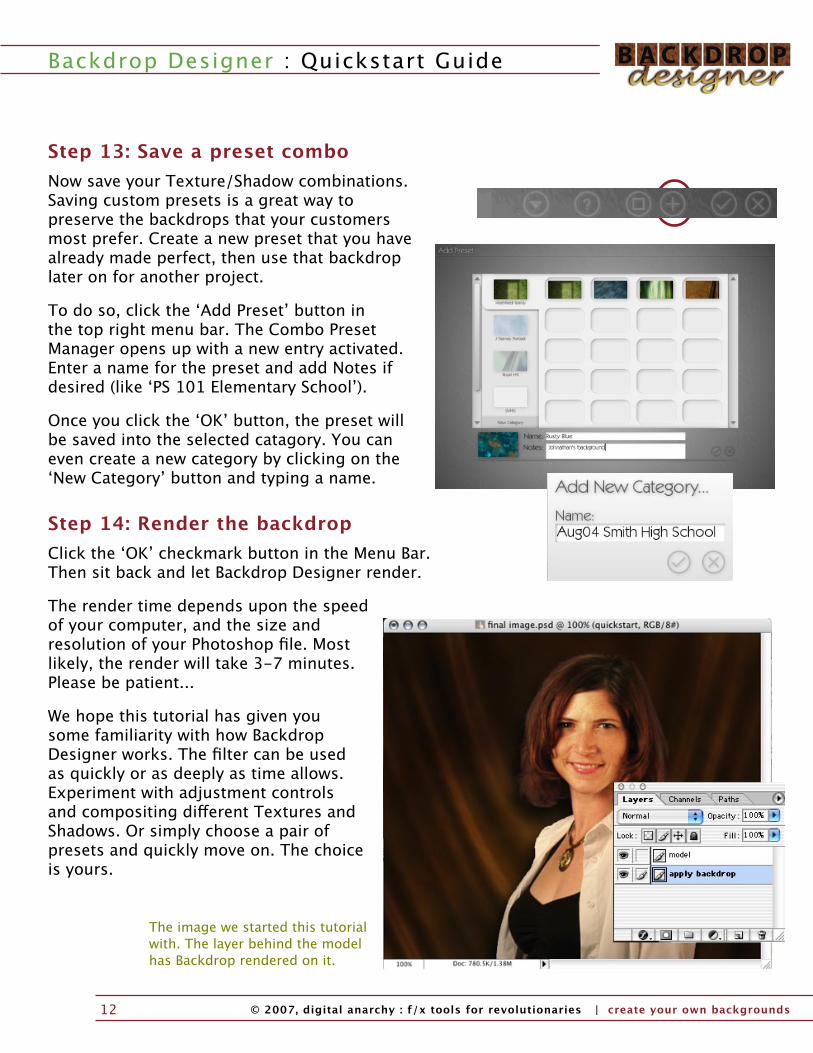
Step 13: Save a preset comboNow save your Texture/Shadow combinations. Saving custom presets is a great way to preserve the backdrops that your customers most prefer. Create a new preset that you have already made perfect, then use that backdrop later on for another project.
To do so, click the ʻAdd Presetʼ button in the top right menu bar. The Combo Preset Manager opens up with a new entry activated. Enter a name for the preset and add Notes if desired (like ʻPS 101 Elementary Schoolʼ).
Once you click the ʻOKʼ button, the preset will be saved into the selected catagory. You can even create a new category by clicking on the ʻNew Categoryʼ button and typing a name.
Step 14: Render the backdropClick the ʻOKʼ checkmark button in the Menu Bar. Then sit back and let Backdrop Designer render.
The render time depends upon the speed of your computer, and the size and resolution of your Photoshop file. Most likely, the render will take 3-7 minutes. Please be patient...
We hope this tutorial has given you some familiarity with how Backdrop Designer works. The filter can be used as quickly or as deeply as time allows. Experiment with adjustment controls and compositing different Textures and Shadows. Or simply choose a pair of presets and quickly move on. The choice is yours.
The image we started this tutorial with. The layer behind the model has Backdrop rendered on it.