quicr stroke registry standard operating procedures · 2 2 table of contents 1 standard operating...
TRANSCRIPT

QuICR Stroke Registry Standard Operating Procedures
April 2016

2 2
Table of Contents
1 STANDARD OPERATING PROCEDURES SUMMARY 1
1.1 ENSURING ACCESS TO THE QUICR REGISTRY AND TWO-FACTOR AUTHENTICATION 1 1.2 ENTER PATIENT, STROKE, AND TREATMENT DATA 1 1.3 INPATIENT DATA 1 1.4 ACUTE STROKE 72- HOUR REPORT 1 1.5 90-DAY STROKE OUTCOME DATA 1
2 ACCESSING THE QUICR REGISTRY 3
3 LOGGING INTO THE QUICR REGISTRY & ENABLING TWO-FACTOR AUTHENTICATION 3
4 TWO-FACTOR AUTHENTICATION 5
4.1 ENABLING TWO-FACTOR AUTHENTICATION (TEXT MESSAGE) 5 4.1.1 LOGGING INTO THE REGISTRY AFTER ENABLING TWO-FACTOR AUTHENTICATION (TEXT MESSAGE) 6 4.2 ENABLING TWO-FACTOR AUTHENTICATION (TOKEN GENERATOR) 7 4.2.1 LOGGING INTO THE REGISTRY AFTER ENABLING TWO-FACTOR AUTHENTICATION (TOKEN GENERATOR) 8
5 STEP 1 – SEARCHING FOR AND ADDING PATIENT DATA 9
5.1 ADDING A NEW PATIENT 9 5.2 EDITING EXISTING PATIENT DATA 14
6 STEP 2 - ADDING A STROKE EVENT 19
6.1 ADDING A NEW STROKE 19 6.2 EDITING EXISTING STROKE DATA 25
7 STEP 3 - ADDING TREATMENTS 32
7.1 ADDING A NEW TREATMENT 32 7.2 EDITING EXISTING TREATMENT DATA 45 7.3 ADDING A NEW TREATMENT (FOR EXISTING PATIENTS NOT LISTED ON THE HOMEPAGE) 58
8 STEP 4 – EDIT INPATIENT DATA 61
9 STEP 5 - PRINTING THE ACUTE STROKE 72-HOUR REPORT 67
10 STEP 6 - EDIT 90-DAY STROKE OUTCOME AND QUALITY METRICS DATA 70
APPENDIX A QUICR REGISTRY DEFINITIONS 75
APPENDIX B NAVIGATING THE QUICR REGISTRY 80
APPENDIX B.1 NAVIGATING THE HOMEPAGE 81 APPENDIX B.2 NAVIGATING THE PATIENT SUMMARY PAGE 83 APPENDIX B.3 NAVIGATING THE STROKE SUMMARY PAGE 84 APPENDIX B.4 NAVIGATING THE TREATMENT SUMMARY PAGE 86 APPENDIX B.5 NAVIGATING USING THE BREADCRUMB 87 APPENDIX B.6 NAVIGATING USING THE PROGRESS BAR 88
APPENDIX C SECURITY 89

3 3
APPENDIX C.1 SECURITY – ADDING BACKUP PHONE NUMBERS 90 APPENDIX C.2 GENERATING AND USING BACKUP TOKENS 92 APPENDIX C.3 DISABLING TWO-FACTOR AUTHENTICATION 93
APPENDIX D CHANGING YOUR PASSWORD 95

1 1
1 Standard Operating Procedures Summary
1.1 Ensuring Access to the QuICR Registry and Two-Factor Authentication As a first step, you need to ensure that you have access to the registry and set-up your Two-Factor
Authentication. Please refer to Section 2, 3 and 4 (pg. 3 to 8).
1.2 Enter Patient, Stroke, and Treatment Data For all patients that are treated with acute reperfusion therapy (intravenous alteplase (tPA) and/or
endovascular therapy), enter data about the patient, the stroke, and the treatment. This data should be
entered within 3 days of admission. Instructions about how to enter patient, stroke, and treatment data can
found in Sections 5, 6, and 7 (pg. 8-61).
Here are standard operation procedures for entering this data:
1. Please ensure that you do not add a patient that is already registered in the QuICR. Registry. A
person is only entered once. Each person can have multiple stroke events. Please first search for
the patient before adding a new patient (pg. 8)
a. If the patient exists in the registry, add a new stroke event for this patient (pg. 19)
b. If the patient does not exist in the registry, please create a new patient (pg. 8)
c. Once the patient has been selected or created, please add the new stroke details for patient
if they were treated with alteplase (tPA) or endovascular therapy (EVT) (pg. 19)
2. Enter data about the treatment with alteplase (tPA) and/or EVT for the stroke (pg. 32)
1.3 Inpatient Data For all patients that were treated with alteplase (tPA)/endovascular treatment, collect the Inpatient data
about the stroke event. This page is to be filled out within 24 hours of treatment. Instructions about how
you enter Inpatient data can be found in Section 8 (pg. 61-67).
1.4 Acute Stroke 72- Hour Report After completing the steps outlined in Sections 1.2 and 1.3 above, print off the Acute Stroke 72-Hour
Report and place this report into the patient’s chart. Instructions about how to generate the report can
be found in Section 9 (pg. 67). The data that you have entered will now be the central data about the
treatment that this stroke patient received and will become part of the medical record.
1.5 90-Day Stroke Outcome Data For all patients that were treated with alteplase (tPA)/endovascular treatment, please collect data about
outcomes after 90-days of the stroke. This can be done via a telephone follow-up or from the clinic
follow-up for the patient. Instructions about how you enter 90-Day Stroke Outcome data can be found in
Section 10 (pg. 70-75).
If at any point you require additional clarification on a specific term, please hover over the term
and a definition will appear (only in edit mode pages).
2 2
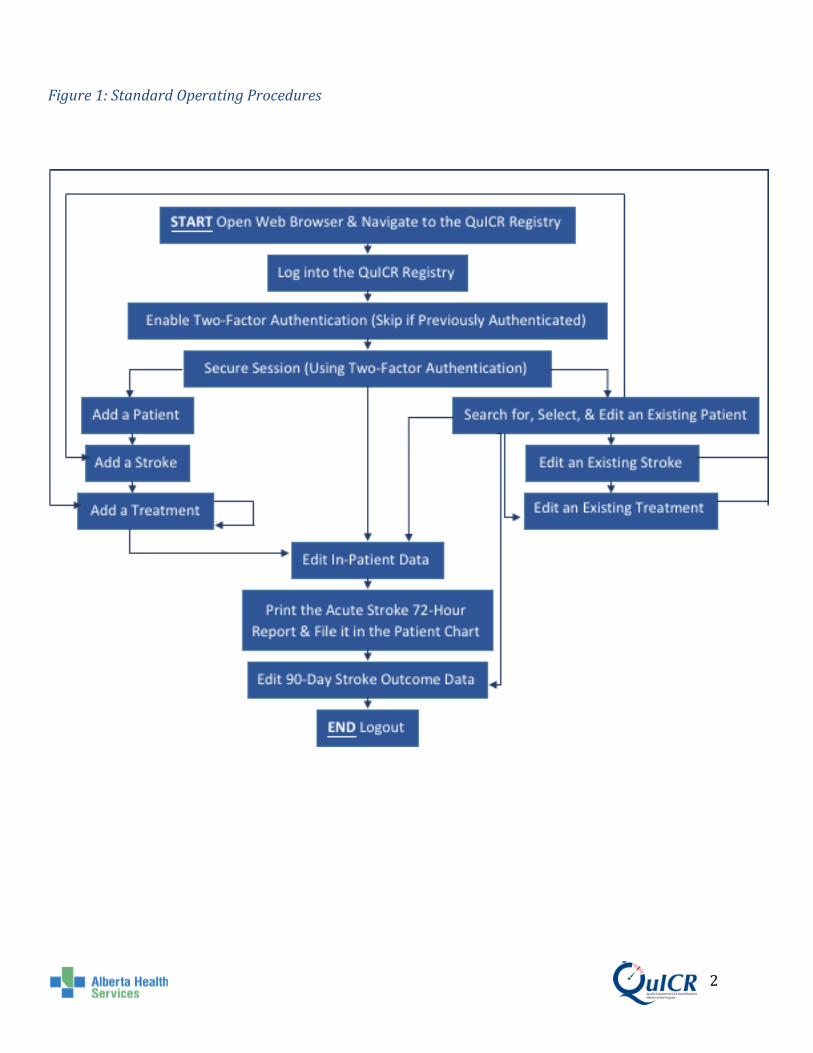
Figure 1: Standard Operating Procedures

3 3
2 Accessing the QuICR Registry
The registry can be accessed by navigating to https://quicr.cru.ucalgary.ca/ on your web browser
(Chrome, Safari, Firefox, Internet Explorer, etc.).
3 Logging into the QuICR Registry & Enabling Two-Factor Authentication
You will be assigned a user name and password by QuICR Support. If you do not have a
password, please contact [email protected].
From the Homepage of the QuICR Registry enter your email address and password then select
“Next” (boxed in red) as shown in Figure 2. You will be provided login credentials by contacting
your Site Administrator. If the Site Administrator is unable to create an account, please email
QuICR Support at [email protected] or by calling (403) 220-8256.
Figure 2: Login Page
If you are logging into the QuICR Registry for the first time, you will have to enable Two-
Factor Authentication. Click on the “Enable Two-Factor Authentication” button, as shown in
Figure 3 (boxed in red). If you have already enabled Two-Factor Authentication, please skip
Section 4.
Figure 3: Enabling Two-Factor Authentication (1)

4 4
After clicking “Enable Two-Factor Authentication” you will then see the screen below. Click on
the “Next” (boxed in red) button as shown in Figure 4.
Figure 4: Enabling Two-Factor Authentication (2)
Please follow the instructions found in Section 4 to complete the enable Two-Factor
Authentication process.
Rationale for Two-Factor Authentication
Not all hospitals in Alberta are within the AHS network. Because we are dealing with patient
information, privacy considerations demand that we have adequate e-security for accessing the
database.

5 5
4 Two-Factor Authentication There are two choices for Two-Factor Authentication. To authenticate via Text Message please
refer to Section 4.1. To authenticate via Token Generator please refer to Section 4.2. We
recommend that you use Text Message as your authentication method if you have reliable
cellular reception at your site.
4.1 Enabling Two-Factor Authentication (Text Message)
To enable Two-Factor Authentication via Text Message, first ensure that “Text Message” is
selected and click “Next” (boxed in red) as shown in Figure 5. If you would like to enable Two-
Factor Authentication by Token Generator (this is done through Google authentication app for
smart phones), please see Section 4.2.
Figure 5: Enabling Two-Factor Authentication via Text Message (1)
Enter the phone number you wish to receive the Text Messages on. Preface the phone number
by “+” and the country code (e.g. +1 for Canada so an example phone number would be
+1403555555). Once your phone number has been entered, select “Next” (boxed in red) as
shown in Figure 6.
Figure 6: Enabling Two-Factor Authentication via Text Message (2)

6 6
On your mobile device, you will receive a 6-digit number through Text Message. Enter the 6-
digit number into the Token box on the QuICR Registry and click “Next” (boxed in red) as
shown in Figure 7.
Figure 7: Enabling Two-Factor Authentication via Text Message (3)
You should now be able to enter the QuICR Registry.
4.1.1 Logging into The Registry After Enabling Two-Factor Authentication (Text Message)
If Two-Factor Authentication is enabled via Text Message, you will no longer need to enable
Two-Factor Authentication. Instead, subsequent logins to the QuICR Registry will require you to
enter a 6-digit number sent to your phone as a Text Message.

7 7
4.2 Enabling Two-Factor Authentication (Token Generator)
STOP! On your mobile device, download and install Google Authenticator. This is an app
that can be found through the Apple app store or Google Play.
To enable Two-Factor Authentication by a Token Generator, first ensure that “Token Generator”
is selected and click “Next” (boxed in red) as shown in Figure 8. If you would like to enable
Two-Factor Authentication by Text Message, please go to Section 4.1 instead.
Figure 8: Enabling Two-Factor Authentication via Token Generator (1)
1) On your mobile device, open Google Authenticator 2) Select “Begin Setup” 3) Under “Manually add an account”, select “Scan a barcode”. 4) Using your mobile device, scan the barcode shown on the QuICR Registry 5) Enter the 6-digit token displayed on your mobile device in the QuICR Registry and
click “Next” (boxed in red) as shown in Figure 9.
Figure 9: Enabling Two-Factor Authentication via Token Generator (2)
You will now be able to enter the QuICR Registry.

8 8
4.2.1 Logging into The Registry After Enabling Two-Factor Authentication (Token Generator)
If Two-Factor Authentication is enabled via Token Generator, you will no longer need to enable
Two-Factor Authentication. Instead, subsequent logins to the QuICR Registry will require you to
enter a 6-digit number sent to periodically to the Google Authenticator app (or your preferred
authenticator) on the mobile device used to enable Two-Factor Authentication.

9 9
5 Step 1 – Searching for and Adding Patient Data
Searching for and/or adding a patient is the first step when entering data about a stroke event. To
add a new patient to the QuICR Registry, please refer to Section 5.1. If the patient exists in the
QuICR Registry, go to Section 5.2 and follow the instructions to navigate to and edit the patient
data.
5.1 Adding a New Patient
To add a new patient, select “New” (boxed in red) on the Homepage as shown below in Figure
10.
Figure 10: Navigating to the Add New Patient Page
10 10
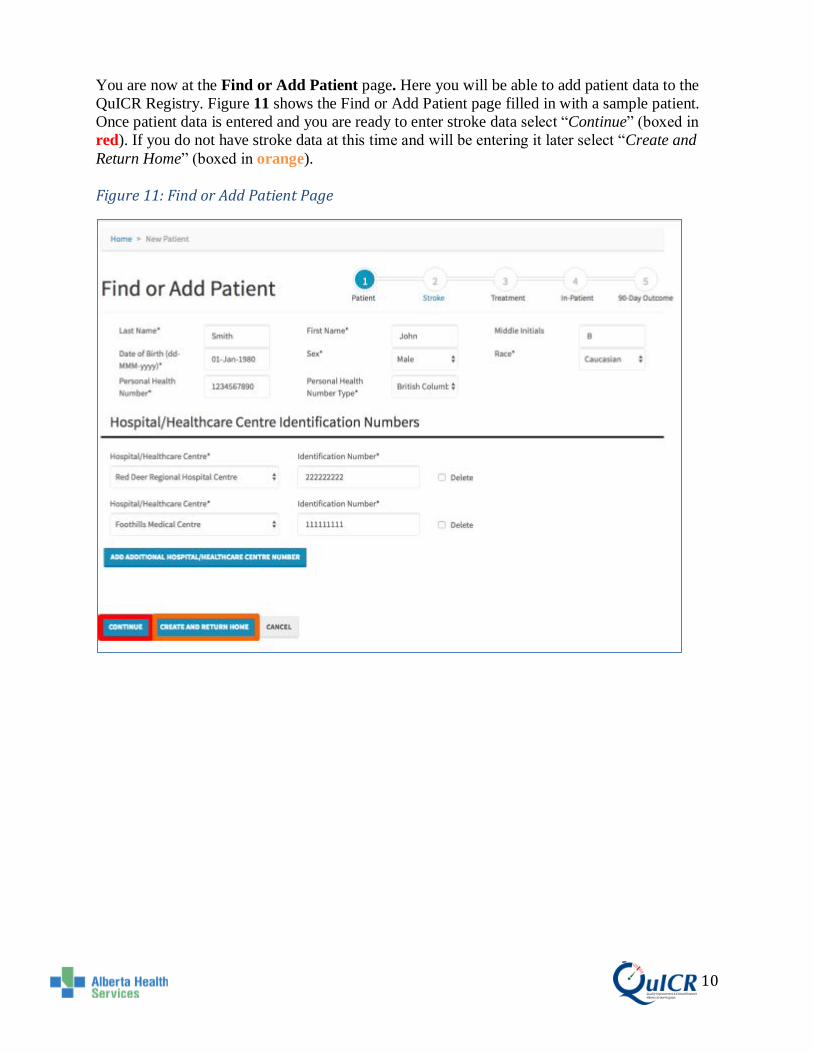
You are now at the Find or Add Patient page. Here you will be able to add patient data to the
QuICR Registry. Figure 11 shows the Find or Add Patient page filled in with a sample patient.
Once patient data is entered and you are ready to enter stroke data select “Continue” (boxed in
red). If you do not have stroke data at this time and will be entering it later select “Create and
Return Home” (boxed in orange).
Figure 11: Find or Add Patient Page

11 11
On this page you will enter the patient’s demographic data and medical record numbers.
• Type the patient’s Last Name, First Name, and Middle Initial(s) in the boxes. • The patient’s Date of Birth can be typed into the box (dd-MMM-yyyy or an example
would be 01-Jan-1955) or by clicking in the box a drop down menu will appear and the date of birth can be selected.
• The patient’s Sex is selected from the dropdown menu. Select "undetermined" if the patient’s sex cannot be determined.
• The patient’s Race is selected from the dropdown menu. For general guidance on Race, please refer to Table 1 below. Select “utd” if the patient’s race cannot be determined.
• Enter the patient’s Personal Health Number (or ULI) in the box and then select the Personal Health Number Type from the dropdown menu (province, military, treaty, etc.). Entering the PHN is not necessary when the patient is from out of the country.
• Add the patient’s Medical Record Number (MRN) by selecting the appropriate institution from the Hospital or Healthcare Centre drop down menu and typing the ID number in the box. To add a secondary MRN, select the “Add Additional Hospital Number” button.

12 12
It is important that you enter the correct data into the QuICR Registry. For a list of
definitions on the Find or Add Patient page, please refer to Table 1.
Table 1: Find or Add Patient Definitions
Term Definition
Last Name Patient's last name as shown on their Alberta Personal Health Card. If
Alberta Health Card is not available, this should be a family name
provided on a government issued identification card.
First Name Patient's first name as shown on their Alberta Personal Health Card. If
Alberta Health Card is not available, this should be a family name
provided on a government issued identification card.
Middle Initials Initial of the patient's middle name (if applicable).
Date of Birth (DOB) Day on which the patient is born as shown on their Alberta Personal
Health Card or a government issued identification card. If not known,
then a close approximation where first day if day is not known and
January if month is not known. Format: dd-MMM-yyyy (e.g. 01-Jan-
1950).
Sex Either of two main categories (male and female) on the basis of genetics.
Select "undetermined" if unknown.
Race Group the patient is related by common descent or heredity as self-
described.
First Nations: Indigenous peoples within the boundaries of present-day
Canada.
Asian: A person having origins in any of the original peoples of the Far
East and Southeast Asia.
South Asian: A person having origins from India, Pakistan, Bangladesh,
Sri Lanka, Nepal, Bhutan, and the Maldives.
Black: A person having origins in any of the black racial groups of
Africa.
Caucasian: A person having origins in any of the original peoples of
Europe, the Middle East, or North Africa.
Hispanic: A person of Cuban, Puerto Rican, South or Central American,
Mexican, or other Spanish culture or origin.
Pacific Islander: A person having origins in any of the original peoples
of Guam, Samoa, Hawaii, or other Pacific Islands.
Personal Health
Number (PHN)
Identifier issued to Albertans who are eligible for basic coverage with
Alberta Health Care Insurance Plan. This number is the same as the ULI
(if applicable). PHN may apply to other provinces in Canada for visitors
to Alberta.
Personal Health
Number Type
Select the province or national organization that is associated with the
PHN. If the patient is not from Canada, select "out of country".
Hospital/Healthcare
Centre
Institution where the patients has received care including the emergency
department.
Medical Record
Number (MRN)
Medical record number is health-facility specific. The number is used by
the hospital as a systematic documentation of a patient's medical history
and care during each hospital stay.

13 13
You will then be asked to confirm if the data entered are correct as shown in Figure 12. If the
data is correct, select “Save” (boxed in red). If modifications are needed, select “Cancel”.
Figure 12: Find or Add Patient - Confirmation
If the patient already exists in the database (meaning they have had a prior stroke) you will
see a screen similar to Figure 13. If this is the same patient select “Use This Patient” (boxed in
red) and you will be able to update data for their current stroke. If this is not the correct patient
(just one with a similar name or PHN) select “Create New” (boxed in orange). If you would like
to make any additional changes, click “Cancel”.
Figure 13: Matching Patient
If you click either “Use This Patient” or “Create New”, you will be directed to the Add Stroke
page.

14 14
5.2 Editing Existing Patient Data
To navigate to the Edit Patient page for the patient that you wish to edit, go to the Homepage and
click on the patient’s full name (boxed in red) as shown in Figure 14.
Figure 14: Navigating to the Edit Patient Page (1)
Next, click on the “Edit Patient” button (boxed in red) as shown in Figure 15.
Figure 15: Navigating to the Edit Patient Page (2)

15 15
You are now at the Edit Patient page. Figure 16 shows the Edit Patient page filled in with a
sample patient. Once the patient data is entered and you are ready to enter stroke data select
“Continue” (boxed in red). If you do not have stroke data at this time and will be entering it later
select “Create and Return Home” (boxed in orange).
Figure 16: Edit Patient Page
16 16
On this page you will edit the patient’s demographic data and medical record numbers.
• Type the patient’s Last Name, First Name, and Middle Initials in the boxes. • The patient’s Date of Birth can be typed into the box (dd-MMM-yyyy or an example
would be 01-Jan-1955) or by clicking in the box a drop down menu will appear and the date of birth can be selected.
• The patient’s Sex is selected from the dropdown menu. Select "undetermined" if unknown.
• The patient’s Race is selected from the dropdown menu. For general guidance on Race, please refer to Table 2 below. Select “utd” if unknown.
• Enter the patient’s Personal Health Number (or ULI) in the box and then select the Personal Health Number Type from the dropdown menu (province, military, treaty, etc.). Entering the PHN is not necessary when the patient is from out of the country.
• Add the patient’s Medical Record Number (MRN) by selecting the appropriate institution from the Hospital or Healthcare Centre drop down menu and typing the ID number in the box. To add a secondary MRN, select the “Add Additional Hospital Number” button.

17 17
It is important that you enter the correct data into the QuICR Registry. For a list of definitions on the Find or Add Patient page, please refer to Table 2.
Table 2: Edit Patient Definitions
Term Definition
Last Name Patient's last name as shown on their Alberta Personal Health Card. If
Alberta Health Card is not available, this should be a family name
provided on a government issued identification card.
First Name Patient's first name as shown on their Alberta Personal Health Card. If
Alberta Health Card is not available, this should be a family name
provided on a government issued identification card.
Middle Initials Initial of the patient's middle name (if applicable).
Date of Birth (DOB) Day on which the patient is born as shown on their Alberta Personal
Health Card or a government issued identification card. If not known,
then a close approximation where first day if day is not known and
January if month is not known. Format: dd-MMM-yyyy (e.g. 01-Jan-
1950).
Sex Either of two main categories (male and female) on the basis of genetics.
Select "undetermined" if unknown.
Race Group the patient is related by common descent or heredity as self-
described.
First Nations: Indigenous peoples within the boundaries of present-day
Canada.
Asian: A person having origins in any of the original peoples of the Far
East and Southeast Asia.
South Asian: A person having origins from India, Pakistan, Bangladesh,
Sri Lanka, Nepal, Bhutan, and the Maldives.
Black: A person having origins in any of the black racial groups of
Africa.
Caucasian: A person having origins in any of the original peoples of
Europe, the Middle East, or North Africa.
Hispanic: A person of Cuban, Puerto Rican, South or Central American,
Mexican, or other Spanish culture or origin.
Pacific Islander: A person having origins in any of the original peoples
of Guam, Samoa, Hawaii, or other Pacific Islands.
Personal Health
Number (PHN)
Identifier issued to Albertans who are eligible for basic coverage with
Alberta Health Care Insurance Plan. This number is the same as the ULI
(if applicable). PHN may apply to other provinces in Canada for visitors
to Alberta.
Personal Health
Number Type
Select the province or national organization that is associated with the
PHN. If the patient is not from Canada, select "out of country".
Hospital/Healthcare
Centre
Institution where the patients has received care including the emergency
department.
Medical Record
Number (MRN)
Medical record number is health-facility specific. The number is used by
the hospital as a systematic documentation of a patient's medical history
and care during each hospital stay.

18 18
You will then be asked to confirm if the data entered is correct as shown in Figure 17. If the data
is correct, select “Save” (boxed in red). If modifications are needed, select “Cancel”. If “Save”
is selected, you will be redirected to the most recent strokes Edit Stroke page. If the patient does
not have a stroke added to the QuICR Registry, selecting “Save” will redirect you to the Add
Stroke page.
Figure 17: Edit Patient - Confirmation
19 19
6 Step 2 - Adding a Stroke Event
Adding a stroke event is typically the second step when entering data about a stroke patient. To
add a new stroke to the QuICR Registry, please refer to Section 6.1. If the stroke exists in the
QuICR Registry, go to Section 6.2 and follow the instructions to navigate to and edit the stroke
data.
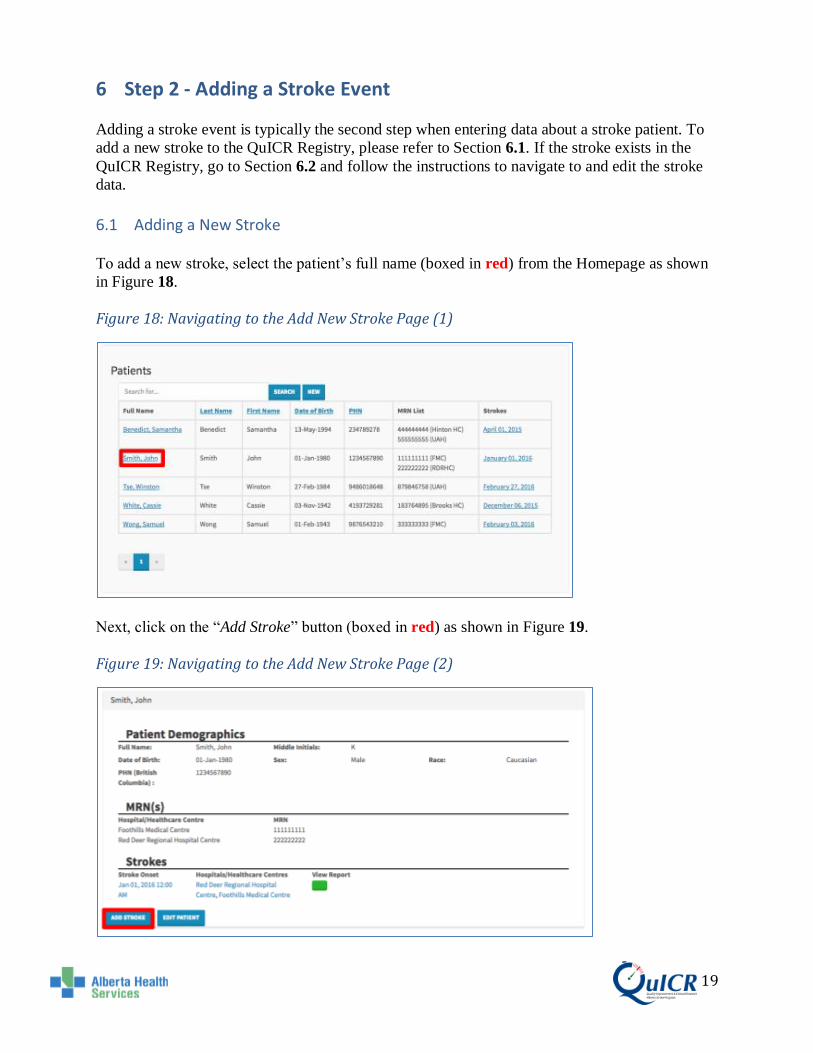
6.1 Adding a New Stroke
To add a new stroke, select the patient’s full name (boxed in red) from the Homepage as shown
in Figure 18.
Figure 18: Navigating to the Add New Stroke Page (1)
Next, click on the “Add Stroke” button (boxed in red) as shown in Figure 19.
Figure 19: Navigating to the Add New Stroke Page (2)

20 20
You are now at the Add Stroke page. Here you will be able to add the patient’s stroke to the
registry. Figure 20 shows the Add Stroke page filled in for a sample patient. Once the required
stroke data are entered and you are ready to enter treatment data select “Continue” (boxed in
red). If you do not have treatment data at this time and will be entering it later select “Save And
Return Home” (boxed in orange). If you would like to cancel, select “Cancel”.
Figure 20: Add Stroke Event Page

21 21
On this page enter Intake and EMS time data (if applicable).
Intake:
• The Date of Onset can be typed in the box (dd-MMM-yyyy) or by clicking in the box a drop down menu will appear and the Date of Onset can be selected. For additional information on Date of Onset, please refer to Table 3 below.
• The Time of Onset can be typed in the box (hh:mm using 24-hour clock) or by clicking in the box a drop down menu will appear and the Time of Onset can be selected. For additional information on Time of Onset, please refer to Table 3 below.
• Using the drop down menu next to Stroke Occurred in select if the stroke occurred in the community or in hospital. Select "Hospital" if stroke (re)occurs while the patient is in a hospital with Inpatient beds (including in the Emergency Department). If the stroke occurred in Hospital, Recognition Date and Recognition Time fields need to be completed.
• Enter the Patient’s Postal Code in the box. This is the patient's home postal code at the time of stroke onset. (e.g. If a patient's primary residence is British Columbia and displays stroke symptoms while at their residence in Alberta; the postal code will be that of the primary residence in British Columbia).
Status & EMS Verified (for Site Administrators only):
• You may change the status of the stroke from “Active” to “Closed” after all the data for a stroke has been collected and reviewed.
• Check "EMS Verified" if EMS has uploaded EMS time stamp data for the stroke event. If this is checked, you will not be able to make changes to the EMS time stamp data until the box is unchecked.
EMS Time Stamp:
• If the EMS print out (yellow sheet) is available fill in the appropriate dates and times • All dates can be typed in the box (dd-MMM-yyyy) or by clicking in the box a drop
down menu will appear and the date can be selected. • All times can be typed in the box (hh:mm using 24-hour clock) or by clicking in the
box a drop down menu will appear and the time can be selected. • Please use the EMS dates and times from the Community to the first Site. Do
not fill in the EMS dates and times for inter-hospital transfers.
It is important that you enter the correct data into the QuICR Registry. For a list of
definitions for the Add Stroke page, please refer to Table 3.
22 22
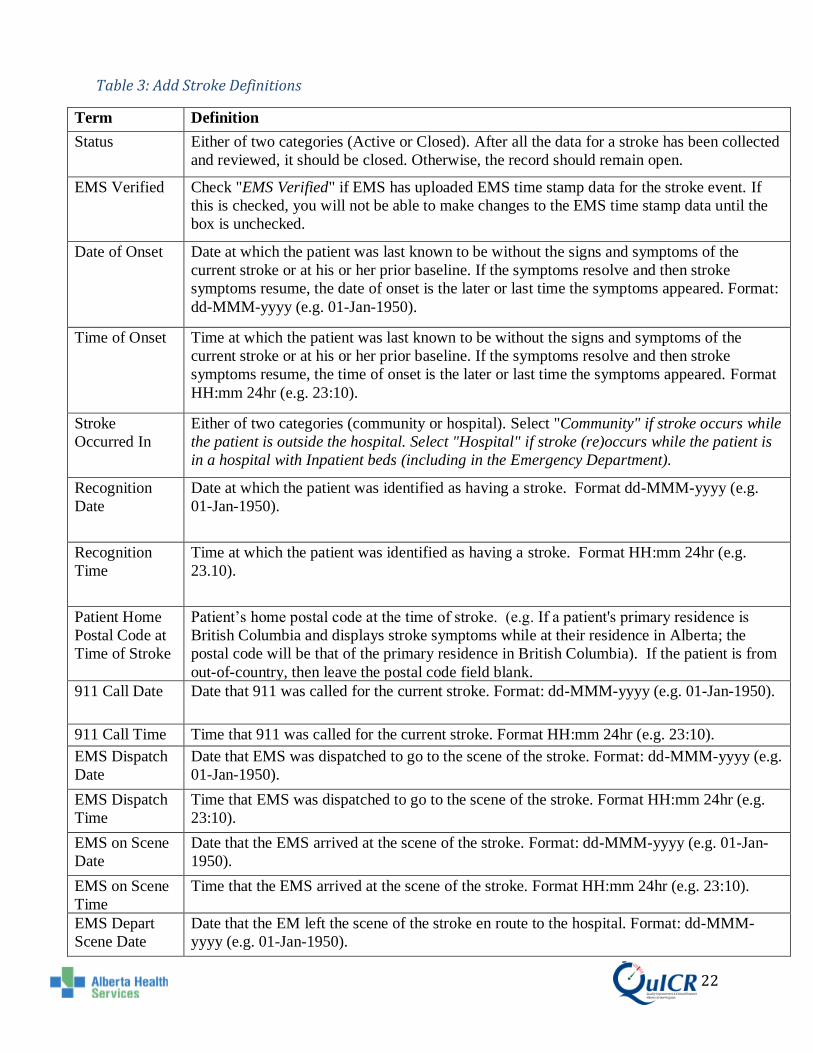
Table 3: Add Stroke Definitions
Term Definition
Status Either of two categories (Active or Closed). After all the data for a stroke has been collected
and reviewed, it should be closed. Otherwise, the record should remain open.
EMS Verified Check "EMS Verified" if EMS has uploaded EMS time stamp data for the stroke event. If
this is checked, you will not be able to make changes to the EMS time stamp data until the
box is unchecked.
Date of Onset Date at which the patient was last known to be without the signs and symptoms of the
current stroke or at his or her prior baseline. If the symptoms resolve and then stroke
symptoms resume, the date of onset is the later or last time the symptoms appeared. Format:
dd-MMM-yyyy (e.g. 01-Jan-1950).
Time of Onset Time at which the patient was last known to be without the signs and symptoms of the
current stroke or at his or her prior baseline. If the symptoms resolve and then stroke
symptoms resume, the time of onset is the later or last time the symptoms appeared. Format
HH:mm 24hr (e.g. 23:10).
Stroke
Occurred In
Either of two categories (community or hospital). Select "Community" if stroke occurs while
the patient is outside the hospital. Select "Hospital" if stroke (re)occurs while the patient is
in a hospital with Inpatient beds (including in the Emergency Department).
Recognition
Date
Date at which the patient was identified as having a stroke. Format dd-MMM-yyyy (e.g.
01-Jan-1950).
Recognition
Time
Time at which the patient was identified as having a stroke. Format HH:mm 24hr (e.g.
23.10).
Patient Home
Postal Code at
Time of Stroke
Patient’s home postal code at the time of stroke. (e.g. If a patient's primary residence is
British Columbia and displays stroke symptoms while at their residence in Alberta; the
postal code will be that of the primary residence in British Columbia). If the patient is from
out-of-country, then leave the postal code field blank.
911 Call Date Date that 911 was called for the current stroke. Format: dd-MMM-yyyy (e.g. 01-Jan-1950).
911 Call Time Time that 911 was called for the current stroke. Format HH:mm 24hr (e.g. 23:10).
EMS Dispatch
Date
Date that EMS was dispatched to go to the scene of the stroke. Format: dd-MMM-yyyy (e.g.
01-Jan-1950).
EMS Dispatch
Time
Time that EMS was dispatched to go to the scene of the stroke. Format HH:mm 24hr (e.g.
23:10).
EMS on Scene
Date
Date that the EMS arrived at the scene of the stroke. Format: dd-MMM-yyyy (e.g. 01-Jan-
1950).
EMS on Scene
Time
Time that the EMS arrived at the scene of the stroke. Format HH:mm 24hr (e.g. 23:10).
EMS Depart
Scene Date
Date that the EM left the scene of the stroke en route to the hospital. Format: dd-MMM-
yyyy (e.g. 01-Jan-1950).

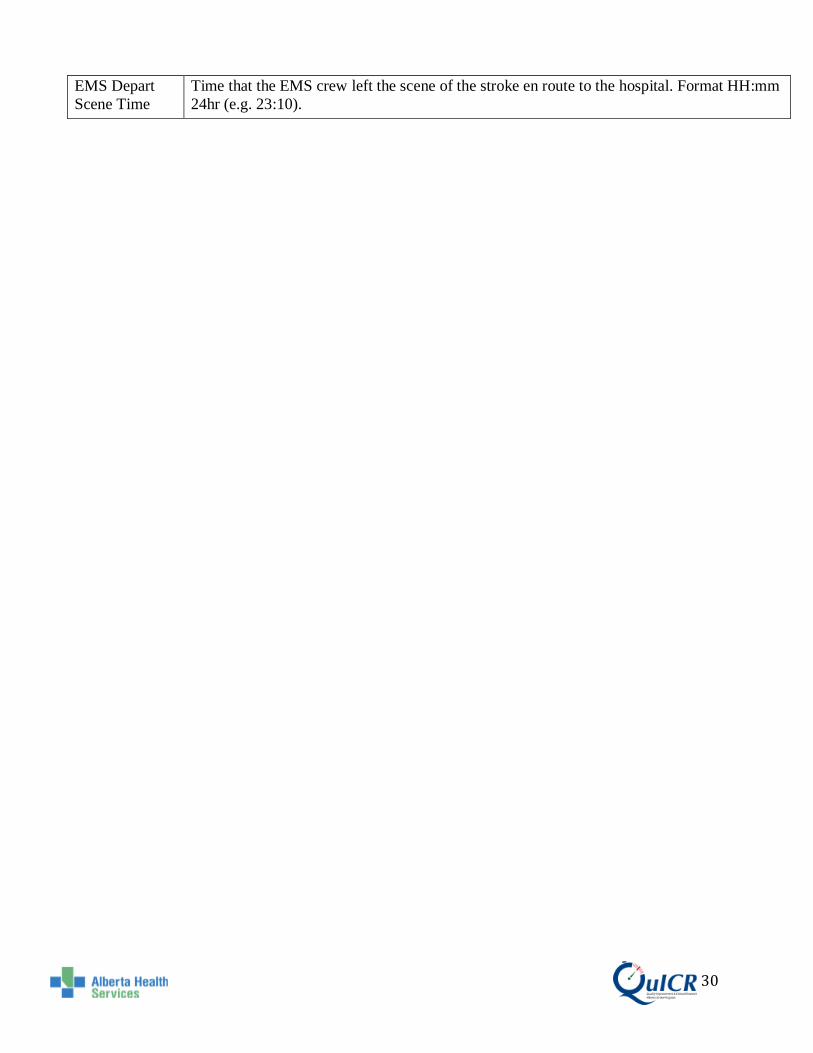
23 23
EMS Depart
Scene Time
Time that the EM left the scene of the stroke en route to the hospital. Format HH:mm 24hr
(e.g. 23:10).

24 24
You will then be asked to confirm if the data entered are correct as shown in Figure 21. If the
data is correct, select “Save” (boxed in red) if modifications are needed select “Cancel”. If you
click “Save”, you will be directed to the Add Treatment page.
Figure 21: Add Stroke – Confirmation

25 25
6.2 Editing Existing Stroke Data
To navigate to the Edit Stroke page for the stroke that you wish to edit, go to the Homepage and click on the patient’s full name (boxed in red) as shown in Figure 22. Figure 22: Navigating to the Edit Stroke Page (1)
Next, click on the existing stroke (boxed in red) you would like to edit as shown in Figure 23.
Figure 23: Navigating to the Edit Stroke Page (2)

26 26
Next, click on the “Edit Stroke” button (boxed in red) as shown in Figure 24.
Figure 24: Navigating to the Edit Stroke Page (3)

27 27
You are now at the Edit Stroke page. Figure 25 shows the Edit Stroke page filled in for a sample
patient. Once the required stroke data are entered and you are ready to enter treatment data select
“Continue” (boxed in red). If you do not have treatment data at this time and will be entering it
later select “Save And Return Home” (boxed in orange). If you would like to cancel, select
“Cancel”.
Figure 25: Edit Stroke Page

28 28
On this page enter Intake and EMS time data (if applicable).
Intake:
• The Date of Onset can be typed in the box (dd-MMM-yyyy) or by clicking in the box a drop down menu will appear and the Date of Onset can be selected. For additional information on the Date of Onset, please refer to Table 4 below.
• The Time of Onset can be typed in the box (hh:mm using 24-hour clock) or by clicking in the box a drop down menu will appear and the Time of Onset can be selected. For additional information on the Time of Onset, please refer to Table 4 below.
• Using the drop down menu next to Stroke Occurred in select if the stroke occurred in the community or in hospital. Select "Hospital" if stroke (re)occurs while the patient is in a hospital with Inpatient beds (including in the Emergency Department).
• Enter the Patient’s Postal Code in the box. This is the patient's home postal code at the time of stroke onset. (e.g. If a patient's primary residence is British Columbia and displays stroke symptoms while at their residence in Alberta; the postal code will be that of the primary residence in British Columbia).
Status & EMS Verified (for Site Administrators only):
• You may change the status of the stroke from “Active” to “Closed” after all the data for a stroke has been collected and reviewed.
• Check "EMS Verified" if EMS has uploaded EMS time stamp data for the stroke event. If this is checked, you will not be able to make changes to the EMS time stamp data until the box is unchecked.
EMS Time Stamp:
• If the EMS print out (yellow sheet) is available fill in the appropriate dates and times • All dates can be typed in the box (dd-MMM-yyyy) or by clicking in the box a drop
down menu will appear and the date can be selected. • All times can be typed in the box (hh:mm using 24-hour clock) or by clicking in the
box a drop down menu will appear and the time can be selected. • EMS times should be times from the Community and does not include times from
when. • EMS dates and times are the ones recorded from the Community to the First
Hospital. They do not include inter-hospital EMS travel. • Please use the EMS dates and times from the Community to the first Site. Do
not fill in the EMS dates and times for inter-hospital transfers.
It is important that you enter the correct data into the QuICR Registry. For a list of
definitions for the Add Stroke page, please refer to Table 4.

29 29
Table 4: Edit Stroke Definitions
Term Definition
Status Either of two categories (Active or Closed). After all the data for a stroke has been collected
and reviewed, it should be closed. Otherwise, the record should remain open.
EMS Verified Check "EMS Verified" if EMS has uploaded EMS time stamp data for the stroke event. If
this is checked, you will not be able to make changes to the EMS time stamp data until the
box is unchecked.
Date of Onset Date at which the patient was last known to be without the signs and symptoms of the
current stroke or at his or her prior baseline. If the symptoms resolve and then stroke
symptoms resume, the date of onset is the later or last time the symptoms appeared. Format:
dd-MMM-yyyy (e.g. 01-Jan-1950).
Time of Onset Time at which the patient was last known to be without the signs and symptoms of the
current stroke or at his or her prior baseline. If the symptoms resolve and then stroke
symptoms resume, the time of onset is the later or last time the symptoms appeared. Format
HH:mm 24hr (e.g. 23:10).
Stroke
Occurred In
Either of two categories (community or hospital). Select "Community" if stroke occurs while
the patient is outside the hospital. Select "Hospital" if stroke (re)occurs while the patient is
in a hospital with Inpatient beds (including in the Emergency Department).
Recognition
Date
Date at which the patient was identified as having a stroke. Format dd-MMM-yyyy (e.g.
01-Jan-1950).
Recognition
Time
Time at which the patient was identified as having a stroke. Format HH:mm 24hr (e.g.
23.10).
Patient Home
Postal Code at
Time of Stroke
Patient’s home postal code at the time of stroke. (e.g. If a patient's primary residence is
British Columbia and displays stroke symptoms while at their residence in Alberta; the
postal code will be that of the primary residence in British Columbia). If the patient is from
out-of-country, then leave the postal code field blank.
911 Call Date Date that 911 was called for the current stroke. Format: dd-MMM-yyyy (e.g. 01-Jan-1950).
911 Call Time Time that 911 was called for the current stroke. Format HH:mm 24hr (e.g. 23:10).
EMS Dispatch
Date
Date that EMS was dispatched to go to the scene of the stroke. Format: dd-MMM-yyyy (e.g.
01-Jan-1950).
EMS Dispatch
Time
Time that EMS was dispatched to go to the scene of the stroke. Format HH:mm 24hr (e.g.
23:10).
EMS on Scene
Date
Date that the EMS crew arrived at the scene of the stroke. Format: dd-MMM-yyyy (e.g. 01-
Jan-1950).
EMS on Scene
Time
Time that the EMS crew arrived at the scene of the stroke. Format HH:mm 24hr (e.g.
23:10).
EMS Depart
Scene Date
Date that the EMS crew left the scene of the stroke en route to the hospital. Format: dd-
MMM-yyyy (e.g. 01-Jan-1950).
30 30
EMS Depart
Scene Time
Time that the EMS crew left the scene of the stroke en route to the hospital. Format HH:mm
24hr (e.g. 23:10).

31 31
You will then be asked to confirm if the data entered are correct as shown in Figure 26. If the
data is correct, select “Save” (boxed in red) if modifications are needed select “Cancel”. If
“Save” is selected, you will be redirected to the most recent treatments Edit Treatment page. If
the patient does not have a treatment added to the QuICR Registry, selecting “Save” will redirect
you to the Add Treatment page.
Figure 26: Edit Stroke – Confirmation

32 32
7 Step 3 - Adding Treatments
Adding a treatment is typically the third step when entering data about a stroke patient. To add a
new treatment to the QuICR Registry, please refer to Section 7.1. If the treatment exists in the
QuICR Registry, go to Section 7.2 and follow the instructions to navigate to and edit the
treatment data. To enter treatment data for a patient that exists in the QuICR Registry but is not
listed on the Homepage (the QuICR Registry is designed so that you are unable to view patients
that were treated at other Stroke Centre) please see Section 7.3.
7.1 Adding a New Treatment
To add a new treatment, select the patient’s full name (boxed in red) from the Homepage as
shown in Figure 27.
Figure 27: Navigating to the Add New Treatment Page (1)
33 33
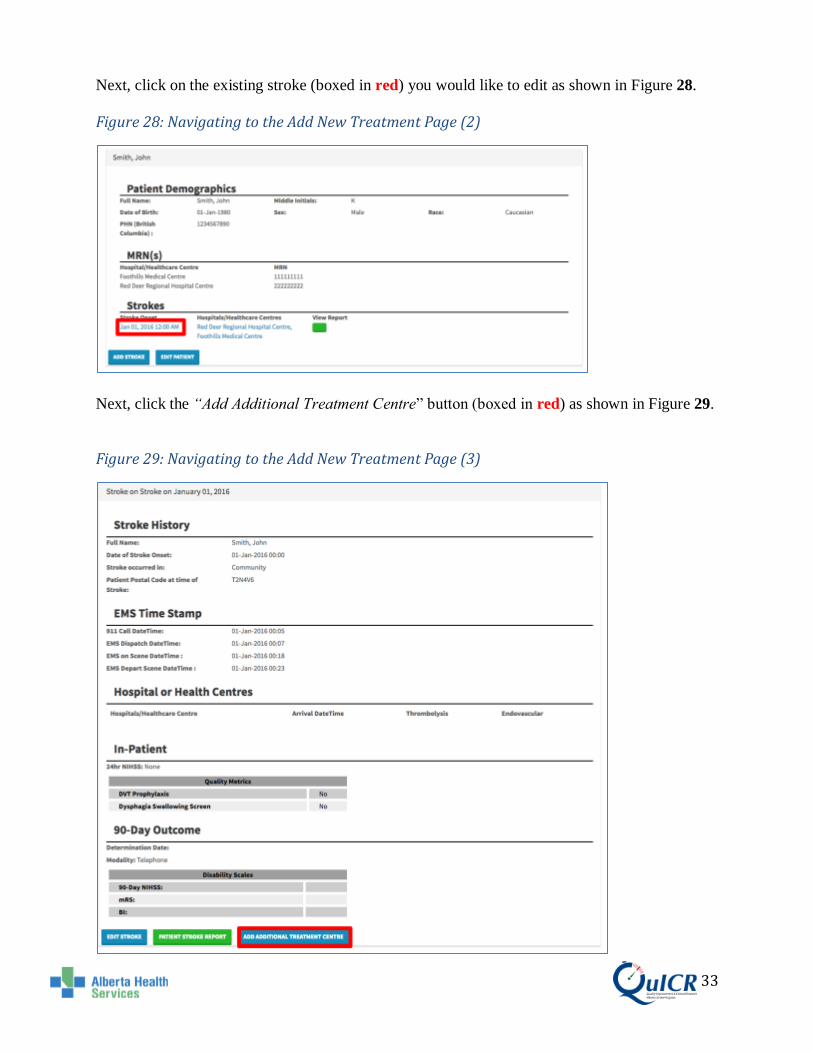
Next, click on the existing stroke (boxed in red) you would like to edit as shown in Figure 28.
Figure 28: Navigating to the Add New Treatment Page (2)
Next, click the “Add Additional Treatment Centre” button (boxed in red) as shown in Figure 29.
Figure 29: Navigating to the Add New Treatment Page (3)

34 34
You are now at the Add Treatment page. Here you will be able to add site specific, acute
imaging, thrombolysis, and endovascular details to the QuICR Registry. Please enter all
treatments given at YOUR SITE (unless adding or editing data for a referring site). Figure 30
shows the top half of the Add Treatment page filled in for a sample patient.
Figure 30: Add Treatment Page (Top Half)

35 35
Treatment Site Specific:
• Select the Hospital or Healthcare Centre from the drop down menu. • The Arrival Date can be typed in the box (dd-MMM-yyyy) or by clicking in the box a
drop down menu will appear and the Arrival Date can be selected. o Leave the Arrival Date field blank for an in hospital stroke.
• The Arrival Time can be typed in the box (hh:mm using 24-hour clock) or by clicking in the box a drop down menu will appear and the Arrival Time can be selected.
o Leave the Arrival Time field blank for an in hospital stroke. • Select the patient’s method of arrival from the Arrival Method drop down menu. • Enter the patient’s Pre-Treatment NIHSS score in the box. • When the patient is discharged from acute care, please enter the Discharge Date.
The Discharge Date can be typed in the box (dd-MMM-yyyy) or by clicking in the box a drop down menu will appear and the Discharge Date can be selected. Leave this field blank if the patient is still at your site. Please remember to fill the discharge date in when you receive the data.
• When the patient is discharged from acute care, please enter the Discharge Time. The Discharge Time can be typed in the box (hh:mm using 24-hour clock) or by clicking in the box a drop down menu will appear and Discharge Time can be selected. Leave this field blank if the patient is still at your site. Please remember to fill the discharge time in when you receive the data
Acute Imaging:
• Select the type of imaging from the Type of Imaging drop down menu. • The First Image Date can be typed in the box (dd-MMM-yyyy) or by clicking in the
box a drop down menu will appear and the First Image Date can be selected. • The First Image Time can be typed in the box (hh:mm using 24-hour clock) or by
clicking in the box a drop down menu will appear and the First Image Time can be selected.
• If more than three types of imaging were performed, press “Add Additional Acute Image” button and another imaging field will appear. Repeat this as many times as necessary.
• If an imaging field needs to be deleted check the delete box and it will be removed when you save.
Processes:
If any of the following apply to the treatment, please select “Yes”:
• Treatment with Telemedicine: if telestroke was involved Inpatient care or treatment decisions.
• Stroke Team Pre-notified: if the stroke team was pre notified of the patient’s arrival. • Direct to CT: if the patient traveled directly from the emergency room to the CT
scanner. • Patient Admitted as Unknown: if the patient was initially admitted as “unknown” or
if another rapid registration process was used in order to save time.

36 36
It is important that you enter the correct data into the QuICR Registry. For a list of
definitions for the top half of the Add Treatment page, please refer to Table 5 below.
Table 5: Add Treatment (Top Half) Definitions
Term Definition
Arrival Date The earliest arrival date available from any of the following time stamps: 1) EMS
arrival date 2) Patient registration or triage date or 3) CT start date If this is an in-
hospital stroke, leave the arrival date blank. Format: dd-MMM-yyyy (e.g. 01-Jan-
1950).
Arrival Time Enter the earliest arrival time available from any of the following time stamps: 1)
EMS arrival time; 2) Patient registration or triage time; or 3) CT start time. If this is
an in-hospital stroke, leave the arrival time blank.
Format HH:mm 24hr (e.g. 23:10).
Arrival Method Modality of transportation used by the patient to arrive at the emergency department.
Pre-treatment NIHSS National Institute of Health Stroke Scale (NIHSS) score given to the patient prior to
treatment. The NIHSS is a standardized stroke severity scale used to describe
neurological deficits in acute stroke patients. Minimum: 0, Maximum: 42.
Discharge Date Date at which the patient leaves acute care at the hospital and either returns home or
is transferred to another facility. (e.g. if the patient is discharged from acute care and
transferred to a rehab or long term care ward (within the same institution) then date
of discharge is the date of transfer). If the patient is not admitted to the hospital, use
the date of discharge from the Emergency Department. If the patient is treated in a
CT Ambulance, the date of discharge is the departure date after tPA has started.
Format: dd-MMM-yyyy (e.g. 01-Jan-1950).
Discharge Time Time at which the patient leaves acute care at the hospital and either returns home or
is transferred to another facility. (e.g. if the patient is discharged from acute care and
transferred to a rehab or long term care ward (within the same institution) then time
of discharge is the time of transfer). If the patient is not admitted to the hospital, use
the time of discharge from the Emergency Department. If the patient is treated in a
CT Ambulance, the time of discharge is the departure time after tPA has started.
Format HH:mm 24hr (e.g. 23:10).
Type of Imaging Type of neuroimaging used for the patient in the acute phase (prior to treatment at the
site).
First Slice Date The date displayed on the first slice image. Format dd-MMM-yyyy (e.g. 01-Jan-
1950).
First Slice Time The time displayed on the first slice image. Format HH:mm 24hr (e.g. 23:10).
Treatment with
Telemedicine
Select "Yes" if telestroke was used in diagnosis or treatment decisions. Select "No"
if telestroke was not used in diagnosis or treatment decisions. Select "UTD" if it
cannot be determined if telestroke was used in diagnosis or treatment decisions.
Stroke Team Pre-
notified
Select "Yes" if the stroke/care team was notified of the incoming stroke before the
patient's arrival. Select "No" if the stroke/care team was not notified of the incoming
stroke before the patient's arrival. Select "UTD" if it cannot be determined if the
stroke/care team was notified of the incoming stroke before the patient's arrival.
Direct to CT Select "Yes" if the patient was transported directly from triage to the CT scanner on
the EMS stretcher. Select "No" if the patient was not transported directly from triage
to the CT scanner on the EMS stretcher. Select "UTD" if it cannot be determined if

37 37
the patient was transported directly from triage to the CT scanner on the EMS
stretcher.
Patient Registered as
Unknown
Select "Yes" if the patient was registered as unknown, pre-registered prior to arrival,
or another rapid registration process where the full registration of the patient was
done in a rapid manner (as per your site's trauma protocol). Select "No" if there was
no rapid registration process used and full registration was completed upon patient
arrival in the ED. Select "UTD" if it cannot be determined if a rapid registration
process was used.
You can then scroll down to enter more treatment data. If thrombolysis is administered at your
site, check the Thrombolysis Checkbox to expand the selection. Here you will be able to edit or
add a patient’s thrombolysis data. Figure 31 shows the Thrombolysis portion of the Add
Treatment page filled in with a sample patient.
Figure 31: Add Treatment Page (Thrombolysis)
Thrombolysis Data:
• Thrombolysis Date can be typed in the box (dd-MMM-yyyy) or by clicking in the box a drop down menu will appear and the Thrombolysis Date can be selected.
• Thrombolysis Time can be typed in the box (hh:mm using 24-hour clock) or by clicking in the box a drop down menu will appear and the Thrombolysis Time can be selected.
• The Thrombolysis Physician can be selected from the drop down menu. If the physician’s name is not listed “Add New” can be selected from the list and the physician’s name can be entered.
• Select the Thrombolysis Location from the drop down menu. • Select the Thrombolysis Drug from the drop down menu. • Enter the patient’s Weight in kilograms. • Enter the Drug Dose in milligrams.

38 38
It is Important that you enter the correct data into the QuICR Registry. For a list of
definitions for the thrombolysis portion of the Add Treatment page, please refer to Table 6
below.
Table 6: Add Treatment (Thrombolysis) Definitions
Term Definition
Thrombolysis Administered Check "Thrombolysis Administered" if thrombolysis (intravenous alteplase
(tPA)) has been administered at the hospital.
Thrombolysis Date Date when thrombolysis bolus was initiated. Format: dd-MMM-yyyy (e.g. 01-
Jan-1950).
Thrombolysis Time Time when thrombolysis bolus was initiated. Format HH:mm 24hr (e.g. 23:10).
Thrombolysis Physician Name of the Most Responsible Physician that ordered thrombolysis at your site.
If telemedicine was utilized, the Thrombolysis Physician is the physician at
your site.
Thrombolysis Location Location in the hospital where the patient was administered thrombolysis.
Select Emergency Bay if it was administered in the ED; CT Scanner/Imaging
area if it was administered while the patient was in the scanner or in the
imaging area; Inpatient unit if the it was administered in an Inpatient bed
(includes ICU and the Step Down Unit); angio suite if it was administered in the
angio suite; or unable to determine.
Thrombolysis Drug Thrombolytic drug name administered.
Drug Dose (mg) Thrombolytic drug dose (mg).
Patient Weight est. (kg) Estimated weight (kg). Do not enter the patient's weight in pounds.

39 39
You can then scroll down to enter more treatment data. If endovascular treatment is administered
at your site, check the Endovascular Checkbox to expand the selection. shows the
Endovascular portion of the Add Treatment page filled in with a sample patient. This section
only applies to Calgary (Foothills Hospital) and Edmonton (UAH) sites.
Figure 32: Add Treatment Page (Endovascular)

40 40
Endovascular Data:
• The Interventionist can be selected from the drop down menu. If the physician’s name is not listed “Add New” can be selected from the list and the physician’s name can be entered.
• The Neurologist can be selected from the drop down menu. If the physician’s name is not listed “Add New” can be selected from the list and the physician’s name can be entered.
• Groin Puncture Date can be typed in the box (dd-MMM-yyyy) or by clicking in the box a drop down menu will appear and the Groin Puncture Date can be selected.
• Groin Puncture Time can be typed in the box (hh:mm using 24-hour clock) or by clicking in the box a drop down menu will appear and the Groin Puncture Time can be selected.
• Select the final TICI score from the drop down menu. • First Reperfusion Date can be typed in the box (dd-MMM-yyyy) or by clicking in the
box a drop down menu will appear and the First Reperfusion Date can be selected. • First Reperfusion Time can be typed in the box (hh:mm using 24-hour clock) or by
clicking in the box a drop down menu will appear and the First Reperfusion Time can be selected.
• Select the type of device used for endovascular treatment from the Device Used drop down menu.
• If more than two types of devices were used, press “Add Additional Device” button and another treatment field will appear. Repeat this as many times as necessary.
• If a device field needs to be deleted check the delete box and it will be removed when you move to the next screen.
41 41
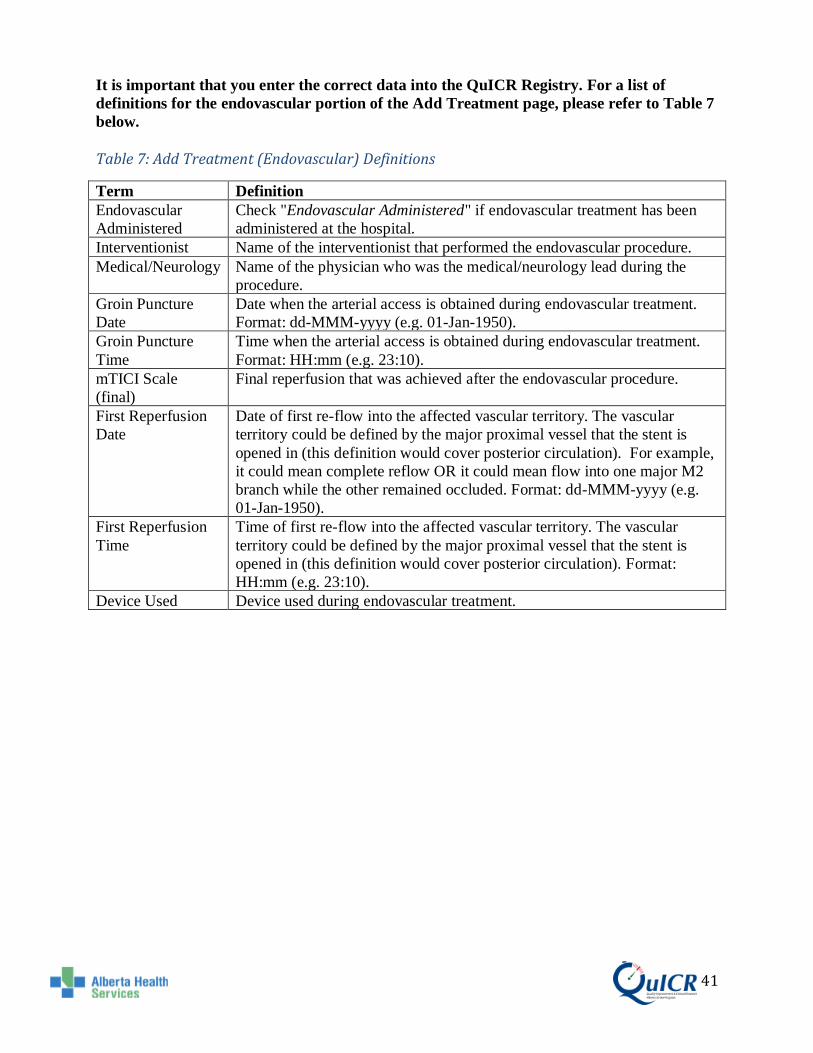
It is important that you enter the correct data into the QuICR Registry. For a list of
definitions for the endovascular portion of the Add Treatment page, please refer to Table 7
below.
Table 7: Add Treatment (Endovascular) Definitions
Term Definition
Endovascular
Administered
Check "Endovascular Administered" if endovascular treatment has been
administered at the hospital.
Interventionist Name of the interventionist that performed the endovascular procedure.
Medical/Neurology Name of the physician who was the medical/neurology lead during the
procedure.
Groin Puncture
Date
Date when the arterial access is obtained during endovascular treatment.
Format: dd-MMM-yyyy (e.g. 01-Jan-1950).
Groin Puncture
Time
Time when the arterial access is obtained during endovascular treatment.
Format: HH:mm (e.g. 23:10).
mTICI Scale
(final)
Final reperfusion that was achieved after the endovascular procedure.
First Reperfusion
Date
Date of first re-flow into the affected vascular territory. The vascular
territory could be defined by the major proximal vessel that the stent is
opened in (this definition would cover posterior circulation). For example,
it could mean complete reflow OR it could mean flow into one major M2
branch while the other remained occluded. Format: dd-MMM-yyyy (e.g.
01-Jan-1950).
First Reperfusion
Time
Time of first re-flow into the affected vascular territory. The vascular
territory could be defined by the major proximal vessel that the stent is
opened in (this definition would cover posterior circulation). Format:
HH:mm (e.g. 23:10).
Device Used Device used during endovascular treatment.

42 42
You can then scroll down to enter more treatment data. Next you will see the Clinical Trials data
entry fields. Here you will be able to add the patient’s clinical trials.
The Clinical Trials page is shown below in Figure 33.
Figure 33: Add Treatment Page (Enter Clinical Trials)
Clinical Trials:
• If the patient was enrolled in a Clinical Trial, you can select it from the drop down menu.
• If the patient was enrolled in more than one clinical trial, press the “Enroll in Additional Clinical Trial” button and another clinical trial field will appear. Repeat this as many times as necessary.
• If a clinical trial field needs to be deleted check the delete box and it will be removed when you move to the next screen.
It is important that you enter the correct data into the QuICR Registry. For a list of
definitions for the clinical trials portion of the Add Treatment page, please refer to Table 8
below.
Table 8: Add Treatment (Clinical Trial) Definition
Term Definition
Clinical Trial Select the clinical trials that the patient was enrolled in at your site.

43 43
Once all treatment data are entered and you are ready to enter Inpatient data, select “Continue”
(boxed in red). If you do not have Inpatient data at this time, and do not wish to print the Acute
Stroke 72-Hour Report select “Save And Return Home” (boxed in orange). If you have data from
a different Treatment Centre to enter press “Save and Add Additional Treatment Centre” (boxed
in brown). If you would like to view or print the Acute Stroke 72-Hour Report, select “Save and
View Report” (boxed in purple). The save and navigation options are shown in Figure 34.
If you would like to add additional details about the patient’s treatment or stroke, that is not
captured in the QuICR Registry, feel free to utilize the Notes section on this page.
Figure 34: Add Treatment Page – Save and Navigation Options
44 44
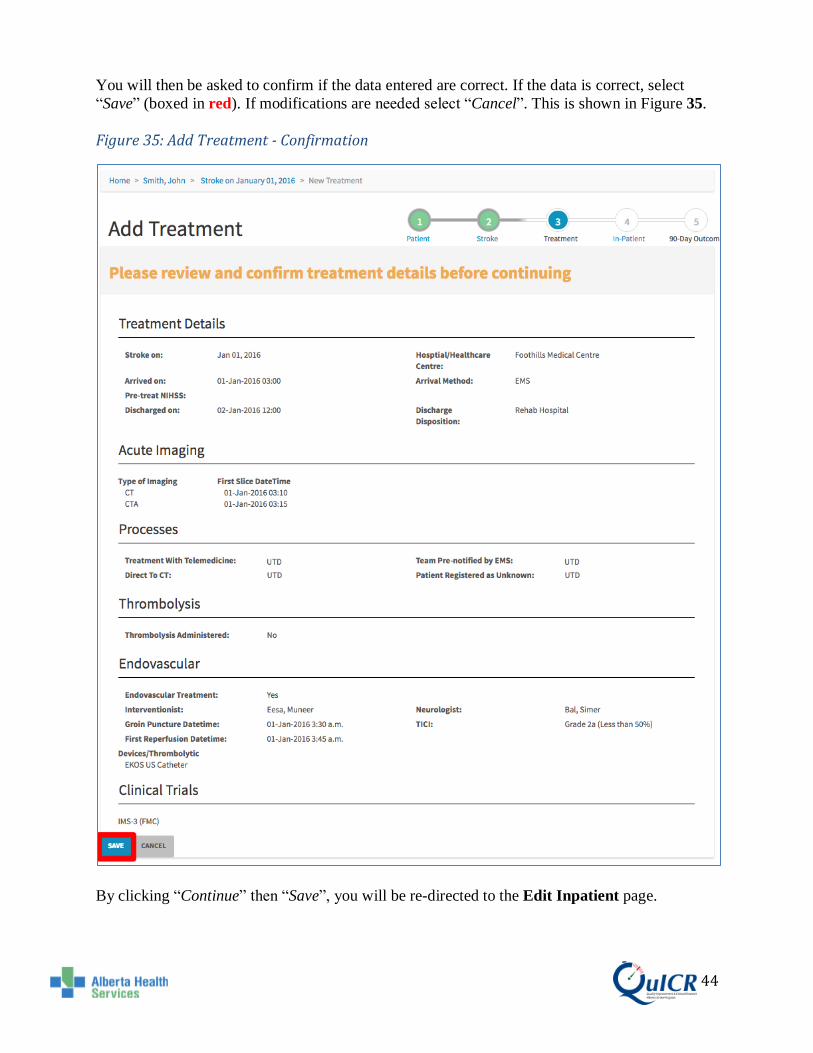
You will then be asked to confirm if the data entered are correct. If the data is correct, select
“Save” (boxed in red). If modifications are needed select “Cancel”. This is shown in Figure 35.
Figure 35: Add Treatment - Confirmation
By clicking “Continue” then “Save”, you will be re-directed to the Edit Inpatient page.

45 45
7.2 Editing Existing Treatment Data
To navigate to the Edit Treatment page for the treatment you wish to edit, go to the Homepage
and click on the patient’s full name (boxed in red) as shown in Figure 36.
Figure 36: Navigating to the Edit Treatment Page (1)
Next, click on the existing treatment (boxed in red) you would like to edit as shown in Figure 37.
Figure 37: Navigating to the Edit Treatment Page (2)

46 46
Next, click on the “Edit Treatment” button (boxed in red) as shown in Figure 38.
Figure 38: Navigating to the Edit Treatment Page (3)

47 47
You are now at the Edit Treatment page. Here you will be able to edit site specific, acute
imaging, thrombolysis, and endovascular details to the QuICR Registry. Please enter all
treatments given at YOUR SITE (unless adding or editing data for a referring site). Figure 39
shows the top half of the Edit Treatment page filled in for a sample patient.
Figure 39: Edit Treatment Page (Top Half)

48 48
Treatment Site Specific:
• Select the Hospital or Healthcare Centre from the drop down menu. • The Arrival Date can be typed in the box (dd-MMM-yyyy) or by clicking in the box a
drop down menu will appear and the Arrival Date can be selected. o Leave the Arrival Date field blank for an in hospital stroke.
• The Arrival Time can be typed in the box (hh:mm using 24-hour clock) or by clicking in the box a drop down menu will appear and the Arrival Time can be selected.
o Leave the Arrival Time field blank for an in hospital stroke. • Select the patient’s method of arrival from the Arrival Method drop down menu. • Enter the patient’s Pre-Treatment NIHSS score in the box. • When the patient is discharged from acute care, please enter the Discharge Date.
The Discharge Date can be typed in the box (dd-MMM-yyyy) or by clicking in the box a drop down menu will appear and the Discharge Date can be selected. Leave this field blank if the patient is still at your site. Please remember to fill the discharge date in when you receive the data.
• When the patient is discharged from acute care, please enter the Discharge Time. The discharge Time can be typed in the box (hh:mm using 24-hour clock) or by clicking in the box a drop down menu will appear and Discharge Time can be selected. Leave this field blank if the patient is still at your site. Please remember to fill the discharge time in when you receive the data
Acute Imaging:
• Select the type of imaging from the Type of Imaging drop down menu. • The First Image Date can be typed in the box (dd-MMM-yyyy) or by clicking in the
box a drop down menu will appear and the First Image Date can be selected. • The First Image Time can be typed in the box (hh:mm using 24-hour clock) or by
clicking in the box a drop down menu will appear and the First Image Time can be selected.
• If more than three types of imaging were performed, press “Add Additional Acute Image” button and another imaging field will appear. Repeat this as many times as necessary.
• If an imaging field needs to be deleted check the delete box and it will be removed when you save.
Processes:
If any of the following apply to the treatment, please select “Yes”:
• Treatment with Telemedicine: if telestroke was involved Inpatient care or treatment decisions.
• Stroke Team Pre-notified: if the stroke team was pre notified of the patient’s arrival. • Direct to CT: if the patient traveled directly from the emergency room to the CT
scanner. • Patient Admitted as Unknown: if the patient was initially admitted as “unknown” or
if another rapid registration process was used in order to save time.

49 49
It is important that you enter the correct data into the QuICR Registry. For a list of
definitions for the top half of the Edit Treatment page, please refer to Table 9 below.
Table 9: Edit Treatment Page (Top Half) Definitions
Term Definition
Arrival Date The earliest arrival date available from any of the following time stamps: 1) EMS
arrival date 2) Patient registration or triage date or 3) CT start date If this is an in-
hospital stroke, leave the arrival date blank. Format: dd-MMM-yyyy (e.g. 01-Jan-
1950).
Arrival Time Enter the earliest arrival time available from any of the following time stamps: 1)
EMS arrival time; 2) Patient registration or triage time; or 3) CT start time. If this is
an in-hospital stroke, leave the arrival time blank.
Format HH:mm 24hr (e.g. 23:10).
Arrival Method Modality of transportation used by the patient to arrive at the emergency department.
Pre-treatment NIHSS National Institute of Health Stroke Scale (NIHSS) score given to the patient prior to
treatment. The NIHSS is a standardized stroke severity scale used to describe
neurological deficits in acute stroke patients. Minimum: 0, Maximum: 42.
Discharge Date Date at which the patient leaves acute care at the hospital and either returns home or
is transferred to another facility. (e.g. if the patient is discharged from acute care and
transferred to a rehab or long term care ward (within the same institution) then date
of discharge is the date of transfer). If the patient is not admitted to the hospital, use
the date of discharge from the Emergency Department. If the patient is treated in a
CT Ambulance, the date of discharge is the departure date after tPA has started.
Format: dd-MMM-yyyy (e.g. 01-Jan-1950).
Discharge Time Time at which the patient leaves acute care at the hospital and either returns home or
is transferred to another facility. (e.g. if the patient is discharged from acute care and
transferred to a rehab or long term care ward (within the same institution) then time
of discharge is the time of transfer). If the patient is not admitted to the hospital, use
the time of discharge from the Emergency Department. If the patient is treated in a
CT Ambulance, the time of discharge is the departure time after tPA has started.
Format HH:mm 24hr (e.g. 23:10).
Type of Imaging Type of neuroimaging used for the patient in the acute phase (prior to treatment at the
site).
First Slice Date The date displayed on the first slice image. Format dd-MMM-yyyy (e.g. 01-Jan-
1950).
First Slice Time The time displayed on the first slice image. Format HH:mm 24hr (e.g. 23:10).
Treatment with
Telemedicine
Select "Yes" if telestroke was used in diagnosis or treatment decisions. Select "No"
if telestroke was not used in diagnosis or treatment decisions. Select "UTD" if it
cannot be determined if telestroke was used in diagnosis or treatment decisions.
Stroke Team Pre-
notified
Select "Yes" if the stroke/care team was notified of the incoming stroke before the
patient's arrival. Select "No" if the stroke/care team was not notified of the incoming
stroke before the patient's arrival. Select "UTD" if it cannot be determined if the
stroke/care team was notified of the incoming stroke before the patient's arrival.
Direct to CT Select "Yes" if the patient was transported directly from triage to the CT scanner on
the EMS stretcher. Select "No" if the patient was not transported directly from triage

50 50
to the CT scanner on the EMS stretcher. Select "UTD" if it cannot be determined if
the patient was transported directly from triage to the CT scanner on the EMS
stretcher.
Patient Registered as
Unknown
Select "Yes" if the patient was registered as unknown, pre-registered prior to arrival,
or another rapid registration process where the full registration of the patient was
done in a rapid manner (as per your site's trauma protocol). Select "No" if there was
no rapid registration process used and full registration was completed upon patient
arrival in the ED. Select "UTD" if it cannot be determined if a rapid registration
process was used.
You can then scroll down to enter more treatment data. If thrombolysis is administered at your
site, check the Thrombolysis Checkbox to expand the selection. Here you will be able to edit or
add a patient’s thrombolysis data. Figure 40 shows the Thrombolysis portion of the Edit
Treatment page filled in with a sample patient.
Figure 40: Edit Treatment Page (Thrombolysis)
Thrombolysis Data:
• Thrombolysis Date can be typed in the box (dd-MMM-yyyy) or by clicking in the box a drop down menu will appear and the Thrombolysis Date can be selected.
• Thrombolysis Time can be typed in the box (hh:mm using 24-hour clock) or by clicking in the box a drop down menu will appear and the Thrombolysis Time can be selected.
• The Thrombolysis Physician can be selected from the drop down menu. If the physician’s name is not listed “Add New” can be selected from the list and the physician’s name can be entered.
• Select the Thrombolysis Location from the drop down menu. • Select the Thrombolysis Drug from the drop down menu. • Enter the patient’s Weight in kilograms. • Enter the Drug Dose in milligrams.

51 51
It is Important that you enter the correct data into the QuICR Registry. For a list of
definitions for the thrombolysis portion of the Edit Treatment page, please refer to Table
10 below.
Table 10: Edit Treatment (Thrombolysis) Definitions
Term Definition
Thrombolysis Administered Check "Thrombolysis Administered" if thrombolysis (intravenous alteplase
(tPA)) has been administered at the hospital.
Thrombolysis Date Date when thrombolysis bolus was initiated. Format: dd-MMM-yyyy (e.g. 01-
Jan-1950).
Thrombolysis Time Time when thrombolysis bolus was initiated. Format HH:mm 24hr (e.g. 23:10).
Thrombolysis Physician Name of the Most Responsible Physician that ordered thrombolysis at your site.
If telemedicine was utilized, the Thrombolysis Physician is the physician at
your site.
Thrombolysis Location Location in the hospital where the patient was administered thrombolysis.
Select Emergency Bay if it was administered in the ED; CT Scanner/Imaging
area if it was administered while the patient was in the scanner or in the
imaging area; Inpatient unit if the it was administered in an Inpatient bed
(includes ICU and the Step Down Unit); angio suite if it was administered in the
angio suite; or unable to determine.
Thrombolysis Drug Thrombolytic drug name administered.
Drug Dose (mg) Thrombolytic drug dose (mg).
Patient Weight est. (kg) Estimated weight (kg). Do not enter the patient's weight in pounds.
52 52
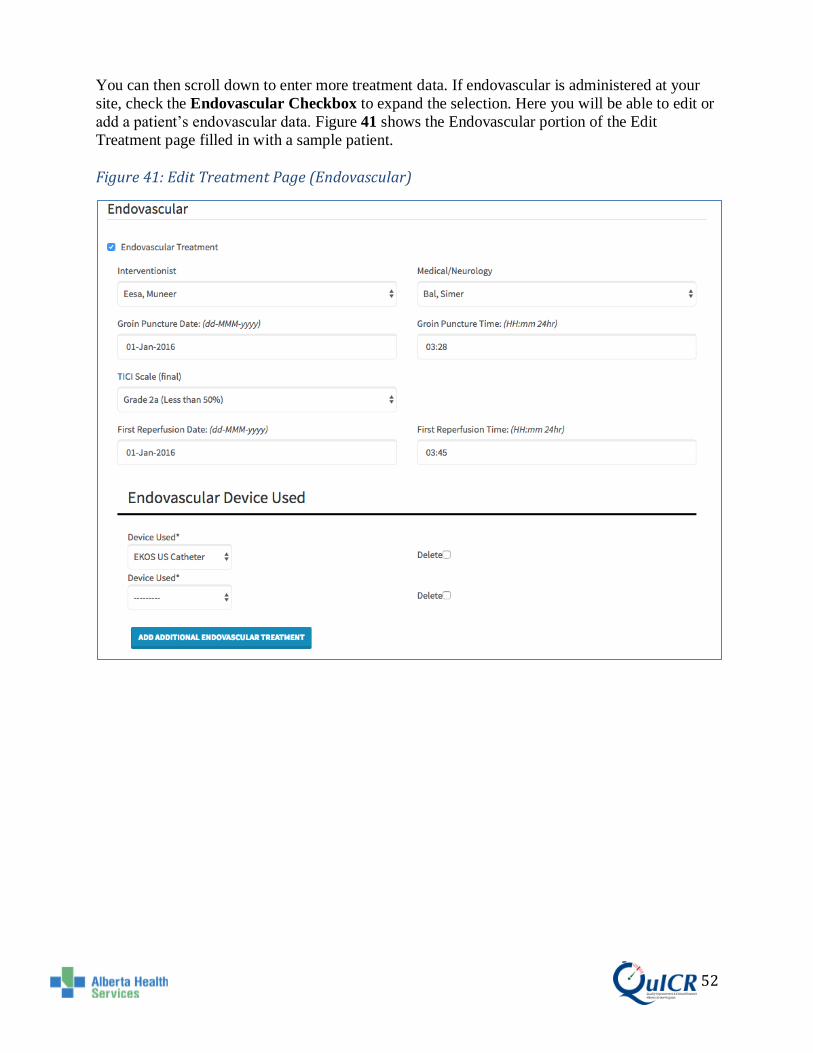
You can then scroll down to enter more treatment data. If endovascular is administered at your
site, check the Endovascular Checkbox to expand the selection. Here you will be able to edit or
add a patient’s endovascular data. Figure 41 shows the Endovascular portion of the Edit
Treatment page filled in with a sample patient.
Figure 41: Edit Treatment Page (Endovascular)

53 53
Endovascular Data:
• The Interventionist can be selected from the drop down menu. If the physician’s name is not listed “Add New” can be selected from the list and the physician’s name can be entered.
• The Neurologist can be selected from the drop down menu. If the physician’s name is not listed “Add New” can be selected from the list and the physician’s name can be entered.
• Groin Puncture Date can be typed in the box (dd-MMM-yyyy) or by clicking in the box a drop down menu will appear and the Groin Puncture Date can be selected.
• Groin Puncture Time can be typed in the box (hh:mm using 24-hour clock) or by clicking in the box a drop down menu will appear and the Groin Puncture Time can be selected.
• Select the final TICI score from the drop down menu. • First Reperfusion Date can be typed in the box (dd-MMM-yyyy) or by clicking in the
box a drop down menu will appear and the First Reperfusion Date can be selected. • First Reperfusion Time can be typed in the box (hh:mm using 24-hour clock) or by
clicking in the box a drop down menu will appear and the First Reperfusion Time can be selected.
• Select the type of device used for endovascular treatment from the Device Used drop down menu.
• If more than two types of devices were used, press “Add Additional Device” button and another treatment field will appear. Repeat this as many times as necessary.
• If a device field needs to be deleted check the delete box and it will be removed when you move to the next screen.

54 54
It is important that you enter the correct data into the QuICR Registry. For a list of
definitions for the endovascular portion of the Edit Treatment page, please refer to Table
11 below.
Table 11: Edit Treatment (Endovascular) Definitions
Term Definition
Endovascular
Administered
Check "Endovascular Administered" if endovascular has been
administered at the hospital.
Interventionist Name of the interventionist that performed the endovascular procedure.
Medical/Neurology Name of the physician who was the medical/neurology lead during the
procedure.
Groin Puncture
Date Date when arterial access was obtained during endovascular treatment. Format: dd-MMM-yyyy (e.g. 01-Jan-1950).
Groin Puncture
Time
Time when the arterial access is obtained during endovascular treatment.
Format: HH:mm (e.g. 23:10).
mTICI Scale
(final)
Final reperfusion that was achieved after the endovascular procedure.
First Reperfusion
Date
Date of first re-flow into the affected vascular territory. The vascular
territory could be defined by the major proximal vessel that the stent is
opened in (this definition would cover posterior circulation). It could mean
complete reflow OR it could mean flow into one major M2 branch while
the other remained occluded. Format: dd-MMM-yyyy (e.g. 01-Jan-1950).
First Reperfusion
Time
Time of first re-flow into the affected vascular territory. The vascular
territory could be defined by the major proximal vessel that the stent is
opened in (this definition would cover posterior circulation). It could mean
complete reflow OR it could mean flow into one major M2 branch while
the other remained occluded. Format: HH:mm (e.g. 23:10).
Device Used Device used during endovascular treatment.

55 55
You can then scroll down to enter more treatment data. Next you will see the Clinical Trials data
entry fields. Here you will be able to edit the patient’s clinical trials.
The Clinical Trials page is shown below in Figure 33.
Figure 42: Edit Treatment Page (Clinical Trials)
Clinical Trials:
• If the patient was enrolled in a Clinical Trial, you can select it from the drop down menu.
• If the patient was enrolled in more than one clinical trial, press the “Enroll in Additional Clinical Trial” button and another clinical trial field will appear. Repeat this as many times as necessary.
• If a clinical trial field needs to be deleted check the delete box and it will be removed when you move to the next screen.
It is important that you enter the correct data into the QuICR Registry. For a list of
definitions for the clinical trials portion of the Edit Treatment page, please refer to Table
12 below.
Table 12: Edit Treatment (Clinical Trial) Definition
Term Definition
Clinical Trial Select the clinical trials that the patient was enrolled in at your site.

56 56
Once all the treatment data are edited and you would like to view or print the Acute Stroke 72-
Hour Report, select “Save and View Report” (boxed in purple) Once all treatment data are edited
and you are ready to enter Inpatient data, select “Continue” (boxed in red). If you do not have
Inpatient data at this time, and do not wish to print the Acute Stroke 72-Hour Report select “Save
And Return Home” (boxed in orange). If you have data from a different Treatment Centre to
enter press “Save and Add Additional Treatment Centre” (boxed in brown). The save and
navigation options are shown in Figure 43.
Figure 43: Edit Treatment Page – Save and Navigation Options

57 57
You will then be asked to confirm if the data entered are correct. If the data is correct, select
“Save” (boxed in red). If modifications are needed select “Cancel”. This is shown in Figure 44.
Figure 44: Edit Treatment - Confirmation
By clicking “Continue” then “Save”, you will be re-directed to the Edit Inpatient page.

58 58
7.3 Adding A New Treatment (For Existing Patients Not Listed On The Homepage)
To enter treatment data for a patient that exists in the QuICR Registry but is not listed on the
Homepage (the QuICR Registry is designed so that you are unable to view patients that were
treated at other Stroke Centre) click “New” (boxed in red) from the Homepage as shown in
Figure 45. You will be redirected to the Find or Add Patient page.
Figure 45: Navigating to the Add New Treatment Page (1)

59 59
On the Find or Add Patient page, please enter the existing patient’s demographic data and click
“Continue” (boxed in red) as shown in Figure 46. For additional information and guidance on
how to enter data for the Find or Add Patient page.
Figure 46: Navigating to the Add New Treatment Page (2)
If the patient already exists in the database (meaning they have had a prior stroke) you will
see a screen similar to Figure 47. If this is the same patient select “Use This Patient” (boxed in
red) and you will be able to update data for their current stroke and add additional treatments. If
this is not the correct patient (just one with a similar name or PHN) select “Cancel” and ensure
that the information entered is correct.

60 60
Figure 47: Navigating to the Add New Treatment Page (3)
If you click “Use This Patient” you will be redirected to the Edit Patient page. The Edit Patient
page is shown in Figure 48. From the Edit Patient page, use the navigation options to 1) edit the
patient data, 2) edit the stroke event data, 3) add a new stroke event and add a new treatment, 4)
edit an existing stroke event and edit an existing treatment, and 4) edit an existing stroke and add
a new stroke event.
Figure 48: Edit Patient Page

61 61
8 Step 4 – Edit Inpatient Data
Editing a patient’s Inpatient data is typically the fourth step when entering data about a stroke
patient. To add or edit a patient’s Inpatient data, select the patient’s full name (boxed in red)
from the Homepage as shown in Figure 49.
Figure 49: Navigating to the Edit Inpatient Page (1)
Next, click on the existing stroke (boxed in red) you would like to edit as shown in Figure 50.
Figure 50: Navigating to the Edit Inpatient Page (2)

62 62
Next, click on “In-Patient” text (boxed in red) as shown in Figure 51.
Figure 51: Navigating to the Edit Inpatient Page (3)

63 63
You are now at the Edit Inpatient page. Here you will be able to add and edit the patient’s
Inpatient data. Figure 52 shows the Edit Inpatient page filled in for a sample patient. Once the
Inpatient data is entered, you are now ready to print the Acute Stroke 72-Hour Report. Please
click “View and Print Report” (boxed in purple) to view and print the Acute Stroke 72-Hour
Report. If you would like to enter stroke outcome data now, select “Continue” (boxed in red). If
you select “Continue” please remember to print the Acute Stroke 72-Hour Report after entering
the stroke outcome data. If you do not have stroke outcome data at this time and will be entering
it later select “Create and Return Home” (boxed in orange). If you would like to cancel, select
“Cancel”.
The Edit Inpatient page is shown below in Figure 52.
Figure 52: Edit Inpatient Page

64 64
On this page you will enter 24-Hour Follow-up, Quality Metrics, and Adverse Events data (if
applicable).
24-Hour Follow-Up:
• Enter the patients NIHSS 24 hours after stroke in the box. If the 24-Hour NIHSS cannot be determined, Check “24-Hour NIHSS UTD”.
Quality Metrics:
• If any of the following apply to the patient, check the appropriate check box. o DVT Prophylaxis: if the patient received DVT Prophylaxis at any hospital. o Dysphagia Swallowing Screen: if the patient was screened using a Dysphagia
Swallowing Screen AND the screen was done appropriately prior to any oral intake.
Adverse Events:
• Select the type of Adverse Event from the Adverse Event drop down menu. • If the Adverse Event was associated with neurological worsening check the
Neurological Worsening checkbox. • If more than one Adverse Event happened, press the “Add Additional Adverse Event”
button and another Adverse Event box will appear. Repeat this as many times as necessary.
• If an Adverse Event needs to be deleted check the delete box and it will be removed when you save.

65 65
It is important that you enter the correct data into the QuICR Registry. For a list of
definitions for the Add Stroke page, please refer to Table 13.
Table 13: Edit Inpatient Definitions
Term Definition
24-Hour NIHSS UTD Check "24-Hour NIHSS UTD" if the 24-Hour NIHSS cannot be determined. If
this is checked, you will not be able to fill in the 24-Hour NIHSS until the box is
unchecked.
24-Hour NIHSS National Institute of Health Stroke Scale (NIHSS) score 24 hours after
treatment. The NIHSS is a standardized stroke severity scale used to describe
neurological deficits in acute stroke patients. Minimum: 0, Maximum: 42.
DVT Prophylaxis Medical or physical measure to prevent deep venous thrombosis. Select "Yes"
if the patient received DVT prophylaxis while in hospital. Select "No" if the
patient did not receive DVT prophylaxis while in hospital. Select "UTD" if it
cannot be determined if the patient received DVT prophylaxis while in hospital.
Dysphagia Swallowing
Screen
Select “Yes” if the patient was screened using a Dysphagia Swallowing Screen
AND the screen was done appropriately prior to any oral intake. Select “No” if
the patient was not screened using a Dysphagia Swallowing Screen OR the
screen was not done appropriately prior to any oral intake. Select "UTD" if it
cannot be determined if the patient received a Dysphagia Swallowing Screen
while in hospital.
Neurological Worsening Check "Neurological Worsening" if there is an increase of 2 or more points
(compared to baseline) on the NIHSS or a clear deterioration in neurological
status with new or worsening signs on physical examination.
Adverse Event Type An adverse event is an undesired harmful effect resulting from the stroke or a
secondary complication. Select the type of event from list. Add adverse events
to list all events that occurred.
66 66
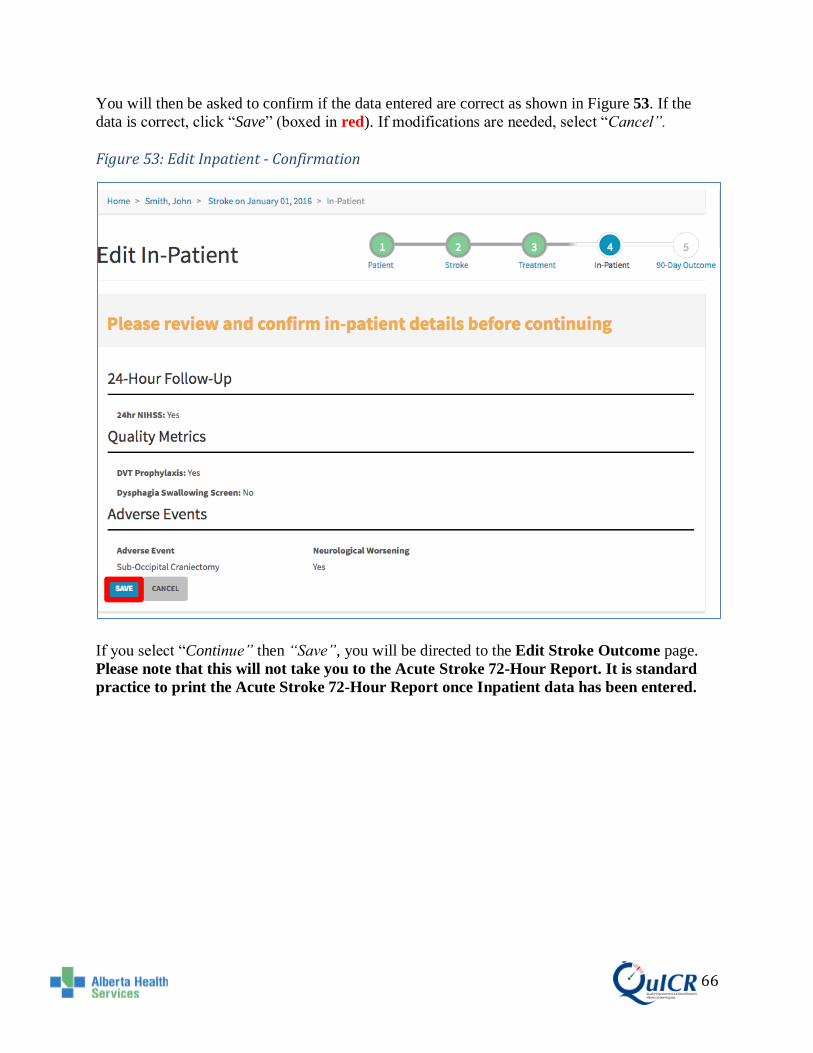
You will then be asked to confirm if the data entered are correct as shown in Figure 53. If the
data is correct, click “Save” (boxed in red). If modifications are needed, select “Cancel”.
Figure 53: Edit Inpatient - Confirmation
If you select “Continue” then “Save”, you will be directed to the Edit Stroke Outcome page.
Please note that this will not take you to the Acute Stroke 72-Hour Report. It is standard
practice to print the Acute Stroke 72-Hour Report once Inpatient data has been entered.

67 67
9 Step 5 - Printing the Acute Stroke 72-Hour Report
Typically, this will be the fifth step when entering data about a stroke patient. The Acute Stroke
72-Hour Report is a one page per stroke report using the QuICR Registry for the Patient Chart. It
is planned to be pushed to Alberta Netcare. The report highlights hospital performance metrics
such as DTN and CT-to-Groin Puncture times.
The Acute Stroke 72-Hour Report can be accessed by clicking
1) “Finish” button in the Stroke Outcomes Entry/Editing page 2) Any Green Button in the QuICR Registry
After entering patient, stroke, treatment, and Inpatient data to the QuICR Registry it is
important that you PRINT this report and file it in the Patient Chart. Figure 54 below
shows the Acute Stroke 72-Hour Report.

68 68
Figure 54: Acute Stroke 72-Hour Report

69 69
The Acute Stroke 72-Hour Report is to be physically printed and placed in the patient’s Patient
Chart. It will be kept as a physical record of the patient’s stroke. Figure 55 shows the steps on
how to print the report (boxed in red).
To print the Acute Stroke-72-Hour Report to the Patient Chart:
1) Click on the “Print” button on the top right corner (a print dialog box should pop up) 2) Choose the printer you would like to print to 3) Select the number of copies you would like to print 4) Select the Portrait layout 5) Click the new “Print” button
Figure 55: Printing the Acute Stroke 72-Hour Report
Steps to print the report may vary based on the web browser used. The above steps are for
Google Chrome but can be modified and adapted for use in other browsers.

70 70
10 Step 6 - Edit 90-Day Stroke Outcome and Quality Metrics Data
Editing a patient’s 90-Day Stroke Outcome is typically the last step when entering data about a
stroke patient. To add or edit a patient’s 90-Day Stroke Outcome data, select the patient’s full
name (boxed in red) from the Homepage as shown in Figure 56.
Figure 56: Navigating to the Edit 90-Day Stroke Outcome Page (1)
Next, click on the existing stroke (boxed in red) you would like to edit as shown in Figure 57.
Figure 57: Navigating to the Edit 90-Day Stroke Outcome Page (2)

71 71
Next, click on “90-Day Stroke Outcome” text (boxed in red) as shown in Figure 58.
Figure 58: Navigating to the Edit 90-Day Stroke Outcome Page (3)

72 72
You are now at the Edit 90-Day Stroke Outcome page. Typically, this will be the final step
when entering data about a stroke patient. Here you will be able to edit the patient’s 90-Day
Stroke Outcome and Quality Metrics data. You will add 90-Day Stroke Outcome data after you
have entered the patient, stroke, treatment, and Inpatient data. If you have not already printed the
72-Hour Acute Stroke Report, please do so before or after editing the patient’s 90-Day Stroke
Outcome. Figure 59 shows the 90-Day Stroke Outcome page filled in for a sample patient. Once
the required stroke outcome data are entered, select “Finish” (boxed in red). This will take you
to the 72-Hour Acute Stroke Report.
If you do not have 90-Day Stroke Outcome data at this time and will be entering it later select
“Cancel”.
Figure 59: Edit 90-Day Stroke Outcome Page

73 73
Stroke Outcome:
• Check "90-Day Follow-Up UTD" if the 90-Day Outcome cannot be reasonably determined. If this is checked, you will not be able to make add or more changes to the 90-Day Outcomes Page until the box is unchecked. (e.g. If the patient is from out of country or if the stroke was a mimic, check "90-Day Follow-Up UTD").
• Select the appropriate outcome modality check box (in-person or telephone interview).
• The Determination Date can be typed in the box (dd-MMM-yyyy) or by clicking in the box a drop down menu will appear and the Determination Date can be selected.
• Check the “Death” checkbox if the patient has died. If the patient has died, fill in the date of death (dd-MMM-yyyy) and whether the death occurred in hospital or outside of the hospital.
Disability Scales:
• Enter the appropriate mRS, 90-Day NIHSS, and BI scores in the boxes
It is important that you enter the correct data into the QuICR Registry. For a list of
definitions for the edit 90-Day Stroke Outcomes page, please refer to Table 14 below.
Table 14: Edit 90-Day Stroke Outcome Definitions
Term Definition
Determination Date Date when the 90-day stroke outcome was determined. Format: dd-MMM-yyyy (e.g.
01-Jan-1950).
Modality The method used to determine the 90-day stroke outcome. Can be either in "Person" or
by "Telephone".
Death Check "Death" if the patient died.
Date of Death Date when the patient died. Format: dd-MMM-yyyy (e.g. 01-Jan-1950).
Death Occurred in
Hospital
Either of two categories (yes or no). Select "Yes" if the patient died in hospital
(including in the Emergency Department). Select "No" if the patient died while outside
the hospital.
mRS The Modified Rankin Scale (mRS) measures the degree of functional neurological
disability/dependence after a stroke. This scale can be assessed in person or by
telephone with the patient or caregiver. Minimum: 0, Maximum: 6 (lower is better).
90-Day NIHSS National Institute of Health Stroke Scale (NIHSS) score after 3 months +/- 30 days
from the stroke onset date. The NIHSS is a standardized stroke severity scale used to
describe neurological deficits in acute stroke patients. Minimum: 0, Maximum: 42
(lower is better).
BI The Barthel Index (BI) rates simple activities of daily living (ADLs). This scale can be
assessed in person or by telephone with the patient or caregiver. Minimum: 0,
Maximum: 100 (higher is better).

74 74
You will then be asked to confirm the data entered are correct as shown in Figure 60. If the data
is correct, select “Finish” (boxed in red) if modifications are needed select “Cancel”.
Figure 60: Edit 90-Day Stroke Outcome - Confirmation
If you click “Finish” then “Save”, you will be directed to the Acute Stroke 72-Hour Report.
You have now entered all data necessary for your patient!
If you have not already printed the Acute Stroke 72-Hour Report, please
print and file it in the Patient Chart.
Please log out.
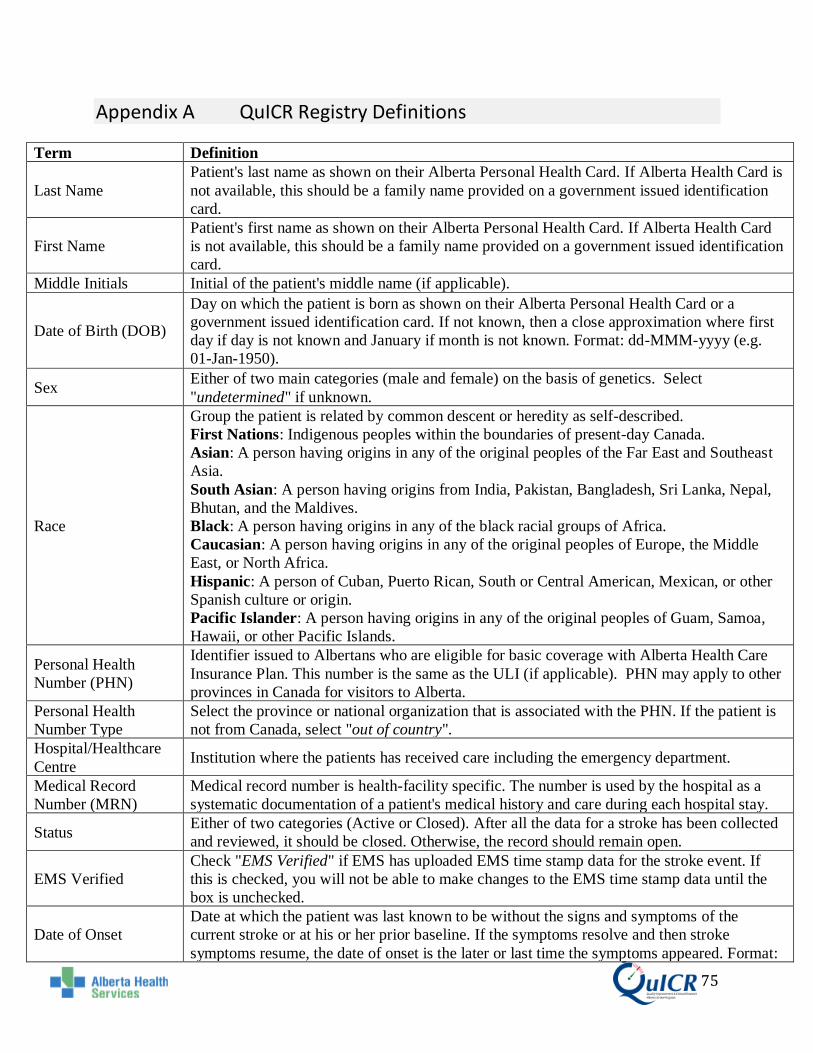
75 75
Appendix A QuICR Registry Definitions
Term Definition
Last Name
Patient's last name as shown on their Alberta Personal Health Card. If Alberta Health Card is
not available, this should be a family name provided on a government issued identification
card.
First Name
Patient's first name as shown on their Alberta Personal Health Card. If Alberta Health Card
is not available, this should be a family name provided on a government issued identification
card.
Middle Initials Initial of the patient's middle name (if applicable).
Date of Birth (DOB)
Day on which the patient is born as shown on their Alberta Personal Health Card or a
government issued identification card. If not known, then a close approximation where first
day if day is not known and January if month is not known. Format: dd-MMM-yyyy (e.g.
01-Jan-1950).
Sex Either of two main categories (male and female) on the basis of genetics. Select
"undetermined" if unknown.
Race
Group the patient is related by common descent or heredity as self-described.
First Nations: Indigenous peoples within the boundaries of present-day Canada.
Asian: A person having origins in any of the original peoples of the Far East and Southeast
Asia.
South Asian: A person having origins from India, Pakistan, Bangladesh, Sri Lanka, Nepal,
Bhutan, and the Maldives.
Black: A person having origins in any of the black racial groups of Africa.
Caucasian: A person having origins in any of the original peoples of Europe, the Middle
East, or North Africa.
Hispanic: A person of Cuban, Puerto Rican, South or Central American, Mexican, or other
Spanish culture or origin.
Pacific Islander: A person having origins in any of the original peoples of Guam, Samoa,
Hawaii, or other Pacific Islands.
Personal Health
Number (PHN)
Identifier issued to Albertans who are eligible for basic coverage with Alberta Health Care
Insurance Plan. This number is the same as the ULI (if applicable). PHN may apply to other
provinces in Canada for visitors to Alberta.
Personal Health
Number Type
Select the province or national organization that is associated with the PHN. If the patient is
not from Canada, select "out of country".
Hospital/Healthcare
Centre Institution where the patients has received care including the emergency department.
Medical Record
Number (MRN)
Medical record number is health-facility specific. The number is used by the hospital as a
systematic documentation of a patient's medical history and care during each hospital stay.
Status Either of two categories (Active or Closed). After all the data for a stroke has been collected
and reviewed, it should be closed. Otherwise, the record should remain open.
EMS Verified
Check "EMS Verified" if EMS has uploaded EMS time stamp data for the stroke event. If
this is checked, you will not be able to make changes to the EMS time stamp data until the
box is unchecked.
Date of Onset
Date at which the patient was last known to be without the signs and symptoms of the
current stroke or at his or her prior baseline. If the symptoms resolve and then stroke
symptoms resume, the date of onset is the later or last time the symptoms appeared. Format:

76 76
dd-MMM-yyyy (e.g. 01-Jan-1950).
Time of Onset
Time at which the patient was last known to be without the signs and symptoms of the
current stroke or at his or her prior baseline. If the symptoms resolve and then stroke
symptoms resume, the time of onset is the later or last time the symptoms appeared. Format
HH:mm 24hr (e.g. 23:10).
Stroke occurred in
Either of two categories (community or hospital). Select "Community" if stroke occurs while
the patient is outside the hospital. Select "Hospital" if stroke (re)occurs while the patient is
in a hospital with Inpatient beds (including in the Emergency Department).
Patient Home Postal
Code at Time of
Stroke
Patient’s home postal code at the time of stroke. (e.g. If a patient's primary residence is
British Columbia and displays stroke symptoms while at their residence in Alberta; the
postal code will be that of the primary residence in British Columbia). If the patient is from
out-of-country, then leave the postal code field blank.
911 Call Date Date that 911 was called for the current stroke. Format: dd-MMM-yyyy (e.g. 01-Jan-1950).
911 Call Time Time that 911 was called for the current stroke. Format HH:mm 24hr (e.g. 23:10).
EMS Dispatch Date Date that EMS was dispatched to go to the scene of the stroke. Format: dd-MMM-yyyy (e.g.
01-Jan-1950).
EMS Dispatch Time Time that EMS was dispatched to go to the scene of the stroke. Format HH:mm 24hr (e.g.
23:10).
EMS on Scene Date Date that the EMS crew arrived at the scene of the stroke. Format: dd-MMM-yyyy (e.g. 01-
Jan-1950).
EMS on Scene Time Time that the EMS crew arrived at the scene of the stroke. Format HH:mm 24hr (e.g. 23:10).
EMS Depart Scene
Date
Date that the EMS crew left the scene of the stroke en route to the hospital. Format: dd-
MMM-yyyy (e.g. 01-Jan-1950).
EMS Depart Scene
Time
Time that the EMS crew left the scene of the stroke en route to the hospital. Format HH:mm
24hr (e.g. 23:10).
Arrival Date
The earliest arrival date available from any of the following time stamps: 1) EMS arrival
date 2) Patient registration or triage date or 3) CT start date If this is an in-hospital stroke,
leave the arrival date blank. Format: dd-MMM-yyyy (e.g. 01-Jan-1950).
Arrival Time
Enter the earliest arrival time available from any of the following time stamps: 1) EMS
arrival time; 2) Patient registration or triage time; or 3) CT start time. If this is an in-hospital
stroke, leave the arrival time blank.
Format HH:mm 24hr (e.g. 23:10).
Arrival Method Modality of transportation used by the patient to arrive at the emergency department.
Pre-treatment NIHSS
National Institute of Health Stroke Scale (NIHSS) score given to the patient prior to
treatment. The NIHSS is a standardized stroke severity scale used to describe neurological
deficits in acute stroke patients. Minimum: 0, Maximum: 42.
Type of Imaging Type of neuroimaging used for the patient in the acute phase (prior to treatment at the site).
First Slice Date The date displayed on the first slice image. Format dd-MMM-yyyy (e.g. 01-Jan-1950).
First Slice Time The time displayed on the first slice image. Format HH:mm 24hr (e.g. 23:10).
Thrombolysis
Administered
Check "Thrombolysis Administered" if thrombolysis (intravenous alteplase (tPA)) has been
administered at the hospital.
Thrombolysis Date Date of thrombolysis bolus was initiated. Format: dd-MMM-yyyy (e.g. 01-Jan-1950).
Thrombolysis Time Time of thrombolysis bolus was initiated. Format HH:mm 24hr (e.g. 23:10).
Thrombolysis
Physician
Name of the Most Responsible Physician that ordered thrombolysis at your site. If
telemedicine was utilized, the Thrombolysis Physician is the physician at your site.
Thrombolysis
Location
Location in the hospital where the patient was administered thrombolysis. Select Emergency
Bay if it was administered in the ED; CT Scanner/Imaging area if it was administered while

77 77
the patient was in the scanner or in the imaging area; Inpatient unit if the it was administered
in an Inpatient bed (includes ICU and the Step Down Unit); angio suite if it was
administered in the angio suite; or unable to determine.
Thrombolysis Drug Thrombolytic drug name administered.
Patient Weight Est.
(kg) Estimated weight (kg). Do not enter the patient's weight in pounds.
Drug Dose (mg) Thrombolytic drug dose (mg).
Treatment with
Telemedicine
Select "Yes" if telestroke was used in diagnosis or treatment decisions. Select "No" if
telestroke was not used in diagnosis or treatment decisions. Select "UTD" if it cannot be
determined if telestroke was used in diagnosis or treatment decisions.
Stroke Team Pre-
notified
Select "Yes" if the stroke/care team was notified of the incoming stroke before the patient's
arrival. Select "No" if the stroke/care team was not notified of the incoming stroke before the
patient's arrival. Select "UTD" if it cannot be determined if the stroke/care team was notified
of the incoming stroke before the patient's arrival.
Direct to CT
Select "Yes" if the patient was transported directly from triage to the CT scanner on the EMS
stretcher. Select "No" if the patient was not transported directly from triage to the CT
scanner on the EMS stretcher. Select "UTD" if it cannot be determined if the patient was
transported directly from triage to the CT scanner on the EMS stretcher.
Patient Registered as
Unknown
Select "Yes" if the patient was registered as unknown, pre-registered prior to arrival, or
another rapid registration process where the full registration of the patient was done in a
rapid manner (as per your site's trauma protocol). Select "No" if there was no rapid
registration process used and full registration was completed upon patient arrival in the ED.
Select "UTD" if it cannot be determined if a rapid registration process was used.
Endovascular
Treatment Check "Endovascular Administered" if the patient was treated with endovascular procedure.
Interventionist Name of the interventionist that performed the endovascular procedure.
Medical/Neurology Name of the physician who was the medical/neurology lead during the procedure.
Groin Puncture Date Date when arterial access was obtained during endovascular treatment. Format: dd-MMM-
yyyy (e.g. 01-Jan-1950).
Groin Puncture Time Time when arterial access was obtained during endovascular treatment. Format HH:mm 24hr
(e.g. 23:10).
mTICI Scale (final) Final reperfusion that was achieved after the endovascular procedure.
First Reperfusion
Date
Date of first re-flow into the affected vascular territory. The vascular territory could be
defined by the major proximal vessel that the stent is opened in (this definition would cover
posterior circulation). It could mean complete reflow OR it could mean flow into one major
M2 branch while the other remained occluded. Format: dd-MMM-yyyy (e.g. 01-Jan-1950).
First Reperfusion
Time
Time of first re-flow into the affected vascular territory. The vascular territory could be
defined by the major proximal vessel that the stent is opened in (this definition would cover
posterior circulation). It could mean complete reflow OR it could mean flow into one major
M2 branch while the other remained occluded. Format HH:mm 24hr (e.g. 23:10).
Device Used Device used during endovascular treatment.
Clinical Trial Select the clinical trials that the patient was enrolled in at your site.
24-Hour NIHSS UTD Check "24-Hour NIHSS UTD" if the 24-Hour NIHSS cannot be determined. If this is
checked, you will not be able to fill in the 24-Hour NIHSS until the box is unchecked.
24-Hour NIHSS
National Institute of Health Stroke Scale (NIHSS) score 24 hours after treatment. The
NIHSS is a standardized stroke severity scale used to describe neurological deficits in acute
stroke patients. Minimum: 0, Maximum: 42.

78 78
Discharge Date
Date at which the patient leaves acute care at the hospital and either returns home or is
transferred to another facility. (e.g. if the patient is discharged from acute care and
transferred to a rehab or long term care ward (within the same institution) then date of
discharge is the date of transfer). If the patient is not admitted to the hospital, use the date of
discharge from the Emergency Department. If the patient is treated in a CT Ambulance, the
date of discharge is the departure date after tPA has started. Format: dd-MMM-yyyy (e.g.
01-Jan-1950).
Discharge Time
Time at which the patient leaves acute care at the hospital and either returns home or is
transferred to another facility. (e.g. if the patient is discharged from acute care and
transferred to a rehab or long term care ward (within the same institution) then time of
discharge is the time of transfer). If the patient is not admitted to the hospital, use the time
of discharge from the Emergency Department. If the patient is treated in a CT Ambulance,
the time of discharge is the departure time after tPA has started. Format HH:mm 24hr (e.g.
23:10).
Discharge
Disposition
Patient's discharge location with disposition after discharge from the hospital. If the patient
died in hospital, select "Death". If the patient is not admitted to the hospital, use the date of
discharge from the Emergency Department.
DVT Prophylaxis
Medical or physical measure to prevent deep venous thrombosis. Select "Yes" if the patient
received DVT prophylaxis while in hospital. Select "No" if the patient did not receive DVT
prophylaxis while in hospital. Select "UTD" if it cannot be determined if the patient
received DVT prophylaxis while in hospital.
Dysphagia
Swallowing Screen
Select “Yes” if the patient was screened using a Dysphagia Swallowing Screen AND the
screen was done appropriately prior to any oral intake. Select “No” if the patient was not
screened using a Dysphagia Swallowing Screen OR the screen was not done appropriately
prior to any oral intake. Select "UTD" if it cannot be determined if the patient received a
Dysphagia Swallowing Screen while in hospital.
Neurological
Worsening
Check "Neurological Worsening" if there is an increase of 2 or more points on the NIHSS or
a clear deterioration in neurological status with new or worsening signs on physical
examination.
Adverse Event Type
An adverse event is an undesired harmful effect resulting from the stroke or a secondary
complication. Select the type of event from list. Add adverse events to list all events that
occurred.
90-Day follow-Up
UTD
Check "90-Day Follow-Up UTD" if the 90-Day Outcome cannot be reasonably determined.
If this is checked, you will not be able to make add or more changes to the 90-Day Outcomes
Page until the box is unchecked. (e.g. If the patient is from out of country or if the stroke was
a mimic, check "90-Day Follow-Up UTD").
Determination Date Date when the 90-day stroke outcome was determined. Format: dd-MMM-yyyy (e.g. 01-Jan-
1950).
Modality The method used to determine the 90-day stroke outcome. Can be either in "Person" or by
"Telephone".
Death Check "Death" if the patient died.
Date of Death Date when the patient died. Format: dd-MMM-yyyy (e.g. 01-Jan-1950).
Death Occurred in
Hospital
Either of two categories (yes or no). Select "Yes" if the patient died in hospital (including in
the Emergency Department). Select "No" if the patient died while outside the hospital.
mRS
The Modified Rankin Scale (mRS) measures the degree of functional neurological
disability/dependence after a stroke. This scale can be assessed in person or by telephone
with the patient or caregiver. Minimum: 0, Maximum: 6 (lower is better).

79 79
90-Day NIHSS
National Institute of Health Stroke Scale (NIHSS) score after 3 months +/- 30 days from the
stroke onset date. The NIHSS is a standardized stroke severity scale used to describe
neurological deficits in acute stroke patients. Minimum: 0, Maximum: 42 (lower is better).
BI
The Barthel Index (BI) rates simple activities of daily living (ADLs). This scale can be
assessed in person or by telephone with the patient or caregiver. Minimum: 0, Maximum:
100 (higher is better).

80 80
Appendix B Navigating the QuICR Registry
After entering data in the Edit pages and confirming the data in Confirmation pages, Summary
pages are created. This section will help you understand the navigation options available on the
Homepage, Summary pages, Breadcrumb, and Progress bar.
• For navigation options on the Homepage, please refer to Appendix B.1. • For navigation options on the Patient Summary page, please refer to Appendix B.2. • For navigation options on the Stroke Summary page, please refer to Appendix B.3.
For navigation options on the Treatment Summary page, please refer to Appendix B.4.
• For navigation options on the Breadcrumb, please refer to Appendix B.5. • For navigation options on the Progress Bar, please refer to Appendix B.6.

81 81
Appendix B.1 Navigating the Homepage
Log into the QuICR Registry, as described in Section 3, and click “Home” (boxed in red) on any
page. You will then see a screen similar to Figure 61.
Figure 61: Navigating to the Homepage
From the Homepage search for a patient by typing the patients name or PHN in the search box
(boxed in orange) and select “Search” (boxed in red) i.e. the desired patient’s name is John
Smith, we type John Smith in the search box. These steps are shown in Figure 62.
Figure 62: Homepage – Searching for a Patient

82 82
All patients matching your description will be listed. An example search result for “John Smith”
is shown below in Figure 63. From this page you can either:
1) Add a new patient by clicking “New” (boxed in purple). For instructions on how to add a new patient, please refer to Section 5.1.
2) Edit the patient’s data by clicking on the patient’s name (boxed in red). You will then be navigated to the selected patient’s edit page. For instructions on the fields in the edit patient page, please refer to Section 5.2.
3) Edit an existing stroke by clicking on the stroke occurrence date (boxed in orange). For instructions on how to enter stroke data, please refer to Section 6.2.
Figure 63: Homepage – Selecting a Patient or Stroke
If a patient is selected on the Homepage, you will be redirected to the Patient Summary page. For
instructions on how to navigate through the Patient Summary page, please refer to Appendix
B.2.
If a stroke date is selected on the Homepage, you will be redirected to the Stroke Summary page.
For instructions on how to navigate through the Stroke Summary page, please refer to Appendix
B.3.

83 83
Appendix B.2 Navigating the Patient Summary Page
If a patient is selected on the Homepage, you will be directed to the Patient Summary page. The
Patient Summary page is shown below in Figure 64. From the Patient Summary page, you will
be able to:
1) Edit the patient’s data by clicking on the patient’s name (boxed in red). For instructions on how to edit a new patient, please refer to Section 8.
2) Navigate to the Stroke Summary page and edit an existing stroke by clicking on the stroke occurrence date (boxed in purple). For instructions on how to navigate through the Stroke Summary page, please refer to Appendix B.3.
3) Add a new stroke event to the patient by clicking the “Add Stroke” button (boxed in orange). For instructions on how to enter stroke data, please refer to Section 6.1.
4) Navigate to the Treatment Summary page and edit an existing treatment by clicking on the hospital name (boxed in brown). For instructions on how to navigate through the Treatment Summary page, please refer to Appendix B.4.
5) View and print the Acute Stroke 72-Hour Report by clicking on the green button associated with the stroke event of interest. For instructions on how to print the Acute Stroke 72-Hour Report, please refer to Section 9.
Figure 64: Patient Summary Page

84 84
Appendix B.3 Navigating the Stroke Summary Page
If a stroke is selected on the Homepage, or Patient Summary page, you will be directed to a
Stroke Summary page for the patient. The sample patient’s Stroke Summary is shown below in
Figure 65. From the Stroke Summary page, you will be able to:
1) Edit the stroke by clicking on “Edit Stroke” button (boxed in red). For instructions on how to enter stroke data, please refer to Section 6.2.
2) Navigate to the Treatment Summary page and edit an existing treatment by clicking on the hospital name (boxed in brown). For instructions on how to navigate through the Treatment Summary page, please refer to Appendix B.4.
3) Edit the Inpatient data by clicking on the heading “Inpatient” (boxed in orange). For Instructions on how to enter Inpatient data, please refer to Section 8.
4) View and print the Acute Stroke 72-Hour Report by clicking on the green button. For instructions on how to print the Acute Stroke 72-Hour Report please refer to Section 9.
5) Edit the 90-Day Stroke Outcome data by clicking on the heading “90-Day Stroke Outcome” (boxed in purple). For instructions on how to enter 90-Day Stroke Outcome data please refer to Section 10.

85 85
Figure 65: Stroke summary

86 86
Appendix B.4 Navigating the Treatment Summary Page
If a treatment is selected on the Stroke Summary page, or Patient Summary page, you will be
directed to a Treatment Summary page for the patient. The sample patient’s Treatment Summary
is shown below in Figure 66. From the Treatment Summary page, you will be able to:
1) Edit the treatment by clicking on the “Edit Treatment” button (boxed in red). For instructions on how to enter stroke data, please refer to Section 7.2.
2) Navigate to the previous or next treatment site’s summary page by clicking on the “Previous Hospital” or “Next Hospital” button respectively (boxed in purple).
Figure 66: Treatment Summary Page

87 87
Appendix B.5 Navigating Using the Breadcrumb
The Breadcrumb is a useful navigation tool that can help you navigate to a previous step in the
data entry process. If there are any outstanding changes, please remember to save before
navigating with the breadcrumb. As you progress through the data entry process, new links
will appear on the breadcrumb:
• The “Home” link (boxed in red) is shown when a patient is selected. This link will take you to the Homepage. For more information on the Homepage, please refer to Appendix B.1.
• The “Patient” link (boxed in orange) is shown when a stroke is selected. This link will take you to the Patient Summary page. For more information on the Patient Summary page, please refer to Appendix B.2.
• The “Stroke” link (boxed in purple) is shown when you are on a treatment, Inpatient, or 90-Day Stroke Outcome page. This link will allow you to navigate back to the Stroke Summary page. For more information on the Stroke Summary page, please refer to Appendix B.3.
The breadcrumb is shown below in Figure 67.
Figure 67: The Breadcrumb
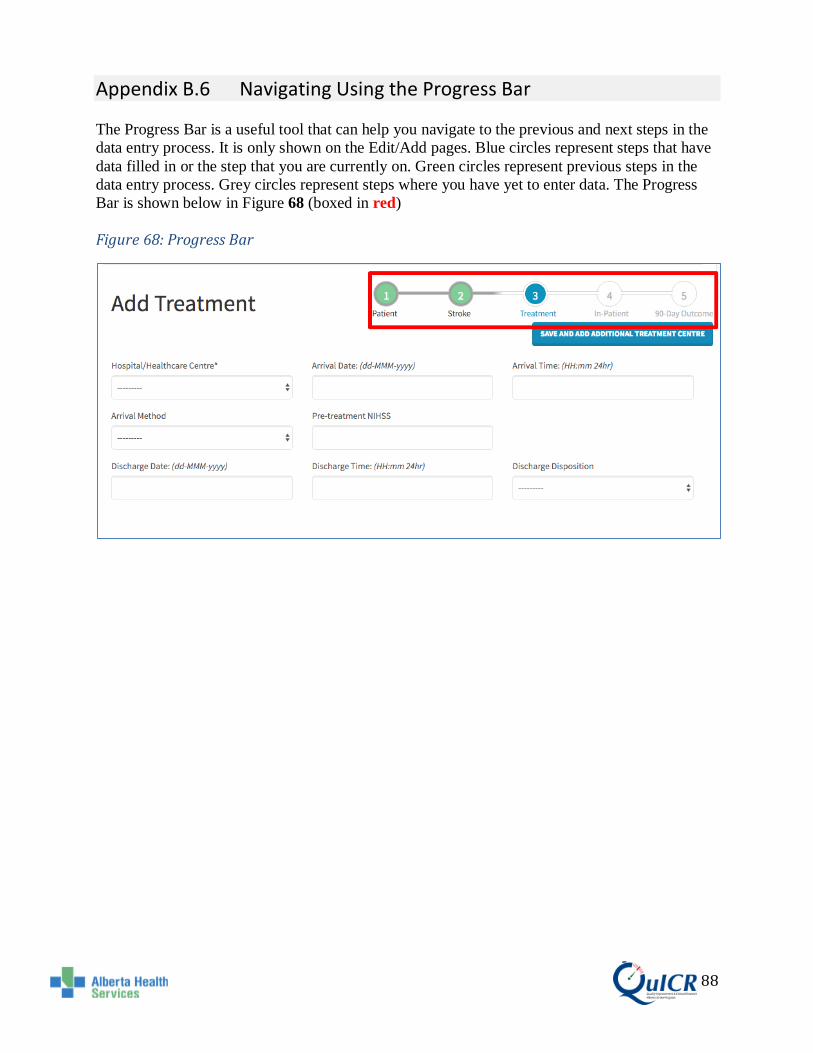
88 88
Appendix B.6 Navigating Using the Progress Bar
The Progress Bar is a useful tool that can help you navigate to the previous and next steps in the
data entry process. It is only shown on the Edit/Add pages. Blue circles represent steps that have
data filled in or the step that you are currently on. Green circles represent previous steps in the
data entry process. Grey circles represent steps where you have yet to enter data. The Progress
Bar is shown below in Figure 68 (boxed in red)
Figure 68: Progress Bar

89 89
Appendix C Security To access Account Security, select “Security Settings” at the top of any page as shown in Figure
69 below. (boxed in red). If you are adding or editing patient data, please remember to save first.
Figure 69: Security Settings
Here you will have the ability to add additional backup phone numbers, create backup tokens,
and disable Two-Factor Authentication.
Backup Phone Numbers are used to access the QuICR Registry should the primary token
device be unavailable. Please see Appendix C.1 for more details.
Backup Tokens can be used to access the QuICR Registry when your primary token device and
backup devices are not available. Backup Tokens can only be used once per code. It is
recommended that you print and store a list of backup tokens at a secure location. Please see
Appendix C.2 for more details.
Disabling Two-Factor Authentication is not recommended. If you disable Two-Factor
Authentication, you will have to redo the process and enable Two-Factor Authentication.
Disabling Two-Factor Authentication is recommended only if you are deleting account saves
from your Google Authenticator mobile application. This includes resetting your phone or
reinstalling Google Authenticator. Please see Appendix C.3 for more details.

90 90
Appendix C.1 Security – Adding Backup Phone Numbers
Adding a backup phone number is a feature that helps you access the QuICR Registry if your
primary authentication method (Text Message or Token Generator) fails.
To add Backup Phone Numbers, navigate to the Account Security page and select “Add Phone
Number” as shown in Figure 70 (boxed in red).
Figure 70: Adding a Backup Phone (1)

91 91
Enter the phone number you wish to receive the Text Messages on. Ensure that the beginning
of the phone number has “+” and the country code. Once your phone number has been
entered, ensure that “Text Message” is selected and click “Next” as shown in Figure 71 (boxed in
red).
Figure 71: Adding a Backup Phone (2)
On your mobile device, you will receive a 6-digit number through Text Message.
Enter the 6-digit number into the Token box on the QuICR Registry as shown in Figure 72
(boxed in red).
Figure 72: Adding a Backup Phone (3)

92 92
Appendix C.2 Generating and Using Backup Tokens
Backup Tokens are useful if you do not have access to your primary authentication method or
registered backup phone number. Please generate the backup tokens and store them in a safe
location for future use.
To create a list of Backup Tokens, navigate to the Account Security, select “Show Codes” (boxed
in red) as shown below in Figure 73.
Figure 73: Generating Backup Tokens (1)
Next, select “Generate Tokens” as shown below in Figure 74 (boxed in red).
Figure 74: Generating Backup Tokens (2)

93 93
Appendix C.3 Disabling Two-Factor Authentication
It is not recommended to disable Two-Factor Authentication, as you will have to re-enable Two-
Factor Authentication upon login. Disabling Two-Factor Authentication may be useful in the
following scenarios:
1) If the authentication method is “Text Message” and you are going to switch to a new phone number.
2) If the authentication method is “Token Generator” and you are going to remove Google Authenticator from your mobile device.
3) If the authentication method is “Token Generator” and you are going to remove reformat/reset your mobile authentication device.
4) If the authentication method is “Token Generator” and you would like to transfer your Two-Factor Authentication device to another device.
If you did not disable Two-Factor Authentication before acting upon these scenarios’ you will be
locked out of the QuICR Registry. If this happens to you, email QuICR Support at
[email protected] or by calling (403) 220-8256. QuICR Support will reset your Two-Factor
Authentication and you will have to re-enable it.
To disable Two-Factor Authentication, please click “Disable Two-Factor Authentication” (boxed
in red) from the Security Settings page as shown in Figure 75.
Figure 75: Disabling Two-Factor Authentication (1)
Next, check “Yes, I am sure” and click “Disable” as shown in Figure 76 (boxed in red).

94 94
Figure 76: Disabling Two-Factor Authentication (2)
You have now disabled Two-Factor Authentication. If you would like to re-enable Two-Factor
Authentication, please follow the steps found in Section 4.

95 95
Appendix D Changing Your Password
If you have forgotten your password or would like to change your password, navigate to the
login page at: https://quicr.cru.ucalgary.ca/account/login/.
Next, click on the “Lost password” text (boxed in red). This is shown in Figure 77.
Figure 77: Password Reset (1)
You will be redirected to the Password Reset page. Enter your login email address in the text box
(boxed in orange) and click “Reset my password” (boxed in red). This is shown in Figure 78. If
you would like to go back to the Login page, please click the “Back” button.
Figure 78: Password Reset (2)

96 96
After you have completed the previous step, log into the email that you typed in the text box.
You will receive an email from [email protected]. Open the email and click on the attached
hyperlink.
You will be redirected to the Change Password page. Please enter your desired password in the
two text boxes provided (boxed in orange) then click the “Change my password” button (boxed
in red). These steps are shown in Figure 79.
Figure 79: Password Reset (3)
If the password’s match, you will be redirected to a Password Reset Confirmation page. From
here, click “Login” (boxed in red) to login with your new password. This step is shown in Figure
80.
Figure 80: Password Reset (4)
If you are having difficulties changing your password, please email QuICR Support at
[email protected] or by calling (403) 220-8256.