quillen etsu physicians - quillenphysiciansehr.com · when you first log in, you’ll land on the...
TRANSCRIPT
QUILLEN ETSU
PHYSICIANS
Quillen EHR Team
Phone: (423) 282-6122, Option 1
Provider Training Module
Allscripts Touchworks EHR
June 2018
Module 1: Daily Schedule & Clinical Desktop

2
MODULE INSTRUCTIONS
There are a total of 5 modules that need to be completed prior to the on-site training. It is REQUIRED that you complete all of the modules PRIOR to training.
These modules are intended to serve two purposes: as an introduction to the system, and as a reference. The modules are very detailed. As such, we don’t expect you to retain all of the information in the slides before training; however, we encourage you to print the PDFs, as you will be able to refer back to them as you begin to use the system.
Training will consist mainly of mock practice sessions, so a basic knowledge of the system prior to training is essential. If you have any problems completing these modules, please contact the EHR team. (Contact info is on Slide 1 of each module).

3
When you first log in, you’ll land
on the Daily schedule page.
You’ll notice a ”floating” Clinical Toolbar that
can be moved to different locations on the
screen. You can drag this out of the way, or
you can “x” out of it. (You won’t use it on this
screen very often). If you need to get it back,
click on Tools and choose Show/Hide Clinical
Toolbar.
“Floating” Clinical Toolbar
4
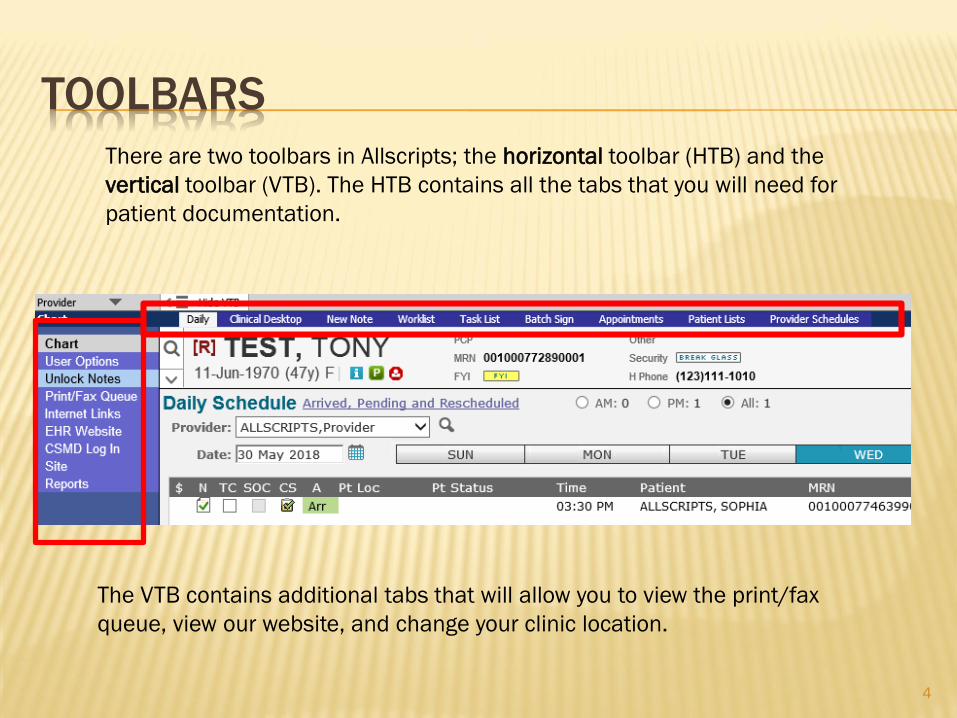
There are two toolbars in Allscripts; the horizontal toolbar (HTB) and the
vertical toolbar (VTB). The HTB contains all the tabs that you will need for
patient documentation.
The VTB contains additional tabs that will allow you to view the print/fax
queue, view our website, and change your clinic location.
TOOLBARS

5
“Floating” Clinical Toolbar
Tip: Once you’ve
searched for a name,
it will appear in the
drop-down list the next
time you perform a
search. This
functionality works
throughout Allscripts.
DAILY SCHEDULEWhen you first log in, you will see your Daily Schedule. To pull in aprovider’s schedule, click the
drop-down arrow in the Provider field. If their name is not there, click on the icon. A
Search Window will pop up.
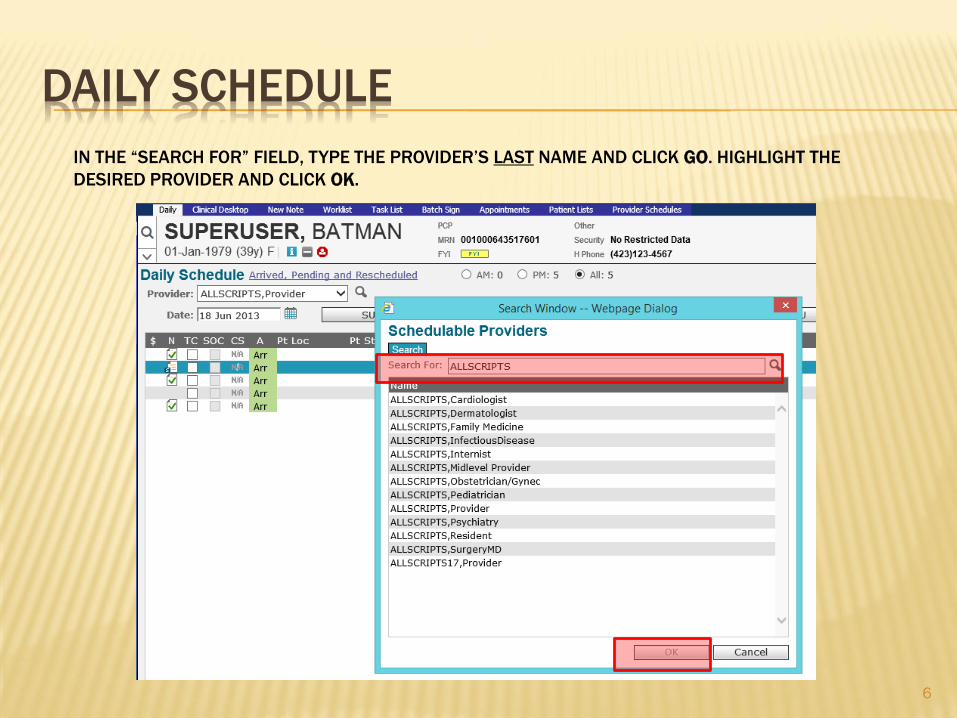
IN THE “SEARCH FOR” FIELD, TYPE THE PROVIDER’S LAST NAME AND CLICK GO. HIGHLIGHT THE
DESIRED PROVIDER AND CLICK OK.
6
DAILY SCHEDULE

7
There are several ways to change the date of the schedule:
1. Click on the day of the week
2. Click on the calendar icon next to the Date field
3. Click on the black arrows to navigate forward or backward a week
4. To get back to today’s date, click on this icon
DAILY SCHEDULE
8
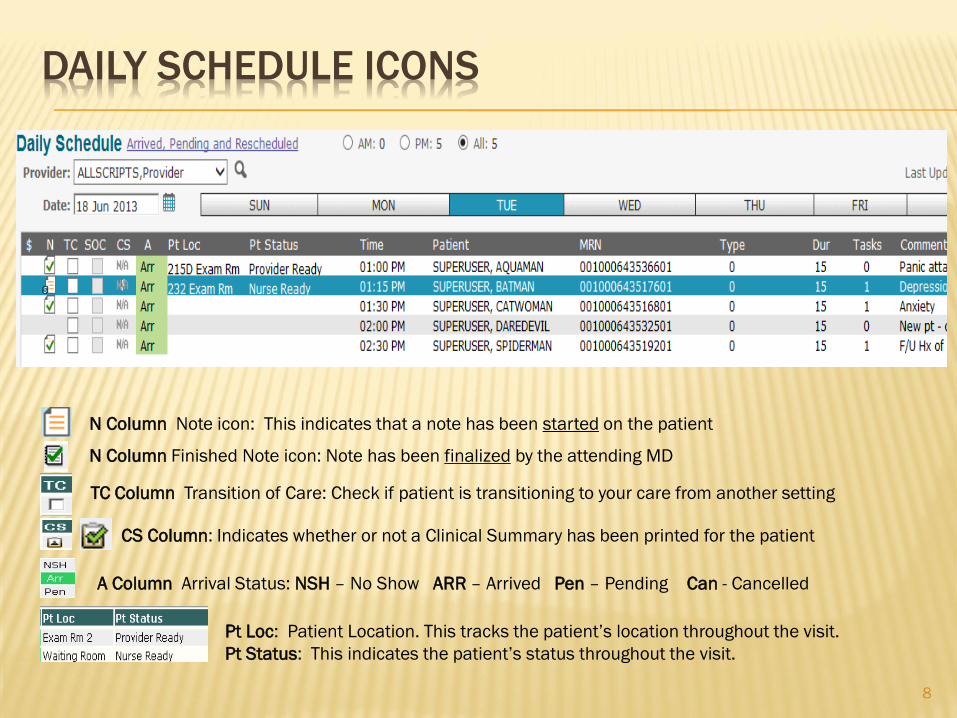
N Column Finished Note icon: Note has been finalized by the attending MD
N Column Note icon: This indicates that a note has been started on the patient
TC Column Transition of Care: Check if patient is transitioning to your care from another setting
CS Column: Indicates whether or not a Clinical Summary has been printed for the patient
A Column Arrival Status: NSH – No Show ARR – Arrived Pen – Pending Can - Cancelled
Pt Loc: Patient Location. This tracks the patient’s location throughout the visit.
Pt Status: This indicates the patient’s status throughout the visit.
DAILY SCHEDULE ICONS

9
PATIENT BANNER
A single click on the patient’s name from the Daily Schedule will pull them into the Patient
Banner. If the patient’s name is in the Banner, that indicates that you are documenting on that
patient’s electronic chart, so make a habit of checking the banner when charting to ensure you
are working on the correct patient.

10
You can also manually pull a patient into context. In the Patient Banner, click the magnifying
glass to choose the Select Patient. In the Select Patient box, type the patient’s LAST NAME,
FIRST NAME. Highlight the correct patient’s name, and then click OK.
Tip: When searching, you don’t have to type the entire name. You can type “Super, Gr,” for Superuser,
Grover. You can also search by other parameters, such as DOB, phone number, etc. Click the drop down next
to Name and choose the search parameter that you want to use. You can set a different parameter as your
default, too. Just click on the blue Personalize button in the upper right-hand corner!
PATIENT BANNER - SEARCHING

11
To read an FYI,
click on the yellow
FYI button on the
Patient Banner.
Tip: If the icon on the patient banner is yellow, there is
an available FYI. If it is grayed out, the field is empty.
PATIENT BANNER – FYI ICON
All of the patient’s demographic information can be accessed from the Patient Banner. The
age, sex, allergies, phone number, etc., are visible whenever the patient’s name is in context.
The FYI box on the patient banner is similar to a “sticky note” on a paper chart. It is used to
document information that is not clinically relevant and is typically used by the front desk staff;
however, anyone can read the information in the FYI field.

Other patient information can be accessed by clicking on the on the banner.
12
Information icon: Clicking on this opens the Patient Profile Dialog box. Information in this section
includes the FYI box, Chart Alerts, demographics, emergency contact info, pharmacy info and patient
care team. Hyperlinks at the top of the page will take you directly to each individual section.
PATIENT BANNER – INFORMATION ICON

13
Chart Alerts are used to document
clinically relevant information. You can
add a chart alert by clicking on the
on the patient banner.
Clicking the Add Alert button
opens this window, which
allows you to add multiple
Chart Alerts. There are some
available alerts which can
just be checked, or you can
free text an alert in the Ad
Hoc Alert section.
The Chart Alerts will appear on the
Clinical Toolbar.
INFORMATION ICON – CHART ALERTS

The patient care team, which is also accessed through the Information Icon, allows you to add/delete and view
other members of the patient’s care team. You can add providers, healthcare agencies and even family
members to the care team.
14
Click on the Add Provider/Agency
button. You can search by last
name or specialty. Check the
box next to the provider’s name
to add it to the patient’s chart.
To add a family member, click on
the Add Patient
Caregiver/Resource button and
free text their name.
INFORMATION ICON – PATIENT CARE TEAM

15
Tip: It’s important that you
ALWAYS access the patient’s
chart by double clicking from
the Daily Schedule (if they
have an appointment),
because this links the
appointment date with your
chart documentation.
To look at the patient’s chart, from the Daily tab, double click their name on your schedule. This
will take you to the next tab, the Clinical Desktop, which is their electronic chart.
THE CLINICAL DESKTOP

The Clinical Desktop is the patient’s “electronic chart.” There are two main components. Each
component contains different tabs, where you will access the patient’s information.
16
Clinical Toolbar
Component 1 Component 2
THE CLINICAL DESKTOP
17
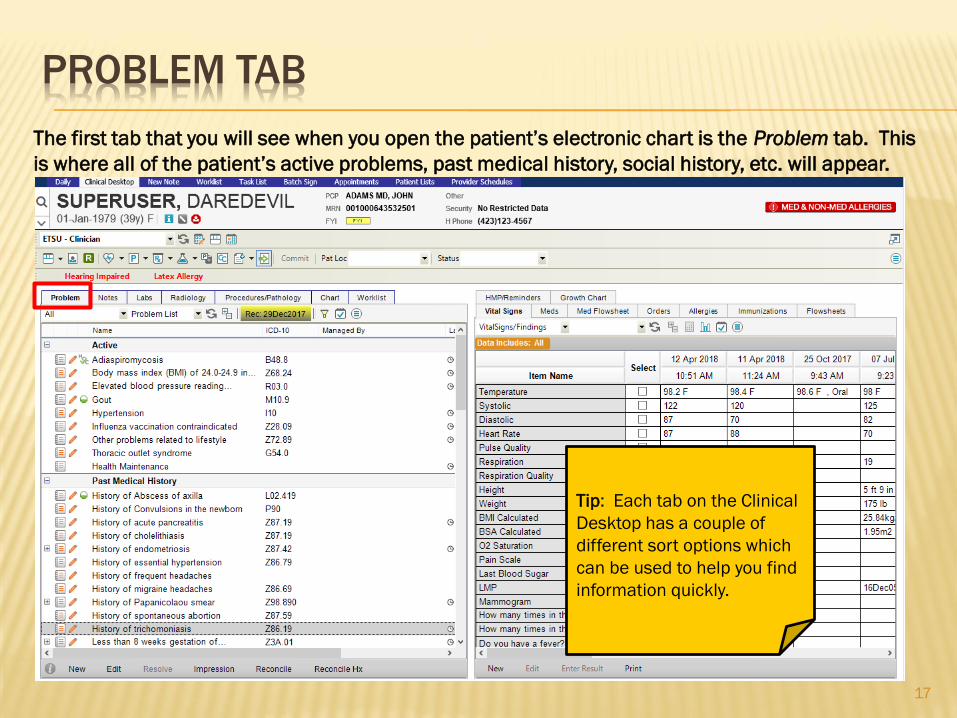
Tip: Each tab on the Clinical
Desktop has a couple of
different sort options which
can be used to help you find
information quickly.
The first tab that you will see when you open the patient’s electronic chart is the Problem tab. This
is where all of the patient’s active problems, past medical history, social history, etc. will appear.
PROBLEM TAB
18
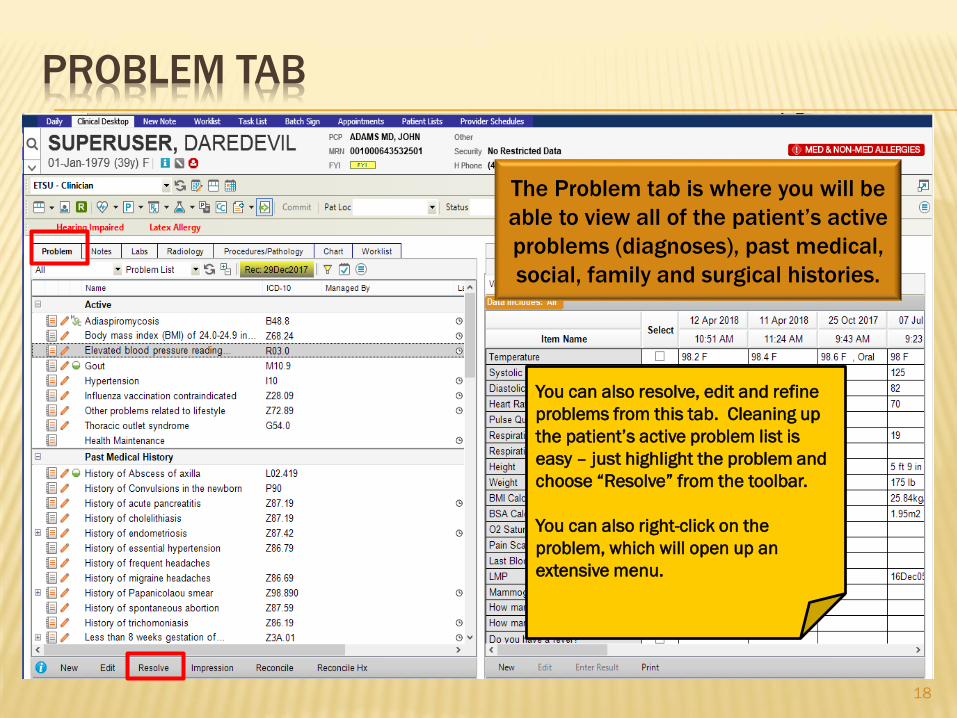
The Problem tab is where you will be
able to view all of the patient’s active
problems (diagnoses), past medical,
social, family and surgical histories.
You can also resolve, edit and refine
problems from this tab. Cleaning up
the patient’s active problem list is
easy – just highlight the problem and
choose “Resolve” from the toolbar.
You can also right-click on the
problem, which will open up an
extensive menu.
PROBLEM TAB

PROBLEM RECONCILATION
19
In order to ensure that the problem list remains
current and up to date, the Reconciliation button
will turn yellow at each appointment. Once the list
has been verified/updated, click the yellow button
to indicate that the list is current. For most clinics,
this is a provider task.
Different clinics have different policies regarding
resolving problems entered in by other clinics.
Please use your clinical discretion.
20
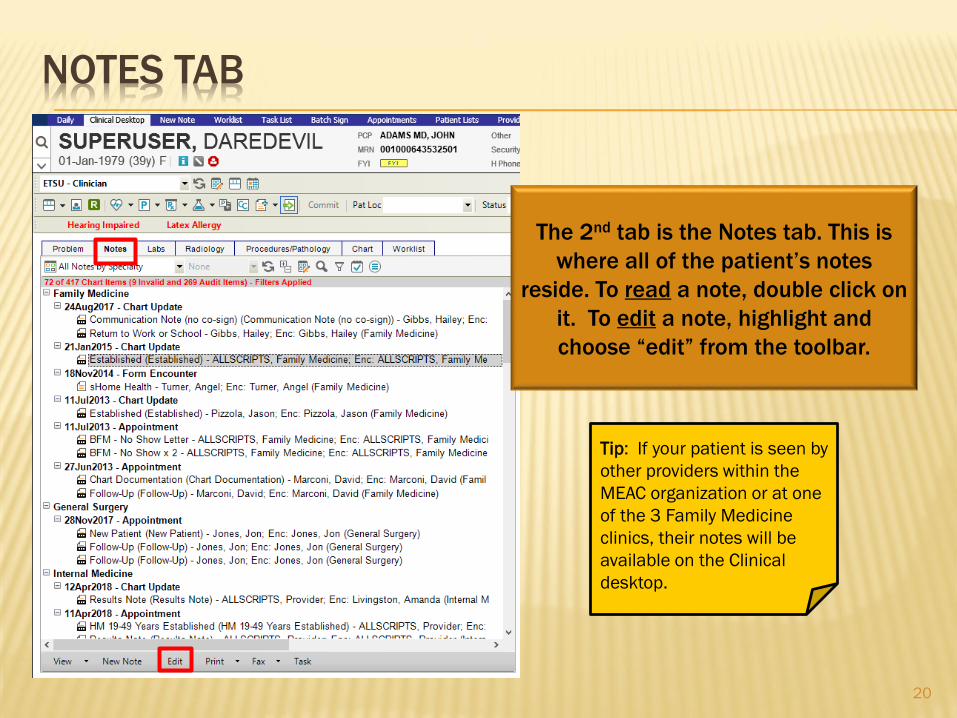
The 2nd tab is the Notes tab. This is
where all of the patient’s notes
reside. To read a note, double click on
it. To edit a note, highlight and
choose “edit” from the toolbar.
Tip: If your patient is seen by
other providers within the
MEAC organization or at one
of the 3 Family Medicine
clinics, their notes will be
available on the Clinical
desktop.
NOTES TAB

21
Finalized note icon: This note has been signed by the attending physician
Unfinalized note icon: This note still requires a signature
The small “s” indicates that this is a scanned document
sArchive – document was part of the original paper chart
NOTES TAB - ICONS

22
View Mode: This is similar to a “read-only”
mode. You can’t make any changes on this
page. This is how you should always open a
note unless you are charting in it.
To open a note in View Mode, double click the
note icon on the Clinical Desktop.
Edit Mode: This is what the screen looks when you are
actively charting on a patient.
There are two main ways to open a note in Edit mode:
1. Double click on the note icon on the Daily Schedule.
2. Highlight the note icon on the Notes tab and choose
“edit” on the toolbar.
NOTES – VIEW MODE VS. EDIT MODE

23
Normal lab that has been verified
Abnormal lab that has not been verified
Abnormal lab that has been verified
Scanned lab
We have an interface
with “Orchard” (our
own lab), so labs sent
to our lab will result
back into the system
electronically. Labs
that are sent to outside
vendors will come back
on paper and will be
scanned in by medical
records personnel.
Normal lab that has not been verified
Lab that has been resulted back manually
LABS TAB

24
The next couple of tabs in the first component
are pretty self-explanatory: the Procedures tab
contains procedure reports; Imaging has x-rays,
CT scans, etc., and the Chart tab contains the
entire chart—notes, labs, procedures, imaging
and administrative documents.
Procedures Radiology
Chart
Each tab has a sort option
that will allow you to find items
easier.
25
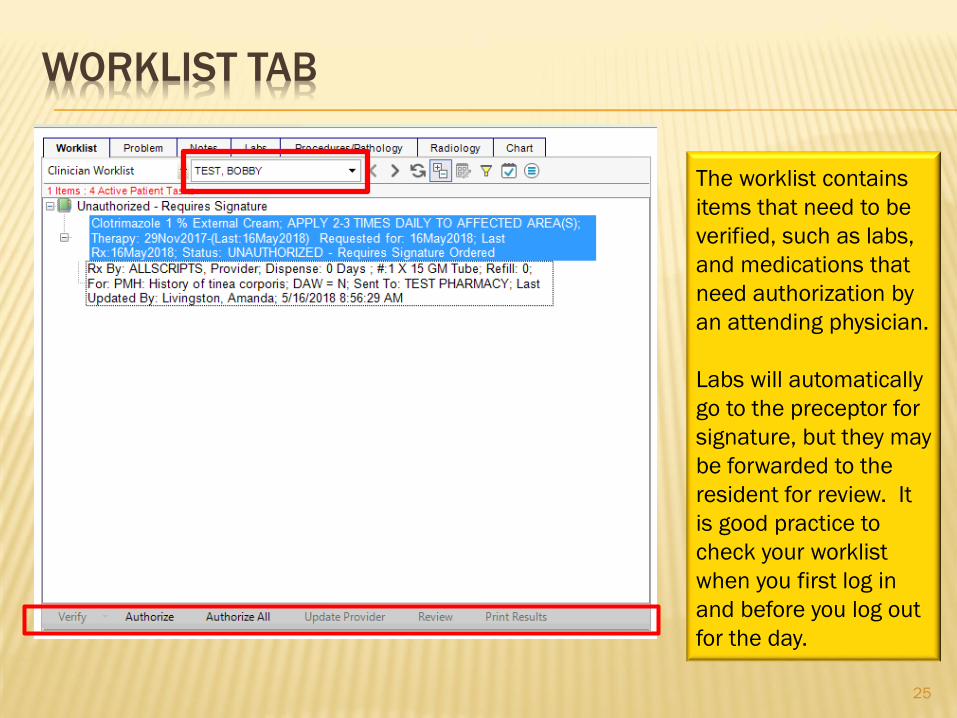
The worklist contains
items that need to be
verified, such as labs,
and medications that
need authorization by
an attending physician.
Labs will automatically
go to the preceptor for
signature, but they may
be forwarded to the
resident for review. It
is good practice to
check your worklist
when you first log in
and before you log out
for the day.
WORKLIST TAB
26
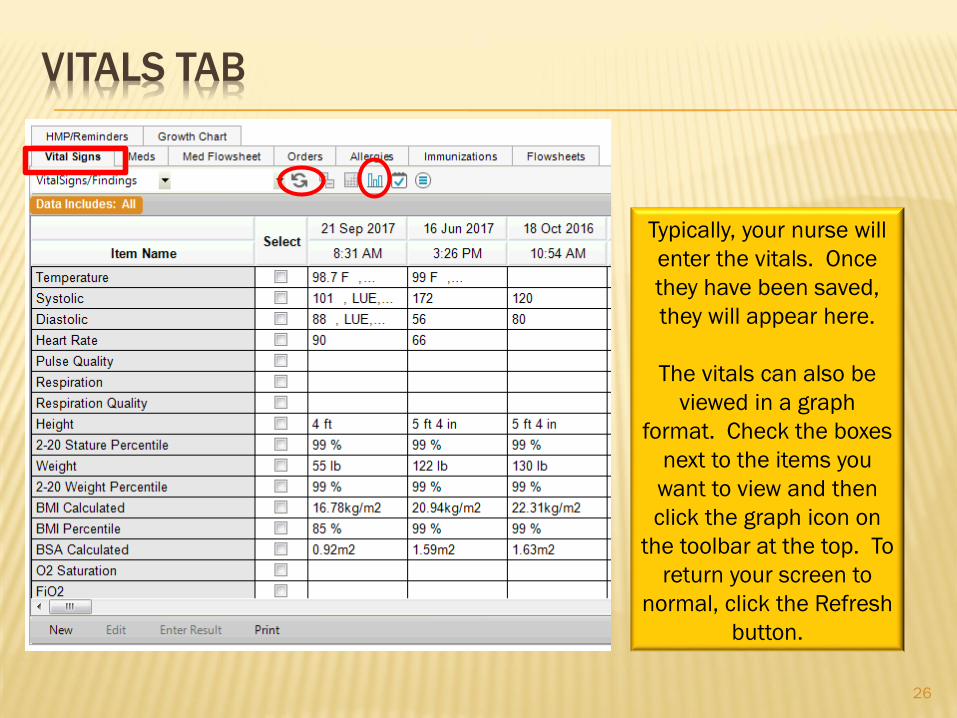
Typically, your nurse will
enter the vitals. Once
they have been saved,
they will appear here.
The vitals can also be
viewed in a graph
format. Check the boxes
next to the items you
want to view and then
click the graph icon on
the toolbar at the top. To
return your screen to
normal, click the Refresh
button.
VITALS TAB

27
The Meds tab allows you to do the following:
1. View the Current Medications. To view the details, double click the med
2. View the Past Medications/All Medications. To view discontinued and completed meds,
click the drop down and choose Past Medications
3. Prescribe a new medication (click on the New Rx button on the toolbar)
4. Renew a medication (click on the Renew w/ Changes button)
5. Discontinue/Complete a medication
6. Reprint/Resend a medication
7. View/print the drug education on a prescription (Drug Ed button)
MEDS TAB
28
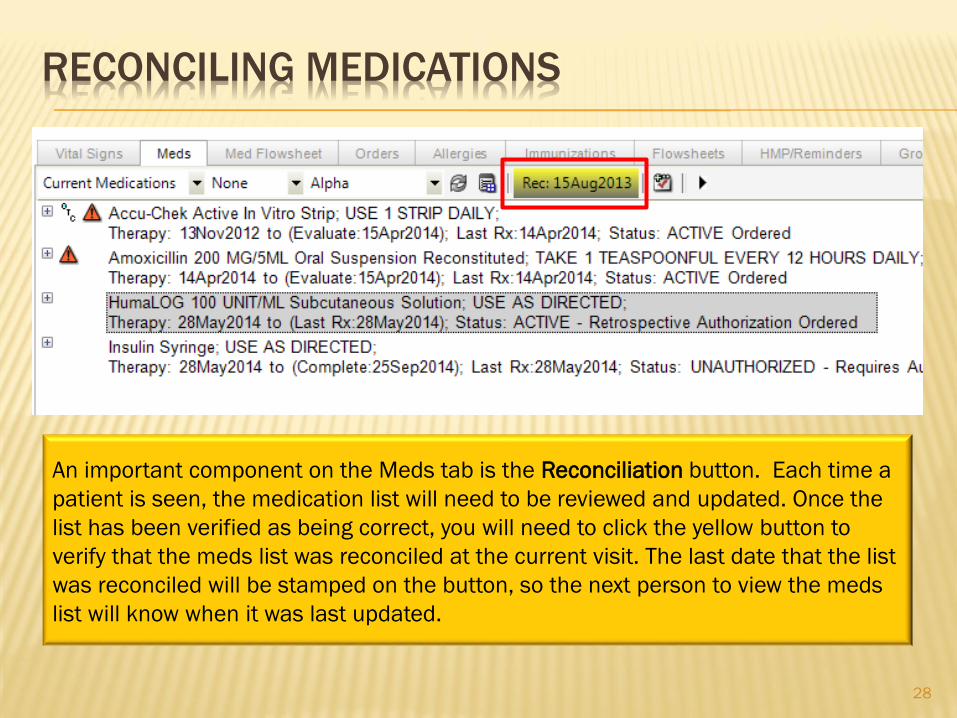
An important component on the Meds tab is the Reconciliation button. Each time a
patient is seen, the medication list will need to be reviewed and updated. Once the
list has been verified as being correct, you will need to click the yellow button to
verify that the meds list was reconciled at the current visit. The last date that the list
was reconciled will be stamped on the button, so the next person to view the meds
list will know when it was last updated.
RECONCILING MEDICATIONS

29
The Medication Flowsheet tab allows you to view the patient’s
meds in a easy-to-view table. The columns with a funnel icon allow
you to sort the meds by problem, status and medication name.
MEDICATION FLOWSHEET
30
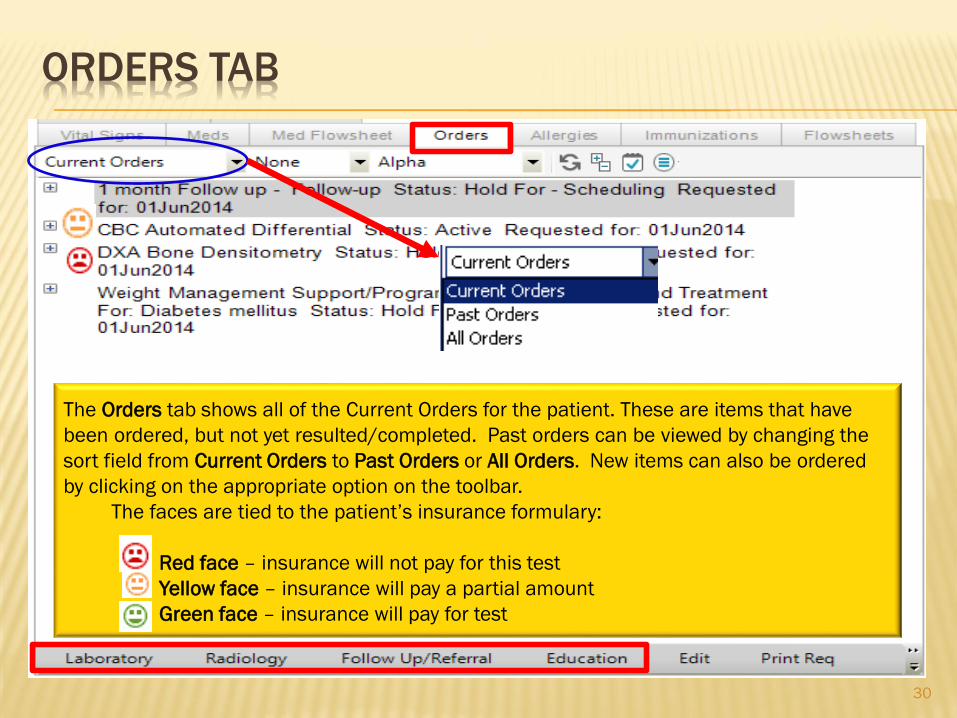
The Orders tab shows all of the Current Orders for the patient. These are items that have
been ordered, but not yet resulted/completed. Past orders can be viewed by changing the
sort field from Current Orders to Past Orders or All Orders. New items can also be ordered
by clicking on the appropriate option on the toolbar.
The faces are tied to the patient’s insurance formulary:
Red face – insurance will not pay for this test
Yellow face – insurance will pay a partial amount
Green face – insurance will pay for test
ORDERS TAB
31
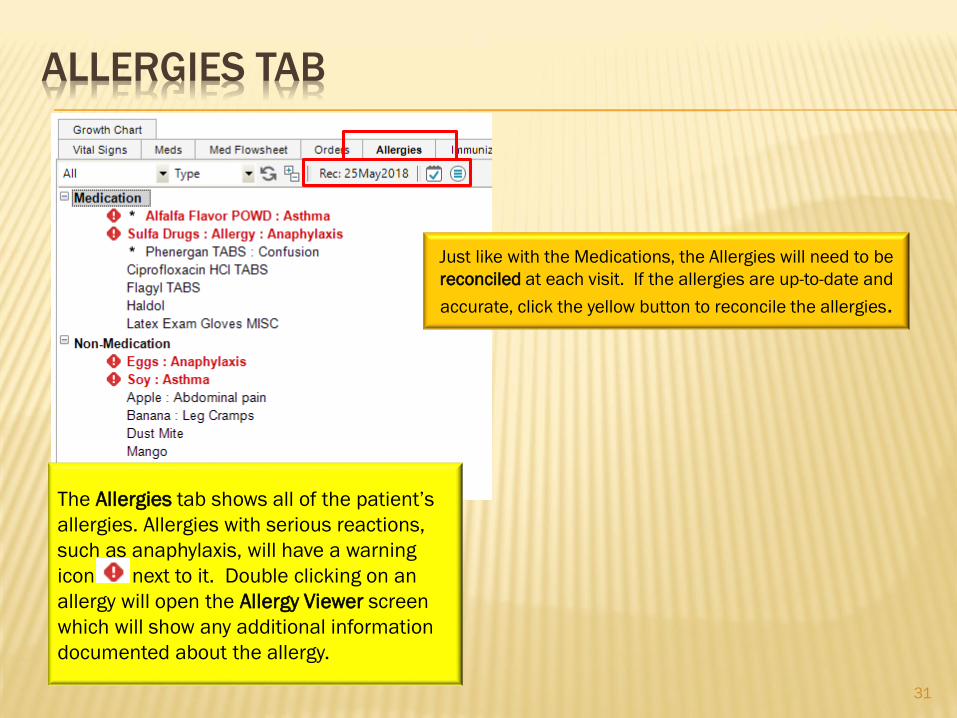
The Allergies tab shows all of the patient’s
allergies. Allergies with serious reactions,
such as anaphylaxis, will have a warning
icon next to it. Double clicking on an
allergy will open the Allergy Viewer screen
which will show any additional information
documented about the allergy.
Just like with the Medications, the Allergies will need to be
reconciled at each visit. If the allergies are up-to-date and
accurate, click the yellow button to reconcile the allergies.
ALLERGIES TAB

32
As immunizations are ordered, they
will automatically flow into this
table. The immunization list can
be printed by clicking Print on the
bottom toolbar.
IMMUNIZATIONS TAB

33
Flowsheets allow you to keep
track of various clinical items—
usually based upon specific
disease processes. Flowsheets
are created by the EHR team,
depending upon the needs of
each clinic.
FLOWSHEETS TAB
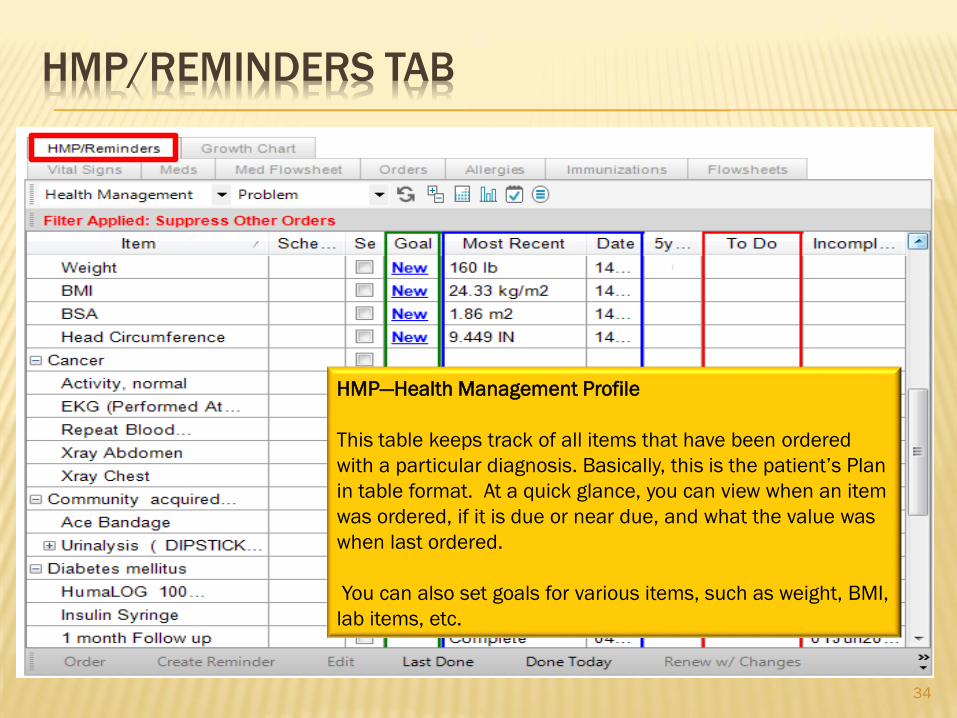
34
HMP—Health Management Profile
This table keeps track of all items that have been ordered
with a particular diagnosis. Basically, this is the patient’s Plan
in table format. At a quick glance, you can view when an item
was ordered, if it is due or near due, and what the value was
when last ordered.
You can also set goals for various items, such as weight, BMI,
lab items, etc.
HMP/REMINDERS TAB

35
Growth chart for Pediatric patients
The default is the standard view; however,
clicking the drop down allows you to choose
either Prematurity or Down syndrome. (The
patient must have that dx in their Active
Problem list before it will generate the
chart).
GROWTH CHART TAB

36
PLEASE PROCEED TO THE NEXT MODULE – DOCUMENTING HISTORY