quintic ball roll v3 ball roll v3.4 calibration... · the camera lens used for quintic ball roll is...
TRANSCRIPT
www.quinticballroll.com
Quintic Ball Roll v3.4 ‘The Launch Monitor for Putting’
Set-up & Calibration Instructions
August 2015

www.quinticballroll.com
PLEASE ENSURE YOUR QUINTIC BALL ROLL SOFTWARE IS INSTALLED AND
UNLOCKED BEFORE SET-UP & CALIBRATION : Through Quintic Security each Quintic
Licence is dedicated to recognise one computer... Click Register Now to enter your 25 digit 'A'
Security Code. Please note: Any changes (e.g. new hard drive, re-formatting the hard drive, new
operating system, new computer.) locks out the Licence and the Quintic Program will not function.
PLEASE INSTALL the Quintic USB3 high-speed drivers (64 or 32 bit version). Once correctly
installed, the light on the back of the Quintic USB3 camera will go from red to green (as below). This
signifies that the computer has recognised the presence of the camera. If the camera is RED, please
refer to the camera driver installation section.
Open Quintic Ball Roll v3.4 from the desktop icon. After the USB3 camera is installed correctly and
connected, the ‘Open Live Camera’ button will be active. Please click this to see the live USB3
camera image. PLEASE ensure Camera is connected FIRST, before opening Quintic Ball Roll v3.4
To select the optimal camera recording speed, click on ‘Camera Frame
Speed’. This section of the software will enable you to find the optimum
speed for the camera on your computer. Note and select the best Frame
Rate for your computer to record using your Ball Roll analysis software.
The maximum frame speed for the USB3 camera is 365.51frames per
second (fps), but the system will set the suggested maximum as 360fps.
Once selected click ‘Save Camera Parameters’. The camera parameters
will be saved for next time you OPEN the Quintic software.
If the camera is less than 300fps please refer to the camera driver
installation section, reconfigure the USB3 port drivers on your computer
or contact [email protected] for further help.

www.quinticballroll.com
Setting Up the Quintic Ball Roll v 3.4 System

www.quinticballroll.com
The camera lens used for Quintic Ball Roll is a fixed lens (fixed focus length of 12mm) with manual
focus and exposure (with locking screws) and has to be a fixed calibrated distance of 112cm / 44”
from the Ball to Target Line 'T' Bar to the front of the camera lens (see image above). The camera
must be positioned correctly, focused and correct aperture (light setting) prior to any data collection
using the calibration procedure within the software.
Make a mark on the floor / grass where all the putts will be hit from (we suggest using a permanent
marker or something similar). This is to ensure ball position remains constant throughout the session,
and the system is correctly calibrated to this ball position.
(N.B. Please note the different ball positions for a right/left handed golfer. The images in this tutorial
are based upon a right handed golfer.) However, once the putt for a left hander has been collected,
ball travelling from right to left during the LIVE image – the display image will be left to right (the
same as for a right hander)
Position the 'T' Bar on the 'Ball to Target Line' BEFORE you position the two marked balls. Use your
mark on the floor and a laser/chalk line to position the ‘T’ bar in the correct position. Please see the
image on the right, which depicts the laser line going down the central line of the ‘T’ bar, and then
can be seen running up the flag pole in the hole (the target).
(N.B. Please note that although a laser line is used for this calibration tutorial, a chalk line would
work equally as well. In addition, for a breaking putt the chosen target line must allow for your
assessment of break and speed.)
Additionally the Camera Exposure must be set correctly. By clicking on ‘Camera Exposure Time’ a
bar will appear whereby you move the pointer to set the exposure time. Please note, the shorter
(faster) the exposure, the sharper the images will appear within the software, however you will require
more light in the area. Please be aware of changing light conditions (especially outdoors with
intermittent cloud cover). It is possible to open and alter ‘Camera Exposure’ without impacting the
frame capture speed or calibration, so the exposure can be adjusted between putts.
REMEMBER the Sunlight Filter for the 12mm fixed lens if using the system outdoors!

www.quinticballroll.com
Calibrating the Balls
Click on ‘Calibrate’, then ‘Ball’, and position two balls into the cut-outs in the ‘T’ Bar.
This will open up the image below, displaying two yellow circles and two red lines.
By moving the camera unit (NOT the ‘T’ Bar) and adjusting the feet on the tripod unit you need to
ensure that the two balls fit precisely inside the yellow circles and the vertical red line runs directly
through the central groove of the ‘T’ Bar (this ensures the camera is 90 degrees to the path of the
putt). Additionally, to ensure that the camera is level, make sure the horizontal red line is parallel to
the base of the ‘T’ Bar. Ensure you can see the three black dots in both balls – Ideally try and
have one dot in each quarter of the golf ball… (see image below)

www.quinticballroll.com
Carefully slide the ‘T’ bar out of the way, click ‘Reset’ and then ‘Calibrate’, ‘Ball’ again.
Once you click Calibrate Ball, two small red dots (At the end of the yellow scaling ruler) should both
turn GREEN after a 10 seconds (see image below). This means the software has correctly identified
the balls. If either of the balls are not correctly positioned or lit then the corresponding dot will stay
RED – please adjust the position of the camera / exposure / lighting and try again. Please ensure you
can see the 3 black dots in both balls, otherwise the light will not turn green.

www.quinticballroll.com
Note the Ball Brightness figures just below the control buttons (highlighted in RED in image above).
The ball brightness value should be between 100 – 115 and ideally there should be no more than 5
difference in the ball brightness value between the left and right balls. If the difference is greater than
5, please check the angle of the light on the stand (it may not be square) and look for any additional
light source within the room. If possible block out this additional light source.
If the Ball Brightness is too high or low, the software may not be able to identify the golf balls. If the
dots do not turn green within 30 seconds, please confirm that the three dots are visible, the balls are
within the yellow circles, and if all this is correct, adjust the ‘Ball Brightness’ by either altering the ‘f’
stop value on the camera lens (by rotating the middle ring on the lens), or by changing the exposure
time within the ‘Camera Exposure Time’ option.
An example of the ball being overexposed: (Ball Brightness 140)

www.quinticballroll.com
An example of the ball being underexposed: (Ball Brightness 70)
Once the ball dots have gone GREEN, the information box appears notifying you that Ball
Calibration is complete. If you are happy with this calibration click ‘Yes’. If you wish to make
changes and recalibrate, click ‘Retry’.
When happy remove the second ball and click on the ‘Test’ button. This will ensure that the computer
can locate the golf ball and three dots correctly prior to any data capture.
If the ball has been found three crosses (Red, Blue, Green) will be displayed on the software along
with the location of the golf ball (Red Circle and Cross). The Ball’s Brightness level will also be
displayed underneath the 16” mark on the yellow scaling ruler.

www.quinticballroll.com
Please note: It is a good idea to mark on the floor / green the location of the 0” (right handed
players) and if measuring a left hander, mark the 12” location.

www.quinticballroll.com
Calibrating the Putter
Firstly, attach the supplied club markers to the putter. The smaller of the two markers goes on the Toe
of the club, the larger on the base of the Shaft (as displayed below).
N.B. Although these markers should peel off without any problem, we do not recommend they are left
on the club for too long. If so, they may be more difficult to peel off, but should only leave a sticky
residue if this happens. The markers don’t have to be vertical, but would recommend you try and
locate them approximately in the vertical plane.
You will be required to enter the distance between the top shaft marker and the top toe marker using
the metal ruler. In the example below 8.4cm. Please ensure you are as accurate as possible during this
measurement.
www.quinticballroll.com
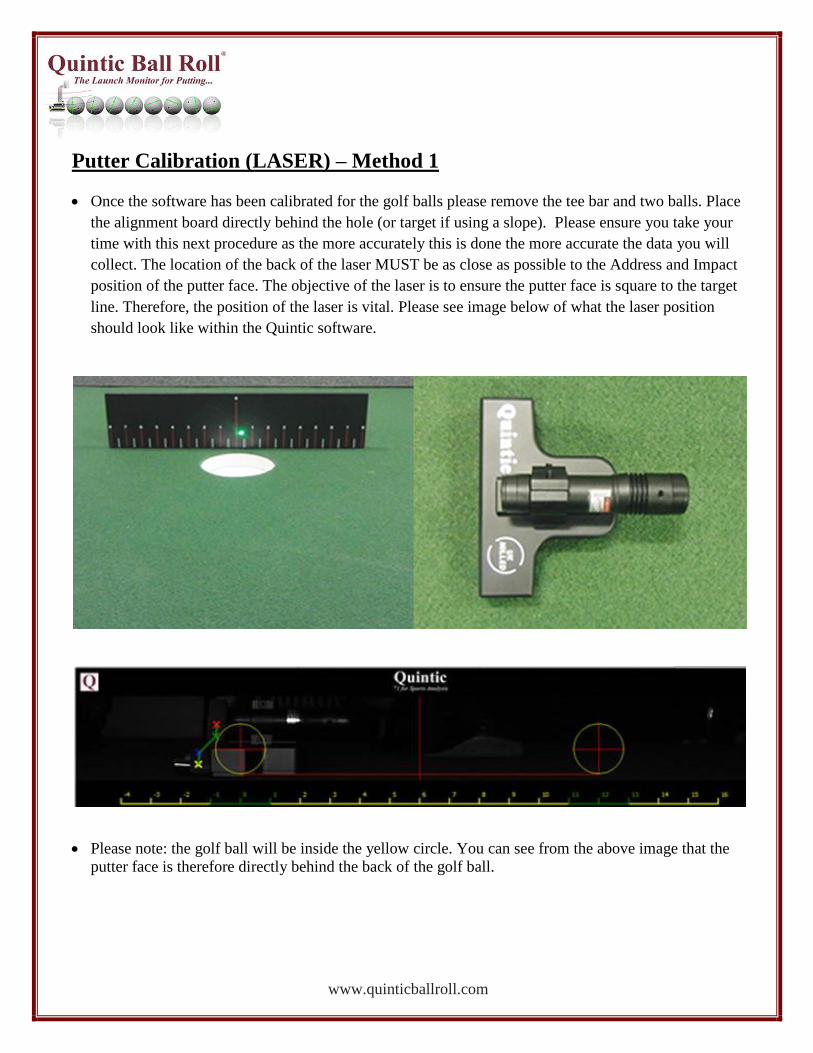
Putter Calibration (LASER) – Method 1
Once the software has been calibrated for the golf balls please remove the tee bar and two balls. Place
the alignment board directly behind the hole (or target if using a slope). Please ensure you take your
time with this next procedure as the more accurately this is done the more accurate the data you will
collect. The location of the back of the laser MUST be as close as possible to the Address and Impact
position of the putter face. The objective of the laser is to ensure the putter face is square to the target
line. Therefore, the position of the laser is vital. Please see image below of what the laser position
should look like within the Quintic software.
Please note: the golf ball will be inside the yellow circle. You can see from the above image that the
putter face is therefore directly behind the back of the golf ball.

www.quinticballroll.com
Switch on the Quintic laser and position it so that the beam hits the centre of the alignment board (or
‘starting line’ when putting on a slope) When the laser and alignment board are positioned correctly
move the putter so it is pressed ‘FLUSH’ against the back of the laser in the address position of the
golfer.
www.quinticballroll.com
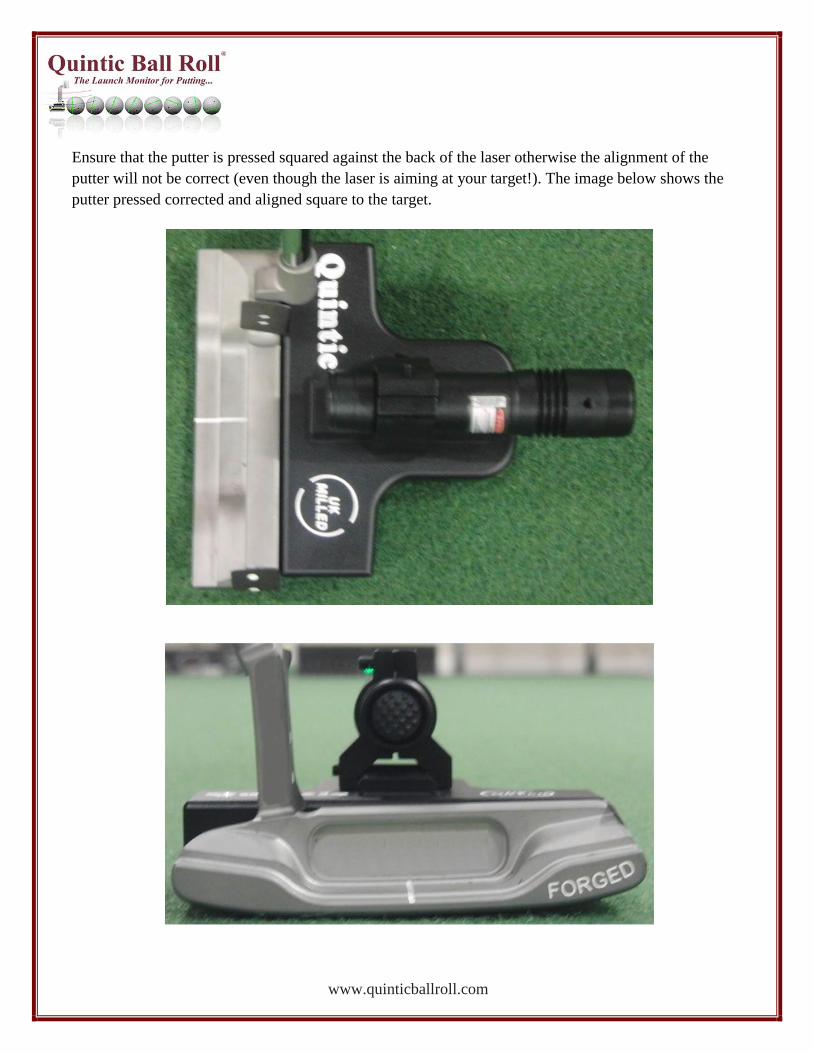
Ensure that the putter is pressed squared against the back of the laser otherwise the alignment of the
putter will not be correct (even though the laser is aiming at your target!). The image below shows the
putter pressed corrected and aligned square to the target.

www.quinticballroll.com
The two images below represent occasions where the putter would not be aligned square.

www.quinticballroll.com
Now that the putter is positioned correctly you can begin to calibrate the putter. First click the calibrate
button located on the tool bar. Then select putter and the image below should appear.
Once you have clicked ‘OK’ the software should calibrate the putter. If the putter is successfully
calibrated a screen such as the one below will be produced.

www.quinticballroll.com
The final step of the calibration and aligning the putter is to insert the distance between the top shaft
marker and the top toe marker using the metal ruler. Please ensure you are as accurate as possible
during this measurement.

www.quinticballroll.com
Please note, it is also possible to calibrate the putter in the player’s particular golf stance - the face,
lie and shaft angle readings from the software are relative to the calibration frame. It is recommended
for accurate results, that the lie of the putter is as close to the normal address position (i.e. do not
have the toe or the heel too high off the ground in comparison to your normal set-up).
If you calibrate the software using the players own address position (for example a 2 degree shaft lean
at address) the software will report positive or negative values based on the calibrated position. For
example, is a player adding loft during the stroke, or delofting by increasing the forward shaft lean.
If your need to know the shaft angle relative to the vertical (0 degrees = Vertical) the club needs to be
calibrated vertically using the spirit level provided, along with keeping the face flush to the ‘T’ Bar.
Position the club shaft so as the spirit levels reads the club shaft as vertical (see images below).
This is an option if you require a vertical shaft at putter
calibration – the majority of clients use the shaft angle of the
golfer at their own address position…
Once you are happy the face is square, and the shaft is vertical, click on ‘ Calibrate’, then click
‘Putter’ This process requires two people, one to hold the club, one to click the buttons on the
computer.

www.quinticballroll.com
Putter Calibration – Method 2
Remove the ball (after marking its location) rotate the ‘T’ Bar 90 degrees compared to before and
place it as shown in the image below. Line up the laser (or string line) along the groove down through
the ‘T’ Bar, and position it so as you can see the mark you made indicating the ball position through
the central hole. This is to ensure the club face is calibrated directly at the position it makes contact
with the golf ball as well as being square to the target. Please ensure you take your time with this
procedure as the more accurately this is done the more accurate the data you will collect. “Rubbish in,
Rubbish out…”
The face of the putter now needs to be positioned and held flush against the ‘T’ Bar seen below.

www.quinticballroll.com
The two images below display incorrect putter positions, whereby the face is not flush to the ‘T’ Bar.
Not Square
Too Far Away - Not Square

www.quinticballroll.com
If the software has successfully managed to identify the four markers on the Putter, then the
information box will appear (see below). If you are happy with this calibration and the markers
identified, click ‘Yes’. If you wish to make changes and recalibrate, click ‘Cancel’.
If the software is unable to identify the putter, the following information box will appear notifying
you. The example below shows the Toe of the club being too high, obstructing one of the shaft
markers. As the information box informs you, please check the position of the putter, check that all
markers are visible to the camera and check the lighting (especially if you are working outside and the
conditions may have changed).

www.quinticballroll.com
Finally you are required to enter the distance between the top shaft marker and the top toe marker
using the metal ruler. In the example below 8.4cm. Please ensure you are as accurate as possible
during this measurement.

www.quinticballroll.com
Collecting Data
You are now ready to start collecting data. Start putting from either Ball Position 0” (Right
hander) or 12” (Left hander in the opposite direction) that you have calibrated and marked. The
software will automatically recognise that as the calibrated ball position for subsequent putts with no
need to re-calibrate.
Although we suggest you mark the address ball position on the ground during the calibration process,
if you have not, use the green guides on the ruler below the video to position the ball. The centre of
the golf ball should be inside these lines (either the ones around 0 inches for right handed golfers, or
the lines around 12 inches for left handed golfers).
When ready to hit a putt, position the ball in the correct position, and click on ‘Start Putt’. Flashing
crosses (Green, Blue and Red) will appear on the black dots on the ball signifying that the software
has identified the ball (see below). You may now complete your putt. Enjoy!
Please note, if you are receiving an error stating that the ‘critical event markers’ could not be tracked,
you may have to adjust the position of the toe marker on the club very slightly. If the putter being used
has a particularly shiny face some reflections may be created around the point of impact which will
invalidate the data collection. Please reposition the markers slightly over the face as shown in the below
images and recalibrate the putter.

www.quinticballroll.com
You can save single putts or ‘Create Putting Session Directory’ by clicking on the file icon. The
Directory allows you to add selected putts one by one through the session. The results can be viewed
in the Summary Tab.
There is also an Auto Save option for sessions of putts. To enable, click on ‘Help’ and tick ‘Auto
Save Putts’.
Finally, there is an option for the client to insert their own company logo. The logo is permanently
displayed within the Quintic software. Please see example below, please contact [email protected]
for further details on the location required for client logo.

www.quinticballroll.com
REMEMBER the Sunlight Filter for the 12mm fixed lens if using the system outdoors!