r ina-n333r - alpine.com · phone 1-800-alpine-1 (1-800-257-4631) 1-888-nav-help (1-888-628-4357)...
TRANSCRIPT

EN
DE
FR
IT
ES
SE
R
NL
DK
ALPINE ELECTRONICS MARKETING, INC.1-1-8 Nishi Gotanda,
Shinagawa-ku, Tokyo 141-0031, JapanPhone 03-5496-8231
ALPINE ELECTRONICS OF AMERICA, INC.19145 Gramercy Place, Torrance,
California 90501, U.S.A.Phone 1-800-ALPINE-1 (1-800-257-4631)
1-888-NAV-HELP (1-888-628-4357)
ALPINE ELECTRONICS OF CANADA, INC.7300 Warden Ave., Suite 203, Markham,
Ontario L3R 9Z6, CanadaPhone 1-800-ALPINE-1 (1-800-257-4631)
1-888-NAV-HELP (1-888-628-4357)
ALPINE ELECTRONICS FRANCE S.A.R.L.(RCS PONTOISE B 338 101 280)
98, Rue de la Belle Etoile, Z.I. ParisNord II, B.P. 50016, 95945 RoissyCharles de Gaulle Cedex, France
Phone 01-48638989
ALPINE ITALIA S.p.A.Viale C. Colombo 8, 20090 Trezzano
Sul Naviglio (MI), ItalyPhone 02-484781
ALPINE ELECTRONICS DE ESPAÑA, S.A.Portal de Gamarra 36, Pabellón, 3201013 Vitoria (Alava) - APDO 133,
SpainPhone 945-283588
ALPINE ELECTRONICS OF AUSTRALIA PTY. LTD.6-8 Fiveways Boulevarde Keysborough,
Victoria 3173, AustraliaPhone 03-9769-0000
ALPINE ELECTRONICS GmbHKreuzerkamp 7, 40878 Ratingen,
GermanyPhone 02102-4550
ALPINE ELECTRONICS OF U.K. LTD.Alpine House
Fletchamstead Highway,Coventry CV4 9TW, U.K.Phone 0870-33 33 763
Designed by ALPINE JapanPrinted in Japan (S)
68P50520Y74-O
• OWNER'S MANUALPlease read before using this equipment.
• BEDIENUNGSANLEITUNGLesen Sie diese Bedienungsanleitung bitte vorGebrauch des Gerätes.
• MODE D'EMPLOIVeuillez lire avant d’utiliser cet appareil.
• ISTRUZIONI PER L’USOSi prega di leggere prima di utilizzare ilattrezzatura.
• MANUAL DE OPERACIÓNLéalo antes de utilizar este equipo.
• GEBRUIKSAANWIJZINGGelieve de gebruiksaanwijzing te lezen alvorensmet dit toestel te werken.
• ANVÄNDARHANDLEDNINGInnan du använder utrustningen bör du läsaigenom denna användarhandledning.
• BRUGERVEJLEDNINGLæs venligst denne vejledning, før du tagerenheden i brug.
INA-N333RGPS Car Navigation/CD Receiver
Sankei Kikaku Co., Ltd.1-13-38, Hinodai, Hino, Tokyo, Japan

CHA-S634 CHA-1214• CD changer for INA-N333R.• CD-Wechsler für INA-N333R.• Changeur CD pour INA-N333R.• Cambia CD per INA-N333R.• Cambiador de CD para INA-N333R.• CD-wisselaar voor INA-N333R.• CD-växlare för INA-N333R.• Cd-skifter til INA-N333R.
• CD changer for INA-N333R.• CD-Wechsler für INA-N333R.• Changeur CD pour INA-N333R.• Cambia CD per INA-N333R.• Cambiador de CD para INA-N333R.• CD-wisselaar voor INA-N333R.• CD-växlare för INA-N333R.• Cd-skifter til INA-N333R.
CHM-S630
Alpine CD Changers Give You More!More musical selections, more versatility, more convenience.The CHA-S634 is a high-performance 6-disc changer with a new M DAC, CD-R/RW PLAY BACK, MP3 PLAY BACK and CD TEXT.The CHA-1214 Ai-NET model holds 12 discs, and the CHM-S630 M-Bus model is a super-compact 6-disc changer with a CD-R/RWPLAY BACK.
Von Alpine CD-Wechslern haben Sie mehr!Mehr Musikauswahl, mehr Vielseitigkeit, mehr Komfort.Der CHA-S634 ist ein Hochleistungs-Wechsler für 6 CDs mit dem neuen M-DAC, mit CD-R/RW- und MP3-Wiedergabefunktion undmit CD-TEXT. Der CHA-1214 ist ein Ai-NET-Modell für 12 CDs. Der M-Bus-kompatible CHM-S630 ist ein superkompakter Wechslerfür 6 CDs mit CD-R/RW-Wiedergabefunktion.
Changeurs de CD Alpine : vous avez le choix!Plus de sélections musicales, plus de souplesse, plus de confort.Le modèle CHA-S634 est un changeur 6 disques ultra performant équipé des nouvelles fonctions M DAC, CD-R/RW PLAY BACK,MP3 PLAY BACK et CD TEXT. Le modèle CHA-1214 Ai-NET contient 12 disques. Le modèle CHM-S630 M-Bus est un changeur 6disques super compact doté de la fonction CD-R/RW PLAY BACK.
I caricatori CD Alpine danno di più!Più scelta, più versatilità, più comodità.Il modello CHA-S634 è un caricatore a 6 dischi ad elevate prestazioni dotato di un nuovo M DAC, CD-R/RW PLAY BACK, MP3 PLAYBACK e CD TEXT. Il modello CHA-1214 Ai-NET è in grado di contenere 12 dischi, il modello CHM-S630 M-Bus è un caricatore a 6dischi ultra compatto dotato di un CD-R/RW PLAY BACK.
¡Los cambiadores Alpine de CD le ofrecen más!Más selecciones musicales, más versatilidad y más ventajas.CHA-S634 es un cambiador de seis discos de alto rendimiento con nuevo M DAC, CD-R/RW PLAY BACK, MP3 PLAY BACK y CDTEXT. El modelo CHA-1214 Ai-NET alberga 12 discos y el modelo CHM-S630 M-Bus es un cambiador de seis discos de tamañoreducido con un CD-R/RW PLAY BACK.
CD-wisselaars van Alpine hebben meer te bieden!Meer muziekkeuze, meer veelzijdigheid, meer gebruiksgemak.De CHA-S634 is een op hoog niveau presterende wisselaar voor 6 discs met een nieuwe M DAC, weergavefuncties voorCD-R/CD-RW en MP3 en een displayfunctie voor CD-TEKST. De CHA-1214 is een Ai-NET model voor 12 discs en de M-Bus compatibele CHM-S630 is een ultracompacte wisselaar voor 6 discs met weergavefuncties voor CD-R/RW.
Alpines CD-växlare ger mer!Fler musikval, mer variation, större bekvämlighet.CHA-S634 är en växlare för 6 skivor med mycket höga prestanda och en ny M D/A-omvandlare samt uppspelning av CD-R/RW, MP3och CD TEXT. CHA-1214 Ai-NET rymmer 12 skivor. CHM-S630 M-Bus är en mycket kompakt växlare med kapaciteten 6 skivor meduppspelning av CD-R/RW PLAY BACK.
Med Alpine-cd-skiftere får du mere!Flere musikvalg, mere alsidighed og mere bekvemmelighed.CHA-S634 er en højtydende 6-disc skifter med en ny type M DAC, CD-R/RW PLAY BACK, MP3 PLAYBACK og CD TEXT. CHA-1214 Ai-NET modellen har kapacitet for 12 discs og model CHM-S630 M-Bus er en superkompakt 6-disc skifter med CD-R/RWPLAYBACK.

1-EN
ContentsOperating Instructions
WARNINGWARNING .................................................. 3CAUTION ................................................... 3PRECAUTIONS ......................................... 3
Basic OperationDetaching the Front Panel .................................. 5Attaching the Front Panel .................................. 5Initial System Start-Up ...................................... 5Turning Power On and Off ................................ 5Display Angle Adjustment ................................. 6Adjusting Volume/Balance (Between Left and
Right)/Fader (Between Front and Rear) ......... 6Automatic Position Display ............................... 6
Radio OperationSwitching the Tuner Mode ................................. 7Listening to Radio .............................................. 7Manual Storing of Station Presets ..................... 7Automatic Memory of Station Presets ............... 8Tuning to Preset Stations ................................... 8Station Title Search Function ............................. 8
RDS OperationSetting RDS Reception Mode and Receiving
RDS Stations .................................................. 9Recalling Preset RDS Stations ........................... 9Receiving RDS Regional (Local) Stations ........ 9PI SEEK Setting ............................................... 10Receiving Traffic Information.......................... 10PTY (Programme Type) Tuning ...................... 10Receiving Traffic Information While Playing
CD or Radio .................................................. 11Priority PTY (Programme Type) ...................... 11Displaying Radio Text ..................................... 11
CD Player OperationOpening and Closing the Movable Display ..... 12Playback ........................................................... 12Music Sensor (Skip) ......................................... 13Fast Forward and Backward ............................ 13Repeat Play ...................................................... 13M.I.X. (Random Play) ..................................... 13Scanning Programmes ..................................... 13
ENGLISH
Other FunctionsDisplaying the Title/Text .................................. 14Titling Discs/Stations ....................................... 15
Erasing Disc Title/Station Title ........................ 15
Sound Setup OperationTurning Loudness On/Off ................................ 16Turning Defeat Mode On/Off .......................... 16Switching the Phase of the Subwoofer Output .. 16Setting the Bass Control .................................. 17Setting the Treble Control ................................ 17
SETUP OperationChanging Backlighting Colour ........................ 18Sound (Beep) Guide Function ......................... 18Displaying Time ............................................... 18Setting Time ..................................................... 19Setting the Clock Auto Adjustment ................. 19Subwoofer On and Off ..................................... 19Scroll Setting .................................................... 19Navigation Interruption and Adjusting its
Volume (NAVI MIX) .................................... 20Auto Volume Setting ........................................ 20Setting the AUX Mode (V-Link) ...................... 20Turning Mute Mode On/Off ............................. 21Adjusting Source Signal Level ........................ 21Demonstration .................................................. 21
Changer Operation (Optional)Controlling Changer (Optional) ....................... 22Multi-Changer Selection .................................. 22Music Sensor (Skip) ......................................... 23Fast Forward and Backward ............................ 23Repeat Play ...................................................... 23M.I.X. (Random Play) ..................................... 23Scanning Programmes ..................................... 23Selecting Folders (only for MP3 compatible
changer) ........................................................ 24File/Folder Search (only for MP3 compatible
changer) ........................................................ 24Setting the Range of MP3 File Selection
(only for MP3 compatible changer) ......................... 24

2-EN
DAB Operation (Optional)Using DAB Receiver for the Ensemble Seek
Tuning (Optional) ......................................... 25Changing the Service ....................................... 25Changing the Service Component ................... 25Memorizing the Service ................................... 25Receiving the Memorized Service ................... 26Memorizing the Ensemble Automatically ....... 26PTY (Programme Type) Tuning ...................... 26Turning ON/OFF Traffic News
Announcement .............................................. 27Setting the Announcement Select Mode .......... 27Changing the Display Mode ............................ 27Receiving Announcement Information of DAB
Local Stations ............................................... 28Setting for Automatic Change from DAB
to RDS ......................................................... 28Setting ON/OFF for DRC (Dynamic Range
Control) ............................................................ 28
MobileHubTM Link Operation (Optional)About MobileHubTM Link (Optional) ............... 29Telephone Mode On and Off ........................... 29Incoming Calls ................................................. 30Calling
Calling by using the Speed Dial ................... 30
Calling by the phone book ............................ 30Calling by the outgoing/incoming/absent
incoming history ......................................... 30Dial call (only for operation on optional remote
control) ........................................................... 31
SMS (Short Message Service) Operation ........ 31
Remote Control OperationOperation on Remote Control
RUE-4191 (Optional) ................................... 32Operation on Remote Control
RUE-4135 (Optional) ................................... 33
InformationIn Case of Difficulty ........................................ 34Specifications ................................................... 36
Installation and ConnectionsWarning ............................................................ 37Caution ............................................................. 37Precautions ....................................................... 37Installation ....................................................... 38Connection ....................................................... 40

3-EN
WARNINGThis symbol means important instructions. Failureto heed them can result in serious injury or death.
DO NOT OPERATE ANY FUNCTION THAT TAKES YOURATTENTION AWAY FROM SAFELY DRIVING YOURVEHICLE.Any function that requires your prolonged attention should onlybe performed after coming to a complete stop. Always stop thevehicle in a safe location before performing these functions.Failure to do so may result in an accident.
KEEP THE VOLUME AT A LEVEL WHERE YOU CAN STILLHEAR OUTSIDE NOISE WHILE DRIVING.Failure to do so may result in an accident.
USE ONLY IN CARS WITH A 12 VOLT NEGATIVE GROUND.(Check with your dealer if you are not sure.) Failure to do so mayresult in fire, etc.
DO NOT DISASSEMBLE OR ALTER.Doing so may result in an accident, fire or electric shock.
USE THIS PRODUCT FOR MOBILE 12V APPLICATIONS.Use for other than its designed application may result in fire,electric shock or other injury.
KEEP SMALL OBJECTS SUCH AS BATTERIES OUT OF THEREACH OF CHILDREN.Swallowing them may result in serious injury. If swallowed,consult a physician immediately.
USE THE CORRECT AMPERE RATING WHEN REPLACINGFUSES.Failure to do so may result in fire or electric shock.
DO NOT BLOCK VENTS OR RADIATOR PANELS.Doing so may cause heat to build up inside and may result in fire.
DO NOT PLACE HANDS, FINGERS OR FOREIGN OBJECTSIN INSERTION SLOTS OR GAPS.Doing so may result in personal injury or damage to the product.
WARNINGCAUTION
This symbol means important instructions. Failureto heed them can result in injury or materialproperty damage.
HALT USE IMMEDIATELY IF A PROBLEM APPEARS.Failure to do so may cause personal injury or damage to theproduct. Return it to your authorized Alpine dealer or the nearestAlpine Service Centre for repairing.
KEEP FINGERS AWAY WHILE THE MOTORIZED FRONTPANEL OR MOVING MONITOR IS IN MOTION.Failure to do so may result in personal injury or damage to theproduct.
PRECAUTIONSTemperatureBe sure the temperature inside the vehicle is between +60°C(+140°F) and –10°C (+14°F) before turning your unit on.
Moisture CondensationYou may notice the CD playback sound wavering due tocondensation. If this happens, remove the disc from the playerand wait about an hour for the moisture to evaporate.
Damaged DiscDo not attempt to play cracked, warped, or damaged discs.Playing a bad disc could severely damage the playbackmechanism.
MaintenanceIf you have problems, do not attempt to repair the unit yourself.Return it to your Alpine dealer or the nearest Alpine ServiceStation for servicing.
Installation LocationMake sure the INA-N333R will not be installed in a locationsubjected to:
• Direct sun and heat• High humidity and water• Excessive dust• Excessive vibrations
Handling the Detachable Front Panel• Do not expose to rain or water.• Do not drop or apply shock.
4-EN
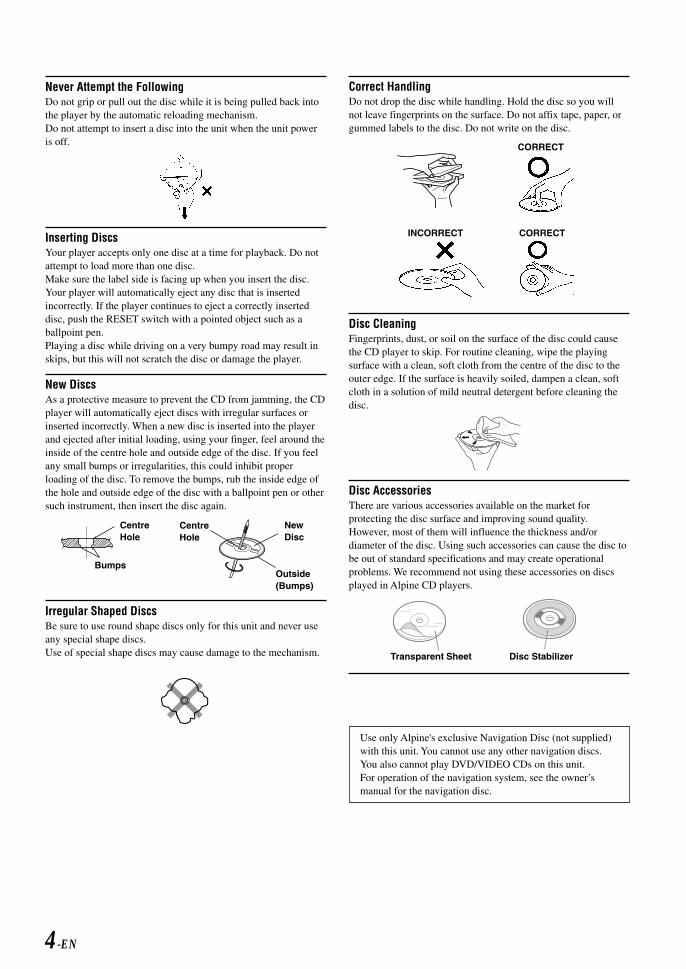
Never Attempt the FollowingDo not grip or pull out the disc while it is being pulled back intothe player by the automatic reloading mechanism.Do not attempt to insert a disc into the unit when the unit poweris off.
Inserting DiscsYour player accepts only one disc at a time for playback. Do notattempt to load more than one disc.Make sure the label side is facing up when you insert the disc.Your player will automatically eject any disc that is insertedincorrectly. If the player continues to eject a correctly inserteddisc, push the RESET switch with a pointed object such as aballpoint pen.Playing a disc while driving on a very bumpy road may result inskips, but this will not scratch the disc or damage the player.
New DiscsAs a protective measure to prevent the CD from jamming, the CDplayer will automatically eject discs with irregular surfaces orinserted incorrectly. When a new disc is inserted into the playerand ejected after initial loading, using your finger, feel around theinside of the centre hole and outside edge of the disc. If you feelany small bumps or irregularities, this could inhibit properloading of the disc. To remove the bumps, rub the inside edge ofthe hole and outside edge of the disc with a ballpoint pen or othersuch instrument, then insert the disc again.
Irregular Shaped DiscsBe sure to use round shape discs only for this unit and never useany special shape discs.Use of special shape discs may cause damage to the mechanism.
Correct HandlingDo not drop the disc while handling. Hold the disc so you willnot leave fingerprints on the surface. Do not affix tape, paper, orgummed labels to the disc. Do not write on the disc.
Disc CleaningFingerprints, dust, or soil on the surface of the disc could causethe CD player to skip. For routine cleaning, wipe the playingsurface with a clean, soft cloth from the centre of the disc to theouter edge. If the surface is heavily soiled, dampen a clean, softcloth in a solution of mild neutral detergent before cleaning thedisc.
Disc AccessoriesThere are various accessories available on the market forprotecting the disc surface and improving sound quality.However, most of them will influence the thickness and/ordiameter of the disc. Using such accessories can cause the disc tobe out of standard specifications and may create operationalproblems. We recommend not using these accessories on discsplayed in Alpine CD players.
Use only Alpine's exclusive Navigation Disc (not supplied)with this unit. You cannot use any other navigation discs.You also cannot play DVD/VIDEO CDs on this unit.For operation of the navigation system, see the owner’smanual for the navigation disc.
CORRECT
INCORRECT CORRECT
CentreHole
Bumps
CentreHole
NewDisc
Outside(Bumps)
Disc StabilizerTransparent Sheet

5-EN
Detaching the Front Panel
1 Press and hold the SOURCE/POWER button at least 2seconds to turn off the power.
2 Press the (Release) button at left side until thefront panel pops out.
3 Grasp the left side of the front panel and pull it out.
NOTES• The front panel may become hot in normal usage (especially
the connector terminals on the back of the front panel), this isnot malfunction.
• To protect the front panel, place it in the supplied carryingcase.
Attaching the Front Panel
1 First, insert the right side of the front panel into themain unit. Align the groove on the front panel with theprojections on the main unit.
2 Push the left side of the front panel until it locks firmlyinto the main unit.
NOTEBefore attaching the front panel, make sure that there is no dirtor dust on the connector terminals and no foreign objectbetween the front panel and the main unit.
2
1
• Controllable with Remote Control
• Compatibility with Factory Steering Wheel RadioControlsIf your vehicle has steering wheel controls for the radio,an optional steering wheel control interface may beavailable to connect your Alpine radio. For details,contact your Alpine dealer.
Initial System Start-Up
Immediately after installing or applying power to the unit, itshould be initialized. Press the RESET switch with aballpoint pen or any other pointed object.
About DemonstrationThis unit is equipped with a Demonstration function.Soon after resetting the unit or after turning the unit onthe first time, the demonstration starts automatically.To cancel the demonstration, refer to "Demonstration"on page 21.
Turning Power On and Off
1 Press the SOURCE/POWER button to turn on the unit.
NOTEThe unit can be turned on by pressing any other button exceptthe eject button and TILT button.
The volume level gradually increases to the previous levelyou were listening to before the unit was turned off. Pressand hold the SOURCE/POWER button for at least 2seconds to turn off the unit.
NOTEThe very first time the power is turned on, the volume will startfrom level 0.
Remote control sensorSOURCE/POWER
RESET
Basic Operation

6-EN
Movable display
The movable display may be adjusted to 3 differentangles depending upon user preference.
1 Press the TILT button to adjust the angle of themovable display.
NOTES• The display will close a half minute after the ignition key is
turned to the OFF position.• The adjusted angle of the display is stored in memory. There
is no need to re-adjust the angle when the power is turnedback on.
CAUTIONKeep hands (or any other object) away from the display while itis opening or closing to avoid damage or injury. The back of themovable display will get very warm under normal operatingconditions. This is not a malfunction. Do not touch.
Adjusting Volume/Balance (BetweenLeft and Right)/Fader (Between Frontand Rear)
1 Press the MODE (Audio Control) knob repeatedly tochoose the desired mode.Each press changes the modes as follows:
Volume: 0 ~ 35Balance: L15 ~ R15Fader: F15 ~ R15Subwoofer: 0 ~ 15Mix level: 0 ~ 15
Display Angle Adjustment
Vol. MIX* BAL. FAD. Vol.SUBW.*
Example of vehicle’s present position
The GPS receiving sensitivity and thenumber of satellites are displayed.
Basic OperationNOTES• If the MODE (Audio Control) knob is not rotated within 5
seconds after selecting the BALANCE, or FADER mode, theunit automatically returns to the VOLUME mode.
•* When the NAVI MIX (page 20), subwoofer (page 19) is ON,respective levels may be adjusted.
2 Turn the MODE (Audio Control) knob until the desiredsound is obtained in each mode.
NOTEWhen the temperature inside the unit rises, the volume maydecrease momentarily. This is not a malfunction.
Automatic Position Display
1 Press the NAV. button to change the display. Automaticposition (present position) and the GPS receivingsensitivity are displayed.
NOTES• To display the present position of your vehicle, connect the
GPS antenna to the unit. (Refer to “Installing the GPSAntenna” on page 39.).
• When inserting the separately sold navigation disk (NVD-T003) specialized for this unit, navigating operations from theunit become available. MENU, VOICE and TMC button areused for navigating operations.
MODE
TILT
NAV.
7-EN
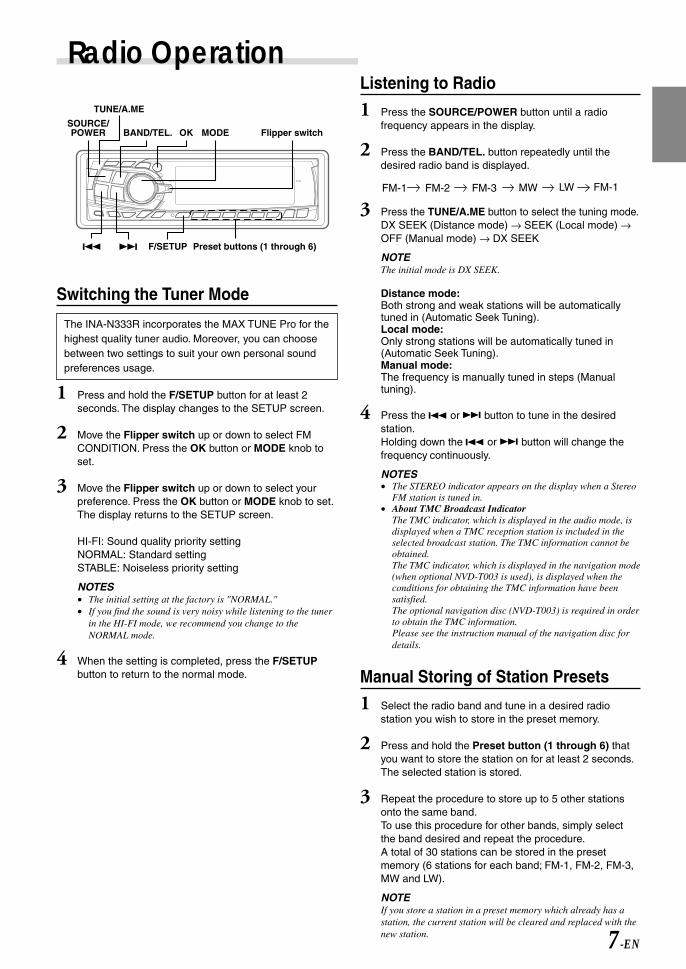
Radio Operation
Switching the Tuner Mode
The INA-N333R incorporates the MAX TUNE Pro for thehighest quality tuner audio. Moreover, you can choosebetween two settings to suit your own personal soundpreferences usage.
1 Press and hold the F/SETUP button for at least 2seconds. The display changes to the SETUP screen.
2 Move the Flipper switch up or down to select FMCONDITION. Press the OK button or MODE knob toset.
3 Move the Flipper switch up or down to select yourpreference. Press the OK button or MODE knob to set.The display returns to the SETUP screen.
HI-FI: Sound quality priority settingNORMAL: Standard settingSTABLE: Noiseless priority setting
NOTES• The initial setting at the factory is "NORMAL."• If you find the sound is very noisy while listening to the tuner
in the HI-FI mode, we recommend you change to theNORMAL mode.
4 When the setting is completed, press the F/SETUPbutton to return to the normal mode.
Listening to Radio
1 Press the SOURCE/POWER button until a radiofrequency appears in the display.
2 Press the BAND/TEL. button repeatedly until thedesired radio band is displayed.
3 Press the TUNE/A.ME button to select the tuning mode.DX SEEK (Distance mode) → SEEK (Local mode) →OFF (Manual mode) → DX SEEK
NOTEThe initial mode is DX SEEK.
Distance mode:Both strong and weak stations will be automaticallytuned in (Automatic Seek Tuning).Local mode:Only strong stations will be automatically tuned in(Automatic Seek Tuning).Manual mode:The frequency is manually tuned in steps (Manualtuning).
4 Press the or button to tune in the desiredstation.Holding down the or button will change thefrequency continuously.
NOTES• The STEREO indicator appears on the display when a Stereo
FM station is tuned in.• About TMC Broadcast Indicator
The TMC indicator, which is displayed in the audio mode, isdisplayed when a TMC reception station is included in theselected broadcast station. The TMC information cannot beobtained.The TMC indicator, which is displayed in the navigation mode(when optional NVD-T003 is used), is displayed when theconditions for obtaining the TMC information have beensatisfied.The optional navigation disc (NVD-T003) is required in orderto obtain the TMC information.Please see the instruction manual of the navigation disc fordetails.
Manual Storing of Station Presets
1 Select the radio band and tune in a desired radiostation you wish to store in the preset memory.
2 Press and hold the Preset button (1 through 6) thatyou want to store the station on for at least 2 seconds.The selected station is stored.
3 Repeat the procedure to store up to 5 other stationsonto the same band.To use this procedure for other bands, simply selectthe band desired and repeat the procedure.A total of 30 stations can be stored in the presetmemory (6 stations for each band; FM-1, FM-2, FM-3,MW and LW).
NOTEIf you store a station in a preset memory which already has astation, the current station will be cleared and replaced with thenew station.
FM-1 FM-2 MW LW FM-1FM-3
F/SETUP Preset buttons (1 through 6)
BAND/TEL. MODE Flipper switchOK
TUNE/A.ME
SOURCE/POWER

8-EN
Radio Operation
Automatic Memory of Station Presets
1 Press the SOURCE/POWER button to select the radiomode.
2 Press the BAND/TEL. button repeatedly until thedesired radio band is displayed.
3 Press and hold the TUNE/A. ME button for at least 2seconds.The frequency on the display continues to changewhile the automatic memory is in progress. The tunerwill automatically seek and store 6 strong stations inthe selected band. They will be stored into buttonsPreset 1 to 6 in order of signal strength.When the automatic memory has been completed, thetuner goes to the station stored in the preset locationNo. 1.
NOTEIf no stations are stored, the tuner will return to the originalstation you were listening to before the auto memory procedurebegan.
Tuning to Preset Stations
1 Press the SOURCE/POWER button to select the radiomode.
2 Press the BAND/TEL. button repeatedly until thedesired band is displayed.
3 Press the station Preset button that has your desiredradio station in memory.The display shows the band, preset number andfrequency of the station selected.
Station Title Search Function
If titles for radio stations (radio frequency) are entered,you can search for a radio station from its title.
1 Press and hold the MODE knob for at least 2 seconds.The display changes to the station title search mode.
2 Move the Flipper switch up, down or press the , button to select the station title.
3 Press the OK button or MODE knob.The radio station with the selected title is received.
NOTES• Press the RTN button or press and hold the MODE knob for
at least 2 seconds to cancel the search mode.• Pressing the button will permit reception of the
broadcast station of the selected title, the same as with the OKbutton or the MODE knob.
BAND/TEL. MODE Flipper switch
TUNE/A.ME
SOURCE/POWER
Preset buttons (1 through 6)
OK

9-EN
RDS Operation
Setting RDS Reception Mode andReceiving RDS Stations
The RDS (Radio Data System) is a radio informationsystem using the 57 kHz subcarrier of regular FMbroadcast. The RDS allows you to receive a variety ofinformation such as traffic information, station names,and to automatically re-tune to a stronger transmitterthat is broadcasting the same programme.
1 Press the SOURCE/POWER button until a radiofrequency appears in the display.
2 Press the F/SETUP button. The "FUNC" indicator willilluminate.
3 Press the 1/AF button to activate the RDS mode.The display shows the "AF" indicator when the RDSmode is activated.
4 Press the or button to tune in the desiredRDS station.
5 Press the 1/AF button to deactivate the RDS mode.The "AF" indicator will turn off.
6 Press the F/SETUP button to activate the normalmode. The "FUNC" indicator will turn off.
Tips• When the unit receives the PTY31 (Emergency Broadcast)
signal, the unit will show "ALARM" in the displayautomatically.
• The RDS digital data includes the followings:
PI Programme IdentificationPS Programme Service NameAF List of Alternative FrequenciesTP Traffic ProgrammeTA Traffic AnnouncementPTY Programme TypeEON Enhanced Other NetworksR.TEXT Radio Text Information
F/SETUP 1/AF 1 through 6 buttons
MODE Flipper switchOKSOURCE/POWER
Recalling Preset RDS Stations
1 Press the F/SETUP button. The "FUNC" indicator willilluminate.
2 Press the 1/AF button to activate the RDS mode.The display shows the "AF" indicator when the RDSmode is activated.
3 Press the F/SETUP button to activate the normalmode. The "FUNC" indicator will turn off.
4 Press the 1 through 6 buttons in which your desiredRDS station is preset. If the preset station's signal isweak, the unit automatically searches and tunes to astronger station in the AF (Alternative Frequencies) list.
5 If the preset station and the stations in the AF listcannot be received:
When the PI SEEK setting is on (refer to "PI SEEKSetting" on page 10), the unit searches again for astation in the PI (Programme Identification) list.
If the signal level of the Regional (Local) station beingtuned becomes too weak to receive, press the samepreset button to tune in a Regional station in otherdistrict.
NOTEFor presetting the RDS stations, refer to the Radio Operationsection. The RDS stations can be preset in the FM-1, FM-2 andFM-3 bands only.
Receiving RDS Regional (Local)Stations
1 Press and hold the F/SETUP button for at least 2seconds. The display changes to the SETUP screen.
2 Move the Flipper switch up or down to select RDSREGIONAL. Press the OK button or MODE knob toset.
3 Move the Flipper switch up or down to select ON orOFF. Press the OK button or MODE knob to set. Thedisplay returns to the SETUP screen.In the "RDS REGIONAL OFF" mode, the unitautomatically keeps receiving the related local RDSstation.
4 Press the F/SETUP button to deactivate the settingmode.

10-EN
Light M Classics Other M
RDS Operation
PI SEEK Setting
1 Press and hold the F/SETUP button for at least 2seconds. The display changes to the SETUP screen.
2 Move the Flipper switch up or down to select PISEEK. Press the OK button or MODE knob to set.
3 Move the Flipper switch up or down to select ON orOFF. Press the OK button or MODE knob to set. Thedisplay returns to the SETUP screen.
4 Press the F/SETUP button again to return to normaloperation.
Receiving Traffic Information
1 Press the T.INFO/ANNC. button to activate the TrafficInformation mode.To cancel the Traffic information mode, press theT.INFO/ANNC. button again.
2 Press the or button to select your desiredtraffic information station. When a traffic informationstation is tuned in, the TP indicator lights up.
Traffic information is heard only when it is beingbroadcast. If traffic information is not being broadcast,the unit is set in the standby mode. When a trafficinformation broadcast begins, the unit automaticallyreceives it and the display shows "T.INFO".
When traffic information broadcast is over, the unit willautomatically set in the standby mode.
NOTES• If the traffic information broadcast signal falls below a
certain level, the unit remains in the receiving mode for 70seconds. If the signal remains below a certain level for over70 seconds, the "T.INFO" indicator blinks.
• If you do not want to listen to the traffic information beingreceived, lightly press the T.INFO/ANNC. button to skip thattraffic information message. The T.INFO mode will remain inthe ON position to receive the next traffic informationmessage.
• If the volume level is changed while receiving trafficinformation, the changed volume level will be memorized.When traffic information is received next time, the volumelevel will be automatically adjusted to the level memorized.
• In the T.INFO mode, the SEEK tuning selects only the TP stations.
PTY (Programme Type) Tuning
1 Press the F/SETUP button. The "FUNC" indicator willilluminate.
2 Press the 2/PTY button to activate the PTY mode, inthe FM radio mode. The Programme Type of the stationbeing currently received will be displayed for 5seconds.
If there is no receivable PTY broadcast, "NO PTY" willbe displayed for 5 seconds.
NOTEIf no buttons are pressed within 5 seconds after pressing the 2/PTY button, the PTY mode will be automatically cancelled.
3 Press the and buttons or move the Flipperswitch up or down within 5 seconds after activating thePTY mode to choose the desired programme typewhile the PTY (programme type) is being displayed.Each press scrolls the programme type by one.
4 Press the 2/PTY button within 5 seconds afterselecting the programme type to start searching for astation in the selected programme type.If the received station is found, the programme type ofthe received station will be displayed for 5 seconds.
If no station is found, "NO PTY" will be displayed for 2seconds.
5 Press the F/SETUP button to activate the normalmode. The "FUNC" indicator will turn off.
NOTES• Operate the unit while the "FUNC" indicator is illuminated.
If no buttons are pressed within 5 seconds, the "FUNC"indicator will turn off.
• When the Navigation disc (sold separately) is inserted and thesystem is set in navigation mode, the selected language can beused with the PTY (Programme Type) or P.PTY (PriorityProgramme Type) language.
F/SETUPT.INFO/ANNC.
2/PTY 3/P. PTY
MODE Flipper switchOK
TITLE
11-EN
NOTEIf no buttons are pressed within 5 seconds after pressing the 3/P.PTY button, the PRIORITY PTY mode is automatically cancelled.
3 Press the or button or move the Flipperswitch up or down within 5 seconds while "News" isbeing displayed to choose a desired programme type.Then press 3/P. PTY button. The PRIORITY PTYfunction will activate.
4 Press the 3/P. PTY button to activate the PRIORITYPTY mode again.
• To change the programme category, perform thestep 3.
• To disable the PRIORITY PTY function, press andhold the 3/P. PTY button for at least 2 seconds.
NOTEIn the PRIORITY PTY function, unlike in the T.INFO function,the volume does not increase during operation.
5 Press the F/SETUP button to activate the normalmode. The "FUNC" indicator will turn off.
NOTEOperate the unit while the "FUNC" indicator is illuminated.If no buttons are pressed within 5 seconds, the "FUNC"indicator will turn off.
Displaying Radio Text
Text messages from a radio station can be displayed.
1 Press the TITLE button while receiving FM in the radiomode to select the Radio Text display.
∗ If titles for radio stations are entered, you cansearch for a radio station from its title."Station Title Search Function" (See page 8)
The display shows "Waiting" for a few seconds.
NOTES• If there is no receivable text message or the unit cannot
receive a text message properly, the display shows "NOTEXT".
• Depending on the signal reception conditions, “Waiting” maybe displayed.
PS (Programme Service Name) *Station namePSRadio Text
Receiving Traffic Information WhilePlaying CD or Radio
1 Press the T.INFO/ANNC. button repeatedly until theT.INFO indicator appears in the display.
2 Press the and buttons to select a trafficinformation station if necessary.
• When a traffic information broadcast starts, the unitautomatically mutes the CD player or the regular FMbroadcast.
• When the traffic information broadcast finishes, theunit automatically returns to the original source playbefore the traffic information broadcast began.
• When traffic information stations cannot bereceived:In the tuner mode:
When the TP signal can no longer be received forover 70 seconds, the "T.INFO" indicator blinks.
In the CD mode:When the TP signal can no longer be received,the traffic information station of another frequencywill be selected automatically.
NOTEThe receiver is equipped with the EON (Enhanced OtherNetworks) function in order to keep track of additionalalternative frequencies to the AF list. The EON indicatorappears while an RDS EON station is being received. If thestation being received does not broadcast the traffic information,the receiver automatically tunes in the related station thatbroadcasts the traffic information when it occurs.
3 Press the T.INFO/ANNC. button to deactivate theTraffic Information mode. The T.INFO indicatordisappears.
NOTEThe unit automatically switches to a traffic informationannouncement even if you are listening to a source other thanthe radio or CD.
Priority PTY (Programme Type)
This function allows presetting of a programme typesuch as music category, news, etc. You can listen to aprogramme in the preset programme type as the unitautomatically gives priority to the preset programmetype when it begins broadcasting, and interrupts theprogramme you are currently listening. This feature isfunctional when your unit is set to a mode other than theLW and MW.
1 Press the F/SETUP button. The "FUNC" indicator willilluminate.
2 Press the 3/P. PTY button to activate the PRIORITYPTY mode.The programme type will be displayed for 5 seconds.The initial setting is "News."

12-EN
CD Player Operation2 Insert a disc with the label side facing up.
The disc will be pulled into the unit automatically. Themovable display will close and playback will begin.When a disc is already inserted, press the SOURCE/POWER button to switch to the CD mode.The mode will change every time the button is pressed.
3 To pause playback, press the button.Pressing the button again will resume playback.
4 To eject the disc, press the button.
NOTES• If the CD does not eject, press button again for at least 2
seconds with the movable display open.• In CD mode, if the navigation disc (sold separately) is loaded,
“NAV. DISC” is displayed.
Opening and Closing the MovableDisplay
1 Press the button.The movable display will open.
To close the movable display, press the button again.The movable display will close.
NOTES• Do not apply shock to the movable display when it is open as
it may result in malfunction of the unit.• The display will stop at the set angle when closing.
CAUTIONKeep hands (or any other object) away from the display while itis opening or closing to avoid damage or injury. The back of themovable display will get very warm under normal operatingconditions. This is not a malfunction. Do not touch.
Playback
1 Press the button.The movable display will open.
(Movable display fully opened)
Insert a disc with the label side facing up.
(∗ Only when the CD changer is connected)
→ TUNER → CD → CD CHANGER∗
On handling Compact Discs (CD/CD-R/CD-RW)
• Do not touch the surface.• Do not expose the disc to direct sunlight.• Do not affix stickers or labels and do not write on the
surface.• Clean the disc when it is dusty.• Make sure that there are no bumps around the disc.• Do not use commercially available disc accessories.
Do not leave the disc in the car or the unit for along time. Never expose the disc to direct sunlight.Heat and humidity may damage the CD and you maynot be able to play it again.
To customers using CD-R/CD-RW• If a CD-R/CD-RW cannot be played back, make sure the
last recording session was closed (finalized).• Finalize the CD-R/CD-RW if necessary, and attempt
playback again.
About discs that can be used with the INA-N333R models.Use only compact discs with the label side showing the CDlogo marks below.
You can play CD-Rs (CD-Recordable)/CD-RWs (CD-ReWritable) for audio use on this unit. You can not playCD-Rs/CD-RWs containing MP3 formatted audio files.
• Some of the following CDs may not play on this unit:Flawed CDs, CDs with fingerprints, CDs exposed toextreme temperatures or sunlight (e.g., left in the caror this unit), CDs recorded under unstableconditions, CDs not designed for audio use, CDs onwhich a recording failed or a re-recording wasattempted.
MP3 can be played back if an MP3 compatible CDchanger is connected. (Refer to “Changer operation” onpage 22)
4 ( ) 6 ( )5 ( )
SOURCE/POWER

13-EN
Music Sensor (Skip)
1 Momentarily press the button once during CD playto return to the beginning of the current track. If youwish to access the beginning of a track further back,repeatedly press until you reach the desired track.
Press the button once to advance to the beginningof the next track. If you wish to access the beginning ofa track further ahead, press repeatedly until thedesired track is reached.
NOTEThe music sensor feature is functional in the play or pause mode.
Fast Forward and Backward
1 Press and hold the or button to quickly movebackward or forward until you reach the desired sectionof the track.
Repeat Play
1 Press the 5 ( ) button to play back repeatedly thetrack being played.The REPEAT indicator will illuminate and the track willbe played repeatedly.
Press the 5 ( ) button again and select OFF todeactivate the repeat play.
M.I.X. (Random Play)
1 Press the 4 ( ) button in the play or pause mode.The M.I.X. indicator will illuminate and the tracks on thedisc will be played back in a random sequence. After allthe tracks on the disc have been played back once, theplayer will begin a new random sequence play until theM.I.X. mode is cancelled.
To cancel M.I.X. play, press the 4 ( ) button again toturn off the M.I.X.
Scanning Programmes
1 Press the 6 ( ) button to activate the Scan mode.The first 10 seconds of each track will be played backin succession.
To stop scanning, press the 6 ( ) button anddeactivate the Scan mode.

14-EN
Displaying the Title/Text
It is possible to display the CD/Station title if the title hasbeen previously inputted. For details, see “Titling Discs/Stations” (page 15). Text information, such as the discname and the track name, will be displayed if playing aCD text compatible disc. If a MP3 compatible CD changeris connected, it is also possible to display the foldername, the file name, and the ID3 tag, etc. while playingMP3 files.
1 Press the TITLE button.The mode will change every time the button is pressed.
About "Title" and "Text"Title: With this device, it is possible to input the CD name
(see page 15). This inputted name is referred to asa "title."
Text: Text compatible CDs contain text information suchas the disc name and track name. Such textinformation is referred to as "text."
Radio mode:
CD/Changer mode:
MP3 mode (When MP3 compatible changer isconnected):
∗1 Displayed during playback of a disc with CD Text.Nothing will be displayed when the CD contains notext data.
∗2 If an MP3 file contains ID3 tag information, all theID3 tag information is displayed (e.g., track name,artist name, and album name).All other tag data is ignored.
∗3 The recording sampling rate and bit rate of the MP3file are displayed.
∗4 Nothing will be displayed when the title has notbeen inputted.
NOTES• Some characters may not be displayed correctly with this
device, depending on the character type.• The display may not show all the information of the CD Text
depending on the CD changer.• When the Scroll Setting (refer to page 19) is set to "OFF",
press and hold the TITLE button for at least 2 seconds toscroll the Text information only once (TEXT DISPLAY,FOLDER NAME DISPLAY, FILE NAME DISPLAY or TAGDISPLAY mode.)
• “NO SUPPORT” is displayed when the desired textinformation cannot be displayed on this unit.
Other Functions
PS (Programme Service Name)
Station Name (TITLE DISPLAY)*4
RADIO TEXT DISPLAY
TEXT DISPLAY (TRACK/DISC NAME)*1
TITLE DISPLAY*4
ID3 TAG DISPLAY*2
FOLDER/FRAME*3 DISPLAY
FILE/FRAME*3 DISPLAY
TITLE DISPLAY*4TITLE
MODEOK Flipper switch

15-EN
Titling Discs/Stations
1 Press the TITLE button and select the title displaymode.For details, see “Displaying the Title/Text” (see page14).
2 Press the TITLE button for at least 2 seconds tochange to the Title Input mode.
3 Letter symbols appear on the display. Move the Flipperswitch up or down within 10 seconds to transfer thecursor to the letter symbol you want to input. Press theOK button or MODE knob to set the letter.
4 Repeat the Procedure 3. Up to 8 digits can be input.The input title is memorized automatically anddisplayed as title.When inputting less than 8 digits, select OK in theletter symbols shown on the display. The letters will bememorized automatically and displayed as title. Even ifOK is not selected, the letters will be memorizedautomatically after 10 seconds.
NOTES• In step 3 and 4, if you do not operate for at least 10 seconds,
the Title Inputting mode will be canceled.• You can also cancel the Title Inputting mode by pressing the
RTN button.• You cannot give titles to tracks.• You can enter 24 station titles for the radio frequency and 18
disc titles on this unit. If you try to store beyond the limit, thedisplay will show "FULL DATA" for 2 seconds. At this point,no more titles can be stored.
• To input a new title, one of the previously inputted titles mustfirst be deleted.
• When you want to erase a title, enter the " " symbol intoall spaces.
• When you select or , the cursor indicating the inputtitle moves right or left.
• When selecting , you can insert the space.• When you select 1 or 2 , the character/symbol pattern
display changes alternately.• The CD Changer title length or memory capacity varies
depending upon the model being used.• Removing power from the unit may delete these titles. Use
caution when manipulating the power cord.• You can also press the or button instead of the
Flipper switch to select a text to enter.• You can also press the button instead of the OK button or
MODE knob to set a text.
Erasing Disc Title/Station Title
1 Press the TITLE button to select the Title Display.Then, press again and hold for at least 2 seconds.
• For details, see “Displaying the Title/Text” (page 14).
2 Press and hold the OK or button or MODE knobfor at least 2 seconds.The title in the display will blink and “SEARCHINGTITLE” will be displayed.
3 Move the Flipper switch up or down until the title youwant to erase is displayed.
4 Press the OK or button or MODE knob. Themessage “DELETE OK?” is displayed.
5 Press the OK or button or MODE knob again.The title is deleted.
6 Press the TITLE button to cancel the title erasingmode.
NOTES• You cannot erase CD-TEXT.• “NO DATA” is displayed for 2 seconds if the title is not input
in step 2, or if the all title is erased in step 5.• You can also press the or button instead of the
Flipper switch to select a title.

16-EN
Sound Setup Operation
Turning Loudness On/Off
Loudness introduces a special low- and high-frequencyemphasis at low listening levels. This compensates forthe ear's decreased sensitivity to bass and treble sound.
1 Press the bass engine button to change to the bassengine mode.
2 Move the Flipper switch up or down to select LOUD.Press the OK button or MODE knob to set the LOUDmode.
3 Press the OK button or MODE knob again.
4 Move the Flipper switch up or down to select ON orOFF.Press the OK button or MODE knob to set. The displayreturns to the LOUD mode.
5 When the setting is completed, press the bass enginebutton to return to the normal mode.
NOTES• If no button is pressed within 10 seconds, the Loudness
setting will be turned off automatically.• After 10 seconds from the completion of operation, the system
returns to the normal mode automatically. If the RTN buttonis pressed, the display returns to the previous setting indication.
• You can also press the or button instead of theFlipper switch to select an item.
• You can also press the button instead of the OK button orMODE knob to set an item.
Turning Defeat Mode On/Off
By setting Defeat ON, all previously adjusted in the bassengine mode (except subwoofer mode) settings willreturn to the factory defaults.
1 Press the DEFEAT button for more than 2 seconds toturn Defeat on.
To cancel Defeat, press the DEFEAT button again formore than 2 seconds.
Switching the Phase of theSubwoofer Output
You can switch the phase of the subwoofer output toNORMAL 0° or REVERSE 180°. To select the desiredphase:
1 Press the bass engine button to change to the bassengine mode.
2 Move the Flipper switch up or down to select SUBW.Press the OK button or MODE knob to set the SUBW.mode.
3 Press the OK button or MODE knob to change to theSUBW. PHASE setting display.
4 Move the Flipper switch up or down to select 0°(NORMAL) or 180° (REVERSE). Press the OK buttonor MODE knob to set.
NOTES• If no button is pressed within 10 seconds, the Phase of the
Subwoofer Output setting will be turned off automatically.• After 10 seconds from the completion of operation, the system
returns to the normal mode automatically. If the RTN buttonis pressed, the display returns to the previous settingindication.
bass engine/DEFEAT
MODEOK Flipper switch

17-EN
Setting the Bass Control
You can change the Bass Frequency emphasis to createyour own tonal preference.
1 Press the bass engine button to change to the bassengine mode.
2 Move the Flipper switch up or down to select BASSCONT. Press the OK button or MODE knob to set theBASS CONT. (Bass Center frequency control) mode.
3-1 Setting the bass Level:Move the Flipper switch up or down to select BASSLEVEL. Press the OK button or MODE knob to set.Move the Flipper switch up or down to select thedesired bass level (–7~+7). Press the OK button orMODE knob to set.You can emphasize or weaken the bass frequency.
3-2 Setting the bass Centre frequency:Move the Flipper switch up or down to select BASSFREQ. Press the OK button or MODE knob to set.Move the Flipper switch up or down to select thedesired bass centre frequency (60Hz ~ 180Hz). Pressthe OK button or MODE knob to set.
Emphasizes the displayed Bass frequency ranges.
3-3 Setting the bass Band Width (Q-Factor):Move the Flipper switch up or down to select BANDWIDTH. Press the OK button or MODE knob to set.Move the Flipper switch up or down to select thedesired bass Band Width (WIDE1 (Narrow) ~ WIDE4(Wide)). Press the OK button or MODE knob to set.
Changes the bass boost band width to narrow or wide. Awide setting will boost a wide range of frequencies aboveand below the centre frequency. A narrower setting willboost only frequencies near the centre frequency.
NOTES• If no buttons are pressed within 10 seconds, the Bass control
setting will be turned off automatically.• After 10 seconds from the completion of operation, the system
returns to the normal mode automatically. By pressing theRTN button, the display returns to the previous indication.
• You can also press the or button instead of theFlipper switch to select an item.
• You can also press the button instead of the OK button orMODE knob to set an item.
• The bass level settings will be individually memorized foreach source (FM, MW (LW), CD, etc.) until the setting ischanged. The bass frequency and bass band width settingsadjusted for one source are effective for all other sources(FM, MW (LW), CD etc.).
• Depending on the connected devices, some functions anddisplay indications do not work. However, bass level is stilladjustable if an audio processor with the bass adjustment isconnected.
Setting the Treble Control
You can change the Treble Frequency emphasis tocreate your own tonal preference.
1 Press the bass engine button to change to the bassengine mode.
2 Move the Flipper switch up or down to select TREBLECONT. Press the OK button or MODE knob to set theTREBLE CONT. (Treble Center frequency control)mode.
3-1 Setting the treble Level:Move the Flipper switch up or down to select TREBLELEVEL. Press the OK button or MODE knob to set.Move the Flipper switch up or down to select thedesired Treble level (–7~+7). Press the OK button orMODE knob to set.You can emphasize the treble frequency.
3-2 Setting the treble Centre frequency:Move the Flipper switch up or down to select TREBLEFREQ. Press the OK button or MODE knob to set.Move the Flipper switch up or down to select thedesired treble centre frequency (10.0kHz ~ 17.5kHz).Press the OK button or MODE knob to set.
Emphasizes the displayed Treble frequency ranges.
NOTES• If no buttons are pressed within 10 seconds, the Treble control
setting will be turned off automatically.• After 10 seconds from the operation is completed, the system
returns to the normal mode automatically. By pressing theRTN button, the display returns to the previous settingindication.
• You can also press the or button instead of theFlipper switch to select an item.
• You can also press the button instead of the OK button orMODE knob to set an item.
• The treble level settings will be individually memorized foreach source (FM, MW (LW), CD, etc.) until the setting ischanged. The Treble frequency settings adjusted for onesource are effective for all other sources (FM, MW (LW), CD,etc.).
• Depending on the connected devices, some functions anddisplay indications do not work. However, treble level is stilladjustable if an audio processor with the treble adjustment isconnected.

18-EN
SETUP Operation
Changing Backlighting Colour
1 Press and hold the F/SETUP button for at least 2seconds. The display changes to the SETUP screen.
2 Move the Flipper switch up or down to selectILLUMINATION. Press the OK button or MODE knob toset.
3 Move the Flipper switch up or down and to selectGREEN or AMBER. Press the OK button or MODEknob to set. The display returns to the SETUP screen.
NOTEIf you continue to press the Flipper switch to up or down, thecursor position moves continuously.
4 When the setting is completed, press the F/SETUPbutton to return to the normal mode.
NOTES• You can also press the or button instead of the
Flipper switch to select an item.• You can also press the button instead of the OK button or
MODE knob to set an item.• “Switching the Tuner Mode” in the SETUP items is described
in the Radio Operation on page 7.• “Receiving RDS Regional (Local) Stations” and “PI SEEK
Setting” in the SETUP items are described in the RDSOperation on page 9 and 10.
• “Receiving Announcement Information of DAB LocalStation”, “Setting for Automatic Change from DAB to RDS”and “Setting ON/OFF for DRC” in the SETUP items aredescribed in the DAB Operation on page 28.The setting can be operated only when the optional DABreceiver Box is connected.
• “Setting the Range of MP3 File Selection” in the SETUPitems is described in the Changer Operation on page 24.The setting can be operated only when the optional changercompatible with MP3 is connected.
• “Switching the incoming calls of the telephone” in the SETUPitems is described in the MobileHubTM Link Operation onpage 30.The setting can be operated only when the optional portabletelephone and the Mobile Hub are connected.
MODEOK
F/SETUPRTN
Flipper switch
Sound (Beep) Guide Function
This function will give audible feedback with varyingtones depending upon the button pressed.
1 Press and hold the F/SETUP button for at least 2seconds. The display changes to the SETUP screen.
2 Move the Flipper switch up or down to select BEEP.Press the OK button or MODE knob to set.
3 Move the Flipper switch up or down to select OFF orset your preferred volume. The volume can be set oneof the three steps: LOW, MID, and HIGH. Press the OKbutton or MODE knob to set. The display returns to theSETUP screen.
NOTES• The initial setting at the factory is BEEP OFF.• When an external audio processor is connected, the beep tone
does not function although the BEEP setting is set to on.• The beep tone will be output from the front speakers only.
4 When the setting is completed, press the F/SETUPbutton to return to the normal mode.
Displaying Time
1 Press and hold the F/SETUP button for at least 2seconds. The display changes to the SETUP screen.
2 Move the Flipper switch up or down to select CLOCKDISPLAY. Press the OK button or MODE knob to set.
3 Move the Flipper switch up or down to change theclock display ON or OFF. Press the OK button orMODE knob to set. The display returns to the SETUPscreen.
4 When the setting is completed, press the F/SETUPbutton to return to the normal mode.

19-EN
SUBW. BAL.
FAD.Vol.
Setting Time
1 Press and hold the F/SETUP button for at least 2seconds. The display changes to the SETUP screen.
2 Move the Flipper switch up or down to select CLOCKADJUST. Press the OK button or MODE knob to set.
3 Move the Flipper switch up or down to select HOUR.Press the OK button or MODE knob to set. Move theFlipper switch up or down again to set the "Hour".After adjustment, press the RTN button to return to theprevious indication.
4 Move the Flipper switch up or down to selectMINUTE. Press the OK button or MODE knob to set.Move the Flipper switch up or down again to set the"Minute".After adjustment, press the RTN button to return to theprevious indication.
5 When the setting is completed, press the F/SETUPbutton to return to the normal mode.
Setting the Clock Auto Adjustment
If this is set to ON, the clock display calculated from theGPS information is available.
1 Press and hold the F/SETUP button for at least 2seconds. The display changes to the SETUP screen.
2 Move the Flipper switch up or down to select AUTOGPS CLOCK. Press the OK button or MODE knob toset.
3 Move the Flipper switch up or down to select ON orOFF. Press the OK button or MODE knob to set. Thedisplay returns to the SETUP screen.
4 When the setting is completed, press the F/SETUPbutton to return to the normal mode.
NOTES• Only minute and second are adjusted automatically.• Set the Clock Auto Adjustment to OFF, when not connecting
to GPS antenna.
Subwoofer On and Off
1 Press and hold the F/SETUP button for at least 2seconds. The display changes to the SETUP screen.
2 Move the Flipper switch up or down to selectSUBWOOFER. Press the OK button or MODE knob toset.
3 Move the Flipper switch up or down to select ON orOFF. Press the OK button or MODE knob to set. Thedisplay returns to the SETUP screen.
4 Press the F/SETUP button after setting theSUBWOOFER ON.
5 Press the MODE (Audio Control) knob repeatedly toselect the SUBWOOFER mode.
6 Turn the MODE (Audio Control) knob until the desiredsound is obtained in each mode.
Scroll Setting
When the display of text characters etc., does not fit onthe display, it is scrolled.When the display of text characters fit on the display, it isnot scrolled even if the Scroll ON/OFF setting isperformed.
1 Press and hold the F/SETUP button for at least 2seconds. The display changes to the SETUP screen.
2 Move the Flipper switch up or down to select AUTOSCROLL. Press the OK button or MODE knob to set.
3 Move the Flipper switch up or down to select ON orOFF.Press the OK button or MODE knob to set. The displayreturns to the SETUP screen.
• ON: the display of CD text, etc., is scrolledcontinuously.
• OFF: the display is scrolled only when a disc isloaded or when a track is changed, etc.
4 When the setting is completed, press the F/SETUPbutton to return to the normal mode.
NOTES• Initial mode is "OFF".• The disc titles input manually (refer to page 15) cannot be
scrolled.

20-EN
SETUP Operation
Navigation Interruption and Adjustingits Volume (NAVI MIX)
When the voice guidance of the navigation systemstarts, the volume level of any currently playing audiosource is reduced automatically.You can also adjust the volume level of voice guidance.
1 Press and hold the F/SETUP button for at least 2seconds. The display changes to the SETUP screen.
2 Move the Flipper switch up or down to select NAVIMIX. Press the OK button or MODE knob to set.
3 Move the Flipper switch up or down to select ON orOFF. Press the OK button or MODE knob to set. Thedisplay returns to the SETUP screen.
4 Press the F/SETUP button after setting the NAVI MIXON.
5 Press the MODE (Audio Control) knob repeatedly toselect the NAVI MIX mode.
6 Turn the MODE (Audio Control) knob until the desiredsound is obtained in each mode.
NOTES• When the voice guidance of the Navigation system starts to
interrupt the audio the display is automatically changed to thenavigation screen.
• The audio volume during the navigation guide can be set byadjusting the audio volume while the navigation guidecontinues. When the navigation guide finishes, the previousaudio volume and the previous screen are restored. Forexception, if the navigation cuts in when the audio volume islower than the setting level, the audio volume during thenavigation guide is reset the current listening volume. (Whenthe navigation guide cuts in, the audio volume does notincrease.)
• The voice guidance will be output from the front speakersonly.
• When connecting the external audio processor to the unit,ensure the output of the voice guidance by connecting theexternal speaker (KAX-551N).
Auto Volume Setting
This is a function that changes the Volume, Bass valueaccording to the car speed pulse for the compensationof hearing by noise. The desirable compensationamount can be selected from 6 patterns.
1 Press and hold the F/SETUP button for at least 2seconds. The display changes to the SETUP screen.
2 Move the Flipper switch up or down to select AUTOVOLUME. Press the OK button or MODE knob to set.
3 Move the Flipper switch up or down to select yourpreferred Volume pattern (VOL 1: small compensationto VOL 6: large compensation. Set VOL. to OFF whenthe function is not used.) Press the OK button orMODE knob to set. The display returns to the SETUPscreen.
4 When the setting is completed, press the F/SETUPbutton to return to the normal mode.
Setting the AUX Mode (V-Link)
You can input TV/video sound by connecting an optionalAi-NET/RCA Interface cable (KCA-121B) or VersatileLink Terminal (KCA-410C) to this component.
1 Press and hold the F/SETUP button for at least 2seconds. The display changes to the SETUP screen.
2 Move the Flipper switch up or down to selectAUXILIARY INPUT. Press the OK button or MODEknob to set.
3 Move the Flipper switch up or down to select yourpreferred auxiliary mode.Press the OK button or MODE knob to set. The displayreturns to the SETUP screen.
OFF:You cannot select an external input sound source.
ON:You can select an external input sound source. You canalso select an AUXILIARY LABEL for external input∗.∗ 1. Move the Flipper switch up or down to select the
AUXILIARY LABEL on the SETUP display. Pressthe OK button or MODE knob to set.
2. Move the Flipper switch up or down to select yourpreferred name from AUX, GAME, VCR, TV andMP3. Press the OK button or MODE knob to set.
AUXILIARY LABELYou can select and set a name of external input whenVersatile Link Terminal (KCA-410C) is not connected.
AUX-1 LABEL / AUX-2 LABELYou can select an AUXILIARY LABEL when VersatileLink Terminal (KCA-410C) is connected.
NOTEWhen connecting the Versatile Link Terminal (KCA-410C), youcan set two AUX mode displays.
MIX BAL. Vol. MIXFAD.
MODEOK
F/SETUP
Flipper switchSOURCE/POWER

21-EN
Turning Mute Mode On/Off
If a device having the interrupt feature is connected,audio will be automatically muted whenever the interruptsignal is received from the device. This function can beturned ON or OFF from the head unit by followingprocedure below.
1 Press and hold the F/SETUP button for at least 2seconds. The display changes to the SETUP screen.
2 Move the Flipper switch up or down to select MUTE.Press the OK button or MODE knob to set.
3 Move the Flipper switch up or down to select ON orOFF. Press the OK button or MODE knob to set. Thedisplay returns to the SETUP screen.
NOTEThe initial setting at the factory is "MUTE ON."
4 When the setting is completed, press the F/SETUPbutton to return to the normal mode.
NOTEWhen Mute is set to OFF, if an external interruption (e.g.,vehicle phone) happens, the display shows “INT.”.When Mute is set to ON, the display shows “MUTE”.
Adjusting Source Signal Level
If the difference in volume level between the CD playerand FM radio is too great, adjust the FM signal level asfollows.
1 Press and hold the F/SETUP button for at least 2seconds. The display changes to the SETUP screen.
2 Move the Flipper switch up or down to select FMLEVEL.Press the OK button or MODE knob to set.
3 Move the Flipper switch up or down to select HIGH orLOW. Press the OK button or MODE knob to set. Thedisplay returns to the SETUP screen.
4 When the setting is completed, press the F/SETUPbutton to return to the normal mode.
Demonstration
This unit has the Demonstration feature which simulatesthe display functions on the display panel.
1 Press and hold the F/SETUP button for at least 2seconds. The display changes to the SETUP screen.
2 Move the Flipper switch up or down to select DEMO.Press the OK button or MODE knob to set.
3 Move the Flipper switch up or down to select ON orOFF. Press the OK button or MODE knob to set. Thedisplay returns to the SETUP screen.
If no buttons are pressed 30 seconds after the DEMOmode is turned ON, the DEMO mode then begins.
NOTES• The initial setting at the factory is "DEMO ON".• The demonstration operation will repeat automatically until
the DEMO mode is changed to OFF.
4 When the setting is completed, press the F/SETUPbutton to return to the normal mode.
4 When the setting is completed, press the F/SETUPbutton to return to the normal mode.
5 To adjust the volume, etc., first press the SOURCE/POWER button and select the AUX mode, then makethe necessary adjustment.
NOTEWhen using the Versatile Link Terminal (KCA-410C), you canconnect two external inputs. To select the mode, press the BAND/TEL. button on the unit.

22-EN
Controlling Changer (Optional)
An optional 6-disc (including MP3 compatible changer)or 12-disc CD Changer may be connected to the INA-N333R if it is Ai-NET compatible. With a CD Changerconnected to the Ai-NET input of the INA-N333R, theCD Changer will be controllable from the INA-N333R.Using the KCA-400C (the Multi-Changer Switchingdevice) or KCA-410C (Versatile Link Terminal) multiplechangers can be controlled by the INA-N333R.See the Multi-Changer Selection section on this page forselecting the CD Changers.
NOTES• The controls on the INA-N333R for CD Changer operation are
operative only when a CD Changer is connected.• The DVD changer (optional) is controllable from the INA-
N333R as well as the CD changer.
1 Press the SOURCE/POWER button to activate theCHANGER mode. The display shows the disc numberand track number.
NOTEThe source indicator varies depending on the connected source.
2 Press the Disc Select buttons (1 through 6)corresponding to one of the discs loaded in the CDChanger. The selected disc number appears in thedisplay and CD playback starts.
3 To pause playback, press the button.Pressing the button again will resume playback.
NOTES• After selecting the desired disc, you can operate in the same
way as for the CD player.For details, please see the CD Operation section.
• If the "FUNC" indicator is illuminated the Disc Select buttonsbecome nonfunctional.
• The MP3 indicator is lit during MP3 playback.• Press BAND to switch the Disc mode in the CD/DVD/
Changer mode.• When an MP3 compatible CD player is connected, the unit
can play discs containing both audio data and MP3 data.
Changer Operation (optional)When a 12-disc CD Changer is connected:To select discs numbered from 1 to 6, the procedure isthe same as for the 6-disc CD Changer. To select discsnumbered from 7 to 12, first press the F/SETUP button.This changes the "D" indicator to "d". Then press thedesired Preset button. With the F/SETUP buttonactivated, the Preset buttons 1 to 6 will represent discs7 to 12 respectively.
Multi-Changer Selection
Alpine's Ai-NET system will support up to 6 CDChangers. When operating two or more changers, theKCA-400C (Multi-Changer Switching device) must beused. If you use 1 Switching device, you can connect upto 4 CD Changers. If you use 2 Switching devices, youcan connect up to 6 CD Changers. When using KCA-410C (Versatile Link Terminal), you can connect twochangers and two external outputs (AUX).
1 Press the SOURCE/POWER button to activate the CDChanger mode.
Alternatively, press the SOURCE button on the RemoteControl (optional) to activate the CD Changer mode.Proceed to Step 3 below to select the desired CDChanger.
2 Press the BAND button on this unit or the RemoteControl (optional) to activate the CD Changer Selectionmode.
3 The CD Changer Selection mode remains active for 3seconds after Step 2 is performed. Press the BANDbutton on this unit or the Remote Control until thedesired CD Changer indicator appears on the display.
NOTES• If the selected CD Changer is not connected, the display will
show "NO CHANGER."• For further details about the external input (AUX) when using
KCA-410C, see "Setting the AUX Mode (V-Link)" on page 20.
SOURCE/POWER
Disc select buttons (1 through 6)
5 ( )F/SETUP
BAND
4 ( ) 6 ( )
23-EN
REPEAT *REPEAT ALL REPEAT(off)
Music Sensor (Skip)
1 Momentarily press the button once during CD playto return to the beginning of the current track (file). Ifyou wish to access the beginning of a track (file) furtherback, repeatedly press until you reach the desired track(file).
Press the button once to advance to the beginningof the next track (file). If you wish to access thebeginning of a track (file) further ahead, pressrepeatedly until the desired track (file) is reached.
NOTEThe music sensor feature is functional in the play or pause mode.
Fast Forward and Backward
1 Press and hold the or button to quickly movebackward or forward until you reach the desired sectionof the track (file).
Repeat Play
1 Press the F/SETUP button. The "FUNC" indicator willilluminate.
2 Within 5 seconds, press the 5 ( ) button to playback repeatedly the track being played.The track (file) will be played repeatedly.
Press the 5 ( ) button again and select OFF todeactivate the repeat play.
NOTES• *The REPEAT ALL mode is selected, the unit repeatedly plays
back all tracks (files) on the selected disc.• If a CD changer applicable to MP3 is connected, when you
select “FOLDER” and set to REPEAT ALL in the "Setting theRange of MP3 File Selection" section on page 24, the Fileswill be repeatedly played back.
• In case a 12-disc CD changer is connected:In changer mode, press the F/SETUP button twice toilluminate the "FUNC" indicator and go to step 1 within 5seconds.
M.I.X. (Random Play)
1 Press the F/SETUP button. The "FUNC" indicator willilluminate.
2 Within 5 seconds, press the 4 ( ) button in the playor pause mode.The tracks (files) on the disc will be played back in arandom sequence.
To cancel M.I.X. play, press the 4 ( ) button againto turn off the M.I.X.
NOTES•* If a CD Changer equipped with the ALL M.I.X. function is
connected, ALL M.I.X. will also be selectable.In this mode, the tracks on all the CDs in the currentmagazine will be included in the random playback sequence.
• In case an MP3 compatible CD changer is connected:When you select "FOLDER" and set to M.I.X. in the "Settingthe Range of MP3 File Selection" section on page 24, theFiles in the Folder are played back in random sequence. Afterall the files have been played back, play does not shift to thenext Folder.
• In case a 12-disc CD changer is connected:In changer mode, press the F/SETUP button twice toilluminate the "FUNC" indicator and go to step 1 within 5seconds.
Scanning Programmes
1 Press the F/SETUP button. The "FUNC" indicator willilluminate.
2 Within 5 seconds, press the 6 ( ) button to activatethe Scan mode.The first 10 seconds of each track (file) will be playedback in succession.
To stop scanning, press the 6 ( ) button anddeactivate the Scan mode.
NOTES• If a CD changer applicable to MP3 is connected:
When you select "FOLDER" in the "Setting the Range of MP3File Selection" section on page 24, the first 10 seconds ofeach File in the Folder will be played back.
• In case a 12-disc CD changer is connected:In changer mode, press the F/SETUP button twice toilluminate the "FUNC" indicator and go to step 1 within 5seconds.
M.I.X. *ALL M.I.X. M.I.X.(off)

24-EN
Changer Operation (optional)
MODEOK
F/SETUP 1 (FOLDER DN) 2 (FOLDER UP)
Flipper switch
Selecting Folders (only for MP3compatible changer)
Operation I from the main unit button:
1 Move the Flipper switch up or down to select thefolder.
Operation II from the main unit button:
1 Press the F/SETUP button so that the "FUNC"indicator will illuminate.
2 Within 5 seconds, press the 1/FOLDER DN or 2/FOLDER UP button to select the folder.
File/Folder Search (only for MP3compatible changer)
You can locate all the files on a disc and play them.
1 Press and hold the MODE knob for at least 2 seconds.The unit switches to File/Folder Search Mode.
2 Press and hold the button for at least 2 secondsto select the File search mode or Folder search mode.
3 Move the Flipper switch up or down or press the , to select the desired file or folder.
4 Press the OK button or MODE knob to execute thesetting. The selected file or folder starts to play.
NOTEDuring search, press the RTN button or press and hold theMODE knob for at least 2 seconds to cancel the Search mode.
Setting the Range of MP3 File Selection(only for MP3 compatible changer)
When an MP3 compatible CD changer is connected,you can set the range of MP3 file selection to “entiredisc contents” or “folder contents only.”
1 Press and hold the F/SETUP button for at least 2seconds.
2 Move the Flipper switch up or down to select MP3PLAY. Press the OK button or MODE knob to set.
3 Move the Flipper switch up or down to toggle themode between ALL and FOLDER .• ALL : plays all the files on one disc• FOLDER : plays files in the selected folder only.
4 Press the OK button or MODE knob to set.The display returns to the SETUP screen.
NOTEThe initial setting at the factory is ALL.
5 Press the F/SETUP button to set the selected mode.

25-EN
DAB Operation (optional)
Using DAB Receiver for the EnsembleSeek Tuning (Optional)
DAB (Digital Audio Broadcasting) offers excellent soundquality even in a moving vehicle, enabling you to receivevarious types of information, including weather and trafficinformation, and it also displays information sent from thebroadcasting stations. You can also let urgent broadcastsor announcements interrupt a current broadcast.
NOTES• If you connect the DAB Receiver Box TUA-T100DAB
(separately sold), you can control DAB for the reception ofbroadcast.
• CD quality sound can be obtained from DAB broadcasts,although quality may differ on some services.
• Some broadcasting stations may perform test broadcasts.• When DAB reception is poor, metallic noise may occur. This is
not a malfunction.
1 Press the SOURCE/POWER button to select DAB.
2 Press the BAND/TEL. button to select DAB1, DAB2, orDAB3.
3 If you press and hold the or button whilereceiving DAB1, 2, or 3, it starts searching for ensembleautomatically.By selecting the mode in the “Changing the DisplayMode” section (see page 27), the display shows thestatus of the broadcasting stations that have beenreceived as follows:
Ensemble/Service Label Display: the Ensemble/Service Label of received station is displayed.
Service/Component Label Display: the Service/Ensemble Label is displayed for 2 seconds, and thenthe display is changed to the Service Label andComponent Label after receiving the broadcastingstation.
Dynamic Label Display: the Service/Ensemble Label isdisplayed for 2 seconds, and then the display ischanged to the Dynamic Label after receiving thebroadcasting station.
TipsWhen you use DAB, you can select a desired ensemble whichmay contain one or more services, any of which can be received.Furthermore, each service contains a Service Component, whichitself can contain any number of Primary or Secondary services,depending on the Service Component. Several different kinds ofservice can therefore be selected.
Changing the Service
Services are received within the ensemble that you arecurrently receiving.
1 While receiving the ensemble, momentarily press the or button, and select the service that you
desire.The selected service label is displayed for 2 seconds,and then you return to the display that you select withthe steps described under the section “Changing theDisplay Mode” (see page 27).
Changing the Service Component
You can change Audio Services of the Service Componentbetween the Primary and Secondary, when listening to anAudio Service that has a Secondary Service Component.
1 Press the F/SETUP button so that "FUNC" willilluminate.
2 Press the 4 / P/S button to change the ServiceComponent between the Primary and Secondarybroadcast.Every time you press the button the selection toggles.The Component label is displayed for 2 seconds, andthen you return to the display that you selected with thesteps described under the section “Changing theDisplay Mode” (see page 27).
NOTES• If there exists a Secondary Service Component within a
service, the indicator “S” blinks on the display. Whenreceiving the Secondary Service Component, the indicator“S” remains lit.
• When receiving the Primary Service Component, the "P"indicator lights up.
.
Memorizing the Service
1 Select the service that you want to memorize.
2 Press any one of the Preset buttons (1 through 6) forat least 2 seconds while the “FUNC” indicator is turnedoff. The selected service is memorized.
3 To memorize more, repeat the above steps 1 and 2.
NOTES• You can memorize up to 18 stations (6 stations for each
band; DAB1, DAB2, DAB3).• If you select a preset button that has already memorized a
service, the new selection takes it over.• When you are not receiving DAB, the service is not
memorized. (Memorize the service when the DAB receptionis good)
F/SETUP 4 / P/S
SOURCE/POWER BAND/TEL.
Preset buttons(1 through 6)

26-EN
By selecting the mode in the “Changing the DisplayMode” section (see page 27), the display shows thestatus of the broadcasting stations that have beenreceived as follows:
Ensemble/Service Label Display: the Ensemble/Service Label of received station is displayed.
Service/Component Label Display: the Service/Ensemble Label is displayed for 2 seconds, and thenthe display is changed to the Service/Component Labelafter receiving the broadcasting station.
Dynamic Label Display: the Service/Ensemble Label isdisplayed for 2 seconds, and then the display ischanged to the Dynamic Label after receiving thebroadcasting station.
NOTEIf no ensemble is received, the one that has been received beforeyou perform this automatic memorization is received.
PTY (Programme Type) Tuning
1 Press the F/SETUP button so that "FUNC" willilluminate.
2 Press the 2/PTY button to go to the PTY Select mode.
3 Press the or button or move the Flipperswitch up or down to select your desired programmetype.
4 After selecting a programme type, and when the"FUNC" indicator will illuminate, press the 2/PTY buttonto go to the PTY Search mode.The selected programme type is searched for.
NOTETo cancel the PTY Search mode during the PTY search, pressthe 2/PTY button.
5 When the station is received, the received programmetype is displayed for 5 seconds. If no station is found,“NO PTY” is displayed for 2 seconds. Then, theselected programme type will be displayed for 3seconds and the PTY mode will end.
NOTES• Above functions can be performed only for services within an
Ensemble.• PTY selected here is reflected to the RDS broadcast.
Receiving the Memorized Service
1 Press the BAND/TEL. button to select your desiredband.
2 Press one of the Preset buttons (1 through 6).The selected service is received.By selecting the mode in the “Changing the DisplayMode” section (see page 27), the display shows thestatus of the broadcasting stations that have beenreceived as follows:
Ensemble/Service Label Display: the Ensemble/Service Label of received station is displayed.
Service/Component Label Display: the Service/Component Label after receiving the broadcastingstation.
Dynamic Label Display: the Service/Ensemble Label isdisplayed for 2 seconds, and then the display ischanged to the Dynamic Label after receiving thebroadcasting station.
NOTEWhen you receive the Secondary Service Component, youmemorize the service, but when you call out this memorizedservice, the Primary Service Component will be called out.
Memorizing the Ensemble Automatically
1 Press the BAND/TEL. button to select the band thatyou want to receive.
2 Press and hold the TUNE/A.ME button for at least 2seconds.The ensemble is searched for, and six ensembles areautomatically received and memorized with the presetbuttons (1 through 6).When memorization has completed, the Ensemble thatwas memorized last is received.
DAB Operation (optional)
Preset buttons (1 through 6)
BAND/TEL.TUNE/A.ME
F/SETUPTITLE
T.INFO/ANNC.
2/PTY
Flipper switch

27-EN
4 Press the button to set ON/OFF for the selectedAnnouncement.Repeat Steps 3 and 4 to set more.
5 To set the Announcement Select mode OFF, press theT.INFO/ANNC. button for at least 2 seconds.
NOTES• When one of the selections between "All Select" and
"Financial" is set ON, no announcement interrupts are madeif you set OFF for the "Announcement."
• If you set ON/OFF with the "All Select" selection, you can setON/OFF for the selections from "Traffic News" to"Financial."
Tips• When an urgent broadcast is received, the mode automatically
changes to the DAB mode to receive the AlarmAnnouncement. If you adjust the volume level at this time,that volume level is memorized, and that volume level isapplied the next time you receive an urgent broadcast.
• If the announcement that you select in Step 3 interrupts, theselected announcement Label is displayed. If you adjust thevolume level at this time, that volume level is memorized, andthat volume level is applied the next time announcementinterrupts.
Changing the Display Mode
You can display information that is sent from broad-casting stations, such as the channel number or theservice name that you are receiving or listening.
1 While receiving DAB, press the TITLE button tochange the display mode.
∗1: You can display this only when the broadcastingstation supplies the Service Component Label.Otherwise, “NO COMPONENT” is displayed.
∗2: • If you set “ON” for “Scroll Setting,” the characterinformation that is sent from the broadcastingstation is scrolled when it displayed.If you are set to “OFF” while displaying theDynamic Label and press and hold the TITLEbutton for at least 2 seconds, you can scroll thecharacter information once.
• “NO SERVICE” is displayed when there is noservice, while “NO ENSEMBLE” is displayedwhen there is no ensemble label.
• “NO TEXT” is displayed when broadcastingstations which contain no Dynamic Label arereceived.
Turning ON/OFF Traffic NewsAnnouncement
When you set to ON, you can automatically receive theTraffic News.
1 Press the T.INFO/ANNC. button to set ON/OFF for theTraffic News.You can also set the RDS stations at the same time.
NOTEThis operation can also be performed by turning the TrafficNews ON/OFF in the "Setting the Announcement Select Mode"section on this page.
Setting the Announcement SelectMode
1 Press the T.INFO/ANNC. button for at least 2 secondsto turn ON the Announcement Select mode.
2 Press the or button to select “Announcement,”and then press the button to set it ON.
3 After turning ON the “Announcement,” press the or button to select your desired Announcement.
Announcement
All Select
Traffic News
Travel News
Warning
News
Weather
Event
Special Event
Radio Info
Sports News
Financial
Ensemble Label/Service Label Display
Service Label/Component Label Display*1
Dynamic Label Display*2

28-EN
Receiving Announcement Informationof DAB Local Stations
1 Press and hold the F/SETUP button for at least 2seconds.The display changes to the SETUP screen.
2 Move the Flipper switch up or down to select DABREGIONAL.Press the OK button or MODE knob to set.
3 Move the Flipper switch up or down to select ON orOFF.
ON: You can automatically receive the announcementinterrupt of the regional you are currently in.
OFF: Announcement interrupt is valid for all regions.
Press the OK button or MODE knob to set. The displayreturns to the SETUP screen.
4 When the setting is completed, press the F/SETUPbutton to return to the normal mode.
NOTES• You can also press the or button instead of the
Flipper switch to select an item.• You can also press the button instead of the OK button or
MODE knob to set an item.
Setting for Automatic Change fromDAB to RDS
When the DAB reception is poor, you can set thisselection ON to automatically change to the RDS station(a station that can be received) within the samebroadcasting station until good reception is achieved.You can switch this for voice only (except Service label/Dynamic label display). The display and operationremain as for DAB.
1 Press and hold the F/SETUP button for at least 2seconds.The display changes to the SETUP screen.
2 Move the Flipper switch up or down to select RDS/DAB SW.Press the OK button or MODE knob to set.
3 Move the Flipper switch up or down to select ON orOFF.Press the OK button or MODE knob to set. The displayreturns to the SETUP screen.
4 When the setting is completed, press the F/SETUPbutton to return to the normal mode.
NOTEWhen reception is being changed from DAB to RDS, the DABindicator blinks.
Setting ON/OFF for DRC (DynamicRange Control)
If you set this ON when receiving the sound of a wideDynamic Range, the DRC (Dynamic Range Control)gain increases when the source sound is small, and theDRC (Dynamic Range Control) gain decreases whenthe source sound is large, making the Dynamic Rangenarrower to give you better and more comfortable soundeven in the vehicle that produces a large noise.
1 Press and hold the F/SETUP button for at least 2seconds.The display changes to the SETUP screen.
2 Move the Flipper switch up or down to select DRC.Press the OK button or MODE knob to set.
3 Move the Flipper switch up or down to select ON orOFF.Press the OK button or MODE knob to set. The displayreturns to the SETUP screen.
4 When the setting is completed, press the F/SETUPbutton to return to the normal mode.
NOTEWhen a radio programme is set to ON, sound other than whatyou previously set may be produced depending on the broadcast.In this case, turn the programme OFF.
DAB Operation (optional)
MODEOK
F/SETUP
Flipper switch

29-EN
MobileHubTM Link Operation (optional)
About MobileHub™ Link (Optional)
Connect a separately sold Junction Box and a portabletelephone (available from Nokia) to control the incomingand outgoing calls of the portable telephone.
About Icon IndicatorSignal strength indicator: Telephone signalstrength is displayed at 4 levels.
Unread mail icon indicator: lights when there is anunread short message.
Missed call icon indicator: lights when there is amissed call.
CAUTION• Even with hands-free operation, a driver can be distracted
during telephone operation or receiving a call. For the sake ofsafety, drivers are requested to refrain from operating thetelephone while driving.
• For the sake of safety, operations other than incoming callsand Speed-Dial outgoing calls cannot be used.
NOTES• If a portable telephone is connected, its address book,
incoming and outgoing history, short message history aredownloaded to the Junction Box.
• Please refer to the instruction manual of the Junction BOX.
Telephone Mode On and Off
1 Press and hold the BAND/TEL. button for at least 2seconds.After the Network Operator display is shown for about2 seconds, the display changes to the Speed Dialscreen.See relevant pages for each item.
Press and hold the BAND/TEL. button for at least 2seconds or press the RTN button to cancel thetelephone mode.
BAND/TEL.
RTN
NOTES• When a portable telephone is not connected, “NO PHONE”
is displayed for at least 2 seconds, then the mode returns tothe original source mode.
• When the portable telephone is taken off the Junction BOXduring an incoming or outgoing call, or during a hands-freecall, the call will be treated as an ordinary one by theportable telephone.
• When there is an incoming call while the power of INA-N333R is OFF, the power of INA-N333R will turn ONautomatically for a hands-free call.
• Even if the power of the portable telephone is OFF, whenINA-N333R is set to the telephone mode, the power of theportable telephone will be turned ON.
• Even if the ACC power of the vehicle is turned OFF (even ifthe engine is stopped) during a hands-free call, the call is notdisconnected, and an ordinary call by the portable telephoneis possible.
• If there is an incoming call during operation (except anoutgoing call or talking), operation mode will end and switchto the incoming or talking mode.
• An outgoing call from a portable telephone is also possible.However, you cannot perform different operations at the sametime from a portable telephone and INA-N333R asmalfunction can result.
• With a Junction BOX connected, outgoing and incominghistory will also be recorded in the portable telephone.
• The telephone volume can be adjusted from the INA-N333R .The volume you set during the call is memorized, and isautomatically applied again on the next call.
• While telephoning, defeat is set to ON. When the call hasfinished, the unit returns to your previous setting.
• In a status other than telephoning, receiving incoming calls ormaking a call, press the TITLE button to show the NetworkOperator display for 2 seconds.
• After a call, instead of going to a talking mode, the unitdisplays the message “NO NETWORK COVERAGE” or“BUSY” for about 2 seconds and then disconnects the line.
• Within 5 seconds after a call, press the button, OKbutton or MODE knob to redial.
• During a call, you can send dial tone signals 1 to 6 usingpreset buttons 1 through 6, and dial tone signals 7 to 9, 0, *and # by pressing F/SETUP, and then preset buttons 1through 6.
• Pressing the OK button in the navigation mode (whenoptional navigation disc NVD-T003 is used) will not allowselection of message transmissions, item definitions, or itemsobtained by moving the Flipper switch.

30-EN
MobileHubTM Link Operation (optional)
Preset buttons (1 through 6)
BAND/TEL.
F/SETUPRTN
MODEOK Flipper switch
Incoming Calls
1 Press the or OK button to receive an incomingcall.
2 Press and hold the BAND/TEL. button for at least 2seconds to finish a call. Or the line is disconnectedautomatically if 5 seconds elapse after the call.The telephone mode will end and return to the originalsource mode.
NOTES• An incoming call can be received by pressing the MODE
knob.• When the Automatic Calling mode is on, you can talk after 3
seconds of receiving the incoming call.• Press and hold BAND/TEL. for at least 2 seconds during an
incoming call to disconnect it.• The incoming call can be switched to Automatic Calling or
Manual Calling.1. Press and hold the F/SETUP button for at least 2
seconds.The display changes to the SETUP screen.
2. Move the Flipper switch up or down to select TELRECEIVE.Press the OK button or MODE knob to set.
3. Move the Flipper switch up or down to selectAUTO or MANUAL.Press the OK button or MODE knob to set. Thedisplay returns to the SETUP screen.
4. When the setting is completed, press the F/SETUPbutton to return to the normal mode.
Calling
� Calling by using the Speed Dial
You can place a call by retrieving one of the telephonenumbers registered in No. 1 to 9 of the address book.
1 Press and hold the BAND/TEL. button for at least 2seconds.The display changes to the Speed dial screen.
2 Press the Preset buttons (1 through 6) to place acall. Or press the F/SETUP button and then press thePreset button (1 through 3). The telephone numbersstored in 7 through 9 can be accessed.The display changes to the Select screen.
3 Press the OK button or MODE knob to place a call.If you press and hold the Preset button selected in step2 for at least 2 seconds, you can place the call directly.
4 Press and hold the BAND/TEL. button for at least 2seconds to finish the call. Or the line is disconnectedautomatically if 5 seconds elapse after the call. Thetelephone mode will end and return to the originalsource mode.
NOTES• If there is no telephone number registered to a preset button,
“ERROR” is displayed for 2 seconds when you try to place acall.
• You can also place a call by pressing the button.
� Calling by the phone book
You can call up the phone book registered in theportable telephone to call from.
1 Press and hold BAND/TEL. button for at least 2seconds.The display changes to the Speed dial screen.
2 Press the BAND/TEL. button to select the Phone Bookmode.The Phone Book list is displayed.
3 Move the Flipper switch up or down to select theother party.• To skip alphabetically to the next (or previous) set of
name, press continuously the Flipper switch up ordown.
4 Press the OK button or MODE knob.The display changes to the Select screen.
5 Press the OK button or MODE knob again to place thecall.
6 Press and hold the BAND/TEL. button for at least 2seconds to finish the call. Or the line is disconnectedautomatically if 5 seconds elapse after the call. Thetelephone mode will end and return to the originalsource mode.
NOTES• If no item is registered, “NO MEMORY” is displayed.• You can also press the or button instead of the
Flipper switch to select the other party.• You can also press the button instead of the OK button
or MODE knob to set an item or to place a call.
� Calling by the outgoing/incoming/absent incoming history
You can place a call to any of the last 999 calls byoutgoing/incoming/absent incoming history.
1 Press and hold BAND/TEL. button for at least 2 seconds.The display changes to the Speed dial screen.

31-EN
2 Press the BAND/TEL. button to select “DIALED”(outgoing history), “RECEIVED” (incoming history) or“MISSED” (incoming history).• If no history is registered to any of the lists, NO
MEMORY is displayed.
3 Move the Flipper switch up or down to select theother party.• Press continuously the Flipper switch up or down to
change the address continuously.• The history dial takes priority to display only when
there is a missed call.
4 Press the OK button or MODE knob.The display changes to the Select screen.
5 Press the OK button or MODE knob again to place the call.
6 Press and hold the BAND/TEL. button for at least 2seconds to finish the call. Or the line is disconnectedautomatically if 5 seconds elapse after the call. Thetelephone mode will end and return to the originalsource mode.
NOTES• You can also press the or button instead of the
Flipper switch to select the other party.• You can also press the button instead of the OK button
or MODE knob to set an item or to place a call.
� Dial call (only for operation onoptional remote control)
Input the telephone number using the dial.
<For operation on optional remote control>Use the optional Remote Control RUE-4191 to explain.
1 In the TEL mode, press and hold the 0 button for atleast 2 seconds.The Direct Dial mode will be activated.
2 Input the telephone number by using the ten keys (0to 9, # and *).
NOTES• Press the DEL. button to input *. Press the DEL. button again
within 2 seconds to input +. Press the +10 button to input #.• To erase the numbers you already input, press the RETURN
button.
3 Press the or ENTER button to place a call.
4 Press and hold the BAND button for at least 2 secondsto finish the call.
SMS (Short Message Service)Operation
You can receive short messages and display thecontents.
1 Press and hold the BAND/TEL. button for at least 2seconds.The display changes to the Speed dial screen.
2 Press the BAND/TEL. button to select “SMS INBOX” .
3 Move the Flipper switch up or down to select theother party.
4 Press the OK button or MODE knob.The display changes to the SMS READ screen.The contents of the received message is displayed upto 140 letters.• The display switches between the SMS READ
screen and the SMS INBOX screen every time the button (OK button or MODE knob) is pressed.
• When no item is registered, “NO MEMORY” isdisplayed.
5 Press the or button or move the Flipperswitch up or down to scroll the words one by one.Press and hold the button to scroll the displaycontinuously.• When the “Scroll Setting” (Page 19) is set to ON, the
display is scrolled continuously.• When the unit receives a message, the new
reception icon appears.
6 Press the RTN button to return to the previous screen.
NOTES• You can also press the or button instead of the
Flipper switch to select an item or the other party.• You can also press the button instead of the OK button
or MODE knob to set an item or the other party.

32-EN
Remote Control Operation
1 d
2
a
o
3
9
q
6
7
8
5
4
s
p
i
uy
t
r
;
w
e
f
The recommended remote control for this model is the RUE-4191.Operation is also possible from the RUE-4135; however, a portion of the functions will be limited.
Operation on Remote Control RUE-4191 (Optional)
You can operate it with the optional remote control (RUE-4191). Change the EXT DVD/AUDIO/NAV. Switch, on the side ofthe remote control, to AUDIO.
1 A.PROC. Button*1
Press the button to call the external audio processormode.*2
2 ButtonPLAY/PAUSERadio mode : Tune switchingTEL mode*3 : Place a call.
3 POWER ButtonPower ON/OFF
4 / ButtonRadio mode : SEEK UP/DOWNCD/Changer mode : Music Sensor, BW/FF (Press andhold)DAB mode*4 : Service UP/DOWN
5 V.SEL. ButtonSwitch Audio/Navigation mode.
6 LIGHT ButtonLight the indicator
7 TILT / ButtonDisplay Angle UP/DOWN
8 ENTER ButtonTEL mode*3 : Place a call.
9 JoystickList display UP/DOWN ( / )
p REAR ButtonNot used.
q RETURN ButtonTEL mode*3 : Cancel TEL mode. Used as a backspace atthe time of Direct dial.
w Numeric KeypadTEL mode*3 : Input numbers and symbols. Press and holdthe 0 button for at least 2 seconds to switch Direct DialON.
e AUDIO ButtonNot used.
r SUB T. ButtonNot used.
t ANGLE ButtonNot used.
y DISP/TOP.M ButtonSwitch the display.
u MENU/SETUP ButtonPress and hold the button for at least 2 seconds to accessthe SETUP mode.
i MUTE ButtonPress the button to lower the volume by 20dB instantly.Press the button again to cancel.
o VOLUME / Button Volume UP/DOWN
; Button Not used.
a SOURCE Button Select the audio source.
s / ButtonRadio mode : Preset Selection
Changer mode : Disc Selection MP3 mode*5 : Disc Selection TEL mode*3 : List UP/DOWN (before calling).
d BAND ButtonRadio mode : BAND Selection
CD/Changer mode : Changes Disc ModeTEL mode*3 :• Press the button to select the item for making a call.• Press and hold the button for at least 2 seconds to
switch the TEL display ON/OFF.• During a call, press and hold the button for at least 2
seconds to finish the call.
(Rear of the Remote Control)

33-EN
Operation on Remote Control RUE-4135 (Optional)
You can operate it with the optional remote control (RUE-4135). Change the AUDIO/NAV. Switch, on the side of the remotecontrol, to AUDIO.
ENTER/
LO.PT. RETURN
54
1
BS
7 8
0
9
6
2 3
ON/OFF DEL.DEST.
OKDEST.
ROUTE VOICE
M. PT.
POS.
TEL.
V. SEL.
FUNC.
OP/CL
A.PROC.
MUTE BAND
VOL.
SOURCE
MENU
i
t1
3
4
6
5
7
8
p
9
2e
w
q
r
1 VOL. / ButtonVolume UP/DOWN
2 AUDIO/NAV. ButtonSet to the "AUDIO" side to operate the INA-N333R ofAudio.
3 A.PROC.*2 ButtonPress the button to call the external audio processormode.*1
4 MUTE ButtonPress the button to lower the volume by 20 dB instantly.Press the button again to cancel.
5 FUNC. ButtonNot used.
6 OP/CL ButtonNot used.
7 ButtonDisplay Angle DOWN (only pressing MODE button)
8 ON/OFF ButtonPress the button to turn the power on/off.
9 V.SEL. ButtonSwitch Audio/Navigation mode.
p ButtonDisplay Angle UP (only pressing MODE button)
q Numeric KeypadNot used.
w BAND ButtonRadio mode: Radio Band SelectionCD/Changer mode: Changes Disc ModeTEL mode*4: Press and hold the button for at least 2seconds to access the TEL display.
e SOURCE ButtonSelect the audio source.
r MODE ButtonOperates 7 to p (Flashes the Status Indicator for 5seconds.)
t ButtonPush : PLAY/PAUSE
Radio mode: Preset Selection ( / ), SEEK UP/DOWN( / )CD/Changer mode:
Disc Selection ( / ), Music Sensor ( / ), BW/FF( / Hold)
TEL mode*4 : Preset a call. List UP/DOWN (beforecalling) ( / )
List display UP/DOWN ( / )DAB mode*5 : Service UP/DOWN ( / )MP3 mode*3 : Disc selection ( / )
*1 For the operation of external audio processor, refer to theOwner's Manual of the external audio processor youpurchased.
*2 This button is used in conjunction with an optional Ai-NETprocessor.
*3 When an optional MP3 compatible CD changer is connected.*4 When the optional Junction Box and cellular phone are
connected.*5 When an optional DAB Receiver Box is connected.
f EXT DVD/AUDIO/NAV. SwitchTV/MONI. Switch (Push)Set to the “AUDIO” side to operate the INA-N333R ofAudio.
*1 For the operation of external audio processor, refer to theOwner's Manual of the external audio processor you purchased.
*2 This button is used in conjunction with an optional Ai-NETprocessor.
*3 When the optional Junction Box and cellular phone areconnected.
*4 When an optional DAB Receiver Box is connected.*5 When an optional MP3 compatible changer is connected.

34-EN
InformationCDCD Player/Changer not functioning.• Out of operating temperature range +50˚C (+120˚F) for CD.
- Allow the vehicle's interior (or trunk) temperature to cool.CD playback sound is wavering.• Moisture condensation in the CD Module.
- Allow enough time for the condensation to evaporate (about1 hour).
CD insertion not possible.• A CD is already in the CD player.
- Eject the CD and remove it.• The CD is being improperly inserted.
- Make sure the CD is being inserted following instructions inthe CD Player Operation section.
Unable to fast forward or backward the CD.• The CD has been damaged.
- Eject the CD and discard it; using a damaged CD in your unitcan cause damage to the mechanism.
CD playback sound skips due to vibration.• Improper mounting of the unit.
- Securely re-mount the unit.• Disc is very dirty.
- Clean the disc.• Disc has scratches.
- Change the disc.CD playback sound skips without vibration.• Dirty or scratched disc.
- Clean the disc; damaged disc should be replaced.Error displays (built-in CD player only)• Mechanical error
- Press the button. After the error indication disappears,insert the disc again. If the above-mentioned solution doesnot solve the problem, consult your nearest ALPINE dealer.
In Case of Difficulty
If you encounter a problem, please review the items inthe following checklist. This guide will help you isolatethe problem if the unit is at fault. Otherwise, make surethe rest of your system is properly connected or consultyour authorized Alpine dealer.
BasicNo function or display.• Vehicle's ignition is off.
- If connected following instructions, the unit will not operatewith the vehicle's ignition off.
• Improper power lead connections.- Check power lead connections.
• Blown fuse.- Check the fuse on the battery lead of the unit; replace with
the proper value if necessary.• Internal micro-computer malfunctioned due to interference
noise etc.- Press the RESET switch with a ballpoint pen or other pointed
article.
RadioUnable to receive stations.• No antenna or open connection in cable.
- Make sure the antenna is properly connected; replace theantenna or cable if necessary.
Unable to tune stations in the seek mode.• You are in a weak signal area.
- Make sure the tuner is in the DX mode.• If the area you are in is a primary signal area, the antenna may
not be grounded and connected properly.- Check your antenna connections; make sure the antenna is
properly grounded at its mounting location.• The antenna may not be the proper length.
- Make sure the antenna is fully extended; if broken, replacethe antenna with a new one.
Broadcast is noisy.• The antenna is not the proper length.
- Extend the antenna fully; replace it if it is broken.• The antenna is poorly grounded.
- Make sure the antenna is grounded properly at its mountinglocation.

35-EN
Indication for CD Changer
• Protective circuit is activated due to high temperature.- The indicator will disappear when the temperature returns to
within operation range.
• Malfunction in the CD Changer.- Consult your Alpine dealer. Press the magazine eject button
and pull out the magazine.Check the indication. Insert the magazine again.If the magazine cannot be pulled out, consult your Alpinedealer.
• Magazine ejection not possible.- Press the magazine eject button. If the magazine does not
eject, consult your Alpine dealer.
• A disc is left inside the CD Changer.- Press the Eject button to activate the eject function.
When the CD Changer finishes the eject function, insert anempty CD magazine into the CD Changer to receive the discleft inside the CD Changer.
• No magazine is loaded into the CD Changer.- Insert a magazine.
• No indicated disc.- Choose another disc.
Indication for CD Player
• Protective circuit is activated due to high temperature.- The indicator will disappear when the temperature returns to
within operation range.
• No CD is inserted.- Insert a CD.
• Although a disc is inserted, “NO DISC” is displayed and theunit does not start to play or eject the disc.- Remove the disc by following these steps: 1) Press the button.
The movable display will open. 2) Press the button again for at least 2 seconds while the
movable display is open.
• Mechanism error.1) Press the button and eject the CD.
If not ejecting, consult your Alpine dealer.2) When the error indication remains after ejecting, press the
button again.If the error indication still does not turn off after pressingthe button for a few times, consult your Alpine dealer.
• The disc cannot be read.- Do not insert a scratched disc or an unplayable disc such as
DVD, VIDEO CD or CD-ROM.
NOTEWhen the “ERROR” is displayed:In case that the disc cannot be ejected by pressing the button,press the RESET switch (refer to page 5) and press the buttonagain.If not ejecting, consult your Alpine dealer.
HI-TEMP
NO DISC
ERROR
HI-TEMP
NO DISC
ERROR 01
ERROR 02
NO MAGAZINE

36-EN
GENERALPower Requirement 14.4 V DC
(11–15 V allowable)Maximum Power Output 45 W × 4
Maximum Pre-Output Voltage 2 V/10k ohmsBass ±14 dB at 60 HzTreble ±14 dB at 10 kHzWeight 2.0 kg (4 lbs. 6 oz)
CHASSIS SIZEWidth 178 mm (7")Height 50 mm (2")Depth 155 mm (6-3/32")
NOSEPIECE SIZEWidth 170 mm (6-11/16")Height 46 mm (1-13/16")Depth 24 mm (15/16")
Due to continuous product improvement, specifications and designare subject to change without notice.
Specifications
FM TUNER SECTIONTuning Range 87.5 – 108.0 MHzMono Usable Sensitivity 0.7 µVAlternate Channel Selectivity 90 dBSignal-to-Noise Ratio 65 dBStereo Separation 35 dB
MW TUNER SECTIONTuning Range 531 – 1,602 kHzSensitivity (IEC Standard) 25.1 µV/28 dB
LW TUNER SECTIONTuning Range 153 – 281 kHzSensitivity (IEC Standard) 31.6 µV/30 dB
CD SECTIONFrequency Response 5 – 20,000 Hz (±1 dB)Wow & Flutter (% WRMS) Below measurable limitsTotal Harmonic Distortion 0.008% (at 1 kHz)Dynamic Range 95 dB (at 1 kHz)Signal-to-Noise Ratio 95 dBChannel Separation 85 dB (at 1 kHz)
PICKUPWave length 655 nmLaser power CLASS II
NAVIGATION SECTIONAerial Type Micro-strip planar aerialReception Frequency 1575.42±1 MHzReception Sensitivity -130 dB max.Reception Method Parallel 12 channels
CAUTION
CLASS 1LASER PRODUCT
(Bottom side of player)
CAUTION-Laser radiation when open, DO NOT STARE INTO BEAM
(Bottom side of player)
Information

37-EN
CautionHAVE THE WIRING AND INSTALLATION DONE BYEXPERTS.The wiring and installation of this unit requires special technicalskill and experience. To ensure safety, always contact the dealerwhere you purchased this product to have the work done.
USE SPECIFIED ACCESSORY PARTS AND INSTALL THEMSECURELY.Be sure to use only the specified accessory parts. Use of otherthan designated parts may damage this unit internally or may notsecurely install the unit in place. This may cause parts to becomeloose resulting in hazards or product failure.
ARRANGE THE WIRING SO IT IS NOT CRIMPED ORPINCHED BY A SHARP METAL EDGE.Route the cables and wiring away from moving parts (like theseat rails) or sharp or pointed edges. This will prevent crimpingand damage to the wiring. If wiring passes through a hole inmetal, use a rubber grommet to prevent the wire’s insulation frombeing cut by the metal edge of the hole.
DO NOT INSTALL IN LOCATIONS WITH HIGH MOISTUREOR DUST.Avoid installing the unit in locations with high incidence ofmoisture or dust. Moisture or dust that penetrates into this unitmay result in product failure.
Precautions• Be sure to disconnect the cable from the (–) battery post before
installing your INA-N333R. This will reduce any chance ofdamage to the unit in case of a short-circuit.
• Be sure to connect the colour coded leads according to thediagram. Incorrect connections may cause the unit tomalfunction or damage to the vehicle's electrical system.
• When making connections to the vehicle's electrical system, beaware of the factory installed components (e.g. on-boardcomputer). Do not tap into these leads to provide power forthis unit. When connecting the INA-N333R to the fuse box,make sure the fuse for the intended circuit of the INA-N333Rhas the appropriate amperage. Failure to do so may result indamage to the unit and/or the vehicle. When in doubt, consultyour ALPINE dealer.
• The INA-N333R uses female RCA-type jacks for connectionto other units (e.g. amplifier) having RCA connectors. Youmay need an adaptor to connect other units. If so, pleasecontact your authorized ALPINE dealer for assistance.
• Be sure to connect the speaker (–) leads to the speaker (–)terminal. Never connect left and right channel speaker cablesto each other or to the vehicle body.
IMPORTANTPlease record the serial number of your unit in the spaceprovided below and keep it as a permanent record. The serialnumber plate is located on the bottom of the unit.
SERIAL NUMBER:INSTALLATION DATE:INSTALLATION TECHNICIAN:PLACE OF PURCHASE:
Before installing or connecting the unit, please readthe following and pages 3 and 4 of this manualthoroughly for proper use.
WarningMAKE THE CORRECT CONNECTIONS.Failure to make the proper connections may result in fire orproduct damage.
USE ONLY IN CARS WITH A 12 VOLT NEGATIVE GROUND.(Check with your dealer if you are not sure.) Failure to do so mayresult in fire, etc.
BEFORE WIRING, DISCONNECT THE CABLE FROM THENEGATIVE BATTERY TERMINAL.Failure to do so may result in electric shock or injury due toelectrical shorts.
DO NOT SPLICE INTO ELECTRICAL CABLES.Never cut away cable insulation to supply power to otherequipment. Doing so will exceed the current carrying capacity ofthe wire and result in fire or electric shock.
DO NOT DAMAGE PIPE OR WIRING WHEN DRILLINGHOLES.When drilling holes in the chassis for installation, takeprecautions so as not to contact, damage or obstruct pipes, fuellines, tanks or electrical wiring. Failure to take such precautionsmay result in fire.
DO NOT USE BOLTS OR NUTS IN THE BRAKE ORSTEERING SYSTEMS TO MAKE GROUND CONNECTIONS.Bolts or nuts used for the brake or steering systems (or any othersafety-related system), or tanks should NEVER be used forinstallations or ground connections. Using such parts coulddisable control of the vehicle and cause fire etc.
KEEP SMALL OBJECTS SUCH AS BOLTS OR SCREWS OUTOF THE REACH OF CHILDREN.Swallowing them may result in serious injury. If swallowed,consult a physician immediately.
DO NOT INSTALL IN LOCATIONS WHICH MIGHT HINDERVEHICLE OPERATION, SUCH AS THE STEERING WHEELOR SHIFT LEVER.Doing so may obstruct forward vision or hamper movement etc.and results in serious accident.
Installation and Connections
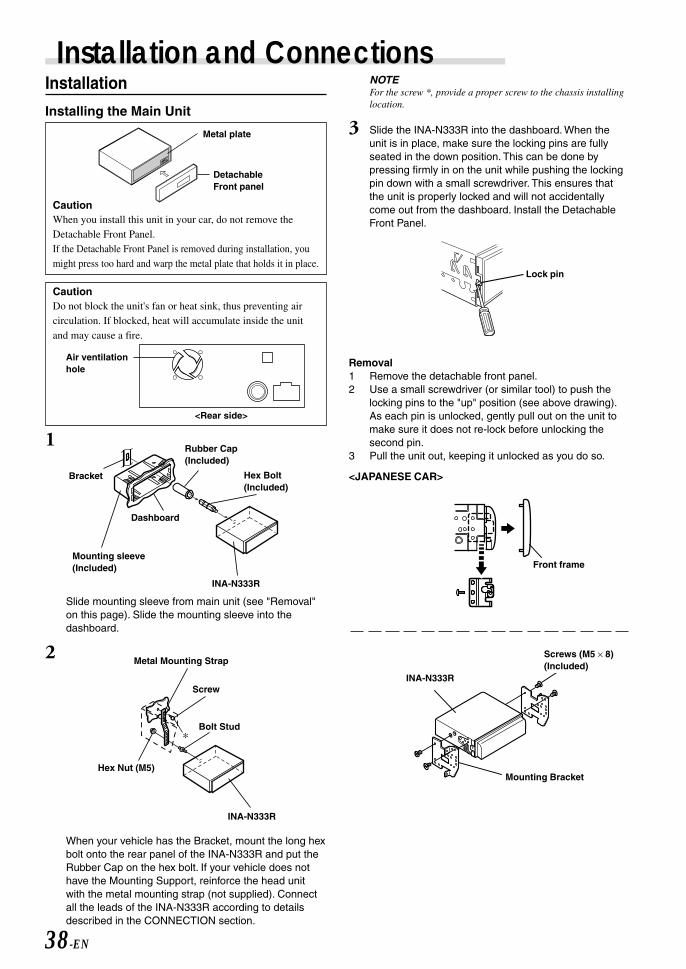
38-EN
Installation and ConnectionsInstallation
Installing the Main Unit
CautionWhen you install this unit in your car, do not remove theDetachable Front Panel.If the Detachable Front Panel is removed during installation, youmight press too hard and warp the metal plate that holds it in place.
CautionDo not block the unit's fan or heat sink, thus preventing aircirculation. If blocked, heat will accumulate inside the unitand may cause a fire.
1
Slide mounting sleeve from main unit (see "Removal"on this page). Slide the mounting sleeve into thedashboard.
2
When your vehicle has the Bracket, mount the long hexbolt onto the rear panel of the INA-N333R and put theRubber Cap on the hex bolt. If your vehicle does nothave the Mounting Support, reinforce the head unitwith the metal mounting strap (not supplied). Connectall the leads of the INA-N333R according to detailsdescribed in the CONNECTION section.
NOTEFor the screw *, provide a proper screw to the chassis installinglocation.
3 Slide the INA-N333R into the dashboard. When theunit is in place, make sure the locking pins are fullyseated in the down position. This can be done bypressing firmly in on the unit while pushing the lockingpin down with a small screwdriver. This ensures thatthe unit is properly locked and will not accidentallycome out from the dashboard. Install the DetachableFront Panel.
Removal1 Remove the detachable front panel.2 Use a small screwdriver (or similar tool) to push the
locking pins to the "up" position (see above drawing).As each pin is unlocked, gently pull out on the unit tomake sure it does not re-lock before unlocking thesecond pin.
3 Pull the unit out, keeping it unlocked as you do so.
Metal plate
DetachableFront panel
∗
Metal Mounting Strap
Screw
Bolt Stud
Hex Nut (M5)
INA-N333R
Lock pin
<JAPANESE CAR>
Front frame
Screws (M5 × 8)(Included)
Mounting Bracket
INA-N333R
Dashboard
Rubber Cap(Included)
Bracket
Mounting sleeve(Included)
Hex Bolt(Included)
INA-N333R
Air ventilationhole
<Rear side>

39-EN
Installing the GPS Antenna
1 Mount the antenna on the roof.Clean dust and oil at the mounting location and mountthe antenna.
NOTES• The magnet of the antenna is very strong. Proceed cautiously
to prevent any damage to the vehicle’s body. Keep the magnetaway from articles susceptible to magnetic fields such ascredit cards, watches, etc.
• Do not paint the antenna. Reception sensitivity may bedecreased.
Mounting the antenna inside the vehicle.1. Clean the mounting location.2. Put on the antenna mounting plate.3. Mount the antenna.
NOTES• Mount the antenna on a flat plane of the dash board or rear
tray.• Some thermal reflection type or thermal absorption type glass
may interrupt high frequency waves. If reception is poor withthe antenna installed inside the car, try to mount the antennaoutside the car.
2 Routing the antenna cable.1. Route the cable using the provided cable clampers
to take up the cable’s slack.2. Use the waterproof pad when running the cable
under the vehicle’s rubber gasket.3. Attach the cable at several points using the
remaining cable clampers.
Speed Sensor Lead or Parking Brake LeadConnection
For leads which need branching to the supplied speedsensor and parking brake, use the solderlessconnectors.
1
2
Antenna(Included)
Antenna(Included)
Antenna mounting plate(Included)
Cable clampers(Included)
Water proof pad
Speed sensor auxiliary cableor
Parking brake auxiliary cable
ToSpeed sensor cable
orParking brake cable
Vehicle lead
Pliers
NOTEThe main unit must be mounted within ± 5 degrees of thehorizontal plane, left to right, and 30 degrees of the horizontalplane, back to front.
Less than 30°
• The unit may not be able to show your presentposition accurately if the angle is too big.For best performance, be sure to mount the unit ashorizontally as possible.

40-EN
Installation and Connections
Ai-NET
NORM EQ/DIV
∗
f
i
u
y
l
z
d
h
g
q
p
7
6
5
4
21
3
8
j
9
w
e
r
k
o
t
s
s
;
s
/
a
x
Connection
ISO Antenna Plug
Antenna
To vehicle phone
To amplifier or equalizer
To power antenna
Battery
ISO Antenna Convertor Plug
To the instrument clusterillumination lead
Rear Left
Front Left
Front Right
Rear Right
Speakers
Amplifier
Amplifier
Speakers
Front
Rear
CD Changer(Ai-NET)(Sold Separately)
Ignition Key
chokecoil
Amplifier Subwoofer
(Pink/Black) AUDIO INTERRUPT IN
(Blue/White) REMOTE TURN-ON
(Red) IGNITION
(Black) GND
(Blue) POWER ANT
BATTERY (Yellow)
(Orange) DIMMER
(Green)
(Green/Black)
(White)
(White/Black)
(Gray/Black)
(Gray)
(Violet/Black)
(Violet)
To the vehicle speed pulse lineSPEED SENSOR
(Green/White)
To the parking brake signal line(Yellow/Blue) PARKING BRAKE
speed sensorauxiliary lead
To remote controlinterface Box
To RDS-TMC Box (TMC-001P)(refer to page 42 for connection)

41-EN
1 Antenna ReceptacleConnect to the supplied ISO antenna convertor plug.
2 Parking Brake Lead (Yellow/Blue)Connect this lead to the power supply side of the parkingbrake switch to transmit the parking brake status signals tothe INA-N333R.
3 Audio Interrupt In Lead (Pink/Black)Connect this lead to the Audio Interface output of a cellularphone which provides ground shorting when a call isreceived.
4 Remote Turn-On Lead (Blue/White)Connect this lead to the remote turn-on lead of youramplifier or signal processor.
5 Dimmer Lead (Orange)This lead may be connected to the vehicle's instrumentcluster illumination lead. This will enable the vehicle'sdimmer control to dim the backlighting of the unit.
6 Switched Power Lead (Ignition) (Red)Connect this lead to an open terminal on the vehicle's fusebox or another unused power source which provides (+) 12Vonly when the ignition is turned on or in the accessoryposition.
7 Ground Lead (Black)Connect this lead to a good chassis ground on the vehicle.Make sure the connection is made to bare metal and issecurely fastened using the sheet metal screw provided.
8 Power Antenna Lead (Blue)Connect this lead to the +B terminal of your power antenna,if applicable.
NOTEThis lead should be used only for controlling the vehicle's powerantenna. Do not use this lead to turn on an amplifier or a signalprocessor, etc.
9 Battery Lead (Yellow)Connect this lead to the positive (+) post of the vehicle'sbattery.
p Fuse Holder (10A)q ISO Power Supply Connectorw Speed Sensor (Green/White)
Connect to VSS (Digital or Analog 0V - 3V)Improper connection of the speed pulse line may causeimportant safety features of the vehicle to fail (such as thebrakes or air bags). Such failures may result in an accidentand loss of life. We strongly recommend that the installationbe performed by a trained, authorized Alpine dealer.
* If the connectors of the vehicle are not ISO type or theyare ISO type but not equipped with the speed sensorterminal on the vehicle side ISO connector, use thesupplied speed sensor auxiliary cable to connect to thespeed sensor cable of the vehicle.
e Remote Control Interface ConnectorTo remote control interface box.
r To RDS-TMC Receiver (Optional)
NOTETo connect an Alpine RDS-TMC Receiver, consult your Alpinedealer.
t GPS Antenna (Included)y Power Supply Connectoru Ai-NET Connector
Connect this to the output or input connector of otherproduct (CD changer, Equalizer, etc.) equipped with Ai-NET.
i System SwitchWhen connecting a processor using Ai-NET, place thisswitch in the EQ/DIV position. When no device isconnected, leave the switch in the NORM position.
NOTEBe sure to turn the power off to the unit before changing theswitch position.
o Front Output RCA ConnectorsRED is right and WHITE is left.
; Rear Output RCA ConnectorsRED is right and WHITE is left.
a Subwoofer Output RCA ConnectorsRED is right and WHITE is left.
s RCA Extension Cable (Sold Separately)d Ai-NET Cable (Included with CD Changer)f ISO Connector (Speaker Output)g Left Rear (+) Speaker Output Lead (Green)h Left Rear (–) Speaker Output Lead (Green/Black)j Left Front (+) Speaker Output Lead (White)k Left Front (–) Speaker Output Lead (White/Black)l Right Front (–) Speaker Output Lead (Grey/Black)/ Right Front (+) Speaker Output Lead (Grey)z Right Rear (–) Speaker Output Lead (Violet/Black)x Right Rear (+) Speaker Output Lead (Violet)
To prevent external noise from entering the audio system.• Locate the unit and route the leads at least 10 cm away from the car harness.• Keep the battery power leads as far away from other leads as possible.• Connect the ground lead securely to a bare metal spot (remove any paint, dirt or grease if necessary) of the car chassis.• If you add an optional noise suppressor, connect it as far away from the unit as possible. Your Alpine dealer carries various noise
suppressors, contact them for further information.• Your Alpine dealer knows best about noise prevention measures so consult your dealer for further information.

42-EN
Connection with optional RDS-TMC Receiver Box TMC-001P
<INA-N333R>
ACC (Ignition) (Red)
Ignition Key
Battery
Battery lead (Yellow)
Ground (Black)
TMC-001PTMC Receiver Box(Sold Separately)
∗ For further information about the connection andinstallation of TMC-001P, refer to the owner’s manual ofTMC-001P.
TMC-001PAttachedantenna
NOTE• Matching the optional Navigation Disc (NVD-T003) with the RDS-TMC Receiver Box (TMC-001P) may cause function failure to part of
the built-in TMC tuner.
Installation and Connections

Tipps der Polizei:[ Stellen Sie Ihr Fahrzeug stets gut sichtbar ab.[ Verschließen Sie Türen, Fenster, Schiebedach und Kofferraum immer, auch bei nur kurzer Abwesenheit.[ Lassen Sie keine Wertsachen sichtbar im Auto liegen.[ Wird Ihr Fahrzeug aufgebrochen, wenden Sie sich sofort an die nächste Polizeidienststelle.[ Belassen Sie Ihr Fahrzeug nach einem Aufbruch im Originalzustand.[ Informieren Sie sich über technische Sicherungsmöglichkeiten bei einer Kriminalpolizeilichen
Beratungsstelle.
Gerät 1
Modell-Nr.:
Hersteller:
Seriennummer:
A L
Kaufdatum: Preis:
Händlerstemple

R
Fahrzeugmarke: Typ:
Amtl. Kennzeichen:
Name des Halters:
Straße:
Wohnort:
Bitte füllen Sie diesen Pass vollständig aus und bewahren Sie ihnaußerhalb des Fahrzeugs auf:Im Falle eines Diebstahls wird für Sie die Schadensabwicklung mit derVersicherung einfacher, und Sie erleichtern der Polizei die Fahndungnach den Tätern.
Car Audio and Navigation Systems
GERÄTE-PASSAUDIO SYSTEME