raccoon - scripps research institutemgldev.scripps.edu/raccoon/raccoon_v1.0_user_manual.pdfraccoon...
TRANSCRIPT

RaccoonAutoDock VS
Preparation ToolStefano Forli
The Scripps Research InstituteMolecular Graphics Laboratory
10550 N. Torrey Pines Rd.La Jolla, California 92037-1000
USA
November 12th 2009 v.1.1

Contents
1. Introduction
2. Installation
3. Quickstart- Workstation- Linux cluster
4. Interface description and usage4.1 - Toolbar menu4.2 - Ligands tab4.3 - Receptors tab4.4 - Maps tab4.5 - Docking tab4.6 - VS Generation
5. Results analysis
6. References

1. Introduction Raccoon is a graphical interface for processing ligand libraries in different formats (PDB, multi-structure MOL2 and PDBQT), multiple receptor conformations (e.g. relaxed complex experiments) and flexible residues, to generate all the files required to run an AutoDock [1] virtual screening.
A basic knowledge of AutoDock and AutoDockTools is required.
The interface is composed of five tabs which encompass all the essential aspects that need to be addressed when preparing a virtual screening : Ligand(s), Receptor(s), Maps, Docking and VS Generation.
Although a few options require prior activation of at least a ligand and/or a receptor, the workflow is rather flexible so there is no predefined order to specifying required inputs for the VS generation.
The software automates some of the most common operations performed when preparing a virtual screening:-splitting multi-structure files (MOL2)-generation of PDBQT input files-ligand filter by number of atoms, HB donor/acceptors, MW, torsions-generation of configuration files for both AutoGrid and AutoDock-generation of scripts for running the virtual screening.
It supports use of pre-calculated grid maps or can generate them on the fly during the generation phase.
Raccoon can be used to generate automatically all the scripts for running a virtual screening on the current machine or for submitting jobs on a Linux cluster (PBS systems only).
The Virtual Screening Generation tab opens the “Summary” panel, an overview of the current status. It lists all the inputs yet to be defined colored in red. When all requirements are satisfied, the button for starting the generation is be activated.
A simple status bar is shown at the bottom of the interface. Messages the end of any operations (and potential errors) are printed on the status bar.
Raccoon has been successfully tested on Linux, Mac OS X and Windows 2K/XP/Vista.
HELP & SUPPORTAs for all the MGL software, community and developers support for Raccoon is available through the Internet. Any suggestions for improvements or bug reports are welcome.
Mailing listSubscribe to the AutoDock mailing list as described here:
http://autodock.scripps.edu/mailing_listThe best way to report a problem is to write a message with the prefix “Raccoon: ” in the subject and a short description of the issue. Any error messages and further details should be reported in the body of the email.
ForumRegister for the MGL Forum by going here:
http://mgl.scripps.edu/forum/Search for threads related to the issue encountered, and if open a new thread if necessary.

2. InstallationRaccoon requres the following software:
- MGLTools v.1.5.4 or newer installed on your system.- although not essential, installing AutoDock is strongly recommended for full access to all the features.
Go to http://autodock.scripps.edu/raccoon and download the files corresponding to your system.
Linux/Mac1. Extract all the content of the file raccoon.tar.gz in a directory (i.e. your Desktop)
2. Open a terminal, cd to the directory where the file “raccoon.py” has been extracted and type:
pythonsh raccoon.py
If the “pythonsh” command is not recognized by the terminal, specify the full path corresponding to your MGLTools installation, for example:
[ Linux ] /usr/local/mgltools_i86Linux2_1.5.4/bin/pythonsh raccoon.py
[ Mac ] /Library/MGLTools/1.5.4/bin/pythonsh raccoon.py
3. (Optional) Add an alias to your .bashrc or .cshrc for running Raccoon:
[Bash] alias raccoon='/usr/local/mgltools_i86Linux2_1.5.4/bin/pythonsh /full/path/to/raccoon.py'
[C-shell]alias raccoon '/usr/local/mgltools_i86Linux2_1.5.4/bin/pythonsh /full/path/to/raccoon.py'
Windows1. Extract all the files contained in the file raccoon_win.zip in the MGL Tools installation directory (default: “C:\Program Files\MGLTools 1.5.4”)
2. Edit the file raccoon.bat, if necessary, to match your installation path
set MGLPYTHONPATH=C:\Program Files\MGLTools 1.5.4"C:\Python25\python.exe" "%MGLPYTHONPATH%\raccoon.py"
3. (Optional) Create a link to raccoon.bat on your desktop by dragging the icon of the file to the Desktop while pressing the Alt-key.
3. Quickstart
Two quickstart guides follow which cover how to generate a simple virtual screening with a library of one or more ligands versus a single target receptor.
The first section presentes a quickstart guide for generating scripts for running a simple virtual screening on the local machine (Linux, Mac or Windows OS).
The second section covers generating scripts for running a simple virtual screening on a PBS cluster (Linux OS)
More details on how to customize the virtual screening parameters are available on Section 4.

Raccoon quickstart (workstation)
GOAL- Generate a virtual screening of ligand library on a single target structure- Run the jobs on the local machine
REQUIRED FILES- Ligand structures (one or more) as PDB, MOL2 or PDBQT files- Receptor structure as PDB, MOL2 or PDBQT file- GPF generated by AutoDockTools, centered and sized on the binding site- [optional] DPF with the docking parameters to be used for all the ligands during the virtual screenings
Step-by-step procedure
1. LIGAND(S) TAB Add one or more ligands by clicking on one of these buttons:
Browse where your ligands are and select files or directories.
2. RECEPTOR(S) TABAdd the target structure by clicking on and navigate to the target structure file (PDB, PDBQT, MOL2).
3. MAPS TAB: Add the GPF to be used in the VS by clicking
4. DOCKING TAB : From the pull-down menu “[ select docking setup ]”, pick the “From template...” option, then click on or
5. VS GENERATION TAB : Specify the output directory where the virtual screening files will be generated by clicking on . To create a new directory, type the name in the file entry.
6. VS GENERATION TAB : Check that no red lines are left inside the “Summary” panel then press the button, and wait until the process is completed.
7. RUN THE VIRTUAL SCREENING: [Lin,Mac,Win/Cygwin] To run the virtual screening, open a terminal shell, change directory to the location specified in the step 6, enter into the directory named after your target structure, then launch the script:
./RunVS.sh
[Win] Browse to the directory specified in step 6, then to the directory named after the target structure and double-click on the file RunVS.bat
[ + ] Add l igands... [ ++ ] Add a dire ctory
Add re ceptor fi l e ...
Se t directory...
G E N E R A T E
Load a GPF template
Load DPF template ...Ge nerate de fault DPF

Raccoon quickstart (PBS cluster)
GOAL- Generate a virtual screening of ligand library on a single target structure- Run the jobs on a PBS cluster
REQUIRED FILES- Ligand structures (one or more) as PDB, MOL2 or PDBQT files- Receptor structure as PDB, MOL2 or PDBQT file- GPF generated by AutoDockTools, centered and sized on the binding site- [optional] DPF with the docking parameters to be used for all the ligands during the virtual screenings
Step-by-step procedure
1. LIGAND(S) TAB Add one or more ligands by clicking on one of these buttons:
Browse to the location where ligands are stored and select files or directories.
2. RECEPTOR(S) TABAdd the target structure by clicking on and navigate to the target structure file (PDB, PDBQT, MOL2).
3. MAPS TAB: Add the GPF to be used in the VS by clicking
4. DOCKING TAB : From the pull-down menu “[ select docking setup ]”, pick the “From template...” option, then click on or
5. VS GENERATION TAB : Specify the output directory where the virtual screening files will be generated by clicking on .To create a new directory, type the name in the
file entry.
6. VS GENERATION TAB : Select the “Linux cluster” option in the “OS options” panel; set the package generation options (e.g. Tar file for shipping the files); [OPTIONAL: change the CPU time and number of DLG's ]
7. VS GENERATION TAB : Check that no red lines are left inside the “Summary” panel then press the button, and wait until the process is completed.
8 TERMINAL : Either copy the VS directory or copy and un-tar the package file (if generated) to the Linux cluster. Move (“cd”) to the directory containing the virtual screening jobs and start the submission with:
./vs_submit.sh
[ + ] Add l igands... [ ++ ] Add a directory
Add re ceptor fi l e ...
Se t dire ctory...
G E N E R A T E
Load a GPF template
Load DPF te mplate ...Ge nerate de fault DPF

4.1 Toolbar menu
The toolbar menu at the top of the window contains the functions relative to the current Raccoon session.
File“File” menu entry contains all the options for loading in and saving data from the current Raccoon session. These include:
Load VS configuration...Load a saved Raccoon session. Once opened the file, it is possible to select change: (1) which dataset to load; (2) the list of ligands; (3) parameters for filtering the ligands; (4) list of receptors; (5) flexible residues; (6) grid map settings; (7) docking parameters and (8) virtual screening generation details. By default all the options are selected. Raccoon sessions are simple text files with a “.log” extension. They are automatically generated in the target directory when a virtual screening generation is performed. Alternatively can be saved with the “Save VS configuration...” entry in the File menu.
Save VS configuration...Save the current Raccoon state. The state can be saved at any moment, allowing the user to resume a virtual screening setup later.
Import ligand list file...Load a list of ligands to be included in the virtual screening. The list is a text file that can be generated by any text editor or using the “Export ligand list file...” option in the File menu. The file must contain the complete path to the files to be loaded. The file can include ligands in any supported format (PDBQT, MOL2, PDB). Lines starting with “#” will be ignored:
/path/to/my/pdbqt/ligand000.pdbqt/path/to/my/pdbqt/ligand001.pdbqt#/path/to/my/pdbqt/ligand002.pdbqt/path/to/my/pdbqt/ligand003.pdbqt/path/to/my/mol2/l00ligands.mol2
Each file will be processed according its format (e.g. user will be prompted to split automatically multi-structure MOL2) and filtered using the current filter set. Duplicate files will be skipped.
Export ligand list file...Save a list of ligands from the ligands currently loaded. It is possible to choose whether to save ligands that have passed the filtering process or not, or to chose to save the entire ligand set. The ligand list can be loaded via the “Import ligand list file...” menu option.
UtilitiesThis menu contains optional useful functions present in Raccoon that can be used outside the virtual screening generation.
Split a MOL2Split a multi-structure MOL2 file into single ligands. The ZINC database [2] id is supported: ligands with the ZINC_id code in their name will be saved as [ZINC_id].mol2. The user must select the multi-structure MOL2 file and specify a directory in which to save the new single-structure MOL2 files. If the directory doesn't exist it will be created.
HelpThis menu contains the “About” command that can be used for identifying the current version of Raccoon.

4.2 Ligands tab
Raccoon supports the following ligand input formats: PDB (Protein Data Bank), single or multiple-structure MOL2, AutoDock formatted PDBQT. The different file formats are managed automatically. Whenever a multi-structure MOL2 is detected, the user will be asked to specify a directory to contain the resulting ligands. At the end of the process, the generated PDBQT files will be shown in the ligands list on the screen. Duplicate files are automatically excludedand filtered using the current ligand filter set. (see “Filter ligand list options..”)
[ + ] Add ligandsIt allows to load one or more ligands in any supported formats. Multiple selections can be performed by pressing Ctrl and/or Shift keys.
[ ++ ] Add a directoryIt allows to load all the ligands contained in selected directory.
[ +++ ]Add recursively...It allows to import all the ligands contained in the selected directory plus its sub-directories.
[ - ] Remove selectedThe ligands selected in the ligand list will be deleted from the set. Use Shift and/or Control for multiple selections.
[ --- ] Remove all Delete the entire ligand set.
Once one or more ligands are imported, a check is performed before accepting them. Target structures, flexible residues, incorrect PDBQTs and empty files are automatically excluded. When more than one ligand is rejected, user is asked whether inspect the list of problematic structures.
The File->Load VS configuration or File->Import ligand list file... menu entry can also be used to import ligands.
NOTE: If the ligand structures were obtained as MOL2 from ZINC, [2] Raccoon will save the single ligand structures using their ZINC ids, making easy to track compounds.

Ligands options
PDBQT GENERATIONAny time a non-PDBQT ligand is imported, it will be automatically converted in PDBQT. The options for the conversion are accessible via the “PDBQT generation options” button. NOTE: the options will affect newly imported ligands only.
Set defaultsRestore the default values for all the options
Partial chargesSelect whether to use the AutoDock Gasteiger charges or tokeep the original charges in the molecule.
Structure repairPerform a structure repair addin bonds and hydrogens.
Structure clean-upRemove lone pairs and non-polar hydrogens.
Special rotatable bondsSpecify types of bonds to be set as rotatable (or kept rigid). All the remaining standard rotatable bonds are set as rotatable by default.
Fragmented structuresSet the policy for managing problematic structures(e.g. containing multiple fragments, salts)
FILTER LIGAND LISTSpecify a simple set of parameters to use to exclude ligands based on some of their structural properties: hydrogen bond donors/acceptors, molecular weight, number of atoms and rotatable bonds. By default non-AutoDock atom types are excluded. NOTE: Once the filters have been accepted, they will be applied to current ligands as well as any subsequently loaded.
Filter presetsSets of predefined values in a pull-down menu: Lipinski's rules (except for the ClogP), DrugLike set, DrugLike for fragments set. The Default set provides the set of standard values within the AutoDock limits.
For each criterion the Default button restores it to its initial value.
An estimate of the number of ligands that will be accepted with any value set can be obtained before being actually applied by pressing the “Preview” button at any time.
Rejected ligands will be highlighted in red in the ligand list.
Rotatable bondsThe maximum value for the rotatable bonds is set to that supported by AutoDock (32). When a flexible residue is loaded, its rotatable bonds are included into the total count. Therefore the maximum value allowed per ligand is reduced, and ligands are filtered again.

4.3 Receptors tabAt the top of the “Receptor(s)” tab there are two buttons for selecting the options for switching between a classical virtual screening (Single target) on a single protein conformation and a docking versus an ensemble of protein states (Multiple conformations). Receptor structures can be imported in any of the supported formats (PDB, MOL2, PDBQT). Ligand and flexible residues PDBQT are automatically rejected. Non-PDBQT structures will be automatically converted using the options specified in the “PDBQT generation options” panel.
SINGLE TARGET MODEThe standard virtual screening approach docks a library of ligands onto a given target structure. This mode requires the minimum input from the user, a single structure file.
“Add receptor file”: Load the receptor structure.
MULTIPLE CONFORMATIONS MODEWith Raccoon is possible to generate the files for a virtual screening of a set of ligands against multiple states of the same protein. The target structures can be different snapshots of a molecular dynamics simulation [3] or an NMR ensemble.The receptor structure can be loaded in any of the supported formats (PDB, MOL2, PDBQT). Ligand and flexible residues PDBQT are automatically rejected. Non-PDBQT structures will be converted automatically using the PDBQT generation options.
“Add a structure...”Load receptor structures in any of the supported formats. Multiple selections can be made by pressing Ctrl and/or Shift.
“Add a directory”It allows to load all the receptors in any of the supported formats contained in a directory.
“Remove a structure” and “Remove All”Remove a selected structure or the entire set, respectively.
A good practice is to store the multiple target structures in a single directory. Since an unique GPF template is going to be used, all the structures must be aligned with the same reference structure and with the grid box defined in the GPF template.

Receptors options
PDBQT GENERATION It contains all the available options for generating the PDBQT receptor structure from PDB or MOL2.
Set defaultsRestore the initial settings for all the options.
Partial chargesSet whether to use the AutoDock Gasteiger charges or to keepthe original charges in the molecule.
RemoveDefine the clean-up operations thatwill be performed on the receptor structure by selectingthe features that will be removed during the PDBQT generation.
Structure repairPerform a structure repair adding bonds and hydrogens.
NOTE: All the options will affect the next imported receptor only.
FLEXIBLE RESIDUES PANELIt contains all the available options for importing or generating the flexible residues PDBQT file. At least one target structure must have already been defined for this panel to be active.
From file Specify a flexible residue file generated with AutoDockTools through the “Import PDBQT” button. Ligand PDBQT's will be rejected. This choice is available on Single Target Mode only.
From selectionGenerate a flexible residues file by specifying one or more residue names using the following syntax:
THR276 → threonine 276 B:THR276 → threonine 276 on chain BB:THR276, B:HIS229 → threonine 276 and histidine 229 on chain B
The syntax is case sensitive. The presence of the selected residues will be checked in all the target structures before being accepted.
NOTE: When flexible residues are either loaded from a file or defined from selection, the maximum number of rotatable bonds acceptable for the ligands is correspondingly reduced to fit with the AutoDock limit of 32 maximum rotatable bonds. When flexible residues are unset, the standard value is restored. Specifying flexible residues triggers re-filtering ligands.
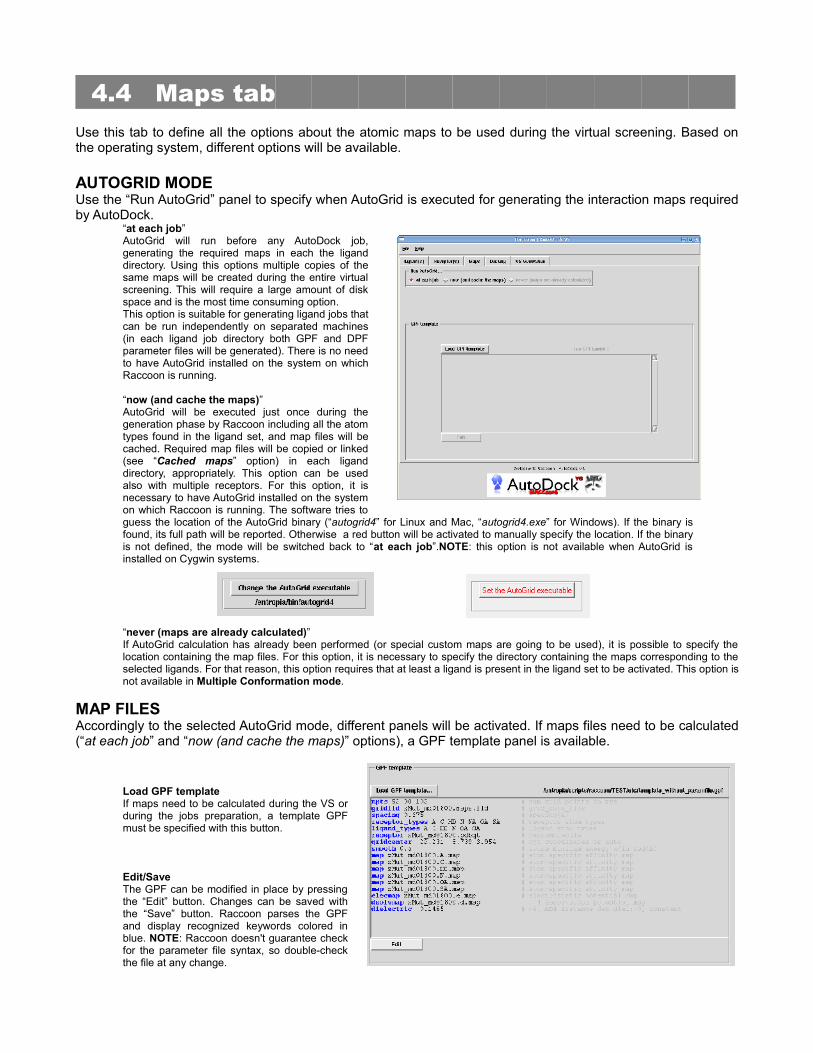
4.4 Maps tabUse this tab to define all the options about the atomic maps to be used during the virtual screening. Based on the operating system, different options will be available.
AUTOGRID MODEUse the “Run AutoGrid” panel to specify when AutoGrid is executed for generating the interaction maps required by AutoDock.
“at each job”AutoGrid will run before any AutoDock job, generating the required maps in each the ligand directory. Using this options multiple copies of the same maps will be created during the entire virtual screening. This will require a large amount of disk space and is the most time consuming option.This option is suitable for generating ligand jobs that can be run independently on separated machines (in each ligand job directory both GPF and DPF parameter files will be generated). There is no need to have AutoGrid installed on the system on which Raccoon is running.
“now (and cache the maps)”AutoGrid will be executed just once during the generation phase by Raccoon including all the atom types found in the ligand set, and map files will be cached. Required map files will be copied or linked (see “Cached maps” option) in each ligand directory, appropriately. This option can be used also with multiple receptors. For this option, it is necessary to have AutoGrid installed on the system on which Raccoon is running. The software tries to guess the location of the AutoGrid binary (“autogrid4” for Linux and Mac, “autogrid4.exe” for Windows). If the binary is found, its full path will be reported. Otherwise a red button will be activated to manually specify the location. If the binary is not defined, the mode will be switched back to “at each job”.NOTE: this option is not available when AutoGrid is installed on Cygwin systems.
“never (maps are already calculated)”If AutoGrid calculation has already been performed (or special custom maps are going to be used), it is possible to specify the location containing the map files. For this option, it is necessary to specify the directory containing the maps corresponding to the selected ligands. For that reason, this option requires that at least a ligand is present in the ligand set to be activated. This option is not available in Multiple Conformation mode.
MAP FILESAccordingly to the selected AutoGrid mode, different panels will be activated. If maps files need to be calculated (“at each job” and “now (and cache the maps)” options), a GPF template panel is available.
Load GPF templateIf maps need to be calculated during the VS or during the jobs preparation, a template GPF must be specified with this button.
Edit/SaveThe GPF can be modified in place by pressing the “Edit” button. Changes can be saved with the “Save” button. Raccoon parses the GPF and display recognized keywords colored in blue. NOTE: Raccoon doesn't guarantee check for the parameter file syntax, so double-check the file at any change.

NOTE: if a custom energy parameter file (AD4.xxxx.dat) is defined in the GPF, the user will be prompted to specify the file location.
If maps are already calculated (“never (maps are already calculated)” option), the map file manager is activated.
Select the cached maps directory If maps have been already calculated, the directory in which they are stored must be specified.
Once map directory is specified, Raccoon will check for the presence of all atom types for the the current ligand set (plus the desolvation and electrostatic special maps) and their coherence (same number of points, center, etc...). If all the checks pass, the map files will be imported and used during the virtual screening generation.
CACHED MAPSOn Unix-like systems it is possible to use symbolic links to save disk space. When cached maps (“now (and cache the maps)” and “never (maps are already calculated)” options) are used under Linux and Mac, by default Raccoon will make symbolic links between the cached maps and the ligand directories. When available, this is the best choice for having the smallest hard-disk footprint. NOTE: this option is not available on Windows due to the NTFS filesystem limitations. Therefore the button is disabled on Windows.
Cached mapsTwo options are available:
Make copies [ use more disk space ]Make symbolic links [ save disk space ]

4.5 Docking tabA single set of parameters for the docking calculation is specified for the entire ligand set by using a template DPF when generating the parameters for each ligand.
Open a DPF...Docking parameters are generated for each ligand by using a template DPF. The DPF can be modified in place by pressing the “Edit” button. Recognized keywords will be represented with a bold font.
Generate default DPFUse this button to create a docking parameter file with the default AutoDock values. The file can be customized with the Edit/Save button.
Edit/SaveThe DPF can be modified in place by pressing the “Edit” button and changes can be accepted with the “Save” button. Raccoon parses the DPF and display recognized keywords colored in blue. NOTE: Raccoon doesn't check for the parameter file syntax, so double-check the file at any change.
NOTE: Raccoon only supports the use of LGA search algorithm. Simulated annealing algorithm is not supported.
NOTE: if a custom energy parameter file (AD4.xxxx.dat) is defined in the DPF, the user will be prompted to specify the file location.
The docking parameters should be selected to provide the best compromise between speed and accuracy and further tuned for the complexity of the search (number of torsions, binding site size...). Moreover, the amount of details output by AutoDock should be minimized by setting the outlev keyword in the DPF to 0.

4.6 VS Generation tabThis tab contains the virtual screening generation summary and the operating system-dependent options.
SUMMARYThe status of the virtual screening generation can be accessed at any moment via the Summary panel. Required input dependencies (ligands, receptors, maps and docking parameters and the target directory where to generate the virtual screening files) are displayed and colored accordingly to their status. Incomplete and incomplete requirements are in colored in red and green, respectively. With the exception of a few correlated options, the inputs for Raccoon can be specified in any order. Whenever an operation is performed and all the requirements are met, the corresponding dependency will be changed to green.
Set directory...Specify the output directory in which the jobs will be generated. Although the software doesn't require any particular naming scheme, the suggested format would be “TargetName_LigandSetName”. Therefore, a virtual screening on a protease target with the NCI Diversity Set would be generated in a directory named “Protease_NCIdiv”. NOTE: even if the available disk space is measured and reported, Raccoon doesn't perform any estimation of the space required for the generation.
OS optionsAfter preparing the files required by AutoDock for the docking calculations, Raccoon can also be used to generate script files to automate the jobs executions on different systems. Currently, the two choices are “Workstation” to run the virtual screening on a single machine with any of AutoDock supported OS (Linux, Mac, Solaris, Windows) or a “Linux cluster”. NOTE: the only cluster scheduler currently supported is PBS, but the scripts should be easily adapted to run with different schedulers.
WorkstationWhen generating the virtual screening for a workstation, different options are available, accordingly to the operating system.
Script generation“master script for starting the VS”: generate a main script RunVS.sh (Linux, Mac, Solaris, Win/Cygwin) or RunVS.bat (Windows). A script is generated for each target and contains the information to run all the ligand jobs. Unless special requirements are present, this is the best choice.
“single script for each ligand”: generate a script run.sh (Linux, Mac, Solaris, Win/Cygwin) or run.bat (Windows) in each ligand directory for running single jobs independently. This script contains the information to run AutoGrid (if required) and AutoDock.
NOTE:Raccoon tries to guess the most suitable scripting format to be used based on the operating system on which it is executed. On Unix-like systems, the scripts will be in Bash scripting language, while on Windows the batch language will be used. A special option “Use Cygwin” available on Windows systems sets the Bash language to be used in a Cygwin environment.

Create a VS package fileAfter the generation process, create a package containing all the files for the virtual screening to make easier to move the docking data on different machines. The available formats are Tar (Bz2, Gzip or uncompressed) and Zip.
Linux clusterTo generate the virtual screening files to be run on a cluster there are some extra options for defining the job submission to the queuing system:
CPU time per jobThis value defines the maximum amount of hours to use per ligand job before the calculation is killed. The default is 24 hours. This is a very conservative value but guarantees that the jobs have enough time to be completed .The best value is different according to the calculation complexity and the cluster nodes speed.
Number of DLG's to run per ligandAccordingly to the available resources dockings of a single ligand can be distributed among multiple nodes. This value specifies how many nodes will run a single ligand job. Therefore, 100 poses per ligand can be generated either by setting the ga_run to 100 on the DPF and specifying 1 in the number of DLG's per ligand value, or by reducing the ga_run to 10 and increasing the number of DLG's to run per ligand to 10. The results are a single DLG with 100 poses or 10 DLG's with 10 poses each, respectively, that can be clustered together using the summarize_results4.py script.
Generate buttonOnce all the dependencies are satisfied so that all Summary entries are green, the “Generate” button will be activated. The first step is to write a log file in the virtual screening output directory containing all the information of the current virtual screening. This log file can be used to re-load data from a previous session and/or replicate the calculations. The log file format is raccoonVS-YYYY.MM.DD.log. Raccoon generates a set of directories arranged accordingly to the following scheme:
single target multiple targets

5. Results analysisWhen all the docking calculations are terminated, the ligand poses need to be summarized and ranked so to proceed to inspect the most promising results. Raccoon is designed to generate the files necessary to the virtual screening. However, currently it doesn't provide an interface for analyzing and filtering docked ligands. Results analysis can be performed by using summarize_results4.py and other scripts in AutoDockTools.
This command can be invoked in a terminal using the following syntax:
[Linux/Mac] pythonsh /usr/local/mgltools_i86Linux2_1.5.4/MGLToolsPckgs/AutoDockTools/Utilities24/summarize_results4.py
[Win] C:\Python25\python.exe "c:\Program Files\MGLTools 1.5.4\MGLToolsPckgs\AutoDockTools\Utilities24\summarize_results4.py"
The script usage is the following:
Usage: summarize_results4.py -d directory
Description of command... -d directory Optional parameters: [-t] rmsd tolerance (default is 1.0) [-f] rmsd reference filename (default is to use input ligand coordinates from docking log) [-b] print best docking info only (default is print all) [-L] print largest cluster info only (default is print all) [-B] print best docking and largest cluster info only (default is print all) [-o] output filename (default is 'summary_of_results') [-a] append to output filename (default is to open output filename 'w') [-k] build hydrogen bonds and report number built [-e] compute estat, vdw, hb + desolv energies and report breakdown [-r] receptor filename [-u] report unbound energy [-i] subtract internal energy [-p] report depth of torsion tree [-v] verbose output
Further information on how to use the scripts are available at the following link:
http://autodock.scripps.edu/faqs-help/how-to/how-to-summarize-a-directory-of-autodock4-docking-results
6. References
[1] Morris, G. M., Huey, R., Lindstrom, W., Sanner, M. F, Belew, R. K., Goodsell, D. S., Olson, A.J. “AutoDock4 and AutoDockTools4: Automated docking with selective receptor flexibility. ”, J. Comput. Chem. 2009, 30(16):2785-91.
[2] Irwin, J.J., Shoichet, B.K., “ZINC - a free database of commercially available compounds for virtual screening.”, J. Chem. Inf. Model. 2005, 45(1):177-82
[3] Amaro, R.E., R. Baron, J.A. McCammon, “An Improved Relaxed Complex Scheme for Receptor Flexibility in Computer-Aided Drug Design”, J. Comput.-Aided Mol. Des. 22, 2008: 693-705