rainbow circle vest - red heart · rainbow circle vest red heart® fashion soft™: 1 ball each of...
TRANSCRIPT

Find more ideas & inspiration: redheart.com©2017 Coats & Clark Page 1 of 8
Rainbow Circle Vest
RED HEART® Fashion Soft™: 1 ball each of 4654 Atlantis A, 4200 Flax B, 4652 Kelly Green C, and 4702 Bright Pink D, and 3 (4, 4) balls 4613 Camel E
Susan Bates® Crochet Hook: 5 mm [US H-8]
Stitch markers, yarn needle
GAUGE: One Circle measures about 9½" [24 cm] across. 4 rows = about 4" [10 cm] in Large Lace Filler pattern. CHECK YOUR GAUGE. Use any size hook to obtain the gauge.
RED HEART® Fashion Soft™, Art E845 available in
solid color 5 oz (141 g), 381 yds (348 m) balls
LW5769
crochetDesigned by Tammy Hildebrand
What you will need:
BUY YARN
continued...
Crochet a vest that you will absolutely love wearing! First you crochet
the circles joining them together with a join-as-you-go technique. Then you fill in with a
meshy lace filler. It’s simply stunning!
Directions are for size Small/Medium. Changes for sizes Large/1X, and 2X/3X are in parentheses.
To Fit Bust: 32–38 (40–46, 48–54)" [81.5–96.5 (101.5–117, 122–137 cm]Finished Bust: 39 (45, 51)" [99 (114.5, 129.5) cm]
Notes1. Vest is made from four Panels. 2. Each Panel is made from four Circles
that are joined together using a join-as-you-go technique. Chain-mesh Lace Filler is then worked between Circles and along edges of the Panel to fill in spaces and shape the Panel.
3. Each Circle is worked identically, in joined rounds, using different yarn colors.
4. The chain-mesh Lace is reversible. Work the indicated fillers and corners with whichever side (right side or wrong side) allows you to work in the indicated space or along the indicated edge.
5. Panels are joined while edgings are worked along the inner long edges of the Panels, using a join-as-you-go technique.
6. Refer to the assembly diagram and stitch diagrams for Circle arrangement and Lace Filler placement.
Special Stitchesch-3 join (chain-3 join) = Ch 1, drop loop from hook, insert hook in center chain of corresponding ch-3, pick up dropped loop and draw through, ch 1.ch-5 join (chain-5 join) = Ch 2, drop loop from hook, insert hook in center chain of corresponding ch-5, pick up dropped loop and draw through, ch 2.
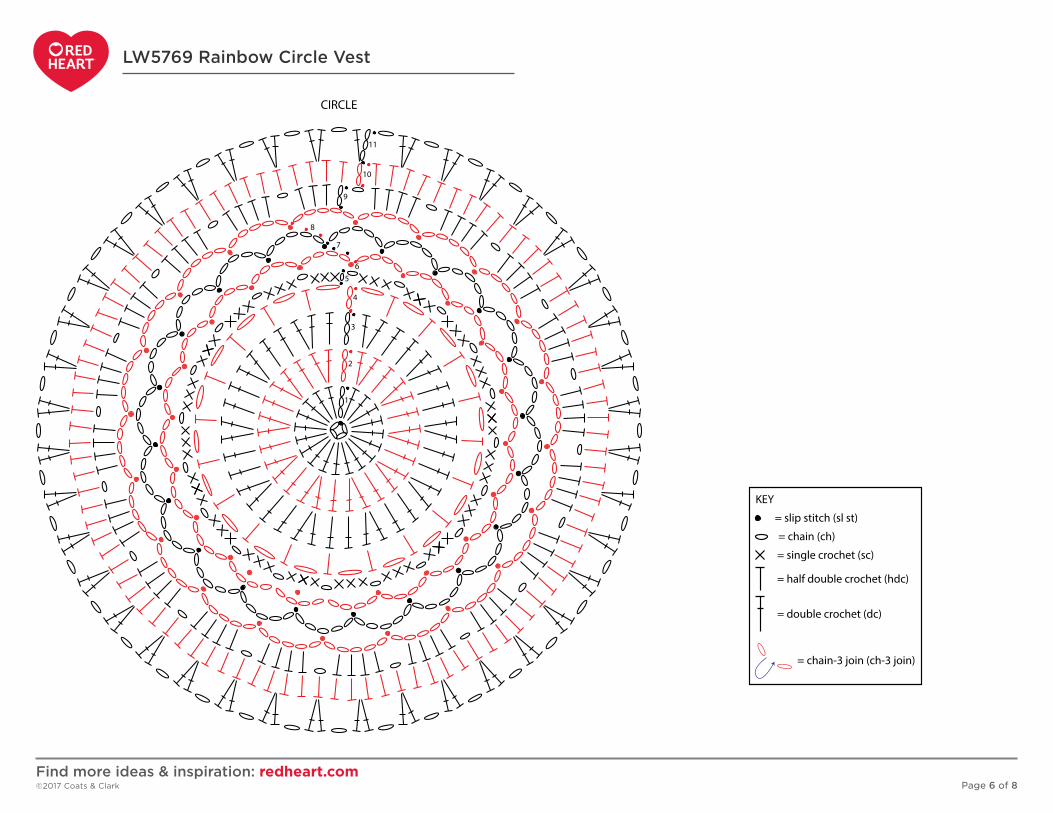
CIRCLE #1 (make 4)With A, ch 4; join with slip st in first ch to form a ring.
Round 1 (right side): Ch 3 (counts as first dc), 19 dc in ring; join with slip st in top of beginning ch-3—20 dc.RoundRound 2: Ch 3 (counts as first dc), 2 dc in next st, *dc in next st, 2 dc in next st; repeat from * around; join with slip st in top of beginning ch-3—30 dc.Round 3: Ch 3 (counts as first dc), dc in next st, 2 dc in next st, *dc in next 2 sts, 2 dc in next st; repeat from * around; join with slip st in top of beginning ch-3—40 dc. Fasten off A.Round 4: With right side facing, join B with slip st in any st, ch 3 (counts as first
Find more ideas & inspiration: redheart.com©2017 Coats & Clark Page 2 of 8
hdc, ch 1), skip next st, hdc in next st, *ch 1, skip next st, hdc in next st; repeat from * to last st, ch 1, skip last st; join with slip st in 2nd ch of beginning ch-3—20 hdc and 20 ch-1 spaces. Round 5: (Slip st, ch 1, 3 sc) in next ch-1 space, *ch 1, 3 sc in next ch-1 space; repeat from * around, ch 1; join with slip st in first sc—60 sc and 20 ch-1 spaces. Fasten off B.Round 6: With right side facing, join C with slip st in any ch-1 space, *ch 4, slip st in next ch-1 space; repeat from * around, ch 4; join with slip st in same ch-1 space as first slip st—20 slip sts and 20 ch-4 spaces.Round 7: Slip st to center of next ch-4 space, *ch 5, slip st in next ch-4 space; repeat from * around, ch 5; join with slip st in same ch-4 space as first slip st—20 slip sts and 20 ch-5 spaces. Round 8: Slip st to center of next ch-5 space, *ch 5, slip st in next ch-5 space; repeat from * around, ch 5; join with slip st in same ch-5 space as first slip st—20 slip sts and 20 ch-5 spaces. Fasten off C.Round 9: With right side facing, join D with slip st in any ch-5 space, ch 2 (counts as first hdc), 3 hdc in same ch-5 space, *ch 1, 4 hdc in next ch-5 space; repeat from * around, ch 1; join with slip st top of beginning ch-2—80 hdc (twenty 4-hdc groups) and 20 ch-1 spaces. Fasten off D.Round 10: With right side facing, join A with slip st in any ch-1 space, ch 2 (counts as first hdc), mark this st, hdc in next 4 sts, *hdc in next ch-1 space, hdc in next 4 sts; repeat from * around; join with slip st top of beginning ch-2—100 hdc.Fasten off A.
Round 11: With right side facing, join B with slip st in marked st, ch 3 (counts as first dc), dc in same st, ch 1, skip next 2 sts, 2 dc in next space between sts, *ch 1, skip next 2 sts, 2 dc in next st, ch 1, skip next 2 sts, 2 dc in next space between sts; repeat from * to last 2 sts, ch 1, skip last 2 sts; join with slip st in top of beginning ch-3—80 dc (forty 2-dc groups) and 40 ch-1 spaces. Fasten off B.
CIRCLE #2 (make 4)Make same as Circle #1, using D for Rounds 1–3, A for Rounds 4 and 5, B for Rounds 6–8, C for Round 9,D for Round 10, and A for Round 11.
CIRCLE #3 (make 4)Make same as Circle #1, using C for Rounds 1–3, D for Rounds 4 and 5, A for Rounds 6–8, B for Round 9,C for Round 10, and D for Round 11.
CIRCLE #4 (make 4)Make same as Circle #1, using B for Rounds 1–3, C for Rounds 4 and 5, D for Rounds 6–8, A for Round 9,B for Round 10, and C for Round 11.
PANEL #1Edge First Circle: With right side of Circle #1 facing, join E with slip st in any ch-1 space, *ch 3, slip st in next ch-1 space; repeat from * around, ch 3; join with slip st in same ch-3 space as first slip st—40 slip sts and 40 ch-3 spaces. Fasten off.
Edge Second Circle and Join to First Circle As-You-Go: With right side of Circle #2 facing, join E with slip st in any ch-1 space, ch 3, slip st in next ch-1 space; hold Circle #1 and Circle #2 side by side with right sides facing you, ch-3 join in closest ch-3 space of Circle #1, slip st in next ch-1 space of Circle #2, [ch-3 join in next ch-3 space of Circle #1, slip st in next ch-1 space of Circle #2] 4 times, *ch 3, slip st in next ch-1 space of Circle #2; repeat from * around, ch 3; join with slip st in same ch-3 space as first slip st.Fasten off.Edge and Join Third and Fourth Circles: Edge and join Circle #3 to Circle #2 in the same way that Circle #2 was joined to Circle #1, leaving 9 ch-3 spaces unjoined on one side of Circle #2 and 21 ch-3 spaces unjoined on the other side of Circle #2. Join Circle #4 to Circle #3 in the same way that Circle #2 was joined to Circle #3.
Large Lace FillerRow 1: Working in one of the large spaces between circles, join E with slip st in center ch of the ch-3 space just before join between circles, dc in join between circles, slip st in center ch of next ch-3 space of next circle, [ch 5, slip st in center ch of next ch-3 space] 8 times, dc in join between circles, slip st in center ch of next ch-3 space of next circle—2 dc and 8 ch-3 spaces.Row 2: Slip st to center ch of next ch-3 space of current circle, turn, ch 2, dc in first dc, slip st in center ch of next ch-5 space, [ch 5, slip st in center ch of ch-5 space] 7 times, dc in next dc, ch 2, slip st in center ch of next ch-3 space—2 dc and 7 ch-5 spaces.
Row 3: Slip st to center ch of next ch-3 space of current circle, turn, ch 2, dc in first dc, slip st in center ch of next ch-5 space, [ch 5, slip st in center ch of ch-5 space] 6 times, dc in next dc, ch 2, slip st in center ch of next ch-3 space—2 dc and 6 ch-5 spaces.Row 4: Slip st to center ch of next ch-3 space of current circle, turn, ch 2, dc in first dc, [ch 5, slip st in center ch of ch-5 space] 6 times, ch 5, dc in next dc, ch 2, slip st in center ch of next ch-3 space—2 dc and 7 ch-5 spaces.Rows 5–8: Slip st to center ch of next ch-3 space of current circle, turn, ch 2, dc in first dc, *ch 5, slip st in center ch of ch-5 space; repeat from * to next dc, ch 5, dc in next dc, ch 2, slip st in center ch of next ch-3 space—2 dc and 11 ch-5 spaces in Row 8.Fasten off.Repeat to fill second large space between circles.
Lower Corner LaceRow 1: Working in space between lowest two circles (to form a corner), join E with slip st in center ch of ch-3 space of higher of the two circles just before join between circles, ch 2, dc in join between circles, slip st in center ch of next ch-3 space of next circle, [ch 5, slip st in center ch of next ch-3 space] 8 times, dc in center ch of next ch-3 space, ch 2, dc in center ch of next ch-3 space—3 dc, 2 ch-2 spaces, and 8 ch-5 spaces.Row 2: Ch 5 (counts as dc, ch 2), turn, dc in first dc, slip st in center ch of next ch-5 space, [ch 5, slip st in center ch of next ch-5 space] 7 times, dc in next dc, ch 2, slip st in center ch of next ch-3 space—3 dc, 2 ch-2 spaces, and 7 ch-5 spaces.
LW5769 Rainbow Circle Vest
continued...

Find more ideas & inspiration: redheart.com©2017 Coats & Clark Page 3 of 8
Row 3: Slip st to center ch of next ch-3 space, turn, ch 2, dc in first dc, slip st in center ch of next ch-5 space, [ch 5, slip st in center ch of next ch-5 space] 6 times, dc in next dc, ch 2, dc in 3rd ch of beg ch-5—3 dc, 2 ch-2 spaces, and 6 ch-5 spaces.Row 4: Ch 5 (counts as dc, ch 2), turn, dc in first dc, slip st in center ch of next ch-5 space, [ch 5, slip st in center ch of next ch-5 space] 5 times, ch 5, dc in next dc, ch 2, slip st in center ch of next ch-3 space—3 dc, 2 ch-2 spaces and 6 ch-5 spaces.Row 5: Slip st to center ch of next ch-3 space, turn, ch 2, dc in first dc, [ch 5, slip st in center ch of next ch-5 space] 6 times, dc in next dc, ch 2, dc in 3rd ch of beg ch-5—3 dc, 2 ch-2 spaces, and 6 ch-5 spaces.Row 6 and 7: Repeat Rows 4 and 5.Row 8: Repeat Row 4.Fasten off E.
Small Lace FillerRow 1: Working in small space between top two circles, join E with slip st in center ch of ch-3 space of top most circle just before join between circles, ch 3, slip st in center ch of next ch-3 space of next circle—1 ch-3 space of filler lace.Row 2: Slip st to center ch of next ch-3 space of current circle, turn, ch 3, slip st in center ch of ch-3 space of lace filler, ch 3, slip st in center ch of next ch-3 space of next circle—2 ch-3 spaces.Rows 3-5: Slip st to center ch of next ch-3 space of current circle, turn, *ch 3, slip st in center ch of next ch-3 space of lace filler; repeat from * to end of lace filler, ch 3, slip st in center ch of next ch-3 space of next circle—5 ch-3 spaces in Row 5.Fasten off.
Upper Corner Lace (shoulder)Skip 6 ch-3 spaces of the topmost circle above the end of the small lace filler and mark the next ch-3 space. Skip 10 ch-3 spaces of the topmost circle above the end of the large lace filer and mark the next ch-3 space. Upper Corner Lace is worked between these markers.Row 1: Join E with slip st in center ch of one of the marked ch-3 spaces to work towards the other marked ch-3 space, [ch 5, slip st in center ch of next ch-3 space] 5 times—5 ch-5 spaces. Remove markers.Row 2: Turn, slip st up to center ch of first ch-5 space, [ch 5, slip st in center ch of next ch-5 space; repeat from * across—4 ch-5 spaces.Fasten off.
PANEL #2Referring to diagrams for arrangement of Circles, Fillers, and Lower Corner, make Panel #2 same as Panel #1, using Circle #2 for first circle, Circle #1 for second circle, Circle #4 for third circle, and Circle #3 for fourth circle. Work Upper Corner Lace same as on Panel #1, except work ch-5 joins instead of standard ch-5 when working Row 2, to join to corresponding ch-5 spaces of Panel #1 Upper Corner Lace.
PANEL #3Referring to diagrams for arrangement of Circles, Fillers, and Corners make Panel #3 same as Panel #1, using Circle #4 for first circle, Circle #3 for second circle, Circle #2 for third circle, and Circle #1 for fourth circle.
PANEL #4Make Panel #4 the same as Panel #2, joining Upper Corner Lace to corresponding ch-5 spaces of Panel #3 Upper Corner Lace.
FINISHINGSeam SidesEdge First Panel: Row 1: Leaving 8 ch-3 spaces of lower most circle following Lower Corner Lace at lower end of Panel #1 unworked, join E with slip st in center ch of next ch-3 space, [ch 5, slip st in center ch of next ch-3 space] 7 times, ch 5, slip st in ch-2 space of Large Lace Filler, [ch 5, slip st in center ch of next ch-5 space of Large Lace Filler] 11 times, ch 5, slip st in next ch-2 space of Larger Lace Filler, [ch 5, slip st in center ch of next ch-3 space] 14 times.
Size Small/Medium OnlyFasten off.
Size Large/1X OnlyRow 2: Turn, slip st to center ch of first ch-5 space, *ch 5, slip st in center ch of next ch-5 space; repeat from * across. Fasten off.
Size 2X/3X OnlyRows 2 and 3: Turn, slip st to center ch of first ch-5 space, *ch 5, slip st in center ch of next ch-5 space; repeat from * across. Fasten off.
Edge Second Panel and Join to First Panel: Panel #2 is edged same as Panel #1, except that in last row of edging some of the ch-5 spaces of Panel #2 are
joined to the corresponding ch-5 spaces of Panel #1. Place the two Panels side by side with ends of rows matching.
Size Small/Medium OnlyRow 1: Leaving 8 ch-3 spaces of lower most circle following Lower Corner Lace at lower end of Panel #2 unworked, join E with slip st in center ch of next ch-3 space, [ch 5, slip st in center ch of next ch-3 space] 7 times, ch 5, slip st in ch-2 space of Large Lace Filler, [ch 5, slip st in center ch of next ch-5 space of Large Lace Filler] 11 times, ch 5, slip st in next ch-2 space of Larger Lace Filler, [ch 5, slip st in center ch of next ch-3 space] 8 times [ch-5 join, slip st in center ch of next ch-3 space] 6 times. Fasten off.
Size Large/1X OnlyRow 1: Working on Panel #2, work same as Row 1 of edging on Panel #1.Row 2: Turn, slip st to center ch of first ch-5 space, [ch-5 join, slip st in center ch of next ch-5 space] 6 times, *ch 5, slip st in center ch of next ch-5 space; repeat from * across. Fasten off.
Size 2X/3X OnlyRows 1 and 2: Working on Panel #2, work same as Rows 1 and 2 of edging on Panel #1.Row 3: Turn, slip st to center ch of first ch-5 space, [ch 5, slip st in center ch of next ch-5 space] 18 times, [ch-5 join, slip st in center ch of next ch-5 space] 6 times.Fasten off.Repeat to edge and seam side between Panel #3 and Panel #4.
Side InsertThe side insert completes the side seam and creates a slight flare.
LW5769 Rainbow Circle Vest
continued...

Find more ideas & inspiration: redheart.com©2017 Coats & Clark Page 4 of 8
Row 1 (right side): With right side facing, join E with slip st in center ch of first unjoined ch-5 space of side edging on Panel #1, slip st in center ch of of first unjoined ch-5 space of side edging on Panel #2.Row 2: Slip st to center ch of next ch-5 space of Panel #2, turn, slip st in center ch of next ch-5 space on Panel #1.Row 3: Slip st to center ch of next ch-5 space of Panel #1, turn, slip st in center ch of next ch-5 space on Panel #2.Rows 4 and 5: Repeat Rows 2 and 3.Row 6: Repeat Row 2.Row 7: Slip st to center ch of next ch-5 space of Panel #1, turn, ch 2, (dc, ch 3, dc) in center of joining of Row 6, ch 2, slip st in center ch of next ch-5 space of Panel #2.Row 8: Slip st to center ch of next ch-5 space of Panel #2, ch 2, (2 dc, ch 3, 2 dc) in ch-3 space, ch 2, slip in center ch of next ch-5 space of Panel #1.Row 9: Slip st to center ch of next ch-5 space of Panel #1, ch 2, (2 dc, ch 3, 2 dc) in ch-3 space, ch 2, slip in center ch of next ch-5 space of Panel #2.Repeat Rows 8 and 9 to lower edge. Fasten off.Repeat to work Side Insert between Panel #3 and Panel #4.
Seam Center BackEdge First Side: Row 1: Join E with slip st in first st of last row of Lower Corner Lace of Panel #2, ch 5, slip st in first ch-2 space, [ch 5, slip st in center ch of next ch-5 space] 6 times, ch 5, slip st in next ch-2 space, [ch 5, slip st in center ch of next ch-3 space] 5 times, ch 5, slip st in next ch-2 space, [ch 5, slip st in center ch of next ch-5 space] 11 times, ch 5, slip st in next ch-2 space, [ch 5, slip st in center ch of next ch-3 space] 8 times.
Size Small/Medium OnlyFasten off.
Sizes Large/1X OnlyRow 2: Turn, slip st to center ch of first ch-5 space, *ch 5, slip st in center ch of next ch-5 space; repeat from * across. Fasten off.
Size 2X/3X OnlyRow 2: Turn, slip st to center ch of first ch-5 space, *ch 5, slip st in center ch of next ch-5 space; repeat from * across.Row 3: Ch 5, turn, slip st in center ch of next ch-5 space, *ch 5, slip st in center ch of next ch-5 space; repeat from * across.Fasten off.
Edge Second Side and Join to First Side:Center back edge of Panel #3 is edged same as Panel #2, except that in last row of edging some of the ch-5 spaces of Panel #3 are joined to the corresponding ch-5 spaces of Panel #2. Place the two Panels side by side with ends of rows matching.
Size Small/Medium OnlyRow 1: Join E with slip st in first st of last row of Lower Corner Lace of Panel #3, ch 5, slip st in first ch-2 space, [ch 5, slip st in center ch of next ch-5 space] 6 times, ch 5, slip st in next ch-2 space, [ch 5, slip st in center ch of next ch-3 space] 5 times, ch 5, slip st in next ch-2 space, [ch 5, slip st in center ch of next ch-5 space] 10 times, ch-5 join, slip st in center ch of next ch-5 space, ch-5 join, slip st in next ch-2 space, [ch-5 join, slip st in center ch of next ch-3 space] 8 times. Fasten off.
Sizes Large/1X OnlyRow 1: Working on Panel #3, work same as Row 1 of edging on Panel #2.Row 2: Turn, slip st to center ch of first ch-5 space, [ch 5-join, slip st in center ch of next ch-5 space] 10 times, *ch 5, slip st in center ch of next ch-5 space; repeat from * across. Fasten off.
Size 2X/3X OnlyRows 1 and 2: Working on Panel #3, work same as Rows 1 and 2 of edging on Panel #2.Row 3: Turn, ch 5, slip st in center ch of next ch-5 space, *ch 5, slip st in center ch of next ch-5 space; repeat from * to last 10 ch-5 spaces, [ch-5 join, slip st in center ch of next ch-5 space] 10 times.Fasten off.
Center InsertRow 1 (right side): With right side facing, join E with slip st in center ch of first unjoined ch-5 space of center edging on Panel #2, ch 2, dc in center join between panels, ch 2, slip st in center ch of of first unjoined ch-5 space of side edging on Panel #3.Row 2: Slip st to center ch of next ch-5 space of Panel #3, turn, ch 2, (dc, ch 3, dc) in center dc, ch 2, slip st in center ch of next ch-5 space of Panel #2.Row 3: Slip st to center ch of next ch-5 space of Panel #2, ch 2, (2 dc, ch 3, 2 dc) in ch-3 space, ch 2, slip in center ch of next ch-5 space of Panel #3.Row 4: Slip st to center ch of next ch-5 space of Panel #3, ch 2, (2 dc, ch 3, 2 dc) in ch-3 space, ch 2, slip in center ch of next ch-5 space of Panel #2.Repeat Rows 3 and 4 to lower edge. Fasten off.
Right Front Edging: With right side facing, join E with slip st in first st of last row of Lower Corner Lace of Panel #4, ch 5, slip st in first ch-2 space, [ch 5, slip st in center ch of next ch-5 space] 6 times, ch 5, slip st in next ch-2 space, [ch 5, slip st in center ch of next ch-3 space] 5 times, ch 5, slip st in next ch-2 space, [ch 5, slip st in center ch of next ch-5 space] 11 times, ch 5, slip st in next ch-2 space, [ch 5, slip st in center ch of next ch-3 space] 10 times; working in ends of rows of Upper Lace Corner, ch 5, slip st in end of first row, ch 5, skip next row, slip st in join between Panel #4 and Panel #3; working in ends of rows of Panel #3 Upper Lace Corner, ch 5, skip next row, slip st in end of next row, *ch 5, slip st in center ch of next ch-3 space; repeat from * to center back seam, ch 5, slip st in center of back seam. Fasten off.
Left Front Edging: With wrong side facing, join E with slip st in first st of last row of Lower Corner Lace of Panel #1, ch 5, slip st in first ch-2 space, [ch 5, slip st in center ch of next ch-5 space] 6 times, ch 5, slip st in next ch-2 space, [ch 5, slip st in center ch of next ch-3 space] 5 times, ch 5, slip st in next ch-2 space, [ch 5, slip st in center ch of next ch-5 space] 11 times, ch 5, slip st in next ch-2 space, [ch 5, slip st in center ch of next ch-3 space] 10 times; working in ends of rows of Upper Lace Corner, ch 5, slip st in end of first row, ch 5, skip next row, slip st in join between Panel #1 and Panel #2; working in ends of rows of Panel #2 Upper Lace Corner, ch 5, skip next row, slip st in end of next row, *ch 5, slip st in center ch of next ch-3 space; repeat from * to center back seam, ch 5, slip st in center of back seam. Fasten off.
LW5769 Rainbow Circle Vest
continued...

Find more ideas & inspiration: redheart.com©2017 Coats & Clark Page 5 of 8
Armhole EdgingRound 1 (right side): With right side facing, join E with slip st in armhole at center seam, *ch 3, slip st in end of next row or in center ch of next ch-3 space; repeat from * all the way around armhole opening; join with slip st in same space as first slip st. Fasten off. Repeat to edge second armhole.Weave in ends.
ABBREVIATIONS A, B, C = Color A, Color B, Color C etc; ch = chain; dc = double crochet; hdc = half double crochet; sc = single crochet; st(s) = stitch(es); () = work directions in parentheses into same st; [ ] = work directions in brackets the number of times specified; * = repeat whatever follows the * as indicated.
LW5769 Rainbow Circle Vest
See next 3 pages for diagrams...
Front Back
Find more ideas & inspiration: redheart.com©2017 Coats & Clark Page 6 of 8
LW5769 Rainbow Circle Vest
1
2
3
4
56
7
8
9
10
11
CIRCLE
1 3
24
5
6
7
8
11
11
11
11
SecondCircle
FirstCircle
ThirdCircle
13
2
4
5
6
78
1 3
5
7
2
4
6
8
FourthCircle
1
2
3
4
5
12
Upper CornerLace
Small LaceFiller
Large LaceFiller
Large LaceFiller
Lower CornerLace
= slip stitch (sl st)
= chain (ch)
= double crochet (dc)
= single crochet (sc)
= half double crochet (hdc)
KEY
= chain-3 join (ch-3 join)

Find more ideas & inspiration: redheart.com©2017 Coats & Clark Page 7 of 8
LW5769 Rainbow Circle Vest
13
24
5
6
7
8
11
11
11
11
SecondCircle
FirstCircle
ThirdCircle
1
3
2
4
5
6
78
13
5
7
2
4
6
8
FourthCircle
1
2
3
4
5
12
Upper Corner
Lace
Small LaceFiller
Large LaceFiller
Large LaceFiller
Lower CornerLace
= slip stitch (sl st)
= chain (ch)
= double crochet (dc)
= single crochet (sc)
= half double crochet (hdc)
KEY
= chain-3 join (ch-3 join)
13
24
5
6
7
8
11
11
11
11
SecondCircle
FirstCircle
ThirdCircle
1
3
2
4
5
6
78
13
5
7
2
4
6
8
FourthCircle
1
2
3
4
5
12
Upper Corner
Lace
Small LaceFiller
Large LaceFiller
Large LaceFiller
Lower CornerLace
= slip stitch (sl st)
= chain (ch)
= double crochet (dc)
= single crochet (sc)
= half double crochet (hdc)
KEY
= chain-3 join (ch-3 join)

Find more ideas & inspiration: redheart.com©2017 Coats & Clark Page 8 of 8
LW5769 Rainbow Circle Vest
CIRCLE#2
CIRCLE#1
CIRCLE#4
CIRCLE#3
PANEL#2
CIRCLE#4
CIRCLE#3
CIRCLE#2
CIRCLE#1
PANEL#3
CIRCLE#1
CIRCLE#2
CIRCLE#3
CIRCLE#4
PANEL#1
CIRCLE#2
CIRCLE#1
CIRCLE#4
CIRCLE#3
PANEL#4