ransformation i - microscopy-uk
TRANSCRIPT
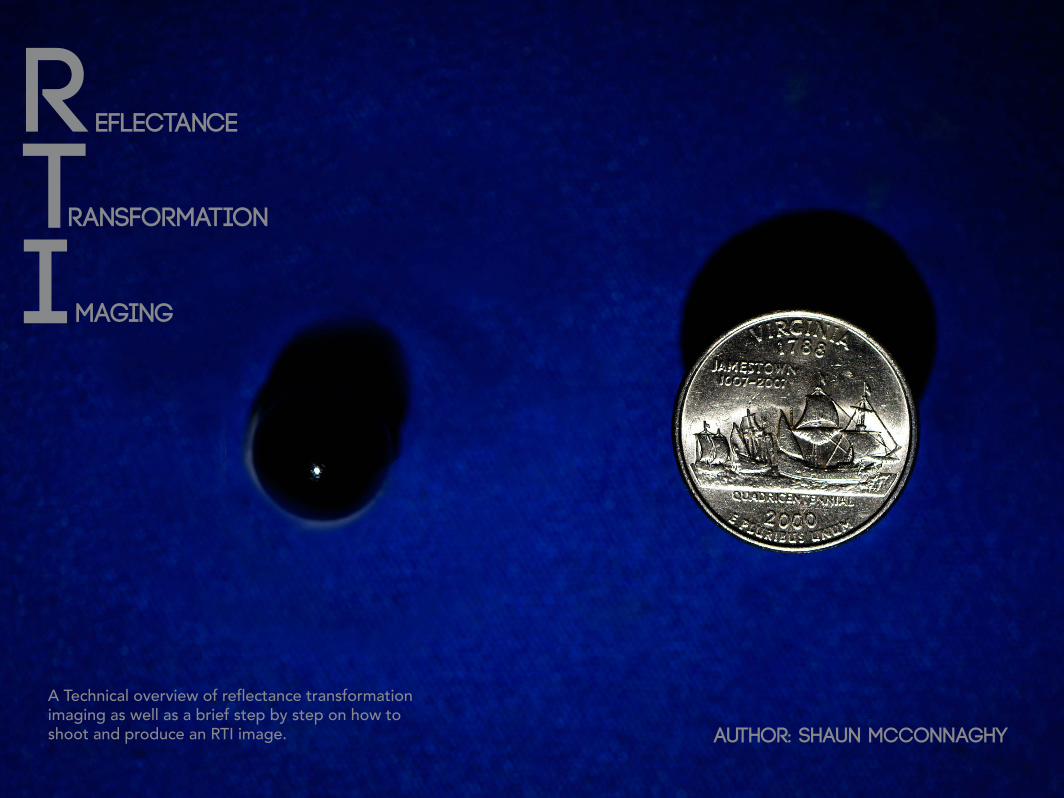
Reflectance
maging
ransformation
Author: Shaun McConnaghy
TI
A Technical overview of reflectance transformation imaging as well as a brief step by step on how to shoot and produce an RTI image.
What IS RTI?Reflectance transformation imaging (RTI), is a way to show a subject under various lighting set ups with interactive viewing software. This Software, developed by the Cultural Heritage Imaging Corporation, could be vital in the future for documentation of historical or rare artifacts. Previous to the Cultural Heritage society adopting this process for photographing artifacts, RTI was called Polynomial Texture Mapping, which was developed in 2001 by Tom Malzbender and Dan Gelb at Hewlett-Packard. The software was originally intended for making 3-D computer graphics. Once the Cultural Heritage society was able to adjust it for imaging it became a way to document and showcase delicate objects without having them be in any further danger.
DSLR cameraQuarterCopy stand Off Camera Speedlight or external flash Camera, flash syncBlack marbleRTI Builder and viewer software
Equipment UsedThe RTI ProcessOverviewIn order to obtain a good RTI image there are some very unique steps that need to be followed. Before imaging begins it is crucial that your subject and camera will not experience any vibrations or movement or the resulting image will become blurry. Next make sure there is extra room in the frame for a black marble. This marble is going to be the key compo-nent for the RTI builder to read where the light is coming from in each image. Try to prevent the exposure from clipping in the marble if possible; howev-er it is more important for the subject to be properly exposed. Once everything is immobilized, your imaging can begin. In order to end with an adequate
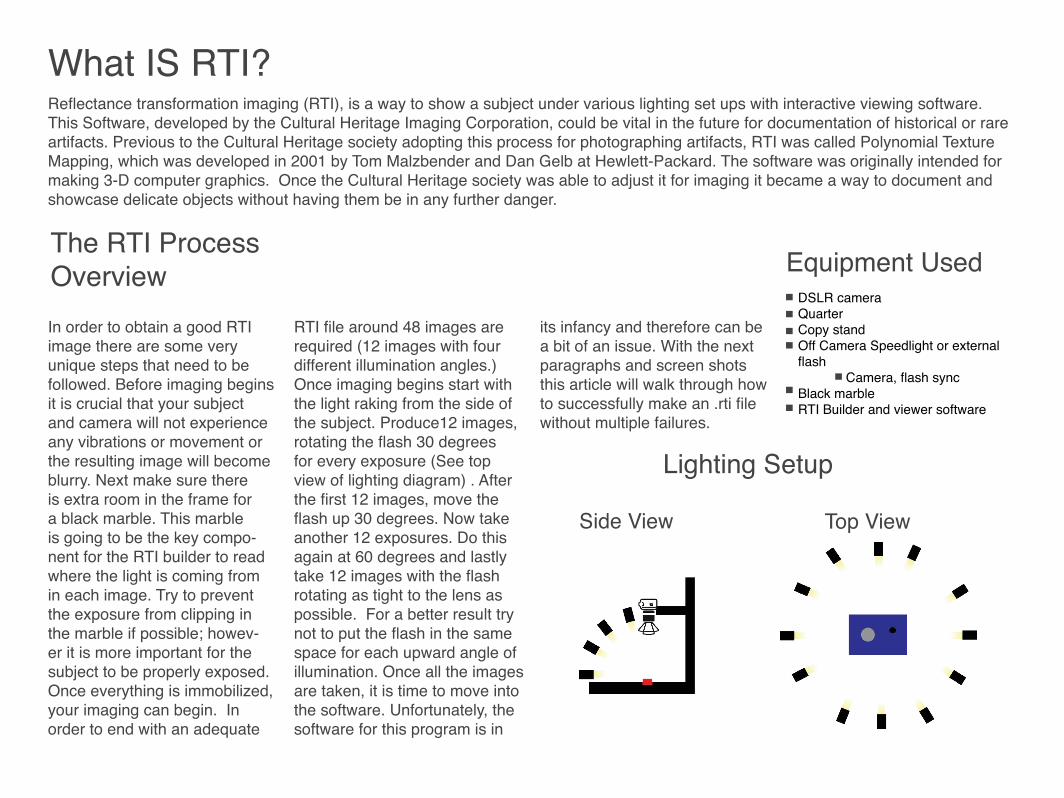
RTI file around 48 images are required (12 images with four different illumination angles.) Once imaging begins start with the light raking from the side of the subject. Produce12 images, rotating the flash 30 degrees for every exposure (See top view of lighting diagram) . After the first 12 images, move the flash up 30 degrees. Now take another 12 exposures. Do this again at 60 degrees and lastly take 12 images with the flash rotating as tight to the lens as possible. For a better result try not to put the flash in the same space for each upward angle of illumination. Once all the images are taken, it is time to move into the software. Unfortunately, the software for this program is in
Lighting Setup
Side View Top View
its infancy and therefore can be a bit of an issue. With the next paragraphs and screen shots this article will walk through how to successfully make an .rti file without multiple failures.
RTI Builder SoftwareThis Software is certainly the most difficult part of the entire process and therefore could unecessarily lead to be the most time consuming.
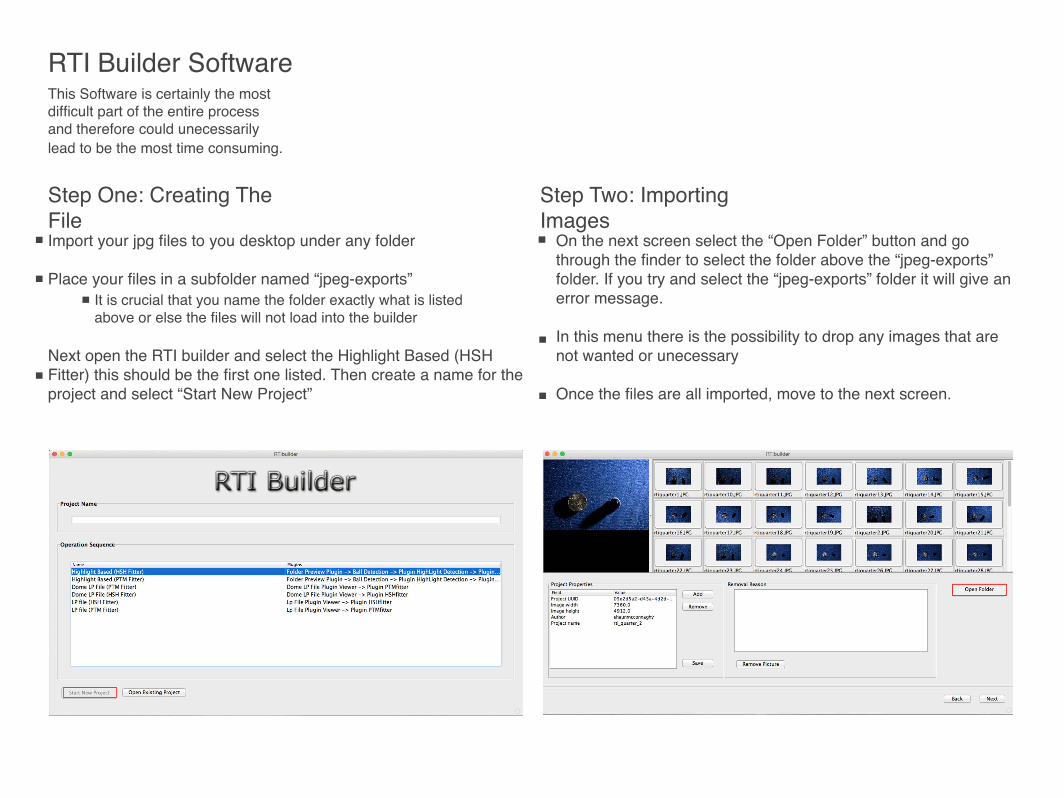
Step One: Creating The FileImport your jpg files to you desktop under any folder
Place your files in a subfolder named “jpeg-exports”
Next open the RTI builder and select the Highlight Based (HSH Fitter) this should be the first one listed. Then create a name for the project and select “Start New Project”
On the next screen select the “Open Folder” button and go through the finder to select the folder above the “jpeg-exports” folder. If you try and select the “jpeg-exports” folder it will give an error message.
In this menu there is the possibility to drop any images that are not wanted or unecessary
Once the files are all imported, move to the next screen.
Step Two: Importing Images
It is crucial that you name the folder exactly what is listed above or else the files will not load into the builder

On the next screen take your cursor and draw a box around your marble. Try to keep the box as tight to the marble without cropping any of it out.
Once you have the box dragged over the marble press the “Add Area” button and the box should turn from green to red. This is not an error; it is to show the selection has been made
Next press the “detect spheres” key Wait for the program to find the marble in all of your images.
Once completed proceed to the next screen
Step Three: Choosing the highlight detector Step Four: Alignment
Use the image scale to show the entire marble in the frame. Adjust the red target so it is in the center of marble and the make sure the circle is big/small enough for the marble.
Once your adjustments are competed press “Set New Center” and proceed to the next screen
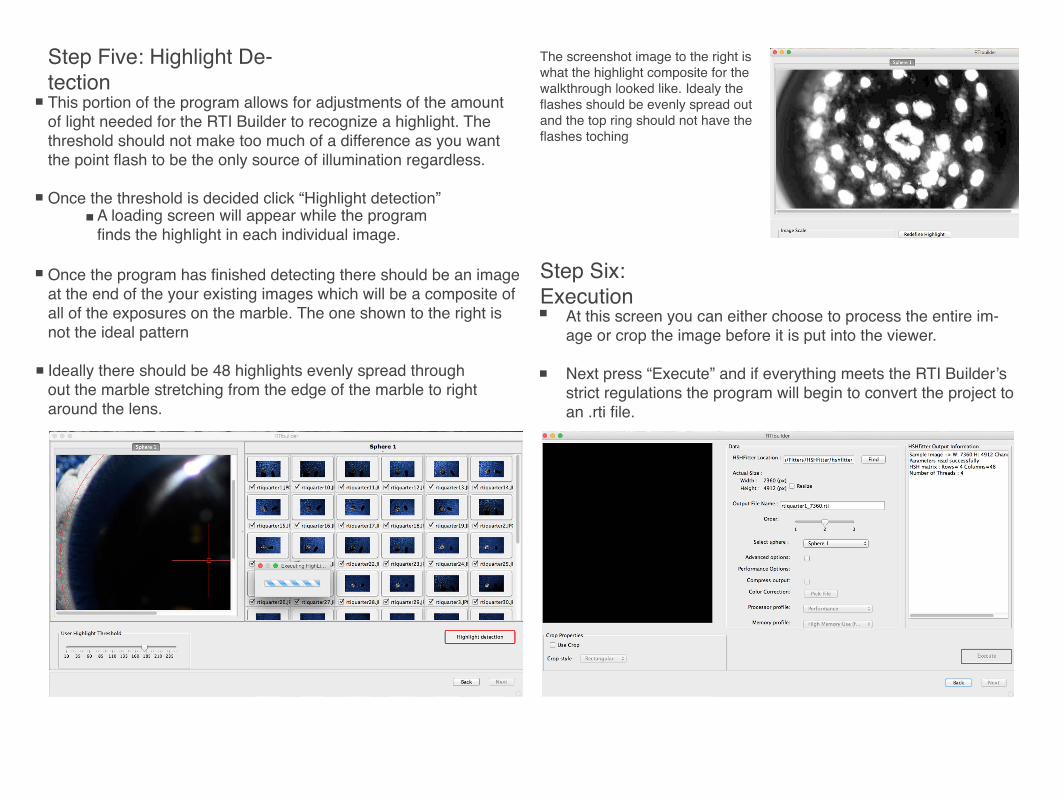
Step Five: Highlight De-tectionThis portion of the program allows for adjustments of the amount of light needed for the RTI Builder to recognize a highlight. The threshold should not make too much of a difference as you want the point flash to be the only source of illumination regardless.
Once the threshold is decided click “Highlight detection”
Once the program has finished detecting there should be an image at the end of the your existing images which will be a composite of all of the exposures on the marble. The one shown to the right is not the ideal pattern
Ideally there should be 48 highlights evenly spread throughout the marble stretching from the edge of the marble to right around the lens.
A loading screen will appear while the program finds the highlight in each individual image.
Step Six: Execution
At this screen you can either choose to process the entire im-age or crop the image before it is put into the viewer.
Next press “Execute” and if everything meets the RTI Builder’s strict regulations the program will begin to convert the project to an .rti file.
The screenshot image to the right is what the highlight composite for the walkthrough looked like. Idealy the flashes should be evenly spread out and the top ring should not have the flashes toching

RTI viewer SoftwareOnce the .rti file has been made this is the software to view and examine your image.
After the .rti file has been created, Open up the RTI viewer soft-ware. There is a folder icon in the top right area of the window, click this and find the .rti file that was just created.
Once the file has been loaded start moving your cursor around the green sphere and it should moving the lighting around accordingly. If you had any lighting gaps they will be apparent once you move the lighting.
If you bumped the camera or subject at all you will get some double images when you move the lighting around.
There is a drop down menu on the right side where you can select between the three different lighting types.
(above) The relation of the highlight in the green circle is where the light in the image is apearing. The highlight on the green sphere can be ad-justed freely by clicking and dragging with your mouse. There is also the option to zoom in for more detail.
(Above) The specular enhancement mode shows more contrast and detail for the subject. The amount of detail and contrast can be controlled with the three sliders underneath the sphrere. With this increased detail it is possible to see more small details along with scratches.
(Above) the Normals view shows where the planes face. Each of the three direc-tions is shown by a color. The normals feature allows the viewer to know where the each subject edge is facing. This can be especially helpful when there are no background cues.
After using this software, the advantages are apparently clear. It gives the viewer views of a subject while only needed one file. The software has so much potential to grow in the future. However, with this being such a new file type there are inherent bugs and draw backs that need to get tackled before it can be-come as common as something such as focus stacking.
Starting with the RTI builder software, the program needs to be re-programming to be more accepting filenames and folders. For instance the jpeg-exports folder is too specific of a proce-dure and is not clearly stated anywhere in the program. If the .rti builder used importing software like photo mechanic or even the same software as
Zerene Stacker, importing the images would be exponentially easier. Once in the program there are specifications that can cause the program to fail, which are not recognized until the last step is attempted. Wasting 5-10 minutes going through every step to get an error at the end can be extremely frustrating es-pecially when the error normally displayed is “Unknown Error”, this does not help the user solve the problem.
Overall the RTI software is able to create a unique medium for displaying subjects. while cur-rently it is used mainly for doc-umentation purposes it could have some interesting impli-cations on other subjects and testing out new options could yield interesting results.
Review of The Software
Do not let the marble cast a shadow on the subject, or visa versa.
Try to make the flashes as directional as possible. Small points on the marble result in better images
The more evenly spread out the flashes are the better
Capture in RAW+JPEG as the .rti file only takes JPEG Files.
Tips for Photographing
Cultural Heritage Imaging links
Home Webpage
RTI Builder Download
RTI Viewer Download
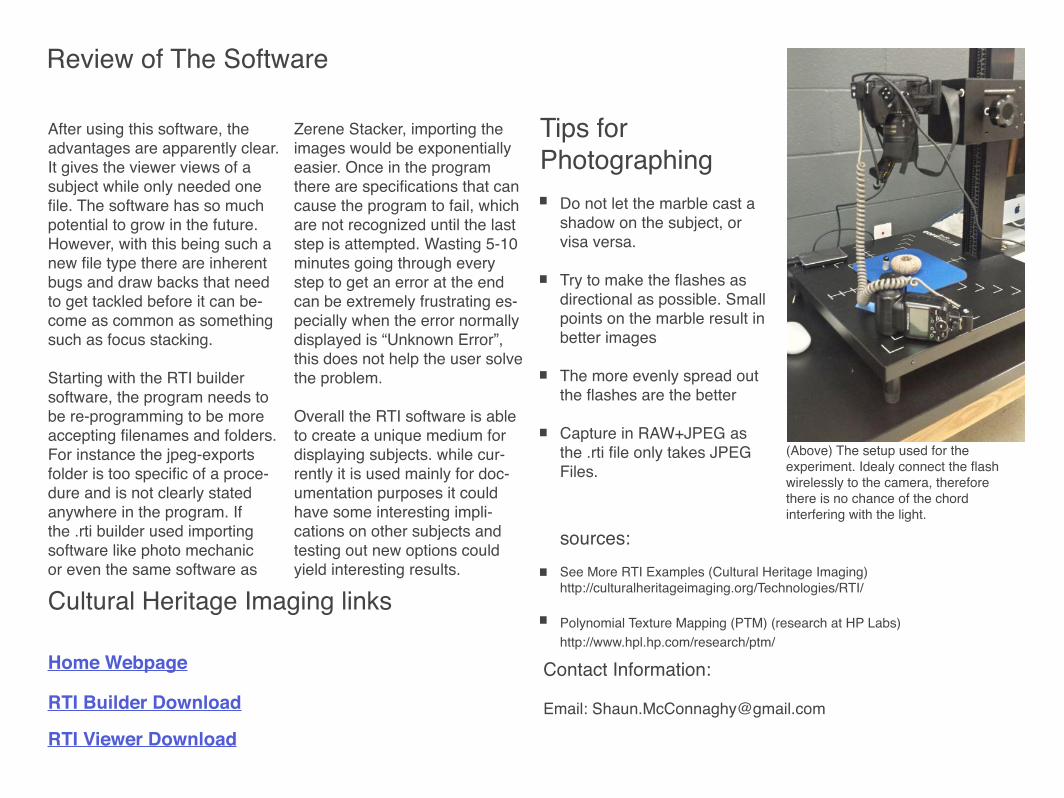
(Above) The setup used for the experiment. Idealy connect the flash wirelessly to the camera, therefore there is no chance of the chord interfering with the light.
sources:See More RTI Examples (Cultural Heritage Imaging)http://culturalheritageimaging.org/Technologies/RTI/
Polynomial Texture Mapping (PTM) (research at HP Labs)http://www.hpl.hp.com/research/ptm/
Contact Information:
Email: [email protected]