real com mode for nport to configure nport w2x50a to connect to a cisco 2100/2500/4400/5500/flex...
TRANSCRIPT
Copyright © 2014 Moxa Inc. Released on July 1, 2014
About Moxa
Moxa is a leading manufacturer of industrial networking, computing, and automation solutions. With over 25 years of industry experience, Moxa has connected more than 30 million devices worldwide and has a distribution and service network that reaches customers in more than 70 countries. Moxa delivers lasting business value by empowering industry with reliable networks and sincere service for automation systems. Information about Moxa’s solutions is available at www.moxa.com. You may also contact Moxa by email at [email protected].
How to Contact Moxa
Tel: +886-2-8919-1230 Fax: +886-2-8919-1231
How to Configure NPort W2x50A to Connect to a Cisco 2100/2500/4400/5500/Flex 7500 Series Wireless LAN Controller
Moxa Technical Support Team [email protected]
Contents 1. Introduction .................................................................................... 2
2. Applicable Products ........................................................................ 2
3. System Requirements ..................................................................... 2
4. System Overview ............................................................................ 2
5. Basic Configuration of the Cisco Controller ..................................... 3
5.1. Enable the WLAN Function .......................................................................... 3
6. Moxa NPort W2x50A Configuration ................................................. 4
6.1. Configuring the NPort W2x50A with the Configuration Wizard ......................... 4
7. Configuring Detailed WLAN Security Settings ................................. 7
7.1. No Security: Open System ......................................................................... 8
7.2. Lowest Security: WEP ................................................................................ 9
7.3. Higher Security: WPA-PSK/WPA2-PSK .........................................................10
7.4. Highest Security: WPA/WPA2 .....................................................................11

Moxa Tech Note Connecting NPort W2x50A to a Cisco WLC
Copyright © 2014 Moxa Inc. Page 2 of 15
1. Introduction This application note describes the corresponding settings of connection authentications for Moxa’s wireless NPort W2x50A series and a Cisco 2100/2500/4400/5500/Flex 7500 Series Wireless LAN Controller.
2. Applicable Products Product Line Model Names
NPort W2x50A Series NPort W2150A, NPort W2250A
3. System Requirements Description Model / File Name S/W Ver.
Cisco WLC WLC 2100/2500/4400/ 5500/Flex 7500 Series
7.0.235.0 or later
Cisco Lightweight AP AIR-LAP1141N-A-K9 (Boot Version) (IOS Version) (Mini IOS Version)
12.4.23.3 12.4(23c)JA5 3.0.51.0
Moxa NPort W2x50A series W2x50A FW Ver 1.7 or later
4. System Overview The test system architecture is shown below.
Moxa Tech Note Connecting NPort W2x50A to a Cisco WLC
Copyright © 2014 Moxa Inc. Page 3 of 15
5. Basic Configuration of the Cisco Controller 5.1. Enable the WLAN Function
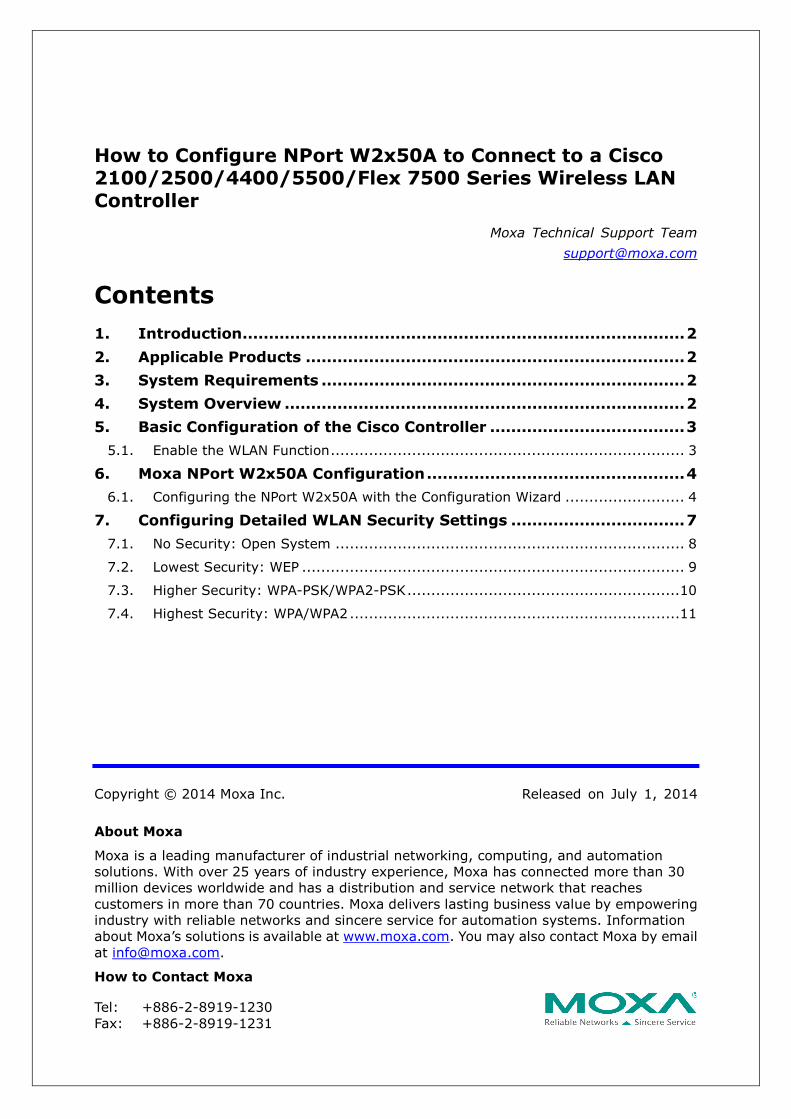
5.1.1. Log in to the controller’s web GUI.
5.1.2. Cick the WLANs tab. Select “Create New” to create a new profile for the wireless connection and then click Go.
5.1.3. Fill in the Profile Name and SSID and then click Apply.
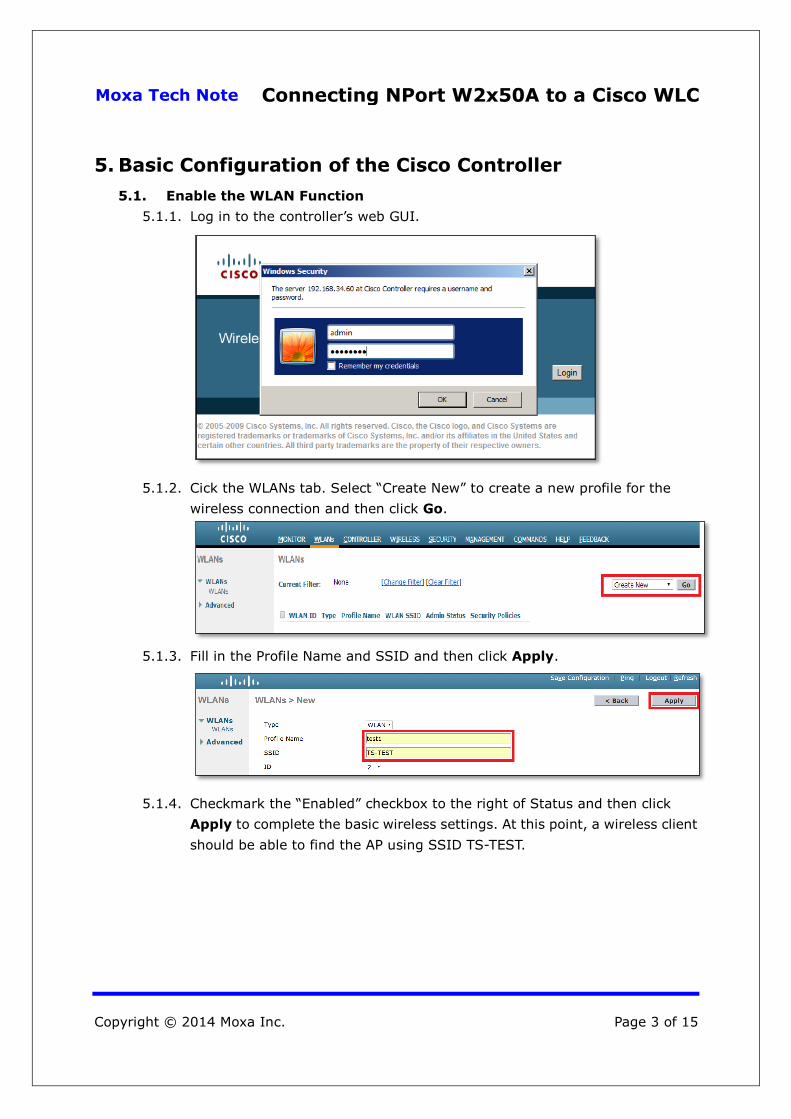
5.1.4. Checkmark the “Enabled” checkbox to the right of Status and then click Apply to complete the basic wireless settings. At this point, a wireless client should be able to find the AP using SSID TS-TEST.
Moxa Tech Note Connecting NPort W2x50A to a Cisco WLC
Copyright © 2014 Moxa Inc. Page 4 of 15
6. Moxa NPort W2x50A Configuration 6.1. Configuring the NPort W2x50A with the Configuration Wizard
6.1.1. Connect the NPort W2x50A to an Ethernet network and then power it on. Use the NPort Search Utility to locate the NPort W2x50A, and then double click on the selected NPort W2x50A to enter the web console.
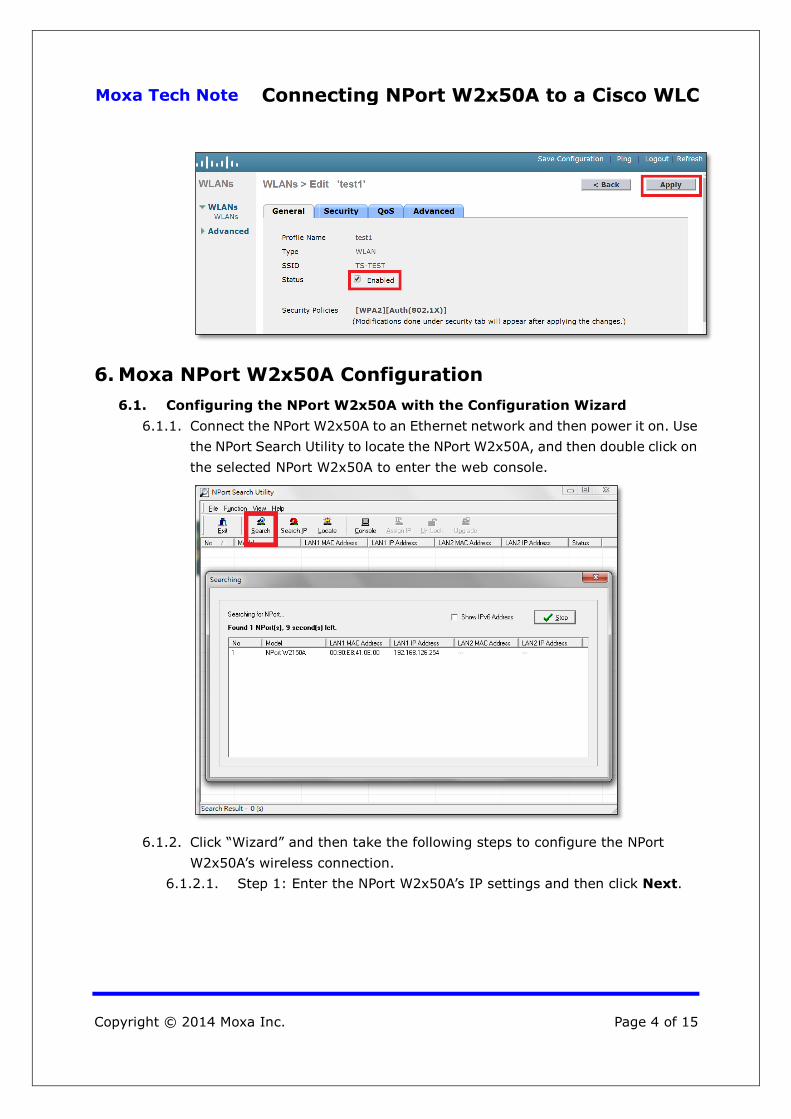
6.1.2. Click “Wizard” and then take the following steps to configure the NPort W2x50A’s wireless connection.
6.1.2.1. Step 1: Enter the NPort W2x50A’s IP settings and then click Next.
Moxa Tech Note Connecting NPort W2x50A to a Cisco WLC
Copyright © 2014 Moxa Inc. Page 5 of 15
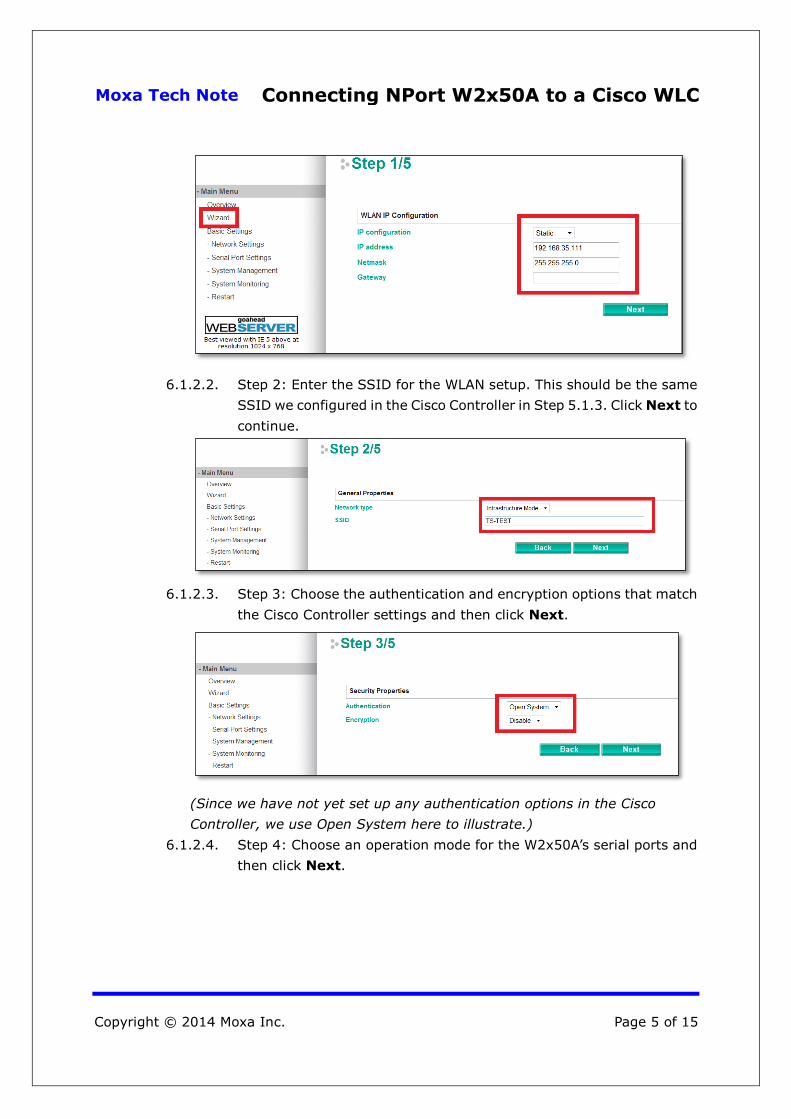
6.1.2.2. Step 2: Enter the SSID for the WLAN setup. This should be the same SSID we configured in the Cisco Controller in Step 5.1.3. Click Next to continue.
6.1.2.3. Step 3: Choose the authentication and encryption options that match
the Cisco Controller settings and then click Next.
(Since we have not yet set up any authentication options in the Cisco Controller, we use Open System here to illustrate.)
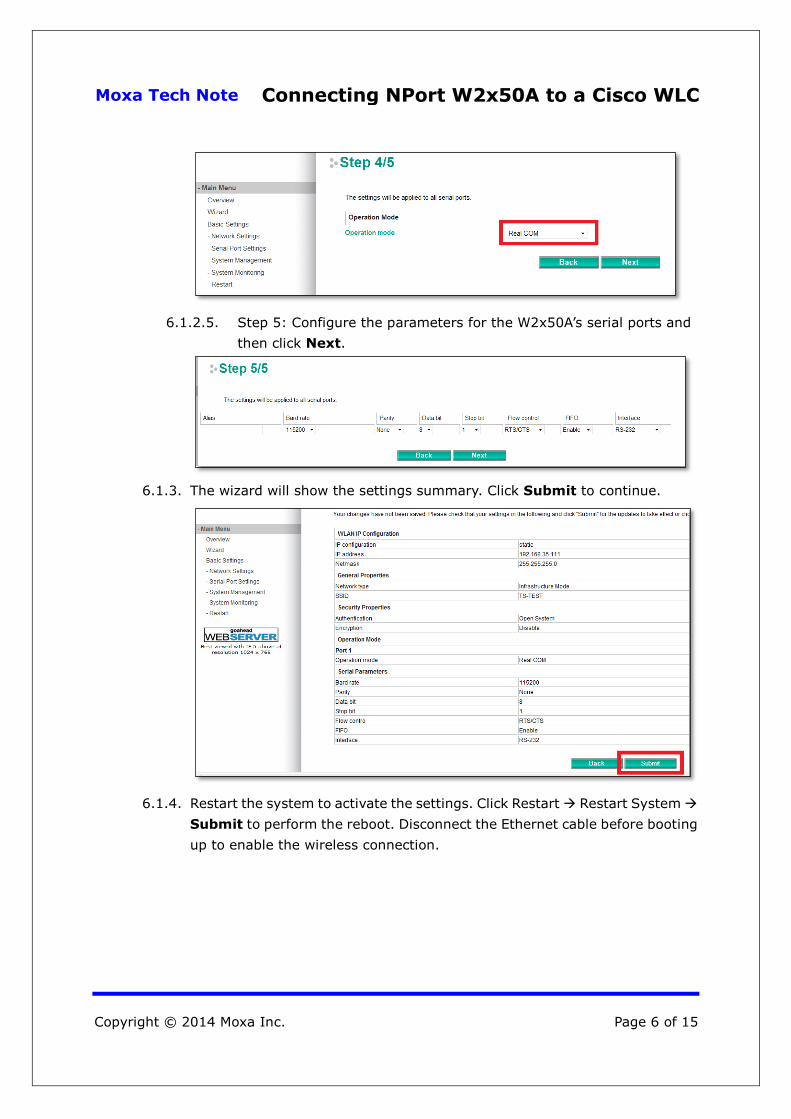
6.1.2.4. Step 4: Choose an operation mode for the W2x50A’s serial ports and then click Next.
Moxa Tech Note Connecting NPort W2x50A to a Cisco WLC
Copyright © 2014 Moxa Inc. Page 6 of 15
6.1.2.5. Step 5: Configure the parameters for the W2x50A’s serial ports and then click Next.
6.1.3. The wizard will show the settings summary. Click Submit to continue.
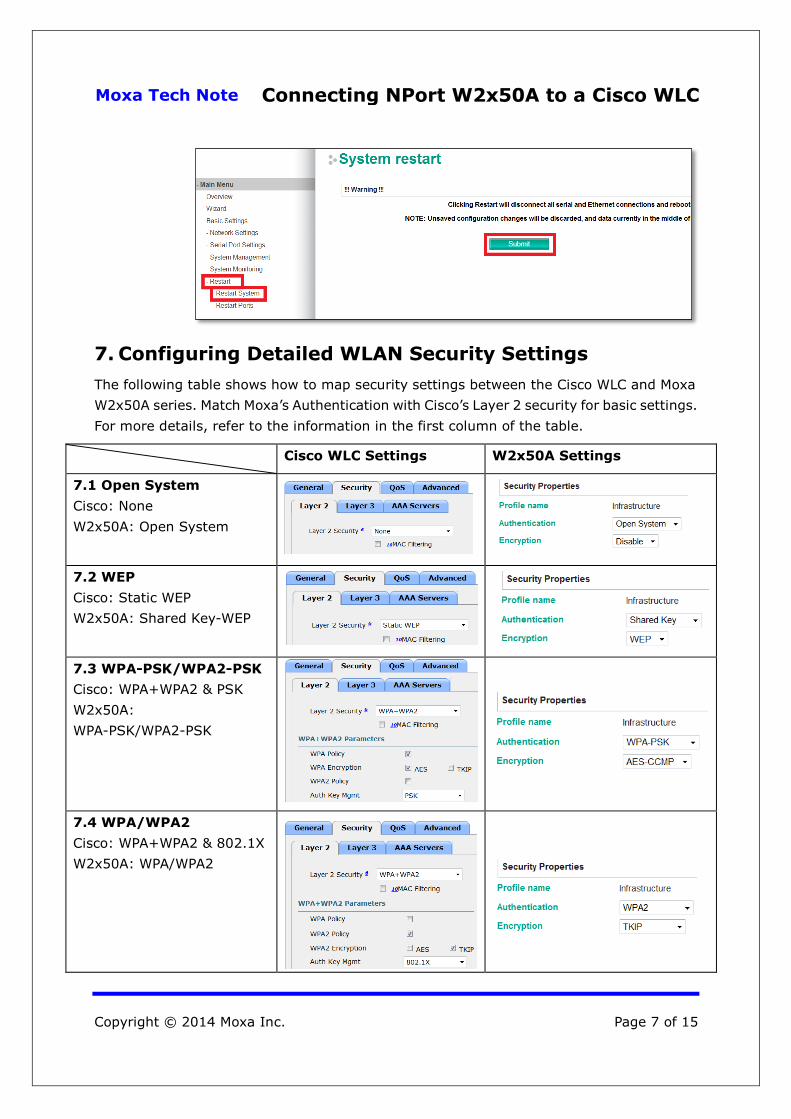
6.1.4. Restart the system to activate the settings. Click Restart Restart System Submit to perform the reboot. Disconnect the Ethernet cable before booting up to enable the wireless connection.
Moxa Tech Note Connecting NPort W2x50A to a Cisco WLC
Copyright © 2014 Moxa Inc. Page 7 of 15
7. Configuring Detailed WLAN Security Settings The following table shows how to map security settings between the Cisco WLC and Moxa W2x50A series. Match Moxa’s Authentication with Cisco’s Layer 2 security for basic settings. For more details, refer to the information in the first column of the table.
Cisco WLC Settings W2x50A Settings
7.1 Open System Cisco: None W2x50A: Open System
7.2 WEP Cisco: Static WEP W2x50A: Shared Key-WEP
7.3 WPA-PSK/WPA2-PSK Cisco: WPA+WPA2 & PSK W2x50A: WPA-PSK/WPA2-PSK
7.4 WPA/WPA2 Cisco: WPA+WPA2 & 802.1X W2x50A: WPA/WPA2
Moxa Tech Note Connecting NPort W2x50A to a Cisco WLC
Copyright © 2014 Moxa Inc. Page 8 of 15
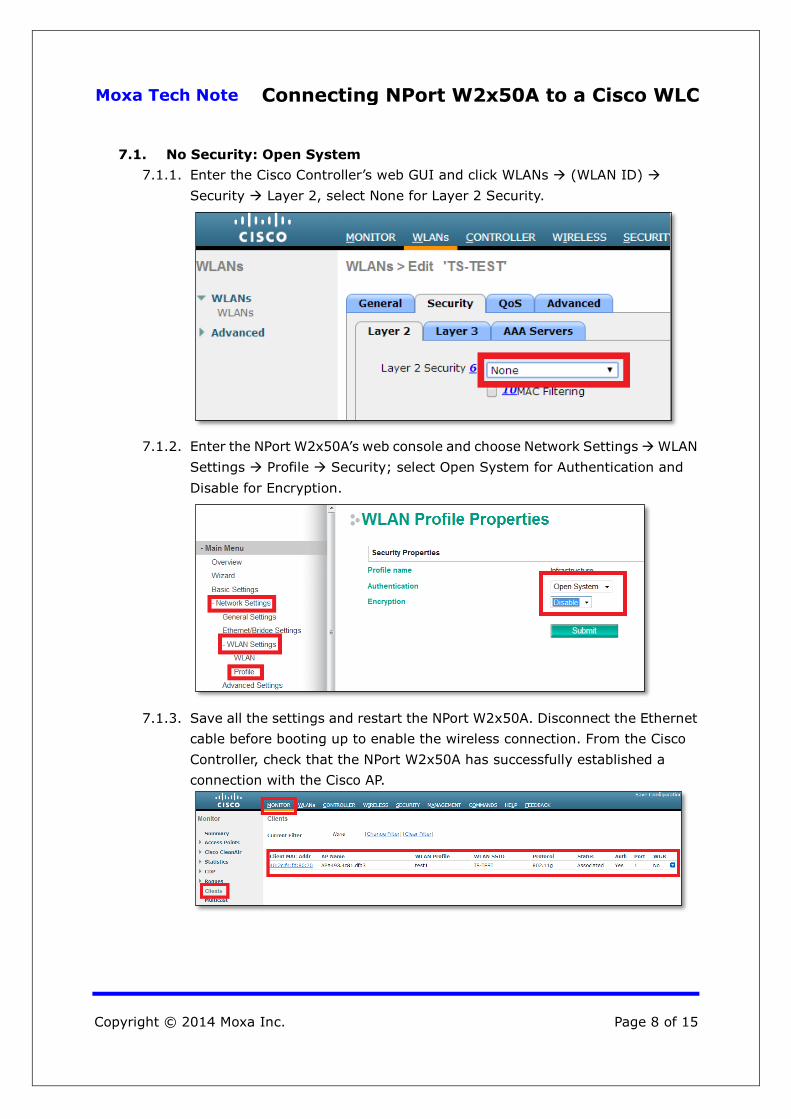
7.1. No Security: Open System 7.1.1. Enter the Cisco Controller’s web GUI and click WLANs (WLAN ID)
Security Layer 2, select None for Layer 2 Security.
7.1.2. Enter the NPort W2x50A’s web console and choose Network Settings WLAN Settings Profile Security; select Open System for Authentication and Disable for Encryption.
7.1.3. Save all the settings and restart the NPort W2x50A. Disconnect the Ethernet cable before booting up to enable the wireless connection. From the Cisco Controller, check that the NPort W2x50A has successfully established a connection with the Cisco AP.

Moxa Tech Note Connecting NPort W2x50A to a Cisco WLC
Copyright © 2014 Moxa Inc. Page 9 of 15
7.2. Lowest Security: WEP 7.2.1. Enter the Cisco Controller’s web GUI and click WLANs (WLAN ID)
Security Layer 2, and select Static WEP. Select Key Size, enter the Encryption Key, and checkmark Enabled to the right of Allow Shared Key Authentication.
(12345 is an example)
7.2.2. Enter the NPort W2x50A’s web console, choose Network Settings WLAN Settings Profile Security; select Shared Key for Authentication and WEP for Encryption.
Note: Choose 64-bit length to match the 40-bit setting in the Cisco Controller.
7.2.3. Save all the settings and restart the NPort W2x50A. Disconnect the Ethernet cable before booting up to enable the wireless connection. From the Cisco Controller, check that the NPort W2x50A has successfully established a connection with the Cisco AP.
Moxa Tech Note Connecting NPort W2x50A to a Cisco WLC
Copyright © 2014 Moxa Inc. Page 10 of 15
7.3. Higher Security: WPA-PSK/WPA2-PSK
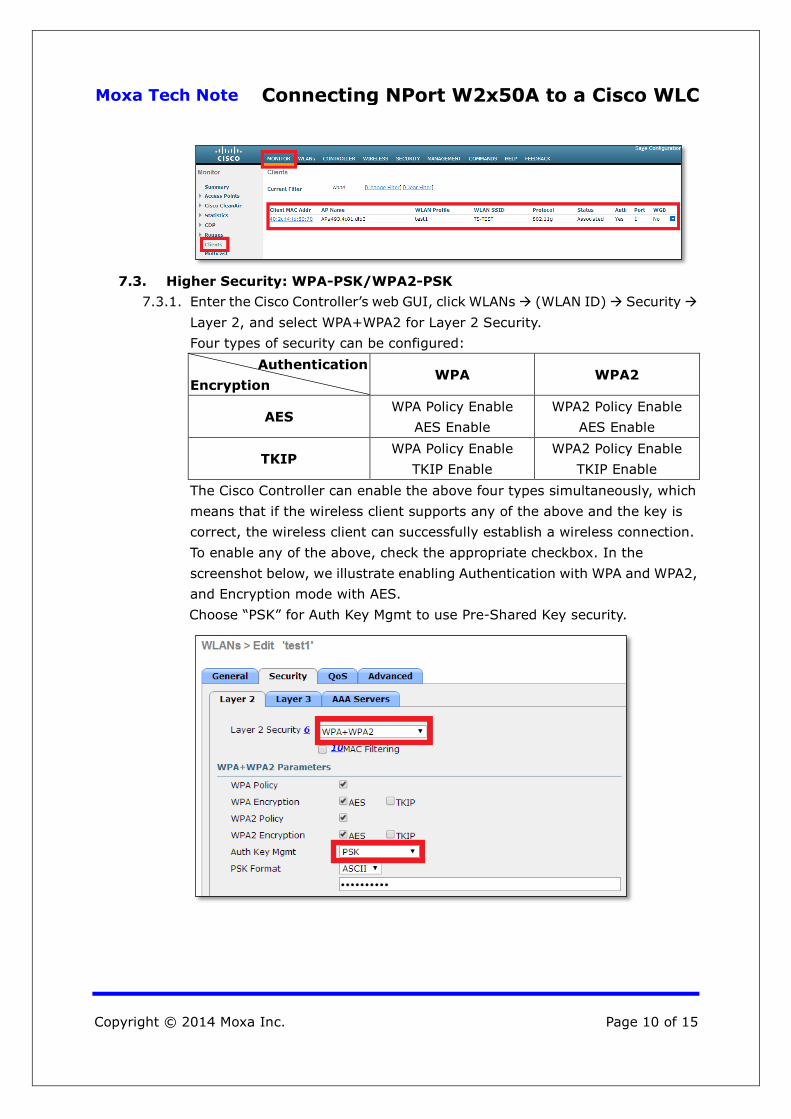
7.3.1. Enter the Cisco Controller’s web GUI, click WLANs (WLAN ID) Security Layer 2, and select WPA+WPA2 for Layer 2 Security. Four types of security can be configured:
Authentication Encryption
WPA WPA2
AES WPA Policy Enable
AES Enable WPA2 Policy Enable
AES Enable
TKIP WPA Policy Enable
TKIP Enable WPA2 Policy Enable
TKIP Enable The Cisco Controller can enable the above four types simultaneously, which means that if the wireless client supports any of the above and the key is correct, the wireless client can successfully establish a wireless connection. To enable any of the above, check the appropriate checkbox. In the screenshot below, we illustrate enabling Authentication with WPA and WPA2, and Encryption mode with AES. Choose “PSK” for Auth Key Mgmt to use Pre-Shared Key security.
Moxa Tech Note Connecting NPort W2x50A to a Cisco WLC
Copyright © 2014 Moxa Inc. Page 11 of 15
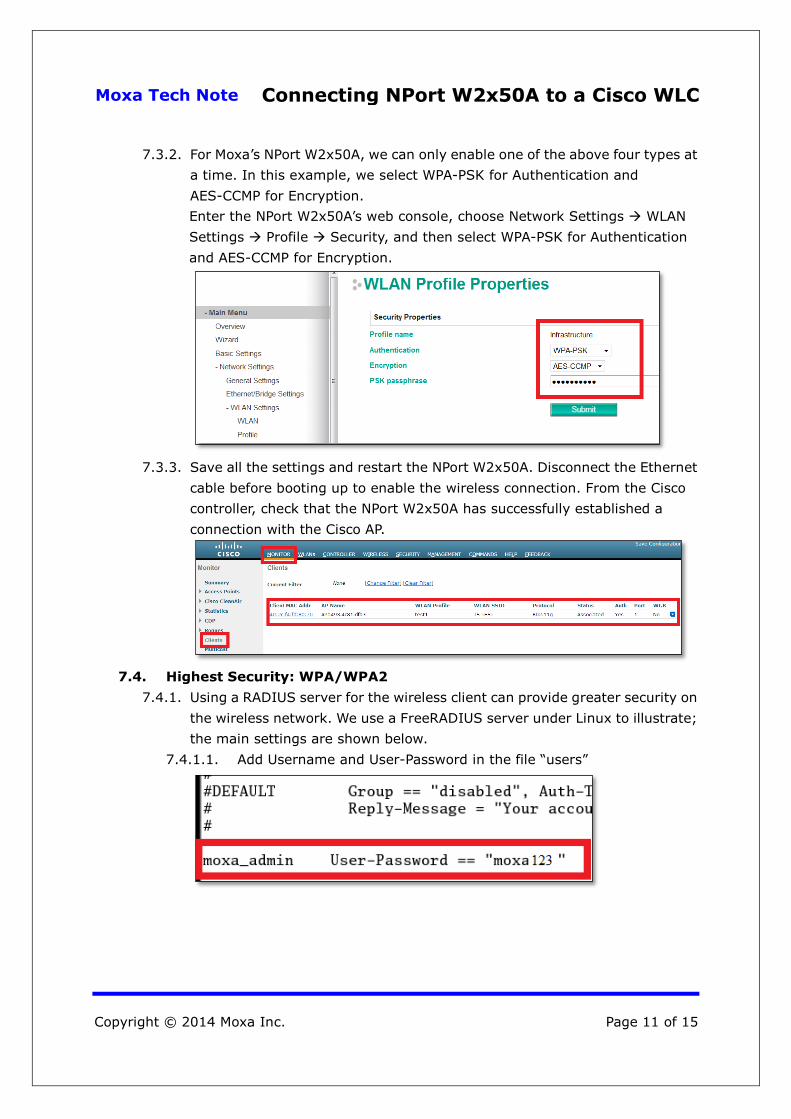
7.3.2. For Moxa’s NPort W2x50A, we can only enable one of the above four types at a time. In this example, we select WPA-PSK for Authentication and AES-CCMP for Encryption. Enter the NPort W2x50A’s web console, choose Network Settings WLAN Settings Profile Security, and then select WPA-PSK for Authentication and AES-CCMP for Encryption.
7.3.3. Save all the settings and restart the NPort W2x50A. Disconnect the Ethernet
cable before booting up to enable the wireless connection. From the Cisco controller, check that the NPort W2x50A has successfully established a connection with the Cisco AP.
7.4. Highest Security: WPA/WPA2
7.4.1. Using a RADIUS server for the wireless client can provide greater security on the wireless network. We use a FreeRADIUS server under Linux to illustrate; the main settings are shown below.
7.4.1.1. Add Username and User-Password in the file “users”
Moxa Tech Note Connecting NPort W2x50A to a Cisco WLC
Copyright © 2014 Moxa Inc. Page 12 of 15
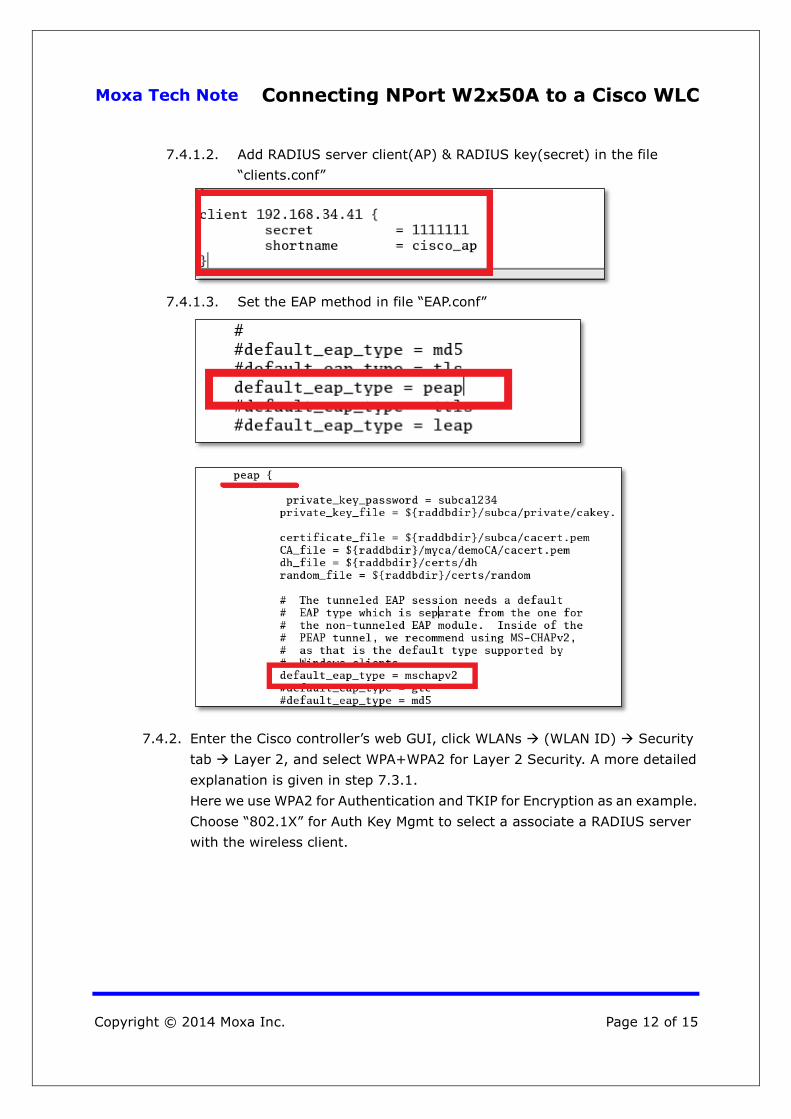
7.4.1.2. Add RADIUS server client(AP) & RADIUS key(secret) in the file “clients.conf”
7.4.1.3. Set the EAP method in file “EAP.conf”
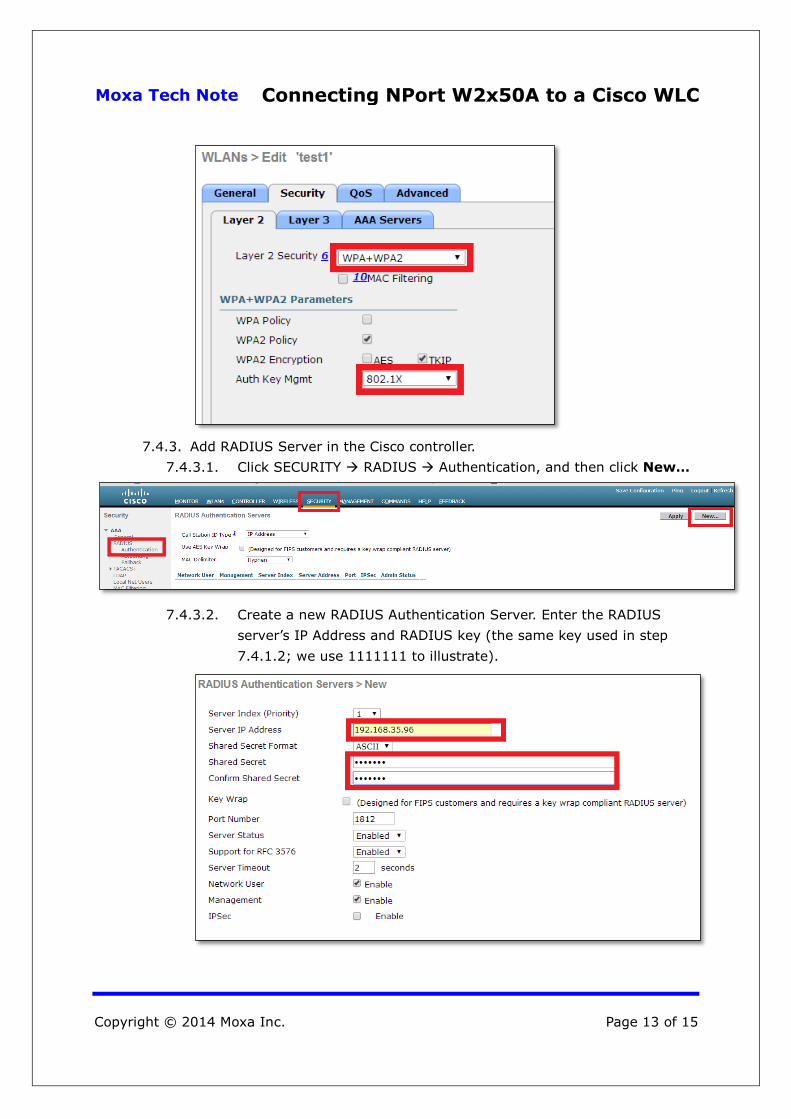
7.4.2. Enter the Cisco controller’s web GUI, click WLANs (WLAN ID) Security tab Layer 2, and select WPA+WPA2 for Layer 2 Security. A more detailed explanation is given in step 7.3.1. Here we use WPA2 for Authentication and TKIP for Encryption as an example. Choose “802.1X” for Auth Key Mgmt to select a associate a RADIUS server with the wireless client.
Moxa Tech Note Connecting NPort W2x50A to a Cisco WLC
Copyright © 2014 Moxa Inc. Page 13 of 15
7.4.3. Add RADIUS Server in the Cisco controller.
7.4.3.1. Click SECURITY RADIUS Authentication, and then click New…
7.4.3.2. Create a new RADIUS Authentication Server. Enter the RADIUS server’s IP Address and RADIUS key (the same key used in step 7.4.1.2; we use 1111111 to illustrate).
Moxa Tech Note Connecting NPort W2x50A to a Cisco WLC
Copyright © 2014 Moxa Inc. Page 14 of 15
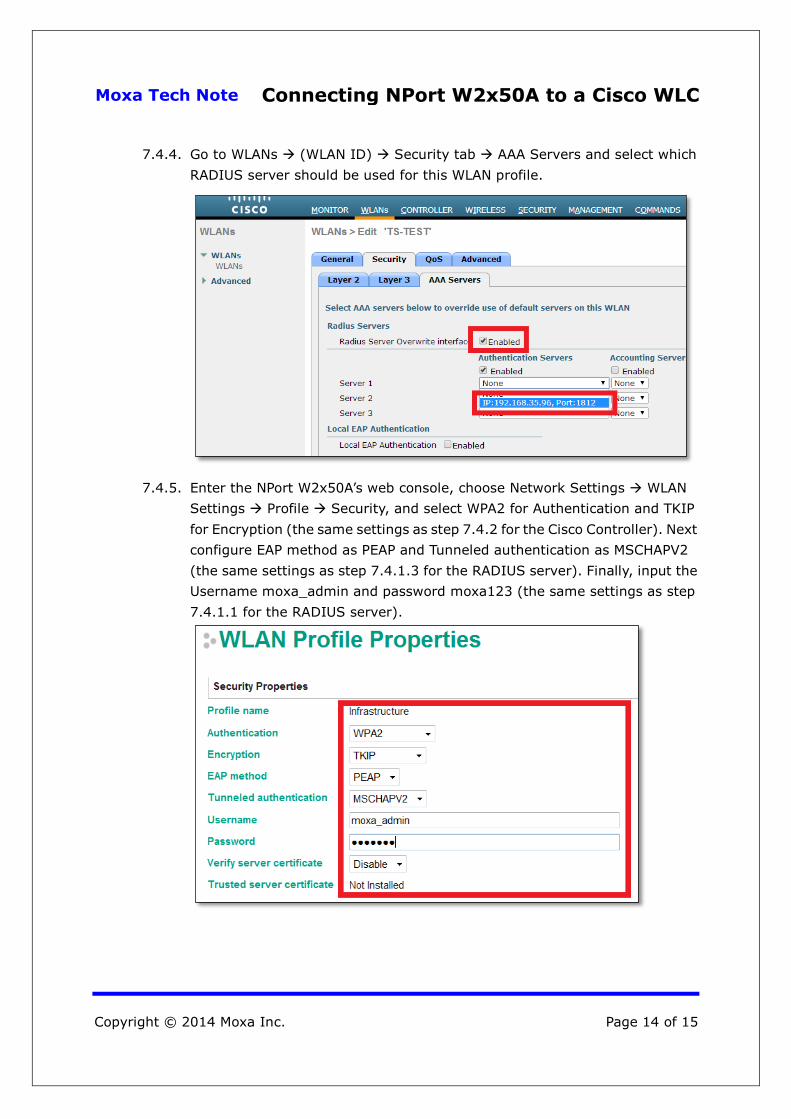
7.4.4. Go to WLANs (WLAN ID) Security tab AAA Servers and select which RADIUS server should be used for this WLAN profile.
7.4.5. Enter the NPort W2x50A’s web console, choose Network Settings WLAN Settings Profile Security, and select WPA2 for Authentication and TKIP for Encryption (the same settings as step 7.4.2 for the Cisco Controller). Next configure EAP method as PEAP and Tunneled authentication as MSCHAPV2 (the same settings as step 7.4.1.3 for the RADIUS server). Finally, input the Username moxa_admin and password moxa123 (the same settings as step 7.4.1.1 for the RADIUS server).
Moxa Tech Note Connecting NPort W2x50A to a Cisco WLC
Copyright © 2014 Moxa Inc. Page 15 of 15
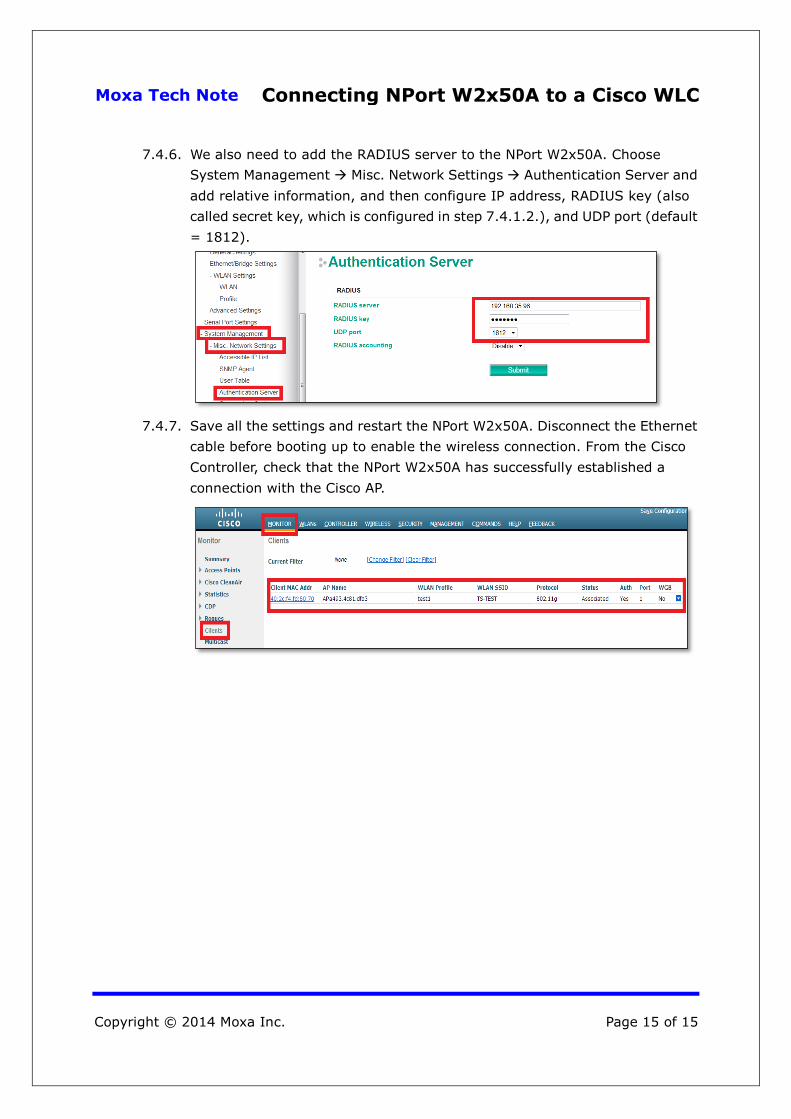
7.4.6. We also need to add the RADIUS server to the NPort W2x50A. Choose System Management Misc. Network Settings Authentication Server and add relative information, and then configure IP address, RADIUS key (also called secret key, which is configured in step 7.4.1.2.), and UDP port (default = 1812).
7.4.7. Save all the settings and restart the NPort W2x50A. Disconnect the Ethernet
cable before booting up to enable the wireless connection. From the Cisco Controller, check that the NPort W2x50A has successfully established a connection with the Cisco AP.