real-time monitoring workbench
DESCRIPTION
Real-time Monitoring WorkbenchTRANSCRIPT

IBM Cognos Real-time Monitoring WorkbenchVersion 10.1.1
User Guide
���

NoteBefore using this information and the product it supports, read the information in “Notices” on page 115.
Product Information
This document applies to IBM Cognos Real-time Monitoring Version 10.1.1 and may also apply to subsequentreleases. To check for newer versions of this document, visit the IBM Cognos Information Centers(http://publib.boulder.ibm.com/infocenter/cogic/v1r0m0/index.jsp).
Licensed Materials - Property of IBM
© Copyright IBM Corporation 2009, 2011.US Government Users Restricted Rights – Use, duplication or disclosure restricted by GSA ADP Schedule Contractwith IBM Corp.

Contents
Introduction . . . . . . . . . . . . . . . . . . . . . . . . . . . . . . . . . vii
Chapter 1. Getting started . . . . . . . . . . . . . . . . . . . . . . . . . . . . 1Launching Real-time Monitoring Workbench . . . . . . . . . . . . . . . . . . . . . . . . 1Working with the product . . . . . . . . . . . . . . . . . . . . . . . . . . . . . . . 2
Chapter 2. Setting up data sources for lookup tables . . . . . . . . . . . . . . . . 3Creating data source agents for lookup tables . . . . . . . . . . . . . . . . . . . . . . . . 4Creating source definitions for lookup table data . . . . . . . . . . . . . . . . . . . . . . . 8
Creating a JDBC source definition for lookup table data . . . . . . . . . . . . . . . . . . . . 8Creating a source definition for lookup table data from a Web Service . . . . . . . . . . . . . . . 9Creating a source definition for lookup table data from Salesforce tables . . . . . . . . . . . . . . 10Creating a source definition for lookup table data from a flat file . . . . . . . . . . . . . . . . 11Editing source definitions for lookup table data . . . . . . . . . . . . . . . . . . . . . . 11Lookup tables limitations . . . . . . . . . . . . . . . . . . . . . . . . . . . . . . 11Mapping JDBC data types . . . . . . . . . . . . . . . . . . . . . . . . . . . . . 12
Data caching . . . . . . . . . . . . . . . . . . . . . . . . . . . . . . . . . . . 13Setting caching parameters . . . . . . . . . . . . . . . . . . . . . . . . . . . . . 14Setting invalidation schedules . . . . . . . . . . . . . . . . . . . . . . . . . . . . 15
Chapter 3. Modeling business data . . . . . . . . . . . . . . . . . . . . . . . 17The Scenario Modeler . . . . . . . . . . . . . . . . . . . . . . . . . . . . . . . . 17Working with business views . . . . . . . . . . . . . . . . . . . . . . . . . . . . . 18
Creating views . . . . . . . . . . . . . . . . . . . . . . . . . . . . . . . . . 19Working with business activities and scenarios . . . . . . . . . . . . . . . . . . . . . . . 20Working with rules and alerts . . . . . . . . . . . . . . . . . . . . . . . . . . . . . 20
Setting an alert to invoke an external Web service . . . . . . . . . . . . . . . . . . . . . 21Rule details . . . . . . . . . . . . . . . . . . . . . . . . . . . . . . . . . . 21Alert details . . . . . . . . . . . . . . . . . . . . . . . . . . . . . . . . . . 22Limiting the number of alert instances . . . . . . . . . . . . . . . . . . . . . . . . . 24Setting an alert to invoke an external Web service . . . . . . . . . . . . . . . . . . . . . 24
Working with rule templates . . . . . . . . . . . . . . . . . . . . . . . . . . . . . 25Creating a rule template . . . . . . . . . . . . . . . . . . . . . . . . . . . . . . 25
Working with reportlets . . . . . . . . . . . . . . . . . . . . . . . . . . . . . . . 27
Chapter 4. Enabling support for business views . . . . . . . . . . . . . . . . . . 29Working with the Workbench . . . . . . . . . . . . . . . . . . . . . . . . . . . . . 29
Workbench folders . . . . . . . . . . . . . . . . . . . . . . . . . . . . . . . . 31Object dependencies and requirements . . . . . . . . . . . . . . . . . . . . . . . . . . 33Working with agents . . . . . . . . . . . . . . . . . . . . . . . . . . . . . . . . 33Working with data streams and lookup tables . . . . . . . . . . . . . . . . . . . . . . . . 34
Creating a data stream. . . . . . . . . . . . . . . . . . . . . . . . . . . . . . . 35Creating a lookup table . . . . . . . . . . . . . . . . . . . . . . . . . . . . . . 37Uploading a data file . . . . . . . . . . . . . . . . . . . . . . . . . . . . . . . 37Working with consolidated data streams. . . . . . . . . . . . . . . . . . . . . . . . . 38
Working with views . . . . . . . . . . . . . . . . . . . . . . . . . . . . . . . . 39View tabs . . . . . . . . . . . . . . . . . . . . . . . . . . . . . . . . . . . 39Creating and editing views . . . . . . . . . . . . . . . . . . . . . . . . . . . . . 39Creating view fields . . . . . . . . . . . . . . . . . . . . . . . . . . . . . . . 40Working with clauses . . . . . . . . . . . . . . . . . . . . . . . . . . . . . . . 42Maintaining events in a stateless view . . . . . . . . . . . . . . . . . . . . . . . . . 44Displaying SQL expressions . . . . . . . . . . . . . . . . . . . . . . . . . . . . . 45Viewing threshold relationships . . . . . . . . . . . . . . . . . . . . . . . . . . . 45
Working with cubes and dimensions . . . . . . . . . . . . . . . . . . . . . . . . . . . 46
© Copyright IBM Corp. 2009, 2011 iii

Creating dimensions . . . . . . . . . . . . . . . . . . . . . . . . . . . . . . . 47Creating lookup tables on data streams and views . . . . . . . . . . . . . . . . . . . . . 48Creating cubes . . . . . . . . . . . . . . . . . . . . . . . . . . . . . . . . . 49Cube threshold relationships . . . . . . . . . . . . . . . . . . . . . . . . . . . . 49
Working with UDF and JAR files . . . . . . . . . . . . . . . . . . . . . . . . . . . . 50JAR Files folder . . . . . . . . . . . . . . . . . . . . . . . . . . . . . . . . . 50User defined functions folder . . . . . . . . . . . . . . . . . . . . . . . . . . . . 51
Creating external links. . . . . . . . . . . . . . . . . . . . . . . . . . . . . . . . 51Creating process definitions . . . . . . . . . . . . . . . . . . . . . . . . . . . . . . 52Creating drill-through targets . . . . . . . . . . . . . . . . . . . . . . . . . . . . . 54Exporting selected objects . . . . . . . . . . . . . . . . . . . . . . . . . . . . . . 56
Chapter 5. Managing system administration. . . . . . . . . . . . . . . . . . . . 59Managing users . . . . . . . . . . . . . . . . . . . . . . . . . . . . . . . . . . 59Managing roles . . . . . . . . . . . . . . . . . . . . . . . . . . . . . . . . . . 60Viewing the external processes list. . . . . . . . . . . . . . . . . . . . . . . . . . . . 61Working with system settings . . . . . . . . . . . . . . . . . . . . . . . . . . . . . 62
Business Insight Integration . . . . . . . . . . . . . . . . . . . . . . . . . . . . . 62Checkpoint Configuration . . . . . . . . . . . . . . . . . . . . . . . . . . . . . 63Custom Branding . . . . . . . . . . . . . . . . . . . . . . . . . . . . . . . . 65Encryption Configuration. . . . . . . . . . . . . . . . . . . . . . . . . . . . . . 65Execution Throttling . . . . . . . . . . . . . . . . . . . . . . . . . . . . . . . 66Geography Maps . . . . . . . . . . . . . . . . . . . . . . . . . . . . . . . . 67IBM Cognos Business Intelligence . . . . . . . . . . . . . . . . . . . . . . . . . . . 68JDBC Access to Views and Cubes . . . . . . . . . . . . . . . . . . . . . . . . . . . 69LDAP . . . . . . . . . . . . . . . . . . . . . . . . . . . . . . . . . . . . 70Logging . . . . . . . . . . . . . . . . . . . . . . . . . . . . . . . . . . . 73Logging Levels . . . . . . . . . . . . . . . . . . . . . . . . . . . . . . . . . 76Memory Monitoring . . . . . . . . . . . . . . . . . . . . . . . . . . . . . . . 76Notifications . . . . . . . . . . . . . . . . . . . . . . . . . . . . . . . . . . 76Session Time-out Configuration. . . . . . . . . . . . . . . . . . . . . . . . . . . . 77SMTP Configuration . . . . . . . . . . . . . . . . . . . . . . . . . . . . . . . 77System Control . . . . . . . . . . . . . . . . . . . . . . . . . . . . . . . . . 78Thread Configurations. . . . . . . . . . . . . . . . . . . . . . . . . . . . . . . 78User Interface . . . . . . . . . . . . . . . . . . . . . . . . . . . . . . . . . 79User Management and Authentication . . . . . . . . . . . . . . . . . . . . . . . . . 79
Importing and exporting metadata . . . . . . . . . . . . . . . . . . . . . . . . . . . 81Exporting metadata. . . . . . . . . . . . . . . . . . . . . . . . . . . . . . . . 81Importing metadata . . . . . . . . . . . . . . . . . . . . . . . . . . . . . . . 83
Understanding logging . . . . . . . . . . . . . . . . . . . . . . . . . . . . . . . 85Viewing logging destinations . . . . . . . . . . . . . . . . . . . . . . . . . . . . 86Understanding logging modules . . . . . . . . . . . . . . . . . . . . . . . . . . . 87Understanding logging levels . . . . . . . . . . . . . . . . . . . . . . . . . . . . 87Assigning log levels to loggers and destinations . . . . . . . . . . . . . . . . . . . . . . 88Monitoring the logs . . . . . . . . . . . . . . . . . . . . . . . . . . . . . . . 89
Chapter 6. Configuring interoperability between Real-time Monitoring and IBM CognosBI . . . . . . . . . . . . . . . . . . . . . . . . . . . . . . . . . . . . . . 91Enabling single sign-on with IBM Cognos BI . . . . . . . . . . . . . . . . . . . . . . . . 91Using Real-time Monitoring cubes as data sources in IBM Cognos BI . . . . . . . . . . . . . . . . 93
Creating a data source connection to a Real-time Monitoring cube . . . . . . . . . . . . . . . . 93Creating and publishing a package based on a Real-time Monitoring cube . . . . . . . . . . . . . 94Testing the Real-time Monitoring package in IBM Cognos studios . . . . . . . . . . . . . . . . 95
Using Real-time Monitoring views as data sources in IBM Cognos BI . . . . . . . . . . . . . . . . 96Creating a data source connection to a Real-time Monitoring view on Windows . . . . . . . . . . . 96Creating a data source connection to a Real-time Monitoring view on other operating systems . . . . . . 97Creating and publishing a package based on a Real-time Monitoring view . . . . . . . . . . . . . 99Testing the Real-time Monitoring package in IBM Cognos studios . . . . . . . . . . . . . . . . 100
Configuring the system for integration with Business Insight . . . . . . . . . . . . . . . . . . 101
iv IBM Cognos Real-time Monitoring Workbench Version 10.1.1: User Guide

Chapter 7. Troubleshooting . . . . . . . . . . . . . . . . . . . . . . . . . . 105Authentication issues when using Tivoli Directory Server . . . . . . . . . . . . . . . . . . . 105Authentication issues when using Active Directory . . . . . . . . . . . . . . . . . . . . . . 105ODBC driver issues when creating a data source connection to a Real-time Monitoring view on 64-bit Windowssystems . . . . . . . . . . . . . . . . . . . . . . . . . . . . . . . . . . . . 106Unable to remove external users and roles after initial synchronization . . . . . . . . . . . . . . . 106Custom import and export of tasks only does not import tasks . . . . . . . . . . . . . . . . . . 107Avoiding cache issues when integrating RTM with Business Insight . . . . . . . . . . . . . . . . 107
Appendix. Geography map tuning . . . . . . . . . . . . . . . . . . . . . . . 109Improving geocoder accuracy . . . . . . . . . . . . . . . . . . . . . . . . . . . . . 109Extending geography map support . . . . . . . . . . . . . . . . . . . . . . . . . . . 109
IGeocoder interface . . . . . . . . . . . . . . . . . . . . . . . . . . . . . . . 110GeoPoint class . . . . . . . . . . . . . . . . . . . . . . . . . . . . . . . . . 112
Notices . . . . . . . . . . . . . . . . . . . . . . . . . . . . . . . . . . . 115
Index . . . . . . . . . . . . . . . . . . . . . . . . . . . . . . . . . . . . 119
Contents v

vi IBM Cognos Real-time Monitoring Workbench Version 10.1.1: User Guide

Introduction
This document is intended for use with IBM® Cognos® Real-time MonitoringWorkbench.
The Real-time Monitoring Workbench allows you to access various data sources,perform data aggregations and calculations, and create the objects to display yourinformation on the Real-time Monitoring Dashboard. For information about usingthe dashboard, see the IBM Cognos Real-time Monitoring Dashboard User Guide.
Audience
This document is intended for administrators, data modelers, and applicationdevelopers. Developers and data modelers use this application to create views,rules, and alerts that model their business. Administrators use this application tomanage users and application servers.
Finding information
To find IBM Cognos product documentation on the web, including all translateddocumentation, access one of the IBM Cognos Information Centers. Updates toRelease Notes are published directly to Information Centers.
You can also read PDF versions of the product release notes and installation guidesdirectly from IBM Cognos product disks.
Accessibility features
Accessibility features help users who have a physical disability, such as restrictedmobility or limited vision, to use information technology products. This producthas accessibility features when it is integrated with IBM Cognos Business Insight.If not integrated with IBM Cognos Business Insight, it has no accessibility features.This product supports keyboard navigation and screen readers when metrics areviewed in Business Insight. For information on accessibility features when theproduct is used with IBM Cognos Business Insight, see the accessibility section inthe IBM Cognos Dashboard User Guide.
Samples disclaimer
Sample files may contain fictional data manually or machine generated, factualdata compiled from academic or public sources, or data used with permission ofthe copyright holder, for use as sample data to develop sample applications.Product names referenced may be the trademarks of their respective owners.Unauthorized duplication is prohibited.
Forward-looking statements
This documentation describes the current functionality of the product. Referencesto items that are not currently available may be included. No implication of anyfuture availability should be inferred. Any such references are not a commitment,promise, or legal obligation to deliver any material, code, or functionality. Thedevelopment, release, and timing of features or functionality remain at the solediscretion of IBM.
© Copyright IBM Corp. 2009, 2011 vii

viii IBM Cognos Real-time Monitoring Workbench Version 10.1.1: User Guide

Chapter 1. Getting started
Your system administrator must first install, configure, and start the IBM CognosReal-time Monitoring server components. To receive events, or to retrieve lookuptable data, the servers must locate and collect the data. For example, to access aDBMS to retrieve lookup table data, the servers must be configured with the accessname and password for the database.
For more information, see the IBM Cognos Real-time Monitoring Installation andConfiguration Guide.
Launching Real-time Monitoring WorkbenchIf you are a system administrator, you access Real-time Monitoring Workbench firstso that you can configure the system settings before other users access the product.
Before you begin
Before launching IBM Cognos Real-time Monitoring Workbench, ensure that thefollowing conditions are met:v Your Web browser is Microsoft Internet Explorer 6.0 or newer.v Real-time Monitoring servers are running.v JavaScript is enabled.v Adobe Flash version 9 or later is installed.
About this task
You must use the rtmadmin user account with the password manager to log in.For more information, see the section about configuring Real-time Monitoring afterinstallation in the Installation and Configuration Guide.
When safe mode is enabled, Real-time Monitoring Workbench displays a bannerindicating that the system is in safe mode and that all events are paused. Datastreaming stops when the system is in safe mode. For more information, see theReal-time Monitoring Installation and Configuration Guide.
Procedure1. In your Web browser, type the following URL, where servername represents the
host computer name and port number:http://servername/cognos/realtime/landing/landingpage.htmThe Real-time Monitoring Welcome page opens.
2. Depending on your role as an administrator, modeler, or developer, click one ofthe following links:v Administer real-time content.v Model my real-time data.v Create my real-time dashboard.
3. Log in using the user name and password assigned by your administrator.
© Copyright IBM Corp. 2009, 2011 1

Note: If single sign-on between IBM Cognos Business Intelligence (BI) andReal-time Monitoring is enabled, and you are already logged in to IBM CognosBI, the login page does not appear. You are automatically logged in toReal-time Monitoring Workbench.
Working with the productYou can perform the following tasks using IBM Cognos Real-time MonitoringWorkbench.v Setting up user accounts.
Everyone who uses Real-time Monitoring Workbench or Real-time MonitoringDashboard needs a user account. Users can view their account information byclicking Account Settings in the application.System administrators can add and modify user accounts using theAdministration Console .
v Creating and modifying agents.Agents collect events and lookup table data to make it available to Real-timeMonitoring.System administrators create and modify agents using the AdministrationConsole.
v Creating data streams and lookup tables.Agents insert data into data stream tables and lookup tables. These tables are thesource of the business views that present and aggregate the information.You can create data streams and lookup tables using Workbench.
v Using business views.Business views contain, aggregate, and provide data stream and lookup tableinformation.You can create complex business views using Scenario Modeler.
v Creating scenarios, rules, and alerts.Real-time Monitoring allows you to identify exceptional business events andnotify users about the activity.You do this by creating scenarios, rules, and alerts in Scenario Modeler. You canalso use Scenario Modeler to define reportlets that provide metrics associatedwith the events..
2 IBM Cognos Real-time Monitoring Workbench Version 10.1.1: User Guide

Chapter 2. Setting up data sources for lookup tables
Lookup table data complements event data by providing additional, meaningfulinformation. For example, an event instance may include a product number, butnot a product description. Data sources for lookup tables make this additionalinformation available for inclusion in views.
Data sources for lookup tables have two parts: the agent, which references a JDBCconnection or Web service invocation, and the lookup table definition, whichconfigures the input and output for the retrieved data.
When a data stream is processed in IBM Cognos Real-time Monitoring, the dataavailable from the data stream source may be limited. For example, a view that isprocessing a purchase order may have received a product identification numberand the event data. By joining information from complementary data sources forlookup tables, the view can include additional information, such as productdescription, manufacturer, and other purchase order information. In the viewdefinition, a WHERE clause, as in the following statement, would join the definitionof the lookup table to the data stream table:WHERE datastream.product_id = lookuptable.suppliers_of_product_id
When the view performs this join, it passes the ID from the data stream to thedefinition of the lookup table. If the matching supplier data is already in thelookup table cache, the definition uses that data and passes it to the business view.If the data is not already in memory, the ID is passed to an agent (either as an SQLquery or by value for a stored procedure), which sends data to the DBMS or a Webservice for processing. The result of the query is then loaded into the definition forthe lookup table, and subsequently included in the business view.
The following diagram illustrates the process described above. The lookup tablecontains data that matches some ID in the view. The data comes from a cache,which originally comes from some external source, such as a DBMS.
© Copyright IBM Corp. 2009, 2011 3

The source for the lookup table may be a database accessed through a JDBCconnection, or a business application accessed through a Web service.
Creating data source agents for lookup tablesTo set up a data source for lookup table data, you must first create an agent thatimplements the data source connection.
You can create several types of agents; however, when setting up data sources forlookup tables, you are limited to the following types:v JDBC
Enables you to retrieve lookup table data from databases such as Oracle, MSSQLServer, DB2®, Sybase, and other databases.Note: You must configure a corresponding JNDI definition for the applicationserver. For more information, see the Real-time Monitoring Installation andConfiguration Guide.Specify the following attributes for this agent:
Attribute Description
Name Identifies the agent. This name must beunique among agents.
Status Specifies whether the agent is enabled ordisabled.
Save in Specifies the folder in which to save theagent. The default is Public Folders. ClickChoose Folder to select a different folder.
Description Specifies a description that may contain anycharacters. This parameter is optional.
Database Type Identifies the DBMS vendor as DB2, Oracle,SQL Server, Sybase, or PostgreSQL.
User name Specifies the user name that is used toconnect to the DBMS. The users must havequery access rights.
1. An event comes from the data stream to the business view.
2. The view looks for additional information from the lookup table. If the data is in the lookup table, it is returnedto the view.
3. If the data is not in the lookup table, a query is sent to the agent.
4. The agent queries to the data source.
5. The data is returned to the agent from the data source.
6. The agent provides the result rows to the lookup table.
7. The view uses the data from the result set rows.
4 IBM Cognos Real-time Monitoring Workbench Version 10.1.1: User Guide

Attribute Description
Password Specifies the password associated with theuser name. If you do not specify thepassword, the agent uses the passwordspecified in the JDBC Source configurationdefinition in the application server.
Max Rows Per Query Specifies the maximum number of rows toreturn as the query result. This preventsusers from returning exceptionally largeresults that impact the DBMS.
Type of JDBC Connection Describes how to connect to the JDBCdatabase in the application server.
The Data source-based connection connectsto a JDBC database pool through a JNDIconnection.
The URL-based connection connects to aJDBC source through a URL. Do not use thistype of connection for IBM WebSphere®.
JNDI name for JDBC Source (Datasource-based only)
Specifies the name of the data source to useas a connection to the database. The name isin JNDI form, for example,com.now.products.ProductSource. A sourcegets its connection from a pool ofconnections that the application servermaintains. The server keeps the connectionsopen to reduce delays when establishing aconnection.Note: You must configure the connectionpool as a non-transactional pool.
JDBC URL (URL-based only) Specifies the URL that maps to the JDBCconnection that is configured in theapplication server that is running Real-timeMonitoring. Refer to your JDBC driverdocumentation for the appropriate format ofthis URL.
JDBC Driver Class (URL-based only) Specifies the JDBC driver to use. This drivermust reside in the classpath of theapplication server running Real-timeMonitoring. Refer to your JDBC driverdocumentation for the appropriate classname of the JDBC driver.
Chapter 2. Setting up data sources for lookup tables 5

Attribute Description
JNDI properties (Datasource-based only) Specifies the optional and additional Javanaming and directory interface (JNDI)properties necessary to create or maintainthe agent for the JDBC source. Thesename/value pairs allow you to specify JDBCproperties. The names are either one of theshortcuts listed below, or a JNDI recognizedproperty. The agent recognizes the followingnames as shortcuts to JNDI properties:
- factory maps toINITIAL_CONTEXT_FACTORY.
- provider maps to PROVIDER_URL.
- security_credentials maps toSECURITY_CREDENTIALS.
- security_principal maps toSECURITY_PRINCIPAL.
Connection Properties (URL-based only) Specifies the optional and additionalconnection properties necessary to create ormaintain the agent for the JDBC source.These name-value pairs allow you to specifyproperties for the JDBC connection.
v Web Service
Enables you to retrieve lookup table data from a Web service invocation.Specify the following attributes for this agent:
Attribute Description
Name Identifies the agent. This name must beunique among agents.
Status Specifies whether the agent is enabled ordisabled.
Save in Specifies the folder in which to save theagent. The default is Public Folders. ClickChoose Folder to select a different folder.
Description Specifies a description that may contain anycharacters. This parameter is optional.
URL Specifies the HTTP location of the Webservice definition language file (WSDL) thatdescribes the service, the data it provides,and how to exchange data with the service.The data that is returned must be a SOAPdoc-style message. RPC binding is notsupported.
User name Specifies the user name that is used toconnect to the service. This parameter ispassed to the server when the serverrequires a user name. This parameter isoptional.
6 IBM Cognos Real-time Monitoring Workbench Version 10.1.1: User Guide

Attribute Description
Password Specifies the user password that is used toconnect to the service. This parameter ispassed to the server when the serverrequires a password. This parameter isoptional.
v Salesforce
Allows you to retrieve lookup table data from Salesforce tables.Specify the following attributes for this agent:
Salesforce Description
Name Identifies the agent. This name must beunique among agents.
Description Specifies the description that may containany characters. This parameter is optional.
Status Specifies whether the agent is enabled ordisabled.
URL Specifies the HTTP location of the Webservice definition language file (WSDL) thatdescribes the service, the data it provides,and how to exchange data with the service.The data that is returned must be a SOAPdoc-style message. RPC binding is notsupported.
User name Specifies the user name that is used toconnect to the service. This parameter ispassed to the server when the serverrequires a user name.
Password Specifies the user password that is used toconnect to the service. This parameter ispassed to the server when the serverrequires a password.
v File System
Allows you to retrieve lookup table data from a text file.For this type of agents, you optionally require a sample delimited or fixed widthtext file.
v Agent AdaptersAllow you to retrieve lookup table data from various types of data sources.For this type of agents, you optionally require a sample delimited or fixed-widthtext file.Agent adapters are agents created with the agent adapter framework. For moreinformation, see the Workbench Technical Reference.
Note: The query or invocation is configured in the definition for the lookup table.
Before you create a new agent, your user configuration must have the necessarycreate permissions for agents and the connection specifications for the specificagent type. Before you edit an agent, you must have read and write permissionsfor the agent.
Chapter 2. Setting up data sources for lookup tables 7

The steps in this section describe how to create a new agent for both JDBC andWeb service data sources. For other types of agents, refer to the Real-timeMonitoring Workbench Technical Reference.
Procedure1. Log in to Real-time Monitoring Workbench.2. On the Workbench tab, click Activities.3. Click Create New, and then click Agent.4. In the Create Agent dialog box, from the Agent Type drop-down list, select
JDBC, Web Service, Salesforce, or an agent created with the agent adapterframework.
5. For each selected agent type, specify the required attributes, as specified in thetables in this section.
6. Set the Status value to Enabled, and click OK.7. To edit an agent:
v Select the agent.v Click Activities, and then click Edit.v In the Edit Agent dialog box, modify the attributes for the agent, and click
OK.
Results
The Create dialog box closes and the new agent is now listed on the Agents tab.The agent is immediately available to receive lookup table data.
Creating source definitions for lookup table dataYou must first create the definition of a data source for a lookup table.
Creating a JDBC source definition for lookup table dataThis section describes how to create a new JDBC source definition for lookup tabledata. A source definition for lookup table data from a JDBC source can take theform of either an SQL query or the invocation of a stored procedure.
Procedure1. Log in to Real-time Monitoring Workbench.2. On the Workbench tab, click Activities.3. Click Create New, and then click Lookup Table.4. In the New Lookup Table dialog box, click JDBC, and then click Continue.5. Click the Browse button, select the source, and click OK.
The agent that you previously created for this data source appears underAgents.
6. Specify the type of source.v To create a source based on an SQL query, click the Query button, type a
query statement in the text area, and click Continue.If the query is not valid, an error message appears. Otherwise, the ConfigureLookup Table - JDBC Query dialog box appears. The results of the queryare displayed in the lower portion of the dialog box on the FieldInformation tab.
8 IBM Cognos Real-time Monitoring Workbench Version 10.1.1: User Guide

v To create a source based on a stored procedure, click the Stored Procedurebutton, and then click Continue.The Configure Lookup Table - Stored Procedure dialog box appears.On the Field Information tab, in the Procedure name field, type the namefor the stored procedure. This value must match the name of the storedprocedure in the database referenced by the agent shown in step 5. ClickAdd Field in the Output and Input areas of the tab to add output and inputfields. See the table in the next step for descriptions of these fields.
For both source types, configure data caching on the Data Caching tab. You canselect the index when enabling prefetch type of caching. You can also configurethe number of result sets to cache. Specifying more than the default ten resultsets improves performance, but consumes more memory.
7. Click Save Lookup Table.The tabs for the columns of the new lookup table (as read from the query) anddependencies are displayed.For stored procedures, you can now use the source to receive lookup table data.
Attribute Description
Outputs Specify the columns in the lookup tabledefinition, their data types, and optionalformatting. The procedure returns a resultset with values that map to the columns inthe order in which they appear in this list.The data type identifies the column type inthe definition and is converted from theJDBC type as defined in “Mapping JDBCdata types” on page 12.
Inputs Specify the parameters passed to the storedprocedure and their data types. Inputs arepassed as arguments to the procedure in theorder in which they appear in the list. Thedata type identifies the Real-time Monitoringdata type of the value being passed to theprocedure. For more information about datatypes, see “Mapping JDBC data types” onpage 12.
Creating a source definition for lookup table data from a WebService
This section describes how to create a lookup table source from a Web service.
Procedure1. Log in to Real-time Monitoring Workbench.2. On the Workbench tab, click Activities.3. Click Create New, and then click Lookup Table.4. In the New Lookup Table dialog box, click Web Service, and then click
Continue.5. In the New Web Services Lookup Table dialog box, click Browse and select
the agent that represents the Web service that you want to use as the lookuptable source.Select the agent that you configured as described in “Creating data sourceagents for lookup tables” on page 4.
Chapter 2. Setting up data sources for lookup tables 9

6. Click Continue.The dialog box displays the methods and operations that are available in theWeb service.
7. Select the method that you want, and click Continue.The Configure Lookup Table - Web Services dialog box appears. The inputsand outputs (as read from the WSDL file that the agent configuration for theWeb service references) are displayed in the Field Information pane at thebottom of the dialog box.Tip: Depending on its relevance, use the Hide/Show button to show or hidethe content.
8. Type a name for the lookup table in the Name field.9. In the Status field, select Enabled.
10. Click the Data Caching tab if you want to modify the caching parameters.The default is 10 result sets.
11. When finished, click Save Lookup Table.The dialog box closes and the tabs for the columns of the new lookup tables(as read from the query) and dependencies are displayed.The source is now ready to receive lookup table data.
Creating a source definition for lookup table data fromSalesforce tables
When you import Salesforce tables using the Import Salesforce Object Wizard, thewizard creates a lookup table object from the imported table. The wizard createsthe lookup tables names by adding context to the table name. For example, a tablenamed Account, imported for a lookup tables is named Account_context.
For more information, see the IBM Cognos Real-time Monitoring WorkbenchTechnical Reference.
Use the following procedure to create a Salesforce source for a lookup table, if youwant to create additional lookup tables from your imported Salesforce tables.
Procedure1. Log in to Real-time Monitoring Workbench.2. On the Workbench tab, click Activities.3. Click Create New, and then click Lookup Table.4. In the New Lookup Table dialog box, click Salesforce, and then click
Continue.5. Click Browse, and select a the Salesforce agent that you previously configured.6. Type an SQL query statement in the Salesforce Query text field, for example,
type SELECT * FROM ACCOUNT, and click Continue.If the query is not valid, an error message appears. Otherwise, the ConfigureLookup Table - Salesforce Query dialog box appears. The results of the queryare displayed in the lower portion of the dialog box in the Field Informationtab.
7. Click the Data Cache tab to configure data caching.8. When finished, click Save Lookup Table.
The dialog box closes and the tabs for the columns of the new lookup tables (asread from the query) and dependencies are displayed.The source is ready to receive lookup table data.
10 IBM Cognos Real-time Monitoring Workbench Version 10.1.1: User Guide

Creating a source definition for lookup table data from a flatfile
This section describes how to create a source for lookup tables data from a flat file.These can be either a delimited or fixed-width text file.
Procedure1. Log in to Real-time Monitoring Workbench.2. On the Workbench tab, click Activities.3. Click Create New, and then click Lookup Table.4. In the New Lookup Table dialog box, click File System, and then click
Continue.5. Select the type of flat file to use for your lookup table source: delimited or
fixed-width.6. Click Browse next to the File System Agent, and in the Select Object dialog
box select the agent that you want to use and click OK.7. Click Browse to locate the sample file that you can use when mapping the file
data into the lookup table.This step is optional.
8. Click Continue.The Configure Lookup Table - Delimited File System Source dialog boxappears if you are using a delimited text file. The Set Field Widths dialog boxappears if you are using a fixed-width file. The Configure Lookup Table -Fixed Width Flat File Source box appears after you have set the field widths.For more information about the configuration settings associated with thefixed-width and delimited text files, see the IBM Cognos Real-time MonitoringWorkbench Technical Reference.
9. Set the field information for the columns as necessary.10. Click the Data Caching tab if you want to modify the caching parameters.11. Click Save Lookup Table.
Editing source definitions for lookup table dataThe steps in this section describe how to edit or modify an existing sourcedefinition for lookup table data.
Procedure1. Log in to the IBM Cognos Real-time Monitoring Workbench.2. On the Workbench tab, select the lookup table.3. Click Activities, and then click Edit.
The Configure Lookup Table dialog box appears.4. Modify the definition settings as required.5. Click Save Lookup Table.
Lookup tables limitationsYou can retrieve lookup tables with no limitations from a JDBC query source.
However, the following limitations apply when retrieving lookup tables from asource that is a JDBC stored procedure or a Web service:v When the lookup table column is referenced as part of a query, somewhere in
the WHERE or FROM clause it must appear in an equality expression and then only
Chapter 2. Setting up data sources for lookup tables 11
as an atomic predicate. An atomic predicate has no other operators on the sameside of the equal sign. For example, this is permitted:WHERElookuptable_column = 10*datastream_column
But the following is not permitted because the left-side predicate, which containsthe lookup tables column, is an expression that includes an operator (/):WHERE lookuptable_column/10 = datastream_column
v The required atomic reference may not appear in a disjunct (OR) expression.This fails:WHERE(lookuptable_column = datastream_column OR A > B)
However, it may appear in a conjunct (AND) expression:WHERE (lookuptable_column = datastream_column AND A >B)
v Once there is at least one equality reference in the query, you may use thecolumn in any other way. For example, these two are permitted:WHERE (lookuptable_column= datastream_column AND
lookuptable_column/10 = other_datastream_column)
WHERE ((lookuptable_column = datastream_column ANDlookuptable_column >= other_datastream_column) OR(A > B))
But the following fails because there is no equality reference in the query:WHERE lookuptable_column >= datastream_column
v The required equality expression may not reference another lookup table columnin the same table. For example:t1.lookuptable_column = t1.other_datastream_column
v The equality expression may reference a lookup table column in another table,for example:t1.lookuptable_column= t2.other_datastream_column
Sybase LimitationsWhen making a query to a Sybase database, be aware of these limitations.
All names, including tables and columns, are case-sensitive.
All queries must be in the form SELECT * FROM table only. You cannot include anySELECT clauses. To filter the results, load them into a business view, then filter thatview.
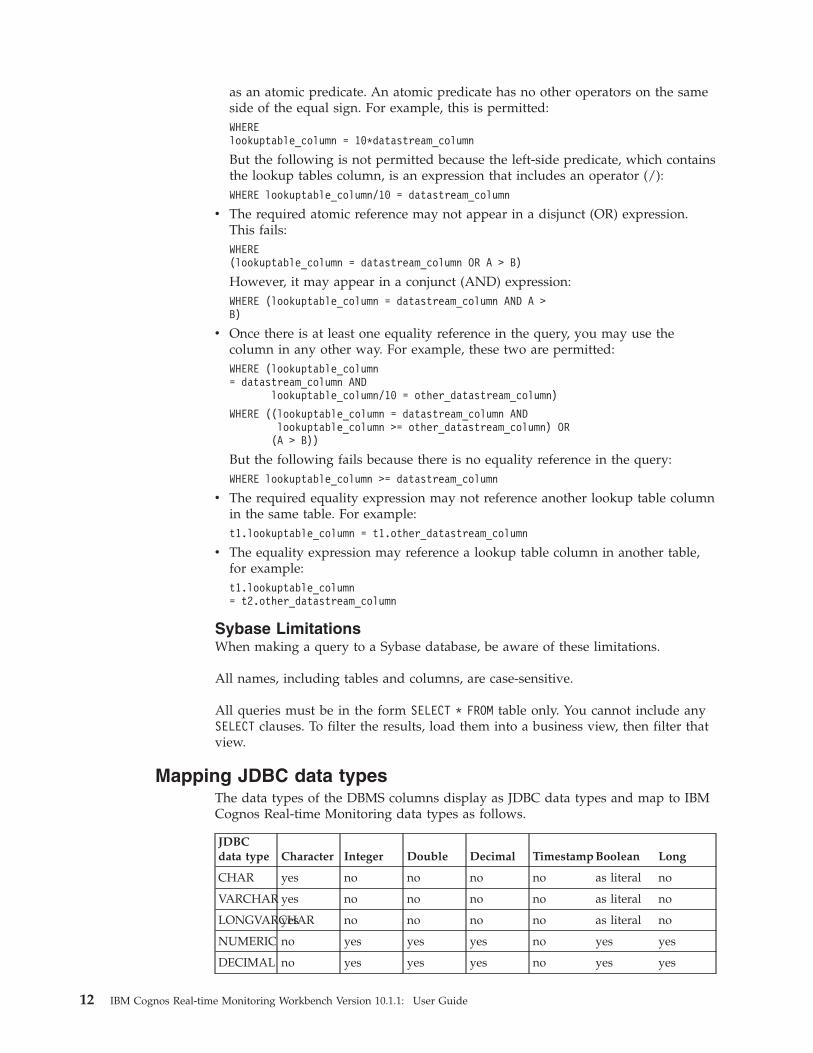
Mapping JDBC data typesThe data types of the DBMS columns display as JDBC data types and map to IBMCognos Real-time Monitoring data types as follows.
JDBCdata type Character Integer Double Decimal Timestamp Boolean Long
CHAR yes no no no no as literal no
VARCHAR yes no no no no as literal no
LONGVARCHARyes no no no no as literal no
NUMERIC no yes yes yes no yes yes
DECIMAL no yes yes yes no yes yes
12 IBM Cognos Real-time Monitoring Workbench Version 10.1.1: User Guide

JDBCdata type Character Integer Double Decimal Timestamp Boolean Long
BIT no yes yes yes no yes yes
TINYINT no yes yes yes no yes yes
SMALLINTno yes yes yes no yes yes
INTEGER no yes yes yes no yes yes
BIGINT no yes yes yes no yes yes
REAL no yes yes yes no yes yes
FLOAT no yes yes yes no yes yes
DOUBLE no yes yes yes no yes yes
BINARY no no no no no no no
VARBINARYno no no no no no no
DATE no no no no yes no no
TIME no no no no yes no no
TIMESTAMPno no no no yes no no
Note: Do not use an Real-time Monitoring Boolean data type in a WHEREpredicatethat is passed to the JDBC source. You can include Boolean values in the Select list.
Data cachingData caching allows you to store the results of lookup table queries in memory.
Subsequent requests for the same information are then retrieved from memoryinstead of impacting the DBMS with a redundant query. When caching is activeand a view requests a lookup table, it searches the cache first.
You can enable two levels of data caching. These arev On-demand caching
You can enable on-demand caching when you select Cache data for this lookuptable on the Data Caching tab when configuring lookup tables from JDBC andWeb service sources “Setting caching parameters” on page 14.) With this type ofcaching, a recent-query cache is created that maintains results on a least recentlyused (LRU) basis. This cache tracks when each result set was last requested.When the cache is full, it keeps the most recently accessed rows, and discardsthe rows that were not accessed for the longest period of time. Rows containingfrequently requested data remain in the recent query cache to reduce impact onthe database. If data is requested that is not in the recent query cache, the data isretrieved from the external data source.On demand caching deliver better performance than if no caching is used.However, using prefetch caching will result in the best performance.
v Prefetch cachingWhen you enable the prefetch cache, entire external lookup table is cached eitherinto memory or to a database from the external data source. This table becomesa replacement for the external query source. When data is requested that is notin the recent query cache, the data is retrieved from the prefetch cache. When aninvalidation occurs according to your specified invalidation schedule, the recentquery cache is cleared, and a query is issued to the external data source to
Chapter 2. Setting up data sources for lookup tables 13

update the prefetch copy of the lookup table. The recent query cache is updatedfrom the prefetch cache on subsequent queries.When enabling the prefetch data cache, consider the following:– When In memory is enabled for the cache type, more memory is used
because the information from the external data source is stored in memory,and an index is built for each checked column.
– The prefetch cache is only updated at the scheduled invalidation time. If datais not in the prefetch cache, no data is returned. Updates to the external datasource are not reflected in the prefetch cache until the next scheduledinvalidation.
If an exception occurs, the prefetch cache attempts to refresh on the invalidationschedule up to five times. If it cannot refresh from the external data source, therecent query cache is used until the next scheduled refresh.
Setting caching parametersYou set the caching parameters for JDBC, Web service, and file system (flat file)sources on the Data Caching tab that is located in the Configure Lookup Tabledialog box.
Data caching parameters for JDBC and Web Service lookuptables
You can set the following data caching parameters for JDBC and Web service:v Cache data for this lookup table
Specify whether you want to cache the set of query result on lookup tables inthe recent query cache. Selecting this parameter enables you to set the remainingparameters. You must add at least one invalidation schedule when selecting thisparameter.
Note: If not selected, the default is 10 result sets.v Enable prefetch
Specify this parameter to enable or disable prefetch type of data caching for thelookup table.
Note: The prefetch cache is only supported for JDBC and Salesforce Webservices.
v Fallback to external source
Specify this parameter if you want the system to use the data from the externaldatabase when the system cannot access the data cache.
v Number of results to cache
Specify this parameter to set the number of result sets to cache in memory. Eachset of results may contain one or more rows of lookup table data related to theevent. For example, if 3 queries are made and each result set contains 5 rows, 15rows are stored in the cache.
v Add Schedule
Select this parameter to set an invalidation schedule.
Data caching parameters for lookup tables from file systemsources
You can set the following data caching parameters for file system sources:v Cache Type
14 IBM Cognos Real-time Monitoring Workbench Version 10.1.1: User Guide

– In Memory
Specify this parameter to store the prefetched cached data in memory. If youselect this option, JDBC store is not available.
– JDBC Store
Specify this parameter to store the prefetched cached data to a database. Youmust also select an agent from the JDBC Agent drop-down list.
– Fetch and store on restart
Specify this parameter so that the data can be fetched and stored by thespecified JDBC agent immediately after a restart occurs.
v Number of results to cache
Specify this parameter to set the number of result sets to cache in memory. Eachset of results may contain one or more rows of lookup table data related to theevent. For example, if 3 queries are made and each result set contains 5 rows, 15rows are stored in the cache.
v Add Schedule
Select this parameter to set an invalidation schedule.
Setting invalidation schedulesYou can create multiple invalidation schedules that determine when to purge datafrom the cache. When a scheduled invalidation occurs, the recent query cache iscleared and updated on subsequent queries.
If lookup table data is not rapidly changing, it is best to invalidate the recent querycache less often. For example, if the lookup table is fairly static, you may invalidatethe cache weekly or monthly. However, if the lookup table database is updatednightly, you may also invalidate the recent query cache nightly to ensure the latestdata.
Procedure1. In the Configure Lookup Table dialog box, click the Data Caching tab.2. Click Add Schedule.3. In the Add Invalidation Schedule dialog box, specify the required scheduling
options, such as day, time, day of the week, and so on.4. Click OK.
The new schedule appears on the Data Caching tab.
Note: You can add multiple schedules for each lookup table.5. To edit a schedule:
v In the Invalidation Schedule box, select the schedule that you want tomodify
v Click Edit Schedule.v In the Add Invalidation Schedule dialog box, modify the schedule
parameters as required.v
6. To delete a schedule, in the Invalidation Schedule box, select the schedule thatyou want to remove and click Remove Schedule.
Chapter 2. Setting up data sources for lookup tables 15

16 IBM Cognos Real-time Monitoring Workbench Version 10.1.1: User Guide

Chapter 3. Modeling business data
Business data modeling is a technique for describing the events, lookup tables, andrules that depict how your business functions. Modeling in IBM Cognos Real-timeMonitoring is done by combining data stream and lookup table sources intobusiness views: models that provide a picture of a business activity. As new eventsenter the system, the views immediately update to reflect the current details aboutthe activity.
In addition to the views, modeling allows you to create and test scenarios.Scenarios allow you to test for expected or possible outcomes, and to identifyexceptional business conditions. Each scenario contains rules that identify specificpossible conditions, and alerts and reportlets to send to key personnel when thecondition is found to exist.
The Scenario ModelerIn IBM Cognos Real-time Monitoring Workbench, all data modeling is performedwith the Scenario Modeler. You use the Scenario Modeler to define scenarios andtheir rules, alerts, reportlets, and create views for modeling your business data.
The hierarchical tree on the left side of the Scenario Modeler displays all objectsdefined by you, or by other users, that you are allowed to see. This also includes alist of views that you can use to create your models. When you select an object inthe tree, the window on the right side displays details about the object and, if theobject is a folder, its content.
Every object has a status that indicates its ability to receive and process new data.The following types of status exist:
v Running (or enabled)The object is accepting new data and is processing them. All objects are createdin this state.
v Stand-by (or disabled)The object is not accepting new data. Disabling an object does not affect itsdefinition or existence. Disabling the object keeps new data from flowing intothe object and to all objects that rely on the target object. All dependent objects,however, are stopped.
v Stopped (or disabled dependent)The object is not accepting new data and cannot be re-enabled until firstre-enabling an object it depends on. For information about determining whichobjects are derived from or depend on a particular object, see “Objectdependencies and requirements” on page 33.
If an object has an invalid reference to another object, the object is invalid. Areference can be invalid because an object does not exist or because some attributesof the object do not match the requirements of the dependent object (such as a datatype mismatch), not because the dependent object is disabled. All objects thatdepend on invalid objects are also invalid.
© Copyright IBM Corp. 2009, 2011 17

For more information about object states and the effects of changing a state, see theIBM Cognos Real-time Monitoring Workbench Technical Reference.
Working with business viewsBusiness views are data models that provide a real-time picture of a businessactivity. As changes and transactions occur in your business, they generate eventsthat are sent to IBM Cognos Real-time Monitoring. Each new event drives animmediate update of the views (the business models). The views in turn provide areal-time, updated view of the business metrics.
New events entering the system become part of a data stream that flows from thesource of the event to a business view, possibly passing through other businessviews along the way. As such, every business view depends on a data stream oranother business view, and every view optionally joins the data stream informationwith lookup table information provides a meaningful picture of the activity.
The following illustration shows the view AvailableSuppliers as part of a datastream starting with ShippingEvents and passing through DelayedSuppliers.PartDescription and Suppliers are each joined lookup table sources.
You can create business views using data streams or other business views as thesource of the events that drives the new view. A key characteristic of businessviews is the ability to aggregate data stream and lookup table information; that is,to detect, analyze, and combine the information into meaningful business metrics.For example, views can perform simple aggregations on the events, such askeeping a running total of all the events received, in whole or over a period oftime.
By combining aggregate data with other lookup tables, you can create moremeaningful metrics for various scenarios. For example, a view can track theperformance of marketing representatives to identify those that are on target tomeet their individual quotas for the fiscal quarter. Each sale is recorded as anevent, included in a total sales calculation, and compared against quotainformation retrieved as a lookup table. Those current performance results can becombined to compare the performance of different sales regions. Another view cancollect the performance of all sales regions and compare those metrics with currentmanufacturing projections to identify possible over-production situations.
Formulas perform aggregation that display their results in fields in the view. Forinformation about creating formulas in fields, see “Working with views” on page39.
The rest of this section discusses how to create and work with views.
18 IBM Cognos Real-time Monitoring Workbench Version 10.1.1: User Guide

Creating viewsBefore you can create a view, you need either an existing data stream table or abusiness view on which to base your new view. You can create data stream tablesand base views in IBM Cognos Real-time Monitoring Workbench.
You work with views in the Scenario Modeler. Click the Views folder on theSystem Objects tab to see existing views that you have access to, or to create newviews. The window on the right shows the views names, locations, descriptions,and statuses. When a view is stopped, it is neither receiving events nor passingevents to any views, rules, alerts, or reportlets that depend on that view. Forinformation about stopping and starting views, and for details about invalid views,see “The Scenario Modeler” on page 17.
For information about creating more complex views, see Chapter 4, “Enablingsupport for business views,” on page 29
Filters allow you to restrict the view results to include only those rows that meetthe specified condition. The condition can be simple. For example, only thoseproducts whose price is greater than 100.00. Filters can also be complex, andcontain multiple conditions, all of which must be met before the result is allowedinto the view.
To create more complex filters, define the filter in the view Where clause.
Ordering allows you to sort the view results based on the values in one or morefields and specify the sort order. When you choose to order on multiple fields, theresults are sorted by the top field first, then in order from there.
Note: The Order the results by option is only available for stateful views. Statelessviews cannot be ordered. For more information, see the IBM Cognos Real-timeMonitoring Workbench Technical Reference
Maintaining results allows you to specify sets of recent event details to keep. Whenyou look at the view results, you can see the results from more than one event. Italso allows for external applications to perform trend or historical analysis,provided that they receive the view as a real-time data feed (metrics).
When you choose to maintain results, you specify a number of events or time-spanunits. For example, you can specify to keep events for 10 days. The numberspecifies the maximum number of events to maintain. For example, whenmaintaining 10 events, when the eleventh event arrives, it is kept, and the oldest isdiscarded. By default, a stateless view contains only rows representing the lastevent that satisfied the view condition. Rows from previous events are discarded.
When using a time interval, the actual number of events in the view variesdepending on the number of events in the interval when the view updates. The setof events is determined when the last event is inserted into the view, not at thecurrent time. For example, an interval of one hour shows all events that arrived inthe view for the hour previous to the last update. If no events were inserted in thelast day, the view might still show one hour of events from the previous day.However, when a new event arrives, all those events are discarded.
Procedure1. In Real-time Monitoring Workbench, click the Scenario Modeler tab.
Chapter 3. Modeling business data 19

2. On the System Objects tab, click Views, and then click New View on theViews tab.
3. Select the base data stream or view that will supply events to your new viewand click Next.
4. In the New View page, define the view attributes.You can add or delete the selected fields, change the field names, or edit theirdefinitions by clicking the associated buttons.
5. In the Results display definition box at the bottom of the page, specifyfiltering, ordering, and maintaining result by clicking the associated links.
6. Click Finish to save the view.If you save the view in a running state (enabled), it will immediately be readyto receive events.
Working with business activities and scenariosThe Business Activities folder in the Scenario Modeler organizes your scenarios.You must have at least one folder, but you can have as many as you need.Scenarios are restrictive. Every scenario has an associated business view, and youmust base the rules, alerts, and reportlets within the scenario on that view, or on aview derived from that view.
Selecting a business activity in the object tree lists that folder scenarios on theScenarios tab. Similarly, selecting a scenario lists its rules. You can edit any of thecontained objects by double-clicking them on the Scenarios tab, or by selecting ascenario and clicking the Edit Scenario button.
The Status column on the Scenarios tab indicates whether the object is receivingand processing new data.
For more information, see the IBM Cognos Real-time Monitoring WorkbenchTechnical Reference.
Working with rules and alertsRules and alerts are associated with scenarios. Scenarios provide a base businessview that its rules monitor and from which its alerts and reportlets draw datastream and lookup table details.
The data sources for rules and alerts are views and cubes. Rules monitor views orcubes looking for specific conditions, and alerts retrieve data stream and lookuptable details from the data source. The view used as a data source must beassociated with the scenario when you created the scenario, or a view or cube thatis derived from the associated view. When you create a new rule, the systemassumes the associated view unless you choose another view by clicking SelectData Source.
If a data source currently has results, those values are displayed to help you as youcreate the rule or alert.
When the data source for the rule is a cube, you identify the dimension level tomonitor and optionally apply a filter that further restricts the data that the rulemonitors. For more information, see the IBM Cognos Real-time MonitoringWorkbench Technical Reference.
20 IBM Cognos Real-time Monitoring Workbench Version 10.1.1: User Guide

Procedure1. Open the scenario folder that contains the object.2. To see a list of the objects, click the Alerts, Rules, Reportlets, or Rule
Templates tab.3. To edit the object, select it and click Edit.4. To create a new object, click New.
Note: You can create an alert without a rule, but every rule needs an associatealert as its rule-action.
Setting an alert to invoke an external Web serviceYou can configure an alert message to invoke an external Web service. Thisrequires the creation of a function that constructs the Web service message basedon the alert payload. Specifically, this function determines which data elements inthe alert payload are mapped to the inputs that the Web service expects. Thisfunction is then uploaded to IBM Cognos Real-time Monitoring as a user-definedfunction (UDF). The Web service is specified in a Web service profile that calls theUDF. You can then set the Web service profile as a subscriber to the desired alert.
Procedure1. Create a function that constructs the Web service message using parts of the
alert data, and package it as a JAR file.2. Upload the JAR file as a user-defined function in the Real-time Monitoring
Workbench.3. Create the Web service profile by creating a new user in the Administration
Console, selecting the Delivery Profiles tab, and clicking Create AdditionalProfiles, where you set the following parameters:v For profile type, select Web Service.v For profile name, type an appropriate value.v For Web Service URL, type the endpoint for the WSDL.v For method, specify the required method (operation) to be invoked in the
Web service.v Supply a user name and password, as required.v For UDF, select the JAR file you uploaded for this Web service invocation.v Click OK.
4. When you create or modify the alert that is intended to invoke the Web service,you can add the new Web service profile as a subscriber.
Rule detailsDefine rules with the rules editor. Every rule has a name that identifies it, acondition to look for that indicates an exceptional state, and an action to take whenthe condition exists. The action either generates an alert, or lowers a previouslyraised alert. Optionally, you can set the rule to perform the action only when thecondition holds true for a period of time.
Rule ConditionsA rule condition is a formula that tests the row in the associated view or cubelooking for a specific condition.
When the condition exists the rule action activates an alert. They can be simpletests for a value in a column in the view, such as InvLevel>MaxThreshold, or they
Chapter 3. Modeling business data 21

can be complex expressions with functions, operators, and parenthesis groupings.For example, (InvLevel<MinThreshold OR InvLevel<(AverageInvLevel*.90)).
For more information, see the IBM Cognos Real-time Monitoring WorkbenchTechnical Reference.
Rule ActionsRule actions either generate alerts or lower previously raised alerts.
Rules can have one of three actions:v Send alerts every time the condition is found to exist (fire). A fire action sends
an alert every time a rule identifies an exceptional condition. For example, sendan alert every time inventory drops below the minimum threshold.
v Send alerts once and ignore subsequent events until the initial condition isresolved (raise). A raise action sends an alert message when the condition of therule applies, but ignores subsequent events until after the initial condition isresolved. A raise action is useful when you do not want multiple alerts forsituations where the rule condition is true for multiple, related events. Forexample, after the inventory falls below the minimum threshold, do not sendanother alert if the inventory continues to drop.The option Send an alert one time (until reset) for a specific occurrence allowsyou to send alerts once for each specific occurrence of the named column. Forexample, send an alert every time the inventory falls below the minimumthreshold for each specific product.
v Reset (lower) previously raised rules to allow them to again send new alerts. Forexample, when the inventory is once again above the minimum threshold, resetthe alert so new ones can be sent if the inventory subsequently falls below theminimum threshold again.
For more information about actions, see the IBM Cognos Real-time MonitoringWorkbench Technical Reference.
Holds ForYou can delay an action using this option.
Rules usually perform their action as soon as the condition exists. However, insome cases you would rather wait to see if the condition is corrected beforealerting key personnel. In that case, you can specify a duration of time to wait. Ifthe condition continues to exist when the rule waits, the system then sends thealert. For example, only send the alert if the inventory remains below theminimum threshold for 2 days.
You can enter a number that is the length of time or count of events to wait, or thename of a column in the view that contains the number. When you use the columnname option, the rule takes the value from the data stream in the view. In this way,the data stream can determine the time to wait.
Alert detailsDefine alerts with the alert editor. Every alert has a name that identifies it, asubject that tells the recipient what the alert is about, and an optional messagebody that provides more detail in an HTML format.
You can also attach reportlets to the alert to provide greater details about the eventas retrieved from a data source. By default the system uses the view associatedwith the containing scenario. To choose another view, click Select Data Source .
22 IBM Cognos Real-time Monitoring Workbench Version 10.1.1: User Guide

For more information, see the IBM Cognos Real-time Monitoring WorkbenchTechnical Reference.
SubscribersSubscribers are the users who will receive this alert.
A mandatory subscriber will always receive this alert. An optional subscriber maychoose to unsubscribe from it in the Real-time Monitoring Dashboard. For moreinformation about subscribing to alerts, see the IBM Cognos Real-time MonitoringDashboard User Guide.
FieldsThe Add Field button allows you to insert a field into the subject or body textfrom the Add Field dialog box. When the alert is generated, the value of the fieldin the view or cube is inserted into the text, thereby replacing the field placeholder. In the illustration above, the value of ProductName from the view or cubeis inserted into the Subject line.
When the associated view or cube has multiple rows for the event, the value fromeach row is inserted into the field place holder, and separated by commas. Forexample, the subject might look like the following:Inventory level low on Nano Webber, Smoke Shifter, LockingRail Key
When the field has the same value in multiple rows, each occurrence is inserted.Instead, you can consolidate duplicate values by choosing that option on the AddField dialog. This dialog also allows you to specify the character or string thatseparates duplicate values.
Subject and bodyThe Subject and Body fields are similar to an e-mail message: they providesummary and detail descriptions about the event that the rule identified.
Each field may contain a static message or text with placeholders to be completedwhen the message is generated.
AcknowledgmentsAn acknowledgment is a link that you can add to the message body.
When a user receives the alert notification, they can click the link to acknowledgethe alert. This opens a new browser window that prompts the user to log in, andthen displays a message describing when the alert was acknowledged.
To add an acknowledgment link, point to the place in the body where you want toinsert the link, and click Add Acknowledgement. Users then click the link to gothe acknowledgments page. The acknowledgment link appears as text in the bodyof the message. You can use the default text, customize it to use your own text, orpresent the link URL as the text.
ReportletsReportlets provide detailed information about the event, and are attached to orinserted into the alert when it is sent to the subscribers.
Each reportlet presentation is a table that is formatted and inserted into themessage body, or included as an attachment that is formatted as either plain text orHTML.
Chapter 3. Modeling business data 23

Note: You cannot create a reportlet on a cube.
Every alert may have none, one, or multiple reportlets that retrieve informationfrom a view that is either the same view that the alert uses, or a view derived fromthat view. The reportlet includes all of the information in the view unless youchoose to base the reportlet data on the option Rule Filter of Data Stream data.This option limits the reportlet information to include only those rows in the viewthat meet the condition identified by the rule that generated the alert. For example,when a view contains multiple rows, by default, the reportlet includes all thoserows. However, by using this option, the reportlet includes only those rows thatmeet the rule condition.
For details about creating reportlets, see “Working with reportlets” on page 27.
Limiting the number of alert instancesThe alert manager only displays a specified number of alert instances for a user.This limitation prevents the system from being overwhelmed by too many alerts.
The default is to display the first 200 alert instances for each user. However, thissetting is configurable.
Procedure1. Log in to the IBM Cognos Real-time Monitoring Workbench.2. On the Administration Console tab, click the System Settings
3. From the Configure drop-down list, click User Interface.4. Modify the Maximum Alert Instances To Display setting as required, and click
OK.
Setting an alert to invoke an external Web serviceYou can configure an alert message to invoke an external Web service. Thisrequires the creation of a function that constructs the Web service message basedon the alert payload. Specifically, this function determines which data elements inthe alert payload are mapped to the inputs that the Web service expects. Thisfunction is then uploaded to IBM Cognos Real-time Monitoring as a user-definedfunction (UDF). The Web service is specified in a Web service profile that calls theUDF. You can then set the Web service profile as a subscriber to the desired alert.
Procedure1. Create a function that constructs the Web service message using parts of the
alert data, and package it as a JAR file.2. Upload the JAR file as a user-defined function in the Real-time Monitoring
Workbench.3. Create the Web service profile by creating a new user in the Administration
Console, selecting the Delivery Profiles tab, and clicking Create AdditionalProfiles, where you set the following parameters:v For profile type, select Web Service.v For profile name, type an appropriate value.v For Web Service URL, type the endpoint for the WSDL.v For method, specify the required method (operation) to be invoked in the
Web service.v Supply a user name and password, as required.v For UDF, select the JAR file you uploaded for this Web service invocation.
24 IBM Cognos Real-time Monitoring Workbench Version 10.1.1: User Guide

v Click OK.4. When you create or modify the alert that is intended to invoke the Web service,
you can add the new Web service profile as a subscriber.
Working with rule templatesRule templates allow users of the IBM Cognos Real-time Monitoring Dashboard toquickly create business rules without having to define the logic of the ruleconditions, or its alert message. Instead, the user chooses the template andprovides the values for which the rule will test. For example, with the templatecondition order_total>amount, a user provides the value of the amount parameter,and later receives notifications when that condition is true.
Defining a template once in the Scenario Modeler allows users of the Real-timeMonitoring Dashboard to create multiple, unique business rules with the samelogic, but which test for different values. For example, one user might use atemplate to look for orders greater than $10,000, while another looks for ordersover $66,000.
Note: Business rules are based on the definition of the rule-template at the time ofcreation. Any subsequent changes to the template (including its alert message orreportlet) do not affect the existing business rules created from that template.
You can create a rule template that monitors either a view or a cube. For views, therule monitors every event that enters the view. For cubes, the rule monitors theresults in a specific dimension level only. Additionally, for cubes, alerts attached torules cannot incorporate reportlets.
Creating a rule templateCreating or editing a rule template is a multi-step process. In this process, youdefine the conditional logic, identify the parameters that the user will provide,define the alert message, and identify the properties of the alert.
When creating rule templates, you must specify the following:v An activation condition
This is the test that, when true, causes the alert message to be sent.v An optional reset condition
This test resets the alert and re-allows the activation condition to look for newevents that meet the criteria.
v Parameters and promptsParameters are the values that the user will provide when creating the businessrule. Prompts describe the parameters to the user.
v Alert messageThe message template that generates the notification.
v Template and alert propertiesA name and description of the template, the message's level of importance, andhow the alert tracks the condition.
To create a rule template, you must have the following permissions:v Create permissions for business activities.v Read and Write permissions on the business activity that will contain the
template.
Chapter 3. Modeling business data 25

v Read only permissions on the view that will feed the rule.
Parameters are the values that the user provides in Real-time MonitoringDashboard when creating a template-based rule. When defining the template, youcan provide a list of values, from which the user can choose, or omit the choicesand let the user enter the value. You can also provide the custom prompt that theuser sees next to the parameter field.
In the Edit Rule Template dialog box, add parameters to the condition logic withthe Insert Template Parameter option. You can insert a new parameter or chooseone already defined for the template.
Procedure1. On the Scenario Modeler tab, select the scenario to maintain the template.
The view on which the scenario is based identifies the data stream that isassociated with the rule template. All dashboard objects built on this datastream will have access to the new rule-template.
2. Click the Rule Templates tab, and then click New Rule Template.3. In the Create Template Parameter dialog box, define the activation condition.
v Insert any parameters that the user will need to provide.You can customize the parameter name, data type, and valid choices. Addthe valid choices to the drop-down list, or omit the choices to allow the userto provide the value.
v Optionally, select the Holds For option and define a duration.This is the test that, when true, causes the alert message to be sent. Conditionscan be simple tests for a value in a view column, such as InvLevel>threshold, orthey can be complex expressions with functions, operators, and groupings, suchas (InvLevel>threshold OR InvLevel>(AverageInvLevel*.90)). For moreinformation, see the IBM Cognos Real-time Monitoring Workbench TechnicalReference.
4. Click Continue, and optionally, define the reset condition.Insert any parameters that the user will need to provide.This test resets the alert and allows the activation condition to look again fornew events that meet the criteria. If you omit this condition, the activation testsends a notification each time an event meets the criteria (a fire rule). Includethis condition to send the notification once (raise), and not send another untilthe reset condition (lower) is true.
5. On the Rule Templates tab, click Edit Rule Template, and define the details forthe template parameters.v Define the prompts.
The prompts describe each parameter to the Real-time Monitoring Dashboarduser. When creating the business rule, the users see a prompt next to eachparameter that describes what they are choosing.
v Specify whether to show the condition(s) to the user.6. Define the alert message.
This is the message template that generates the notification. The page containsa minimum set of the parameters of an independent alert.
7. Optionally, insert or attach an existing or new reportlet to include with the alertmessage.
8. Define the following rule template properties:
26 IBM Cognos Real-time Monitoring Workbench Version 10.1.1: User Guide

v Provide a name and optional description. Use the description to describe thetemplate to the Real-time Monitoring Dashboard user.
v Optionally, specify the severity of the alert message.v Optionally, specify whether to consolidate multiple alerts from the same data
stream. For more information, see the IBM Cognos Real-time MonitoringWorkbench Technical Reference.
v Optionally, identify the columns in the view that uniquely describe theevents to track when using a reset condition. For example, if the rule looksfor product back orders that exceed a threshold, you want to track separatealerts for each product. To do this, choose the columns that uniquely identifythe products, such as product name and product family.Omit column selection when you do not need to track alerts individually,such as when total sales-to-date are below target-to-date.
9. Save the template to make it immediately available to users of the Real-timeMonitoring Dashboard.
Working with reportletsReportlets describe the contents of a view, and present that information in a reportthat is either attached to an alert message or sent to an external system. Frequently,reportlets provide information about an event that puts the event into the lookuptable. For example, when an inventory is low for a product, and a restockshipment is overdue, an alert can notify purchasing managers of that state, and areportlet attached to the alert can list alternative suppliers for that product.Reportlets are attached to all subscribers of the associated alert.
There are two types of reportlets:v Internal reportlets are the visual representation of the information in a view
when the alert generated the reportlet. The presentation is a table formatted ineither text or HTML. The table contains all of the information that was in theview.
v External (third-party) reportlets that external reporting systems produce.External reportlets generate their reports based on view data passed to themwhen the alert generates the reportlet.Note: External reportlets are only available when an external reporting systemhas been defined.
All reportlets are associated with a scenario. To create, edit, or delete a reportlet,choose the Reportlets tab in the desired scenario.
When you create or edit a reportlet, you must identify the following properties:v The type of reportlet (internal or external).v The business view on which the reportlet is based, and from which it retrieves
the values to report.
Chapter 3. Modeling business data 27

28 IBM Cognos Real-time Monitoring Workbench Version 10.1.1: User Guide

Chapter 4. Enabling support for business views
New events entering the system become part of a data stream that flows from theevent source to a business view, possibly passing through other business viewsalong the way.
Every business view depends on an event or another business view, and everyview optionally joins the event information in data stream tables with lookup tableinformation that provides a meaningful picture of the activity.
The illustration below shows the view AvailableSuppliers as part of a data streamstarting with ShippingEvents and passing through DelayedSuppliers.PartDescriptions and Suppliers are each joined sources for the lookup table.
Use the IBM Cognos Real-time Monitoring Workbench to create and manage thedata streams, lookup tables, and views that support business views.
Working with the WorkbenchThe left side of the Workbench tab lists the public folders, views, JAR files, UserDefined Functions (UDFs) that you created, or to which you have access, externallinks, and drill through targets.
The right side of the Workbench tab shows the contents of the folder and providesinformation about each object (name, description, type, read and write grantability, and status). This tab also displays the IBM Cognos Real-time MonitoringDashboard objects. These differ from the list of Workbench objects in the followingways:v They are not shown in the navigation tree. They are shown only in their
respective folder lists and in the object library.v They do not have a status icon.v The permissions icon shown depends on the user's permissions.v You cannot double-click the objects.v You can only move or delete these objects. No other operations are possible,
such as edit, disable, or permissions.
Public Folders contains the objects in the system. Objects with names that beginwith "VC_" are system tables that you may access, but whose definition you cannotchange. For example, the VC_SYSTEM_EVENTS is a data stream table thatcontains events IBM Cognos Real-time Monitoring generated. For moreinformation, see “Monitoring the logs” on page 89.
© Copyright IBM Corp. 2009, 2011 29

Objects in the Workbench are identified by an icon, which displays next to thename of the object. The icons are as follows:
Icon Object Type
Agent
Cube
Dashboard
Dimension
Data Stream
Lookup Table
Process Definition
View
Procedure1. To create a new object:
v On the Workbench tab, click Activities.v Select Create New.v From the drop-down list, select the object type that you want to create.
2. To display a detailed list of objects, click on Public Folders or any subfolder inthe Workbench Objects pane to display a detailed list of the objects in thecontents panel.
Note: From the list in the contents panel, you can delete the object by clickingActivities and then selecting Delete. You can also change the status of theobject. For more information, see “The Scenario Modeler” on page 17.
3. To display object details and access the object definition, click on an object inthe tree to display object details. The detailed information about the objectincludes:v Dependencies.v Columns showing the column (field) specifications defined for the view.v Results (views only) showing a snapshot of the information currently in the
view.
30 IBM Cognos Real-time Monitoring Workbench Version 10.1.1: User Guide

Workbench foldersUnder the Workbench tab is the Workbench Objects pane.
This pane contains several folders:v Public Folders
This folder contains objects and subfolders. For more information, see “Workingwith Workbench folders” on page 32.
v JAR Files
This folder contains any JAR files that you have created. For more information,see “JAR Files folder” on page 50.
v User Defined Functions
Contains any User Defined Functions (UDFs) that you have uploaded. For moreinformation, see “User defined functions folder” on page 51.
v External Links
This folder contains URLs that locate external systems, and that you can use tocreate drill-through targets. For more information, see “Creating external links”on page 51.
v Drill Through Targets
This folder contains drill-through targets that link a view to an externalreporting system through a previously defined external link. For moreinformation, see “Creating drill-through targets” on page 54.
v Object Library
This folder contains all the objects that are currently defined in the Workbench.From within this folder you can perform the same activities on objects as whenyou are viewing objects in Public Folders or a subfolder. The Object Libraryfolder does not display any subfolders.
Currently defined folders and the objects that they contain will also display in aSelect Object dialog box when creating objects such as Cubes or Dimensions, andselecting a Fact Table. For information about cubes and dimensions, see the IBMCognos Real-time Monitoring Workbench Technical Reference.
Navigating Workbench folders and objectsYou can navigate workbench folders and objects in several ways:v In the Workbench Objects pane on the left side of the page, you can select an
object or expand a folder and select the required subfolder or object.v In the title bar of the objects pane, which is to the right of the Workbench
Objects pane, the path of the currently selected object displays. You can clickany name in the path to go to that folder.
Note: You can toggle the object path on and off with the path toggle.v In the objects pane, you can select the object.v In the Object Library folder, select the object from the objects pane.
Searching the object libraryYou can use the search tool to find objects in the object library.
About this task
The object library lists all the metadata objects in the application. You may need tofind objects that contain specific text.
Chapter 4. Enabling support for business views 31

For example, you change the name of a column in a view, making the objects thatare dependent on the view invalid. You can search for all the objects that use thecolumn name to make any necessary changes. The search tool has the followingcharacteristics:v The search tool only searches for text in the object definition, which is defined in
XML format. The XML tags are not searched.v The search tool is not case sensitive.v If you type multiple words with spaces, the search tool returns objects that
contain all of the words, not necessarily in succession.For example, a search for sales amount may return an object that contains sales inits name and a column named amount.
Procedure1. On the Workbench tab, in the Workbench Objects pane, click the Object
Library icon to display a list of the objects in the contents panel.2. In the search box, type the text you are searching for.
Results
After a brief delay, the search results display in the same format as the original list.To return to the original list, clear the search box.
Note: Search results are not saved.
Working with Workbench foldersWithin Public Folders, you can create subfolders allowing you to group andorganize objects.
The operations that you can perform on folders are:v Createv Renamev Deletev Movev Move an object from one folder to another
Note: You can move objects from one folder to another by using either theMove option from the Activities button, or by editing the object.
Procedure1. Click Activities, and select Create New.2. Select Folder from the drop-down list.3. In the Create Folder dialog box, do the following:
v Type a folder name.v To specify a location for the folder, click Choose Folder, and select the folder
in which you want to place the new folder.
Note: The default is the root, which is the Public Folders folder.v Optionally, type a description for the folder.
4. To rename a folder:v Select the folder name, and click Activities.v Select Edit.
32 IBM Cognos Real-time Monitoring Workbench Version 10.1.1: User Guide

v In the name field, type a new name for the folder.5. To delete a folder, select the folder, click Activities, and click Delete
Note: Deleting a folder deletes all the objects in the folder, includingsubfolders. If an error occurs during delete, no objects or subfolders may bedeleted.
6. To move a folder:v Select the folder to move.v Click Activities.v Click Move.v Select the folder to which you want to move the folder.v Click Move.
7. To move an object:v Select the object.v Click Activities.v Click Move.v In the Select Folder dialog box, create a new folder or select an existing
folder.
Object dependencies and requirementsThe Relationships tab lists the dependencies and requirements for the selectedobject.
The dependencies of an object are other objects that depend on it in order for themto be valid. For example, the dependencies of a selected view include all viewsdirectly derived from the view and all cubes that are built on the view.
The requirements of an object are the objects that it requires in order to be valid.For example, the requirements of a cube include the dimensions and the fact tablethat the cube is built on.
When you click an object in the Workbench Objects pane, you can click theRelationships tab to view the object's dependencies and requirements as a tree list.You can expand the tree list to view the entire object chain.
You can expand each object in the tree list to view the object's dependencies orrequirements, depending on which branch of the tree the object is in.
You can perform operations using the icons available in the top right corner of theRelationships tab, such as Find Object, Delete, Enable, Disable, Edit, Export,Move, and Permissions. The operations that are available depend on the objecttype and the permissions of the user.
Working with agentsAgents are IBM Cognos Real-time Monitoring objects that receive or retrieveinformation from external sources, such as external events, DBMS, or file storagesystems.
When an agent detects or locates required information, it inserts the data into adata stream or lookup table that the system can use.
Chapter 4. Enabling support for business views 33

The following illustration shows how agents retrieve data from different sources.
Agents are listed with other objects in the Public Folders folder, the ObjectLibrary, or might be contained in a custom folder. Agents are identified by theAgent type, such as JDBC Agent or File Agent. Use the Activities button to:v Create agents.
Click Create New, then click Agent. In the Create Agent dialog box, select theagent type and attributes.
v Modify an agent.For the specified agent, click Activities, then click Edit. You can also modify anagent by clicking the agent name in the Tables and Views pane, and thenclicking Edit Agent for that agent.
v Delete agents.Selecting one or more agents, click Activities, and then click Delete.
v Enable and disable agents.Select the agent, click Activities, and then click either Enable or Disable.
For more information about agents, agent attributes, and about specific agentsources, see the IBM Cognos Real-time Monitoring Workbench Technical Reference.
Working with data streams and lookup tablesData streams and lookup tables drive IBM Cognos Real-time Monitoring.v Data streams feed events to Real-time Monitoring and generate internal
processing. External business applications produce events that recordtransactions, identify changes in business state, and synthesize the details aboutthe business activities.
v Lookup tables support data stream processing and provide meaningfulinformation about events. Lookup table data is the business information storedin databases, data warehouses, or is provided by Web services.
Business views get their event and lookup table information from data stream andlookup tables defined with the IBM Cognos Real-time Monitoring Workbench, andthe tables get their information from agents defined in the Workbench. For moreinformation, see “Working with agents” on page 33.
The illustration below shows ShippingEvents as a data stream table andPartDescriptions as a lookup table for the DelayedSuppliers view. TheDelayedSuppliers views has the derived view AvailableSupplier that uses he
1. Data stream agents monitor external data streams and route required data stream information to the data streamtable when detected.
2. Data stream agents and all lookup table agents retrieve data from storage.
34 IBM Cognos Real-time Monitoring Workbench Version 10.1.1: User Guide

Suppliers as a lookup tables. The lookup tables feed information into the twobusiness views. Each of the tables must exist before you can define the businessviews.
With the Workbench, you can create, edit, or delete the data stream and lookuptables, and see which objects depend on them.
Note: If you change a table that makes one or more dependent objects becomeinvalid, for example, by deleting a column that a view uses, those objects alsobecome disabled. You must then either modify the dependent objects to correct theproblem, or restore the change to the table. You can then enable the dependentobjects again. For more information, see the IBM Cognos Real-time MonitoringWorkbench Technical Reference.
Creating a data streamData stream objects are listed in the Workbench Objects pane either in PublicFolders, or in a folder where you assigned the data stream object.
Click the name of an existing data stream object to see its columns anddependencies, edit or delete the object, or set its permissions. If the data stream isused for flat files, you can select Upload Data File to load raw event data into adata stream table.
Note: VC_SYSTEM_EVENT is a special case data stream that tracks informationabout IBM Cognos Real-time Monitoring activity. Use this stream to monitor thesystem. For more information, see “Understanding logging” on page 85.
Note: When creating JDBC data streams, you can enable the upsert functionality.
Procedure1. On the Workbench tab, click Activities, and then click Create, Data Stream.
The New Data Stream dialog box displays, prompting you to select the type ofdata stream.
2. Select the type of data stream.In most cases you will select Single Data Stream. Use the Consolidated DataStream option only if you are merging multiple event sources into one stream.
3. Click Continue.The New Data Stream dialog box prompts you to select the type of data sourcethat can be a flat file, JDBC, or other type of data source.You can only select a data source type if at least one data source is defined.Thatis, an agent for the data source has been created. Otherwise, the option is notavailable as indicated by the grayed-out radio button.For more information about agents, see “Working with agents” on page 33.
4. Select the type of data stream source, and click Continue.
Chapter 4. Enabling support for business views 35

The New Data Stream dialog box prompts you to select the specific agent forthe data stream source.Some agents require additional information before you can create the datastream table. Specifically:v Flat file agents require the following types of flat files: delimited, fixed
width, or XML. For more information, see the IBM Cognos Real-timeMonitoring Workbench Technical Reference.)Optionally, you can identify sample data to load to assist you with specifyingthe column definitions. When you include a sample data file, thatinformation is presented in a table that you use to format the columns in thenext step.
v JDBC and Salesforce agents require an SQL SELECT query to retrieve datafrom the source database.
5. Configure and define the data stream table following the instructions anddescriptions in the IBM Cognos Real-time Monitoring Workbench TechnicalReference.After saving the table, business views, alerts, rules, and reportlets can use it.
Enabling upsert for a data streamThe upsert functionality combines the actions of updating, inserting, and deletingdata from data stream tables.
You can enable this feature for JDBC data streams, flat file data streams, JMS datastreams, and others.
The upsert functionality dynamically updates your database. As new events areadded to the database tables, old events are replaced or deleted, and the databasealways contains only the required data.
To enable the upsert functionality, you need a JDBC agent specifically for upsert.This agent manages the data required for the upsert functionality. You can createthe upsert JDBC agent before or when creating the data stream. By default, upsertuses the same JDBC agent that you specify for the creation of a JDBC data stream.For more information about agents, see “Creating data source agents for lookuptables” on page 4
You enable the upsert functionality when creating the JDBC data stream. Do notenable this functionality when the data stream uses the event key.
Procedure1. On the Workbench tab, start creating a data stream.
For detailed information, see the steps in the section “Creating a data stream”on page 35.
2. When you reach the Configure Data Stream - JDBC Source dialog box, ensurethat the Treat all rows in the result as a single event check box is not selected,and click the Upsert tab.
3. Select the Enable Updates/Inserts/Deletes (Upsert) check box.4. Specify the JDBC Agent.
You can either accept the default agent that you selected for the data stream, orclick Browse and specify a different agent.
5. Type the name for Table Name for Upsert Data Storage.
36 IBM Cognos Real-time Monitoring Workbench Version 10.1.1: User Guide

A table with this name is created in the database associated with the JDBCagent. This table stores the data required for the upsert functionality. Delete thistable if you delete or disable the upsert stream.
6. For Maximum age of upsert data, specify the period of time to support upsert.The update or delete action is not valid for an event older than this period.
7. In Action Column, choose the column that will contain the "I/D/U" flags forthe Insert/Delete/Update actions.
8. In Key Column, choose the appropriate columns as keys that will be used toidentify the events that should be deleted or updated.You can select multiple check boxes. However, do not select the column that isalready selected as Action Column.
9. Click Save Data Stream.
Creating a lookup tableLookup tables that you have access to are displayed in Public Folders, or in thefolder to which you assigned them.
The object details and status are displayed in the detail panel. Click the name of anexisting lookup table to see its dependencies and join relationships, and to edit ordelete a lookup table.
Tip: You can also see all objects in the Object Library.
Procedure1. On the Workbench tab, click Activities, and then click Create, Lookup Table.2. Select the type of data source for the lookup table.
Only the types with previously defined agents are available. For informationabout creating agents, see “Working with agents” on page 33.
3. Identify the agent that you want to use.Some agents require additional information before you can create the lookuptable. For example, JDBC agents require an SQL SELECT query to retrieve datafrom the source database.
4. Configure and define the lookup table following the instructions anddescriptions in the IBM Cognos Real-time Monitoring Workbench TechnicalReference.After saving the table, business views can use it.
Note: Lookup table data does not change rapidly; therefore, to lessen theimpact on the system that provides the lookup table data, you can cache theresults in memory. Subsequent requests for the same data will then retrieve theresults from memory instead of issuing a new query. For more information, seeIBM Cognos Real-time Monitoring Workbench Technical Reference.
Uploading a data fileIn addition to receiving events as they happen, you can click Upload Data File toupload events from a text file directly into the system.
This option is useful for:v Analyzing events that were gathered in batch from another system, such as the
results collected from a testing system, or the Web logs gathered from HTTPservers.
Chapter 4. Enabling support for business views 37

v Using scenarios by allowing you to test your formulas, rules, alerts, and so on.Use this feature to test your scenarios, modify them, and retest them with thesame data.
Note: This option is only available for data streams that have a text file as anevent source. For more information about text files, see the IBM Cognos Real-timeMonitoring Workbench Technical Reference.
The data format of the uploaded text file must match the format defined for thedata stream data source. For example, if the source is defined as receivingdelimited text for 5 columns, the data in the upload file must match that format.
For XML files, the filename must end with an .xml extension, such as filename.xml.
Procedure1. For the specified data stream, on the Workbench tab, click Upload Data File.2. Identify the file to upload.
Type the full path, or use the browser to select the file.3. Click OK.4. The File Upload Progress dialog box shows the upload status.
If the source file contains erroneous data, click Display Error to see thedescriptions of the errors in the error log.
Working with consolidated data streamsConsolidated data streams accept events from multiple event sources. However,the data from each source must map directly into the view columns of theconsolidated data streams.
Consolidated data streams are useful for combining events from multiple, similarsources. For example, the results from multiple devices that are testing a singleproduct line or the records from multiple real-time, point-of-sale devices.
Consider the following example that combines the logs from two HTTP serversinto a single data stream. A business view then combines the log information withthe lookup table, describing the pages to produce detailed information about theWeb pages visited.
You can create a consolidated data stream in the same way as a single data streamby clicking Activities in the Workbench, and selecting Create New then New DataStream. For more information, see “Creating a data stream” on page 35.
The tables and views on which consolidated data streams are built have theserestrictions:
38 IBM Cognos Real-time Monitoring Workbench Version 10.1.1: User Guide

v They must supply data that maps directly into the columns of the consolidateddata stream, and the data types of the source must exactly match the target intype, width, scale, and precision.
v Stateful views are unavailable for selection.
Working with viewsBusiness views are data models that provide a real-time picture of a businessactivity.
As changes and transactions occur in your business, business views generateevents that are sent to IBM Cognos Real-time Monitoring. Each new event drivesan immediate update of the views (the business models) which provides areal-time, updated view of the business metrics.
In the Workbench you create business views derived from data stream and lookuptables and from other business views. You can also define:v How the view results are grouped and ordered.v Formulas for aggregating the information displayed in the view columns.v Complex join conditions (WHERE clauses) that specify how to relate the source
data.v Access filters that allow different users to see different rows of the same view
depending on the criteria specified in the filter. These filters restrict the data auser sees without defining a new view for each user. For more information, seethe IBM Cognos Real-time Monitoring Workbench Technical Reference.
View tabsClick any view in Public Folders, or in the folder where you assigned the view, tosee the tabs that provide detailed information about that view.
These tabs are:v Columns
Descriptions and definitions of the columns in the view.v Dependencies
Objects that depend on this view.v Reference Data
Reference data for thresholds on this view.v Results
Current® values in the view, if any.v Access Filters
Access filters applied to this view. For more information about access filters,refer to the IBM Cognos Real-time Monitoring Workbench Technical Reference.
Creating and editing viewsWhen you create a view, you first select the data stream that drives the view.
A data stream is either a data stream table or another business view. Optionally,you also select one or more lookup tables to join with the data stream. These tablesand views become part of the workset of the derived view. In the view editor, youcan see the workset tables and views and their columns on the left side of thepage.
Chapter 4. Enabling support for business views 39

Use the Configure View dialog box to create and modify views. This dialog boxdisplays the tables and views from which the current view gets its information, thelist of fields or columns in the view, and how the information is joined andordered.
Note: When you change any part of the definition of a view, all results currentlyin the view and in any views derived from the modified view are discarded.
Procedure1. On the Workbench tab, click Activities.2. Click Create New, and then click View.3. Select the data stream or view that is the base for the new view.4. Optionally, select one or more lookup tables to include in the view.
The views and tables that are available depend on the selection made in theprevious step, which depend on the following:v If you selected a data stream or a consolidated data stream, all lookup tables
and all views built on the same data stream, or consolidated data stream,display.
v If you selected a view, the corresponding data stream or a consolidated datastream for that view displays.
5. Define the view in the Configure View dialog box.When you save the view, it is ready to receive events.
6. To edit an existing view:v Select the name of the view in the object browserv Click Edit This View.v Change the definition in the Configure View dialog box.
Creating view fieldsFields in a view are usually derived from fields in the source tables and view butmay be formulas independent of the source table, such as a field that identifies thecurrent date or time.
To add a field to a view, drag the fields from the source in the workset onto thefield list of the view.
Add new, empty fields by clicking Add Field for the Drag fields from worksetarea.
Field namesField names appear in view results and are the names that rules, alerts, reportlets,and other views use to reference the field.
Names can be mixed case, and can include numbers and special characters.However, names must not coincide with system reserved words. For informationabout names, see the IBM Cognos Real-time Monitoring Workbench TechnicalReference.
Field definitionsEach field definition is an expression or formula that identifies what information toproduce in the view.
40 IBM Cognos Real-time Monitoring Workbench Version 10.1.1: User Guide

By default, definitions are references to the source field. For example,orderStatusEvent.OS_ID is the name of the data stream followed by the columnname in the source table.
More complex definitions include functions that modify the field value or displayor perform some analytic operation. The following are some examples:v DISPLAY_MONEY(OS_PRICE) formats a number as a currency value, such as
$1,234.56.v TO_CHAR(CURRENT_TIMESTAMP(), 'd MMMM yy') formats the current data
as '5 March 09'.
More complex formulas might have nested functions, such as the following:v DISPLAY_MONEY(AVG(OS_PRICE)) formats the average price as a currency
value, such as $1,234.56.v CAST(((OS_PRICE/OS_COST)-1)*100 AS DECIMAL(5,0) )||'%' determines the
percentage markup on the price of an item over its cost, strips out the decimals,and concatenates a percent symbol. The result might look like 18%.
You can type formulas directly into the field definition, or you can use the “FieldBuilder” feature to quickly create formulas.
For more information about functions and expressions, see the IBM CognosReal-time Monitoring Workbench Technical Reference.
Field BuilderThe Field Builder assists you when creating field definitions.
Use the feature by clicking the Field Builder button next to the fielddefinition.
With this feature, you can do the following:v Edit formulas in a large text editor.v Add fields from the work set by choosing them from the drop-down list.v Insert operators by clicking them.v Insert functions directly into the formula.
Function PickerThe More Functions option displays the Function Picker which lists the functionsthat you can insert into the current field.
Each function is listed by category, and each includes a synopsis that describes thefunction and its arguments.
For detailed descriptions about the function, click Help on the dialog box, or referto the IBM Cognos Real-time Monitoring Workbench Technical Reference.
Group ByThe Group by option produces summary information for groups of rows wherevalues in the selected fields are the same.
Consider this set of data:Name Quantity
------------ --------
Chapter 4. Enabling support for business views 41

Nano Webber 10
Fizzy Lifter 700
Nano Webber 50
Nano Webber 20
Nano Webber 15
Smoke Shifter 310
If you create a view that groups by name and determines the sum of the quantityfor each group, it would look like the following:Name: product.name GROUP BY
Qsum: SUM(product.quantity)
Name Qsum
------------ ----
Nano Webber 95
Fizzy Lifter 700
Smoke Shifter 310
You can also group on multiple fields. For example:Name: product.name GROUP BY
Local: product.location GROUP BY
Qsum: SUM(product.quantity)
Name Location Qsum
------------ -------- ----
Nano Webber West 10
Fizzy Lifter East 700
Nano Webber East 85
Smoke Shifter West 310
When you use the Group by option, every field must either be part of the Groupby or its definition must include a set function, such as SUM() or AVG().
For more information about Group by semantics, see the IBM Cognos Real-timeMonitoring Workbench Technical Reference.
Working with clausesThe three clause fields specify the source of the data on which the view is derived,how these sources are joined together, under what conditions the data should bejoined, and how the result is sorted.v From Clause names the source tables and views on which the view is derived.v Where Clause accepts only those rows that meet the specified condition.v Window Clause defines query windows. For more information, see the IBM
Cognos Real-time Monitoring Workbench Technical Reference.v Order By sorts the resulting view based on column names or on expression
results.v Advanced allows you to set View Persistence and Drill Back to Detail for the
view.
Note: These tabs correspond to the clauses in the C-SQL SELECT statement:FROM clause, WHERE clause, and WINDOW clause. For more information, seethe IBM Cognos Real-time Monitoring Workbench Technical Reference.
42 IBM Cognos Real-time Monitoring Workbench Version 10.1.1: User Guide

From clauseThe From clause contains a list of the tables and views from which to derive theview.
Every table or view referenced in the “Field definitions” on page 40 must also belisted here. This list usually corresponds with the table and view objects shown inthe workset.
You can also use the From clause to define an inner join relationship between thetables and views in the workset. An inner join is one where the rows in the resulttable are the rows from the first table that meet the specified criteria, combinedwith the corresponding rows from the second table that meet the specified criteria.That is, the records from the first table are combined with the records from thesecond table, and only those records that satisfy the join predicate remain in theresult table. For example:Product AS P INNER JOIN ManufacturerAS M
ON P.productName = M.ProductName
For more information about join relationships, see the IBM Cognos Real-timeMonitoring Workbench Technical Reference.
Where clauseThe Where clause defines how to join multiple source tables and views.
It also filters the resulting view to accept only those that meet the specifiedcondition. For example, this clause specifies how to join the lookup table to thedata stream, and how to join the lookup table to the lookup table:orderStatusEvent.OS_PROD_ID = Product.prod_id AND
Product.prod_supp_id = Supplier.supp_id
You can expand the clause to filter out all rows whose price is greater than orequal to 10, as follows:orderStatusDataStream.OS_PROD_ID = Product.prod_id AND
Product.prod_supp_id = Supplier.supp_id AND
orderStatusEvent.OS_PRICE >= 10
Window clauseThe Window clause defines query windows that you can use in aggregations oversets of events and view rows.
For more information about query windows, see the IBM Cognos Real-timeMonitoring Workbench Technical Reference.
Order By clauseThe Order By clause orders (sorts) the resulting view based on column names oron expression results. Without this clause, the same query might not produce rowsin the same order on subsequent queries.
By default, the view is ordered in ascending order (ASC). To order in descendingorder, specify the DESC option.
This example has two fields (Name and Quantity) and the results are ordered byName in descending order:Name: product.name
Chapter 4. Enabling support for business views 43

Quantity: product.quantity
Order by: product.name DESC
Name Quantity
------------ --------
Smoke Shifter 310
Nano Webber 10
Nano Webber 50
Nano Webber 20
Nano Webber 15
Fizzy Lifter 700
Configuring advanced featuresThe Advanced tab allows you to configure the View Persistence and Drill Back toDetail features.
For information about using this feature, see the IBM Cognos Real-time MonitoringWorkbench Technical Reference.
Persisting view data:
IBM Cognos Real-time Monitoring can persist business view data to an externalRDBMS for future reporting by third-party tools.
The information in the table is sufficient for the reporting tools to recreate acomplete snapshot of the view. When persisting, the view information is written toa table in the RDBMS at a rate following a policy that you define.
To use view persistence, you will first need to have a defined JDBC agent to accessthe RDBMS that will store the data.
Drill Back to Detail:
You can create views to drill back to detail on a chart. This allows a user to see thecolumns in the fact table of a cube and all levels of all cube dimensions whenviewing a dashboard object.
Drill Back to Detail has the following requirements:v The data source of the dashboard object must be a cube.v The view on which the cube is built must be stateless.v The dimensions of the cube must be derived from a single external database.v If there is more than one table in the view, you can use a persisted table for the
drill back to detail table.
Maintaining events in a stateless viewBy default, a stateless view contains only rows representing the effect of the lastevent. Rows from previous events are discarded. With this option you can specifya set of recent event rows to maintain in the view contents on the Results tab.
You cannot maintain previous stateful views. This option is only available forstateless views.
You can specify either the count or time-span of events to retain:
44 IBM Cognos Real-time Monitoring Workbench Version 10.1.1: User Guide

v An event count is the maximum number of events to maintain that satisfies theview condition. The view discards the oldest event rows that do not fit in thespecified size.
v A time interval defines a set of the most recent events. The count of events inthe view varies depending on the number of events in the interval when theview was updated. For example, if an event arrived that did not meet the viewcriteria, it is excluded from the view, but the view still recalculates the interval atthat time.
Note: The set of events is determined when the last event was inserted, not at thecurrent time. For example, an interval of one hour shows all the events thatarrived in the view for the hour previous to the last update. If no events wereinserted in the last day, the view might still show an hour of events from theprevious day. However, when a new event arrives at the view, all those events arediscarded.
For information about how to perform aggregations on sets of recent events, seethe IBM Cognos Real-time Monitoring Workbench Technical Reference.
Displaying SQL expressionsCreate views with the view editor as an SQL SELECT statement. From the editor,you can see the SQL statement by clicking Display SQL Expression.
For information about using the SELECT statement, see the IBM Cognos Real-timeMonitoring Workbench Technical Reference.
Viewing threshold relationshipsReference data is the data source for references in IBM Cognos Real-timeMonitoring dashboard objects. For example, if a speedometer shows the currenttotal sales, a reference line can show the target sales.
Before the dashboard objects can use the reference, you must define the referencesin the Workbench. To access the references associated with a view, select the viewand click the Reference Data tab.
Each reference is a numeric column in the same view as the source for thedashboard object. Click Manage Reference Data to associate references with thecolumn that will be presented in the dashboard object. For example, if aspeedometer charts the value in the view Sales column, and the Target columncontains the sales threshold (target), create a reference to Target and associate itwith Sales.
A column can be associated as a reference to multiple presentation columns.However, the Alias Name must be unique within the view. When you create oredit the dashboard object, and when the object measures the Sales column, thesereferences are available to the object.
For information about using reference data in dashboard objects, see the IBMCognos Real-time Monitoring Workbench Technical Reference.
Chapter 4. Enabling support for business views 45

Working with cubes and dimensionsA cube is a set of data organized by dimensions and measures to aggregatedifferent subsets of the larger set of data. When rendered as a dashboard object,cubes allow you to quickly choose categories that filter data to show the resultsthat meet your selection. For example, a cube of sales data might provideaggregations of the same data by product, by time, or by sales region dimensions.Looking at the cube, you might choose to view the total sales of a product (Nails)within a business region (West) during a fiscal quarter (Q1).
Cubes are similar to business views in that they aggregate event data, but they doso across different dimensions. The view that a cube aggregates is a fact table: aview or data stream table for an event that contains one or more columns tomeasure (aggregate) and that also contains columns that identify the dimensionalelements associated with the event. For example, you could imagine a fact tablecontaining an event similar to the following:Cost Quantity Product State Month
------ -------- ------- ---------- -------
200.00 1600 Nails California January
The dimensional elements are stored in dimensions (special lookup tables) andreferenced by IDs like the following:Cost Quantity prod_id region_id ddim_id
------ -------- ------- --------- -------
200.00 1600 100 7 39
Similar to a view, as new events enter the system they become part of an eventthat can feed a cube. As new events enter a cube, each measure of each dimensionis recalculated to provide the latest aggregation. The following illustration shows acube built from the OrderDetails fact table that includes measures for total salesacross various business regions, products, and date and time.
For more information, see the IBM Cognos Real-time Monitoring WorkbenchTechnical Reference.
Procedure1. Select the fact table and columns to measure.2. Specify how to measure them (aggregate formulas to use).3. Select one or more dimensions that classify the measurements. For example:
46 IBM Cognos Real-time Monitoring Workbench Version 10.1.1: User Guide

SUM(OrderDetails.prod_cost*OrderDetails.order_qty) ASTotalOrderSales
Creating dimensionsDimension columns categorize the measurements. A cube must have at least onedimension, and it may have more. Also, the data in the fact table must be able toidentify a unique element in each associated dimension. While the mathematicalterm cube implies three dimensions, a database cube can have any number greaterthan one.
The following table lists examples of different types of measures by category.
Time Geography Inventory Security Taxonomy
year
quarter
month
week
day
hour
minute
continent
country orregion
state
county
city
district
classification
type
manufacturer
model
configuration
type
rating
company
cusip
kingdom
phylum
class
order
family
genus
species
Before creating a dimension, you must have the following:v Create permissions for views, cubes, and dimensions.v At least read-only access to the lookup table that provides the dimension
elements
Turn on caching for the lookup table for optimum performance. When caching isoff, performance for cubes can be slowed dramatically. For information aboutcontrolling the cache, see the IBM Cognos Real-time Monitoring WorkbenchTechnical Reference.
Procedure1. On the Workbench tab, click Activities, and then select Create New,
Dimension.2. In the Configure Dimension dialog box, type a name and, optionally, a
description of the dimension.3. Select the lookup table that contains the dimension elements by clicking
Browse next to the Lookup Table Name field.4. Optionally, select Use this for Geography Charts to implement geographical
maps. The Geo Categories column displays next to the Selected Fields list.5. Define the levels of the hierarchy:
v Add fields to the hierarchy from the Available Fields list.v Order the levels from largest set (top) to smallest (bottom) in the Selected
Fields list.v Optionally, identify one or more key fields to include in the Select Key
Fields list.v Optionally, assign alias names to the levels.
Chapter 4. Enabling support for business views 47

v Optionally, assign Geo Categories to each level, if you selected the Use thisfor Geography Charts check box. The Selected Fields list displays a GeoCategories column. From this column, you can assign Not Used, Country orRegion, State/Province, City, Street, or Postal Code geo category to a levelin the hierarchy.
6. Save the dimension.You can immediately use the dimension in cubes.
Creating lookup tables on data streams and viewsYou can use data from data streams and views as the source for values in adimension in a cube.
About this task
Lookup tables provide the functionality of inline dimensions (that is, dimensionvalues sourced from the event stream), as well as the functionality of a streaminglookup table that you can use to join to views as well to cubes.
By using a streaming lookup table based on an event stream, the values in thelookup table are updated as quickly as the data is processed and can be sourcedfrom non-JDBC sources such as JMS or MQ Series.
You can use a streaming lookup table as a source of real-time data for a dimensionin a cube. In previous releases, sometimes the event would be processed before thelookup table that sourced the dimension had been updated with new values for anevent streaming in real time.
The data is also available in real time for use as a lookup table joined in a view,and can be used in a separate data stream than the one that the lookup data isarriving in. In previous releases, you could join data from a single data stream pluslookup tables, but the lookup tables were always cached or on-demand and not inreal time.
Procedure1. On the Workbench tab, click Activities, and then click Create New > Lookup
Table.2. In the New Lookup Table window, select the Data Stream or View option and
click Continue.3. Click Browse and select a data stream or view from the available list.
All the fields in the corresponding data stream or view display in the FieldInformation tab.
4. Select the columns that you want to include in the lookup table. You can alsoselect a column to use as an index.The new lookup table keeps only unique records for the specified columnsfrom the data stream or view.Optionally, you can specify a schedule in the Invalidation Schedule tab.However, adding the invalidation schedule clears the data in the lookup tableaccording to the schedule and is not recommended.For more information, see “Setting invalidation schedules” on page 15.
5. Click Save Lookup Table.You can now use this lookup table to create dimensions. For more information,see “Creating dimensions” on page 47.
48 IBM Cognos Real-time Monitoring Workbench Version 10.1.1: User Guide

Creating cubesYou can create a cube to build dashboards from.
To see the contents of a cube, use the Results tab. The Dimension and Levelcontrols determine the cube-face to view.
If the cube is empty, or if you do not have access to a dimension or level, you seethe None available message instead.
Using the Real-time Monitoring Dashboard, you can chart the contents of a cube ordisplay values in a table.
Before you begin
Before creating a cube, you must have the followingv Create permission for views, cubes, and dimensions.v At least Read-Only access to an existing fact table (business view).v At least Read-Only access to the dimensions to include.
Procedure1. On the Workbench tab, click Activities, and then click Create, Cube.2. Type a name and, optionally, a description of the cube.3. Click Browse next to the Fact Table field to select the fact table that contains
the data to measure, and the columns that identify the dimension elements.4. In the Measure Columns of the Configure Cube dialog box, define one or
more measure columns by typing a measure name or names in the MeasureName column, and an expression or expressions in the Aggregate Expressioncolumn.For example, type:SUM(OrderDetails.prod_cost*OrderDetails.order_qty)
5. In the Dimension Column Information area of the Configure Cube dialog,define one or more dimension columns.This list includes all dimensions to which you have at least read-only access.
6. Save the cube.You can immediately begin building dashboard objects using this cube.
Cube threshold relationshipsReference data are the data sources for references in dashboard objects of IBMCognos Real-time Monitoring. For example, if a bar chart measures total sales, areference line can show the target sales for each category, while a range shows thesales target range for the same.
Before the dashboard objects can use the reference, you must define them in theWorkbench. To access the references associated with a cube, select the cube andclick the Reference Data tab.
Click Manage Reference Data to create and edit references.Each reference is acolumn in a lookup table that is related to a column in the cube. For example, tohave the sales targets for a product, there needs to be a product name column inthe cube, and it needs to map to a product name column in the lookup table thatcontains the sales targets for each product. The following is an example of somedata from the Product_Targets lookup table:
Chapter 4. Enabling support for business views 49

PRODUCT_NAME PRODUCT_MIN PRODUCT_TARGET PRODUCT_MAX
Nails 100000.00 150000.00 200000.00
Screws 60000.00 80000.00 100000.00
Lag bolts 30000.00 65000.00 100000.00
Washers 120000.00 170000.00 220000.00
Each reference is associated with a measure in the cube (such as total sales), and isavailable to a single level of a single dimension of the cube. For example, the dataabove is only applicable to the Product Dimension, Product level of a cube.
When you create or edit the dashboard object, and when the object measures theTotal_Sales column, these references will be available to the object.
For information about using reference data in dashboard objects, see the IBMCognos Real-time Monitoring Dashboard User Guide.
Working with UDF and JAR filesApplication developers may create user-defined functions (UDFs) for use inqueries, views, and rules. For example, you might have a UDF that takes a set ofvalues and concatenates them alphabetically while ignoring NULL values. In aField expression, you would use that UDF in an expression such as the following:ConcatSet(Product.Name)
UDFs are small Java programs that take arguments and return a value, just like theinternal IBM Cognos Real-time Monitoring functions. For information aboutimplementing UDFs, see the IBM Cognos Real-time Monitoring WorkbenchTechnical Reference.
The UDF Java programs are stored in JAR files. To access the UDFs, you mustupload the JAR file to Real-time Monitoring servers, then identify the functions tomake them available.
JAR Files folderJAR files contain one or more Java programs.
The JAR files folder provides access to the JAR files available to IBM CognosReal-time Monitoring. Select the folder to see a list of the JAR files alreadyinstalled, and to upload new JAR files. Select a JAR file in the folder to see thefunctions that JAR contains, and the objects that depend on the functions in thatJAR.
Procedure1. From the Workbench, click the JAR Files folder, and click New JAR.2. Type a name for your JAR in the Name field, and optionally, a description.3. Click Browse to locate the file in the Path field.)4. Click Save.
The JAR file is now available to the system.
50 IBM Cognos Real-time Monitoring Workbench Version 10.1.1: User Guide

User defined functions folderThe User Defined Functions folder controls access to the User Defined Functions(UDF) available to IBM Cognos Real-time Monitoring. Select the folder to see thelist of functions available, to upload or identify new functions, or to edit or deletefunctions already in the list.
To make a UDF available to the system, you must first upload the JAR file thatcontains it. You can either follow the steps provided in the section “JAR Filesfolder” on page 50, or you can upload it when you create a new UDF in the list.
Procedure1. Select the User Defined Functions folder, and select New User Defined
Function.2. The Create UDF dialog box prompts you to either select one of the JAR files
already in the system or upload a new JAR file.If you upload a new file, it will appear in the JAR Files folder after youcomplete these steps.
3. After identifying the JAR file, select the UDFs that you want to include in thefolder.By default, all UDFs in the JAR are selected. Each UDF is assigned a name thatis the same as it appears in the JAR file. However, you can assign anothername. The name appears in the UDF Name column in the “JAR Files folder”on page 50 list.
4. Click Finish to make the UDFs immediately available to the system.
Creating external linksExternal links are URLs that locate external systems. Use them to createdrill-through targets that are inserted into reportlets for communicating to externalreport mechanisms.
Property Description
Name Specifies the name of the external linkobject. This is the name that appears in thelist of links when creating an externalreportlet or drill-through targets.
Description Specifies the text description of this object.
URL Link Specifies the complete URL for locating theexternal system. The URL must begin withhttp or https. If you do not assign a valuefor this field, the system assumes an httpconnection to port 80 on the same domain asthe application.
The URL is the string that locates the reporting system. Later, when the reportlet isgenerated, it extends the URL with data parameters to pass to the report system.Note that the URL must contain the http://qualifier. For example,http://reports:8091
Later, the reportlet might expand the URL similar to the following:http://reports:8091?ProdDescrPDF=MyReprt&product=prod_id
Chapter 4. Enabling support for business views 51

For information about reportlets, see the IBM Cognos Real-time MonitoringWorkbench Technical Reference.
Procedure1. On the Workbench tab, click on External Links in the left column.
The right pane displays the External Links tab pane.2. Click New External Link.3. Name and describe the link, and define the URL.4. Click OK.
The new link is immediately available for reportlets and drill-through targets.
Creating process definitionsProcess definition objects associate a process definition file with an aggregate viewor cube, and optionally with a search lookup table. The dashboard uses the objectwhen rendering a process diagram to identify the associated aggregate source forstatistics, and for identifying the search lookup table and search label to show theuser.
A process definition has the following properties:
Property Description
Name Specifies the name of the process definitionobject. This name appears in the list ofprocesses when creating a process diagramin the dashboard.
Save in Specifies the folder in which to save theprocess definition. (The default is PublicFolders.) Click the Choose Folder button toselect a folder.
Description Specifies the text description of this object.
Process Name Specifies the name that identifies the processin the uploaded process definition file. ClickUpload Process Definition File. Theexternal process management systemgenerates the process definition.
Aggregate View or Cube Specifies the view or cube that aggregatesprocess instance data. One of the columnsidentifies the steps in the process, such as astep name or ID. The Current Data Sourcefield specifies the current data source usedfrom the view or cube. The Step Columnspecifies the column in the data source thatcontains the steps.
52 IBM Cognos Real-time Monitoring Workbench Version 10.1.1: User Guide

Property Description
Detail Search Specifies the lookup table that queries theexternal process management system abouta specific process. Users viewing a processdiagram in the dashboard can use an ID of aspecific process instance and receive theinformation about the instance as reportedin the lookup table. The Lookup Table fieldspecifies the lookup table to use for thequery. Click Select Data Source to select alookup table. The Search Column field is adrop-down list from which you can select acolumn in the lookup table. You can alsoassign a name for your search in theDescriptive Name field.
This parameter is optional.
Before creating a process definition, you must have:v A process definition file that conforms to the XML Process Definition Language
(XPDL) 2.0.v A view or a cube that aggregates the process-instance data, where one column
specifies the steps in the process.v Read only access for the view or cube that aggregates the process data streams.v Permission to search the lookup table (optional).
For more information, see the section about processes in the IBM Cognos Real-timeMonitoring Workbench Technical Reference.
Procedure1. On the Workbench tab, click Activities, and then click Create, Process
Definition.2. Name process definition, specify a folder, and provide an optional description.
The default folder is Public Folders.3. Click Upload Process Definition File to upload the process definition file
generated by the BPM.The process name from the definition file appears in the Process Name fieldafter uploading the file.For more information, see the section about processes in the IBM CognosReal-time Monitoring Workbench Technical Reference.
4. Select the aggregate view or cube and select the column that identifies the stepsin the process by doing the following:v Click Select Data Source to select the aggregate view or cube.v Use the Step Column drop-down list to select the step column. For example,
each step in the process might be identified by a name or ID number.5. If needed, create a detail search by doing the following:
v Click Select Data Source to select the lookup table for the detail searchv Select the column to search from the Search Column drop-down list.v If needed, provide a descriptive text in the Descriptive Name field. This text
appears in the Real-time Monitoring Dashboard.6. Click Save.
Chapter 4. Enabling support for business views 53

You can now create process diagrams based on this definition.
Creating drill-through targetsA drill-through target links a view to an external reporting system through apreviously defined external link. External links are URLs. The configuration of adrill-through target includes specifying parameters in the URL that can besubstituted with values derived from columns in the view definition.
After configuration, a drill-through target can be accessed from the Activitiessubmenu in IBM Cognos Real-time Monitoring Dashboard for any dashboardobject that is based on the view defined in the configuration of the Drill ThroughTarget.
For more information about using drill-through targets, see the IBM CognosReal-time Monitoring Dashboard User Guide.
Procedure1. On the Workbench tab, create an external link for the drill-through target, as
described in “Creating external links” on page 51.2. Click Drill Through Targets in the left pane.
The right pane refreshes to show the Drill Through Targets tab.3. Click Create Drill Through Target.4. In the Create Drill Through Target dialog box, specify the following properties:
Property Description
Select an External Link Lists the external links that are configuredfor IBM Cognos Real-time Monitoring.
Select the data that this report will beassociated with
Opens a secondary dialog box that lists theconfigured views with which you canassociate the report.
Status Indicates whether the report is availablewhen a dashboard is being created with thespecified view.
Drill Through Target Name Specifies the name of the report as it willappear on the Drill Through Targets tabafter the drill-through target report iscreated.
Description Specifies the text description of this object.
54 IBM Cognos Real-time Monitoring Workbench Version 10.1.1: User Guide

Property Description
Dynamic Report ParametersSpecifies the column from which you canassign values to the variable parameters inthe URL that is specified in the external link.For example, consider the case in which theexternal link defines a base URL for an IBMCognos report, and the base URL needs thefollowing arguments:
ui.tool=CognosViewer
ui.object=content/folder[@name='DemoReport']/report[@name='Inventory Levels byRetailers']
ui.action=run
run.outputFormat=PDF
The base URL is:
http://server_name/ibmcognos/cgi-bin/cognos.cgi?b_action=xts.run&m=portal/launch.xts&ui.tool=CognosViewer&ui.object=content/folder[@name='DemoReport']/report[@name='Inventory Levels byRetailers']&ui.action=run&run.outputFormat=PDF
You can create multiple parameters, as thesearch criteria allow.
Chapter 4. Enabling support for business views 55

Property Description
Constant Report ParametersSpecifies argument values that you canassign to parameters in the URL that arespecified in the external link. For example,consider the case in which the external linkdefines a base URL for an IBM Cognosreport, and the base URL needs thefollowing arguments:
ui.tool=CognosViewer
ui.object=content/folder[@name='DemoReport']/report[@name='Inventory Levels byRetailers']
ui.action=run
run.outputFormat=PDF
The base URL is:http://server_name/ibmcognos/cgi-bin/cognos.cgi?b_action=xts.run&m=portal/launch.xts
When the drill-through target report iscalled from the dashboard object, the valuesspecified for the Dynamic ReportParameters and Constant Report Parametersare used in the URL. The actual URL requestis constructed as follows:
http://server_name/ibmcognos/cgi-bin/cognos.cgi?b_action=xts.run&m=portal/launch.xts&ui.tool=CognosViewer&ui.object=content/folder[@name='DemoReport']/report[@name='Inventory Levels byRetailers']&ui.action=run&run.outputFormat=PDF
5. Save the values.The dialog box closes, and the new drill-through target now appears on theDrill Through Targets tab.
Exporting selected objectsYou can export selected IBM Cognos Real-time Monitoring objects. This is usefulwhen exporting objects from a development environment to a productionenvironment.
The export action writes the object information to one of the following:v XML files in a directory on the server.v A single compressed JAR file on the server or local client computer.
You can export a single object, an object and its dependencies, an object and itsrequirements, or an object and its requirements and dependencies.
The dependencies of an object are other objects that depend on your selected objectin order for them to be valid. For example, when choosing to export a view withits dependencies, your export operation also includes all views directly derived
56 IBM Cognos Real-time Monitoring Workbench Version 10.1.1: User Guide

from the view that you selected and all scenarios, rules, alerts, and reportlets thatreference the view. For more information, see “Object dependencies andrequirements” on page 33
The requirements of an object are the objects that your selected object requires tobe valid. For example, when choosing to export a cube with its requirements, yourexport operation also includes the dimensions, lookup tables, agents, views, anddata streams associated with the cube.
For information about export and import of entire Real-time Monitoring metadata,see “Importing and exporting metadata” on page 81.
Procedure1. On the Workbench tab, select the object or objects that you want to export.2. From the Activities drop-down menu, click Export objects.3. In the Selective Export dialog box, from the Operations drop-down menu,
select one of the following types of export:v Export metadata to a directory on the server
Selecting this option exports the metadata to the directory that you specify inthe Server Location field. Type the full path to the directory where you wantto export the metadata. The directory must exist, and you must havepermission to write to the specified directory. Also, two directories arecreated in your specified directory. One subdirectory is named latest. Theother is the timestamp of your export. If the directories already exist, theyare reused.
v Export metadata to a JAR file on the server
Selecting this option exports the metadata to a JAR file in the directory youspecify in the Server Location field. Type the full path to the directory whereyou want to export the metadata. The directory must exist, and you musthave permission to write to the specified directory.The filename on the server is _export.jar. If _export.jar already exists, it isoverwritten.
v Export metadata to a JAR file (download)
Selecting this option exports the metadata to a JAR file on the client. Use thebrowser download dialog box to identify the location (and optionally changethe file name) on your local machine.
4. From the Export Options drop-down menu, specify what you want to includein the export.Choose one of the following options:v Export entire project
Exports the selected objects, and the dependencies and requirements of allrelated objects.
v Export sub-project
Exports the selected objects with their requirements and dependencies, andthe requirements of those dependencies.
v Export with requirements
Exports the selected objects and their requirements.v Export with dependencies
Exports the selected objects and their dependencies. The requirements ofdependencies are not exported.
v Export with dependencies and requirements
Chapter 4. Enabling support for business views 57

Exports the selected objects with their dependencies and requirements. Therequirements of dependencies are not exported.
v Export only selected objects
Exports only the objects that you select. The dependencies and requirementsof those objects are not exported.
5. Optionally, select Include permissions on these objects.This option is useful when you want to avoid reassigning permissions for yourobjects after you import them.
6. Click Preview Export List to ensure that you selected the proper exportoptions.
7. Click OK to complete the export.
58 IBM Cognos Real-time Monitoring Workbench Version 10.1.1: User Guide

Chapter 5. Managing system administration
All system administration tasks are performed using the Administration Console.This section describes the configurations that you can define and change, and theactivities that you can perform using the Administration Console.
Managing usersEach user that interacts with IBM Cognos Real-time Monitoring has an account inthe system. The Users list in the Administration Console provides access to theuser accounts.
Real-time Monitoring supports the following types of users:v Internal
The accounts for these users are created in Real-time Monitoring Workbench.You can create, view, edit, or delete the internal user accounts from the Users listin the Administration Console. When you choose the Internal authenticationmethod, your system supports only internal users. The system deletes externalusers, if they exist.Tip: You can view and edit your own account information by clicking AccountSettings in the upper-right corner of the application page.
v ExternalThe accounts for external users are created in the supported LDAP directoryservers, such as IBM Tivoli®, Sun ONE, or Microsoft Active Directory, or in thedirectory servers supported by IBM Cognos Business Intelligence (BI). Externalusers are added to the system when you choose the LDAP/ADS or IBM CognosBusiness Intelligence authentication methods and synchronize the users. Thesystem retains internal users, if they exist.External user accounts appear in the Users list in the Administration Console.You can add access permissions for the Real-time Monitoring objects to thoseusers, and assign the required delivery profiles to them. You can also make themmembers of the internal roles. You cannot delete external users, or change theirpassword and membership in the external roles.
For more information, see “User Management and Authentication” on page 79.
All internal and external users have read permissions for the user object type andcan view all user accounts.
To create a new internal user, you need create permissions for the user object type.To edit or delete user account information, you need read and write permissionsfor that account.
All account management activities for external users are performed in the directoryservers. The changes appear in Real-time Monitoring Workbench after the users aresynchronized.
For more information, see the IBM Cognos Real-time Monitoring WorkbenchTechnical Reference.
© Copyright IBM Corp. 2009, 2011 59

Procedure1. Click the Administration Console tab.2. Click Users to see the list of all users currently defined in the system.
You can perform the following tasks on user accounts:v Create a new user account.
Click New User. On the User Details tab, specify the user name andpassword, and add the roles to which the user needs to belong. On theDelivery Profiles tab, specify the delivery profiles that define how to deliveralerts and data feeds to the user. On the Access Permissions tab, specify theaccess permissions to objects in Real-time Monitoring that the user needs.
v Edit an existing user account.Double-click the user name in the list. The Edit User dialog box appears.For all users, you can change the access permissions and delivery profiles.For internal users only, you can change the user name and password, andadd or remove roles.
v Delete an internal user.Select one or more users in the list, and click Delete User(s). You cannotdelete the rtmadmin user account, or your own account.Tip: For external users, the Delete User(s) button is disabled.
v View or specify access permissions the user object.Select a user from the list, and click Permissions. View or specify the usersor roles that can modify the definition of this user account. You can add newusers and roles by clicking Add User or Add Role.
Managing rolesRoles define the minimum sets of permissions associated with users. Using roles,you can quickly assign the same permissions to an object, or a set of objects. TheRoles list in the Administration Console shows the current roles in the system.
Real-time Monitoring supports the following types of roles:v Internal
These roles are created in Real-time Monitoring Workbench. You can create,view, edit, or delete the internal roles from the Roles list in the AdministrationConsole. When you choose the Internal authentication method, your systemsupports only internal roles. The system deletes external roles, if they exist.
v ExternalThese roles are created in the supported LDAP directory servers, such as IBMTivoli, Sun ONE, or Microsoft Active Directory, or in the directory serverssupported by IBM Cognos Business Intelligence (BI). External roles are added tothe system when you choose the LDAP/ADS or IBM Cognos BusinessIntelligence authentication methods and synchronize the users. The systemretains internal roles, if they exist.External roles appear in the Roles list in the Administration Console. You canassign access permissions to the Real-time Monitoring objects for those roles.You cannot delete external roles, or change their membership properties.Note: Some directory servers support groups instead of roles. The groups areconverted to roles in Real-time Monitoring Workbench during thesynchronization process.
For more information, see “User Management and Authentication” on page 79.
60 IBM Cognos Real-time Monitoring Workbench Version 10.1.1: User Guide

To see which roles a user belongs to, see the user account information, asdocumented in “Managing users” on page 59. To see which roles you belong to,view your user account by clicking Account Settings in the upper-right corner ofthe application page.
All management activities for external roles are performed in the directory servers.The changes appear in Real-time Monitoring Workbench after the synchronizationprocess.
For more information, see the IBM Cognos Real-time Monitoring WorkbenchTechnical Reference.
Procedure1. Click the Administration Console tab.2. Click Roles to see the list of all roles in the system.
You can perform the following tasks on roles:v Create new internal roles.
Click New Role. Specify the role name and description. On the AccessPermissions tab, specify the access permissions to objects in Real-timeMonitoring that members of this role need. On the Members tab, add theusers or roles that need to be members of this role.
v Modify internal and external roles.Double-click the role name in the Roles list. The Edit Role dialog boxappears.For internal roles, you can change the role name, description, accesspermissions, and membership.For external roles, you can only change access permissions.
v Delete internal roles.Select one or more roles in the Roles list, and click Delete Role(s) .Tip: For external roles, the Delete Role(s) button is disabled.
v View or specify access permissions for the role object.Select a role from the list, and click Permissions. View or specify the users orroles that can modify the definition of this role. You can add new users androles by clicking Add User or Add Role.
Viewing the external processes listExternal processes are external Web service methods that receive specific alertmessages when initiated by a user viewing the message in the dashboard. IBMCognos Real-time Monitoring publishes the alert message and any attachedreportlets as an XML document to the service.
The External Processes list in the Administration Console provides access to theprocesses. From this list, you can perform the following tasks:v Create processes by clicking New Process and defining the process attributes.v Modify a process by double-clicking its name in the list.v Delete processes by selecting one or more of them, and clicking Delete
Processes.v Disable or re-enable processes by clicking their status indicator.
Chapter 5. Managing system administration 61

For more information, see the IBM Cognos Real-time Monitoring WorkbenchTechnical Reference.
Working with system settingsYou can modify the system settings for IBM Cognos Real-time Monitoring usingthe Administration Console. The system settings specify how the Real-timeMonitoring components are configured for normal operation.
Note: The LDAP settings LDAP Role Mapping, LDAP Synchronization, andLDAP User Mapping are only available when you select LDAP Authentication inUser Management and Authentication.
Procedure1. On the Administration Console tab, click System Settings.2. From the Configure drop-down list, choose the setting to change.
The parameters for each setting are described later in this chapter.3. Save the changes for the specific setting by clicking OK or Apply.
Click OK to save the changes and exit System Settings, or click Apply to savethe changes and continue working in System Settings.
Business Insight IntegrationUse this system setting to configure the integration between IBM Cognos Real-timeMonitoring and IBM Cognos Business Insight.
Set up the following properties when configuring this functionality.
Parameter Description
Display Name Specifies the root folder in Business Insightfor the Real-time Monitoring dashboardobjects and their folders.
This folder appears in the Content pane inBusiness Insight.
Description Specifies the text that appears when thepointer is positioned over the root folderspecified for the Display Name parameter.
IBM Cognos Real-time URL Specifies the server URL to which BusinessInsight connects to display the Real-timeMonitoring content.
The URL format is http://servername/urlcontext. For example, the URL can behttp://my_server/realtime.
Download contribution file Specifies the download link to theRealtime_contribution.atom file.
Save the file to the c10_location\configuration\icd\contributions\contribdirectory, where c10_location specifies theIBM Cognos BI installation location.
62 IBM Cognos Real-time Monitoring Workbench Version 10.1.1: User Guide

Checkpoint ConfigurationCheckpoint Configuration allows you to enable a checkpoint, run a checkpoint, orcreate a schedule for checkpoints.
A checkpoint is a snapshot of the state of the system, similar to a backup. Arecovery log tracks event data that has entered the system since the lastcheckpoint. The recovery helps to rebuild the state of the system in case of anabnormal shutdown: one where the normal shutdown checkpoint was unable torun or complete. These features restore the state of the system when the systemrestarts.
What is savedThe snapshot records the state of all objects defined in memory except disabled orinvalid objects. Every object in an event is saved with the same event.
The recovery log tracks new event details that occurred after the checkpointstarted. However, only for those events for which recovery logging is enabled withthe Log event data for recovery option. When a new checkpoint starts, a newrecovery log is created, and the old log is purged once the snapshot finishes.
For more information, see the IBM Cognos Real-time Monitoring WorkbenchTechnical Reference.
What is recoveredWhen the system restarts, and the Recover State on Restart option of the SystemControl is on, the system restores its state consistent to the last checkpoint.
If a recovery log exists, the system also replays the logged events, possibly raising,lowering, and firing events.
The replay restores the system to a state consistent with the current lookup tabledata. If dependent lookup table data has changed since the last checkpoint, thenew data is used. Similarly, if the lookup table data is missing, views might notmatch their state prior to the checkpoint.
Because time-based moving windows are restored to the state at the time of thesnapshot and recovery, a restored view might contain stale information. Forexample, if a window tracks events for the last hour, the restored view contains thedata from the last hour when the snapshot and recovery were recorded, not thecurrent system time. However, the next event that updates the view discards allold information.
What is not savedLookup Table data in the data cache is not saved. After a restart, the lookup tablecache is empty.
Alerts with pending “Holds For” on page 22 conditions where the conditions havenot been met are not saved either. For example, if an event met a rule condition,but the associated alert had a Holds for condition that had not been met, such as 1hour left on a 2-hour hold, that state is not saved and the pending alert isdiscarded when the system shuts down.
Disabled or invalid objects are not saved because they do not have a state.
Chapter 5. Managing system administration 63

Error conditionsWhen schedules overlap, the subsequent checkpoints are ignored. For example, ifone schedule that is set to run hourly overlaps with one set to run daily, the firstone runs and the second is ignored without error.
If an error occurs when creating the snapshot, the entire checkpoint is invalid andan error message is logged. If this happens during shutdown, the shutdowncontinues without creating a valid snapshot. If this happens during a scheduledcheckpoint, the error is logged and no automatic checkpoint activity occurs untilthe next scheduled activity.
If the recovery log encounters errors during startup, such as invalid permission onthe drive, the startup fails and the system shuts down. Errors during runtime, suchas running out of space during logging, stops all agents receiving data streams, acheckpoint occurs, and the servers shut down.
Email alert notifications might be duplicated if the system shuts down abnormallywhile sending the notifications. The system writes a warning message to thesystem log under such conditions. Also, if the SMTP e-mail server is terminatedabnormally, the recipient might never receive the alert.
By default, the system begins checkpointing and recovery logging when the systemstarts. You can disable this feature for future restarts from the System Settingsdialog box. However, to disable it when starting the servers, include the followingoption when starting the application server:"-Dcom.cogno.obi.property.Recover State on Restart"
The first time you start the servers, you can identify a recovery logging directoryby including the following option on the command-line that starts the applicationserver:"-Dcom.cogno.obi.property.Recovery Log Directory=/cq_logs"
Checkpoint ConfigurationThe following table describes the available checkpoint and recovery parameters.
Parameter Description
Enable Checkpoint Causes checkpoints to occur on definedschedules. Regardless of this setting,checkpoints always occur during normalserver shutdown, and a checkpoint occurswhenever the system starts up and noprevious checkpoints have occurred.
Run Checkpoint Now Executes an immediate checkpoint,regardless of the schedule.
Checkpoint Schedule Lists the checkpoint schedules. Add, edit, orremove schedules from this list by clickingAdd Schedule, Edit Schedule, or RemoveSchedule.
Months that do not include the specifiedday, such as the 31st in June, are ignored.
64 IBM Cognos Real-time Monitoring Workbench Version 10.1.1: User Guide

Parameter Description
Recovery Log Directory Specifies the directory that contains therecovery and checkpoint log files. The logfile name isDEFAULTRECOVERYLOGGER_<n>, where<n> represents a number that differentiatesthe log files.Note: If the source of the data stream is aflat-file agent, consider pointing to adifferent server to improve input/outputperformance.
Custom BrandingCustom branding allows you to change the header that appears in IBM CognosReal-time Monitoring at the top of the application page, both in Real-timeMonitoring Dashboard and in Real-time Monitoring Workbench. The image for theheader must be in the GIF, JPG, or PNG format, and it must be sized as specifiedin the labels on the Custom Branding tab. You must change either all of theimages or none.
Encryption ConfigurationUse this page to specify the keystore passwords and keystore location for IBMCognos Real-time Monitoring.
Real-time Monitoring encrypts passwords with asymmetric encryption that consistsof a public key and a private key. The private key is used for encryption. Thepublic key is used for decryption. Both keys are kept in the Java KeyStore. Forinformation about the KeyStore class, see the Java documentation.
To provide additional security, the private key is placed in a certificate, and thecertificate is stored in the keystore. Real-time Monitoring uses two keystores: onefor the administrator and one for users. Keystore entries, the keys and certificates,are accessed through a unique alias, which is also used to create the public/privatekey pair. The aliases for Real-time Monitoring are:v CQ_USER_PASSWORD_ENC
This alias encrypts the keys for customer created users.v CQ_ADMIN_PASSWORD_ENC
This alias encrypts the keys for the RTMadmin and system_monitor users.
At start-up, Real-time Monitoring uses the administrator keystore. This keystore isprovided on the installation CD. The file is admin.jks. You must specify its locationwith the Admin Keystore Location property in the file that contains the systemsettings properties. For more information about the file that contains the systemsettings properties, refer to the IBM Cognos Real-time Monitoring Installation andConfiguration Guide.
After start-up, you must provide the keys for the user keystore and specify thekeystore location. A sample keystore user_sample.jks is provided on the installationCD. To create your own keys, the administrator must use the keytool utility. Forinformation about the keytool utility, check the vendor documentation.
Chapter 5. Managing system administration 65

If you create a new keystore, users are automatically migrated from the oldkeystore to the new one the next time they log in to the IBM Cognos Real-timeMonitoring Dashboard. New users are always added to the user keystore.
If your are changing your administration or user keystore, make sure that the oldkeystore remains in the same location with the same name until after all usershave been migrated. If you are changing the location of your admin keystore, youmust specify the same location in your system settings properties file.
Parameter Description
Administrator Keystore Location Specifies the location and name of theadministrator keystore. You can set theadministrator keystore location at start-up inthe properties file for system settings. Formore information, see the installation andconfiguration documentation.
Administrator Keystore Password Specifies the administrator keystorepassword. This password is used whenchanging the name or location of the adminkeystore. The default admin keystorepassword is 40fd2442fa.
Administrator PrivateKey Password Specifies the administrator password foraccessing the Real-time MonitoringWorkbench. The default administratorprivate key password is 40fd2442fa.
Keystore Location Specifies the location and name of the userkeystore.
Keystore Password Specifies the user keystore password. Thispassword is used when changing the nameor location of the user keystore. The defaultuser keystore password is 8deb5102f8.
User PrivateKey Password Specifies the user password that users willuse to access the Real-time MonitoringDashboard. The default user private keypassword is 8deb5102f8.
Execution ThrottlingUse this page to set the monitoring rate, which is the rate at which events arepublished and propagated into the view system. Throttling adjusts the publicationrate when levels exceed the propagation rate by a specified threshold. Use thesettings to reduce the amount of memory that Real-time Monitoring consumeswhen storing unprocessed events.
Parameter Description
Throttling on Overproduction Enabled Adjusts the publication rate for all eventproducers when they exceed the EventThreshold. This control does not affect theHTTP Post, Web Services, or system eventlogging event publishers. Use the “MemoryMonitoring” on page 76 to adjust the rate ofthose event publishers.
66 IBM Cognos Real-time Monitoring Workbench Version 10.1.1: User Guide

Parameter Description
Throttling on Low Memory Enabled Adjusts the publication rate for all eventproducers when the amount of availablememory is low. See “Memory Monitoring”on page 76 for details about the memorythresholds.
Event Threshold Throttles an event producer when thenumber of newly published events equalsthe number of not yet processed events.Throttling stops when the producer backlogfalls below this level.
Publisher Sample Interval Specifies in seconds how often to examinethe count of over-published events. Samplesregardless of the Publisher Sample EventCount setting. Set to zero (0) to turn this off.
Publisher Sample Event Count Specifies how frequently, in event counts, toexamine the count of over-published events.Samples regardless of the Publisher SampleInterval setting. Set to zero (0) to turn thisoff.
Average Smoothing Factory Specifies smooths fluctuations in theoverflow sampling. High values are moresensitive to fluctuations than lower values.Do not change this setting without specificdirection from technical support.
Deviation Multiplier Adjusts how rapidly an event producer isthrottled relative to the event sourceoverflow. High values are faster than lowervalues. Do not change this setting withoutspecific direction from technical support.
Backlog Weight Influences how previous throttling actionsaffect current and future actions. Do notchange this setting without specific directionfrom technical support.
Geography MapsUse this page to configure geography maps. The creation of geography maps isenabled when the Use this for Geography Charts check box is selected whenconfiguring a dimension.
You can use any mapping service that has an API similar to the Google API, forexample, http://ditu.google.cn that provides Chinese maps.
Parameter Description
Geo Cache Size Specifies the number of geocodes (addresses)to cache. A geocode is added to the cachethe first time it is used.
Geocoder Thread Pool Size Specifies the number of threads available forsimultaneous geocode requests.
Chapter 5. Managing system administration 67

Parameter Description
Base URL for Geocoder Specifies the URL to use for obtainingmapping information. For example, if youuse Google Maps, the URL is
http://maps.google.com/maps/geo?
If this parameter is missing, an errormessage appears.
Geocode Key Translates the address to longitude andlatitude coordinates. For example, if you useGoogle Maps, obtain the key from
http://www.google.com/apis/maps/signup.html
For Google Maps, this parameter is the sameas Mapping Key.
Geocoder Classname Specifies the Java class name that initializesgeocoding and handles the retrieval of thelatitude and longitude of a given address. Ifyou use Google Maps, the class is
com.cognos.obi.maps.GoogleGeocoder
Mapping URL Specifies the mapping URL. For example, ifyou use Google Maps, the URL is
http://maps.google.com/maps?
If this parameter is missing, an errormessage appears.
Mapping Key Specifies the mapping key that is used foraccessing map graphics. For example, if youuse Google Maps, obtain the key from
http://www.google.com/apis/maps/signup.html
For Google Maps, this parameter is the sameas Geocode Key.
IBM Cognos Business IntelligenceUse this page to import user information from IBM Cognos Business Intelligence(BI) in order to enable single sign-on (SSO) between IBM Cognos Real-timeMonitoring and IBM Cognos BI.
Set up the following properties when configuring this functionality.
Parameter Description
IBM Cognos Dispatch URL Specifies the IBM Cognos BI dispatcher URI, as specified inIBM Cognos Configuration, under Gateway Settings for theEnvironment category. For example, http://cognos_bi_server_name:9300/p2pd/servlet/dispatch/ext
Directory AdministratorUsername
Specifies the directory administrator user ID for thenamespace that is used for authentication to IBM Cognos BIserver. The directory administrator configures this namespacein IBM Cognos Configuration.
68 IBM Cognos Real-time Monitoring Workbench Version 10.1.1: User Guide

Parameter Description
Directory AdministratorPassword
Specifies the directory administrator password for thenamespace that authenticates to IBM Cognos BI server.
Directory AdministratorNamespace
Specifies the name of the namespace that authenticates to IBMCognos BI server.
Cookie Domain Specifies the cookie domain setting that is specified in IBMCognos Configuration, in global settings, on the General tab,under Cookie Settings.
Cookie Path Specifies the cookie path that appears in the URL of both IBMCognos BI and IBM Cognos Real-time Monitoring after thehost name. This is the same path that is specified in IBMCognos Configuration, in global settings, under CookieSettings on the General tab.
For example, if the IBM Cognos BI URL ismyserver.ibm.com/ibm/cognos, and the IBM CognosReal-time Monitoring URL is myserver.ibm.com/ibm/cognos/realtime, the Cookie Path can be /ibm/cognos, /ibm, or /. Theforward slash character (/) is always a valid value for thissetting.
JDBC Access to Views and CubesUse this page to configure the JDBC driver settings. The JDBC driver enablesaccess to views and cubes when accessing IBM Cognos Real-time Monitoringprogrammatically or through third-party tools that are based on the JDBC API.
Parameter Description
JDBC Port The TCP port on which the streamingdatabase should listen for JDBC connections.Enter 0 to disable JDBC access.
JDBC ResultSet Fetch Size The desired ResultSet fetch size for the JDBCconnection. If the value is set to 0, the JDBCdriver ignores the value and is free to makeits own best guess as to what the fetch sizeshould be.
JDBC Compression LevelSpecifies the compression level if theResultSet size reaches the JDBC compressionthreshold. The possible choices are:
v Best Speed
Provides the fastest compression, butmight not provide the best compression.
v Best Compression
Provides the best compression, resultingin the smallest size.
v No Compression
No compression occurs even if thethreshold is reached.
JDBC Compression Threshold The compression threshold of ResultSet size.A value of 0 means that the ResultSet shouldalways be compressed.
Chapter 5. Managing system administration 69

Parameter Description
JDBC Connection Timeout The maximum idle time before a connectionis closed. A value of 0 means no time-out.Therefore, the connection will not beautomatically closed. The default value is 0.
LDAPIBM Cognos Real-time Monitoring enables you to import user information fromsupported Lightweight Directory Access Protocol (LDAP) providers. Real-timeMonitoring can be set up for scheduled synchronizations with the LDAP server toupdate the users and roles.
Note: A "role" in Real-time Monitoring maps to a "group" on the LDAP server. Inthe synchronization process, Real-time Monitoring adds or updates the users.LDAP groups are converted to roles in Real-time Monitoring. When roles areimported, they retain their LDAP user assignments.
Importation happens at the group level. Users are imported only if they aremembers of a targeted group. When a user is imported into Real-time Monitoring,a default e-mail UserProfile called PrimaryEmail is created. You cannot modify thisprofile. When Real-time Monitoring synchronizes with the LDAP server, it usesthis e-mail value to ensure that UserProfile is consistent with the groupmemberships on the LDAP server.
When users are imported, they are assigned permissions based on the roles thatthey are assigned in the source directory. If Real-time Monitoring does notrecognize a role, it creates the role and assigns a set of default permissions. Youcan modify the permissions later if necessary.
For more information about LDAP configuration, see the Real-time MonitoringInstallation and Configuration Guide.
LDAP Role MappingThis section describes the role mapping parameters that determine which groupsand roles are imported and synchronized. The parameters vary depending on theLDAP provider being used.
The following table lists the parameters and provides sample values for LDAP rolemapping.
Parameter Value
LDAP Role Base DN Use the format appropriate to the indicatedprovider:
v Sun ONE:OU=Groups,DC=yourdomain,DC=com
v Active Directory:CN=Users,DC=yourdomain,DC=com
You can specify multiple Role Base DNs thatallow you to choose the role to synchronize.Note: Do not enter a blank line betweenrows.
70 IBM Cognos Real-time Monitoring Workbench Version 10.1.1: User Guide

Parameter Value
LDAP Role Search Filter Use the value appropriate to the indicatedprovider:
v Sun ONE:(&(objectclass=groupOfUniqueNames))
v Active Directory: (&(objectclass=group))
LDAP Role LoginID Type "cn" for both Sun ONE and ActiveDirectory.
LDAP Role Full Name Type "displayname" for both Sun ONE andActive Directory.
LDAP Role Description Type "description" for both Sun ONE andActive Directory.
LDAP Role Member This is the name of the multi-value propertythat contains role members:
v Sun ONE: uniqueMember
v Active Directory: member
LDAP Role Member Select one of the following options:
v Distinguished Name
Choose this option if the role memberproperties identify users by distinguishednames, such as"cn=jadmin,ou=people,dc=yourdomain,dc=com"
v Login ID
Choose this option if the role memberproperties identify users by value of theproperty used as the Real-time Monitoringlogin ID.
LDAP SynchronizationDuring the synchronization process, Real-time Monitoring adds new roles togroups that appear on the LDAP server, and removes any roles whose groups havebeen removed from the LDAP server. To set the schedule for automaticsynchronization, go to the User Management and Authentication page and useSynchronization Schedule for User Management Provider to set the time when asynchronization occurs. Set synchronization for a time when as few users aspossible are logged in.
Users that were added manually are not affected by the synchronization, even iftheir roles are removed from the LDAP server. For more information, see“Manually Synchronizing with the LDAP server” on page 73.
You can only select LDAP Synchronization if you have set the LDAP/ADSauthentication method in the User Management and Authentication page.
The following table lists the parameters and provides sample values for LDAPsynchronization.
Parameter Value
Initial Lookup Table Factory The Java Naming and Directory Interface(JNDI) through which Real-time Monitoringconnects to the LDAP server. The defaultvalue is com.sun.jndi.ldap.LdapCtxFactory.
Chapter 5. Managing system administration 71

Parameter Value
LDAP Server The DNS name or IP address of the LDAPserver.
LDAP Port Port on which the LDAP server is running.The default is 389. However, if you selectthe SSL option, the port value is likely to be636, depending on your LDAP serverconfiguration.
LDAP Use SSL Select or clear. Select this option when theLDAP server is configured for SSL. This mayaffect the LDAP port setting, as describedabove.
LDAP Authentication There are three options:
v Simple
v Compare Encrypted Password
v SASL (Simple Authentication andSecurity Layer)
Select this option for Sun ONE.
LDAP Principal DN Prefix For the simple authentication method, thistext is inserted before the user's login name.For LDAP servers that require DN login, setthis to the appropriate property value plusthe equal sign ("cn=", "uid=", and so on). ForActive Directory, leave this blank.
LDAP Principal DN Suffix For the simple authentication method, thistext is inserted after the user's login name.For LDAP servers that require DN login, setthis to the appropriate chain of values. Forexample: "ou=Users,dc=domain,dc=name"For Active Directory, which requires simplelogin with e-mail address, set this to "@"plus the domain name of the ActiveDirectory.
For DN login, the first character of the prefixmust be ",".
LDAP Synchronization User DN This user binds to the server and reads thelists of users and roles. For securitypurposes, use a user that has no permissionsother than LDAP directory reading.
LDAP Synchronization Password Password for above user.
LDAP Referral Indicate to service providers how to handlereferrals. Set the referral to one of thefollowing:
v Follow
Referrals are followed.
v Ignore
Referral entries are ignored and returnedas plain entries. This is the default.
v Throw
Each referral encountered results in anexception.
72 IBM Cognos Real-time Monitoring Workbench Version 10.1.1: User Guide

Manually Synchronizing with the LDAP server:
You can manually synchronize Real-time Monitoring with the LDAP server at anytime. Synchronization requests are queued to prevent concurrent synchronizations.
Procedure
1. In System Settings, click User Management and Authentication.2. From the User Management and SSO provider drop-down menu, select
LDAP/ADS.3. Click Synchronize Now.
A message indicates that the synchronization is complete.4. Click OK to save the changes and exit System Settings, or click Apply to save
the changes and continue working in System Settings.
LDAP User MappingThis section describes the user mapping parameters that determine which users areimported or synchronized, or imported and synchronized. The settings varydepending on the LDAP provider.
The following table lists the parameters and provides sample values for LDAP usermapping.
Parameter Value
LDAP User Base DN This is the root of the tree that is searchedfor users. You can specify multiple User BaseDNs, allowing you to choose the users tosynchronize.
Do not enter a blank line between rows.
LDAP User Search Filter Use the format appropriate to the indicatedprovider. For example, your LDAP servercould have a special group for Real-timeMonitoring users. This filter could thenensure that only users with this groupmembership are imported.
LDAP User LoginID Use the value appropriate to the indicatedprovider. This value will become the user'slogin ID in Real-time Monitoring.
LDAP User Full Name Type "cn" for both Sun ONE and ActiveDirectory.
LDAP User Description Type "description" for both Sun ONE andActive Directory.
LDAP User Primary Email Type "userPrincipalName". This refers to theuser's email address in the LDAP.
LDAP User EncryptedPassword Type "userPassword" for both Sun ONE andIBM Tivoli. Leave blank for Active Directory.
LoggingUse this page to configure how the system logs messages and identifies where themessages are logged.
Chapter 5. Managing system administration 73

For information about system logging, see “Understanding logging” on page 85. Toidentify which system modules generate log messages, see “Logging Levels” onpage 76.
Parameter Description
Logging Directory Specifies the directory to receive logmessages written to files. By default, nodirectory is defined and no files are written.
Standard Out Log Level Specifies logging level to standard output(stdout) on the server hosting IBM CognosReal-time Monitoring. May be redirected toa console.
Summary File Log Level Specifies the level of summary logging tothe general log file named bam.log in thelog directory. Use this destination for normallogging. Typically this is set to receiveERROR level messages.
Detailed File Log Level Specifies the logging level for detailedlogging. Use this log to track a problemwithout adding to the messages in theSummary file. The log file isbam_detailed.log in the log directory.Typically this is set to OFF.
System Appender Log Level Specified the logging level for the systemappender log, which publishes rows to theVC_SYSTEM_EVENTS data stream. Thisallows administrators to create views andrules that monitor Real-time Monitoring.Typically this is set to receive WARNING orERROR level messages. Views and rules canthen further filter messages as they arrive.
Logging Synchroneity Specifies whether logging is synchronous orasynchronous, which determines whethermessages are buffered before writing themto the log. The default mode isasynchronous: messages are buffered for ashort time before output to the logdestination. Although asynchronous loggingis more efficient, there can be delaysbetween when a message is logged andwhen a message becomes visible in thedestination. The delay should be no longerthan 10 seconds. If this delay isunacceptable, change the setting tosynchronous, which outputs messages asthey are published.
74 IBM Cognos Real-time Monitoring Workbench Version 10.1.1: User Guide

Parameter Description
Log File Rollover Period Specifies how often to close the log file andstart a new one. Use this option to avoidcreating overly large log files and tofacilitate archiving the files. When a file isclosed, it is renamed with a date-timeappended to the filename. The choices areMonthly, Weekly, Daily, Twice per day,Hourly, and Per Minute. This field is onlyapplicable when DailyRollingFileAppenderis selected for Appender Class.
Twice-per-day logs are closed at noon andmidnight.
(FileAppender) Max Log File Size (MB) Specifies the maximum size (in Megabytes)of a log file before rollover occurs. When thefile reaches the maximum size, a new logfile is created. This field is only applicablewhen RollingFileAppender is selected forAppender Class.
(FileAppender) Max Number of Log Files Specifies the maximum number of log files.When the maximum number of files isreached, the oldest log file is deleted. Thisfield is only applicable whenRollingFileAppender is selected forAppender Class.
Appender Class Specifies which appender class to use. Thisfield allows you to select one of twodifferent policies for rolling over andarchiving log files: rollover daily or rolloverwhen the file reaches a size limit. To rollover daily, selectDailyRollingFileAppender. For roll overbased on file size, selectRollingFileAppender. The Log FileRollover Period specifies how often to rollover the log when theDailyRollingFileAppender is selected. The(FileAppender) Max Log File Size (MB)setting specifies the maximum size of the logfile before a new file is started. The(FileAppender) Max Number of Log Filessetting specifies the maximum number oflog files to maintain.
Additional Log4j Properties Points to a log4j.properties file that modifiesor augments the logging infrastructure, suchas setting default values, configuringappenders, and modifying logger modulelevels. When this property is set, the file isloaded during startup and every minutethereafter. For details about this file, consultthe Class PropertyConfiguratordocumentation in the Apache Jakarta Project.
Log File Prefix Adds the specified prefix to the log files.
Chapter 5. Managing system administration 75

Logging LevelsUse this page to configure and identify which system modules generate logmessages, and what level of messages they publish.
For more information, see “Understanding logging modules” on page 87, and“Understanding logging” on page 85.
Memory MonitoringUse this page to configure how the system behaves when the amount of the virtualmemory heap for the Java application becomes low on the server. When lowmemory conditions occur, these settings instruct the data stream producing agentsto slow or stop publishing new events to the data stream.
The threshold settings identify percentages of memory consumed before the actionoccurs. For example, a setting of 85 means that there is 15% free memory available.Once consumed, memory crosses a threshold, and the threshold action remains ineffect until the memory level falls below the triggering threshold.
Adjust the thresholds to be smaller only if your system frequently encountersout-of-memory conditions not trapped by the execution throttling. For moreinformation, see “Execution Throttling” on page 66. Do not raise these levelswithout specific direction from technical support. Rather, you should increase thememory on the server or off-load to other servers processes that are not IBMCognos Real-time Monitoring processes.
Parameter Description
Memory Monitor Interval Frequency (in seconds) at which to look atmemory levels. Disable sampling by settingthe interval to zero (0).
Low Memory Threshold Slows event production and instructs thesystem logger to discard debug- andinformation-level messages when thispercentage of memory is consumed.
Dangerous Memory Threshold Impedes event production and restricts thesystem logger to recording fatal errors onlywhen this percentage of memory isconsumed.
Critical Memory Threshold Blocks event production and randomlysheds system logging events when thispercentage of memory is consumed.
The thresholds apply to the amount of memory that the application serverallocates. It is possible to cross a threshold for the current memory allocation, butnot be near the same threshold for maximum memory available to the server.Normally, the application server allocates more memory before a threshold iscrossed. However, for optimum performance of this feature, you should set theminimum virtual memory setting (ms) of the application server to be the same asits maximum (max) setting.
NotificationsUse this page to set limitations on the number of alerts that can be set during aspecified time interval.
76 IBM Cognos Real-time Monitoring Workbench Version 10.1.1: User Guide

For example, if you set the maximum number of alerts to 100 and the interval to30 minutes, the alerts stop after the 100th alert. You must enable the alert manuallyto continue sending the alert. These settings are per defined alert.
Set the following properties:
Parameter Description
Alert Acknowledgement URL A URL to include in the alert.
Maximum Alerts To Be Fired Per Interval Specifies the maximum number of alerts thatyou can set during the defined intervalperiod.
Interval Size Duration of the interval in number of timeunits. Units are in seconds or minutes,depending on the Interval Units setting.
Interval Units Set to seconds or minutes as desired.
Session Time-out ConfigurationThis page allows you to set the time-out period for IBM Cognos Real-timeMonitoring. You can also specify a specific time-out for a group of users. When thesession time-out occurs, IBM Cognos Real-time Monitoring displays a window thatinforms the user that the session has expired and allows the user to reenter theuser name and password. Session time-out does not apply to the Anonymous user.
Specify the following parameters:
Parameter Description
Default Session Timeout Specifies how long Real-time Monitoring canbe idle before users must log in again.Setting the default session timeout to 0indicates that user sessions do not time out.The default is 60 minutes.
Alternate Session Timeout Specifies how long IBM Cognos Real-timeMonitoring can be idle before a specified listof users must log in again. The value thatyou specify for the alternate session timeoutoverrides the default session timeout forthese users. Setting the alternate sessiontimeout to 0 creates an infinite session forthose users included in the user list forsession timeout. The default value is 60minutes.
User List for Session Timeout Specifies the users to which the alternatesession timeout applies. To add users, clickAdd. To remove a user, select the user thenclick Remove User.
SMTP ConfigurationThe simple mail transfer protocol (SMTP) configuration specifies how IBM CognosReal-time Monitoring connects to the mail server that delivers email notifications.The server is external to IBM Cognos Real-time Monitoring. Contact your e-mailsystem administrator to set up an account for IBM Cognos Real-time Monitoring.
Chapter 5. Managing system administration 77

Parameter Description
SMTP Host Name of the e-mail host that provides thetransport. A typical name might look likethis: mail.mydomain.com. Specify the portnumber after the address. For exampleserver.domain.com:2500. If you do notspecify a port number, the default port is 25.
SMTP From address Address that appears in the From field forall e-mail messages sent by the system.
SMTP User User name that the system uses to access thetransport.
SMTP Password Password that validates the user to thetransport.
System ControlUse this page to administer the operation of the IBM Cognos Real-time Monitoringinstallation.
Parameter Description
Recover State on Restart Loads the last checkpoint data when theserver restarts. Turn this off to start with nocheckpoint data. For more information aboutcheckpoints, see Checkpoint Configuration.
Seconds Before Starting Pollers How long to wait before the data streampollers start looking for new data. Thisdelay gives developers time to disableevents on restart before they begin feedingdata into the data stream.
Thread ConfigurationsYou can view thread configurations in the Thread Configuration window.
IBM Cognos Real-time Monitoring uses execution threads that allow the system toprocess views, alerts, rules, and lookup table queries in parallel (multiple threadsat the same time) when running on multiple CPU hosts. These parameters tune thethread processing.
Note: Do not change these parameters without direction from technical support.
Parameter Description
Number of Runtime Execution Threads Count of processing threads to use. Increasethis value only when using four or moreCPUs. The default is 8.
Maximum Dequeue Batch Size Count of processes to extract from thewaiting pool. The default is 5.
Maximum Dequeue Block Wait inMilliseconds
When to check for missed extractions. Thedefault is 50.
Number of Web Application BackgroundThreads
The maximum number of threads can thatyou can run in the background for a Webapplication.
78 IBM Cognos Real-time Monitoring Workbench Version 10.1.1: User Guide

User InterfaceUse this page to specify user interface settings for all users.
Setting Description
Maximum View Snapshot Rows Returned The greatest count of rows to display whenshowing the contents of a view. Zero (0), thedefault, is unlimited.
Alert Expiration Interval The maximum number of days to retainalert notifications. This is the greatest countof 24-hour days to retain alerts in IBMCognos Real-time Monitoring. Timing beginswhen the alert is generated. For example, ifthe expiration period is 1 day, the alert isremoved from the IBM Cognos Real-timeMonitoring Dashboard at least 24 hours afterit was generated.
Expired alerts are removed regardless oftheir state. Alerts do, however, retain theirstate; they just no longer appear in the IBMCognos Real-time Monitoring Dashboard.
Maximum Alerts Instances to Display The maximum number of alert notificationsdisplayed in the IBM Cognos Real-timeMonitoring Dashboard.
Do not send HTML alerts This setting enables or disables the option tosend alerts in the HTML format. If thisoption is selected, all alert messages are sentin the text format.
By default, you can send HTML alerts.However, in some situations, for example,when security is a concern, it may not bedesirable to permit HTML content. In thiscase, you can disallow sending HTML alerts.
Webservice Event Host The name of the host to use for Web serviceevents. For example, localhost.
Webservice Event Port The port to use for Web service events. Forexample, 8080.
User Management and AuthenticationUse this page to configure user management and authentication, and to enablesingle sign-on (SSO) between IBM Cognos Real-time Monitoring and IBM CognosBusiness Intelligence (BI).
Chapter 5. Managing system administration 79

Parameter Description
User Management and SSO ProviderSpecifies the authentication method to use inIBM Cognos Real-time Monitoring.
The following methods are available:
v Internal
Use this method if you want only localusers of Real-time Monitoring to beauthenticated.
CAUTION:When you change from any of the otherauthentication methods to this one, allexternal users and their custompermissions are deleted. To avoid this,define internal roles with the custompermissions, and map the external usersto those roles.
CAUTION:The internal users and their permissionsare retained with all authenticationmethods.
v LDAP/ADS
Use this method if you want the LDAP orActive Directory servers supported byReal-time Monitoring to authenticateusers. The following settings areassociated with this method:
– Synchronization Schedule
Click OK, then return to the UserManagement window to see theschedule.
– LDAP Role Mapping, LDAPSynchronization, and LDAP UserMapping are added to the Configuredrop-down list.
v IBM Cognos Business Intelligence
Use this method if you want IBM CognosBI to authenticate users, and to enablesingle sign-on between IBM Cognos BIand Real-time Monitoring.
v Custom user management andauthentication plug-in
If you have a custom plug-in installed, itappears in the list of settings, and you canenable it. For more information, see theIBM Cognos Real-time MonitoringWorkbench Technical Reference.
80 IBM Cognos Real-time Monitoring Workbench Version 10.1.1: User Guide

Parameter Description
Enable Single Sign-On Allow users to log in to multipleapplications by responding to only oneauthentication prompt.
You can enable single sign-on betweenReal-time Monitoring and any externalapplication. However, the user managementand authentication system in the externalapplication must follow the UserManagement and Authenticationframework in Real-time Monitoring.
Sign-off URL If Enable Single Sign-On is selected, this isthe URL to which the user is redirectedwhen logging out.
Request HeaderUse this setting when you enable singlesign-on with eTrust SiteMinder. The headervariable must contain the user name thatexists both in Real-time Monitoring and inSiteMinder.Note: Ensure that you create the same usersin Real-time Monitoring and in SiteMinder.
Synchronize NowClick this button to immediately synchronizethe connection to the reporting system.
Synchronization Schedule for UserManagement Provider Schedules the synchronization of user, role,
and user-role mapping for the reportingsystem, such as every 30 minutes between12:00 AM and 11:30 PM daily.
Use the Add Schedule, Edit Schedule andRemove Schedule buttons to manage yoursynchronization schedules.
Importing and exporting metadataMetadata are descriptions of the object and user definitions, and system settings.This information is stored in an RDBMS database. The export action writes thisinformation to one of the following:v XML files in a directory on the server.v A single compressed JAR file on the server or local client computer.
Later you can use the import action to load those objects back into the installation.
By default, the operation includes the definition of the metadata objects only.
Exporting metadataThe exported metadata contain the descriptions of all objects in the system, and allsystem settings, similar to a backup of the installation.
For information about another form of system backup, see “CheckpointConfiguration” on page 63.
Chapter 5. Managing system administration 81

Alert subscribers are not exported.
For information about object-level export, see “Exporting selected objects” on page56.
Where the metadata is writtenWhen exporting XML files to a directory on the server, the files are duplicated intotwo sibling subdirectories. One subdirectory is always named latest. The other is anew folder whose name matches the timestamp of the export. This allows you toquickly identify the last export by looking in latest, while the timestamp-nameddirectories act as specific, past export instances.
Files written to the server have the access permission of the account that starts theReal-time Monitoring server. Because the files are not encrypted, all user accountinformation is available to anyone with access to the files.
When exporting to a JAR file, the file contains compressed definitions of all of theobjects.
Procedure1. On the Administration Console tab, click Import/Export.2. From the Operation drop-down list, select the type of export operation you
want to perform: Full Export or Custom Export. For a description of thedifferent types of operations, see “Export Operations.”
3. From the Export Options drop-down list, select one of the options. For adescription of the options, see “Export Options” on page 83,
4. Click OK to begin the download.If you are exporting metadata to a JAR file, use the browser download dialogbox to identify the location (and optionally change the file name) on your localmachine.
5. Depending on your browser, you might receive a prompt to confirmdownloading a JAR file. Select Yes.
6. When the export of metadata is finished, click Cancel to close theImport/Export dialog box.
Export OperationsOn the Import/Export page, you can select export operations from the Operationsdrop-down list.
The following export operations are available from the Operations drop-down list:v Export metadata to a directory on the server
Selecting this option exports the metadata to the directory that you specify in theServer Location field. Type the full path to the directory where you want toexport the metadata. The directory must exist, and you must have permission towrite to the specified directory. Also, two directories are created in yourspecified directory. One subdirectory is named latest. The other is the timestampof your export. If the directories already exist, they are reused.
v Export metadata to a JAR file on the server
Selecting this option exports the metadata to a JAR file in the directory youspecify in the Server Location field. Type the full path to the directory whereyou want to export the metadata. The directory must exist, and you must havepermission to write to the specified directory.
82 IBM Cognos Real-time Monitoring Workbench Version 10.1.1: User Guide

The filename on the server is _export.jar. If _export.jar already exists, it isoverwritten.
v Export metadata to a JAR file (download)
Selecting this option exports the metadata to a JAR file on the client. Use thebrowser download dialog box to identify the location (and optionally change thefile name) on your local machine.
Export OptionsOn the Import/Export page, you can select export options from the Optionsdrop-down list.
The following export options are available from the Options drop-down list:v Full export
All metadata is exported. If you select this option, the custom export options arenot available. Full export is the default.
Note: Full export does not export the system settings.v Custom Export
Allows you to select the types of objects to export. The custom export optionsare:– Include Workbench and Dashboard objects
This option specifies that the metadata for workbench and dashboard objectsis exported. If you also want to export the object level permissions for yourworkbench and dashboard objects, select Include object level permissions.
– Include users
User information is exported. If you also want the type level permissions forthe users, also select Include type level permissions.
– Include roles
Role information is exported. If you also want the type level permissions forthe users, also select Include type level permissions.
– Include type level permissions
Type level permissions are exported. These are the permissions that you seeon the Permissions tab of the User dialog box.
– Include tasks
Dashboard tasks are exported.– Include personal objects
Business rules, private perspectives, and other operational data are includedin the exported metadata.
– Include System Settings
All system settings are included in the exported metadata.
Importing metadataThe import action reads the previously exported metadata. When importing fromthe server, you must know the full path to the location for the JAR file or directoryof files. To import from the local machine (upload), you may browse to identify thelocation.
A metadata JAR file that contains LDAP user, roles, and associated Access ControlLevel (ACL) permissions requires that you synchronize the LDAP users before youimport the metadata to a clean IBM Cognos Real-time Monitoring system. If you
Chapter 5. Managing system administration 83

do not synchronize the users prior to import, you may lose the ACLs associatedwith the users, requiring you to import the metadata again after synchronizing theusers.
Also, the synchronization of users can affect the actual number of users importedfrom the metadata. Only the ACLs associated with the users that you synchronizedwill be imported. For example, if ten users exist in the metadata, but you onlysynchronized five users prior to importing the metadata, only the ACLs for thosefive synchronized users who exist in the metadata are imported. The remainingACLs for the other five users are not imported.
Note: Importing a large set of metadata from a busy DBMS can take severalminutes to complete. In some cases, the application server might time-out waitingfor the entire operation to complete. If you get a log error message about anincomplete transaction, increase the time that the server allocates to transactions.For example, by default BEA WebLogic times out after 5 minutes (300 seconds).
Perform the following steps to import metadata.
Procedure1. In the Administration Console, select Import/Export.2. Choose one of the import options:
v Import metadata from a directory on the server
Imports metadata from a location on the server where Real-time Monitoringis running. The location is the directory that you will specify in step 4.
v Import metadata from a JAR File on the server
Imports a JAR file from a location on a server where Real-time Monitoring isrunning. The location is the path to the JAR file that you will specify in step4.
v Import metadata from a JAR file (upload)
Imports a JAR file from a location on the client.3. Locate the file, or directory of files, to import.
If you selected Import metadata from a directory on the server or Importmetadata from a JAR File on the server, identify the full path to the directorycontaining previously exported metadata. Enter the directory in the ServerLocation field.If you selected Import metadata from a JAR file (upload), enter the file nameof the JAR file to upload. You can use the Browse button to locate the file onyour local machine.
4. Optionally, specify a folder into which the metadata is to be imported. Onlythose objects that can be placed in a folder will be placed in the specifiedfolder. The default folder is Public Folder.
5. Select the import mode for the metadata. The choices are:v Overwrite
If you select this option, imported objects overwrite existing objects with thesame name and type. Overwrite is the default.
Note: If you specify a folder into which to import the metadata, and anobject with an identical identifier already exists in the system, the existingobject will be overwritten then moved to the specified folder.
v Do not overwrite
84 IBM Cognos Real-time Monitoring Workbench Version 10.1.1: User Guide

If you select this option, an object is not imported if an object with the sameidentifier already exists. All other objects are imported.
Note: If you specify a folder into which to import the metadata, and anobject with the same identifier already exists, the existing object will not beoverwritten or moved into the specified folder.
v Create a copy
If you select this option, every object is copied into the selected folder aslong as there are no conflicts with existing names in that folder. If a namingconflict occurs, the existing object is preserved, and the imported object is notcopied.
6. Read the data from storage by clicking OK.7. If the dialog box remains open after the import completes, choose Cancel to
close it.
Understanding loggingLogging facilitates software service and maintenance by producing reports suitablefor analysis by end users, system administrators, support engineers, and softwaredevelopment teams.
The various IBM Cognos Real-time Monitoring subsystems generate messages thatprovide information about the application state, and about the internal systemevents. For more information, see “Understanding logging modules” on page 87.These messages can be logged to “Viewing logging destinations” on page 86 thatinclude files, console, or a data streams suitable for monitoring by a rule in ascenario.
The following diagram shows the basic logging scenario.
Real-time Monitoring has many loggers. Most of them assist with applicationdevelopment and the messages that they generate are not useful for generalconsideration. However, some messages are important, and can indicate problemswith the system. Application developers and system administrators use thesemessages to trace the behavior of the program, and to identify events that led upto the problem.
Messages have associated logging levels that indicate the importance and urgencyof the message. Messages with higher levels indicate higher levels of importance.Use the levels to tell the loggers which messages to publish, and to tell thedestinations which messages to include. The destinations ignore messages of lowerpriority than they are set to record.
1. Loggers publish messages.
2. Destinations record or report messages.
3. Log files contain reports.
Chapter 5. Managing system administration 85

When configuring logging, set the destination to match the level of the logger ifyou want to see all of the messages that the logger publishes. Otherwise, thedestination filters and omits the lower level messages.
When a logger publishes a message, each destination checks the message level andpublishes the messages whose level matches the level that the destination isconfigured to accept. Multiple destinations can record messages published by onelogger, as shown in the following illustration.
Viewing logging destinationsLogging destinations identify where log messages are recorded when thedestination receives messages of the level it is configured to receive. The followingtable lists the logging destinations.
Setting Description
Logging Directory Directory where log files are written. Bydefault, no directory is defined and no filesare written.
Standard Out Log Level Standard output (stdout) on the serverhosting IBM Cognos Real-time Monitoring.You can direct the output to a console.
Summary File Log Level General log file named bam.log in the logdirectory. Use this destination for normallogging. Typically this is set to receive Errorlevel messages.
Detailed File Log Level Use this log to track problems when you donot want messages to go to the summaryfile. The file bam_detailed.log is in the logdirectory. This is set to Off by default.
1. The logger is publishing low level messages.
2. The destination is recording high level messages, and filtering out low level messages.
3. The log file contains only high level messages.
1. The logger is publishing low level messages.
2. Three of the destinations are recording only low level messages. The fourth destination is ignoring the messages.
86 IBM Cognos Real-time Monitoring Workbench Version 10.1.1: User Guide

Setting Description
System Appender Log Level Publishes rows to the VC_SYSTEM_EVENTSdata stream. This allows administrators tocreate views and rules that monitor IBMCognos Real-time Monitoring. Typically thisis set to receive Warn or Error levelmessages. Views and rules can then furtherfilter messages as they arrive. For moreinformation, see “Monitoring the logs” onpage 89.
Understanding logging modulesLoggers publish messages that provide information about the application state orabout internal system events. Each logger publishes messages of at least the loglevel that you request, and discards those of lower priority.
Each logger has a name that determines where that logger fits into the loggerhierarchy tree. The logger hierarchy tree allows you to configure logging details atvarious levels of granularity. Because each logger inherits its logging level from itsparent in the logger hierarchy tree, you can assign a logging level to the top-mostlogger (com) and all IBM Cognos Real-time Monitoring loggers inherit that setting.By assigning a level to a specific logger, you can override the value inherited fromthe parent.
Note: Do not turn on Debug logging for modules without direction from technicalsupport. Turning on this excessive logging for high volume modules like system,query, or exec can rapidly flood your system and kill the servers.
Understanding logging levelsEach log message has an associated log level that gives a rough guide to theimportance and urgency of the message. Each level has an associated integer valueusable by rules that monitor system messages. Higher values indicate higherpriorities. As such, a rule might look for Error and Fatal messages by looking forvalues greater than or equal to 40,000 (Level>=40000).
Level Value Description
Inherit Not applicable Inherit the level from theparent logger.
Off Not applicable No logging.
Fatal 50,000 Very severe error events thatmight cause the applicationto terminate.
Error 40,000 Error events of considerableimportance that will preventnormal program execution,but might still allow theapplication to continuerunning.
Warn 30,000 Potentially harmful situationsof interest to end users orsystem managers thatindicate potential problems.
Chapter 5. Managing system administration 87

Level Value Description
Info 20,000 Informational messages thatmight make sense to endusers and systemadministrators, and highlightthe progress of theapplication.
Debug 10,000 Relatively detailed tracingused by applicationdevelopers. The exactmeaning of the three debuglevels varies amongsubsystems.
Debug - Low 9,000 Information broadlyinteresting to developerswho do not have aspecialized interest in thespecific subsystem. Mightinclude minor (recoverable)failures and issues indicatingpotential performanceproblems.
Debug - Medium 8,000 Fairly detailed tracingmessages. Calls for entering,returning, or throwing anexception are traced at thislevel.
Debug - High 7,000 Highly detailed tracingmessages. Produces the mostvoluminous output.
All Not applicable All messages.
You might want to increase the logging level of a logger to diagnose or debug aproblem. The default level for all loggers is Inherit, and the default level for theroot logger is Info.
Do not turn on Debug or higher logging without direction from technical support.Turning on this excessive logging for high volume module like system, query, orexec can rapidly flood your system and terminate the servers.
Assigning log levels to loggers and destinationsUse this section to assign a log level.
Procedure1. On the Administration Console tab, click System Settings.2. In the Configure drop-down list, click Logging.3. Specify the value for the specific destination or destinations.4. In the Configure drop-down list, click Logging Levels.5. Specify the value for the specific logger.
A subcomponent can have a higher or lower priority level than its parent.6. Click OK to save the settings.
The changes take effect immediately.
88 IBM Cognos Real-time Monitoring Workbench Version 10.1.1: User Guide

Monitoring the logsYou can create a rule that monitors messages for high priority error conditions, andthat reports them in an alert to key administrators. When the destination oflogging for the system appender is capturing log messages, it writes them to theVC_SYSTEM_EVENTS data stream, which has the following fields:
Field Description
ERROR_LEVEL_INT Message level. “Understanding logginglevels” on page 87 lists the values and whatthey mean.
ORIGINAL_VC_EVENT_ID ID of the event that generated the message.
USER_NAME User that was using the application thatgenerated the message.
MODULE_NAME Subsystem that generated the message. Formore information, see “Understandinglogging modules” on page 87.
MESSAGE_TEXT Text of the message.
OBJECT_NAME Name of the object that generated themessage.
Note: You cannot edit or delete this table.
You can build views on the VC_SYSTEM_EVENTS data stream, and then buildrules that monitor the views that are looking for specific messages, usually thosethat have a high priority.
Procedure1. Turn on logging for the system appender and set the logging levels to the
priority that you want to record.v On the Administration Console tab, click System Settings.v Set Logging Levels to publish the messages that you want. For example, set
com.cognos.obi to Warn.v On the Logging settings, set System Appender Log Level to the same level,
such as Warn.v Click OK to save the setting and close the dialog box.
2. Create a new view based on all fields in the VC_SYSTEM_EVENTS data streamand with no lookup table.v On the Workbench tab, click New View, and choose the
VC_SYSTEM_EVENTS data stream and no lookup table.v Assign a view name, such as SysEventView.v Drag all of the data stream fields into the view.v Click Save View to save the view and close the dialog.
3. Create a business activity that contains a scenario for the system data streams.v Click the Scenario Modeler tab.v Select Business Activities, and create a business activity named
SysEventsActivity by clicking New Business Activity. The new businessactivity displays under Business Activities.
v Select SysEventActivites then click the New Scenario button to create ascenario within that activity named SysEventsScenario. The Create Scenariodialog displays.
Chapter 5. Managing system administration 89

v To create the scenario, enter SysEventScenario in the Scenario Name field,select Exiting View, then select SysEventView for the View Name field.
4. Create a rule to monitor the view, an alert, and optionally a reportlet to reporton the messages.v Click New Rule to create a rule named SysEventsRule.v In the Condition field under Define Rule Condition, define the rule
condition as TRUE to report all messages that enter the view.Optionally, to filter messages, define a more specific rule. For example, toalert only Error messages and higher, create a rule that filters forERROR_LEVEL_INT>=40000 (the Error level). For a list of log level values,see “Understanding logging levels” on page 87.
v Create an alert named SysEventsAlert. Assign system_monitor as amandatory subscriber. Click Choose to select the alert. If SysEventsAlert doesnot already exist, click Create Alert.Optionally assign other subscribers.
v Optionally, create a reportlet to contain the message information by clickingAdd Reportlet.
v Finish defining the alert.v Click Finish Rule to save the changes.The system immediately begins monitoring the message log system.
90 IBM Cognos Real-time Monitoring Workbench Version 10.1.1: User Guide

Chapter 6. Configuring interoperability between Real-timeMonitoring and IBM Cognos BI
When you implement interoperability between the two products, you can viewand interact with the IBM Cognos Real-time Monitoring content in IBM CognosBusiness Intelligence (BI), and with the IBM Cognos BI content in Real-timeMonitoring.
Before you start configuring the interoperability settings, ensure that both productsare properly installed and configured. For more information, see the installationguides for both products.
Authentication in IBM Cognos BI must be configured to use an authenticationprovider. For more information, see the section about configuring IBM Cognos BIcomponents to use an authentication provider in the IBM Cognos BI Installation andConfiguration Guide. For information about the IBM Cognos BI security model, seethe IBM Cognos Administration and Security Guide.
The following configuration tasks are involved when setting up interoperabilitybetween the two products:v Configure authentication in Real-time Monitoring to use the IBM Cognos
Business Intelligence authentication method, and enable single sign-on betweenthe two products.
v Configure IBM Cognos BI to use Real-time Monitoring cubes or views as datasources.This task is required when you want to use the Real-time Monitoring data tocreate reports in the IBM Cognos BI environment. This task is not required forintegration with IBM Cognos Business Insight.
v Configuring the system for integration with IBM Cognos Business Insight.
Enabling single sign-on with IBM Cognos BIWhen you enable single sign-on (SSO) between IBM Cognos Real-time Monitoringand IBM Cognos BI, users need to log in only once to either application.
They gain access to the other application without a repeated prompt forauthentication. The single sign-on is required for integration with IBM CognosBusiness Insight.
Before you begin
Before you enable single sign-on, ensure that the following settings are properlyspecified in IBM Cognos Configuration, the IBM Cognos BI configuration tool:v The gateways for IBM Cognos BI and Real-time Monitoring are in the same
domain.This is required so that the IBM Cognos BI passportID cookie can pass to theReal-time Monitoring environment, and the Real-time Monitoring sessionIDcookie can pass to the IBM Cognos BI environment.Tip: In IBM Cognos Configuration, from the Actions menu, select Edit GlobalConfiguration. On the General tab, specify the Domain and Path properties.
© Copyright IBM Corp. 2009, 2011 91

v All gateway URI settings in IBM Cognos Configuration, the Environmentcategory, contain computer-specific host names, not the default localhost.
For more information, see the IBM Cognos Business Intelligence Installation andConfiguration Guide.
About this task
Set up the following properties when configuring this functionality.
Parameter Description
IBM Cognos Dispatch URL Specifies the IBM Cognos BI dispatcher URI, as specified inIBM Cognos Configuration, under Gateway Settings for theEnvironment category. For example, http://cognos_bi_server_name:9300/p2pd/servlet/dispatch/ext
Directory AdministratorUsername
Specifies the directory administrator user ID for thenamespace that is used for authentication to IBM Cognos BIserver. The directory administrator configures this namespacein IBM Cognos Configuration.
Directory AdministratorPassword
Specifies the directory administrator password for thenamespace that authenticates to IBM Cognos BI server.
Directory AdministratorNamespace
Specifies the name of the namespace that authenticates to IBMCognos BI server.
Cookie Domain Specifies the cookie domain setting that is specified in IBMCognos Configuration, in global settings, on the General tab,under Cookie Settings.
Cookie Path Specifies the cookie path that appears in the URL of both IBMCognos BI and IBM Cognos Real-time Monitoring after thehost name. This is the same path that is specified in IBMCognos Configuration, in global settings, under CookieSettings on the General tab.
For example, if the IBM Cognos BI URL ismyserver.ibm.com/ibm/cognos, and the IBM CognosReal-time Monitoring URL is myserver.ibm.com/ibm/cognos/realtime, the Cookie Path can be /ibm/cognos, /ibm, or /. Theforward slash character (/) is always a valid value for thissetting.
Procedure1. Log in to Real-time Monitoring Workbench with a user ID that has system
administrator access permissions.Note: When configuring this functionality for the first time, you must log inusing the rtmadmin user ID. This ID is created in the directory server that isassociated with the IBM Cognos BI namespace that is configured forauthentication to both products. For more information about this ID, see theReal-time Monitoring Installation and Configuration Guide.
2. On the Administration Console tab, click System Settings.3. In the Configure drop-down list, click User Management and Authentication.4. In the User Management and SSO Provider drop-down list, click IBM
Cognos Business Intelligence.5. In the System Settings page, select the Enable Single Sign-On check box, and
click Apply.
92 IBM Cognos Real-time Monitoring Workbench Version 10.1.1: User Guide

6. Type values for the remaining settings as specified in the table above in thissection.
7. Click Synchronize Now.8. Click Apply, and then OK.9. Log off from Real-time Monitoring Workbench.
10. Delete the cookies in your browser.
Results
After enabling single sign-on, test if it works as expected:1. Log in to either IBM Cognos BI or Real-time Monitoring.
Tip: If the login fails, ensure that you specified a correct value for Cookie Pathin Real-time Monitoring Workbench.
2. Open the other application in the same browser window, or in a new tab in thesame window.The other application opens without a login prompt.
Using Real-time Monitoring cubes as data sources in IBM Cognos BIYou must configure access to the Real-time Monitoring data server before you canuse the data in IBM Cognos BI. The Real-time Monitoring cubes and views aresupported as data sources in IBM Cognos BI.
Perform the following tasks to make the Real-time Monitoring cube data availablein IBM Cognos BI:v Creating a data source connection to a Real-time Monitoring cubev Creating and publishing a package based on a Real-time Monitoring cubev Testing the Real-time Monitoring package in the IBM Cognos studios, such as
Report Studio
Creating a data source connection to a Real-time Monitoringcube
You create a data source connection to the Real-time Monitoring cube in IBMCognos Administration to make the cube data available in IBM Cognos BI.
For more information about data source connections, see the IBM CognosAdministration and Security Guide.
Ensure that single sign-on between Real-time Monitoring and IBM Cognos BI isenabled.
Note: You cannot use dynamic query mode in IBM Cognos BI to connect to aReal-time Monitoring cube.
For more information, see the section about data sources and connections in theIBM Cognos Administration and Security Guide.
Procedure1. Log on to IBM Cognos Connection, and open IBM Cognos Administration.
You must have sufficient administrative permissions to access IBM CognosAdministration.
Chapter 6. Configuring interoperability between Real-time Monitoring and IBM Cognos BI 93

Tip: You can open IBM Cognos Administration by clicking Administer IBMCognos Content in the Welcome page, or from the Launch menu in IBMCognos Connection.
2. On the Configuration tab, click Data Source Connections.
3. Click the new data source button in the toolbar.4. In the name and description page, type a unique name for the cube and,
optionally, a description and screen tip, and then click Next.5. From the Type drop-down list, select IBM Cognos Now! - Real-time
Monitoring Cube, and click Next.6. Specify the connection parameters.
v For Server name, type the IP address or host name, and for Port numbertype the port number of your Real-time Monitoring server that is configuredfor interoperability with IBM Cognos BI.
v IBM Cognos Now! - Real-time Monitoring Cube connection string
Specifies the path to the cube. The path should match what is configured inyour Web server.
7. Click Test the connection and follow the steps in the wizard.8. If the connection is successful, click Finish.
The new data source appears in the Data Source Connections page.
Note: The connection is not successful when using dynamic query mode.
Results
You can now create a package in IBM Cognos Framework Manager based on thisdata source.
Creating and publishing a package based on a Real-timeMonitoring cube
You use IBM Cognos Framework Manager to create a package based on aReal-time Monitoring cube. After creating the package, you can publish it directlyto IBM Cognos Connection to make the cube metadata available for use with IBMCognos studios, such as Report Studio and Query Studio.
For more information, see the IBM Cognos Framework Manager User Guide.
The data source connection to the Real-time Monitoring cube must already exist.
Procedure1. Log in to Framework Manager using the same credentials as when logging in
to IBM Cognos Connection.2. In the Welcome page, click Create a new project.
Tip: If a project already exists, click Open a project.
3. In the New Project page, specify a name and location for the project, and clickOK.
4. In the Select Language page, click the design language for the project.You cannot change the selected language after you click OK, but you can addother languages later.
5. In the Metadata Wizard dialog box, click Data source, and click Next.
94 IBM Cognos Real-time Monitoring Workbench Version 10.1.1: User Guide

6. From the list of available data sources, select the Real-time Monitoring cubethat you created, and click Next.
7. Select the Create a default package check box, and click Finish.8. Specify a name for the package.
Optionally, you can specify a description and screen tip for the package.9. Click Finish to import the metadata, and create the package.
10. Click Yes to open the Publish Wizard.11. In the Publish Wizard - Select Location Type dialog box, ensure that IBM
Cognos Content Store is selected as the publish location, and clear the Enablemodel versioning check box. Then, click Next.
12. In the Publish Wizard - Add Security dialog box, specify security settings forthe package, and click Next.You can specify access permissions for the package when publishing it for thefirst time. On subsequent publish operations, you must accept the previouslyspecified access permissions.
13. In the Publish Wizard - Options dialog box, keep the defaults, and clickPublish.
Note: Ensure that the Use Dynamic Query Mode check box is not selected.14. Click Finish, ignore any warnings, and click Close.
Results
The package is now available in IBM Cognos Connection, and you can use it tocreate Cognos BI reports and analyses. You can test the package now.
Testing the Real-time Monitoring package in IBM Cognosstudios
After you create and publish the package based on the IBM Cognos Real-timeMonitoring cube or view , you can test the package in one of the IBM Cognosstudios, such as Query Studio or Report Studio, to create reports.
To access the studios, users must have access to the associated secured functions inIBM Cognos BI, and have the required access permissions for the package. Formore information, see the security chapter in the IBM Cognos Administration andSecurity Guide.
Procedure1. Log in to IBM Cognos BI.2. Start IBM Cognos Query Studio.
Tip: You can start Query Studio from the Welcome page by clicking the linkQuery my data, or from the Launch menu in IBM Cognos Connection.
3. In the Select a package page, choose the package that you publishedpreviously.
4. In the Query Studio Menu on the left side of the page, select Insert Data.The published package appears below the Menu items.
5. Click the package to expand it, and view its contents.6. Create a report based on this package.
For information about creating Query Studio reports, see the IBM CognosQuery Studio User Guide.
Chapter 6. Configuring interoperability between Real-time Monitoring and IBM Cognos BI 95

Using Real-time Monitoring views as data sources in IBM Cognos BIYou must configure access to the IBM Cognos Real-time Monitoring data serverbefore you can use the data in IBM Cognos BI. The Real-time Monitoring cubesand views are supported as data sources in IBM Cognos BI.
Ensure that single sign-on between IBM Cognos BI and Real-time Monitoring isenabled.
Perform the following tasks to make the Real-time Monitoring view data availablein IBM Cognos BI:v Creating a data source connection to the Real-time Monitoring viewv Creating and publishing a package based on the Real-time Monitoring viewv Testing the package in IBM Cognos studios
Creating a data source connection to a Real-time Monitoringview on Windows
You create a data source connection to the IBM Cognos Real-time Monitoring viewto make the content based on that view available in IBM Cognos BI.
For more information, see the section about data sources and connections in theIBM Cognos Administration and Security Guide.
Note: You cannot use dynamic query mode in IBM Cognos BI to connect to aReal-time Monitoring view.
Procedure1. Open the directory where the SDK drivers.zip is located.
By default, this is the c10_location/realtime/sdk/odbc/operating_systemdirectory, where c10_location specifies the IBM Cognos BI installation location.Ensure that the cqjdbcclient.jar file is in this directory.
2. Run the setup.exe file to install the driver and provide input for the followingparameters:v JVM Path
Type the path of the jvm.dll file, for example, C:\Program Files\IBM\cognos\c10\bin\jre\6.0\bin\j9vm\jvm.dll.
v JDBC Driver Path
Type the path of the Real-time Monitoring JDBC Driver. This is the path forthe cqjdbcclient.jar file contained in the jdbc_driver directory. This directoryis created after you extract the contents of driver.zip.
v Driver Class
Type com/cognos/obi/jdbc/driver/Driver.v Logging Details
To generate a driver specific log file, select On, and type the path for the logfile.
3. Open the Control Panel, select Administrative Tool, then Data Sources(ODBC).
Note: If you are installing the driver on a 64 bit Windows OS, type in thefollowing command to configure the ODBC data source: cmd>C:\WINDOWS\SysWOW64\odbcad32.exe
96 IBM Cognos Real-time Monitoring Workbench Version 10.1.1: User Guide

4. In ODBC Data Source Administrator, select System DSN, and click Add.5. In the Create New Data Source window, select Cognos, and click Finish.
The Cognos ODBC-JDBC Bridge Driver dialog box displays.6. In the Cognos ODBC-JDBC Bridge Driver dialog box, provide the following:
v Data source name
Type the DSN name; for example, RtMView.v JDBC URL
Type the JDBC URL for Real-time Monitoring, in the following format:jdbc:cognos:obi://ip:port
For example, type 2669.Note: The port number is the same as that specified as JDBC Port in SystemSettings under JDBC Access to Views and Cubes.
7. Specify the User Name and Password, and then click Test Connection.On a successful connection, a confirming message appears. Otherwise, an errormessage appears.
Creating a data source connection to a Real-time Monitoringview on other operating systems
You create a data source connection to the IBM Cognos Real-time Monitoring viewto make the content based on that view available in IBM Cognos BI.
For more information, see the section about data sources and connections in theIBM Cognos Administration and Security Guide.
Note: You cannot use dynamic query mode in IBM Cognos BI to connect to aReal-time Monitoring view.
Procedure1. Ensure that your environment is set up in the following way:
v You have installed Sun JDK version 1.4 or higher, or IBM JDK version 5.0 orhigher, and unixODBC version 2.2.11 or iODBC version 3.52.6.
v JAVA_HOME is set to the directory where Java SDK is installed.For example, for Sun Java JDK, set JAVA_HOME to:export JAVA_HOME=/usr/local/Java/j2sdk1.4.2_15
For IBM Java JDK, set JAVA_HOME to:export JAVA_HOME=/opt/ibm/java-<ver>-50/
v LD_LIBRARY_PATH contains the path to JNI- specific libjvm.so libraries fora client, server, and i386.For example, for Sun Java JDK, set LD_LIBRARY_PATH to:export LD_LIBRARY_PATH=$LD_LIBRARY_PATH:$JAVA_HOME/jre/lib/architecture/server
For IBM Java JDK, set LD_LIBRARY_PATH to:export LD_LIBRARY_PATH=$JAVA_HOME/jre/bin:$LD_LIBRARY_PATH
2. Set up the library files.v Install the liblava.so file.
For example, install this file to the /usr/local/lib directory.v Edit the odbcinst.ini file using the liblava.so directory as the Driver and
Setup parameters. For example:Driver = /usr/local/lib/liblava.so
Chapter 6. Configuring interoperability between Real-time Monitoring and IBM Cognos BI 97

Setup = /usr/local/lib/liblava.so
v Specify other name/value pairs, as described in the sample odbc.ini andodbcinst.ini files.
3. Create or update the odbcinst.ini and odbc.ini files.Do this in at least one of the following locations:v Home directory of the user running the application that is using the ODBC
driver.In this case, change the file names to .odbcinst.ini and .odbc.ini.
v Corresponding system configuration files where the value/name pairs arespecified.
v The location specified by the environment variables ODBCINI orODBCINSTINI.Set ODBCINI to the path of the odbc.ini file. For example,export ODBCINSTINI=/tmp/odbcinst.ini
Set ODBCINSTINI to the path of the odbcinst.ini file. For example,export ODBCINI=/tmp/odbc.ini
Note: If the location is not specified, odbc.ini and odbcinst.ini must exist inthe home directory.
4. Open the directory where the Real-time Monitoring SDK drivers.zip file islocated.By default, this is the c10_location/realtime/sdk/odbc/operating_systemdirectory, where c10_location specifies the IBM Cognos BI installation location.Ensure that the cqjdbcclient.jar file is in this directory.
5. Run the setup to install the ODBC driver.Ensure that:v JDBC driver jar files are present, and the corresponding paths are specified
in the odbcinst.ini file under the DSN name.v DSN is registered with Driver Manager.v odbc.ini and .odbcinst.ini are present in the appropriate directory with
appropriate settings.v the liblava.so files exist in the directory specified in the odbc.ini file.v IBM Cognos Real-time Monitoring is configured and running.
6. Log on to IBM Cognos Connection, and open IBM Cognos Administration.You must have sufficient administrative permissions to access IBM CognosAdministration.Tip: You can open IBM Cognos Administration by clicking Administer IBMCognos Content in the Welcome page, or from the Launch menu in IBMCognos Connection.
7. On the Configuration tab, click Data Source Connections.
8. Click the new data source button in the toolbar.9. In the name and description page, type a name for the data source, and,
optionally, a description and screen tip, and click Next.10. From the Type drop-down list, select ODBC, and click Next.11. Specify the connection parameters in the following way:
v For ODBC data source, type the DSN ODBC data source name createdpreviously .
98 IBM Cognos Real-time Monitoring Workbench Version 10.1.1: User Guide

v For ODBC connect string, type any text that must be appended to theconnection string. This parameter is typically left blank.
v Select the Password check box, and type the credentials associated with theDSN ODBC data source created previously .
v Accept the default values for the remaining parameters.12. Click Test the connection and follow the steps in the wizard.13. If the connection is successful, click Finish.
The new data source appears in the Data Source Connections page.
Note: The connection is not successful when using IBM Cognos BI dynamicquery mode.
Results
You can now create a package based on this data source, and publish the packageto IBM Cognos Connection.
Creating and publishing a package based on a Real-timeMonitoring view
You use IBM Cognos Framework Manager to create a package based on a view.You can then publish it directly to IBM Cognos Connection to make the viewmetadata available for use with IBM Cognos studios.
For more information, see the IBM Cognos Framework Manager User Guide.
Procedure1. Log in to IBM Cognos Framework Manager.
Ensure that the IBM Cognos service is running.2. Click Create a new project, type a name, and select a location for the project.
For location, choose a folder in IBM Cognos Connection.3. Specify the design language as English, and click OK.4. In the next dialog box, click Cancel.
The project name specified in step 2 appears in the right pane of FrameworkManager.
5. Right-click Model in the left pane, and from the Create menu, click QuerySubject.
6. Type a name for the query subject, select Data source [Tables and Column],and click OK.
7. Select the data source name that you created in IBM Cognos Administration,clear the Run database query subject wizard check box, and click Finish.
8. In the Query Subject Definition window, select the Query Information tab,and click Options.
9. Click the SQL Settings tab, and select Cognos as SQL Type.
Ignore the warning that appears.10. In the Generate SQL box, select As View, and click OK.11. Select the SQL tab, and enter the query SELECT * FROM view_name.
Note: The value of view_name in the FROM clause is the view name available inIBM Cognos Real-time Monitoring.
Chapter 6. Configuring interoperability between Real-time Monitoring and IBM Cognos BI 99

Note: Only SELECT * FROM view_name types of queries are supported.12. Click OK.13. Click Data Source and select the data source that you created in IBM Cognos
Administration.14. In the properties window, select Limited Local for Query Processing.15. Select Project from the menu, and click Edit Governors.16. Clear the Allow usage of local cache check box, and click OK.17. To change the display of a column, click the plus (+) sign in front of the name.
Right-click the column that you want to change, and click Rename.18. To change the usage of a column, click the plus (+) sign in front of the name,
then change the Usage field in the Properties window.19. Save the Framework Manager project.20. Click the Packages folder, and from the Actions menu select Create, and then
Package.21. Type a name for the package, and click Next.22. Ensure that Model is selected, and click Next.23. Select the From the project option, and select the model that you created in
the previous step.If you created other packages, add package references by clicking Usingexisting packages.
24. In the Create Package - Select Function Lists dialog box, move all items fromSelect function sets to Available functions sets, and click Finish.The package is created.
25. Click Yes to open the Publish Wizard.26. In the Publish Wizard - Select Location Type dialog box, ensure that IBM
Cognos 10 Content Store is selected as the publish location, and clear theEnable model versioning check box. Then, click Next.
27. In the Publish Wizard - Add Security dialog box, specify security settings forthe package, and click Next.You can specify access permissions for the package when publishing it for thefirst time. On subsequent publish operations, you must accept the previouslyspecified access permissions.
28. In the Publish Wizard - Options dialog box, keep the defaults, and clickPublish.
Note: Ensure that the Use Dynamic Query Mode check box is not selected.29. Click Finish, ignore any warnings, and click Close.
Results
The package is now available in IBM Cognos Connection, and can be used tocreate Cognos BI reports and analyses. You can test the package now.
Testing the Real-time Monitoring package in IBM Cognosstudios
After you create and publish the package based on the IBM Cognos Real-timeMonitoring cube or view , you can test the package in one of the IBM Cognosstudios, such as Query Studio or Report Studio, to create reports.
100 IBM Cognos Real-time Monitoring Workbench Version 10.1.1: User Guide

To access the studios, users must have access to the associated secured functions inIBM Cognos BI, and have the required access permissions for the package. Formore information, see the security chapter in the IBM Cognos Administration andSecurity Guide.
Procedure1. Log in to IBM Cognos BI.2. Start IBM Cognos Query Studio.
Tip: You can start Query Studio from the Welcome page by clicking the linkQuery my data, or from the Launch menu in IBM Cognos Connection.
3. In the Select a package page, choose the package that you publishedpreviously.
4. In the Query Studio Menu on the left side of the page, select Insert Data.The published package appears below the Menu items.
5. Click the package to expand it, and view its contents.6. Create a report based on this package.
For information about creating Query Studio reports, see the IBM CognosQuery Studio User Guide.
Configuring the system for integration with Business InsightThe dashboard users can view and interact with the IBM Cognos Real-timeMonitoring content in IBM Cognos Business Insight, the dashboard component ofIBM Cognos BI. IBM Cognos Real-time Monitoring offers the IBM Cognos BI usersaccess to their operational data in real-time. Users view the content in all Webbrowsers that Business Insight supports.
The Real-time Monitoring content appears in the Content pane in Business Insight,and you can drag content onto the dashboard canvas. When you add objects inBusiness Insight they display as widgets. Widgets are interactive containers. Youcan also interact with the contents of the widgets. For more information, see theIBM Cognos Real-time Monitoring Dashboard User Guide.
Before you begin
Before you start configuring this functionality,v Enable single sign-on between Real-time Monitoring and IBM Cognos BI.v Ensure that you have the required access permissions to use Business Insight.
For more information, see the section about configuring Business Insight in theIBM Cognos Business Intelligence Installation and Configuration Guide.
About this task
Set up the following properties when configuring this functionality.
Parameter Description
Display Name Specifies the root folder in Business Insightfor the Real-time Monitoring dashboardobjects and their folders.
This folder appears in the Content pane inBusiness Insight.
Chapter 6. Configuring interoperability between Real-time Monitoring and IBM Cognos BI 101

Parameter Description
Description Specifies the text that appears when thepointer is positioned over the root folderspecified for the Display Name parameter.
IBM Cognos Real-time URL Specifies the server URL to which BusinessInsight connects to display the Real-timeMonitoring content.
The URL format is http://servername/urlcontext. For example, the URL can behttp://my_server/realtime.
Download contribution file Specifies the download link to theRealtime_contribution.atom file.
Save the file to the c10_location\configuration\icd\contributions\contribdirectory, where c10_location specifies theIBM Cognos BI installation location.
Procedure1. Log in to Real-time Monitoring Workbench with a user ID that has system
administrator access permissions.If this is the initial configuration, you must log in using the rtmadmin userID. For more information about this ID, see the Real-time MonitoringInstallation and Configuration Guide.
2. On the Administration Console tab, click System Settings.3. In the Configure drop-down list, click Business Insight Integration.4. Type values for the Display Name, Description, and IBM Cognos Real-time
URL settings.See the table in this section for descriptions of these settings.
5. Click Apply.6. Click the Download contribution file button to download the
Realtime_contribution.atom file.See the table in this section for a description of the download button.
7. Save the Realtime_contribution.atom file to the c10_location\configuration\icd\contributions\contrib directory, where c10_location specifies the IBMCognos BI installation location.
8. In System Settings, click OK to exist the page.9. Open IBM Cognos Configuration.
10. Under Security, IBM Cognos Application Firewall, add the Real-timeMonitoring domain that is configured for integration with Business Insight tothe list of Valid domains or hosts.Ensure that both the domain name and the port number are specified. Formore information, see the help in IBM Cognos Configuration.
11. From the Actions menu, click Edit Global Configuration, and on the Generaltab, ensure that the Cookie Settings are properly specified.The cookie settings are used with the single sign-on.
12. Save the configuration settings in IBM Cognos Configuration.
102 IBM Cognos Real-time Monitoring Workbench Version 10.1.1: User Guide

Tip: You can close IBM Cognos Configuration now, or keep it open so thatyou can restart the IBM Cognos service in step 9.
13. Go the c10_location\configuration\icd\proxy directory, where c10_locationspecifies the IBM Cognos BI installation location.
14. Open the file proxy-config.xml.15. Add the following proxy policy for Real-time Monitoring to this file:
<proxy:policy url="http://realtime_url/*"acf="none">
<proxy:actions><proxy:method>GET</proxy:method><proxy:method>HEAD</proxy:method><proxy:method>POST</proxy:method><proxy:method>PUT</proxy:method><proxy:method>DELETE</proxy:method>
</proxy:actions><proxy:cookies>
<proxy:cookie>JSESSIONID_LC</proxy:cookie><proxy:cookie>JSESSIONID</proxy:cookie><proxy:cookie>LtpaToken</proxy:cookie><proxy:cookie>LtpaToken2</proxy:cookie><proxy:cookie>cam_passport</proxy:cookie><proxy:cookie>CRN</proxy:cookie>
</proxy:cookies><proxy:users>
<proxy:user>AllAuthenticatedUsers</proxy:user></proxy:users>
</proxy:policy>
16. Save the proxy-config.xml file.17. Restart the IBM Cognos service.
You can do this from IBM Cognos Configuration, or from the WindowsControl Panel.
Results
The Real-time Monitoring content is now available in Business Insight.
Chapter 6. Configuring interoperability between Real-time Monitoring and IBM Cognos BI 103

104 IBM Cognos Real-time Monitoring Workbench Version 10.1.1: User Guide

Chapter 7. Troubleshooting
This section describes tasks that can help you to troubleshoot issues in IBMCognos Real-time Monitoring Workbench.
Authentication issues when using Tivoli Directory ServerWhen IBM Tivoli Directory Server is your LDAP authentication provider, usersmay encounter authentication issues in IBM Cognos Real-time Monitoring if theiruser names contain special characters.
Tivoli automatically appends the escape character (\) before the special characterin user names. After the users are synchronized in Real-time MonitoringWorkbench, their names include the escape character. For example, a user nameduser#1 is created as user\#1 in Real-time Monitoring Workbench. Accesspermissions and role memberships are associated with user\#1.
This creates the following authentication problems:v If the user logs in to Real-time Monitoring using the name containing the escape
character, Tivoli does not recognize the name, and the user cannot log in.v If the user logs in to Real-time Monitoring using the original name, Tivoli
recognizes the name, and the user can log in. However, at the same time,Real-time Monitoring Workbench creates a new user name, this time without theescape character. The application now contains two names for the same user.The original name, even though it logged the user into Real-time Monitoring,does not have any associated access permissions and role memberships. Thismakes the name unusable.
To reset the users and roles, configure Real-time Monitoring to use the Internalauthentication method and synchronize users. Then, change the authenticationmethod to either LDAP/ADS or IBM Cognos Business Intelligence, andsynchronize users again. For more information, see “User Management andAuthentication” on page 79.
Authentication issues when using Active DirectoryWhen Microsoft Active Directory is your LDAP authentication provider, users mayencounter authentication issues in IBM Cognos Real-time Monitoring if their usernames contain special characters.
Active Directory automatically replaces the special character in user names withthe underscore character (_). After the users are synchronized in Real-timeMonitoring Workbench, their names contain the underscore instead of the specialcharacter. For example, a user named user#1 is created as user_1 in Real-timeMonitoring Workbench.
This creates the following problems:v If the user logs in to Real-time Monitoring using the name containing the
underscore character (_), Active Directory does not recognize the name, and theuser cannot log in.
© Copyright IBM Corp. 2009, 2011 105

v If the user logs in to Real-time Monitoring using the original name, ActiveDirectory recognizes the name, and the user can log in. However, at the sametime, Real-time Monitoring Workbench creates a new user name, this time withthe special character. The application now contains two names for the same user.The original name, even though it logged the user into Real-time Monitoring,does not have any associated access permissions and role memberships. Thismakes the name unusable.
To reset the users and roles, configure Real-time Monitoring to use the Internalauthentication method and synchronize users. Then, change the authenticationmethod to either LDAP/ADS or IBM Cognos Business Intelligence, andsynchronize users again. For more information, see “User Management andAuthentication” on page 79.
ODBC driver issues when creating a data source connection to aReal-time Monitoring view on 64-bit Windows systems
When creating a data source connection to an IBM Cognos Real-time Monitoringview, you must create a System DSN ODBC data source using the Cognos ODBCdriver. When doing this, on some 64-bit Microsoft Windows systems you mayencounter an error message.
The following is the error message:
"The setup routines for Cognos ODBC driver could not be loaded due to thesystem error code 14001."
To avoid this issue, ensure that you have Microsoft Visual C++ 2005Redistributable Package (x86) installed. This package contains additional librariesthat you need to create a System DSN using the Cognos ODBC driver.
You can download and install Visual C++ 2005 Redistributable Package (x86) fromthe Microsoft Web site.
Unable to remove external users and roles after initial synchronizationThis problem occurs after initial synchronization, and is characterized by beingunable to remove external users and roles.
This problem occurs when the following scenario applies:v Configure IBM Cognos Real-time Monitoring to use the LDAP/ADS or IBM
Cognos Business Intelligence authentication methods.v Synchronize the users.v Change the configuration settings for the LDAP/ADS or IBM Cognos Business
Intelligence authentication methods to remove the previously synchronizedusers and roles.
v Synchronize the users again.
The external users and roles should be removed from Real-time MonitoringWorkbench. However, the users and roles are still in the system, and the users cansuccessfully log in to Real-time Monitoring.
106 IBM Cognos Real-time Monitoring Workbench Version 10.1.1: User Guide

Procedure1. In User Management and Authentication, configure Real-time Monitoring to
use the Internal authentication method.2. Synchronize the users.
This removes all existing external users and roles from the system.3. Configure Real-time Monitoring to use the LDAP/ADS or IBM Cognos
Business Intelligence authentication methods again, specifying the propersettings.
4. Synchronize the users.Only the expected external users and roles are now in the system.
Custom import and export of tasks only does not import tasksWhen doing a custom import and export of tasks only, the tasks are not imported.
In the Import/Export window, select the Include users check box and the Includetasks check box. This ensures that the tasks are imported correctly.
Avoiding cache issues when integrating RTM with Business InsightWhen a dashboard object is added, removed, or renamed in RTM, the changes arenot reflected under the RTM folder in the Business Insight content pane, even afterthe refresh icon is clicked.
Similarly, when the locale is changed in Business Insight, the change does not takeaffect immediately for RTM dashboard objects.
To avoid these situations, you must clear the browser cache, then log in again tosee these changes.
Chapter 7. Troubleshooting 107

108 IBM Cognos Real-time Monitoring Workbench Version 10.1.1: User Guide

Appendix. Geography map tuning
This appendix explains the geography database schema and how you can improvegeocoding accuracy using the database and geocoding software.
Improving geocoder accuracyTo improve the accuracy of the geocoder, you can modify the ABBREVMAP andGEOCODECACHE tables in the geography data source to affect the results.v ABBREVMAP
The ABBREVMAP table expands abbreviations so they are not ambiguous to thegeocoder. The ABBREVMAP table contains ABBREV, EXPANSION, andCATEGORY columns. The system uses the table to expand abbreviations into thefull name of a state, province, or country or region. Currently, the table hasexpansions for US states and Canadian provinces. For each row in the table, theABBREV column stores the abbreviation, the EXPANSION column contains whatthe abbreviation should expand to, and the CATEGORY column stores thecategory to which this abbreviation should apply. Possible values forCATEGORY are city, stateprovince, country, region, and, postal code. Notethat the ABBREV and EXPANSION column values are expected to be capitalizedwithout trailing or leading spaces and no more than one single space betweenwords.
v GEOCODECACHEThe GEOCODECACHE table caches the results of the geocoders. TheGEOCODECACHE table maps the logical address to the GPS latitude/longitudecoordinates that are returned by the geocoder. It contains the ADDRESS,LATITUDE, LONGITUDE, ACCURACY, and LAST_ACCESS columns. TheADDRESS column stores the address. It must be capitalized, and all extraneousspaces must be removed, including spaces around commas. LATITUDE andLONGITUDE are the GPS coordinates. ACCURACY can be any number.However, if the value is 6 or greater, it will be treated as an exact location.LAST_ACCESS is the time in milliseconds since EPOCH. The higher thisnumber, the more likely it will be precached on startup.If the geocoder that you are using cannot look up a particular address, or thecoordinates that you are getting are incorrect, you can prepopulate theGEOCODECACHE table in your geography data source. To prepopulate thetable:– Uppercase all letters in your address, and remove all preceding and trailing
spaces (including around commas).– Add the required Latitude/Longitude values in the respective columns and
use any numbers in the remaining columns.
You might be able to improve accuracy by adding more abbreviations to theABBREVMAP table in your geography data source. Ensure that all entries areuppercase, and that you trim all unnecessary spaces.
Extending geography map supportThis section describes how to create a geocoder.
© Copyright IBM Corp. 2009, 2011 109

You can extend support for Geography Maps by creating your own geocoder. Tocreate a geocoder, you must implement the com.cognos.obi.maps.IGeocoderinterface. In System Settings > Geography Maps of IBM Cognos Real-timeMonitoring Workbench, you can then type the class name of your custom geocoderand populate the Geocoder Key and URL fields with values needed by yourgeocoder. Your geocoder can access these values as parameters through theinit(url,key) callback that you must implement.
IGeocoder interfaceYou can create your own geocoder by implementing the IGeocoder Java interface(com.cognos.obi.maps.IGeocoder).
This interface requires you to implement two methods: init and geocode.
void init(String url, String key)
The init method is an initialization callback. It is called immediately after thegeocoder is constructed, and it is assumed that the geocoder class will have azero-argument constructor. The arguments represent the parameters "Base URL forGeoCoder" and "Geocoder Key" in the System Settings for Geography Maps. Themethod parameters are defines as follows:v url
The URL for the geocoder base URL entered in the system settings forGeography Maps in the Administration Console of the Real-time MonitoringWorkbench.
v keyThe geocoder key used in the system settings for Geography Maps in theAdministration Console of the Real-time Monitoring Workbench.GeoPoint geocode(String address) throws VCException
The geocode method takes an address and returns a GeoPoint objectrepresenting the latitude and longitude of the given address. If the addresscannot be geocoded, the geocode method must throw a VCException. Also,geocoders must be re-entrant; that is, thread-safe. For more information aboutthe GeoPoint object, see “GeoPoint class” on page 112.
You can use the geocode method of the IGeocoder interface to return latitude andlongitude values for dimension values that the default geocoders cannot handle.For example, you have a Sales Territory dimension with three levels: World,Country or Region, and Local. These levels have the following values:v World: "Asia and Pacific", "Americas", "Europe"v Country or Region: "USA and Canada", "Mexico and Central America"v Local: "New England", "West Coast"
Because the default Google geocoder does not recognize values such as "WestCoast" or "USA and Canada" and cannot provide latitude and longitudecoordinates for these, you need a custom geocoder that can provide the correctlatitude and longitude for these addresses.
To make sure that addresses are not ambiguous, Real-time Monitoring appends alldimension levels of a higher granularity to the address. For example, "West Coast"can refer to either the west coast of "USA and Canada" or "Mexico and CentralAmerica". Therefore, the address becomes "West Coast,USA and Canada,Americas"to specify the correct address for the west coast of "USA and Canada." Also,
110 IBM Cognos Real-time Monitoring Workbench Version 10.1.1: User Guide

Real-time Monitoring capitalizes the string and removes any extraneous spaces tocache the results efficiently. Your geocoder should take addresses such as "WESTCOAST,USAANDCANADA,AMERICAS" or "MEXICOANDCENTRALAMERICA,AMERICAS" and return the correct latitude and longitude for thataddress. Also, Real-time Monitoring expands any abbreviations according to theABBREVMAP table. For example, the abbreviations for the states California andOregon are expanded from CA and OR to CALIFORNIA and OREGON.
Dimension levels create the address provided to the geocoder. You can programyour custom geocoder in any manner you want to provide the correct longitudesand latitudes for the addresses that you expect it to receive.
Addresses are cached in the in-memory cache and GEOCODECACHE table of thedatabase cache. After the system concatenates, uppercases and removes extraspaces (canonicalization), and expands abbreviations, the geography coordinate isreturned. If the address is not in the in-memory cache, the database cache ischecked, and the coordinates are returned if the address exists in the databasecache. If the address is not in the in-memory cache or database cache, the geocoderprocesses the address and returns the coordinates. The in-memory cache andGEOCODECACHE table are then updated with the new address if the cache sizeis non-zero.
You can cause the system to always use the geocoder to return the coordinates bysetting the cache size to zero. Setting the cache size to zero causes all requests tobypass the caches. This is useful for mapping moving coordinates and whendebugging a custom geocoder.
The database cache stores the address and coordinates in the GEOCODECACHE.However, you can only delete these addresses manually. You can prepopulate thetable with your own coordinates if the address that you use matches the addressoutput after concatenation, canonicalization, and the expansion of abbreviations.
The following diagram shows the steps in processing addresses and updating thecaches.
Appendix. Geography map tuning 111

After you have created your custom geocoder, you must place it in a JAR file andensure that it is part of the classpath that Real-time Monitoring is using.
GeoPoint classThe GeoPoint class contains longitude and latitude information. A GeoPoint objectis returned from the geocode method of the IGeocoder interface.
The constructor for GeoPoint isGeoPoint(double latitude, double longitude, int accuracy)
The GeoPoint class has the getter methodsv getLatitude
v getLongitude
v getAccuracy
double getLatitude()
Returns the latitude coordinate in degrees as a double.
double getLongitude()
Returns a longitude coordinate in degrees as a double.
int getAccuracy()
112 IBM Cognos Real-time Monitoring Workbench Version 10.1.1: User Guide

Indicates the accuracy of the latitude and longitude coordinates. The higher thevalue returned, the more accurate the coordinates. If the value is 6 or greater, thecoordinates are treated as an exact location.
Appendix. Geography map tuning 113

114 IBM Cognos Real-time Monitoring Workbench Version 10.1.1: User Guide

Notices
This information was developed for products and services offered worldwide.
IBM may not offer the products, services, or features discussed in this document inother countries. Consult your local IBM representative for information on theproducts and services currently available in your area. Any reference to an IBMproduct, program, or service is not intended to state or imply that only that IBMproduct, program, or service may be used. Any functionally equivalent product,program, or service that does not infringe any IBM intellectual property right maybe used instead. However, it is the user's responsibility to evaluate and verify theoperation of any non-IBM product, program, or service.
IBM may have patents or pending patent applications covering subject matterdescribed in this document. The furnishing of this document does not grant youany license to these patents. You can send license inquiries, in writing, to:
IBM Director of LicensingIBM CorporationNorth Castle DriveArmonk, NY 10504-1785U.S.A.
For license inquiries regarding double-byte (DBCS) information, contact the IBMIntellectual Property Department in your country or send inquiries, in writing, to:
Intellectual Property LicensingLegal and Intellectual Property LawIBM Japan Ltd.1623-14, Shimotsuruma, Yamato-shiKanagawa 242-8502 Japan
The following paragraph does not apply to the United Kingdom or any othercountry where such provisions are inconsistent with local law: INTERNATIONALBUSINESS MACHINES CORPORATION PROVIDES THIS PUBLICATION "AS IS"WITHOUT WARRANTY OF ANY KIND, EITHER EXPRESS OR IMPLIED,INCLUDING, BUT NOT LIMITED TO, THE IMPLIED WARRANTIES OFNON-INFRINGEMENT, MERCHANTABILITY OR FITNESS FOR A PARTICULARPURPOSE. Some states do not allow disclaimer of express or implied warranties incertain transactions, therefore, this statement may not apply to you.
This information could include technical inaccuracies or typographical errors.Changes are periodically made to the information herein; these changes will beincorporated in new editions of the publication. IBM may make improvementsand/or changes in the product(s) and/or the program(s) described in thispublication at any time without notice.
Any references in this information to non-IBM Web sites are provided forconvenience only and do not in any manner serve as an endorsement of those Websites. The materials at those Web sites are not part of the materials for this IBMproduct and use of those Web sites is at your own risk.
© Copyright IBM Corp. 2009, 2011 115

IBM may use or distribute any of the information you supply in any way itbelieves appropriate without incurring any obligation to you.
Licensees of this program who wish to have information about it for the purposeof enabling: (i) the exchange of information between independently createdprograms and other programs (including this one) and (ii) the mutual use of theinformation which has been exchanged, should contact:
IBM Software GroupAttention: Licensing3755 Riverside DrOttawa, ON K1V 1B7Canada
Such information may be available, subject to appropriate terms and conditions,including in some cases, payment of a fee.
The licensed program described in this document and all licensed materialavailable for it are provided by IBM under terms of the IBM Customer Agreement,IBM International Program License Agreement or any equivalent agreementbetween us.
Any performance data contained herein was determined in a controlledenvironment. Therefore, the results obtained in other operating environments mayvary significantly. Some measurements may have been made on development-levelsystems and there is no guarantee that these measurements will be the same ongenerally available systems. Furthermore, some measurements may have beenestimated through extrapolation. Actual results may vary. Users of this documentshould verify the applicable data for their specific environment.
Information concerning non-IBM products was obtained from the suppliers ofthose products, their published announcements or other publicly available sources.IBM has not tested those products and cannot confirm the accuracy ofperformance, compatibility or any other claims related to non-IBM products.Questions on the capabilities of non-IBM products should be addressed to thesuppliers of those products.
All statements regarding IBM's future direction or intent are subject to change orwithdrawal without notice, and represent goals and objectives only.
This information contains examples of data and reports used in daily businessoperations. To illustrate them as completely as possible, the examples include thenames of individuals, companies, brands, and products. All of these names arefictitious and any similarity to the names and addresses used by an actual businessenterprise is entirely coincidental.
If you are viewing this information softcopy, the photographs and colorillustrations may not appear.
116 IBM Cognos Real-time Monitoring Workbench Version 10.1.1: User Guide

Trademarks
IBM, the IBM logo, ibm.com, and Cognos are trademarks or registered trademarksof International Business Machines Corp., registered in many jurisdictionsworldwide. Other product and service names might be trademarks of IBM or othercompanies. A current list of IBM trademarks is available on the Web at “ Copyrightand trademark information ” at www.ibm.com/legal/copytrade.shtml.
The following terms are trademarks or registered trademarks of other companies:v Microsoft, Windows, Windows NT, and the Windows logo are trademarks of
Microsoft Corporation in the United States, other countries, or both.v UNIX is a registered trademark of The Open Group in the United States and
other countries.v Java and all Java-based trademarks and logos are trademarks or registered
trademarks of Oracle and/or its affiliates.
Notices 117

118 IBM Cognos Real-time Monitoring Workbench Version 10.1.1: User Guide

Index
Aacknowledgements 23Active Directory
authentication issues 105administration
managing 59Administration Console 59agents 33
creating 8, 33deleting 33editing 8modifying 33
alert editor 22alerts
acknowledgements 23creating in Scenario Modeler 21dashboard expiration 79deleting automatically 79external Web service 21, 24Rule Filter of Data Stream Data 23setting limitations 77setting number of instances 24testing 38
Application Workbench 29authentication
issues when using Active Directory 105issues when using Tivoli 105LDAP 70user management 80
Bbackup 81branding 65business data
modeling 17Business Insight
integration 62, 91, 101business views 18
creating in Scenario Modeler 20data streams 34enabling support 29lookup tables 34
Ccheckpoints
configuration 63clauses 42columns
editing in View editor 40connection pool 8consolidated events 38context tables
working with Workbench 37cubes 46
creating 49creating dimensions 47data source connection 93data sources in IBM Cognos BI 93
cubes (continued)publishing packages to IBM Cognos BI 94threshold relationships 50
Ddashboard
alert expiration 79data caching 13
setting parameters 14data files
uploading 38data modeling 17data source connections
cubes 93views 96, 97
data sources 4agents 8
data streams 34, 35, 38upsert 36views 48
data typesJDBC 12
DB2JDBC agent 8
dimensions 46creating 47
directorieslog files 86
disabled state 17Display SQL expression option 45Drill back to detail
View in editor 44drill through targets
creating 54
Ee-mail transport 78enabled state 17encryption 65event file for uploading 38events
consolidated 38maintaining 45uploading from text 38VC_SYSTEM_EVENTS 89
execution throttling 66export
all metadata 81selected objects 57
external links 52external processes list
viewing 61
Ffields
editing in View editor 40
© Copyright IBM Corp. 2009, 2011 119

files_export.jar 82bam_detailed.log 86bam.log 86DEFAULTRECOVERYLOGGER_ 64flat 11JAR 50user defined functions 50
folders 31adding 31deleting 31JAR 50moving 31renaming 31user defined functions 51
Ggeocoder
accuracy 109interface 110
geography maps 67extending support 110geocoder 110geocoder accuracy 109GeoPoint Class 112tuning 109
GeoPoint Class 112
IIBM Cognos BI 68
Business Insight 101interoperability 91
imagesheader logo 65logos 65
integrationBusiness Insight 101
invalid object 17invalidation schedules 15
JJAR Files folder 50JDBC
access 69cubes 69data types 12views 69
Kkeystores 65
LLDAP 70
role mapping 70synchronization 70user mapping 70
logging 85Appender Class 74assigning levels 88destinations 86
logging (continued)directory for log files 86file prefix 74levels 76, 87log4j properties 74loggers 87maximum file size 74maximum files 74modules 87monitoring with rules 89rollover period 74synchroneity 74
lookup tables 4, 34, 37data 8data source agents 8data streams 48editing 11flat file 11JDBC source definition 8limitations 11Salesforce tables 10setting up data sources 4source definitions 8Web Service 9
Mmetadata 81
export 81import 81
MySQLJDBC agent 8
Nnotifications
deleting automatically 79
Oobject dependencies 33objects
create new 30exporting 57invalid 17searching for 31
OracleJDBC agent 8
Ppackages
publishing to IBM Cognos BI 94, 99testing 95, 101
performanceevent publication rate 66
performance tuningmemory low conditions 76
permissionsroles 61users 60
Persist view data 44persistence 63plan relationships
cubes 50
120 IBM Cognos Real-time Monitoring Workbench Version 10.1.1: User Guide

plan relationships (continued)views 46
PostgreSQLJDBC agent 8
process definitionscreating 53
propertieslog4j 74
Rrecovery 63reference data 50
views 46, 50reportlets
data 23external 52Rule Filter of Data Stream Data 23Scenario Modeler 27testing 38third party 52
reportsdrill though targets 54
rolesmanaging 61permissions 61removing external roles 107
RPC style messages 8Rule Filter of Data Stream Data 23rule templates 25
creating 26details 26
rulescreating in Scenario Modeler 21templates 25testing 38
rules editor 21running state 17
SSalesforce tables 10Scenario Modeler 17scenarios
creating in Scenario Modeler 20testing 38what if 38
settingsthread configuration 78
shutdown 78single sign-on
IBM Cognos BI 91SMTP configuration 78source definitions
creating 8editing 11flat file 11Salesforce tables 10Web Service 9
SQLdisplay a view definition 45JDBC agent 8
stand-by state 17stopped state 17stopping the servers 78
SybaseJDBC agent 8limitations 12
system administrationmanaging 59
system controls 78system logging 85
assigning levels 88destinations 86levels 87loggers 87modules 87monitoring with rules 89
system settings 62
Ttabs 66
Custom Branding 65Memory Monitoring 76Notifications 77workbench 30
testingcube-based packages 95, 101view-based packages 95, 101
text fileuploading to event stream 38
thread configuration settings 78time-out period
setting 77Tivoli
authentication issues 105troubleshooting
authentication issues when using Active Directory 105authentication issues when using Tivoli 105cache issues when integrating with Business Insight 107external users and roles 107import and export of tasks does not import tasks 107Real-time Monitoring Workbench 105views as data sources on 64-bit Windows systems 106
tuningevent publication rate 66geography maps 109memory low conditions 76
UUpload Event File 38upsert
data streams 36User Defined Functions folder 51user interface
configuration settings 79users
creating 60managing 60removing external users 107
VView editor 39
Drill back to detail 44fields 40From clause 43Maintain in View 45Order by clause 43
Index 121

View editor (continued)Persist view data 44Where clause 43Window clause 43workset 40
viewscreating 40creating in Scenario Modeler 19, 20data source connection 96, 97data sources in IBM Cognos BI 96display definition in SQL 45editing 40publishing packages to IBM Cognos BI 99stateless 45
views (continued)testing 38troubleshooting on 64-bit Windows systems 106View editor 39
WWeb Service
creating a source definition 9workbench 2, 30
launching 1workset 40
122 IBM Cognos Real-time Monitoring Workbench Version 10.1.1: User Guide