rear seal replacement
TRANSCRIPT

7/23/2019 Rear Seal Replacement
http://slidepdf.com/reader/full/rear-seal-replacement 1/8
Pry out seal (fig. 3).
54
Rear Wheel Seal and
Pinion InstallationRear Wheel Seals and BearingsFor Disc and Drum Brakes
Note: Before starting any removal procedures, determine ifthe axle shafts are held in place by C-shaped locks atthe inner end, or by a retainer plate bolted to the axlehousing. Then follow the steps below appropriate to“C-lock” or “non-C-lock” type of axle shaft. If unsure,remove the differential carrier cover.
Bearing/Seal Removal1. Raise the rear end of the car on a hoist or support it on jack
stands. Both rear wheels must be elevated. Do not work oncars supported only by bumper jacks.
2. Remove the hub cap or wheel cover. Use a wrench or jackhandle to take off wheel lug nuts. Pull straight back toremove the wheel.
3. Detach any retaining clips or bolts holding brake drums to axleshaft flanges. Remove brake drums.
Note: Brake adjustment may have to be backed off.Emergency brake must be off.
4. Brush dirt from the brake drum
C-Lock Axles5. Place a container or pan under the differential and remove the
differential carrier cover. Allow the rear axle lubricant to drain.
6. Loosen the differential pinion shaft locking bolt. Remove thepinion shaft (fig.1).
7. Push in on the axle shaft (toward the center of the car).Remove the C-lock from the grooved end of the shaft (fig. 2).Replace the pinion shaft and locking bolt temporarily, to keepdifferential gears in position.
8. Pull the axle shaft from the housing. Be careful not to dam-agethe bearings and seal, which remain in the housing.
9. Insert a suitable tool (pry bar) behind the seal and pry it fromthe bore (fig. 3). Discard the seal. Never reuse old seals.
Loosen differential pinionshaft locking bolt (fig. 1).
Remove C-Lock (fig. 2).

7/23/2019 Rear Seal Replacement
http://slidepdf.com/reader/full/rear-seal-replacement 2/8
10. Place the legs of a slide hammer behind the bearingand remove it.
11. Inspect the old bearing for nicks, pitting and damage.If there is any damage, the entire bearing must be replaced.Never interchange new and old bearing parts.
Non C-Lock Axles5. Remove the nuts holding the retainer plate to the
backing plate (fig. 4).
6. Slide the retainer plate off of the studs. To prevent the brake
backing plate from slipping off, reinstall and finger tighten thelower nuts.
7. Grip the axle shaft flange with a puller or slide hammer.Remove the axle shaft and bearing assembly (fig. 5).
8. Remove the seal from the housing.
9. Inspect the old bearing for nicks, pitting and damage. If thereis any damage, the entire bearing must be replaced. Neverinterchange new and old bearing parts.
10. To replace the bearing, put the axle in a vise. Use a chiseland hammer to nick the bearing retainer in 3 or 4 places. Becareful not to damage the axle shaft.
11. Slide the loosened retainer from the shaft (fig. 6).
12. Place the shaft in an arbor press. Press the bearing off theshaft and discard it.
Bearing/Seal InstallationBe sure the new seal and bearing are correct for the application.Check part numbers against the old seal. Use the SKF ServicesPassenger Car and Light Truck Seals and Bearing Catalog (SKF#457205).
Steps listed below apply to either C-lock or non C-lock axles.
C-Lock Axles1. Inspect the axle shaft and housing for nicks or scratches.
Carefully file or polish to remove surface imperfections.
Note: Deep scores or grooves on the shaft where the seal makescontact must be repaired. (Refer to Chapter 7: WearSleeves.)
Remove nuts holding
retainer plate (fig. 4).
Grip axle shaft flange witha slidehammer (fig. 5).
Slide off retainer (figl. 6).
7/23/2019 Rear Seal Replacement
http://slidepdf.com/reader/full/rear-seal-replacement 3/856
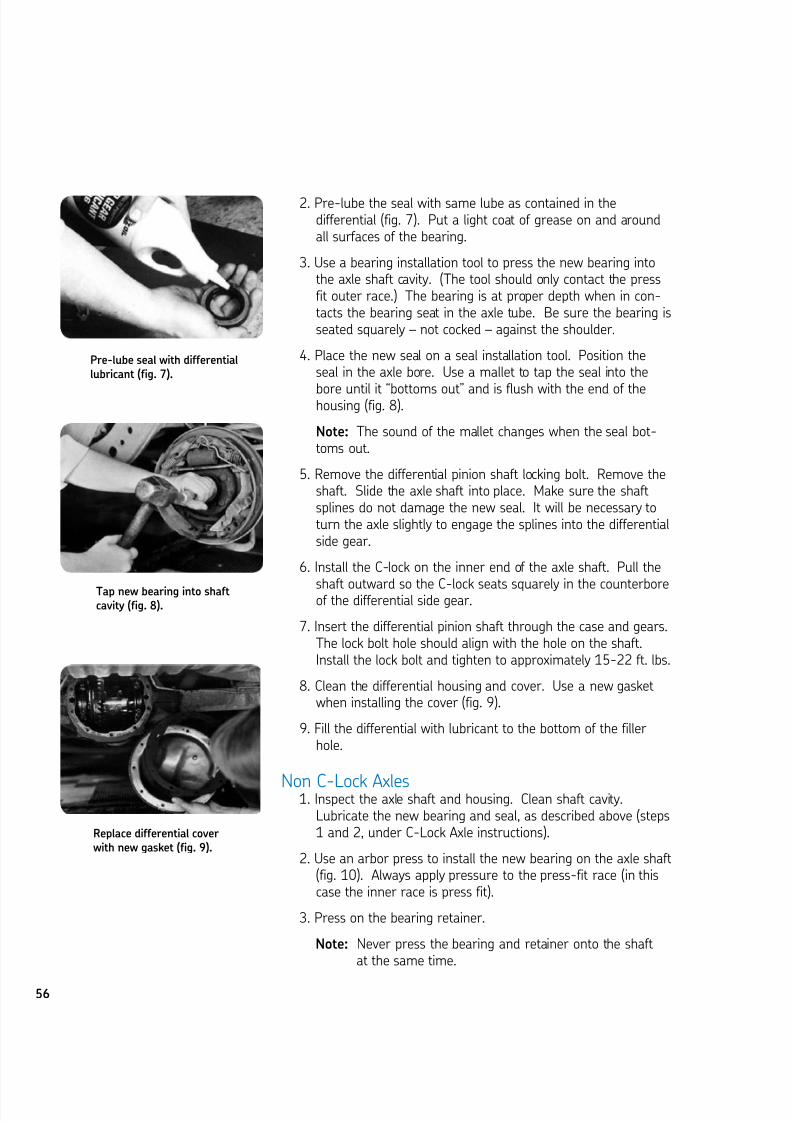
2. Pre-lube the seal with same lube as contained in thedifferential (fig. 7). Put a light coat of grease on and aroundall surfaces of the bearing.
3. Use a bearing installation tool to press the new bearing intothe axle shaft cavity. (The tool should only contact the pressfit outer race.) The bearing is at proper depth when in con-tacts the bearing seat in the axle tube. Be sure the bearing isseated squarely – not cocked – against the shoulder.
4. Place the new seal on a seal installation tool. Position theseal in the axle bore. Use a mallet to tap the seal into the
bore until it “bottoms out” and is flush with the end of thehousing (fig. 8).
Note: The sound of the mallet changes when the seal bot-toms out.
5. Remove the differential pinion shaft locking bolt. Remove theshaft. Slide the axle shaft into place. Make sure the shaftsplines do not damage the new seal. It will be necessary toturn the axle slightly to engage the splines into the differentialside gear.
6. Install the C-lock on the inner end of the axle shaft. Pull the
shaft outward so the C-lock seats squarely in the counterboreof the differential side gear.
7. Insert the differential pinion shaft through the case and gears.The lock bolt hole should align with the hole on the shaft.Install the lock bolt and tighten to approximately 15-22 ft. lbs.
8. Clean the differential housing and cover. Use a new gasketwhen installing the cover (fig. 9).
9. Fill the differential with lubricant to the bottom of the fillerhole.
Non C-Lock Axles1. Inspect the axle shaft and housing. Clean shaft cavity.Lubricate the new bearing and seal, as described above (steps1 and 2, under C-Lock Axle instructions).
2. Use an arbor press to install the new bearing on the axle shaft(fig. 10). Always apply pressure to the press-fit race (in thiscase the inner race is press fit).
3. Press on the bearing retainer.
Note: Never press the bearing and retainer onto the shaftat the same time.
Pre-lube seal with differentiallubricant (fig. 7).
Tap new bearing into shaftcavity (fig. 8).
Replace differential coverwith new gasket (fig. 9).

7/23/2019 Rear Seal Replacement
http://slidepdf.com/reader/full/rear-seal-replacement 4/8
4. Insert the new seal. Use a seal installation tool to press it intothe housing.
5. Carefully insert the shaft and bearing into the housing. Avoiddamaging the seal. Be sure the bearing is seated properly inthe housing.
6. Install the retainer plate over the axle housing studs. Torquesecuring nuts to 35 ft. lbs.
Rear Wheel Reassembly(Both C-lock and Non C-Lock)
1. Install the brake drum.2. Replace the wheel.3. Replace lug nuts and tighten evenly.4. Lower the car.5. Torque lug nuts to manufacturer’s recommended specifications.6. Install the hubcap or wheel cover.
Pinion Seal ReplacementPinion seal maintenance recommendations vary by manufacturer.Generally these seals must be replaced when leaks develop. Pinionseals should be checked and replaced whenever servicing a universal joint.
Replacement of the pinion seal usually requires removal andinstallation of only the pinion shaft nut and flange.
Note: A circular mounting flange, U-bolts or straps are used tohold the driveshaft in position on the differential pinion.The mounting flange attaches directly to the pinion yoke,while U-bolts/straps contact the bearing cups.
Use arbor press to installbearing (fig. 10).

7/23/2019 Rear Seal Replacement
http://slidepdf.com/reader/full/rear-seal-replacement 5/858
Seal Removal1. Raise the car on a hoist.
2. Make a mark where the driveshaft and the pinion flangemeet (fig. 11). The driveshaft and flange were balanced at thefactory and must be reassembled in the same position.
3. Disconnect the driveshaft by unbolting the mounting flange.If straps or U-bolts are used, tape the bearing cups in place(be careful not to lose bearing rollers). Remove the straps orU-bolts.
4. Support the driveshaft to prevent strain on the universal joint,and the transmission extension housing seal (fig. 12).
5. With a torque wrench placed on the pinion nut, record thepinion bearing preload.
6. Support the pinion yoke and remove the pinion nut and thewasher.
7. Place a pan under the seal to hold any lube that drains fromthe rear axle.
8. Mark the pinion yoke and shaft to identify correct positionfor reassembly. Remove the pinion yoke.
9. Use a seal puller or suitable tool to pry out the old seal (fig.13).Discard the old pinion seal. Be careful not to damage the sealhousing. Never reuse old seals.
Support driveshaft (fig. 12).
Pry out old pinion seal (fig. 13).
Mark the driveshaft andpinion flange (fig. 11).

7/23/2019 Rear Seal Replacement
http://slidepdf.com/reader/full/rear-seal-replacement 6/8
Seal Installation1. Select a new seal for the application. Refer to the SKF
Passenger Car, Light and Medium Truck Seals and BearingCatalog (SKF#457205).
2. Clean and inspect the pinion yoke seal surface (fig. 14).If damaged, it may be repaired using a shaft repair kit:the SKF Speedi-Sleeve. (See Chapter 7: Wear Sleeves.)
3. Apply lubricant to the seal lips (fig. 15). With an SKF sealinstallation tool and adapter (or similar tool), press the sealinto the housing. The seal should be centered and seated
squarely.
4. Check pinion shaft splines and yoke for burrs or damage.Wipe the pinion clean.
5. Apply lubricant to the outer diameter of the pinion yoke andon flange splines.
6. Replace the pinion yoke on the shaft. Match previously mademarks so shaft and yoke align.
7. While holding the flange, tighten the pinion nut to previouslyrecorded disassembly or preload torque.
8. Connect rear end of the driveshaft to pinion yoke. Alignpreviously made markings.
9. Replace the circular mounting flange or install U-bolts orstraps, and secure the driveshaft in position.
10. Add lubricant to within 1/8”-1/4” from the bottom of the fillerhole. Do not overfill.
11. Lower the car.
Inspect pinion yoke sealsurface (fig. 14).
Apply lube to seal lips (fig. 15).
7/23/2019 Rear Seal Replacement
http://slidepdf.com/reader/full/rear-seal-replacement 7/8
To take this test, simply place a card or sheet of paper under the first question.After you’ve read it (and answered it to yourself), slide the paper down below thenext question. The correct answer to the first problem will appear directly to theright of the new question. Be sure not to skip any of the questions. This learningtechnique assures more than four times the normal retention rate for even thistechnical subject.
1. Both rear wheels must be elevated when removing rear wheel bearingsand seals.
N True N False T 2. When performing a seal and/or bearing removal on a “C-lock” type of axle
shaft, you do not have to allow the rear axle lubricant to drain. N True N False F 3. After removing a seal from a C-lock axle, you may save it to re-install after
servicing. N True N False F 4. You must replace a bearing if you discover nicks, pitting or damage during
inspection. N True N False
T 5. When performing service on a Non C-lock axle type shaft, reinstall andfinger tighten the lower nuts of the brake backing plate to prevent itfrom slipping off.
N True N False T 6. While preparing a C-lock axle shaft for bearing and/or seal installation,
there is no need to file or polish nicks or scratches from the axle surface. N True N False F 7. You should use a bearing installation tool to press the new bearing into the
axle shaft cavity.
N True N False T 8. When installing the retainer plate over the axle housing studs during
Non-C-lock installation, be sure to torque the securing nuts to 35 ft. lbs. N True N False T
60
CHAPTER 8 REVIEW

7/23/2019 Rear Seal Replacement
http://slidepdf.com/reader/full/rear-seal-replacement 8/8
9. Replacement of the pinion seal usually requires removal and installationof only the pinion shaft nut and flange.
N True N False T10. During pinion seal removal, there is no need to support the driveshaft
to prevent strain on the universal joint. N True N False F11. Before pinion seal installation, it is important to clean and inspect the
pinion yoke seal surface. N True N False
T12. Add lubricant to within 1/8” – 1/4” from the bottom of the filler holeduring pinion seal installation, and be sure not to overfill.
N True N False T