receptacle specifications - cloud object storage · 2016-08-03 · 1 receptacle specifications...
TRANSCRIPT

1
RECEPTACLE SPECIFICATIONS
RECTANGULAR POLE-MOUNTED RECEPTACLE
Capacity:~ 700 cigarette butts
Dimensions: 3 1/8” x 3 1/8” x 19” high
Construction: - Fire-safe aluminum- 100% rust-resistant
Security: Lockable
Ash Liner: No
Installation:- Bolted (included)- Steel-banded(recommended and instructions included)
Special Features:- Rain gutter to reduce rain water into the unit- Easy installation and servicing- Weather resistant- Customization available (vinyl stickers)
19"
17"
2.2" x 0.6"
3.125" 3.12
5"

2
STEEL-BANDINGINSTALLATION
Purchasable: http://www.uline.com/BL_2905/Stainless-Steel-Strapping
1. Three vinyl stickers should be applied to each receptacle (these stickers are customizable)
2. Check each lamp pole or post against the installation map (varies per location)
3. Measure 40 inches from ground level. The bottom of the receptacle should be 40 inches from ground level when installed
4. Ensure that the receptacle is vertically level and the front faces the sidewalk
5. Measure the stainless steel band on the circumference of the pole
6. Pass the band through the top portion of the mounting bracket
7. Tighten the band
8. Repeat the steps above with the lower band
9. Check that the receptacle is tightly mounted by alternately placing light pressure against the sides of the receptacle
10. Cut off the excess banding
MATERIALS NEEDED:
INSTALLATION INSTRUCTIONS:
ITEM # DESCRIPTION QUANTITY
S-14377 5/8" Stainless steel bandingVaries depending on number of receptacles and width of
post
S-14378 5/8" Banding seals Two seals per receptacle
H-1273 Tensioner to tighten bands around post
Varies on number of individuals installing

3
1. Receptacles must not reach a fill rate of more than 85% (safety precaution).
2. Receptacles must be closed securely after emptying.
3. Place a bag or bucket beneath the receptacle, raising the rear edge at least two inches behind the receptacle between the receptacle and the pole.
4. Hold the bag/bucket with one hand.
5. With the other hand unlock the receptacle door with the receptacle key. Please note that the servicer will be required to keep and safeguard the receptacle keys.
6. Tap the side of the receptacle gently to dislodge any material clogged inside.
7. Close and lock the receptacle.
8. Aggregate all collected cigarette waste and seal in trash bags.
INSTRUCTIONS:
SERVICINGINSTRUCTIONS
4
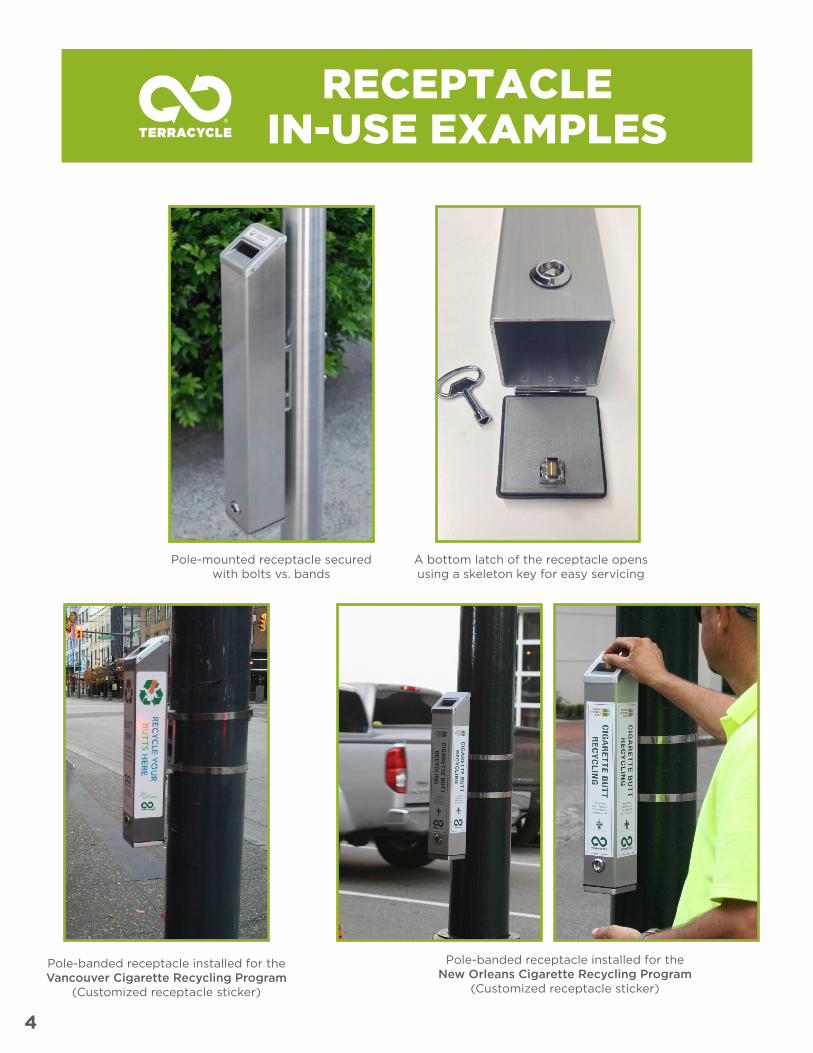
RECEPTACLEIN-USE EXAMPLES
Pole-banded receptacle installed for the Vancouver Cigarette Recycling Program
(Customized receptacle sticker)
Pole-mounted receptacle securedwith bolts vs. bands
A bottom latch of the receptacle opensusing a skeleton key for easy servicing
Pole-banded receptacle installed for the New Orleans Cigarette Recycling Program
(Customized receptacle sticker)