recipes - grandmother's kitchen · chocolate drizzle to make the chocolate drizzle, put the...
TRANSCRIPT
BrowniesChocolate Orange Brownie 5Peanut Butter Blonde Brownies 6Chocolate Fudge Brownies 7Brownies With Cream Cheese Icing 8Fudgy Brownie 9Marshmallow Swirl Brownies 10Cherry Cheesecake Brownies 11Chocolate Mint Brownies 12Cheesecake Brownies with Raspberries 13Brownie Cheesecake Bites 14
CakesCream Layered Cake 15Coconut Cake Glaze 16Orange Layer Cake 17Simple White Cake 18Fresh Banana Chocolate Cake 19Walnut Hummingbird Cake 20Lemon Cake & Filling & Creamy Frosting 21Pecan Cream Cake 22Vanilla Layer Cake with Coconut 23Caramel Frosted Yellow Cake 24Angel Food Cake & Fluffy White Frosting 25Elegant Chocolate Cake 26Triple Chocolate Cake 27Strawberry Frosted Mini Cakes 28Carrot Pineapple Cake 29Honey Carrot Cake 30Carrot Cake With Pistachio Topping 31Moist Layered Carrot Cake 32Carrot Cake & Cream Cheese Icing 33
Recipes

CandyEasy Peanut Butter Balls 34Coconut Chocolate Truffles 35Coconut Coated Peanut Butter Balls 36Homemade Truffles 37Homemade Marshmallows 38Easy Homemade Almond Roca 39White Chocolate Turtle Bark 40Caramel Apples 41Strawberry Mango Jelly With Cream 89
CheesecakesTiramisu Cheesecake 42Mocha Cake & Orange Cream Cheese 43Peanut Butter Cheesecake Pie 44Easy No Bake Blueberry Cheesecakes 45Oreo Ultimate Turtle Cheesecake 46
Cookies & Cinnamon RollsPerfect Cinnamon Rolls 47Sweet Potato Cinnamon Rolls 48Mini Cinnamon Rolls 49Homemade Peanut Butter Cookies 50Orange Meringue Cookies 51Cookies & Cream Cheese Mini Bites 52Coconut Macaroons & Chocolate Drizzle 53Peanut Butter Chocolate Chip Cookies 54Oreo Chocolate Cookies & Cream Cookies 55Danish Shortbread Cookies & Jam 56Lemon Deluxe Sugar Cookies 57
CupcakesEasy Red Velvet Cupcake 58Maple Cupcakes 59Lemon Cupcakes 60Oreo Cupcakes 61Carrot Pineapple Cupcakes 62Chocolate Cupcakes & Chocolate Icing 63Mini Chocolate Cupcakes & Ganache 64Individual Chocolate Cakes 65 Chocolate Peanut Butter Cup Cupcakes 66Banana &Vanilla Pastry Cream Cupcakes 67
Recipes
Squares & BarsStrawberry Chiffon Squares 68Cherry Bars 69Coconut Chocolate Chip Squares 70Lemon Cheesecake Squares 71Pineapple Cheesecake Squares 72Cherry Cheesecake Squares 73Berry Cobbler Squares 74Delicious Date Filled Squares 75Toffee Squares With Toasted Pecans 76Cheesecake Apple Streusel Bars 77Rocky Road Cake 78Nanaimo Bar 79
DonutsJelly Filled Donuts 80Super Easy Doughnut Holes 81Homemade Donuts With Sugar Coating 82Donuts - Krapfen - Traditional German 83
Ice Cream CakesOreo Ice Cream Cake 84Layered Ice Cream Cake 85Coffee and Amaretti Ice-Cream Cake 86Frozen Tiramisu 87Chocolate Chip Ice Cream Sandwich 88
FudgeBrown Sugar Fudge 90Chocolate & Peanut Butter Fudge 91Dark Chocolate Fudge 92Creamy Vanilla Fudge & Ganache 93Peanut Butter Fudge 94
Tarts and PiesPeanut Butter Fudge Tarts 95Cherry Tarts 96Coconut Cream Tarts 97Chocolate Mousse Tart 98Glazed Apricot Tart 99Rustic Apple Tarts 100Cherry Dumplings 101Old Fashioned Coconut Cream Pie 102Black Bottom Cream Pie 103Homemade Pie Crust 104
Recipes

5Go to Index ©2016 www.grandmotherskitchen.ca
BrowniePreheat the oven to 3750F.Grease a 9 x 13 inch baking pan with butter.
Place the butter and chocolate chips into a small saucepan and melt over low heat. Add marmalade, stir until smooth. Turn off heat and mix in vanilla and orange extract. Set aside to cool.
In a bowl whisk together flour and salt.
In a large mixing bowl, use and electric mixer to beat together eggs and sugar until light and has thickened. Beat in the cooled chocolate mixture until smooth. Beat in the flour mixture and mix till well incorporated. Place into the preheated oven and bake for 25 minutes, or until a toothpick inserted in the center of the brownie comes out clean. Remove to a cooling rack and let cool before frosting.
GanacheHeat the cream in a small saucepan over medium heat. Bring just to the boiling point, but do not boil. Place the chocolate chips into a small heatproof bowl. Pour the hot cream over and let sit for 10 minutes without stirring.After 10 minutes, stir with a whisk until smooth and shiny. Break up any pieces of chocolate that remain and scrape the bottom of the bowl with a spatula to incorporate. Let cool for a few minutes then pour over the brownie and use a metal spatula to spread evenly.
GarnishWash and dry your oranges. To cut the orange peel, use a small sharp knife to peel the orange cutting the peel off in long pieces. Trim the white pith off the peels. Cut these peels into long narrow strips. In a small saucepan, heat the marmalade. Add the cut peel to coat and glaze. Decorate the brownie with a little of this glazed peel on each piece.
Makes (1) 9x13 inch pan
Brownies 3/4 cup butter 1 cup chocolate chips1 cup orange marmalade 3 Tablespoons pure vanilla extract 1 teaspoon orange extract 1 cup all purpose flour 1/2 teaspoon salt 4 large eggs 1 1/3 cups granulated sugar
Chocolate Ganache Icing 1 cup heavy cream8 oz. (1/2 lb) dark chocolate cut into even size small pieces or 1 1/3 cups chocolate chips or melting wafers
Garnish 1 -2 oranges, for peel 1/4 cup marmalade
Chocolate Orange Brownie

6Go to Index ©2016 www.grandmotherskitchen.ca
Brownie Preheat oven to 3500F.Grease an 8x 8 inch square baking pan.
In a large mixing bowl, using an electric mixer on medium speed, cream together the peanut butter and butter.
Add and beat in the brown sugar, vanilla and eggs until light and fluffy. Whisk together the flour, baking powder, and salt in a separate bowl. Slowly beat in to the butter mixture and mix until well blended. Use a wooden spoon to stir in the peanuts.
Spread batter evenly into the prepared pan. Place into the preheated oven and bake for 25 to 30 minutes or until a toothpick inserted in the center of the brownie comes out clean.
Remove and place onto a rack to cool before cutting into pieces.
Makes (1) 8x8 inch pan
1/2 cup peanut butter4 Tablespoons butter, at room temperature1 cup packed brown sugar1 teaspoon pure vanilla extract2 eggs 2/3 cup all purpose flour1 teaspoon baking powder1/4 teaspoon salt1/2 cup salted peanuts, finely chopped
Peanut Butter Blonde Brownies
7Go to Index ©2016 www.grandmotherskitchen.ca
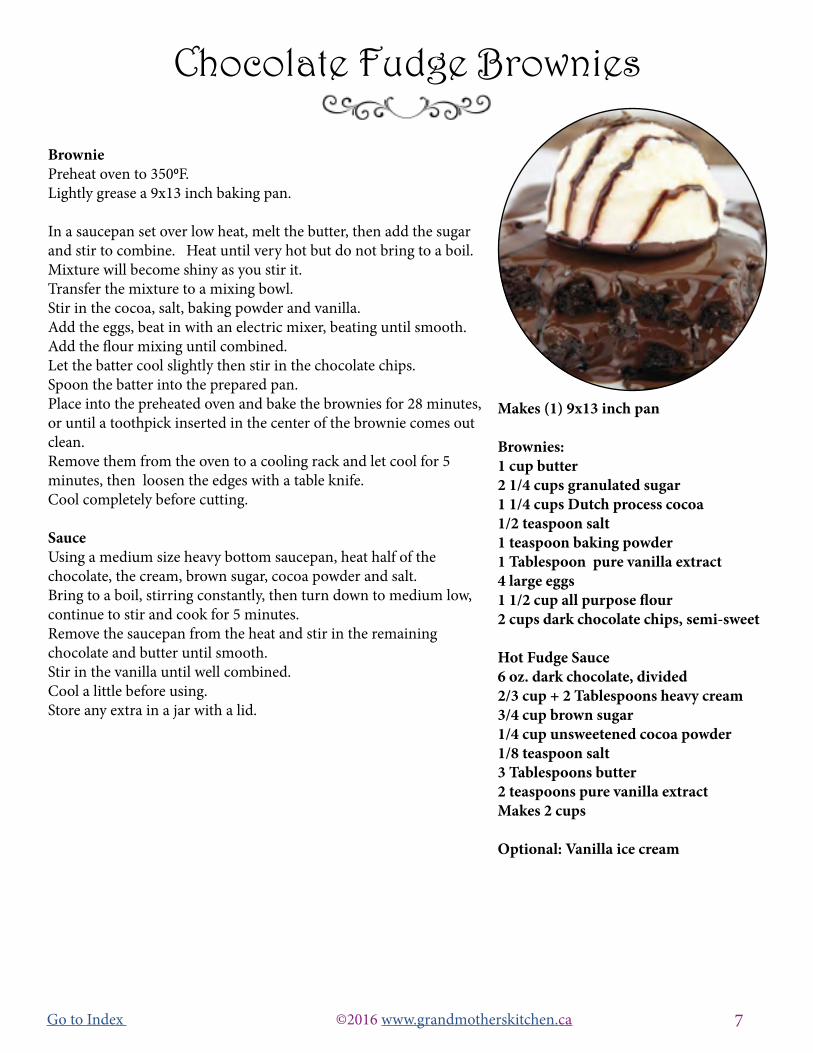
Brownie Preheat oven to 3500F. Lightly grease a 9x13 inch baking pan. In a saucepan set over low heat, melt the butter, then add the sugar and stir to combine. Heat until very hot but do not bring to a boil. Mixture will become shiny as you stir it.Transfer the mixture to a mixing bowl. Stir in the cocoa, salt, baking powder and vanilla. Add the eggs, beat in with an electric mixer, beating until smooth. Add the flour mixing until combined. Let the batter cool slightly then stir in the chocolate chips. Spoon the batter into the prepared pan. Place into the preheated oven and bake the brownies for 28 minutes, or until a toothpick inserted in the center of the brownie comes out clean. Remove them from the oven to a cooling rack and let cool for 5 minutes, then loosen the edges with a table knife. Cool completely before cutting.
Sauce Using a medium size heavy bottom saucepan, heat half of the chocolate, the cream, brown sugar, cocoa powder and salt.Bring to a boil, stirring constantly, then turn down to medium low, continue to stir and cook for 5 minutes. Remove the saucepan from the heat and stir in the remaining chocolate and butter until smooth. Stir in the vanilla until well combined. Cool a little before using. Store any extra in a jar with a lid.
Makes (1) 9x13 inch pan Brownies:1 cup butter2 1/4 cups granulated sugar1 1/4 cups Dutch process cocoa 1/2 teaspoon salt1 teaspoon baking powder1 Tablespoon pure vanilla extract4 large eggs1 1/2 cup all purpose flour2 cups dark chocolate chips, semi-sweet
Hot Fudge Sauce 6 oz. dark chocolate, divided2/3 cup + 2 Tablespoons heavy cream3/4 cup brown sugar1/4 cup unsweetened cocoa powder1/8 teaspoon salt3 Tablespoons butter2 teaspoons pure vanilla extract Makes 2 cups
Optional: Vanilla ice cream
Chocolate Fudge Brownies

8Go to Index ©2016 www.grandmotherskitchen.ca
BrowniePreheat oven to 3500F. Grease a 9 x9 inch square pan with oil.
Place the oil and sugar into a mixing bowl and beat with an electric mixer until they are combined. Mix in vanilla and eggs, one at a time.
In another bowl, whisk together the baking powder, cocoa powder, salt and flour and mix until well incorporated. Mix the dry ingredients into the wet ingredients until incorporated.
Pour the batter into prepared baking pan and bake for 18 to 20 minutes, or until an inserted toothpick comes out with a moist crumb. Remove from the oven and set on a rack to cool before frosting.
Cream Cheese FrostingUse an electric mixer to mix together the cream cheese, butter and sugar until light and fluffy.
Spread the cream cheese frosting over top of cooled brownies. Chocolate Drizzle To make the chocolate drizzle, put the melting wafers into a small saucepan on the stove-top and heat over low to melt. Cut the brownie into pieces, drizzle each with chocolate and serve.
Makes (1) 9x9 inch pan Brownie1/2 cup vegetable oil 1 cup granulated sugar 1 teaspoon pure vanilla extract2 large eggs 1/4 teaspoon baking powder 1/3 cup cocoa powder 1/4 teaspoon salt 1/2 cup all purpose flour
Cream Cheese Frosting3/4 cup cream cheese, at room temperature1/3 cup butter, at room temperature3 cups confectioners’ sugar
Chocolate Drizzle 1 cup chocolate melting wafers, melted
Brownies With Cream Cheese Icing

9Go to Index ©2016 www.grandmotherskitchen.ca
BrowniePreheat oven to 3500F. Grease an 8x8 inch baking pan with butter. Melt the butter over low heat in a small saucepan. Pour into a mixing bowl. Add the sugar, eggs and vanilla and using an electric mixer, beat together.
In another bowl, whisk together the flour, cocoa powder and salt. Mix the dry ingredients to the wet ingredients to combine.
Pour the batter into the prepared pan and place into the preheated oven.
Bake for 30 minutes, or until a toothpick inserted in the middle comes out clean. Remove from the oven and cool brownies in the pan on wire rack.
Fudge FrostingPlace the butter and chocolate in the top of a double boiler and melt over medium heat.Using an electric mixer on low speed, combine the confectioners’ sugar with the vanilla and 1/2 cup of the milk in a mixing bowl.Add in the melted chocolate, beat in. Add the remaining milk, just a little at a time to get the desired consistency.
This frosting will thicken as it cools.
Place frosting into a piping bag and frost the brownies decoratively.
Makes (1) 8x8 inch pan Fudgy Brownie2/3 cup butter, melted 1 1/3 cups granulated sugar 2 eggs 1 1/2 teaspoons pure vanilla extract 1 cup all purpose flour 1/2 cup unsweetened cocoa powder 1/4 teaspoon salt
Fudge Frosting1/2 cup butter3 oz. chunk chocolate, cut into small pieces , or chocolate melting wafers4 cups confectioners’ sugar1/2 teaspoon pure vanilla extract3/4 cup milk
Fudgy Brownie

10Go to Index ©2016 www.grandmotherskitchen.ca
BrowniePreheat oven to 3500F. Grease an 8x8 inch baking pan and set aside.
In a double boiler or a saucepan over low heat, combine chocolate and butter and melt to combine, whisking frequently to ensure chocolate does not burn or separate from butter. Once the chocolate is completely melted, remove from heat and stir in sugar. Add eggs one at a time, whisking to blend after each addition. Add vanilla, flour and salt. Stir until just combined.
Stir in the white chocolate chips. Pour batter into prepared pan. Put dollops of marshmallow cream over the top and swirl in themarshmallow creme, make figure 8 patterns into the batter. Place into the preheated oven and bake for 30-35 minutes, or until a toothpick inserted in the center comes out with a few crumbs. Remove to a cooling rack and let cool before eating.
Makes (1) 8x8 inch pan
2/3 cup chocolate chips1 1/2 sticks (3/4 cup) butter1 cup granulated sugar3 eggs1 teaspoon pure vanilla extract1/4 teaspoon salt1 cup all purpose flour1/2 cup white chocolate chips1 cup marshmallow creme
Marshmallow Swirl Brownies
11Go to Index ©2016 www.grandmotherskitchen.ca
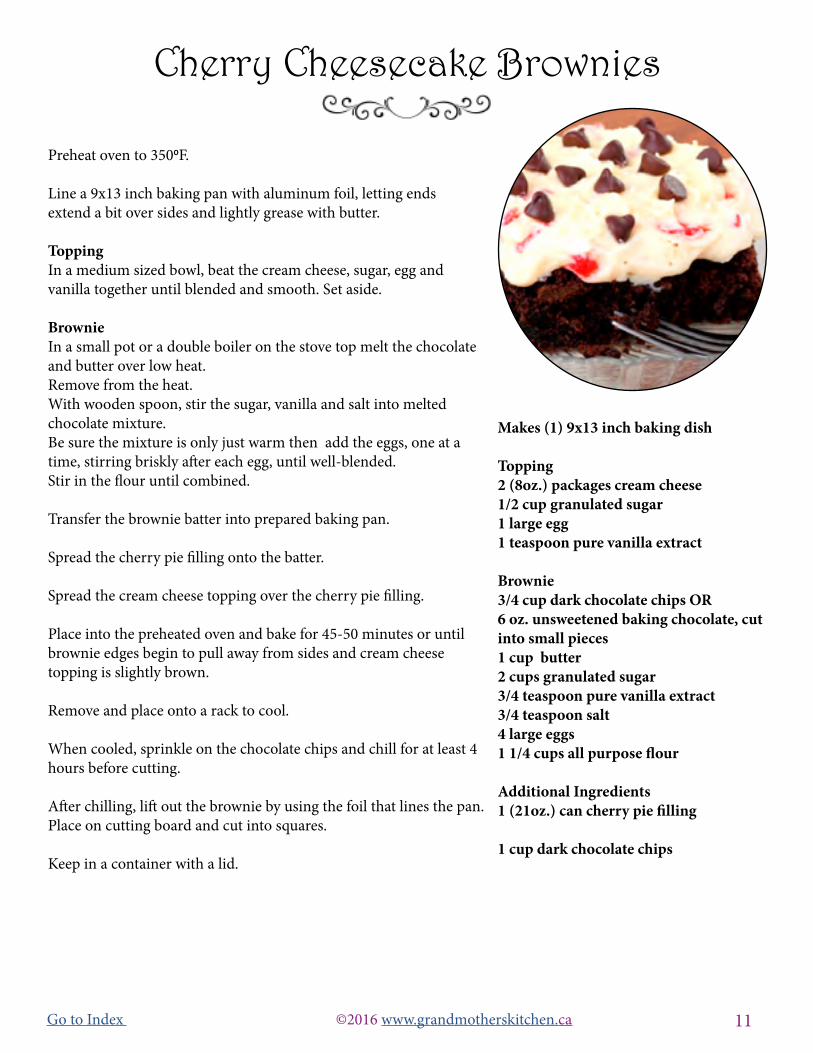
Preheat oven to 3500F.
Line a 9x13 inch baking pan with aluminum foil, letting ends extend a bit over sides and lightly grease with butter.
ToppingIn a medium sized bowl, beat the cream cheese, sugar, egg and vanilla together until blended and smooth. Set aside.
BrownieIn a small pot or a double boiler on the stove top melt the chocolate and butter over low heat.Remove from the heat.With wooden spoon, stir the sugar, vanilla and salt into melted chocolate mixture. Be sure the mixture is only just warm then add the eggs, one at a time, stirring briskly after each egg, until well-blended. Stir in the flour until combined.
Transfer the brownie batter into prepared baking pan.
Spread the cherry pie filling onto the batter. Spread the cream cheese topping over the cherry pie filling.
Place into the preheated oven and bake for 45-50 minutes or until brownie edges begin to pull away from sides and cream cheese topping is slightly brown. Remove and place onto a rack to cool.
When cooled, sprinkle on the chocolate chips and chill for at least 4 hours before cutting.
After chilling, lift out the brownie by using the foil that lines the pan. Place on cutting board and cut into squares. Keep in a container with a lid.
Makes (1) 9x13 inch baking dish Topping 2 (8oz.) packages cream cheese 1/2 cup granulated sugar 1 large egg 1 teaspoon pure vanilla extract
Brownie 3/4 cup dark chocolate chips OR 6 oz. unsweetened baking chocolate, cut into small pieces 1 cup butter 2 cups granulated sugar 3/4 teaspoon pure vanilla extract 3/4 teaspoon salt 4 large eggs 1 1/4 cups all purpose flour
Additional Ingredients1 (21oz.) can cherry pie filling
1 cup dark chocolate chips
Cherry Cheesecake Brownies
12Go to Index ©2016 www.grandmotherskitchen.ca
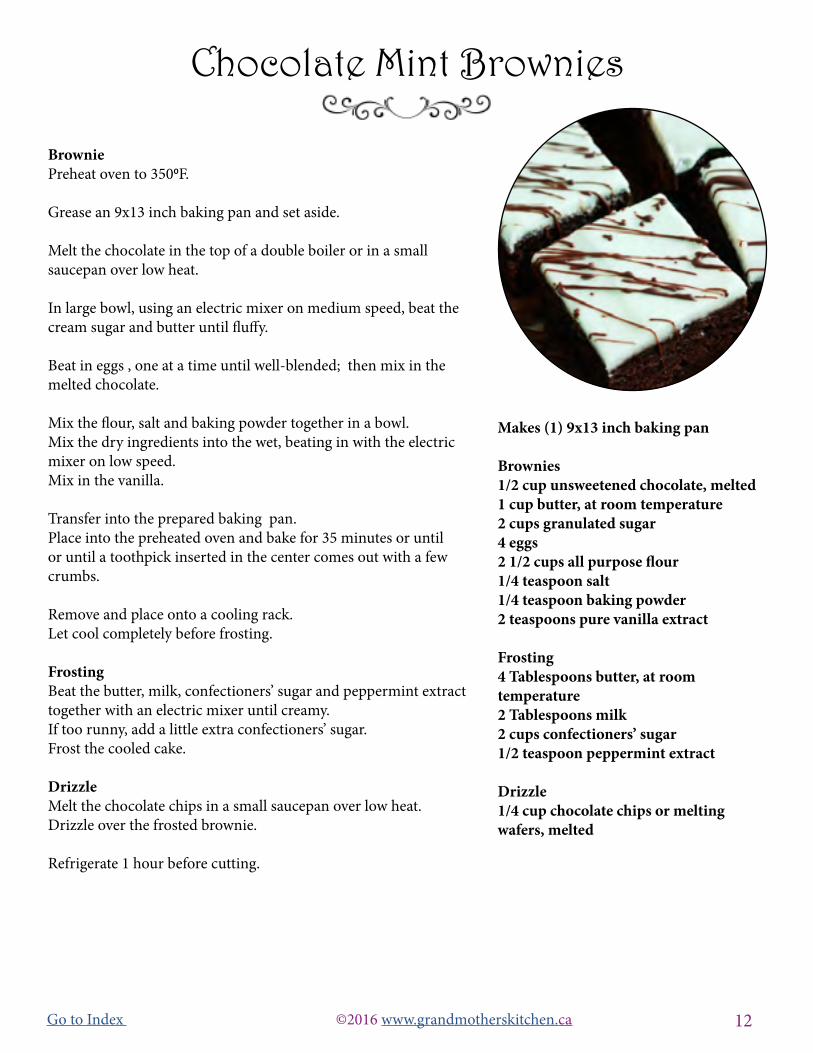
Brownie Preheat oven to 3500F.
Grease an 9x13 inch baking pan and set aside. Melt the chocolate in the top of a double boiler or in a small saucepan over low heat.
In large bowl, using an electric mixer on medium speed, beat the cream sugar and butter until fluffy.
Beat in eggs , one at a time until well-blended; then mix in the melted chocolate.
Mix the flour, salt and baking powder together in a bowl. Mix the dry ingredients into the wet, beating in with the electric mixer on low speed. Mix in the vanilla.
Transfer into the prepared baking pan. Place into the preheated oven and bake for 35 minutes or until or until a toothpick inserted in the center comes out with a few crumbs. Remove and place onto a cooling rack. Let cool completely before frosting. Frosting Beat the butter, milk, confectioners’ sugar and peppermint extract together with an electric mixer until creamy. If too runny, add a little extra confectioners’ sugar. Frost the cooled cake. Drizzle Melt the chocolate chips in a small saucepan over low heat. Drizzle over the frosted brownie.
Refrigerate 1 hour before cutting.
Makes (1) 9x13 inch baking pan
Brownies1/2 cup unsweetened chocolate, melted1 cup butter, at room temperature 2 cups granulated sugar4 eggs 2 1/2 cups all purpose flour1/4 teaspoon salt1/4 teaspoon baking powder2 teaspoons pure vanilla extract
Frosting4 Tablespoons butter, at room temperature2 Tablespoons milk 2 cups confectioners’ sugar1/2 teaspoon peppermint extract
Drizzle1/4 cup chocolate chips or melting wafers, melted
Chocolate Mint Brownies

13Go to Index ©2016 www.grandmotherskitchen.ca
Brownie Preheat oven to 3500F. Grease a 9x13 inch baking pan lightly with butter. Place a heatproof bowl into a saucepan of simmering water. Melt the butter and chocolate. Remove from heat and stir in the sugar and vanilla extract. Add the eggs, using an electric mixer on low to beat in, one at a time until well incorporated. Beat in the flour and salt and until the batter is smooth and glossy. Spread half of the brownie batter evenly onto the bottom of the prepared pan.
Cream Cheese Layer Using your food processor or an electric mixer, beat the cream cheese just until smooth. Add the sugar, vanilla, and egg and mix in until just until creamy and smooth. Spread the cream cheese filling evenly over the brownie layer. Spoon the reserved brownie batter evenly on top of the cream cheese layer in spoonfuls. Place raspberries evenly around top press them in slightly. Place in the preheated oven and bake for 30 minutes or until a toothpick inserted in the center comes out with a few crumbs andthe brownies are set. Remove and place on a cooling rack to cool before cutting.
(1) 9x13 inch baking pan
Brownie Layers1 cup butter, cut into pieces8 oz. unsweetened chocolate, coarsely chopped2 cups granulated white sugar2 teaspoon pure vanilla extract4 large eggs1 cup all purpose flour1/4 teaspoon salt
Cheese Cake Layer8 oz.cream cheese, at room temperature1/3 cup granulated white sugar1/2 teaspoon pure vanilla extract1 large egg1 cup fresh raspberries
Cheesecake Brownies with Raspberries
14Go to Index ©2016 www.grandmotherskitchen.ca
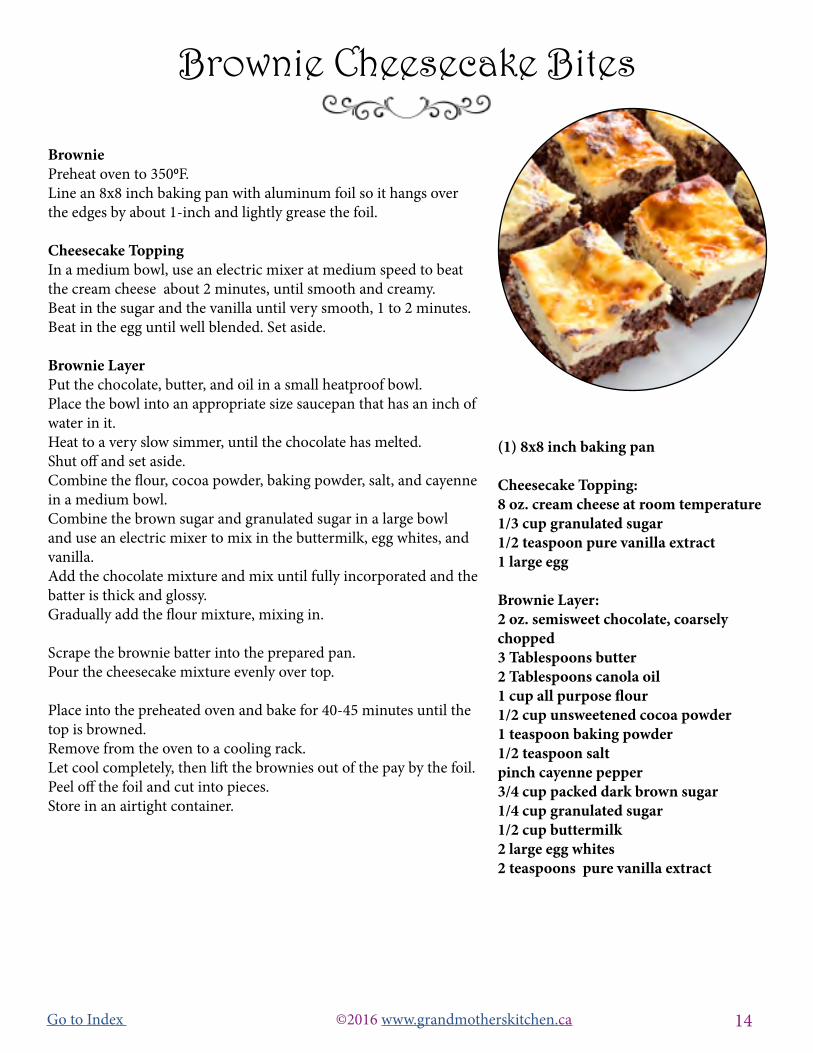
Brownie Preheat oven to 3500F. Line an 8x8 inch baking pan with aluminum foil so it hangs over the edges by about 1-inch and lightly grease the foil.
Cheesecake ToppingIn a medium bowl, use an electric mixer at medium speed to beat the cream cheese about 2 minutes, until smooth and creamy.Beat in the sugar and the vanilla until very smooth, 1 to 2 minutes. Beat in the egg until well blended. Set aside.
Brownie LayerPut the chocolate, butter, and oil in a small heatproof bowl.Place the bowl into an appropriate size saucepan that has an inch of water in it. Heat to a very slow simmer, until the chocolate has melted. Shut off and set aside. Combine the flour, cocoa powder, baking powder, salt, and cayenne in a medium bowl.Combine the brown sugar and granulated sugar in a large bowl and use an electric mixer to mix in the buttermilk, egg whites, and vanilla. Add the chocolate mixture and mix until fully incorporated and the batter is thick and glossy. Gradually add the flour mixture, mixing in.
Scrape the brownie batter into the prepared pan. Pour the cheesecake mixture evenly over top. Place into the preheated oven and bake for 40-45 minutes until the top is browned. Remove from the oven to a cooling rack.Let cool completely, then lift the brownies out of the pay by the foil.Peel off the foil and cut into pieces. Store in an airtight container.
(1) 8x8 inch baking pan
Cheesecake Topping:8 oz. cream cheese at room temperature1/3 cup granulated sugar1/2 teaspoon pure vanilla extract1 large egg
Brownie Layer:2 oz. semisweet chocolate, coarsely chopped3 Tablespoons butter2 Tablespoons canola oil1 cup all purpose flour1/2 cup unsweetened cocoa powder1 teaspoon baking powder1/2 teaspoon saltpinch cayenne pepper3/4 cup packed dark brown sugar1/4 cup granulated sugar1/2 cup buttermilk2 large egg whites2 teaspoons pure vanilla extract
Brownie Cheesecake Bites

15Go to Index ©2016 www.grandmotherskitchen.ca
CakePreheat oven to 3500F.
Grease with butter and lightly flour (2) - 10 inch square cake pans.
Using an electric mixer, beat together butter and sugar in a mixing bowl until light and fluffy. Add the eggs, one at a time, beating after each addition. Mix in flour, milk and vanilla until well incorporated. Pour half the batter into a bowl and mix in brewed coffee until its combined.
Pour each batter into its prepared cake pan.Place into the preheated oven and bake for 20 - 25 minutes, or until an toothpick inserted in the center comes out clean. Remove from oven and set onto a cooling rack. Once cool enough to touch, turn cakes out of pan and let cool completely on a wire racks.
Whipped CreamWhip together sugar, cream, and vanilla to stiff peaks. Set aside in the refrigerator.
Puree raspberries and put through a strainer to rid of seed and pulp. Take half of whipped cream and fold in raspberry puree until incorporated.
AssemblyPlace coffee flavoured layer on bottom and frost with plain whipped cream on top. Place layer of plain white cake on top, then spread whipped raspberry cream on top. Dust with cocoa powder and garnish with chocolate slices.
(1) 10x10-inch layer cake Cake1 cup butter, at room temperature2 cups granulated sugar4 medium eggs, at room temperature3 cups self-raising flour1 cup whole milk1 teaspoon pure vanilla extract1 Tablespoon brewed coffee
Whipped Cream1 Tablespoon confectioners’ sugar1 cup heavy cream1/2 teaspoon pure vanilla extract
1/2 cup raspberries
cocoa powder, for dustingchocolate slices *optional
Cream Layered Cake
16Go to Index ©2016 www.grandmotherskitchen.ca
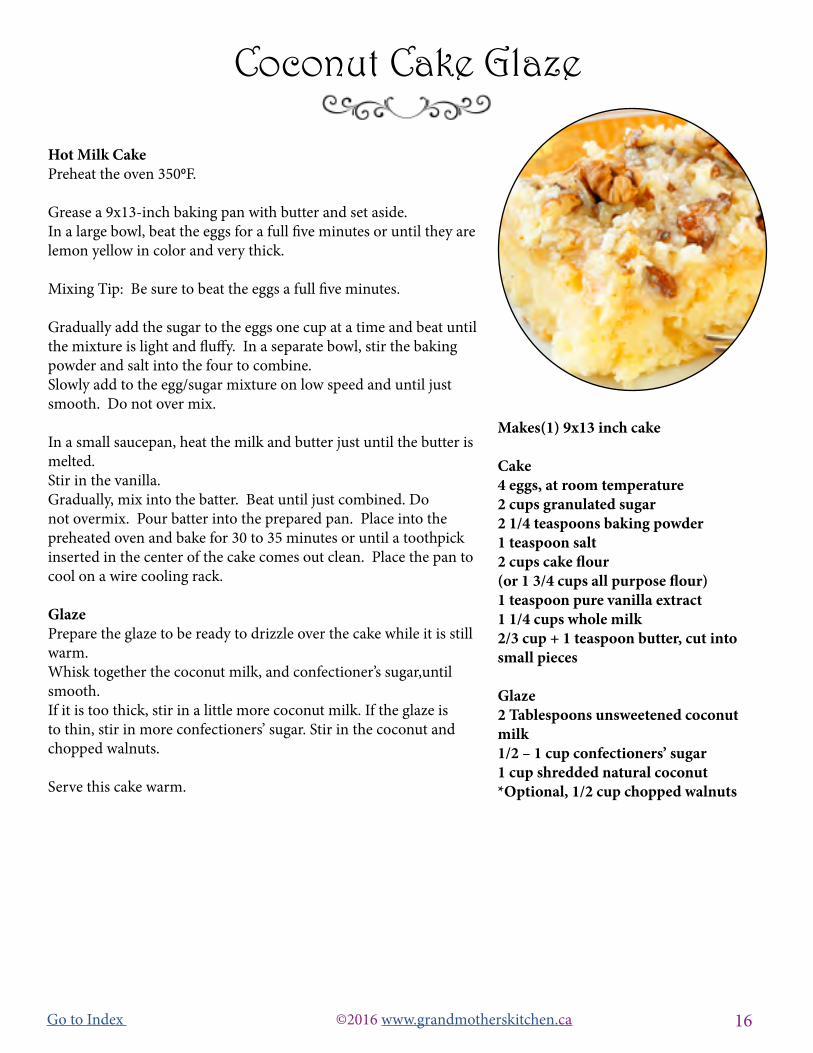
Hot Milk Cake Preheat the oven 3500F. Grease a 9x13-inch baking pan with butter and set aside. In a large bowl, beat the eggs for a full five minutes or until they are lemon yellow in color and very thick.
Mixing Tip: Be sure to beat the eggs a full five minutes. Gradually add the sugar to the eggs one cup at a time and beat until the mixture is light and fluffy. In a separate bowl, stir the baking powder and salt into the four to combine. Slowly add to the egg/sugar mixture on low speed and until just smooth. Do not over mix. In a small saucepan, heat the milk and butter just until the butter is melted. Stir in the vanilla. Gradually, mix into the batter. Beat until just combined. Do not overmix. Pour batter into the prepared pan. Place into the preheated oven and bake for 30 to 35 minutes or until a toothpick inserted in the center of the cake comes out clean. Place the pan to cool on a wire cooling rack.
GlazePrepare the glaze to be ready to drizzle over the cake while it is still warm.Whisk together the coconut milk, and confectioner’s sugar,until smooth.If it is too thick, stir in a little more coconut milk. If the glaze is to thin, stir in more confectioners’ sugar. Stir in the coconut and chopped walnuts.
Serve this cake warm.
Makes(1) 9x13 inch cake
Cake 4 eggs, at room temperature 2 cups granulated sugar 2 1/4 teaspoons baking powder1 teaspoon salt 2 cups cake flour (or 1 3/4 cups all purpose flour) 1 teaspoon pure vanilla extract 1 1/4 cups whole milk 2/3 cup + 1 teaspoon butter, cut into small pieces
Glaze2 Tablespoons unsweetened coconut milk1/2 – 1 cup confectioners’ sugar1 cup shredded natural coconut*Optional, 1/2 cup chopped walnuts
Coconut Cake Glaze

17Go to Index ©2016 www.grandmotherskitchen.ca
CakeHeat the oven to 3750F. Grease the bottom and the sides of a 15x10 inch jelly roll pan and line with parchment paper. Set aside.In a mixing bowl use an electric mixer to beat butter and sugar until light and fluffy. Scrape the sides of the bowl and one by one, add the 3 eggs followed by the lemon extract.Stir the flour, baking powder and salt together. Slowly fold the flour mixture alternately with the milk and orange juice into the batter.Spoon the batter into the prepared baking pan. Place in the preheated oven and bake for about 25 minutes or until a toothpick inserted in the middle comes out clean. Remove from oven and place on a cooling rack.Leave to cool completely.Sprinkle powder sugar on top of the cake, cover with a cutting board and turn. This way you’ll be able to remove the cake form the pan without breaking it into pieces or sticking to the cutting board.Remove the parchment paper, and cut cake into 3 slices. Let cool.
Orange CurdZest your orange. Squeeze the oranges.Separate the egg yolks from the whites. You only need the yolks for this recipe.In a heat proof bowl, combine the orange zest, juice, sugar and salt and stir together.Select a pan to fit the heat proof bowl and put about two inches of water in it. Bring it to the boil, then turn it down to simmer.Put the heat proof bowl with ingredients already in it into the pot with the heated water. Whisk in the egg yolks.Let this cook for about 7-10 minutes, whisking while it is cooking. Once the mixture thickens you can remove it from the hot water pot.Whisk in the butter pieces, one at a time until all the butter is in the curd. Strain the curd through a strainer to remove the zest pieces.Keep the orange curd refrigerated.
FrostingIn the bowl of an electric mixer fitted with the flat beater, beat the cream cheese on medium speed until smooth and fluffy, 2 to 3 minutes. Add the butter and beat for 2 to 3 minutes more. Add the confectioners’ sugar 1 cup at a time and beat until smooth and no lumps of sugar are visible. Add the orange blossom extract and beat until combined. AssemblyPlace (1) cake piece onto a serving plate. Spread a layer of the orange curd onto the cake.Top with a thick layer frosting, spreading carefully and gently so you do not mess up the curd layer. Repeat, layering to the top.Chill in refrigerator for 2-3 hours before cutting.
Makes (1) 15x10-inch jelly roll cake,cut into layers
Citrus Cake3/4 cup butter, at room temperature1 3/4 cups granulated sugar3 eggs1 teaspoon lemon extract2 1/2 cups all purpose flour2 1/2 teaspoons baking powder1/2 teaspoon salt3/4 cup milk1/2 cup orange juice (freshly squeezed)
Orange Curd Layer1/4 cup fresh orange zest (2 oranges)1/3 cup freshly squeezed orange juice4 egg yolks1/2 cup granulated sugar 1/8 teaspoon salt6 Tablespoons butter (3/4 stick), cut into 6 pieces , at room temperature(Makes about 1 1/2 cups)
Frosting1 lb. cream cheese 1 cup (2 sticks)butter 4 cups confectioners’ sugar 2 teaspoon orange blossom extract
Orange Layer Cake

18Go to Index ©2016 www.grandmotherskitchen.ca
CakePreheat oven to 3500F. Grease a 9x9 inch cake pan with butter, dust with flour and set aside.In a medium bowl,using an electric mixer, cream together the sugar and butter. Beat in the eggs, one at a time, then stir in the vanilla. In a measuring cup, combine the flour and baking powder together.Add dry ingredients to the creamed mixture and mix well. Finally stir in the milk until batter is smooth. Pour batter into the prepared pan. Place into the preheated oven and bake for 30-40 minutes or until a toothpick inserted in the center comes out clean.Remove from oven and place onto a cooling rack.
Buttercream FrostingPlace softened butter into the bowl and use an electric mixer to beat for about 3 minutes, until the butter is smooth and has lightened in color.Mix in the confectioner’s sugar, 1/2 cup at a time. After each cup has been added, turn the mixer onto the highest speed setting and beat for about 30 seconds. This will help to lighten the color closer to white.Add the vanilla and salt and combine until well-incorporated.Add the milk, or cream a little at a time until the frosting has reached the preferred consistency. For a firmer frosting, you may need more confectioners’ sugar, for a runnier frosting, you may want to add more milk.
Optional* When you serve the cake, drizzle some cherry juice and put a spoonful of cherry pie filling onto each piece.
Makes (1) 9x9 inch cake
Simple White Cake1 cup granulated sugar 1/2 cup butter, at room temperature2 eggs 1 teaspoon pure vanilla extract 1 1/2 cups all purpose flour 1 3/4 teaspoons baking powder 1/2 cup milk
Buttercream Frosting1/2 cup butter, at room temperature2 cups confectioners’ sugar, sifted1 teaspoon pure vanilla extractpinch salt1-2 Tablespoons of milk or cream
Garnish *OptionalA can or jar of Cherry Pie Filling
Simple White Cake
19Go to Index ©2016 www.grandmotherskitchen.ca
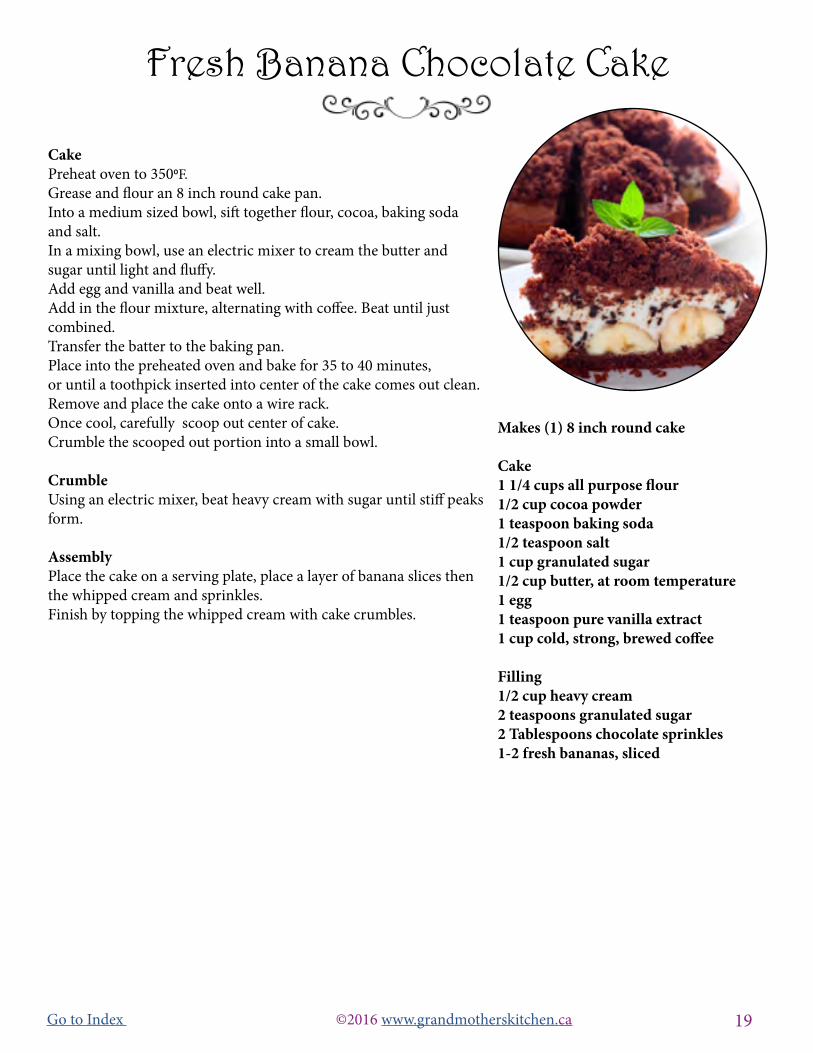
CakePreheat oven to 3500F. Grease and flour an 8 inch round cake pan.Into a medium sized bowl, sift together flour, cocoa, baking soda and salt.In a mixing bowl, use an electric mixer to cream the butter and sugar until light and fluffy.Add egg and vanilla and beat well.Add in the flour mixture, alternating with coffee. Beat until just combined. Transfer the batter to the baking pan. Place into the preheated oven and bake for 35 to 40 minutes, or until a toothpick inserted into center of the cake comes out clean. Remove and place the cake onto a wire rack.Once cool, carefully scoop out center of cake.Crumble the scooped out portion into a small bowl. CrumbleUsing an electric mixer, beat heavy cream with sugar until stiff peaks form.
Assembly Place the cake on a serving plate, place a layer of banana slices then the whipped cream and sprinkles.Finish by topping the whipped cream with cake crumbles.
Makes (1) 8 inch round cake Cake1 1/4 cups all purpose flour1/2 cup cocoa powder1 teaspoon baking soda1/2 teaspoon salt1 cup granulated sugar1/2 cup butter, at room temperature1 egg1 teaspoon pure vanilla extract1 cup cold, strong, brewed coffee
Filling1/2 cup heavy cream2 teaspoons granulated sugar2 Tablespoons chocolate sprinkles1-2 fresh bananas, sliced
Fresh Banana Chocolate Cake
20Go to Index ©2016 www.grandmotherskitchen.ca
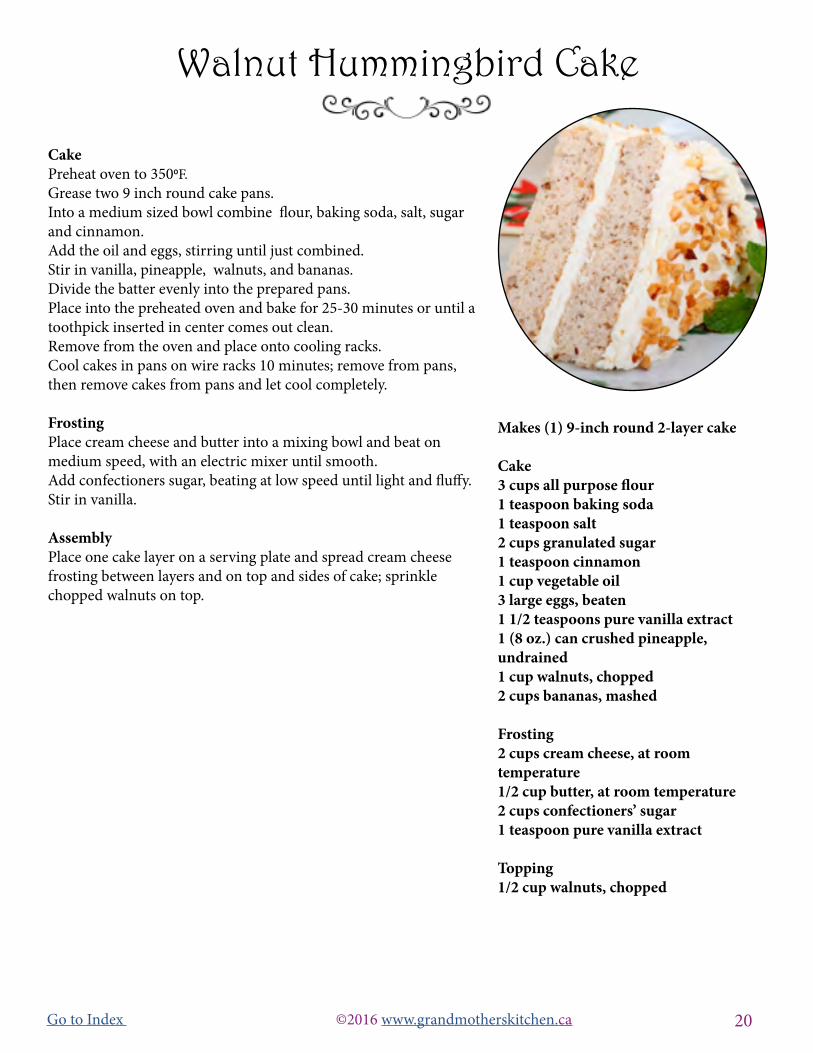
CakePreheat oven to 3500F. Grease two 9 inch round cake pans.Into a medium sized bowl combine flour, baking soda, salt, sugar and cinnamon. Add the oil and eggs, stirring until just combined.Stir in vanilla, pineapple, walnuts, and bananas.Divide the batter evenly into the prepared pans. Place into the preheated oven and bake for 25-30 minutes or until a toothpick inserted in center comes out clean. Remove from the oven and place onto cooling racks.Cool cakes in pans on wire racks 10 minutes; remove from pans, then remove cakes from pans and let cool completely. Frosting Place cream cheese and butter into a mixing bowl and beat on medium speed, with an electric mixer until smooth. Add confectioners sugar, beating at low speed until light and fluffy. Stir in vanilla. Assembly Place one cake layer on a serving plate and spread cream cheese frosting between layers and on top and sides of cake; sprinkle chopped walnuts on top.
Makes (1) 9-inch round 2-layer cake
Cake3 cups all purpose flour1 teaspoon baking soda1 teaspoon salt2 cups granulated sugar1 teaspoon cinnamon 1 cup vegetable oil3 large eggs, beaten1 1/2 teaspoons pure vanilla extract1 (8 oz.) can crushed pineapple, undrained1 cup walnuts, chopped2 cups bananas, mashed
Frosting2 cups cream cheese, at room temperature1/2 cup butter, at room temperature2 cups confectioners’ sugar1 teaspoon pure vanilla extract
Topping1/2 cup walnuts, chopped
Walnut Hummingbird Cake

21Go to Index ©2016 www.grandmotherskitchen.ca
CakePreheat oven to 3500F. Grease two round 8-inch pans.Sift and whisk dry ingredients together in a medium bowl, and set aside.In the bowl of an electric mixer fitted with the paddle attachment, cream the sugar, pudding, and butter on medium speed until light and fluffy.Add the eggs, one by one, mixing well after each addition.Add the wet and dry ingredients to the creamed mixture, not overmix. Add the lemon juice and zest last to prevent the milk from curdling.Divide between pans. Place into the preheated oven and bake for 25-30 minutes or until a toothpick inserted in center comes out clean. Remove from the oven and let cool in pans on racks for 10 minutes. Loosen the sides with a knife or spatula, and invert onto wire racks. Cool cakes completely before assembling.
Lemon Curd Filling In a small saucepan over medium-low heat, whisk the eggs, sugar, and lemon juice until blended. Cook, stirring constantly until the mixture becomes thick, approx 10 minutes. Remove from heat. Cut the butter into small pieces and whisk into the mixture until the butter has melted. Add the lemon zest and let cool. The lemon curd will continue to thicken as it cools.
Frosting Place the butter, lemon zest and vanilla together in a mixing bowl. Use an electric mixer to beat on medium speed until smooth making sure all the lumps are gone. Mix the milk into the butter mixture. Add the confectioners’ sugar a little at a time, using low speed. Once all incorporated mix on high speed for two minutes. Mix in lemon juice. It the frosting is too runny add more confectioners’ sugar in small increments until you reach the desired consistency.
Makes (1) 8-inch round 2-layer cake
Cake1 3/4 cups granulated sugar1 (3 oz) package lemon pudding mix1 cup butter, at room temperature4 eggs (room temperature)3 cups sifted cake flour1 Tablespoon baking powder3/4 teaspoon salt1 cup milk1 Tablespoon pure vanilla extract6 Tablespoons lemon juice
Lemon Curd Filling4 large eggs1 cup granulated sugar1/4 cup fresh lemon juice, (1-2)lemons4 Tablespoons butter , at room temperature1 Tablespoon finely shredded lemon zest
Frosting1/2 cup butter, at room temperature1 teaspoon pure vanilla extract1 Tablespoon lemon zest 2-3 Tablespoons milk3 1/2 cups confectioners’ sugar 2 Tablespoon lemon juice
Lemon Cake & Filling & Creamy Frosting

22Go to Index ©2016 www.grandmotherskitchen.ca
CakePreheat oven to 3500F. Grease two 9 inch round cake pans.Place the butter into a mixing bowl and with an electric mixer, beat butter at medium speed until fluffy. Gradually beat in the sugar, mixing well. Add egg yolks, 1 at a time, beating each one until blended. Add vanilla; beat until blended.Combine flour and baking soda together, then mix into the creamy mixture, alternately with adding the buttermilk. Beat at low speed until blended after each addition. Stir in coconut.Beat egg whites in a clean bowl until stiff peaks form; fold into batter. Pour batter into cake pans. Place into the preheated oven and bake for 25 minutes or until a toothpick inserted in center comes out clean. Remove and place to cool in pans on wire racks for 10 minutes. Remove cakes from pans, and cool completely on wire racks.
Frosting Beat cream cheese, butter and vanilla at medium speed with an electric mixer until creamy. Gradually add confectioners’ sugar, beating at low speed until blended. Beat at high speed until smooth. Put some of the frosting into a piping bag if desired so you can pipe the decorate the cake as show. Chocolate Drizzle Melt the chocolate and butter slowly in a small saucepan over low heat. Don’t use high heat. Stir occasionally. Shut off once melted.
Assembly Place one layer on a serving plate and top a thin layer of frosting then top cake layer. Smooth frosting over top and sides of cake. Decoratively pipe icing using a star tip on the top of the cake. Gently use your fingertip to pat the toasted chopped pecans over the sides of the cake. Drizzle the chocolate on top and garnish with a pecan.
Makes (1) 9-inch round 2-layer cake
Cake3/4 cup butter, at room temperature1 1/2 cups granulated sugar3 large eggs, separated1 Tablespoon pure vanilla extract1 1/2 cups all purpose flour1 teaspoon baking soda3/4 cup buttermilk1 cup flaked coconut
Frosting1 (8 oz.) package cream cheese, at room temperature1/2 cup butter, at room temperature1 Tablespoon pure vanilla extract4 cups confectioners’ sugar
Toppings1 cup chopped pecans, toasted1/2 cup pecan halves Chocolate Drizzle 4 oz. (1/2 cup) chocolate melting wafers, or chocolate chips 1 teaspoon butter
Pecan Cream Cake

23Go to Index ©2016 www.grandmotherskitchen.ca
CakePreheat oven to 3500F. Grease two 9 inch round cake pans.Sift together flour, baking powder, baking soda, and salt, and set the bowl aside.In the bowl of an electric mixer, cream butter on medium-low speed until fluffy, 1 to 2 minutes. Add sugar, and keep beating until the mixture is fluffy and light in color, about 3 minutes. Separate the egg yolks and whites into two bowls. Add in egg yolks, milk and vanilla extract, beating on medium-low speed between each addition until the batter is no longer slick. Beat until the mixture is fluffy.Alternate add and mix in the flour mixture and sour cream to the batter. Divide the batter between the prepared cake pans. Place into the preheated oven and bake about 30 minutes, until a toothpick inserted into the center of each cake comes out clean. Remove from the oven and transfer cake pans to wire racks to cool, about 15 minutes. Remove cakes from pans, and let cool completely on racks, tops up.
Frosting Don’t make the frosting until the cakes are ready to frost. Mix all of the ingredients except for the vanilla and almond extracts in the top of a large double boiler; it must have at least an 8 to 10-cup capacity. Place over hot water on moderate heat. Beat with an electric mixer at high speed for 5 to 6 minutes, until the mixture stands in peaks when the beaters are lifted.Immediately, transfer to a the large bowl of an electric mixer. Add the vanilla and almond extracts and beat at high speed for 5 minutes more. Use immediately.
Assembly Split each layer in half horizontally. Place one layer of cake on serving tray and top with some icing, Alternate until all layers are on and frosted then spread icing on the top and down the sides. Gently press on the coconut.
Makes (2) 9-inch round cakes, each layer cut in half to form a 4 layer cake
Cake2 cups all purpose flour 1/2 teaspoon baking powder1/2 teaspoon baking soda1/4 teaspoon salt3/4 cup butter, room temperature, 1 cup granulated sugar4 large egg yolks, lightly beaten2/3 cup sour cream1/3 cup milk1 teaspoon pure vanilla extract
Fluffy White Icing4 egg whites1/4 cup light corn syrup2 tablespoons water2 1/2 cups confectioners’ sugarpinch salt1 teaspoon pure vanilla extract1/4 teaspoon almond extract
1/2 cup long shredded coconut for garnish
Vanilla Layer Cake with Coconut

24Go to Index ©2016 www.grandmotherskitchen.ca
CakePreheat oven to 3500F. Grease and lightly flour, two, 2 deep, 9-inch round cake pans.In a mixing bowl, mix together the flour, baking powder and salt and set aside.In a stand mixing bowl, beat the butter on medium high speed until light and creamy. Beat in the vanilla. Gradually add the sugar, scraping the sides of the bowl once or twice and beating for about 5 minutes or until light and creamy.Add eggs one at a time and continue beating for another minute or two, scraping sides of bowl. Reduce speed to low and add the milk, then add flour mixture and sour cream alternately until fully incorporated. Divide evenly among the pans. Place into the preheated oven and bake on center rack for about 35 minutes or until a toothpick inserted in the center comes out clean. Remove from oven and place onto racks. Let cool for 10 minutes, then turn cakes out onto racks to cool completely before frosting.
FrostingMeasure 2 1/2 cups of the sugar in a large mixing bowl. Add the butter and mash it around until mixture is grainy and moist, then add the egg, milk and salt and stir until relatively smooth. Set aside.Sprinkle remaining 1/2 cup sugar in 3-4 quart heavy duty saucepan; cook over medium heat, stirring constantly, until sugar melts and syrup is a light golden brown.Remove from heat and stir the butter mixture into hot caramelized sugar, then return to heat and cook over medium, stirring constantly, until mixture reaches 235 on a candy thermometer. Note: The butter mixture will start to harden and clump when you first put the mixture into the caramelized sugar. Keep cooking and stirring until it all melts together, but do keep the heat even. This process should take about 10 to 15 minutes.When mixture reaches 235, remove from heat and let cool for about 5 minutes.Add the vanilla, then pour the mixture it into a mixing bowl and beat it with a hand held mixer until it starts to thicken. As soon as it’s thick enough to pour, but not too runny, spoon some over the first layer of cake. It should fan out a bit, but eventually set. Stack on the second layer of cake and pour some more caramel carefully over the top. Spread it around the sides the best you can.
Makes (2) 9-inch round cakes
Yellow Cake2 3/4 cups sifted all purpose flour2 teaspoons baking powder1/2 teaspoon salt1 cup (2 sticks) butter, at room temperature2 teaspoons pure vanilla extract2 cups granulated sugar4 large eggs1/4 cup milk1 cup room temperature sour cream
Frosting3 cups granulated sugar, divided1/2 cup butter, at room temperature 1 large egg, lightly beaten3/4 cup whole milk, at room temperature1/4 teaspoon salt1/4 teaspoon pure vanilla extract
Optional: *recipe not given but you can decorate the cake by piping on decorative creamy butter icing and garnish with creamy shavings.
Caramel Frosted Yellow Cake

25Go to Index ©2016 www.grandmotherskitchen.ca
CakePreheat oven to 3250F. Grease a 10-inch tube pan with butter on the bottom and up the sides.Sift the flour into a bowl and stir in the granulated sugar. Set aside.In a large bowl, use an electric mixer to whip the egg whites with the cream of tartar and salt until foamy. Gradually add the confectioners’ sugar, whipping until the whites hold a medium peak when the beaters are lifted. Stir in the vanilla. Add the flour and sugar mixture to the whipped whites in 2 additions. Use a whisk to fold in the flour evenly and easily.Scrape the batter into the prepared tube pan, spread it to level. Place in the preheated oven.Bake for 30-35 minutes. Cake is baked when it springs back when gently pressed down on the top with a fingertip. Remove from the oven and place the pan onto a cooling rack. Let cool for 10 minutes. Use a knife to cut around the inside and the outside of the pan to help release the cake. Place the cake directly onto the cooling rack and cool completely before frosting.
Frosting Combine the sugar, water, cream of tartar and salt in a saucepan. Cover and bring to a boil. Uncover and stir until the sugar dissolves.Meanwhile, place the egg whites in the mixing and using an electric mixer, beat at high speed until soft peaks form. Slowly pour the sugar mixture into the egg whites while the mixer is running. Continue beating for 5-7 minutes, until the mixture has cooled and is light and fluffy. Mix in the vanilla.Frost the cake immediately. Garnish with cake sprinkles.
Makes (1) 10-inch tube pan
Cake1 cup cake flour1 cup granulated sugar8 large egg whites, room temperature1/2 teaspoon cream of tartar1/8 teaspoon salt1/2 cup confectioners’ sugar, sifted1/2 teaspoon pure vanilla extract
Frosting2 cups granulated sugar2/3 cup water1/2 teaspoon cream of tartar1/8 teaspoon salt4 unbeaten egg whites1 teaspoon pure vanilla extract Garnish cake sprinkles
Angel Food Cake & Fluffy White Frosting
26Go to Index ©2016 www.grandmotherskitchen.ca
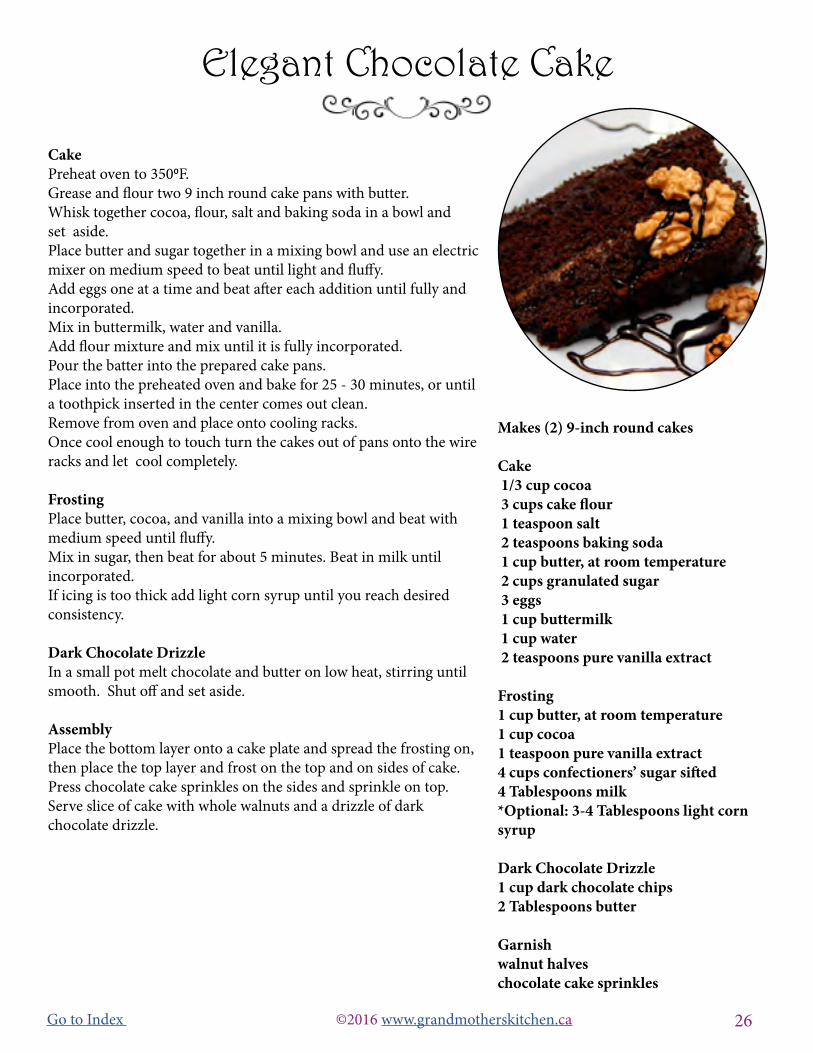
CakePreheat oven to 3500F. Grease and flour two 9 inch round cake pans with butter. Whisk together cocoa, flour, salt and baking soda in a bowl and set aside.Place butter and sugar together in a mixing bowl and use an electric mixer on medium speed to beat until light and fluffy. Add eggs one at a time and beat after each addition until fully and incorporated. Mix in buttermilk, water and vanilla. Add flour mixture and mix until it is fully incorporated.Pour the batter into the prepared cake pans. Place into the preheated oven and bake for 25 - 30 minutes, or until a toothpick inserted in the center comes out clean. Remove from oven and place onto cooling racks. Once cool enough to touch turn the cakes out of pans onto the wire racks and let cool completely. FrostingPlace butter, cocoa, and vanilla into a mixing bowl and beat with medium speed until fluffy. Mix in sugar, then beat for about 5 minutes. Beat in milk until incorporated. If icing is too thick add light corn syrup until you reach desired consistency.
Dark Chocolate DrizzleIn a small pot melt chocolate and butter on low heat, stirring until smooth. Shut off and set aside.
AssemblyPlace the bottom layer onto a cake plate and spread the frosting on, then place the top layer and frost on the top and on sides of cake. Press chocolate cake sprinkles on the sides and sprinkle on top. Serve slice of cake with whole walnuts and a drizzle of dark chocolate drizzle.
Makes (2) 9-inch round cakes Cake 1/3 cup cocoa 3 cups cake flour 1 teaspoon salt 2 teaspoons baking soda 1 cup butter, at room temperature 2 cups granulated sugar 3 eggs 1 cup buttermilk 1 cup water 2 teaspoons pure vanilla extract
Frosting1 cup butter, at room temperature1 cup cocoa 1 teaspoon pure vanilla extract4 cups confectioners’ sugar sifted4 Tablespoons milk*Optional: 3-4 Tablespoons light corn syrup
Dark Chocolate Drizzle1 cup dark chocolate chips2 Tablespoons butter
Garnish walnut halveschocolate cake sprinkles
Elegant Chocolate Cake

27Go to Index ©2016 www.grandmotherskitchen.ca
Cake Preheat oven to 3500F. Grease and flour 3 - 8 inch rounds cake pans with butter.In a large bowl, stir together the sugar, flour, cocoa powder, baking soda, baking powder and salt. Use an electric mixer on low to medium speed to mix in coffee, buttermilk, vegetable oil, eggs and vanilla until smooth.Divide the batter between the three prepared pans. Place into the preheated oven and bake for 15-20 minutes or until a toothpick inserted in the center comes out clean. Remove from the oven and place cakes onto racks to cool. Once cool enough to touch turn cakes out of pans and let cool completely on a wire rack.
FrostingSlowly melt the chocolate chips in a double boiler, or a heat proof bowl that fits into a saucepan that has one inch of simmering water in it. Set to cool.In a separate bowl use an electric mixer to beat together the butter, cream cheese and vanilla until light and fluffy. Slowly add and beat in the cooled chocolate until well incorporated. Spread frosting in between layers, on the sides, and on top.
Makes (3) 8-inch round cakes
Cake1 1/2 cups light brown sugar 1 1/2 cups cake flour 1/2 cup cocoa powder 1 1/2 teaspoons baking soda 3/4 teaspoon baking powder 1/4 teaspoon salt 3/4 cup strong coffee 3/4 cup buttermilk 1/3 cup vegetable oil 2 eggs1 teaspoon pure vanilla extract
Cake Filling and Frosting1 1/2 cups milk chocolate chips1 1/2 cups dark chocolate chips2 cups butter, at room temperature 1/2 lb. cream cheese, at room temperature 2 teaspoons pure vanilla extract
Serves 6 - 8
Triple Chocolate Cake
28Go to Index ©2016 www.grandmotherskitchen.ca
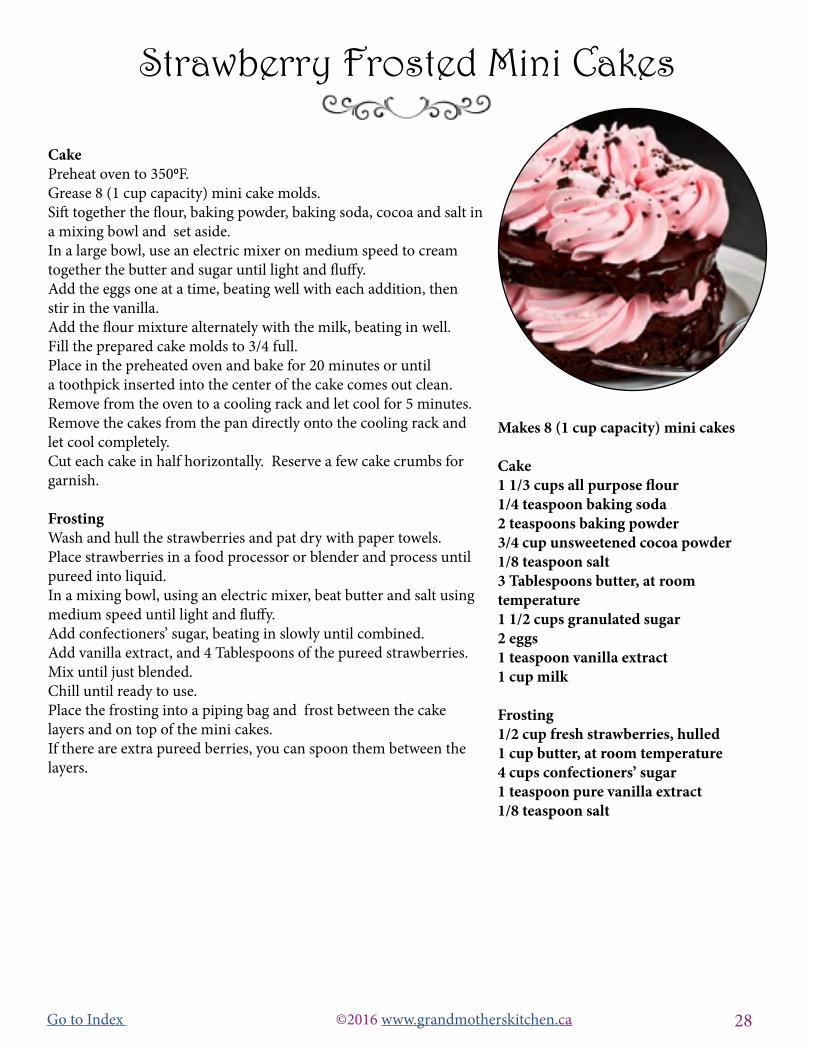
Cake Preheat oven to 3500F. Grease 8 (1 cup capacity) mini cake molds.Sift together the flour, baking powder, baking soda, cocoa and salt in a mixing bowl and set aside.In a large bowl, use an electric mixer on medium speed to cream together the butter and sugar until light and fluffy. Add the eggs one at a time, beating well with each addition, then stir in the vanilla.Add the flour mixture alternately with the milk, beating in well.Fill the prepared cake molds to 3/4 full. Place in the preheated oven and bake for 20 minutes or until a toothpick inserted into the center of the cake comes out clean. Remove from the oven to a cooling rack and let cool for 5 minutes. Remove the cakes from the pan directly onto the cooling rack and let cool completely. Cut each cake in half horizontally. Reserve a few cake crumbs for garnish.
Frosting Wash and hull the strawberries and pat dry with paper towels. Place strawberries in a food processor or blender and process until pureed into liquid.In a mixing bowl, using an electric mixer, beat butter and salt using medium speed until light and fluffy. Add confectioners’ sugar, beating in slowly until combined.Add vanilla extract, and 4 Tablespoons of the pureed strawberries. Mix until just blended. Chill until ready to use.Place the frosting into a piping bag and frost between the cake layers and on top of the mini cakes.If there are extra pureed berries, you can spoon them between the layers.
Makes 8 (1 cup capacity) mini cakes
Cake1 1/3 cups all purpose flour1/4 teaspoon baking soda2 teaspoons baking powder3/4 cup unsweetened cocoa powder1/8 teaspoon salt3 Tablespoons butter, at room temperature1 1/2 cups granulated sugar2 eggs1 teaspoon vanilla extract1 cup milk
Frosting1/2 cup fresh strawberries, hulled1 cup butter, at room temperature4 cups confectioners’ sugar1 teaspoon pure vanilla extract1/8 teaspoon salt
Strawberry Frosted Mini Cakes

29Go to Index ©2016 www.grandmotherskitchen.ca
Cake Preheat oven to 3500F. Grease a 9-inch square pan with oil.In a mixing bowl, beat together the sugar, oil, eggs, and vanilla.In another bowl, whisk together flour, baking powder, cinnamon, and salt. Add the wet mixture to the dry mixture and mix until well incorporated. Gently mix in the shredded carrots, crushed pineapple, and shredded coconut.Pour the batter into the prepared pan and bake for 45 to 50 minutes, or until a toothpick inserted in the center comes out clean. Remove from oven and set on a rack to cool.
FrostingUse an electric mixer to beat the cream cheese, sugar, milk and vanilla into a smooth glaze. If its too thick add more milk, adding only one tablespoon at a time.Spread the frosting over top cooled carrot cake and serve.
If you feel like the frosting is too thin, add a little confectioners’ sugar. If it’s too thick, thin it out with a tiny bit more milk.
Makes (1) 9-inch square cake Carrot Cake1 1/4 cups granulated sugar 2/3 cups vegetable oil 2 eggs, slightly beaten1/2 teaspoon pure vanilla extract1 1/2 cups all purpose flour 1 1/2 teaspoons baking powder 1 1/2 teaspoons cinnamon 1/4 teaspoon salt 1 cup fresh carrot, shredded, packed 1 cup crushed canned pineapple, drained 2/3 cup shredded coconut
Icing1/2 cup cream cheese, softened1 1/2 cups confectioners’ sugar2 Tablespoons milk1 teaspoon pure vanilla extract
Carrot Pineapple Cake
30Go to Index ©2016 www.grandmotherskitchen.ca
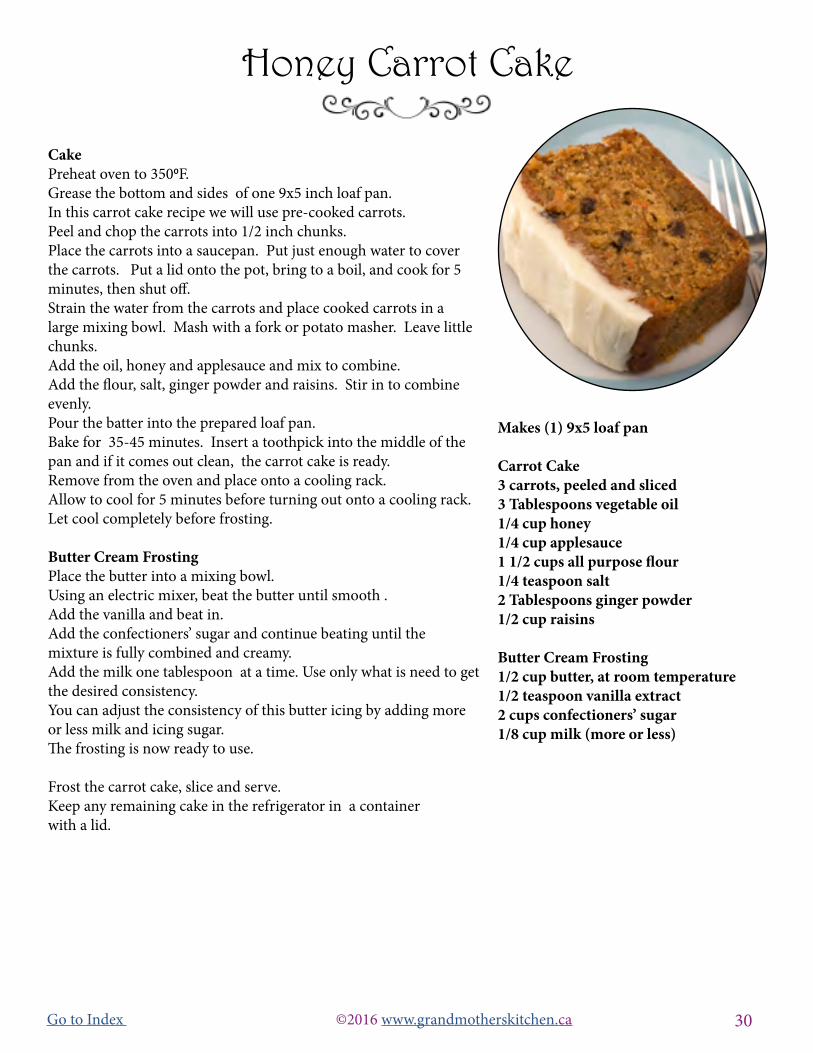
Cake Preheat oven to 3500F. Grease the bottom and sides of one 9x5 inch loaf pan. In this carrot cake recipe we will use pre-cooked carrots.Peel and chop the carrots into 1/2 inch chunks. Place the carrots into a saucepan. Put just enough water to cover the carrots. Put a lid onto the pot, bring to a boil, and cook for 5 minutes, then shut off.Strain the water from the carrots and place cooked carrots in a large mixing bowl. Mash with a fork or potato masher. Leave little chunks.Add the oil, honey and applesauce and mix to combine.Add the flour, salt, ginger powder and raisins. Stir in to combine evenly.Pour the batter into the prepared loaf pan. Bake for 35-45 minutes. Insert a toothpick into the middle of the pan and if it comes out clean, the carrot cake is ready.Remove from the oven and place onto a cooling rack. Allow to cool for 5 minutes before turning out onto a cooling rack.Let cool completely before frosting.
Butter Cream FrostingPlace the butter into a mixing bowl.Using an electric mixer, beat the butter until smooth .Add the vanilla and beat in.Add the confectioners’ sugar and continue beating until the mixture is fully combined and creamy.Add the milk one tablespoon at a time. Use only what is need to get the desired consistency.You can adjust the consistency of this butter icing by adding more or less milk and icing sugar. The frosting is now ready to use. Frost the carrot cake, slice and serve. Keep any remaining cake in the refrigerator in a container with a lid.
Makes (1) 9x5 loaf pan Carrot Cake3 carrots, peeled and sliced3 Tablespoons vegetable oil1/4 cup honey 1/4 cup applesauce 1 1/2 cups all purpose flour1/4 teaspoon salt 2 Tablespoons ginger powder 1/2 cup raisins
Butter Cream Frosting1/2 cup butter, at room temperature1/2 teaspoon vanilla extract2 cups confectioners’ sugar1/8 cup milk (more or less)
Honey Carrot Cake

31Go to Index ©2016 www.grandmotherskitchen.ca
Cake Preheat oven to 3500F. Grease and flour 9x13-inch cake pan.In large bowl, whisk together flour, baking powder, cinnamon, baking soda, salt and nutmeg. In separate bowl, use an electric mixer to beat together sugar, eggs, oil and vanilla until smooth. Pour over flour mixture and stir just until moistened. Stir in grated carrots. Transfer to prepared baking pan and spread batter evenly. Place into the preheated oven and bake for 40 minutes or until a toothpick inserted in the centre of the cake comes out clean. Remove from the oven and place on a cooling rack. Let cool completely before frosting. IcingPlace the cream cheese and butter into a mixing bowl and use an electric mixer on medium speed to beat until smooth. Beat in vanilla and confectioners sugar until smooth. Spread over top of cooled cake.Sprinkle chopped pistachios on top. Cut and serve.
Makes (1) 9x13-inch cake
Cake 2 cups all purpose flour2 teaspoon baking powder2 teaspoons cinnamon1 teaspoon baking soda3/4 teaspoons salt1/2 teaspoon nutmeg1 cup granulated sugar3 eggs3/4 cup vegetable oil1 teaspoon pure vanilla extract2 cups fresh carrots, finely grated Icing(1) 8 oz. (250g) package cream cheese, at room temperature1/4 cup butter, at room temperature1/2 teaspoon pure vanilla extract1 cup confectioners’ sugar
Garnish1/2 cup pistachios, chopped
Carrot Cake With Pistachio Topping
32Go to Index ©2016 www.grandmotherskitchen.ca
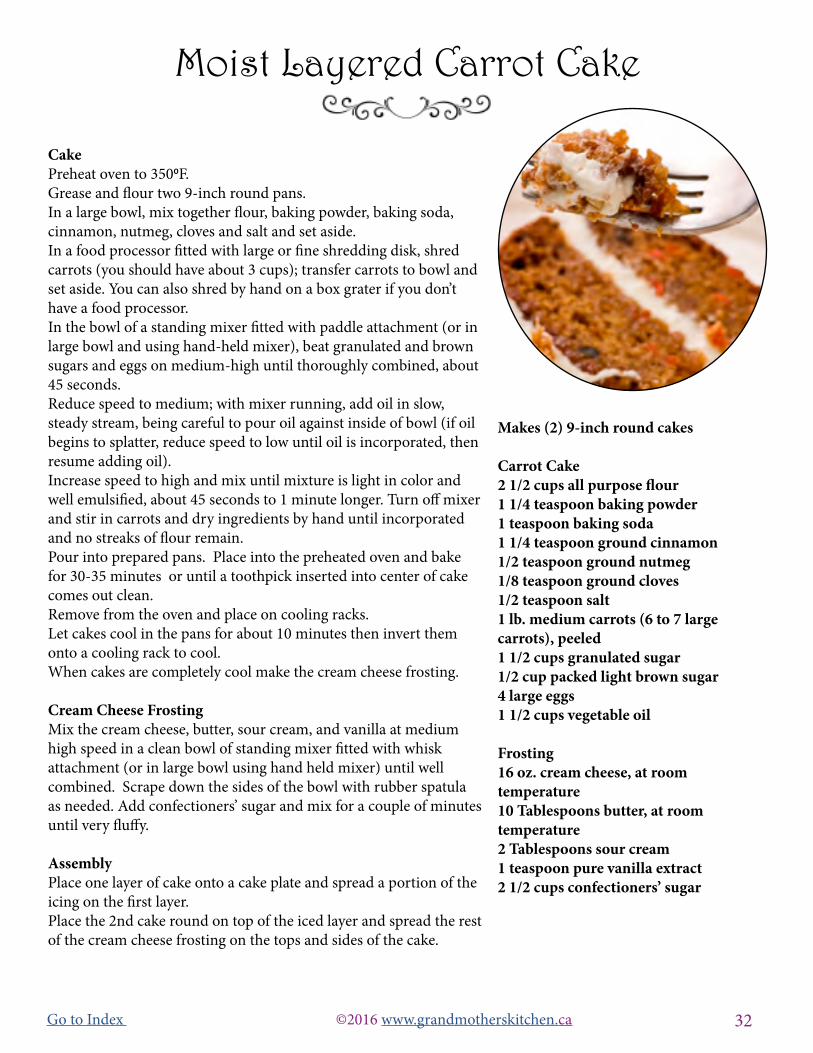
Cake Preheat oven to 3500F. Grease and flour two 9-inch round pans.In a large bowl, mix together flour, baking powder, baking soda, cinnamon, nutmeg, cloves and salt and set aside.In a food processor fitted with large or fine shredding disk, shred carrots (you should have about 3 cups); transfer carrots to bowl and set aside. You can also shred by hand on a box grater if you don’t have a food processor.In the bowl of a standing mixer fitted with paddle attachment (or in large bowl and using hand-held mixer), beat granulated and brown sugars and eggs on medium-high until thoroughly combined, about 45 seconds.Reduce speed to medium; with mixer running, add oil in slow, steady stream, being careful to pour oil against inside of bowl (if oil begins to splatter, reduce speed to low until oil is incorporated, then resume adding oil).Increase speed to high and mix until mixture is light in color and well emulsified, about 45 seconds to 1 minute longer. Turn off mixer and stir in carrots and dry ingredients by hand until incorporated and no streaks of flour remain.Pour into prepared pans. Place into the preheated oven and bake for 30-35 minutes or until a toothpick inserted into center of cake comes out clean. Remove from the oven and place on cooling racks.Let cakes cool in the pans for about 10 minutes then invert them onto a cooling rack to cool.When cakes are completely cool make the cream cheese frosting.
Cream Cheese FrostingMix the cream cheese, butter, sour cream, and vanilla at medium high speed in a clean bowl of standing mixer fitted with whisk attachment (or in large bowl using hand held mixer) until well combined. Scrape down the sides of the bowl with rubber spatula as needed. Add confectioners’ sugar and mix for a couple of minutes until very fluffy.
AssemblyPlace one layer of cake onto a cake plate and spread a portion of the icing on the first layer.Place the 2nd cake round on top of the iced layer and spread the rest of the cream cheese frosting on the tops and sides of the cake.
Makes (2) 9-inch round cakes
Carrot Cake2 1/2 cups all purpose flour1 1/4 teaspoon baking powder1 teaspoon baking soda1 1/4 teaspoon ground cinnamon1/2 teaspoon ground nutmeg1/8 teaspoon ground cloves1/2 teaspoon salt1 lb. medium carrots (6 to 7 large carrots), peeled1 1/2 cups granulated sugar 1/2 cup packed light brown sugar4 large eggs1 1/2 cups vegetable oil
Frosting16 oz. cream cheese, at room temperature10 Tablespoons butter, at room temperature 2 Tablespoons sour cream1 teaspoon pure vanilla extract2 1/2 cups confectioners’ sugar
Moist Layered Carrot Cake

33Go to Index ©2016 www.grandmotherskitchen.ca
Cake Preheat oven to 3500F. Grease three 8-inch round cake pans lightly with butter.Cut parchment paper to fit the bottoms, place in the pans and lightly flour the parchment paper.In a small saucepan, melt the butter over medium heat and continue to heat, stirring constantly until the butter turns a golden brown, about 5 minutes. Set aside to cool for 15 minutes.In a separate bowl, whisk together the flour, baking soda, salt, cinnamon, ginger and cloves. In another larger bowl, whisk together the grated carrots, applesauce, brown sugar, eggs, buttermilk and vanilla.Gradually whisk in the flour mixture until combined. Add the brown butter and whisk until incorporated. Divide the batter between the cake pans.Place into the preheated oven and bake about 25-30 minutes or until a toothpick inserted in the center comes out clean. Remove from the oven and place on wire racks and cool completely in the pans.
FrostingIn a mixing bowl, combine the butter, cream cheese and vanilla. Using a stand up beater or hand beater, use a whisk attachment and beat on medium low for 1-2 minutes until well combined.In a separate bowl, combine the confectioners’ sugar, meringue powder, cinnamon and nutmeg. Add to the mixing bowl, a cup at a time, mixing on low to combine. Increase speed to medium and beat for 2-3 minutes until smooth and creamy.
Assembly Remove the cooled cakes from the pans and carefully peel off the parchment paper. Level the tops of the cakes with a sharp knife or cake leveler.Divide the icing into 3 portions and if you wish to make an optional decorative carrot, leave a portion of icing for that.*Note: You would need to add a little orange coloring to the frosting, possibly add a bit more confectioners’ sugar to make the frosting stiffer and form the carrot by hand.Place one layer of cake on a cake plate. Top with first portion of frosting.Repeat with the next 2 layers of cake and frosting. Refrigerate the cake until ready to serve, but let it come to room temperature for about an hour before serving. Cover and refrigerate any leftovers.
Makes (3) 8-inch round cakes
Cake3/4 cup (1 1/2 sticks) butter3 1/4 cups all purpose flour1 3/4 teaspoons baking soda1/2 teaspoon salt2 teaspoons ground cinnamon1 1/4 teaspoons ground ginger1/2 teaspoon ground cloves2 cups finely grated carrots (6-8 carrots, depends on their size)1/2 cup applesauce2 cups brown sugar3 eggs3/4 cup buttermilk2 teaspoons pure vanilla extract
Spiced Cream cheese Frosting1 cup (2 sticks) butter at room temperature12oz. (1 1/2 packages) cream cheese at room temperature1 Tablespoon pure vanilla extract5 cups confectioners’ sugar3 Tablespoons meringue powder1 teaspoon ground cinnamon1/4 teaspoon ground nutmeg1 teaspoon salt
Carrot Cake & Cream Cheese Icing

34Go to Index ©2016 www.grandmotherskitchen.ca
Peanut Butter BallsLine a baking sheet with parchment paper. Use either a small food processor or an electric mixer.Place all the ingredients in and turn on to combine.Do a little taste test. If you want it sweeter, add a little more honey.The well combined peanut butter texture should be crumbly.
You can use a either a teaspoon or a melon scoop.Take a spoonful and use your hands to roll into nice tight packed balls.
Have ready the toppings of choice. Roll each ball into a coating, pressing slightly to make the toppings stick. Place the balls onto the prepared sheet. Place the finished balls into the refrigerator to make firm. Transfer to a container with a seal top. Keep refrigerated.
Makes about 30 melon scoop sized balls
Peanut Butter Balls2/3 cup crunchy peanut butter 1 cup nonfat dry milk powder 2 Tablespoons honey
Coating Suggestions: Amounts will depend on how many balls you are rolling in a coating.ground pumpkin seedsground nutssesame seedscocoa powder stirred into confectioners’ sugarnatural dark cacao powder
Easy Peanut Butter Balls

35Go to Index ©2016 www.grandmotherskitchen.ca
TrufflesLine a cookie sheet with parchment or waxed paper.In a medium bowl, stir together the coconut and confectioners’ sugar. Stir in the sweetened condensed milk and melted coconut oil or melted butter. Use your hands to roll 1 1/2 teaspoons of the mixture to form the truffle balls. Place each ball onto the parchment paper. Place baking sheet into the freezer for 30 minutes.
Chocolate CoatingIn a small saucepan, melt the chocolate and coconut oil over low heat. Stir occasionally until melted and smooth. Shut off.Remove the truffles from the freezer.Use a toothpick to spear each ball. Dip the ball into the warm chocolate, covering completely.Let the chocolate drip off before returning the truffle onto the parchment lined sheet.Use a fork to carefully push the truffle off.Sprinkle on a little coconut while the chocolate is soft.Repeat until truffles are all coated.
Place into the refrigerator until set. Transfer the truffles to an air-tight container in the refrigerator.
Makes about 30 Truffles
3 cups sweetened, shredded coconut1/2 cup confectioners’ sugar1/2 cup sweetened condensed milk1/4 cup coconut oil, melted (could also use butter) Chocolate Dip2 cups chocolate chips, melted 1 teaspoon coconut oil
Coconut Chocolate Truffles

36Go to Index ©2016 www.grandmotherskitchen.ca
Peanut Butter BallsLine a cookie sheet with parchment or waxed paper. In a large mixing bowl, use a wooden spoon to mix together peanut butter, milk powder and coconut. Add the oats, cinnamon, and apple juice, stir until combined.
Coconut CoatingShape the peanut butter mixture into 1 inch balls,. Roll each ball into the coconut to coat, garnish with a candy ifdesired and place into a plastic container with a lid. Refrigerate at least 1 hour or until firm before eating.
Number of balls depends on how small or large you roll them. 1/2 cup natural peanut butter1/4 cup nonfat dry milk powder1/4 cup unsweetened flaked coconut1/3 cup fine rolled oats1/2 teaspoon ground cinnamon1/4 cup unsweetened apple juice concentrate, thawed
Desiccated coconut for rolling inM&Ms or Smarties for garnish * Optional
Coconut Coated Peanut Butter Balls

37Go to Index ©2016 www.grandmotherskitchen.ca
Chocolate GanacheShave all of the bittersweet chocolate with a serrated knife, and then chop your shavings into small chunks. Divide the chocolate for the ganache and the coating into two separate stainless steel bowls. Set aside the smaller portion for the coating. Heat the cream in a small saucepan until it just comes to a boil and pour it directly over the chopped chocolate.Use a wooden spoon to stir small quick circles in the middle of the bowl gradually stirring bigger circles to incorporate chocolate from the sides of the bowl. Keep stirring smoothly until all chocolate is melted in. When there are no more lumps, continue stirring for about 45 more seconds being careful not to over mix. Set the ganache aside to cool. In a new bowl, beat the softened butter with a wooden spoon until its very soft, smooth, and creamy. When the ganache has cooled to room temperature and thickened, add the butter, a little bit at a time. Stir until no butter bits remain. If you want to form your truffles immediately, you can chill the mixture in the fridge for 10 minutes. If you need to prepare other things first, cover the bowl with plastic wrap and let sit at room temperature to cool.
Shaping the TrufflesFill a pastry bag, fitted with a 1/2-inch tip, one third of the way with the ganache.Hold the bag vertically and pipe 1 inch drops of ganache onto parchment-lined baking sheets. Refrigerate the truffles until quite firm, about 1 hour. Shape each truffle into a smooth ball by rolling it between your palms. Troubleshooting: If the truffles melt too much in your hands, run your hands under very cold water, dry them well, and then continue.Refrigerate the shaped truffles on the baking sheet for 1 hour.Note: For extra smooth truffles: refrigerate after first rolling for 30 minutes, and then repeat the rolling process again and refrigerate before coating.
Prepare the chocolate coating:Bring a shallow saucepan of water to high heat.Remove the pan of water from the heat and set the second stainless steel bowl of chopped chocolate over top it. Stir chocolate with a wooden spoon until melted.
Dipping your truffles:Line a new plate with parchment paper.Remove truffles from the refrigerator.Without poking a hole, use a fork to gently lift a truffle and gently drop it into the melted chocolate coating and spin it around with a fork to cover completely.Lift it out on the fork and gently tap the sides of your bowl to remove excess dripping chocolate. Be patient as you may need to gently tap the bowl about a dozen times to get rid of drippings. When chocolate is no longer dripping, gently place truffle onto parchment lined paper.
Coating Truffles in Cocoa (optional)Sift the cocoa powder into a shallow dish.Gently place the freshly dipped truffle into the dish of sifted cocoa and continue adding dipped truffles until the plate is full.Gently shake the plate to coat the truffles, and then gently transfer them to the parchment lined pan.
Place it refrigerator to set for 1 hour.Store truffles in the freezer or refrigerator in an air tight container.
Makes About 40 Truffles Truffles 1 cup heavy cream10 1/2 oz. bittersweet chocolate, finely chopped.2 Tablespoons butter
Coating9 oz. bittersweet chocolate, chopped1 cup finest quality unsweetened cocoa, sifted
Homemade Truffles

38Go to Index ©2016 www.grandmotherskitchen.ca
Line a 9 x13 inch baking sheet with aluminum foil and grease with oil, leaving some foil on the sides to be able to pull up.Pour 1/2 cup of cold water into a bowl, and sprinkle the gelatin. Let it sit for 15 minutes.While you wait, bring to a simmer 1/2 cup water, corn syrup, sugar and salt.Be careful to pour the sugar into the center of the pan, so it does not touch the sides of the pan and crystallize.Bring to a boil over medium high heat, gently incorporating, but not stirring.Use a thermometer and bring mixture to 240°F. (About 7-8 minutes). On low, use the electric mixture to whisk the gelatin and water. Now slowly add the warm mixture into the gelatin mixture. Feel the side of the bowl, and you will feel that it is quite warm/hot.Increase the speed to high, until the mixture turns opaque white and begins to expand. Mix for 12 minutes. Do not let the bowl cool down. Add vanilla extract and mix in entirely with the electric mixer. Rub some oil onto a metal spatula or large spoon, and use the spatula to pour the mixture into the lined/greased dish and smooth evenly.Work very very quickly, so the mixture does not harden.In small bowl, mix together corn starch and confectioners’ sugar.Sift 3 Tablespoons over the marshmallows. Set the remaining cornstarch/confectioners’ sugar mixture aside for tomorrow.Cover marshmallows with plastic wrap and let them sit overnight to firm.To wash the sticky bowl and spoon, just let soak in warm water for a few minutes, and it will begin to soften, dissolve and be easy to clean up.The next day, sprinkle half of the cornstarch/confectioners’ sugar mixture onto a clean working surface or cutting board.Flip the marshmallows on to a cutting board and peel away the foil.Sprinkle a bit more of the cornstarch/confectioners’ sugar onto the marshmallows (keeping a bit aside for one more step).Grease a sharp knife with oil and cut your marshmallows into squares. Add more oil to the knife if it starts to stick until all the marshmallows are cut.Working with 2-3 marshmallows at a time, first roll them in the remaining corn starch/confectioners’ sugar mixture and then place them in the sieve to let any loose pieces come off.Repeat until all the marshmallows are done.Store in an airtight container or Ziploc bag at room temperature.(Not in the refrigerator)
Makes (1) 9x13 inch baking dish 2 1/2 Tablespoons gelatin 1/2 cup cold water 1/2 cup water1/3 cup plain corn syrup2 cups granulated sugar1/4 teaspoon salt 2 teaspoons of pure vanilla extract
1/2 cup cornstarch1/2 cup confectioners’ sugar
Tools: 9 x 13 baking panaluminum foilElectric mixerMetal Spatula or large spoonThermometerSieve (colander)Extra oil for greasing
Homemade Marshmallows

39Go to Index ©2016 www.grandmotherskitchen.ca
Almond Roca Line a cookie sheet with aluminum foil and cut the sheet large enough to extend the edges of the foil over the tin. Grease lightly with butter. Melt the butter in a large pot over medium heat.Add sugar, corn syrup, and water to the pot and cook until temp reaches 290°F. OR for about 15-20 minutes, until the mixture becomes the color of a brown paper bag. Stir constantly with a wooden spoon. The mixture will rise and bubble quite a bit.Remove from heat and stir in 1/2 of the almonds.Turn the mixture into the prepared cookie sheet.While the mixture is cooling, melt the chocolate over low flame until all the chips are melted and the chocolate is smooth.Score the almond butter mixture into the shape you desire.Pour the melted chocolate over the almond mixture and spread evenly.Sprinkle with remaining almonds and seasalt and allow candy to cool completely and chocolate to harden before breaking apart.Refrigerate for a few hours before eating.
Makes (1) cookie sheet
2 cups (4sticks) butter 2 cups granulated sugar 2 Tablespoons light corn syrup 6 Tablespoons water 1 cup finely chopped almonds 1 (11 1/2 oz.) bags milk or dark chocolate chipssea salt
Easy Homemade Almond Roca
40Go to Index ©2016 www.grandmotherskitchen.ca
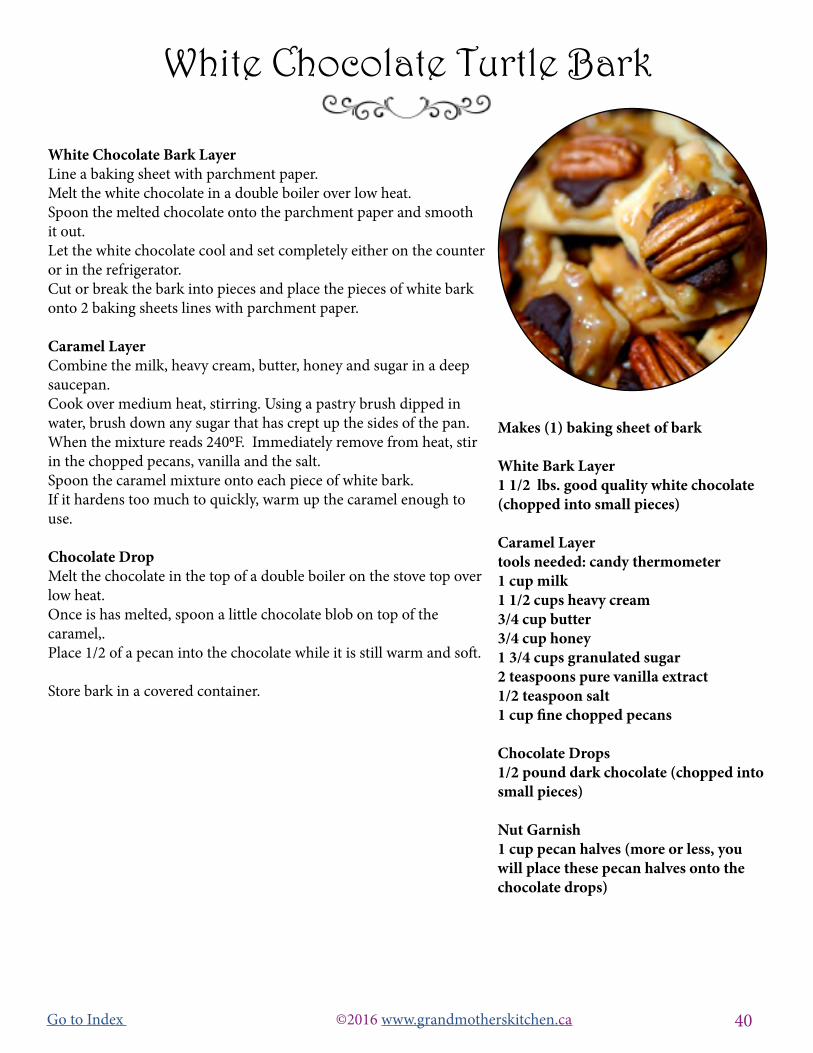
White Chocolate Bark LayerLine a baking sheet with parchment paper.Melt the white chocolate in a double boiler over low heat.Spoon the melted chocolate onto the parchment paper and smooth it out.Let the white chocolate cool and set completely either on the counter or in the refrigerator.Cut or break the bark into pieces and place the pieces of white bark onto 2 baking sheets lines with parchment paper.
Caramel LayerCombine the milk, heavy cream, butter, honey and sugar in a deep saucepan.Cook over medium heat, stirring. Using a pastry brush dipped in water, brush down any sugar that has crept up the sides of the pan. When the mixture reads 2400F. Immediately remove from heat, stir in the chopped pecans, vanilla and the salt. Spoon the caramel mixture onto each piece of white bark.If it hardens too much to quickly, warm up the caramel enough to use.
Chocolate DropMelt the chocolate in the top of a double boiler on the stove top over low heat. Once is has melted, spoon a little chocolate blob on top of the caramel,. Place 1/2 of a pecan into the chocolate while it is still warm and soft. Store bark in a covered container.
Makes (1) baking sheet of bark
White Bark Layer1 1/2 lbs. good quality white chocolate (chopped into small pieces)
Caramel Layertools needed: candy thermometer1 cup milk1 1/2 cups heavy cream3/4 cup butter3/4 cup honey1 3/4 cups granulated sugar2 teaspoons pure vanilla extract1/2 teaspoon salt 1 cup fine chopped pecans
Chocolate Drops1/2 pound dark chocolate (chopped into small pieces) Nut Garnish1 cup pecan halves (more or less, you will place these pecan halves onto the chocolate drops)
White Chocolate Turtle Bark
41Go to Index ©2016 www.grandmotherskitchen.ca
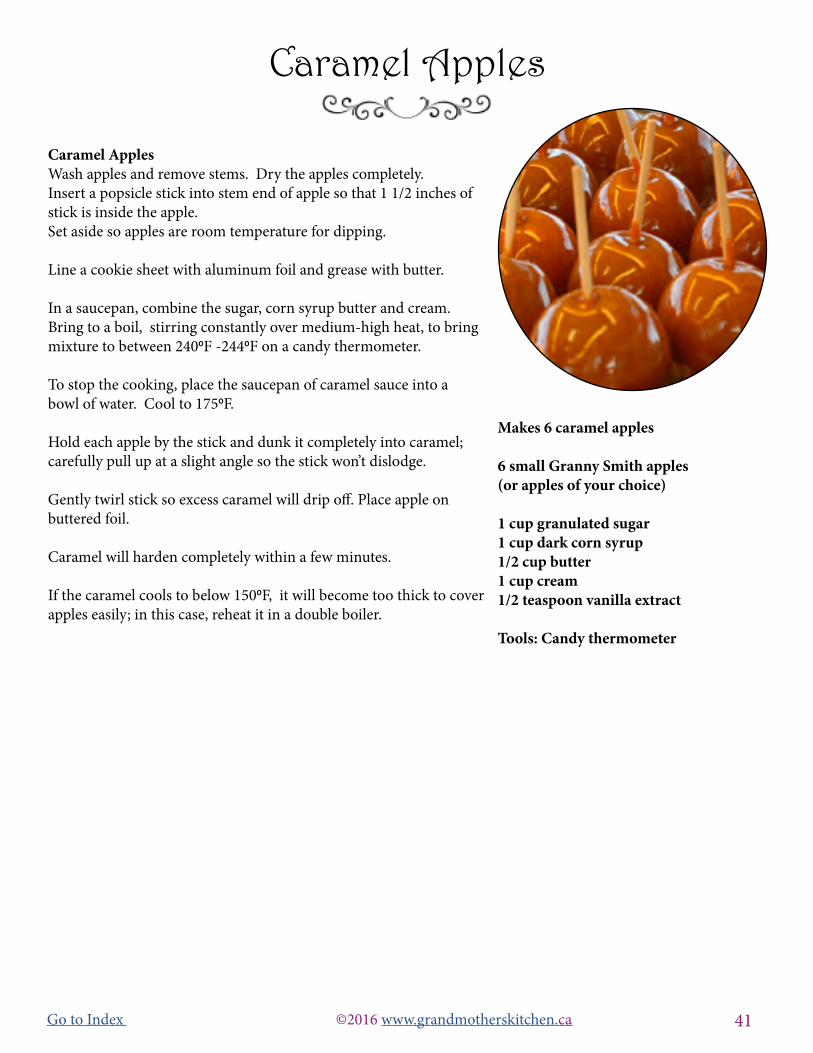
Caramel Apples Wash apples and remove stems. Dry the apples completely. Insert a popsicle stick into stem end of apple so that 1 1/2 inches of stick is inside the apple. Set aside so apples are room temperature for dipping. Line a cookie sheet with aluminum foil and grease with butter. In a saucepan, combine the sugar, corn syrup butter and cream. Bring to a boil, stirring constantly over medium-high heat, to bring mixture to between 2400F -2440F on a candy thermometer. To stop the cooking, place the saucepan of caramel sauce into a bowl of water. Cool to 1750F.
Hold each apple by the stick and dunk it completely into caramel; carefully pull up at a slight angle so the stick won’t dislodge.
Gently twirl stick so excess caramel will drip off. Place apple on buttered foil. Caramel will harden completely within a few minutes.
If the caramel cools to below 1500F, it will become too thick to cover apples easily; in this case, reheat it in a double boiler.
Makes 6 caramel apples
6 small Granny Smith apples(or apples of your choice) 1 cup granulated sugar1 cup dark corn syrup1/2 cup butter1 cup cream1/2 teaspoon vanilla extract
Tools: Candy thermometer
Caramel Apples
42Go to Index ©2016 www.grandmotherskitchen.ca
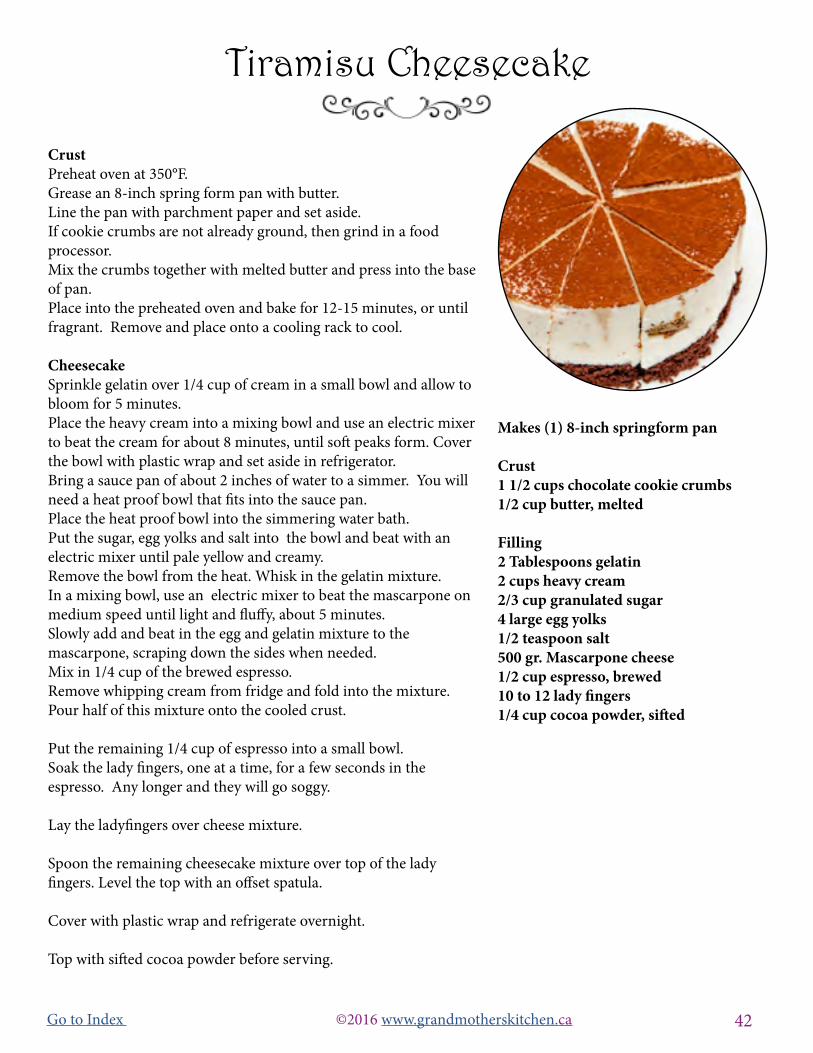
CrustPreheat oven at 350°F. Grease an 8-inch spring form pan with butter. Line the pan with parchment paper and set aside.If cookie crumbs are not already ground, then grind in a food processor.Mix the crumbs together with melted butter and press into the base of pan. Place into the preheated oven and bake for 12-15 minutes, or until fragrant. Remove and place onto a cooling rack to cool.
CheesecakeSprinkle gelatin over 1/4 cup of cream in a small bowl and allow to bloom for 5 minutes.Place the heavy cream into a mixing bowl and use an electric mixer to beat the cream for about 8 minutes, until soft peaks form. Cover the bowl with plastic wrap and set aside in refrigerator. Bring a sauce pan of about 2 inches of water to a simmer. You will need a heat proof bowl that fits into the sauce pan.Place the heat proof bowl into the simmering water bath.Put the sugar, egg yolks and salt into the bowl and beat with an electric mixer until pale yellow and creamy.Remove the bowl from the heat. Whisk in the gelatin mixture.In a mixing bowl, use an electric mixer to beat the mascarpone on medium speed until light and fluffy, about 5 minutes.Slowly add and beat in the egg and gelatin mixture to the mascarpone, scraping down the sides when needed.Mix in 1/4 cup of the brewed espresso.Remove whipping cream from fridge and fold into the mixture.Pour half of this mixture onto the cooled crust.
Put the remaining 1/4 cup of espresso into a small bowl. Soak the lady fingers, one at a time, for a few seconds in the espresso. Any longer and they will go soggy.
Lay the ladyfingers over cheese mixture.
Spoon the remaining cheesecake mixture over top of the lady fingers. Level the top with an offset spatula.
Cover with plastic wrap and refrigerate overnight.
Top with sifted cocoa powder before serving.
Makes (1) 8-inch springform pan Crust1 1/2 cups chocolate cookie crumbs1/2 cup butter, melted
Filling2 Tablespoons gelatin2 cups heavy cream2/3 cup granulated sugar4 large egg yolks1/2 teaspoon salt500 gr. Mascarpone cheese1/2 cup espresso, brewed10 to 12 lady fingers1/4 cup cocoa powder, sifted
Tiramisu Cheesecake

43Go to Index ©2016 www.grandmotherskitchen.ca
Mocha CakePre-heat the oven to 350°F. Grease two (9 inch) round cake pans and line them with parchment paper cut to fit.In a large bowl whisk together the flour, sugar, cocoa powder, baking soda, salt and baking powder. In a mixing bowl use an electric mixer to beat together the oil, eggs, buttermilk, and coffee. Add the flour mixture to the wet mixture and beat on medium speed for 2 minutes until smooth. The batter will be thin. Pour into prepared cake pans and place into the preheated oven.Bake for 30 to 35 minutes or until a toothpick inserted in the center comes out clean. Remove from the oven and place the pans on cooling racks for 10 minutes. Remove the cakes from the baking pans and finish cooling the cakes on wire racks.While the cake is cooling, to make the orange cream cheese filling.
Orange Cream Filling Place a medium size glass or metal bowl into the freezer for 15 minutes. This will be the bowl you make the whipped cream in. While the bowl is chilling, place the cream cheese into another mixing bowl and use and electric mixer on medium to beat until creamy. Add the confectioners’ sugar and beat until smooth. Mix in the orange juice and orange zest and set aside.Using the chilled bowl from the freezer, pour in the heavy cream. Use clean beaters to whip the cream until it forms stiff peaks. Fold the whipped cream into the cream cheese mixture gentlyby hand until well combined. Place one layer of the cake onto a cake plate and spread on a generous portion of the orange cream filling. Place the 2nd layer of cake on top. Spread the rest of the orange cream cheese frosting onto the top and sides of the cake. Place the cake into the refrigerator.
Orange GlazeHeat together marmalade and water in small saucepan over medium heat until liquid. When cool enough to touch, spoon the glaze over the cake. Spread out evenly with spatula to cover top. Refrigerate the cake for at least an hour before cutting and serving. Garnish with orange slices. Keep cake leftovers refrigerated.
Makes (2) 9-inch round cakes
MochaCake2 cups all purpose flour2 cups granulated sugar2/3 cup unsweetened cocoa powder2 teaspoons baking soda1/2 teaspoon salt1 teaspoon baking powder1/2 cup vegetable oil2 eggs1 cup buttermilk1 cup brewed coffee
Orange Whipped Cream Cheese Filling 16 oz. cream cheese, at room temperature4 cups confectioners’ sugar1/3 cup orange juicezest of 2 oranges2 cups of heavy cream
Orange GlazeTopping 2/3 cup orange marmalade1-2 teaspoons water Garnish small orange slices
Mocha Cake & Orange Cream Cheese
44Go to Index ©2016 www.grandmotherskitchen.ca
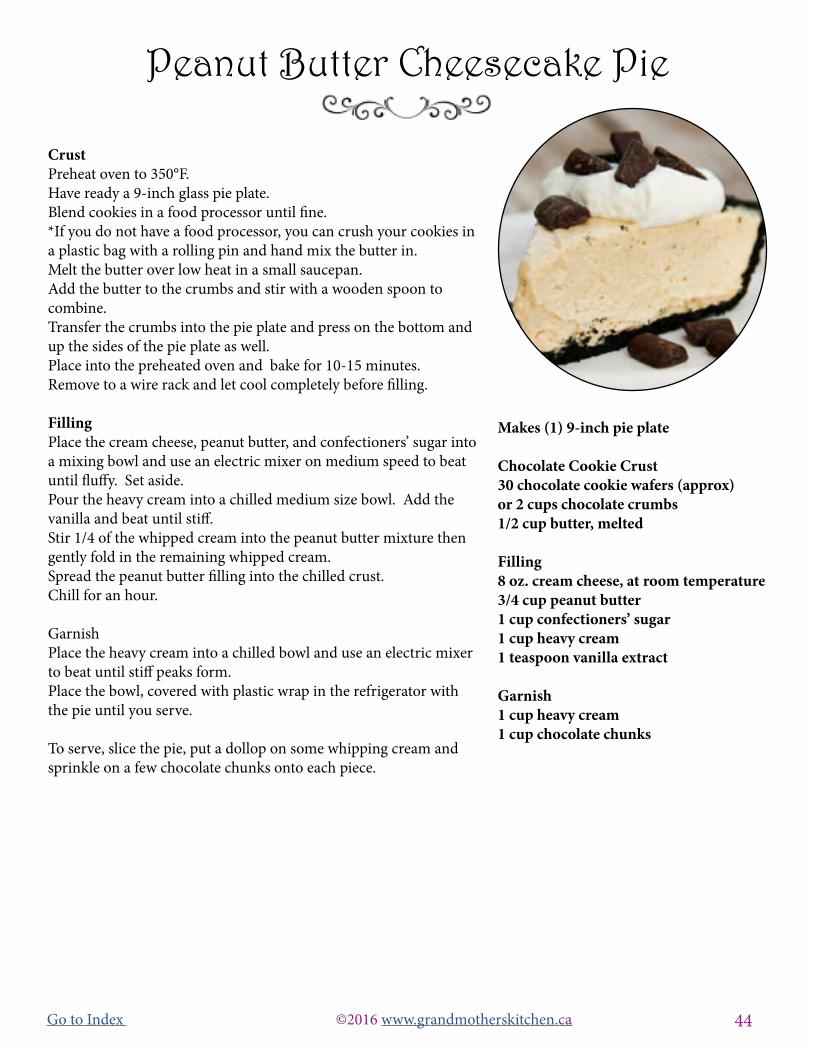
Crust Preheat oven to 350°F. Have ready a 9-inch glass pie plate. Blend cookies in a food processor until fine.*If you do not have a food processor, you can crush your cookies in a plastic bag with a rolling pin and hand mix the butter in. Melt the butter over low heat in a small saucepan. Add the butter to the crumbs and stir with a wooden spoon to combine. Transfer the crumbs into the pie plate and press on the bottom and up the sides of the pie plate as well. Place into the preheated oven and bake for 10-15 minutes. Remove to a wire rack and let cool completely before filling.
FillingPlace the cream cheese, peanut butter, and confectioners’ sugar into a mixing bowl and use an electric mixer on medium speed to beat until fluffy. Set aside.Pour the heavy cream into a chilled medium size bowl. Add the vanilla and beat until stiff. Stir 1/4 of the whipped cream into the peanut butter mixture then gently fold in the remaining whipped cream.Spread the peanut butter filling into the chilled crust. Chill for an hour. Garnish Place the heavy cream into a chilled bowl and use an electric mixer to beat until stiff peaks form. Place the bowl, covered with plastic wrap in the refrigerator with the pie until you serve. To serve, slice the pie, put a dollop on some whipping cream and sprinkle on a few chocolate chunks onto each piece.
Makes (1) 9-inch pie plate Chocolate Cookie Crust30 chocolate cookie wafers (approx) or 2 cups chocolate crumbs 1/2 cup butter, melted Filling8 oz. cream cheese, at room temperature 3/4 cup peanut butter1 cup confectioners’ sugar1 cup heavy cream1 teaspoon vanilla extract Garnish 1 cup heavy cream 1 cup chocolate chunks
Peanut Butter Cheesecake Pie
45Go to Index ©2016 www.grandmotherskitchen.ca
Cheesecake Prepare mini cheesecake tins or a 16 hole muffin tin. Cut parchment paper circle bottoms and strips wide enough to extend up past the height of the tins, for a smooth looking texture on the finished cheesecake or you can use paper or silicone muffin liners which will give a waved finish. In a mixing bowl combine the crumbs with the butter and sugar stir together to form the crust. Press about one tablespoon of crumbs evenly onto the bottom of each liner and set aside.
Filling Place the cream cheese into a large mixing bowl and using an electric mixer on high, beat cream cheese for about 3 minutes until fluffy. Add in the confectioners’ sugar and mix in to combine. Add the yogurt, vanilla, and a pinch of salt and beat until smooth. Chill a small mixing bowl in the freezer for 10 minutes. Pour the heavy cream into the chilled bowl and use an electric mixer on medium speed to whip the cream until soft peaks form. Use a rubber spatula, to fold the whipped cream into the cream cheese mixture. Use a tablespoon or ice cream scoop to evenly spoon over the crusts. Smooth tops with a spatula. Cover and refrigerate for at least 8 hours until the cheesecakes are firm.
The Blueberry ToppingCombine sugar and cornstarch in a small saucepan and blend thoroughly. Stir in the water. Place 1 cup of the blueberries into the mixture. Cook over medium heat until the mixture thickens and comes to a boil, stirring as it cooks. Use a fork to mash up the berries as they are cooking.Remove blueberry sauce from heat, shut off and stir in the remaining uncooked berries. Let the sauce cool before using.
To serve your mini cheesecakes, remove them from the tins, remove the paper liners, place a cheesecake onto a serving dish and spoon on some delicious blueberry topping. Keep everything refrigerated.
Makes (16) muffin size cheesecakes
Crust 2 cups vanilla cookie crumbs or graham crumbs1/2 cup, (1 stick) butter, melted 2 Tablespoons granulated sugar Filling16 oz. cream cheese, at room temperature 3/4 cup confectioners’ sugar1 cup full fat Greek yogurt 2 teaspoons pure vanilla extractpinch of salt1 cup heavy cream
The Blueberry Topping1 cup granulated sugar2 Tablespoons cornstarch1 cup water2 cups fresh blueberries divided in half
Easy No Bake Blueberry Cheesecakes
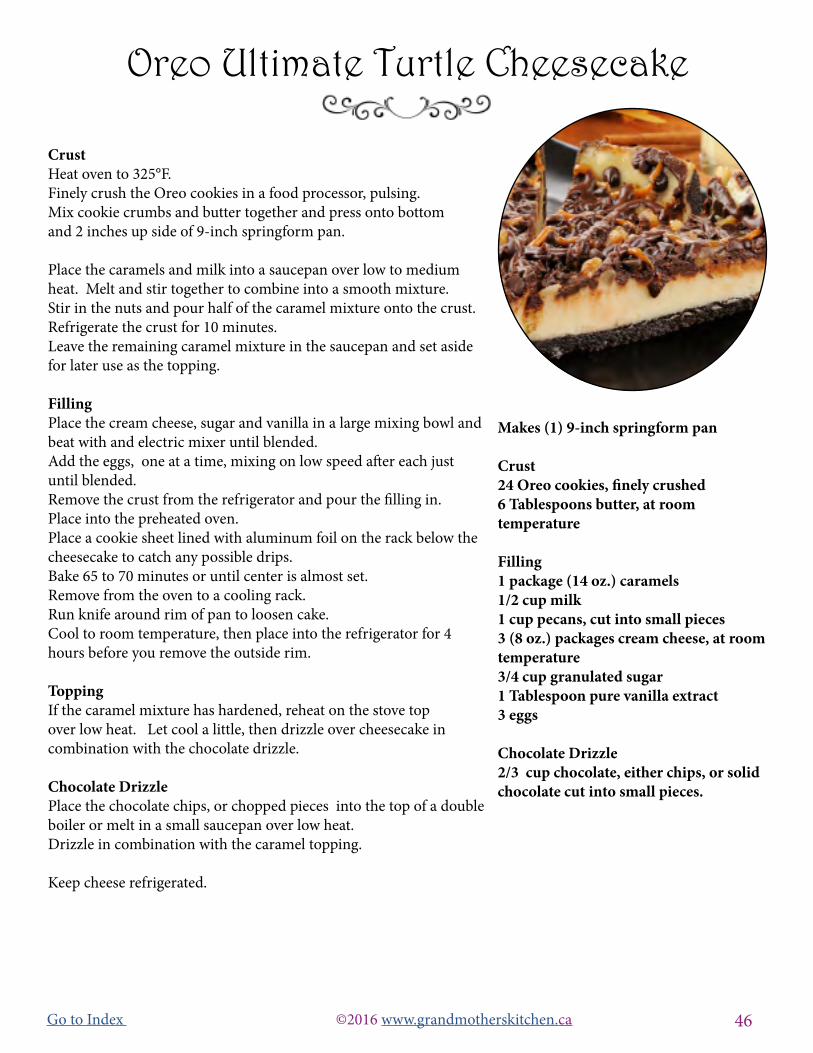
46Go to Index ©2016 www.grandmotherskitchen.ca
Crust Heat oven to 325°F. Finely crush the Oreo cookies in a food processor, pulsing. Mix cookie crumbs and butter together and press onto bottom and 2 inches up side of 9-inch springform pan.
Place the caramels and milk into a saucepan over low to medium heat. Melt and stir together to combine into a smooth mixture. Stir in the nuts and pour half of the caramel mixture onto the crust. Refrigerate the crust for 10 minutes. Leave the remaining caramel mixture in the saucepan and set aside for later use as the topping. Filling Place the cream cheese, sugar and vanilla in a large mixing bowl and beat with and electric mixer until blended. Add the eggs, one at a time, mixing on low speed after each just until blended. Remove the crust from the refrigerator and pour the filling in. Place into the preheated oven. Place a cookie sheet lined with aluminum foil on the rack below the cheesecake to catch any possible drips. Bake 65 to 70 minutes or until center is almost set. Remove from the oven to a cooling rack. Run knife around rim of pan to loosen cake. Cool to room temperature, then place into the refrigerator for 4 hours before you remove the outside rim. ToppingIf the caramel mixture has hardened, reheat on the stove top over low heat. Let cool a little, then drizzle over cheesecake in combination with the chocolate drizzle. Chocolate Drizzle Place the chocolate chips, or chopped pieces into the top of a double boiler or melt in a small saucepan over low heat. Drizzle in combination with the caramel topping.
Keep cheese refrigerated.
Makes (1) 9-inch springform pan Crust 24 Oreo cookies, finely crushed6 Tablespoons butter, at room temperature Filling1 package (14 oz.) caramels1/2 cup milk1 cup pecans, cut into small pieces 3 (8 oz.) packages cream cheese, at room temperature 3/4 cup granulated sugar1 Tablespoon pure vanilla extract3 eggs
Chocolate Drizzle 2/3 cup chocolate, either chips, or solid chocolate cut into small pieces.
Oreo Ultimate Turtle Cheesecake

47Go to Index ©2016 www.grandmotherskitchen.ca
Cinnamon Rolls Place the yeast, sugar and warm water in a small bowl for 10 minutes. This timing allows the yeast to activate.In a small sauce pan over low temperature, heat milk, butter, salt and remaining 1/2 cup sugar. Just heat enough to melt the butter. Do not boil. Stir to dissolve.Add 4 cups of flour to a large mixing bowl.Add milk mixture and egg to the flour. Use a wooden spoon to stir to combine. Form a well in the center of the mixture.Add the activated yeast to the flour. Use a wooden spoon and your hands to combine the dough. Knead dough for 10 minutes only adding the remaining cup of flour if the dough is sticky. The less flour you have to add the more tender the rolls will be.Transfer the dough to a lightly floured surface and cover with a clean tea towel for 5 minutes.Shape the dough into a ball and place into a large greased bowl.Cover and let rise to double for about 30 minutes to 1 hour.Punch down the dough and allow to rest in bowl for 5 minutes.
In a small bowl mix together the brown sugar with cinnamon.
Transfer the dough to a lightly floured surface, and a make rectangle that is about 18x13 inches approximately.Use clean fingers or a pastry brush to spread softened butter over the dough. Sprinkle the brown sugar/cinnamon mixture evenly over the butter.Starting at the short end roll up the dough tightly.Pinch the seam together as best as possible and then turn it onto a cutting board seam down.
Using a serrated knife slice log into two even halves, then slice each half into 6 even slices, making 12 pieces.Generously butter a large cookie tray and one by one transfer the rolls cut side down.Cover with a clean tea towel and allow to rise in a warm place until doubled (about 1 hour)
Preheat oven to 375°F. Place the cinnamon rolls into the preheated oven and bake until browned, about 25 minutes. Remove and place onto a cooling rack.
Serve warm for the absolute most divine flavor and texture.
Make (12) Cinnamon Rolls Dough 1 Tablespoon active dry yeast1/2 cup warm water (110 °F)2 teaspoons granulated sugar 1 cup milk 1/3 cup butter, cut into pieces 1 teaspoon salt 1/2 cup granulated sugar 4 -5 cups all purpose flour 1 large egg
Filling 3/4 cup butter, at room temperature and spreadable 1 1/2 cups brown sugar, packed 4 teaspoons cinnamon1 teaspoon nutmeg (optional)
Perfect Cinnamon Rolls

48Go to Index ©2016 www.grandmotherskitchen.ca
Sweet Potato Puree Preheat oven 375°F. Prepared the sweet potato puree. Pierce and place the sweet potatoes into a pan and bake for 45-60 minutes, until tender when speared with a knife.Once baked, let cool, peel skin off, place the potato into a small bowl and use a hand held mixer to puree the potato. Measure out 3/4 cup of the puree and set aside. Turn off oven. DoughMeasure the warm water to a small bowl and lightly stir in the yeast; add a pinch of sugar and set aside until foamy (15-20 minutes).In a small saucepan over medium heat, melt the butter, then stir in the sugar, sweet potato and milk. Stirring, warm the mixture enough to dissolve together. Remove from heat and let cool for 10-15 minutes - do not skip this step or you will overheat and deactivate the yeast. Add 3 cups of the flour and salt to the bowl of a stand mixer fitted with the hook attachment; mix for 10-15 seconds.Add the sweet potato mixture and the yeast mixture, then mix dough on medium-high speed for 6-7 minutes.If the dough is too sticky, add in a bit more flour, 1 teaspoon at a time until you reach desired consistency.Lightly grease a mixing bowl with a bit of butter and transfer dough to your mixing bowl. Cover with a towel and let stand for 2 hours in a warm part of your kitchen.Prepare 2 extra large 6-cup muffins tray by greasing them.Line a flat surface with parchment paper and sprinkle with flour.Punch down and roll the dough out into an 18×12 rectangle.Spread butter all over your dough and then sprinkle evenly with sugar and cinnamon.Start at the longest end of your dough and tightly roll and then cut into 12 even pieces.Transfer each roll to your muffin pan hole.Cover pan with a towel and allow the rolls to rise for one hour.Preheat oven to 375˚F.Place into the oven and bake for 12-14 minutes. Remove and place onto a wire rack. Allow to cool in the pan.
GlazeIn a medium bowl, mix the butter, confectioners’ sugar and vanilla. Add hot water, one tablespoon at a time until glaze reaches desired spreading consistency. Spread over slightly cooled rolls.
Makes (12) cinnamon rolls Sweet Potato Puree 2 medium sized sweet potatoes
Dough 1/4 cup warm water (110°F)2 1/4 teaspoons active dry yeast2 teaspoons granulated sugar 1/4 cup butter1/2 cup granulated sugar3/4 cup sweet potato puree 1/4 cup milk3 1/4 cups all purpose flour, plus more for rolling1 teaspoon salt
Filling3 Tablespoons butter, at room temperature 1/2 cup granulated sugar2 Tablespoons ground cinnamon
Glaze 4 Tablespoons butter, at room temperature 2 cups confectioners’ sugar 1 teaspoons pure vanilla extract3-6 Tablespoons hot water
Sweet Potato Cinnamon Rolls
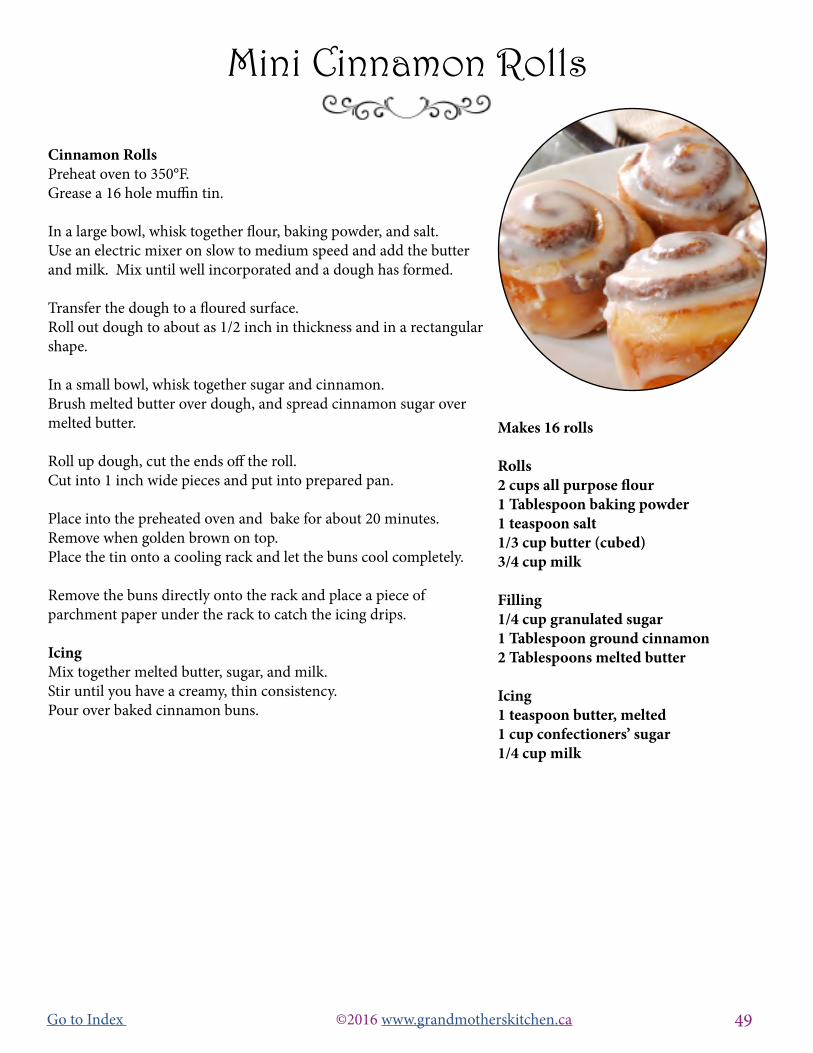
49Go to Index ©2016 www.grandmotherskitchen.ca
Cinnamon Rolls Preheat oven to 350°F. Grease a 16 hole muffin tin.
In a large bowl, whisk together flour, baking powder, and salt. Use an electric mixer on slow to medium speed and add the butter and milk. Mix until well incorporated and a dough has formed.
Transfer the dough to a floured surface. Roll out dough to about as 1/2 inch in thickness and in a rectangular shape.
In a small bowl, whisk together sugar and cinnamon. Brush melted butter over dough, and spread cinnamon sugar over melted butter.
Roll up dough, cut the ends off the roll. Cut into 1 inch wide pieces and put into prepared pan. Place into the preheated oven and bake for about 20 minutes.Remove when golden brown on top.Place the tin onto a cooling rack and let the buns cool completely. Remove the buns directly onto the rack and place a piece of parchment paper under the rack to catch the icing drips.
IcingMix together melted butter, sugar, and milk. Stir until you have a creamy, thin consistency. Pour over baked cinnamon buns.
Makes 16 rolls Rolls 2 cups all purpose flour1 Tablespoon baking powder1 teaspoon salt1/3 cup butter (cubed)3/4 cup milk Filling 1/4 cup granulated sugar1 Tablespoon ground cinnamon2 Tablespoons melted butter Icing 1 teaspoon butter, melted1 cup confectioners’ sugar1/4 cup milk
Mini Cinnamon Rolls

50Go to Index ©2016 www.grandmotherskitchen.ca
Cookies Preheat oven to 375°F. Line 2 cookie sheets with parchment paper or grease with butter.
In medium mixing bowl beat together peanut butter, butter, brown sugar, sugar, egg and vanilla until creamy.Mix in the flour, baking soda and salt.Cover the bowl with plastic wrap and refrigerate at least 1 hour.
Remove the dough from the refrigerator and form dough into 24 balls, each about 2-inches in diameter.Arrange the balls about 2-inches apart on two cookie sheets.Flatten each one with a fork.
Press the roasted peanuts onto the tops of each cookie.
Place into the preheated oven, one sheet at a time and bake 10-12 minutes or until light golden brown. Remove from the oven and place onto cooling racks. Let sit for a few minutes, then transfer the cookies directly onto the cooling rack.
Keep stored in a container with a lid that seals.
Makes 24 cookies 3/4 cup peanut butter, at room temperature1/2 cup butter, at room temperature1/2 cup brown sugar, firmly packed 1/2 cup granulated sugar 1 large egg 1/2 teaspoon pure vanilla extract1 1/2 cups all purpose flour 3/4 teaspoon baking soda 1/4 teaspoon salt
Topping3/4 cup roasted peanut halves
Homemade Peanut Butter Cookies

51Go to Index ©2016 www.grandmotherskitchen.ca
Cookies Preheat oven to 225°F. Line 2 cookie sheets with parchment paper. Make sure your egg whites are at room temperature.Use a clean glass or metal bowl to beat the egg whites. If the bowl is not really clean, the eggs do not beat up properly.
Beat the egg whites with and electric beater on medium speed until the whites are frothy. Add the cream of tartar and continue to beat on high speed. Now add the sugar to the egg whites, just one tablespoon at a time. This step is important. If you add the sugar too quickly you will not get the light and fluffy meringue that you want.
Continue beating while adding all the sugar, then continue to beat on high until the sugar is all dissolved and you have stiff peaks. Fold in the orange extract and a couple drops of orange food coloring. Add drops of color as you would like for a lighter or darker orange meringue.
Fit a piping bag with a large star tip and fill with meringue mixture. Pipe the cookies directly onto the pans. Leave an inch between each cookie.
Place both cookie sheets, side by side into the preheated oven. Bake for 45 minutes. Turn off the oven, open the door a little and let the cookies cool for at least an hour in the oven. If you make your cookies in the evening, you can leave them to sit overnight in the open oven.
Carefully remove the meringues from the parchment paper and place them into an air tight container. Meringues freeze well.
*Tip: You can save the yolks and use them to make scrambled eggs or french toast.
Makes 2 cookie sheets
4 egg whites, at room temperature1/2 teaspoon of cream of tarter1 cup granulated sugar1/2 teaspoon orange extract 2-4 drops of orange food coloring
Orange Meringue Cookies
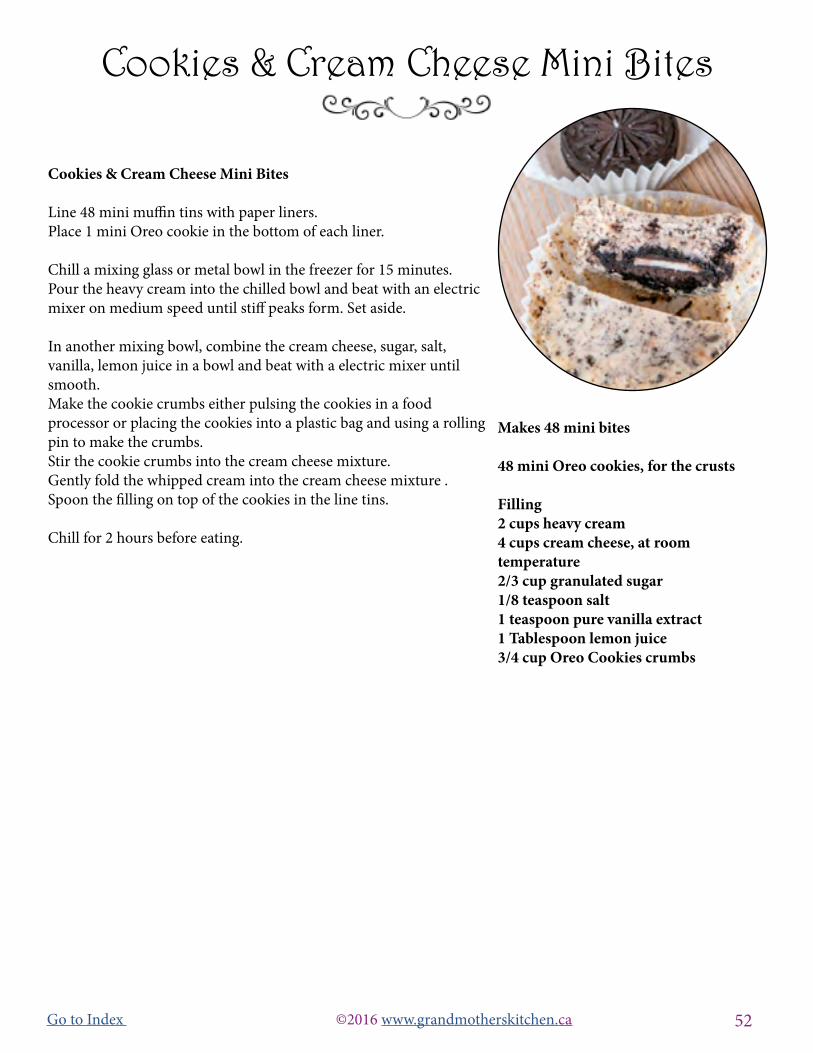
52Go to Index ©2016 www.grandmotherskitchen.ca
Cookies & Cream Cheese Mini Bites Line 48 mini muffin tins with paper liners. Place 1 mini Oreo cookie in the bottom of each liner.
Chill a mixing glass or metal bowl in the freezer for 15 minutes. Pour the heavy cream into the chilled bowl and beat with an electric mixer on medium speed until stiff peaks form. Set aside.
In another mixing bowl, combine the cream cheese, sugar, salt, vanilla, lemon juice in a bowl and beat with a electric mixer until smooth. Make the cookie crumbs either pulsing the cookies in a food processor or placing the cookies into a plastic bag and using a rolling pin to make the crumbs. Stir the cookie crumbs into the cream cheese mixture. Gently fold the whipped cream into the cream cheese mixture .Spoon the filling on top of the cookies in the line tins. Chill for 2 hours before eating.
Makes 48 mini bites 48 mini Oreo cookies, for the crusts
Filling 2 cups heavy cream4 cups cream cheese, at room temperature2/3 cup granulated sugar1/8 teaspoon salt1 teaspoon pure vanilla extract1 Tablespoon lemon juice3/4 cup Oreo Cookies crumbs
Cookies & Cream Cheese Mini Bites
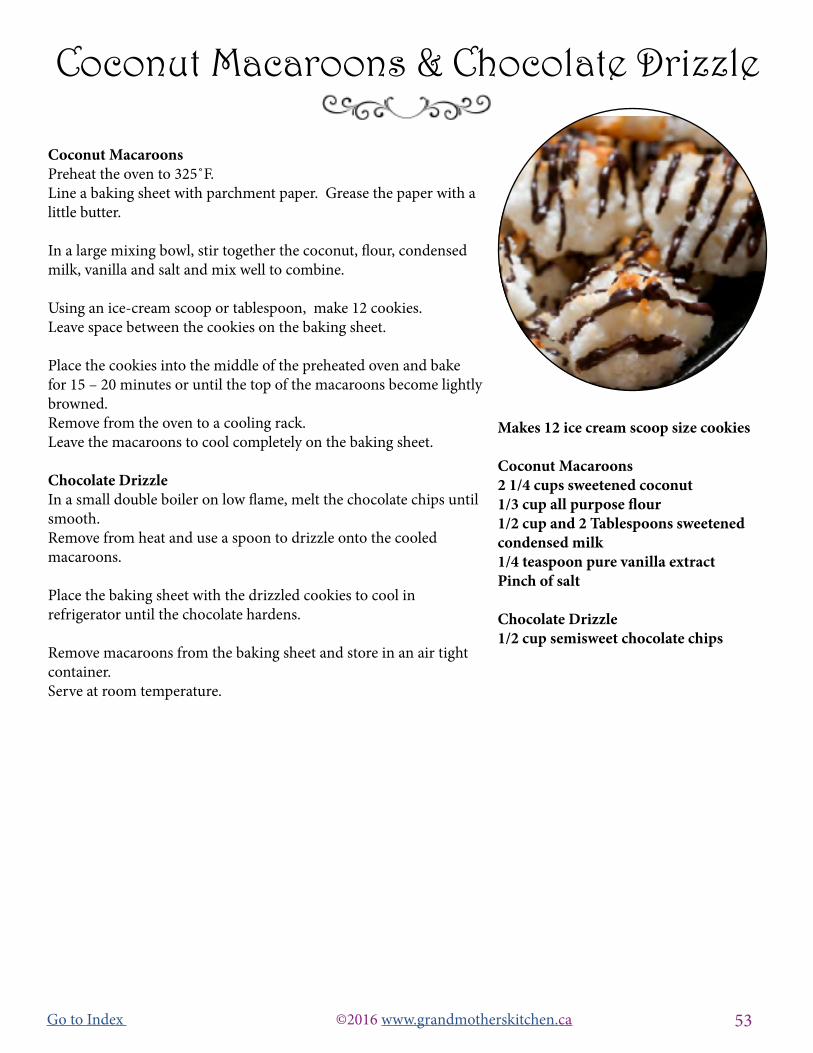
53Go to Index ©2016 www.grandmotherskitchen.ca
Coconut Macaroons Preheat the oven to 325˚F. Line a baking sheet with parchment paper. Grease the paper with a little butter.
In a large mixing bowl, stir together the coconut, flour, condensed milk, vanilla and salt and mix well to combine. Using an ice-cream scoop or tablespoon, make 12 cookies. Leave space between the cookies on the baking sheet.
Place the cookies into the middle of the preheated oven and bake for 15 – 20 minutes or until the top of the macaroons become lightly browned. Remove from the oven to a cooling rack.Leave the macaroons to cool completely on the baking sheet. Chocolate DrizzleIn a small double boiler on low flame, melt the chocolate chips until smooth. Remove from heat and use a spoon to drizzle onto the cooled macaroons.
Place the baking sheet with the drizzled cookies to cool in refrigerator until the chocolate hardens.
Remove macaroons from the baking sheet and store in an air tight container. Serve at room temperature.
Makes 12 ice cream scoop size cookies
Coconut Macaroons 2 1/4 cups sweetened coconut1/3 cup all purpose flour1/2 cup and 2 Tablespoons sweetened condensed milk1/4 teaspoon pure vanilla extractPinch of salt Chocolate Drizzle1/2 cup semisweet chocolate chips
Coconut Macaroons & Chocolate Drizzle
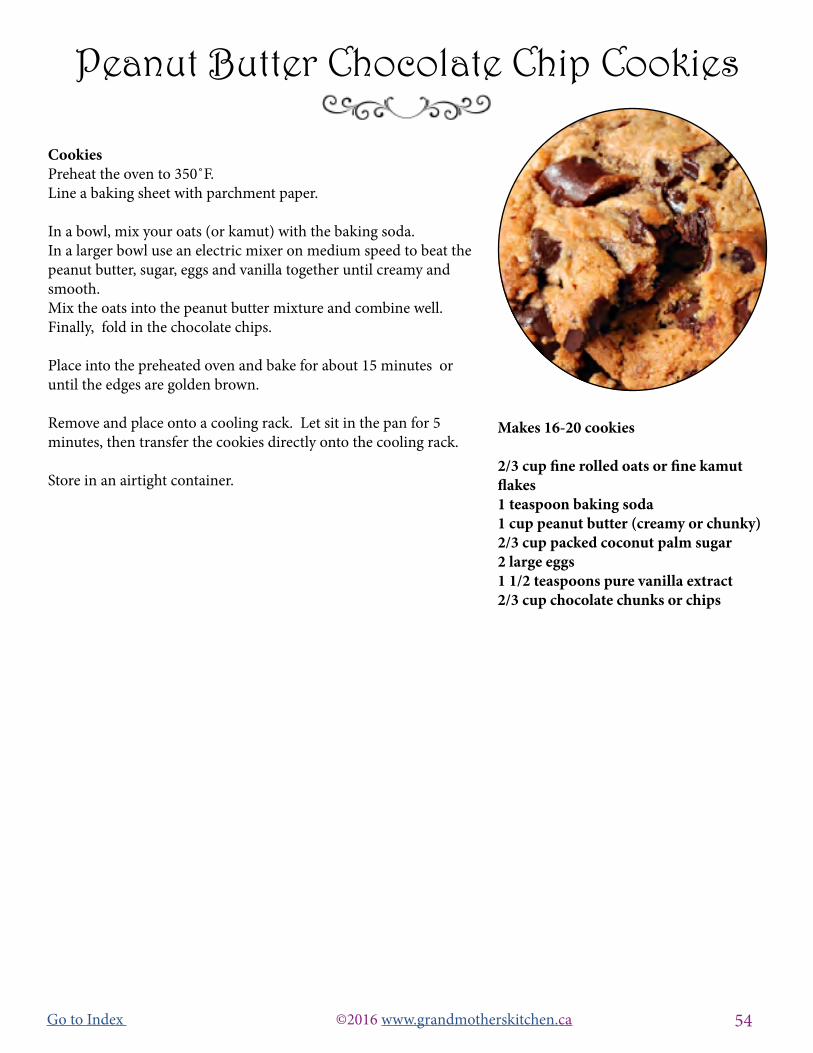
54Go to Index ©2016 www.grandmotherskitchen.ca
Cookies Preheat the oven to 350˚F. Line a baking sheet with parchment paper.
In a bowl, mix your oats (or kamut) with the baking soda.In a larger bowl use an electric mixer on medium speed to beat the peanut butter, sugar, eggs and vanilla together until creamy and smooth.Mix the oats into the peanut butter mixture and combine well. Finally, fold in the chocolate chips.
Place into the preheated oven and bake for about 15 minutes or until the edges are golden brown.
Remove and place onto a cooling rack. Let sit in the pan for 5 minutes, then transfer the cookies directly onto the cooling rack. Store in an airtight container.
Makes 16-20 cookies
2/3 cup fine rolled oats or fine kamut flakes1 teaspoon baking soda 1 cup peanut butter (creamy or chunky)2/3 cup packed coconut palm sugar2 large eggs1 1/2 teaspoons pure vanilla extract2/3 cup chocolate chunks or chips
Peanut Butter Chocolate Chip Cookies

55Go to Index ©2016 www.grandmotherskitchen.ca
Cookies Preheat the oven to 350˚F. Line a baking sheet with parchment paper.
In a large mixing bowl, use and electric mixer to beat the butter and sugars together until completely combined.Beat in eggs, one at a time, then the vanilla until fully mixed.
In a medium-large bowl mix together flour, baking soda, and salt.
Mix the dry ingredients into the butter mixture. Mix in the cocoa and ground Oreo cookies until well combined. Stir in the chocolate chips with a wooden spoon.
Using a medium cookie scoop, drop dough onto the prepared baking sheet(s) leaving an inch of space between the cookies. Cook cookies in batches, one sheet at a time. Place into the preheated oven and bake 9-11 minutes.
Remove from the oven and place onto a cooling rack.
Let cool on baking sheet for 5 minutes before transferring the cookies directly onto the cooling rack. Store cookies in an airtight container.
Makes about 2 dozen cookies 1 cup (2 sticks) butter, at room temperature 1 cup granulated sugar3/4 cup light brown sugar, packed2 eggs1 Tablespoon pure vanilla extract1 3/4 cup all purpose flour1 teaspoon baking soda1/2 teaspoon salt1 cup cocoa powder15 Oreo cookies, finely ground3/4 cups dark chocolate chips 3/4 cups white chocolate chips
Oreo Chocolate Cookies&Cream Cookies
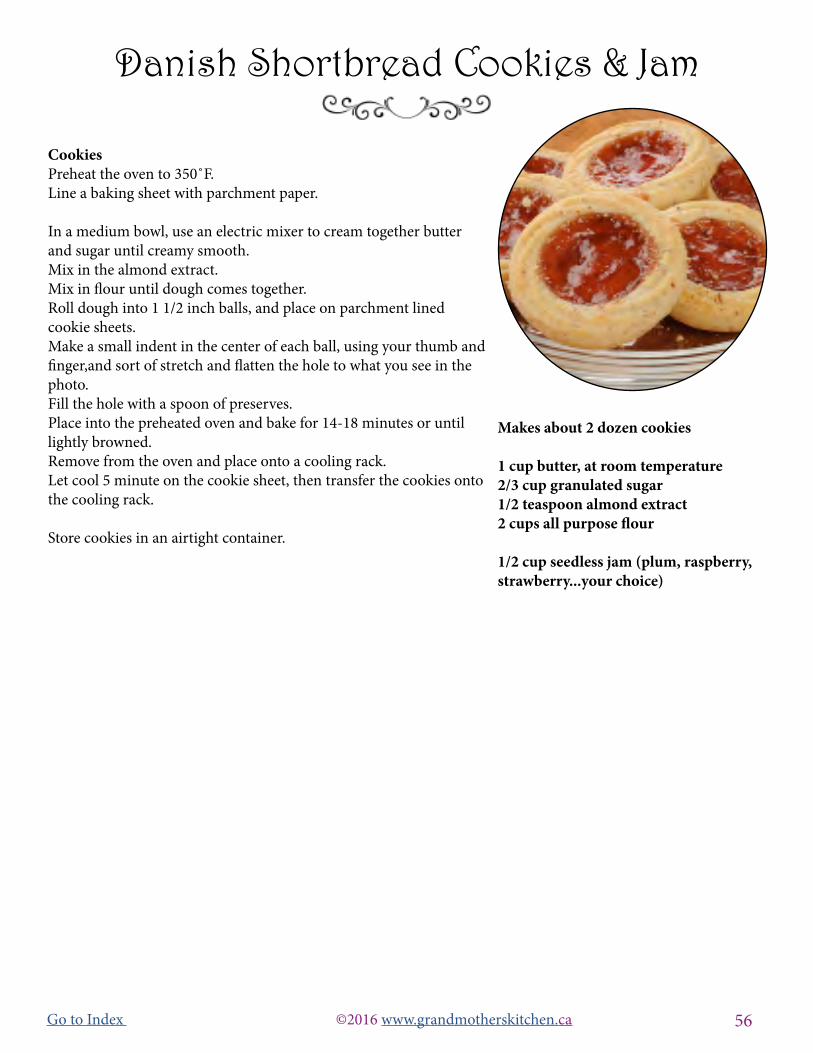
56Go to Index ©2016 www.grandmotherskitchen.ca
Cookies Preheat the oven to 350˚F. Line a baking sheet with parchment paper.
In a medium bowl, use an electric mixer to cream together butter and sugar until creamy smooth.Mix in the almond extract.Mix in flour until dough comes together. Roll dough into 1 1/2 inch balls, and place on parchment lined cookie sheets.Make a small indent in the center of each ball, using your thumb and finger,and sort of stretch and flatten the hole to what you see in the photo.Fill the hole with a spoon of preserves. Place into the preheated oven and bake for 14-18 minutes or until lightly browned. Remove from the oven and place onto a cooling rack.Let cool 5 minute on the cookie sheet, then transfer the cookies onto the cooling rack. Store cookies in an airtight container.
Makes about 2 dozen cookies 1 cup butter, at room temperature 2/3 cup granulated sugar1/2 teaspoon almond extract2 cups all purpose flour
1/2 cup seedless jam (plum, raspberry, strawberry...your choice)
Danish Shortbread Cookies & Jam

57Go to Index ©2016 www.grandmotherskitchen.ca
Cookies Line one or two baking sheets with parchment paper. Lightly grease with butter.
In a large mixing bowl, use an electric mixer, beat the butter, confectioners’ sugar, egg, and lemon extract. In another bowl, whisk together the flour baking soda and cream of tartar. Mix the dry ingredients into the wet to form the cookie batter. Cover with plastic wrap and chill the dough for 2 to 3 hours.
Preheat the oven to 375˚F.
Divide the dough in half, and roll each half of dough 3/16” inch thick on a lightly floured or cloth-covered board.Cut into desired shapes and place on the lightly greased baking sheet. Re-roll and cut the cookies until you have used up all the dough.Place cookies into the preheated oven and bake 7 to 8 minutes or until light brown on the edges. Remove and place the sheet onto a cooling rack. After 5 minutes, transfer the cookies directly onto the cooling rack. Let cool completely before frosting. Repeat in batches.
The Lemon Buttercream FrostingMeasure the confectioners’ sugar and lemon zest into a large mixing bowl and use and electric mixer on low to completely incorporate. Beat in the butter, until very well blended and smooth.Add the lemon juice, one tablespoon at a time and a few drops of yellow food coloring. Beat until creamy smooth. If necessary, add a bit more confectioners’ sugar to stiffen the frosting or a bit more lemon juice to thin it so that is of spreading consistency.
Spread the frosting onto the cookies, apply the candy sprinkles. Let stand for about one hour until the frosting completely sets. Store in a single layer or layered with wax paper in an airtight container in a cool place for up to 2 days. Refrigerate for up to 1 week, or freeze for up to 2 months.
Makes about 2-3 dozen cookies
Cookies1 cup butter , at room temperature 1 1/2 cups confectioners’ sugar1 egg1 teaspoon lemon extract2 1/2 cups all purpose flour1 teaspoon baking soda1 teaspoon cream of tartar
Lemon Buttercream Frosting2 1/2 cups confectioners’ sugar, plus more if needed1 1/2 teaspoons finely grated lemon zest1/4 cup butter, at room temperature 2-4 Tablespoons fresh lemon juice, plus more if needed1 -2 drop of yellow liquid food coloring
Garnish candy sprinkles
Lemon Deluxe Sugar Cookies

58Go to Index ©2016 www.grandmotherskitchen.ca
Cupcakes Preheat oven to 325˚F. Line two 12-muffin cup tins with paper liners.
Measure the sugar and oil into a large mixing bowl mix and use an electric mixer to beat together until well combined. Beat in eggs until mixture is uniform in color.Add in buttermilk, vanilla extract and food coloring and beat until well combined.Add the hot water and vinegar and mix in.In a bowl, whisk together the flour, baking soda, baking powder, and salt. Stir in the cocoa powder. Combine the dry ingredients well.Add the dry ingredients to the wet, beating in until well combined. Pour 1/4 cup of batter into each lined cup.Place into the preheated oven and bake for 18-20 or until the tops are a toothpick inserted in the center comes out with a few crumbs clinging to it. You want to be careful not to overcook this cupcakeso that it will remain moist. Remove from the oven and place the pans onto cooling racks.Let the cupcakes sit in the pans for for 5 minutes, then place the cupcakes on a cooling racks to finish cooling. FrostingPlace the cream cheese and butter into a mixing bowl and using an electric mixer, beat on medium speed until creamy. Slowly beat in the confectioners’ sugar. Put into a piping bag with a star tip and frost the cupcakes. Keep cupcakes in an airtight container.
Makes 24 Cupcakes
Cupcakes 2 cups granulated sugar3/4 cup vegetable oil2 eggs, at room temperature1 cup buttermilk, at room temperature2 teaspoons pure vanilla extract1 oz. (2 Tablespoons) red food coloring1/2 cup hot water1 teaspoon white vinegar2 cups all purpose flour1 teaspoon baking soda1 teaspoon baking powder1 teaspoon salt2 Tablespoons unsweetened cocoa powder
Frosting8 oz. cream cheese, at room temperature4 Tablespoons butter, at room temperature 2 cups confectioners’ sugar
Easy Red Velvet Cupcake

59Go to Index ©2016 www.grandmotherskitchen.ca
Cupcakes Preheat oven to 350˚F. Line a 12-muffin cup tin with paper liners. In a mixing bowl, whisk together flour, baking powder, baking sodaand brown sugar. Use an electric mixer on medium to mix in the buttermilk, maple syrup, oil, maple extract and vanilla extract and mix until it is well incorporated.
Fill prepared muffin tin 2/3 of the way.Place into the preheated oven and bake for 20 - 22 minutes, or until an toothpick inserted in the center comes out clean. Remove from oven and set on a rack to cool. Once cool enough to touch turn cupcakes out of pan and let cool completely on a wire rack.
FrostingMeasure the butter, sugar and vanilla into a mixing bowl and use an electric mixer on medium to beat until light and fluffy (about 5 minutes). Add heavy cream 1 tablespoon at a time to make consistency more spreadable.
AssemblyFill a piping bag with some frosting and pipe designs on top of cupcakes. Garnish with some toasted coconut on top.
Makes 12 cupcakes Cupcakes1 1/3 cups all purpose flour 3/4 teaspoon baking powder 1/2 teaspoon baking soda 2 Tablespoons brown sugar 1/2 cup buttermilk1/2 cup maple syrup 1/3 cup oil1 1/4 teaspoons maple extract 1/2 teaspoon vanilla extract
Buttercream Frosting1 cup butter, at room temperature4 cups confectioners’ sugar1 Tablespoon pure vanilla extract4 Tablespoons heavy cream
Garnishfine toasted coconut
Maple Cupcakes

60Go to Index ©2016 www.grandmotherskitchen.ca
Lemon Curd Select a sauce pan that can hold a heat proof bowl . Put about 2 inches of water in the saucepan. Bring it to the boil, then turn it down to simmer. Wash and zest your lemons to make 1/8 cup of zest. Squeeze the juice from the lemons to measure out 1/3 cup lemon juice.In the heat proof bowl, combine the lemon zest, juice, sugar and salt and stir together.Separate the egg yolks from the whites. You only need the yolks for this recipe. Whisk the egg yolks into the lemon, sugar mixture.Place the heat proof bowl with ingredients already in it into the sauce pan with the heated water.Let this cook for about 7-10 minutes, whisking while it is cooking. Once the mixture thickens you can remove it from the hot water pot.Whisk in the butter pieces, one at a time until all the butter is in the curd.Your curd can now be transferred to a container with a lid.If you do not like the texture of the zest in the curd, you can put the curd through a strainer to remove it. Let cool to room temperature then place the curd into the refrigerator to cool completely before piping onto the cupcakes.Once the curd has cooled, fill a piping bag.
CupcakesPreheat oven to 350˚F. Line (24) 2 1/2-inch muffin cups with paper liners.In a bowl, stir together the flour, baking powder, soda, and salt. Set aside.In a large mixing bowl beat the butter, using an electric mixer at medium speed, until creamy. Add sugar and mix in.Add the eggs, one at a time, beating each one in.Alternately beat in the flour mixture and buttermilk.Beat on low speed after each addition, mixing just until combined. Stir in lemon peel and lemon juice. Divide cupcake batter evenly among prepared muffin cups.Place into the preheated oven and bake for 15 to 18 minutes or until a toothpick inserted in the center of the cupcake comes out clean. Remove from the oven to cooling racks. Cool in the muffin pans for 5 minutes, then remove the cupcakes and cool on wire racks.
Using a melon scoop and scoop out a small bit of the top of the cupcake. Pipe the lemon curd in and onto each cupcake. Dust with confectioners’ sugar.Any leftovers should be kept refrigerated in a sealed container.
Makes 24 cupcakes Lemon Curd2-4 lemons, depending on size for: 1/8 cup fresh lemon zest + 1/3 cup freshly squeezed lemon juice 4 egg yolks 1/2 cup granulated sugar 1/8 teaspoon salt4 egg yolks6 Tablespoons butter (3/4 stick), cut into 6 pieces , at room temperature(Makes about 1 1/2 cups)
Cupcakes2 1/3 cups all purpose flour1 1/2 teaspoons baking powder1/2 teaspoon baking soda1/4 teaspoon salt1 cup butter, at room temperature2 cups granulated sugar4 eggs1 cup buttermilk (or soured milk just add 1 Tablespoon lemon juice to 1 cup milk )2 teaspoons finely shredded lemon peel2 Tablespoons lemon juice Garnish with a dusting of confectioners’ sugar.
Lemon Cupcakes

61Go to Index ©2016 www.grandmotherskitchen.ca
Cupcakes Preheat oven to 350˚F. Line two 12-muffin cup tin with paper liners.
If you are making the Oreo cookie crumbs, put the enough cookies in a plastic bag, for the cupcakes, frosting and garnish and using a rolling pin, roll over the cookies to crush and make the crumbs. Total needed is 2 1/4 cups of crumbs.Once you have enough crumbs made, set aside.
Cupcakes In a medium size bowl, combine the flour, baking powder and salt.In a large mixing bowl, use an electric mixer to cream together the sugar and the butter until light and fluffy. Beat in vanilla extract.Add egg whites one at a time beating in and making sure each is fully incorporated before adding the next.Working in increments, add the flour mixture and the milk into the sugar mixture a little at a time, mixing in to incorporate.Start and end with the flour mixture, keeping the mixer on low speed.Stir in 1 1/4 cups of the crushed Oreo crumbs.Spoon batter evenly into muffin tins, filling each about 2/3 full.Place the muffin tins into the oven using only the center rack and putting the muffin pans side by side so they cook evenly.Bake for 15-18 minutes or until a toothpick inserted in the center of a cupcake comes out clean. There may be a few cookie crumbs on the toothpick, which is fine and will give you moist cupcakes.Remove from the oven and place the muffin pans onto cooling racks. Once they have cooled for 10 minutes, remove the cupcakes from the tins onto the racks.Cool completely before frosting.
Chocolate Buttercream FrostingPlace the butter into a mixing bowl and cream the butter for a few minutes using an electric mixer on medium speed. Sift 3 cups confectioners’ sugar and 1/2 cup cocoa into the creamed butter.Mix on low until well incorporated and creamy.Add vanilla extract, salt, and milk or cream and beat for 3 minutes on medium speed. Add the 1/2 cup of oreo cookie crumbs and mix in.Notes: To thicken the consistency, add a little more confectioners’ sugar. To thin the consistency, add additional milk 1 tablespoon at a time.
AssemblyPut the frosting into a piping bag and pipe onto the cupcakes. Pat the garnish Oreo crumbs around the outside edges of the frosted cupcakes and put a mini oreo cookie on top of each. Cupcakes can be stored in a airtight container in the refrigerator for several days.
Makes 24 cupcakes Oreo Cupcakes2 1/4 cups all purpose flour 2 teaspoons baking powder 1/4 teaspoon salt 1 1/2 cups granulated sugar 1/2 cup butter, at room temperature 2 teaspoons pure vanilla extract 3 egg whites, at room temperature 3/4 cup milk 1 1/4 cups Oreo crumbs *Note you can buy a box of Oreo cookie crumbs Or you can make your own, this amount will take about 10 cookies
Chocolate Buttercream Frosting1 cup butter, at room temperature3 1/2 cups confectioners’ sugar1/2 cup cocoa powder2 teaspoons pure vanilla extract 1/2 teaspoon salt4 Tablespoons milk or heavy cream1/2 cup Oreo cookie crumbs
Garnish24 mini Oreo cookies1/2 cup Oreo crumbs
Oreo Cupcakes

62Go to Index ©2016 www.grandmotherskitchen.ca
CupcakesPreheat oven to 350°F Line 12 standard muffin cups with paper liners.
Sift the flour, baking powder, baking soda, salt and cinnamon into a medium sized bowl. In a large bowl, using an electric mixer, beat sugar, oil and eggs until well blended. Add dry ingredients to the wet mixture in 2 additions, beating until well blended after each addition. Use a mixing spoon to stir in the grated carrots and pineapple. Spoon batter into prepared muffin cups, filling each 3/4 full. Place into the preheated oven and bake for 30 minutes or until a toothpick inserted into center comes out clean. Remove from the oven and place the tin onto a cooling rack. Let sit for 10 minutes then turn the cupcakes out onto racks and cool completely before icing. Cut a small bit of cupcake from the tops of the cupcakes to make the crumble. Put the cake bits into a small bowl and break into fine crumbs.
IcingUsing electric mixer, beat the cream cheese and butter in large bowl until creamy smooth. Add confectioners’ sugar and ginger; beat until fluffy and smooth. Place the frosting into a piping bag and pipe the icing onto each cupcake. Sprinkle a few crumbs on top to garnish.Pipe frosting onto cooled cupcakes.
Makes 12 cupcakes Cupcakes 1 cup all purpose flour 3/4 teaspoon baking powder 3/4 teaspoon baking soda 1/2 teaspoon salt 1/2 teaspoon ground cinnamon 3/4 cup granulated sugar 2/3 cup vegetable oil 2 large eggs 1 1/2 cups finely grated fresh carrots 1/4 cup crushed pineapple, drained
Ginger-Cream Cheese Icing 1 cup cream cheese, at room temperature 6 Tablespoons butter, at room temperature 3 cups confectioners’ sugar 1-2 teaspoons fresh ginger, peeled and finely grated
Carrot Pineapple Cupcakes
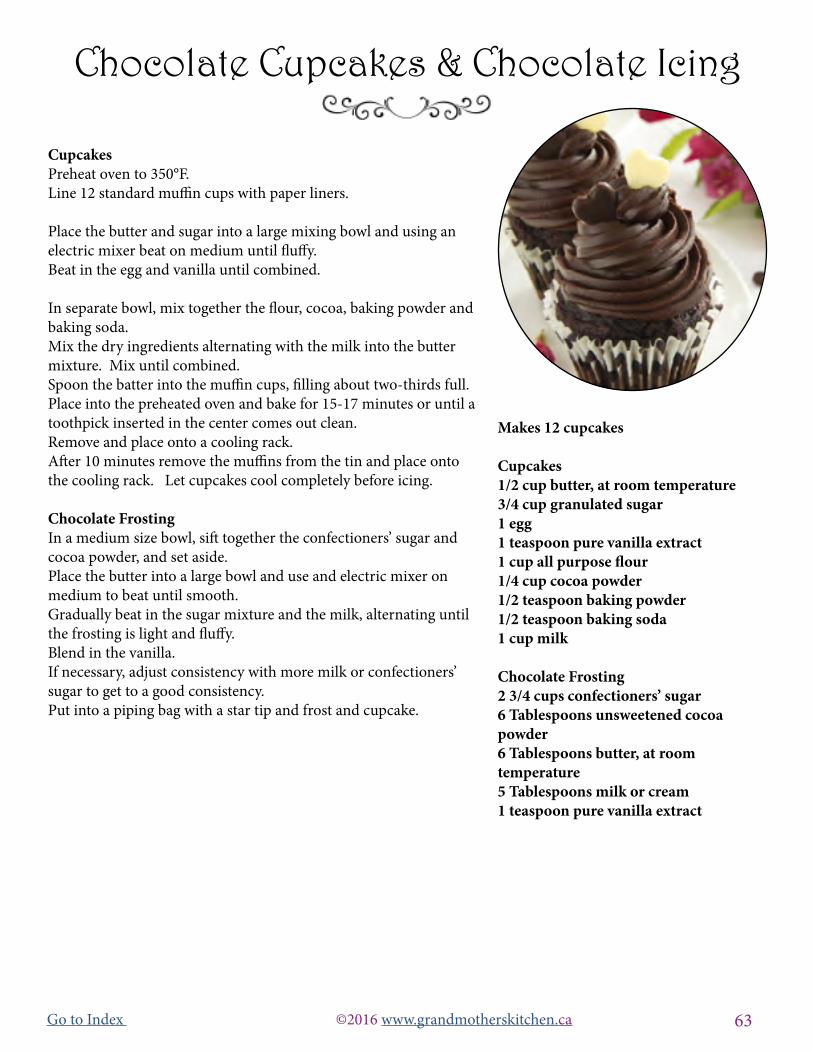
63Go to Index ©2016 www.grandmotherskitchen.ca
CupcakesPreheat oven to 350°F. Line 12 standard muffin cups with paper liners.
Place the butter and sugar into a large mixing bowl and using an electric mixer beat on medium until fluffy. Beat in the egg and vanilla until combined.
In separate bowl, mix together the flour, cocoa, baking powder and baking soda.Mix the dry ingredients alternating with the milk into the butter mixture. Mix until combined. Spoon the batter into the muffin cups, filling about two-thirds full. Place into the preheated oven and bake for 15-17 minutes or until a toothpick inserted in the center comes out clean.Remove and place onto a cooling rack. After 10 minutes remove the muffins from the tin and place onto the cooling rack. Let cupcakes cool completely before icing.
Chocolate Frosting In a medium size bowl, sift together the confectioners’ sugar and cocoa powder, and set aside.Place the butter into a large bowl and use and electric mixer on medium to beat until smooth. Gradually beat in the sugar mixture and the milk, alternating until the frosting is light and fluffy. Blend in the vanilla. If necessary, adjust consistency with more milk or confectioners’ sugar to get to a good consistency. Put into a piping bag with a star tip and frost and cupcake.
Makes 12 cupcakes Cupcakes1/2 cup butter, at room temperature3/4 cup granulated sugar1 egg1 teaspoon pure vanilla extract1 cup all purpose flour1/4 cup cocoa powder1/2 teaspoon baking powder1/2 teaspoon baking soda1 cup milk
Chocolate Frosting 2 3/4 cups confectioners’ sugar6 Tablespoons unsweetened cocoa powder6 Tablespoons butter, at room temperature5 Tablespoons milk or cream1 teaspoon pure vanilla extract
Chocolate Cupcakes & Chocolate Icing
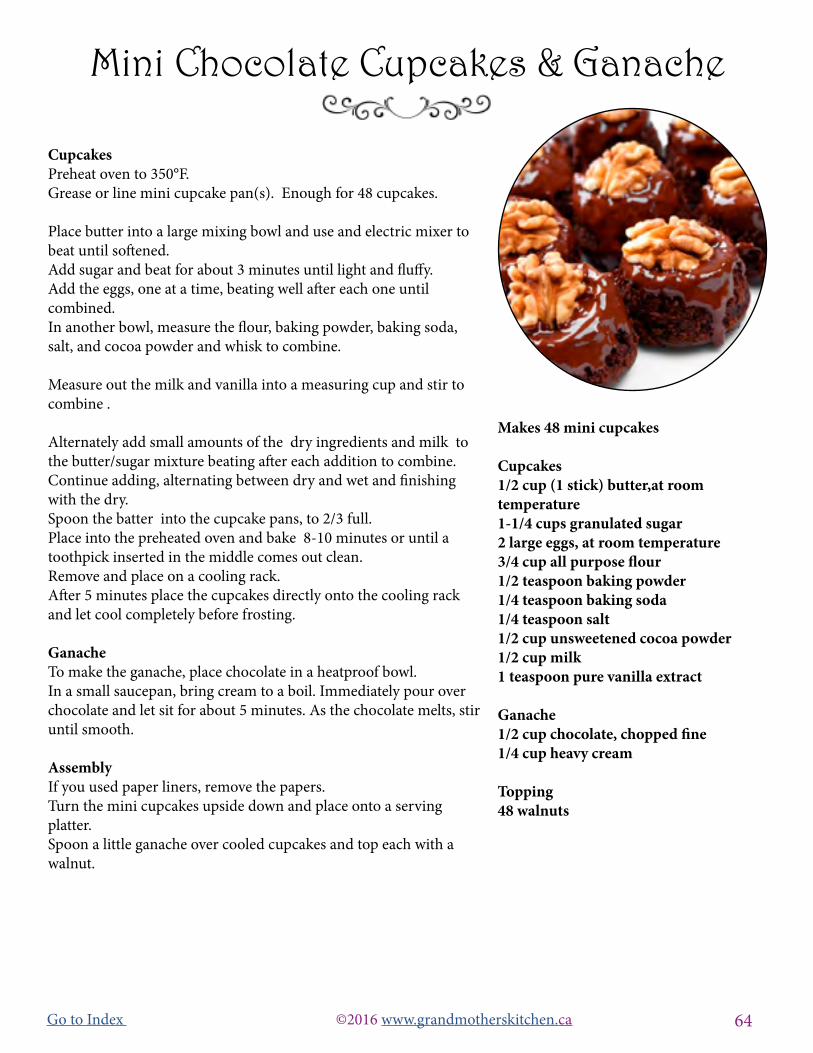
64Go to Index ©2016 www.grandmotherskitchen.ca
Cupcakes Preheat oven to 350°F. Grease or line mini cupcake pan(s). Enough for 48 cupcakes.
Place butter into a large mixing bowl and use and electric mixer to beat until softened. Add sugar and beat for about 3 minutes until light and fluffy.Add the eggs, one at a time, beating well after each one until combined. In another bowl, measure the flour, baking powder, baking soda, salt, and cocoa powder and whisk to combine. Measure out the milk and vanilla into a measuring cup and stir to combine .
Alternately add small amounts of the dry ingredients and milk to the butter/sugar mixture beating after each addition to combine. Continue adding, alternating between dry and wet and finishing with the dry. Spoon the batter into the cupcake pans, to 2/3 full. Place into the preheated oven and bake 8-10 minutes or until a toothpick inserted in the middle comes out clean. Remove and place on a cooling rack. After 5 minutes place the cupcakes directly onto the cooling rack and let cool completely before frosting.
GanacheTo make the ganache, place chocolate in a heatproof bowl.In a small saucepan, bring cream to a boil. Immediately pour over chocolate and let sit for about 5 minutes. As the chocolate melts, stir until smooth. Assembly If you used paper liners, remove the papers. Turn the mini cupcakes upside down and place onto a serving platter. Spoon a little ganache over cooled cupcakes and top each with a walnut.
Makes 48 mini cupcakes Cupcakes1/2 cup (1 stick) butter,at room temperature 1-1/4 cups granulated sugar 2 large eggs, at room temperature3/4 cup all purpose flour 1/2 teaspoon baking powder 1/4 teaspoon baking soda 1/4 teaspoon salt 1/2 cup unsweetened cocoa powder 1/2 cup milk 1 teaspoon pure vanilla extract
Ganache1/2 cup chocolate, chopped fine1/4 cup heavy cream
Topping48 walnuts
Mini Chocolate Cupcakes & Ganache
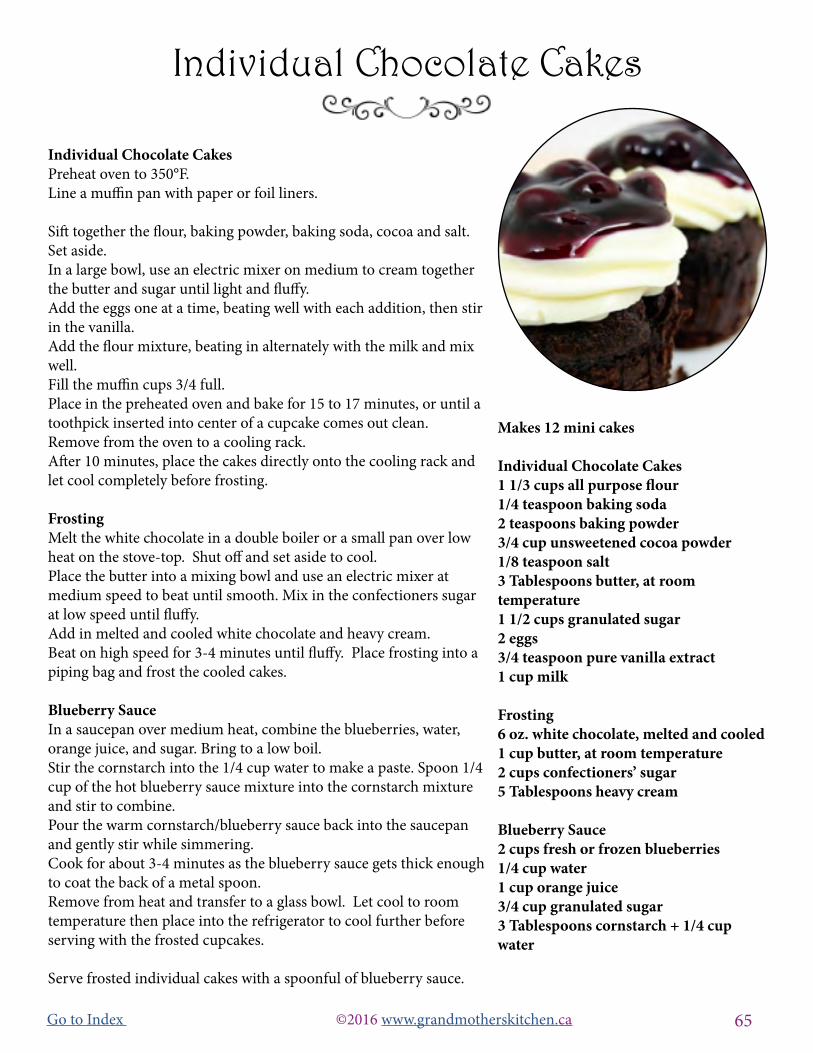
65Go to Index ©2016 www.grandmotherskitchen.ca
Individual Chocolate Cakes Preheat oven to 350°F. Line a muffin pan with paper or foil liners.
Sift together the flour, baking powder, baking soda, cocoa and salt. Set aside.In a large bowl, use an electric mixer on medium to cream together the butter and sugar until light and fluffy.Add the eggs one at a time, beating well with each addition, then stir in the vanilla. Add the flour mixture, beating in alternately with the milk and mix well. Fill the muffin cups 3/4 full. Place in the preheated oven and bake for 15 to 17 minutes, or until a toothpick inserted into center of a cupcake comes out clean.Remove from the oven to a cooling rack. After 10 minutes, place the cakes directly onto the cooling rack and let cool completely before frosting.
Frosting Melt the white chocolate in a double boiler or a small pan over low heat on the stove-top. Shut off and set aside to cool. Place the butter into a mixing bowl and use an electric mixer at medium speed to beat until smooth. Mix in the confectioners sugar at low speed until fluffy. Add in melted and cooled white chocolate and heavy cream. Beat on high speed for 3-4 minutes until fluffy. Place frosting into a piping bag and frost the cooled cakes. Blueberry Sauce In a saucepan over medium heat, combine the blueberries, water, orange juice, and sugar. Bring to a low boil. Stir the cornstarch into the 1/4 cup water to make a paste. Spoon 1/4 cup of the hot blueberry sauce mixture into the cornstarch mixture and stir to combine. Pour the warm cornstarch/blueberry sauce back into the saucepan and gently stir while simmering. Cook for about 3-4 minutes as the blueberry sauce gets thick enough to coat the back of a metal spoon. Remove from heat and transfer to a glass bowl. Let cool to room temperature then place into the refrigerator to cool further before serving with the frosted cupcakes. Serve frosted individual cakes with a spoonful of blueberry sauce.
Makes 12 mini cakes Individual Chocolate Cakes1 1/3 cups all purpose flour1/4 teaspoon baking soda2 teaspoons baking powder3/4 cup unsweetened cocoa powder1/8 teaspoon salt3 Tablespoons butter, at room temperature1 1/2 cups granulated sugar2 eggs3/4 teaspoon pure vanilla extract1 cup milk
Frosting6 oz. white chocolate, melted and cooled1 cup butter, at room temperature2 cups confectioners’ sugar5 Tablespoons heavy cream
Blueberry Sauce2 cups fresh or frozen blueberries1/4 cup water1 cup orange juice3/4 cup granulated sugar3 Tablespoons cornstarch + 1/4 cup water
Individual Chocolate Cakes

66Go to Index ©2016 www.grandmotherskitchen.ca
Cupcakes Preheat oven to 350°F. Line 2 muffin pans with paper liners. To make the batter whisk together sugar, flour, cocoa, baking soda, baking powder and salt in large mixing bowl.Add the eggs, buttermilk, coffee, oil and vanilla and mix on medium speed of an electric mixer to combine.
Filling Combine the confectioners’ sugar, peanut butter, butter and vanilla extract in a small mixing bowl.Beat with an electric mixer on medium speed until well combined. Roll the mixture into 1-inch balls and set aside on a baking sheet.
Spoon cupcake batter into the bottom of each cupcake liner.Place a ball of the peanut butter filling in each cupcake well and top with the remaining batter so that all the cups are 3/4 filled.
Place into the preheated oven and bake for 20-25 minutes. Remove and allow to cool in the pan for 10 minutes, then transfer the cupcakes to a wire rack to cool completely. FrostingPlace the confectioners sugar, peanut butter, butter, vanilla, and salt in a mixing bowl. Use an electric mixer and mix on medium-low speed until creamy, scraping down the bowl with a rubber spatula as you work. Add the cream and beat on high speed until the mixture is light and smooth. Frost the cooled cupcakes. Sprinkle a few peanut bits around the outside of the top of the cupcakes and place a piece of peanut butter cup on top.
Store in an airtight container.
Makes 24 cupcakes Chocolate Cupcake2 cups granulated sugar1 3/4 cups all purpose flour3/4 cup unsweetened cocoa2 teaspoons baking soda1 teaspoon baking powder1 teaspoon salt2 eggs1 cup buttermilk 1 cup black coffee 1/2 cup vegetable oil1 teaspoon pure vanilla extract
Peanut Butter Filling2/3 cup confectioners’ sugar1/2 cup creamy peanut butter3 Tablespoons butter, room temperature1/4 teaspoon pure vanilla extract
Peanut Butter Frosting2 cups confectioners’ sugar2 cups creamy peanut butter 10 Tablespoons butter, at room temperature1 1/2 teaspoon pure vanilla extract1/2 teaspoon sea salt2/3 cup heavy cream
chopped peanuts + peanut butter cups quartered for garnish
Chocolate Peanut Butter Cup Cupcakes

67Go to Index ©2016 www.grandmotherskitchen.ca
Vanilla Pastry Cream Make the pastry cream first and refrigerate at least an hour before piping onto the cupcakes. Pour the cream into a medium size saucepan, and using medium heat bring just to a simmer and shut off. In a mixing bowl, whisk the egg yolks, sugar, cornstarch, and salt together for a minute or two until the mixture is pale. Whisk half of the warm cream into the egg yolk mixture, then pour the egg mixture back into the saucepan with the remaining cream. Using medium heat, cook; whisking constantly for 8-10 minutes, until the pastry cream is thickened and boiling. Remove from the heat and whisk in the vanilla. Strain the pastry cream through a fine-mesh sieve into a glass container to remove any lumps. Press a piece of plastic wrap onto the surface of the pastry cream to prevent a skin from forming and place into the refrigerator to cool at least an hour or you can make a day before you make the cupcakes.
Cupcakes Preheat oven to 350°F. Line 2 muffin pans with paper liners.
Combine the flour, baking powder, baking soda, and salt together into a bowl and set aside. Place the butter into a mixing bowl and using an electric mixer on medium speed, beat for about 4 minutes until creamy. Add the sugar and vanilla and beat about 3 minutes until fluffy. Scrape down the bowl, add the eggs, and beat until just combined. Scrape down the bowl again and add the bananas, beating until just combined. Turn the mixer to low. Add the flour mixture, alternating with the buttermilk, in three additions, beginning and ending with the flour mixture until batter is combined.Fill the cupcake liners about 3/4 full. Place into the preheated oven on the middle rack and bake for 20-25 minutes, or until a toothpick inserted in the center comes out clean. Remove from the oven and cool in pans for 10 minutes, then remove cupcakes onto the wire racks and cool completely.
Assembly Place the vanilla pastry cream into a piping bag with a star tip and pipe onto each cupcake. Drizzle on a little caramel topping. Store in an airtight container in the refrigerator.
Makes 24 cupcakes
Vanilla Pastry Cream 3 cups half and half cream (or use a cream that has about 10% to 18% milk fat) 6 large egg yolks 1/2 cup granulated sugar 3 Tablespoons cornstarch 1/4 teaspoon salt 1 teaspoon pure vanilla extract Cupcakes 2 3/4 cups all purpose flour 1 1/4 teaspoons baking powder 1 teaspoon baking soda 1/2 teaspoon salt 3/4 cup butter, at room temperature1 3/4 cups granulated sugar 2 teaspoons pure vanilla extract 2 large eggs 1 1/2 cups mashed very ripe bananas (about 2-4 bananas)1/2 cup buttermilk Garnish Caramel topping (pre-made)
Banana &Vanilla Pastry Cream Cupcakes

68Go to Index ©2016 www.grandmotherskitchen.ca
CrustPreheat oven to 350°F. Lightly grease a 9 x 13 inch baking pan with butter.
Melt the butter in a small saucepan over low heat. Pour the butter over the vanilla cookie crumbs in a mixing bowl and stir with a wooden spoon to combine. Press into prepared baking pan.Place into the preheated oven and bake for 10 minutes. Remove from oven and let cool.
Strawberry Chiffon Rinse the strawberries, pat dry with paper towels. Cut off the stems and cut into quarters. Place berries into a bowl and use a fork to lightly mash, so there are still some small chunks. Set aside. Place the heavy cream into a bowl whip to form soft peaks, set aside.
Soak gelatin in cold water for about 10 minutes. Add boiling water and stir until gelatin dissolves. Add in 3/4 cup of the sugar, the mashed strawberries and salt. Mix until mixture starts to thicken. Fold in whipped cream until well incorporated. Set aside.
In a separate bowl use an electric mixer to beat the egg whites to stiff peaks, then add the remaining 1/4 cup sugar and mix in. Fold into strawberry mixture. Pour over the crust and place into the refrigerator to chill.
Glaze ToppingIn a cup add gelatin to cold water and let soften for about 10 minutes Puree the topping strawberries with a hand held mixer or in a blender. In a small saucepan add the pureed strawberries and sugar, bring to a boil stirring the whole time. Add softened gelatin to strawberry mixture and mix till well incorporated.Cool down before spreading over the chilled strawberry chiffon. Keep covered with plastic wrap in the refrigerator until ready to cut into squares and serve.
Makes (1) 9x13 inch baking dish Crust 3/4 cup butter, melted3 cups vanilla cookie crumbs
Strawberry Chiffon 1 1/2 cups strawberries, mashed 1/3 cup heavy cream1 Tablespoon unflavored gelatin1/4 cup cold water1/2 cup boiling water1 cup granulated sugar1/4 teaspoon salt2 egg whites
Glaze Topping2 teaspoons unflavored gelatin1/4 cup cold water3/4 cup pureed strawberries1 cup granulated sugar
Serves 8 - 12
Strawberry Chiffon Squares
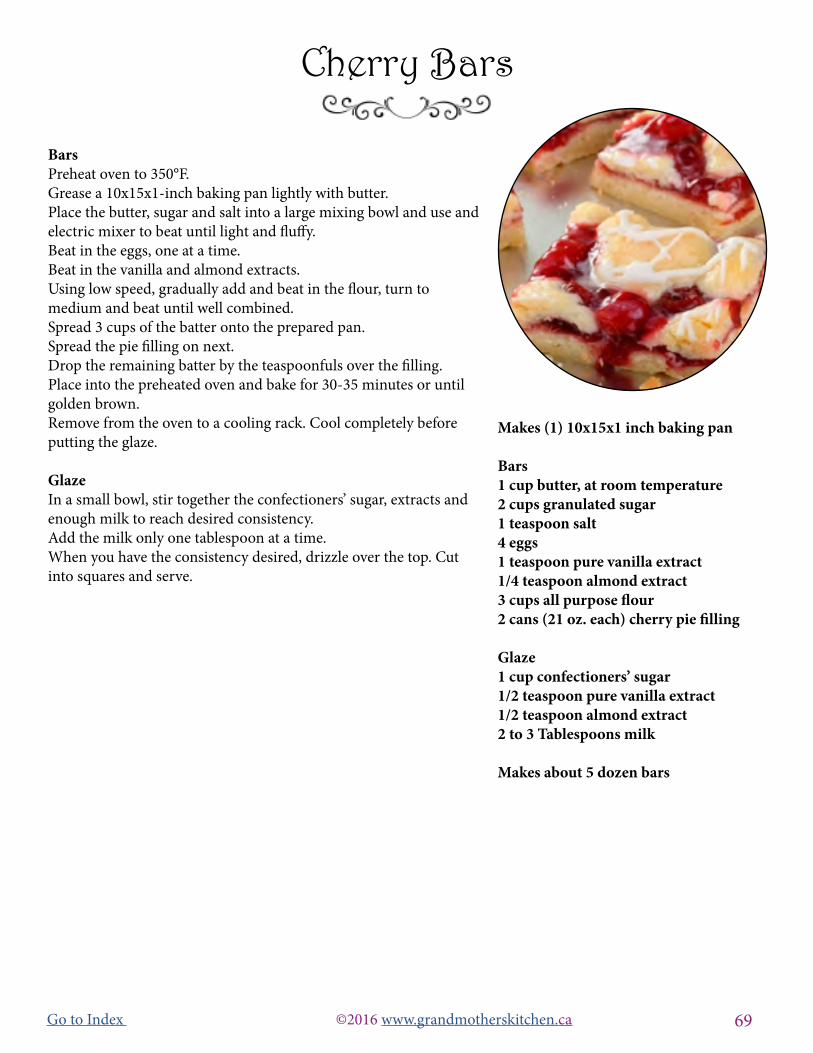
69Go to Index ©2016 www.grandmotherskitchen.ca
Bars Preheat oven to 350°F.Grease a 10x15x1-inch baking pan lightly with butter. Place the butter, sugar and salt into a large mixing bowl and use and electric mixer to beat until light and fluffy.Beat in the eggs, one at a time.Beat in the vanilla and almond extracts.Using low speed, gradually add and beat in the flour, turn to medium and beat until well combined.Spread 3 cups of the batter onto the prepared pan.Spread the pie filling on next.Drop the remaining batter by the teaspoonfuls over the filling.Place into the preheated oven and bake for 30-35 minutes or until golden brown.Remove from the oven to a cooling rack. Cool completely before putting the glaze.
GlazeIn a small bowl, stir together the confectioners’ sugar, extracts and enough milk to reach desired consistency. Add the milk only one tablespoon at a time.When you have the consistency desired, drizzle over the top. Cut into squares and serve.
Makes (1) 10x15x1 inch baking pan
Bars1 cup butter, at room temperature2 cups granulated sugar1 teaspoon salt4 eggs1 teaspoon pure vanilla extract1/4 teaspoon almond extract3 cups all purpose flour2 cans (21 oz. each) cherry pie filling
Glaze1 cup confectioners’ sugar1/2 teaspoon pure vanilla extract1/2 teaspoon almond extract2 to 3 Tablespoons milk
Makes about 5 dozen bars
Cherry Bars

70Go to Index ©2016 www.grandmotherskitchen.ca
Crust Preheat oven to 350°F. Grease a 9 x 13 pan with a little butter.
Melt the butter in a small saucepan over low heat. Pour the butter over the graham crumbs in a mixing bowl and stir with a wooden spoon to combine. Press into prepared baking pan. Set aside.
Filling Heat a small pot filled with water, place an opened can of condensed milk in heated water. Once condensed milk has become runny pour over graham crackers. Put chocolate chip and butterscotch chips on top of condensed milk. Lastly put shredded coconut on top.
Place into the preheated oven and bake for 20 - 25 minutes, or until bars have set and coconut is slightly browned. Cool completely before cutting and serving.
Store in an airtight container in the refrigerator.
Makes (1) 9x13 inch baking dish Crust 3/4 cup butter, melted2 1/4 cups graham cracker crumbs Topping1 (14-oz.) can sweetened condensed milk (opened)2 cups semi-sweet chocolate chips1/2 cup butterscotch chips1 1/3 cups shredded coconut
Coconut Chocolate Chip Squares
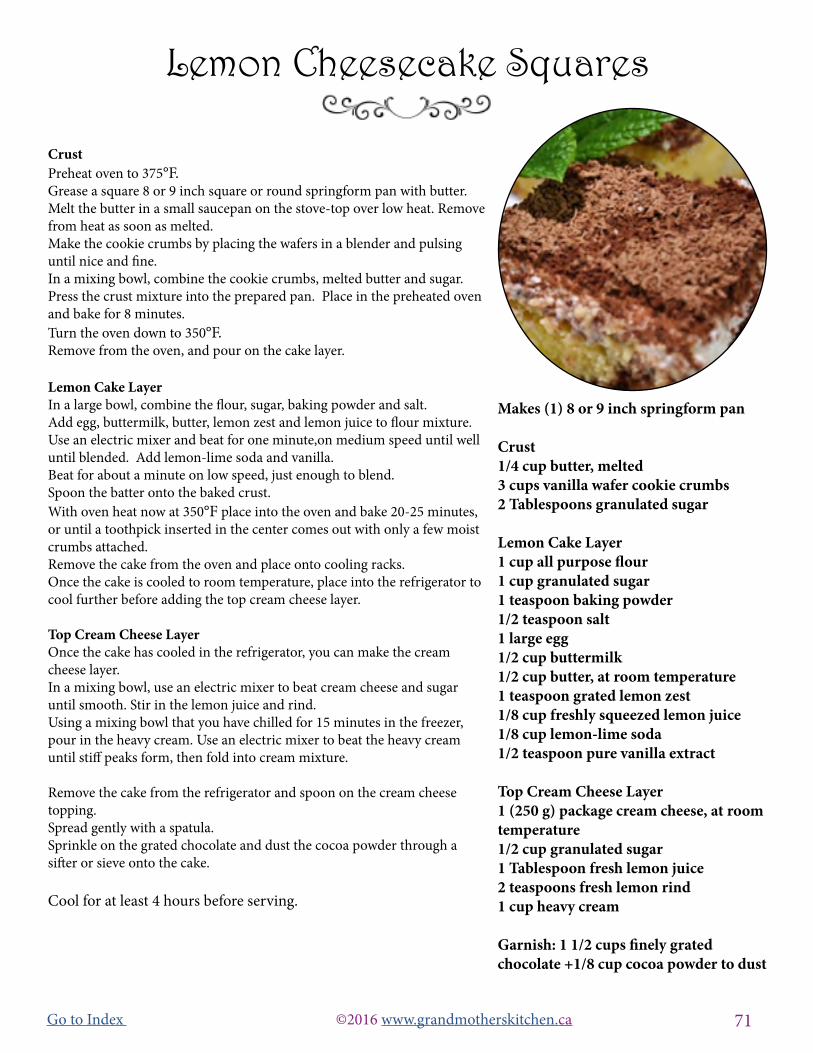
71Go to Index ©2016 www.grandmotherskitchen.ca
Crust Preheat oven to 375°F. Grease a square 8 or 9 inch square or round springform pan with butter.Melt the butter in a small saucepan on the stove-top over low heat. Remove from heat as soon as melted.Make the cookie crumbs by placing the wafers in a blender and pulsing until nice and fine.In a mixing bowl, combine the cookie crumbs, melted butter and sugar.Press the crust mixture into the prepared pan. Place in the preheated oven and bake for 8 minutes. Turn the oven down to 350°F. Remove from the oven, and pour on the cake layer.
Lemon Cake Layer In a large bowl, combine the flour, sugar, baking powder and salt. Add egg, buttermilk, butter, lemon zest and lemon juice to flour mixture. Use an electric mixer and beat for one minute,on medium speed until well until blended. Add lemon-lime soda and vanilla. Beat for about a minute on low speed, just enough to blend.Spoon the batter onto the baked crust. With oven heat now at 350°F place into the oven and bake 20-25 minutes, or until a toothpick inserted in the center comes out with only a few moist crumbs attached. Remove the cake from the oven and place onto cooling racks. Once the cake is cooled to room temperature, place into the refrigerator to cool further before adding the top cream cheese layer.
Top Cream Cheese LayerOnce the cake has cooled in the refrigerator, you can make the cream cheese layer.In a mixing bowl, use an electric mixer to beat cream cheese and sugar until smooth. Stir in the lemon juice and rind.Using a mixing bowl that you have chilled for 15 minutes in the freezer, pour in the heavy cream. Use an electric mixer to beat the heavy cream until stiff peaks form, then fold into cream mixture.
Remove the cake from the refrigerator and spoon on the cream cheese topping. Spread gently with a spatula.Sprinkle on the grated chocolate and dust the cocoa powder through a sifter or sieve onto the cake.
Cool for at least 4 hours before serving.
Makes (1) 8 or 9 inch springform pan
Crust 1/4 cup butter, melted3 cups vanilla wafer cookie crumbs2 Tablespoons granulated sugar
Lemon Cake Layer1 cup all purpose flour1 cup granulated sugar1 teaspoon baking powder1/2 teaspoon salt1 large egg1/2 cup buttermilk1/2 cup butter, at room temperature1 teaspoon grated lemon zest1/8 cup freshly squeezed lemon juice1/8 cup lemon-lime soda1/2 teaspoon pure vanilla extract
Top Cream Cheese Layer1 (250 g) package cream cheese, at room temperature1/2 cup granulated sugar 1 Tablespoon fresh lemon juice 2 teaspoons fresh lemon rind 1 cup heavy cream
Garnish: 1 1/2 cups finely grated chocolate +1/8 cup cocoa powder to dust
Lemon Cheesecake Squares
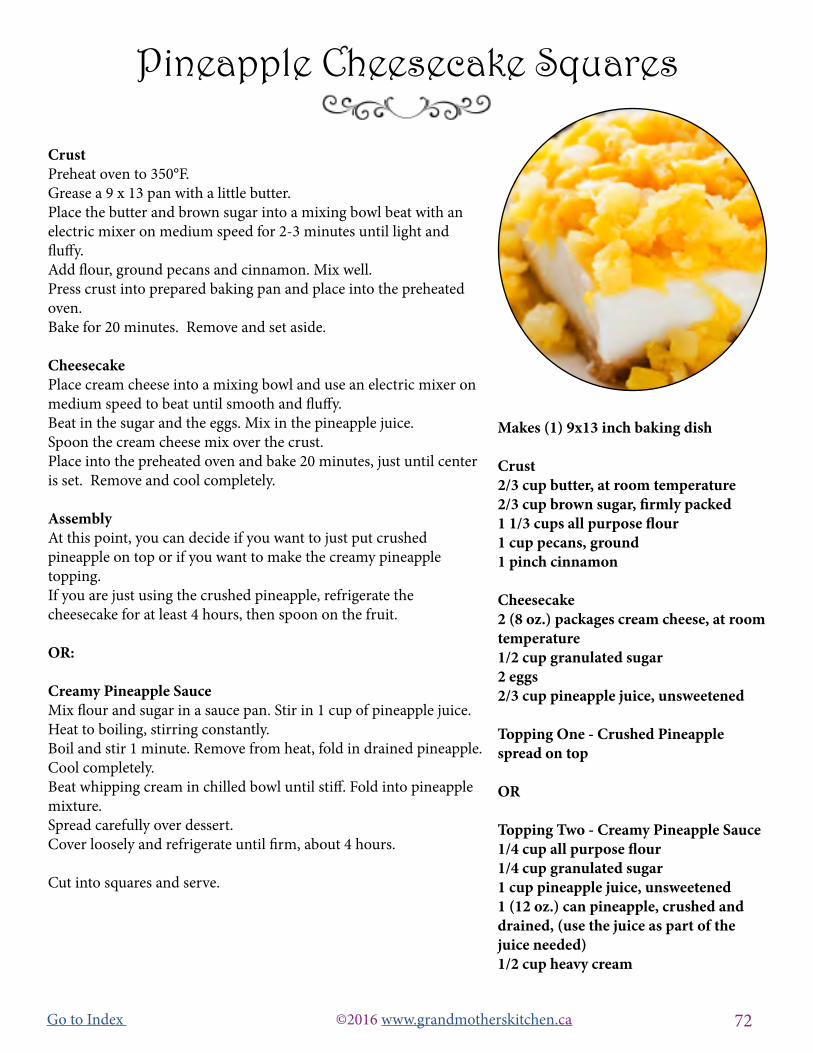
72Go to Index ©2016 www.grandmotherskitchen.ca
Crust Preheat oven to 350°F. Grease a 9 x 13 pan with a little butter. Place the butter and brown sugar into a mixing bowl beat with an electric mixer on medium speed for 2-3 minutes until light and fluffy. Add flour, ground pecans and cinnamon. Mix well.Press crust into prepared baking pan and place into the preheated oven.Bake for 20 minutes. Remove and set aside. CheesecakePlace cream cheese into a mixing bowl and use an electric mixer on medium speed to beat until smooth and fluffy.Beat in the sugar and the eggs. Mix in the pineapple juice.Spoon the cream cheese mix over the crust. Place into the preheated oven and bake 20 minutes, just until center is set. Remove and cool completely.
AssemblyAt this point, you can decide if you want to just put crushed pineapple on top or if you want to make the creamy pineapple topping.If you are just using the crushed pineapple, refrigerate the cheesecake for at least 4 hours, then spoon on the fruit.
OR:
Creamy Pineapple SauceMix flour and sugar in a sauce pan. Stir in 1 cup of pineapple juice. Heat to boiling, stirring constantly.Boil and stir 1 minute. Remove from heat, fold in drained pineapple. Cool completely.Beat whipping cream in chilled bowl until stiff. Fold into pineapple mixture.Spread carefully over dessert.Cover loosely and refrigerate until firm, about 4 hours.
Cut into squares and serve.
Makes (1) 9x13 inch baking dish Crust2/3 cup butter, at room temperature2/3 cup brown sugar, firmly packed 1 1/3 cups all purpose flour 1 cup pecans, ground 1 pinch cinnamon
Cheesecake2 (8 oz.) packages cream cheese, at room temperature 1/2 cup granulated sugar 2 eggs 2/3 cup pineapple juice, unsweetened
Topping One - Crushed Pineapple spread on top OR
Topping Two - Creamy Pineapple Sauce1/4 cup all purpose flour 1/4 cup granulated sugar 1 cup pineapple juice, unsweetened 1 (12 oz.) can pineapple, crushed and drained, (use the juice as part of the juice needed)1/2 cup heavy cream
Pineapple Cheesecake Squares
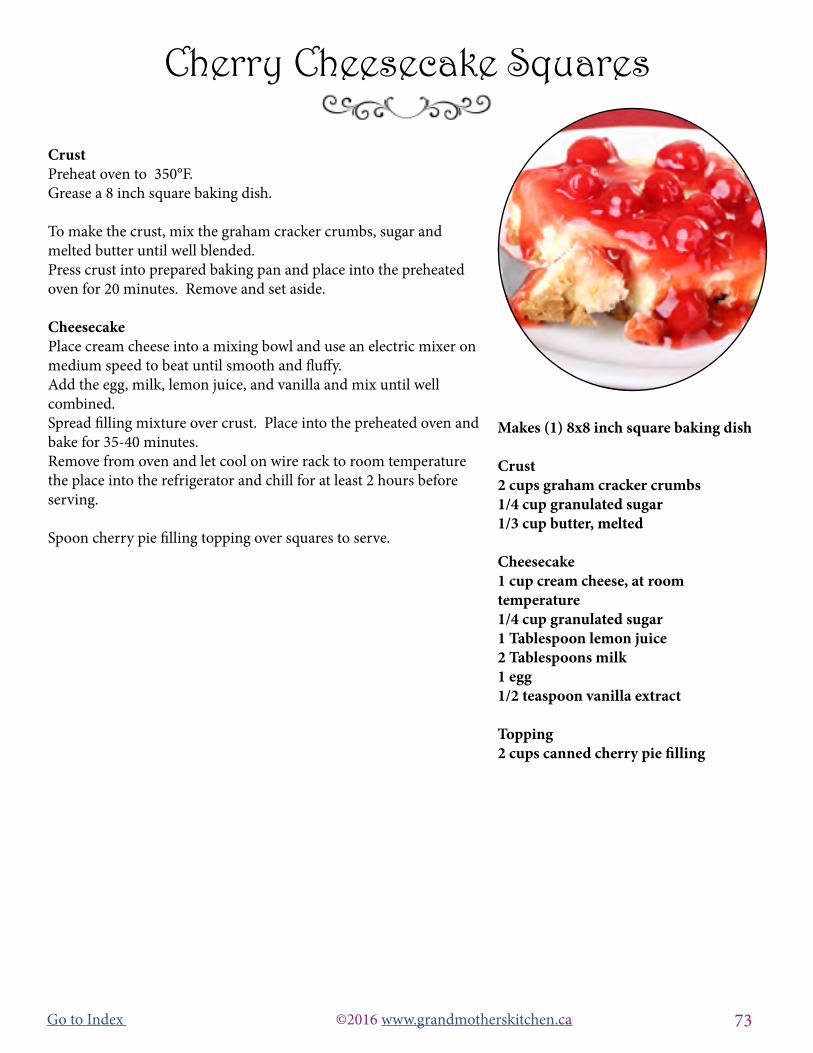
73Go to Index ©2016 www.grandmotherskitchen.ca
Crust Preheat oven to 350°F. Grease a 8 inch square baking dish.
To make the crust, mix the graham cracker crumbs, sugar and melted butter until well blended. Press crust into prepared baking pan and place into the preheated oven for 20 minutes. Remove and set aside. Cheesecake Place cream cheese into a mixing bowl and use an electric mixer on medium speed to beat until smooth and fluffy.Add the egg, milk, lemon juice, and vanilla and mix until well combined. Spread filling mixture over crust. Place into the preheated oven and bake for 35-40 minutes. Remove from oven and let cool on wire rack to room temperaturethe place into the refrigerator and chill for at least 2 hours before serving.
Spoon cherry pie filling topping over squares to serve.
Makes (1) 8x8 inch square baking dish Crust2 cups graham cracker crumbs1/4 cup granulated sugar1/3 cup butter, melted
Cheesecake1 cup cream cheese, at room temperature1/4 cup granulated sugar1 Tablespoon lemon juice2 Tablespoons milk1 egg1/2 teaspoon vanilla extract
Topping2 cups canned cherry pie filling
Cherry Cheesecake Squares
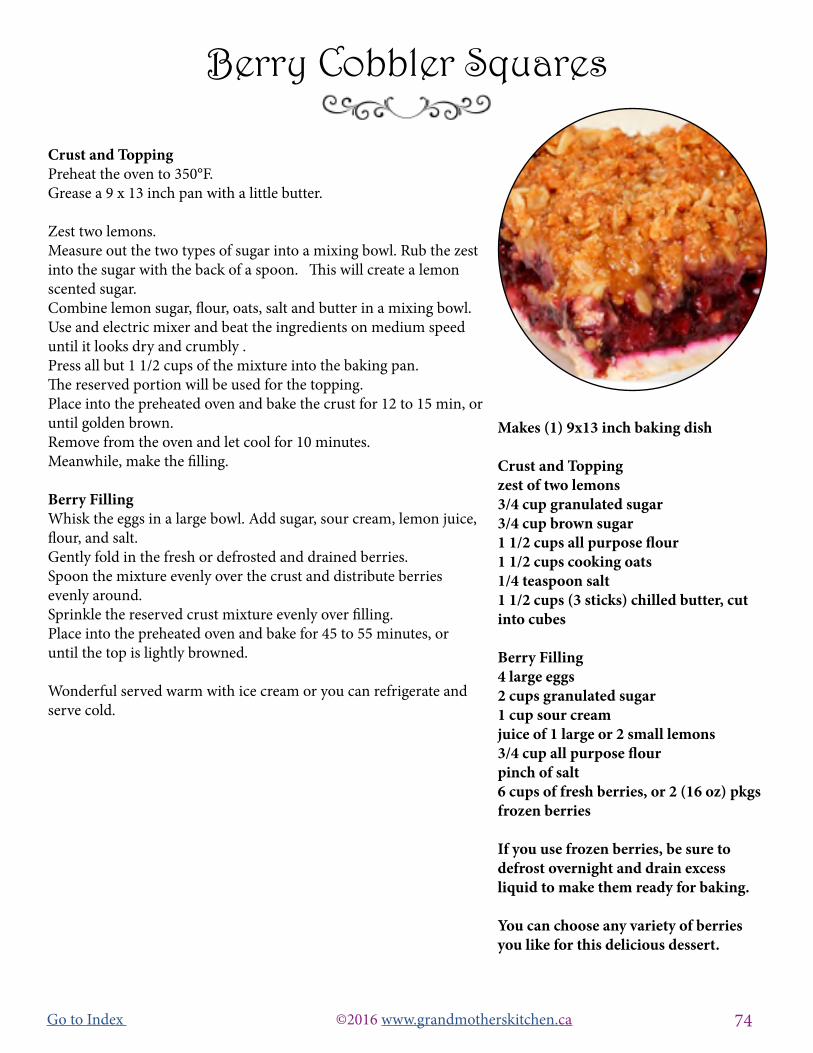
74Go to Index ©2016 www.grandmotherskitchen.ca
Crust and ToppingPreheat the oven to 350°F. Grease a 9 x 13 inch pan with a little butter.
Zest two lemons. Measure out the two types of sugar into a mixing bowl. Rub the zest into the sugar with the back of a spoon. This will create a lemon scented sugar.Combine lemon sugar, flour, oats, salt and butter in a mixing bowl. Use and electric mixer and beat the ingredients on medium speed until it looks dry and crumbly . Press all but 1 1/2 cups of the mixture into the baking pan. The reserved portion will be used for the topping. Place into the preheated oven and bake the crust for 12 to 15 min, or until golden brown. Remove from the oven and let cool for 10 minutes.Meanwhile, make the filling.
Berry FillingWhisk the eggs in a large bowl. Add sugar, sour cream, lemon juice, flour, and salt. Gently fold in the fresh or defrosted and drained berries.Spoon the mixture evenly over the crust and distribute berries evenly around.Sprinkle the reserved crust mixture evenly over filling.Place into the preheated oven and bake for 45 to 55 minutes, or until the top is lightly browned. Wonderful served warm with ice cream or you can refrigerate and serve cold.
Makes (1) 9x13 inch baking dish Crust and Topping zest of two lemons 3/4 cup granulated sugar 3/4 cup brown sugar 1 1/2 cups all purpose flour1 1/2 cups cooking oats1/4 teaspoon salt1 1/2 cups (3 sticks) chilled butter, cut into cubes
Berry Filling 4 large eggs2 cups granulated sugar1 cup sour creamjuice of 1 large or 2 small lemons3/4 cup all purpose flourpinch of salt6 cups of fresh berries, or 2 (16 oz) pkgs frozen berries
If you use frozen berries, be sure to defrost overnight and drain excess liquid to make them ready for baking. You can choose any variety of berries you like for this delicious dessert.
Berry Cobbler Squares
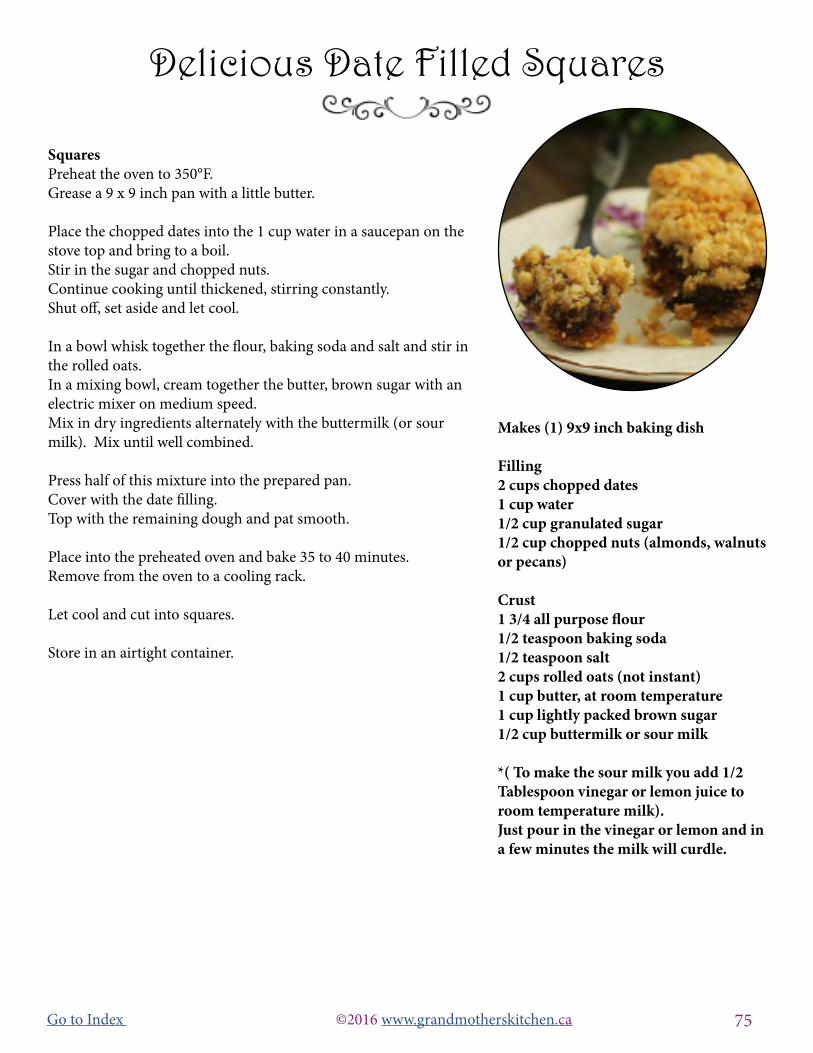
75Go to Index ©2016 www.grandmotherskitchen.ca
SquaresPreheat the oven to 350°F. Grease a 9 x 9 inch pan with a little butter.
Place the chopped dates into the 1 cup water in a saucepan on the stove top and bring to a boil.Stir in the sugar and chopped nuts.Continue cooking until thickened, stirring constantly. Shut off, set aside and let cool.
In a bowl whisk together the flour, baking soda and salt and stir in the rolled oats.In a mixing bowl, cream together the butter, brown sugar with an electric mixer on medium speed.Mix in dry ingredients alternately with the buttermilk (or sour milk). Mix until well combined.
Press half of this mixture into the prepared pan. Cover with the date filling. Top with the remaining dough and pat smooth.
Place into the preheated oven and bake 35 to 40 minutes. Remove from the oven to a cooling rack.
Let cool and cut into squares. Store in an airtight container.
Makes (1) 9x9 inch baking dish Filling 2 cups chopped dates1 cup water1/2 cup granulated sugar1/2 cup chopped nuts (almonds, walnuts or pecans)
Crust 1 3/4 all purpose flour1/2 teaspoon baking soda1/2 teaspoon salt2 cups rolled oats (not instant)1 cup butter, at room temperature1 cup lightly packed brown sugar1/2 cup buttermilk or sour milk
*( To make the sour milk you add 1/2 Tablespoon vinegar or lemon juice to room temperature milk). Just pour in the vinegar or lemon and in a few minutes the milk will curdle.
Delicious Date Filled Squares

76Go to Index ©2016 www.grandmotherskitchen.ca
Toffee Squares Preheat oven to 375°F. Grease 9x13 inch baking dish.
Bottom Layer Place the butter, brown sugar into a mixing bowl and use an electric mixer at medium speed to beat until light and fluffy. Mix in salt.Add flour, 1 cup at a time, mixing until fully incorporated after each addition.Continue mixing until dough begins to come together.Press dough into baking dish. Prick the dough in several places with a fork. Place into the preheated oven and bake for 15-20 minutes or until golden brown. Remove to a cooling rack and let cool.
Reduce oven to 325°F. ToppingPlace butter, brown sugar, honey, granulated sugar, and heavy cream into a saucepan and heat over high heat.Bring to a boil, stirring constantly for about 1 minute, until the mixture coats the back of a spoon.Remove pan from heat; stir in salt, nuts and vanilla.Pour onto the crust. Place into the 325°F. oven and bake 15 to 20 minutes until filling bubbles, Remove from oven and transfer it to wire rack to cool completely.
Cut with a sharp knife cut into 1 by 3 inch bars. Store in an airtight container.
Makes (1) 9x13 inch baking dish Bottom layer1 cup butter, at room temperature3/4 cup brown sugar 1/2 teaspoon salt3 cups all purpose flour
Topping1/2 cup butter1/2 cup brown sugar 1/4 cup honey2 Tablespoons granulated sugar2 Tablespoons heavy cream1/4 teaspoon salt2 cups pecans, chopped 1/2 teaspoon pure vanilla extract
Toffee Squares With Toasted Pecans
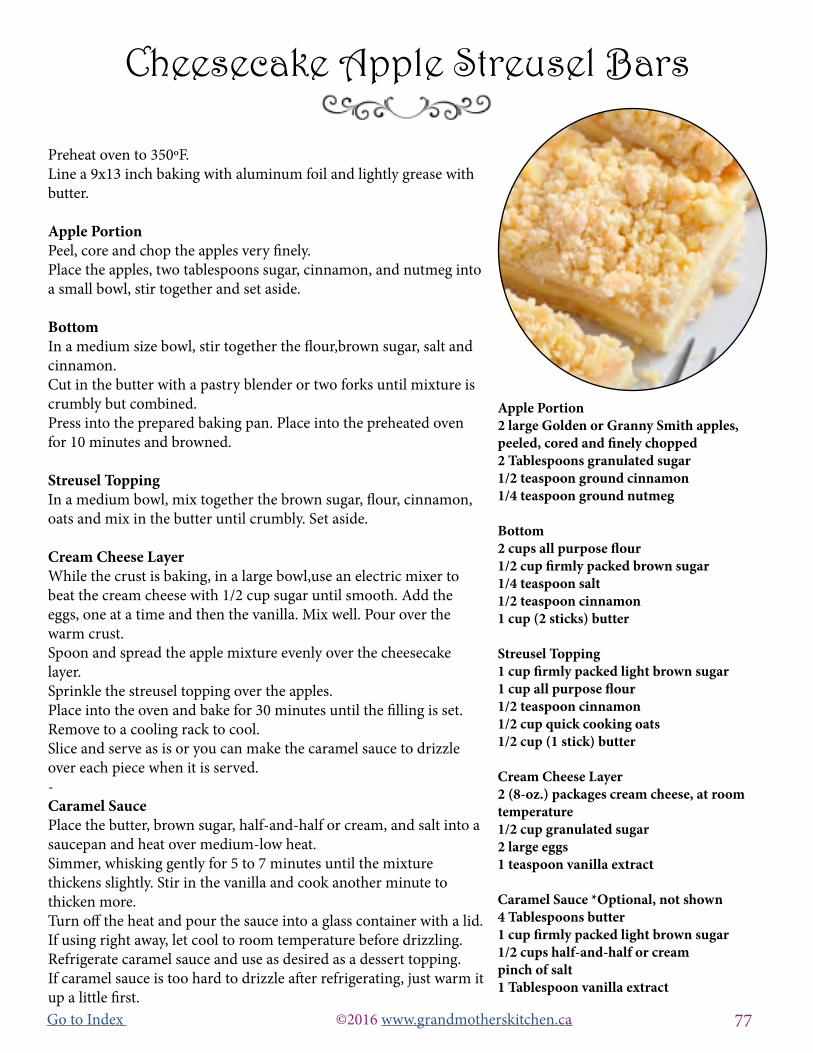
77Go to Index ©2016 www.grandmotherskitchen.ca
Preheat oven to 350ºF. Line a 9x13 inch baking with aluminum foil and lightly grease with butter.
Apple PortionPeel, core and chop the apples very finely.Place the apples, two tablespoons sugar, cinnamon, and nutmeg into a small bowl, stir together and set aside.
BottomIn a medium size bowl, stir together the flour,brown sugar, salt and cinnamon.Cut in the butter with a pastry blender or two forks until mixture is crumbly but combined.Press into the prepared baking pan. Place into the preheated oven for 10 minutes and browned.
Streusel ToppingIn a medium bowl, mix together the brown sugar, flour, cinnamon, oats and mix in the butter until crumbly. Set aside.
Cream Cheese LayerWhile the crust is baking, in a large bowl,use an electric mixer to beat the cream cheese with 1/2 cup sugar until smooth. Add the eggs, one at a time and then the vanilla. Mix well. Pour over the warm crust.Spoon and spread the apple mixture evenly over the cheesecake layer.Sprinkle the streusel topping over the apples.Place into the oven and bake for 30 minutes until the filling is set.Remove to a cooling rack to cool.Slice and serve as is or you can make the caramel sauce to drizzle over each piece when it is served.-Caramel SaucePlace the butter, brown sugar, half-and-half or cream, and salt into a saucepan and heat over medium-low heat.Simmer, whisking gently for 5 to 7 minutes until the mixture thickens slightly. Stir in the vanilla and cook another minute to thicken more.Turn off the heat and pour the sauce into a glass container with a lid.If using right away, let cool to room temperature before drizzling.Refrigerate caramel sauce and use as desired as a dessert topping.If caramel sauce is too hard to drizzle after refrigerating, just warm it up a little first.
Apple Portion2 large Golden or Granny Smith apples, peeled, cored and finely chopped2 Tablespoons granulated sugar1/2 teaspoon ground cinnamon1/4 teaspoon ground nutmeg
Bottom2 cups all purpose flour1/2 cup firmly packed brown sugar1/4 teaspoon salt1/2 teaspoon cinnamon1 cup (2 sticks) butter
Streusel Topping1 cup firmly packed light brown sugar1 cup all purpose flour1/2 teaspoon cinnamon1/2 cup quick cooking oats1/2 cup (1 stick) butter
Cream Cheese Layer2 (8-oz.) packages cream cheese, at room temperature1/2 cup granulated sugar2 large eggs1 teaspoon vanilla extract
Caramel Sauce *Optional, not shown4 Tablespoons butter1 cup firmly packed light brown sugar1/2 cups half-and-half or creampinch of salt1 Tablespoon vanilla extract
Cheesecake Apple Streusel Bars

78Go to Index ©2016 www.grandmotherskitchen.ca
Rocky Road Cake Line an 8×8 inch baking dish with parchment paper.
In a large saucepan, combine the chocolate chips, sweetened condensed milk, and salt.Turn the heat on to the lowest setting and melt the ingredients together while continuously stirring.Heat and stir until the mixture is completely smooth. Reserve 1/4 cup of melted chocolate to drizzle on top later.
Stir in the nuts and cookie pieces.Spread the mixture out into the prepared baking dish and top with marshmallows and candied cherries.Drizzle melted chocolate around top.
Place into the refrigerator and cool several hours. Remove from the dish and cut into squares. Store in an airtight container.
Makes (1) 8x8 inch baking dish 3 cups chocolate chips 1 (14 oz.) can sweetened condensed milk 1/4 teaspoon salt 1 cup walnuts, chopped1 1/2 cups cookies, chopped1 1/2 cups mini marshmallows 1/2 cup candied cherries1/3 cup chocolate chips, melted
Rocky Road Cake
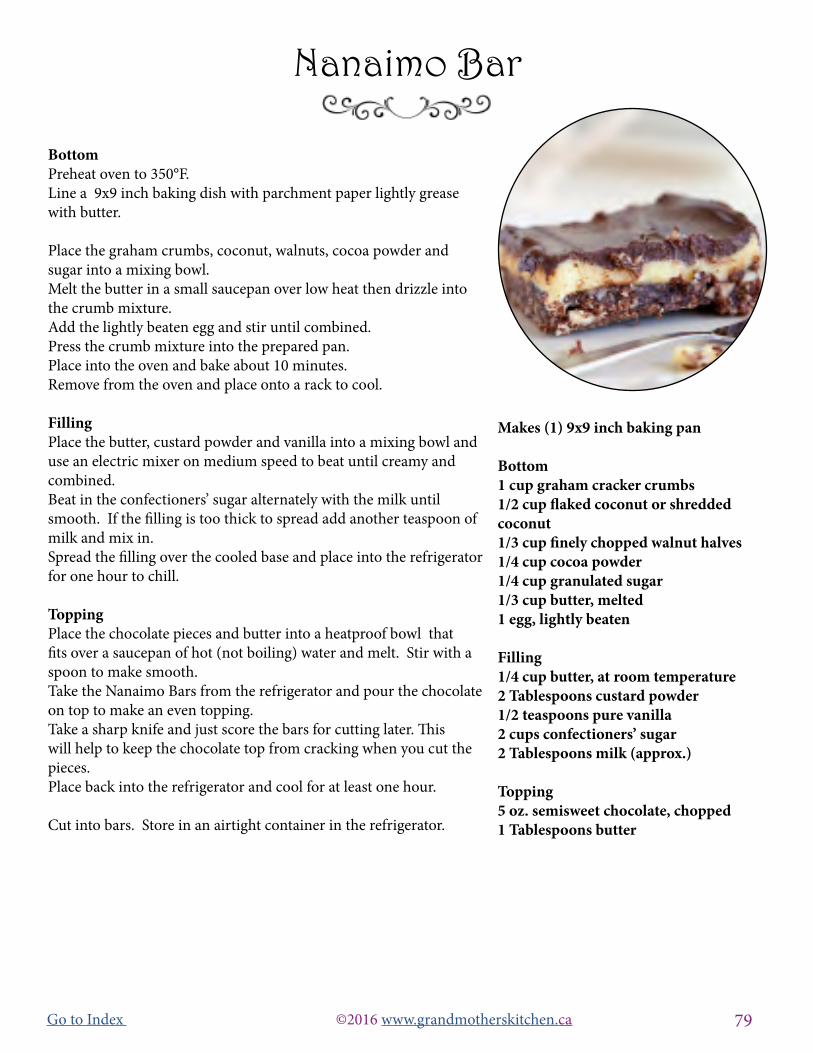
79Go to Index ©2016 www.grandmotherskitchen.ca
Bottom Preheat oven to 350°F. Line a 9x9 inch baking dish with parchment paper lightly grease with butter. Place the graham crumbs, coconut, walnuts, cocoa powder and sugar into a mixing bowl. Melt the butter in a small saucepan over low heat then drizzle into the crumb mixture. Add the lightly beaten egg and stir until combined. Press the crumb mixture into the prepared pan. Place into the oven and bake about 10 minutes. Remove from the oven and place onto a rack to cool. Filling Place the butter, custard powder and vanilla into a mixing bowl and use an electric mixer on medium speed to beat until creamy and combined. Beat in the confectioners’ sugar alternately with the milk until smooth. If the filling is too thick to spread add another teaspoon of milk and mix in. Spread the filling over the cooled base and place into the refrigerator for one hour to chill.
Topping Place the chocolate pieces and butter into a heatproof bowl that fits over a saucepan of hot (not boiling) water and melt. Stir with a spoon to make smooth. Take the Nanaimo Bars from the refrigerator and pour the chocolate on top to make an even topping. Take a sharp knife and just score the bars for cutting later. This will help to keep the chocolate top from cracking when you cut the pieces. Place back into the refrigerator and cool for at least one hour. Cut into bars. Store in an airtight container in the refrigerator.
Makes (1) 9x9 inch baking pan Bottom 1 cup graham cracker crumbs1/2 cup flaked coconut or shredded coconut1/3 cup finely chopped walnut halves1/4 cup cocoa powder1/4 cup granulated sugar1/3 cup butter, melted1 egg, lightly beaten
Filling 1/4 cup butter, at room temperature 2 Tablespoons custard powder1/2 teaspoons pure vanilla2 cups confectioners’ sugar2 Tablespoons milk (approx.)
Topping5 oz. semisweet chocolate, chopped 1 Tablespoons butter
Nanaimo Bar

80Go to Index ©2016 www.grandmotherskitchen.ca
DonutsPlace active yeast into the warm water, give a quick stir and set aside. Place all the other ingredients into a large mixing bowl and use an electric mixer on low to medium speed to combine. Once a dough has formed, you will need to knead it by hand for 5 minutes. If it is sticky just lightly sprinkle with a little flour. When it is the right consistency, you should be able to pull at dough and it not tear right away. Place the dough ball into a lightly greased bowl, cover with a clean dish cloth, and let sit for about 60 minutes. Punch out the air. Place the dough onto a lightly floured counter and roll out to about 1/4 inch thick. Cut out circle shapes as close to each other as possible to get as many cut as you can, then re-roll the excess dough and cut out more, repeating the process until all the dough is used. Place the cut donuts onto a lightly floured surface to keep them from sticking to the counter.
Pour the oil into a heavy bottom deep saucepan. The amount you use will depend on the size of the saucepan. Heat oil and keep temperature between 350°F-375°F. Gently put 3-4 donuts into the hot oil, being careful not to splash the oil on to yourself. Fry the donuts, for about 2 minutes on each side or until golden brown. It is fine to turn the donuts once or twice to let them cook evenly and not brown too quickly. Use tongs to remove the cooked donuts to a plate lined with paper towels, to soak up excess oil. Continue the process until all the donuts are cooked.
Put strawberry jam in a pipping bag, with a round tip. Poke a small hole in the side of donut and pipe jam in the middle of donut.
Place a couple spoonfuls of confectioners’ sugar into a sieve, and dust over donut and on both sides. Best eaten the same day.
Makes 14-20 donuts
Donuts5 teaspoons active dry yeast1/4 cup warm water (110°F)1 1/2 cups lukewarm milk1/2 cup granulated sugar1 teaspoon salt2 eggs1/3 cup butter, at room temperature5 cups all purpose flour
1 quart oil (approx) for frying (make sure it has a high smoke point) Tools: Cooking Thermometer
confectioners’ sugar for dusting
Strawberry jam for the filling
*It is best to use a cooking oil with a high smoke point.
Jelly Filled Donuts
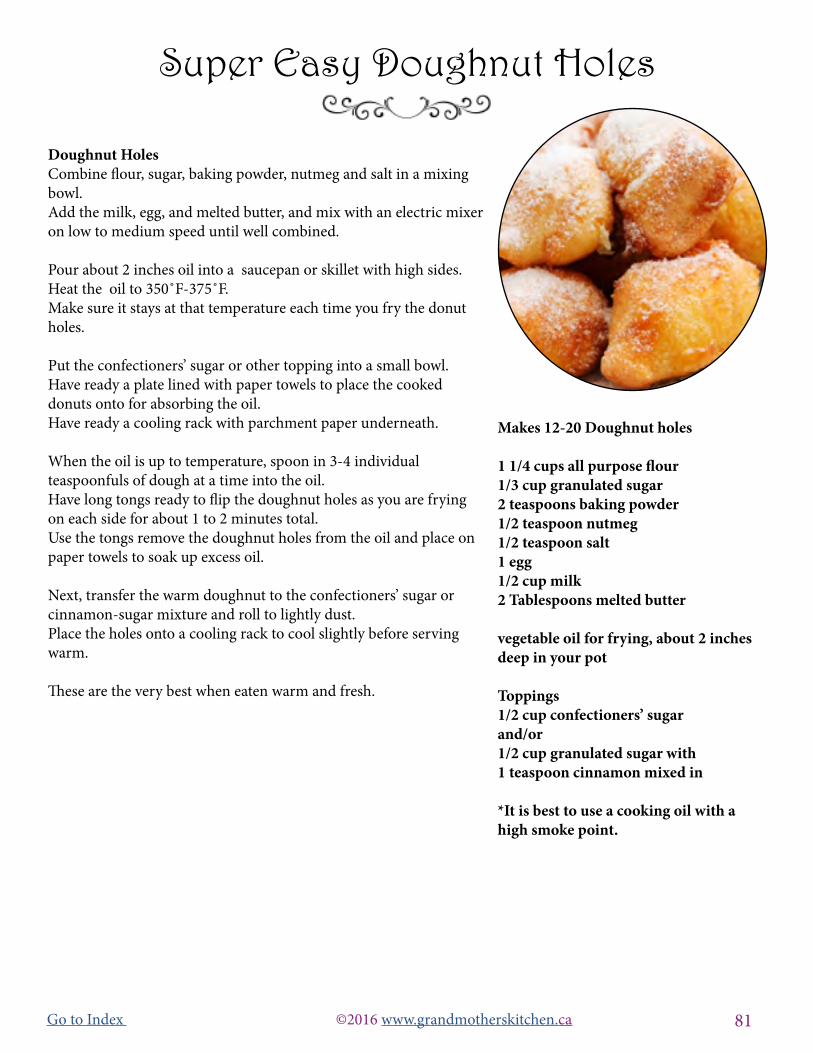
81Go to Index ©2016 www.grandmotherskitchen.ca
Doughnut Holes Combine flour, sugar, baking powder, nutmeg and salt in a mixing bowl.Add the milk, egg, and melted butter, and mix with an electric mixer on low to medium speed until well combined.
Pour about 2 inches oil into a saucepan or skillet with high sides. Heat the oil to 350˚F-375˚F.Make sure it stays at that temperature each time you fry the donut holes.
Put the confectioners’ sugar or other topping into a small bowl.Have ready a plate lined with paper towels to place the cooked donuts onto for absorbing the oil. Have ready a cooling rack with parchment paper underneath.
When the oil is up to temperature, spoon in 3-4 individual teaspoonfuls of dough at a time into the oil.Have long tongs ready to flip the doughnut holes as you are frying on each side for about 1 to 2 minutes total. Use the tongs remove the doughnut holes from the oil and place on paper towels to soak up excess oil.
Next, transfer the warm doughnut to the confectioners’ sugar or cinnamon-sugar mixture and roll to lightly dust. Place the holes onto a cooling rack to cool slightly before serving warm. These are the very best when eaten warm and fresh.
Makes 12-20 Doughnut holes 1 1/4 cups all purpose flour1/3 cup granulated sugar2 teaspoons baking powder1/2 teaspoon nutmeg1/2 teaspoon salt1 egg1/2 cup milk2 Tablespoons melted butter
vegetable oil for frying, about 2 inches deep in your pot
Toppings1/2 cup confectioners’ sugarand/or 1/2 cup granulated sugar with 1 teaspoon cinnamon mixed in
*It is best to use a cooking oil with a high smoke point.
Super Easy Doughnut Holes

82Go to Index ©2016 www.grandmotherskitchen.ca
Donuts Dissolve yeast in water in a large bowl. Combine milk, sugar, salt, eggs, shortening and add to yeast water. Slowly beat in the flour with an electric mixer on low speed until you have a smooth elastic dough.
Cover and let it rise for an hour in a warm place until doubled. Punch down and roll out onto a floured surface about 1/2 inch thick. Cut with a donut cutter or you can use a cookie cutter or any circular glass and use a smaller circle to cut out the center donut holes.
Separate the donut centers (holes) from the donut rings and place them onto a cookie sheet lined with parchment paper and dusted with flour. Leave room between to let them rise and let sit in a warm spot for 30 minutes. When ready to cook, pour about 2 inches of oil in a deep sided skillet or saucepan. Heat the oil to 350˚F-375˚F.
Have ready a plate lined with paper towels.
Put your coating into a brown paper sandwich bag. This need to be ready before frying so the hot donuts can be coated immediately.
Working in small batches of 3 or 4 donuts at a time, carefully transfer the donuts with a spatula to the hot oil. Fry for a minute on each side, and flipping if necessary, so they do not get too brown as they are cooking. Cooking time is about 3-4 minutes for the donuts and you want them to just be a golden brown color. Cook the holes separate as they will cook quicker. Using long metal tongs so you do not burn yourself, lift each cooked donut out of the hot oil and first place onto the paper lined plate to absorb the oil. While still warm, place the donut into the paper bag with the sugar. Shake the bag to coat evenly. Remove and put onto a plate. Repeat process until all donuts are cooked. Best eaten the same day.
Makes 18-24 donuts 1 Tablespoon active dry yeast 1/8 cup warm water (110˚F)3/4 cup lukewarm milk1/4 cup granulated sugar1/2 teaspoon salt1 egg3 Tablespoons shortening, at room temperature3 cups all purpose flour Coating 1/2 cup granulated sugar *You may need more or less coating. It depends on personal choice of amount wanted. You can mix in 1 teaspoon cinnamon to the sugar.
Vegetable oil for frying. You will need to have about 2 inches in your pot. *It is best to use a cooking oil with a high smoke point.
Homemade Donuts With Sugar Coating
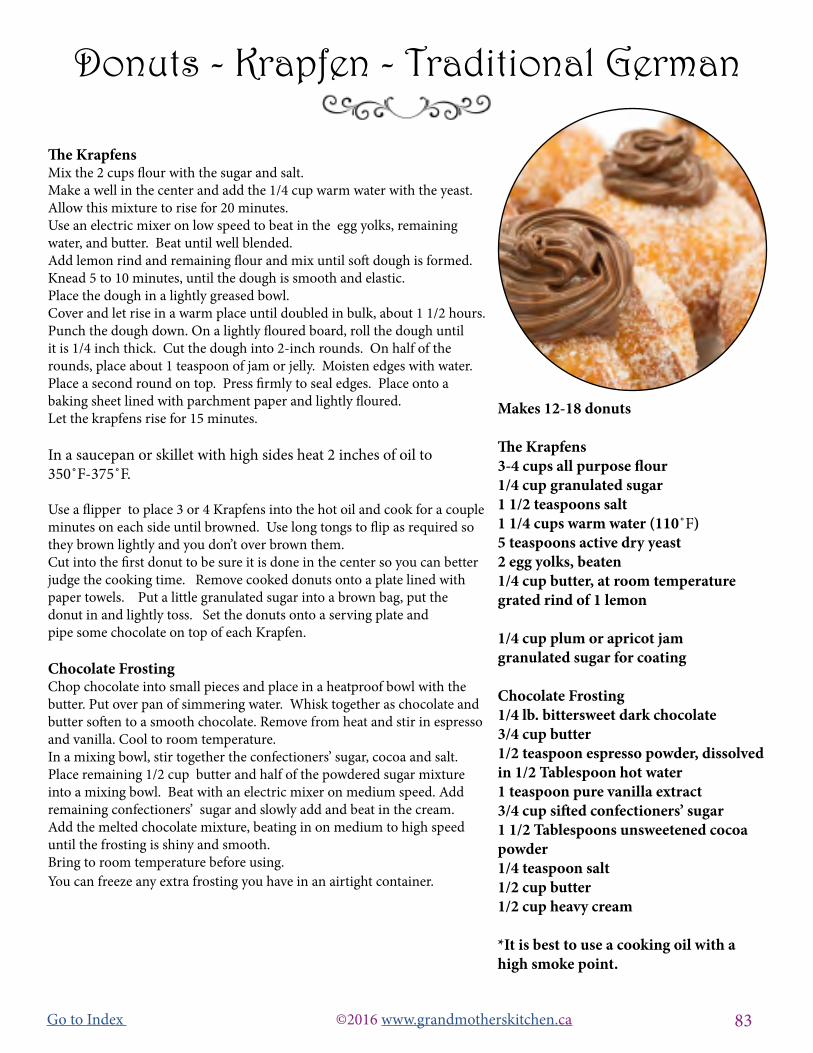
83Go to Index ©2016 www.grandmotherskitchen.ca
The KrapfensMix the 2 cups flour with the sugar and salt.Make a well in the center and add the 1/4 cup warm water with the yeast.Allow this mixture to rise for 20 minutes.Use an electric mixer on low speed to beat in the egg yolks, remaining water, and butter. Beat until well blended.Add lemon rind and remaining flour and mix until soft dough is formed.Knead 5 to 10 minutes, until the dough is smooth and elastic.Place the dough in a lightly greased bowl.Cover and let rise in a warm place until doubled in bulk, about 1 1/2 hours.Punch the dough down. On a lightly floured board, roll the dough until it is 1/4 inch thick. Cut the dough into 2-inch rounds. On half of the rounds, place about 1 teaspoon of jam or jelly. Moisten edges with water.Place a second round on top. Press firmly to seal edges. Place onto a baking sheet lined with parchment paper and lightly floured.Let the krapfens rise for 15 minutes.
In a saucepan or skillet with high sides heat 2 inches of oil to 350˚F-375˚F.
Use a flipper to place 3 or 4 Krapfens into the hot oil and cook for a couple minutes on each side until browned. Use long tongs to flip as required so they brown lightly and you don’t over brown them.Cut into the first donut to be sure it is done in the center so you can better judge the cooking time. Remove cooked donuts onto a plate lined with paper towels. Put a little granulated sugar into a brown bag, put the donut in and lightly toss. Set the donuts onto a serving plate and pipe some chocolate on top of each Krapfen.
Chocolate FrostingChop chocolate into small pieces and place in a heatproof bowl with the butter. Put over pan of simmering water. Whisk together as chocolate and butter soften to a smooth chocolate. Remove from heat and stir in espresso and vanilla. Cool to room temperature.In a mixing bowl, stir together the confectioners’ sugar, cocoa and salt. Place remaining 1/2 cup butter and half of the powdered sugar mixture into a mixing bowl. Beat with an electric mixer on medium speed. Add remaining confectioners’ sugar and slowly add and beat in the cream. Add the melted chocolate mixture, beating in on medium to high speed until the frosting is shiny and smooth.Bring to room temperature before using. You can freeze any extra frosting you have in an airtight container.
Makes 12-18 donuts The Krapfens3-4 cups all purpose flour1/4 cup granulated sugar1 1/2 teaspoons salt1 1/4 cups warm water (110˚F)5 teaspoons active dry yeast2 egg yolks, beaten1/4 cup butter, at room temperaturegrated rind of 1 lemon
1/4 cup plum or apricot jam granulated sugar for coating
Chocolate Frosting1/4 lb. bittersweet dark chocolate 3/4 cup butter1/2 teaspoon espresso powder, dissolved in 1/2 Tablespoon hot water1 teaspoon pure vanilla extract3/4 cup sifted confectioners’ sugar1 1/2 Tablespoons unsweetened cocoa powder 1/4 teaspoon salt1/2 cup butter1/2 cup heavy cream
*It is best to use a cooking oil with a high smoke point.
Donuts - Krapfen - Traditional German

84Go to Index ©2016 www.grandmotherskitchen.ca
Brownie Preheat oven to 350°F.Line a 9 inch round pan with parchment paper, and grease the paper with butter.Melt butter in a large saucepan over low heat, then whisk in cocoa.Remove from heat and mix in sugar and vanilla with an electric mixer. Beat in the eggs one at a time.Mix in the flour, baking powder and salt. Place into the preheated oven and bake for 30 minutes, or until a toothpick inserted in the center comes out clean. Remove from oven to a cooling rack.Cool completely, flip pan and peel away parchment paper.
Ice Cream Cake Place the ice cream into the refrigerator to soften for about an hour.Place the Oreo cookies into a food processor and pulse until most is broken up. Using a 9 inch springform cake pan, cut a piece of parchment paper wide enough to line the edge of the pan.Place the baked brownie on the bottom of the pan. Place the softened ice cream into a large mixing bowl along with the cookie crumbs and mix until cookies are well incorporated. Pour this over the brownie in the springform pan. Cover with plastic wrap and re-freeze overnight. Make the cake the day ahead and the icing and whipping cream the next day.
Chocolate IcingChop chocolate into small pieces, and melt with butter in a small sauce pan over low heat. Stir and when melted, remove from heat. Meanwhile combine icing sugar, milk, and vanilla extract in a mixer until smooth. While beating sugar, slowly add melted chocolate until fluff. Add more confectioners’ sugar if you need to thicken the icing at all. Reserve a little of the melted chocolate for chocolate drizzle. Place the icing into a piping bag.
Assembly Chill a mixing bowl. Pour the heavy cream into the chilled bowl and using an electric mixer beat until stiff peaks form. Fill a piping bag with some of the whipped cream for the garnish.Remove ice cream cake form freezer (make sure it is frozen and not runny). Take spring form off cake, and peel off parchment. Place onto a cake plate. Ice the sides and top with whipped cream using an offset spatula to make smooth. Decorate with chocolate icing, Oreo’s, the remaining whipped cream and drizzle. Place back into the freezer for at least an hour before serving.
Makes (1) 9 inch round springform cake Brownie 3/4 cup butter3/4 cup cocoa powder 3/4 cups granulated sugar 1 teaspoon pure vanilla extract 4 large eggs 1 1/4 cups all purpose flour 1 teaspoon baking powder 1 teaspoon salt Ice Cream Cake 15 Oreos (or similar) cookies3 quarts vanilla ice cream, softened in the refrigerator (about an hour or until you can stick a spoon in easily)
Chocolate Icing 5 oz. unsweetened bakers chocolate 1/2 cup butter, cubed 3 cups confectioners’ sugar1/4 cup milk1 teaspoon pure vanilla extract Decorating 1 litre heavy creamOreo Cookies
Serves 8 to 12
Oreo Ice Cream Cake
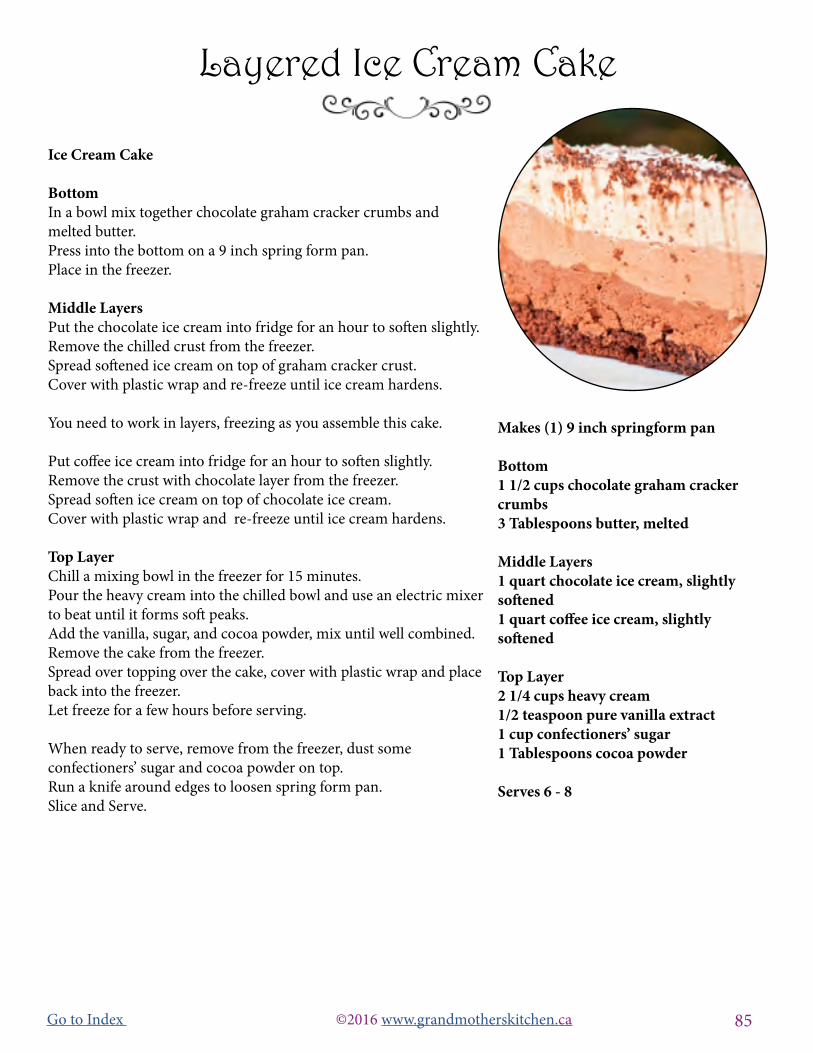
85Go to Index ©2016 www.grandmotherskitchen.ca
Ice Cream Cake Bottom In a bowl mix together chocolate graham cracker crumbs and melted butter. Press into the bottom on a 9 inch spring form pan. Place in the freezer.
Middle Layers Put the chocolate ice cream into fridge for an hour to soften slightly. Remove the chilled crust from the freezer. Spread softened ice cream on top of graham cracker crust. Cover with plastic wrap and re-freeze until ice cream hardens. You need to work in layers, freezing as you assemble this cake.
Put coffee ice cream into fridge for an hour to soften slightly. Remove the crust with chocolate layer from the freezer. Spread soften ice cream on top of chocolate ice cream. Cover with plastic wrap and re-freeze until ice cream hardens.
Top Layer Chill a mixing bowl in the freezer for 15 minutes. Pour the heavy cream into the chilled bowl and use an electric mixer to beat until it forms soft peaks. Add the vanilla, sugar, and cocoa powder, mix until well combined. Remove the cake from the freezer.Spread over topping over the cake, cover with plastic wrap and place back into the freezer. Let freeze for a few hours before serving.
When ready to serve, remove from the freezer, dust some confectioners’ sugar and cocoa powder on top. Run a knife around edges to loosen spring form pan. Slice and Serve.
Makes (1) 9 inch springform pan Bottom 1 1/2 cups chocolate graham cracker crumbs3 Tablespoons butter, melted
Middle Layers 1 quart chocolate ice cream, slightly softened 1 quart coffee ice cream, slightly softened
Top Layer 2 1/4 cups heavy cream 1/2 teaspoon pure vanilla extract1 cup confectioners’ sugar1 Tablespoons cocoa powder
Serves 6 - 8
Layered Ice Cream Cake

86Go to Index ©2016 www.grandmotherskitchen.ca
CakePlace the crumbs chocolate crumbs and butter into a bowl and use a fork to mix together until the mixture is well combined. Pat the mixture into the bottom and 1 inch up the side of a lightly oiled 8-inch springform pan, 2 1/2 inches deep.Freeze the crust for 30 minutes, or until it is firm.
Remove from the freezer and spread the softened coffee ice cream evenly on the crust, then return the pan to the freezer for 30 minutes, or until the ice cream is firm. Pour the heavy cream into a chilled mixing bowl use an electric mixer beat the cream with the vanilla until it holds stiff peaks. Fold in the crushed amaretti thoroughly. Remove the cake from the freezer and spread the mixture over the ice cream. Smooth the top of the cake, sprinkle with crushed amaretti cookies.Cover with plastic wrap and put back to freeze for at least 4 hours or overnight. Just before serving, wrap dampened towel around the outside of the springform pan, remove the side and transfer the cake to a serving plate.
Cut the cake into wedges with a knife dipped in hot water and serve it with the chocolate sauce and sprinkle on some chopped roasted peanuts. Garnish with a fresh cherry or other fresh fruit if desired.
Dark Chocolate SauceIn a small heavy saucepan combine the cream and brown sugar.Bring the mixture to a boil over moderately high heat, whisking occasionally, and boil it, whisking, until the brown sugar is dissolved. Remove the pan from the heat and add the chocolates, whisking until they are melted. Whisk in the butter and Amaretto, whisking until sauce is smooth, and let cool slightly. The chocolate sauce may be made up to a week in advance and kept covered and chilled.To soften, reheat the chocolate sauce over very low heat, stirring occasionally, until it is warm.
Makes (1) 8 inch spring form pan Bottom1 1/2 cups fine chocolate wafer crumbs (about 30 wafer cookies)1/4 cup (1/2 stick) butter, melted
Filling 1 1/2 pints coffee ice cream, softened in the refrigerator for one hour
1 1/2 cups well-chilled heavy cream1 teaspoon pure vanilla extract1 1/2 cups crushed amaretti (Italian almond macaroons, available at specialty food shops and some supermarkets), plus more for garnish
Dark Chocolate Sauce1 1/2 cups heavy cream2/3 cup firmly packed dark brown sugar4 oz. fine-quality bittersweet chocolate, chopped into small pieces3 oz. unsweetened chocolate, chopped into small pieces1/4 cup (1 stick) butter, at room temperature 3 to 4 Tablespoons Amaretto, or to taste (optional) chopped roasted peanuts
Coffee and Amaretti Ice-Cream Cake
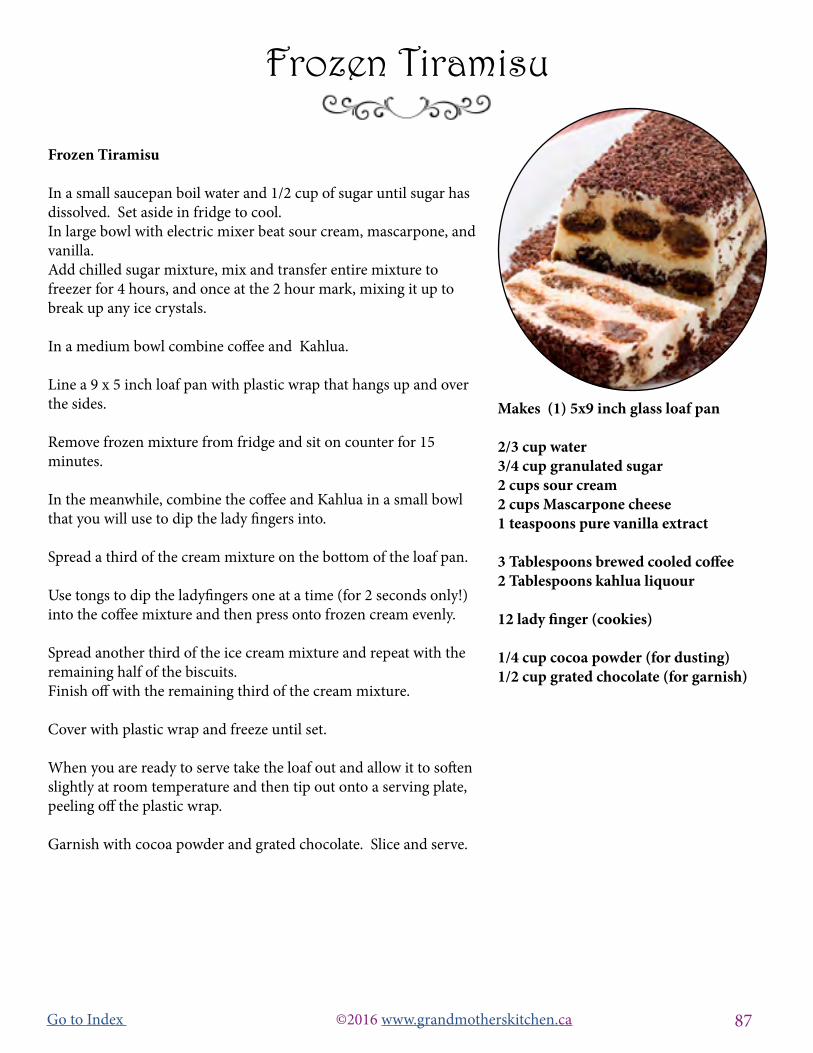
87Go to Index ©2016 www.grandmotherskitchen.ca
Frozen Tiramisu
In a small saucepan boil water and 1/2 cup of sugar until sugar has dissolved. Set aside in fridge to cool.In large bowl with electric mixer beat sour cream, mascarpone, and vanilla.Add chilled sugar mixture, mix and transfer entire mixture to freezer for 4 hours, and once at the 2 hour mark, mixing it up to break up any ice crystals.
In a medium bowl combine coffee and Kahlua.
Line a 9 x 5 inch loaf pan with plastic wrap that hangs up and over the sides.
Remove frozen mixture from fridge and sit on counter for 15 minutes.
In the meanwhile, combine the coffee and Kahlua in a small bowl that you will use to dip the lady fingers into.
Spread a third of the cream mixture on the bottom of the loaf pan.
Use tongs to dip the ladyfingers one at a time (for 2 seconds only!) into the coffee mixture and then press onto frozen cream evenly.
Spread another third of the ice cream mixture and repeat with the remaining half of the biscuits. Finish off with the remaining third of the cream mixture.
Cover with plastic wrap and freeze until set.
When you are ready to serve take the loaf out and allow it to soften slightly at room temperature and then tip out onto a serving plate, peeling off the plastic wrap.
Garnish with cocoa powder and grated chocolate. Slice and serve.
Makes (1) 5x9 inch glass loaf pan 2/3 cup water3/4 cup granulated sugar 2 cups sour cream2 cups Mascarpone cheese1 teaspoons pure vanilla extract
3 Tablespoons brewed cooled coffee2 Tablespoons kahlua liquour
12 lady finger (cookies)
1/4 cup cocoa powder (for dusting)1/2 cup grated chocolate (for garnish)
Frozen Tiramisu
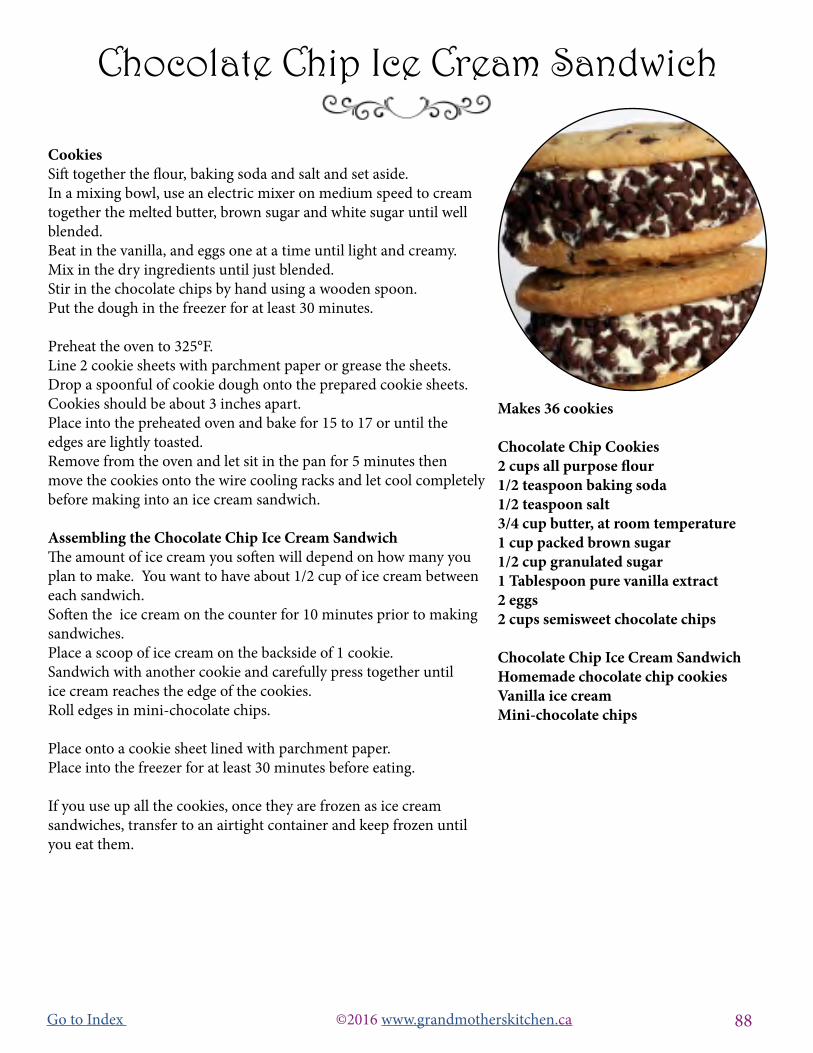
88Go to Index ©2016 www.grandmotherskitchen.ca
Cookies Sift together the flour, baking soda and salt and set aside.In a mixing bowl, use an electric mixer on medium speed to cream together the melted butter, brown sugar and white sugar until well blended. Beat in the vanilla, and eggs one at a time until light and creamy. Mix in the dry ingredients until just blended. Stir in the chocolate chips by hand using a wooden spoon.Put the dough in the freezer for at least 30 minutes.
Preheat the oven to 325°F.Line 2 cookie sheets with parchment paper or grease the sheets.Drop a spoonful of cookie dough onto the prepared cookie sheets. Cookies should be about 3 inches apart. Place into the preheated oven and bake for 15 to 17 or until the edges are lightly toasted. Remove from the oven and let sit in the pan for 5 minutes then move the cookies onto the wire cooling racks and let cool completely before making into an ice cream sandwich.
Assembling the Chocolate Chip Ice Cream SandwichThe amount of ice cream you soften will depend on how many you plan to make. You want to have about 1/2 cup of ice cream between each sandwich. Soften the ice cream on the counter for 10 minutes prior to making sandwiches.Place a scoop of ice cream on the backside of 1 cookie.Sandwich with another cookie and carefully press together until ice cream reaches the edge of the cookies. Roll edges in mini-chocolate chips. Place onto a cookie sheet lined with parchment paper. Place into the freezer for at least 30 minutes before eating. If you use up all the cookies, once they are frozen as ice cream sandwiches, transfer to an airtight container and keep frozen until you eat them.
Makes 36 cookies Chocolate Chip Cookies2 cups all purpose flour1/2 teaspoon baking soda1/2 teaspoon salt3/4 cup butter, at room temperature 1 cup packed brown sugar1/2 cup granulated sugar1 Tablespoon pure vanilla extract2 eggs2 cups semisweet chocolate chips
Chocolate Chip Ice Cream Sandwich Homemade chocolate chip cookiesVanilla ice creamMini-chocolate chips
Chocolate Chip Ice Cream Sandwich
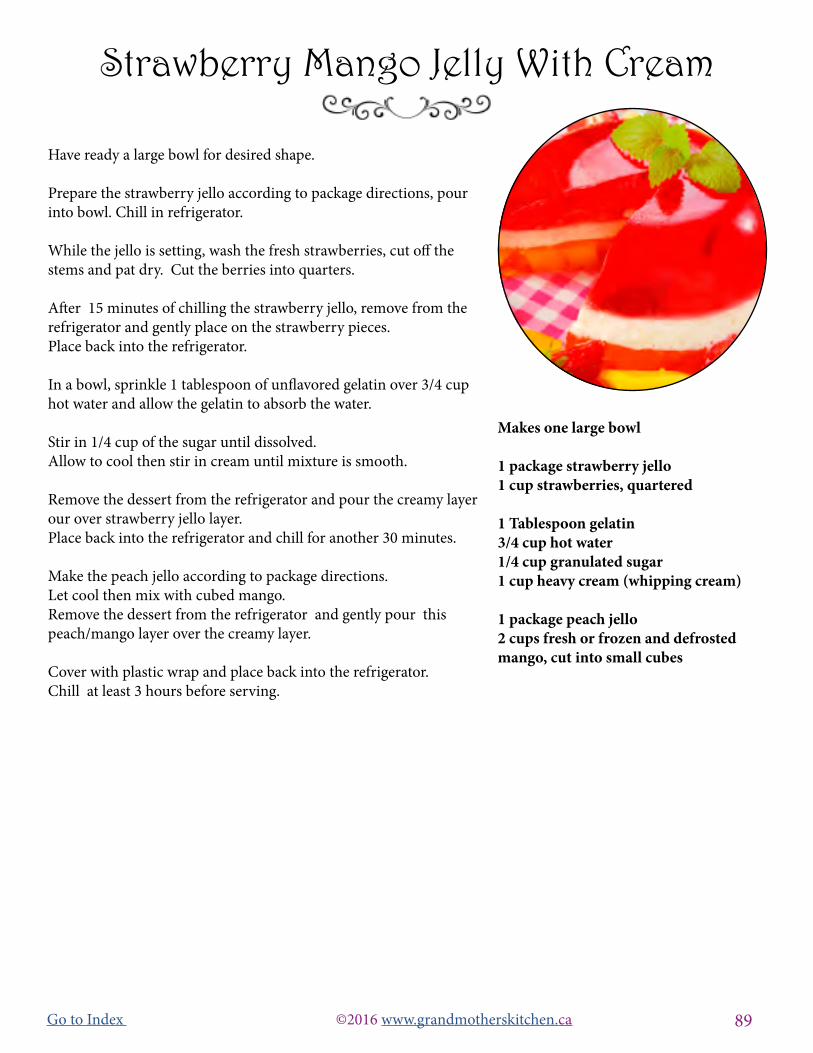
89Go to Index ©2016 www.grandmotherskitchen.ca
Have ready a large bowl for desired shape.
Prepare the strawberry jello according to package directions, pour into bowl. Chill in refrigerator. While the jello is setting, wash the fresh strawberries, cut off the stems and pat dry. Cut the berries into quarters.
After 15 minutes of chilling the strawberry jello, remove from the refrigerator and gently place on the strawberry pieces. Place back into the refrigerator.
In a bowl, sprinkle 1 tablespoon of unflavored gelatin over 3/4 cup hot water and allow the gelatin to absorb the water.
Stir in 1/4 cup of the sugar until dissolved. Allow to cool then stir in cream until mixture is smooth.
Remove the dessert from the refrigerator and pour the creamy layer our over strawberry jello layer. Place back into the refrigerator and chill for another 30 minutes.
Make the peach jello according to package directions. Let cool then mix with cubed mango.Remove the dessert from the refrigerator and gently pour this peach/mango layer over the creamy layer. Cover with plastic wrap and place back into the refrigerator. Chill at least 3 hours before serving.
Makes one large bowl 1 package strawberry jello1 cup strawberries, quartered
1 Tablespoon gelatin 3/4 cup hot water 1/4 cup granulated sugar 1 cup heavy cream (whipping cream)
1 package peach jello2 cups fresh or frozen and defrosted mango, cut into small cubes
Strawberry Mango Jelly With Cream

90Go to Index ©2016 www.grandmotherskitchen.ca
FudgeLine an 8x8 inch baking pan with aluminum foil, going up the sides. Grease the foil on the bottom and sides with a little butter. Foil makes it easier to remove the fudge. In a pot add the evaporated milk, brown sugar, butter, and salt. Bring to a boil stirring the whole time. Reduce heat to medium - high heat continuing to stir. The fudge must reach a temperature of 240°F. on the candy thermometer.If you don’t have a candy thermometer, this will take about 20 to 30 minutes. (see note below)
Pour the hot mixture into a heat proof bowl and mix in vanilla. Add the confectioners’ sugar in slowly and mix till incorporated. Beat with an electric mixer on high speed until thick and creamy.
Pour into the prepared pan.Cover with plastic wrap and place into the refrigerate for about 30 minutes. Cut into squares. Keep refrigerated in an airtight container.
* Note - without a thermometer - you do run the risk of fudge not setting once done. If this happens, use it as a delicious sauce.
Makes (1) 8x8 inch square baking pan 2/3 cup canned evaporated milk 2 cups firmly packed brown sugar 3/4 cup butter, cut into chunks 1/4 teaspoon salt 3/4 teaspoon pure vanilla extract1 3/4 cups confectioners’ sugar
Brown Sugar Fudge

91Go to Index ©2016 www.grandmotherskitchen.ca
Chocolate LayerLine a 9x9 inch baking pan with aluminum foil, leaving the sides of the foil long enough to go up the sides for easy removal. Grease with butter and set aside.Measure 1 1/2 cups granulated sugar and 2 Tablespoons cocoa into a medium-size saucepan and stir together.Add 1/2 cup milk and stir well to incorporate. Cook over high heat until the mixture is brought to rolling boil. Reduce heat enough to just keep mixture at rolling boil. Watch that it does not boil over.Stirring occasionally, boil until mixture, until it reaches 234°F to 240°F on a candy thermometer. Remove from heat. Add 1/2 teaspoon of vanilla and 1 1/2 tablespoons of the butter.Pour chocolate layer into a prepared pan and let chill in fridge while you are making the next layer.
Peanut Butter LayerIn medium-size saucepan, add 1 1/2 cups granulated sugar.Add 1/2 cup milk and stir well to incorporate. Cook over high heat until mixture is brought to rolling boil. Reduce heat enough to keep mixture at rolling boil. Watch that it does not boil over.Stirring occasionally, boil until mixture until it reaches 234°F to 240°F on a candy thermometer.Remove from heat. Add 1/2 teaspoon of vanilla, 1 1/2 tablespoons o f butter and the 1/4 cup of peanut butter.Stir the mixture with a large spoon until it thickens to consistency of plaster.Pour over cooled chocolate layer.Cool in refrigerator until set. Remove from the refrigerator and turn out of the pan. Remove the aluminum foil and cut into pieces.Pieces can be individually wrapped in plastic wrap. Store refrigerated in a container with a lid.
Makes (1) 9x9 inch baking pan
Chocolate Layer 1 1/2 cups granulated sugar 2 Tablespoons cocoa 1/2 cup milk 1/2 teaspoon pure vanilla extract 1 1/2 Tablespoon butter Peanut Butter Layer 1 1/2 cups granulated sugar1/2 cup milk1/2 teaspoon pure vanilla extract1 1/2 Tablespoons butter1/4 cup peanut butter
Tools: Candy thermometer
Chocolate & Peanut Butter Fudge
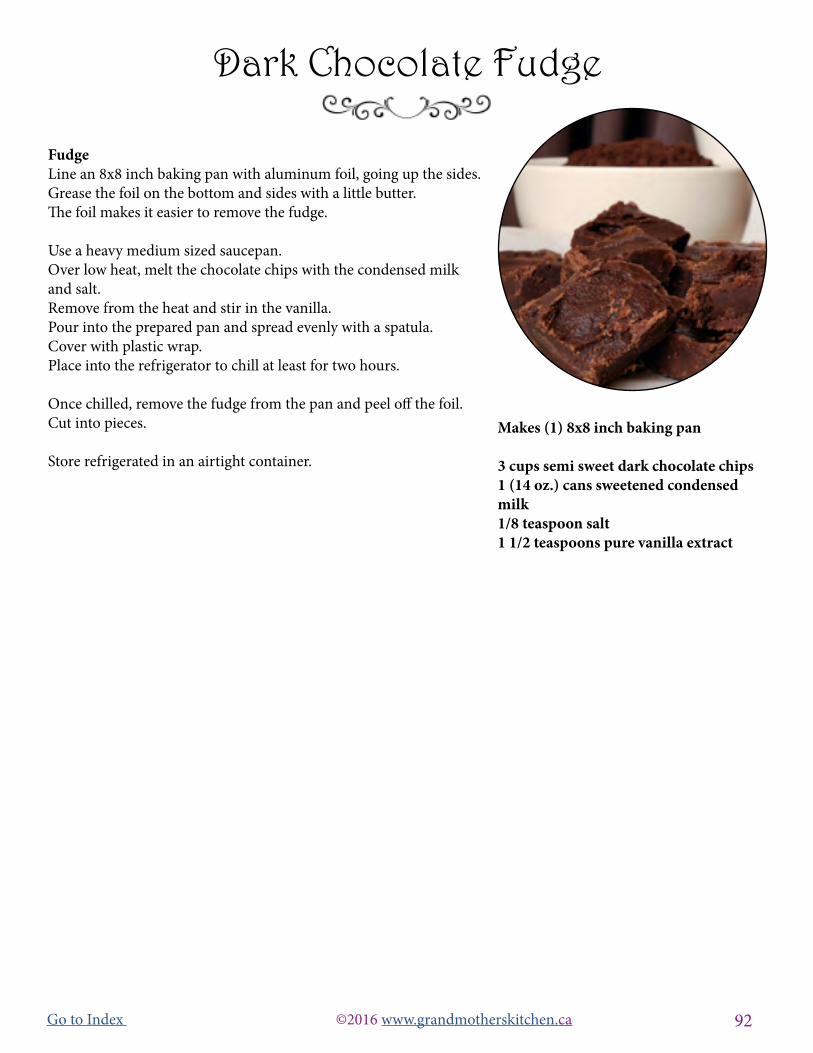
92Go to Index ©2016 www.grandmotherskitchen.ca
FudgeLine an 8x8 inch baking pan with aluminum foil, going up the sides. Grease the foil on the bottom and sides with a little butter. The foil makes it easier to remove the fudge.
Use a heavy medium sized saucepan.Over low heat, melt the chocolate chips with the condensed milk and salt.Remove from the heat and stir in the vanilla.Pour into the prepared pan and spread evenly with a spatula.Cover with plastic wrap.Place into the refrigerator to chill at least for two hours.
Once chilled, remove the fudge from the pan and peel off the foil. Cut into pieces.
Store refrigerated in an airtight container.
Makes (1) 8x8 inch baking pan 3 cups semi sweet dark chocolate chips 1 (14 oz.) cans sweetened condensed milk 1/8 teaspoon salt 1 1/2 teaspoons pure vanilla extract
Dark Chocolate Fudge

93Go to Index ©2016 www.grandmotherskitchen.ca
Fudge Line an 8x8 inch baking pan with aluminum foil, going up the sides. Grease the foil on the bottom and sides with a little butter. The foil makes it easier to remove the fudge. Put the milk, sugar and butter in a heavy-based saucepan. Heat slowly, stirring all the time, until the sugar has dissolved and the butter melted.Bring to the boil and boil for 15-20 minutes, stirring all the time.When the mixture reaches the soft-ball stage (234°F-240°F) on a sugar thermometer, remove from the heat and stir in the vanilla extract. Leave to cool for 5 minutes.
Beat the mixture with a spoon for a few minutes until it starts to thicken and the gloss disappears. Pour into the prepared tin and leave to set at room temperature (do not put it in the fridge). When it has cooled pour on the layer of chocolate ganache. (*See below for directions).Once set, cut the fudge into small squares and store in a sealed container in the refrigerator.
*GanachePlace the chocolate in a medium size heat proof bowl. In a saucepan, bring cream to a boil. Pour boiling cream over the bowl of chocolate. Allow to sit for 2 minutes. With a small whisk or fork, gently bring the cream and melted chocolate together until thoroughly combined, smooth and shiny.Pour chocolate ganache over the cooled fudge. Use a small offset spatula to smooth and level.
Makes (1) 8x8 inch baking pan Fudge1 1/4 cups milk12 oz. superfine sugar3 1/2 oz. butter1 teaspoon pure vanilla extract
Ganache8 oz. semi-sweet chocolate (chopped, or high quality chips)1/2 cup heavy cream
Creamy Vanilla Fudge & Ganache
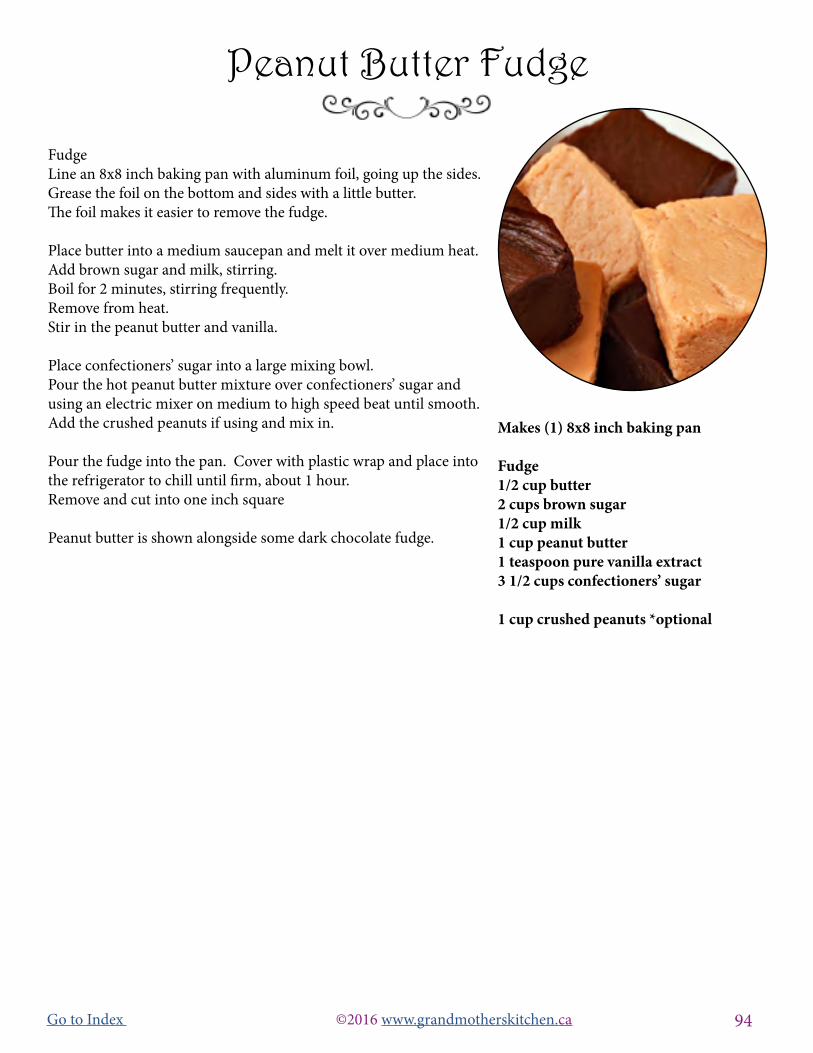
94Go to Index ©2016 www.grandmotherskitchen.ca
Fudge Line an 8x8 inch baking pan with aluminum foil, going up the sides. Grease the foil on the bottom and sides with a little butter. The foil makes it easier to remove the fudge.
Place butter into a medium saucepan and melt it over medium heat.Add brown sugar and milk, stirring.Boil for 2 minutes, stirring frequently.Remove from heat.Stir in the peanut butter and vanilla.
Place confectioners’ sugar into a large mixing bowl.Pour the hot peanut butter mixture over confectioners’ sugar and using an electric mixer on medium to high speed beat until smooth. Add the crushed peanuts if using and mix in.
Pour the fudge into the pan. Cover with plastic wrap and place into the refrigerator to chill until firm, about 1 hour.Remove and cut into one inch square Peanut butter is shown alongside some dark chocolate fudge.
Makes (1) 8x8 inch baking pan Fudge 1/2 cup butter2 cups brown sugar1/2 cup milk1 cup peanut butter1 teaspoon pure vanilla extract3 1/2 cups confectioners’ sugar
1 cup crushed peanuts *optional
Peanut Butter Fudge

95Go to Index ©2016 www.grandmotherskitchen.ca
CrustPreheat oven to 350°F.Grease 12 - 2 inch tart shells with butter.
Place peanut butter, sugar, butter and corn syrup into a mixing bowl and beat with an electric mixer on medium speed until smooth. Add flour, salt and water and mix till its just combined and has formed a dough.Roll out dough on a lightly floured surface and cut out 3 inch circles, line your prepared tart tins with the dough cutting off excess. Set aside.
FillingIn a small pot melt together sugar, cocoa powder, chocolate chips, butter and milk on low heat. Stir until smooth.Remove from heat and add in flour and egg and mix till its well incorporated. Pour batter into prepared tart shells . Place into the preheated oven and bake for 12 - 15 minutes, or until crust is a golden brown. Remove from oven and let cool on a wire rack. Once cool enough to touch remove tarts from tart tins and let cool completely on a wire rack.
Whipped CreamPut your mixing bowl and beaters into the freezer for 15 minutes.Pour the heavy cream into the chilled mixing bowl and use an electric mixer on medium to high speed and beat for a minute.Add the sugar and vanilla and continue beating until you have reached the perfect firm peak consistency. Cover the bowl with plastic wrap and place into the refrigerator until you are ready to serve the tarts.
AssemblyPut the whipped cream into a piping bag with a star tip and pipe on top of each cooled tart. Garnish with a sprinkling of mini chocolate chips and serve.
Makes 12 - 2 inch tarts Crust1/4 cup peanut butter3 Tablespoons packed brown sugar2 Tablespoons butter, cold & cut into small pieces1 1/2 Tablespoons light corn syrup1 cup all purpose flour1/4 teaspoon salt3 Tablespoons cold water
Filling2/3 cup dark brown sugar2 Tablespoons cocoa powder2 Tablespoons chocolate chips1 Tablespoon butter3 Tablespoons milk2 Tablespoons all purpose flour1 large egg, lightly beaten
Whipped Cream1 cup heavy cream1 Tablespoon granulated sugar 1/2 teaspoon pure vanilla extract
Garnish mini chocolate chips
Peanut Butter Fudge Tarts

96Go to Index ©2016 www.grandmotherskitchen.ca
Tart ShellsPlace sugar and butter into a mixing bowl and use and electric mixer to beat until light and fluffy. Beat in the eggs, one at a time until incorporated and smooth. On low speed gradually add ground almonds and flour, and mix till its just combined. Form a ball with dough cover and place in refrigerator for an hour.
Preheat oven to 350°F.
Roll out chilled dough, cut out the dough and line six 4 inch tart shell pans. Place into the preheated oven and bake for 15 to 20 minutes, or until golden brown. If they start to get air bubbles poke with a fork to let out steam. Remove to a cooling rack.
FillingIf using fresh cherries rinse and pit the cherries. Boil cherries for one minute and drain, keep cherries covered in pot so they stay hot.
In a separate pot on medium high heat, add sugar, cornstarch and water. Stir until it starts to thicken. Add in cinnamon, almond extract and lemon juice and bring to a boil. Stir constantly while it boils for about a minute. Remove from heat and fold in cherries.
Spoon filling into prepared tart shells and chill. Garnish with some fresh whipped cream.
Makes (6) 4-inch tart shell pans Tart Shells3/4 cup granulated sugar 3/4 cup salted butter, at room temperature 2 eggs1/2 cup finely ground almonds 2 3/4 cups all purpose flour
Filling3 1/3 cups fresh or thawed sour cherries1 cup granulated sugar1/4 cup + 1 Tablespoon cornstarch1 1/3 cups cold water1/8 teaspoon cinnamon1/4 teaspoon almond extract1/2 Tablespoons lemon juice
Cherry Tarts
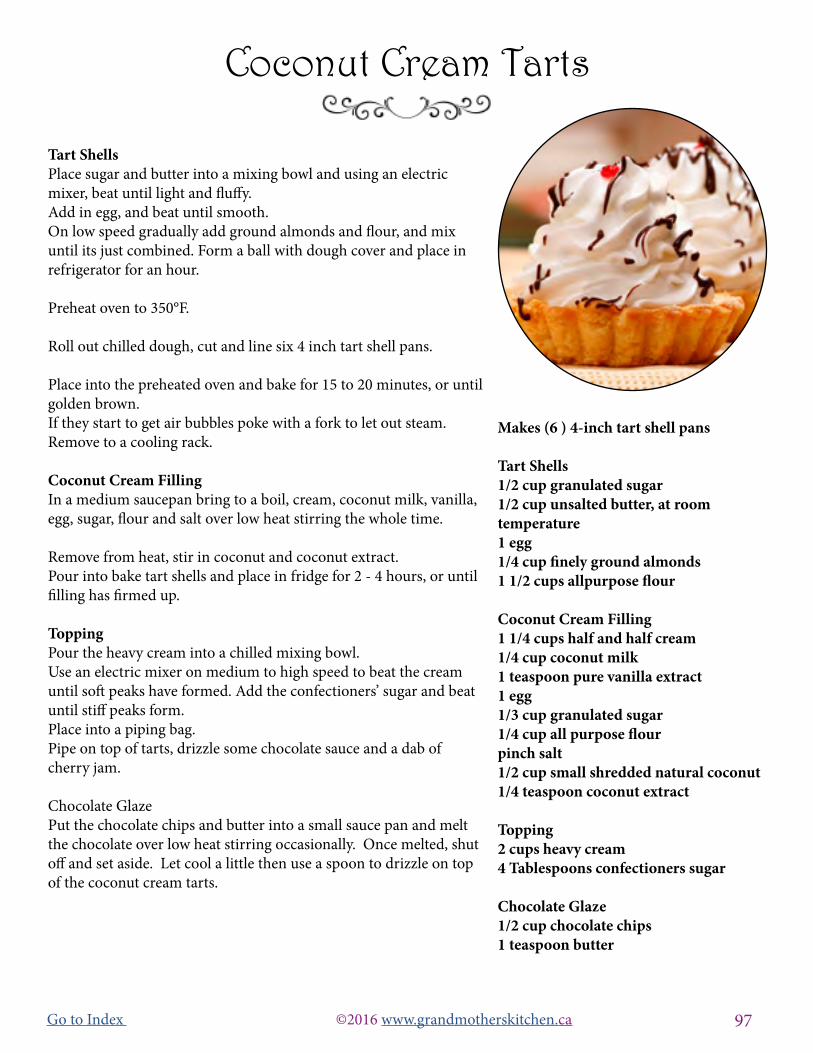
97Go to Index ©2016 www.grandmotherskitchen.ca
Tart ShellsPlace sugar and butter into a mixing bowl and using an electric mixer, beat until light and fluffy. Add in egg, and beat until smooth. On low speed gradually add ground almonds and flour, and mix until its just combined. Form a ball with dough cover and place in refrigerator for an hour.
Preheat oven to 350°F.
Roll out chilled dough, cut and line six 4 inch tart shell pans.
Place into the preheated oven and bake for 15 to 20 minutes, or until golden brown. If they start to get air bubbles poke with a fork to let out steam. Remove to a cooling rack.
Coconut Cream FillingIn a medium saucepan bring to a boil, cream, coconut milk, vanilla, egg, sugar, flour and salt over low heat stirring the whole time.
Remove from heat, stir in coconut and coconut extract. Pour into bake tart shells and place in fridge for 2 - 4 hours, or until filling has firmed up.
Topping Pour the heavy cream into a chilled mixing bowl. Use an electric mixer on medium to high speed to beat the cream until soft peaks have formed. Add the confectioners’ sugar and beat until stiff peaks form. Place into a piping bag. Pipe on top of tarts, drizzle some chocolate sauce and a dab of cherry jam. Chocolate Glaze Put the chocolate chips and butter into a small sauce pan and melt the chocolate over low heat stirring occasionally. Once melted, shut off and set aside. Let cool a little then use a spoon to drizzle on top of the coconut cream tarts.
Makes (6 ) 4-inch tart shell pans
Tart Shells1/2 cup granulated sugar 1/2 cup unsalted butter, at room temperature 1 egg 1/4 cup finely ground almonds 1 1/2 cups allpurpose flour
Coconut Cream Filling1 1/4 cups half and half cream1/4 cup coconut milk1 teaspoon pure vanilla extract1 egg1/3 cup granulated sugar1/4 cup all purpose flourpinch salt1/2 cup small shredded natural coconut1/4 teaspoon coconut extract
Topping 2 cups heavy cream4 Tablespoons confectioners sugar Chocolate Glaze 1/2 cup chocolate chips 1 teaspoon butter
Coconut Cream Tarts

98Go to Index ©2016 www.grandmotherskitchen.ca
Chocolate Chip Cookie TartUsing an electric mixer, beat the butter, sugars, vanilla and egg in a mixing bowl, until creamy and well combined.Stir the salt into the flour. Mix the flour mixture into the wet mixture, with the electric mixer, adding a little at a time.It will form a sticky dough.Use a wooden spoon to stir in the chocolate pieces.Form the dough into a ball and wrap with plastic wrap.Put into the refrigerator for 2 hours.
Preheat oven to 375°F. Grease a 12 hole muffin tin with butter.
Remove the chilled dough from the refrigerator.Divide the dough into 12 pieces the same size.Roll the piece into a ball, then pat it out to make a circle. Press the circle into one of the muffin holes and pat on the bottom and up the sides as evenly as you can. Repeat until you have all the dough used up.The size of the tins will determine how many tarts you will make.You use own judgment to make sure the shells are a nice size. Don’t make them too thick. Prick each bottom with a fork several times to try to keep them from expanding too high. Make as many tart shells as you have dough for.Place the tarts into the preheated oven and bake about 10-12 minutes or until golden brown.Remove from the oven and place onto a cooling rack.When the tart shells have cooled enough, run a knife around the outside edge and lift the tarts out.Do do when the are hot or they will break.Once they cool to room temperature, put the tarts onto a serving plate and into the refrigerator to cool more before piping in the mousse.
Chocolate MoussePlace the chocolate into the top of a double boiler and melt the chocolate over low heat. Set aside to cool.Combine 1/3 cup sugar with the egg yolks in the top of a double boiler and whisk the mixture for 3 minutes, or until it is fluffy, smooth, and doubled in volume. Add the melted chocolate to the mixture and stir to combine.Pour the heavy cream into a chilled mixing bowl, add the sugar and using an electric mixer on medium to high speed beat for a minutes until firm peaks form. Gently fold the whipped cream into the chocolate mixture and mix until incorporated. Put chocolate mousse into a piping bag and chill for an hour to set enough to pipe into the cooled tarts.Garnish with fresh raspberries if desired.
Makes 12 tarts Chocolate Chip Cookie Tart3/4 butter, at room temperature1/2 cup brown sugar, loosely packed1/2 cup granulated sugar1 egg1 teaspoon pure vanilla extract3 cups cake flour1/2 teaspoon salt1/2 cup small chocolate chunks, (cut from a large chunk of chocolate) or mini chocolate chips
Chocolate Mousse1 3/4 cups dark bittersweet or semisweet chocolate, finely chopped & melted1/3 cup granulated sugar4 large egg yolks2 cups heavy cream2 Tablespoons granulated sugar
Garnish *Optional, fresh raspberries
Chocolate Mousse Tart
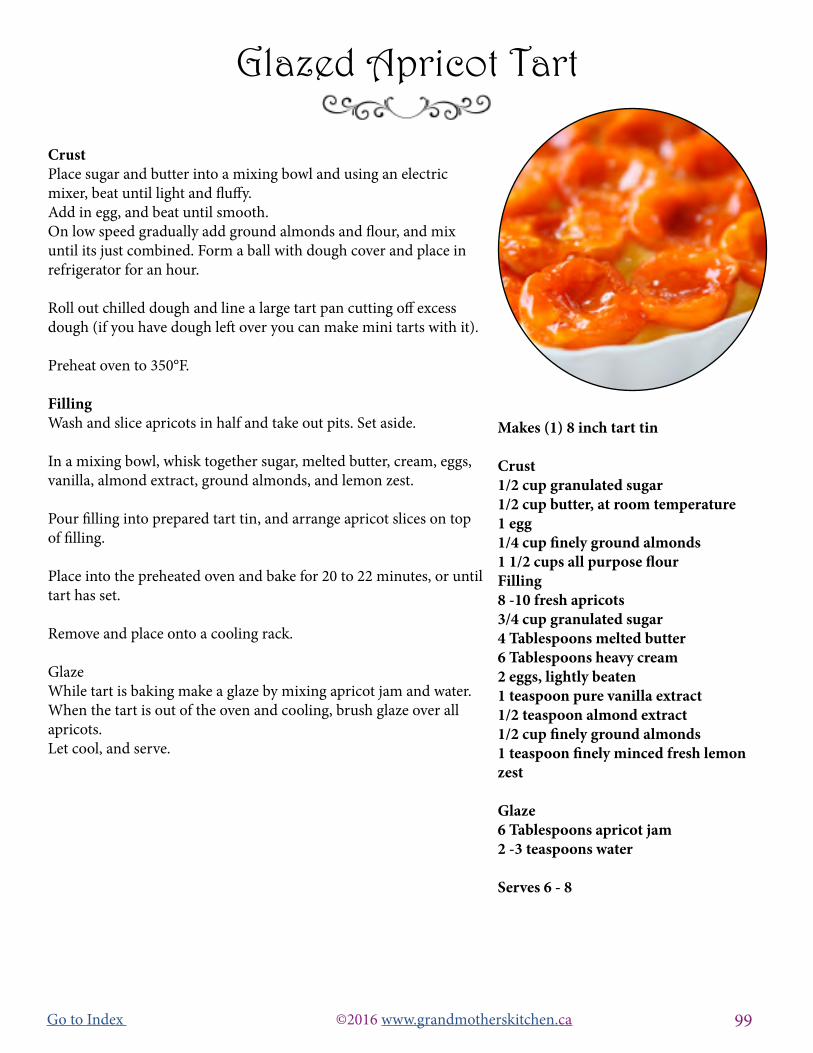
99Go to Index ©2016 www.grandmotherskitchen.ca
CrustPlace sugar and butter into a mixing bowl and using an electric mixer, beat until light and fluffy. Add in egg, and beat until smooth. On low speed gradually add ground almonds and flour, and mix until its just combined. Form a ball with dough cover and place in refrigerator for an hour.
Roll out chilled dough and line a large tart pan cutting off excess dough (if you have dough left over you can make mini tarts with it).
Preheat oven to 350°F.
FillingWash and slice apricots in half and take out pits. Set aside.
In a mixing bowl, whisk together sugar, melted butter, cream, eggs, vanilla, almond extract, ground almonds, and lemon zest.
Pour filling into prepared tart tin, and arrange apricot slices on top of filling.
Place into the preheated oven and bake for 20 to 22 minutes, or until tart has set. Remove and place onto a cooling rack.
Glaze While tart is baking make a glaze by mixing apricot jam and water. When the tart is out of the oven and cooling, brush glaze over all apricots. Let cool, and serve.
Makes (1) 8 inch tart tin Crust 1/2 cup granulated sugar 1/2 cup butter, at room temperature 1 egg 1/4 cup finely ground almonds 1 1/2 cups all purpose flour Filling 8 -10 fresh apricots 3/4 cup granulated sugar 4 Tablespoons melted butter 6 Tablespoons heavy cream 2 eggs, lightly beaten 1 teaspoon pure vanilla extract1/2 teaspoon almond extract 1/2 cup finely ground almonds 1 teaspoon finely minced fresh lemon zest
Glaze 6 Tablespoons apricot jam 2 -3 teaspoons water
Serves 6 - 8
Glazed Apricot Tart

100Go to Index ©2016 www.grandmotherskitchen.ca
DoughPlace all the ingredients for the dough into a large bowl and using a pastry cutter and a cutting motion, combine until the dough just comes together. Lightly dust your work surface with flour. Turn dough out onto surface and gather into a ball. Wrap the dough ball in plastic wrap. Chill in refrigerator for at least 2 hours, until firm. Apple Filling While the dough is chilling make the filling. Peel, core and slice the apples into small 1/4 inch pieces. Place the applesauce into a small sauce pan and add the apple pieces. Bring to a boil over medium heat, then turn down and let simmer for 10-15 minutes, until the apple pieces start to soften. Stir in 1 teaspoon cinnamon and the butter. Shut off and set aside and let cool before using..
Assembly & BakingPreheat oven to 375ºF. Line a baking sheet with parchment paper.
On a lightly dusted a work surface, roll the chilled dough to about 1/8-inch thick. Cut the rolled dough into eight 5-inch squares.Gather up scraps and re-roll dough, if necessary.In the center of each square, place about 1/3 cup of the cooled apple filling mixture. Be careful not to get anything on the edges.
To wrap the apple tarts, working carefully, take the opposite sides of a square of dough and gently stretch each side up and over the filling. Tuck in the underneath layer pressing the two ends together, then take the remaining opposite corners, pull up the dough together and overlap at the top to seal.Place individual pies 2 inches apart on prepared baking sheet.
Place in the preheated oven and bake for about 30 minutes or until the crust is golden brown.Remove and let cool on a cooling rack until you can handle them. Really delicious when served warm and fresh from the oven.
Makes 8
Rustic Tart Dough 2 cups all purpose flour, plus extra for dusting 1/4 cup granulated sugar 8 oz. butter, chilled, cut into small pieces 1 Tablespoon pure vanilla extract 2 Tablespoons water
Apple Filling 4 cups cored, peeled apples and cut into 1/4 inch cubes (3-4 apples) 1 cup unsweetened applesauce 1 teaspoon cinnamon 1 Tablespoon butter
Rustic Apple Tarts

101Go to Index ©2016 www.grandmotherskitchen.ca
Sauce and FillingPour the cherries and juice through a sieve into a saucepan.Place the strained cherries in a bowl and set aside until ready to make the pierogi.For the sauce, pour the strained juice into a sauce pan.Add the 1 tablespoon or more sugar, the cinnamon and cornstarchto the juice and stir to mix well.Heat the cherry juice, stirring until the sauce has become thick.Remove from the heat and allow to cool.If you want, you can cut a few of the cherries and place into the thickened sauce.
DoughCombine milk, egg, butter, salt, and 1 1/2 cups of flour in a large mixing bowl. Use a hook attachment to mix on low speeds until thoroughly combined.Add 1 more cup of flour and use your hands to work in and knead until a smooth dough, that doesn’t stick to the sides of the bowl forms.Let the dough rest for 30 minutes, at room temperature.Sprinkle a dusting of flour onto 2 baking sheets and set aside.Divide the dough into 2 balls.Working with one dough ball at a time, roll it out with a rolling-pin until about 1/8 inch thin.Dust the surface with flour, to keep the dough from sticking.Using a round cookie cutter, cut out circles, as close to each other as possible. Collect all the pieces around the circles and add them to the rest of the dough (keep the dough balls covered between use).Place 2-3 cherries in the middle of each circle. Working with one circle at a time, fold it in half, keeping the cherries from moistening the edges as this will prevent you from forming a seal.Press the two edges together to form a half circle shaped dumpling. Press lightly with a fork around the edge to help form the seal. Place it onto the dusted baking sheet.Repeat the process and keep working with all the dough until the cherries are used.To CookIn a large pot, over high heat, bring 3 quarts of water to boil.Working with about 10 dumplings at a time, drop them into the water, one at a time and gently mix with a rubber spatula or wooden spoon.Bring to a boil again and lower the heat to medium. Cook for about 5-7 minutes.They will float to the top when cooked.Place 1-2 tablespoons butter into a serving dish.Remove the cooked dumplings from the water with a slotted spoon and gently place into the bowl with the butter.Gently toss to coat all with the butter and to keep them from sticking to each other. Let them sit for about 3-5 minutes, to cool slightly.Serve with a dollop of sour cream.
Makes 40-50 Filling1 (16 oz.) jar canned cherries in juice1-2 Tablespoons granulated sugar1 1/2 Tablespoons cornstarch1/4 teaspoon cinnamon Dough1 cups milk1 egg 2 1/2 cups all purpose flour, divided 1/4 cup (1/2 stick butter), at room temperature1 teaspoon salt
Serve WithButterSour Cream
Cherry Dumplings

102Go to Index ©2016 www.grandmotherskitchen.ca
Preheat the oven to 450˚F.
Flute the edge of the pastry in your favourite way.Prick with at fork at 1” intervals and bake in a preheated oven for 10-12 minutes or until golden brown.Cool before adding the cooked filling.
Turn oven down to 350ºF.
Coconut Cream Pie FillingIn a large saucepan combine 2 cups milk, sugar and salt. Bring to a boil over medium heat.Meanwhile combine remaining 1 cup of milk and cornstarch in a bowl.Mix together well and then add to hot milk mixture.Cook stirring occasionally until mixture thickens. Add coconut, butter and vanilla. Cook and still until mixture thickens again.
Pour into baked pie shell and top with meringue.
Preheat oven to 350ºF. Meringue In a large bowl, beat egg whites, cornstarch and cram of tarter at high speed with an electric mixer. Mix until soft peaks form.Add sugar one tablespoon at a time, beating well after each addition. Spoon meringue onto pie, swirling to make soft peaks. Sprinkle shredded coconut on top of the meringue. Place into the preheated oven and cook for several minutes until golden brown.Watch carefully as it will burn easily
Bake until meringue is light brown around the edges and the coconut is toasted and light brown in color.
Makes (1) 9 inch pie
One - 9 inch baked pie shell (Click for recipe on page 104)
Filling3 cups milk, divided1 cup granulated sugar1/8 teaspoon salt6 Tablespoons cornstarch1 cup flaked coconut3 Tablespoons butter1 Tablespoon pure vanilla extractadditional coconut - for garnish
Meringue3 large egg whites1 Tablespoon cornstarch1/4 teaspoon cream of tarter6 Tablespoons granulated sugar 1/2 cup shredded coconut
Old Fashioned Coconut Cream Pie

103Go to Index ©2016 www.grandmotherskitchen.ca
Preheat the oven to 450˚F.
Flute the edge of the pastry in your favourite way.Prick with at fork at 1” intervals and bake in a preheated oven for 10-12 minutes or until golden brown.Cool before adding the cooked filling. Shut off the oven. FillingIn a small bowl combine the rum, water and gelatin. Stir and set aside until gelatin has softened, about 5 minutes.In a saucepan combine the milk, egg yolks, sugar and cornstarch and stir or whisk until thoroughly combined.Heat over medium-high heat until mixture comes to a boil and thickens, whisking constantly.Remove from the heat and add the gelatin mixture. Stir until smooth, then transfer 1 cup of the hot mixture to a clean mixing bowl and add the chocolate morsels.Stir until the chocolate is melted and the mixture is smooth.Transfer the chocolate mixture into the cooled crust and refrigerate, lightly covered, for 30 minutes.In the meanwhile, leave the remaining custard in the pot, allowing it to continue cooling on the counter.
After 30 minutes, make the topping.
Pour the heavy cream and the confectioners’ sugar to a medium mixing bowl and beat until stiff peaks form.Remove 1 cup of the whipped cream and fold it into the remaining custard mixture.
Remove the pie from the refrigerator and fill with the custard.
Top with the remaining whipped cream and refrigerate until thoroughly chilled and set, at least 4 hours and up to overnight.
When ready to serve, garnish the pie with chocolate curls and cut into slices. Serve cold.
Makes (1) 9-inch pie
(1) 9-inch pie crust(Click for recipe on page 104)
Filling:3 Tablespoons white rum1 Tablespoon water1 envelope plain unflavored gelatin2 cups milk4 egg yolks2/3 cup granulated sugar1 Tablespoon cornstarch6 oz. semisweet chocolate morsels
Topping2 cups heavy cream3 Tablespoons confectioners’ sugar
Chocolate shavings, for garnish
Black Bottom Cream Pie
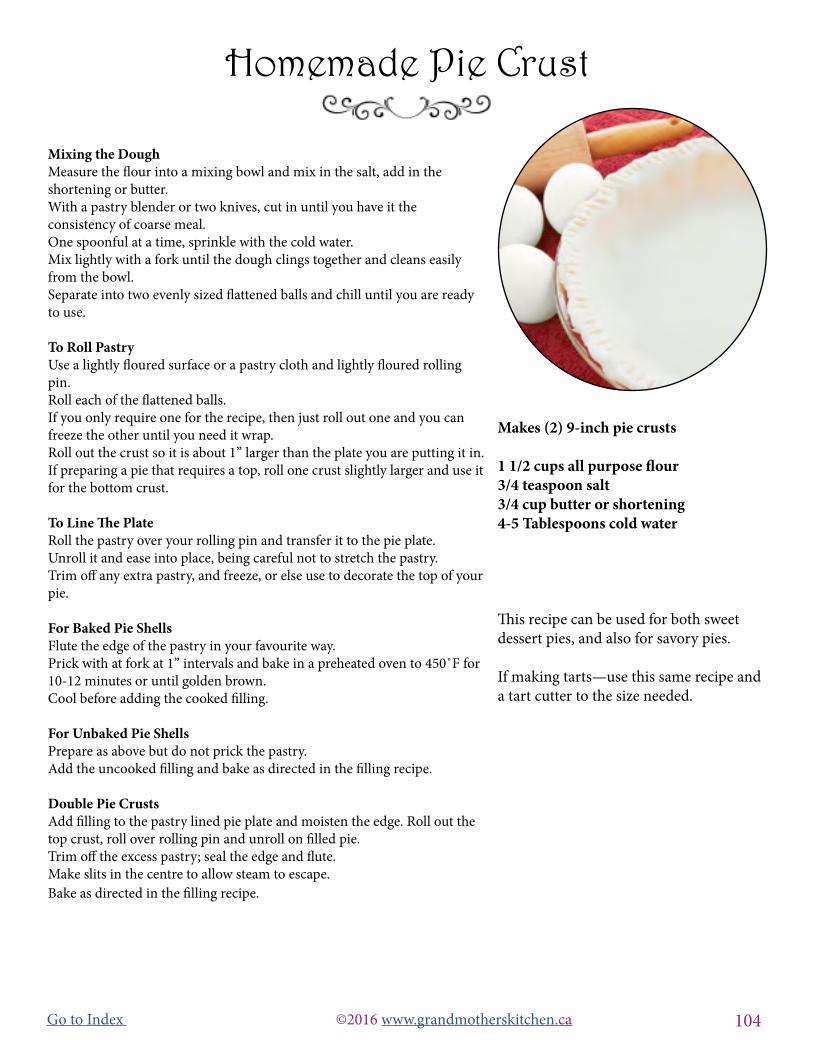
104Go to Index ©2016 www.grandmotherskitchen.ca
Mixing the DoughMeasure the flour into a mixing bowl and mix in the salt, add in the shortening or butter.With a pastry blender or two knives, cut in until you have it the consistency of coarse meal.One spoonful at a time, sprinkle with the cold water.Mix lightly with a fork until the dough clings together and cleans easily from the bowl.Separate into two evenly sized flattened balls and chill until you are ready to use.
To Roll PastryUse a lightly floured surface or a pastry cloth and lightly floured rolling pin.Roll each of the flattened balls.If you only require one for the recipe, then just roll out one and you can freeze the other until you need it wrap.Roll out the crust so it is about 1” larger than the plate you are putting it in.If preparing a pie that requires a top, roll one crust slightly larger and use it for the bottom crust.
To Line The PlateRoll the pastry over your rolling pin and transfer it to the pie plate.Unroll it and ease into place, being careful not to stretch the pastry.Trim off any extra pastry, and freeze, or else use to decorate the top of your pie.
For Baked Pie ShellsFlute the edge of the pastry in your favourite way.Prick with at fork at 1” intervals and bake in a preheated oven to 450˚F for 10-12 minutes or until golden brown.Cool before adding the cooked filling.
For Unbaked Pie ShellsPrepare as above but do not prick the pastry.Add the uncooked filling and bake as directed in the filling recipe.
Double Pie CrustsAdd filling to the pastry lined pie plate and moisten the edge. Roll out the top crust, roll over rolling pin and unroll on filled pie.Trim off the excess pastry; seal the edge and flute.Make slits in the centre to allow steam to escape.Bake as directed in the filling recipe.
Makes (2) 9-inch pie crusts
1 1/2 cups all purpose flour3/4 teaspoon salt3/4 cup butter or shortening4-5 Tablespoons cold water
This recipe can be used for both sweet dessert pies, and also for savory pies.
If making tarts—use this same recipe and a tart cutter to the size needed.
Homemade Pie Crust