reconstructing transparent objects by refractive light...
TRANSCRIPT

Reconstructing Transparent Objects by
Refractive Light-Path Triangulation
by
Eron Steger
A thesis submitted in conformity with the requirementsfor the degree of Master of Science
Graduate Department of Computer ScienceUniversity of Toronto
Copyright c© 2006 by Eron Steger

Abstract
Reconstructing Transparent Objects by Refractive Light-Path Triangulation
Eron Steger
Master of Science
Graduate Department of Computer Science
University of Toronto
2006
This thesis presents a method for reconstructing the shape of specular, transparent ob-
jects from multiple viewpoints. This method works on scenes where light refracts through
the object twice, entering and exiting the object’s surface. Scenes are reconstructed by
determining the 3D path light takes through each pixel on a camera’s image plane.
Triangulating this light path is accomplished by finding the one that is consistent with
known light rays from multiple viewpoints of the scene, determined using an environment-
matting based approach. It is shown that this method requires at least three viewpoints
to triangulate light paths in general, four if the index of refraction is unknown. Also,
shapes and camera configurations for which light-path triangulation fails regardless of
the number of viewpoints are explored. Results of our method applied to several glass
objects are analyzed.
ii

Acknowledgements
This work would not have been possible without the assistance of my supervisor Kyros
Kutulakos, whose insights helped bring this work to fruition. I would also like to thank
Allan Jepson and Alex Kolliopoulos for their help reviewing this thesis. For assistance
in setting up the equipment necessary for this research, I thank John Hancock. Thanks
goes to all those in the DGP who made the lab an enjoyable place to work, including
Abhishek, Anand, Azeem, Gonzalo, Jack, Jacky, Joe, Kevin, Mike, Nigel, Noah, Patricio,
Pierre, Sam, and Winnie. This work was supported in part by the National Sciences and
Engineering Research Council of Canada under the PGS-M program and by the Ontario
Graduate Scholarships in Science and Technology program.
iii

Contents
1 Introduction 1
1.1 Motivation . . . . . . . . . . . . . . . . . . . . . . . . . . . . . . . . . . . 1
1.2 Summary of Contributions . . . . . . . . . . . . . . . . . . . . . . . . . . 2
1.3 Thesis Structure . . . . . . . . . . . . . . . . . . . . . . . . . . . . . . . . 3
2 Background 5
2.1 Refraction . . . . . . . . . . . . . . . . . . . . . . . . . . . . . . . . . . . 5
2.1.1 Index of Refraction . . . . . . . . . . . . . . . . . . . . . . . . . . 7
2.1.2 Snell’s Law . . . . . . . . . . . . . . . . . . . . . . . . . . . . . . 9
2.1.3 Total Internal Reflection . . . . . . . . . . . . . . . . . . . . . . . 10
2.2 Appearance Models . . . . . . . . . . . . . . . . . . . . . . . . . . . . . . 10
2.2.1 Light Fields . . . . . . . . . . . . . . . . . . . . . . . . . . . . . . 12
2.2.2 Environment Matting . . . . . . . . . . . . . . . . . . . . . . . . . 13
2.3 Specular Reconstruction . . . . . . . . . . . . . . . . . . . . . . . . . . . 16
2.3.1 Reflective Distortion . . . . . . . . . . . . . . . . . . . . . . . . . 17
2.3.2 Multi-media Photogrammetry . . . . . . . . . . . . . . . . . . . . 19
2.3.3 Polarization . . . . . . . . . . . . . . . . . . . . . . . . . . . . . . 20
2.3.4 Visual Hull . . . . . . . . . . . . . . . . . . . . . . . . . . . . . . 21
3 Refractive Light-Path Triangulation 23
3.1 Scene Model . . . . . . . . . . . . . . . . . . . . . . . . . . . . . . . . . . 24
iv

3.2 Problem Statement . . . . . . . . . . . . . . . . . . . . . . . . . . . . . . 25
3.2.1 Viewing Scene With Multiple Cameras . . . . . . . . . . . . . . . 25
3.2.2 Light Path Consistency . . . . . . . . . . . . . . . . . . . . . . . . 27
3.2.3 Triangulating the Light Path . . . . . . . . . . . . . . . . . . . . 30
3.3 Triangulation Solution Space . . . . . . . . . . . . . . . . . . . . . . . . . 31
3.3.1 One Camera . . . . . . . . . . . . . . . . . . . . . . . . . . . . . . 31
3.3.2 Two Cameras . . . . . . . . . . . . . . . . . . . . . . . . . . . . . 32
3.3.3 Three Cameras . . . . . . . . . . . . . . . . . . . . . . . . . . . . 33
4 Reconstruction Method 35
4.1 Correspondence Map . . . . . . . . . . . . . . . . . . . . . . . . . . . . . 36
4.1.1 Setup . . . . . . . . . . . . . . . . . . . . . . . . . . . . . . . . . 36
4.1.2 Stripe Projection . . . . . . . . . . . . . . . . . . . . . . . . . . . 37
4.1.3 Determining the Backdrop Position . . . . . . . . . . . . . . . . . 39
4.1.4 Determining the Corresponding Ray . . . . . . . . . . . . . . . . 41
4.2 Reconstruction Algorithm . . . . . . . . . . . . . . . . . . . . . . . . . . 41
4.2.1 Light-Path Consistency Metric . . . . . . . . . . . . . . . . . . . . 42
4.2.2 Depth Sampling . . . . . . . . . . . . . . . . . . . . . . . . . . . . 45
4.2.3 Refining the Solution . . . . . . . . . . . . . . . . . . . . . . . . . 47
4.2.4 Estimating the Initial Light-Path Vertices . . . . . . . . . . . . . 49
4.2.5 Determining the Index of Refraction . . . . . . . . . . . . . . . . 50
4.3 Summary of the Triangulation Method . . . . . . . . . . . . . . . . . . . 50
4.4 Degeneracies in the Solution Space . . . . . . . . . . . . . . . . . . . . . 52
4.4.1 Shape Degeneracies . . . . . . . . . . . . . . . . . . . . . . . . . . 52
4.4.2 Camera Degeneracies . . . . . . . . . . . . . . . . . . . . . . . . . 57
5 Results 59
5.1 Introduction . . . . . . . . . . . . . . . . . . . . . . . . . . . . . . . . . . 59
v

5.2 Imaging Apparatus . . . . . . . . . . . . . . . . . . . . . . . . . . . . . . 59
5.2.1 Controllable Stages . . . . . . . . . . . . . . . . . . . . . . . . . . 60
5.2.2 Camera . . . . . . . . . . . . . . . . . . . . . . . . . . . . . . . . 61
5.3 Experimental Results . . . . . . . . . . . . . . . . . . . . . . . . . . . . . 62
5.3.1 Bohemian Crystal . . . . . . . . . . . . . . . . . . . . . . . . . . . 62
5.3.2 Ashtray . . . . . . . . . . . . . . . . . . . . . . . . . . . . . . . . 73
6 Conclusion 83
Bibliography 85
vi

List of Figures
2.1 A checker background refractively distorted by a transparent object. . . . 6
2.2 An incoming wavefront passing through the boundary between air and
water. . . . . . . . . . . . . . . . . . . . . . . . . . . . . . . . . . . . . . 8
2.3 An incoming ray refracted at the boundary between two media toward an
outgoing refracted ray. . . . . . . . . . . . . . . . . . . . . . . . . . . . . 9
2.4 Total internal reflection. . . . . . . . . . . . . . . . . . . . . . . . . . . . 11
3.1 Perspective projection and indirect projection of light. . . . . . . . . . . 26
3.2 Light paths for multiple cameras. . . . . . . . . . . . . . . . . . . . . . . 28
3.3 Diagram highlighting the properties of a light-path consistent with the
laws of refraction. . . . . . . . . . . . . . . . . . . . . . . . . . . . . . . . 30
3.4 Solution space of surfels at at a fixed 3D position with a single camera. . 32
3.5 Solution space of surfels at a fixed 3D position with two cameras. . . . . 33
3.6 Solution space of surfels at fixed 3D positions with three cameras. . . . . 34
4.1 The light path of a pixel through backdrops at two locations. . . . . . . . 36
4.2 Physical setup for capturing correspondence maps. . . . . . . . . . . . . . 38
4.3 Tracing refraction backward to determine the second ray on a light path. 43
4.4 Determining the distance between the implied second ray of the light path
and the first ray of the light path. . . . . . . . . . . . . . . . . . . . . . . 45
4.5 Sampling the space of points along the first and last light-path rays. . . . 46
vii

4.6 Estimating the initial light-path vertices. . . . . . . . . . . . . . . . . . . 49
4.7 The refractive light path triangulation method for reconstructing the shape
of specular, transparent objects. . . . . . . . . . . . . . . . . . . . . . . . 51
4.8 Degeneracies for parallel planes. . . . . . . . . . . . . . . . . . . . . . . . 53
4.9 Degeneracies for spheres. . . . . . . . . . . . . . . . . . . . . . . . . . . . 56
4.10 Ambiguity due to the first and last light-path rays being along the same
plane. . . . . . . . . . . . . . . . . . . . . . . . . . . . . . . . . . . . . . 58
5.1 Apparatus used to capture the correspondence maps. . . . . . . . . . . . 60
5.2 Bohemian crystal with a diamond cut. . . . . . . . . . . . . . . . . . . . 63
5.3 Reference and rotated views of the Bohemian crystal used for reconstruction. 64
5.4 Reconstruction of the Bohemian crystal figure. . . . . . . . . . . . . . . . 66
5.5 3D view of the reconstructed surfels from the Bohemian crystal dataset. . 67
5.6 Facet labels on the Bohemian crystal. . . . . . . . . . . . . . . . . . . . . 68
5.7 Pixels whose objective functions are shown in Figure 5.8. . . . . . . . . . 71
5.8 Optimization function for the Bohemian crystal. . . . . . . . . . . . . . . 72
5.9 Glass ashtray. . . . . . . . . . . . . . . . . . . . . . . . . . . . . . . . . . 73
5.10 Reference and rotated views of the ashtray used for reconstruction. . . . 74
5.11 Reconstruction of the ashtray. . . . . . . . . . . . . . . . . . . . . . . . . 75
5.12 3D views of the reconstructed surfels from the ashtray dataset. . . . . . . 76
5.13 Area on the ashtray used for the planarity measurement. . . . . . . . . . 77
5.14 Ashtray split into four regions for analysis. . . . . . . . . . . . . . . . . . 78
5.15 Optimization function for a pixel within region A of the ashtray. . . . . . 80
5.16 Optimization function for a pixel within region B of the ashtray. . . . . . 81
5.17 Optimization function for a pixel within region C of the ashtray. . . . . . 81
5.18 Optimization function for a pixel within region D of the ashtray. . . . . . 82
viii

Chapter 1
Introduction
When looking at a glass of water, we do not see the glass directly. Instead, we see
a distortion of the scene behind. This effect is known as refraction and can be seen
through any transparent or translucent object. Consider what this distortion tells us
about the glass’s shape. Clearly, the shape of the object affects the appearance of the
refractive distortion. While the physics behind refraction are well known, determining
the path light takes through a transparent object is nontrivial. In this thesis, we describe
a method to determine the light paths through a scene containing a specular, transparent
object1, given images of it from multiple viewpoints.
1.1 Motivation
Reconstructing the shape of transparent objects is an open problem in the computational
vision community. Unlike most opaque objects, transparent objects do not have a local
appearance. Instead, their appearance is primarily from light reflecting or refracting off
their surface. This causes methods that rely on local reflectance models [49] or tracking
features on an object’s surface [2, 17] to fail. To analyze the shape of a transparent
1We often refer to specular, transparent objects simply as transparent objects.
1

Chapter 1. Introduction 2
object, one cannot ignore how light reflects and refracts off its surface.
Many methods currently exist for analyzing refraction within a scene. The field
of Multi-media Photogrammetry specifically deals with the problem of analyzing light
travelling through at least two different media. Unfortunately, limitations of existing
methods do not make them ideal for analyzing many transparent objects. For instance,
some methods only analyze light undergoing refraction once, such as light coming from
the bottom of a pool to a viewer above the water’s surface [32, 33]. To analyze transparent
objects such as diamonds and glass figurines, we must consider light refracting twice—
first when it enters the object and again as it exits the object. While there are methods
that can deal with light refracting more than once, they often require the object’s shape
to fit a predefined parametric model [4]. The method we present can determine the path
light takes through more general scenes.
A wide variety of methods can be used to determine the shape of transparent objects
by analyzing how light reflects off their surfaces [5, 16, 42]. These methods are usually
geared for mirror surfaces, however they can also be applied to transparent surfaces as
they almost always reflect light. Unfortunately, since light reflecting off a transparent
object is only visible when it reflects at a relatively steep angle to the surface’s normal,
it is often difficult to capture the shape of the entire object. Since the appearance
of transparent objects is primarily from refraction, methods that analyze shape using
refraction should theoretically provide better results than those using reflection.
1.2 Summary of Contributions
• We present a theoretical framework for determining the path of light refracting
through a specular, transparent scene. We show how to evaluate a hypothesized
light path by determining if it is consistent with multiple viewpoints of the scene.
In our analysis, we show that at least three viewpoints of the scene are necessary

Chapter 1. Introduction 3
to unambiguously determine such light paths using our method.
• We present a novel method to determine the light paths that refract twice through
a specular, transparent object. Our method is local, that is, it is able to determine
the light path going through a pixel without considering the shape of surrounding
pixels. Unlike methods that rely solely on analyzing the silhouette of an object,
our method can determine the shape of concave objects.
• We provide experimental results of our method applied to real transparent scenes.
We analyze the quality these results and highlight cases where our method failed
to uniquely determine light paths through the scene.
1.3 Thesis Structure
The structure of this thesis after the introduction is as follows. In Chapter 2, we present
background information. This includes a summary of refraction, image-based models
useful for representing specular scenes, and previous methods for reconstructing the shape
of specular scenes.
Chapter 3 presents a theoretical framework for analyzing the path of light refracting
through a scene. We introduce the notion of light-path consistency to describe light paths
that are consistent with images from several viewpoints of a scene.
In Chapter 4, we describe our method for reconstructing the shape of transparent
scenes. First, we describe how to determine part of the light path from images of a
transparent object distorting a known backdrop placed behind it. We then present an
algorithm to fully determine light paths within the scene by finding those that are con-
sistent with the data obtained in the first step. Finally, we present an analysis of cases
where the problem of determining the light path is ambiguous no matter how many views
of the scene we have.

Chapter 1. Introduction 4
We present the results of our method on real transparent objects in Chapter 5. First,
we describe the imaging apparatus used to capture images of the scene. Next, we show
the results from our method by applying the algorithms from Chapter 4 to images of
a transparent scene captured from several viewpoints. These results are analyzed to
determine the quality of the reconstruction.
In Chapter 6, we conclude by summarizing the major contributions of this thesis and
discuss possible future areas of research related to this work.

Chapter 2
Background
There has been much fascination within the computer graphics and computer vision
communities in transparent scenes. This is evidenced by the many models that exist for
representing their reflective and refractive properties. Some of these models take into
consideration the entire image formation process, analyzing how light rays interact with
surfaces in the scene. Others mainly ignore this, concentrating on only capturing the
scene’s appearance.
Before describing our approach for capturing the shape of specular, transparent
scenes, we first consider previous related work. In the first section, we look at how
refraction in light works, detailing its fundamental properties. Next, we present ap-
pearance models useful for representing transparent scenes, with a particular interest in
Environment Matting as it plays a key role in our reconstruction method. Finally, we
describe previous methods for reconstructing the shape of specular scenes.
2.1 Refraction
Refraction is the change in a light wave’s direction as it passes from one transparent
medium to another. The appearance of a refractive object is a distortion of the scene
behind it. This effect can be seen when looking through a glass object (Figure 2.1).
5

Chapter 2. Background 6
Figure 2.1: A checker background refractively distorted by a transparent object.

Chapter 2. Background 7
Refraction occurs due to differences in the optical densities of the transparent media
light is travelling through. The optical density of a medium affects the speed of light
travelling through it. Light moves faster through a medium of low optical density than
through a medium of high optical density. The speed of light is maximized when it is
travelling through a vacuum.
Consider a wavefront of light travelling from a medium of low optical density, such as
air, to a medium of higher optical density, such as glass. Suppose the boundary between
the two media is at an angle to the incoming wavefront (Figure 2.2). As a light wave
passes through the boundary between the media, part of it will be in the low density
medium while the other part is in the higher density medium. Different parts of the light
wave move at different speeds, causing it to bend [18]. A similar effect occurs as light
moves from a high density material to a low density material.
The angle between the wavefront and the boundary between the two media affects
how much the light bends due to refraction. As this angle increases, the light bends
further. If the wavefront and the boundary are parallel to each other, the light does not
bend at all.
2.1.1 Index of Refraction
To describe the optical density of a medium, we measure its index of refraction [18]. This
index describes the ratio between the speed of light travelling through a vacuum and the
speed of light travelling through the medium. Specifically, the index of refraction for a
medium is:
a = c/v (2.1)
where a is the index of refraction, c is the speed of light in a vacuum, and v is the speed
of light travelling through the medium.

Chapter 2. Background 8
wavefront
medium boundarywaterair
Figure 2.2: An incoming wavefront passing through the boundary between air and water.
Parallel black lines represent waves, while red arrows show the direction of these waves. As
a wave pass through the boundary between air and water, it slows down. Since the medium
boundary is not parallel with the incoming wavefront, parts of the wave will be on each side of
the boundary. This means that different parts of the wave move at different speeds. This causes
the wave to bend. Also, due to the change in speed, the wavelength of the light is reduced.

Chapter 2. Background 9
incoming ray
refracted ray
medium boundary
normal
Figure 2.3: An incoming ray refracted at the boundary between two media toward an outgoing
refracted ray. The angle between the normal and the incoming ray is θi, and the angle between
the refracted ray and the normal is θr. Snell’s law describes the relationship between θi, θr,
and the indices of refraction of the two media.
2.1.2 Snell’s Law
We can describe how refraction bends a ray of light using Snell’s Law. Snell’s Law [18]
describes the relationship between an incoming light ray, the outgoing refracted ray, the
normal at the medium boundary, and the indices of refraction of the two media (Figure
2.3). Snell’s Law is defined as:
ai sin(θi) = ar sin(θr) (2.2)
where θi and θr are the angles between the incoming and outgoing light rays and the
surface normal, respectively, and ai and ar are the indices of refraction of the media
containing the incoming and outgoing rays.

Chapter 2. Background 10
2.1.3 Total Internal Reflection
For light moving from a higher density medium to a low density medium, that is, ai > ar,
Snell’s law implies θi > θr. For some angle γ, when θi > γ, θr will be greater than 90
degrees. In this case, Equation 2.2 does not describe the path the light takes. The angle
at which this occurs is known as the critical angle. We can derive the critical angle from
Snell’s law as:
γ = arcsin(ar/ai) (2.3)
When θi is greater than the critical angle, no refraction occurs. Instead, we get an
effect called total internal reflection. In this case, instead of refracting at the boundary
between two mediums, light is reflected (Figure 2.4).
Fiber optic cable takes advantage of this effect to transmit light through it. The cable
is made of solid glass, which is optically denser than air. As long as the cable is not bent
too much, the angle between the normal of the surface of the cable and any incoming
light waves will be larger than the critical angle between glass and air. This causes total
internal refraction to occur, allowing the light to travel through the entire length of the
cable.
2.2 Appearance Models
While geometric models describe the shape of a scene, it is also important to consider
its appearance. Appearance models provide a description of a scene’s appearance, often
without taking its geometry into account. Such models can provide the basis for rendering
the scene from novel viewpoints [15, 25, 37, 44, 48], with modified lighting [9], or with
modified reflectance properties [3]. Appearance models can in some cases be used to
determine geometric models.

Chapter 2. Background 11
incoming ray
refracted ray
medium boundary
normal
= 90º
=
(a)
incoming ray
reflected ray
medium boundary
normal
reflect
(b)
Figure 2.4: (a) When angle of incidence (θi) is equal to the critical angle (γ), the angle of
refraction (θr) is maximized at 90◦. (b) When the angle of incidence is greater than the critical
angle, no light is refracted, and total internal reflection occurs. The angle of reflection (θreflect)
is equal to the angle of incidence.

Chapter 2. Background 12
2.2.1 Light Fields
Light fields, introduced by Levoy and Hanrahan in [25] and Gortler et al. in [15], are a
model for representing all light rays within a scene using a 4-dimensional representation.
From this model, it is possible to generate images of a scene from nearly any viewpoint
with the appearance of light accurately reproduced, including global effects such as re-
flection and refraction. This model is appearance based and does not require geometric
information of the scene.
Plenoptic Function
The light field representation is based on the plenoptic function [1]. This function de-
scribes the radiance going in any direction from any point in a scene. The full plenoptic
function P is defined as:
P = P (ω, θ, λ, t, Vx, Vy, Vz) (2.4)
where Vx, Vy, Vz is the point in the scene, ω, θ is the direction of the light, λ represents
the light’s wavelength, and t represents the time. If we assume time and wavelength are
constant, this reduces to a 5-dimensional function.
Light Slabs and the Lumigraph
The light field representation simplifies this to a 4-dimensional representation by only
considering light that is not occluded by the scene. This simplification takes into ac-
count that radiance along a light ray is the same for any unoccluded points along it. A
ray of light is parameterized as its intersection points with two arbitrary planes. This
parameterization is called a light slab or Lumigraph. It is defined as:
L(u, v, s, t) (2.5)
where L is the Lumigraph function returning the radiance of a given light ray, u,v is the
intersection point of the light ray with the first plane, and s,t is the intersection point

Chapter 2. Background 13
of the light ray with the second plane. The intersection points are represented as local
coordinates on their corresponding planes.
Capturing Light Fields
Light fields are captured by taking a set of images of the scene from different camera
positions and orientations. The method used in both [15] and [25] capture images of the
scene from a set of viewpoints along a plane. This plane is split into a set of equally
spaced grid points, with each point representing a position sampled along one of the
Lumigraph’s planes. The other Lumigraph plane is sampled at the intersection points of
the view rays of pixels in each image.
Levoy and Hanrahan [25] analyze a variety of possible capture setups, considering
issues such as the viewpoints used to capture the scene, the camera’s aperture size, and
the scene’s lighting. These issues affect the quality of novel viewpoints reconstructed
using the light field model. Gortler et al. [15] developed a method of reducing aliasing
artifacts in these reconstructions by taking a rough estimate of the scene’s shape into
account.
2.2.2 Environment Matting
Traditional matting and compositing processes, such as blue screen matting, are used to
separate a foreground object from a single coloured backdrop [10]. Once separated, the
image of the foreground object can be inserted into another scene. With blue screen
matting, images of a foreground object are taken in front of a solid coloured backdrop.
From these images, a pixel is determined to be in the background if it is close to the
colour of the backdrop, otherwise it is identified as part of the foreground. Unfortunately,
this method is limited as it can only handle opaque foregrounds. Smith and Blinn [43]
present a method to determine the transparency of objects by capturing the scene using
two backdrops. While this method is an improvement on blue screen matting, it cannot

Chapter 2. Background 14
capture the reflective and refractive properties of specular objects.
Environment Matting, introduced by Zongker et al. in [50], is a technique for cap-
turing the appearance of scene depending on the environment surrounding it. Unlike
previous matting techniques, it is able to reproduce effects such as reflection and refrac-
tion. An environment matte describes how the foreground, background, and surrounding
environment combine to form the appearance of each pixel. The colour of each a pixel
C in the scene is modelled as:
C = F + (1 − α)B + φ (2.6)
where F is the foreground colour, B is the background colour, α is the transparency of the
foreground object, and φ describes the contribution of light from the environment. This
equation is called the environment matting equation and is the basis for the environment
matting technique.
Suppose we describe the environment as a function E(ω) returning the incoming
radiance from the environment for all directions ω. We can then describe the effect the
environment has on a specific pixel as:
φ =
∫R(ω)E(ω)dω (2.7)
where R(ω) is an attenuation function specific to the pixel describing how much light
from any direction ω in the environment is reflected toward the camera. To determine a
pixel in the environment matte, we must determine F , B, α, and R(ω).
Capturing an Environment Matte
To capture an environment matte, images of the scene are taken from a single viewpoint
with one or more monitors placed around the object. In each image, a different pattern
is displayed from the monitors. These patterns are designed such that the area on the
backdrop seen through each pixel can be estimated. In [50], stripe patterns are used,
such that the stripes width changes logarithmically from image to image.

Chapter 2. Background 15
To determine an environment matte from these images, a three step approach is taken.
First, a coarse estimate of the coverage of each pixel is made to determine α. This is
done by determining if a pixel varies between images using different backdrops. Next,
F and B are determined by analyzing the scene behind two solid coloured backdrops.
Finally, R(ω) is determined by finding the rectangular area on each monitor that best
reconstructs the captured images using Equations 2.6 and 2.7. It is assumed that within
this rectangular area R(ω) is a constant, and for all other directions it is zero.
Environment Compositing
Once an environment matte is captured, images of the foreground object with novel
environments can be generated. This is done by calculating the environment matting
equation using different values for B and E(ω). For most scenes the generated image
looks very close to images of the actual scene with the new environment. However,
for some scenes the generated image and the actual image don’t match, such as those
containing glossy surfaces. This is due to the representation of R(ω) as a rectangular
area.
Changing the Backdrop’s Depth
An interesting extension to this technique is the construction of an environment matte
where backdrop can be moved to different depths. This is done by capturing the scene
with the monitor placed at two different depths, obtaining two rectangular areas repre-
senting R(ω) for each pixel. By interpolating and extrapolating between the two rectan-
gular areas for each pixel, environment mattes for any depth can by estimated.
Improving Accuracy and Capturing Environment Mattes in Real-time
In [8], Chuang et al. extend environment matting to overcome two key limitations, its
poor accuracy and its inability to handle motion. To increase accuracy, more images of

Chapter 2. Background 16
the scene are used as input. Instead of logarithmic patterns, a 1-dimensional Gaussian
stripe is moved across the monitor. While this requires more images than the original
method, it allows for the estimation of more accurate environment mattes.
To capture environment mattes in real-time, the number of images necessary to de-
termine it must be decreased. To accomplish this, a single colour-ramp backdrop is used.
Unfortunately, since less images are used, more assumptions need to be made about the
scene in order to capture the environment matte. This causes noticeable artifacts to
appear in the matte, the most noticeable of which is that specular highlights are not
captured. To overcome this a heuristic is used to add highlights, providing results that,
while not accurate, are visually pleasing.
Image Based Environment Matting
Wexler, Fitzgibbon, and Zisserman [47] describe a method for determining environment
mattes without the use of calibrated backgrounds. This is done by taking pictures of
the scene with the backdrop positioned at multiple locations. Unfortunately, the nature
of this setup means that different areas of the backdrop are occluded by the foreground
object in different images. To fill in the image of the backdrop, a homography mapping
the pixels from one backdrop position to another is determined. Using this mapping,
areas of the backdrop that are occluded in one image can filled in using another image
where that area is not occluded.
2.3 Specular Reconstruction
In this section, we discuss techniques for shape reconstruction of specular surfaces, both
reflective and refractive. Many shape reconstruction techniques use local reflectance
models [49], which do not model the global reflectance effects necessary to represent
specular scenes. Some techniques rely on tracking features points on surfaces [2, 17].

Chapter 2. Background 17
However, feature points seen on a specular surface are often not on the surface itself but
are instead a reflection from elsewhere in the scene. Due to this, methods that do not
take reflection or refraction into account will fail.
A wide variety of techniques have been developed to reconstruct specular surfaces.
Some techniques analyze how the surface reflectively or refractively distorts the scene sur-
rounding it. Other work looks at the polarization of light reflecting off specular surfaces.
Some ignore the surface’s reflectance properties altogether, instead analyzing silhouettes
of the surface.
2.3.1 Reflective Distortion
The appearance of a specularly reflective surface is a distortion of the scene around it.
The nature of this distortion is directly tied to surface’s shape. For example, the reflection
of a line off a planar mirror is also a line, while the reflection of a line off a spherical
mirror is a curve. Many techniques for reconstructing the shape of specular surfaces rely
on analyzing this distortion.
Single View
Savarese and Perona [41] determine the shape of a specular surface by analyzing how
lines from a calibrated pattern reflect off it. To do this, they derive a mapping between
the reflected lines as seen on the specular surface to the 2D curves they project to on the
image plane. Analyzing the first and second derivatives of these mappings allows them
to find explicit solutions for solving for the shape of planes and spheres. In [42], they
extend this work to provide explicit solutions for any smooth surface. Their techniques
are able to determine the depth, normal, and curvature for points on the surface.
Tarini et al. [45] describe a method to determine a depth and normal map for specular
mirror surfaces from an environment matte of the scene. The environment matte provides
a mapping between each pixel on the surface and a point on a backdrop that is being

Chapter 2. Background 18
reflected off the surface. First, they show the surface normal at a pixel can be determined
from its depth. This is done by finding the normal that directly reflects the incoming
light ray from the backdrop off the surface at the known depth toward the camera. Using
this, they create an initial estimate of the shape by choosing some initial depth for one
pixel and propagate depths to other pixels by following the implicitly defined normals.
They refine their estimate by integrating the normal map to determine a new depth map,
and then recalculate the normal map using the new depth map. This process is repeated
until convergence.
Multiple Views
Oren and Nayar [36] analyze the motion of feature points in a scene containing a specular
surface as the camera is moved. These feature points are either scene points viewed
directly, or ‘virtual’ feature points which are reflections of scene points. First, they
develop support functions to classify whether a feature point is part of the surface or
a reflection. Then, by analyzing the image trajectory of the virtual feature points as
the camera is moved, they reconstruct profiles of the object along the curves the feature
points reflect off the surface.
Bonfort and Sturm [5] describe a voxel carving approach for determining the shape of
specular surfaces. As input, images of a scene containing the unknown specular surface
are taken from a set of calibrated cameras. The surface reflects a pattern whose feature
points’ positions are known. The shape of the surface is modelled using a voxel grid.
From each camera, the voxels are assigned a set of normals such that they would reflect
scene points viewed through them toward the camera if the voxel represents the true
specular surface. The surface is then carved out of by discarding those voxels whose
normals are not consistent across the cameras.

Chapter 2. Background 19
Videokeratography
As the eye is a specular surface, many techniques for analyzing specular surfaces come
from optometry. Analyzing the shape of the eye’s cornea has important medical uses,
such as fitting contact lenses or identifying astigmatisms. The field of analyzing the
cornea’s topography from images of the eye is known as Videokeratography [16, 22, 46].
Halstead et al. [16] present a method for determining a model of the cornea accurate
to within microns. Using a device known as a videokeratograph, an image of the eye is
taken with a pattern of concentric rings reflecting off it. Using a backward raytracer to
simulate the scene, a hypothesized model of the surface of the cornea can be evaluated
by comparing the edges of the concentric rings in the raytraced image with the edges in
the input image. By adjusting the surface model until these edges match, the shape of
the cornea can be determined.
2.3.2 Multi-media Photogrammetry
Much research in the vision community deals with the refraction of light. Multi-media
photogrammetry is the field analyzing how rays of light refract through a scene containing
several media before reaching the camera [4, 21, 32, 33]. Most of these techniques are
limited to dealing with parametric shape models of the scene [4, 21, 26], while others use
more general shape models [32, 33].
Ben-Ezra and Nayar [4] analyze scene points refracting through a transparent object
from multiple viewpoints to determine its shape, modelled as a superquadric ellipsoid.
The scene points are assumed to be distant from the object, so it can be assumed any rays
refracting toward the same scene point are parallel. Using this assumption, a hypothe-
sized shape can be analyzed by tracing light rays backward through it at each imaged
scene point from multiple viewpoints and measuring the variance in the direction of these
rays. For the true shape there is no variance in their direction. To determine the shape,

Chapter 2. Background 20
the ellipsoid’s parameters are optimized using a steepest-descent approach.
Much work deals with reconstructing the shape of moving water [32, 33]. Morris and
Kutulakos [32] determine depth and normal maps of the surface of water by analyzing
the distortion of a calibrated checkerboard pattern placed underwater. Given a point on
the pattern whose location is known, the depth of the water viewing that point implicitly
defines a normal refracting it toward the camera. For the true depth, the implicitly
defined normals are consistent across multiple cameras. To follow the shape of the water
over time, the feature points need to be tracked. Unfortunately, the feature points are
often obscured as the water moves. To handle this problem, a heuristic was developed
to identify feature points as they go in and out of view.
2.3.3 Polarization
The polarization of light reflecting off a specular surface is dependent on its shape. For
example, unpolarized light reflecting off a smooth surface becomes partial linear polarized
[40]. Many reconstruction methods take advantage of this to determine the normal map
of specular scenes.
Saito et al. [40] present a method for determining surface orientation across trans-
parent objects by analyzing the polarization of specularly reflected light. They first
determine the angle of polarization and degree of polarization across an image of an
evenly lit scene containing the object. By analyzing the angle of polarization, they de-
termine the plane containing the camera, the surface normal, and the incoming light ray
reflecting off the surface. Then using the degree of polarization, they determine the angle
of reflection, restricting the normal to a finite set. Using a heuristic, they determine a
unique normal.
To analyze the polarization of the scene, multiple images of it are taken with a linear
polarizer placed in front of the camera. In each successive image, the linear polarizer is
rotated a constant amount from the previous image. These images are taken until the

Chapter 2. Background 21
polarizer has been rotated by 180◦. To determine the angle of polarization of a pixel, they
find the polarizer rotation that maximizes its intensity. The degree of polarization of a
pixel can be measured by dividing the difference of the maximum and minimum intensities
with the unpolarized pixel intensity. The unpolarized intensity can be determined by
taking the sum of the maximum and minimum intensities.
A major issue with this method is that it does not provide a one-to-one mapping
between the angle and degree of polarization, and the surface normal. Miyazaki et al.
[30, 31] describe a method to handle this ambiguity by analyzing the scene from two view
points, one slightly tilted from the other. They segment the surface along curves where
the degree of polarization is one, denoting such curves as Brewster curves. Within each
segment, the surface normals can be restricted to a subset of possible normals. From this
they are able to uniquely determine the normal for each point on the surface.
2.3.4 Visual Hull
The silhouette of an object is a useful feature for determining its shape and is the basis
for determining an object’s visual hull. The visual hull of an object is the smallest volume
encompassing all possible shapes that project within the silhouettes seen from a set of
viewpoints. These methods do not require analysis of the reflectance properties of an
object, thus they work equally well for opaque and transparent scenes.
Usually we are restricted to capturing images of the silhouette from camera positions
outside the object’s convex hull. Thus, it is useful to consider the external visual hull
of an object, which is the visual hull consisting of all views outside the object’s convex
hull. Unfortunately, such a visual hull can only fully define shapes that are convex. For
concave objects, the shape can be only be partially determined.
Matusik et al. [27] describe an image-based approach to rendering visual hulls. In-
stead of determining the shape of the hull beforehand, they determine where the view ray
for each pixel in a desired view intersects with the visual hull. This is done by projecting

Chapter 2. Background 22
the view ray into multiple silhouette images and determining the intervals along it that
fall within silhouette in all the images.
In [28], this work is extended by representing image silhouettes as alpha mattes. This
provides higher quality results on specular scenes and scenes containing fuzzy materi-
als. In [29] this work is further extended by using environment matting to capture the
reflective and refractive properties of specular scenes.

Chapter 3
Refractive Light-Path Triangulation
Reconstruction of transparent objects is complicated by the fact that they do not have a
local appearance. Instead, their appearance is primarily from refraction, which appears
as a distortion of the scene behind it. As this distortion changes depending on the
viewpoint, it is difficult to find useful correspondences between images for determining
the shape.
In order to analyze the shape of a transparent object, it is important to consider how
light propagates through the scene it is contained within. Each view of the scene provides
some information about light propagating toward the camera. Given enough views of the
scene, if light only intersects with the surface of the object twice1, we can constrain the
problem to a finite set of possible shapes. This idea is the basis for refractive light-path
triangulation.
In this chapter we describe the theory behind refractive light-path triangulation. We
first define a model describing light propagation through a scene containing a transparent
object. From each camera, we can partially determine how light propagates through the
scene toward it. Using this, we constrain the shape to those that are consistent with our
knowledge of light propagation from multiple viewpoints. We then show that under this
1Specifically, the path light takes from its source through the scene toward the camera only entersand exits the object once.
23

Chapter 3. Refractive Light-Path Triangulation 24
model, there is a minimum number of viewpoints necessary to constrain the shape to a
finite set of solutions.
3.1 Scene Model
Consider a scene consisting of a transparent object with a homogeneously dense interior
and a specularly smooth surface of arbitrary and unknown shape. As the object is
smooth, incident light on the surface is not scattered2. We further assume that the
surface is reflective. Within such a scene, incident light at the surface of the object can
only be refracted [13, 34]. Given these restrictions, light propagation throughout the
scene is linear except when it refracts at the object’s surface. Finally, we assume that
light travelling through the object is refracted exactly twice, once as it enters the object
and again as it exits the object.
Suppose we have a camera viewing this scene from viewpoint c. Let us consider a 3D
point p in the scene that is observed by some pixel located at 3D point q on the camera’s
image plane. If our view of this point is not obscured by the object—that is, the path
from p to c does not pass through the object—q will be located at the intersection point
of this path and image plane (Figure 3.1(a)). This projection of point p to pixel q is
referred to as perspective projection [7].
Now suppose our view of point p through pixel q is obscured by the transparent
object. For light from p to reach the camera through pixel q, it must take a path
through the object, refracting at the object’s surface. We refer to this path as the light
path of pixel q (Figure 3.1(b)). Since light travels linearly through the scene except when
it refracts at the object’s surface, the light path is a piecewise linear curve. We refer
to the points where the light path changes direction—when it intersects the object—as
its vertices. We assume that the light path of pixel q intersects with the surface exactly
2This differs from a Lambertian scene where incident light on a surface scatters uniformly.

Chapter 3. Refractive Light-Path Triangulation 25
twice, and thus has two vertices. Note that in this case perspective projection fails to
describe how light from a scene point reaches the image plane, as it ignores the effect
refraction has on the light path.
In order to take refraction into account, we need to consider how light indirectly
projects from point p through to pixel q. We do this by following the light path of the
pixel. Let b be the point along the light path that first intersects with the object, nb be
the normal of the surface at this point, and ℓb be the ray from p to b (Figure 3.1(b)).
Incident light along ray ℓb is refracted at the surface of the object at point b to a ray ℓm
inside the object. The light path continues inside the object along this ray till it intersects
the surface a second time. Let f be this intersection point and nf be the surface’s normal
at this point. Incident light on the path along ray ℓm is refracted away from the object
at the surface of the object at point f to a ray ℓf . This ray travels from f to camera c,
intersecting the camera’s image plane at pixel q.
3.2 Problem Statement
Consider the light path of a pixel q in the scene that is obscured by the transparent
object. Suppose we know for this light path the ray ℓb entering the object, as well the
ray ℓf exiting the object toward the camera. We would like to determine the points b
and f , and surface normals nb and nf , fully determining the light path. As we will see
later, given information only from a single camera, the problem is under-constrained.
3.2.1 Viewing Scene With Multiple Cameras
To constrain the problem, we extend our scene model to consider 3 camera views3. We
refer to c1 as the position of the reference camera and c2 and c3 as the positions of
the validation cameras (Figure 3.2). We define 3 different light paths through f by
3We describe in §3.3 why we need at least 3 cameras to sufficiently constrain the problem.

Chapter 3. Refractive Light-Path Triangulation 26
q
p
c
(a)
q
c
f
b
p
(b)
Figure 3.1: Light projection. A scene point p viewed by a camera c projects to some
pixel q. (a) If p can be viewed directly by the camera, the relationship between p and
q can be described by perspective projection. That is, q will be located where the line
from p to c intersects the image plane. (b) If the camera’s view of point p is obscured
by a transparent object, perspective projection fails to describe the relationship between
p and q. To take into account refraction at the surface of the object, we must consider
the light path of the pixel, which describes how the point p projects through the scene
to the camera. The points b and f are where the light path intersects the object, with
associated surface normals nb and nf , respectively. The path is composed of segments
ℓb, ℓm, and ℓf .

Chapter 3. Refractive Light-Path Triangulation 27
appending the camera as a subscript to our original notation. Perspectively projecting f
in the reference camera, we obtain the pixel q1. Light path 1 is the light path through
q1.
To analyze the scene from the validation cameras, we again consider the light paths
going through point f . Perspectively projecting f into the validation cameras, we obtain
pixel locations q2 and q3 for cameras c2 and c3, respectively. Light path 2 is the one
through q2 on camera 2 and light path 3 is the one through q3 on camera 3. The light
paths through both the reference camera and the validation cameras all exit the object
at the same surface point f with normal nf , so no subscript is used when referring to
these.
Consider the light path through the reference camera. Suppose we know the ray ℓb1
entering the object, as well the ray ℓf1 exiting the object toward the camera. Moreover,
suppose for each camera ci, we know for any pixel qi the first and last rays along its light
path, denoted ℓbi and ℓfi , respectively. On the reference camera’s light path we would
like to determine the points b1 and f , and surface normals nb1 and nf . Moreover, we
would also like to determine b2, b3, nb2 , and nb
3 , fully determining the light paths in
the validation cameras. Informally, refractive light-path triangulation is the problem of
determining these variables such that they are consistent with the known light rays in
the reference and validation cameras.
3.2.2 Light Path Consistency
We know that the point f must be somewhere along ray ℓf1. Suppose we hypothesize
its depth along this ray, letting f be the hypothesized point. Let us also hypothesize a
surface normal nf for this point. We would like to know whether this point-normal pair
is consistent with the known rays of the light paths going through it.
We first consider consistency with a single camera at viewpoint c. Perspectively
projecting f determines a pixel q on the image plane of the camera. The light path for

Chapter 3. Refractive Light-Path Triangulation 28
c1
c2
c3
12
3
q1
q2
q3
f
Figure 3.2: Light paths for multiple cameras. Notation is the same as in Figure 3.1 with
the addition of subscripts denoting the camera the light path is associated with. Each
view of point f on the surface of the object goes through a different light path. All light
paths first refract at different points (b1,b2,b3) on the surface of the object, travelling
through till refracting at shared surface point f , then finally travelling to their respective
cameras.

Chapter 3. Refractive Light-Path Triangulation 29
q is made up of the rays ℓb, ℓm, and ℓf , where ℓb and ℓf are known. Unknown on this
light path are ray ℓm along with surface intersection points b and f , as well as their
corresponding surface normals nb and nf .
For a light path to be consistent with the laws of refraction, it must hold the following
constraints (Figure 3.3) [13]:
• Planarity constraint: Incident light refracting at the surface of the object is
planar with the surface normal and the refracted light. Thus, ℓb, nb, and ℓm are
on a plane, and similarly, ℓm, nf , and ℓf are on a plane.
• Refraction constraint: For light refracting at the surface of the object, the angle
of incidence, angle of refraction, and surface normal are related by Snell’s law (See
§2.1.2). Thus:
a1αi = a2αr (3.1)
where αi is the angle between ℓb and nb, αr is the angle between ℓb and −nb, and
a2 and a1 are the indices of refraction of the object and the medium surrounding
it, respectively. Similarly:
a2θi = a1θr (3.2)
where θi is the angle between ℓf and −nf , and θr is the angle between ℓf and nf .
This leads to the following definition:
Definition 1. Consider the light-path through a 3D point f on some camera c. Suppose
that the first ray ℓb and last ray ℓf along this light path are known. We say that a
position-normal pair⟨f , nf
⟩defining the last light-path vertex is light-path consistent
with camera c if there exists a point b and normal nb defining the first vertex such that
the resulting light-path satisfies the planarity and refraction constraints.
Such position-normal pairs are often referred to as surfels [20, 38].

Chapter 3. Refractive Light-Path Triangulation 30
Figure 3.3: Diagram highlighting the properties of a light-path consistent with the laws of
refraction. Incident light refracting at the surface of the object is planar with the surface
normal and the refracted light (planes shown in orange). The relationship between the
angles of incidence and refraction of these rays is dictated by Snell’s law.
3.2.3 Triangulating the Light Path
Knowing that a light path is consistent with a camera allows us to determine whether
a surfel could represent the true surface. However, as described earlier, a single camera
does not fully constrain the set of solutions. Instead, we need to determine whether a
surfel is consistent with a set of cameras. Also, consistency does not provide a method
of determining which surfel represents the true surface, but instead provides a test that
describes whether or not a given surfel is ‘correct’ given what we know about the scene.
This leads to following definition:
Definition 2. Refractive light-path triangulation is the assignment of a depth d and
normal nf for a pixel q1, such that the surfel s = 〈f , nf 〉 is light-path consistent with all
camera views, where f = c1 + d ℓf
‖ℓf‖.

Chapter 3. Refractive Light-Path Triangulation 31
3.3 Triangulation Solution Space
The solution space of light-path triangulation differs depending on the number of camera
views we have of the scene. For a given pixel q1, we want to determine both a depth
and normal. The problem space can be encoded in 3 dimensions, with 1 dimension
representing the depth along the view ray and 2 dimensions representing the normal
at that point. We wish to determine the number of cameras necessary to restrict the
solution space to a 0-dimensional manifold, that is, a set of isolated set of depth/normal
pairs. To do this, we analyze how the solution space for this pixel changes as we add
more cameras to the scene.
3.3.1 One Camera
With a single camera, we know the rays ℓb1 and ℓf1 on the light path of the pixel. We
first consider the solution space for a fixed depth (Figure 3.4(a)). This depth defines a
position f along the ray ℓf1. We wish to determine the normals of a surfel at this depth
that are light-path consistent with this camera. For a light path to be consistent, it must
refract at some point b1 along ray ℓb1 toward f . Each point b1 defines the ray ℓm1 , and
thus the incoming and refracted rays at both vertices of the light path (Figure 3.4(b)).
Assuming this light path is consistent with the laws of refraction, we can use these rays
to solve for the normals at both vertices (See §2.1)4. As the surfel’s normal is defined by
the position of b1 along ray ℓb1 , it is restricted to a 1D set (Figure 3.4(c)).
Now consider the entire solution space where the depth is not fixed. For any combi-
nation of depth and position along ray ℓb1 whose resulting light path is consistent with
the laws of refraction, we can determine a normal and thus a surfel that is light-path
consistent with our single view of the scene. Thus, the entire solution space with a single
camera is 2-dimensional.
4The light path will not be consistent with the laws of refraction if the angle between the normalimplicitly defined by Snell’s law and the incoming ray is past the critical angle. See §2.1.3.

Chapter 3. Refractive Light-Path Triangulation 32
1
1
1
(a)
11
1
1
(b)
N1
(c)
Figure 3.4: Solution space of surfels at 3D position f with a single camera. (a) A possible
light path refracting at b1 along known ray ℓb1 . With f fixed, b1 defines the normal nf .
(b) As we trace the position of b1 along ray ℓb1 , we define a set of surfel normals. (c) The
set of surfel normals obtained by tracing b1 along ray ℓb1 , mapped onto a sphere.
3.3.2 Two Cameras
Now consider the solution space if an additional camera is added to the scene. We again
first consider the problem for a fixed depth. The first camera restricts the set of light-
path consistent surfels at this depth to those whose normals are on a 1D set. For light
paths on the second camera, we know rays ℓb2 and ℓf2 (Figure 3.5(a)). In a similar manner
as with the first camera, the second camera also restricts the set of surfel normals to a
1D set. This set of normals is determined by the light paths refracting at f and points
along ray ℓb2 . The set of light-path consistent surfels is the intersection of the surfel sets
consistent with each camera (Figure 3.5(b)). It can be shown that in general, this is a
0-dimensional set [23].
Now consider the entire solution space where the depth is not fixed. Though we cannot
determine the depth, we can for any specific depth obtain a set of isolated normals. Thus,
the solution space with 2 cameras is 1-dimensional.

Chapter 3. Refractive Light-Path Triangulation 33
2
2
1
1
2
2
(a)
N1
N2
(b)
Figure 3.5: Solution space of surfels at 3D position f with two cameras. (a) Light paths
for the second camera refracting at positions along known ray ℓb2 . Tracing b2 along ray
ℓb2 defines a set of surfel normals. (b) The sets of normals obtained by tracing along b1
along ray ℓb1 in camera 1 and b2 along ray ℓb2 in camera 2, mapped onto a sphere.
3.3.3 Three Cameras
Now consider the solution space if we have three cameras viewing the scene. First consider
the problem for fixed depth. In general, the first two camera views restrict the normal
to a 0-dimensional set. In a similar manner, the third camera restricts the set of possible
normals to those along a 1-dimensional set. If this is the true depth of the surface, this set
will intersect with the 0-dimensional set obtained from the first two cameras at the true
normal (Figure 3.6(b)). In general, if this is not the correct depth, it will not intersect
except at an isolated set of depths (Figure 3.6(a)) [23].
Now consider the entire solution space where the depth is not fixed. The set of light-
path consistent surfels has been restricted to those at isolated depths. Moreover, for each
depth, we have restricted the surfels to an isolated set of normals. Thus, the entire set
of surfels that are light-path consistent is 0-dimensional.

Chapter 3. Refractive Light-Path Triangulation 34
N1
N2
N3
(a)
N1
N2
N3
(b)
Figure 3.6: Solution space of surfels at fixed 3D positions with three cameras. Each
camera restricts the surfel normal along a curve. (a) Surfel’s depth is not the true depth
of the surface. In this case the normals generally will not all intersect. (b) Surfel’s depth
is the true depth of the surface. In this case the normals intersect at the true surface
normal.

Chapter 4
Reconstruction Method
In this chapter, we develop a method for reconstructing transparent scenes using re-
fractive light-path triangulation. In Chapter 3 we defined light-path triangulation as the
process of determining for some pixel the surfel that is light-path consistent with multiple
viewpoints of the scene.
Our approach to reconstruction requires us to solve two main problems. First, we
need some way to determine for each pixel in every camera the first ray along the light
path indirectly projecting through it. We then need a method to determine the surfel
that is light-path consistent from each viewpoint in the scene.
We determine the initial light-path ray for each pixel by projecting structured light
patterns through the scene. For each camera i, we determine the function Li mapping
pixels qi to their corresponding initial light-path ray ℓbi as
ℓbi = Li(qi). (4.1)
To triangulate the light-path consistent surfel, we solve an optimization problem. We
define a metric measuring the reconstruction error of the light path in a single camera,
and then extend it to handle multiple cameras. The reconstruction error is defined such
that it is minimized when the surfel is light-path consistent for the given cameras.
35

Chapter 4. Reconstruction Method 36
qL(q)
ss
Figure 4.1: The light path of pixel q through backdrops at two locations. The initial ray
on the light path L(q) is determined by the intersection points s1 and s2 of the ray with
the backdrops.
4.1 Correspondence Map
To determine the initial light-path ray for each pixel, we take an approach similar to
that used for Environment Matting [50]. We display a set of patterned backdrops from
a monitor placed behind the transparent object. From a camera, we capture a set of
images of these backdrops being distorted due to refraction by the object. Using these
images as input, we infer for each pixel the 3D points on the backdrop seen through it.
This gives us a point along the first ray of the light path. To determine another point on
the ray, we repeat this process with the monitor placed at a different position. Having
two points on the ray allows us to determine its direction, and thus fully determine the
ray (Figure 4.1).
4.1.1 Setup
We have a scene containing the specular object, a calibrated camera viewing the object,
and a monitor (Figures 4.1 and 4.2). The monitor is positioned such that it is seen by the

Chapter 4. Reconstruction Method 37
camera from behind the object. A 4x4 transformation matrix MW←S which transforms
from screen coordinates to world coordinates is known. The matrix is defined such that:
sx
sy
sz
1
= MW←S
rx
ry
0
1
(4.2)
where r = [rx ry] is a point in screen coordinates, and s = [sx sy sz] is the position of r
in world coordinates.
4.1.2 Stripe Projection
The backdrop images used must provide some way to determine for any pixel the point
on the monitor indirectly projecting through it. As the monitor is planar, determining
this location is a 2-dimensional problem. We can simplify the problem if we determine
the horizontal and vertical positions separately. To accomplish this, we use two sets of
backdrop images, one for each dimension. Each set will use images that only vary along
a single dimension.
The first image set Bh contains an image of a white vertical stripe on a black back-
ground for each pixel along the horizontal axis of the monitor. Similarly, the second
image set Bv contains an image of a white horizontal stripe on a black background for
each pixel along the vertical axis of the monitor. Formally, these images are defined as:
Bhi (rx, ry) =
1 when rx = i
0 when rx 6= j
and
Bvj (rx, ry) =
1 when ry = j
0 when ry 6= j
where Bhi is the i-th binary image in the first image set, and Bv
j is the j-th binary image
in the second image set.

Chapter 4. Reconstruction Method 38
camera
monitor
refractive
object
(a)
(b)
camera
refractive object
monitor
Figure 4.2: Physical setup for capturing correspondence maps. A camera views a refrac-
tive object with a monitor positioned behind it. The monitor displays a backdrop, which
when viewed through the camera is distorted by the object due to refraction.

Chapter 4. Reconstruction Method 39
We take an image of the scene using each of these images as the backdrop projecting
from the monitor. For a pixel q on the image plane, let Iq(x) be the intensity of the
pixel using the backdrop Bhx and Jq(y) be the intensity of the pixel using the backdrop
Bvy. A pixel’s intensity will be bright when the stripe is on a part of the backdrop being
indirectly projected through it.
4.1.3 Determining the Backdrop Position
For each pixel, we wish to determine a single location on the monitor that indirectly
projects to the centre of the pixel. Unfortunately, localizing this position is difficult
as: (1) the input data is noisy, (2) our input data does not record light impinging at a
single point but instead records light impinging over the entire area of a pixel, and (3)
we only know a pixel’s intensity for discrete positions of the stripe. The first problem is
dealt with by applying a Gaussian filter to I and J. To deal with the second problem,
we make the assumption that the intensity across a pixel’s area is maximized for light
projecting through the centre of the pixel. We deal with the final problem by assuming
the derivatives of the functions I and J are linear between the sampled stripe positions1.
Our goal is determine the 2D location r = (rx, ry) on the backdrop refracting through
the pixel:
rx = arg maxx
Iq(x)
ry = arg maxy
Jq(y)
We can find the maximum on the intensity curve by finding the zero-crossings of its
derivative [14]. The curve is locally maximized or minimized at the zero-crossings of its
derivative. We determine the values of x and y such that:
I′q(x) = 0
J′q(y) = 0
1This is equivalent to using a quadratic approximation of the function between sampled positions.

Chapter 4. Reconstruction Method 40
We approximate the derivative of I and J at each stripe position by calculating their
finite differences:
I′q(x) ≈ △Iq(x) = [Iq(x + 1) − Iq(x − 1)]/2
J′q(y) ≈ △Jq(y) = [Jq(y + 1) − Jq(y − 1)]/2
For each stripe position, we have an estimate of its derivative. If this value is exactly
0, we can trivially identify it as a zero-crossing. For values where the derivative’s sign
changes between two stripe positions, we know a zero-crossing exists somewhere between
them. If the function is 0 for neighbouring stripe positions, we use their mid-point.
To determine the location of a zero-crossing between stripe positions x0 and x0 + 1,
we use our assumption that the derivative is linear between them. We construct a line ℓ
through the derivatives of these neighbouring stripes:
ℓ(x) = △Iq(x0) + (x − x0)[△Iq(x0 + 1) −△Iq(x0)] (4.3)
We determine the zero-crossing as the stripe position x where this line crosses 0:
0 = △Iq(x0) + (x − x0)[△Iq(x0 + 1) −△Iq(x0)] (4.4)
⇒ x = x0 −△Iq(x0)
△Iq(x0 + 1) −△Iq(x0)(4.5)
We may have several zero-crossings, each of which could maximize I. We can discount
those where the derivative changes from negative to positive, as these represent local
minima. Those remaining represent local maxima. Of these, we choose the one that is
closest to the discrete stripe position of maximal pixel intensity.
From this, we have a continuous estimate of the horizontal and vertical stripe posi-
tions maximizing the pixel intensity. The position where these stripes cross gives us our
estimated 2D backdrop position r.

Chapter 4. Reconstruction Method 41
4.1.4 Determining the Corresponding Ray
We now need to determine for each pixel the entire first ray along its light path. The
capture process presented determines a single point along this ray. If we know another
point on this ray, we can fully determine it. To get a second point, we repeat the capture
process but with the monitor moved to a different known location. Doing this, we obtain
a new set of images I2 and J2, which can be used to estimate another set of points along
the first ray that cross through the backdrop.
We can now define the mapping between pixels and rays as:
L(q) =⟨M1
W←Sr1, M2
W←Sr2⟩
(4.6)
where r1 and r2 are the 2D pixel positions on the monitor indirectly projecting through q
for the first and second monitor locations, respectively, and M1W←S and M2
W←S transform
2D pixel locations on the monitor into 3D world coordinates for pixels on the first and
second monitor locations, respectively (Figure 4.1).
4.2 Reconstruction Algorithm
In this section, we present our method for finding a surfel that is light-path consistent
with a set of views of the scene for some image point. We approach this as an optimization
problem. Our goal is to determine the surfel that is the ‘most consistent’ with the cameras
viewing the scene. To do this, we need to answer several questions. First, what metric
should we use to measure the consistency of a surfel? Then, given such a metric, how do
we find the most consistent surfel?
We define a function E(s) to measure light-path consistency error across a set of
cameras. We design this function by making the observation that if a surfel is light-
path consistent with a camera, we can determine the second ray on its light path in
each camera using Snell’s law (Figure 4.3(a)). These implied rays must intersect with

Chapter 4. Reconstruction Method 42
their corresponding initial light-path ray for the surfel to be light-path consistent (Figure
4.3(b)).
To minimize E(s) for some pixel q in the reference camera, we take a two-step ap-
proach. First, we obtain a rough estimate of the optimal surfel by limiting the search
space to surfels whose implied second light-path ray in the reference camera intersect ex-
actly with the known first light-path ray L1(q). We then refine the solution by searching
the full 3-dimensional set of possible surfels, obtaining a result that is not biased toward
error in the reference camera.
4.2.1 Light-Path Consistency Metric
We first define a consistency metric with respect to a single camera. The camera’s
intrinsic and extrinsic parameters are known, thus we know its position c and the trans-
formation P(p) projecting a point p from world space into the image plane of the camera.
Consider some hypothesized surfel s = 〈f , nf 〉. This surfel projects into the camera at
pixel q = P(f). We determine the first and last rays along its light path, denoted ℓb and
ℓf , as:
ℓf = 〈q, c〉 (4.7)
ℓb = L(q). (4.8)
Suppose s represents the true surface. Tracing refraction at s backward along ℓf , we
would obtain the implied ray ℓm as:
ℓm =⟨f , f + refract(ℓf , 〈f , nf , ai, ar)
⟩(4.9)
where refract(v,n, ai, ar) is the refracted vector for a given normalized incoming vector
v refracting off a surface with the normal n from a medium whose index of refraction is
ai to a medium whose index of refraction is ar. Snell’s law is used to derive refract in

Chapter 4. Reconstruction Method 43
nf
f
s
q
(a)
nf
f
s
q
(b)
Figure 4.3: (a) Using Snell’s law, we can trace refraction backwards from known ray ℓf
through surfel s, determining the ray ℓm. (b) When s is light-path consistent, it intersects
with initial light-path ray ℓb, which is determined using the method described in §4.1.

Chapter 4. Reconstruction Method 44
[13] as:
refract(v,n, ai, ar) = −ai
ar
v + n
ai
ar
b −
√
1 −
(ai
ar
)2
(1 − b2)
(4.10)
where
b = v · n (4.11)
If s is light-path consistent with the camera, then ℓm will intersect with ray ℓb. Oth-
erwise, ℓm will be some distance away from ℓb. Using this idea, we define reconstruction
error e in a single camera as:
e(s) = d2(ℓm, ℓb) (4.12)
where d returns the shortest distance between two rays. This function measures the
squared distance between the ray that would be travelling through the object if the
hypothesized surfel represents the true surface and the first ray on the light path. Error
will be minimized to 0 if and only if the surfel given is light-path consistent with the
camera.
To find the shortest distance between two rays, we first find a plane whose normal is
perpendicular to both rays. We then project onto this plane a line segment connecting
two arbitrary points on each ray together. The length of this projected line segment is
the shortest ray distance. This can be expressed as [12]:
d (〈x1, x2〉 , 〈y1, y2〉) =|(y1 − x1) · [(x2 − x1) × (y2 − y1)]|
|(x2 − x1) × (y2 − y1)|(4.13)
where 〈x1, x2〉 and 〈y1, y2〉 represent the two rays each as pairs of 3D points.
We now use this to create a metric E measuring the reconstruction error in multiple
cameras. This is done by summing the reconstruction error in all cameras together:
E(s) =∑
i
ei(s) (4.14)
where ei is the reconstruction error of the surfel s with the i-th camera. When the surfel
is consistent with all the cameras, E(s) = 0. Otherwise, E(s) > 0.

Chapter 4. Reconstruction Method 45
nf
f
s
q
Figure 4.4: Determining the distance between the implied second ray of the light path
and the first ray of the light path.
4.2.2 Depth Sampling
Our goal is to find the surfel s that minimizes E(s). While the space of possible surfels
is 3-dimensional, we can simplify the search space considerably if we take known ray
ℓb1 into account. As our analysis in §3.3 showed, this ray restricts the search space to
2 dimensions. Here we describe in detail our depth sampling algorithm to obtain a
light-path consistent surfel. An overview of this is described in Algorithm 1.
Let us consider the problem of triangulation for some pixel in the reference camera.
On the light path for this pixel, we know the rays ℓb1 and ℓf1. The vertex b1 must be
somewhere along ℓb1 , and the vertex f must be somewhere along ray ℓf1. Furthermore,
as the light path must be consistent with the laws of refraction, the normals nb1 and nf
are determined by the positions of f and b1. Thus, we can simplify triangulation to a
2-dimensional search for the vertices b1 and f along the rays ℓb1 and ℓf1, respectively.
We perform a brute force search on the possible locations of the vertices b1 and f
(Figure 4.5). First, we choose ranges along the rays ℓb1 and ℓf1 on the reference camera that
include the locations of b1 and f on the true surface, respectively. On each ray, we choose
n equally spaced sample points along its corresponding range. Let B ={b1
1, b21, . . . , b
n1
}

Chapter 4. Reconstruction Method 46
i
i
(a)
i
i
(b)
i
j
(c)
Figure 4.5: Sampling the space of points f and b along light-path rays ℓf and ℓb, re-
spectively. (a) For each f and b, solve for the surfel normal nf . (b) For each f , sample
the space of possible intersection points with ℓb. (c) For each b, we sample possible
intersection points with ℓf .

Chapter 4. Reconstruction Method 47
be the sampled points along ℓb and F ={f1, f2, . . . , fn
}be the sampled points along ℓf .
Each of these points represent hypothesized locations for b1 and f . We sample each of
the n2 combination of points along these rays.
For each sample(f i,bj
1
), we solve for the normal nf
i,jsuch that refracting the ray
ℓf1 backward through the surfel si,j = 〈f i, nf 〉 using Equation 4.10, we obtain a ray that
goes through bj1 [32]. For any such surfel, the error on the reference camera is 0. This
means that only error in the validation cameras will be used to measure the light-path
consistency of the surfel.
We now measure the error of each surfel si,j. For each camera c, we project the surfel
into the camera’s image plane to determine the image point qc. We then use our stored
initial light-path ray obtained in §4.1 for this pixel as ℓbc = L(qc). Given this ray and the
known final ray on the light path ℓfc = 〈c, f i〉, we evaluate the reconstruction error ec(si,j).
Summing together the error in all the cameras, we obtain the total reconstruction error
E(si,j).
Finally, we choose the surfel with the lowest total reconstruction error as our estimate.
This search can be done relatively quickly as it is only 2-dimensional. Also, assuming
the step size is small enough and the ranges sampled include the true positions of the
light-path vertices, this algorithm will find the global minimum.
Unfortunately, this sampling method has several disadvantages. Since we are sampling
only for equally spaced points along the first and last ray of the light path, we limit the
accuracy of our result. Furthermore, by sampling along the ray ℓb1 in the reference camera
we bias the result to error in this camera. With the presence of noise, it would be best
if we could treat all cameras equally.
4.2.3 Refining the Solution
While depth sampling provides a rough estimate of the light-path consistent surfel, we
can obtain a more accurate result by refining the solution. For this refinement step, we

Chapter 4. Reconstruction Method 48
Algorithm 1 Estimating s by Depth Sampling
1: for j = 1 to n do
2: for i = 1 to n do
3: Determine the normal nf such that (f i − bj) = refract(f i − c1, nf , ai, ar)
4: for all c ∈ C do
5: Project the surfel into camera c using Pc(fi) to determine the image point qc.
6: Determine the initial ray ℓbc = L(qc) on the light path of qc.
7: Evaluate the reconstruction error e(s) in camera c for the surfel s =⟨f i, nf
⟩
using Equation 4.12.
8: end for
9: Sum the error in each camera to determine the total error E(s).
10: end for
11: end for
12: Return the surfel with the minimum total reconstruction error.
do not limit our samples to discrete points along the light path, and we take into account
all camera views equally by not searching along the first ray in the reference camera’s
light path. At this point, we rely on depth sampling’s ability to avoid local minima and
thus are only concerned with increasing the accuracy of a result which is close to the
global minimum.
We search the space of depths and normals for the surfel, taking into account the
entire 3-dimensional space of possible surfels. This allows us to avoid biasing the result
to any one camera. We use a down-hill simplex method [35, 39], as it works well with
multiple parameters and does not require us to know the derivative of the objective
function.
The function we wish to minimize is E(s). We search along along a depth parameter
d for the position of f and 2 spherical parameters φ, θ for the surface normal nf . These

Chapter 4. Reconstruction Method 49
nf
f
s
qc
b
Figure 4.6: The initial light path vertex b is estimated by back projecting the light path
from c through surfel s = 〈f , nf 〉 and determining the point closest to both the estimated
refracted ray ℓm and the initial light-path ray ℓb.
parameters are mapped as follows:
f = c1 + d(q1 − c1) (4.15)
nf = (sin φ cos θ, sin φ sin θ, cos φ) (4.16)
By applying the down-hill simplex method on the function E(s) on the parameters d, φ,
and θ, we obtain our refined solution for surfel s.
4.2.4 Estimating the Initial Light-Path Vertices
Using our estimate of the second light path vertex s, we can estimate the position where
the light path first intersects with the back of the object. We do this by determining the
point closest to the initial light-path ray and the ray refracting through the object.
From each camera i, we trace refraction at s backward from ci, obtaining the ray ℓmi .
We estimate the 3D position bi where the light path enters the object by determining
the point closest to both ℓm and ℓb (Figure 4.6).

Chapter 4. Reconstruction Method 50
4.2.5 Determining the Index of Refraction
The algorithm presented requires us to know the index of refraction of the transparent
object. While sometimes it is possible to determine the index beforehand by analyzing
the object optically, it is often difficult to determine. If we have at least four cameras
viewing the scene, it is possible to compute the index of refraction.
Our approach is to apply the triangulation method multiple times using different
indices of refraction. We determine the index of refraction as the one resulting in the
lowest total error. For the true index of refraction, this error should approach zero.
First, we choose a set of n pixels on the reference camera, and m indices of refraction.
We then triangulate the surfels for each of the n pixels m times, once with each hypoth-
esized index of refraction. For each pixel and index of refraction, we have a measure of
reconstruction error. After removing from consideration outlier pixels, we determine the
index of refraction that has the minimum total error.
4.3 Summary of the Triangulation Method
Refractive light-path triangulation is summarized as follows (Figure 4.7):
1. Capture images of the scene in front of stripe backdrops.
2. Determine the correspondence map.
3. Determine the index of refraction that minimizes the total reconstruction error for
a set of pixels.
4. For each pixel in the reference view, triangulate the surfel:
(a) Depth sample along the first and last light-path rays.
(b) Refine the solution by optimizing along the surfel’s depth and normal.

Chapter 4. Reconstruction Method 51
Determine the correspondence map
Capture images of the scene with stripe backdrops
Depth sample along the first and last light-path rays
Optimize the surfel along the depth and normal
For each pixel in the reference view
Triangulate the light-path consistent surfel
Determine index of
refraction with the
lowest reconstruction
errror
Figure 4.7: The refractive light-path triangulation method for reconstructing the shape
of specular, transparent objects.
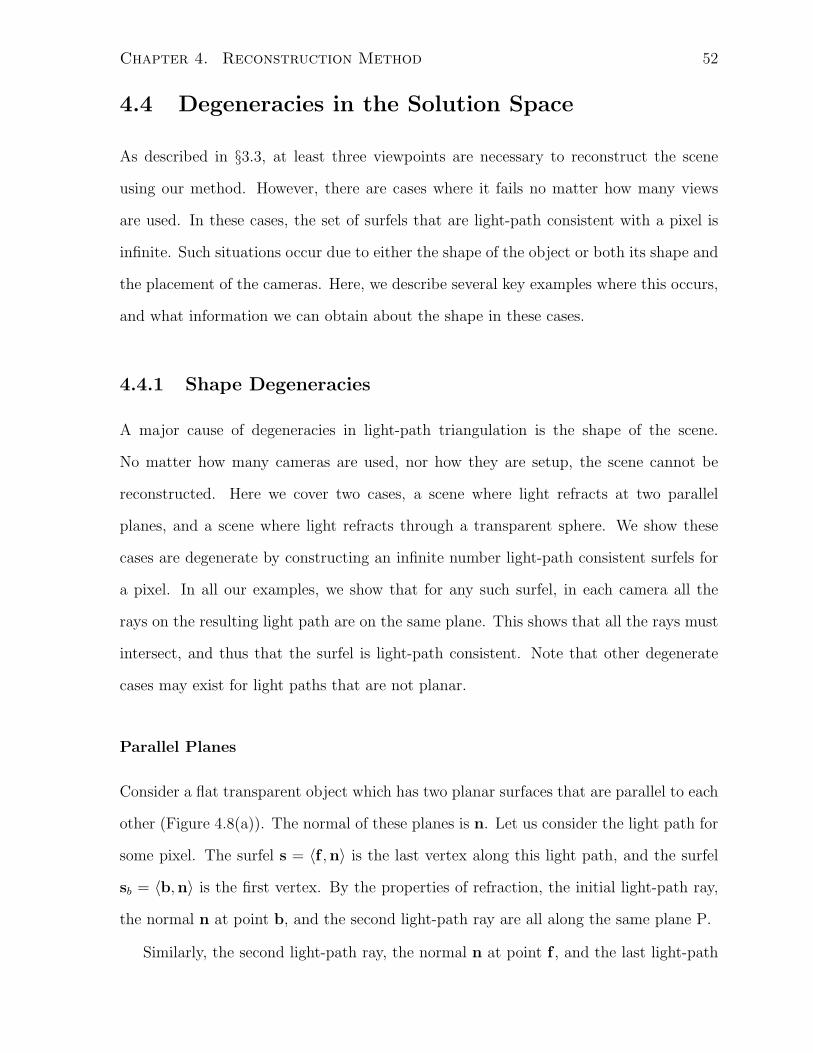
Chapter 4. Reconstruction Method 52
4.4 Degeneracies in the Solution Space
As described in §3.3, at least three viewpoints are necessary to reconstruct the scene
using our method. However, there are cases where it fails no matter how many views
are used. In these cases, the set of surfels that are light-path consistent with a pixel is
infinite. Such situations occur due to either the shape of the object or both its shape and
the placement of the cameras. Here, we describe several key examples where this occurs,
and what information we can obtain about the shape in these cases.
4.4.1 Shape Degeneracies
A major cause of degeneracies in light-path triangulation is the shape of the scene.
No matter how many cameras are used, nor how they are setup, the scene cannot be
reconstructed. Here we cover two cases, a scene where light refracts at two parallel
planes, and a scene where light refracts through a transparent sphere. We show these
cases are degenerate by constructing an infinite number light-path consistent surfels for
a pixel. In all our examples, we show that for any such surfel, in each camera all the
rays on the resulting light path are on the same plane. This shows that all the rays must
intersect, and thus that the surfel is light-path consistent. Note that other degenerate
cases may exist for light paths that are not planar.
Parallel Planes
Consider a flat transparent object which has two planar surfaces that are parallel to each
other (Figure 4.8(a)). The normal of these planes is n. Let us consider the light path for
some pixel. The surfel s = 〈f ,n〉 is the last vertex along this light path, and the surfel
sb = 〈b,n〉 is the first vertex. By the properties of refraction, the initial light-path ray,
the normal n at point b, and the second light-path ray are all along the same plane P.
Similarly, the second light-path ray, the normal n at point f , and the last light-path

Chapter 4. Reconstruction Method 53
ci
i
(a)
ci
i
i
i
i
(b)
Figure 4.8: (a) A light path crossing through two parallel planes at points f and bi, both
with surface normal n. The entire light path is on a plane. (b) Any hypothesized surfel
with the true surface normal is light-path consistent for any camera. Examples of these
surfels are shown as points f and normals n, along with the true surfel located at point
f . To see that these surfels are light-path consistent, follow refraction backward through
the surfel, determining the second light-path ray (shown in blue). As this ray is on the
same plane as the first ray of the true light path, it must intersect with it.

Chapter 4. Reconstruction Method 54
ray are also on a plane P2. Since the normal n is the same on both surfaces, and both
planes cross the point f , P = P2. Thus, all refraction occurs on the same plane.
Now, let us consider a hypothesized surfel s =⟨f ,n
⟩, such that f is some point along
the last light-path ray. Since f is along this ray, it is on plane P (Figure 4.8(b)). Similarly,
the plane contains the direction n at f . We determine the implied second ray of the light
path by tracing refraction backward through s. By the properties of refraction, this ray
is also on P since f and n are on it. Since both this ray and the initial light-path ray are
on this plane, they must intersect. Thus, s is light-path consistent.
Features Extractable on Parallel Planes
As can be seen, any surfel with the true surface normal n is light-path consistent in
all camera views. Moreover, only surfels with this normal are light-path consistent in
general. To see this, consider the light-path in each view. For a surfel to be light-path
consistent, the normal must be on the same plane as the first and last rays of the light
path, or else the second ray will not intersect with the first ray. Thus, the normal is
restricted to lie on the intersection of the light-path planes from all viewpoints. Since in
general the plane the light path is on will not be the same across multiple camera views,
the intersection of these planes will result in a single normal. Therefore, the normal of
a surfel that is light-path consistent with all camera views is in general the same as the
true normal.
While we cannot determine the position of f , we can determine the distance between f
and b. This is due to the fact that the first and last light-path rays are parallel. Consider
any light-path consistent surfel. Tracing refraction backward from the camera through
this surfel, we obtain the implied second light-path ray. Since the normal of the surfel
is the same as the true surface normal, the second light-path ray will be parallel with
the true second light-path ray (Figure 4.8(b)). The true second light-path ray intersects
the first and last light-path rays at points b and f , respectively, and the implied second

Chapter 4. Reconstruction Method 55
light-path ray intersects the first and last light-path rays at points b and f , respectively.
Since the true and implied second light-path rays are parallel, along with the first and
last light-path rays, we can trace a parallelogram through points(b, f , f ,b
). Since the
length of opposite sides of a parallelogram are equal, the distance between f and b is
equal to the distance between f and b.
Sphere
Consider a scene containing a transparent sphere (Figure 4.9(a)). Let us consider the light
path for some pixel. The surfel s = 〈f ,nf 〉 is the last vertex along this light path, and the
surfel sb = 〈b,nb〉 is the first vertex. Let P be the plane containing the initial light-path
ray, the normal nb, and the second light-path ray. Let P2 be the plane containing the
second light-path ray, the normal nf , and the final light-path ray.
First we will show that P = P2. The normal at any point on the surface goes through
the centre of the sphere, which we will denote as r. Since both planes contain r, f , and
b, P = P2.
Now, let us consider a hypothesized surfel s =⟨f , nf
⟩, such that f is some point along
the last light-path ray and the normal nf at f points toward r (Figure 4.9(b)). Since
f is along the last light-path ray, it is on plane P. Similarly, since nf points toward r,
and r is on P, nf is also on P. We determine the second ray of the light path by tracing
refraction backward through s. By the properties of refraction, this ray is also on P since
f and nf are on it as well. Since the known initial light-path ray is on this plane, it must
intersect with this second light-path ray. Thus, s is light-path consistent.
Features Extractable on a Sphere
Unlike the situation with parallel planes, we cannot determine either the depth or the
normal of the surface. If we do know the object is a sphere beforehand, we can determine
its centre r. Since each light-path consistent surfel has a normal pointing toward r, we

Chapter 4. Reconstruction Method 56
i i
ci
(a)
i
i
ci
(b)
Figure 4.9: (a) A light path crossing through a sphere at points f and bi, where the
surface normals nf and nbi both point away from the sphere’s centre. The entire light
path is on a plane. (b) Any hypothesized surfel with the normal pointing away from the
sphere’s centre is light-path consistent with all cameras. An example of such a surfel is
shown as point f and normal nf . To see that such a surfel is light-path consistent, follow
refraction backward through the surfel, determining the implied second light-path ray
(shown in blue). As this ray is on the same plane as the first ray of the true light path,
it must intersect with the first ray.

Chapter 4. Reconstruction Method 57
can determine its position by finding the point where the normals of any two light-path
consistent surfels intersect.
4.4.2 Camera Degeneracies
Another set of degeneracies occurs due to the combination of the shape of the object
and the camera views used to capture the scene. Consider if we were to capture views of
a transparent object by leaving the camera fixed and rotating the object along a single
axis. In this case, all the resulting viewpoints would be along a plane. Since all the
viewpoints are on the same plane, the epipolar plane through any combination of two
cameras will be the same as this plane, and the epipolar lines in each pair of cameras
will be along the same part of the object.
Consider the case where due to the shape of the object, from each viewpoint the
light path is along the epipolar plane (Figure 4.10). Such a situation would occur if the
surface normals of points seen through the epipolar line are along the epipolar plane.
Any hypothesized surfel whose position and normal are on this plane will be light-path
consistent. This is because all refraction occurs along a single plane, thus the initial
light-path ray and the implied second light-path ray will intersect.
In such cases, the best way to avoid this problem is to ensure the viewpoints are not
all along the same plane.

Chapter 4. Reconstruction Method 58
1
2 3
1
2
3
c1
c2
c3
1
23
s
Figure 4.10: Ambiguity due to the first and last light-path rays, ℓb and ℓf , being along
the same plane. As long as the hypothesized surfel’s normal is on this plane, the implied
second light-path rays ℓm will also be on this plane, and thus will intersect with the first
light-path rays.

Chapter 5
Results
5.1 Introduction
In this chapter, we examine 3D shape reconstructions obtained using the light-path trian-
gulation method described in Chapter 4. We analyze the quality of these reconstructions
to determine how well our method works, and on what kinds of shapes it has difficulty
with.
We first describe the imaging apparatus used to capture images of the scene. Our
setup allows us to capture accurate correspondence maps from different viewpoints of
the object using a single camera. We then show the results of our method applied to two
different objects: a Bohemian crystal structure and a glass ashtray. These results are il-
lustrated as depth and normal maps, as well as 3D views of the estimated surfels. Finally,
we analyze the quality of these results by looking at how well our method reconstructs
planar areas of the objects.
5.2 Imaging Apparatus
The imaging apparatus used to capture correspondence maps of refractive scenes is shown
in Figure 5.1. The refractive object is mounted onto a Daedal 20601 Motor Driven Rotary
59

Chapter 5. Results 60
camera
refractive object
turntabletranslation stage
monitor
Figure 5.1: Apparatus used to capture the correspondence maps. The monitor is moved
toward and away from the refractive object using the translation stage. The refractive
object is rotated using the turntable.
Table. A Sony DXC-9000 3CCD video camera, which is able to capture images at a
resolution of 640x480, is placed such that it views the object from about one meter away.
Behind the object relative to the camera, a Dell 2000FP 20” LCD monitor is mounted
onto a Daedal 404LXR Linear Motor Table, such that its screen is 10-30 cm away from
the object. The resolution of the monitor is 1600x1200. Both the turntable and the
translation stage are controlled using a Compumotor 6K4 Servo/Stepper controller.
5.2.1 Controllable Stages
While we have only one camera, we can obtain different viewpoints of the refractive
object by rotating it with the turntable it is mounted to. Viewing the object at different
rotation angles is equivalent to rotating the rest of the scene, including the camera and

Chapter 5. Results 61
monitor, in the opposite direction relative to the turntable’s rotation axis. The controller
is able to rotate the object to absolute rotation angles specified by the user, thus we know
the relative rotation of the object between different views.
Using this single camera approach has several advantages. First, we only have to
determine one set of intrinsic parameters. Second, we only have to make sure the LCD
backdrop is viewable from one viewpoint. If we were to place multiple cameras to get
multiple viewpoints instead of rotating the object, it would be impossible to image the
side of the object being obscured by the monitor. The main problem with using a single
camera is that all our views come from rotating the object along a single rotation axis,
and thus the viewpoints relative to the object are all along the same plane. We will see
that our reconstruction method sometimes cannot solve for a unique light-path consistent
surfel due to ambiguities in the solution space.
To capture the scene with the backdrop at multiple positions, we move the LCD
monitor using the translation stage it is mounted to. Similar to the turntable, we are
able specify absolute positions of the stage. When capturing the correspondence map,
we move the monitor to each of two user specified positions for each rotated view of the
transparent object.
5.2.2 Camera
When capturing images of the scene, we would like to keep as much of it in focus as
possible. This can be difficult as we not only want the transparent object to be in focus,
but also the LCD backdrop when viewed directly and indirectly through the object.
Therefore, we increase the depth of field of the camera by using a low aperture setting.
As this does not allow much light into the camera, we have to compensate by increasing
its exposure time.
To calibrate the camera, we use the method described in [19]. Given a set of images
taken from the camera of a planar calibration pattern, this technique allows us to estimate

Chapter 5. Results 62
its intrinsic and extrinsic parameters. With the object removed from the scene, we use
the LCD monitor to project the image of the calibration pattern. A first set of images
is obtained by mounting the LCD monitor to the turntable and taking images of it
at several rotations. Another set of images is taken with the LCD monitor mounted
onto the translation stage, taking images at several positions along it. Processing these
images through the Camera Calibration Toolbox for Matlab [6], we obtain the camera’s
parameters. From this, we can readily obtain the positions and orientations of the LCD
display. Also, the images taken of the monitor on the turntable allow us to determine its
axis of rotation.
5.3 Experimental Results
5.3.1 Bohemian Crystal
Here we show the results of our method applied to a Bohemian crystal figure with a
diamond cut (Figure 5.2). For the capture session, we needed to ensure that the LCD
backdrop could be seen indirectly through as much of the visible surface of the the object
as possible, as we will not be able to determine the initial light-path ray for pixels through
which the backdrop is not visible. We found we could do this by positioning the glass
such that in the reference view the point on its bottom was directed toward the camera.
We captured images of the object from 7 viewpoints, rotated 0, ±10, ±20, and ±30
degrees (Figure 5.3). The total capture time was 8.5 hours.
Using our method we obtained the depth and normal maps shown in Figure 5.4, and
a 3D view of the estimated surfels shown in Figure 5.5. Using the method described in
§4.2.5, we determined the index of refraction to be 1.55. As can be seen, the reconstructed
depths and normals are quite consistent over the surface of each facet. The planar facets
on the surface of the object are flat in their reconstruction, though some have a fair
amount of nonuniform noise. Note that in the depth and normals maps the facets are

Chapter 5. Results 63
Figure 5.2: Bohemian crystal with a diamond cut.

Chapter 5. Results 64
Reference View
-10˚
-20˚
-30˚
10˚
20˚
30˚
Figure 5.3: Reference and rotated views of the Bohemian crystal used for reconstruction.

Chapter 5. Results 65
segmented. This occurs because we cannot accurately estimate the correspondence maps
near facet edges, and thus no estimate of shape is made for these pixels.
Accuracy
To measure the quality of the reconstruction, we measure how ‘planar’ the reconstruction
of the planar facets are. We first define a set of metrics to measure the planarity of a
set of estimated surfels S = {〈p1,n2〉 , . . . , 〈pn,nn〉}. We define the metrics Enorm, Enorm,
Epos, and Epos, the first two measuring the planarity of the surfel set’s normals and the
latter two measuring the planarity of the surfel set’s 3D positions. Enorm and Enorm are
defined to measure the mean and median angle between each surfel normal from the
mean surfel normal, respectively. That is,
navg =
∑(ni)
‖∑
(ni)‖(5.1)
einorm = acos(ni · navg) (5.2)
Enorm = meani(einorm) (5.3)
Enorm = mediani(einorm) (5.4)
where navg is the average surfel normal, ni is the normal of the i-th surfel, and einorm is
the normal error of i-th surfel.
To measure the positional planarity, we first fit the position of the points to a plane
robustly using RANSAC [11]. To perform this fit, we determine the three points that
define a plane that maximizes the number of inlier points to it. A point is considered an
inlier if it is within 0.5 mm of the plane. We then perform a least squares fit on these
inlier points to determine the plane. We define Epos and Epos to measure the mean and
median squared distance of each surfel’s position to the plane as:
eipos = [projR(pi) − pi]
2 (5.5)
Enorm = meani(eipos) (5.6)
Enorm = mediani(eipos) (5.7)

Chapter 5. Results 66
(a)
(b)
Figure 5.4: Reconstruction of the Bohemian crystal figure. (a) Depth map of the reference
view. (b) Normal maps of the reference view, showing the slant (left image) and tilt (right
image).

Chapter 5. Results 67
Figure 5.5: 3D view of the reconstructed surfels from the Bohemian crystal dataset.

Chapter 5. Results 68
1
2
3
4
5
6
7
8
Figure 5.6: Facet labels on the Bohemian crystal.
where pi is the position of the i-th surfel, R is the RANSAC fit plane, projR(p) projects
point p onto plane R, and eipos is the position error of i-th surfel.
The labeled facets are shown in Figure 5.6, with their planar error listed in Table
5.1. As can be seen, the median normal error is around 1-3 degrees for most facets,
and the median positional error between 0.30 mm and 1.58 mm. To determine whether
error is caused by our optimization method not being able to find an optimal surfel, we
discount surfels whose mean reconstruction error per camera is above 0.1 mm (Equation
4.12), obtaining error listed in Table 5.2. As can be seen, error drops somewhat for most
surfels, though not significantly. Thus, much of the planar error is occurring even though
we have low reconstruction error.

Chapter 5. Results 69
Facet label 1 2 3 4 5 6 7 8
Mean normal error (degrees) 4.46 1.70 2.80 3.15 8.32 6.42 4.14 1.53
Median normal error (degrees) 2.99 1.21 1.83 1.98 6.34 4.18 2.87 1.11
Mean position error (mm) 2.10 0.74 1.60 1.69 2.18 3.40 1.84 0.86
Median position error (mm) 0.71 0.30 0.45 0.47 1.58 0.65 0.57 0.30
RANSAC position inliers (%) 35.9 64.0 52.8 50.1 18.8 40.3 45.1 67.5
Table 5.1: Planar error of facets labeled in Figure 5.6 in the reconstruction of the Bo-
hemian crystal. Normal is determined using Equation 5.2. Position error is measured as
the squared distance between the position of a surfel and the plane fit to all inlier surfels
using RANSAC.
Facet label 1 2 3 4 5 6 7 8
Mean normal error (degrees) 4.34 1.58 2.60 2.80 7.64 5.43 3.97 1.30
Median normal error (degrees) 3.11 1.11 1.74 1.75 5.94 3.21 2.74 1.08
Mean position error (mm) 1.93 0.67 1.51 1.47 2.10 3.06 1.75 0.63
Median position error (mm) 0.60 0.30 0.47 0.41 1.51 0.55 0.55 0.29
RANSAC position inliers (%) 42.2 65.9 49.9 55.8 20.7 44.8 46.4 68.4
Table 5.2: Planar error of facets labeled in Figure 5.6 in the reconstruction of the Bo-
hemian crystal, discounting surfels whose mean reconstruction error is above 0.1 mm
(Equation 4.12).

Chapter 5. Results 70
Analysis
We analyze the error further by looking at the objective function at specific points (Figure
5.7). For points on facets we can accurately reconstruct, we find the objective function
comes to a well defined minimum (Figure 5.8(a)). On facets we cannot accurately recon-
struct the objective function does not have a well defined minimum (Figure 5.8(b)). As
the object is highly symmetrical, the only real difference between facets is their relative
views from the camera. Thus, we should be able to increase the quality within these
facets if we place the camera at a different location.
Note that on the plots of the objective functions (Figure 5.8), there are several impor-
tant landmarks. For some depths along the last light-path ray, we cannot calculate the
objective function. These are marked as feature ‘A’. The reason the objective function
cannot be calculated is because in at least one camera, the position of the hypothesized
point projected onto the camera’s image plane is either not on the surface of the Bo-
hemian crystal, or it is at a point between facets where the correspondence map cannot
be determined.
Another important feature is the depth along which there is a vertical valley in the
objective function, marked as feature ‘B’. At this depth, the last light-path ray is closest to
the initial light-path ray. In the set of hypothesized normals generated by depth-sampling
along the initial light-path ray, most pairs of normals have little angular distance between
them. Since these hypothesized surfels are all at the same 3D point and most have nearly
the same normals, the objective function will be nearly the same for them. Note that
this feature will not be seen in general, as it is specific to the shape of the crystal and
the position of the viewpoints.

Chapter 5. Results 71
accurately
reconstructed pixel
poorly
reconstructed pixel
Figure 5.7: Pixels whose objective functions are shown in Figure 5.8.

Chapter 5. Results 72
0 10
1
Front depth
Back d
epth
A BAAAA AA
(a)
0 10
1
Front depth
Back d
epth
A B AA A
(b)
Figure 5.8: Optimization function over a set of depths along known light-path rays. The
vertical axis represents the hypothesized point of refraction along the initial light-path
ray while the horizontal axis represents the hypothesized point of refraction along the last
light-path ray. The red circle represents the minimum error found by depth sampling.
(a) Error for pixel on facet 2, which could be accurately reconstructed. (b) Error for
pixel on facet 5, which could not be reconstructed.

Chapter 5. Results 73
Figure 5.9: Glass ashtray.
5.3.2 Ashtray
Here we show the results of our method applied to a glass ashtray (Figure 5.9). The
bottom of this ashtray is planar, while the top is concave with a planar edge. Note that
this concavity makes it impossible to reconstruct the ashtray using methods relying solely
on its visual convex hull [24]. For the capture session, the ashtray was positioned such
that the top was pointed toward the camera in the reference view. We captured this
object from 7 viewpoints, rotated 0, ±10, ±20, and ±30 degrees (Figure 5.10). The total
capture time was 13 hours.
Using our method we obtained the depth and normal maps shown in Figure 5.11,

Chapter 5. Results 74
Reference View
-10˚
-20˚
-30˚
10˚
20˚
30˚
Figure 5.10: Reference and rotated views of the ashtray used for reconstruction.

Chapter 5. Results 75
(a)
(b)
Figure 5.11: Reconstruction of the ashtray. (a) Depth map of the reference view. (b)
Normal maps of the reference view, showing the slant (left image) and tilt (right image).
and a 3D view of the estimated surfels shown in Figure 5.12. The estimated index of
refraction of the ashtray is 1.54. As can be seen our method is able to reconstruct the
concavity of the ashtray. We observe noise vertically along the ashtray where the axis
of rotation is located, and horizontally across the ashtray. Also, on the top planar edge
of the ashtray the normal map is smoothly reconstructed while the depth map contains
significant error.

Chapter 5. Results 76
Figure 5.12: 3D views of the reconstructed surfels from the ashtray dataset.

Chapter 5. Results 77
Figure 5.13: Area on the ashtray used for the planarity measurement.
Accuracy
To analyze the quality of the reconstruction, we determine how planar our reconstruction
of the back of the object is. Using the method presented in §4.2.4, we determine the points
where the light path from the reference camera intersects with the back of the ashtray for
pixels within the concave region (Figure 5.13). We measure their planarity the same way
we measure position planarity error for facets on the Bohemian crystal. The positional
error has a mean of 207.62 mm and median of 1.21 mm. The plane fit with RANSAC
uses 23.5% of the surfel points as inliers. The mean error is very large due to the outlier
points that are poorly reconstructed, but the median error measure which is more robust
is relatively low.

Chapter 5. Results 78
A
B
C
D
Figure 5.14: Ashtray split into four regions for analysis. The squares are pixels whose
objective function are shown in Figures 5.15-5.18.
Analysis
The quality of the reconstruction differs over the area of the ashtray. For analytical
purposes, we will split the ashtray into four regions (Figure 5.14):
(A) Concave region reconstructed smoothly
(B) Horizontal axis within the concave region reconstructed poorly
(C) Vertical axis within the concave region reconstructed poorly
(D) Planar edge around the top
We measure the planar error of all 3x3 patches in each region (Table 5.3). The
planarity of each patch is measured the same way we measure normal planarity error
for facets on the Bohemian crystal. We show the mean and median planar error of all

Chapter 5. Results 79
Patch A B C D
Mean normal error (degrees) 1.79 10.28 6.64 0.90
Median normal error (degrees) 1.63 7.51 6.75 0.21
Mean slant error (degrees) 1.99 17.20 0.82 1.00
Median slant error (degrees) 1.79 12.12 0.70 0.21
Mean tilt error (degrees) 2.35 2.46 10.63 0.92
Median tilt error (degrees) 2.08 2.24 10.77 0.17
Table 5.3: Average planar error of all 3x3 patches within the regions marked in Figure
5.14 in the reconstruction of the ashtray.
patches within each region. Since the quality of the normal reconstruction differs over the
slant and tilt maps, we measure the error for these individually. Although the ashtray is
concave over most of its surface, we expect it to be relatively flat for small patches.
In region A, the concave area is reconstructed with no ambiguities (Figure 5.11).
Both the reconstructed depth and normal maps within this region are smooth. Looking
at Figure 5.15, we can see the objective function has a well defined minimum. This shows
that unlike silhouette based techniques (See §2.3.4), our method is able to reconstruct
concave surfaces.
In region B, the horizontal axis within the concave region could not be fully recon-
structed. As can be seen in Figure 5.11, the depth in this area has significant error. In
the normal map, we see that the while there is error in the slant of the normal, the tilt of
the normal was smoothly reconstructed. This can also be seen in the planarity measure-
ments shown in Table 5.3. Taking a look at the objective function of a pixel within this
region (Figure 5.16), we see that the minimum is not well defined, causing our method to
fail. Although it is difficult to fully determine the nature of this ambiguity, it appears to
be due to the placement of the cameras (See §4.4.2). The normals of these points are all
along a plane parallel to the plane containing the viewpoints. Such an ambiguity could

Chapter 5. Results 80
0 10
1
Front depth
Back d
epth
Figure 5.15: Optimization function for a pixel within region A of the ashtray.
be dealt with by adding additional camera views not along the same plane.
In region C, we see the vertical axis in the concave region could not be reconstructed.
This region encloses the rotation axis along which the object was rotated to obtain
multiple viewpoints. As was also the case with region B, the depth map within region C
has significant error. However in this case, while there is error in the tilt of the normal, we
can reconstruct its slant smoothly (Table 5.3). The objective function for a point within
this region is shown in Figure 5.17. Again no unique surfel minimizing the objective
function can be found. As these points occur along the axis the ashtray was rotated, this
ambiguity is due to the placement of the camera. Thus, adding different viewpoints of
the scene should improve the quality of these results.
Region D, the planar area of the ashtray, is partially reconstructed. While the depth
map has significant error, the normal map is accurately reconstructed. This is because
this region is parallel with the bottom of the ashtray. As shown in §4.4.1, if the light

Chapter 5. Results 81
0 10
1
Front depth
Back d
epth
Figure 5.16: Optimization function for a pixel within region B of the ashtray.
0 10
1
Front depth
Back d
epth
Figure 5.17: Optimization function for a pixel within region C of the ashtray.

Chapter 5. Results 82
0 10
1
Front depth
Back d
epth
Figure 5.18: Optimization function for a pixel within region D of the ashtray.
paths through a point on the surface go through two parallel planes, the depth cannot be
determined. The normal planar error along this entire region had a mean of 1.13◦, and
a median of 0.56◦. The objective function for a pixel within this area is shown in Figure
5.18.

Chapter 6
Conclusion
We have shown how the shape of a transparent scene can be reconstructed by analyzing
how light refracts through it. Using an environment matting technique, we determine
for each pixel the light rays entering a transparent object. We then determine the light
paths that are consistent with these initial light rays from multiple viewpoints of the
scene.
A theoretical framework of our method was developed to describe the nature of light
refracting through transparent objects. Using this, we proved our method requires at
least three views of the scene to uniquely determine the light paths. Finally, we applied
our method to images of real transparent objects, generating depth and normal maps of
the scenes.
While our current method provides a useful framework for analyzing transparent
scenes, we would like to improve the quality of the reconstructions. Of particular concern
are shapes where the light path cannot be uniquely determine due to the object’s shape.
It may be possible to improve the quality of our method and handle these ambiguities
by enforcing an integrability constraint to ensure the depth maps and normal maps are
consistent.
While we deal with the light refracting twice at the surface of an object, it would be
83

Chapter 6. Conclusion 84
useful to extend out method to handle more complex light paths. This would allow us
to handle objects made of multiple transparent media, such as a glass filled water. As
shown in [23], it is impossible to handle such a scene if we consider each point on the
object’s surface independently. Thus, handling such situations may require us to take a
more global approach, optimizing for the entire surface of the media.

Bibliography
[1] Edward H. Adelson and James R. Bergen. The plenoptic function and the elements
of early vision. Computational Models of Visual Processing, 1991.
[2] Paul A. Beardsley, Philip H. S. Torr, and Andrew Zisserman. 3d model acquisi-
tion from extended image sequences. In ECCV ’96: Proceedings of the 4th Euro-
pean Conference on Computer Vision, volume 2, pages 683–695, London, UK, 1996.
Springer-Verlag.
[3] Aner Ben-Artzi, Ryan Overbeck, and Ravi Ramamoorthi. Real-time brdf editing in
complex lighting. ACM Transactions on Graphics, 25(3):945–954, 2006.
[4] Moshe Ben-Ezra and Shree K. Nayar. What does motion reveal about transparency?
In ICCV ’03: Proceedings of the Ninth IEEE International Conference on Computer
Vision, page 1025, Washington, DC, USA, 2003. IEEE Computer Society.
[5] Thomas Bonfort and Peter Sturm. Voxel carving for specular surfaces. In ICCV
’03: Proceedings of the Ninth IEEE International Conference on Computer Vision,
page 591, Washington, DC, USA, 2003. IEEE Computer Society.
[6] Jean-Yves Bouguet. Camera Calibration Toolbox for Matlab, 2005. http://www.
vision.caltech.edu/bouguetj/calib_doc/.
[7] Ingrid Carlbom and Joseph Paciorek. Planar geometric projections and viewing
transformations. ACM Computing Surveys, 10(4):465–502, 1978.
85

Bibliography 86
[8] Yung-Yu Chuang, Douglas E. Zongker, Joel Hindorff, Brian Curless, David H.
Salesin, and Richard Szeliski. Environment matting extensions: towards higher
accuracy and real-time capture. In SIGGRAPH ’00: Proceedings of the 27th Annual
Conference on Computer Graphics and Interactive Techniques, pages 121–130, New
York, NY, USA, 2000. ACM Press/Addison-Wesley Publishing Co.
[9] Paul Debevec, Tim Hawkins, Chris Tchou, Haarm-Pieter Duiker, Westley Sarokin,
and Mark Sagar. Acquiring the reflectance field of a human face. In SIGGRAPH ’00:
Proceedings of the 27th Annual Conference on Computer Graphics and Interactive
Techniques, pages 145–156, New York, NY, USA, 2000. ACM Press/Addison-Wesley
Publishing Co.
[10] Raymond Fielding. Technique of Special Effects of Cinematography. Focal Press,
London, UK, 1985.
[11] Martin A. Fischler and Robert C. Bolles. Random sample consensus: a paradigm
for model fitting with applications to image analysis and automated cartography.
Communications of the ACM, 24(6):381–395, 1981.
[12] W. Gellert, S. Gottwald, M. Hellwich, H. Kastner, and H. Kunstner. VNR Concise
Encylopedia of Mathematics. Van Nostrand Reinhold, 2nd edition, 1989.
[13] Andrew S. Glassner. Principles of Digital Image Synthesis. Morgan Kaufmann
Publishers Inc., San Francisco, CA, USA, 1994.
[14] Rafael C. Gonzalez and Richard E. Woods. Digital Image Processing. Addison-
Wesley Longman Publishing Co., Inc., Boston, MA, USA, 2001.
[15] Steven J. Gortler, Radek Grzeszczuk, Richard Szeliski, and Michael F. Cohen. The
lumigraph. In SIGGRAPH ’96: Proceedings of the 23rd Annual Conference on
Computer Graphics and Interactive Techniques, pages 43–54, New York, NY, USA,
1996. ACM Press.

Bibliography 87
[16] Mark A. Halstead, Brain A. Barsky, Stanley A. Klein, and Robert B. Mandell.
Reconstructing curved surfaces from specular reflection patterns using spline surface
fitting of normals. In SIGGRAPH ’96: Proceedings of the 23rd Annual Conference
on Computer Graphics and Interactive Techniques, pages 335–342, New York, NY,
USA, 1996. ACM Press.
[17] Richard Hartley and Andrew Zisserman. Multiple view geometry in computer vision.
Cambridge University Press, New York, NY, USA, 2000.
[18] Eugene Hecht. Optics. Addison-Wesley, Reading, MA, USA, 3rd edition, 1998.
[19] Janne Heikkila and Olli Silven. A four-step camera calibration procedure with im-
plicit image correction. In CVPR ’97: Proceedings of the 1997 Conference on Com-
puter Vision and Pattern Recognition, page 1106, Washington, DC, USA, 1997.
IEEE Computer Society.
[20] Gabor T. Herman. Discrete multidimensional jordan surfaces. CVGIP: Graphical
Models and Image Processing, 54(6):507–515, 1992.
[21] Joachim Hohle. Zur Theorie und Praxis der Unterwasser-Photogrammetrie. Verlag
der Bayer, Akad. d. Wiss, Munich, Germany, 1971.
[22] Stephen D. Klyce. Computer-assisted corneal topography. Investigative Ophthal-
mology and Visual Science, 25(12):1426–1435, 1984.
[23] Kiriakos N. Kutulakos and Eron Steger. A theory of refractive and specular 3d
shape by light-path triangulation. In ICCV ’05: Proceedings of the Tenth IEEE
International Conference on Computer Vision, pages 1448–1455. IEEE Computer
Society, 2005.

Bibliography 88
[24] A. Laurentini. The visual hull concept for silhouette-based image understanding.
IEEE Transactions on Pattern Analysis and Machine Intelligence, 16(2):150–162,
1994.
[25] Marc Levoy and Pat Hanrahan. Light field rendering. In SIGGRAPH ’96: Proceed-
ings of the 23rd Annual Conference on Computer Graphics and Interactive Tech-
niques, pages 31–42, New York, NY, USA, 1996. ACM Press.
[26] Hans-Gerd Maas. New developments in multimedia photogrammetry. Optical 3-D
Measurement Techniques III, 1995.
[27] Wojciech Matusik, Chris Buehler, Ramesh Raskar, Steven J. Gortler, and Leonard
McMillan. Image-based visual hulls. In SIGGRAPH ’00: Proceedings of the 27th
Annual Conference on Computer Graphics and Interactive Techniques, pages 369–
374, New York, NY, USA, 2000. ACM Press/Addison-Wesley Publishing Co.
[28] Wojciech Matusik, Hanspeter Pfister, Addy Ngan, Paul Beardsley, Remo Ziegler,
and Leonard McMillan. Image-based 3d photography using opacity hulls. In SIG-
GRAPH ’02: Proceedings of the 29th Annual Conference on Computer Graphics and
Interactive Techniques, pages 427–437, New York, NY, USA, 2002. ACM Press.
[29] Wojciech Matusik, Hanspeter Pfister, Remo Ziegler, Addy Ngan, and Leonard
McMillan. Acquisition and rendering of transparent and refractive objects. In
EGRW ’02: Proceedings of the 13th Eurographics workshop on Rendering, pages
267–278, Aire-la-Ville, Switzerland, Switzerland, 2002. Eurographics Association.
[30] Daisuke Miyazaki, Masataka Kagesawa, and Katsushi Ikeuchi. Polarization-based
transparent surface modeling from two views. In ICCV ’03: Proceedings of the Ninth
IEEE International Conference on Computer Vision, page 1381, Washington, DC,
USA, 2003. IEEE Computer Society.

Bibliography 89
[31] Daisuke Miyazaki, Masataka Kagesawa, and Katsushi Ikeuchi. Transparent surface
modeling from a pair of polarization images. IEEE Transactions on Pattern Analysis
and Machine Intelligence, 26(1):73–82, 2004.
[32] Nigel J. W. Morris and Kiriakos N. Kutulakos. Dynamic refraction stereo. In ICCV
’05: Proceedings of the Tenth IEEE International Conference on Computer Vision,
pages 1573–1580, Washington, DC, USA, 2005. IEEE Computer Society.
[33] Hiroshi Murase. Surface shape reconstruction of an undulating transparent object. In
ICCV ’90: Proceedings of the Third International Conference on Computer Vision,
pages 313–317, 1990.
[34] Shree K. Nayar, Katsushi Ikeuchi, and Takeo Kanade. Surface reflection: Physical
and geometrical perspectives. IEEE Transactions on Pattern Analysis and Machine
Intelligence, 13(7):611–634, 1991.
[35] J. A. Nelder and R. Mead. A simplex method for function minimization. Computer-
Journal, 7:308–313, 1965.
[36] Michael Oren and Shree K. Nayar. A theory of specular surface geometry. In ICCV
’95: Proceedings of the Fifth IEEE International Conference on Computer Vision,
pages 740–, 1995.
[37] Shmuel Peleg, Benny Rousso, Alex Rav-Acha, and Assaf Zomet. Mosaicing on adap-
tive manifolds. IEEE Transactions on Pattern Analysis and Machine Intelligence,
22(10):1144–1154, 2000.
[38] Hanspeter Pfister, Matthias Zwicker, Jeroen van Baar, and Markus Gross. Surfels:
surface elements as rendering primitives. In SIGGRAPH ’00: Proceedings of the
27th Annual Conference on Computer Graphics and Interactive Techniques, pages
335–342, New York, NY, USA, 2000. ACM Press/Addison-Wesley Publishing Co.

Bibliography 90
[39] William H. Press, Brian P. Flannery, Saul A. Teukolsky, and William T. Vetterling.
Numerical Recipes in C++: The Art of Scientific Computing. Cambridge University
Press, Cambridge (UK) and New York, 2nd edition, 2002.
[40] M. Saito, Yoichi Sato, Katsushi Ikeuchi, and H. Kashiwagi. Measurement of surface
orientations of transparent objects using polarization in highlight. In CVPR ’99:
Proceedings of the IEEE Conference on Computer Vision and Pattern Recognition,
volume 1, pages 381–386, June 1999.
[41] Silvio Savarese and Pietro Perona. Local analysis for 3d reconstruction of specular
surfaces. In CVPR ’01: Proceedings of the IEEE Computer Society Conference on
Computer Vision and Pattern Recognition, pages 738–745. IEEE Computer Society,
2001.
[42] Silvio Savarese and Pietro Perona. Local analysis for 3d reconstruction of specular
surfaces - part II. In ECCV ’02: Proceedings of the 7th European Conference on
Computer Vision, volume 2, pages 759–774, 2002.
[43] Alvy Ray Smith and James F. Blinn. Blue screen matting. In SIGGRAPH ’96:
Proceedings of the 23rd Annual Conference on Computer Graphics and Interactive
Techniques, pages 259–268, New York, NY, USA, 1996. ACM Press.
[44] Richard Szeliski and Heung-Yeung Shum. Creating full view panoramic image mo-
saics and environment maps. In SIGGRAPH ’97: Proceedings of the 24th Annual
Conference on Computer Graphics and Interactive Techniques, pages 251–258, New
York, NY, USA, 1997. ACM Press/Addison-Wesley Publishing Co.
[45] Marco Tarini, Hendrik P. A. Lensch, Michael Goesele, and Hans-Peter Seidel. 3d
acquisition of mirroring objects using striped patterns. Graphical Models, 67(4):233–
259, 2005.

Bibliography 91
[46] Joseph W. Warnicki, Paul G. Rehkopf, Diane Y. Curtin, Stephen A. Burns,
Robert C. Arffa, and John C. Stuart. Corneal topography using computer ana-
lyzed rasterstereographic images. Applied Optics, 27(6):1135–1140, 1988.
[47] Yonatan Wexler, Andrew. W. Fitzgibbon, and Andrew. Zisserman. Image-based
environment matting. In EGRW ’02: Proceedings of the 13th Eurographics work-
shop on Rendering, pages 279–290, Aire-la-Ville, Switzerland, Switzerland, 2002.
Eurographics Association.
[48] Daniel N. Wood, Daniel I. Azuma, Ken Aldinger, Brian Curless, Tom Duchamp,
David H. Salesin, and Werner Stuetzle. Surface light fields for 3d photography. In
SIGGRAPH ’00: Proceedings of the 27th Annual Conference on Computer Graph-
ics and Interactive Techniques, pages 287–296, New York, NY, USA, 2000. ACM
Press/Addison-Wesley Publishing Co.
[49] Ruo Zhang, Ping-Sing Tsai, James Edwin Cryer, and Mubarak Shah. Shape from
shading: A survey. IEEE Transactions on Pattern Analysis and Machine Intelli-
gence, 21(8):690–706, 1999.
[50] Douglas E. Zongker, Dawn M. Werner, Brian Curless, and David H. Salesin. En-
vironment matting and compositing. In SIGGRAPH ’99: Proceedings of the 26th
Annual Conference on Computer Graphics and Interactive Techniques, pages 205–
214, New York, NY, USA, 1999. ACM Press/Addison-Wesley Publishing Co.