record 2 pc - ion audio - dedicated to delivering sound ... 2 pc... · the ion audio record 2 pc is...
TRANSCRIPT

RECORD 2 PC
QUICKSTART GUIDE
ENGLISH ( 3 – 4 )
MANUAL DE INICIO RÁPIDO ESPAÑOL ( 5 – 6 )
GUIDE D'UTILISATION SIMPLIFIÉ
FRANÇAIS ( 7 – 8 )
GUIDA RAPIDA ITALIANO ( 9 – 10 )
KURZANLEITUNG
DEUTSCH ( 11 – 12 )
SNELSTARTGIDS NEDERLANDS ( 13 – 14 )

3
RECORD 2 PC QUICKSTART GUIDE CONNECTING THE RECORD 2 PC The ION Audio RECORD 2 PC is a plug-and-play device, which means that there are no drivers to install. The first time you connect it to your computer, it will automatically install all the necessary driver components and be ready to use.
IMPROVING AUDIO QUALITY If you are experiencing unexpected noise, hiss or distortion in your recordings, here are a few things you can do to improve the quality of your sound as you use RECORD 2 PC: • Use higher-quality RCA cables when connecting your sound source to RECORD 2 PC. • Connect RECORD 2 PC to a different USB port on your computer. (USB ports on the rear panel typically work best.) • Close all software applications other than your recording application (e.g., EZ Vinyl/Tape Converter). • If you are using a laptop, disconnect your laptop's power supply. • Experiment with connecting your computer and/or sound source to different power outlets (or the same power outlet). • Experiment with repositioning RECORD 2 PC and other audio cables away from possible noise sources (e.g.,
computers, power cables, speakers, amps, etc.) • Ensure the connections between all your devices are secure (including the grounding wire of your record player, if it
has one). • Visit www.ionaudio.com/computer-optimization for more information on optimizing your computer for audio.
AUDIO SETUP In most cases (especially if you are using Windows) RECORD 2 PC will be automatically selected as your computer's default recording device. If you find you are unable to record any audio with RECORD 2 PC, follow the instructions below for your operating system.
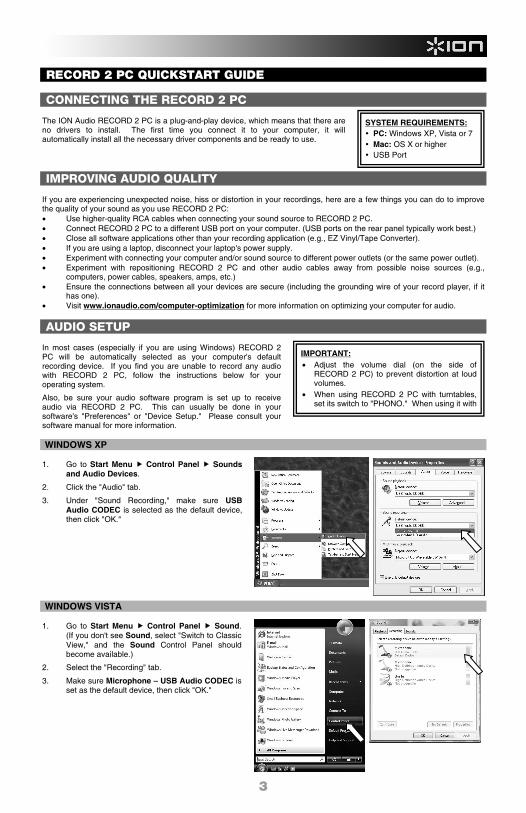
Also, be sure your audio software program is set up to receive audio via RECORD 2 PC. This can usually be done in your software's "Preferences" or "Device Setup." Please consult your software manual for more information. WINDOWS XP 1. Go to Start Menu Control Panel Sounds
and Audio Devices.
2. Click the "Audio" tab.
3. Under "Sound Recording," make sure USB Audio CODEC is selected as the default device, then click "OK."
WINDOWS VISTA 1. Go to Start Menu Control Panel Sound.
(If you don't see Sound, select "Switch to Classic View," and the Sound Control Panel should become available.)
2. Select the "Recording" tab.
3. Make sure Microphone – USB Audio CODEC is set as the default device, then click "OK."
SYSTEM REQUIREMENTS: PC: Windows XP, Vista or 7 Mac: OS X or higher USB Port
IMPORTANT:• Adjust the volume dial (on the side of
RECORD 2 PC) to prevent distortion at loud volumes.
• When using RECORD 2 PC with turntables, set its switch to "PHONO." When using it with

4
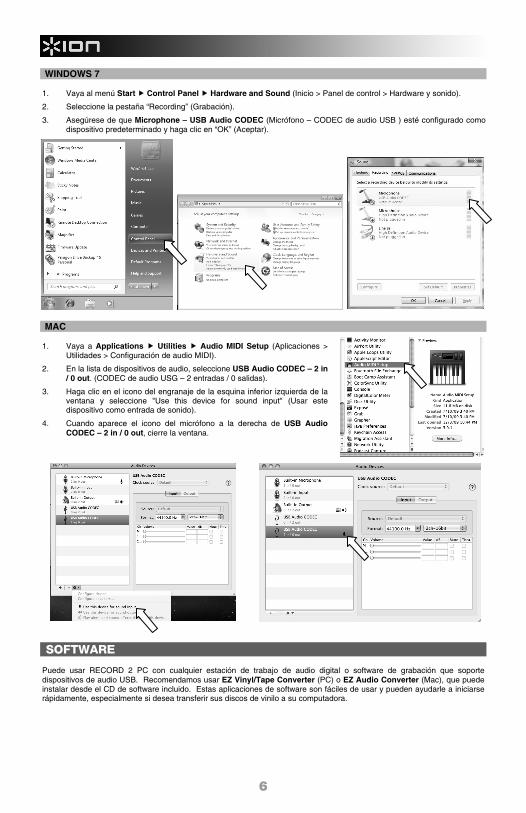
WINDOWS 7 1. Go to Start Menu Control Panel Hardware and Sound Sound.
2. Select the "Recording" tab.
3. Make sure Microphone – USB Audio CODEC is set as the default device, then click "OK."
MAC 1. Go to Applications Utilities Audio MIDI Setup.
2. Under the list of audio devices, select USB Audio CODEC – 2 in / 0 out.
3. Click the gear icon at the bottom-left corner of the window and select "Use this device for sound input."
4. When the microphone icon appears to the right of USB Audio CODEC – 2 in / 0 out, close the window.
SOFTWARE You can use RECORD 2 PC with any digital audio workstation or recording software that supports USB audio devices. We recommend using EZ Vinyl/Tape Converter (PC) or EZ Audio Converter (Mac), which you can install from the included software CD. These software applications are easy to use and can get you started quickly, especially if you want to transfer your vinyl recordings onto your computer.
5
GUÍA DE INICIO RÁPIDO DE RECORD 2 PC CÓMO CONECTAR EL RECORD 2 PC RECORD 2 PC de ION Audio es un dispositivo plug and play, lo que significa que no es necesario instalar drivers. La primera vez que lo conecte a su computadora, se instalan automáticamente todos los componentes de drivers necesarios y estará listo para usar inmediatamente.
CÓMO MEJORAR LA CALIDAD DEL AUDIO Si experimenta ruidos, silbidos o distorsión inesperados en sus grabaciones, he aquí algunas cosas que puede hacer para mejorar la calidad de su sonido cuando utiliza RECORD 2 PC: • Use cables RCA de alta calidad cuando conecta su fuente de sonido a RECORD 2 PC. • Conecte RECORD 2 PC a un puerto USB diferente de la computadora. (Los puertos USB del panel trasero
habitualmente funcionan mejor.) • Cierre todas las aplicaciones de software que no sean su aplicación de grabación (por ej. EZ Vinyl/Tape Converter). • Si está usando una laptop, desconecte la fuente de alimentación de la misma. • Experimente conectando su computadora y/o su fuente de sonido a tomacorrientes diferentes (o al mismo
tomacorriente). • Experimente reposicionando los cables de RECORD 2 PC y los demás cables de audio lejos de las posibles fuentes
de ruido (como computadoras, cables de energía, altavoces, amplificadores, etc.) • Asegúrese de que las conexiones entre todos sus dispositivos sean seguras (incluido el cable de tierra de su
reproductor de discos, si tiene uno). • Visite www.ionaudio.com/computer-optimization para más información sobre la optimización de su computadora
para audio.
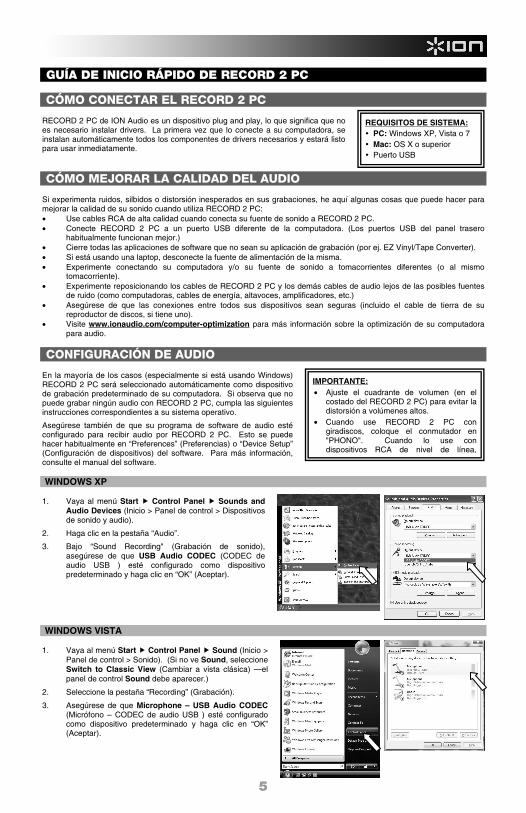
CONFIGURACIÓN DE AUDIO En la mayoría de los casos (especialmente si está usando Windows) RECORD 2 PC será seleccionado automáticamente como dispositivo de grabación predeterminado de su computadora. Si observa que no puede grabar ningún audio con RECORD 2 PC, cumpla las siguientes instrucciones correspondientes a su sistema operativo. Asegúrese también de que su programa de software de audio esté configurado para recibir audio por RECORD 2 PC. Esto se puede hacer habitualmente en “Preferences” (Preferencias) o “Device Setup” (Configuración de dispositivos) del software. Para más información, consulte el manual del software. WINDOWS XP 1. Vaya al menú Start Control Panel Sounds and
Audio Devices (Inicio > Panel de control > Dispositivos de sonido y audio).
2. Haga clic en la pestaña “Audio”.
3. Bajo “Sound Recording" (Grabación de sonido), asegúrese de que USB Audio CODEC (CODEC de audio USB ) esté configurado como dispositivo predeterminado y haga clic en “OK” (Aceptar).
WINDOWS VISTA 1. Vaya al menú Start Control Panel Sound (Inicio >
Panel de control > Sonido). (Si no ve Sound, seleccione Switch to Classic View (Cambiar a vista clásica) —el panel de control Sound debe aparecer.)
2. Seleccione la pestaña “Recording” (Grabación).
3. Asegúrese de que Microphone – USB Audio CODEC (Micrófono – CODEC de audio USB ) esté configurado como dispositivo predeterminado y haga clic en “OK” (Aceptar).
REQUISITOS DE SISTEMA: PC: Windows XP, Vista o 7 Mac: OS X o superior Puerto USB
IMPORTANTE:• Ajuste el cuadrante de volumen (en el
costado del RECORD 2 PC) para evitar la distorsión a volúmenes altos.
• Cuando use RECORD 2 PC con giradiscos, coloque el conmutador en "PHONO". Cuando lo use con dispositivos RCA de nivel de línea,
6
WINDOWS 7 1. Vaya al menú Start Control Panel Hardware and Sound (Inicio > Panel de control > Hardware y sonido). 2. Seleccione la pestaña “Recording” (Grabación).
3. Asegúrese de que Microphone – USB Audio CODEC (Micrófono – CODEC de audio USB ) esté configurado como dispositivo predeterminado y haga clic en “OK” (Aceptar).
MAC 1. Vaya a Applications Utilities Audio MIDI Setup (Aplicaciones >
Utilidades > Configuración de audio MIDI).
2. En la lista de dispositivos de audio, seleccione USB Audio CODEC – 2 in / 0 out. (CODEC de audio USG – 2 entradas / 0 salidas).
3. Haga clic en el icono del engranaje de la esquina inferior izquierda de la ventana y seleccione "Use this device for sound input" (Usar este dispositivo como entrada de sonido).
4. Cuando aparece el icono del micrófono a la derecha de USB Audio CODEC – 2 in / 0 out, cierre la ventana.
SOFTWARE Puede usar RECORD 2 PC con cualquier estación de trabajo de audio digital o software de grabación que soporte dispositivos de audio USB. Recomendamos usar EZ Vinyl/Tape Converter (PC) o EZ Audio Converter (Mac), que puede instalar desde el CD de software incluido. Estas aplicaciones de software son fáciles de usar y pueden ayudarle a iniciarse rápidamente, especialmente si desea transferir sus discos de vinilo a su computadora.
7
GUIDE D'UTILISATION RAPIDE DE RECORD 2 PC BRANCHEMENT DU RECORD 2 PC Le RECORD 2 PC de ION est un appareil prêt à l’utilisation, c.-à-d. qu’il n’y a aucun pilote à installer. Lorsque vous le branchez à votre ordinateur la première fois, il installe automatiquement tous les pilotes nécessaires, puis est prêt à être utilisé.
AMÉLIORER LA QUALITÉ AUDIO Si vos enregistrements contiennent des bruits indésirables, des ronflements ou de la distorsion, voici des options à essayer afin d'améliorer la qualité du son du RECORD 2 PC : • Utilisez des câbles RCA de meilleure qualité afin de brancher la source audio au RECORD 2 PC. • Branchez le RECORD 2 PC sur un des autres ports USB de votre ordinateur. (Les ports USB du panneau arrière
fonctionnent généralement mieux.) • Fermez toutes les applications autres que votre logiciel d’enregistrement (p. ex., EZ Vinyl/Tape Converter). • Si vous utilisez un ordinateur portable, débranchez le bloc d’alimentation. • Essayez de brancher l’ordinateur et/ou la source audio à des prises électriques différentes ou à la même prise
électrique si elles sont différentes. • Essayez de déplacer le RECORD 2 PC et les câbles audio loin des sources possibles d’interférence (p. ex.,
ordinateurs, câbles d’alimentation, enceintes, amplificateurs, etc.). • Vérifiez que tous les branchements des appareils sont corrects, incluant la mise à la terre de la platine tourne-disque,
s'il y a lieu. • Visitez le site www.ionaudio.com/computer-optimization afin d’obtenir plus d’information concernant l’optimisation
de votre ordinateur pour une meilleure qualité audio.
CONFIGURATION AUDIO Dans la plupart des cas, et surtout si vous utilisez Windows, le RECORD 2 PC sera automatiquement sélectionné comme appareil d'enregistrement par défaut par votre ordinateur. Si vous ne parvenez pas à enregistrer un signal audio avec le RECORD 2 PC, veuillez suivre les instructions ci-dessous selon votre système d’exploitation.
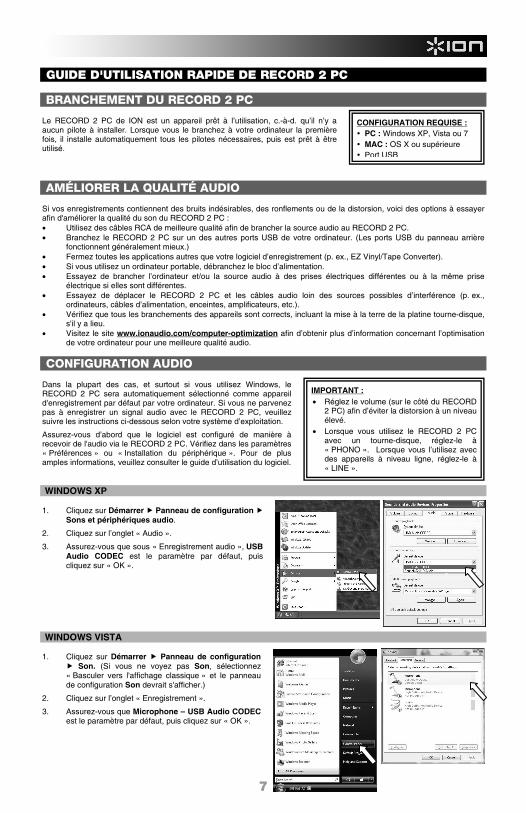
Assurez-vous d’abord que le logiciel est configuré de manière à recevoir de l'audio via le RECORD 2 PC. Vérifiez dans les paramètres « Préférences » ou « Installation du périphérique ». Pour de plus amples informations, veuillez consulter le guide d’utilisation du logiciel. WINDOWS XP 1. Cliquez sur Démarrer Panneau de configuration
Sons et périphériques audio.
2. Cliquez sur l’onglet « Audio ».
3. Assurez-vous que sous « Enregistrement audio », USB Audio CODEC est le paramètre par défaut, puis cliquez sur « OK ».
WINDOWS VISTA 1. Cliquez sur Démarrer Panneau de configuration
Son. (Si vous ne voyez pas Son, sélectionnez « Basculer vers l'affichage classique » et le panneau de configuration Son devrait s'afficher.)
2. Cliquez sur l’onglet « Enregistrement ».
3. Assurez-vous que Microphone – USB Audio CODEC est le paramètre par défaut, puis cliquez sur « OK ».
CONFIGURATION REQUISE : PC : Windows XP, Vista ou 7 MAC : OS X ou supérieure Port USB
IMPORTANT :• Réglez le volume (sur le côté du RECORD
2 PC) afin d’éviter la distorsion à un niveau élevé.
• Lorsque vous utilisez le RECORD 2 PC avec un tourne-disque, réglez-le à « PHONO ». Lorsque vous l’utilisez avec des appareils à niveau ligne, réglez-le à « LINE ».

8
WINDOWS 7 1. Cliquez sur Démarrer Panneau de configuration Matériel et audio Son.
2. Cliquez sur l’onglet « Enregistrement ».
3. Assurez–vous que Microphone – USB Audio CODEC est le paramètre par défaut, puis cliquez sur « OK ».
MAC 1. Allez à Applications Utilitaires Configuration audio et MIDI.
2. Dans l’onglet Sons et périphériques audio, sélectionnez USB Audio CODEC – 2 in / 0 out.
3. Cliquez sur l’icône action dans le coin inférieur gauche de la fenêtre et sélectionnez « ».
4. Lorsque l’icône du microphone apparaît à la droite de USB Audio CODEC – 2 in / 0 out, fermez la fenêtre.
LOGICIEL Vous pouvez utiliser le RECORD 2 PC avec tout poste audio numérique logiciel ou logiciel d’enregistrement qui prend en charge les périphériques audio USB. Nous vous recommandons d’utiliser le EZ Vinyl/Tape Converter (PC) ou EZ Audio Converter (Mac), que vous pouvez installer à partir du CD inclus. Ces applications sont faciles à utiliser et vous permettent de commencer rapidement à utiliser l’appareil, surtout si vous désirez transférer votre collection de vinyles sur votre ordinateur.

9
GUIDA RAPIDA AL RECORD 2 PC COLLEGAMENTO DEL RECORD 2 PC ION Audio RECORD 2 PC è un dispositivo plug-and-play, dunque non è necessario installare driver. La prima volta che viene collegato al computer installerà automaticamente tutti i componenti driver necessari e sarà pronto per l’uso.
COME MIGLIORARE LA QUALITÀ DELL’AUDIO Qualora si dovessero riscontrare rumori, sibili o distorsioni inattesi nelle registrazioni, ecco alcune cose da fare per migliorare la qualità del suono mentre si utilizza il RECORD 2 PC: • Servirsi di cavi RCA di qualità superiore per il collegamento della sorgente audio al RECORD 2 PC. • Collegare il RECORD 2 PC ad una diversa porta USB del computer (le porte USB presenti a livello del pannello
posteriore solitamente funzionano meglio). • Chiudere tutte le applicazioni software diverse dall’applicazione di registrazione (ad es. EZ Vinyl/Tape Converter). • Se si utilizza un computer portatile, scollegarlo dall’alimentazione. • Provare a collegare il computer e/o la fonte audio a diverse prese di alimentazione (o alla stessa presa di
alimentazione). • Provare a riposizionare il RECORD 2 PC e altri cavi audio lontani da possibili fonti di rumore (ad es. computer, cavi di
alimentazione, casse, ampli, ecc.) • Assicurarsi che i collegamenti tra tutti i dispositivi siano sicuri (incluso il cavo di messa a terra del registratore, se ne
ha uno). • Recarsi alla pagina www.ionaudio.com/computer-optimization per maggiori informazioni su come ottimizzare il
computer per l’audio.
CONFIGURAZIONE AUDIO Nella maggior parte dei casi (soprattutto se utilizzate Windows) il RECORD 2 PC verrà selezionato automaticamente dal computer come dispositivo di registrazione predefinito. Qualora fosse impossibile registrare audio con il RECORD 2 PC, seguire le istruzioni di cui sotto relative al vostro sistema operativo. Inoltre, assicuratevi che il vostro programma audio sia configurato per ricevere audio dal RECORD 2 PC. Questo può essere fatto solitamente a livello delle “Preferenze” del software o della “Configurazione periferica”. Per maggiori informazioni, consultate il manuale del vostro software. WINDOWS XP 1. Recarsi su Start Pannello di controllo Suoni e
periferiche audio.
2. Fare clic sulla linguetta “Audio”.
3. Sotto “Registrazione suoni”, assicurarsi che USB Audio CODEC sia selezionato quale periferica predefinita, quindi cliccare su “OK”.
WINDOWS VISTA 1. Recarsi su Start Pannello di controllo Audio.
(Se non viene visualizzato Audio, selezionare “Visualizzazione classica” ed il Pannello di controllo Audio dovrebbe diventare disponibile.)
2. Selezionare la linguetta “Registrazione”.
3. Assicurarsi che Microfono – USB Audio CODEC sia selezionato quale periferica predefinita, quindi cliccare su “OK”.
REQUISITI DI SISTEMA: PC: Windows XP, Vista o 7 Mac: OS X o superiore Porta USB
IMPORTANTE:• Regolare il volume (lateralmente al RECORD
2 PC) per evitare la distorsione a volume elevato.
• Quando si utilizza il RECORD 2 PC con i giradischi, impostare l’interruttore su "PHONO". Quando lo si utilizza con dispositivi RCA a livello di linea, impostatelo su "LINE".
10
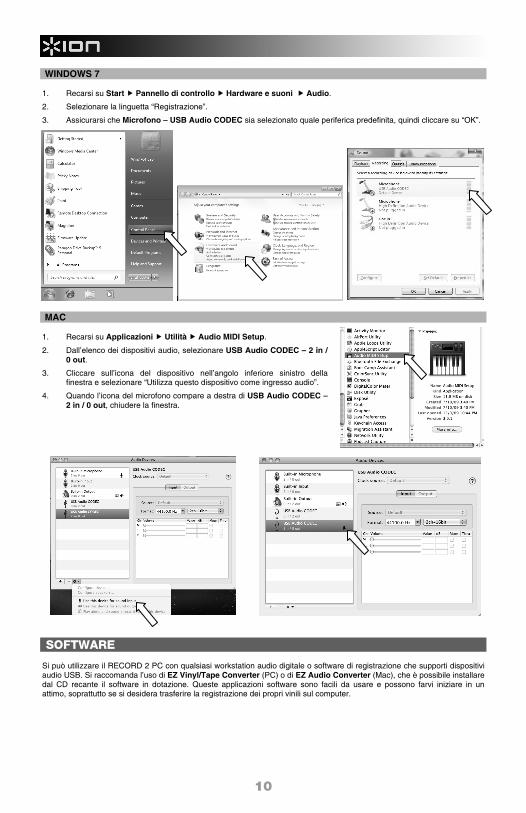
WINDOWS 7 1. Recarsi su Start Pannello di controllo Hardware e suoni Audio. 2. Selezionare la linguetta “Registrazione”.
3. Assicurarsi che Microfono – USB Audio CODEC sia selezionato quale periferica predefinita, quindi cliccare su “OK”.
MAC 1. Recarsi su Applicazioni Utilità Audio MIDI Setup.
2. Dall’elenco dei dispositivi audio, selezionare USB Audio CODEC – 2 in / 0 out.
3. Cliccare sull’icona del dispositivo nell’angolo inferiore sinistro della finestra e selezionare “Utilizza questo dispositivo come ingresso audio”.
4. Quando l’icona del microfono compare a destra di USB Audio CODEC – 2 in / 0 out, chiudere la finestra.
SOFTWARE Si può utilizzare il RECORD 2 PC con qualsiasi workstation audio digitale o software di registrazione che supporti dispositivi audio USB. Si raccomanda l’uso di EZ Vinyl/Tape Converter (PC) o di EZ Audio Converter (Mac), che è possibile installare dal CD recante il software in dotazione. Queste applicazioni software sono facili da usare e possono farvi iniziare in un attimo, soprattutto se si desidera trasferire la registrazione dei propri vinili sul computer.

11
RECORD 2 PC SCHNELLBETRIEBSANLEITUNG RECORD 2 PC ANSCHLIESSEN Beim ION Audio RECORD 2 PC handelt es sich um ein Gerät, das über die Funktion "Plug-and-Play" ohne Treiber installiert werden kann. Wird das Gerät zum ersten mal an den PC angeschlossen, werden automatisch alle notwendigen Treiberkomponenten installiert und es ist gebrauchsfertig.
VERBESSERUNG DER TONQUALITÄT Falls in der Aufnahme unerwartete Geräusche, Rauschen oder Verzerrungen auftreten, können die folgenden Tipps unter Umständen dazu dienen, die Tonqualität beim Einsatz des RECORD 2 PC zu verbessern: • Zum Anschluss der Tonquelle an den RECORD 2 PC RCA-Kabel mit hochwertiger Qualität verwenden. • Den RECORD 2 PC an einen alternativen USB-Anschluss am Computer anschließen. (Im Allgemeinen sind die
rückwärtigen USB-Anschlüsse am besten geeignet.) • Alle Programme bis auf die Aufnahmesoftware (z. B. EZ Vinyl/Tape Converter) schließen. • Bei Verwendung eines Laptop dessen Netzanschluss ausstecken. • Ausprobieren, ob sich die Tonqualität verändert, wenn Computer und/oder die Tonquelle an einen verschiedenen
(oder den gleichen) Netzanschluss angeschlossen werden. • Ausprobieren, ob sich die Tonqualität verändert, wenn der RECORD 2 PC und andere Tonkabel von anderen
möglichen Geräuschquellen (wie z. B. Computer, Netzkabel, Lautsprecher, Verstärker usw.) aufgestellt werden. • Überprüfen, dass die Anschlüsse zwischen allen Geräten sicher sitzen (auch das Erdungskabel am Plattenspieler,
falls dieser ein solches besitzt). • Auf der Webseite www.ionaudio.com/computer-optimization befinden sich weitere Informationen zur Audio-
Optimierung des Computers.
AUDIOEINSTELLUNGEN In den meisten Fällen most cases (vor allem bei der Verwendung von Windows) wird RECORD 2 PC automatisch als vorgegebenes Aufnahmegerät ausgewählt. Falls mit RECORD 2 PC nicht aufgenommen werden kann, den nachstehenden Instruktionen für das jeweilige Betriebssystem folgen.
Darüber hinaus ist sicherzustellen, dass das verwendete Audioprogramm so eingestellt ist, dass es Audio vom RECORD 2 PC empfangen kann. Dies geschieht gewöhnlich in den "Einstellungen" oder "Geräteeinstellungen" der Software. Gegebenfalls die Gebrauchsanleitung des Programms für weitere Informationen zu Rate ziehen. WINDOWS XP 1. Menüs Start Menu Systemsteuerung Sounds
und Audiogeräte aufrufen.
2. Auf "Audio" klicken.
3. Unter "Soundaufnahme" sicherstellen, dass USB Audio CODEC als vorgegebenes Gerät gewählt ist und mit "OK" bestätigen.
WINDOWS VISTA 1. Menüs Start Menu Systemsteuerung Sound.
(Falls Sound nicht erscheint, "Zur klassischen Ansicht" wechseln und die Sound-Systemsteuerung sollte erscheinen).
2. Tab "Aufnahme" anklicken.
3. Sicherstellen, dass Mikrophon – USB Audio CODEC als vorgegebenes Gerät gewählt ist und mit "OK" bestätigen.
SYSTEMVORAUSSETZUNGEN: PC: Windows XP, Vista oder 7 Mac: OS X oder besser USB-Anschluss
WICHTIG:• Lautstärkeregler (befindet sich an der Seite
des RECORD 2 PC) einstellen, um Verzerren bei hoher Lautstärke zu vermeiden.
• Wird RECORD 2 PC mit Plattenspielern verwendet, dessen Schalter auf "PHONO" stellen. Bei Verwendung mit Line-level RCA-Geräten, auf "LINE" umschalten.

12
WINDOWS 7 1. Menüs Start Menu Systemsteuerung Hardware und Sound Sound aufrufen.
2. Tab "Recording" anklicken.
3. Sicherstellen, dass Mikrophon – USB Audio CODEC als vorgegebenes Gerät gewählt ist und mit "OK" bestätigen.
MAC 1. Menüs Programme Utilities Audio MIDI Setup aufrufen.
2. In der Liste der Audiogeräte USB Audio CODEC – 2 in / 0 out wählen.
3. Das im Menüfenster unten links befindliche Icon anklicken und "Dieses Gerät für Soundeingabe verwenden" wählen.
4. Sobald das Mikrofon-Icon rechts von USB Audio CODEC – 2 in / 0 out erscheint, das Fenster schließen.
PROGRAMM RECORD 2 PC kann mit jeder digitalen Audio-Workstation oder jedem Aufnahmeprogramm, welche mit USB-Audiogeräten arbeiten, verwendet werden. Empfohlen ist EZ Vinyl/Tape Converter (PC) oder EZ Audio Converter (Mac), welche von der beiliegenden Programm-CD installiert werden können. Diese Programme sind einfach zu verwenden und ermöglichen einen schnellen Einstieg, vor allem, wenn Vinylplatten auf den PC übertragen werden sollen.

13
SNELSTARTGIDS RECORD 2 PC AANSLUITEN VAN DE RECORD 2 PC De ION Audio RECORD 2 PC is een plug-en-playapparaat, wat betekent dat er geen stuurprogramma's worden geïnstalleerd. De eerste keer dat u de MicLink aansluit op de PC worden alle benodigde componenten automatisch geïnstalleerd en is het apparaat klaar voor gebruik.
VERBETEREN GELUIDSKWALITEIT Als zich onverwacht ruis, sissen of vervorming voordoet in uw opnamen, kunt u de volgende stappen ondernemen om de kwaliteit van het geluid te verbeteren bij gebruik van de RECORD 2 PC: • Gebruik RCA-bekabeling van een hogere kwaliteit bij het aansluiten van uw geluidsbron op de RECORD 2 PC. • Sluit de RECORD 2 PC aan op een andere USB-poort van de computer (USB-poorten aan de achterkant werken vaak
het best). • Sluit alle softwaretoepassingen op de PC behalve die voor de opname (zoals EZ Vinyl/Tape converter). • Als u een laptop gebruikt, koppel dan de stroom los. • Experimenteer met het aansluiten van de computer en/of geluidsbron op verschillende stopcontacten (of hetzelfde
stopcontact). • Experimenteer met het opnieuw positioneren van de RECORD 2 PC en andere geluidskabels uit de buurt van
mogelijke lawaaibronnen (zoals computers, stroomkabels, luidsprekers, versterkers enz.) • Zorg ervoor dat alle aansluitingen tussen de apparatuur goed zitten (inclusief de aardedraad van de platenspeler,
indien van toepassing). • Bezoek www.ionaudio.com/computer-optimization voor meer informatie over het optimaliseren van uw computer
voor geluidsfunctionaliteit.
GELUIDSSET-UP Meestal (en zeker wanneer u Windows gebruikt) zal de RECORD 2 PC automatisch geselecteerd worden als standaard opname-apparaat voor de PC. Als het niet mogelijk blijkt geluid op te nemen met de RECORD 2 PC, volg dan onderstaande instructies voor uw besturingssysteem.
Zorg er ook voor dat de geluidssoftware is ingesteld op het ontvangen van geluid via de RECORD 2 PC. Dit wordt gewoonlijk ingesteld in de "Voorkeuren" of "Apparaatset-up" Raadpleeg de handleiding voor meer informatie. WINDOWS XP 1. Ga naar Startmenu Configuratiescherm
Geluiden en geluidsapparaten.
2. Klik op tab "Geluid".
3. Zorg ervoor dat onder "Geluidsopname" USB Geluid CODEC is ingesteld als standaardapparaat en klik dan op “OK.”
WINDOWS VISTA 1. Ga naar Start menu Configuratiescherm
Geluid. (Als u Geluid niet ziet, selecteer dan “Klassieke weergave” en in het configuratiescherm komt Geluid weer tevoorschijn.)
2. Selecteer tab "Opnemen".
3. Zorg ervoor dat Microfoon – USB Geluid CODEC is ingesteld als standaardapparaat en klik dan op “OK.”
SYSTEEMVEREISTEN: PC: Windows XP, Vista of 7 Mac: OS X of hoger USB-poort
BELANGRIJK:• Pas het volume aan met de draaischijf (aan
de zijkant van de RECORD 2 PC) om vervor-ming bij een luid volume te voorkomen.
• Bij gebruik van de RECORD 2 PC met draai-tafels wordt de schakelaar ingesteld op "PHONO". Bij gebruik met lijnniveau-RCA-apparaten wordt deze ingesteld op "LINE".

14
WINDOWS 7 1. Ga naar Startmenu Configuratiescherm Hardware en geluid Geluid.
2. Selecteer tab "Opnemen".
3. Zorg ervoor dat Microfoon – USB Geluid CODEC is ingesteld als standaardapparaat en klik dan op “OK.”
MAC 1. Ga naar Toepassingen Hulpmiddelen Geluid MIDI Set-up.
2. In de lijst van geluidsapparaten wordt USB Geluid CODEC – 2 in / 0 uit geselecteerd.
3. Klik op het pictogram met apparatuur linksonderin het venster en selecteer "Gebruik dit apparaat voor input van geluid".
4. Wanneer het pictogram met de microfoon rechts van USB Geluid CODEC – 2 in / 0 uit verschijnt, sluit dan het venster.
SOFTWARE U kunt de RECORD 2 PC gebruiken met elk werkstation met digitaal geluid of opnamesoftware die USB-geluidsapparatuur ondersteunt. Het wordt aanbevolen EZ Vinyl/Tape Converter (PC) of EZ Audio Converter (Mac) te gebruiken, te installeren vanaf de meegeleverde software-CD. Deze softwaretoepassingen zijn gemakkelijk in gebruik en u kunt snel aan de slag, in het bijzonder wanneer u uw LP's wilt overzetten naar de PC.

SPECIFICATIONS Digital Conversion: 44.1 kHz sample rate, 16-bit word length (CD quality) USB Interface: USB1.1 or better Analog Inputs: Phono and line levels
ION Audio, LLC Tel: (U.S.) 401.658.3743
E-mail: [email protected]
MANUAL VERSION 1.0

www.ionaudio.com