recorder proxy configuration guide - onssi recorder proxy configuration guide. 2 on-net...
TRANSCRIPT

Recorder Proxy Configuration Guide
Smarter Surveillance for a Safer World

On-Net Surveillance Systems, Inc.
One Blue Hill Plaza, 7th Floor, PO Box 1555 Pearl River, NY 10965
Phone: (845) 732-7900 | Fax: (845) 732-7999 Web: www.onssi.com
Version 5.5
Ocularis 5.5
00001112018-1418-5.5.0.238
Legal Notice
This product manual is intended for general information purposes only, and due care has been taken in its preparation.
Any risk arising from the use of this information rests with the recipient, and nothing herein should be construed as constituting any kind of warranty.
© 2002-2018 On-Net Surveillance Systems, Inc. All rights reserved. OnSSI and the ‘Eye’ logo are registered trademarks of On-Net Surveillance Systems, Inc. Ocularis, Ocularis Client, Ocularis Client Lite, Ocularis Video Synopsis, NetEVS, NetDVMS, NetDVR, ProSight, NetGuard, NetGuard-EVS, NetSwitcher, NetMatrix, NetCentral, NetTransact, NetPDA and NetCell are trademarks of On-Net Surveillance Systems, Inc. All other trademarks are property of their respective owners.
On-Net Surveillance Systems, Inc. reserves the right to change product specifications without prior notice.
US patent # 8390684 B2 for Ocularis Client
Patents Applied For in the U.S. and Abroad

Ocularis Recorder Proxy Configuration Guide Contents
On-Net Surveillance Systems, Inc. i
Table of Contents INTRODUCTION ............................................................................................................................................................ 2 OCULARIS EVENT FLOW ............................................................................................................................................ 2 WHAT IS A RECORDER PROXY? ............................................................................................................................... 3 WHERE TO INSTALL A RECORDER PROXY ............................................................................................................. 3
Missing Recorder Proxy ........................................................................................................................................... 4 HOW TO RESTART THE RECORDER PROXY ........................................................................................................... 5
RESTART THE RECORDER PROXY USING THE SOFTWARE ................................................................................................. 5 RESTART THE RECORDER PROXY USING WINDOWS SERVICES .......................................................................................... 5
TO CONFIGURE THE OCULARIS 5 RECORDER PROXY .......................................................................................... 6 AUTOMATIC UPDATE OF OCULARIS BASE ......................................................................................................................... 9
OCULARIS RECORDER PROXY HELP ..................................................................................................................... 14 APPENDIX A - RECORDER PROXY FOR LEGACY RECORDERS .......................................................................... 15
MIX AND MATCH SYSTEMS ........................................................................................................................................... 15 TO CONFIGURE THE RC-C/RC-I EVENT PROXY ............................................................................................................. 15 TO CONFIGURE THE RC-E / RC-L EVENT PROXY ........................................................................................................... 19
CONTACT INFORMATION ......................................................................................................................................... 22

Ocularis Recorder Proxy Configuration Guide
On-Net Surveillance Systems, Inc. 2
Introduction Ocularis 5 is OnSSI’s newest and most innovative and cost effective open platform Video Management Software
(VMS) and is designed to enhance your security while simplifying your daily workload. The system is comprised of
many separate components that work together as part of a complete scalable and easy-to-use video management
solution.
One component of Ocularis is called the Recorder Proxy1. This document details how to configure the Ocularis 5
Recorder Proxy.
Ocularis Event Flow An event in Ocularis is some action that has occurred. Examples include: motion detected on a camera, a security
card swiped in an access control system, tampering on a camera, a camera going offline, a zone running low on disk
space, etc. Events that are important to you can be configured so that operators can be alerted and a record of the
event, including recorded video, be saved.
A recorder proxy takes events that take place at the camera or recorder level and transfers these to the Event
Coordinator service on Ocularis Base. Then the event can be distributed to interested parties via Ocularis Client,
Ocularis 5 Web or Ocularis 5 Mobile. OpenSight users and third party integrations (e.g. Lenel's OnGuard, Software
House's CCure, etc). can even be the recipient of alerting with Ocularis 5.
The response to the event can be one or any combination of the following:
• Play a sound in Ocularis Client
• Display video in a blank screen pane in Ocularis Client ("Blank Screen Monitoring")
• Move a PTZ camera to a predefined preset
• Send an email to a predefined recipient
• Turn on a light or play a siren
• Send an outgoing HTTP Request
• Send an outgoing Generic Event (TCP/UDP Data Packet)
1 The Ocularis Recorder Proxy was formerly titled 'Ocularis Event Proxy'. The name changed in Ocularis v5.5.

Ocularis Recorder Proxy Configuration Guide
On-Net Surveillance Systems, Inc. 3
• Update the alert counter in Ocularis Client, Ocularis Web and Ocularis Mobile
• Issue a notification alert on an Ocularis Mobile device
What is a Recorder Proxy? A recorder proxy is software that, among many things, manages the flow of events from an Ocularis recorder to an
Ocularis Base or other server. Ocularis Recorder Proxies are specific to the version and generation of Ocularis.
Currently supported are the following recorder proxies:
Name Type Generation Supported in Ocularis Recorder Proxy 64-bit 5 5.5 and later Ocularis 5 Event Proxy 64-bit 5 5.3, 5.4 RC-C/RC-I Event Proxy 64-bit 4 5.3 and later RC-E/L Event Proxy 64-bit 4 5.3 and later
In Ocularis, a Recorder Proxy performs many tasks. These include:
• Forwarding events from an Ocularis recorder to Ocularis Base or other server • Manages multiple streams from cameras on Ocularis recorders • Optimizes which stream to use when using Ocularis Web or Ocularis Mobile • Monitors camera presets for PTZ cameras configured on the recorder • Notify Ocularis Base when a change is made on Ocularis recorders
So if you are using events in your system, you'll need to install the recorder proxy. If you are not using events but are
using Ocularis 5 Web or Ocularis 5 Mobile, you need to install the recorder proxy. It is recommended to install a
recorder proxy on all systems.
This document focuses on the recorder proxy included with Ocularis 5. Details on using legacy recorders with
Ocularis 5 can be found at the end of this document.
Where to Install a Recorder Proxy In Ocularis 5, there is one recorder proxy per master core server of the recorder. Therefore, in most Enterprise and
Ultimate installations, only one recorder proxy is needed since there is typically only one master core. In Professional
installations, however, where there is a master core and device manager on each recording server, a recorder proxy
must be installed for each master core.
• The recorder proxy must be installed on a PC with connectivity to the master core. While not required, in
cases where there are no slave cores, it is highly recommended to install the recorder proxy software on the
same computer as the master core. In cases where there is a slave core installed at the 'Company' or root
level, install the Recorder Proxy on the same computer as this slave core.
• Download the recorder proxy software from the Ocularis Component Downloads webpage located on
Ocularis Base and install from there. For instructions on software installation, refer to the Ocularis
Installation & Licensing Guide found on the OnSSI website.
The following desktop icon appears upon successful installation:

Ocularis Recorder Proxy Configuration Guide
On-Net Surveillance Systems, Inc. 4
Note: Configuration of the recorder proxy requires administrator level access of the Windows user. You can right-click the icon and select 'Run as administrator'.
Missing Recorder Proxy
Until you install and configure the most up-to-date Recorder Proxy, you will see an icon adjacent to the server in
Ocularis Administrator. Configure the proxy in order to eliminate this icon.
Figure 1 Missing or Outdated Recorder Proxy

Ocularis Recorder Proxy Configuration Guide
On-Net Surveillance Systems, Inc. 5
How to Restart The Recorder Proxy There may be a need to restart the Recorder Proxy. If, for instance, a camera name is changed on the recorder, the
Recorder Proxy will update the name in the 'Servers' pane of the Ocularis Administrator 'Servers / Events' tab but the
name change will not be reflected in the 'Events' pane. Restarting the Ocularis Recorder Proxy will update the name
change in the 'Events' pane.
There are two primary ways to do restart the Recorder Proxy:
1. Using the software 2. Using Windows Services
Restart The Recorder Proxy Using the Software 1. Launch the recorder proxy application. 2. Click the Restart Service button.
Restart The Recorder Proxy Using Windows Services Note: While the product name was changed to 'Ocularis Recorder Proxy', the corresponding service is
labeled 'OnSSI Ocularis Event Proxy'.
1. Launch Windows Services on the computer which contains the recorder proxy.
• One way to do this is to type Services in the search field of the Windows Start menu.
2. Scroll to the service name.
For Ocularis 5: OnSSI Ocularis Event Proxy For Ocularis 4: OnSSI RC-C RC-I Event Proxy (for Ocularis CS or IS) For Ocularis 4: OnSSI RC-E RC-L Event Proxy (for Ocularis ES or LS)
3. Right-click the service name and then select Restart.

Ocularis Recorder Proxy Configuration Guide
On-Net Surveillance Systems, Inc. 6
To Configure the Ocularis 5 Recorder Proxy 1. Launch the recorder proxy from the desktop icon or the Windows Start menu. Start All Programs
OnSSI Ocularis Recorder Proxy (64-bit)
Figure 2 Ocularis Recorder Proxy
2. The Recorder Settings button is the only one enabled upon first launch. Click this button to enter recorder criteria.
Figure 3 Recorder Settings
3. Enter the Master Core IP Address or hostname for the recorder's master core. Note that localhost is not supported.

Ocularis Recorder Proxy Configuration Guide
On-Net Surveillance Systems, Inc. 7
4. Provide a Username and Password for an administrative account that is on the master core.
5. For Recorder Name, enter a label as you would like this event source to appear in the Events pane of the Servers/Events Tab in Ocularis Administrator. This field is optional. If left blank, the event source will be listed as: IP_Address of Master Core (Ocularis Recorder) on IP_Address of Recorder Proxy
For example:
192.168.10.82 (Ocularis Recorder) on 192.168.10.82
6. Click Test Connection. Communication with the server is tested, user account authenticated and if successful, a pop-up message appears indicating as such.
7. Click OK.
Once the Recorder Settings pop-up is configured, the Base Settings button becomes enabled.
Figure 4 Base Settings button is enabled
8. Click Base Settings.

Ocularis Recorder Proxy Configuration Guide
On-Net Surveillance Systems, Inc. 8
Figure 5 Base Settings
9. Click Add Base.
Figure 6 Add Base
10. Enter the IP address or hostname of Ocularis Base in the Ocularis Base IP field. Note that localhost is not supported.
11. Provide a Username and Password for an administrative account that is on the Base.
12. Select the type of Authentication to use for the above account. (Use the same authentication that you would use to login with Ocularis Administrator.)
13. Click Test Connection. Communication with the server is tested, user account is authenticated and if all is successful, a pop-up message appears indicating as such. The Add button is enabled.
14. Click Add. The Base List is updated.

Ocularis Recorder Proxy Configuration Guide
On-Net Surveillance Systems, Inc. 9
Figure 7 Base List
You can add multiple Bases to the Base List if you need to send events to additional servers (for example: OpenSight). If you need to remove a Base IP from the list, select it and click Remove Base.
Once you select a Base in the list, two checkboxes appear:
Figure 8 Advanced Checkboxes
Automatic Update of Ocularis Base If the checkbox 'Auto Update Recorder on Ocularis Base' is checked, the proxy will notify Ocularis Base if there is a change made on the Ocularis Recorder (master core) configured in Figure 3. This effectively is equivalent to an administrator executing a right-click Refresh server in Ocularis Administrator. If many changes are made on the recorder, the system will wait 5 minutes until the next refresh in order to prevent

Ocularis Recorder Proxy Configuration Guide
On-Net Surveillance Systems, Inc. 10
too many refreshes. This feature saves the administrator the task to manually update the server on the Base.
If the checkbox 'Associate Cameras with Events' is checked and this is the first time adding this master core to the Base, the system will automatically add the server to the Ocularis Administrator Servers/Events tab and all cameras will automatically be associated with their corresponding events, saving you the time to map the cameras manually. This only works the first time you add the recorder to the Base. Note: it will map each camera to all available corresponding events.
15. When done, click OK. The Event Filters button is enabled.
Figure 9 Event Filters button is enabled
16. The last step is to select the events that you wish the proxy to forward to the Base IP(s) you listed. You must click the Event Filters button even if you are not using events. Click Event Filters.

Ocularis Recorder Proxy Configuration Guide
On-Net Surveillance Systems, Inc. 11
Figure 10 Select Events
The events you see listed are grouped by Camera Events and System Events. Check the events you want transferred from the recorder to the Base. Note: any alarm scenarios that you have configured on the recorder will automatically be transferred to the Base.
With v5.5 and later, the proxy will only forwards events that you have configured in Ocularis Base, thereby greatly improving the performance on the Base - especially on larger systems.
If the proxy is on a different server than Ocularis Base, this method also significantly decreases network traffic.
Note: Double-click the title bar of the pop-up to maximize the window.
17. Select the events you wish to monitor. By default, the following events are enabled in a fresh installation:
Camera Offline - Initial Camera Side Generic Events Camera Side Motion Detection Camera Tampering - Camera Based Camera Tampering - Server Based Server Side Motion Detection
18. Click OK.
The Event Proxy Service may be stopped after configuration. If so, click the Start Service button.
Ocularis Recorder Proxy Configuration Guide
On-Net Surveillance Systems, Inc. 12
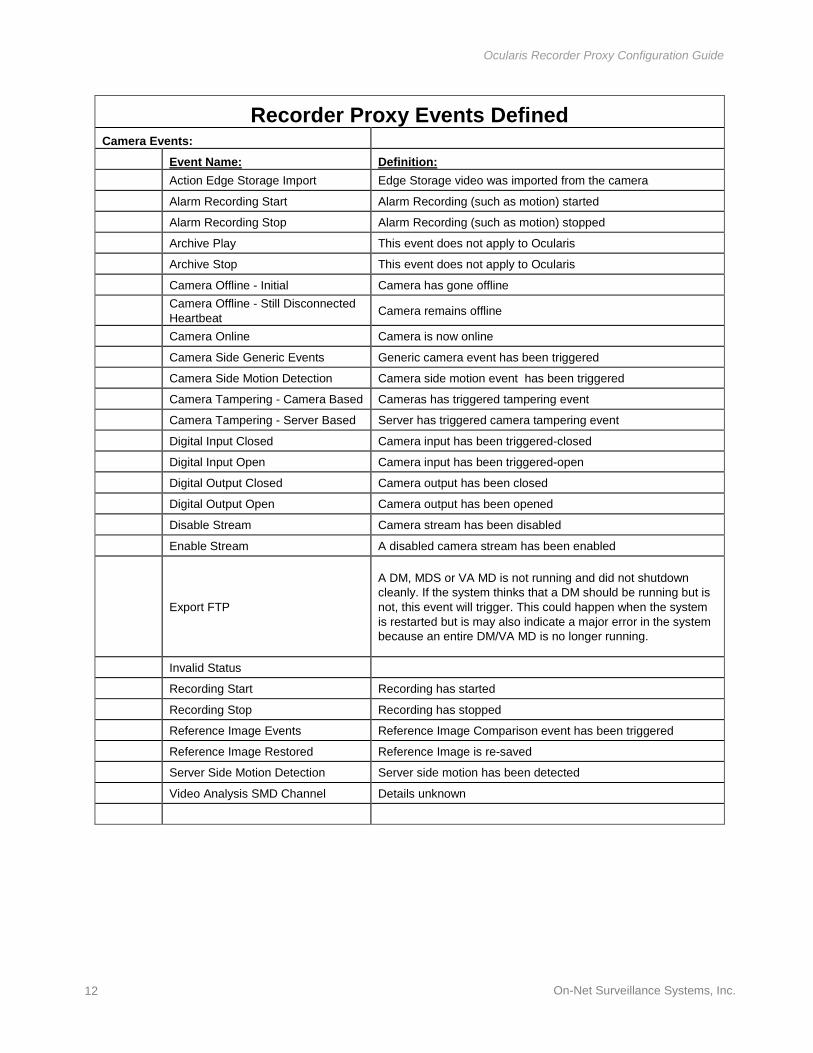
Recorder Proxy Events Defined Camera Events:
Event Name: Definition:
Action Edge Storage Import Edge Storage video was imported from the camera
Alarm Recording Start Alarm Recording (such as motion) started
Alarm Recording Stop Alarm Recording (such as motion) stopped
Archive Play This event does not apply to Ocularis
Archive Stop This event does not apply to Ocularis
Camera Offline - Initial Camera has gone offline
Camera Offline - Still Disconnected Heartbeat Camera remains offline
Camera Online Camera is now online
Camera Side Generic Events Generic camera event has been triggered
Camera Side Motion Detection Camera side motion event has been triggered
Camera Tampering - Camera Based Cameras has triggered tampering event
Camera Tampering - Server Based Server has triggered camera tampering event
Digital Input Closed Camera input has been triggered-closed
Digital Input Open Camera input has been triggered-open
Digital Output Closed Camera output has been closed
Digital Output Open Camera output has been opened
Disable Stream Camera stream has been disabled
Enable Stream A disabled camera stream has been enabled
Export FTP
A DM, MDS or VA MD is not running and did not shutdown cleanly. If the system thinks that a DM should be running but is not, this event will trigger. This could happen when the system is restarted but is may also indicate a major error in the system because an entire DM/VA MD is no longer running.
Invalid Status
Recording Start Recording has started
Recording Stop Recording has stopped
Reference Image Events Reference Image Comparison event has been triggered
Reference Image Restored Reference Image is re-saved
Server Side Motion Detection Server side motion has been detected
Video Analysis SMD Channel Details unknown

Ocularis Recorder Proxy Configuration Guide
On-Net Surveillance Systems, Inc. 13
System Events:
Core Master Unreachable Master Core is not reachable
Core Slave Reachable Slave Core is now reachable
Core Slave Unreachable Slave Core is not reachable
Core Started Core server has started
Database Backup Failed Backup of Core configuration database has failed
Database Load Emergency Shutdown
The database of a core service is almost full (at 90%). To prevent data corruption, the core will shutdown down and is no longer usable. The administrator must take measures to get the core in a good state again (add a database volume, delete events, reduce event storage time, etc.). Although this could happen on any core it is most likely on the master, because only the master stores all events.
Database Load Warning
The database of a core service has reached a high level (70%). The core will continue to work, but the administrator should investigate and possibly take measures to avoid a "Database Load Emergency Shutdown". Although this could happen on any core it is most likely on the master, because only the master stores all events
Device Manager Cannot Start Device Manager Service could not start
Multimedia DB Automated Export Video data was automatically exported using the Video data export feature
Multimedia DB Cannot Mount Zone A DM/MDS was not able to mount a configured zone.
Multimedia DB Cannot Start MDS The MDS could not start. This is a generic error that means "The DM/MDS does not work".
Multimedia DB Edge Storage Recording Fetched MDS Services has retrieved video from a Edge Storage device
Multimedia DB Almost Full Storage Zone is almost full
Multimedia DB Zone Space Full Storage zone is full. Video may be deleted
Server Time Changed A DM detected that the Windows time changed by more than one hour. This may result in all kind of problems, mainly for recordings.

Ocularis Recorder Proxy Configuration Guide
On-Net Surveillance Systems, Inc. 14
Ocularis Recorder Proxy Help To view the application documentation, click the '?' icon in the lower right corner of the main proxy setup screen.
Figure 11 Accessing Recorder Proxy Help

Ocularis Recorder Proxy Configuration Guide
On-Net Surveillance Systems, Inc. 15
Appendix A - Recorder Proxy for Legacy Recorders
Mix and Match Systems In the case where legacy recorders are used with Ocularis 5 (aka 'Mix and Match'), a new proxy was issued for these
recorders for customers who are using v4 recorders in the v5 Base environment. Updates to these version 4 proxies
can be downloaded from our website at http://onssi.com/software-downloads/. Scroll to the section titled 'Proxies' and
download the corresponding proxy for your legacy system:
For Ocularis CS or Ocularis IS: RC-C/RC-I Event Proxy
For Ocularis LS or Ocularis ES: RC-E/L Event Proxy
You need to update the version 4 proxies if:
• the computer it is currently running on is shared by another Ocularis v5 component. The new proxy is a 64-
bit application
• you intend to use Ocularis Web or Ocularis Mobile for cameras on legacy recorders
• you wish to take advantage of multiple live streams (Ocularis LS and ES only)
Ocularis CS and Ocularis IS event proxies need to be installed on the same computer as the recording server.
Ocularis LS and Ocularis ES event proxies can be installed anywhere with network connectivity to the Management
Server. However, we do recommend installing these on the Management Server computers.
To Configure the RC-C/RC-I Event Proxy The following describes the functionality of the RC-C/RC-I Event Proxy. Refer to Figure 12.
Field Description
Name This is the name to represent the event proxy source. It will appear in the Events pane of the Server / Events tab of Ocularis Administrator. You may edit this field. Use a label to help identify the event proxy in the case where you may have more than one installed. The default value is: <IP Address> (RC-C/RC-I) where IP address is the IP address of the PC on which the event proxy is installed.
Base Server IPs (comma delimited)
Enter the IP address of the Ocularis Base you want the proxy to forward the events to/communicate with. You may forward events to multiple Bases or other servers. In this case, separate each with a comma. For example:
192.168.10.82, 192.168.11.185
Recorder Settings
Recorder IP Enter the IP address of the RC-C or RC-I Recording Server.

Ocularis Recorder Proxy Configuration Guide
On-Net Surveillance Systems, Inc. 16
Field Description
NetCentral Port Enter the NetCentral Port as configured in the Management Application. NetCentral is the service that sends events from an RC-C or RC-I recorder. The default port number is 1237.
NetCentral User Name Enter the NetCentral User Name as configured in the RC-C or RC-I Management Application. This account name may be different than the account used to administer the system.
NetCentral Password Enter the password for the NetCentral account as configured in the RC-C or RC-I Management Application.
Recorder Server Port Enter the communication port used by the RC-C or RC-I recording server as configured in the RC-C or RC-I Management Application under 'Server Access'. The default port number is 81.
Recorder Server User Name Enter an administrator account from the RC-C or RC-I recording server as configured in the RC-C or RC-I Management Application under 'Users'. The default value is 'Engine1User'.
Note: if you upgrade an older proxy to this one, be sure to change this field to an actual administrator account on the recorder.
Recorder Server Password Enter the password for the account above.
Service
Status The status of the event proxy service is shown underneath the text 'Service'. If the service is stopped, the word 'Stopped' appears in red. If the service is running the text 'Started' appears in green.
Start Click this button to start the event proxy service.
Stop Click this button to stop the event proxy service.
Settings
Save Click this button to save any changes.
Advanced Click this button to open a pop-up for Advanced Settings. You can set the number of minutes to wait before stopping events with no event coordinator connection. The default value is 2. You can check the box to avoid using the event coordinator in the event you are sending events to non-OnSSI systems. See Figure 13.
View Log Click this button to open a pop-up that displays event communication. This is useful for troubleshooting. See Figure 14.
Build Number Underneath the OnSSI logo the version and build number is displayed. This is helpful for troubleshooting or when contacting OnSSI Tech Support.
OK Click OK to accept changes and close the dialog.

Ocularis Recorder Proxy Configuration Guide
On-Net Surveillance Systems, Inc. 17
Field Description
Cancel Click Cancel to close the dialog without saving anything.
Figure 12 RC-C/RC-I Event Proxy
Figure 13 Advanced Settings

Ocularis Recorder Proxy Configuration Guide
On-Net Surveillance Systems, Inc. 18
Figure 14 View Log - Sample

Ocularis Recorder Proxy Configuration Guide
On-Net Surveillance Systems, Inc. 19
To Configure the RC-E / RC-L Event Proxy The following describes the functionality of the RC-E/RC-L Event Proxy. Refer to Figure 15.
Figure 15 RC-E / RC-L Event Proxy
Field Description
Base Server IP Enter the IP address of the Ocularis Base you want the proxy to forward the events to.
Management Server IP Enter the IP address of the RC-E or RC-L Management Server.
Management Server Username Enter an administrative account as configured in the Management Client of RC-E or RC-L.
Management Server Password Enter the password for the above account.

Ocularis Recorder Proxy Configuration Guide
On-Net Surveillance Systems, Inc. 20
Field Description
Get/Update Event Types Once the above criteria has been entered, click this button to download event types from the Management Server. Events will appear in the Event Types screen. See Figure 16.
Check each event that you would like to keep track of. Events are grouped by: Device, External, Hardware, Recorder and System.
Subscribe To All Event Types This checkbox will select or deselect checkboxes for all event types.
Service
Status The status of the event proxy service is shown underneath the text 'Service'. If the service is stopped, the word 'Stopped' appears in red. If the service is running the text 'Started' appears in green.
Start Click this button to start the event proxy service.
Stop Click this button to stop the event proxy service.
Settings
Save Click this button to save any changes.
Advanced Click this button to open a pop-up for Advanced Settings. You can set the number of minutes to wait before stopping events with no event coordinator connection. The default value is 2. You can check the box to avoid using the event coordinator in the event you are sending events to non-OnSSI systems. See Figure 13.
View Log Click this button to open a pop-up that displays event communication. This is useful for troubleshooting.
Build Number Underneath the OnSSI logo the version and build number is displayed. This is helpful for troubleshooting or when contacting OnSSI Tech Support.
OK Click OK to accept changes and close the dialog.
Cancel Click Cancel to close the dialog without saving anything.

Ocularis Recorder Proxy Configuration Guide
On-Net Surveillance Systems, Inc. 21
Figure 16 RC-E / RC-L Event Types

Contact Information Ocularis Installation & Licensing Guide
On-Net Surveillance Systems, Inc. 22
Contact Information
On-Net Surveillance Systems (OnSSI)
One Blue Plaza
7th Floor
P.O. Box 1555
Pearl River, NY 10965
Website: www.onssi.com
General: [email protected] 845.732.7900
Fax: 845.732.7999
Sales Support: [email protected] 845.732.7900 x 1
PreSales Support [email protected] 845.732.7900 x 2
Technical Support: [email protected] 845.732.7979
Training: [email protected] 845.732.7900 x 4
Marketing: [email protected] 845.732.7900 x 5