recordpoint shared electronic health record system ... · pdf filerecordpoint archetype user...
TRANSCRIPT

Prepared by:
RecordPoint
Shared Electronic
Health Record System
Archetype Wizard and
Import User Guide
Version: 2.00 Date: 2 December 2010 Classification: Confidential Status: Released

RecordPoint Archetype User Guide V2.00
Confidential Page ii
For more information Level 17, 344 Queen St Brisbane QLD 4000 (07) 3292 0222 www.extensia.com.au © Copyright 2010 by Extensia. Notices Confidential The content of this document is Confidential. The information contained herein must only be used for the purpose for which it is supplied. Trademarks Company, product, and service names mentioned herein may be trademarks or service marks; such marks are the property of their respective owners.

RecordPoint Archetype User Guide V2.00
Confidential Page iii
Table of Contents
1 Overview ...................................................................................................................1
1.1 Map of RecordPoint User Guides ....................................................................2
1.2 Instructions Used in this Guide ........................................................................2
1.3 Notes on Using the Application .......................................................................3
1.3.1 Do Not Use the Browser Back and Forward Buttons ................................................... 3
1.3.2 Do Not Use the Browser Reload Button ..................................................................... 3
1.3.3 Opening Multiple Windows for the Same Session ...................................................... 4
1.3.4 Mandatory Fields and Validation Errors ..................................................................... 4
2 Getting Started .........................................................................................................6
2.1 System Requirements ......................................................................................6
2.2 Starting the Archetype Wizard .........................................................................6
2.3 Logging Into the System Administration Application ......................................7
3 Creating Archetypes ............................................................................................... 11
3.1 Editing Archetypes ........................................................................................ 19
3.2 Viewing Archetypes ...................................................................................... 20
4 Importing Archetypes ............................................................................................. 22
4.1 Archetype Search .......................................................................................... 24
4.1.1 View Archetype ADL .............................................................................................. 25
4.2 Maintain Archetype Privileges in Roles ......................................................... 25
5 Definitions and Acronyms ...................................................................................... 28
5.1 Definitions .................................................................................................... 28
5.2 Acronyms ...................................................................................................... 28

RecordPoint Archetype User Guide V2.00
Confidential Page 1
1 Overview
This user guide is intended to provide the reader with the knowledge necessary to use the
RecordPoint software to create and import new Archetypes which can capture and store new
type of documents in a Shared EHR. The main users of this guide are Clinical Data
Modellers and System Administrators.
The main sections are:
Getting Started Includes, setting up and logging on.
Creating Archetypes Includes how to use the Wizard to create
an Archetype.
Importing Archetypes Includes importing the Archetype into the
system and updating roles.
Shared EHR communities are likely to contain a diverse range of Health Care Professionals
sharing clinical data about their patients. Combining this diversity with the challenge of ever
changing health knowledge, demands flexibility from the system in the middle.
The strength of RecordPoint is its ability to respond to changing requirements in health data
capture. This ability is achieved by following the openEHR approach which allows clinicians
to create Archetypes. This manual covers the steps necessary to create simple Archetypes
from scratch and import them into the system ready for use by the Shared EHR community.
The design principles for clinical data capture and Archetypes is not addressed in this
document.
The full flexibility and power of Archetypes is not available in the Archetype Wizard. This
tool has been specifically designed to allow the convenient and efficient creation of
Archetypes (called Compositions) built from pre-existing building blocks (called Entries).
This approach will serve many requirements well. To add or modify Entries requires use of
the Archetype Editor, which is not documented in this guide.
See the Shared EHR Clinical User Guide for an overview of Shared EHR concept.

RecordPoint Archetype User Guide V2.00
Confidential Page 2
1.1 Map of RecordPoint User Guides
The following diagram maps which RecordPoint User guides are applicable for different users
undertaking different activities. For example a Consumer wishing to access their Shared EHR
would use the Shared EHR Clinical User Guide.
Figure 1 – User Guide Map
1.2 Instructions Used in this Guide
Within this user guide, text in bold computer lettering relates to keys on the keyboard, for
example, ‘Press ↵↵↵↵ENTER’ENTER’ENTER’ENTER’. Text in the bold, italic, verdana font face refers to text found
within the application and is generally highlighted with a red circle on the screen shots, for
example, click on the Change Pass Phrase menu item.

RecordPoint Archetype User Guide V2.00
Confidential Page 3
1.3 Notes on Using the Application
The following notes apply to using the Archetype Wizard and System Administration
application and if followed will help avoid common issues.
1.3.1 Do Not Use the Browser Back and Forward Buttons
These applications are not designed to support use of the browser navigation functions,
including the Back and Forward buttons, menu items and keyboard shortcuts as shown in
Figure 2. To change pages and generally navigate around the application please use the
application menu system, buttons and links provided as shown in this user guide.
Although use of the browser navigation functions will not damage the system, they may
produce un-desirable results, including data loss and an unusable login session.
Figure 2 - Browser Back and Forward Functions
1.3.2 Do Not Use the Browser Reload Button
These applications are not designed to support use of the browser reload function, including
the Reload button, menu item and keyboard shortcut as shown in Figure 2. If refreshing the
page is desired please use the application menu system, buttons and links provided as shown
in this user guide to re-display the same page.
Although use of the reload function will not damage the system it may produce un-desirable
results, including data loss and an unusable login session.

RecordPoint Archetype User Guide V2.00
Confidential Page 4
Figure 3 - Browser Reload Function
1.3.3 Opening Multiple Windows for the Same Session
Using the browser to open multiple windows and/or tabs under the same session may produce
unexpected results. Each window will share a single session with the RecordPoint
application. This means any function performed in one of the windows can be considered to
be applicable for all of the windows. For example, logging off in one window, will close the
session for all the windows. To continue to use any of the windows will require logging back
in.
Opening multiple windows under the same session will not damage the system but should be
avoided while becoming familiar with the applications.
1.3.4 Mandatory Fields and Validation Errors
If parts of the data entry pages are incomplete or incorrectly filled out, errors will be displayed
on the current page after attempting to proceed to the next page. All the applicable errors for
the current page will be displayed at the top of the page in red and indicate which field is
incorrect or incomplete and allow correction prior to proceeding. The example shown in
Figure 4 occurred by clicking the Next button without any of the mandatory details being
completed.
Note: Mandatory fields are preceded by a red asterisk (*).

RecordPoint Archetype User Guide V2.00
Confidential Page 5
Figure 4 – Field Error Examples

RecordPoint Archetype User Guide V2.00
Confidential Page 6
2 Getting Started
2.1 System Requirements
Agents wishing to access the Archetype Wizard or System Administration applications will
need access to a computer with a standard web browser and internet connection.
The Archetype Wizard does not require any authentication and does not have a login step.
The System Administration application requires a Medicare Australia Location certificate for
authentication purposes. The Agent will be assigned their role based on the location
certificate used to connect to the application. The location certificate will need to be installed
into the browser either directly or via a smartcard (or other token). The installation
instructions that come with the certificate should be followed for the correct setup of the
certificate.
Microsoft Internet Explorer (version 6 or higher) and Mozilla Firefox are known to work with
the applications. Other browsers should also work but their compatibility would need to be
verified. The browser will require the Adobe Flash Player plugin (version 10 or higher)
installed.
2.2 Starting the Archetype Wizard
To gain access to the Archetype Wizard, type the internet address supplied by the service
provider hosting the application into the address bar as shown in Figure 5 and press the
↵↵↵↵ENTERENTERENTERENTER key. For example: https://sharedehr.org.au/archweb/
Figure 5 – Internet Explorer Address bar – Archetype Wizard
The Archetype Wizard home page will appear as shown in Figure 6.

RecordPoint Archetype User Guide V2.00
Confidential Page 7
Figure 6 – Archetype Wizard Home page
2.3 Logging Into the System Administration Application
To gain access to the System Administration application, type the internet address supplied by
the service provider hosting the application into the address bar as shown in Figure 7 and
press the ↵↵↵↵ENTERENTERENTERENTER key. For example: https://sharedehr.org.au/saweb/
Figure 7 – Internet Explorer Address bar – System Administration
The System Administration application login page will appear as shown in Figure 8. To login
enter the User ID and Password and click on the Ok button.

RecordPoint Archetype User Guide V2.00
Confidential Page 8
Figure 8 – System Administration Login page
If the login is successful the Archetype Management page is displayed as shown in
Figure 9.

RecordPoint Archetype User Guide V2.00
Confidential Page 9
Figure 9 – System Administration Archetype Management Page
For ease of identification where workstations may be shared at a particular Location, the
system provides a method to identify the Agent currently logged on. The name, role and
Location of the current user are displayed at the bottom of the page as shown in Figure 9.
If the login is unsuccessful, the Login failure page will be displayed as shown in Figure 10.

RecordPoint Archetype User Guide V2.00
Confidential Page 10
Figure 10 – Login Failure
Click the Ok button and re-enter your User ID and Password. If you are still
unsuccessful after two to three attempts please contact Support.

RecordPoint Archetype User Guide V2.00
Confidential Page 11
3 Creating Archetypes
Archetypes are used to specify the types of documents that can be stored in the Shared EHR
for a Consumer. They can be created via the Archetype Wizard or other Archetype Editor
tools. The Archetype Wizard provides a streamlined interface to quickly create new
document types from existing Entries.
Once an Archetype is created it must be imported into the Shared EHR system. See section 4
for documentation on importing Archetypes.
The Archetypes that can be created via the Archetype Wizard follow the structure as shown in
Figure 11.
Figure 11 – Archetype Structure
The Archetype Wizard steps through the process of specifying this structure, including the
required Sections and Entries within each Section.
The Archetype is a collection of Sections which represent the grouping within a document.
Each Section contains one or more Entries. Entries allow the capture of related data items.
To create an Archetype, click on the Create submenu from the Archetype menu along the
top menu bar as shown in Figure 12.

RecordPoint Archetype User Guide V2.00
Confidential Page 12
The Step 1 – Header Details page displayed requires the entry of the details for the
Archetype header.
Figure 12 – Step 1 - Header Details
When all required details on this page have been completed, click on the Next> button. The
page for Step 2 – Define Sections is displayed as shown in Figure 13.
Click the Cancel button to return to the Home page. All entered details for the Archetype
will be lost. Clicking on any other link outside this page, for example the menu items, will
also cancel creating the Archetype and all details will be lost.

RecordPoint Archetype User Guide V2.00
Confidential Page 13
Figure 13 - Step 2 – Define Sections
Enter the Sections required for the document, at least one Section is required. To enter a new
Section, type the name of the Section into the New Section field and click the Add >
button. The new Section will appear in the Entered Sections list.
To remove a Section from the Entered Sections list, click the name of the Section (it will
be highlighted), and click the < Remove button.
Click the < Back button to return to the Step 1 – Header Details page. Any Sections
entered will be remembered and displayed on return to the Step 2 – Define Section
page.
Click the Cancel button to return to the Home page. All entered details for the Archetype
will be lost. Clicking on any other link outside this page, for example the menu items, will
also cancel creating the Archetype and all details will be lost.
Enter all of the required Sections and click the Next > button. The page for Step 3 –
Select Entries is displayed as shown in Figure 14.

RecordPoint Archetype User Guide V2.00
Confidential Page 14
Figure 14 - Step 3 – Select Entries
Assign Entries to each Section, at least one Entry is required in each Section. To assign an
Entry to a Section, click on the name of the Entry in the Available Entries list (it will be
highlighted), and click the Add > button for the required Section. The Entry will be shown
in the Selected Entries list for that Section.
To remove an Entry from a Selected Entries list, click the name of the Entry (it will be
highlighted), and click the < Remove button.
Click the < Back button to return to the Step 2 – Define Section page. Any Entries
assigned will be remembered and displayed on return to the Step 3 – Select Entries.
Click the Cancel button to return to the Home page. All entered details for the Archetype
will be lost. Clicking on any other link outside this page, for example the menu items, will
also cancel creating the Archetype and all details will be lost.
Assign all of the required Entries to each Section and click the Next > button. The page for
Step 4 – Section/Entry Occurrence is displayed as shown in Figure 15.

RecordPoint Archetype User Guide V2.00
Confidential Page 15
Figure 15 - Step 4 – Section/Entry Occurrence
Each Section is listed along with their assigned Entries. For each Section and Entry the
required occurrence is selected from the pull-down list. For Sections, occurrence determines
if it is mandatory or optional. For Entries, occurrence determines if it is mandatory or
optional and if the Entries can be repeated within a document. The values for occurrence are
shown in Figure 15.
Click the < Back button to return to the Step 3 – Select Entries page. Any selections
will be remembered and displayed on return to the Step 4 – Section/Entry
Occurrence.
Click the Cancel button to return to the Home page. All entered details for the Archetype
will be lost. Clicking on any other link outside this page, for example the menu items, will
also cancel creating the Archetype and all details will be lost.
Select the required occurrence for all of the Sections and Entries and click the Next >
button. The page for Step 5 – Preview is displayed as shown in Figure 16.

RecordPoint Archetype User Guide V2.00
Confidential Page 16
Figure 16 – Step 5 - Preview
This page allows a final check to ensure the Archetype contains the required Sections and
Entries. To view the native XML format of the Archetype, click the XML link. To view the
native ADL format of the Archetype, click the ADL link. These views are only useful if the
user is familiar with the native formats.
Click the < Back button to return to the Step 4 – Section/Entry Occurrence page to
make any changes.
Click the Cancel button to return to the Home page. All entered details for the Archetype
will be lost. Clicking on any other link outside this page, for example the menu items, will
also cancel creating the Archetype and all details will be lost.
Click the Next > button to display the page for Step 6 – Save as shown in Figure 17.

RecordPoint Archetype User Guide V2.00
Confidential Page 17
Figure 17 - Step 6 - Save
This page allows the Archetype to be saved. This is required so it can be later edited or
imported into the system.
Click the < Back button to return to the Step 5 – Preview page.
Clicking on any other link outside this page, for example the menu items, will close the
Wizard.
Note:
• Closing the Wizard will reset all the data entered so make sure the Archetype is saved
before closing the Wizard.
Click the Save button to save the Archetype. The specific browser being used and the user
settings for the browser will determine the steps required for saving the Archetype. Refer to
the help system for the browser being used.
The browser may display a Save pop up similar to that shown in Figure 18.

RecordPoint Archetype User Guide V2.00
Confidential Page 18
Figure 18 – Save Prompt
If the Save pop-up is shown, click the Save button to save the Archetype.
The browser may ask for the location to save the Archetype, similar to that shown in Figure
19.
Figure 19 – Save Location

RecordPoint Archetype User Guide V2.00
Confidential Page 19
If the Location pop-up is shown, use the directory explorer to find and select a location
(directory) on the workstation to save the Archetype file and click the Save button. The
Archetype file will then be saved in that location. Remember where it has been saved so it
can be retrieved for importing into the system.
Otherwise the browser will automatically save the Archetype into a pre-configured location.
Refer to the help system for the browser being used.
3.1 Editing Archetypes
To make changes to an existing Archetype, click on the Edit submenu from the Archetype
menu along the top menu bar as shown in Figure 20.
The Browse for File page is displayed as shown in Figure 20.
Figure 20 – Edit Browse for File
Click the Browse button to find the Archetype file to edit or enter the location and filename
of the file into the File field. Once the required file is shown in the File field, click the Edit
button to edit the Archetype. The Archetype Wizard to edit the archetype is shown and is the
same one that is used to Create Archetypes. Refer to section 3 for details on using the
Archetype Wizard to change the Archetype.
Click the Cancel button to return to the Home page.

RecordPoint Archetype User Guide V2.00
Confidential Page 20
3.2 Viewing Archetypes
To view the details of an existing Archetype, click on the View submenu from the
Archetype menu along the top menu bar as shown in Figure 21.
The Browse for File page is displayed as shown in Figure 21.
Figure 21 – View Browse for File
Click the Browse button to find the Archetype file to view or enter the location and
filename of the file into the File field. Once the required file is shown in the File field, click
the View button to view the Archetype.
The Overview page of the Archetype will be displayed as shown in Figure 22.
Click the Cancel button to return to the Home page.

RecordPoint Archetype User Guide V2.00
Confidential Page 21
Figure 22 – View Archetype
To view the native XML format of the Archetype, click the XML link. To view the native
ADL format of the Archetype, click the ADL link. These views are only useful if the user is
familiar with the native formats.
Click on the Home menu item along the top menu bar to return to the Home page.

RecordPoint Archetype User Guide V2.00
Confidential Page 22
4 Importing Archetypes
The System Administration application is used to import Archetypes into the Shared EHR
system. Archetypes can be safely imported while the system is being used. Imported
Archetypes will become immediately available for use.
To import an Archetype, login to the System Administration application (see section 2.3) and
click on the Archetypes menu from along the top menu bar as shown in Figure 23.
Figure 23 – Archetype Management Menu
The Archetype Management page will be displayed as shown in Figure 23. This page
is the default (Home) page shown when logging into the System Administration application.
Click the Import button to look for and select the required Archetype file. The Archetype
Wizard can be used to create this file as described in section 3.
The browser will display the Select File pop up as shown in Figure 24.
Note:
• Different browsers may display different windows to allow selection of a file. Refer
to the help system for the browser being used.

RecordPoint Archetype User Guide V2.00
Confidential Page 23
Figure 24 – Select File
Use the file browser in the pop-up to find and select the Archetype file and click the Open
button. The Archetype will then be imported into the system.
Note:
• A newly imported Archetype will need to have Privileges assigned to Roles before it
can be used. See section 4.2 to assign Archetype Privileges to Roles.
If the Archetype already exists, a prompt will be displayed asking if the imported Archetype
is to replace the existing Archetype as shown in Figure 25.
Figure 25 – Import Overwrite

RecordPoint Archetype User Guide V2.00
Confidential Page 24
WARNING:
It is very important to the integrity of the data that Archetypes are not replaced with
changes that would invalidate existing event summaries in the database. It is highly
recommended that if changes to an Archetype are required, that a new version of the
Archetype is imported. This will safely retain the existing version intact.
In some cases it is safe to overwrite an existing Archetype, specifically if there are no
event summaries in the database created with the existing Archetype, or if the changes
to the Archetype are backward compatible. It is highly recommended that you are
absolutely certain that it is safe to overwrite an Archetype before doing so.
Click the Yes button to overwrite the Archetype in the system. Click the No button to cancel
importing the Archetype.
4.1 Archetype Search
The Archetype Management page allows Archetypes to be searched, viewed and
modified. To find an Archetype that already exists in the system, click the Search button as
shown in Figure 26.
The Archetype Management page contains two segments, the search segment on the
left hand side and the overview segment on the right hand side.
Figure 26 – Archetype Search

RecordPoint Archetype User Guide V2.00
Confidential Page 25
To refine the search enter a partial identifier in the Archetype ID field and/or select the
type of Archetype in the Type field.
To display an overview of the Archetype, select it from the Search Results list as shown in
Figure 26.
The Archetype overview contains two segments.
1. The top segment displays the header details about the Archetype.
2. The bottom segment displays an overview of the Archetype Structure showing the
Sections and Entries that define the Archetype, or alternatively the Archetype in ADL
format.
4.1.1 View Archetype ADL
To view the Archetype in ADL (Archetype Definition Language) format, click the ADL
button as shown in Figure 27.
Figure 27 – View Archetype ADL
This view is only useful if the user is familiar with the ADL format.
4.2 Maintain Archetype Privileges in Roles
Archetype Privileges are assigned to Roles to control creation, edit, and strikethrough of event
summaries based on Composition Archetypes. For example, if the Add Event privilege for an
RecordPoint Archetype User Guide V2.00
Confidential Page 26
Archetype is only assigned to the Role of Dietitian, then only those users who are Dietitions
can create Event Summaries based on that Archetype.
To view the Role and Privilege Management page, click on the Roles menu from
along the top menu bar as shown in Figure 28.
Figure 28 – Role Management Menu
The Role and Privilege Management page contains two segments, the search segment
on the left hand side and the view/edit segment on the right hand side.
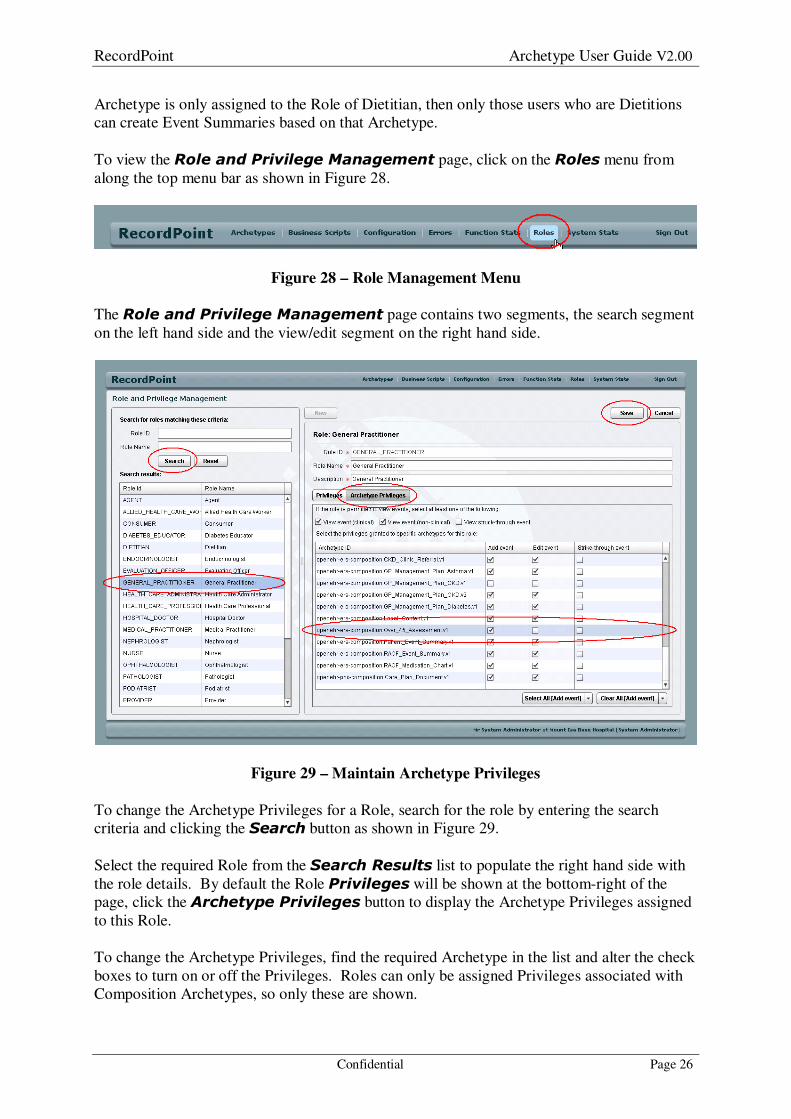
Figure 29 – Maintain Archetype Privileges
To change the Archetype Privileges for a Role, search for the role by entering the search
criteria and clicking the Search button as shown in Figure 29.
Select the required Role from the Search Results list to populate the right hand side with
the role details. By default the Role Privileges will be shown at the bottom-right of the
page, click the Archetype Privileges button to display the Archetype Privileges assigned
to this Role.
To change the Archetype Privileges, find the required Archetype in the list and alter the check
boxes to turn on or off the Privileges. Roles can only be assigned Privileges associated with
Composition Archetypes, so only these are shown.

RecordPoint Archetype User Guide V2.00
Confidential Page 27
The Add event Privilege will allow this Role to create Event Summaries based on this
Archetype.
The Edit event Privilege will allow this Role to edit Event Summaries based on this
Archetype.
The Strike-through event Privilege will allow this Role to strikethrough Event
Summaries based on this Archetype.
Once the required changes have been made, click the Save button to save the changes.
Click the Cancel button to restore the Role back to its original contents.
Note:
• The Save and Cancel buttons will be greyed out until changes are made.

RecordPoint Archetype User Guide V2.00
Confidential Page 28
5 Definitions and Acronyms
A number of terms and abbreviations are used throughout this document which are explained
below.
5.1 Definitions
Term Description
Agent is a person who is not a Consumer, for example Provider or
Registration Officer.
Consumer is a person who is receiving health care treatment.
Event Summary is a set of information related to a single Consumer to be
contributed to their shared EHR as a logical unit. A logical
unit is usually related to a single healthcare event, but may
also be a history.
Location is an identifiable entity that has been issued with a Medicare
Australia Location certificate. A Location is typically only
related to a single administrative entity, such as a general
practice, a clinic or a cell within a large hospital.
Shared EHR is an EHR that is Consumer centric and available and
suitable for contribution by all the Providers that provide
care to a Consumer, regardless of which organisation they
work for or where they are located.
Location
Certificate
is a certificate issued by a Public Key Infrastructure (PKI)
authority that verifies and authenticates the validity of a
location involved in an internet transaction.
5.2 Acronyms
Acronym Expansion
EHR Electronic Health Record