red hat cloudforms 4 · provisioning, workload management, ... [email protected]. legal...
TRANSCRIPT
Red Hat CloudForms 4.6
Provisioning Virtual Machines and Hosts
Provisioning, workload management, and orchestration for Red Hat CloudForms
Last Updated: 2018-08-27


Red Hat CloudForms 4.6 Provisioning Virtual Machines and Hosts
Provisioning, workload management, and orchestration for Red Hat CloudForms
Red Hat CloudForms Documentation [email protected]
Legal Notice
Copyright © 2018 Red Hat, Inc.
The text of and illustrations in this document are licensed by Red Hat under a Creative CommonsAttribution–Share Alike 3.0 Unported license ("CC-BY-SA"). An explanation of CC-BY-SA isavailable athttp://creativecommons.org/licenses/by-sa/3.0/. In accordance with CC-BY-SA, if you distribute this document or an adaptation of it, you mustprovide the URL for the original version.
Red Hat, as the licensor of this document, waives the right to enforce, and agrees not to assert,Section 4d of CC-BY-SA to the fullest extent permitted by applicable law.
Red Hat, Red Hat Enterprise Linux, the Shadowman logo, JBoss, OpenShift, Fedora, the Infinitylogo, and RHCE are trademarks of Red Hat, Inc., registered in the United States and othercountries.
Linux ® is the registered trademark of Linus Torvalds in the United States and other countries.
Java ® is a registered trademark of Oracle and/or its affiliates.
XFS ® is a trademark of Silicon Graphics International Corp. or its subsidiaries in the United Statesand/or other countries.
MySQL ® is a registered trademark of MySQL AB in the United States, the European Union andother countries.
Node.js ® is an official trademark of Joyent. Red Hat Software Collections is not formally related toor endorsed by the official Joyent Node.js open source or commercial project.
The OpenStack ® Word Mark and OpenStack logo are either registered trademarks/service marksor trademarks/service marks of the OpenStack Foundation, in the United States and other countriesand are used with the OpenStack Foundation's permission. We are not affiliated with, endorsed orsponsored by the OpenStack Foundation, or the OpenStack community.
All other trademarks are the property of their respective owners.
Abstract
This guide provides instructions for provisioning, service creation, and automation in Red HatCloudForms. If you have a suggestion for improving this guide or have found an error, pleasesubmit a Bugzilla report at http://bugzilla.redhat.com against Red Hat CloudForms ManagementEngine for the Documentation component. Please provide specific details, such as the sectionnumber, guide name, and CloudForms version so we can easily locate the content.
. . . . . . . . . . . . . . . . . . . . . . . . . . . . . . . . . . . . . . . . . . . . . . . . . . . . . . . . . . . . . . . . . . . . . . . . . . . . . . . . . . . . . . . . . . . . . . . . . . . . . . . . . . . . . . . . . . . . . . . . . . . . . . . . . . . . . . . . . . . . . . . . . . . . . . . . . . . . . . . . . . . . . . . . . . . . . . . . . . . . . . . . . . . . . . . . . . . . . . . . . . . . . . . . . . . . . . . . . . . . . . . . . . . . . . . . . . . . . . . . . . . . . . . . . . . . . . . . . . . . . . . . . . . . . . . . . . . . . . . .
. . . . . . . . . . . . . . . . . . . . . . . . . . . . . . . . . . . . . . . . . . . . . . . . . . . . . . . . . . . . . . . . . . . . . . . . . . . . . . . . . . . . . . . . . . . . . . . . . . . . . . . . . . . . . . . . . . . . . . . . . . . . . . . . . . . . . . . . . . . . . . . . . . . . . . . . . . . . . . . . . . . . . . . . . . . . . . . . . . . . . . . . . . . . . . . . . . . . . . . . . . . . . . . . . . . . . . . . . . . . . . . . . . . . . . . . . . . . . . . . . . . . . . . . . . . . . . . . . . . . . . . . . . . . . . . . . . . . . . . .
. . . . . . . . . . . . . . . . . . . . . . . . . . . . . . . . . . . . . . . . . . . . . . . . . . . . . . . . . . . . . . . . . . . . . . . . . . . . . . . . . . . . . . . . . . . . . . . . . . . . . . . . . . . . . . . . . . . . . . . . . . . . . . . . . . . . . . . . . . . . . . . . . . . . . . . . . . . . . . . . . . . . . . . . . . . . . . . . . . . . . . . . . . . . . . . . . . . . . . . . . . . . . . . . . . . . . . . . . . . . . . . . . . . . . . . . . . . . . . . . . . . . . . . . . . . . . . . . . . . . . . . . . . . . . . . . . . . . . . . .
Table of Contents
CHAPTER 1. RED HAT CLOUDFORMS LIFECYCLE1.1. PROVISIONING
CHAPTER 2. PROVISIONING REQUESTS2.1. REQUIREMENTS FOR PROVISIONING VIRTUAL MACHINES AND INSTANCES2.2. REQUIREMENTS FOR PROVISIONING VIRTUAL MACHINES FROM RED HAT VIRTUALIZATIONMANAGER2.3. PXE PROVISIONING
2.3.1. Connecting to a PXE Server2.3.2. Creating System Image Types for PXE2.3.3. Setting the PXE Image Type for a PXE Image
2.4. ISO PROVISIONING2.4.1. Adding an ISO Datastore2.4.2. Refreshing an ISO Datastore2.4.3. Creating System Image Types for ISO2.4.4. Setting the Image Type for an ISO Image
2.5. CUSTOMIZATION TEMPLATES FOR VIRTUAL MACHINE AND INSTANCE PROVISIONING2.6. CUSTOMIZATION SCRIPT ADDITIONS FOR VIRTUAL MACHINE AND INSTANCE PROVISIONING2.7. ADDING A CUSTOMIZATION TEMPLATE2.8. PROVISIONING VIRTUAL MACHINES
2.8.1. Provisioning a Virtual Machine from a Template2.8.2. Cloning a Virtual Machine2.8.3. Publishing a Virtual Machine to a Template (VMware Virtual Machines Only)
2.9. PROVISIONING INSTANCES2.9.1. Provisioning an EC2 Instance from an Image2.9.2. Provisioning an OpenStack Instance from an Image2.9.3. Provisioning a Google Compute Engine Instance from an Image2.9.4. Requirements for Provisioning a Host
2.9.4.1. IPMI Hosts2.9.4.1.1. Discovering the Management Interface for an IPMI Host2.9.4.1.2. Adding IPMI Credentials to a Discovered Host2.9.4.1.3. Adding the Management Interface for an IPMI Host
2.9.4.2. Customization Templates for Host Provisioning2.9.4.3. Customization Script Additions
2.9.4.3.1. Adding a Customization Template2.9.5. Provisioning a Host2.9.6. Customizing Provisioning Dialogs
2.9.6.1. Adding a Provision Dialog for All Users2.9.6.2. Creating a Custom Provision Dialog
2.9.7. Provisioning Profiles2.9.7.1. Creating a Provisioning Profile Instance2.9.7.2. Setting Provisioning Scope Tags
2.9.8. Managing Key Pairs
CHAPTER 3. WORKING WITH REQUESTS3.1. PROVISIONING REQUEST APPROVAL METHODS3.2. WORKING WITH PROVISIONING REQUESTS
3.2.1. Reloading the Status of Provisioning Requests3.2.2. Approving a Provisioning Request3.2.3. Denying a Provisioning Request3.2.4. Copying a Provisioning Request3.2.5. Editing a Provisioning Request
55
66
6789
101111111212131414151521212222232526272727282828303033343435363738
3939393939394040
Table of Contents
1
. . . . . . . . . . . . . . . . . . . . . . . . . . . . . . . . . . . . . . . . . . . . . . . . . . . . . . . . . . . . . . . . . . . . . . . . . . . . . . . . . . . . . . . . . . . . . . . . . . . . . . . . . . . . . . . . . . . . . . . . . . . . . . . . . . . . . . . . . . . . . . . . . . . . . . . . . . . . . . . . . . . . . . . . . . . . . . . . . . . . . . . . . . . . . . . . . . . . . . . . . . . . . . . . . . . . . . . . . . . . . . . . . . . . . . . . . . . . . . . . . . . . . . . . . . . . . . . . . . . . . . . . . . . . . . . . . . . . . . . .
. . . . . . . . . . . . . . . . . . . . . . . . . . . . . . . . . . . . . . . . . . . . . . . . . . . . . . . . . . . . . . . . . . . . . . . . . . . . . . . . . . . . . . . . . . . . . . . . . . . . . . . . . . . . . . . . . . . . . . . . . . . . . . . . . . . . . . . . . . . . . . . . . . . . . . . . . . . . . . . . . . . . . . . . . . . . . . . . . . . . . . . . . . . . . . . . . . . . . . . . . . . . . . . . . . . . . . . . . . . . . . . . . . . . . . . . . . . . . . . . . . . . . . . . . . . . . . . . . . . . . . . . . . . . . . . . . . . . . . . .
3.2.6. Deleting a Provisioning Request3.2.7. Automatically Approving Requests
3.2.7.1. Enabling Global Defaults for Automatic Approval3.2.7.2. Template Specific Approval Defaults3.2.7.3. Assigning Tags to a Template for Auto Approval3.2.7.4. Setting Provisioning Notification Email Addresses
CHAPTER 4. FULFILLING REQUESTS4.1. FULFILLING A REQUEST4.2. DEFAULT EXECUTION STEPS IN STATES INSTANCE
4.2.1. Quotas4.2.1.1. Applying User or Group Quotas4.2.1.2. Using Tags for Owner and Group Quotas4.2.1.3. Applying a Tag to a User or User Group4.2.1.4. State Machines4.2.1.5. Customizing Provisioning States4.2.1.6. Editing the Default State Instance4.2.1.7. Viewing the Status of a Provisioning Request4.2.1.8. Viewing a Provisioned Virtual Machine or Instance4.2.1.9. Viewing a Virtual Machine or Instance Summary
CHAPTER 5. CATALOGS AND SERVICES5.1. GENERIC OBJECTS
5.1.1. Viewing Generic Objects Classes5.1.2. Creating Generic Objects Classes5.1.3. Editing Generic Object Classes5.1.4. Removing Generic Objects Classes
5.2. SERVICE DIALOGS5.2.1. Adding a Service Dialog5.2.2. Adding a Service Dialog Using Dialog Editor5.2.3. Creating a Service Dialog from a Container Template5.2.4. Importing Service Dialogs5.2.5. Exporting Service Dialogs
5.3. METHODS5.3.1. Creating a Method to Associate with the Dialog5.3.2. Creating a Method in the Service Class5.3.3. Creating an Instance in the Service Class5.3.4. Associating a Method with an Automate Instance
5.4. CATALOGS5.4.1. Creating a Catalog Bundle5.4.2. Creating a Catalog Item5.4.3. Creating a Generic Catalog Item5.4.4. Creating an Ansible Playbook Service Catalog Item5.4.5. Creating an Ansible Tower Service Catalog Item5.4.6. Creating an Amazon Service Catalog Item5.4.7. Creating an Azure Service Catalog Item5.4.8. Creating an OpenShift Template Catalog Item5.4.9. Creating an Orchestration Catalog Item5.4.10. Provisioning a Service
5.5. ORCHESTRATION STACKS5.5.1. Creating an Orchestration Template5.5.2. Editing Orchestration Templates5.5.3. Copying Orchestration Templates
404040424242
44444444454546464849505050
5151525252535353555758585858616162636364656668696970707171727272
Red Hat CloudForms 4.6 Provisioning Virtual Machines and Hosts
2

. . . . . . . . . . . . . . . . . . . . . . . . . . . . . . . . . . . . . . . . . . . . . . . . . . . . . . . . . . . . . . . . . . . . . . . . . . . . . . . . . . . . . . . . . . . . . . . . . . . . . . . . . . . . . . . . . . . . . . . . . . . . . . . . . . . . . . . . . . . . . . . . . . . . . . . . . . . . . . . . . . . . . . . . . . . . . . . . . . . . . . . . . . . . . . . . . . . . . . . . . . . . . . . . . . . . . . . . . . . . . . . . . . . . . . . . . . . . . . . . . . . . . . . . . . . . . . . . . . . . . . . . . . . . . . . . . . . . . . . .
5.5.4. Deleting Orchestration Templates
CHAPTER 6. RETIREMENT6.1. RETIRING VIRTUAL MACHINES
6.1.1. Retiring Virtual Machines and Instances6.1.2. Using the Console to Retire a Virtual Machine6.1.3. Retiring a Virtual Machine Immediately6.1.4. Setting a Retirement Date and Time for a Virtual Machine or Instance6.1.5. Removing a Retirement Date for a Virtual Machine or Instance
6.2. SETTING RETIREMENT IN A PROVISION REQUEST6.2.1. Scheduling Retirement in a Provision Request
6.3. EXTENDING RETIREMENT DATES6.3.1. Creating a Custom Button to Extend Retirement6.3.2. Changing the Number of Days to Extend Retirement
73
747474747474757575767676
Table of Contents
3

Red Hat CloudForms 4.6 Provisioning Virtual Machines and Hosts
4
CHAPTER 1. RED HAT CLOUDFORMS LIFECYCLEThis guide discusses lifecycle activities such as provisioning and retirement that are part of the Red HatCloudForms Automate component. Red Hat CloudForms Automate enables real-time, bidirectionalprocess integration and adaptive automation for management events and administrative or operationalactivities.
Operations Management with service level resource enforcement.
Resource Management including datastore cleanup, snapshot aging and enforcement, andvirtual machine or instance aging and retirement.
Configuration and Change Management including enforced closed loop change management.
Lifecycle Management such as provisioning, customization, reconfiguration, approval, CMDBupdates, and retirement.
IMPORTANT
Provisioning requires the Automation Engine server role enabled. Check your serverrole settings in the settings menu, Configuration → Server → Server Control.
1.1. PROVISIONING
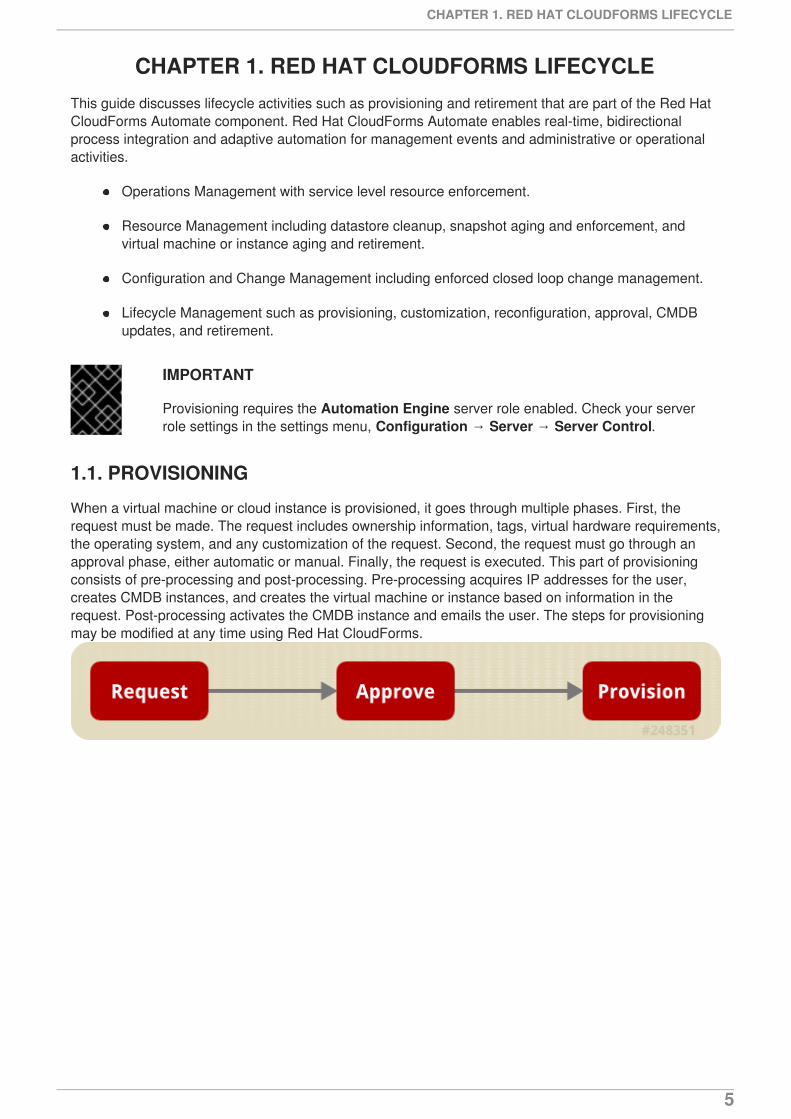
When a virtual machine or cloud instance is provisioned, it goes through multiple phases. First, therequest must be made. The request includes ownership information, tags, virtual hardware requirements,the operating system, and any customization of the request. Second, the request must go through anapproval phase, either automatic or manual. Finally, the request is executed. This part of provisioningconsists of pre-processing and post-processing. Pre-processing acquires IP addresses for the user,creates CMDB instances, and creates the virtual machine or instance based on information in therequest. Post-processing activates the CMDB instance and emails the user. The steps for provisioningmay be modified at any time using Red Hat CloudForms.
CHAPTER 1. RED HAT CLOUDFORMS LIFECYCLE
5

CHAPTER 2. PROVISIONING REQUESTSThe following options are available when making provisioning requests:
Set an owner (User can do this using LDAP lookup)
Assign a purpose (tag)
Select a template or image from which to create a new virtual machine or instance respectively
Choose placement
Set hardware requirements
Specify the vLan
Customize the guest operating system
Schedule the provisioning
2.1. REQUIREMENTS FOR PROVISIONING VIRTUAL MACHINES ANDINSTANCES
Red Hat CloudForms supports the provisioning of VMware ESX hosts/hypervisors. To provision a virtualmachine from VMware providers, you must have an appliance with the Automation Engine role enabled.
If you are using a Windows template, the following configuration is required:
To customize settings that are inside the operating system, Sysprep must be copied to theappropriate directory on your vCenter computer. Usually this location is: C:\Documents and Settings\All Users\Application Data\VMware\VMware VirtualCenter\sysprep. Copy the Sysprep tools to the relevant operating systemsubdirectory. If you are running a standard Win2008 operating system, this step is unnecessaryas Sysprep is included as standard.
The Windows template must have the latest version of VMware tools for its ESX Server. Checkthe VMware Site for more information. If you are creating a new password for the Administratoraccount, the Administrators password must be blank on the template. This is a limitation ofMicrosoft Sysprep.
See the VMware documentation for a complete list of customization requirements.
2.2. REQUIREMENTS FOR PROVISIONING VIRTUAL MACHINES FROMRED HAT VIRTUALIZATION MANAGER
Item Requirements
Red Hat CloudForms 4.6 Provisioning Virtual Machines and Hosts
6

Red Hat Virtualization Manager version 3.0 or higher Red Hat Virtualization Manager properly installed withAPI in default location https://server:8443/api
Red Hat Virtualization Manager History Database Red Hat Virtualization Manager Data Warehouse(DWH) properly installed with access to thePostgreSQL database on the Red Hat VirtualizationManager server. Port 5432 open in iptables.
md5 authentication allowed to Red Hat CloudFormsappliances in pg_hba.conf.
PostgreSQL set to listen for connections on *:5432in postgresql.conf.
Credentials provided during database setup to beused in Red Hat CloudForms UI.
Storage Supported for Red Hat CloudForms VirtualMachine Analysis
NFS - Red Hat CloudForms server must be able tomount NFS storage domain.
iSCSI / FCP - Cluster must use full Red HatEnterprise Linux (not Red Hat VirtualizationHypervisor) Hosts.
DirectLUN Hook installed on each host and registeredto Red Hat Virtualization Managers.
Must have Red Hat CloudForms appliance in eachCluster with this storage type.
Red Hat CloudForms appliance virtual machinecontainer must have DirectLUN attribute set.
Local storage - Not yet supported (Red Hat does notrecommend due to single point of failure).
Item Requirements
2.3. PXE PROVISIONING
PXE is a boot method that allows you to load files from across a network link. Red Hat CloudForms usesit for files required for provisioning virtual machines. PXE can be used for provisioning for either Red HatVirtualization Manager or VMware.
Procedure Overview
1. Connect to the PXE Server.
2. Create a System Image Type.
3. Associate each PXE image with an image type.
4. Create a customization template.
Requirements for PXE Provisioning
CHAPTER 2. PROVISIONING REQUESTS
7

DHCP server configured with required PXE implementation
PXE implementation for Linux virtual machine provisioning
NFS or SAMBA read and write access to create and modify files on the PXE server
Red Hat CloudForms Server uses NFS mount to read and write the response files
HTTP read access to the NFS share location as virtual machines use this URL to access PXEimages and Kickstart or Cloud-Init configuration files
Operating system installation media available to be streamed from PXE server
Images configured for desired operating systems
Kickstart or Cloud-Init templates to configure operating systems with desired packages
Additional Requirements for Provisioning Linux Virtual Machines
Linux distribution kernel and ramdisk available over HTTP
Linux sources available over HTTP
Sample PXE menu item that boots this kernel
Additional Requirements for Provisioning Windows Virtual Machines
WinPE ISO built with rhev-agent-tools (for RHEV-M environments) and configured to mountshares for Windows source files and Sysprep files and configured to run customization script
Windows based WIM file with operating system installed and configured with Sysprep
Sample Sysprep unattend file to be used with the operating system
Sample PXE menu item that downloads WinPE ISO, mount in memdisk and boot into WinPEenvironment
2.3.1. Connecting to a PXE Server
The following procedure connects to a PXE server and adds its details to Red Hat CloudForms.
1. Navigate to Compute → Infrastructure → PXE.
2. Click (Configuration), then (Add a New PXE Server).
Red Hat CloudForms 4.6 Provisioning Virtual Machines and Hosts
8
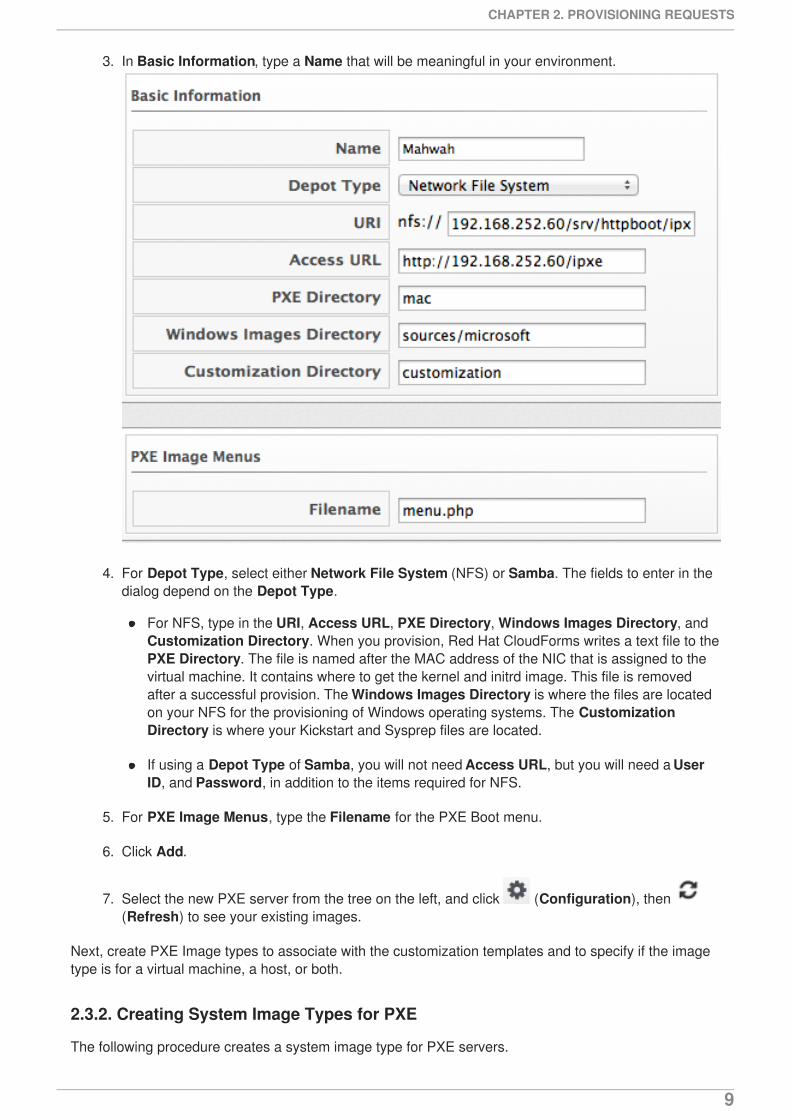
3. In Basic Information, type a Name that will be meaningful in your environment.
4. For Depot Type, select either Network File System (NFS) or Samba. The fields to enter in thedialog depend on the Depot Type.
For NFS, type in the URI, Access URL, PXE Directory, Windows Images Directory, andCustomization Directory. When you provision, Red Hat CloudForms writes a text file to thePXE Directory. The file is named after the MAC address of the NIC that is assigned to thevirtual machine. It contains where to get the kernel and initrd image. This file is removedafter a successful provision. The Windows Images Directory is where the files are locatedon your NFS for the provisioning of Windows operating systems. The CustomizationDirectory is where your Kickstart and Sysprep files are located.
If using a Depot Type of Samba, you will not need Access URL, but you will need a UserID, and Password, in addition to the items required for NFS.
5. For PXE Image Menus, type the Filename for the PXE Boot menu.
6. Click Add.
7. Select the new PXE server from the tree on the left, and click (Configuration), then (Refresh) to see your existing images.
Next, create PXE Image types to associate with the customization templates and to specify if the imagetype is for a virtual machine, a host, or both.
2.3.2. Creating System Image Types for PXE
The following procedure creates a system image type for PXE servers.
CHAPTER 2. PROVISIONING REQUESTS
9

1. Navigate to Compute → Infrastructure → PXE.
2. Click the System Image Types accordion.
3. Click (Configuration), then (Add a new System Image Type).
4. In Basic Information, type in a Name and select a Type.
Use Host if you want this image type to only apply to hosts.
Use Vm if you want this image type to only apply to virtual machines.
Use Any if this image type can be used for either hosts or virtual machines.
5. Click Add.
After creating the System Image Types, assign the types to each image on your PXE servers. To do this,you will select each image on the PXE server and identify its type.
2.3.3. Setting the PXE Image Type for a PXE Image
The following procedure sets the image type for a chosen PXE image.
1. Navigate to Compute → Infrastructure → PXE.
2. Click the PXE Servers accordion and select the image that you want to set a type for.
3. Click (Configuration), then (Edit this PXE Image).
4. From the Basic Information area, select the correct type. If this PXE image will be used as theWindows Boot Environment, check Windows Boot Environment. At the time of this writing,only one PXE Image can be identified as the Windows Boot Environment. Therefore, checkingone as the Windows Boot Environment, will remove that from any other PXE image with thatcheck.
Red Hat CloudForms 4.6 Provisioning Virtual Machines and Hosts
10
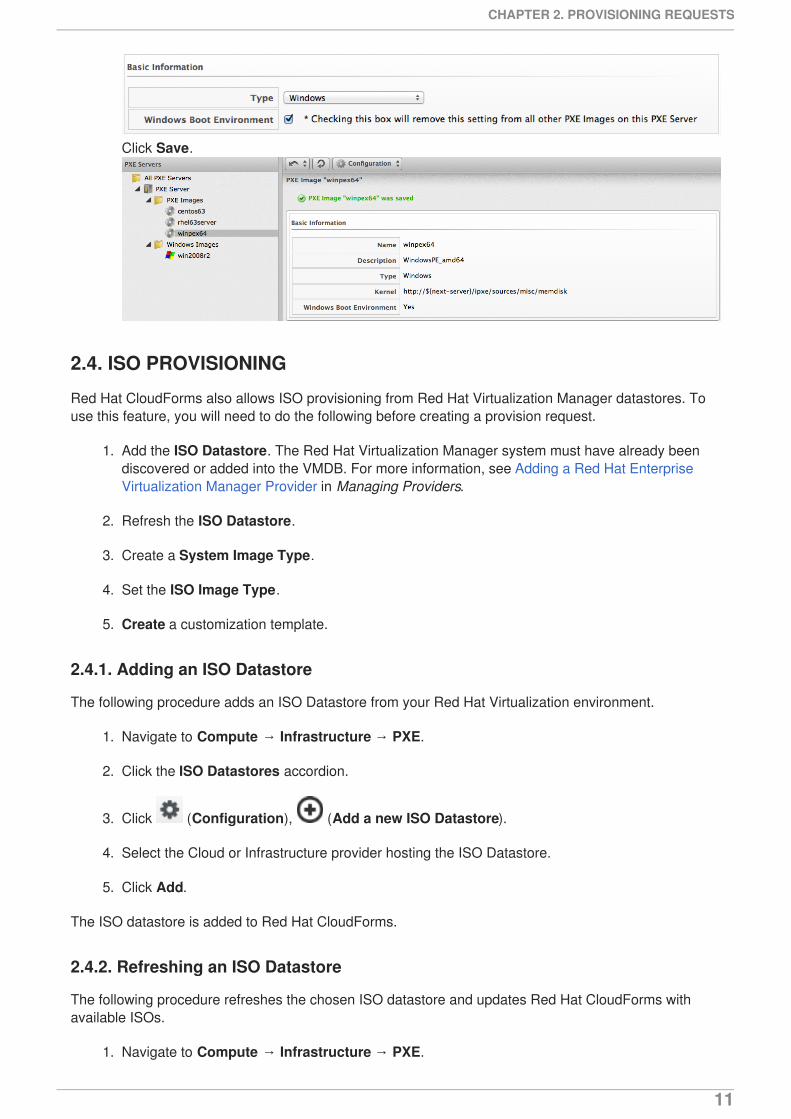
Click Save.
2.4. ISO PROVISIONING
Red Hat CloudForms also allows ISO provisioning from Red Hat Virtualization Manager datastores. Touse this feature, you will need to do the following before creating a provision request.
1. Add the ISO Datastore. The Red Hat Virtualization Manager system must have already beendiscovered or added into the VMDB. For more information, see Adding a Red Hat EnterpriseVirtualization Manager Provider in Managing Providers.
2. Refresh the ISO Datastore.
3. Create a System Image Type.
4. Set the ISO Image Type.
5. Create a customization template.
2.4.1. Adding an ISO Datastore
The following procedure adds an ISO Datastore from your Red Hat Virtualization environment.
1. Navigate to Compute → Infrastructure → PXE.
2. Click the ISO Datastores accordion.
3. Click (Configuration), (Add a new ISO Datastore).
4. Select the Cloud or Infrastructure provider hosting the ISO Datastore.
5. Click Add.
The ISO datastore is added to Red Hat CloudForms.
2.4.2. Refreshing an ISO Datastore
The following procedure refreshes the chosen ISO datastore and updates Red Hat CloudForms withavailable ISOs.
1. Navigate to Compute → Infrastructure → PXE.
CHAPTER 2. PROVISIONING REQUESTS
11
2. Click the ISO Datastores accordion, and select an ISO datastore.
3. Click (Configuration), then click (Refresh Relationships).
2.4.3. Creating System Image Types for ISO
The following procedure creates a system image type for ISO Servers.
1. Navigate to Compute → Infrastructure → PXE.
2. Click the System Image Types accordion.
3. Click (Configuration), then (Add a new System Image Type).
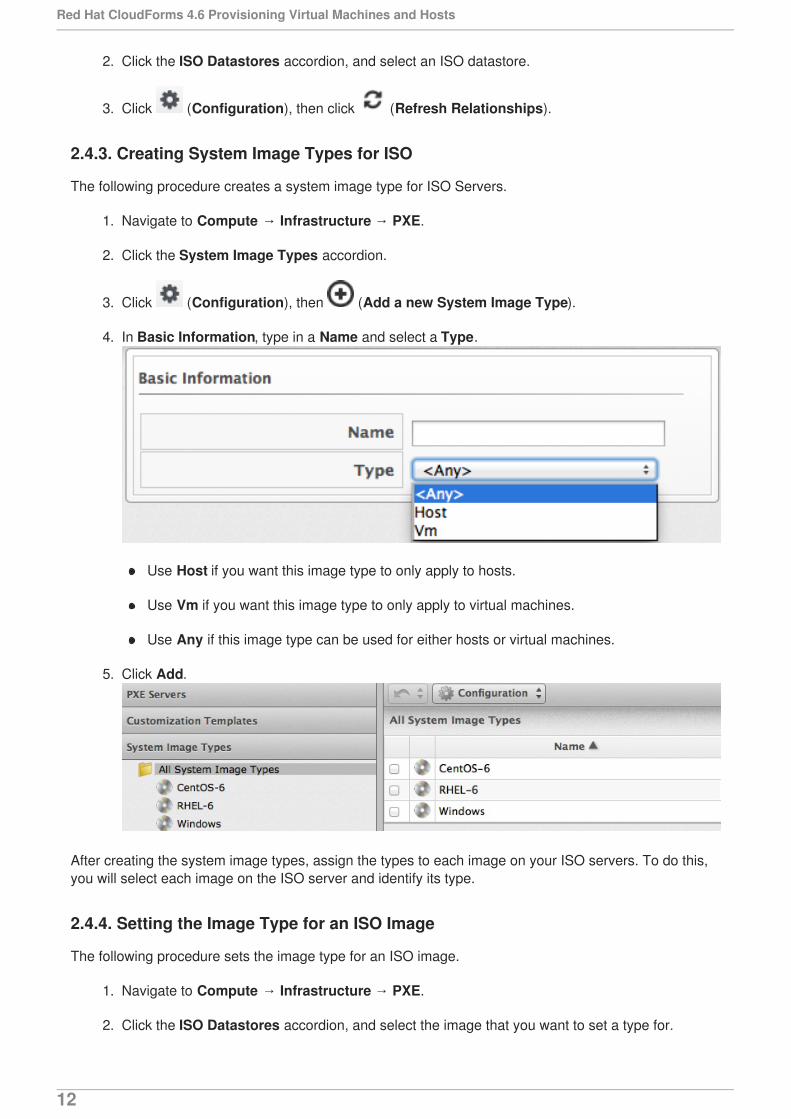
4. In Basic Information, type in a Name and select a Type.
Use Host if you want this image type to only apply to hosts.
Use Vm if you want this image type to only apply to virtual machines.
Use Any if this image type can be used for either hosts or virtual machines.
5. Click Add.
After creating the system image types, assign the types to each image on your ISO servers. To do this,you will select each image on the ISO server and identify its type.
2.4.4. Setting the Image Type for an ISO Image
The following procedure sets the image type for an ISO image.
1. Navigate to Compute → Infrastructure → PXE.
2. Click the ISO Datastores accordion, and select the image that you want to set a type for.
Red Hat CloudForms 4.6 Provisioning Virtual Machines and Hosts
12

3. Click (Configuration), then (Edit this ISO Image).
4. From the Basic Information area, select the correct Type.
5. Click Save.
2.5. CUSTOMIZATION TEMPLATES FOR VIRTUAL MACHINE ANDINSTANCE PROVISIONING
Add a customization template to provide Kickstart, Cloud-Init, or Sysprep files for the initial loading ofthe operating system.
Cloud-Init Requirements
When creating a template using Red Hat Virtualization, install the cloud-init package on thesource virtual machine. This enables Cloud-Init to source configuration scripts when a virtualmachine built on that template boots.
See Using Cloud-Init to Automate the Configuration of Virtual Machines in the Red HatVirtualization Administration Guide for more information on using Cloud-Init in a Red HatVirtualization environment.
See the Cloud-Init Documentation web site for example scripts.
Kickstart Requirements for ISO Provisioning
The Kickstart file must be named ks.cfg.
Set the new virtual machine to power down after provisioning is complete.
CloudForms must use the virtual machine payload feature of Red Hat Virtualization to create afloppy disk containing the data from the selected customization template.
Customize the installer to include the data written to the floppy disk payload.
Example 2.1. RHEL ISO with the following modifications:
isolinux.cfg – add ks=cdrom to the append line
ks.cfg – which must minimally include:
### Pre Install Scripts%pre
# Mount the floppy drive
CHAPTER 2. PROVISIONING REQUESTS
13
modprobe floppymkdir /tmp/floppymount /dev/floppy /tmp/floppy%end
# Include ks.cfg file from the floppy (written by CFME based on selected customization template)%include /tmp/floppy/ks.cfg
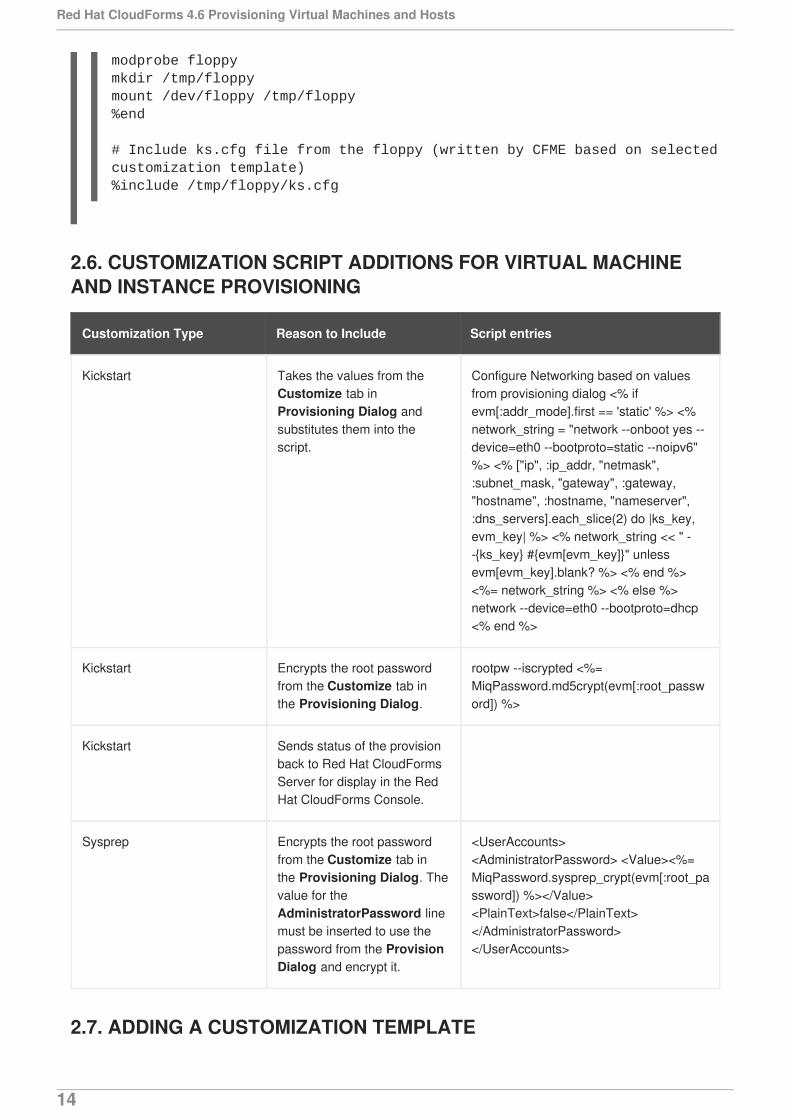
2.6. CUSTOMIZATION SCRIPT ADDITIONS FOR VIRTUAL MACHINEAND INSTANCE PROVISIONING
Customization Type Reason to Include Script entries
Kickstart Takes the values from theCustomize tab inProvisioning Dialog andsubstitutes them into thescript.
Configure Networking based on valuesfrom provisioning dialog <% ifevm[:addr_mode].first == 'static' %> <%network_string = "network --onboot yes --device=eth0 --bootproto=static --noipv6"%> <% ["ip", :ip_addr, "netmask",:subnet_mask, "gateway", :gateway,"hostname", :hostname, "nameserver",:dns_servers].each_slice(2) do |ks_key,evm_key| %> <% network_string << " --{ks_key} #{evm[evm_key]}" unlessevm[evm_key].blank? %> <% end %><%= network_string %> <% else %>network --device=eth0 --bootproto=dhcp<% end %>
Kickstart Encrypts the root passwordfrom the Customize tab inthe Provisioning Dialog.
rootpw --iscrypted <%=MiqPassword.md5crypt(evm[:root_password]) %>
Kickstart Sends status of the provisionback to Red Hat CloudFormsServer for display in the RedHat CloudForms Console.
Sysprep Encrypts the root passwordfrom the Customize tab inthe Provisioning Dialog. Thevalue for theAdministratorPassword linemust be inserted to use thepassword from the ProvisionDialog and encrypt it.
<UserAccounts><AdministratorPassword> <Value><%=MiqPassword.sysprep_crypt(evm[:root_password]) %></Value><PlainText>false</PlainText></AdministratorPassword></UserAccounts>
2.7. ADDING A CUSTOMIZATION TEMPLATE
Red Hat CloudForms 4.6 Provisioning Virtual Machines and Hosts
14
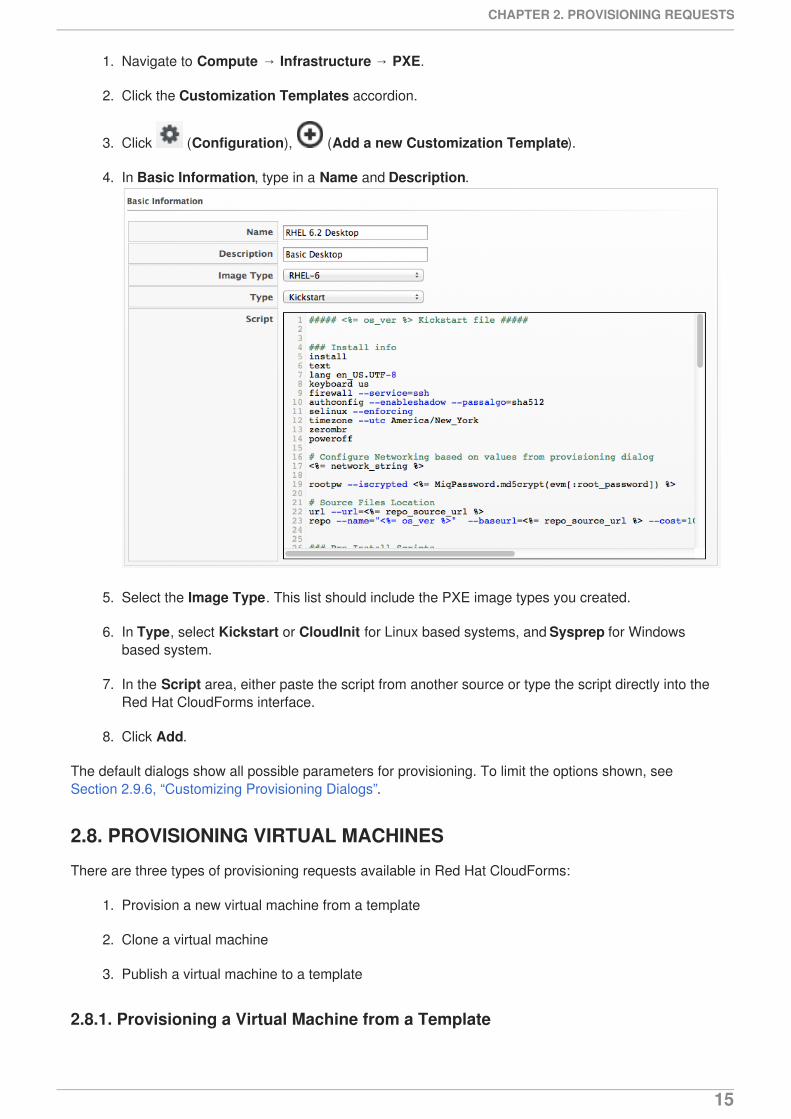
1. Navigate to Compute → Infrastructure → PXE.
2. Click the Customization Templates accordion.
3. Click (Configuration), (Add a new Customization Template).
4. In Basic Information, type in a Name and Description.
5. Select the Image Type. This list should include the PXE image types you created.
6. In Type, select Kickstart or CloudInit for Linux based systems, and Sysprep for Windowsbased system.
7. In the Script area, either paste the script from another source or type the script directly into theRed Hat CloudForms interface.
8. Click Add.
The default dialogs show all possible parameters for provisioning. To limit the options shown, seeSection 2.9.6, “Customizing Provisioning Dialogs”.
2.8. PROVISIONING VIRTUAL MACHINES
There are three types of provisioning requests available in Red Hat CloudForms:
1. Provision a new virtual machine from a template
2. Clone a virtual machine
3. Publish a virtual machine to a template
2.8.1. Provisioning a Virtual Machine from a Template
CHAPTER 2. PROVISIONING REQUESTS
15
You can provision virtual machines through various methods. One method is to provision a virtualmachine directly from a template stored on a provider.
IMPORTANT
To provision a virtual machine, you must have the "Automation Engine" role enabled.
To provision a virtual machine from a template:
1. Navigate to Compute → Infrastructure → Virtual Machines.
2. Click (Lifecycle), and then (Provision VMs).
3. Select a template from the list.
4. Click Continue.
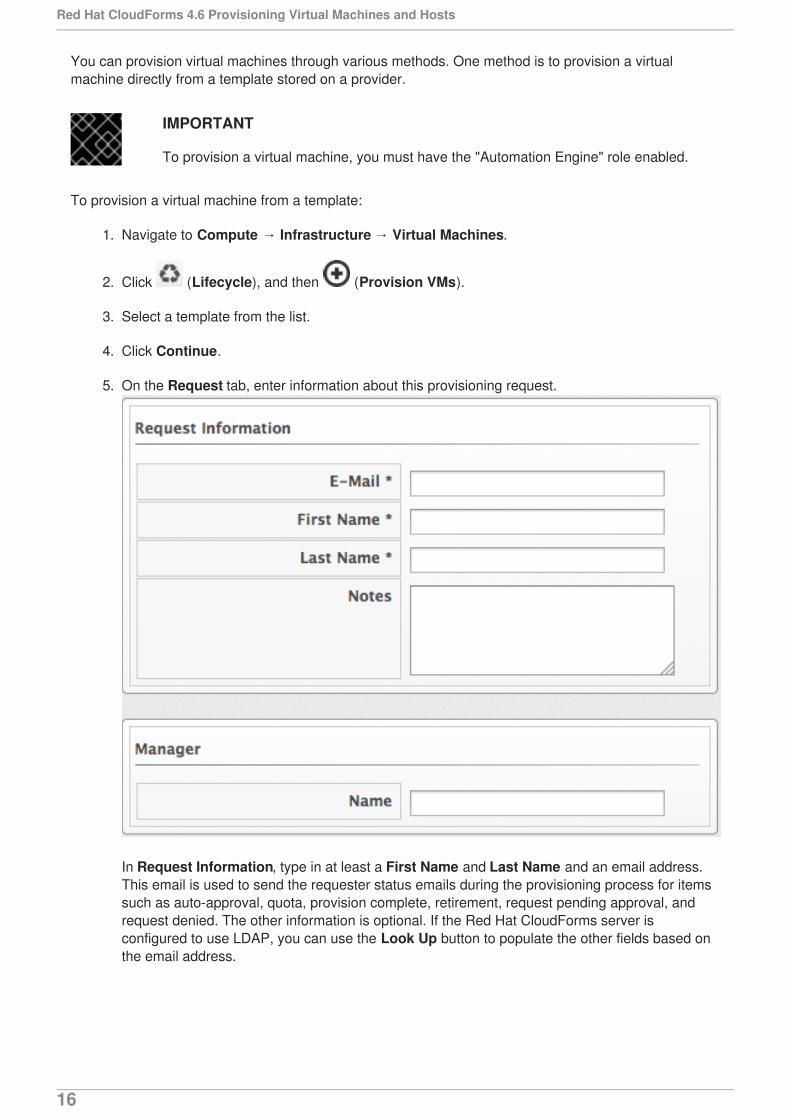
5. On the Request tab, enter information about this provisioning request.
In Request Information, type in at least a First Name and Last Name and an email address.This email is used to send the requester status emails during the provisioning process for itemssuch as auto-approval, quota, provision complete, retirement, request pending approval, andrequest denied. The other information is optional. If the Red Hat CloudForms server isconfigured to use LDAP, you can use the Look Up button to populate the other fields based onthe email address.
Red Hat CloudForms 4.6 Provisioning Virtual Machines and Hosts
16

NOTE
Parameters with a * next to the label are required to submit the provisioningrequest. To change the required parameters, see Section 2.9.6, “CustomizingProvisioning Dialogs”.
6. Click the Purpose tab to select the appropriate tags for the provisioned virtual machines.
7. Click the Catalog tab to select the template to provision from. This tab is context sensitive basedon provider.
8. For templates on VMware providers:
a. For Provision Type, select VMware or PXE.
i. If VMware is selected, select Linked Clone to create a linked clone to the virtualmachine instead of a full clone. Since a snapshot is required to create a linked clone,this box is only enabled if a snapshot is present. Select the snapshot you want to usefor the linked clone.
ii. If PXE is selected, select a PXE Server and Image to use for provisioning.
b. Under Count, select the number of virtual machines to create in this request.
c. Use Naming to specify a virtual machine name and virtual machine description. Whenprovisioning multiple virtual machines, a number will be appended to the virtual machinename.
9. For templates on Red Hat providers:
a. Select the Name of a template to use.
b. For Provision Type, select either ISO, PXE, or Native Clone. You must select NativeClone in order to use a Cloud-Init template.
i. If Native Clone is selected, select Linked Clone to create a linked clone to the virtualmachine instead of a full clone. This is equivalent to Thin Template Provisioning in RedHat Virtualization. Since a snapshot is required to create a linked clone, this box is only
CHAPTER 2. PROVISIONING REQUESTS
17

enabled if a snapshot is present. Select the snapshot to use for the linked clone.
ii. If ISO is selected, select an ISO Image to use for provisioning.
iii. If PXE is selected, select a PXE Server and Image to use for provisioning.
c. Under Count, select the number of virtual machines you want to create in this request.
d. Use Naming to specify a VM Name and VM Description. When provisioning multiple virtualmachines, a number will be appended to the VM Name.
10. Click the Environment tab to decide where you want the new virtual machines to reside.
a. If provisioning from a template on VMware, you can either let Red Hat CloudForms decidefor you by checking Choose Automatically, or select a specific cluster, resource pool,folder, host, and datastore. VMware virtual machines can also be provisioned to a clustereddatastore by selecting it under Datastore. Additionally, you can assign a storage profile to aVMware virtual machine under Datastore to configure the virtual machine to operate using astorage profile from that datastore.Note, read-only datastores are excluded when provisioning a virtual machine.
b. If provisioning from a template on Red Hat, you can either let Red Hat CloudForms decidefor you by checking Choose Automatically, or select a datacenter, cluster, host anddatastore.
11. Click the Hardware tab to set hardware options.
a. In Hardware, set the number of sockets, cores per socket, memory in MB, and disk format:thin, pre-allocated/thick or same as the provisioning template (default).
b. For VMware provisioning, set the VM Limits of CPU and memory the virtual machine canuse.
c. For VMware provisioning, set the VM Reservation amount of CPU and memory.
Red Hat CloudForms 4.6 Provisioning Virtual Machines and Hosts
18

12. Click Network to set the vLan adapter. Additional networking settings that are internal to theoperating system appear on the Customize tab.
a. In Network Adapter Information, select the vLan.
NOTE
A VMware virtual machine can be provisioned to a DVPortgroup by selectingit from the vLan list. Prior to provisioning a virtual machine, the DVPortgroupmust be created on a vSphere Distributed Switch (VDS) in VMware vCenterin order for Red Hat CloudForms to list the DVPortgroup under vLan.
13. Click Customize to customize the operating system of the new virtual machine. These optionsvary based on the operating system of the template.
14. For Windows provisioning:
a. To use a custom specification from the provider, click Specification. To select anappropriate template, choose from the list in the custom specification area. The values thatare honored by Red Hat CloudForms display.
NOTE
Any values in the specification that do not show in the Red Hat CloudFormsconsole’s request dialogs are not used by Red Hat CloudForms. Forexample, for Windows operating systems, if you have any run once values inthe specification, they are not used in creating the new virtual machines.Currently, for a Windows operating system, Red Hat CloudForms honors theunattended GUI, identification, workgroup information, user data, windowsoptions, and server license. If more than one network card is specified, onlythe first is used.
CHAPTER 2. PROVISIONING REQUESTS
19
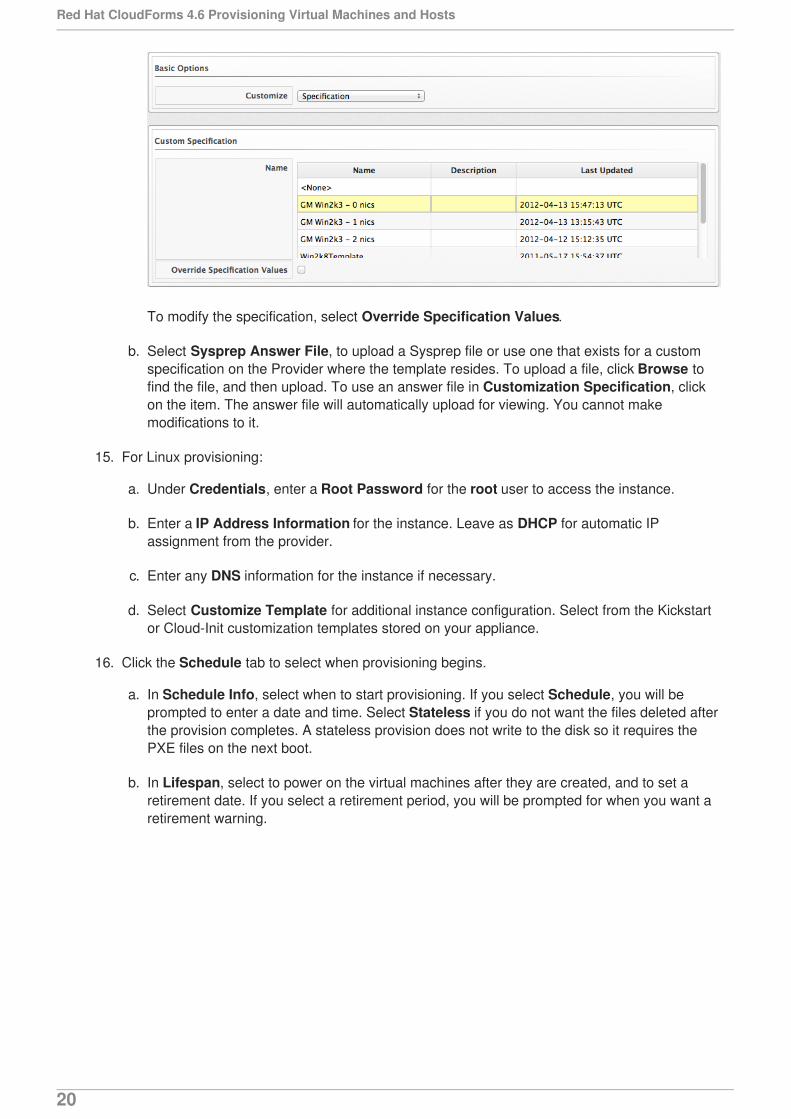
To modify the specification, select Override Specification Values.
b. Select Sysprep Answer File, to upload a Sysprep file or use one that exists for a customspecification on the Provider where the template resides. To upload a file, click Browse tofind the file, and then upload. To use an answer file in Customization Specification, clickon the item. The answer file will automatically upload for viewing. You cannot makemodifications to it.
15. For Linux provisioning:
a. Under Credentials, enter a Root Password for the root user to access the instance.
b. Enter a IP Address Information for the instance. Leave as DHCP for automatic IPassignment from the provider.
c. Enter any DNS information for the instance if necessary.
d. Select Customize Template for additional instance configuration. Select from the Kickstartor Cloud-Init customization templates stored on your appliance.
16. Click the Schedule tab to select when provisioning begins.
a. In Schedule Info, select when to start provisioning. If you select Schedule, you will beprompted to enter a date and time. Select Stateless if you do not want the files deleted afterthe provision completes. A stateless provision does not write to the disk so it requires thePXE files on the next boot.
b. In Lifespan, select to power on the virtual machines after they are created, and to set aretirement date. If you select a retirement period, you will be prompted for when you want aretirement warning.
Red Hat CloudForms 4.6 Provisioning Virtual Machines and Hosts
20
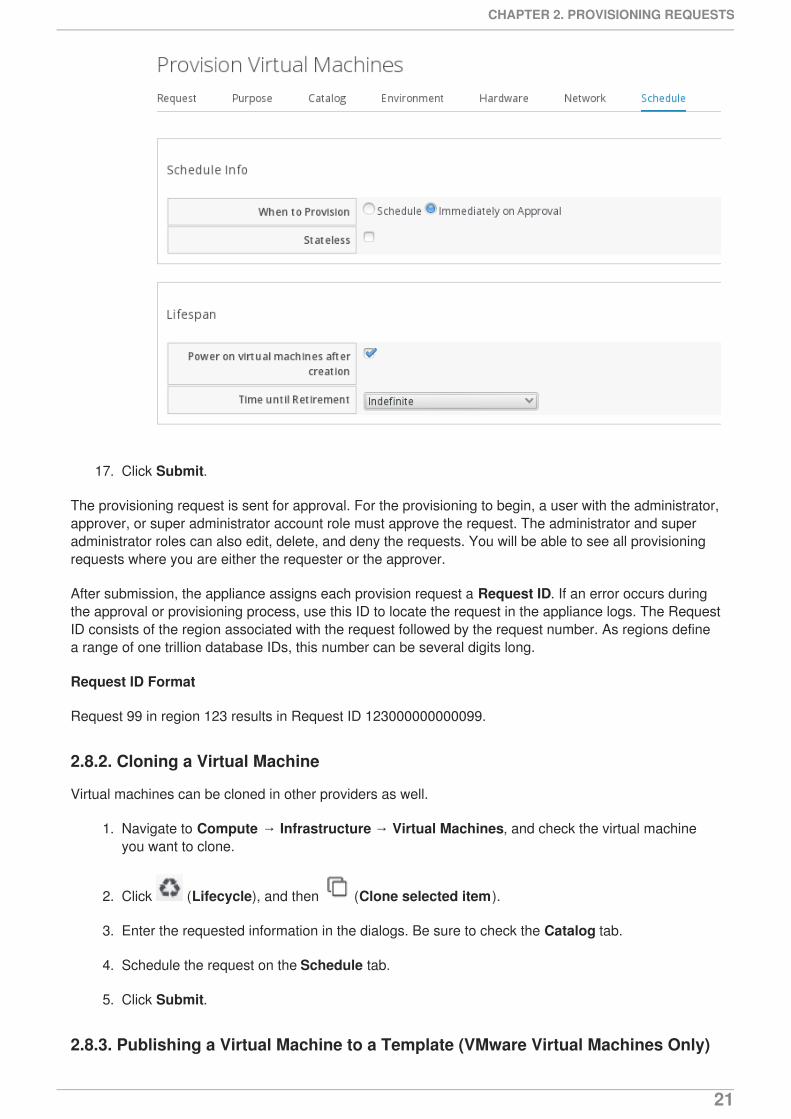
17. Click Submit.
The provisioning request is sent for approval. For the provisioning to begin, a user with the administrator,approver, or super administrator account role must approve the request. The administrator and superadministrator roles can also edit, delete, and deny the requests. You will be able to see all provisioningrequests where you are either the requester or the approver.
After submission, the appliance assigns each provision request a Request ID. If an error occurs duringthe approval or provisioning process, use this ID to locate the request in the appliance logs. The RequestID consists of the region associated with the request followed by the request number. As regions definea range of one trillion database IDs, this number can be several digits long.
Request ID Format
Request 99 in region 123 results in Request ID 123000000000099.
2.8.2. Cloning a Virtual Machine
Virtual machines can be cloned in other providers as well.
1. Navigate to Compute → Infrastructure → Virtual Machines, and check the virtual machineyou want to clone.
2. Click (Lifecycle), and then (Clone selected item).
3. Enter the requested information in the dialogs. Be sure to check the Catalog tab.
4. Schedule the request on the Schedule tab.
5. Click Submit.
2.8.3. Publishing a Virtual Machine to a Template (VMware Virtual Machines Only)
CHAPTER 2. PROVISIONING REQUESTS
21
1. Navigate to Compute → Infrastructure → Virtual Machines, and check the virtual machineyou want to publish as a template.
2. Click (Lifecycle), and then (Publish selected VM to a Template).
3. Enter the requested information in the dialogs. Be sure to check the Catalog tab.
4. Schedule the request on the Schedule tab.
5. Click Submit.
2.9. PROVISIONING INSTANCES
Cloud instances follow the same process (Request, Approval, Deployment) as a standard virtualmachine from virtualization infrastructure. First, a user makes a request for instances and specifies theimage, tags, availability zone and hardware profile flavor. Second, the request goes through the approvalphase. Finally, Red Hat CloudForms executes the request.
2.9.1. Provisioning an EC2 Instance from an Image
1. Navigate to Compute → Clouds → Instances.
2. Click (Lifecycle), then click (Provision Instances).
3. Select an image from the list presented.
4. Click Continue.
5. On the Request tab, enter information about this provisioning request. In Request Information,type in at least a first and last name and an email address. This email is used to send therequester status emails during the provisioning process for items such as auto-approval, quota,provision complete, retirement, request pending approval, and request denied. The otherinformation is optional. If the Red Hat CloudForms Server is configured to use LDAP, you canuse the Look Up button to populate the other fields based on the email address.
NOTE
Parameters with a * next to the label are required to submit the provisioningrequest. To change the required parameters, see Section 2.9.6, “CustomizingProvisioning Dialogs”.
6. Click the Purpose tab to select the appropriate tags for the provisioned instance.
7. Click the Catalog tab for basic instance options.
a. To change the image to use as a basis for the instance, select it from the list of images.
b. Select the Number of VMs to provision.
c. Type a VM Name and VM Description.
8. Click the Environment tab to select the instance’s Availability Zone, Virtual Private Cloud,Cloud Subnet, Security Groups, and Elastic IP Address. If no specific availability zone isrequired, select the Choose Automatically checkbox.
Red Hat CloudForms 4.6 Provisioning Virtual Machines and Hosts
22

9. Click the Properties tab to set provider options such as hardware flavor and security settings.
a. Select a flavor from the Instance Type list.
b. Select a Guest Access Key Pair for access to the instance.
c. Select the CloudWatch monitoring level. Leave as Basic for the default EC2 monitoring.
10. Click the Customize tab to set additional instance options.
a. Under Credentials, enter a Root Password for the root user access to the instance.
b. Enter a IP Address Information for the instance. Leave as DHCP for automatic IPassignment from the provider.
c. Enter any DNS information for the instance if necessary.
d. Select a Customize Template for additional instance configuration. Select from the Cloud-Init scripts stored on your appliance.
11. Click the Schedule tab to set the provisioning and retirement date and time.
a. In Schedule Info, choose whether the provisioning begins upon approval, or at a specifictime. If you select Schedule, you will be prompted to enter a date and time.
b. In Lifespan, select whether to power on the instances after they are created, and whether toset a retirement date. If you select a retirement period, you will be prompted for when toreceive a retirement warning.
12. Click Submit.
The provisioning request is sent for approval. For the provisioning to begin, a user with the admin,approver, or super admin account role must approve the request. The admin and super admin roles canalso edit, delete, and deny the requests. You will be able to see all provisioning requests where you areeither the requester or the approver.
After submission, the appliance assigns each provision request a Request ID. If an error occurs duringthe approval or provisioning process, use this ID to locate the request in the appliance logs. The RequestID consists of the region associated with the request followed by the request number. As regions definea range of one trillion database IDs, this number can be several digits long.
Request ID Format
Request 99 in region 123 results in Request ID 123000000000099.
2.9.2. Provisioning an OpenStack Instance from an Image
1. Navigate to Compute → Clouds → Instances.
2. Click (Lifecycle), then click (Provision Instances).
3. Select an OpenStack image from the list presented. These images must be available on yourOpenStack provider.
4. Click Continue.
5. On the Request tab, enter information about this provisioning request. In Request Information,
CHAPTER 2. PROVISIONING REQUESTS
23
type in at least a first and last name and an email address. This email is used to send therequester status emails during the provisioning process for items such as auto-approval, quota,provision complete, retirement, request pending approval, and request denied. The otherinformation is optional. If the Red Hat CloudForms Server is configured to use LDAP, you canuse the Look Up button to populate the other fields based on the email address.
NOTE
Parameters with a * next to the label are required to submit the provisioningrequest. To change the required parameters, see Section 2.9.6, “CustomizingProvisioning Dialogs”.
6. Click the Purpose tab to select the appropriate tags for the provisioned instance.
7. Click the Catalog tab for basic instance options.
a. To change the image to use as a basis for the instance, select it from the list of images.
b. Select the Number of Instances to provision.
c. Type a Instance Name and Instance Description.
8. Click the Environment tab to select the instance’s Tenant, Availabilty Zones, Cloud Network,Security Groups, and Public IP Address. If no specific Tenant is required, select the ChooseAutomatically checkbox.
9. Click the Properties tab to set provider options such as flavors and security settings.
a. Select a flavor from the Instance Type list.
b. Select a Guest Access Key Pair for access to the instance. For more information about keypairs, see Section 2.9.8, “Managing Key Pairs”.
10. Click the Volumes tab to provision any volumes with the instance. Volumes are useful foraugmenting ephemeral storage of instances with persistent, general-purpose block storage:
a. Fill in the Volume Name and Size (gigabytes) fields.
b. If you want the volume to be deleted once the instance terminates (thereby making it non-persistent), check Delete on Instance Terminate.
c. To provision and add multiple volumes to the instance, click Add Volume. Doing so will addnew fields you can fill in.For more information about persistent storage in OpenStack, see the Red Hat OpenStackPlatform Storage Guide.
11. Click the Customize tab to set additional instance options.
a. Under Credentials, enter a Root Password for the root user access to the instance.
b. Enter a IP Address Information for the instance. Leave as DHCP for automatic IPassignment from the provider.
c. Enter any DNS information for the instance if necessary.
d. Select a Customize Template for additional instance configuration. Select from the Cloud-Init scripts stored on your appliance.
Red Hat CloudForms 4.6 Provisioning Virtual Machines and Hosts
24
12. Click the Schedule tab to set the provisioning and retirement date and time.
a. In Schedule Info, choose whether the provisioning begins upon approval, or at a specifictime. If you select Schedule, you will be prompted to enter a date and time.
b. In Lifespan, select whether to power on the instances after they are created, and whether toset a retirement date. If you select a retirement period, you will be prompted for when toreceive a retirement warning.
13. Click Submit.
The provisioning request is sent for approval. For the provisioning to begin, a user with the admin,approver, or super admin account role must approve the request. The admin and super admin roles canalso edit, delete, and deny the requests. You will be able to see all provisioning requests where you areeither the requester or the approver.
After submission, the appliance assigns each provision request a Request ID. If an error occurs duringthe approval or provisioning process, use this ID to locate the request in the appliance logs. The RequestID consists of the region associated with the request followed by the request number. As regions definea range of one trillion database IDs, this number can be several digits long.
Request ID Format
Request 99 in region 123 results in Request ID 123000000000099.
2.9.3. Provisioning a Google Compute Engine Instance from an Image
From Red Hat Red Hat CloudForms 4.2, a Google Compute Engine instance can be provisioned. Somefunctionality available in other cloud providers is currently unavailable when provisioning from GoogleCompute Engine.
1. Navigate to Compute → Clouds → Instances.
2. Click (Lifecycle), then click (Provision Instances).
3. Select an image from the list presented.
4. Click Continue.
5. On the Request tab, enter information about this provisioning request. In Request Information,type in at least a first and last name and an email address. This email is used to send therequester status emails during the provisioning process for items such as auto-approval, quota,provision complete, retirement, request pending approval, and request denied. The otherinformation is optional. If the Red Hat CloudForms Server is configured to use LDAP, you canuse the Look Up button to populate the other fields based on the email address.
NOTE
Parameters with a * next to the label are required to submit the provisioningrequest. To change the required parameters, see Section 2.9.6, “CustomizingProvisioning Dialogs”.
6. Click the Purpose tab to select the appropriate tags for the provisioned instance.
7. Click the Catalog tab for basic instance options.
a. To change the image to use as a basis for the instance, select it from the list of images.
CHAPTER 2. PROVISIONING REQUESTS
25
a. To change the image to use as a basis for the instance, select it from the list of images.
b. Select the Number of Instances to provision.
c. Type a Instance Name and Instance Description. For Google Compute Engine instances,the Instance Name cannot use upper case letters. Use a combination of lower case lettersand numbers to create the name.
8. Click the Environment tab to select the instance’s Availability Zone and Cloud Network. If nospecific availability zone is required, select the Choose Automatically checkbox.
9. Click the Properties tab to set provider options such as hardware flavor and boot disk settings.
a. Select a flavor from the Instance Type list.
b. Select a Boot Disk Size from the list.
10. Click the Schedule tab to set the provisioning and retirement date and time.
a. In Schedule Info, choose whether the provisioning begins upon approval, or at a specifictime. If you select Schedule, you will be prompted to enter a date and time.
b. In Lifespan, select and whether to set a retirement date. If you select a retirement period,you will be prompted for when to receive a retirement warning.
11. Click Submit.
The provisioning request is sent for approval. For the provisioning to begin, a user with the admin,approver, or super admin account role must approve the request. The admin and super admin roles canalso edit, delete, and deny the requests. You will be able to see all provisioning requests where you areeither the requester or the approver.
After submission, the appliance assigns each provision request a Request ID. If an error occurs duringthe approval or provisioning process, use this ID to locate the request in the appliance logs. The RequestID consists of the region associated with the request followed by the request number. As regions definea range of one trillion database IDs, this number can be several digits long.
Request ID Format
Request 99 in region 123 results in Request ID 123000000000099.
2.9.4. Requirements for Provisioning a Host
Red Hat CloudForms can provision hosts using PXE and Intelligent Platform Management Interface(IPMI) technologies. Before you provision your first host, configure the following prerequisites:
Provisioning requires the Automation Engine server role be enabled. Confirm your server rolesettings in the settings menu, then Configuration → Server → Server Control.
Make a PXE server accessible to the Red Hat CloudForms server.
Create a customization template for hosts. This customization template must contain host-specific additions, documented in the Customization Templates for Host Provisioning section.
Create system image types for the host.
Associate images with the image types.
Red Hat CloudForms 4.6 Provisioning Virtual Machines and Hosts
26

Enable IPMI on provisioning hosts and add them to the Red Hat CloudForms Infrastructure.
2.9.4.1. IPMI Hosts
There are two ways to get the Intelligent Platform Management Interface (IPMI) Host into the VMDB.You can either use the Red Hat CloudForms’s discovery process or add the host using its IP addressand credentials.
2.9.4.1.1. Discovering the Management Interface for an IPMI Host
1. Navigate to Compute → Infrastructure → Hosts.
2. Click (Configuration), then (Discover Items).
3. In Discover, check IPMI.
4. Optionally, in IPMI Credentials, type in a User ID and Password.
NOTE
You can also add IPMI credentials after the host has been discovered. Seesection Section 2.9.4.1.2, “Adding IPMI Credentials to a Discovered Host”.
5. In Subnet Range, type in a range of IP addresses. For quickest results, use the actual IPaddress in both fields.
6. Click Start.
NOTE
After the host is discovered, you can add credentials for IPMI.
2.9.4.1.2. Adding IPMI Credentials to a Discovered Host
After discovering an IPMI host, add the credentials using the following procedure.
1. Navigate to Compute → Infrastructure → Hosts.
2. Click on the host you want to edit.
3. Click (Configuration), and then (Edit this Host).
4. In the Credentials area, IPMI tab, type in the IPMI credentials
a. Use User ID to specify a login ID.
b. Use Password to specify the password for the user ID.
c. Use Verify Password to confirm the password.
5. Click Validate to test the credentials.
6. Click Save.
CHAPTER 2. PROVISIONING REQUESTS
27
2.9.4.1.3. Adding the Management Interface for an IPMI Host
1. Navigate to Compute → Infrastructure → Hosts.
2. Click (Configuration), then (Add a New Item).
3. In Basic Information, type in a Name and the IPMI IP address.
4. In the Credentials area, under IPMI tab, type in the IPMI credentials
a. Use User ID to specify a login ID.
b. Use Password to specify the password for the User ID.
c. Use Verify Password to confirm the password.
5. Click Validate to test the credentials.
6. Click Add.
The IPMI host is added to the Red Hat CloudForms environment; an operating system can now beprovisioned onto it.
2.9.4.2. Customization Templates for Host Provisioning
Add a customization template to provide Kickstart files for the initial loading of the operating system.There are certain sections to use to allow for interactions with the provisioning dialogs provided by RedHat CloudForms.
2.9.4.3. Customization Script Additions
CustomizationType
Reason to Include Script entries
Red Hat CloudForms 4.6 Provisioning Virtual Machines and Hosts
28

Kickstart Takes the valuesfrom theCustomize tab inProvisioningDialog andsubstitutes theminto the script.
#Configure Networking based on values from provisioning dialog<% if evm[:addr_mode].first == 'static' %> <% network_string = "network --onboot yes --device=eth0 --bootproto=static --noipv6" %> <% ["ip", :ip_addr, "netmask", :subnet_mask, "gateway", :gateway, "hostname", :hostname, "nameserver", :dns_servers].each_slice(2) do |ks_key, evm_key| %> <% network_string << " --#{ks_key} #{evm[evm_key]}" unless evm[evm_key].blank? %> <% end %><%= network_string %><% else %>network --device=eth0 --bootproto=dhcp<% end %>
Kickstart Encrypts the rootpassword from theCustomize tab inthe ProvisioningDialog.
rootpw --iscrypted <%= MiqPassword.md5crypt(evm[:root_password]) %>
Kickstart Sends status of theprovision back toRed HatCloudFormsServer for displayin the Red HatCloudFormsConsole.
# Callback to CFME during post-installwget --no-check-certificate <%= evm[:post_install_callback_url] %>
Sysprep Encrypts the rootpassword from theCustomize tab inthe ProvisioningDialog. The valuefor theAdministratorPassword line must beinserted to use thepassword from theProvision Dialogand encrypt it.
<UserAccounts> <AdministratorPassword> <Value><%= MiqPassword.sysprep_crypt(evm[:root_password]) %></Value> <PlainText>false</PlainText> </AdministratorPassword></UserAccounts>
CustomizationType
Reason to Include Script entries
CHAPTER 2. PROVISIONING REQUESTS
29
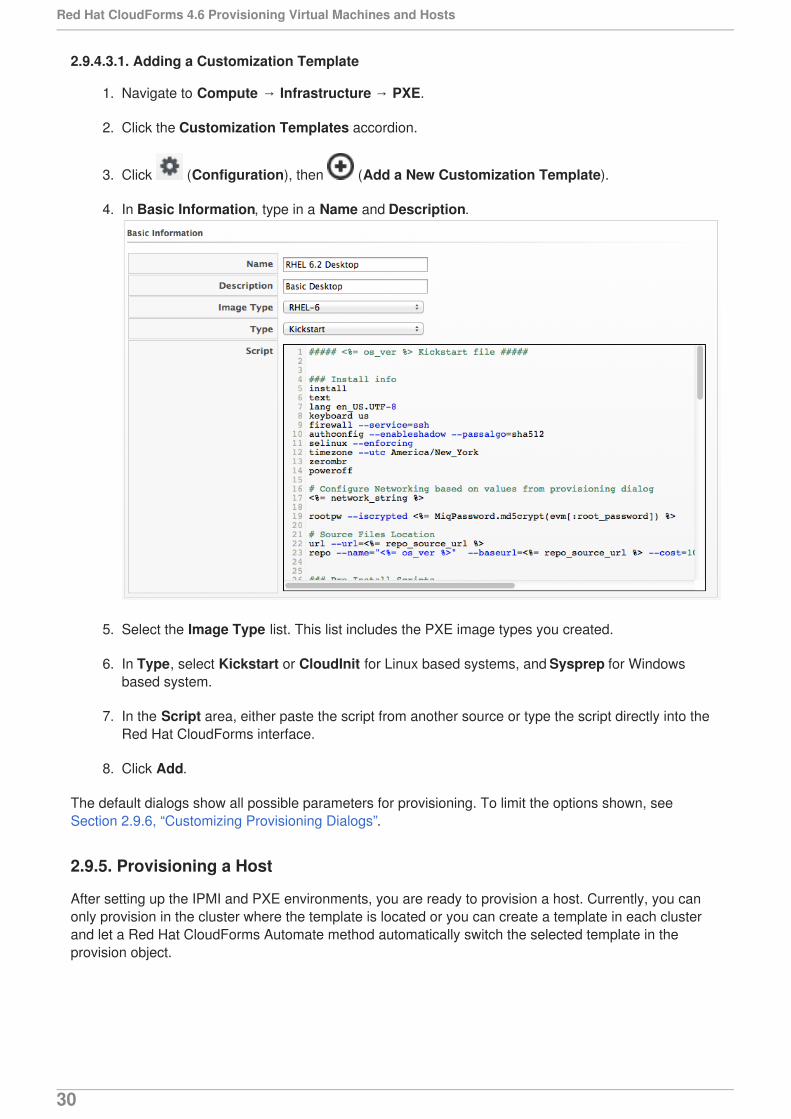
2.9.4.3.1. Adding a Customization Template
1. Navigate to Compute → Infrastructure → PXE.
2. Click the Customization Templates accordion.
3. Click (Configuration), then (Add a New Customization Template).
4. In Basic Information, type in a Name and Description.
5. Select the Image Type list. This list includes the PXE image types you created.
6. In Type, select Kickstart or CloudInit for Linux based systems, and Sysprep for Windowsbased system.
7. In the Script area, either paste the script from another source or type the script directly into theRed Hat CloudForms interface.
8. Click Add.
The default dialogs show all possible parameters for provisioning. To limit the options shown, seeSection 2.9.6, “Customizing Provisioning Dialogs”.
2.9.5. Provisioning a Host
After setting up the IPMI and PXE environments, you are ready to provision a host. Currently, you canonly provision in the cluster where the template is located or you can create a template in each clusterand let a Red Hat CloudForms Automate method automatically switch the selected template in theprovision object.
Red Hat CloudForms 4.6 Provisioning Virtual Machines and Hosts
30

IMPORTANT
A customization template with host-specific script additions is required. Ensure especiallythat the customization template contains the post-installation callback to enable discoveryin Red Hat CloudForms.
1. Navigate to Compute → Infrastructure → Hosts.
2. Select a host with IPMI enabled.
3. Click (Lifecycle), then (Provision Hosts).
4. In Request Information, type in at least a First Name and Last Name and an email address.This email is used to send the requester status emails during the provisioning. The otherinformation is optional. If the Red Hat CloudForms server is configured to use LDAP, you canuse the Look Up button to populate the other fields based on the email address.
CHAPTER 2. PROVISIONING REQUESTS
31

5. On the Purpose tab, select the desired tags for the provisioned host.
6. On the Catalog tab, select the hosts to provision.
In the Host area, select the hosts to provision.
In the PXE area, select the PXE server and image.
7. On the Customize tab, you can select customizations for the operating system of the new host.These options vary based on the operating system to be provisioned.
Use Credentials to type in a root password
In the IP Address area, select either Static or DHCP and enter any other addressinformation you need. If needed, type in DNS specifications.
Under Customize Template, select a script.
Red Hat CloudForms 4.6 Provisioning Virtual Machines and Hosts
32
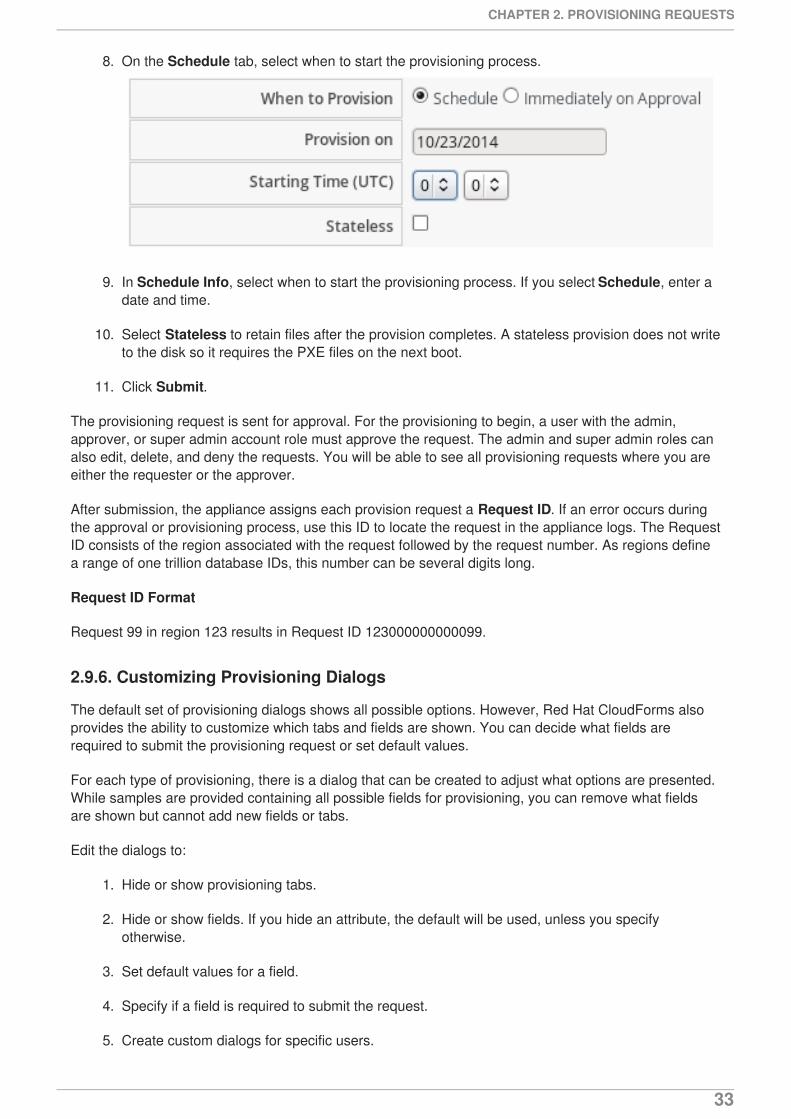
8. On the Schedule tab, select when to start the provisioning process.
9. In Schedule Info, select when to start the provisioning process. If you select Schedule, enter adate and time.
10. Select Stateless to retain files after the provision completes. A stateless provision does not writeto the disk so it requires the PXE files on the next boot.
11. Click Submit.
The provisioning request is sent for approval. For the provisioning to begin, a user with the admin,approver, or super admin account role must approve the request. The admin and super admin roles canalso edit, delete, and deny the requests. You will be able to see all provisioning requests where you areeither the requester or the approver.
After submission, the appliance assigns each provision request a Request ID. If an error occurs duringthe approval or provisioning process, use this ID to locate the request in the appliance logs. The RequestID consists of the region associated with the request followed by the request number. As regions definea range of one trillion database IDs, this number can be several digits long.
Request ID Format
Request 99 in region 123 results in Request ID 123000000000099.
2.9.6. Customizing Provisioning Dialogs
The default set of provisioning dialogs shows all possible options. However, Red Hat CloudForms alsoprovides the ability to customize which tabs and fields are shown. You can decide what fields arerequired to submit the provisioning request or set default values.
For each type of provisioning, there is a dialog that can be created to adjust what options are presented.While samples are provided containing all possible fields for provisioning, you can remove what fieldsare shown but cannot add new fields or tabs.
Edit the dialogs to:
1. Hide or show provisioning tabs.
2. Hide or show fields. If you hide an attribute, the default will be used, unless you specifyotherwise.
3. Set default values for a field.
4. Specify if a field is required to submit the request.
5. Create custom dialogs for specific users.
CHAPTER 2. PROVISIONING REQUESTS
33

2.9.6.1. Adding a Provision Dialog for All Users
1. Login to the Red Hat CloudForms console for the Red Hat CloudForms server where you wantto change the dialog.
2. Navigate to Automate → Customization.
3. Click the Provisioning Dialogs accordion.
4. Click the type of dialog you want to create: Host Provision, VM Provision or VM Migrate.
5. Select one of the default dialogs.
6. Click (Configuration), and then (Copy this Dialog).
7. Type a new Name and Description for the dialog.
8. In the Content field,
To remove a tab from display, change its display value to ignore. By choosing ignore, younot only hide the tab, but also skip any fields on that tab that were required. To show the tab,change the display value to show.
To hide a field, change its :display: value from :edit to :hide. To display fields of mostdata types, use :edit. To display a button, use :show. To set a default value for a field,add :default: defaultvalue to the list of parameters for the field. Set the :required: parameter to either true or false based on your needs.
NOTE
If you set :required: to true, the field must have a value for the provisionrequest to be submitted.
9. Click Add.
If you are using Provisioning Profiles, you can specify a specific file that holds the customizations. Todo this, you must create an instance mapping to this file in the Red Hat CloudFormsApplications/provisioning/profile/VM provisioning by group class. By default, if you are usingprovisioning profiles and the group does not have a defined instance, the appropriate default dialog filewill be used based on the type of provisioning selected.
2.9.6.2. Creating a Custom Provision Dialog
1. Navigate to Automate → Customization.
2. Click on the Provisioning Dialogs accordion.
3. Click on the type of dialog you want to create, Host Provision, VM Provision or VM Migrate.
4. Select one of the default dialogs.
5. Click (Configuration), and then (Copy this Dialog).
6. Rename the dialog as shown in the examples below.
Red Hat CloudForms 4.6 Provisioning Virtual Machines and Hosts
34
Type of Provision Dialog Name
Provision Virtual Machine from a template miq_provision_dialogs_groupname_templateExample: miq_provision_dialogs_ EvmGroup-user_self_service _template
Clone a Virtual Machine miq_provision_dialogs_groupname_clone_to_vmExample: miq_provision_dialogs_ EvmGroup-user_self_service _clone_to_vm
Publish a Virtual Machine to a template miq_provision_dialogs_groupname_clone_to_template Example: miq_provision_dialogs_EvmGroup-user_self_service_clone_to_template
7. Make any changes you need.
8. In the Content field,
To remove a tab from display, change its display value to ignore. By choosing ignore, younot only hide the tab, but also skip any fields on that tab that were required. To show the tab,change the display value to show.
To hide a field, change its :display: value from :edit to :hide. To ensure the field doesnot get turned back on by a workflow model, use :display_override: :hide. Todisplay fields of most data types, use :edit. To display a button, use :show. To set adefault value for a field, add :default: defaultvalue to the list of parameters for thefield. Set the :required: parameter to either true or false based on your needs.
NOTE
If you set :required: to true, the field must have a value for the provisionrequest to be submitted.
9. Click Add.
Enter the name of the new dialog into the dialog name field in the appropriate Red Hat CloudFormsApplications/provisioning/profile instance. This dialog can now be referred to in an instance in theProvisioning Profiles class so that it can be used for groups of users.
2.9.7. Provisioning Profiles
Provisioning profiles can be used to customize the dialogs and the state machine (steps used toprovision the machine). Profiles can be created for LDAP or Red Hat CloudForms groups. To useprovisioning profiles:
Create a Provisioning Profile instance for the LDAP or Red Hat CloudForms group. If noinstance exists, then default settings will be used.
If customizing dialogs, create a custom dialog file, and specify the name of that file in theprovisioning profile instance. If customizing the states for provisioning, create a state instanceand set the name of the state instance in the provisioning profile instance.
CHAPTER 2. PROVISIONING REQUESTS
35
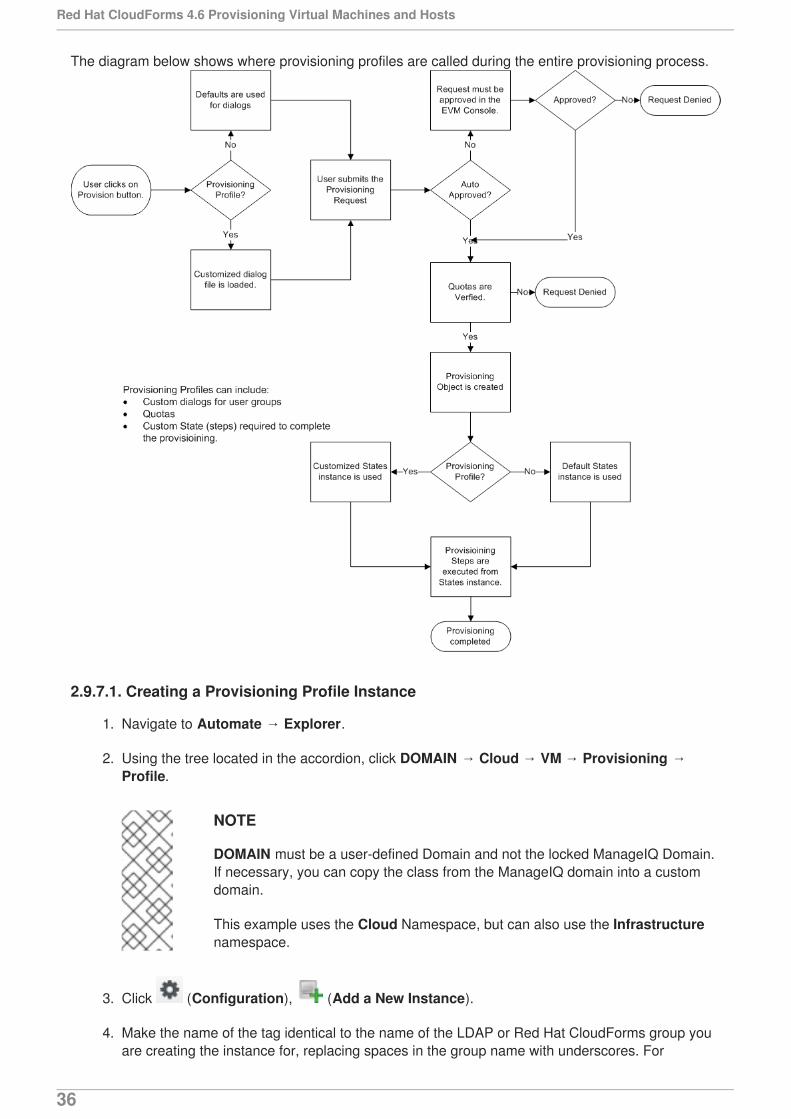
The diagram below shows where provisioning profiles are called during the entire provisioning process.
2.9.7.1. Creating a Provisioning Profile Instance
1. Navigate to Automate → Explorer.
2. Using the tree located in the accordion, click DOMAIN → Cloud → VM → Provisioning →Profile.
NOTE
DOMAIN must be a user-defined Domain and not the locked ManageIQ Domain.If necessary, you can copy the class from the ManageIQ domain into a customdomain.
This example uses the Cloud Namespace, but can also use the Infrastructurenamespace.
3. Click (Configuration), (Add a New Instance).
4. Make the name of the tag identical to the name of the LDAP or Red Hat CloudForms group youare creating the instance for, replacing spaces in the group name with underscores. For
Red Hat CloudForms 4.6 Provisioning Virtual Machines and Hosts
36
example, change Red Hat CloudForms-test group to Red Hat CloudForms-test_group.
5. In the dialog name field, enter the name of the customized dialog file. This file must reside on theRed Hat CloudForms appliance in the /var/www/miq/vmdb/db/fixtures directory. Red Hatrecommends naming the file in the format miq_provision_dialogs-groupname.rb andcopying this file to all Red Hat CloudForms appliances. For instructions on creating a customdialog file, see Section 2.9.6, “Customizing Provisioning Dialogs”.
NOTE
Be sure that the custom dialog file exists. If it does not, an error will appear whenthe user clicks on the Provisioning button in the Red Hat CloudForms console.
6. Click Add.
2.9.7.2. Setting Provisioning Scope Tags
Some non-default placement methods, for example the redhat_best_placement_with_scope orvmware_best_fit_with_scope methods, may require you to set Provisioning Scope tags for a hostand a datastore.
To enable these resources for all groups, set the scope to All. To limit access to a select group, create atag in the Provisioning Scope category with the exact name of the user group and set this tag on thedesired resources. See Tags in General Configuration for information on creating tags.
To set the scope for a host:
1. Navigate to Compute → Infrastructure → Hosts.
2. Select the host to set the provisioning scope for.
3. Click (Policy), and then (Edit Tags).
4. From the Select a customer tag to assign drop down, select Provisioning Scope and then avalue for the tag from the next drop down menu.
5. Click Save.
To set the scope for a datastore:
1. Navigate to Compute → Infrastructure → Datastores.
2. Select the datastore to set the provisioning scope for.
CHAPTER 2. PROVISIONING REQUESTS
37
3. Click (Policy), and then (Edit Tags).
4. From the Select a customer tag to assign drop down, select Provisioning Scope and then avalue for the tag from the next drop down menu.
5. Click Save.
2.9.8. Managing Key Pairs
Key pairs allow you to manage SSH access between a user and provisioned instance. For moreinformation about key pairs in OpenStack, see Manage Key Pairs in the Instances and Images Guide.
To manage key pairs, navigate to Compute → Clouds → Key Pairs. From there, you can view a list ofavailable key pairs. Click on a key pair to view its details.
To create a new key pair:
1. Navigate to Compute → Clouds → Key Pairs.
2. Click (Configuration), (Add a new Key Pair).
3. Enter a Name for the key pair.
4. If you want to use a public key, copy its contents into the Public Key (optional) field.
5. Select which cloud provider on which to create the key pair. The key pair will then be availablefor use by instances in that provider.
6. Click Add.
Red Hat CloudForms 4.6 Provisioning Virtual Machines and Hosts
38
CHAPTER 3. WORKING WITH REQUESTS
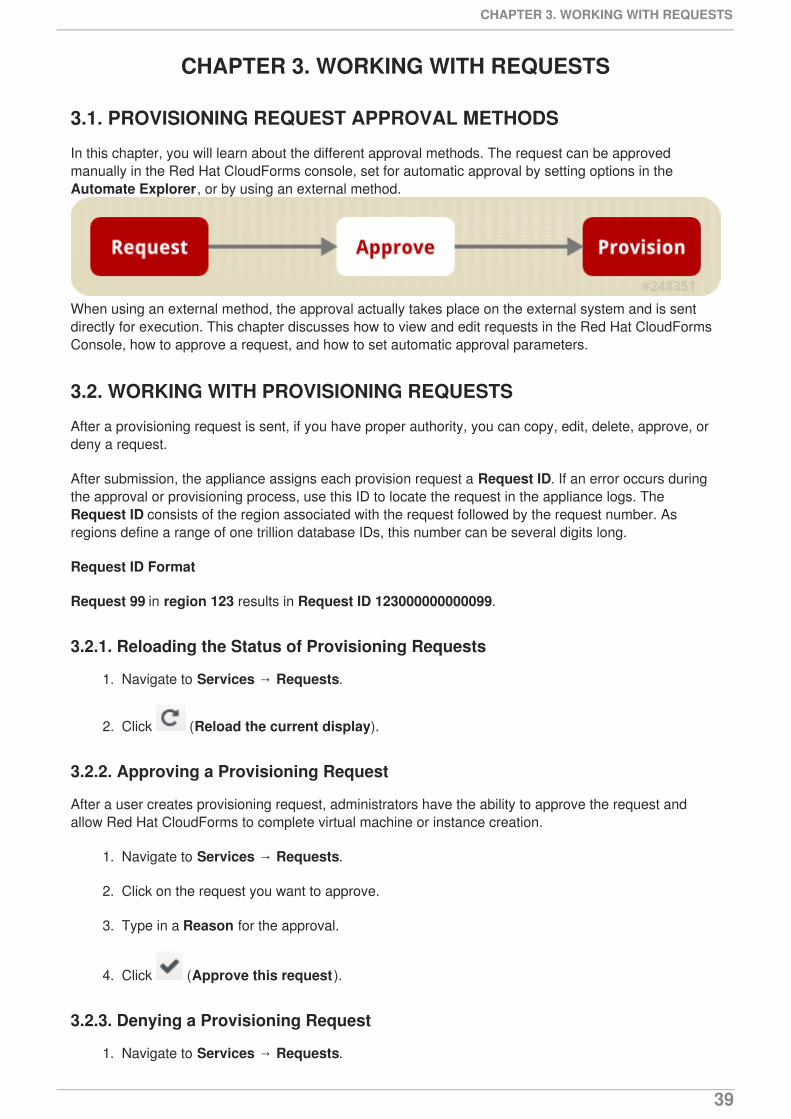
3.1. PROVISIONING REQUEST APPROVAL METHODS
In this chapter, you will learn about the different approval methods. The request can be approvedmanually in the Red Hat CloudForms console, set for automatic approval by setting options in theAutomate Explorer, or by using an external method.
When using an external method, the approval actually takes place on the external system and is sentdirectly for execution. This chapter discusses how to view and edit requests in the Red Hat CloudFormsConsole, how to approve a request, and how to set automatic approval parameters.
3.2. WORKING WITH PROVISIONING REQUESTS
After a provisioning request is sent, if you have proper authority, you can copy, edit, delete, approve, ordeny a request.
After submission, the appliance assigns each provision request a Request ID. If an error occurs duringthe approval or provisioning process, use this ID to locate the request in the appliance logs. TheRequest ID consists of the region associated with the request followed by the request number. Asregions define a range of one trillion database IDs, this number can be several digits long.
Request ID Format
Request 99 in region 123 results in Request ID 123000000000099.
3.2.1. Reloading the Status of Provisioning Requests
1. Navigate to Services → Requests.
2. Click (Reload the current display).
3.2.2. Approving a Provisioning Request
After a user creates provisioning request, administrators have the ability to approve the request andallow Red Hat CloudForms to complete virtual machine or instance creation.
1. Navigate to Services → Requests.
2. Click on the request you want to approve.
3. Type in a Reason for the approval.
4. Click (Approve this request ).
3.2.3. Denying a Provisioning Request
1. Navigate to Services → Requests.
CHAPTER 3. WORKING WITH REQUESTS
39

2. Click on the request you want to deny.
3. Type in a Reason for the denial.
4. Click (Deny this request).
3.2.4. Copying a Provisioning Request
1. Navigate to Services → Requests.
2. Click on the request you want to copy.
3. Click (Copy original provision request).
4. Make changes to the request.
5. Click Submit.
If the logged in user is not same as the requester or the request has been already approved or denied,you cannot edit or delete the request.
3.2.5. Editing a Provisioning Request
1. Navigate to Services → Requests.
2. Click on the request you want to edit.
3. Click (Edit the original provision request).
4. Make changes to the request.
5. Click Submit.
3.2.6. Deleting a Provisioning Request
1. Navigate to Services → Requests.
2. Click on the request you want to delete.
3. Click (Delete this request).
4. Click OK to confirm.
3.2.7. Automatically Approving Requests
You can set thresholds for automatic approval of provisioning requests and, therefore, remove therequirement to manually approve the request. You can do this either as a global default or on a pertemplate basis.
3.2.7.1. Enabling Global Defaults for Automatic Approval
To enable a global set of default approval values, edit the defaults instance by navigating to Automate→ Explorer, then DOMAIN → Cloud|Infrastructure → VM → Provisioning → StateMachines →
Red Hat CloudForms 4.6 Provisioning Virtual Machines and Hosts
40
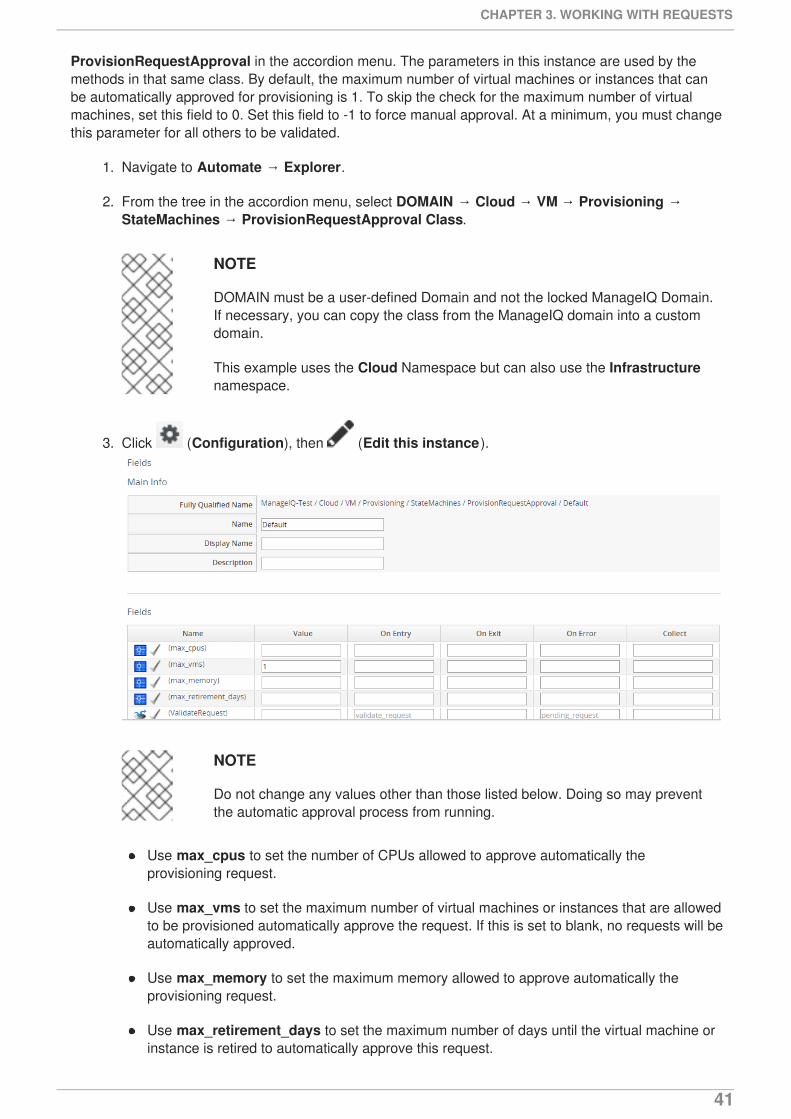
ProvisionRequestApproval in the accordion menu. The parameters in this instance are used by themethods in that same class. By default, the maximum number of virtual machines or instances that canbe automatically approved for provisioning is 1. To skip the check for the maximum number of virtualmachines, set this field to 0. Set this field to -1 to force manual approval. At a minimum, you must changethis parameter for all others to be validated.
1. Navigate to Automate → Explorer.
2. From the tree in the accordion menu, select DOMAIN → Cloud → VM → Provisioning →StateMachines → ProvisionRequestApproval Class.
NOTE
DOMAIN must be a user-defined Domain and not the locked ManageIQ Domain.If necessary, you can copy the class from the ManageIQ domain into a customdomain.
This example uses the Cloud Namespace but can also use the Infrastructurenamespace.
3. Click (Configuration), then (Edit this instance).
NOTE
Do not change any values other than those listed below. Doing so may preventthe automatic approval process from running.
Use max_cpus to set the number of CPUs allowed to approve automatically theprovisioning request.
Use max_vms to set the maximum number of virtual machines or instances that are allowedto be provisioned automatically approve the request. If this is set to blank, no requests will beautomatically approved.
Use max_memory to set the maximum memory allowed to approve automatically theprovisioning request.
Use max_retirement_days to set the maximum number of days until the virtual machine orinstance is retired to automatically approve this request.
CHAPTER 3. WORKING WITH REQUESTS
41
If a value is blank or 0, the parameter is ignored.
4. Click Save.
The thresholds for automatic approval are set. The next time a provision request is created thesethresholds will be checked. If the requirements are met, the provisioning request will be approved with nouser intervention.
3.2.7.2. Template Specific Approval Defaults
Red Hat CloudForms provides tags that can be used to set default automatic approval values on a pertemplate or image basis. These values supersede those in the Automate model. Use these tags toeliminate the need for manual approval for all provisioning requests. To enable automatic approval,assign the tags directly to templates or images.
Category Display Name (Name) Use (Sample values)
Auto Approve Max CPU (prov_max_cpus) Sets the maximum number of CPUs that can be automaticallyapproved in a single provisioning request. Sample Values: 1, 2,3, 4, 5
Auto Approve Max Memory(prov_max_memory)
Sets the maximum number of memory that can be automaticallyapproved in a single provisioning request. Sample Values: 1, 2,4, 8 (in GB)
Auto Approve Max Retirement Days(prov_max_retirement_days)
Sets the maximum number of days until retirement that can beautomatically approved in a single provisioning request. SampleValues: 30, 60, 90, 180 (in days)
Auto Approve Max VM (prov_max_vms) Sets the maximum number of virtual machines or instances thatcan be automatically approved in a single provisioning request.Sample Values: 1, 2, 3, 4, 5
3.2.7.3. Assigning Tags to a Template for Auto Approval
1. Navigate to Compute → Infrastructure → Virtual Machines.
2. Click the Templates accordion, and select the templates that you want to tag.
3. Click (Policy), and then (Edit Tags).
4. Select a customer tag from the first dropdown, and then a value for the tag.
The thresholds for automatic approval for a specific template are set. The next time a provision requestis created for this template these thresholds will be checked. If the requirements are met, theprovisioning request will be approved with no user intervention.
3.2.7.4. Setting Provisioning Notification Email Addresses
Red Hat CloudForms contains a set of Automate instances for provisioning. These Automate instancesalso include email fields to set the sender and recipient of provisioning notifications, such as requests.These fields are set to [email protected] as a default.
Red Hat CloudForms 4.6 Provisioning Virtual Machines and Hosts
42
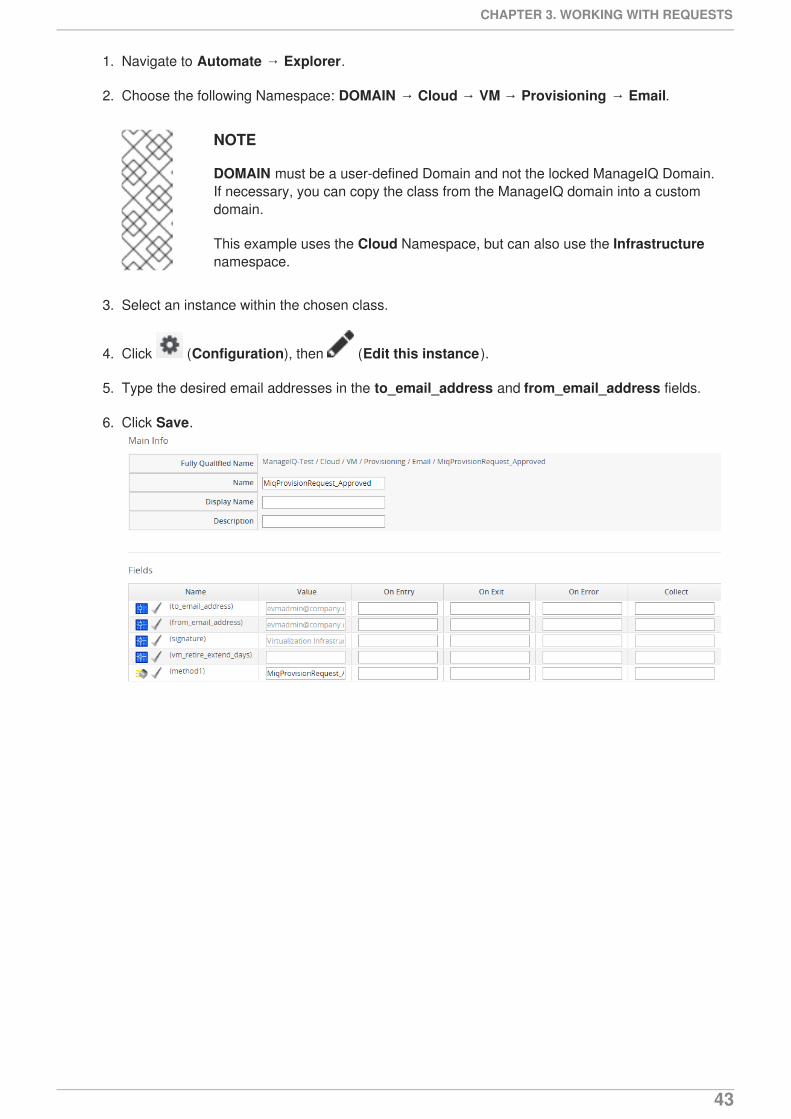
1. Navigate to Automate → Explorer.
2. Choose the following Namespace: DOMAIN → Cloud → VM → Provisioning → Email.
NOTE
DOMAIN must be a user-defined Domain and not the locked ManageIQ Domain.If necessary, you can copy the class from the ManageIQ domain into a customdomain.
This example uses the Cloud Namespace, but can also use the Infrastructurenamespace.
3. Select an instance within the chosen class.
4. Click (Configuration), then (Edit this instance).
5. Type the desired email addresses in the to_email_address and from_email_address fields.
6. Click Save.
CHAPTER 3. WORKING WITH REQUESTS
43
CHAPTER 4. FULFILLING REQUESTS
4.1. FULFILLING A REQUEST
After a request has been approved, Red Hat CloudForms then goes through the steps required tocomplete the request. The steps followed for a regular provision from a virtual machine to a virtualmachine (not to a template) are found by navigating to Automate → Explorer, then listed underDOMAIN → Cloud|Infrastructure → VM → Provisioning → VMProvision_VM → Provision VM fromTemplate (template). The value for each state shows where the instance resides in the Datastoreaccordion. The default set of execution steps is shown below. For more information on state machines,see Section 4.2.1.4, “State Machines”.
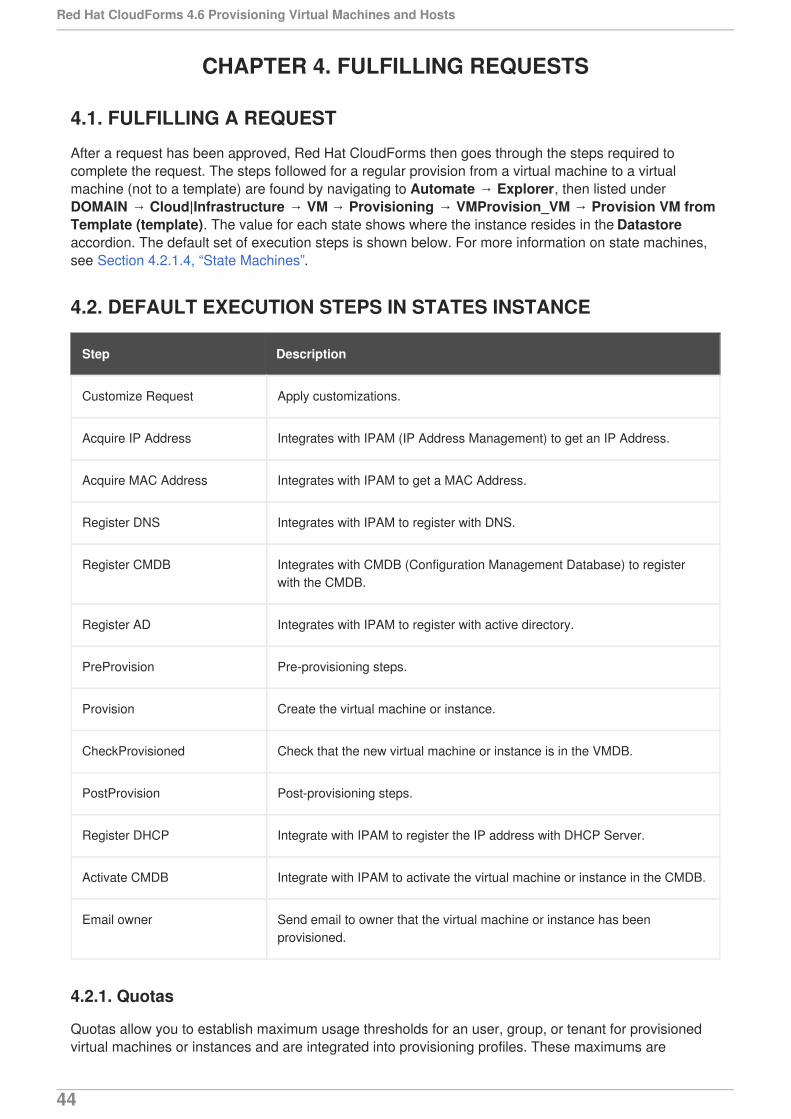
4.2. DEFAULT EXECUTION STEPS IN STATES INSTANCE
Step Description
Customize Request Apply customizations.
Acquire IP Address Integrates with IPAM (IP Address Management) to get an IP Address.
Acquire MAC Address Integrates with IPAM to get a MAC Address.
Register DNS Integrates with IPAM to register with DNS.
Register CMDB Integrates with CMDB (Configuration Management Database) to registerwith the CMDB.
Register AD Integrates with IPAM to register with active directory.
PreProvision Pre-provisioning steps.
Provision Create the virtual machine or instance.
CheckProvisioned Check that the new virtual machine or instance is in the VMDB.
PostProvision Post-provisioning steps.
Register DHCP Integrate with IPAM to register the IP address with DHCP Server.
Activate CMDB Integrate with IPAM to activate the virtual machine or instance in the CMDB.
Email owner Send email to owner that the virtual machine or instance has beenprovisioned.
4.2.1. Quotas
Quotas allow you to establish maximum usage thresholds for an user, group, or tenant for provisionedvirtual machines or instances and are integrated into provisioning profiles. These maximums are
Red Hat CloudForms 4.6 Provisioning Virtual Machines and Hosts
44
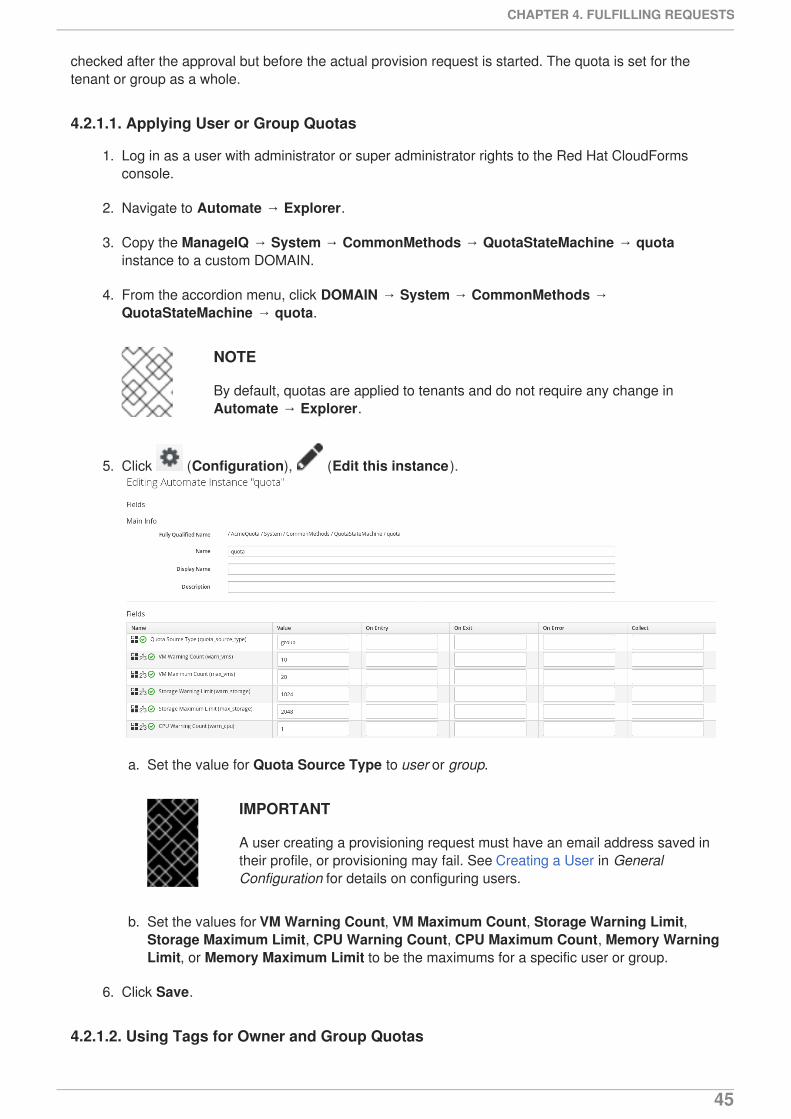
checked after the approval but before the actual provision request is started. The quota is set for thetenant or group as a whole.
4.2.1.1. Applying User or Group Quotas
1. Log in as a user with administrator or super administrator rights to the Red Hat CloudFormsconsole.
2. Navigate to Automate → Explorer.
3. Copy the ManageIQ → System → CommonMethods → QuotaStateMachine → quotainstance to a custom DOMAIN.
4. From the accordion menu, click DOMAIN → System → CommonMethods →QuotaStateMachine → quota.
NOTE
By default, quotas are applied to tenants and do not require any change inAutomate → Explorer.
5. Click (Configuration), (Edit this instance).
a. Set the value for Quota Source Type to user or group.
IMPORTANT
A user creating a provisioning request must have an email address saved intheir profile, or provisioning may fail. See Creating a User in GeneralConfiguration for details on configuring users.
b. Set the values for VM Warning Count, VM Maximum Count, Storage Warning Limit,Storage Maximum Limit, CPU Warning Count, CPU Maximum Count, Memory WarningLimit, or Memory Maximum Limit to be the maximums for a specific user or group.
6. Click Save.
4.2.1.2. Using Tags for Owner and Group Quotas
CHAPTER 4. FULFILLING REQUESTS
45
Red Hat CloudForms provides tags for enforcing quotas for the owners of virtual machines or instances.Ownership of a virtual machine or instance can be set either during the provisioning process or by usingthe Configuration Set Ownership button. If a virtual machine or instance has an owner, the value isdisplayed in the Lifecycle section of the virtual machine or instance summary page.
Quota tags can be assigned directly to either a group or owner not to a configuration item. The tablebelow shows the tags for use in quotas.
Category Display Name(Name)
Use
Quota Max CPU(quota_max_cpu)
Sets the maximum number of CPUs summed over all virtual machines andinstances owned by the group or user. Sample Values: 1, 2, 3, 4, 5, 10, 20,30, 40, 50
Quota Max Memory(quota_max_memory)
Sets the maximum memory summed over all virtual machines and instancesowned by the group or user. Sample Values: 1024, 2048, 4096, 8192,10240, 20480, 40960, 81920 (in MB)
Quota Max Storage(quota_max_storage)
Sets the maximum storage summed over virtual machines and instancesowned by the group or user. Sample Values: 10, 100, 1000, 20, 200, 40,400 (in GB)
4.2.1.3. Applying a Tag to a User or User Group
1. From the settings menu, select Configuration.
2. Click the Access Control accordion, and select the user or group that you want to tag.
3. Click (Policy), then click (Edit Tags).
4. Select the appropriate customer tag to assign, then the value.
5. Click Save.
NOTE
When quotas are applied by both automate instance and tagging, the tagged values willhave higher precedence.
4.2.1.4. State Machines
The automate state machine processes an ordered list of states. It can ensure the successful completionof a step before the next step is run, permit steps to be retried, allow setting a maximum time to retry thestate before exiting, and number of retries before exiting the state. Before each state is executed, the On_Entry method is executed and after the state ends the On_Exit or On_Error method is executedbased on how the state ends.
The following components make up a Red Hat CloudForms automate state machine:
Red Hat CloudForms 4.6 Provisioning Virtual Machines and Hosts
46

Component Description
On_Entry Method to run when entering the state. It enables you to execute anautomate method to do some pre-processing before the state of the statemachine is processed.
On_Exit Method to run when exiting the state.
On_Error Method to run if an error is encountered when running the state. It enablesyou to execute an automate method to do some final processing before thestate machine finally exits (MIQ_ABORT) due to the error.
Default Value Runs after the On_Entry method completes (The actual state beingprocessed).
Max Retries Maximum number of times to retry the state before exiting.
Max Time Maximum time in seconds to retry the state before exiting.
In the diagram below, you can see how these components combine to create a state machine workflow.
NOTE
The retry logic, On_Entry and On_Error are distinct cases in the program flow.
Code snippet demonstrating the state machine retry logic:
# Get current provisioning statustask = $evm.root['service_template_provision_task']task_status = task['status']
CHAPTER 4. FULFILLING REQUESTS
47
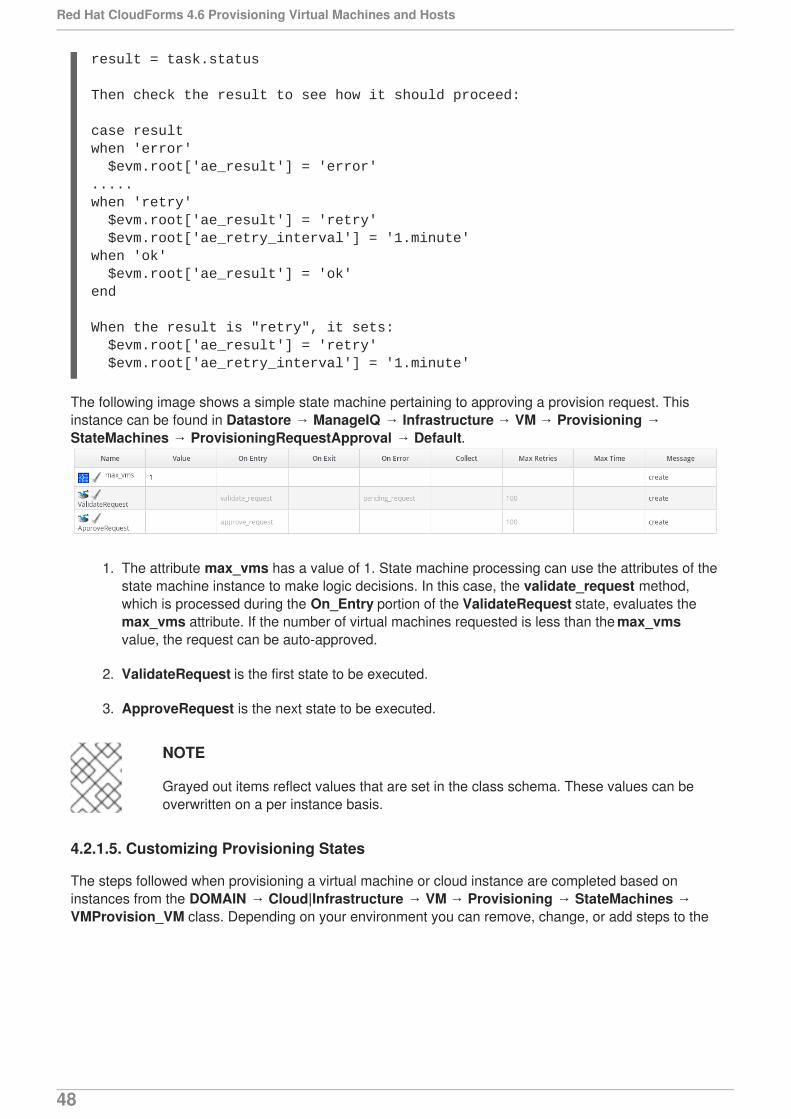
result = task.status
Then check the result to see how it should proceed:
case resultwhen 'error' $evm.root['ae_result'] = 'error'.....when 'retry' $evm.root['ae_result'] = 'retry' $evm.root['ae_retry_interval'] = '1.minute'when 'ok' $evm.root['ae_result'] = 'ok'end
When the result is "retry", it sets: $evm.root['ae_result'] = 'retry' $evm.root['ae_retry_interval'] = '1.minute'
The following image shows a simple state machine pertaining to approving a provision request. Thisinstance can be found in Datastore → ManageIQ → Infrastructure → VM → Provisioning →StateMachines → ProvisioningRequestApproval → Default.
1. The attribute max_vms has a value of 1. State machine processing can use the attributes of thestate machine instance to make logic decisions. In this case, the validate_request method,which is processed during the On_Entry portion of the ValidateRequest state, evaluates themax_vms attribute. If the number of virtual machines requested is less than the max_vmsvalue, the request can be auto-approved.
2. ValidateRequest is the first state to be executed.
3. ApproveRequest is the next state to be executed.
NOTE
Grayed out items reflect values that are set in the class schema. These values can beoverwritten on a per instance basis.
4.2.1.5. Customizing Provisioning States
The steps followed when provisioning a virtual machine or cloud instance are completed based oninstances from the DOMAIN → Cloud|Infrastructure → VM → Provisioning → StateMachines →VMProvision_VM class. Depending on your environment you can remove, change, or add steps to the
Red Hat CloudForms 4.6 Provisioning Virtual Machines and Hosts
48

provisioning process. For example, if you are not integrating with IPAM or a CMDB, then you canremove those execution steps.
4.2.1.6. Editing the Default State Instance
1. Navigate to Automate → Explorer.
2. From the accordion menu, click DOMAIN → Cloud → VM → Provisioning → StateMachines→ VMProvision_VM.
NOTE
DOMAIN must be a user-defined Domain and not the locked ManageIQ Domain.If necessary, you can copy the class from the ManageIQ domain into a customdomain.
This example uses the Cloud Namespace, but can also use the Infrastructurenamespace.
3. Click (Configuration), then (Edit this instance).
4. For each step that you want to remove, clear the entries in the Value, On Entry, On Exit, andOn Error columns.
CHAPTER 4. FULFILLING REQUESTS
49
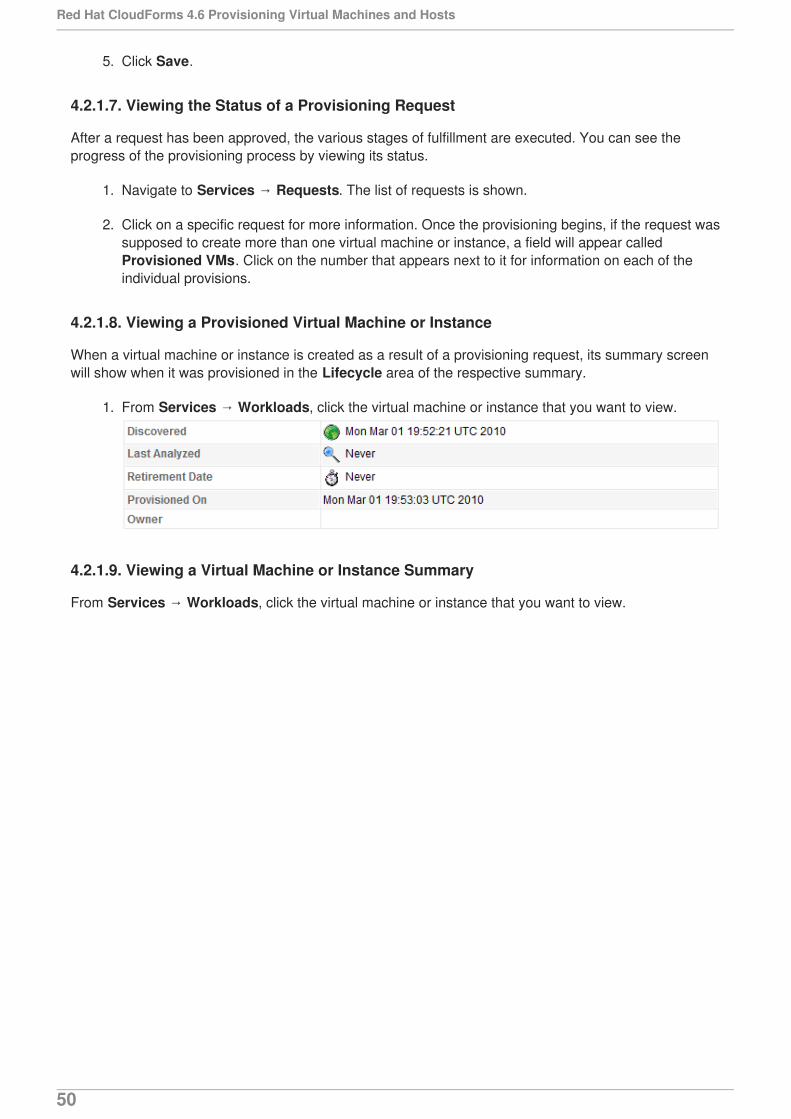
5. Click Save.
4.2.1.7. Viewing the Status of a Provisioning Request
After a request has been approved, the various stages of fulfillment are executed. You can see theprogress of the provisioning process by viewing its status.
1. Navigate to Services → Requests. The list of requests is shown.
2. Click on a specific request for more information. Once the provisioning begins, if the request wassupposed to create more than one virtual machine or instance, a field will appear calledProvisioned VMs. Click on the number that appears next to it for information on each of theindividual provisions.
4.2.1.8. Viewing a Provisioned Virtual Machine or Instance
When a virtual machine or instance is created as a result of a provisioning request, its summary screenwill show when it was provisioned in the Lifecycle area of the respective summary.
1. From Services → Workloads, click the virtual machine or instance that you want to view.
4.2.1.9. Viewing a Virtual Machine or Instance Summary
From Services → Workloads, click the virtual machine or instance that you want to view.
Red Hat CloudForms 4.6 Provisioning Virtual Machines and Hosts
50
CHAPTER 5. CATALOGS AND SERVICESThrough the use of catalogs, Red Hat CloudForms provides support for multi-tier service provisioning todeploy layered workloads across hybrid environments. You can create customized dialogs that will giveconsumers of the services the ability to input just a few parameters and provision the entire service. Thefollowing table lists the terminology associated with catalogs that you will use within the CloudFormsuser interface for service provisioning.
Table 5.1. Terminology
Type Information
Catalog Bundle A group of templates.
Catalog Item A single template.
Template A template is a copy of a preconfigured virtual machine,designed to capture the installed software and softwareconfigurations, as well as the hardware configuration of theoriginal virtual machine.
Dialog Tabs Part of a service dialog.
Element An item on a tab in a dialog. It can be a button, check box, dropdown list, radio button, tag control, text area box, or a text box.
Provisioning Dialogs Dialogs created for host provisioning, virtual machine migration,or virtual machine provisioning. The dialog name must be addedto the appropriate provision instance to be processed.
Service Catalog A catalog item or catalog bundle that is available forprovisioning.
Service Dialogs Made up of fully customizable tabs, items, and values for usewith service provisioning.
5.1. GENERIC OBJECTS
Generic Objects are object-like entities, defined at runtime, that have unique names and user-definedattributes and relationships. Residing in the Automate Engine datastore, generic objects are designed tomanage objects other than those related to private infrastructure, and public or private cloud providers.
Using automate requests, services and catalog items, generic objects can be directly accessed orpassed, during any step, as a parameter to a service state machine. As a result, generic objects can beused to quickly add the capability to provision and collect data on resources not supported by Red HatCloudForms.
CHAPTER 5. CATALOGS AND SERVICES
51

NOTE
Outside of the Red Hat CloudForms user interface, Red Hat Marketing may refer toDynamic Resource Objects when referencing the features and applications of genericobjects.
5.1.1. Viewing Generic Objects Classes
View a list of generic objects and click through to see detailed summary information for each object.
1. Navigate to Automate → Generic Objects.
2. Click on a generic object class in the table to view its summary information.
5.1.2. Creating Generic Objects Classes
Model a new resource by creating a generic object class and adding it to your Red Hat CloudFormsinventory. Each generic object class can have attributes, associations, and methods. Once created,generic object classes are visible to users of the Self Service user interface at the resource level.
Create a generic object class using the following steps:
1. Navigate to Automation → Automate → Generic Objects.
2. Click (Configuration), then click (Add a New Generic Object Class).
3. Provide a Name and Description for the new object class.
4. In the Attributes field, enter a Name and choose a Type from the drop-down list. Click the button to add attributes.
5. Enter a Name and select a Class for the object class’s Associations. Click the button tocreate additional associations.
6. Provide a Name for the Methods. Click the button to add methods.
7. Click Add.
5.1.3. Editing Generic Object Classes
Edit existing generic object classes using the following steps:
1. Navigate to Automation → Automate → Generic Objects.
2. Click on a generic object class in the list view.
3. Click (Configuration), then click (Edit this Generic Object Class).
4. Make required changes to the generic object class fields.
5. Click Save.
Red Hat CloudForms 4.6 Provisioning Virtual Machines and Hosts
52

5.1.4. Removing Generic Objects Classes
Remove generic object classes from your inventory using the following steps:
1. Navigate to Automation → Automate → Generic Objects.
2. Check the generic objects classes from the table to remove.
3. Click (Configuration), then click (Remove selected Generic Object Classes fromInventory).
4. Click OK to confirm.
5.2. SERVICE DIALOGS
When provisioning a service, input will be needed from the requester. Service dialogs are used to takeinput from the user. This input is connected to a method in the Automate model that defines how theusers input is translated into the provision request. Before creating a service dialog, be sure to plan whatitems you need the user to input.
5.2.1. Adding a Service Dialog
IMPORTANT
When creating a service dialog for use with Ansible playbook catalog items,variable elements must use the prefix param_ when assigning the value. Forexample, a new variable labeled key1 should have its value set as param_key1.
Using Ansible playbooks to populate dynamic dialog fields is not recommendeddue to delay times caused by the overhead of interaction between systems.
If you add the playbook automate method to a service dialog, only users withadmin privileges can run the dialog.
1. Navigate to Automation → Automate → Customization.
2. Click the Service Dialogs accordion.
3. Click (Configuration), and then (Add a new Dialog).
4. In Dialog Information, enter a Label and Description. Check the boxes for the buttons youwant available at the bottom of the dialog form. The description will appear as hover text.As you enter the Label of the dialog, it should appear in the Dialog pane on the left.
a. Click (Add), then (Add a New Tab to this Dialog).
b. Enter a Label and Description for this tab.As you enter the Label of the tab, it should appear in the Dialog pane on the left under thedialog you are creating.
c. Click (Add), then (Add a New Box to this Tab).
CHAPTER 5. CATALOGS AND SERVICES
53
d. Enter a Label and Description for this box.As you enter the Label of the box, it should appear in the Dialog pane on the left under thetab you are creating.
5. Add an element to this box. Elements are controls that accept input.
a. Click (Add), then (Add a New Element to this Box).
b. Enter a Label, Name, and Description for this element.
IMPORTANT
Name must use only alphanumeric characters and underscores withoutspaces. It is also used to retrieve the value of this element in the methodused with the dialog and must start with dialog_service_type
c. Select a Type for an element type. All Type options have a Required and Default Valuefield. Check Required or set Required to true if the element is required to proceed. Youcan also specify a default value. The rest of the options presented are based on which typeof element you select.
Element Types Additional Info
Check Box Check Default Value if you want this check box checkedby default.
Date Control Use Date Control to create a field where users canselect a date. If you want users to be able to select adate and time, use the Date/Time Control option.
Date/Time Control Use Date/Time Control to create a field where userscan select a date and time. Only one Date Control orDate/Time Control element can be present in a dialog.
Drop Down Dynamic List Use Drop Down Dynamic List if you want the listoptions to be created using automate methods. UseEntry Point (NS/Cls/Inst) to select an automateinstance. Check Show Refresh Button to allow users torefresh the list options manually.
Radio Button This element type serves the same purpose as DropDown List but displays options using radio buttons.
Tag Control Select a Category of tags you want assigned to thevirtual machines associated with this service dialog.Check Single Select if only one tag can be selected.
Text Area Box Provides text area for users to enter some text. You canalso leave a message to users by typing in the DefaultValue field or leave it as blank.
Red Hat CloudForms 4.6 Provisioning Virtual Machines and Hosts
54
Text Box This element type serves the same purpose as TextArea Box with the option to check Protected so the textis shown as asterisks (*), instead of plain text.
Element Types Additional Info
6. Continue adding the dialog items you need. You can switch between dialogs, tabs, boxes, andelements by selecting their respective labels from the Dialog pane on the left.
7. Click Add. Your dialog should appear in the Service Dialogs accordion.
5.2.2. Adding a Service Dialog Using Dialog Editor
Red Hat CloudForms includes a drag-and-drop service dialog editor to create service dialogs. Theeditor, with its drag-and-drop feature, provides a visual representation of the components that comprisea service dialog. You can easily design your service dialog utilizing dialog tabs, sections (previouslyreferred to as boxes), and elements.
When users access a service, the majority of options available to them are preset and cannot be altered.The requirements for the service determine the options and fields that need to be present in the dialog foruser input. A service dialog exposes some of those options to the user so that even if they are ordering abasic Red Hat Enterprise Linux 7 machine, for example, they can at least choose the amount of memory,virtual CPUs, or other options available to the instance they order. In cases where certain fields must beunique, such as the name of virtual machines in Red Hat Virtualization, users must enter their ownunique name for the virtual machine they choose or the operation will fail, so this field must be exposed.
See Creating a Service in CloudForms for Virtual Machine Provisioning for an example about creating aservice that utilizes a service dialog for provisioning a Red Hat Virtualization virtual machine.
A service dialog contains three components:
One or more Tabs.
Inside the tabs, one or more Sections. Note that in the previous method of creating servicedialogs using the CloudForms user interface, Sections were referred to as Boxes.
Inside the sections, one or more Elements. Elements are controls that accept input. Elementscontain methods, like check boxes, drop-down lists or text fields, to fill in the options on theprovisioning dialog.
IMPORTANT
The names of the elements must correspond to the options used in the provisioningdialog.
1. Navigate to Automation → Automate → Customization.
2. Click the Service Dialogs accordion.
3. Click (Configuration), and then (Add a new Dialog).
CHAPTER 5. CATALOGS AND SERVICES
55
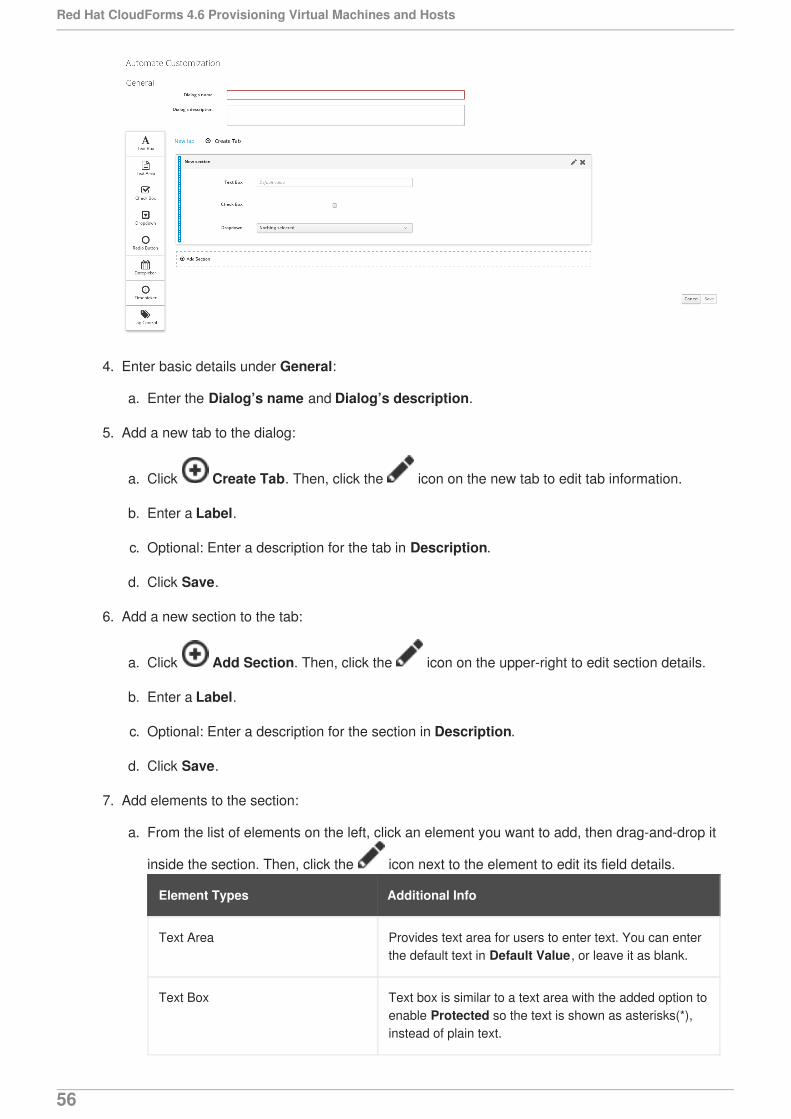
4. Enter basic details under General:
a. Enter the Dialog’s name and Dialog’s description.
5. Add a new tab to the dialog:
a. Click Create Tab. Then, click the icon on the new tab to edit tab information.
b. Enter a Label.
c. Optional: Enter a description for the tab in Description.
d. Click Save.
6. Add a new section to the tab:
a. Click Add Section. Then, click the icon on the upper-right to edit section details.
b. Enter a Label.
c. Optional: Enter a description for the section in Description.
d. Click Save.
7. Add elements to the section:
a. From the list of elements on the left, click an element you want to add, then drag-and-drop it
inside the section. Then, click the icon next to the element to edit its field details.
Element Types Additional Info
Text Area Provides text area for users to enter text. You can enterthe default text in Default Value, or leave it as blank.
Text Box Text box is similar to a text area with the added option toenable Protected so the text is shown as asterisks(*),instead of plain text.
Red Hat CloudForms 4.6 Provisioning Virtual Machines and Hosts
56

Check Box Enable Default Value if you want the box checked bydefault.
Drop Down Use drop down to create list entries either manually orusing automate methods. Enable Dynamic to createlists using automate methods; use Entry Point to selectan automate instance. Enable Show Refresh Button toallow users to refresh list options manually.
Radio Button Similar to a drop down but displays options using radiobuttons.
Datepicker Use this to enable users to pick a date by clicking thecalendar icon.
Timepicker use this to enable users to pick a date and time.
Tag Control Select a Category of tags you want assigned to virtualmachines associated with the service dialog. EnableSingle Select if only one tag can be selected.
Element Types Additional Info
b. Enter a Label, Name, and Description for the element.
IMPORTANT
Element names must correspond to the options used in the provisioningdialog. Name must use only alphanumeric characters and underscoreswithout spaces. It is also used to retrieve the value of this element in themethod used with the dialog and must start with dialog_service_type.
c. Optional: Add additional information in Help to assist the user to complete the fields in theservice dialog. This field is useful for explaining unfamiliar terminology or providingconfiguration tips.
d. Set other options as required.
e. Click Save.
8. Optional: Repeat the above step to add more elements to the existing section, or create and addelements to a new section as required.
9. Optional: Repeat the step to add a new tab to the dialog, and subsequent steps to add sectionsand elements to it as required.
10. Click Save to create the dialog.
The service dialog is now created, and added to the Service Dialogs accordion.
5.2.3. Creating a Service Dialog from a Container Template
CHAPTER 5. CATALOGS AND SERVICES
57
Complete the following procedure to create a Service Dialog from a Container Template.
1. Navigate to Compute → Containers → Container Templates and select the template forprovisioning.
2. Click (Configuration), then (Create Service Dialog from Container Template).
3. Enter a name for the dialog in Service Dialog Name.
4. Click Save.
You can use this service dialog when creating a catalog item for container template provisioning; seeSection 5.4.8, “Creating an OpenShift Template Catalog Item”.
5.2.4. Importing Service Dialogs
You can share service dialogs between appliances using the export and import features.
1. Navigate to Automate → Customization.
2. In the Import/Export accordion, click Service Dialog Import/Export.
3. In the Import area, click Browse to select an import file.
4. Click Upload.
5.2.5. Exporting Service Dialogs
You can share service dialogs between appliances using the export and import features.
1. Navigate to Automate → Customization.
2. In the Import/Export accordion, click Service Dialog Import/Export.
3. In the Export area, select the service dialogs that you want to export.
4. Click Export.
5.3. METHODS
5.3.1. Creating a Method to Associate with the Dialog
You will need to create a method that connects the values in the dialog with the provisioning request.The method should be created in the DOMAIN/Service/Provisioning/StateMachines/ServiceProvision_Template class of theAutomate model.
NOTE
DOMAIN must be a user-defined Domain and not the locked ManageIQ Domain. Ifnecessary, you can copy the class from the ManageIQ domain into a custom domain.
A method is provided below that was created for the following scenario:
Red Hat CloudForms 4.6 Provisioning Virtual Machines and Hosts
58
You want to provision a three-tiered service that contains catalog items of web, app and DB.Each of these virtual machines (or cloud instances) has been tagged under the Service categorywith the appropriate value. Then, added as a catalog item and combined into a catalog bundle.
The Service Dialog captures the selection of small, medium or large application in a dropdowncalled service_type. When referring to a value captured in an element in a dialog, the name ofthe element should be prefixed with dialog_. For example, service_type becomesdialog_service_type when used in the method.
The method will set the memory sizes for each of the catalog items based on the service_typeselection.
# Automate Method#$evm.log("info", "Automate Method ConfigureChildDialog Started")## Method Code Goes here#$evm.log("info", "===========================================")$evm.log("info", "Listing ROOT Attributes:")$evm.root.attributes.sort.each { |k, v| $evm.log("info", "\t#{k}: #{v}")}$evm.log("info", "===========================================")
stp_task = $evm.root["service_template_provision_task"]$evm.log("info", "===========================================")$evm.log("info", "Listing task Attributes:")stp_task.attributes.sort.each { |k, v| $evm.log("info", "\t#{k}: #{v}")}$evm.log("info", "===========================================")
################################################################# This is how the method would look for dialog variables#############################################################dialog_service_type = $evm.root['dialog_service_type']$evm.log("info","User selected Dialog option = [#{dialog_service_type}]")
stp_miq_request_task = stp_task.miq_request_task#$evm.log("info","(parent) miq_request_task: = [#{stp_miq_request_task}]")
################################################################# This is how you get the catalog items for the catalog bundle#############################################################
stp_miq_request_tasks = stp_task.miq_request_tasks#$evm.log("info","(children) miq_request_tasks count: = [#{stp_miq_request_tasks.count}]")
################################################################# By going through the children, you can set the dialog variable for each of the children (we based our values on the childrens service tags)#############################################################
stp_miq_request_tasks.each do |t|
$evm.log("info"," Setting dialog for: #{t.description}") service = t.source
CHAPTER 5. CATALOGS AND SERVICES
59

service_resource = t.service_resource #$evm.log("info"," Child service resource name: #{service_resource.resource_name}") #$evm.log("info"," Child service resource description: #{service_resource.resource_description}")
service_tag_array = service.tags(:app_tier) service_tag = service_tag_array.first.to_s
memory_size = nil
################################################################# The dialog_service_type is the attribute set on the service dialog#### We use the service_tag to decide what child gets what dialog#############################################################
case dialog_service_type when "Small" case service_tag when "app" memory_size = 1024 when "web" memory_size = 1024 when "db" memory_size = 4096 else $evm.log("info","Unknown Dialog type") end when "Large" case service_tag when "app" memory_size = 4096 when "web" memory_size = 4096 when "db" memory_size = 8192 else $evm.log("info","Unknown Dialog type") end else $evm.log("info","Unknown Dialog type - setting Dialog options here") end
################################################################# set_dialog_option sets the dialog for the child#############################################################
t.set_dialog_option('memory',memory_size) unless memory_size.nil? $evm.log("info","Set dialog for selection: [#{dialog_service_type}] Service_Tier: [#{service_tag}] Memory size: [#{memory_size}]")
end##
Red Hat CloudForms 4.6 Provisioning Virtual Machines and Hosts
60
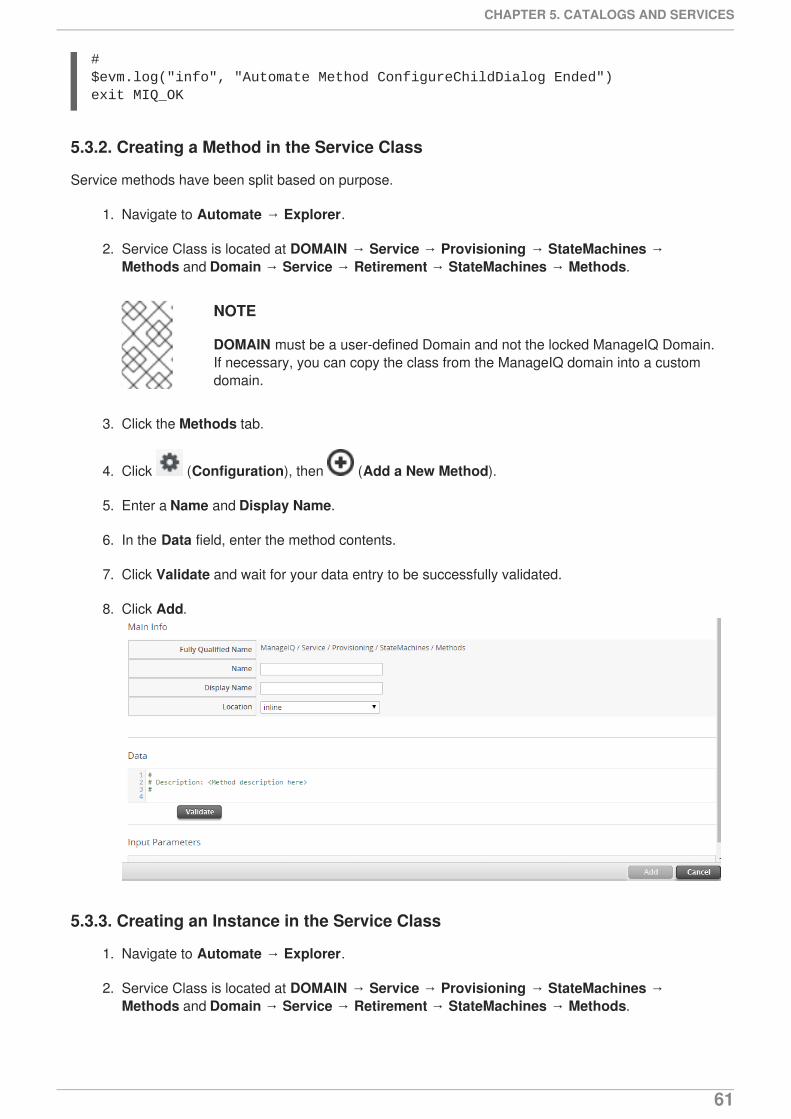
#$evm.log("info", "Automate Method ConfigureChildDialog Ended")exit MIQ_OK
5.3.2. Creating a Method in the Service Class
Service methods have been split based on purpose.
1. Navigate to Automate → Explorer.
2. Service Class is located at DOMAIN → Service → Provisioning → StateMachines →Methods and Domain → Service → Retirement → StateMachines → Methods.
NOTE
DOMAIN must be a user-defined Domain and not the locked ManageIQ Domain.If necessary, you can copy the class from the ManageIQ domain into a customdomain.
3. Click the Methods tab.
4. Click (Configuration), then (Add a New Method).
5. Enter a Name and Display Name.
6. In the Data field, enter the method contents.
7. Click Validate and wait for your data entry to be successfully validated.
8. Click Add.
5.3.3. Creating an Instance in the Service Class
1. Navigate to Automate → Explorer.
2. Service Class is located at DOMAIN → Service → Provisioning → StateMachines →Methods and Domain → Service → Retirement → StateMachines → Methods.
CHAPTER 5. CATALOGS AND SERVICES
61
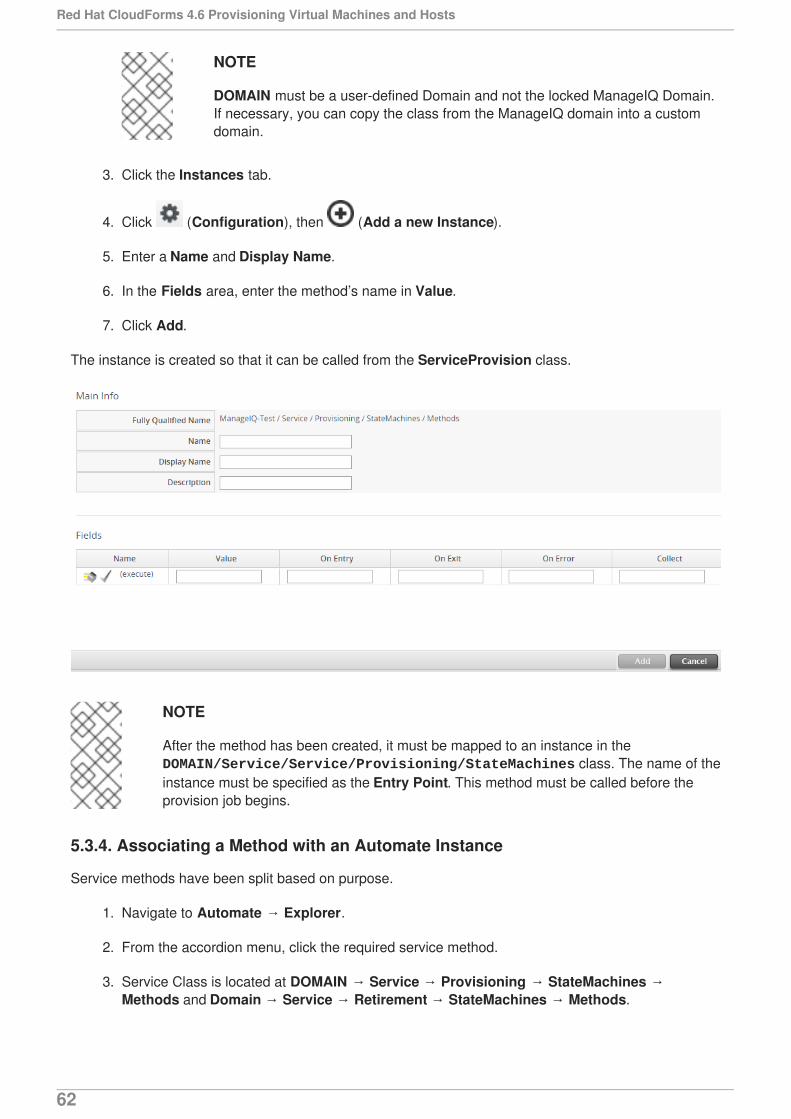
NOTE
DOMAIN must be a user-defined Domain and not the locked ManageIQ Domain.If necessary, you can copy the class from the ManageIQ domain into a customdomain.
3. Click the Instances tab.
4. Click (Configuration), then (Add a new Instance).
5. Enter a Name and Display Name.
6. In the Fields area, enter the method’s name in Value.
7. Click Add.
The instance is created so that it can be called from the ServiceProvision class.
NOTE
After the method has been created, it must be mapped to an instance in the DOMAIN/Service/Service/Provisioning/StateMachines class. The name of theinstance must be specified as the Entry Point. This method must be called before theprovision job begins.
5.3.4. Associating a Method with an Automate Instance
Service methods have been split based on purpose.
1. Navigate to Automate → Explorer.
2. From the accordion menu, click the required service method.
3. Service Class is located at DOMAIN → Service → Provisioning → StateMachines →Methods and Domain → Service → Retirement → StateMachines → Methods.
Red Hat CloudForms 4.6 Provisioning Virtual Machines and Hosts
62
NOTE
DOMAIN must be a user-defined Domain and not the locked ManageIQ Domain.If necessary, you can copy the class from the ManageIQ domain into a customdomain.
4. Either create a new instance or select the clone_to_service instance.
5. Click (Configuration), then (Edit Selected Instance).
6. In the configurechilddialog value, put the path to the method.
7. Click Save or Add if you are adding this to a new instance.
5.4. CATALOGS
Catalogs are used to create groups of virtual machines or instances for provisioning. For example, acomplete package of a database server, desktop with specialized software already on it, and a firewall.You will need to complete the following steps to create and provision a service catalog.
1. Create Catalog Items for each virtual machine or instance that will be part of the service.
2. Create a Service dialog. For example, create a dropdown with three options small, medium, andlarge.
3. Create a method for the Service Dialog. This method defines what each of the options means toeach of the individual virtual machines or cloud instances for the service. This method is calledfrom a service provisioning instance in the Automate model.
4. Create an instance in the DOMAIN/Service/Provisioning/StateMachines/ServiceProvision_Templateclass that calls the method.
NOTE
DOMAIN must be a user-defined Domain and not the locked ManageIQ Domain.If necessary, you can copy the class from the ManageIQ domain into a customdomain.
5. Associate method with Automate instance.
6. Create a Catalog Bundle, adding each of the catalog items to it. Select the Service Dialog youcreated. Use the instance created in the DOMAIN/Service/Provisioning/StateMachines/ServiceProvision_Templateclass as the Entry Point. Check Display in Catalog box.
7. Provision a service.
5.4.1. Creating a Catalog Bundle
1. Navigate to Services → Catalogs.
2. Click the Catalog Items accordion.
CHAPTER 5. CATALOGS AND SERVICES
63
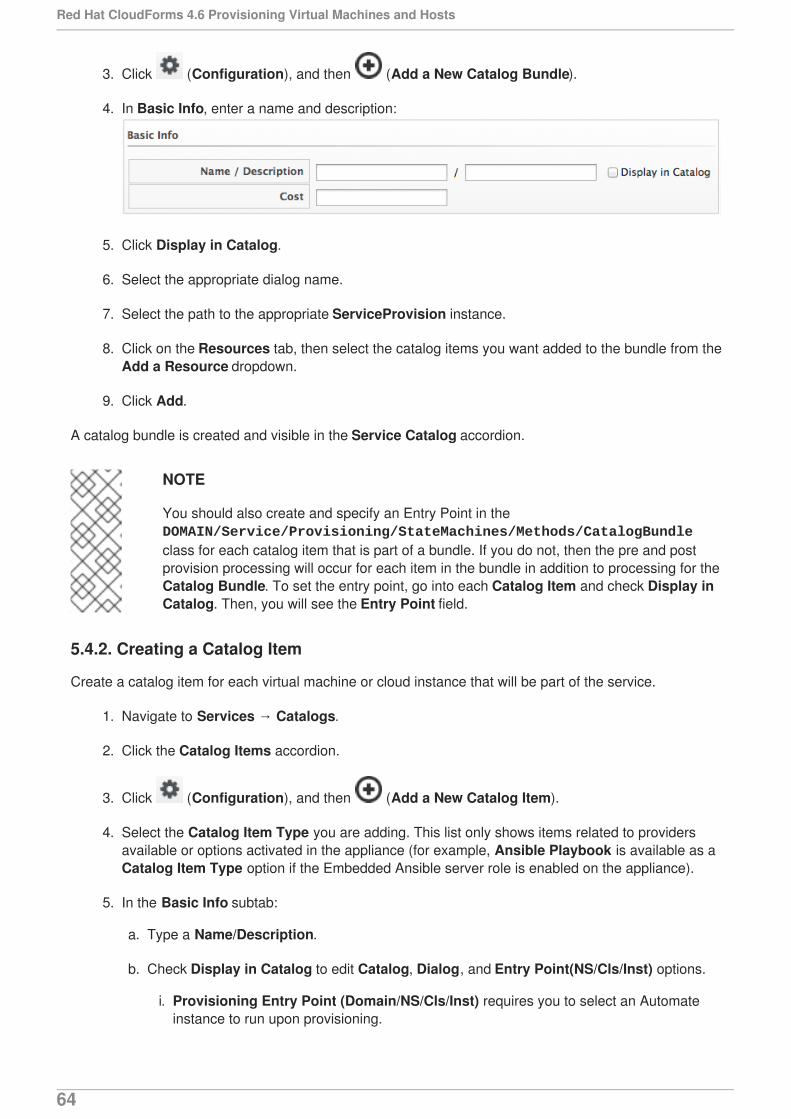
3. Click (Configuration), and then (Add a New Catalog Bundle).
4. In Basic Info, enter a name and description:
5. Click Display in Catalog.
6. Select the appropriate dialog name.
7. Select the path to the appropriate ServiceProvision instance.
8. Click on the Resources tab, then select the catalog items you want added to the bundle from theAdd a Resource dropdown.
9. Click Add.
A catalog bundle is created and visible in the Service Catalog accordion.
NOTE
You should also create and specify an Entry Point in the DOMAIN/Service/Provisioning/StateMachines/Methods/CatalogBundleclass for each catalog item that is part of a bundle. If you do not, then the pre and postprovision processing will occur for each item in the bundle in addition to processing for theCatalog Bundle. To set the entry point, go into each Catalog Item and check Display inCatalog. Then, you will see the Entry Point field.
5.4.2. Creating a Catalog Item
Create a catalog item for each virtual machine or cloud instance that will be part of the service.
1. Navigate to Services → Catalogs.
2. Click the Catalog Items accordion.
3. Click (Configuration), and then (Add a New Catalog Item).
4. Select the Catalog Item Type you are adding. This list only shows items related to providersavailable or options activated in the appliance (for example, Ansible Playbook is available as aCatalog Item Type option if the Embedded Ansible server role is enabled on the appliance).
5. In the Basic Info subtab:
a. Type a Name/Description.
b. Check Display in Catalog to edit Catalog, Dialog, and Entry Point(NS/Cls/Inst) options.
i. Provisioning Entry Point (Domain/NS/Cls/Inst) requires you to select an Automateinstance to run upon provisioning.
Red Hat CloudForms 4.6 Provisioning Virtual Machines and Hosts
64

ii. Retirement Entry Point (Domain/NS/Cls/Inst) requires you to select an Automateinstance to run upon retirement.
NOTE
The entry point must be a State Machine since the Provisioning EntryPoint list is filtered to only show State Machine class instances. No otherentry points will be available from the Provisioning Entry Point field.
NOTE
You can only choose from the catalogs and dialogs you have alreadycreated. If you haven’t done so, leave the values blank and edit later.
6. In the Details subtab, write a Long Description for the catalog item.
7. In the Request Info subtab, select provisioning options that apply to the provider chosen. Formore information, refer to Section 2.8, “Provisioning Virtual Machines” and Section 2.9,“Provisioning Instances”.
8. Click Add.
5.4.3. Creating a Generic Catalog Item
Create generic catalog items for services non-specific to virtualization or cloud environments. Thiscatalog item type can serve a wide array of needs, from creating a vLAN across a network to accessingvirtual machine IP addresses and adding them to a load balancer pool.
1. Navigate to Services → Catalogs.
2. Click the Catalog Items accordion.
3. Click (Configuration), and then (Add a New Catalog Item).
4. Select Generic from the Catalog Item Type list.
5. In the Basic Info subtab:
a. Type a Name/Description.
CHAPTER 5. CATALOGS AND SERVICES
65
a. Type a Name/Description.
b. Check Display in Catalog to display the item in the catalog. A Dialog will be required if youselect Display in Catalog.
c. Choose a Catalog to which to add the new item.
d. Select a Dialog from the available options.
e. Choose a Subtype from the list menu.
f. Add Entry Point(NS/Cls/Inst) options.
i. Provisioning Entry Point (Domain/NS/Cls/Inst) requires you to select an Automateinstance to run upon provisioning.
ii. Retirement Entry Point (Domain/NS/Cls/Inst) requires you to select an Automateinstance to run upon retirement.
NOTE
The entry point must be a State Machine since the Provisioning EntryPoint list is filtered to only show State Machine class instances. No otherentry points will be available from the Provisioning Entry Point field.
6. In the Details subtab, write a Long Description for the catalog item.
7. Click Add.
5.4.4. Creating an Ansible Playbook Service Catalog Item
Create a catalog item that uses an Ansible Playbook to back it.
NOTE
Before creating an Ansible service, at least one repository, one playbook, and onecredential must exist in the Red Hat CloudForms inventory. Check your inventoryand add the appropriate resources before creating an Ansible service. For moreinformation, see Automation Management Providers in Managing Providers.
Debugging verbosity is available for Ansible playbook catalog items. Selecting ahigher verbosity value provides more detailed output as the playbook executes. 0(Normal) is the default value. 1 (Verbose) will yield return data while a value of 3(Debug) provides connection attempt and task invocation details. Higher levels,such as 4 (Connection) can be useful for debugging SSH connections. Use 5(WinRM Debug) when debugging WinRM connections.
Using Ansible playbooks to populate dynamic dialog fields is not recommendeddue to delay times caused by the overhead of interaction between systems.
Only users with administrator privileges can run a service dialog based on aplaybook.
1. Navigate to Services → Catalogs.
2. In the Catalog Items accordion, click on the All Catalog Items.
Red Hat CloudForms 4.6 Provisioning Virtual Machines and Hosts
66
3. Click (Configuration), then (Add a New Catalog Item).
4. Select Ansible Playbook from the Catalog Item Type drop-down list.
5. Type a Name and Description for the new service catalog item.
6. Click Display in Catalog.
7. Select the appropriate Catalog from the drop-down list.
8. In the Provisioning tab, set parameters for your catalog item to use by configuring a Playbookto back your service item:
a. Choose a Repository from the drop-down list.
b. Select the Ansible Playbook to use.
c. Assign the appropriate Machine Credentials from the drop-down list.
d. Add Cloud or Network Credentials from the drop-down lists.
e. Choose the Host against which to run the service item.
f. Set the Max TTL in minutes. The Time To Live (TTL) field allows you to set the maximumexecution time for the playbook to run.
g. Use the Escalate Privilege toggle switch to enable user privilege escalation if called for incredentials during the playbook run.
h. Choose a Verbosity value to set the debug level for playbook execution.
i. Add key value pairs for Variables and their corresponding Default Values.
j. In the Dialog options, choose an existing dialog from the Use Existing drop-down list orselect Create New to add a new dialog.
9. In the Retirement tab, set parameters for your catalog item to use by selecting values for thefollowing:
a. Choose a Repository from the drop-down list.
b. Select the Ansible Playbook to use.
c. Assign the appropriate Machine Credentials from the drop-down list.
d. Add Cloud or Network Credentials from the drop-down lists.
e. Choose the Host against which to run the service item.
f. Set the Max TTL in minutes. The Time To Live (TTL) field allows you to set the maximumexecution time for the playbook to run.
g. Use the Escalate Privilege toggle switch to enable user privilege escalation if called for incredentials during the playbook run.
h. Choose a Verbosity value to set the debug level for playbook execution.
i. Add key value pairs for Variables and their corresponding Default Values.
CHAPTER 5. CATALOGS AND SERVICES
67

j. In the Dialog options, choose an existing dialog from the Use Existing drop-down list orselect Create New to add a new dialog.
10. Click Add.
5.4.5. Creating an Ansible Tower Service Catalog Item
Create a service catalog item from an Ansible Tower template you can use to execute an Ansible Towerplaybook in Red Hat CloudForms.
IMPORTANT
You must first create the job template in Ansible Tower. The job templates areautomatically discovered by CloudForms when refreshing your Ansible Tower provider’sinventory.
First, create a catalog:
1. Navigate to Services → Catalogs.
2. Click (Configuration), then (Add a New Catalog)
3. Enter a Name and Description for the catalog.
4. Click Add.
Then, create an Ansible Tower service catalog item:
1. Navigate to Automation → Ansible Tower → Jobs.
2. Click Ansible Tower Job Templates and select an Ansible Tower job template.
3. Click (Configuration), then (Create Service Dialog from this Job Template).
4. Enter a Service Dialog Name (for example, ansible_tower_job)and click Save.
5. Navigate to Services → Catalogs. Click Catalog Items.
6. Click (Configuration), then (Add a New Catalog Item) to create a new catalog itemwith the following details, at minimum:
For Catalog Item type, select Ansible Tower.
Enter a Name for the service catalog item.
Select Display in Catalog.
In Catalog, select the catalog you created previously.
In Dialog, select the service dialog you created previously (in this example,ansible_tower_job). No Dialog can be selected if the playbook does not require extravariables from the user. To ask the user to enter extra information when running the task,Service Dialog must be selected.
Red Hat CloudForms 4.6 Provisioning Virtual Machines and Hosts
68
In Provider, select your Ansible Tower provider. This brings up the Ansible Tower JobTemplate option and configures the Provisioning Entry Point State Machineautomatically.
Add configuration information for Reconfigure Entry Point and Retirement Entry Point asapplicable.
Select your desired Ansible Tower Job Template from the list. Generally, this is theAnsible Tower job template previously used to create the service dialog.
7. Click Add. The catalog item you created will appear in the All Service Catalog Items list.
5.4.6. Creating an Amazon Service Catalog Item
Use the following procedure to create an Amazon catalog item. Once created, the catalog item andservice dialog combine with all of the options in the provisioning dialog. Users can then order Red HatEnterprise Linux instances from the Service Catalog in the CloudForms Service user interface.
1. Navigate to Services → Catalogs, then click on the Catalog Items accordion.
2. Click (Configuration), then (Add a New Catalog Item).
3. Select Amazon from the Catalog Item Type list.
4. Enter the basic details in the Basic Info tab:
a. Enter a Name and Description for the new service catalog item.
b. Select Display in Catalog.
c. Select the appropriate catalog from the Catalog list.
d. Select the appropriate service dialog from the Dialog list.
5. Click the Request Info tab to enter request details:
a. On the Catalog tab, select your Amazon AWS image name from the Name list, and thenumber of instances from the Count list. The VM Name will be overwritten during theprovisioning process, but you can enter it as changeme for now.
b. On the Properties tab, select T2 Micro from the Instance Type list, and Basic or Advancedfor CloudWatch. If you plan to access the instance, select a Guest Access Key Pair, too.
c. On the Customize tab, set the Root Password under Credentials, then select the Basicroot pass template as a script for cloud-init under Customize Template.
6. Click Add.
5.4.7. Creating an Azure Service Catalog Item
Use the following procedure to create an Azure catalog item.
1. Navigate to Services → Catalogs, then click on the Catalog Items accordion.
2. Click (Configuration), then (Add a New Catalog Item).
CHAPTER 5. CATALOGS AND SERVICES
69
3. Select Azure from the Catalog Item Type list.
4. Enter the basic details in the Basic Info tab:
a. Enter a Name and Description for the new service catalog item.
b. Select Display in Catalog.
c. Select the appropriate catalog from the Catalog list.
d. Select the appropriate service dialog from the Dialog list.
5. Click the Request Info tab to enter request details:
a. On the Catalog tab, select your Azure image name from the Name list, and the number ofinstances from the Count list. The VM Name will be overwritten during the provisioningprocess, but you can enter it as changeme for now.
b. Select appropriate Environment settings that are known to work for your Azureenvironment.
c. On the Customize tab, set the Username and Password under Credentials, then selectthe appropriate script under Customize Template.
6. Click Add.
5.4.8. Creating an OpenShift Template Catalog Item
NOTE
Before adding a new catalog item for container template provisioning, create a servicedialog from a container template. See Section 5.2.3, “Creating a Service Dialog from aContainer Template” for details.
Complete the following procedure to create an OpenShift Template catalog item.
1. Navigate to Services → Catalogs, then click on the Catalog Items accordion.
2. Click (Configuration), then (Add a New Catalog Item).
3. Select OpenShift Template from the Catalog Item Type list.
4. Enter a Name and Description for the new service catalog item. Select Display in Catalog.
5. Select the appropriate catalog from the Catalog list.
6. From the Dialog list, select the service dialog you have created from a container template.
7. Select your provider from the Provider list.
8. Set the Provisioning Entry Point.
9. Click Add.
5.4.9. Creating an Orchestration Catalog Item
Red Hat CloudForms 4.6 Provisioning Virtual Machines and Hosts
70
Use the following procedure to create an Orchestration catalog item.
1. Navigate to Services → Catalogs and select Catalog Items in the accordion menu.
2. Click Configuration, then click Add a New Catalog Item. The Adding a new ServiceCatalog Item window is displayed.
3. Select Orchestration from the Catalog Item Type list.
4. Enter the basic details in the Basic Info:
a. Enter a Name and Description for the new service catalog item.
b. Select Display in Catalog box.
c. Select the appropriate catalog from the Catalog list.
d. Select the appropriate dialog from the Dialog list.
e. Select the Orchestration Template from the list.
5. Click Add.
5.4.10. Provisioning a Service
1. Navigate to Services → Catalogs.
2. Click the Service Catalogs accordion, and select the service to provision.
3. Click Order.
The parameters are passed to the children based on the method tied to the choices made in the dialog.
5.5. ORCHESTRATION STACKS
Cloud orchestration is a service that allows you to create, update, and manage cloud resources and theirsoftware components as a single unit and then deploy them in an automated, repeatable way through atemplate. Templates use a human-readable syntax and can be defined in text files, thereby allowingusers to check them into version control. Templates allow you to easily deploy and reconfigureinfrastructure for applications within your cloud. A user can author the stack templates, or can uploadthem from other sources.
Red Hat CloudForms supports adding Amazon CloudFormation, OpenStack Heat, Microsoft Azure, VNF,and VMware vApp template type, and provides the ability to:
Inventory stacks and elements of each type into the CloudForms VMDB.
Model the relationships of instances to their stacks, inclusive of the user interface. For example,selecting an instance within a region that is within a stack, the user interface shows this on thestandard instance view.
Model the stack and its elements in the user interface.
CHAPTER 5. CATALOGS AND SERVICES
71
NOTE
When importing a template into CloudForms, the selected elements are convertedaccording to their type. For example, lists convert to list boxes, and single items convert totext boxes.
See Service Provisioning in CloudForms Using an Orchestration Template for an example aboutcreating a service in CloudForms for provisioning virtual machine instances using an AWSCloudFormation orchestration template.
5.5.1. Creating an Orchestration Template
Complete the following procedure to add an orchestration template.
1. Navigate to Services → Catalogs and select Orchestration Templates in the accordion menu.
2. Click Configuration, then click Create a new Orchestration Template.
3. Enter a Name and Description for your template.
4. Select the template type from the Template Type list. The default is Amazon CloudFormation.
5. Select Draft to create a draft template.
6. Add your template in the area below for the selected Template Type.
7. Click Add.
5.5.2. Editing Orchestration Templates
Complete the following procedure to edit orchestration templates.
1. Navigate to Services → Catalogs and select Orchestration Templates in the accordion menu.
2. Select the orchestration template you want to edit from the All Orchestration Templates list.
3. Click Configuration, then click Edit this Orchestration Template.
4. Edit the template as needed.
NOTE
You can only edit the name and description of a read-only template as there canbe stacks associated with the template.
5. Click Save.
5.5.3. Copying Orchestration Templates
Complete the following procedure to copy an orchestration template to create a new template.
1. Navigate to Services → Catalogs and select Orchestration Templates in the accordion menu.
Red Hat CloudForms 4.6 Provisioning Virtual Machines and Hosts
72
2. Click Configuration, then click Copy this Orchestration Template.
3. Change the Description and the actual content of the template as required. CloudFormsautomatically prefixes Copy of to the old template Name.
NOTE
To create a copy of an orchestration template into a new template, the old andnew template content must differ.
4. Click Add.
5.5.4. Deleting Orchestration Templates
Complete the following procedure to delete orchestration templates.
1. Navigate to Services → Catalogs and select Orchestration Templates in the accordion menu.
2. Select the orchestration template you want to delete from the All Orchestration Templates list.
3. Click Configuration, then click Remove this Orchestration Template fromInventory.
4. Click OK.
NOTE
Read-only templates cannot be deleted.
CHAPTER 5. CATALOGS AND SERVICES
73
CHAPTER 6. RETIREMENT
6.1. RETIRING VIRTUAL MACHINES
6.1.1. Retiring Virtual Machines and Instances
When a virtual machine or instance is no longer required, it can be retired. Once a virtual machine orinstance reaches its retirement date, it is immediately shut down and not allowed to restart. If an attemptto restart is made, Red Hat CloudForms will shut down the virtual machine or instance.
There are three built-in policies involved with retirement:
If the virtual machine or instance reaches its retirement date, it will be stopped even if it isrunning.
If a retired virtual machine or instance is requested to start through Red Hat CloudForms, thevirtual machine or instance will not be allowed to start.
If a provider starts a retired virtual machine or instance outside of Red Hat CloudForms, thevirtual machine or instance will be stopped.
Red Hat CloudForms provides a number of ways to retire a virtual machine or instance:
By using the allocated buttons in the Red Hat CloudForms console.
When creating a provision request, a retirement date can be set up.
6.1.2. Using the Console to Retire a Virtual Machine
Through the Red Hat CloudForms console, you can retire a virtual machine on a specific date orimmediately.
6.1.3. Retiring a Virtual Machine Immediately
1. Navigate to Compute → Infrastructure → Virtual Machines.
2. Select the virtual machine or instance that you want to retire.
3. Click (Lifecycle), then (Retire this VM/Instance).
The virtual machine or instance is immediately stopped, and will be shut down if an attempt is made torestart it.
6.1.4. Setting a Retirement Date and Time for a Virtual Machine or Instance
You can schedule virtual machine retirement by specifying a date and time, or by selecting a relativetime a number of months, weeks, days or hours ahead of the present time.
1. Navigate to Compute → Infrastructure → Virtual Machines.
2. Select the virtual machine or instance that you want to set a retirement date for.
3. Click (Lifecycle), then (Set Retirement Dates).
Red Hat CloudForms 4.6 Provisioning Virtual Machines and Hosts
74
4. From Enter Retirement Date as, select Specific Date and Time or Time Delay from Now toschedule retirement.
a. To choose a Specific Date and Time, click the Retirement Date and Time field to open thecalendar.
i. Select a retirement date using the calendar control.
ii. Click then select a retirement time (in UTC) using the arrows.
b. To retire the virtual machine using a relative time, select Time Delay from Now.
i. From Time Delay, specify a retirement time any number of months, weeks, days, orhours in the future using the arrows.
5. Select a Retirement Warning if desired.
6. Click Save.
The scheduled retirement date and time display in the virtual machine summary screen.
6.1.5. Removing a Retirement Date for a Virtual Machine or Instance
1. Navigate to Compute → Infrastructure → Virtual Machines.
2. Select the virtual machine or instance that you want to remove the retirement date from.
3. Click (Lifecycle), then click (Set Retirement Date).
4. Click to remove the retirement date.
6.2. SETTING RETIREMENT IN A PROVISION REQUEST
If you are using Red Hat CloudForms to provision, you can set when you want retirement in the provisionrequest. To see how to create a request, see Chapter 2, Provisioning Requests. A warning email will besent to the owner before the retirement.
6.2.1. Scheduling Retirement in a Provision Request
When provisioning a cloud instance or virtual machine, a multi-tabbed screen appears where you canset up your provision requests.
1. Click the Schedule tab to set when to provision your request and the lifespan of the virtualmachine or instance.
2. In Lifespan, you can choose to power on the virtual machines or instances after creation and setthe Time until Retirement. If you select the time until retirement, you will select RetirementWarning accordingly.
3. Click Submit.
CHAPTER 6. RETIREMENT
75

6.3. EXTENDING RETIREMENT DATES
Red Hat CloudForms Automate includes a method to extend the retirement of a virtual machine orinstance by 14 days. This section describes how to create a button that invokes this method and how toedit the method to change the number of days.
6.3.1. Creating a Custom Button to Extend Retirement
1. Navigate to Automate → Customization.
2. Click the Buttons accordion.
3. From the Object Types tree, select VM and Instance.
4. Navigate to the button group to which you want to add this button. (If you do not have a buttongroup, add one and then create the button.)
5. Click (Configuration), then (Add a new Button).
6. Type in a button text and button hover text, and select the image you want to use.
7. In Object Details, select Request from the /System/Process/ dropdown. By default, themessage is create. Do not change it.
8. In Request, type vm_retire_extend.
9. Click Add.
6.3.2. Changing the Number of Days to Extend Retirement
1. Navigate to Automate → Explorer.
2. Click DOMAIN → Cloud → VM → Retirement → Email → vm_retire_extend.
Red Hat CloudForms 4.6 Provisioning Virtual Machines and Hosts
76
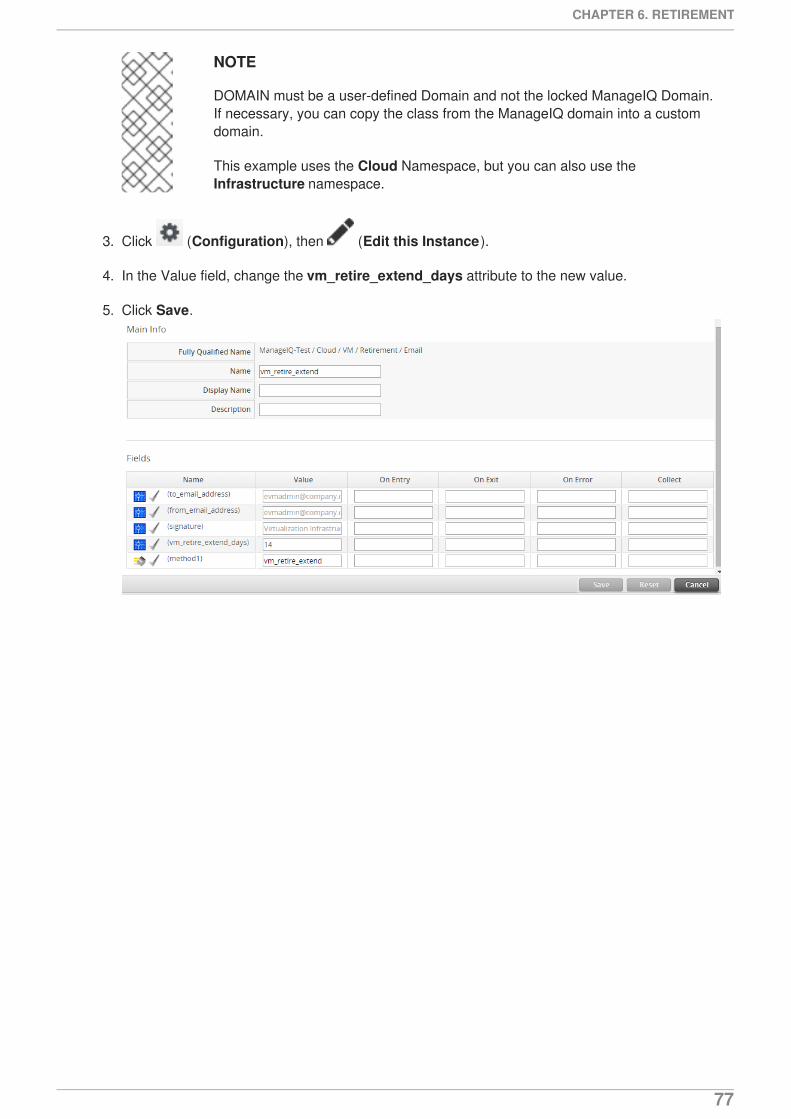
NOTE
DOMAIN must be a user-defined Domain and not the locked ManageIQ Domain.If necessary, you can copy the class from the ManageIQ domain into a customdomain.
This example uses the Cloud Namespace, but you can also use theInfrastructure namespace.
3. Click (Configuration), then (Edit this Instance).
4. In the Value field, change the vm_retire_extend_days attribute to the new value.
5. Click Save.
CHAPTER 6. RETIREMENT
77