red hat enterprise linux 6 fence configuration guide7/centos 6 doc/red_… · scsi persistent...
TRANSCRIPT
Red Hat Enterprise Linux 6Fence Configuration Guide
Configuring and Managing Fence Devices for the High Availability Add-On


Red Hat Enterprise Linux 6 Fence Configurat ion Guide
Configuring and Managing Fence Devices for the High Availability Add-On
.

Legal Notice
Copyright © 2014 Red Hat, Inc. and o thers.
This document is licensed by Red Hat under the Creative Commons Attribution-ShareAlike 3.0Unported License. If you distribute this document, o r a modified version o f it, you must provideattribution to Red Hat, Inc. and provide a link to the original. If the document is modified, all RedHat trademarks must be removed.
Red Hat, as the licensor o f this document, waives the right to enforce, and agrees not to assert,Section 4d o f CC-BY-SA to the fullest extent permitted by applicable law.
Red Hat, Red Hat Enterprise Linux, the Shadowman logo, JBoss, MetaMatrix, Fedora, the InfinityLogo, and RHCE are trademarks o f Red Hat, Inc., registered in the United States and o thercountries.
Linux ® is the registered trademark o f Linus Torvalds in the United States and o ther countries.
Java ® is a registered trademark o f Oracle and/or its affiliates.
XFS ® is a trademark o f Silicon Graphics International Corp. or its subsidiaries in the UnitedStates and/or o ther countries.
MySQL ® is a registered trademark o f MySQL AB in the United States, the European Union andother countries.
Node.js ® is an o fficial trademark o f Joyent. Red Hat Software Collections is not fo rmallyrelated to or endorsed by the o fficial Joyent Node.js open source or commercial pro ject.
The OpenStack ® Word Mark and OpenStack Logo are either registered trademarks/servicemarks or trademarks/service marks o f the OpenStack Foundation, in the United States and o thercountries and are used with the OpenStack Foundation's permission. We are not affiliated with,endorsed or sponsored by the OpenStack Foundation, or the OpenStack community.
All o ther trademarks are the property o f their respective owners.
AbstractFencing is the disconnection o f a node from the cluster's shared storage. Fencing cuts o ff I/Ofrom shared storage, thus ensuring data integrity. This manual documents the configuration o ffencing on clustered systems using High Availability Add-On and details the configuration o fsupported fence devices.
. . . . . . . . . . . . . . . . . . . . . . . . . . . . . . . . . . . . . . . . . . . . . . . . . . . . . . . . . . . . . . . . . . . . . . . . . . . . . . . . . . . . . . . . . . . . . . . . . . . . . . . . . . . . . . . . . . . . . . . . . . . . . . . . . . . . . . . . . . . . . . . . . . . . . . . . . . . . . . . . . . . . . . . . . . . . . . . . . . . . . . . . . . . . . . . . . . . . . . . . . . . . . . . . . . . . . . . . . . . . . . . . . . . . . . . . . . . . . . . . . . . . . . . . . . . . . . . . . . . . . . . . . . . . . . . . . . . . . . . .
. . . . . . . . . . . . . . . . . . . . . . . . . . . . . . . . . . . . . . . . . . . . . . . . . . . . . . . . . . . . . . . . . . . . . . . . . . . . . . . . . . . . . . . . . . . . . . . . . . . . . . . . . . . . . . . . . . . . . . . . . . . . . . . . . . . . . . . . . . . . . . . . . . . . . . . . . . . . . . . . . . . . . . . . . . . . . . . . . . . . . . . . . . . . . . . . . . . . . . . . . . . . . . . . . . . . . . . . . . . . . . . . . . . . . . . . . . . . . . . . . . . . . . . . . . . . . . . . . . . . . . . . . . . . . . . . . . . . . . . .
. . . . . . . . . . . . . . . . . . . . . . . . . . . . . . . . . . . . . . . . . . . . . . . . . . . . . . . . . . . . . . . . . . . . . . . . . . . . . . . . . . . . . . . . . . . . . . . . . . . . . . . . . . . . . . . . . . . . . . . . . . . . . . . . . . . . . . . . . . . . . . . . . . . . . . . . . . . . . . . . . . . . . . . . . . . . . . . . . . . . . . . . . . . . . . . . . . . . . . . . . . . . . . . . . . . . . . . . . . . . . . . . . . . . . . . . . . . . . . . . . . . . . . . . . . . . . . . . . . . . . . . . . . . . . . . . . . . . . . . .
. . . . . . . . . . . . . . . . . . . . . . . . . . . . . . . . . . . . . . . . . . . . . . . . . . . . . . . . . . . . . . . . . . . . . . . . . . . . . . . . . . . . . . . . . . . . . . . . . . . . . . . . . . . . . . . . . . . . . . . . . . . . . . . . . . . . . . . . . . . . . . . . . . . . . . . . . . . . . . . . . . . . . . . . . . . . . . . . . . . . . . . . . . . . . . . . . . . . . . . . . . . . . . . . . . . . . . . . . . . . . . . . . . . . . . . . . . . . . . . . . . . . . . . . . . . . . . . . . . . . . . . . . . . . . . . . . . . . . . . .
. . . . . . . . . . . . . . . . . . . . . . . . . . . . . . . . . . . . . . . . . . . . . . . . . . . . . . . . . . . . . . . . . . . . . . . . . . . . . . . . . . . . . . . . . . . . . . . . . . . . . . . . . . . . . . . . . . . . . . . . . . . . . . . . . . . . . . . . . . . . . . . . . . . . . . . . . . . . . . . . . . . . . . . . . . . . . . . . . . . . . . . . . . . . . . . . . . . . . . . . . . . . . . . . . . . . . . . . . . . . . . . . . . . . . . . . . . . . . . . . . . . . . . . . . . . . . . . . . . . . . . . . . . . . . . . . . . . . . . . .
Table of Contents
Preface1. Do cument Co nventio ns1.1. Typ o g rap hic Co nventio ns1.2. Pull-q uo te Co nventio ns1.3. No tes and Warning s
2. Getting Help and G iving Feed b ack2.1. Do Yo u Need Help ?2.2. We Need Feed b ack!
Chapt er 1 . Fencing Pre- Configurat ion1.1. Co nfig uring ACPI Fo r Use with Integ rated Fence Devices1.1.1. Disab ling ACPI So ft-O ff with chkco nfig Manag ement1.1.2. Disab ling ACPI So ft-O ff with the BIOS1.1.3. Disab ling ACPI Co mp letely in the g rub .co nf File
Chapt er 2 . Configuring Fencing wit h t he ccs Command2.1. Co nfig uring Fence Devices2.2. Lis ting Fence Devices and Fence Device Op tio ns2.3. Co nfig uring Fencing fo r Cluster Memb ers2.3.1. Co nfig uring a Sing le Po wer-Based Fence Device fo r a No d e2.3.2. Co nfig uring a Sing le Sto rag e-Based Fence Device fo r a No d e2.3.3. Co nfig uring a Backup Fence Device2.3.4. Co nfig uring a No d e with Red und ant Po wer2.3.5. Testing the Fence Co nfig uratio n2.3.6 . Remo ving Fence Metho d s and Fence Instances
Chapt er 3. Configuring Fencing wit h Conga3.1. Co nfig uring Fence Daemo n Pro p erties3.2. Co nfig uring Fence Devices3.2.1. Creating a Fence Device3.2.2. Mo d ifying a Fence Device3.2.3. Deleting a Fence Device
3.3. Co nfig uring Fencing fo r Cluster Memb ers3.3.1. Co nfig uring a Sing le Fence Device fo r a No d e3.3.2. Co nfig uring a Backup Fence Device3.3.3. Co nfig uring a No d e with Red und ant Po wer3.3.4. Testing the Fence Co nfig uratio n
Chapt er 4 . Fence Devices4.1. APC Po wer Switch o ver Telnet and SSH4.2. APC Po wer Switch o ver SNMP4.3. Bro cad e Fab ric Switch4.4. Cisco MDS4.5. Cisco UCS4.6 . Dell Drac 54.7. Eato n Netwo rk Po wer Switch4.8 . Eg enera Blad eFrame4.9 . ePo werSwitch4.10 . Fence kd ump4.11. Fence Virt4.12. Fujitsu-Siemens Remo teView Service Bo ard (RSB)4.13. Hewlett-Packard Blad eSystem4.14. Hewlett-Packard iLO
33345556
7788
10
1 2121416161720232526
2 727272829292930303132
343537394144454850515353545658
T able of Cont ent s
1

. . . . . . . . . . . . . . . . . . . . . . . . . . . . . . . . . . . . . . . . . . . . . . . . . . . . . . . . . . . . . . . . . . . . . . . . . . . . . . . . . . . . . . . . . . . . . . . . . . . . . . . . . . . . . . . . . . . . . . . . . . . . . . . . . . . . . . . . . . . . . . . . . . . . . . . . . . . . . . . . . . . . . . . . . . . . . . . . . . . . . . . . . . . . . . . . . . . . . . . . . . . . . . . . . . . . . . . . . . . . . . . . . . . . . . . . . . . . . . . . . . . . . . . . . . . . . . . . . . . . . . . . . . . . . . . . . . . . . . . .
. . . . . . . . . . . . . . . . . . . . . . . . . . . . . . . . . . . . . . . . . . . . . . . . . . . . . . . . . . . . . . . . . . . . . . . . . . . . . . . . . . . . . . . . . . . . . . . . . . . . . . . . . . . . . . . . . . . . . . . . . . . . . . . . . . . . . . . . . . . . . . . . . . . . . . . . . . . . . . . . . . . . . . . . . . . . . . . . . . . . . . . . . . . . . . . . . . . . . . . . . . . . . . . . . . . . . . . . . . . . . . . . . . . . . . . . . . . . . . . . . . . . . . . . . . . . . . . . . . . . . . . . . . . . . . . . . . . . . . . .
4.14. Hewlett-Packard iLO4.15. Hewlett-Packard iLO MP4.16 . IBM Blad eCenter4.17. IBM Blad eCenter o ver SNMP4.18 . IBM iPDU4.19 . IF-MIB4.20 . Intel Mo d ular4.21. IPMI o ver LAN4.22. RHEV-M REST API4.23. SCSI Pers istent Reservatio ns4.24. VMWare o ver SOAP API4.25. WTI Po wer Switch
Revision Hist ory
Index
586 06 26 46 76 972747677798 1
8 4
8 4
Red Hat Ent erprise Linux 6 Fence Configurat ion Guide
2

Preface
1. Document Convent ions
This manual uses several conventions to highlight certain words and phrases and draw attention tospecific pieces of information.
1.1. T ypographic Convent ions
Four typographic conventions are used to call attention to specific words and phrases. Theseconventions, and the circumstances they apply to, are as follows.
Mono-spaced Bold
Used to highlight system input, including shell commands, file names and paths. Also used tohighlight keys and key combinations. For example:
To see the contents of the file my_next_bestselling_novel in your currentworking directory, enter the cat my_next_bestselling_novel command at theshell prompt and press Enter to execute the command.
The above includes a file name, a shell command and a key, all presented in mono-spaced bold andall distinguishable thanks to context.
Key combinations can be distinguished from an individual key by the plus sign that connects eachpart of a key combination. For example:
Press Enter to execute the command.
Press Ctrl+Alt+F2 to switch to a virtual terminal.
The first example highlights a particular key to press. The second example highlights a keycombination: a set of three keys pressed simultaneously.
If source code is discussed, class names, methods, functions, variable names and returned valuesmentioned within a paragraph will be presented as above, in mono-spaced bold . For example:
File-related classes include filesystem for file systems, file for files, and dir fordirectories. Each class has its own associated set of permissions.
Proport ional Bold
This denotes words or phrases encountered on a system, including application names; dialog-boxtext; labeled buttons; check-box and radio-button labels; menu titles and submenu titles. Forexample:
Choose System → Preferences → Mouse from the main menu bar to launchMouse Preferences . In the Buttons tab, select the Left-handed mouse checkbox and click Close to switch the primary mouse button from the left to the right(making the mouse suitable for use in the left hand).
To insert a special character into a gedit file, choose Applicat ions →Accessories → Character Map from the main menu bar. Next, choose Search →Find… from the Character Map menu bar, type the name of the character in the Search field and click Next. The character you sought will be highlighted in the
Preface
3
Character Table. Double-click this highlighted character to place it in the Text to copy field and then click the Copy button. Now switch back to your documentand choose Edit → Paste from the gedit menu bar.
The above text includes application names; system-wide menu names and items; application-specificmenu names; and buttons and text found within a GUI interface, all presented in proportional boldand all distinguishable by context.
Mono-spaced Bold Italic or Proportional Bold Italic
Whether mono-spaced bold or proportional bold, the addition of italics indicates replaceable orvariable text. Italics denotes text you do not input literally or displayed text that changes dependingon circumstance. For example:
To connect to a remote machine using ssh, type ssh [email protected] at ashell prompt. If the remote machine is example.com and your username on thatmachine is john, type ssh [email protected].
The mount -o remount file-system command remounts the named file system.For example, to remount the /home file system, the command is mount -o remount /home.
To see the version of a currently installed package, use the rpm -q packagecommand. It will return a result as follows: package-version-release.
Note the words in bold italics above: username, domain.name, file-system, package, version andrelease. Each word is a placeholder, either for text you enter when issuing a command or for textdisplayed by the system.
Aside from standard usage for presenting the title of a work, italics denotes the first use of a new andimportant term. For example:
Publican is a DocBook publishing system.
1.2. Pull-quote Convent ions
Terminal output and source code listings are set off visually from the surrounding text.
Output sent to a terminal is set in mono-spaced roman and presented thus:
books Desktop documentation drafts mss photos stuff svnbooks_tests Desktop1 downloads images notes scripts svgs
Source-code listings are also set in mono-spaced roman but add syntax highlighting as follows:
static int kvm_vm_ioctl_deassign_device(struct kvm *kvm, struct kvm_assigned_pci_dev *assigned_dev){ int r = 0; struct kvm_assigned_dev_kernel *match;
mutex_lock(&kvm->lock);
match = kvm_find_assigned_dev(&kvm->arch.assigned_dev_head, assigned_dev->assigned_dev_id); if (!match) { printk(KERN_INFO "%s: device hasn't been assigned
Red Hat Ent erprise Linux 6 Fence Configurat ion Guide
4
before, " "so cannot be deassigned\n", __func__); r = -EINVAL; goto out; }
kvm_deassign_device(kvm, match);
kvm_free_assigned_device(kvm, match);
out: mutex_unlock(&kvm->lock); return r;}
1.3. Notes and Warnings
Finally, we use three visual styles to draw attention to information that might otherwise be overlooked.
Note
Notes are tips, shortcuts or alternative approaches to the task at hand. Ignoring a note shouldhave no negative consequences, but you might miss out on a trick that makes your life easier.
Important
Important boxes detail things that are easily missed: configuration changes that only apply tothe current session, or services that need restarting before an update will apply. Ignoring abox labeled “ Important” will not cause data loss but may cause irritation and frustration.
Warning
Warnings should not be ignored. Ignoring warnings will most likely cause data loss.
2. Get t ing Help and Giving Feedback
2.1. Do You Need Help?
If you experience difficulty with a procedure described in this documentation, visit the Red HatCustomer Portal at http://access.redhat.com. Through the customer portal, you can:
search or browse through a knowledgebase of technical support articles about Red Hat products.
submit a support case to Red Hat Global Support Services (GSS).
access other product documentation.
Preface
5
Red Hat also hosts a large number of electronic mailing lists for discussion of Red Hat software andtechnology. You can find a list of publicly available mailing lists athttps://www.redhat.com/mailman/listinfo. Click on the name of any mailing list to subscribe to that listor to access the list archives.
2.2. We Need Feedback!
If you find a typographical error in this manual, or if you have thought of a way to make this manualbetter, we would love to hear from you! Please submit a report in Bugzilla: http://bugzilla.redhat.com/against the product Documentat ion.
When submitting a bug report, be sure to mention the manual's identifier: Fence_Configuration_Guide
If you have a suggestion for improving the documentation, try to be as specific as possible whendescribing it. If you have found an error, please include the section number and some of thesurrounding text so we can find it easily.
Red Hat Ent erprise Linux 6 Fence Configurat ion Guide
6
Chapter 1. Fencing Pre-Configuration
This chapter describes tasks to perform and considerations to make before deploying fencing onclusters using Red Hat High Availability Add-On, and consists of the following sections.
Section 1.1, “Configuring ACPI For Use with Integrated Fence Devices”
1.1. Configuring ACPI For Use with Integrated Fence Devices
If your cluster uses integrated fence devices, you must configure ACPI (Advanced Configuration andPower Interface) to ensure immediate and complete fencing.
Note
For the most current information about integrated fence devices supported by Red Hat HighAvailability Add-On, refer to http://www.redhat.com/cluster_suite/hardware/.
If a cluster node is configured to be fenced by an integrated fence device, disable ACPI Soft-Off forthat node. Disabling ACPI Soft-Off allows an integrated fence device to turn off a node immediatelyand completely rather than attempting a clean shutdown (for example, shutdown -h now).Otherwise, if ACPI Soft-Off is enabled, an integrated fence device can take four or more seconds toturn off a node (refer to note that follows). In addition, if ACPI Soft-Off is enabled and a node panicsor freezes during shutdown, an integrated fence device may not be able to turn off the node. Underthose circumstances, fencing is delayed or unsuccessful. Consequently, when a node is fenced withan integrated fence device and ACPI Soft-Off is enabled, a cluster recovers slowly or requiresadministrative intervention to recover.
Note
The amount of time required to fence a node depends on the integrated fence device used.Some integrated fence devices perform the equivalent of pressing and holding the powerbutton; therefore, the fence device turns off the node in four to five seconds. Other integratedfence devices perform the equivalent of pressing the power button momentarily, relying on theoperating system to turn off the node; therefore, the fence device turns off the node in a timespan much longer than four to five seconds.
To disable ACPI Soft-Off, use chkconfig management and verify that the node turns off immediatelywhen fenced. The preferred way to disable ACPI Soft-Off is with chkconfig management: however, ifthat method is not satisfactory for your cluster, you can disable ACPI Soft-Off with one of thefollowing alternate methods:
Changing the BIOS setting to " instant-off" or an equivalent setting that turns off the node withoutdelay
Note
Disabling ACPI Soft-Off with the BIOS may not be possible with some computers.
Chapt er 1 . Fencing Pre- Configurat ion
7

Appending acpi=off to the kernel boot command line of the /boot/grub/grub.conf file
Important
This method completely disables ACPI; some computers do not boot correctly if ACPI iscompletely disabled. Use this method only if the other methods are not effective for yourcluster.
The following sections provide procedures for the preferred method and alternate methods ofdisabling ACPI Soft-Off:
Section 1.1.1, “Disabling ACPI Soft-Off with chkconfig Management” — Preferred method
Section 1.1.2, “Disabling ACPI Soft-Off with the BIOS” — First alternate method
Section 1.1.3, “Disabling ACPI Completely in the grub.conf File” — Second alternate method
1.1.1. Disabling ACPI Soft -Off with chkconfig Management
You can use chkconfig management to disable ACPI Soft-Off either by removing the ACPI daemon(acpid ) from chkconfig management or by turning off acpid .
Note
This is the preferred method of disabling ACPI Soft-Off.
Disable ACPI Soft-Off with chkconfig management at each cluster node as follows:
1. Run either of the following commands:
chkconfig --del acpid — This command removes acpid from chkconfigmanagement.
— OR —
chkconfig --level 2345 acpid off — This command turns off acpid .
2. Reboot the node.
3. When the cluster is configured and running, verify that the node turns off immediately whenfenced.
Note
You can fence the node with the fence_node command or Conga .
1.1.2. Disabling ACPI Soft -Off with the BIOS
The preferred method of disabling ACPI Soft-Off is with chkconfig management (Section 1.1.1,“Disabling ACPI Soft-Off with chkconfig Management” ). However, if the preferred method is noteffective for your cluster, follow the procedure in this section.
Red Hat Ent erprise Linux 6 Fence Configurat ion Guide
8
Note
Disabling ACPI Soft-Off with the BIOS may not be possible with some computers.
You can disable ACPI Soft-Off by configuring the BIOS of each cluster node as follows:
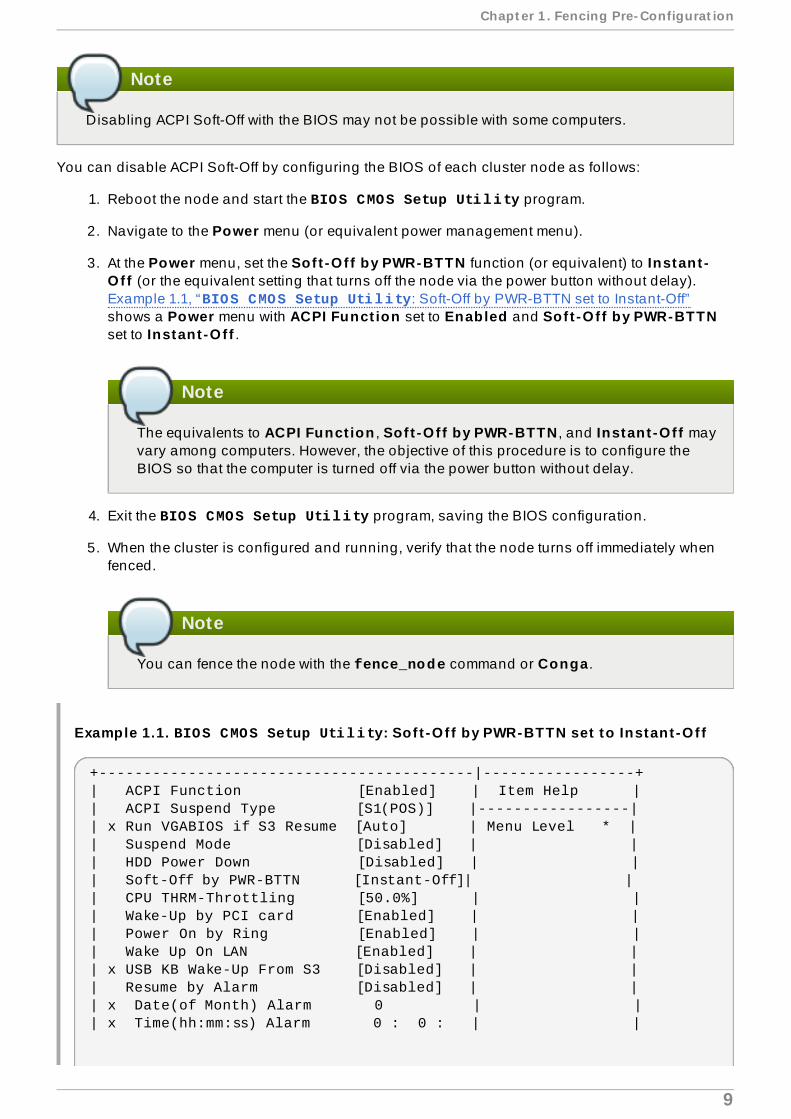
1. Reboot the node and start the BIOS CMOS Setup Utility program.
2. Navigate to the Power menu (or equivalent power management menu).
3. At the Power menu, set the Sof t -O f f by PWR-BTTN function (or equivalent) to Instant -O f f (or the equivalent setting that turns off the node via the power button without delay).Example 1.1, “BIOS CMOS Setup Utility: Soft-Off by PWR-BTTN set to Instant-Off”shows a Power menu with ACPI Funct ion set to Enabled and Sof t -O f f by PWR-BTTNset to Instant -O f f .
Note
The equivalents to ACPI Funct ion , Sof t -O f f by PWR-BTTN , and Instant -O f f mayvary among computers. However, the objective of this procedure is to configure theBIOS so that the computer is turned off via the power button without delay.
4. Exit the BIOS CMOS Setup Utility program, saving the BIOS configuration.
5. When the cluster is configured and running, verify that the node turns off immediately whenfenced.
Note
You can fence the node with the fence_node command or Conga .
Example 1.1. BIOS CMOS Setup Utility: Sof t -O f f by PWR-BTTN set to Instant -O f f
+------------------------------------------|-----------------+| ACPI Function [Enabled] | Item Help || ACPI Suspend Type [S1(POS)] |-----------------|| x Run VGABIOS if S3 Resume [Auto] | Menu Level * || Suspend Mode [Disabled] | || HDD Power Down [Disabled] | || Soft-Off by PWR-BTTN [Instant-Off]| || CPU THRM-Throttling [50.0%] | || Wake-Up by PCI card [Enabled] | || Power On by Ring [Enabled] | || Wake Up On LAN [Enabled] | || x USB KB Wake-Up From S3 [Disabled] | || Resume by Alarm [Disabled] | || x Date(of Month) Alarm 0 | || x Time(hh:mm:ss) Alarm 0 : 0 : | |
Chapt er 1 . Fencing Pre- Configurat ion
9
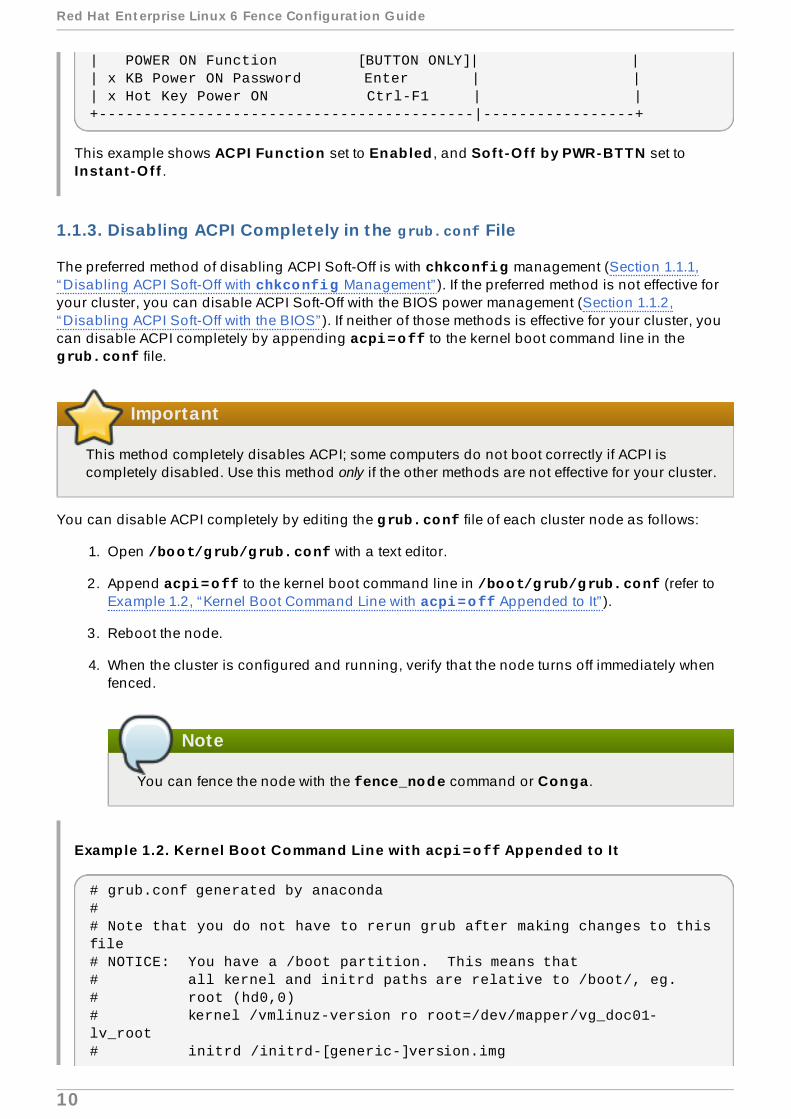
| POWER ON Function [BUTTON ONLY]| || x KB Power ON Password Enter | || x Hot Key Power ON Ctrl-F1 | |+------------------------------------------|-----------------+
This example shows ACPI Funct ion set to Enabled , and Sof t -O f f by PWR-BTTN set toInstant -O f f .
1.1.3. Disabling ACPI Completely in the grub.conf File
The preferred method of disabling ACPI Soft-Off is with chkconfig management (Section 1.1.1,“Disabling ACPI Soft-Off with chkconfig Management” ). If the preferred method is not effective foryour cluster, you can disable ACPI Soft-Off with the BIOS power management (Section 1.1.2,“Disabling ACPI Soft-Off with the BIOS” ). If neither of those methods is effective for your cluster, youcan disable ACPI completely by appending acpi=off to the kernel boot command line in the grub.conf file.
Important
This method completely disables ACPI; some computers do not boot correctly if ACPI iscompletely disabled. Use this method only if the other methods are not effective for your cluster.
You can disable ACPI completely by editing the grub.conf file of each cluster node as follows:
1. Open /boot/grub/grub.conf with a text editor.
2. Append acpi=off to the kernel boot command line in /boot/grub/grub.conf (refer toExample 1.2, “Kernel Boot Command Line with acpi=off Appended to It” ).
3. Reboot the node.
4. When the cluster is configured and running, verify that the node turns off immediately whenfenced.
Note
You can fence the node with the fence_node command or Conga .
Example 1.2. Kernel Boot Command Line with acpi=off Appended to It
# grub.conf generated by anaconda## Note that you do not have to rerun grub after making changes to this file# NOTICE: You have a /boot partition. This means that# all kernel and initrd paths are relative to /boot/, eg.# root (hd0,0)# kernel /vmlinuz-version ro root=/dev/mapper/vg_doc01-lv_root # initrd /initrd-[generic-]version.img
Red Hat Ent erprise Linux 6 Fence Configurat ion Guide
10
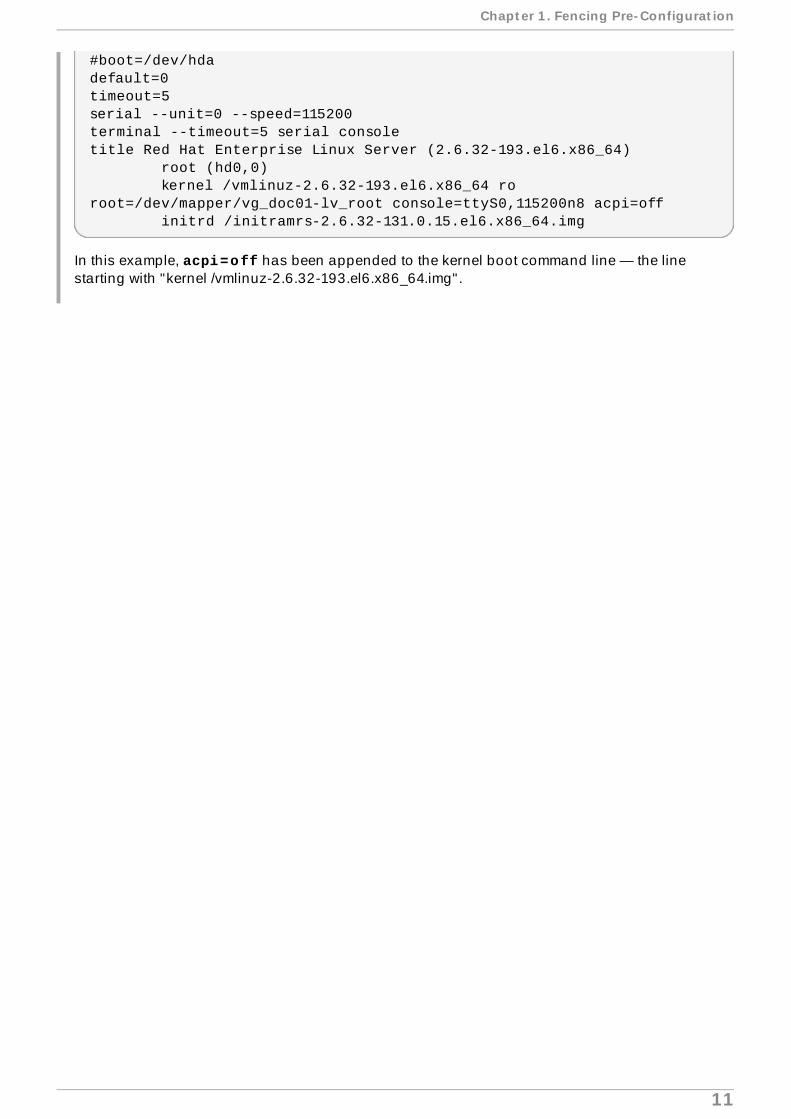
#boot=/dev/hdadefault=0timeout=5serial --unit=0 --speed=115200terminal --timeout=5 serial consoletitle Red Hat Enterprise Linux Server (2.6.32-193.el6.x86_64) root (hd0,0) kernel /vmlinuz-2.6.32-193.el6.x86_64 ro root=/dev/mapper/vg_doc01-lv_root console=ttyS0,115200n8 acpi=off initrd /initramrs-2.6.32-131.0.15.el6.x86_64.img
In this example, acpi=off has been appended to the kernel boot command line — the linestarting with "kernel /vmlinuz-2.6.32-193.el6.x86_64.img".
Chapt er 1 . Fencing Pre- Configurat ion
11
Chapter 2. Configuring Fencing with the ccs Command
As of the Red Hat Enterprise Linux 6.1 release and later, the Red Hat High Availability Add-Onprovides support for the ccs cluster configuration command. The ccs command allows anadministrator to create, modify and view the cluster.conf cluster configuration file. You can usethe ccs command to configure a cluster configuration file on a local file system or on a remote node.Using the ccs command, an administrator can also start and stop the cluster services on one or allof the nodes in a configured cluster.
This chapter describes how to configure the Red Hat High Availability Add-On cluster configurationfile using the ccs command.
This chapter consists of the following sections:
Section 2.1, “Configuring Fence Devices”
Important
Make sure that your deployment of High Availability Add-On meets your needs and can besupported. Consult with an authorized Red Hat representative to verify your configurationprior to deployment. In addition, allow time for a configuration burn-in period to test failuremodes.
Important
This chapter references commonly used cluster.conf elements and attributes. For acomprehensive list and description of cluster.conf elements and attributes, refer to thecluster schema at /usr/share/cluster/cluster.rng , and the annotated schema at /usr/share/doc/cman-X.Y.ZZ/cluster_conf.html (for example /usr/share/doc/cman-3.0.12/cluster_conf.html ).
2.1. Configuring Fence Devices
Configuring fence devices consists of creating, updating, and deleting fence devices for the cluster.You must create and name the fence devices in a cluster before you can configure fencing for thenodes in the cluster. For information on configuring fencing for the individual nodes in the cluster,see Section 2.3, “Configuring Fencing for Cluster Members” .
Before configuring your fence devices, you may want to modify some of the fence daemon propertiesfor your system from the default values. The values you configure for the fence daemon are generalvalues for the cluster. The general fencing properties for the cluster you may want to modify aresummarized as follows:
The post_fail_delay attribute is the number of seconds the fence daemon (fenced ) waitsbefore fencing a node (a member of the fence domain) after the node has failed. The post_fail_delay default value is 0 . Its value may be varied to suit cluster and networkperformance.
Red Hat Ent erprise Linux 6 Fence Configurat ion Guide
12
The post-join_delay attribute is the number of seconds the fence daemon (fenced ) waitsbefore fencing a node after the node joins the fence domain. The post_join_delay defaultvalue is 6 . A typical setting for post_join_delay is between 20 and 30 seconds, but can varyaccording to cluster and network performance.
You reset the values of the post_fail_delay and post_join_delay attributes with the --setfencedaemon option of the ccs command. Note, however, that executing the ccs --setfencedaemon command overwrites all existing fence daemon properties.
For example, to configure a value for the post_fail_delay attribute, execute the followingcommand. This command will overwrite the values of all other exisiting fence daemon properties thatyou can set with this command.
ccs -h host --setfencedaemon post_fail_delay=value
To configure a value for the post_join_delay attribute, execute the following command. Thiscommand will overwrite the values of all other exisiting fence daemon properties that you can set withthis command.
ccs -h host --setfencedaemon post_join_delay=value
To configure a value for both the the post_join_delay attribute and the post_fail_delayattribute, execute the following command:
ccs -h host --setfencedaemon post_fail_delay=value post_join_delay=value
Note
For more information about the post_join_delay and post_fail_delay attributes aswell as the additional fence daemon properties you can modify, refer to the fenced(8) manpage and refer to the cluster schema at /usr/share/cluster/cluster.rng , and theannotated schema at /usr/share/doc/cman-X.Y.ZZ/cluster_conf.html .
To configure a fence device for a cluster, execute the following command:
ccs -h host --addfencedevdevicename[fencedeviceoptions]
For example, to configure an APC fence device in the configuration file on the cluster node node1named myfence with an IP address of apc_ip_example, a login of login_example, and apassword of password_example, execute the following command:
ccs -h node1 --addfencedev myfence agent=fence_apc ipaddr=apc_ip_example login=login_example passwd=password_example
The following example shows the fencedevices section of the cluster.conf configuration fileafter you have added this APC fence device:
<fencedevices> <fencedevice agent="fence_apc" ipaddr="apc_ip_example"
Chapt er 2 . Configuring Fencing wit h t he ccs Command
13
login="login_example" name="myfence" passwd="password_example"/></fencedevices>
When configuring fence devices for a cluster, you may find it useful to see a listing of availabledevices for your cluster and the options available for each device. You may also find it useful to seea listing of fence devices currently configured for your cluster. For information on using the ccscommand to print a list of available fence devices and options or to print a list of fence devicescurrently configured for your cluster, refer to Section 2.2, “Listing Fence Devices and Fence DeviceOptions” .
To remove a fence device from your cluster configuration, execute the following command:
ccs -h host --rmfencedev fence_device_name
For example, to remove a fence device that you have named myfence from the cluster configurationfile on cluster node node1, execute the following command:
ccs -h node1 --rmfencedev myfence
If you need to modify the attributes of a fence device you have already configured, you must firstremove that fence device then add it again with the modified attributes.
Note that when you have finished configuring all of the components of your cluster, you will need tosync the cluster configuration file to all of the nodes.
2.2. List ing Fence Devices and Fence Device Opt ions
You can use the ccs command to print a list of available fence devices and to print a list of optionsfor each available fence type. You can also use the ccs command to print a list of fence devicescurrently configured for your cluster.
To print a list of fence devices currently available for your cluster, execute the following command:
ccs -h host --lsfenceopts
For example, the following command lists the fence devices available on the cluster node node1,showing sample output.
[root@ask-03 ~]# ccs -h node1 --lsfenceoptsfence_rps10 - RPS10 Serial Switchfence_vixel - No description availablefence_egenera - No description availablefence_xcat - No description availablefence_na - Node Assassinfence_apc - Fence agent for APC over telnet/sshfence_apc_snmp - Fence agent for APC over SNMPfence_bladecenter - Fence agent for IBM BladeCenterfence_bladecenter_snmp - Fence agent for IBM BladeCenter over SNMPfence_cisco_mds - Fence agent for Cisco MDSfence_cisco_ucs - Fence agent for Cisco UCSfence_drac5 - Fence agent for Dell DRAC CMC/5fence_eps - Fence agent for ePowerSwitchfence_ibmblade - Fence agent for IBM BladeCenter over SNMPfence_ifmib - Fence agent for IF MIB
Red Hat Ent erprise Linux 6 Fence Configurat ion Guide
14
fence_ilo - Fence agent for HP iLOfence_ilo_mp - Fence agent for HP iLO MPfence_intelmodular - Fence agent for Intel Modularfence_ipmilan - Fence agent for IPMI over LANfence_kdump - Fence agent for use with kdumpfence_rhevm - Fence agent for RHEV-M REST APIfence_rsa - Fence agent for IBM RSAfence_sanbox2 - Fence agent for QLogic SANBox2 FC switchesfence_scsi - fence agent for SCSI-3 persistent reservationsfence_virsh - Fence agent for virshfence_virt - Fence agent for virtual machinesfence_vmware - Fence agent for VMwarefence_vmware_soap - Fence agent for VMware over SOAP APIfence_wti - Fence agent for WTIfence_xvm - Fence agent for virtual machines
To print a list of the options you can specify for a particular fence type, execute the followingcommand:
ccs -h host --lsfenceopts fence_type
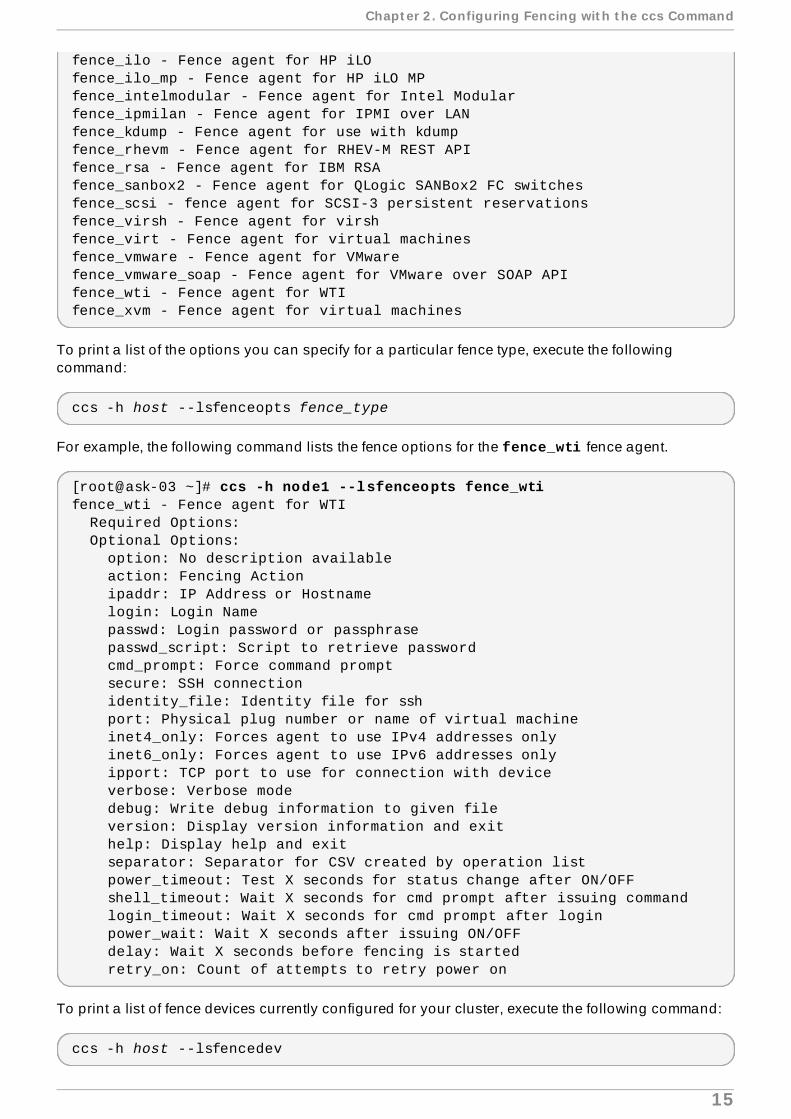
For example, the following command lists the fence options for the fence_wti fence agent.
[root@ask-03 ~]# ccs -h node1 --lsfenceopts fence_wtifence_wti - Fence agent for WTI Required Options: Optional Options: option: No description available action: Fencing Action ipaddr: IP Address or Hostname login: Login Name passwd: Login password or passphrase passwd_script: Script to retrieve password cmd_prompt: Force command prompt secure: SSH connection identity_file: Identity file for ssh port: Physical plug number or name of virtual machine inet4_only: Forces agent to use IPv4 addresses only inet6_only: Forces agent to use IPv6 addresses only ipport: TCP port to use for connection with device verbose: Verbose mode debug: Write debug information to given file version: Display version information and exit help: Display help and exit separator: Separator for CSV created by operation list power_timeout: Test X seconds for status change after ON/OFF shell_timeout: Wait X seconds for cmd prompt after issuing command login_timeout: Wait X seconds for cmd prompt after login power_wait: Wait X seconds after issuing ON/OFF delay: Wait X seconds before fencing is started retry_on: Count of attempts to retry power on
To print a list of fence devices currently configured for your cluster, execute the following command:
ccs -h host --lsfencedev
Chapt er 2 . Configuring Fencing wit h t he ccs Command
15
2.3. Configuring Fencing for Cluster Members
Once you have completed the initial steps of creating a cluster and creating fence devices, you needto configure fencing for the cluster nodes. To configure fencing for the nodes after creating a newcluster and configuring the fencing devices for the cluster, follow the steps in this section. Note thatyou must configure fencing for each node in the cluster.
This section documents the following procedures:
Section 2.3.1, “Configuring a Single Power-Based Fence Device for a Node”
Section 2.3.2, “Configuring a Single Storage-Based Fence Device for a Node”
Section 2.3.3, “Configuring a Backup Fence Device”
Section 2.3.4, “Configuring a Node with Redundant Power”
Section 2.3.6, “Removing Fence Methods and Fence Instances”
2.3.1. Configuring a Single Power-Based Fence Device for a Node
Use the following procedure to configure a node with a single power-based fence device that uses afence device named apc, which uses the fence_apc fencing agent.
1. Add a fence method for the node, providing a name for the fence method.
ccs -h host --addmethod method node
For example, to configure a fence method named APC for the node node-01.example.comin the configuration file on the cluster node node-01.example.com, execute the followingcommand:
ccs -h node01.example.com --addmethod APC node01.example.com
2. Add a fence instance for the method. You must specify the fence device to use for the node,the node this instance applies to, the name of the method, and any options for this methodthat are specific to this node:
ccs -h host --addfenceinst fencedevicename node method [options]
For example, to configure a fence instance in the configuration file on the cluster node node-01.example.com that uses the APC switch power port 1 on the fence device named apc tofence cluster node node-01.example.com using the method named APC , execute thefollowing command:
ccs -h node01.example.com --addfenceinst apc node01.example.com APC port=1
You will need to add a fence method for each node in the cluster. The following commands configurea fence method for each node with the method name APC . The device for the fence method specifies apc as the device name, which is a device previously configured with the --addfencedev option,as described in Section 2.1, “Configuring Fence Devices” . Each node is configured with a uniqueAPC switch power port number: The port number for node-01.example.com is 1, the port numberfor node-02.example.com is 2, and the port number for node-03.example.com is 3.
Red Hat Ent erprise Linux 6 Fence Configurat ion Guide
16
ccs -h node01.example.com --addmethod APC node01.example.comccs -h node01.example.com --addmethod APC node02.example.comccs -h node01.example.com --addmethod APC node03.example.comccs -h node01.example.com --addfenceinst apc node01.example.com APC port=1ccs -h node01.example.com --addfenceinst apc node02.example.com APC port=2ccs -h node01.example.com --addfenceinst apc node03.example.com APC port=3
Example 2.1, “cluster.conf After Adding Power-Based Fence Methods ” shows a cluster.confconfiguration file after you have added these fencing methods and instances to each node in thecluster.
Example 2.1. cluster.conf Af ter Adding Power-Based Fence Methods
<cluster name="mycluster" config_version="3"> <clusternodes> <clusternode name="node-01.example.com" nodeid="1"> <fence> <method name="APC"> <device name="apc" port="1"/> </method> </fence> </clusternode> <clusternode name="node-02.example.com" nodeid="2"> <fence> <method name="APC"> <device name="apc" port="2"/> </method> </fence> </clusternode> <clusternode name="node-03.example.com" nodeid="3"> <fence> <method name="APC"> <device name="apc" port="3"/> </method> </fence> </clusternode> </clusternodes> <fencedevices> <fencedevice agent="fence_apc" ipaddr="apc_ip_example" login="login_example" name="apc" passwd="password_example"/> </fencedevices> <rm> </rm></cluster>
Note that when you have finished configuring all of the components of your cluster, you will need tosync the cluster configuration file to all of the nodes.
2.3.2. Configuring a Single Storage-Based Fence Device for a Node
Chapt er 2 . Configuring Fencing wit h t he ccs Command
17
When using non-power fencing methods (that is, SAN/storage fencing) to fence a node, you mustconfigure unfencing for the fence device. This ensures that a fenced node is not re-enabled until thenode has been rebooted. When you configure unfencing for a node, you specify a device that mirrorsthe corresponding fence device you have configured for the node with the notable addition of theexplicit action of on or enable.
For more information about unfencing a node, refer to the fence_node(8) man page.
Use the following procedure to configure a node with a single storage-based fence device that uses afence device named sanswitch1, which uses the fence_sanbox2 fencing agent.
1. Add a fence method for the node, providing a name for the fence method.
ccs -h host --addmethod method node
For example, to configure a fence method named SAN for the node node-01.example.comin the configuration file on the cluster node node-01.example.com, execute the followingcommand:
ccs -h node01.example.com --addmethod SAN node01.example.com
2. Add a fence instance for the method. You must specify the fence device to use for the node,the node this instance applies to, the name of the method, and any options for this methodthat are specific to this node:
ccs -h host --addfenceinst fencedevicename node method [options]
For example, to configure a fence instance in the configuration file on the cluster node node-01.example.com that uses the SAN switch power port 11 on the fence device named sanswitch1 to fence cluster node node-01.example.com using the method named SAN,execute the following command:
ccs -h node01.example.com --addfenceinst sanswitch1 node01.example.com SAN port=11
3. To configure unfencing for the storage based fence device on this node, execute the followingcommand:
ccs -h host --addunfence fencedevicename node action=on|off
You will need to add a fence method for each node in the cluster. The following commands configurea fence method for each node with the method name SAN. The device for the fence method specifies sanswitch as the device name, which is a device previously configured with the --addfencedevoption, as described in Section 2.1, “Configuring Fence Devices” . Each node is configured with aunique SAN physical port number: The port number for node-01.example.com is 11, the portnumber for node-02.example.com is 12, and the port number for node-03.example.com is 13.
ccs -h node01.example.com --addmethod SAN node01.example.comccs -h node01.example.com --addmethod SAN node02.example.comccs -h node01.example.com --addmethod SAN node03.example.comccs -h node01.example.com --addfenceinst sanswitch1 node01.example.com SAN port=11ccs -h node01.example.com --addfenceinst sanswitch1 node02.example.com SAN port=12
Red Hat Ent erprise Linux 6 Fence Configurat ion Guide
18
ccs -h node01.example.com --addfenceinst sanswitch1 node03.example.com SAN port=13ccs -h node01.example.com --addunfence sanswitch1 node01.example.com port=11 action=onccs -h node01.example.com --addunfence sanswitch1 node02.example.com port=12 action=onccs -h node01.example.com --addunfence sanswitch1 node03.example.com port=13 action=on
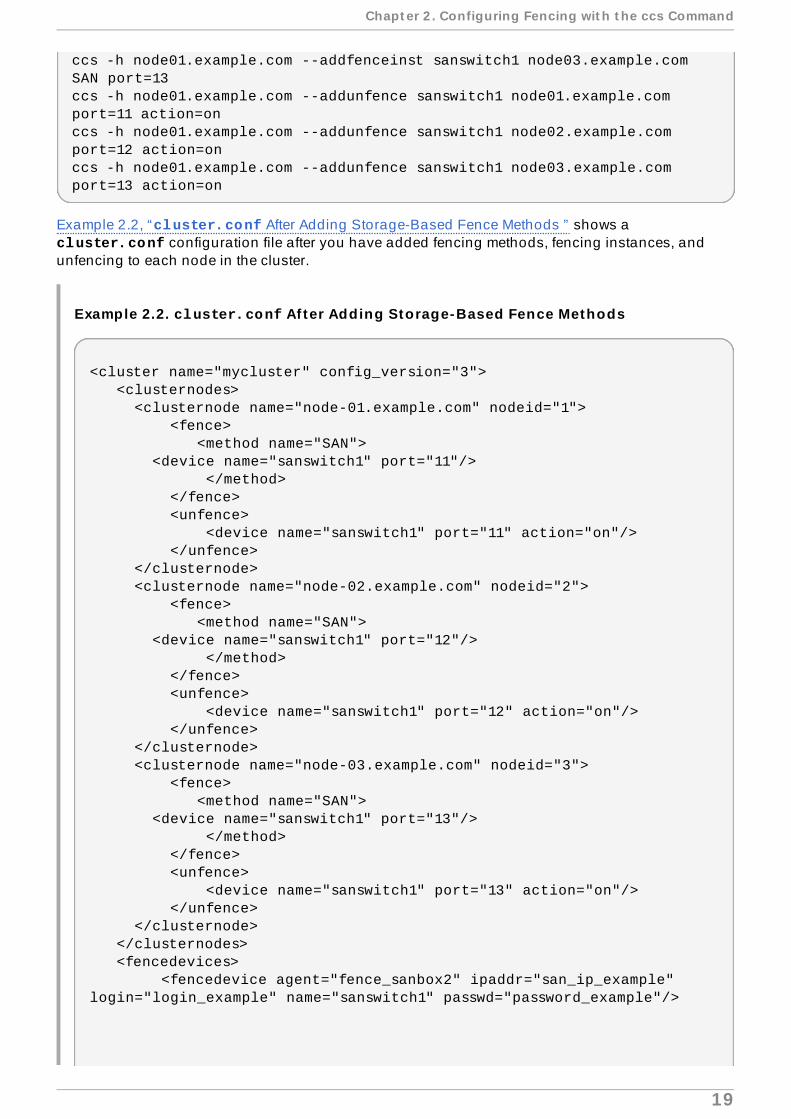
Example 2.2, “cluster.conf After Adding Storage-Based Fence Methods ” shows a cluster.conf configuration file after you have added fencing methods, fencing instances, andunfencing to each node in the cluster.
Example 2.2. cluster.conf Af ter Adding Storage-Based Fence Methods
<cluster name="mycluster" config_version="3"> <clusternodes> <clusternode name="node-01.example.com" nodeid="1"> <fence> <method name="SAN"> <device name="sanswitch1" port="11"/> </method> </fence> <unfence> <device name="sanswitch1" port="11" action="on"/> </unfence> </clusternode> <clusternode name="node-02.example.com" nodeid="2"> <fence> <method name="SAN"> <device name="sanswitch1" port="12"/> </method> </fence> <unfence> <device name="sanswitch1" port="12" action="on"/> </unfence> </clusternode> <clusternode name="node-03.example.com" nodeid="3"> <fence> <method name="SAN"> <device name="sanswitch1" port="13"/> </method> </fence> <unfence> <device name="sanswitch1" port="13" action="on"/> </unfence> </clusternode> </clusternodes> <fencedevices> <fencedevice agent="fence_sanbox2" ipaddr="san_ip_example"login="login_example" name="sanswitch1" passwd="password_example"/>
Chapt er 2 . Configuring Fencing wit h t he ccs Command
19
</fencedevices> <rm> </rm></cluster>
Note that when you have finished configuring all of the components of your cluster, you will need tosync the cluster configuration file to all of the nodes.
2.3.3. Configuring a Backup Fence Device
You can define multiple fencing methods for a node. If fencing fails using the first method, the systemwill attempt to fence the node using the second method, followed by any additional methods youhave configured. To configure a backup fencing method for a node, you configure two methods for anode, configuring a fence instance for each method.
Note
The order in which the system will use the fencing methods you have configured follows theirorder in the cluster configuration file. The first method you configure with the ccs command isthe primary fencing method, and the second method you configure is the backup fencingmethod. To change the order, you can remove the primary fencing method from theconfiguration file, then add that method back.
Note that at any time you can print a list of fence methods and instances currently configured for anode by executing the following command. If you do not specify a node, this command will list thefence methods and instances currently configured for all nodes.
ccs -h host --lsfenceinst [node]
Use the following procedure to configure a node with a primary fencing method that uses a fencedevice named apc, which uses the fence_apc fencing agent, and a backup fencing device thatuses a fence device named sanswitch1, which uses the fence_sanbox2 fencing agent. Since the sanswitch1 device is a storage-based fencing agent, you will need to configure unfencing for thatdevice as well.
1. Add a primary fence method for the node, providing a name for the fence method.
ccs -h host --addmethod method node
For example, to configure a fence method named APC as the primary method for the node node-01.example.com in the configuration file on the cluster node node-01.example.com, execute the following command:
ccs -h node01.example.com --addmethod APC node01.example.com
2. Add a fence instance for the primary method. You must specify the fence device to use for thenode, the node this instance applies to, the name of the method, and any options for thismethod that are specific to this node:
ccs -h host --addfenceinst fencedevicename node method [options]
Red Hat Ent erprise Linux 6 Fence Configurat ion Guide
20
For example, to configure a fence instance in the configuration file on the cluster node node-01.example.com that uses the APC switch power port 1 on the fence device named apc tofence cluster node node-01.example.com using the method named APC , execute thefollowing command:
ccs -h node01.example.com --addfenceinst apc node01.example.com APC port=1
3. Add a backup fence method for the node, providing a name for the fence method.
ccs -h host --addmethod method node
For example, to configure a backup fence method named SAN for the node node-01.example.com in the configuration file on the cluster node node-01.example.com,execute the following command:
ccs -h node01.example.com --addmethod SAN node01.example.com
4. Add a fence instance for the backup method. You must specify the fence device to use for thenode, the node this instance applies to, the name of the method, and any options for thismethod that are specific to this node:
ccs -h host --addfenceinst fencedevicename node method [options]
For example, to configure a fence instance in the configuration file on the cluster node node-01.example.com that uses the SAN switch power port 11 on the fence device named sanswitch1 to fence cluster node node-01.example.com using the method named SAN,execute the following command:
ccs -h node01.example.com --addfenceinst sanswitch1 node01.example.com SAN port=11
5. Since the sanswitch1 device is a storage-based device, you must configure unfencing forthis device.
ccs -h node01.example.com --addunfence sanswitch1 node01.example.com port=11 action=on
You can continue to add fencing methods as needed.
This procedure configures a fence device and a backup fence device for one node in the cluster. Youwill need to configure fencing for the other nodes in the cluster as well.
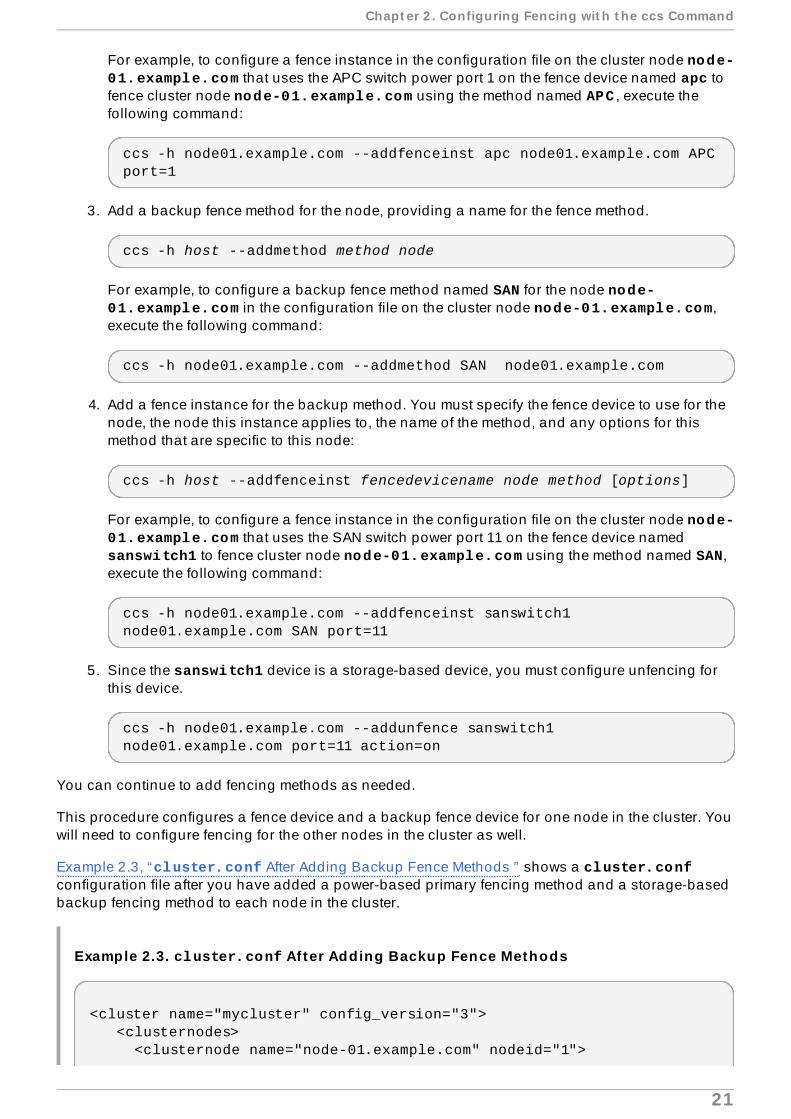
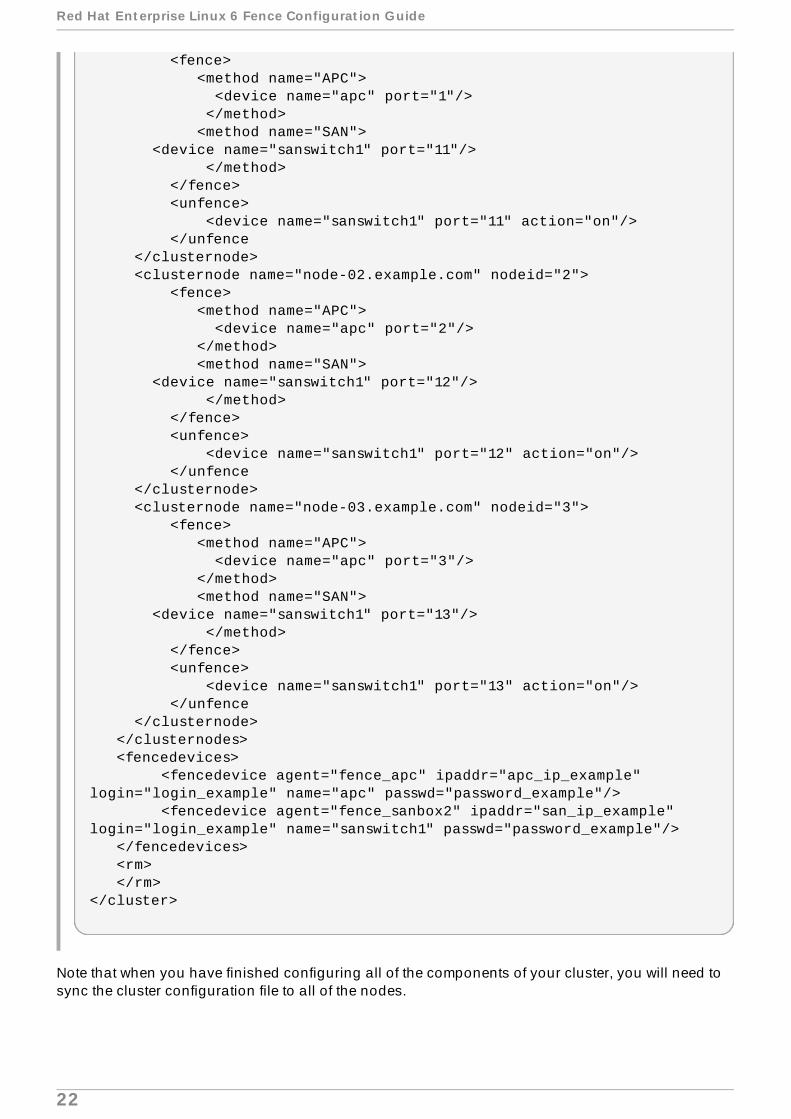
Example 2.3, “cluster.conf After Adding Backup Fence Methods ” shows a cluster.confconfiguration file after you have added a power-based primary fencing method and a storage-basedbackup fencing method to each node in the cluster.
Example 2.3. cluster.conf Af ter Adding Backup Fence Methods
<cluster name="mycluster" config_version="3"> <clusternodes> <clusternode name="node-01.example.com" nodeid="1">
Chapt er 2 . Configuring Fencing wit h t he ccs Command
21
<fence> <method name="APC"> <device name="apc" port="1"/> </method> <method name="SAN"> <device name="sanswitch1" port="11"/> </method> </fence> <unfence> <device name="sanswitch1" port="11" action="on"/> </unfence </clusternode> <clusternode name="node-02.example.com" nodeid="2"> <fence> <method name="APC"> <device name="apc" port="2"/> </method> <method name="SAN"> <device name="sanswitch1" port="12"/> </method> </fence> <unfence> <device name="sanswitch1" port="12" action="on"/> </unfence </clusternode> <clusternode name="node-03.example.com" nodeid="3"> <fence> <method name="APC"> <device name="apc" port="3"/> </method> <method name="SAN"> <device name="sanswitch1" port="13"/> </method> </fence> <unfence> <device name="sanswitch1" port="13" action="on"/> </unfence </clusternode> </clusternodes> <fencedevices> <fencedevice agent="fence_apc" ipaddr="apc_ip_example" login="login_example" name="apc" passwd="password_example"/> <fencedevice agent="fence_sanbox2" ipaddr="san_ip_example" login="login_example" name="sanswitch1" passwd="password_example"/> </fencedevices> <rm> </rm></cluster>
Note that when you have finished configuring all of the components of your cluster, you will need tosync the cluster configuration file to all of the nodes.
Red Hat Ent erprise Linux 6 Fence Configurat ion Guide
22
Note
The order in which the system will use the fencing methods you have configured follows theirorder in the cluster configuration file. The first method you configure is the primary fencingmethod, and the second method you configure is the backup fencing method. To change theorder, you can remove the primary fencing method from the configuration file, then add thatmethod back.
2.3.4 . Configuring a Node with Redundant Power
If your cluster is configured with redundant power supplies for your nodes, you must be sure toconfigure fencing so that your nodes fully shut down when they need to be fenced. If you configureeach power supply as a separate fence method, each power supply will be fenced separately; thesecond power supply will allow the system to continue running when the first power supply is fencedand the system will not be fenced at all. To configure a system with dual power supplies, you mustconfigure your fence devices so that both power supplies are shut off and the system is takencompletely down. This requires that you configure two instances within a single fencing method, andthat for each instance you configure both fence devices with an action attribute of off beforeconfiguring each of the devices with an action attribute of on.
To configure fencing for a node with dual power supplies, follow the steps in this section.
1. Before you can configure fencing for a node with redundant power, you must configure eachof the power switches as a fence device for the cluster. For information on configuring fencedevices, see Section 2.1, “Configuring Fence Devices” .
To print a list of fence devices currently configured for your cluster, execute the followingcommand:
ccs -h host --lsfencedev
2. Add a fence method for the node, providing a name for the fence method.
ccs -h host --addmethod method node
For example, to configure a fence method named APC-dual for the node node-01.example.com in the configuration file on the cluster node node-01.example.com,execute the following command:
ccs -h node01.example.com --addmethod APC-dual node01.example.com
3. Add a fence instance for the first power supply to the fence method. You must specify thefence device to use for the node, the node this instance applies to, the name of the method,and any options for this method that are specific to this node. At this point you configure the action attribute as off.
ccs -h host --addfenceinst fencedevicename node method [options] action=off
For example, to configure a fence instance in the configuration file on the cluster node node-01.example.com that uses the APC switch power port 1 on the fence device named apc1 tofence cluster node node-01.example.com using the method named APC-dual , andsetting the action attribute to off, execute the following command:
Chapt er 2 . Configuring Fencing wit h t he ccs Command
23
ccs -h node01.example.com --addfenceinst apc1 node01.example.com APC-dual port=1 action=off
4. Add a fence instance for the second power supply to the fence method. You must specify thefence device to use for the node, the node this instance applies to, the name of the method,and any options for this method that are specific to this node. At this point you configure the action attribute as off for this instance as well:
ccs -h host --addfenceinst fencedevicename node method [options] action=off
For example, to configure a second fence instance in the configuration file on the clusternode node-01.example.com that uses the APC switch power port 1 on the fence devicenamed apc2 to fence cluster node node-01.example.com using the same method as youspecified for the first instance named APC-dual , and setting the action attribute to off,execute the following command:
ccs -h node01.example.com --addfenceinst apc2 node01.example.com APC-dual port=1 action=off
5. At this point, add another fence instance for the first power supply to the fence method,configuring the action attribute as on. You must specify the fence device to use for thenode, the node this instance applies to, the name of the method, and any options for thismethod that are specific to this node, and specifying the action attribute as on:
ccs -h host --addfenceinst fencedevicename node method [options] action=on
For example, to configure a fence instance in the configuration file on the cluster node node-01.example.com that uses the APC switch power port 1 on the fence device named apc1 tofence cluster node node-01.example.com using the method named APC-dual , andsetting the action attribute to on, execute the following command:
ccs -h node01.example.com --addfenceinst apc1 node01.example.com APC-dual port=1 action=on
6. Add another fence instance for second power supply to the fence method, specifying the action attribute as on for this instance. You must specify the fence device to use for thenode, the node this instance applies to, the name of the method, and any options for thismethod that are specific to this node as well as the action attribute of on.
ccs -h host --addfenceinst fencedevicename node method [options] action=on
For example, to configure a second fence instance in the configuration file on the clusternode node-01.example.com that uses the APC switch power port 1 on the fence devicenamed apc2 to fence cluster node node-01.example.com using the same method as youspecified for the first instance named APC-dual and setting the action attribute to on,execute the following command:
ccs -h node01.example.com --addfenceinst apc2 node01.example.com APC-dual port=1 action=on
Red Hat Ent erprise Linux 6 Fence Configurat ion Guide
24

Example 2.4, “cluster.conf After Adding Dual-Power Fencing ” shows a cluster.confconfiguration file after you have added fencing for two power supplies for each node in a cluster.
Example 2.4 . cluster.conf Af ter Adding Dual-Power Fencing
<cluster name="mycluster" config_version="3"> <clusternodes> <clusternode name="node-01.example.com" nodeid="1"> <fence> <method name="APC-dual"> <device name="apc1" port="1"action="off"/> <device name="apc2" port="1"action="off"/> <device name="apc1" port="1"action="on"/> <device name="apc2" port="1"action="on"/> </method> </fence> </clusternode> <clusternode name="node-02.example.com" nodeid="2"> <fence> <method name="APC-dual"> <device name="apc1" port="2"action="off"/> <device name="apc2" port="2"action="off"/> <device name="apc1" port="2"action="on"/> <device name="apc2" port="2"action="on"/> </method> </fence> </clusternode> <clusternode name="node-03.example.com" nodeid="3"> <fence> <method name="APC-dual"> <device name="apc1" port="3"action="off"/> <device name="apc2" port="3"action="off"/> <device name="apc1" port="3"action="on"/> <device name="apc2" port="3"action="on"/> </method> </fence> </clusternode> </clusternodes> <fencedevices> <fencedevice agent="fence_apc" ipaddr="apc_ip_example" login="login_example" name="apc1" passwd="password_example"/> <fencedevice agent="fence_apc" ipaddr="apc_ip_example" login="login_example" name="apc2" passwd="password_example"/> </fencedevices> <rm> </rm></cluster>
Note that when you have finished configuring all of the components of your cluster, you will need tosync the cluster configuration file to all of the nodes.
2.3.5. T est ing the Fence Configurat ion
Chapt er 2 . Configuring Fencing wit h t he ccs Command
25
As of Red Hat Enterprise Linux Release 6.4, you can test the fence configuration for each node in acluster with the fence_check utility.
The following example shows the output of a successful execution of this command.
[root@host-098 ~]# fence_checkfence_check run at Wed Jul 23 09:13:57 CDT 2014 pid: 4769Testing host-098 method 1: successTesting host-099 method 1: successTesting host-100 method 1: success
For information on this utility, see the fence_check(8) man page.
2.3.6. Removing Fence Methods and Fence Instances
To remove a fence method from your cluster configuration, execute the following command:
ccs -h host --rmmethod method node
For example, to remove a fence method that you have named APC that you have configured for node01.example.com from the cluster configuration file on cluster node node01.example.com, execute the following command:
ccs -h node01.example.com --rmmethod APC node01.example.com
To remove all fence instances of a fence device from a fence method, execute the following command:
ccs -h host --rmfenceinst fencedevicename node method
For example, to remove all instances of the fence device named apc1 from the method named APC-dual configured for node01.example.com from the cluster configuration file on cluster node node01.example.com, execute the following command:
ccs -h node01.example.com --rmfenceinst apc1 node01.example.com APC-dual
Red Hat Ent erprise Linux 6 Fence Configurat ion Guide
26
Chapter 3. Configuring Fencing with Conga
This chapter describes how to configure fencing in Red Hat High Availability Add-On using Conga .
Note
Conga is a graphical user interface that you can use to administer the Red Hat HighAvailability Add-On. Note, however, that in order to use this interface effectively you need tohave a good and clear understanding of the underlying concepts. Learning about clusterconfiguration by exploring the available features in the user interface is not recommended, asit may result in a system that is not robust enough to keep all services running whencomponents fail.
Section 3.2, “Configuring Fence Devices”
3.1. Configuring Fence Daemon Propert ies
Clicking on the Fence Daemon tab displays the Fence Daemon Propert ies page, which providesan interface for configuring Post Fail Delay and Post Join Delay. The values you configure forthese parameters are general fencing properties for the cluster. To configure specific fence devicesfor the nodes of the cluster, use the Fence Devices menu item of the cluster display, as described inSection 3.2, “Configuring Fence Devices” .
The Post Fail Delay parameter is the number of seconds the fence daemon (fenced ) waitsbefore fencing a node (a member of the fence domain) after the node has failed. The Post FailDelay default value is 0 . Its value may be varied to suit cluster and network performance.
The Post Join Delay parameter is the number of seconds the fence daemon (fenced ) waitsbefore fencing a node after the node joins the fence domain. The Post Join Delay default valueis 6 . A typical setting for Post Join Delay is between 20 and 30 seconds, but can varyaccording to cluster and network performance.
Enter the values required and click Apply for changes to take effect.
Note
For more information about Post Join Delay and Post Fail Delay, refer to the fenced(8)man page.
3.2. Configuring Fence Devices
Configuring fence devices consists of creating, updating, and deleting fence devices for the cluster.You must configure the fence devices in a cluster before you can configure fencing for the nodes inthe cluster.
Creating a fence device consists of selecting a fence device type and entering parameters for thatfence device (for example, name, IP address, login, and password). Updating a fence device consistsof selecting an existing fence device and changing parameters for that fence device. Deleting a fencedevice consists of selecting an existing fence device and deleting it.
Chapt er 3. Configuring Fencing wit h Conga
27
This section provides procedures for the following tasks:
Creating fence devices — Refer to Section 3.2.1, “Creating a Fence Device” . Once you havecreated and named a fence device, you can configure the fence devices for each node in thecluster, as described in Section 3.3, “Configuring Fencing for Cluster Members” .
Updating fence devices — Refer to Section 3.2.2, “Modifying a Fence Device” .
Deleting fence devices — Refer to Section 3.2.3, “Deleting a Fence Device” .
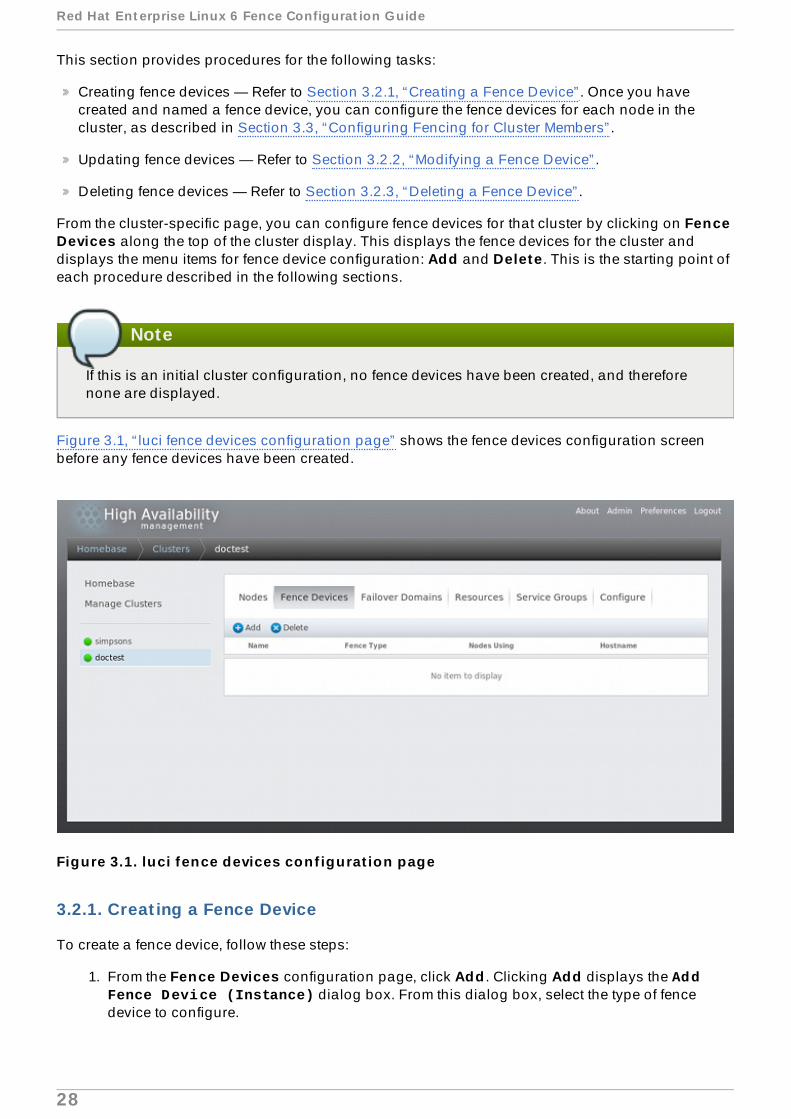
From the cluster-specific page, you can configure fence devices for that cluster by clicking on FenceDevices along the top of the cluster display. This displays the fence devices for the cluster anddisplays the menu items for fence device configuration: Add and Delete . This is the starting point ofeach procedure described in the following sections.
Note
If this is an initial cluster configuration, no fence devices have been created, and thereforenone are displayed.
Figure 3.1, “ luci fence devices configuration page” shows the fence devices configuration screenbefore any fence devices have been created.
Figure 3.1. luci fence devices conf igurat ion page
3.2.1. Creat ing a Fence Device
To create a fence device, follow these steps:
1. From the Fence Devices configuration page, click Add . Clicking Add displays the Add Fence Device (Instance) dialog box. From this dialog box, select the type of fencedevice to configure.
Red Hat Ent erprise Linux 6 Fence Configurat ion Guide
28
2. Specify the information in the Add Fence Device (Instance) dialog box according tothe type of fence device. In some cases you will need to specify additional node-specificparameters for the fence device when you configure fencing for the individual nodes.
3. Click Submit.
After the fence device has been added, it appears on the Fence Devices configuration page.
3.2.2. Modifying a Fence Device
To modify a fence device, follow these steps:
1. From the Fence Devices configuration page, click on the name of the fence device to modify.This displays the dialog box for that fence device, with the values that have been configuredfor the device.
2. To modify the fence device, enter changes to the parameters displayed.
3. Click Apply and wait for the configuration to be updated.
3.2.3. Delet ing a Fence Device
Note
Fence devices that are in use cannot be deleted. To delete a fence device that a node iscurrently using, first update the node fence configuration for any node using the device andthen delete the device.
To delete a fence device, follow these steps:
1. From the Fence Devices configuration page, check the box to the left of the fence device ordevices to select the devices to delete.
2. Click Delete and wait for the configuration to be updated. A message appears indicatingwhich devices are being deleted.
When the configuration has been updated, the deleted fence device no longer appears in the display.
3.3. Configuring Fencing for Cluster Members
Once you have completed the initial steps of creating a cluster and creating fence devices, you needto configure fencing for the cluster nodes. To configure fencing for the nodes after creating a newcluster and configuring the fencing devices for the cluster, follow the steps in this section. Note thatyou must configure fencing for each node in the cluster.
The following sections provide procedures for configuring a single fence device for a node,configuring a node with a backup fence device, and configuring a node with redundant powersupplies:
Section 3.3.1, “Configuring a Single Fence Device for a Node”
Section 3.3.2, “Configuring a Backup Fence Device”
Section 3.3.3, “Configuring a Node with Redundant Power”
Chapt er 3. Configuring Fencing wit h Conga
29
3.3.1. Configuring a Single Fence Device for a Node
Use the following procedure to configure a node with a single fence device.
1. From the cluster-specific page, you can configure fencing for the nodes in the cluster byclicking on Nodes along the top of the cluster display. This displays the nodes thatconstitute the cluster. This is also the default page that appears when you click on the clustername beneath Manage Clusters from the menu on the left side of the luci Homebasepage.
2. Click on a node name. Clicking a link for a node causes a page to be displayed for that linkshowing how that node is configured.
The node-specific page displays any services that are currently running on the node, as wellas any failover domains of which this node is a member. You can modify an existing failoverdomain by clicking on its name.
3. On the node-specific page, under Fence Devices , click Add Fence Method . This displaysthe Add Fence Method to Node dialog box.
4. Enter a Method Name for the fencing method that you are configuring for this node. This isan arbitrary name that will be used by Red Hat High Availability Add-On; it is not the same asthe DNS name for the device.
5. Click Submit. This displays the node-specific screen that now displays the method you havejust added under Fence Devices .
6. Configure a fence instance for this method by clicking the Add Fence Instance button thatappears beneath the fence method. This displays the Add Fence Device ( Instance) drop-down menu from which you can select a fence device you have previously configured, asdescribed in Section 3.2.1, “Creating a Fence Device” .
7. Select a fence device for this method. If this fence device requires that you configure node-specific parameters, the display shows the parameters to configure.
Note
For non-power fence methods (that is, SAN/storage fencing), Unfencing is selectedby default on the node-specific parameters display. This ensures that a fenced node'saccess to storage is not re-enabled until the node has been rebooted. For informationon unfencing a node, refer to the fence_node(8) man page.
8. Click Submit. This returns you to the node-specific screen with the fence method and fenceinstance displayed.
3.3.2. Configuring a Backup Fence Device
You can define multiple fencing methods for a node. If fencing fails using the first method, the systemwill attempt to fence the node using the second method, followed by any additional methods youhave configured.
Use the following procedure to configure a backup fence device for a node.
1. Use the procedure provided in Section 3.3.1, “Configuring a Single Fence Device for a Node”to configure the primary fencing method for a node.
Red Hat Ent erprise Linux 6 Fence Configurat ion Guide
30
2. Beneath the display of the primary method you defined, click Add Fence Method .
3. Enter a name for the backup fencing method that you are configuring for this node and click Submit. This displays the node-specific screen that now displays the method you have justadded, below the primary fence method.
4. Configure a fence instance for this method by clicking Add Fence Instance. This displaysa drop-down menu from which you can select a fence device you have previously configured,as described in Section 3.2.1, “Creating a Fence Device” .
5. Select a fence device for this method. If this fence device requires that you configure node-specific parameters, the display shows the parameters to configure.
6. Click Submit. This returns you to the node-specific screen with the fence method and fenceinstance displayed.
You can continue to add fencing methods as needed. You can rearrange the order of fencingmethods that will be used for this node by clicking on Move Up and Move Down .
3.3.3. Configuring a Node with Redundant Power
If your cluster is configured with redundant power supplies for your nodes, you must be sure toconfigure fencing so that your nodes fully shut down when they need to be fenced. If you configureeach power supply as a separate fence method, each power supply will be fenced separately; thesecond power supply will allow the system to continue running when the first power supply is fencedand the system will not be fenced at all. To configure a system with dual power supplies, you mustconfigure your fence devices so that both power supplies are shut off and the system is takencompletely down. When configuring your system using Conga , this requires that you configure twoinstances within a single fencing method.
To configure fencing for a node with dual power supplies, follow the steps in this section.
1. Before you can configure fencing for a node with redundant power, you must configure eachof the power switches as a fence device for the cluster. For information on configuring fencedevices, see Section 3.2, “Configuring Fence Devices” .
2. From the cluster-specific page, click on Nodes along the top of the cluster display. Thisdisplays the nodes that constitute the cluster. This is also the default page that appears whenyou click on the cluster name beneath Manage Clusters from the menu on the left side ofthe luci Homebase page.
3. Click on a node name. Clicking a link for a node causes a page to be displayed for that linkshowing how that node is configured.
4. On the node-specific page, click Add Fence Method .
5. Enter a name for the fencing method that you are configuring for this node.
6. Click Submit. This displays the node-specific screen that now displays the method you havejust added under Fence Devices .
7. Configure the first power supply as a fence instance for this method by clicking Add Fence Instance. This displays a drop-down menu from which you can select one of the powerfencing devices you have previously configured, as described in Section 3.2.1, “Creating aFence Device” .
8. Select one of the power fence devices for this method and enter the appropriate parametersfor this device.
Chapt er 3. Configuring Fencing wit h Conga
31
9. Click Submit. This returns you to the node-specific screen with the fence method and fenceinstance displayed.
10. Under the same fence method for which you have configured the first power fencing device,click Add Fence Instance. This displays a drop-down menu from which you can selectthe second power fencing devices you have previously configured, as described inSection 3.2.1, “Creating a Fence Device” .
11. Select the second of the power fence devices for this method and enter the appropriateparameters for this device.
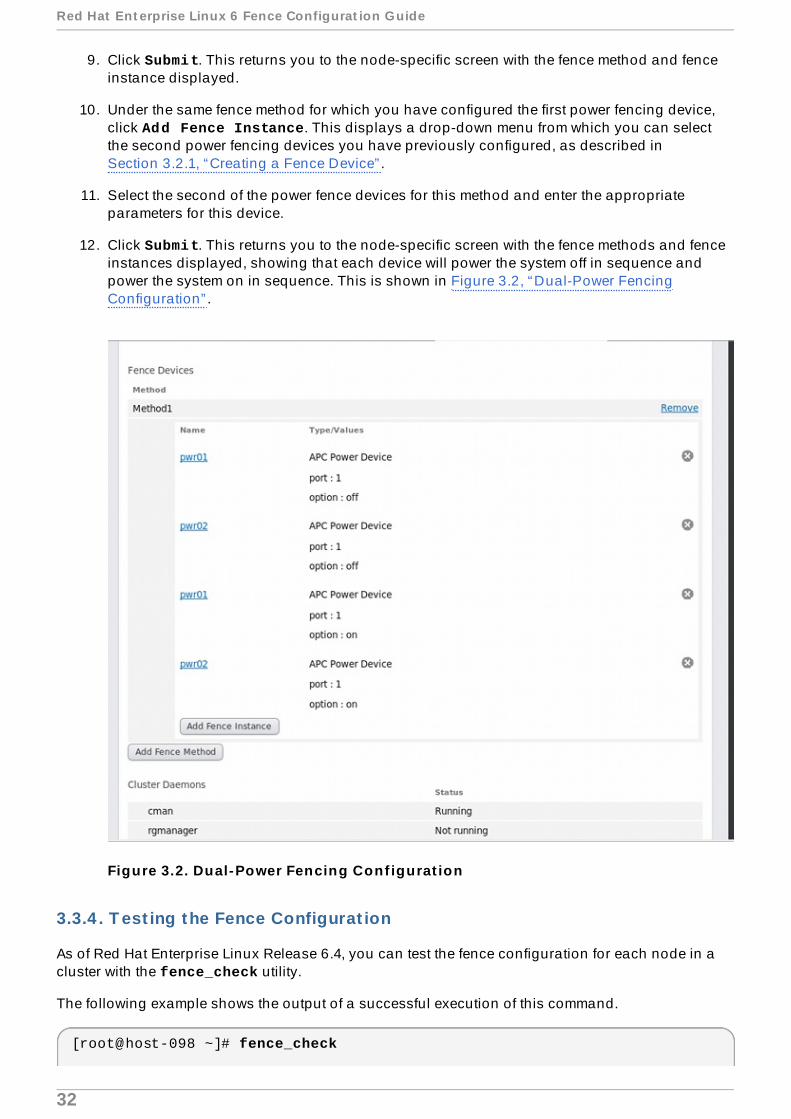
12. Click Submit. This returns you to the node-specific screen with the fence methods and fenceinstances displayed, showing that each device will power the system off in sequence andpower the system on in sequence. This is shown in Figure 3.2, “Dual-Power FencingConfiguration” .
Figure 3.2. Dual-Power Fencing Conf igurat ion
3.3.4 . T est ing the Fence Configurat ion
As of Red Hat Enterprise Linux Release 6.4, you can test the fence configuration for each node in acluster with the fence_check utility.
The following example shows the output of a successful execution of this command.
[root@host-098 ~]# fence_check
Red Hat Ent erprise Linux 6 Fence Configurat ion Guide
32
fence_check run at Wed Jul 23 09:13:57 CDT 2014 pid: 4769Testing host-098 method 1: successTesting host-099 method 1: successTesting host-100 method 1: success
For information on this utility, see the fence_check(8) man page.
Chapt er 3. Configuring Fencing wit h Conga
33

Chapter 4. Fence Devices
This chapter documents the fence devices currently supported in Red Hat Enterprise Linux High-Availability Add-On.
Table 4.1, “Fence Device Summary” lists the fence devices, the fence device agents associated withthe fence devices, and provides a reference to the table documenting the parameters for the fencedevices.
Table 4 .1. Fence Device Summary
Fence Device Fence Agent Reference to ParameterDescript ion
APC PowerSwitch(telnet/SSH)
fence_apc Table 4.2, “APC Power Switch(telnet/SSH)”
APC PowerSwitch overSNMP
fence_apc_snmp Table 4.3, “APC Power Switchover SNMP”
BrocadeFabric Switch
fence_brocade Table 4.4, “Brocade FabricSwitch”
Cisco MDS fence_cisco_mds Table 4.5, “Cisco MDS”Cisco UCS fence_cisco_ucs Table 4.6, “Cisco UCS”Dell DRAC 5 fence_drac5 Table 4.7, “Dell DRAC 5”Dell iDRAC fence_idrac Table 4.22, “ IPMI (Intelligent
Platform ManagementInterface) LAN, Dell iDrac, IBMIntegrated ManagementModule, HPiLO3, HPiLO4”
Eaton NetworkPower Switch(SNMPInterface)
fence_eaton_snmp Table 4.8, “Eaton NetworkPower Controller (SNMPInterface) (Red Hat EnterpriseLinux 6.4 and later)”
EgeneraBladeFrame
fence_egenera Table 4.9, “EgeneraBladeFrame”
ePowerSwitch fence_eps Table 4.10, “ePowerSwitch”Fence kdump fence_kdump Table 4.11, “Fence kdump”Fence virt fence_virt Table 4.12, “Fence virt”FujitsuSiemensRemoteviewService Board(RSB)
fence_rsb Table 4.13, “Fujitsu SiemensRemoteview Service Board(RSB)”
HPBladeSystem
fence_hpblade Table 4.14, “HP BladeSystem(Red Hat Enterprise Linux 6.4and later)”
HP iLO Device(IntegratedLights Out),
fence_ilo Table 4.15, “HP iLO (IntegratedLights Out) and HP iLO2”
HP iLO2 fence_ilo2 Table 4.15, “HP iLO (IntegratedLights Out) and HP iLO2”
Red Hat Ent erprise Linux 6 Fence Configurat ion Guide
34

HPiLO3 fence_ilo3 Table 4.22, “ IPMI (IntelligentPlatform ManagementInterface) LAN, Dell iDrac, IBMIntegrated ManagementModule, HPiLO3, HPiLO4”
HPiLO4 fence_ilo4 Table 4.22, “ IPMI (IntelligentPlatform ManagementInterface) LAN, Dell iDrac, IBMIntegrated ManagementModule, HPiLO3, HPiLO4”
HP iLO(IntegratedLights Out) MP
fence_ilo_mp Table 4.16, “HP iLO (IntegratedLights Out) MP”
IBMBladeCenter
fence_bladecenter Table 4.17, “ IBM BladeCenter”
IBMBladeCenterSNMP
fence_ibmblade Table 4.18, “ IBM BladeCenterSNMP”
IBM IntegratedManagementModule
fence_imm Table 4.22, “ IPMI (IntelligentPlatform ManagementInterface) LAN, Dell iDrac, IBMIntegrated ManagementModule, HPiLO3, HPiLO4”
IBM iPDU fence_ipdu Table 4.19, “ IBM iPDU (RedHat Enterprise Linux 6.4 andlater)”
IF MIB fence_ifmib Table 4.20, “ IF MIB”Intel Modular fence_intelmodular Table 4.21, “ Intel Modular”IPMI(IntelligentPlatformManagementInterface) Lan
fence_ipmilan Table 4.22, “ IPMI (IntelligentPlatform ManagementInterface) LAN, Dell iDrac, IBMIntegrated ManagementModule, HPiLO3, HPiLO4”
RHEV-M RESTAPI
fence_rhevm Table 4.23, “RHEV-M REST API(RHEL 6.2 and later againstRHEV 3.0 and later)”
SCSI Fencing fence_scsi Table 4.24, “SCSI ReservationFencing”
VMwareFencing(SOAPInterface)
fence_vmware_soap Table 4.25, “VMware Fencing(SOAP Interface) (Red HatEnterprise Linux 6.2 and later)”
WTI PowerSwitch
fence_wti Table 4.26, “WTI PowerSwitch”
Fence Device Fence Agent Reference to ParameterDescript ion
4.1. APC Power Switch over Telnet and SSH
Table 4.2, “APC Power Switch (telnet/SSH)” lists the fence device parameters used by fence_apc,the fence agent for APC over telnet/SSH.
Table 4 .2. APC Power Switch ( telnet /SSH)
Chapt er 4 . Fence Devices
35
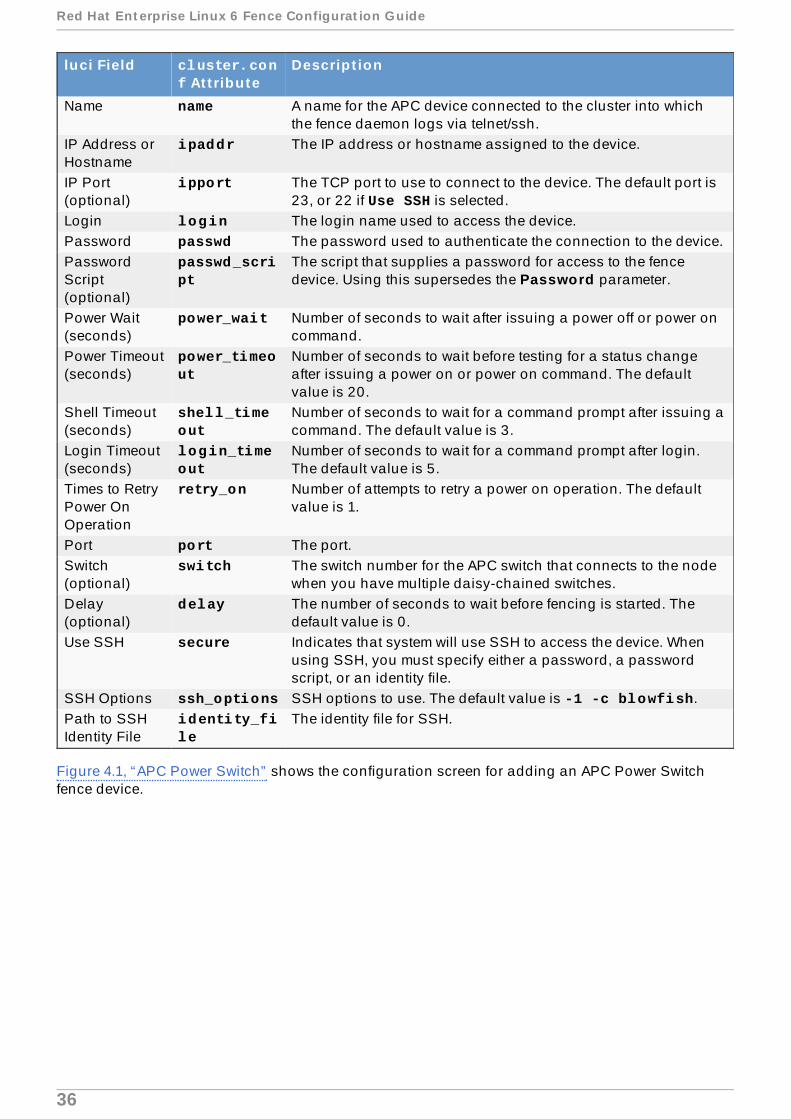
luci Field cluster.conf At t ribute
Descript ion
Name name A name for the APC device connected to the cluster into whichthe fence daemon logs via telnet/ssh.
IP Address orHostname
ipaddr The IP address or hostname assigned to the device.
IP Port(optional)
ipport The TCP port to use to connect to the device. The default port is23, or 22 if Use SSH is selected.
Login login The login name used to access the device.Password passwd The password used to authenticate the connection to the device.PasswordScript(optional)
passwd_script
The script that supplies a password for access to the fencedevice. Using this supersedes the Password parameter.
Power Wait(seconds)
power_wait Number of seconds to wait after issuing a power off or power oncommand.
Power Timeout(seconds)
power_timeout
Number of seconds to wait before testing for a status changeafter issuing a power on or power on command. The defaultvalue is 20.
Shell Timeout(seconds)
shell_timeout
Number of seconds to wait for a command prompt after issuing acommand. The default value is 3.
Login Timeout(seconds)
login_timeout
Number of seconds to wait for a command prompt after login.The default value is 5.
Times to RetryPower OnOperation
retry_on Number of attempts to retry a power on operation. The defaultvalue is 1.
Port port The port.Switch(optional)
switch The switch number for the APC switch that connects to the nodewhen you have multiple daisy-chained switches.
Delay(optional)
delay The number of seconds to wait before fencing is started. Thedefault value is 0.
Use SSH secure Indicates that system will use SSH to access the device. Whenusing SSH, you must specify either a password, a passwordscript, or an identity file.
SSH Options ssh_options SSH options to use. The default value is -1 -c blowfish.Path to SSHIdentity File
identity_file
The identity file for SSH.
Figure 4.1, “APC Power Switch” shows the configuration screen for adding an APC Power Switchfence device.
Red Hat Ent erprise Linux 6 Fence Configurat ion Guide
36
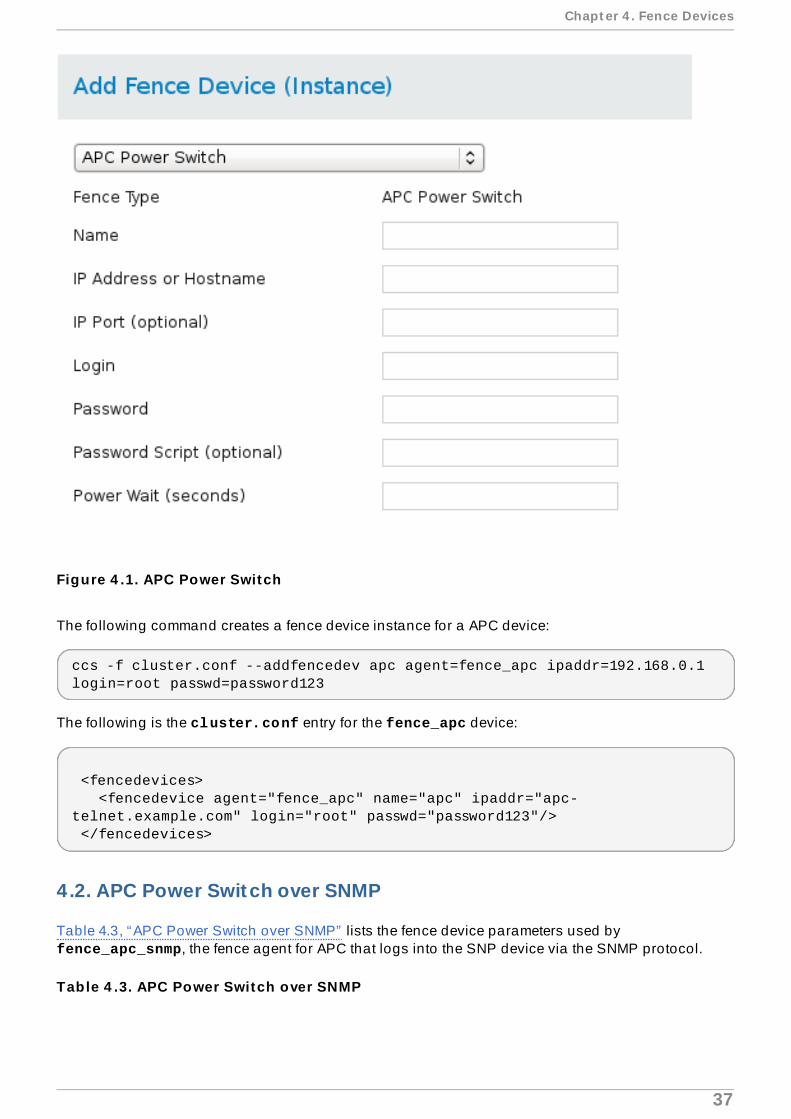
Figure 4 .1. APC Power Switch
The following command creates a fence device instance for a APC device:
ccs -f cluster.conf --addfencedev apc agent=fence_apc ipaddr=192.168.0.1 login=root passwd=password123
The following is the cluster.conf entry for the fence_apc device:
<fencedevices> <fencedevice agent="fence_apc" name="apc" ipaddr="apc-telnet.example.com" login="root" passwd="password123"/> </fencedevices>
4.2. APC Power Switch over SNMP
Table 4.3, “APC Power Switch over SNMP” lists the fence device parameters used by fence_apc_snmp, the fence agent for APC that logs into the SNP device via the SNMP protocol.
Table 4 .3. APC Power Switch over SNMP
Chapt er 4 . Fence Devices
37
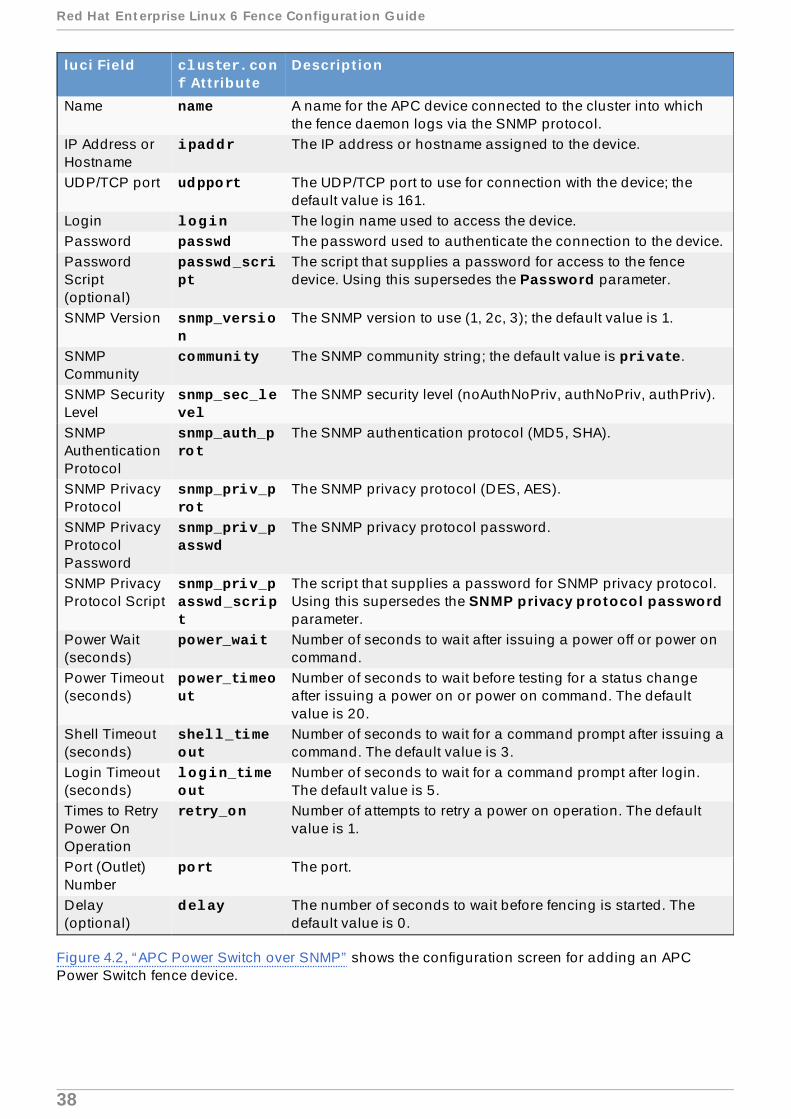
luci Field cluster.conf At t ribute
Descript ion
Name name A name for the APC device connected to the cluster into whichthe fence daemon logs via the SNMP protocol.
IP Address orHostname
ipaddr The IP address or hostname assigned to the device.
UDP/TCP port udpport The UDP/TCP port to use for connection with the device; thedefault value is 161.
Login login The login name used to access the device.Password passwd The password used to authenticate the connection to the device.PasswordScript(optional)
passwd_script
The script that supplies a password for access to the fencedevice. Using this supersedes the Password parameter.
SNMP Version snmp_version
The SNMP version to use (1, 2c, 3); the default value is 1.
SNMPCommunity
community The SNMP community string; the default value is private.
SNMP SecurityLevel
snmp_sec_level
The SNMP security level (noAuthNoPriv, authNoPriv, authPriv).
SNMPAuthenticationProtocol
snmp_auth_prot
The SNMP authentication protocol (MD5, SHA).
SNMP PrivacyProtocol
snmp_priv_prot
The SNMP privacy protocol (DES, AES).
SNMP PrivacyProtocolPassword
snmp_priv_passwd
The SNMP privacy protocol password.
SNMP PrivacyProtocol Script
snmp_priv_passwd_script
The script that supplies a password for SNMP privacy protocol.Using this supersedes the SNMP privacy protocol passwordparameter.
Power Wait(seconds)
power_wait Number of seconds to wait after issuing a power off or power oncommand.
Power Timeout(seconds)
power_timeout
Number of seconds to wait before testing for a status changeafter issuing a power on or power on command. The defaultvalue is 20.
Shell Timeout(seconds)
shell_timeout
Number of seconds to wait for a command prompt after issuing acommand. The default value is 3.
Login Timeout(seconds)
login_timeout
Number of seconds to wait for a command prompt after login.The default value is 5.
Times to RetryPower OnOperation
retry_on Number of attempts to retry a power on operation. The defaultvalue is 1.
Port (Outlet)Number
port The port.
Delay(optional)
delay The number of seconds to wait before fencing is started. Thedefault value is 0.
Figure 4.2, “APC Power Switch over SNMP” shows the configuration screen for adding an APCPower Switch fence device.
Red Hat Ent erprise Linux 6 Fence Configurat ion Guide
38
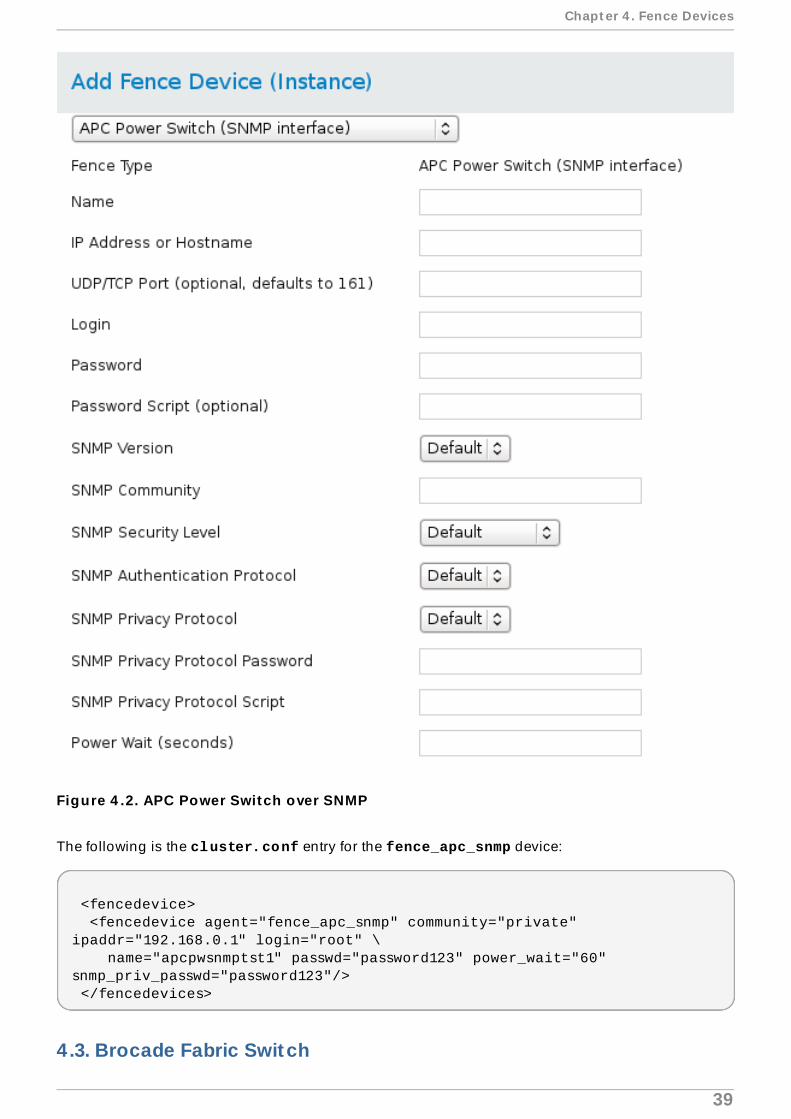
Figure 4 .2. APC Power Switch over SNMP
The following is the cluster.conf entry for the fence_apc_snmp device:
<fencedevice> <fencedevice agent="fence_apc_snmp" community="private" ipaddr="192.168.0.1" login="root" \ name="apcpwsnmptst1" passwd="password123" power_wait="60" snmp_priv_passwd="password123"/> </fencedevices>
4.3. Brocade Fabric Switch
Chapt er 4 . Fence Devices
39
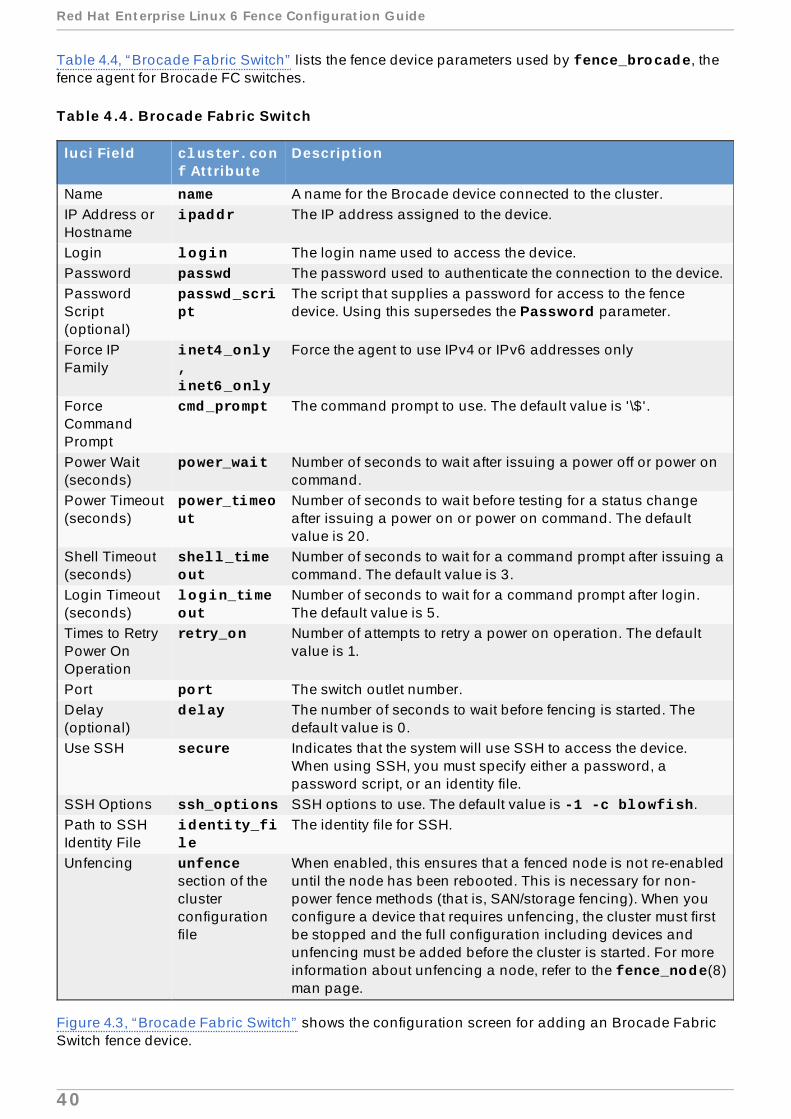
Table 4.4, “Brocade Fabric Switch” lists the fence device parameters used by fence_brocade, thefence agent for Brocade FC switches.
Table 4 .4 . Brocade Fabric Switch
luci Field cluster.conf At t ribute
Descript ion
Name name A name for the Brocade device connected to the cluster.IP Address orHostname
ipaddr The IP address assigned to the device.
Login login The login name used to access the device.Password passwd The password used to authenticate the connection to the device.PasswordScript(optional)
passwd_script
The script that supplies a password for access to the fencedevice. Using this supersedes the Password parameter.
Force IPFamily
inet4_only, inet6_only
Force the agent to use IPv4 or IPv6 addresses only
ForceCommandPrompt
cmd_prompt The command prompt to use. The default value is ' \$'.
Power Wait(seconds)
power_wait Number of seconds to wait after issuing a power off or power oncommand.
Power Timeout(seconds)
power_timeout
Number of seconds to wait before testing for a status changeafter issuing a power on or power on command. The defaultvalue is 20.
Shell Timeout(seconds)
shell_timeout
Number of seconds to wait for a command prompt after issuing acommand. The default value is 3.
Login Timeout(seconds)
login_timeout
Number of seconds to wait for a command prompt after login.The default value is 5.
Times to RetryPower OnOperation
retry_on Number of attempts to retry a power on operation. The defaultvalue is 1.
Port port The switch outlet number.Delay(optional)
delay The number of seconds to wait before fencing is started. Thedefault value is 0.
Use SSH secure Indicates that the system will use SSH to access the device.When using SSH, you must specify either a password, apassword script, or an identity file.
SSH Options ssh_options SSH options to use. The default value is -1 -c blowfish.Path to SSHIdentity File
identity_file
The identity file for SSH.
Unfencing unfencesection of theclusterconfigurationfile
When enabled, this ensures that a fenced node is not re-enableduntil the node has been rebooted. This is necessary for non-power fence methods (that is, SAN/storage fencing). When youconfigure a device that requires unfencing, the cluster must firstbe stopped and the full configuration including devices andunfencing must be added before the cluster is started. For moreinformation about unfencing a node, refer to the fence_node(8)man page.
Figure 4.3, “Brocade Fabric Switch” shows the configuration screen for adding an Brocade FabricSwitch fence device.
Red Hat Ent erprise Linux 6 Fence Configurat ion Guide
4 0
Figure 4 .3. Brocade Fabric Switch
The following command creates a fence device instance for a Brocade device:
ccs -f cluster.conf --addfencedev brocadetest agent=fence_brocade ipaddr=brocadetest.example.com login=root \ passwd=password123
The following is the cluster.conf entry for the fence_brocade device:
<fencedevices> <fencedevice agent="fence_brocade" ipaddr="brocadetest.example.com" login="brocadetest" \ name="brocadetest" passwd="brocadetest"/> </fencedevices>
4.4 . Cisco MDS
Table 4.5, “Cisco MDS” lists the fence device parameters used by fence_cisco_mds, the fenceagent for Cisco MDS.
Table 4 .5. Cisco MDS
luci Field cluster.conf At t ribute
Descript ion
Chapt er 4 . Fence Devices
4 1
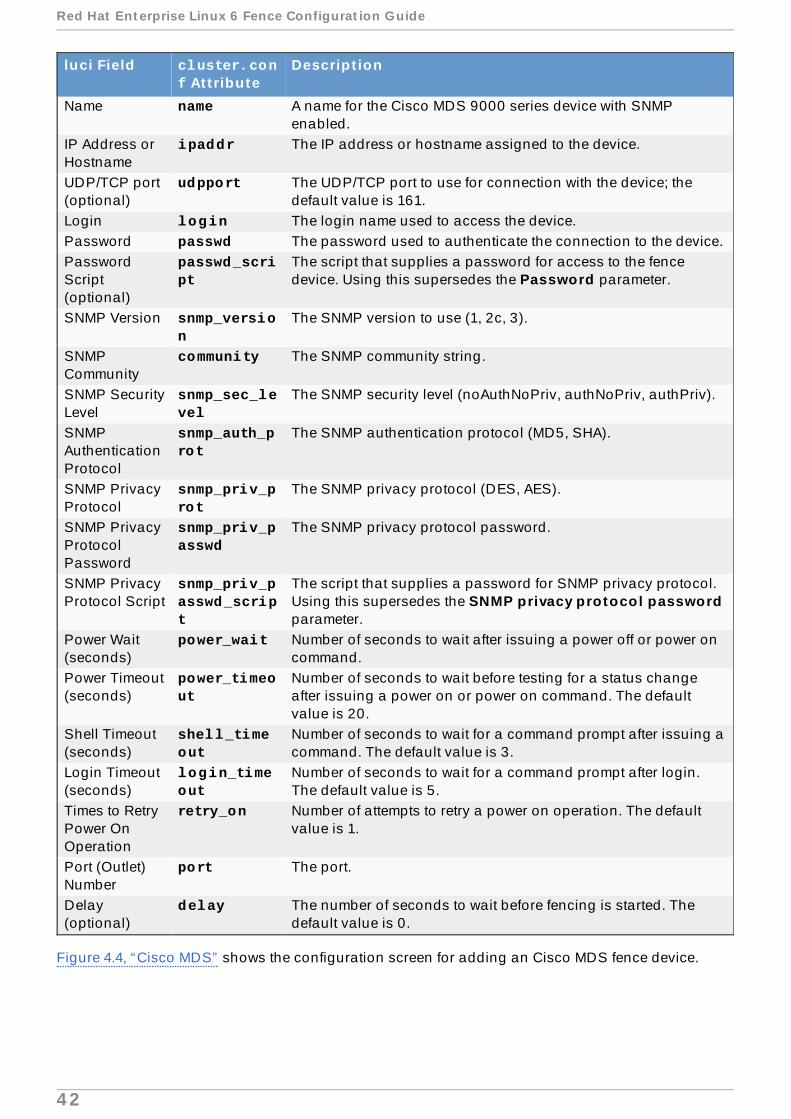
Name name A name for the Cisco MDS 9000 series device with SNMPenabled.
IP Address orHostname
ipaddr The IP address or hostname assigned to the device.
UDP/TCP port(optional)
udpport The UDP/TCP port to use for connection with the device; thedefault value is 161.
Login login The login name used to access the device.Password passwd The password used to authenticate the connection to the device.PasswordScript(optional)
passwd_script
The script that supplies a password for access to the fencedevice. Using this supersedes the Password parameter.
SNMP Version snmp_version
The SNMP version to use (1, 2c, 3).
SNMPCommunity
community The SNMP community string.
SNMP SecurityLevel
snmp_sec_level
The SNMP security level (noAuthNoPriv, authNoPriv, authPriv).
SNMPAuthenticationProtocol
snmp_auth_prot
The SNMP authentication protocol (MD5, SHA).
SNMP PrivacyProtocol
snmp_priv_prot
The SNMP privacy protocol (DES, AES).
SNMP PrivacyProtocolPassword
snmp_priv_passwd
The SNMP privacy protocol password.
SNMP PrivacyProtocol Script
snmp_priv_passwd_script
The script that supplies a password for SNMP privacy protocol.Using this supersedes the SNMP privacy protocol passwordparameter.
Power Wait(seconds)
power_wait Number of seconds to wait after issuing a power off or power oncommand.
Power Timeout(seconds)
power_timeout
Number of seconds to wait before testing for a status changeafter issuing a power on or power on command. The defaultvalue is 20.
Shell Timeout(seconds)
shell_timeout
Number of seconds to wait for a command prompt after issuing acommand. The default value is 3.
Login Timeout(seconds)
login_timeout
Number of seconds to wait for a command prompt after login.The default value is 5.
Times to RetryPower OnOperation
retry_on Number of attempts to retry a power on operation. The defaultvalue is 1.
Port (Outlet)Number
port The port.
Delay(optional)
delay The number of seconds to wait before fencing is started. Thedefault value is 0.
luci Field cluster.conf At t ribute
Descript ion
Figure 4.4, “Cisco MDS” shows the configuration screen for adding an Cisco MDS fence device.
Red Hat Ent erprise Linux 6 Fence Configurat ion Guide
4 2

Figure 4 .4 . Cisco MDS
The following command creates a fence device instance for a Cisco MDS device:
ccs -f cluster.conf --addfencedev mds agent=fence_cisco_mds ipaddr=192.168.0.1 name=ciscomdstest1 login=root \ passwd=password123 power_wait=60 snmp_priv_passwd=password123 udpport=161
The following is the cluster.conf entry for the fence_cisco_mds device:
Chapt er 4 . Fence Devices
4 3
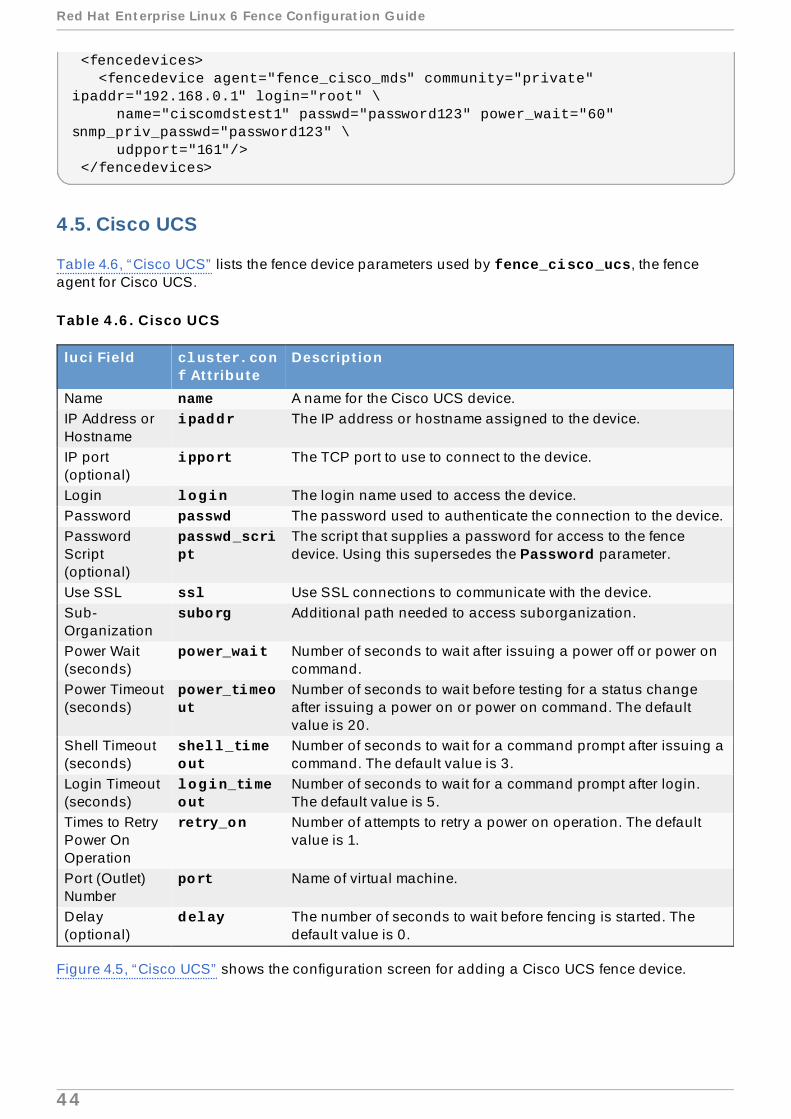
<fencedevices> <fencedevice agent="fence_cisco_mds" community="private" ipaddr="192.168.0.1" login="root" \ name="ciscomdstest1" passwd="password123" power_wait="60" snmp_priv_passwd="password123" \ udpport="161"/> </fencedevices>
4.5. Cisco UCS
Table 4.6, “Cisco UCS” lists the fence device parameters used by fence_cisco_ucs, the fenceagent for Cisco UCS.
Table 4 .6 . Cisco UCS
luci Field cluster.conf At t ribute
Descript ion
Name name A name for the Cisco UCS device.IP Address orHostname
ipaddr The IP address or hostname assigned to the device.
IP port(optional)
ipport The TCP port to use to connect to the device.
Login login The login name used to access the device.Password passwd The password used to authenticate the connection to the device.PasswordScript(optional)
passwd_script
The script that supplies a password for access to the fencedevice. Using this supersedes the Password parameter.
Use SSL ssl Use SSL connections to communicate with the device.Sub-Organization
suborg Additional path needed to access suborganization.
Power Wait(seconds)
power_wait Number of seconds to wait after issuing a power off or power oncommand.
Power Timeout(seconds)
power_timeout
Number of seconds to wait before testing for a status changeafter issuing a power on or power on command. The defaultvalue is 20.
Shell Timeout(seconds)
shell_timeout
Number of seconds to wait for a command prompt after issuing acommand. The default value is 3.
Login Timeout(seconds)
login_timeout
Number of seconds to wait for a command prompt after login.The default value is 5.
Times to RetryPower OnOperation
retry_on Number of attempts to retry a power on operation. The defaultvalue is 1.
Port (Outlet)Number
port Name of virtual machine.
Delay(optional)
delay The number of seconds to wait before fencing is started. Thedefault value is 0.
Figure 4.5, “Cisco UCS” shows the configuration screen for adding a Cisco UCS fence device.
Red Hat Ent erprise Linux 6 Fence Configurat ion Guide
4 4

Figure 4 .5. Cisco UCS
The following command creates a fence device instance for a Cisco UCS device:
ccs -f cluster.conf --addfencedev ucs agent=fence_cisco_ucs ipaddr=192.168.0.1 login=root passwd=password123 \ suborg=/org-RHEL/org-Fence/
The following is an example cluster.conf entry for the fence_cisco_ucs device as createdusing either Conga or ccs:
<fencedevices> <fencedevice agent="fence_cisco_ucs" ipaddr="192.168.0.1" login="root" name="ciscoucstest1" \ passwd="password123" power_wait="60" ssl="on" suborg="/org-RHEL/org-Fence/"/> </fencedevices>
4.6. Dell Drac 5
Chapt er 4 . Fence Devices
4 5
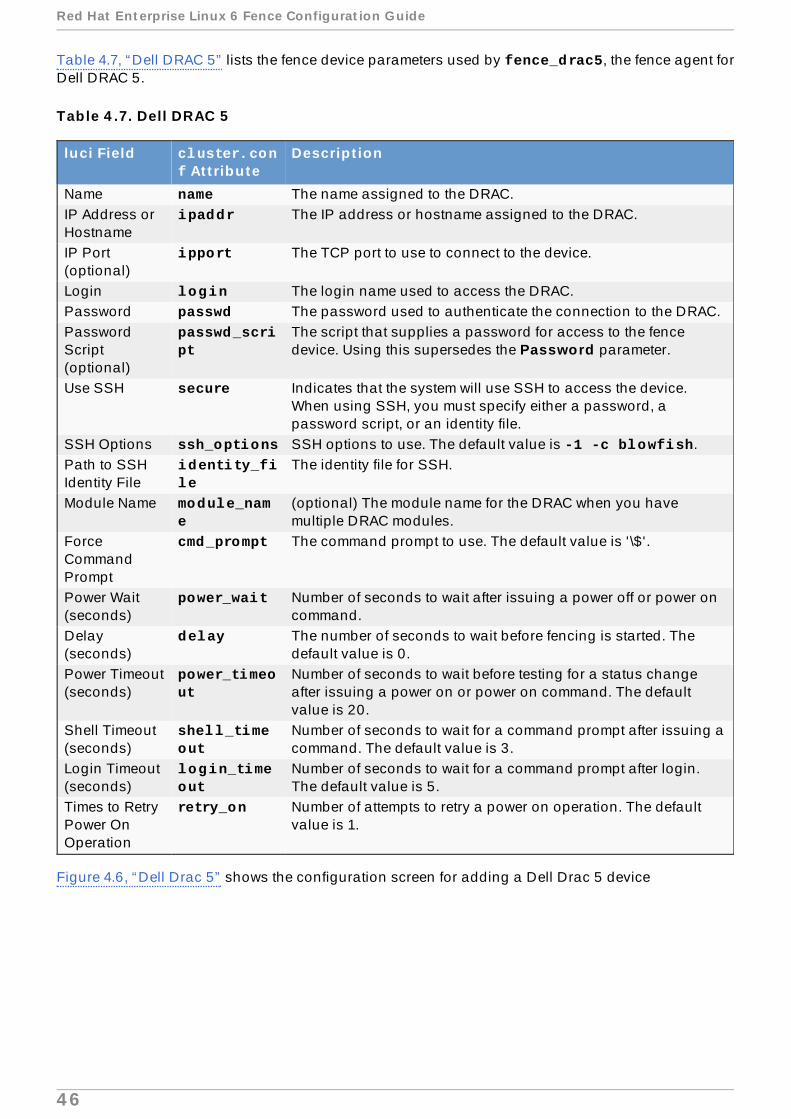
Table 4.7, “Dell DRAC 5” lists the fence device parameters used by fence_drac5, the fence agent forDell DRAC 5.
Table 4 .7. Dell DRAC 5
luci Field cluster.conf At t ribute
Descript ion
Name name The name assigned to the DRAC.IP Address orHostname
ipaddr The IP address or hostname assigned to the DRAC.
IP Port(optional)
ipport The TCP port to use to connect to the device.
Login login The login name used to access the DRAC.Password passwd The password used to authenticate the connection to the DRAC.PasswordScript(optional)
passwd_script
The script that supplies a password for access to the fencedevice. Using this supersedes the Password parameter.
Use SSH secure Indicates that the system will use SSH to access the device.When using SSH, you must specify either a password, apassword script, or an identity file.
SSH Options ssh_options SSH options to use. The default value is -1 -c blowfish.Path to SSHIdentity File
identity_file
The identity file for SSH.
Module Name module_name
(optional) The module name for the DRAC when you havemultiple DRAC modules.
ForceCommandPrompt
cmd_prompt The command prompt to use. The default value is ' \$'.
Power Wait(seconds)
power_wait Number of seconds to wait after issuing a power off or power oncommand.
Delay(seconds)
delay The number of seconds to wait before fencing is started. Thedefault value is 0.
Power Timeout(seconds)
power_timeout
Number of seconds to wait before testing for a status changeafter issuing a power on or power on command. The defaultvalue is 20.
Shell Timeout(seconds)
shell_timeout
Number of seconds to wait for a command prompt after issuing acommand. The default value is 3.
Login Timeout(seconds)
login_timeout
Number of seconds to wait for a command prompt after login.The default value is 5.
Times to RetryPower OnOperation
retry_on Number of attempts to retry a power on operation. The defaultvalue is 1.
Figure 4.6, “Dell Drac 5” shows the configuration screen for adding a Dell Drac 5 device
Red Hat Ent erprise Linux 6 Fence Configurat ion Guide
4 6
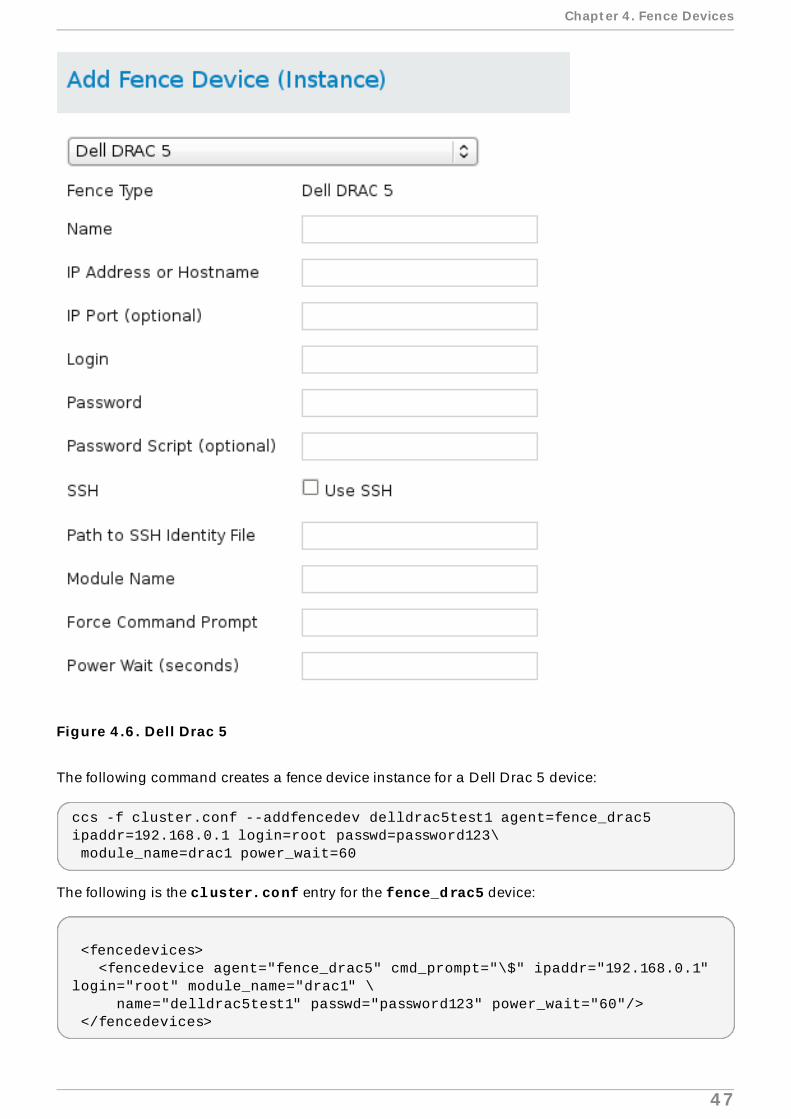
Figure 4 .6 . Dell Drac 5
The following command creates a fence device instance for a Dell Drac 5 device:
ccs -f cluster.conf --addfencedev delldrac5test1 agent=fence_drac5 ipaddr=192.168.0.1 login=root passwd=password123\ module_name=drac1 power_wait=60
The following is the cluster.conf entry for the fence_drac5 device:
<fencedevices> <fencedevice agent="fence_drac5" cmd_prompt="\$" ipaddr="192.168.0.1" login="root" module_name="drac1" \ name="delldrac5test1" passwd="password123" power_wait="60"/> </fencedevices>
Chapt er 4 . Fence Devices
4 7
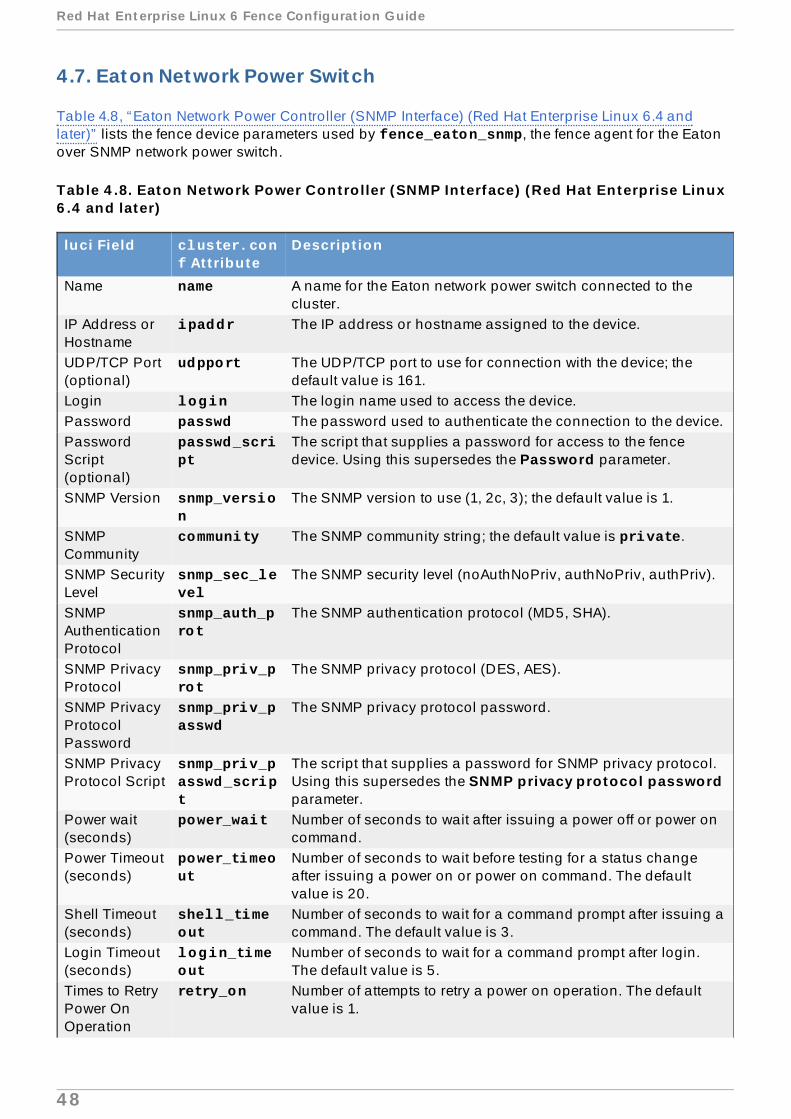
4.7. Eaton Network Power Switch
Table 4.8, “Eaton Network Power Controller (SNMP Interface) (Red Hat Enterprise Linux 6.4 andlater)” lists the fence device parameters used by fence_eaton_snmp, the fence agent for the Eatonover SNMP network power switch.
Table 4 .8. Eaton Network Power Contro ller (SNMP Interface) (Red Hat Enterprise Linux6 .4 and later)
luci Field cluster.conf At t ribute
Descript ion
Name name A name for the Eaton network power switch connected to thecluster.
IP Address orHostname
ipaddr The IP address or hostname assigned to the device.
UDP/TCP Port(optional)
udpport The UDP/TCP port to use for connection with the device; thedefault value is 161.
Login login The login name used to access the device.Password passwd The password used to authenticate the connection to the device.PasswordScript(optional)
passwd_script
The script that supplies a password for access to the fencedevice. Using this supersedes the Password parameter.
SNMP Version snmp_version
The SNMP version to use (1, 2c, 3); the default value is 1.
SNMPCommunity
community The SNMP community string; the default value is private.
SNMP SecurityLevel
snmp_sec_level
The SNMP security level (noAuthNoPriv, authNoPriv, authPriv).
SNMPAuthenticationProtocol
snmp_auth_prot
The SNMP authentication protocol (MD5, SHA).
SNMP PrivacyProtocol
snmp_priv_prot
The SNMP privacy protocol (DES, AES).
SNMP PrivacyProtocolPassword
snmp_priv_passwd
The SNMP privacy protocol password.
SNMP PrivacyProtocol Script
snmp_priv_passwd_script
The script that supplies a password for SNMP privacy protocol.Using this supersedes the SNMP privacy protocol passwordparameter.
Power wait(seconds)
power_wait Number of seconds to wait after issuing a power off or power oncommand.
Power Timeout(seconds)
power_timeout
Number of seconds to wait before testing for a status changeafter issuing a power on or power on command. The defaultvalue is 20.
Shell Timeout(seconds)
shell_timeout
Number of seconds to wait for a command prompt after issuing acommand. The default value is 3.
Login Timeout(seconds)
login_timeout
Number of seconds to wait for a command prompt after login.The default value is 5.
Times to RetryPower OnOperation
retry_on Number of attempts to retry a power on operation. The defaultvalue is 1.
Red Hat Ent erprise Linux 6 Fence Configurat ion Guide
4 8
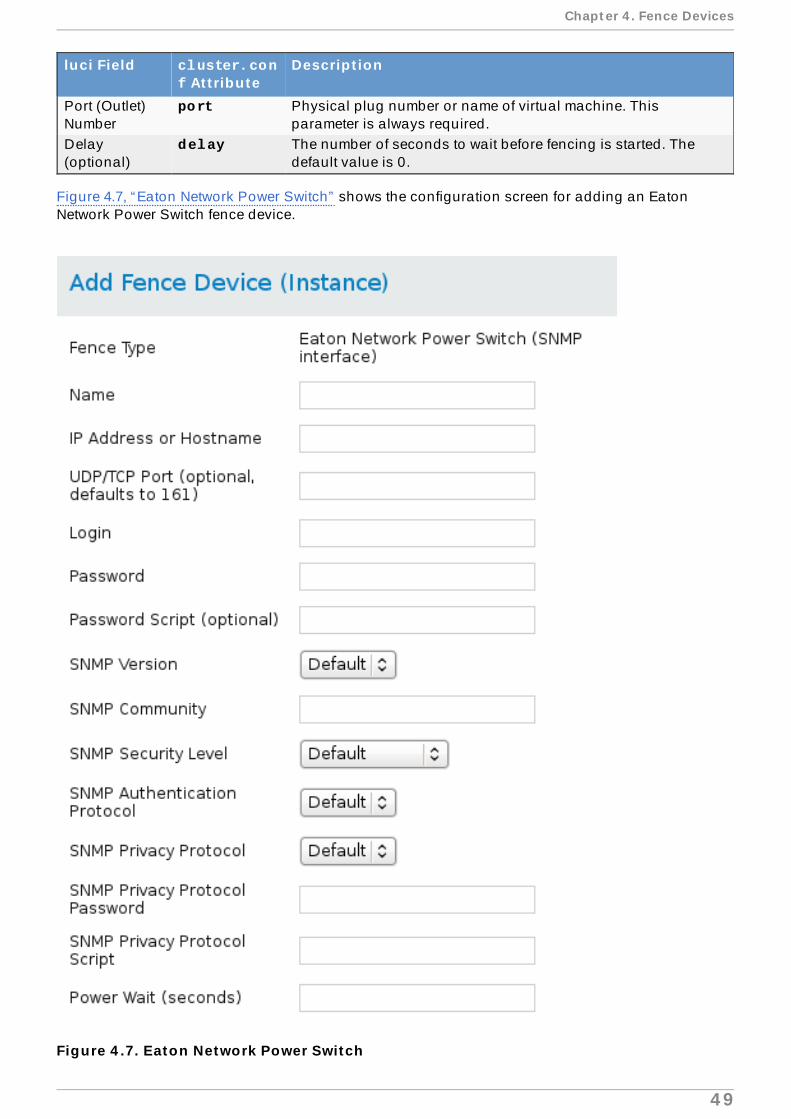
Port (Outlet)Number
port Physical plug number or name of virtual machine. Thisparameter is always required.
Delay(optional)
delay The number of seconds to wait before fencing is started. Thedefault value is 0.
luci Field cluster.conf At t ribute
Descript ion
Figure 4.7, “Eaton Network Power Switch” shows the configuration screen for adding an EatonNetwork Power Switch fence device.
Figure 4 .7. Eaton Network Power Switch
Chapt er 4 . Fence Devices
4 9
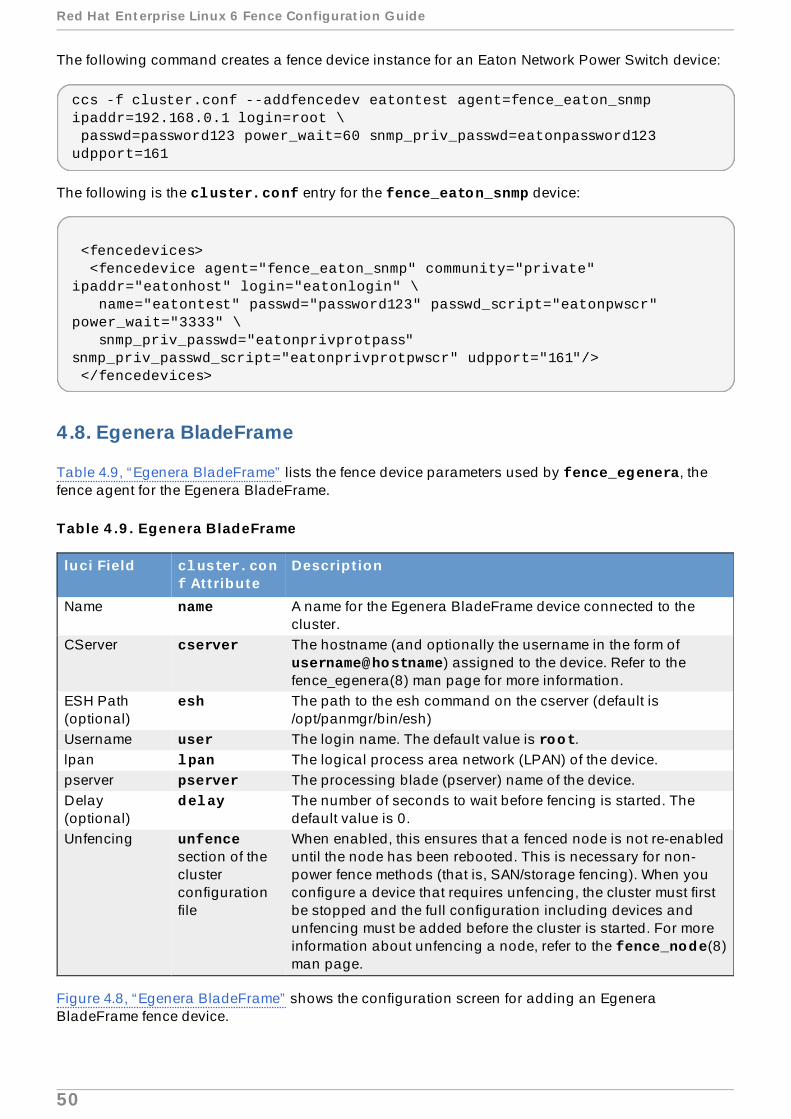
The following command creates a fence device instance for an Eaton Network Power Switch device:
ccs -f cluster.conf --addfencedev eatontest agent=fence_eaton_snmp ipaddr=192.168.0.1 login=root \ passwd=password123 power_wait=60 snmp_priv_passwd=eatonpassword123 udpport=161
The following is the cluster.conf entry for the fence_eaton_snmp device:
<fencedevices> <fencedevice agent="fence_eaton_snmp" community="private" ipaddr="eatonhost" login="eatonlogin" \ name="eatontest" passwd="password123" passwd_script="eatonpwscr" power_wait="3333" \ snmp_priv_passwd="eatonprivprotpass" snmp_priv_passwd_script="eatonprivprotpwscr" udpport="161"/> </fencedevices>
4.8. Egenera BladeFrame
Table 4.9, “Egenera BladeFrame” lists the fence device parameters used by fence_egenera, thefence agent for the Egenera BladeFrame.
Table 4 .9 . Egenera BladeFrame
luci Field cluster.conf At t ribute
Descript ion
Name name A name for the Egenera BladeFrame device connected to thecluster.
CServer cserver The hostname (and optionally the username in the form of username@hostname) assigned to the device. Refer to thefence_egenera(8) man page for more information.
ESH Path(optional)
esh The path to the esh command on the cserver (default is/opt/panmgr/bin/esh)
Username user The login name. The default value is root.lpan lpan The logical process area network (LPAN) of the device.pserver pserver The processing blade (pserver) name of the device.Delay(optional)
delay The number of seconds to wait before fencing is started. Thedefault value is 0.
Unfencing unfencesection of theclusterconfigurationfile
When enabled, this ensures that a fenced node is not re-enableduntil the node has been rebooted. This is necessary for non-power fence methods (that is, SAN/storage fencing). When youconfigure a device that requires unfencing, the cluster must firstbe stopped and the full configuration including devices andunfencing must be added before the cluster is started. For moreinformation about unfencing a node, refer to the fence_node(8)man page.
Figure 4.8, “Egenera BladeFrame” shows the configuration screen for adding an EgeneraBladeFrame fence device.
Red Hat Ent erprise Linux 6 Fence Configurat ion Guide
50
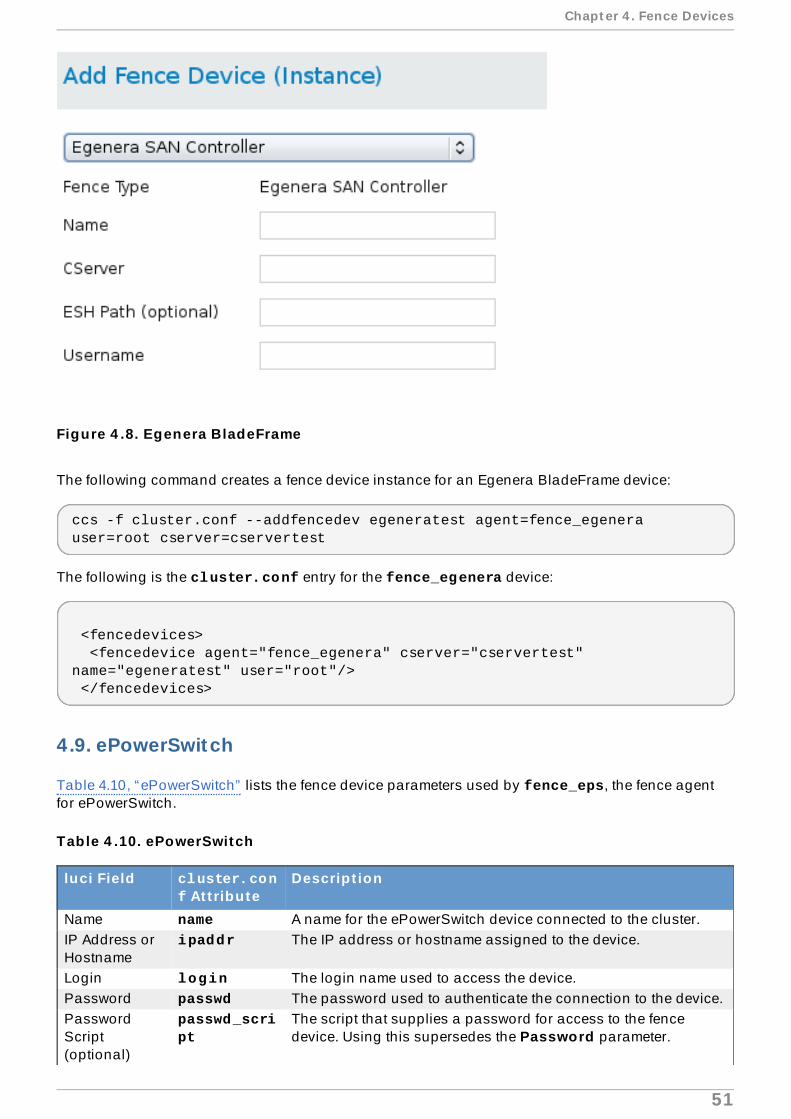
Figure 4 .8. Egenera BladeFrame
The following command creates a fence device instance for an Egenera BladeFrame device:
ccs -f cluster.conf --addfencedev egeneratest agent=fence_egenera user=root cserver=cservertest
The following is the cluster.conf entry for the fence_egenera device:
<fencedevices> <fencedevice agent="fence_egenera" cserver="cservertest" name="egeneratest" user="root"/> </fencedevices>
4.9. ePowerSwitch
Table 4.10, “ePowerSwitch” lists the fence device parameters used by fence_eps, the fence agentfor ePowerSwitch.
Table 4 .10. ePowerSwitch
luci Field cluster.conf At t ribute
Descript ion
Name name A name for the ePowerSwitch device connected to the cluster.IP Address orHostname
ipaddr The IP address or hostname assigned to the device.
Login login The login name used to access the device.Password passwd The password used to authenticate the connection to the device.PasswordScript(optional)
passwd_script
The script that supplies a password for access to the fencedevice. Using this supersedes the Password parameter.
Chapt er 4 . Fence Devices
51
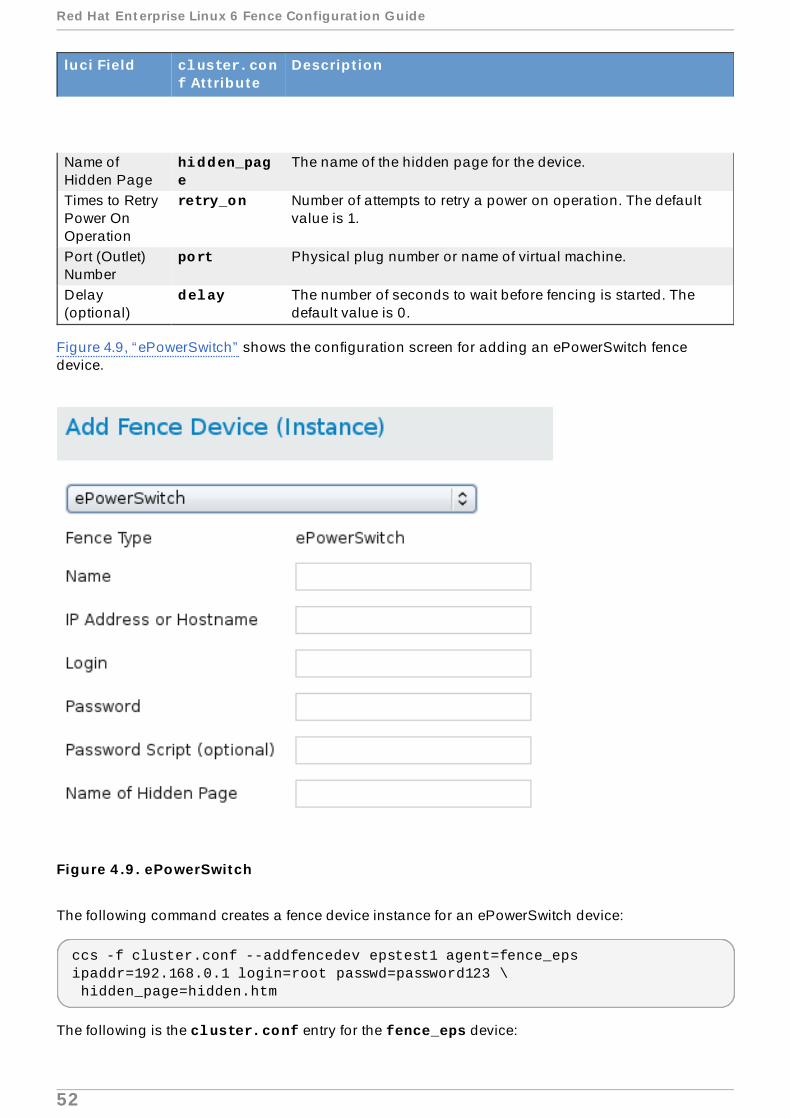
Name ofHidden Page
hidden_page
The name of the hidden page for the device.
Times to RetryPower OnOperation
retry_on Number of attempts to retry a power on operation. The defaultvalue is 1.
Port (Outlet)Number
port Physical plug number or name of virtual machine.
Delay(optional)
delay The number of seconds to wait before fencing is started. Thedefault value is 0.
luci Field cluster.conf At t ribute
Descript ion
Figure 4.9, “ePowerSwitch” shows the configuration screen for adding an ePowerSwitch fencedevice.
Figure 4 .9 . ePowerSwitch
The following command creates a fence device instance for an ePowerSwitch device:
ccs -f cluster.conf --addfencedev epstest1 agent=fence_eps ipaddr=192.168.0.1 login=root passwd=password123 \ hidden_page=hidden.htm
The following is the cluster.conf entry for the fence_eps device:
Red Hat Ent erprise Linux 6 Fence Configurat ion Guide
52
<fencedevices> <fencedevice agent="fence_eps" hidden_page="hidden.htm" ipaddr="192.168.0.1" login="root" name="epstest1" \ passwd="password123"/> </fencedevices>
4.10. Fence kdump
Table 4.11, “Fence kdump” lists the fence device parameters used by fence_dkump, the fence agentfor kdump crash recovery service. Note that fence_kdump is not a replacement for traditionalfencing methods; The fence_kdump agent can detect only that a node has entered the kdump crashrecovery service. This allows the kdump crash recovery service to complete without being preemptedby traditional power fencing methods.
Table 4 .11. Fence kdump
luci Field cluster.conf At t ribute
Descript ion
Name name A name for the fence_kdump device.IP Family family IP network family. The default value is auto .IP Port(optional)
ipport IP port number that the fence_kdump agent will use to listen formessages. The default value is 7410.
OperationTimeout(seconds)(optional)
timeout Number of seconds to wait for message from failed node.
Node name nodename Name or IP address of the node to be fenced.
4.11. Fence Virt
Table 4.12, “Fence virt” lists the fence device parameters used by fence_virt, the fence agent for aFence virt fence device.
Table 4 .12. Fence virt
luci Field cluster.conf At t ribute
Descript ion
Name name A name for the Fence virt fence device.Serial Device serial_dev
iceOn the host, the serial device must be mapped in each domain'sconfiguration file. For more information, see the fence_virt.conf man page. If this field is specified, it causesthe fence_virt fencing agent to operate in serial mode. Notspecifying a value causes the fence_virt fencing agent tooperate in VM channel mode.
SerialParameters
serial_params
The serial parameters. The default is 115200, 8N1.
VM Channel IPAddress
channel_address
The channel IP. The default value is 10.0.2.179.
Chapt er 4 . Fence Devices
53
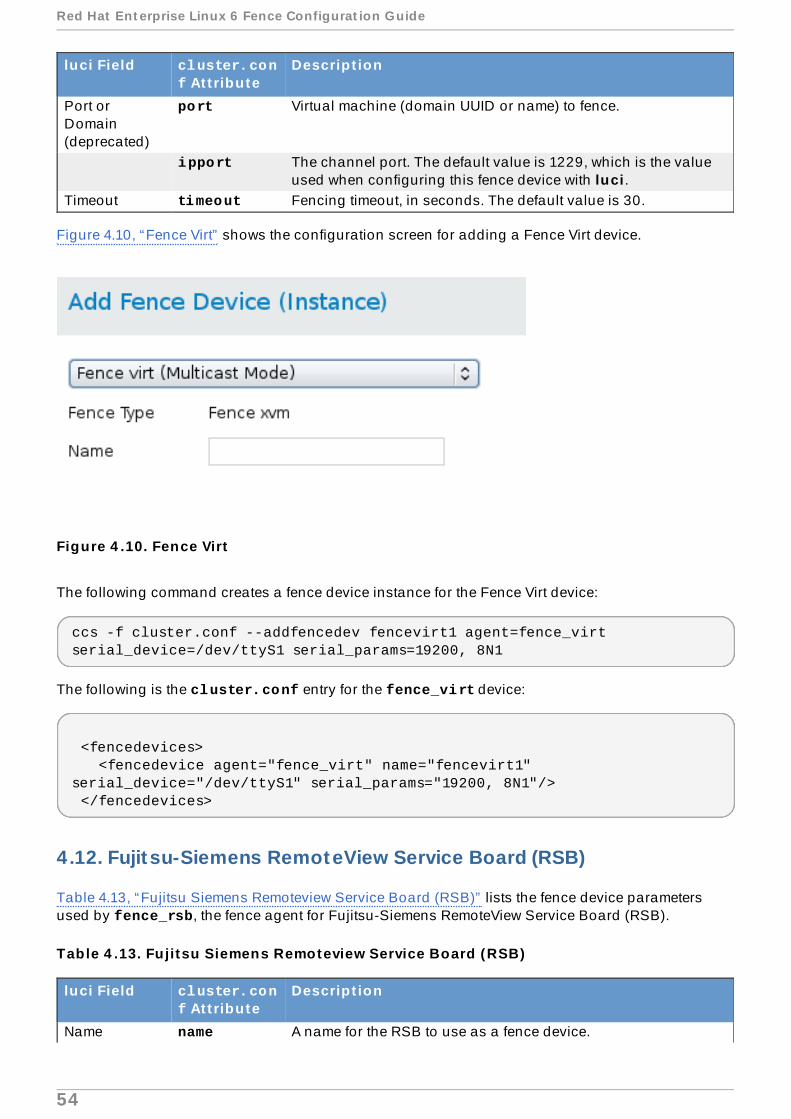
Port orDomain(deprecated)
port Virtual machine (domain UUID or name) to fence.
ipport The channel port. The default value is 1229, which is the valueused when configuring this fence device with luci .
Timeout timeout Fencing timeout, in seconds. The default value is 30.
luci Field cluster.conf At t ribute
Descript ion
Figure 4.10, “Fence Virt” shows the configuration screen for adding a Fence Virt device.
Figure 4 .10. Fence Virt
The following command creates a fence device instance for the Fence Virt device:
ccs -f cluster.conf --addfencedev fencevirt1 agent=fence_virt serial_device=/dev/ttyS1 serial_params=19200, 8N1
The following is the cluster.conf entry for the fence_virt device:
<fencedevices> <fencedevice agent="fence_virt" name="fencevirt1" serial_device="/dev/ttyS1" serial_params="19200, 8N1"/> </fencedevices>
4.12. Fujit su-Siemens RemoteView Service Board (RSB)
Table 4.13, “Fujitsu Siemens Remoteview Service Board (RSB)” lists the fence device parametersused by fence_rsb, the fence agent for Fujitsu-Siemens RemoteView Service Board (RSB).
Table 4 .13. Fujitsu Siemens Remoteview Service Board (RSB)
luci Field cluster.conf At t ribute
Descript ion
Name name A name for the RSB to use as a fence device.
Red Hat Ent erprise Linux 6 Fence Configurat ion Guide
54
IP Address orHostname
ipaddr The hostname assigned to the device.
Login login The login name used to access the device.Password passwd The password used to authenticate the connection to the device.PasswordScript(optional)
passwd_script
The script that supplies a password for access to the fencedevice. Using this supersedes the Password parameter.
TCP Port ipport The port number on which the telnet service listens. The defaultvalue is 3172.
ForceCommandPrompt
cmd_prompt The command prompt to use. The default value is ' \$'.
Power Wait(seconds)
power_wait Number of seconds to wait after issuing a power off or power oncommand.
Delay(seconds)
delay The number of seconds to wait before fencing is started. Thedefault value is 0.
Power Timeout(seconds)
power_timeout
Number of seconds to wait before testing for a status changeafter issuing a power on or power on command. The defaultvalue is 20.
Shell Timeout(seconds)
shell_timeout
Number of seconds to wait for a command prompt after issuing acommand. The default value is 3.
Login Timeout(seconds)
login_timeout
Number of seconds to wait for a command prompt after login.The default value is 5.
Times to RetryPower OnOperation
retry_on Number of attempts to retry a power on operation. The defaultvalue is 1.
luci Field cluster.conf At t ribute
Descript ion
Figure 4.11, “Fujitsu-Siemens RSB” shows the configuration screen for adding an Fujitsu-SiemensRSB fence device.
Chapt er 4 . Fence Devices
55

Figure 4 .11. Fujitsu-Siemens RSB
The following command creates a fence device instance for a Fujiitsu-Siemens RSB device:
ccs -f cluster.conf --addfencedev fsrbtest1 agent=fence_rsb ipaddr=192.168.0.1 login=root passwd=password123 \ telnet_port=3172
The following is the cluster.conf entry for the fence_rsb device:
<fencedevices> <fencedevice agent="fence_rsb" ipaddr="192.168.0.1" login="root" name="fsrsbtest1" passwd="password123" telnet_port="3172"/> </fencedevices>
4.13. Hewlet t -Packard BladeSystem
Table 4.14, “HP BladeSystem (Red Hat Enterprise Linux 6.4 and later)” lists the fence deviceparameters used by fence_hpblade, the fence agent for HP BladeSystem.
Table 4 .14 . HP BladeSystem (Red Hat Enterprise Linux 6 .4 and later)
luci Field cluster.conf At t ribute
Descript ion
Red Hat Ent erprise Linux 6 Fence Configurat ion Guide
56
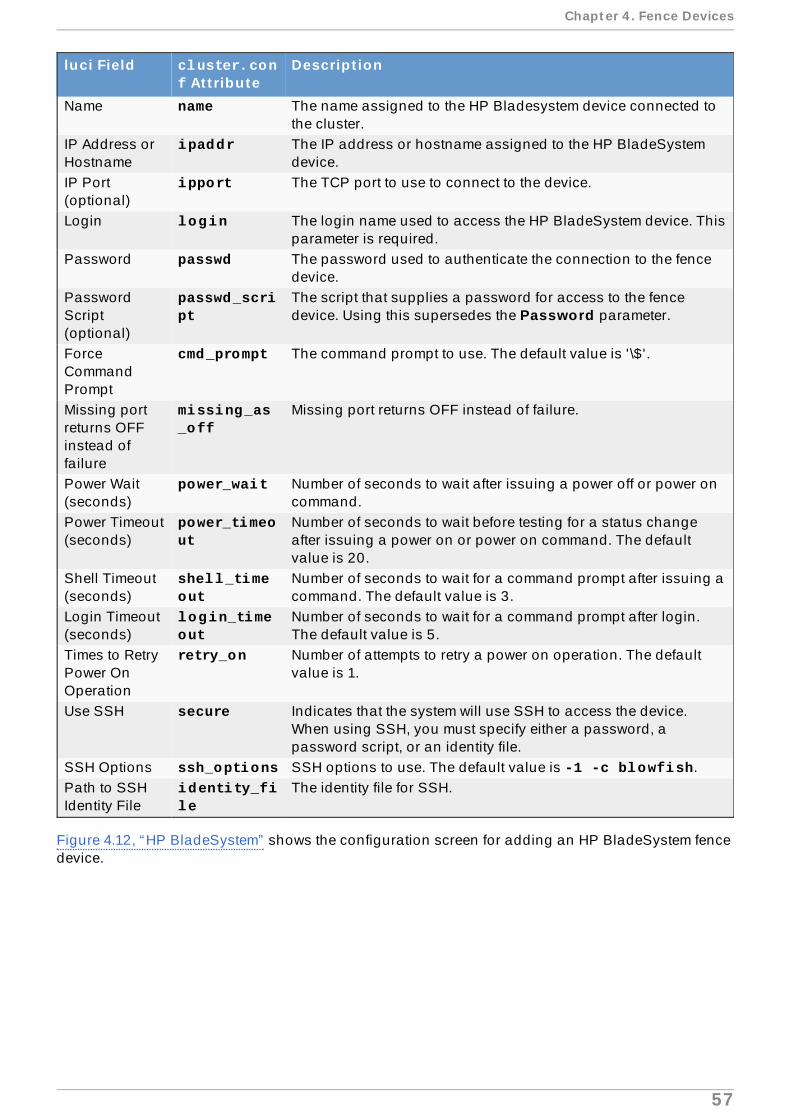
Name name The name assigned to the HP Bladesystem device connected tothe cluster.
IP Address orHostname
ipaddr The IP address or hostname assigned to the HP BladeSystemdevice.
IP Port(optional)
ipport The TCP port to use to connect to the device.
Login login The login name used to access the HP BladeSystem device. Thisparameter is required.
Password passwd The password used to authenticate the connection to the fencedevice.
PasswordScript(optional)
passwd_script
The script that supplies a password for access to the fencedevice. Using this supersedes the Password parameter.
ForceCommandPrompt
cmd_prompt The command prompt to use. The default value is ' \$'.
Missing portreturns OFFinstead offailure
missing_as_off
Missing port returns OFF instead of failure.
Power Wait(seconds)
power_wait Number of seconds to wait after issuing a power off or power oncommand.
Power Timeout(seconds)
power_timeout
Number of seconds to wait before testing for a status changeafter issuing a power on or power on command. The defaultvalue is 20.
Shell Timeout(seconds)
shell_timeout
Number of seconds to wait for a command prompt after issuing acommand. The default value is 3.
Login Timeout(seconds)
login_timeout
Number of seconds to wait for a command prompt after login.The default value is 5.
Times to RetryPower OnOperation
retry_on Number of attempts to retry a power on operation. The defaultvalue is 1.
Use SSH secure Indicates that the system will use SSH to access the device.When using SSH, you must specify either a password, apassword script, or an identity file.
SSH Options ssh_options SSH options to use. The default value is -1 -c blowfish.Path to SSHIdentity File
identity_file
The identity file for SSH.
luci Field cluster.conf At t ribute
Descript ion
Figure 4.12, “HP BladeSystem” shows the configuration screen for adding an HP BladeSystem fencedevice.
Chapt er 4 . Fence Devices
57
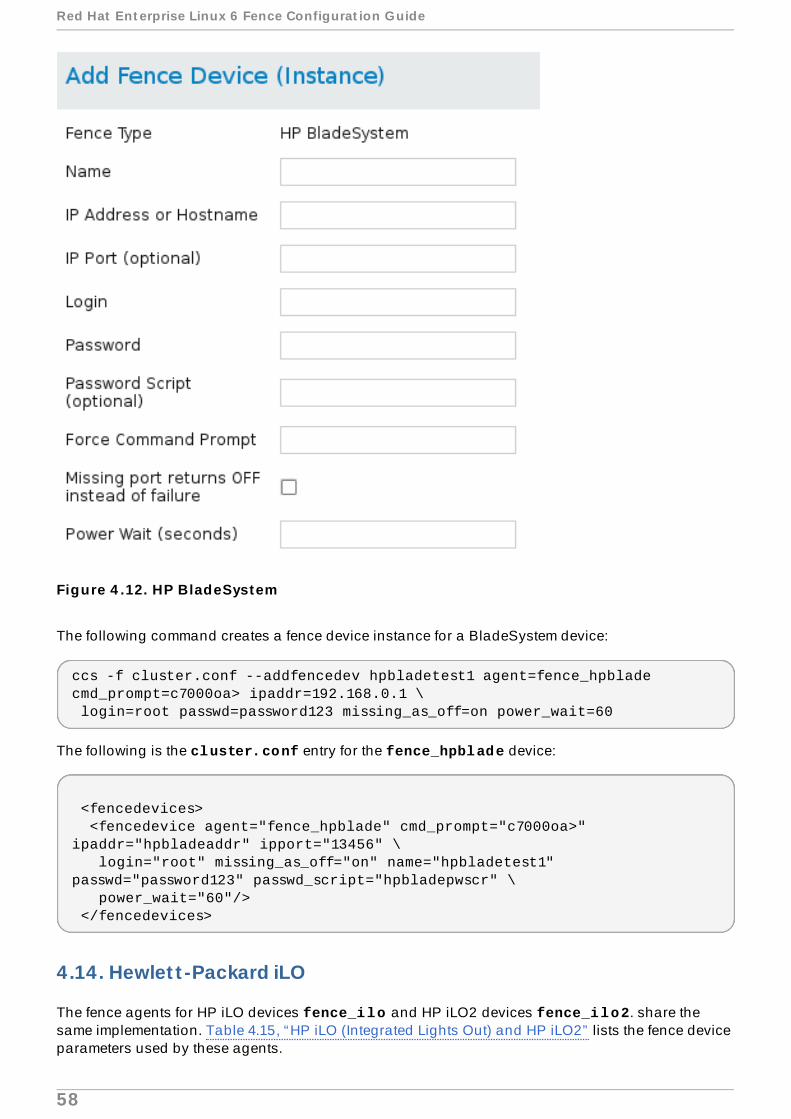
Figure 4 .12. HP BladeSystem
The following command creates a fence device instance for a BladeSystem device:
ccs -f cluster.conf --addfencedev hpbladetest1 agent=fence_hpblade cmd_prompt=c7000oa> ipaddr=192.168.0.1 \ login=root passwd=password123 missing_as_off=on power_wait=60
The following is the cluster.conf entry for the fence_hpblade device:
<fencedevices> <fencedevice agent="fence_hpblade" cmd_prompt="c7000oa>" ipaddr="hpbladeaddr" ipport="13456" \ login="root" missing_as_off="on" name="hpbladetest1" passwd="password123" passwd_script="hpbladepwscr" \ power_wait="60"/> </fencedevices>
4.14. Hewlet t -Packard iLO
The fence agents for HP iLO devices fence_ilo and HP iLO2 devices fence_ilo2. share thesame implementation. Table 4.15, “HP iLO (Integrated Lights Out) and HP iLO2” lists the fence deviceparameters used by these agents.
Red Hat Ent erprise Linux 6 Fence Configurat ion Guide
58
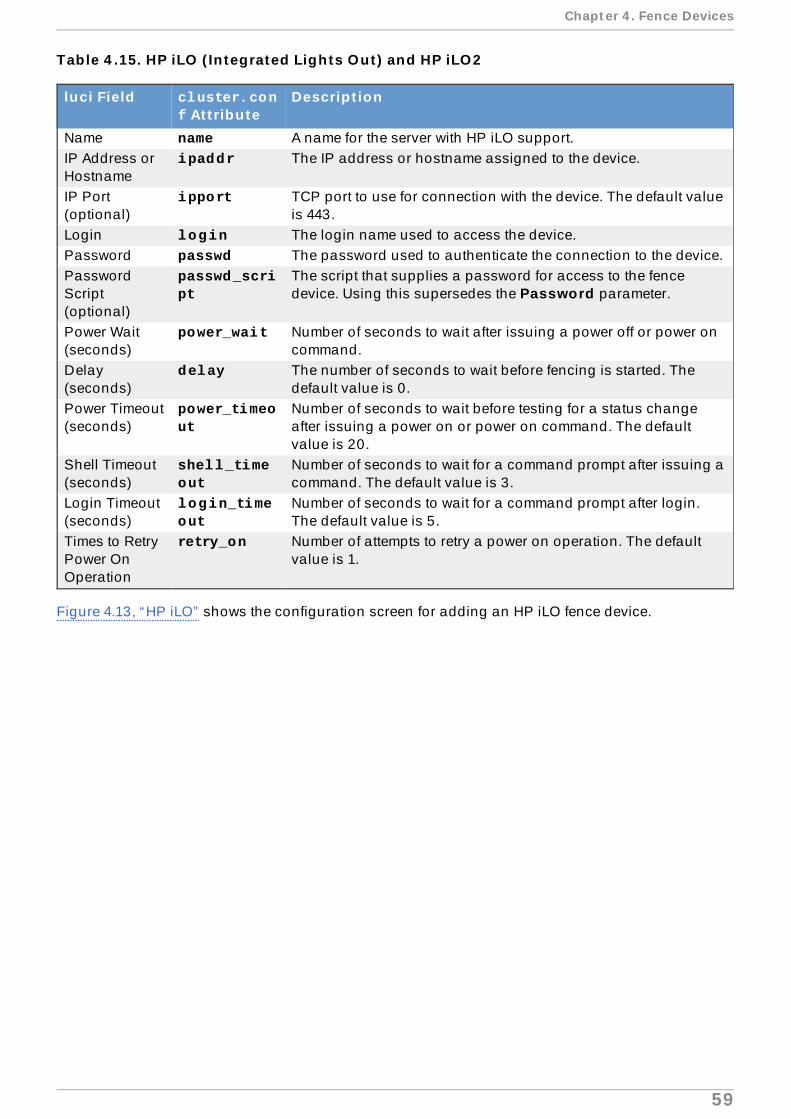
Table 4 .15. HP iLO ( In tegrated Lights Out ) and HP iLO2
luci Field cluster.conf At t ribute
Descript ion
Name name A name for the server with HP iLO support.IP Address orHostname
ipaddr The IP address or hostname assigned to the device.
IP Port(optional)
ipport TCP port to use for connection with the device. The default valueis 443.
Login login The login name used to access the device.Password passwd The password used to authenticate the connection to the device.PasswordScript(optional)
passwd_script
The script that supplies a password for access to the fencedevice. Using this supersedes the Password parameter.
Power Wait(seconds)
power_wait Number of seconds to wait after issuing a power off or power oncommand.
Delay(seconds)
delay The number of seconds to wait before fencing is started. Thedefault value is 0.
Power Timeout(seconds)
power_timeout
Number of seconds to wait before testing for a status changeafter issuing a power on or power on command. The defaultvalue is 20.
Shell Timeout(seconds)
shell_timeout
Number of seconds to wait for a command prompt after issuing acommand. The default value is 3.
Login Timeout(seconds)
login_timeout
Number of seconds to wait for a command prompt after login.The default value is 5.
Times to RetryPower OnOperation
retry_on Number of attempts to retry a power on operation. The defaultvalue is 1.
Figure 4.13, “HP iLO” shows the configuration screen for adding an HP iLO fence device.
Chapt er 4 . Fence Devices
59
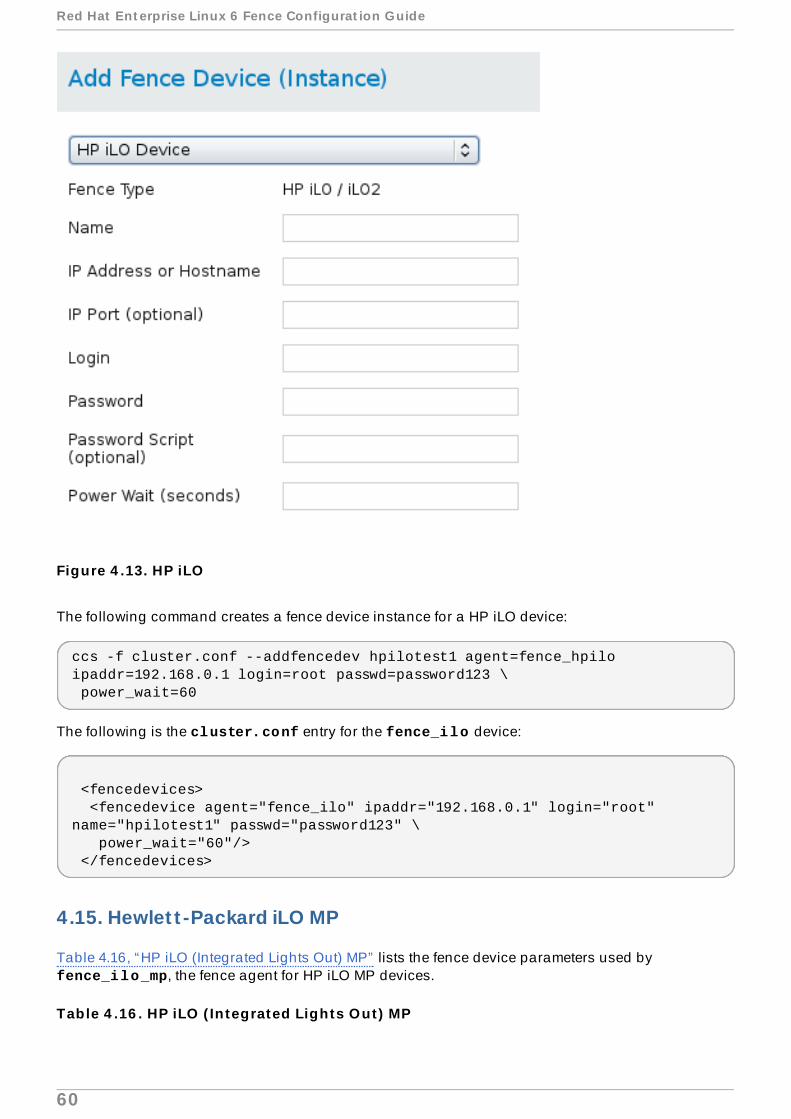
Figure 4 .13. HP iLO
The following command creates a fence device instance for a HP iLO device:
ccs -f cluster.conf --addfencedev hpilotest1 agent=fence_hpilo ipaddr=192.168.0.1 login=root passwd=password123 \ power_wait=60
The following is the cluster.conf entry for the fence_ilo device:
<fencedevices> <fencedevice agent="fence_ilo" ipaddr="192.168.0.1" login="root" name="hpilotest1" passwd="password123" \ power_wait="60"/> </fencedevices>
4.15. Hewlet t -Packard iLO MP
Table 4.16, “HP iLO (Integrated Lights Out) MP” lists the fence device parameters used by fence_ilo_mp, the fence agent for HP iLO MP devices.
Table 4 .16 . HP iLO ( In tegrated Lights Out ) MP
Red Hat Ent erprise Linux 6 Fence Configurat ion Guide
60
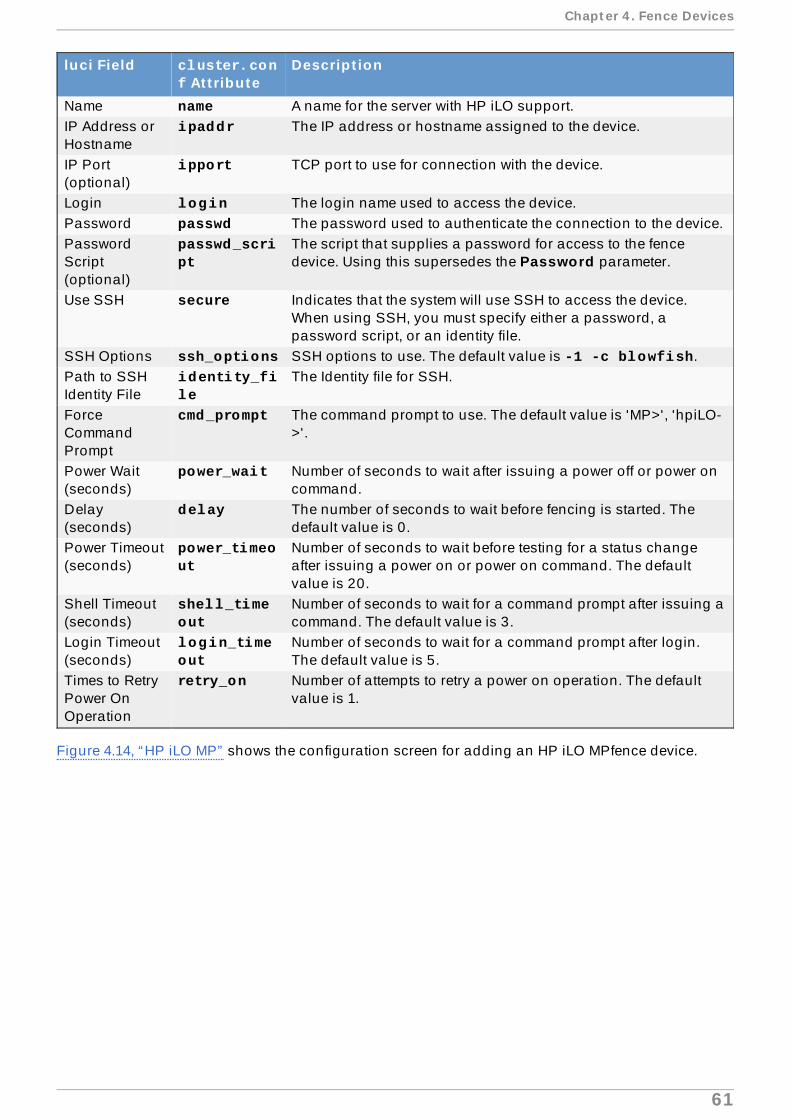
luci Field cluster.conf At t ribute
Descript ion
Name name A name for the server with HP iLO support.IP Address orHostname
ipaddr The IP address or hostname assigned to the device.
IP Port(optional)
ipport TCP port to use for connection with the device.
Login login The login name used to access the device.Password passwd The password used to authenticate the connection to the device.PasswordScript(optional)
passwd_script
The script that supplies a password for access to the fencedevice. Using this supersedes the Password parameter.
Use SSH secure Indicates that the system will use SSH to access the device.When using SSH, you must specify either a password, apassword script, or an identity file.
SSH Options ssh_options SSH options to use. The default value is -1 -c blowfish.Path to SSHIdentity File
identity_file
The Identity file for SSH.
ForceCommandPrompt
cmd_prompt The command prompt to use. The default value is 'MP>', 'hpiLO->'.
Power Wait(seconds)
power_wait Number of seconds to wait after issuing a power off or power oncommand.
Delay(seconds)
delay The number of seconds to wait before fencing is started. Thedefault value is 0.
Power Timeout(seconds)
power_timeout
Number of seconds to wait before testing for a status changeafter issuing a power on or power on command. The defaultvalue is 20.
Shell Timeout(seconds)
shell_timeout
Number of seconds to wait for a command prompt after issuing acommand. The default value is 3.
Login Timeout(seconds)
login_timeout
Number of seconds to wait for a command prompt after login.The default value is 5.
Times to RetryPower OnOperation
retry_on Number of attempts to retry a power on operation. The defaultvalue is 1.
Figure 4.14, “HP iLO MP” shows the configuration screen for adding an HP iLO MPfence device.
Chapt er 4 . Fence Devices
61
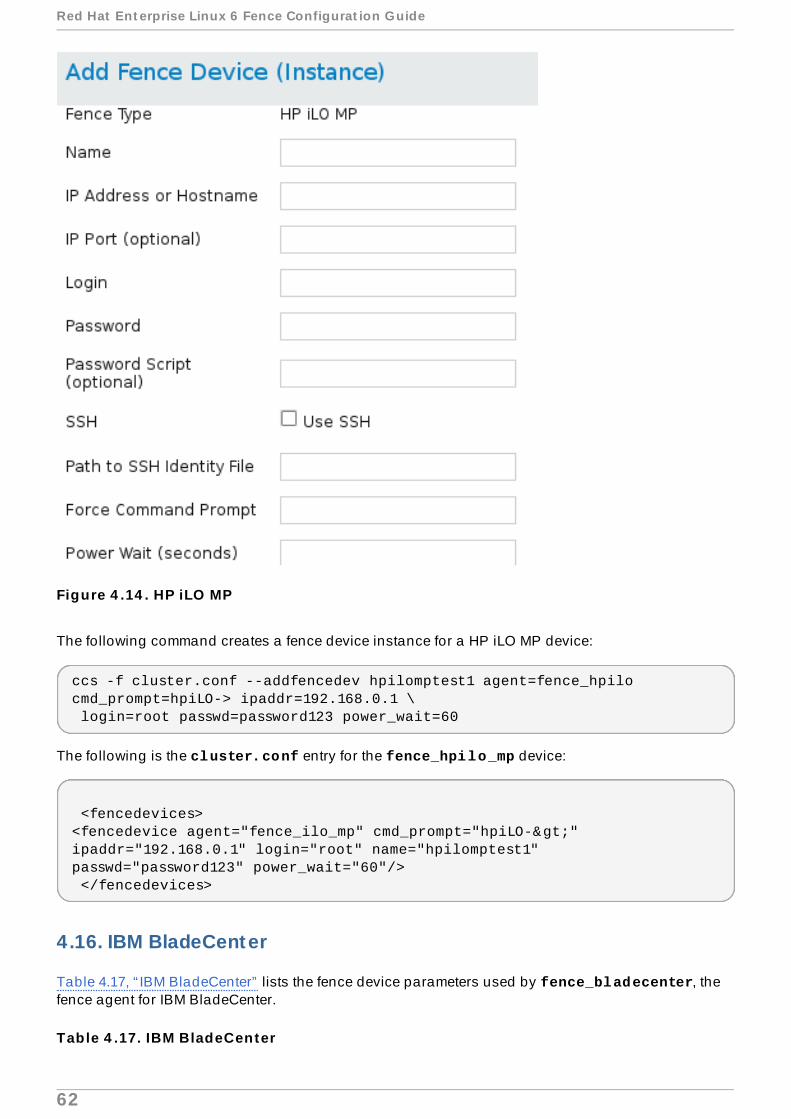
Figure 4 .14 . HP iLO MP
The following command creates a fence device instance for a HP iLO MP device:
ccs -f cluster.conf --addfencedev hpilomptest1 agent=fence_hpilo cmd_prompt=hpiLO-> ipaddr=192.168.0.1 \ login=root passwd=password123 power_wait=60
The following is the cluster.conf entry for the fence_hpilo_mp device:
<fencedevices><fencedevice agent="fence_ilo_mp" cmd_prompt="hpiLO->" ipaddr="192.168.0.1" login="root" name="hpilomptest1" passwd="password123" power_wait="60"/> </fencedevices>
4.16. IBM BladeCenter
Table 4.17, “ IBM BladeCenter” lists the fence device parameters used by fence_bladecenter, thefence agent for IBM BladeCenter.
Table 4 .17. IBM BladeCenter
Red Hat Ent erprise Linux 6 Fence Configurat ion Guide
62
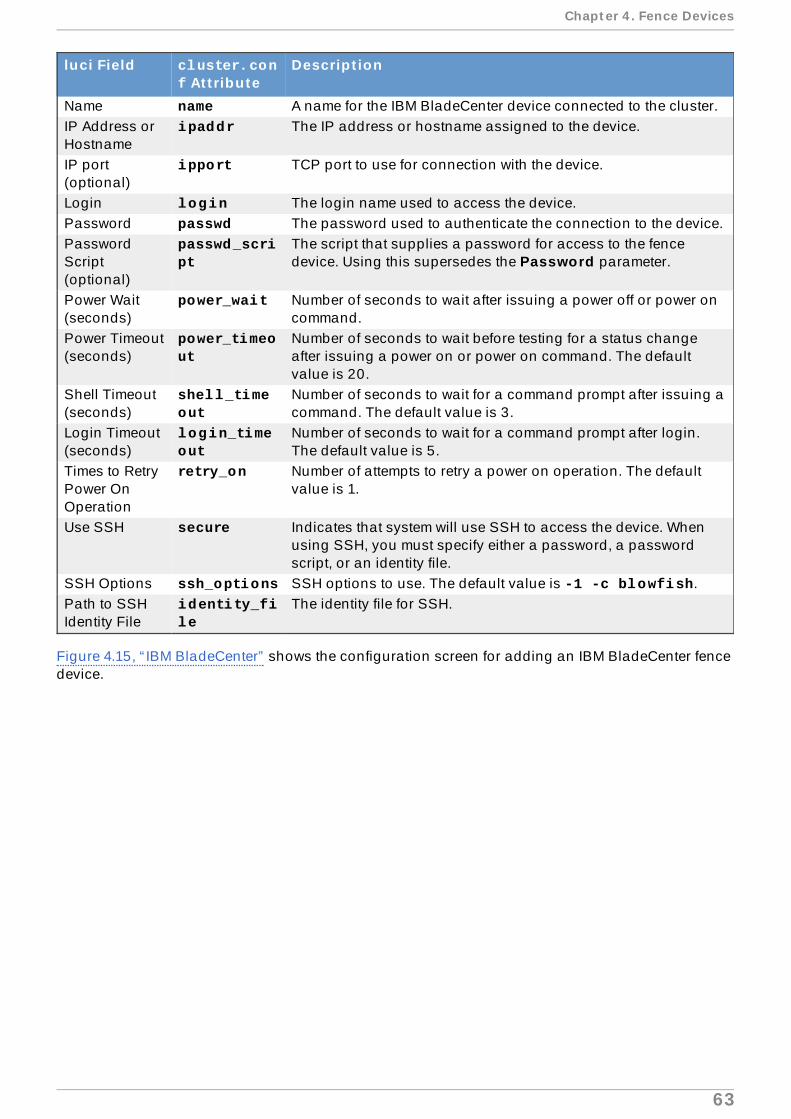
luci Field cluster.conf At t ribute
Descript ion
Name name A name for the IBM BladeCenter device connected to the cluster.IP Address orHostname
ipaddr The IP address or hostname assigned to the device.
IP port(optional)
ipport TCP port to use for connection with the device.
Login login The login name used to access the device.Password passwd The password used to authenticate the connection to the device.PasswordScript(optional)
passwd_script
The script that supplies a password for access to the fencedevice. Using this supersedes the Password parameter.
Power Wait(seconds)
power_wait Number of seconds to wait after issuing a power off or power oncommand.
Power Timeout(seconds)
power_timeout
Number of seconds to wait before testing for a status changeafter issuing a power on or power on command. The defaultvalue is 20.
Shell Timeout(seconds)
shell_timeout
Number of seconds to wait for a command prompt after issuing acommand. The default value is 3.
Login Timeout(seconds)
login_timeout
Number of seconds to wait for a command prompt after login.The default value is 5.
Times to RetryPower OnOperation
retry_on Number of attempts to retry a power on operation. The defaultvalue is 1.
Use SSH secure Indicates that system will use SSH to access the device. Whenusing SSH, you must specify either a password, a passwordscript, or an identity file.
SSH Options ssh_options SSH options to use. The default value is -1 -c blowfish.Path to SSHIdentity File
identity_file
The identity file for SSH.
Figure 4.15, “ IBM BladeCenter” shows the configuration screen for adding an IBM BladeCenter fencedevice.
Chapt er 4 . Fence Devices
63
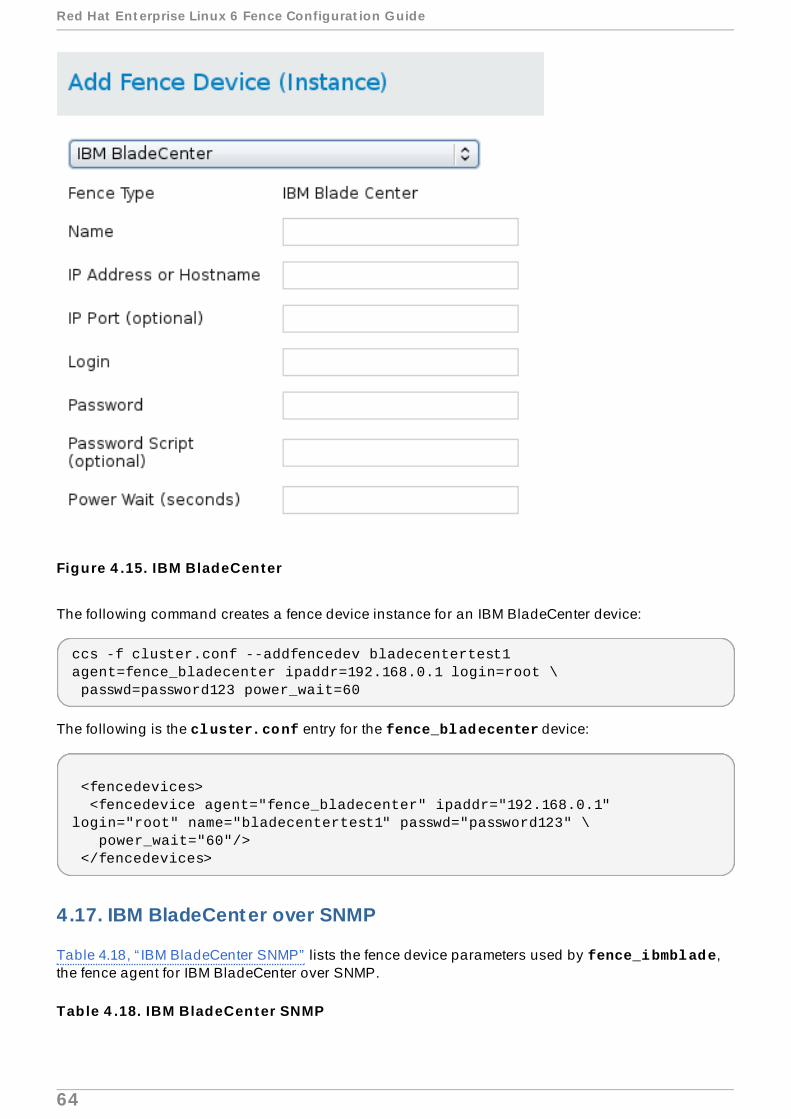
Figure 4 .15. IBM BladeCenter
The following command creates a fence device instance for an IBM BladeCenter device:
ccs -f cluster.conf --addfencedev bladecentertest1 agent=fence_bladecenter ipaddr=192.168.0.1 login=root \ passwd=password123 power_wait=60
The following is the cluster.conf entry for the fence_bladecenter device:
<fencedevices> <fencedevice agent="fence_bladecenter" ipaddr="192.168.0.1" login="root" name="bladecentertest1" passwd="password123" \ power_wait="60"/> </fencedevices>
4.17. IBM BladeCenter over SNMP
Table 4.18, “ IBM BladeCenter SNMP” lists the fence device parameters used by fence_ibmblade,the fence agent for IBM BladeCenter over SNMP.
Table 4 .18. IBM BladeCenter SNMP
Red Hat Ent erprise Linux 6 Fence Configurat ion Guide
64
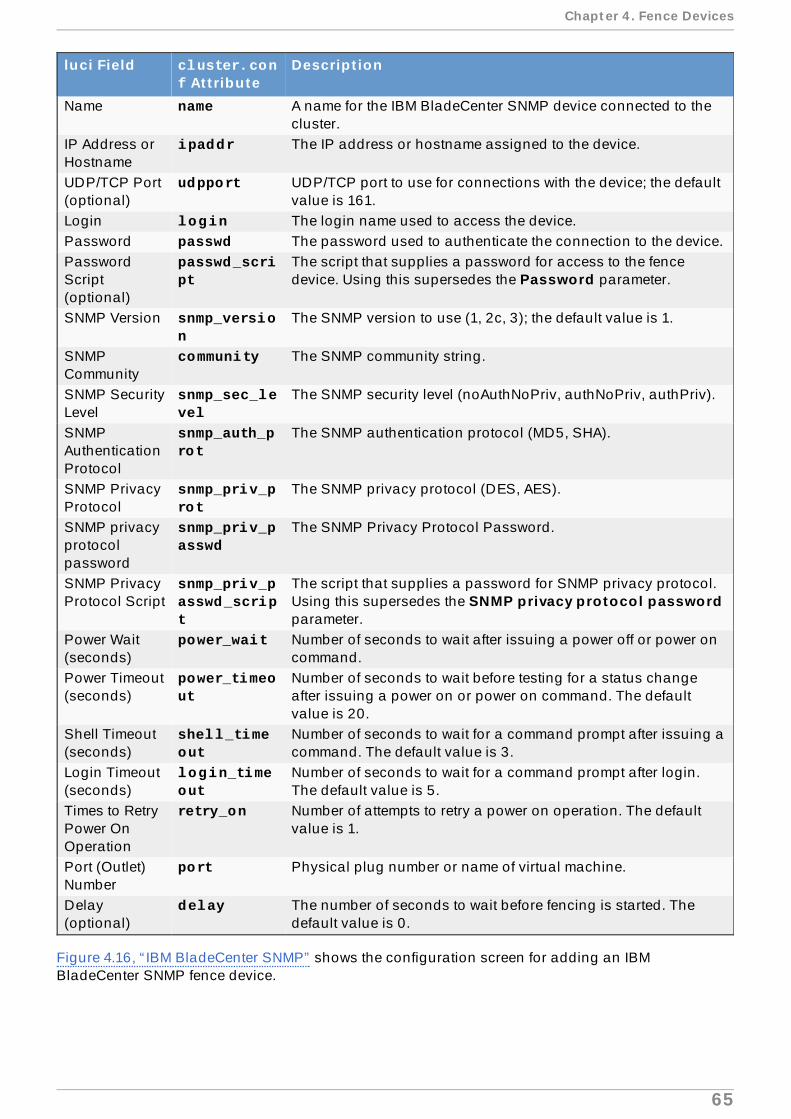
luci Field cluster.conf At t ribute
Descript ion
Name name A name for the IBM BladeCenter SNMP device connected to thecluster.
IP Address orHostname
ipaddr The IP address or hostname assigned to the device.
UDP/TCP Port(optional)
udpport UDP/TCP port to use for connections with the device; the defaultvalue is 161.
Login login The login name used to access the device.Password passwd The password used to authenticate the connection to the device.PasswordScript(optional)
passwd_script
The script that supplies a password for access to the fencedevice. Using this supersedes the Password parameter.
SNMP Version snmp_version
The SNMP version to use (1, 2c, 3); the default value is 1.
SNMPCommunity
community The SNMP community string.
SNMP SecurityLevel
snmp_sec_level
The SNMP security level (noAuthNoPriv, authNoPriv, authPriv).
SNMPAuthenticationProtocol
snmp_auth_prot
The SNMP authentication protocol (MD5, SHA).
SNMP PrivacyProtocol
snmp_priv_prot
The SNMP privacy protocol (DES, AES).
SNMP privacyprotocolpassword
snmp_priv_passwd
The SNMP Privacy Protocol Password.
SNMP PrivacyProtocol Script
snmp_priv_passwd_script
The script that supplies a password for SNMP privacy protocol.Using this supersedes the SNMP privacy protocol passwordparameter.
Power Wait(seconds)
power_wait Number of seconds to wait after issuing a power off or power oncommand.
Power Timeout(seconds)
power_timeout
Number of seconds to wait before testing for a status changeafter issuing a power on or power on command. The defaultvalue is 20.
Shell Timeout(seconds)
shell_timeout
Number of seconds to wait for a command prompt after issuing acommand. The default value is 3.
Login Timeout(seconds)
login_timeout
Number of seconds to wait for a command prompt after login.The default value is 5.
Times to RetryPower OnOperation
retry_on Number of attempts to retry a power on operation. The defaultvalue is 1.
Port (Outlet)Number
port Physical plug number or name of virtual machine.
Delay(optional)
delay The number of seconds to wait before fencing is started. Thedefault value is 0.
Figure 4.16, “ IBM BladeCenter SNMP” shows the configuration screen for adding an IBMBladeCenter SNMP fence device.
Chapt er 4 . Fence Devices
65
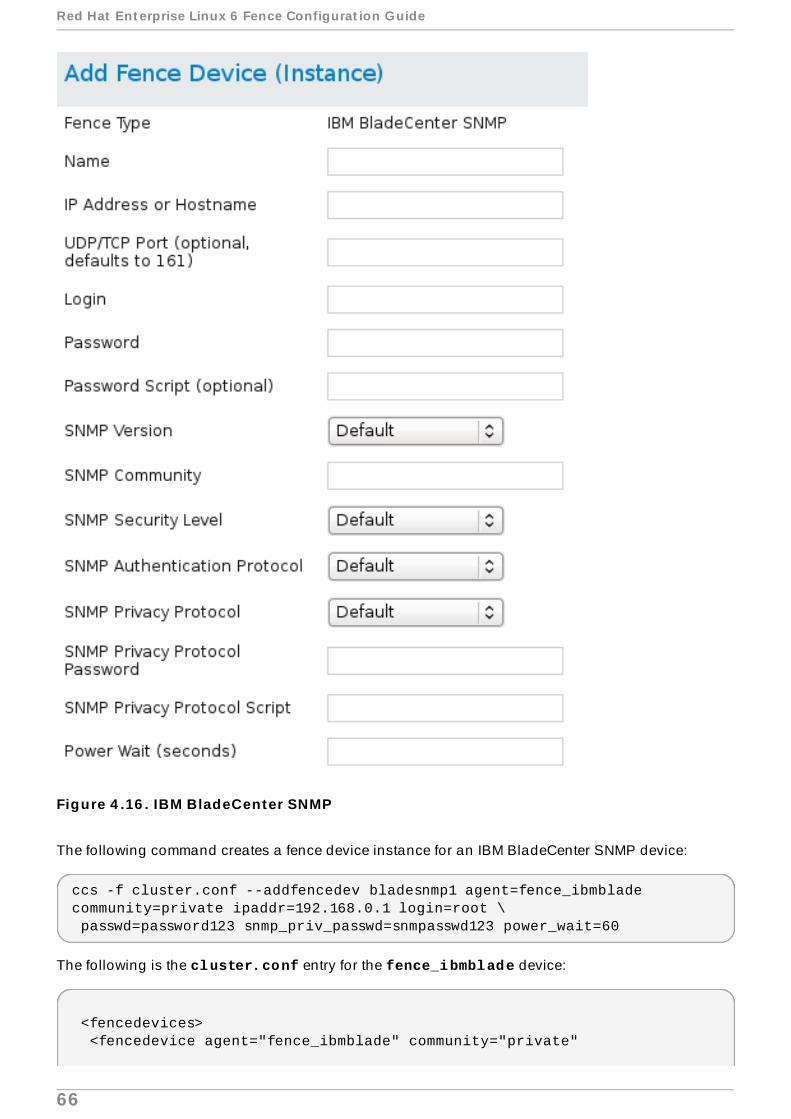
Figure 4 .16 . IBM BladeCenter SNMP
The following command creates a fence device instance for an IBM BladeCenter SNMP device:
ccs -f cluster.conf --addfencedev bladesnmp1 agent=fence_ibmblade community=private ipaddr=192.168.0.1 login=root \ passwd=password123 snmp_priv_passwd=snmpasswd123 power_wait=60
The following is the cluster.conf entry for the fence_ibmblade device:
<fencedevices> <fencedevice agent="fence_ibmblade" community="private"
Red Hat Ent erprise Linux 6 Fence Configurat ion Guide
66
ipaddr="192.168.0.1" login="root" name="bladesnmp1" \ passwd="password123" power_wait="60" snmp_priv_passwd="snmpasswd123" udpport="161"/> </fencedevices>
4.18. IBM iPDU
Table 4.19, “ IBM iPDU (Red Hat Enterprise Linux 6.4 and later)” lists the fence device parametersused by fence_ipdu, the fence agent for iPDU over SNMP devices.
Table 4 .19 . IBM iPDU (Red Hat Enterprise Linux 6 .4 and later)
luci Field cluster.conf At t ribute
Descript ion
Name name A name for the IBM iPDU device connected to the cluster intowhich the fence daemon logs via the SNMP protocol.
IP Address orHostname
ipaddr The IP address or hostname assigned to the device.
UDP/TCP Port udpport The UDP/TCP port to use for connection with the device; thedefault value is 161.
Login login The login name used to access the device.Password passwd The password used to authenticate the connection to the device.PasswordScript(optional)
passwd_script
The script that supplies a password for access to the fencedevice. Using this supersedes the Password parameter.
SNMP Version snmp_version
The SNMP version to use (1, 2c, 3); the default value is 1.
SNMPCommunity
community The SNMP community string; the default value is private.
SNMP SecurityLevel
snmp_sec_level
The SNMP security level (noAuthNoPriv, authNoPriv, authPriv).
SNMPAuthenticationProtocol
snmp_auth_prot
The SNMP Authentication Protocol (MD5, SHA).
SNMP PrivacyProtocol
snmp_priv_prot
The SNMP privacy protocol (DES, AES).
SNMP PrivacyProtocolPassword
snmp_priv_passwd
The SNMP privacy protocol password.
SNMP PrivacyProtocol Script
snmp_priv_passwd_script
The script that supplies a password for SNMP privacy protocol.Using this supersedes the SNMP privacy protocol passwordparameter.
Power Wait(seconds)
power_wait Number of seconds to wait after issuing a power off or power oncommand.
Power Timeout(seconds)
power_timeout
Number of seconds to wait before testing for a status changeafter issuing a power on or power on command. The defaultvalue is 20.
Shell Timeout(seconds)
shell_timeout
Number of seconds to wait for a command prompt after issuing acommand. The default value is 3.
Login Timeout(seconds)
login_timeout
Number of seconds to wait for a command prompt after login.The default value is 5.
Chapt er 4 . Fence Devices
67
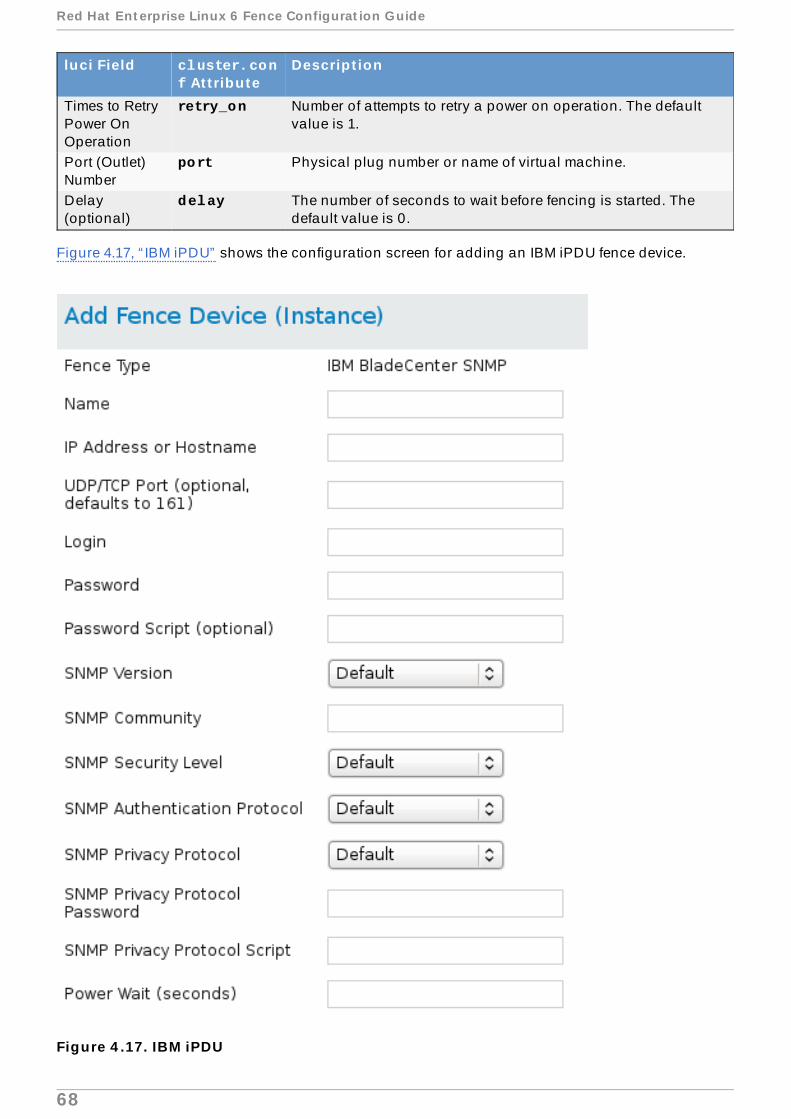
Times to RetryPower OnOperation
retry_on Number of attempts to retry a power on operation. The defaultvalue is 1.
Port (Outlet)Number
port Physical plug number or name of virtual machine.
Delay(optional)
delay The number of seconds to wait before fencing is started. Thedefault value is 0.
luci Field cluster.conf At t ribute
Descript ion
Figure 4.17, “ IBM iPDU” shows the configuration screen for adding an IBM iPDU fence device.
Figure 4 .17. IBM iPDU
Red Hat Ent erprise Linux 6 Fence Configurat ion Guide
68
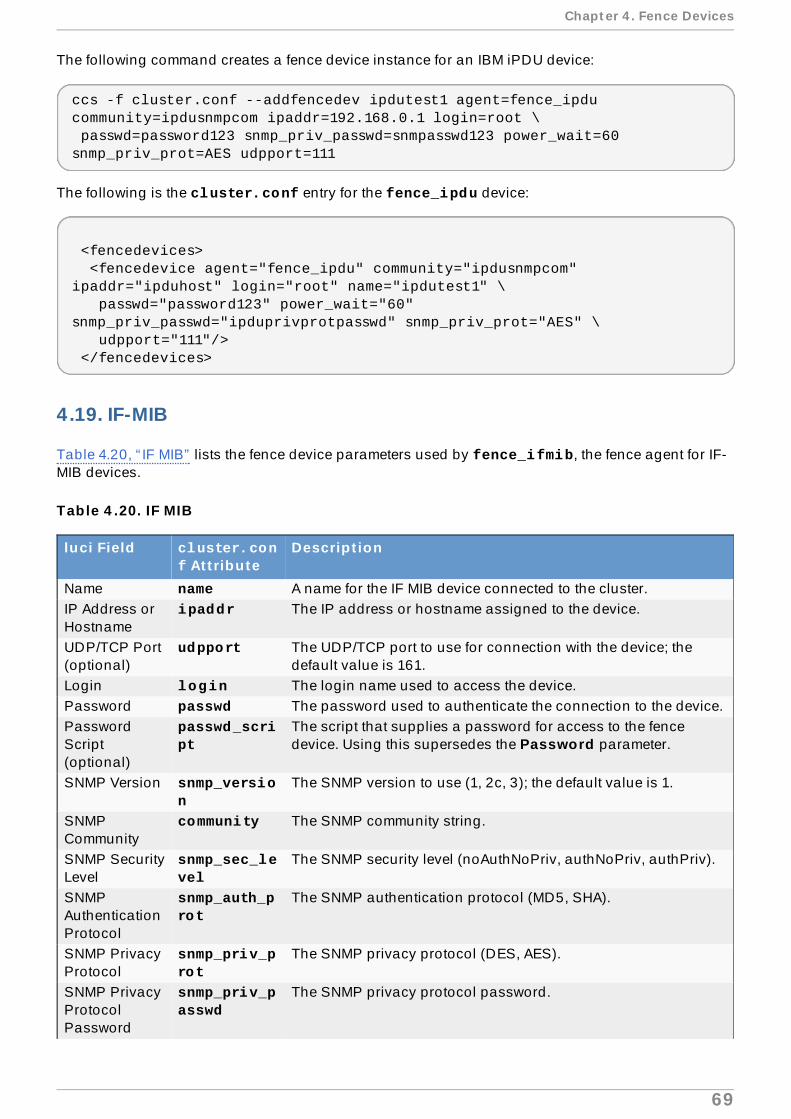
The following command creates a fence device instance for an IBM iPDU device:
ccs -f cluster.conf --addfencedev ipdutest1 agent=fence_ipdu community=ipdusnmpcom ipaddr=192.168.0.1 login=root \ passwd=password123 snmp_priv_passwd=snmpasswd123 power_wait=60 snmp_priv_prot=AES udpport=111
The following is the cluster.conf entry for the fence_ipdu device:
<fencedevices> <fencedevice agent="fence_ipdu" community="ipdusnmpcom" ipaddr="ipduhost" login="root" name="ipdutest1" \ passwd="password123" power_wait="60" snmp_priv_passwd="ipduprivprotpasswd" snmp_priv_prot="AES" \ udpport="111"/> </fencedevices>
4.19. IF-MIB
Table 4.20, “ IF MIB” lists the fence device parameters used by fence_ifmib, the fence agent for IF-MIB devices.
Table 4 .20. IF MIB
luci Field cluster.conf At t ribute
Descript ion
Name name A name for the IF MIB device connected to the cluster.IP Address orHostname
ipaddr The IP address or hostname assigned to the device.
UDP/TCP Port(optional)
udpport The UDP/TCP port to use for connection with the device; thedefault value is 161.
Login login The login name used to access the device.Password passwd The password used to authenticate the connection to the device.PasswordScript(optional)
passwd_script
The script that supplies a password for access to the fencedevice. Using this supersedes the Password parameter.
SNMP Version snmp_version
The SNMP version to use (1, 2c, 3); the default value is 1.
SNMPCommunity
community The SNMP community string.
SNMP SecurityLevel
snmp_sec_level
The SNMP security level (noAuthNoPriv, authNoPriv, authPriv).
SNMPAuthenticationProtocol
snmp_auth_prot
The SNMP authentication protocol (MD5, SHA).
SNMP PrivacyProtocol
snmp_priv_prot
The SNMP privacy protocol (DES, AES).
SNMP PrivacyProtocolPassword
snmp_priv_passwd
The SNMP privacy protocol password.
Chapt er 4 . Fence Devices
69
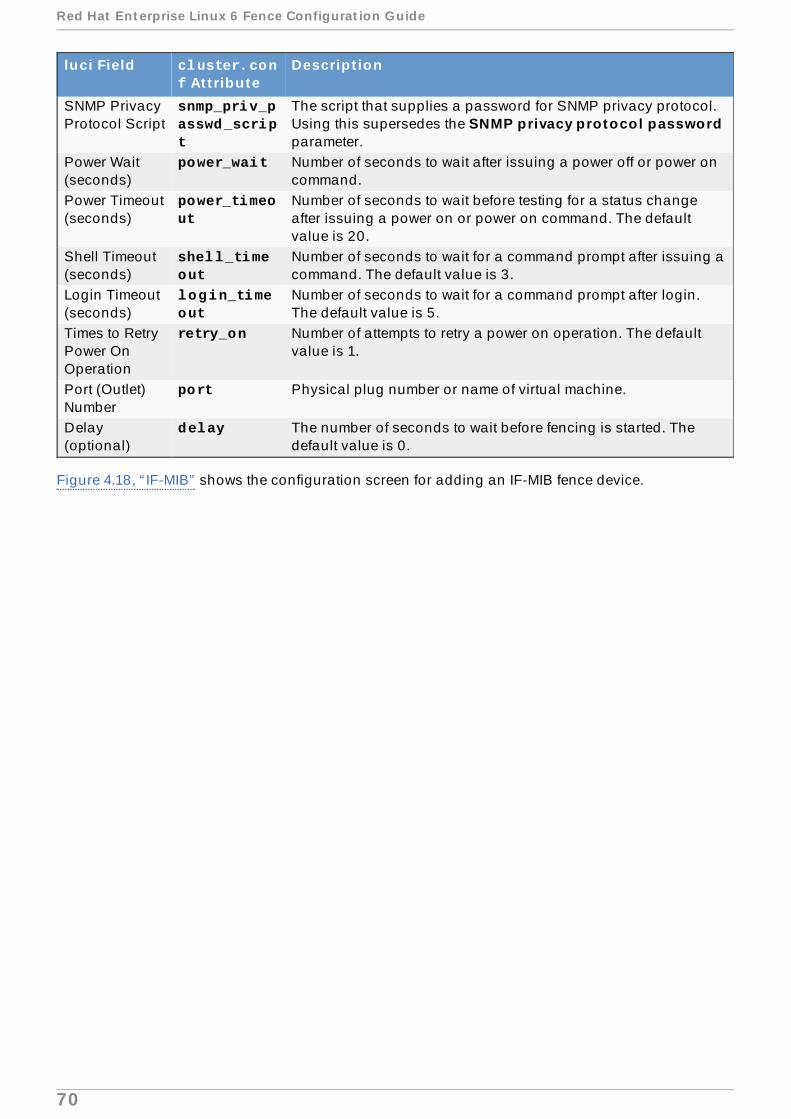
SNMP PrivacyProtocol Script
snmp_priv_passwd_script
The script that supplies a password for SNMP privacy protocol.Using this supersedes the SNMP privacy protocol passwordparameter.
Power Wait(seconds)
power_wait Number of seconds to wait after issuing a power off or power oncommand.
Power Timeout(seconds)
power_timeout
Number of seconds to wait before testing for a status changeafter issuing a power on or power on command. The defaultvalue is 20.
Shell Timeout(seconds)
shell_timeout
Number of seconds to wait for a command prompt after issuing acommand. The default value is 3.
Login Timeout(seconds)
login_timeout
Number of seconds to wait for a command prompt after login.The default value is 5.
Times to RetryPower OnOperation
retry_on Number of attempts to retry a power on operation. The defaultvalue is 1.
Port (Outlet)Number
port Physical plug number or name of virtual machine.
Delay(optional)
delay The number of seconds to wait before fencing is started. Thedefault value is 0.
luci Field cluster.conf At t ribute
Descript ion
Figure 4.18, “ IF-MIB” shows the configuration screen for adding an IF-MIB fence device.
Red Hat Ent erprise Linux 6 Fence Configurat ion Guide
70
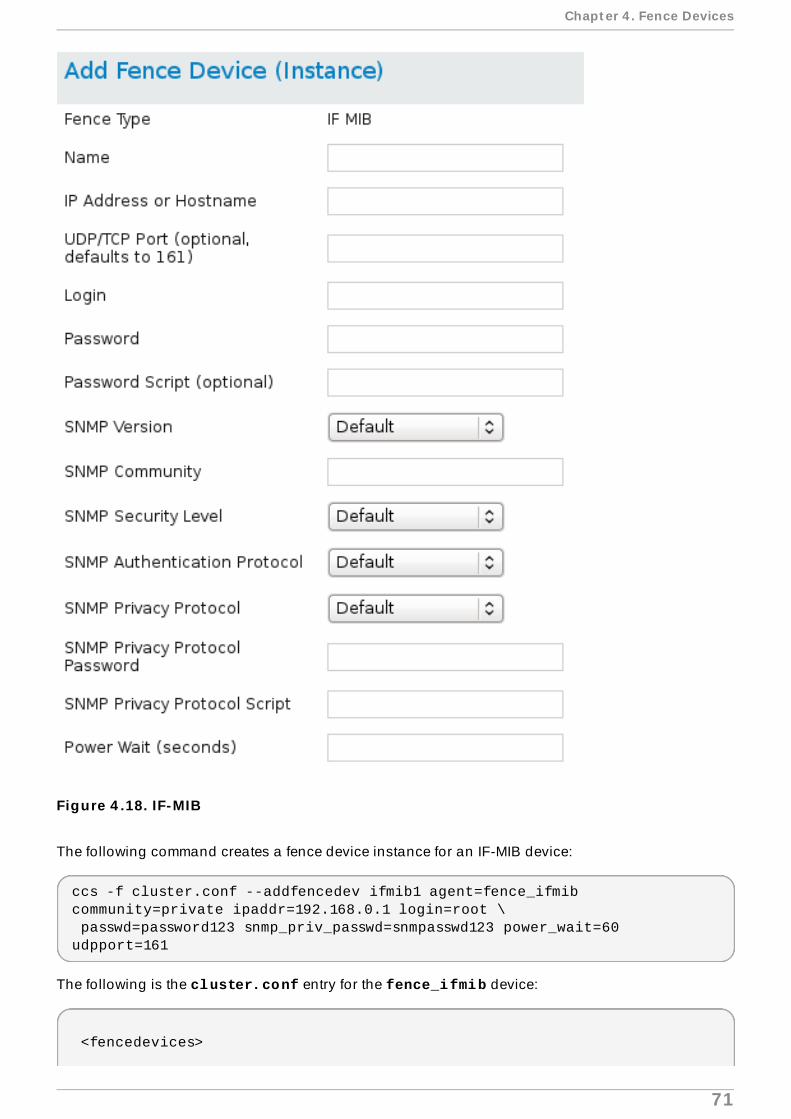
Figure 4 .18. IF-MIB
The following command creates a fence device instance for an IF-MIB device:
ccs -f cluster.conf --addfencedev ifmib1 agent=fence_ifmib community=private ipaddr=192.168.0.1 login=root \ passwd=password123 snmp_priv_passwd=snmpasswd123 power_wait=60 udpport=161
The following is the cluster.conf entry for the fence_ifmib device:
<fencedevices>
Chapt er 4 . Fence Devices
71
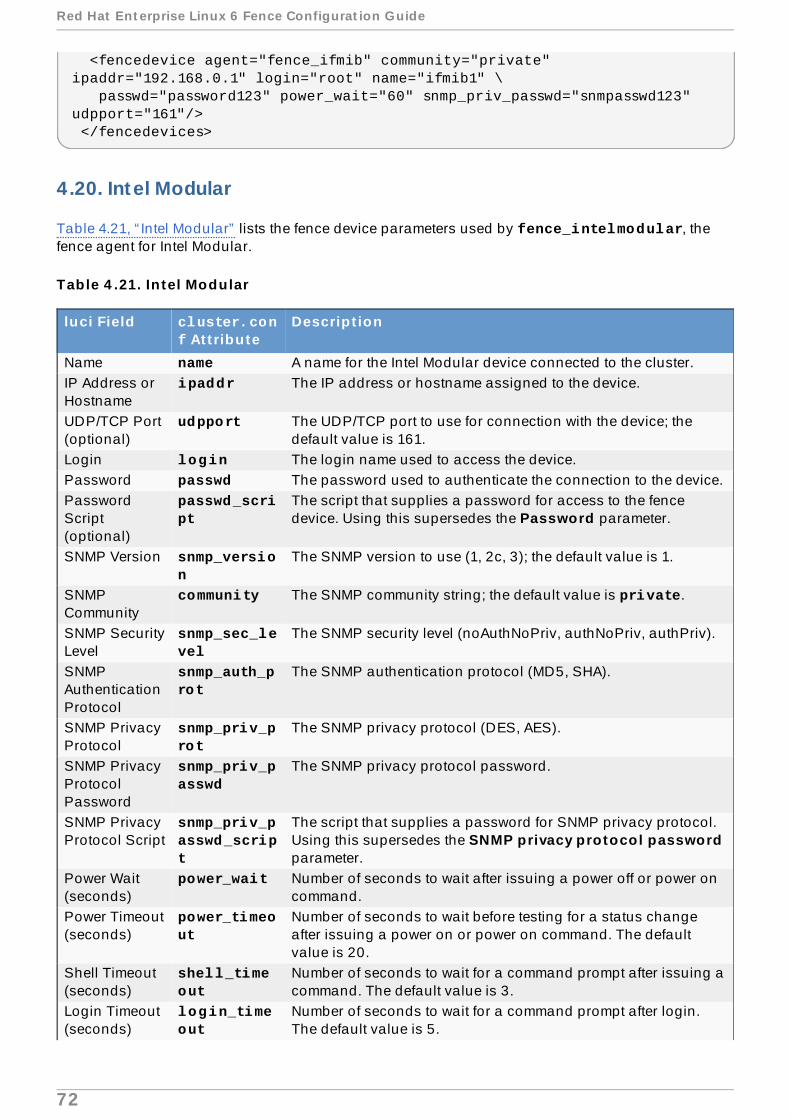
<fencedevice agent="fence_ifmib" community="private" ipaddr="192.168.0.1" login="root" name="ifmib1" \ passwd="password123" power_wait="60" snmp_priv_passwd="snmpasswd123" udpport="161"/> </fencedevices>
4.20. Intel Modular
Table 4.21, “ Intel Modular” lists the fence device parameters used by fence_intelmodular, thefence agent for Intel Modular.
Table 4 .21. In tel Modular
luci Field cluster.conf At t ribute
Descript ion
Name name A name for the Intel Modular device connected to the cluster.IP Address orHostname
ipaddr The IP address or hostname assigned to the device.
UDP/TCP Port(optional)
udpport The UDP/TCP port to use for connection with the device; thedefault value is 161.
Login login The login name used to access the device.Password passwd The password used to authenticate the connection to the device.PasswordScript(optional)
passwd_script
The script that supplies a password for access to the fencedevice. Using this supersedes the Password parameter.
SNMP Version snmp_version
The SNMP version to use (1, 2c, 3); the default value is 1.
SNMPCommunity
community The SNMP community string; the default value is private.
SNMP SecurityLevel
snmp_sec_level
The SNMP security level (noAuthNoPriv, authNoPriv, authPriv).
SNMPAuthenticationProtocol
snmp_auth_prot
The SNMP authentication protocol (MD5, SHA).
SNMP PrivacyProtocol
snmp_priv_prot
The SNMP privacy protocol (DES, AES).
SNMP PrivacyProtocolPassword
snmp_priv_passwd
The SNMP privacy protocol password.
SNMP PrivacyProtocol Script
snmp_priv_passwd_script
The script that supplies a password for SNMP privacy protocol.Using this supersedes the SNMP privacy protocol passwordparameter.
Power Wait(seconds)
power_wait Number of seconds to wait after issuing a power off or power oncommand.
Power Timeout(seconds)
power_timeout
Number of seconds to wait before testing for a status changeafter issuing a power on or power on command. The defaultvalue is 20.
Shell Timeout(seconds)
shell_timeout
Number of seconds to wait for a command prompt after issuing acommand. The default value is 3.
Login Timeout(seconds)
login_timeout
Number of seconds to wait for a command prompt after login.The default value is 5.
Red Hat Ent erprise Linux 6 Fence Configurat ion Guide
72
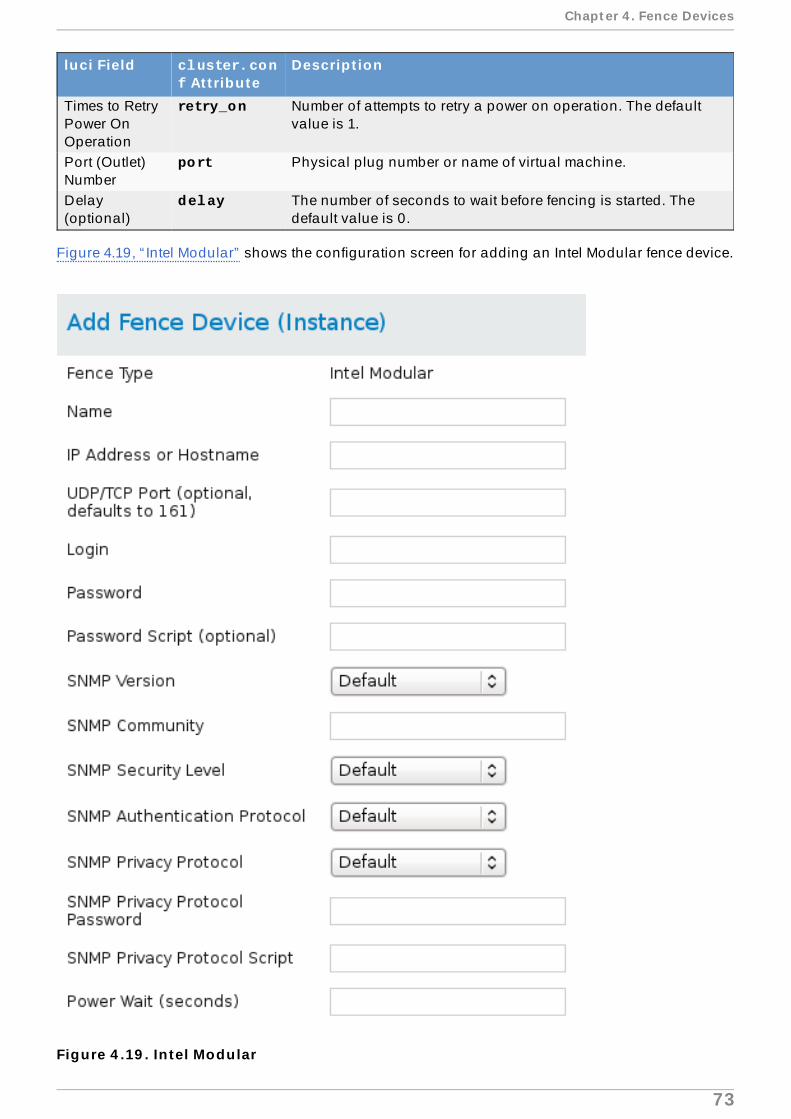
Times to RetryPower OnOperation
retry_on Number of attempts to retry a power on operation. The defaultvalue is 1.
Port (Outlet)Number
port Physical plug number or name of virtual machine.
Delay(optional)
delay The number of seconds to wait before fencing is started. Thedefault value is 0.
luci Field cluster.conf At t ribute
Descript ion
Figure 4.19, “ Intel Modular” shows the configuration screen for adding an Intel Modular fence device.
Figure 4 .19 . In tel Modular
Chapt er 4 . Fence Devices
73

The following command creates a fence device instance for an Intel Modular device:
ccs -f cluster.conf --addfencedev intelmodular1 agent=fence_intelmodular community=private ipaddr=192.168.0.1 login=root \ passwd=password123 snmp_priv_passwd=snmpasswd123 power_wait=60 udpport=161
The following is the cluster.conf entry for the fence_intelmodular device:
<fencedevices> <fencedevice agent="fence_intelmodular" community="private" ipaddr="192.168.0.1" login="root" name="intelmodular1" \ passwd="password123" power_wait="60" snmp_priv_passwd="snmpasswd123" udpport="161"/> </fencedevices>
4.21. IPMI over LAN
The fence agents for IPMI over LAN (fence_ipmilan,) Dell iDRAC (fence_idrac), IBM IntegratedManagement Module (fence_imm), HP iLO3 devices (fence_ilo3), and HP iLO4 devices fence_ilo4 ) share the same implementation. Table 4.22, “ IPMI (Intelligent Platform ManagementInterface) LAN, Dell iDrac, IBM Integrated Management Module, HPiLO3, HPiLO4” lists the fencedevice parameters used by these agents.
Table 4 .22. IPMI ( In telligent Plat form Management In terface) LAN, Dell iDrac, IBMIntegrated Management Module, HPiLO3, HPiLO4
luci Field cluster.conf At t ribute
Descript ion
Name name A name for the fence device connected to the cluster.IP Address orHostname
ipaddr The IP address or hostname assigned to the device.
Login login The login name of a user capable of issuing power on/offcommands to the given port.
Password passwd The password used to authenticate the connection to the port.PasswordScript(optional)
passwd_script
The script that supplies a password for access to the fencedevice. Using this supersedes the Password parameter.
AuthenticationType
auth Authentication type: none, password , or MD5.
Use Lanplus lanplus True or 1. If blank, then value is False. It is recommended thatyou enable Lanplus to improve the security of your connection ifyour hardware supports it.
Ciphersuite touse
cipher The remote server authentication, integrity, and encryptionalgorithms to use for IPMIv2 lanplus connections.
Privilege level privlvl The privilege level on the device.IPMI OperationTimeout
timeout Timeout in seconds for IPMI operation.
Red Hat Ent erprise Linux 6 Fence Configurat ion Guide
74
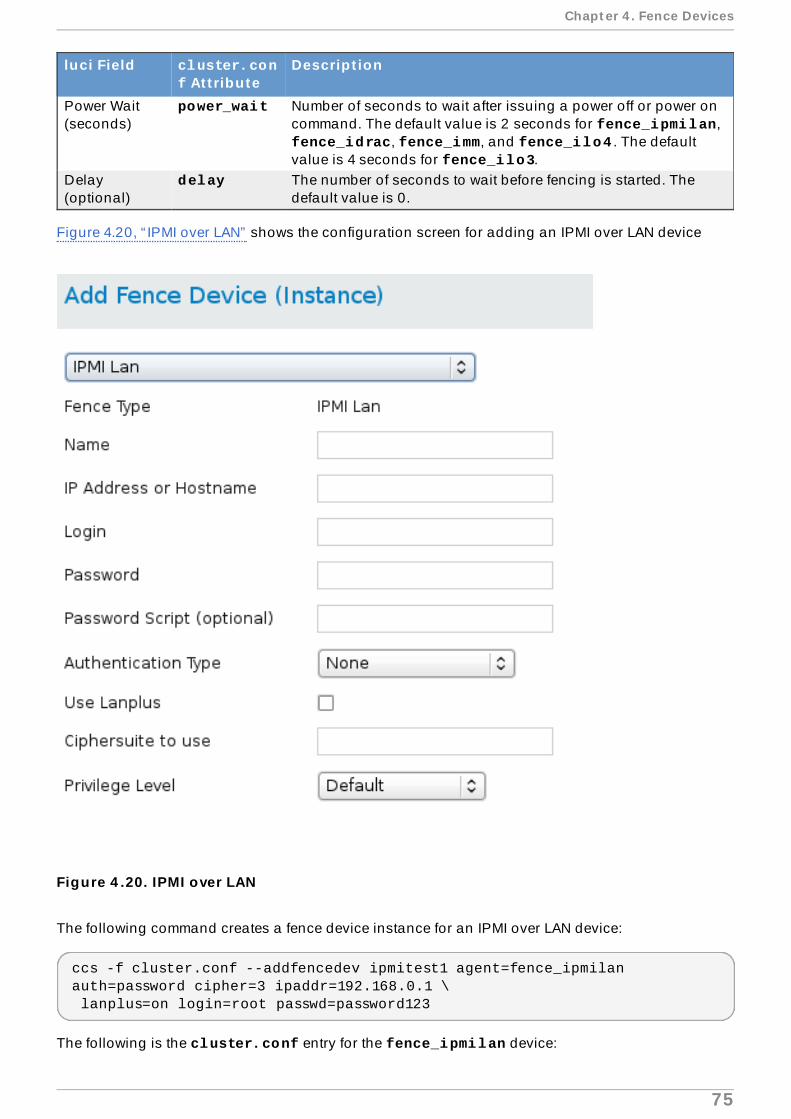
Power Wait(seconds)
power_wait Number of seconds to wait after issuing a power off or power oncommand. The default value is 2 seconds for fence_ipmilan, fence_idrac, fence_imm, and fence_ilo4 . The defaultvalue is 4 seconds for fence_ilo3.
Delay(optional)
delay The number of seconds to wait before fencing is started. Thedefault value is 0.
luci Field cluster.conf At t ribute
Descript ion
Figure 4.20, “ IPMI over LAN” shows the configuration screen for adding an IPMI over LAN device
Figure 4 .20. IPMI over LAN
The following command creates a fence device instance for an IPMI over LAN device:
ccs -f cluster.conf --addfencedev ipmitest1 agent=fence_ipmilan auth=password cipher=3 ipaddr=192.168.0.1 \ lanplus=on login=root passwd=password123
The following is the cluster.conf entry for the fence_ipmilan device:
Chapt er 4 . Fence Devices
75
<fencedevices> <fencedevice agent="fence_ipmilan" auth="password" cipher="3" ipaddr="192.168.0.1" lanplus="on" login="root" \ name="ipmitest1" passwd="password123"/> </fencedevices>
4.22. RHEV-M REST API
Table 4.23, “RHEV-M REST API (RHEL 6.2 and later against RHEV 3.0 and later)” lists the fencedevice parameters used by fence_rhevm, the fence agent for RHEV-M REST API.
Table 4 .23. RHEV-M REST API (RHEL 6 .2 and later against RHEV 3.0 and later)
luci Field cluster.conf At t ribute
Descript ion
Name name Name of the RHEV-M REST API fencing device.IP Address orHostname
ipaddr The IP address or hostname assigned to the device.
IP Port(optional)
ipport The TCP port to use for connection with the device.
Login login The login name used to access the device.Password passwd The password used to authenticate the connection to the device.PasswordScript(optional)
passwd_script
The script that supplies a password for access to the fencedevice. Using this supersedes the Password parameter.
Use SSL ssl Use SSL connections to communicate with the device.Power Wait(seconds)
power_wait Number of seconds to wait after issuing a power off or power oncommand.
Power Timeout(seconds)
power_timeout
Number of seconds to wait before testing for a status changeafter issuing a power on or power on command. The defaultvalue is 20.
Shell Timeout(seconds)
shell_timeout
Number of seconds to wait for a command prompt after issuing acommand. The default value is 3.
Login Timeout(seconds)
login_timeout
Number of seconds to wait for a command prompt after login.The default value is 5.
Times to RetryPower OnOperation
retry_on Number of attempts to retry a power on operation. The defaultvalue is 1.
Port (Outlet)Number
port Physical plug number or name of virtual machine.
Delay(optional)
delay The number of seconds to wait before fencing is started. Thedefault value is 0.
Figure 4.21, “RHEV-M REST API” shows the configuration screen for adding an RHEV-M REST APIdevice
Red Hat Ent erprise Linux 6 Fence Configurat ion Guide
76
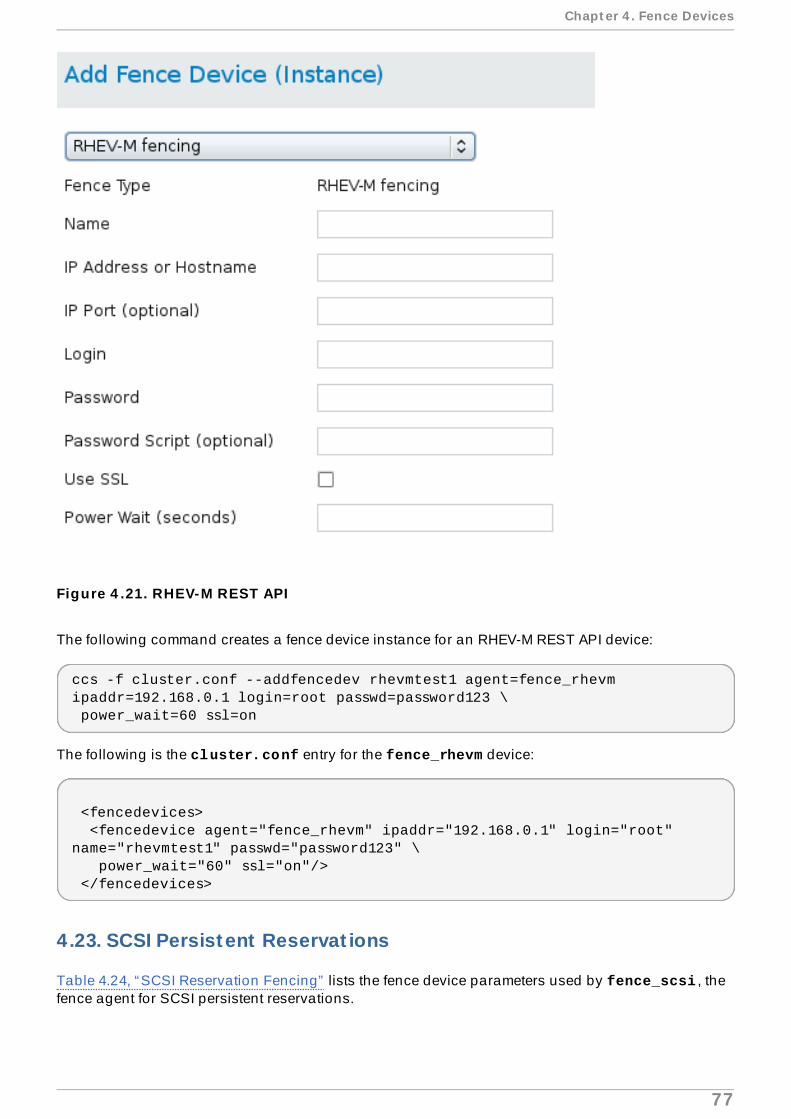
Figure 4 .21. RHEV-M REST API
The following command creates a fence device instance for an RHEV-M REST API device:
ccs -f cluster.conf --addfencedev rhevmtest1 agent=fence_rhevm ipaddr=192.168.0.1 login=root passwd=password123 \ power_wait=60 ssl=on
The following is the cluster.conf entry for the fence_rhevm device:
<fencedevices> <fencedevice agent="fence_rhevm" ipaddr="192.168.0.1" login="root" name="rhevmtest1" passwd="password123" \ power_wait="60" ssl="on"/> </fencedevices>
4.23. SCSI Persistent Reservat ions
Table 4.24, “SCSI Reservation Fencing” lists the fence device parameters used by fence_scsi , thefence agent for SCSI persistent reservations.
Chapt er 4 . Fence Devices
77
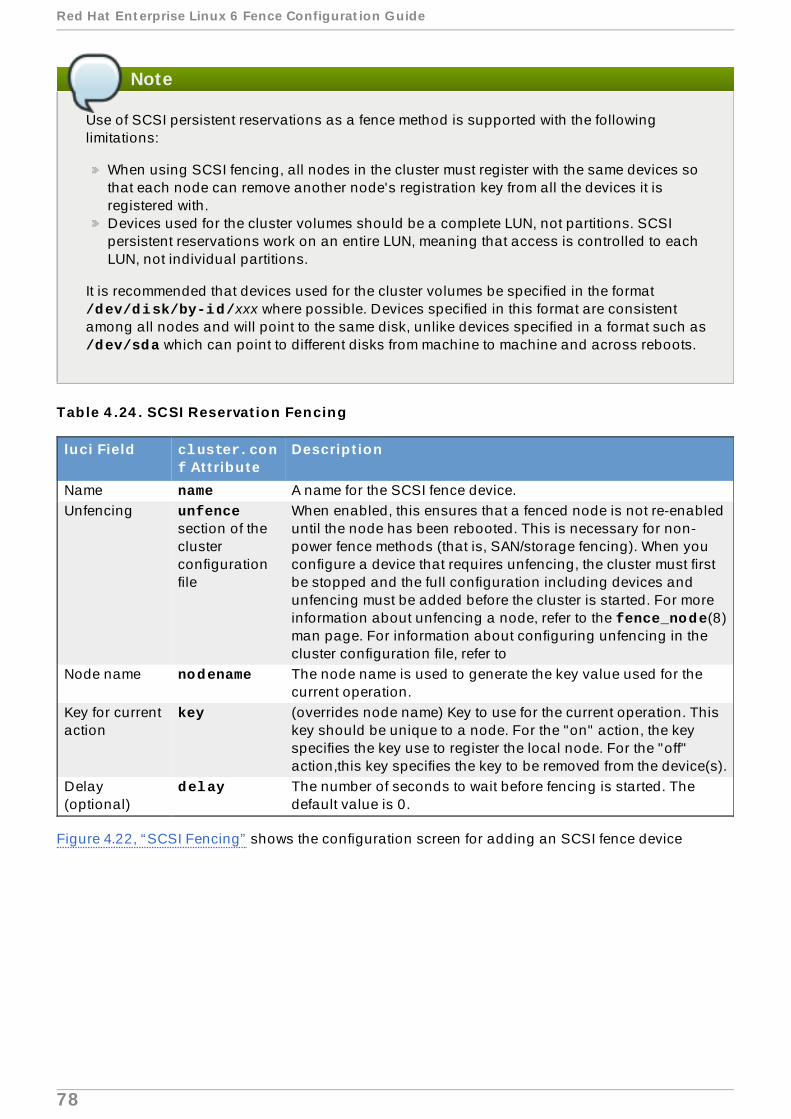
Note
Use of SCSI persistent reservations as a fence method is supported with the followinglimitations:
When using SCSI fencing, all nodes in the cluster must register with the same devices sothat each node can remove another node's registration key from all the devices it isregistered with.Devices used for the cluster volumes should be a complete LUN, not partitions. SCSIpersistent reservations work on an entire LUN, meaning that access is controlled to eachLUN, not individual partitions.
It is recommended that devices used for the cluster volumes be specified in the format /dev/disk/by-id/xxx where possible. Devices specified in this format are consistentamong all nodes and will point to the same disk, unlike devices specified in a format such as /dev/sda which can point to different disks from machine to machine and across reboots.
Table 4 .24 . SCSI Reservat ion Fencing
luci Field cluster.conf At t ribute
Descript ion
Name name A name for the SCSI fence device.Unfencing unfence
section of theclusterconfigurationfile
When enabled, this ensures that a fenced node is not re-enableduntil the node has been rebooted. This is necessary for non-power fence methods (that is, SAN/storage fencing). When youconfigure a device that requires unfencing, the cluster must firstbe stopped and the full configuration including devices andunfencing must be added before the cluster is started. For moreinformation about unfencing a node, refer to the fence_node(8)man page. For information about configuring unfencing in thecluster configuration file, refer to
Node name nodename The node name is used to generate the key value used for thecurrent operation.
Key for currentaction
key (overrides node name) Key to use for the current operation. Thiskey should be unique to a node. For the "on" action, the keyspecifies the key use to register the local node. For the "off"action,this key specifies the key to be removed from the device(s).
Delay(optional)
delay The number of seconds to wait before fencing is started. Thedefault value is 0.
Figure 4.22, “SCSI Fencing” shows the configuration screen for adding an SCSI fence device
Red Hat Ent erprise Linux 6 Fence Configurat ion Guide
78
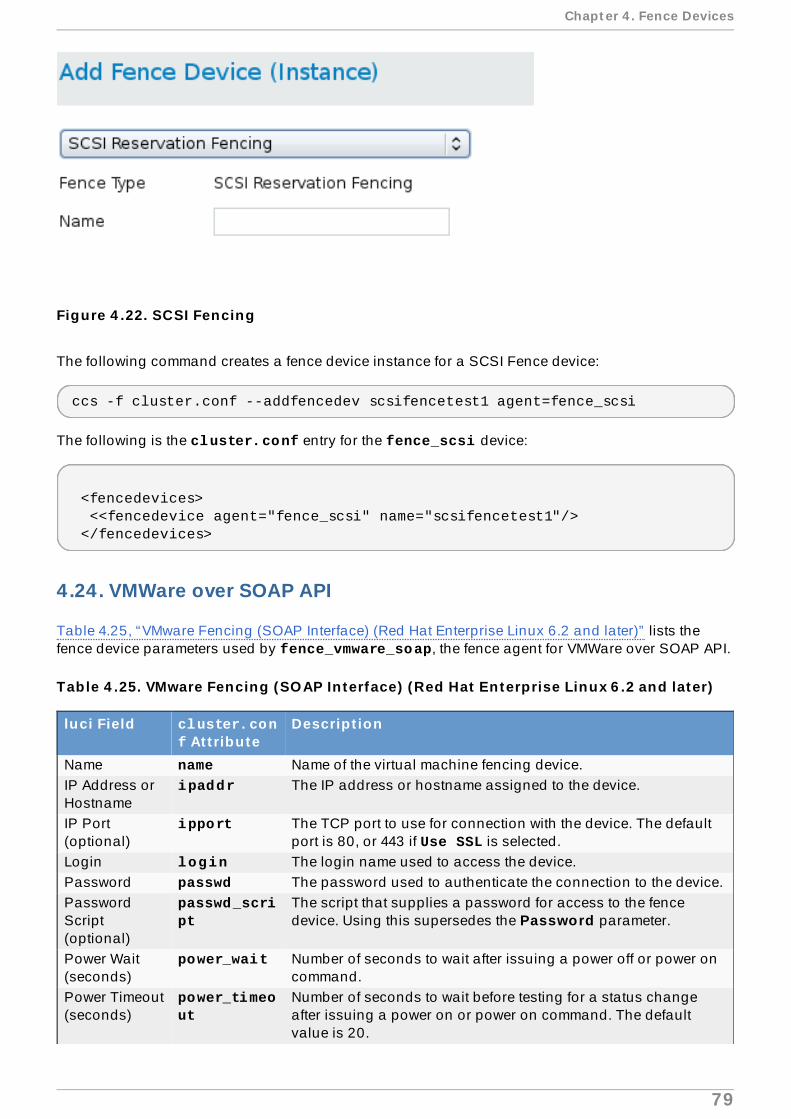
Figure 4 .22. SCSI Fencing
The following command creates a fence device instance for a SCSI Fence device:
ccs -f cluster.conf --addfencedev scsifencetest1 agent=fence_scsi
The following is the cluster.conf entry for the fence_scsi device:
<fencedevices> <<fencedevice agent="fence_scsi" name="scsifencetest1"/> </fencedevices>
4.24. VMWare over SOAP API
Table 4.25, “VMware Fencing (SOAP Interface) (Red Hat Enterprise Linux 6.2 and later)” lists thefence device parameters used by fence_vmware_soap, the fence agent for VMWare over SOAP API.
Table 4 .25. VMware Fencing (SOAP Interface) (Red Hat Enterprise Linux 6 .2 and later)
luci Field cluster.conf At t ribute
Descript ion
Name name Name of the virtual machine fencing device.IP Address orHostname
ipaddr The IP address or hostname assigned to the device.
IP Port(optional)
ipport The TCP port to use for connection with the device. The defaultport is 80, or 443 if Use SSL is selected.
Login login The login name used to access the device.Password passwd The password used to authenticate the connection to the device.PasswordScript(optional)
passwd_script
The script that supplies a password for access to the fencedevice. Using this supersedes the Password parameter.
Power Wait(seconds)
power_wait Number of seconds to wait after issuing a power off or power oncommand.
Power Timeout(seconds)
power_timeout
Number of seconds to wait before testing for a status changeafter issuing a power on or power on command. The defaultvalue is 20.
Chapt er 4 . Fence Devices
79
Shell Timeout(seconds)
shell_timeout
Number of seconds to wait for a command prompt after issuing acommand. The default value is 3.
Login Timeout(seconds)
login_timeout
Number of seconds to wait for a command prompt after login.The default value is 5.
Times to RetryPower OnOperation
retry_on Number of attempts to retry a power on operation. The defaultvalue is 1.
VM name port Name of virtual machine in inventory path format (e.g.,/datacenter/vm/Discovered_virtual_machine/myMachine).
VM UUID uuid The UUID of the virtual machine to fence.Delay(optional)
delay The number of seconds to wait before fencing is started. Thedefault value is 0.
Use SSL ssl Use SSL connections to communicate with the device.
luci Field cluster.conf At t ribute
Descript ion
Figure 4.23, “VMWare over SOAP Fencing” shows the configuration screen for adding a VMWareover SOAP fence device
Figure 4 .23. VMWare over SOAP Fencing
The following command creates a fence device instance for a VMWare over SOAP fence device:
Red Hat Ent erprise Linux 6 Fence Configurat ion Guide
80
ccs -f cluster.conf --addfencedev vmwaresoaptest1 agent=fence_vmware_soap login=root passwd=password123 power_wait=60 \ separator=,
The following is the cluster.conf entry for the fence_vmware_soap device:
<fencedevices> <fencedevice agent="fence_vmware_soap" ipaddr="192.168.0.1" login="root" name="vmwaresoaptest1" passwd="password123" \ power_wait="60" separator="."/> </fencedevices>
4.25. WTI Power Switch
Table 4.26, “WTI Power Switch” lists the fence device parameters used by fence_wti , the fenceagent for the WTI network power switch.
Table 4 .26 . WTI Power Switch
luci Field cluster.conf At t ribute
Descript ion
Name name A name for the WTI power switch connected to the cluster.IP Address orHostname
ipaddr The IP or hostname address assigned to the device.
IP Port(optional)
ipport The TCP port to use to connect to the device.
Login login The login name used to access the device.Password passwd The password used to authenticate the connection to the device.PasswordScript(optional)
passwd_script
The script that supplies a password for access to the fencedevice. Using this supersedes the Password parameter.
Forcecommandprompt
cmd_prompt The command prompt to use. The default value is ['RSM>','>MPC', ' IPS>', 'TPS>', 'NBB>', 'NPS>', 'VMR>']
Power Wait(seconds)
power_wait Number of seconds to wait after issuing a power off or power oncommand.
Power Timeout(seconds)
power_timeout
Number of seconds to wait before testing for a status changeafter issuing a power on or power on command. The defaultvalue is 20.
Shell Timeout(seconds)
shell_timeout
Number of seconds to wait for a command prompt after issuing acommand. The default value is 3.
Login Timeout(seconds)
login_timeout
Number of seconds to wait for a command prompt after login.The default value is 5.
Times to RetryPower OnOperation
retry_on Number of attempts to retry a power on operation. The defaultvalue is 1.
Use SSH secure Indicates that system will use SSH to access the device. Whenusing SSH, you must specify either a password, a passwordscript, or an identity file.
SSH Options ssh_options SSH options to use. The default value is -1 -c blowfish.
Chapt er 4 . Fence Devices
81
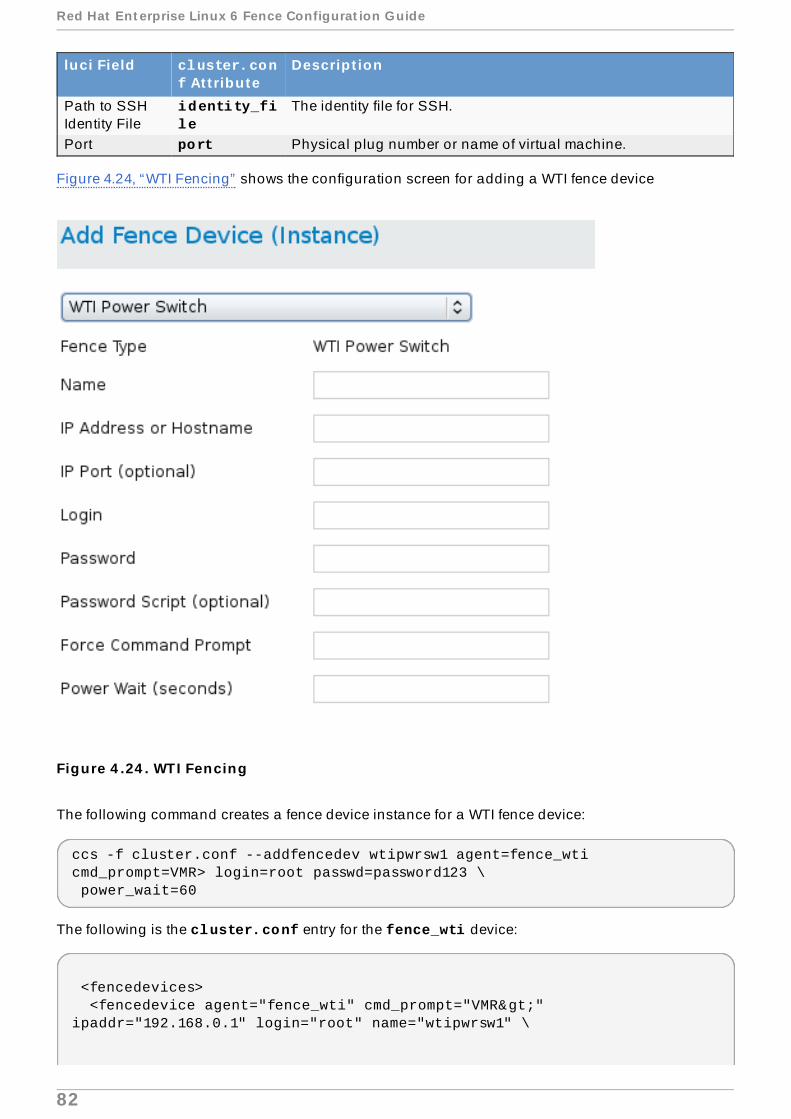
Path to SSHIdentity File
identity_file
The identity file for SSH.
Port port Physical plug number or name of virtual machine.
luci Field cluster.conf At t ribute
Descript ion
Figure 4.24, “WTI Fencing” shows the configuration screen for adding a WTI fence device
Figure 4 .24 . WTI Fencing
The following command creates a fence device instance for a WTI fence device:
ccs -f cluster.conf --addfencedev wtipwrsw1 agent=fence_wti cmd_prompt=VMR> login=root passwd=password123 \ power_wait=60
The following is the cluster.conf entry for the fence_wti device:
<fencedevices> <fencedevice agent="fence_wti" cmd_prompt="VMR>" ipaddr="192.168.0.1" login="root" name="wtipwrsw1" \
Red Hat Ent erprise Linux 6 Fence Configurat ion Guide
82

passwd="password123" power_wait="60"/> </fencedevices>
Chapt er 4 . Fence Devices
83
Revision History
Revision 1-13 Wed Oct 8 2014 Steven LevineVersion for 6.6 GA Release
Revision 1-11 Thu Aug 7 2014 Steven LevineRelease for Beta of Red Hat Enterprise Linux 6.6
Revision 1-10 Thu Jul 31 2014 Steven LevineResolves: #856311Documents fence_check man page.
Resolves: #1104910Updates fence parameter tables with new fence device parameters.
Revision 1-9 Wed Nov 20 2013 John HaRelease for GA of Red Hat Enterprise Linux 6.5
Revision 1-4 Mon Nov 28 2012 John HaRelease for Beta of Red Hat Enterprise Linux 6.5
Revision 1-2 Mon Nov 28 2012 John HaRelease for Beta of Red Hat Enterprise Linux 6.4
Index
AACPI
- configuring, Configuring ACPI For Use with Integrated Fence Devices
APC power switch over SNMP fence device , APC Power Switch over SNMP
APC power switch over telnet /SSH fence device , APC Power Switch over Telnet andSSH
BBrocade fabric switch fence device , Brocade Fabric Switch
CCISCO MDS fence device , Cisco MDS
Cisco UCS fence device , Cisco UCS
cluster administ rat ion- configuring ACPI, Configuring ACPI For Use with Integrated Fence Devices
DDell DRAC 5 fence device , Dell Drac 5
Dell iDRAC fence device , IPMI over LAN
E
Red Hat Ent erprise Linux 6 Fence Configurat ion Guide
84
Eaton network power switch, Eaton Network Power Switch
Egenera BladeFrame fence device , Egenera BladeFrame
ePowerSwitch fence device , ePowerSwitch
Ffeedback
- contact information for this manual, We Need Feedback!
fence- configuration, Fencing Pre-Configuration- devices, Fence Devices
fence agent- fence_apc, APC Power Switch over Telnet and SSH- fence_apc_snmp, APC Power Switch over SNMP- fence_bladecenter, IBM BladeCenter- fence_brocade, Brocade Fabric Switch- fence_cisco_mds, Cisco MDS- fence_cisco_ucs, Cisco UCS- fence_drac5, Dell Drac 5- fence_eaton_snmp, Eaton Network Power Switch- fence_egenera, Egenera BladeFrame- fence_eps, ePowerSwitch- fence_hpblade, Hewlett-Packard BladeSystem- fence_ibmblade, IBM BladeCenter over SNMP- fence_idrac, IPMI over LAN- fence_ifmib, IF-MIB- fence_ilo, Hewlett-Packard iLO- fence_ilo2, Hewlett-Packard iLO- fence_ilo3, IPMI over LAN- fence_ilo4, IPMI over LAN- fence_ilo_mp, Hewlett-Packard iLO MP- fence_imm, IPMI over LAN- fence_intelmodular, Intel Modular- fence_ipdu, IBM iPDU- fence_ipmilan, IPMI over LAN- fence_kdump, Fence kdump- fence_rhevm, RHEV-M REST API- fence_rsb, Fujitsu-Siemens RemoteView Service Board (RSB)- fence_scsi, SCSI Persistent Reservations- fence_virt, Fence Virt- fence_vmware_soap, VMWare over SOAP API- fence_wti, WTI Power Switch
fence conf igurat ion, Fencing Pre-Conf igurat ion, Conf iguring Fencing with Conga
fence device- APC power switch over SNMP, APC Power Switch over SNMP- APC power switch over telnet/SSH, APC Power Switch over Telnet and SSH- Brocade fabric switch, Brocade Fabric Switch- Cisco MDS, Cisco MDS- Cisco UCS, Cisco UCS- Dell DRAC 5, Dell Drac 5- Dell iDRAC, IPMI over LAN- Eaton network power switch, Eaton Network Power Switch
Revision Hist ory
85
- Egenera BladeFrame, Egenera BladeFrame- ePowerSwitch, ePowerSwitch- Fence virt, Fence Virt- Fujitsu Siemens RemoteView Service Board (RSB), Fujitsu-Siemens RemoteViewService Board (RSB)- HP BladeSystem, Hewlett-Packard BladeSystem- HP iLO, Hewlett-Packard iLO- HP iLO MP, Hewlett-Packard iLO MP- HP iLO2, Hewlett-Packard iLO- HP iLO3, IPMI over LAN- HP iLO4, IPMI over LAN- IBM BladeCenter, IBM BladeCenter- IBM BladeCenter SNMP, IBM BladeCenter over SNMP- IBM Integrated Management Module, IPMI over LAN- IBM iPDU, IBM iPDU- IF MIB, IF-MIB- Intel Modular, Intel Modular- IPMI LAN, IPMI over LAN- RHEV-M REST API, RHEV-M REST API- SCSI fencing, SCSI Persistent Reservations- VMware (SOAP interface), VMWare over SOAP API- WTI power switch, WTI Power Switch
fence devices, Fence Devices
Fence virt fence device , Fence Virt
fence_apc fence agent , APC Power Switch over Telnet and SSH
fence_apc_snmp fence agent , APC Power Switch over SNMP
fence_bladecenter fence agent , IBM BladeCenter
fence_brocade fence agent , Brocade Fabric Switch
fence_cisco_mds fence agent , Cisco MDS
fence_cisco_ucs fence agent , Cisco UCS
fence_drac5 fence agent , Dell Drac 5
fence_eaton_snmp fence agent , Eaton Network Power Switch
fence_egenera fence agent , Egenera BladeFrame
fence_eps fence agent , ePowerSwitch
fence_hpblade fence agent , Hewlet t -Packard BladeSystem
fence_ibmblade fence agent , IBM BladeCenter over SNMP
fence_idrac fence agent , IPMI over LAN
fence_ifmib fence agent , IF-MIB
fence_ilo fence agent , Hewlet t -Packard iLO
fence_ilo2 fence agent , Hewlet t -Packard iLO
fence_ilo3 fence agent , IPMI over LAN
fence_ilo4 fence agent , IPMI over LAN
fence_ilo_mp fence agent , Hewlet t -Packard iLO MP
fence_imm fence agent , IPMI over LAN
fence_intelmodular fence agent , In tel Modular
fence_ipdu fence agent , IBM iPDU
fence_ipmilan fence agent , IPMI over LAN
Red Hat Ent erprise Linux 6 Fence Configurat ion Guide
86
fence_kdump fence agent , Fence kdump
fence_rhevm fence agent , RHEV-M REST API
fence_rsb fence agent , Fujitsu-Siemens RemoteView Service Board (RSB)
fence_scsi fence agent , SCSI Persistent Reservat ions
fence_virt fence agent , Fence Virt
fence_vmware_soap fence agent , VMWare over SOAP API
fence_wt i fence agent , WTI Power Switch
fencing- configuration, Configuring Fencing with the ccs Command, Configuring Fencing withConga
fencing conf igurat ion, Conf iguring Fencing with the ccs Command
Fujitsu Siemens RemoteView Service Board (RSB) fence device, Fujitsu-SiemensRemoteView Service Board (RSB)
Hhelp
- getting help, Do You Need Help?
HP Bladesystem fence device , Hewlet t -Packard BladeSystem
HP iLO fence device, Hewlet t -Packard iLO
HP iLO MP fence device , Hewlet t -Packard iLO MP
HP iLO2 fence device, Hewlet t -Packard iLO
HP iLO3 fence device, IPMI over LAN
HP iLO4 fence device, IPMI over LAN
IIBM BladeCenter fence device , IBM BladeCenter
IBM BladeCenter SNMP fence device , IBM BladeCenter over SNMP
IBM Integrated Management Module fence device , IPMI over LAN
IBM iPDU fence device , IBM iPDU
IF MIB fence device , IF-MIB
integrated fence devices- configuring ACPI, Configuring ACPI For Use with Integrated Fence Devices
In tel Modular fence device , In tel Modular
IPMI LAN fence device , IPMI over LAN
RRHEV-M REST API fence device , RHEV-M REST API
SSCSI fencing, SCSI Persistent Reservat ions
Ttab les
- fence devices, parameters, Fence Devices
Revision Hist ory
87

VVMware (SOAP interface) fence device , VMWare over SOAP API
WWTI power switch fence device , WTI Power Switch
Red Hat Ent erprise Linux 6 Fence Configurat ion Guide
88