red hat openshift on the aws cloud...amazon web services – demo: red hat openshift on the aws...
TRANSCRIPT
Page 1 of 17
Red Hat OpenShift on the AWS Cloud
Demo and Walkthrough September 2019
Jay McConnell, Ryan Nitsch, and Mandus Momberg
Amazon Web Services (AWS)
What you’ll accomplish: Learn how to deploy OpenShift on AWS, and
then deploy a standard containerized application into OpenShift. Update the
application to a native AWS service by using AWS Service Broker.
Estimated time: 90 minutes for deployment, 60 minutes for walkthrough
Cost: You are responsible for the cost of the AWS services and Red Hat
OpenShift subscriptions used while running this demo. There is no additional
cost for using the demo.
Experience with AWS: Beginner
Experience with Red Hat OpenShift: Beginner
Prerequisites: An AWS account (sign up at https://aws.amazon.com), a
Red Hat OpenShift subscription, and a web browser
Contents
Overview ................................................................................................................................. 3
Demo components and flow .................................................................................................. 3

Amazon Web Services – Demo: Red Hat OpenShift on the AWS Cloud September 2019
Page 2 of 17
Technical specifications ......................................................................................................... 4
Deploy the demo .................................................................................................................... 5
Explore Red Hat OpenShift on AWS ..................................................................................... 7
Access Red Hat OpenShift.................................................................................................. 7
Deploy WordPress with a MariaDB database ....................................................................8
Update WordPress to use Amazon RDS .......................................................................... 10
Delete the demo ................................................................................................................... 14
Next steps ............................................................................................................................. 15
FAQ....................................................................................................................................... 15
Additional resources ............................................................................................................ 16
Document revisions ............................................................................................................. 16
This demo was created by solutions architects at Amazon Web Services (AWS) for
evaluation or proof-of-concept (POC) purposes on the AWS Cloud.
The demo automatically deploys Red Hat OpenShift into your AWS account with sample
data. After the demo is up and running, you can use the walkthrough in the following pages
for a guided tour of product features.
Quick Start option This demo sets up an evaluation environment. For
production-ready deployments, use the Red Hat OpenShift Quick Start.

Amazon Web Services – Demo: Red Hat OpenShift on the AWS Cloud September 2019
Page 3 of 17
Overview
Red Hat OpenShift is an open-source container application platform for enterprise
application development and deployment that is based on the Kubernetes container
orchestrator. In this demo, we will walk through the steps for installing WordPress into
OpenShift with a standard MariaDB database. You will then migrate the database to use
Amazon Relational Database Service (Amazon RDS) for MariaDB. You will deploy the new
database by using AWS Service Broker, which allows native AWS services to be exposed
directly in Red Hat OpenShift.
Demo components and flow
This demo builds a simplified version of the Quick Start architecture for Red Hat OpenShift
that includes these components:
An AWS Cloud environment that spans three Availability Zones.
A virtual private cloud (VPC) configured with public and private subnets according to
AWS best practices, to provide you with your own virtual network on AWS.
An internet gateway to allow access to the internet. This gateway is used by the bastion
hosts to send and receive traffic.
In the public subnets, managed NAT gateways to allow outbound internet access for
resources in the private subnets.
In the public subnets, a bastion host to allow inbound Secure Shell (SSH) access to
Amazon Elastic Compute Cloud (Amazon EC2) instances in public and private subnets,
and to perform the initial configuration and installation of OpenShift.
In a public subnet, an AWS Cloud9 workspace preconfigured with a sample WordPress
application and the tools needed to complete the demo.
In the private subnets, three OpenShift master hosts, three OpenShift etcd hosts, and
one OpenShift compute node.
An AWS Cloud9 integrated development environment (IDE) that will be used to
complete some of the demo steps.
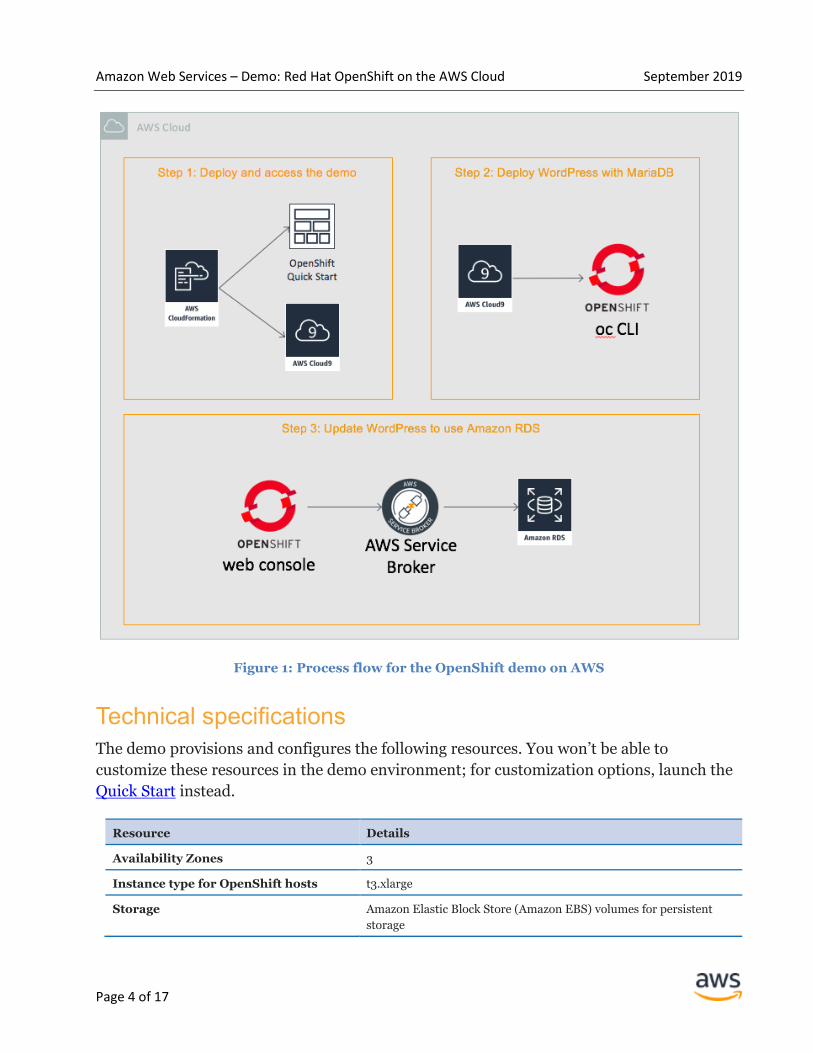
Figure 1 illustrates the process flow and features you’ll explore with this walkthrough. When
the infrastructure is deployed, the demo will walk you through deploying an application
(WordPress) into OpenShift, and then updating a component to a native AWS service
(Amazon RDS) by using AWS Service Broker.
Amazon Web Services – Demo: Red Hat OpenShift on the AWS Cloud September 2019
Page 4 of 17
Figure 1: Process flow for the OpenShift demo on AWS
Technical specifications
The demo provisions and configures the following resources. You won’t be able to
customize these resources in the demo environment; for customization options, launch the
Quick Start instead.
Resource Details
Availability Zones 3
Instance type for OpenShift hosts t3.xlarge
Storage Amazon Elastic Block Store (Amazon EBS) volumes for persistent
storage

Amazon Web Services – Demo: Red Hat OpenShift on the AWS Cloud September 2019
Page 5 of 17
Resource Details
Elastic Load Balancing (ELB) load
balancers
One load balancer for accessing the OpenShift console and another
for application access
Database for WordPress MariaDB on Amazon RDS using a db.t2.large instance in a single
Availability Zone
Deploy the demo
Note These instructions reflect the older version of the AWS CloudFormation
console. If you’re using the redesigned console, some of the option names might be
different.
1. Create an AWS account, or sign into your existing account.
If you don’t already have an AWS account, create one at https://aws.amazon.com by
following the on-screen instructions.
2. Sign up to launch the demo.
After you answer a few questions and submit the sign-up form,
you will be redirected to the AWS CloudFormation console. In
the console, you will need to provide the requested information
to launch the demo.
Note If you want to customize the configuration of OpenShift, please deploy the
Quick Start instead.
3. If you don’t already have a Red Hat subscription for OpenShift with at least eight
entitlements available, you can sign up for a trial license. You will need to provide
your Red Hat user name and password when you launch the demo.
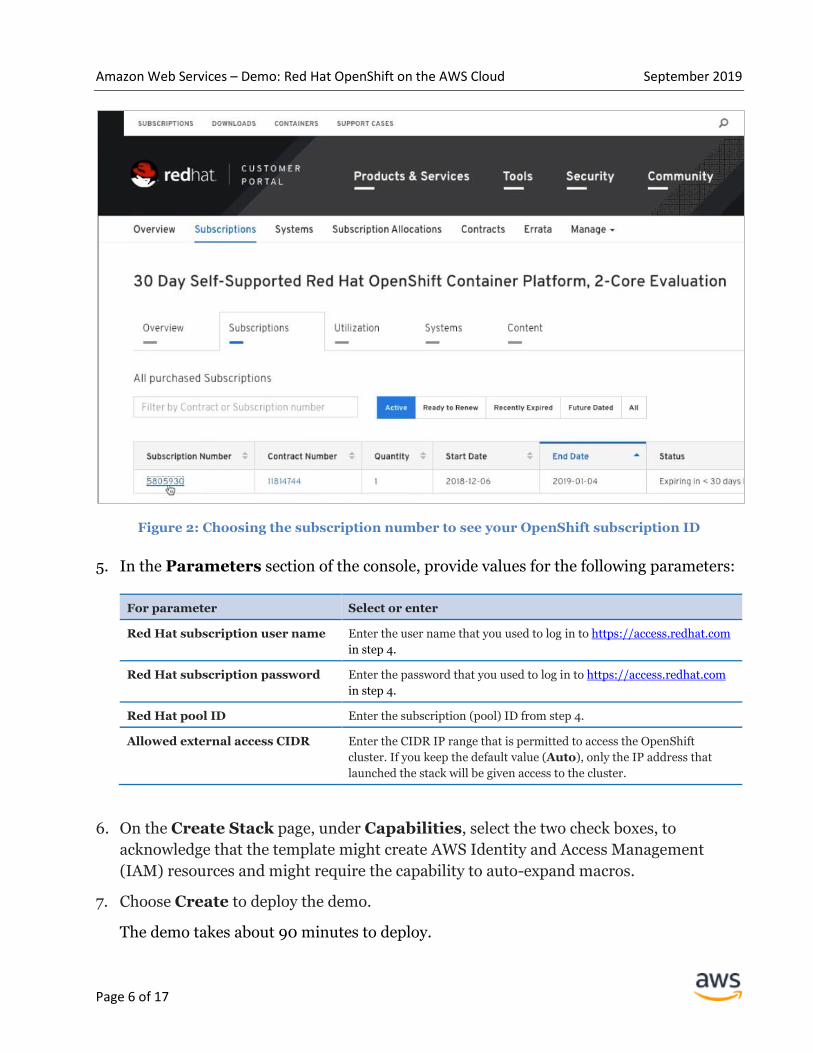
4. You also need an OpenShift subscription ID (pool ID) from Red Hat. To get this ID:
Log in to https://access.redhat.com.
Choose Subscriptions, and then choose the Subscriptions tab.
Search the page for Red Hat OpenShift and choose the OpenShift product name.
Choose the Subscriptions tab, and then choose the subscription number.
Note the pool ID that appears on the subscription page.
Sign up to launch the demo
Amazon Web Services – Demo: Red Hat OpenShift on the AWS Cloud September 2019
Page 6 of 17
Figure 2: Choosing the subscription number to see your OpenShift subscription ID
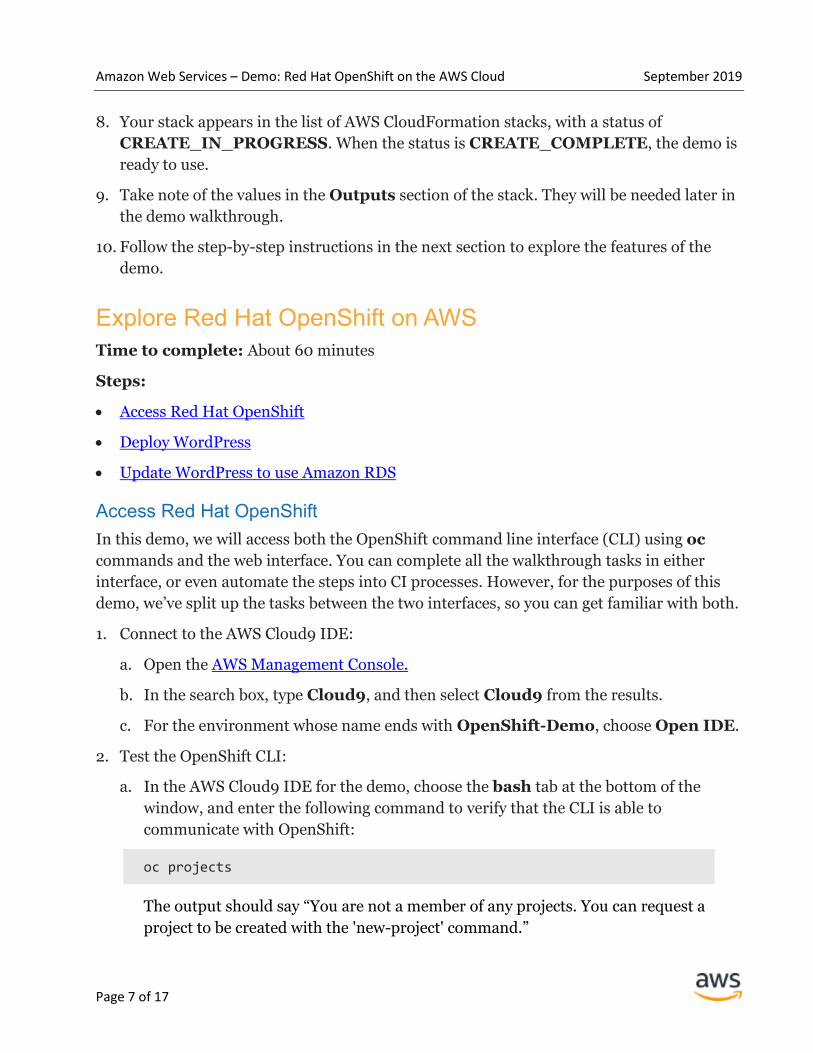
5. In the Parameters section of the console, provide values for the following parameters:
For parameter Select or enter
Red Hat subscription user name Enter the user name that you used to log in to https://access.redhat.com
in step 4.
Red Hat subscription password Enter the password that you used to log in to https://access.redhat.com
in step 4.
Red Hat pool ID Enter the subscription (pool) ID from step 4.
Allowed external access CIDR Enter the CIDR IP range that is permitted to access the OpenShift
cluster. If you keep the default value (Auto), only the IP address that
launched the stack will be given access to the cluster.
6. On the Create Stack page, under Capabilities, select the two check boxes, to
acknowledge that the template might create AWS Identity and Access Management
(IAM) resources and might require the capability to auto-expand macros.
7. Choose Create to deploy the demo.
The demo takes about 90 minutes to deploy.
Amazon Web Services – Demo: Red Hat OpenShift on the AWS Cloud September 2019
Page 7 of 17
8. Your stack appears in the list of AWS CloudFormation stacks, with a status of
CREATE_IN_PROGRESS. When the status is CREATE_COMPLETE, the demo is
ready to use.
9. Take note of the values in the Outputs section of the stack. They will be needed later in
the demo walkthrough.
10. Follow the step-by-step instructions in the next section to explore the features of the
demo.
Explore Red Hat OpenShift on AWS
Time to complete: About 60 minutes
Steps:
Access Red Hat OpenShift
Deploy WordPress
Update WordPress to use Amazon RDS
Access Red Hat OpenShift
In this demo, we will access both the OpenShift command line interface (CLI) using oc
commands and the web interface. You can complete all the walkthrough tasks in either
interface, or even automate the steps into CI processes. However, for the purposes of this
demo, we’ve split up the tasks between the two interfaces, so you can get familiar with both.
1. Connect to the AWS Cloud9 IDE:
a. Open the AWS Management Console.
b. In the search box, type Cloud9, and then select Cloud9 from the results.
c. For the environment whose name ends with OpenShift-Demo, choose Open IDE.
2. Test the OpenShift CLI:
a. In the AWS Cloud9 IDE for the demo, choose the bash tab at the bottom of the
window, and enter the following command to verify that the CLI is able to
communicate with OpenShift:
oc projects
The output should say “You are not a member of any projects. You can request a
project to be created with the 'new-project' command.”

Amazon Web Services – Demo: Red Hat OpenShift on the AWS Cloud September 2019
Page 8 of 17
b. Let’s go ahead and create a project:
oc new-project my-wordpress-project
3. Connect to the OpenShift console.
a. In the AWS Cloud9 IDE, retrieve the OpenShift login credentials from AWS Secrets
Manager by using this command:
./get_cluster_details.sh
Note the output (hostname, user name, password); you’ll need this information later.
b. Enter the OpenShift web console hostname from the previous step into a web
browser.
c. This demo has been set up using self-signed certificates, so your browser may display
security warnings. To access the web console, you will need to accept or bypass these
warnings up to three times.
d. Log in by using the user name and password you noted in step 3(a).
You can now access OpenShift through both the CLI and the web console. Now you’re ready
to deploy WordPress into an OpenShift container.
Deploy WordPress with a MariaDB database
OpenShift has a powerful templating capability, so you can describe your application in a
YAML file that can be parameterized and processed to produce an application’s
components. (YAML is a scripting and configuration language based on JSON.) In this
section of the walkthrough, you’ll use a pre-built YAML template to deploy WordPress and
MariaDB into your project.
1. Using the Cloud9 editor, choose the wordpress-template.yaml file from the
Environment window on the left side of the console.
2. Look at the structure of the YAML file. Notice that it includes an objects section that
contains the components of the WordPress application and MariaDB database, and a
parameters section that defines the parameters that can be specified when applying the
template to customize the deployment. In this case, the parameters define the MariaDB
database connection details, and all have default values, so you don’t have to enter any
parameters for your default installation.
3. Deploy this WordPress template by adding your template to the project. Run this
command in the AWS Cloud9 bash window:

Amazon Web Services – Demo: Red Hat OpenShift on the AWS Cloud September 2019
Page 9 of 17
oc create -f wordpress-template.yaml
4. Deploy your new template with the oc new-app command:
oc new-app --template wordpress
5. View all the newly created resources:
oc get all
6. Confirm the state of the application rollout for both MariaDB and WordPress:
oc rollout status -w dc/mariadb oc rollout status -w dc/wordpress
You should see something like this:
replication controller "mariadb-1" successfully rolled out replication controller "wordpress-1" successfully rolled out
7. Let’s take a look at the MariaDB logs to verify that it’s running as expected:
oc logs dc/mariadb
Expected output:
mysqld_safe Starting mysqld daemon with databases from /var/lib/mysql
8. Let’s also look at the WordPress logs to verify that it’s running as expected:
oc logs dc/wordpress
Expected output:
/usr/sbin/httpd -D FOREGROUND
9. To see how the WordPress application is connecting to the database, run:
oc status
10. To identify the route that has been created for external access, run:

Amazon Web Services – Demo: Red Hat OpenShift on the AWS Cloud September 2019
Page 10 of 17
oc get routes
The output will provide details about the WordPress application, including the
hostname.
11. Enter the hostname from the HOST/PORT section of the output into a web browser.
The WordPress installation screen is displayed.
12. Enter all the required details, make a note of the generated password, and then choose
Install WordPress.
13. Log in to WordPress. Select the “Back to WordPress demo” link under “lost your
password?”
WordPress is now running in your OpenShift cluster. At the moment it’s using a
containerized MariaDB database that you deployed with a YAML template. Managing
databases can be difficult, and requires handling of backups, scaling, and security patching.
You can fix that by switching to a managed database service that will handle your database
administration tasks. In the next section, you’ll use AWS Service Broker to switch to a
MariaDB database that’s running on Amazon RDS.
Update WordPress to use Amazon RDS
1. Open your web browser to the OpenShift web console that you logged in to in step 3 of
the Access Red Hat OpenShift section of this guide.
2. Choose Amazon RDS for MariaDB from the catalog, and then choose Next.
3. For Plan, choose Development, and then choose Next. This will give you a best-
practice Amazon RDS instance configured for development.
4. In the Amazon RDS for MariaDB configuration screen, fill in two values:
– For Access CIDR, enter 10.0.0.0/16 to grant the WordPress application access
to the database.
– For DB Instance Class, select db.t2.small.

Amazon Web Services – Demo: Red Hat OpenShift on the AWS Cloud September 2019
Page 11 of 17
Figure 3: Filling out the Amazon RDS for MariaDB configuration
5. Choose Next, choose Create in the Binding screen, and then choose Close.
6. You should now see “Amazon RDS for MariaDB is being provisioned in my-wordpress-
project.” Choose Continue to the project overview.
In the screen illustrated in Figure 4, you will see your WordPress application. The
Amazon RDS instance will be in a “Pending” state and will take around 20 minutes to
deploy. AWS Service Broker uses AWS CloudFormation to provision resources into your
account. To view what is happening under the hood in more detail, you can navigate to
the AWS CloudFormation console and view the stack events for the stack whose name
starts with aws-service-broker-rdsmariadb-.

Amazon Web Services – Demo: Red Hat OpenShift on the AWS Cloud September 2019
Page 12 of 17
Figure 4: Provisioning Amazon RDS for MariaDB for WordPress
7. When Amazon RDS for MariaDB has been provisioned, the “Pending” status will
disappear. At this point, you can create a binding to the database. Choose Create
Binding, Bind, and then Close.
8. Choose the binding that was crated, and then choose View Secret to see the credential
keys that were returned by AWS Service Broker.
9. Choose Add to Application.
10. From the application drop-down, choose wordpress, and then choose Save.
OpenShift will detect changes to the application pods (containers) and will restart the
pods. The credentials for Amazon RDS will be available to WordPress as environment
variables. However, the credentials that you created when you deployed the demo will
override these variables.
11. In the OpenShift web console, choose Overview.
12. Choose the wordpress deployment configuration.
13. Choose the Environment tab.
Amazon Web Services – Demo: Red Hat OpenShift on the AWS Cloud September 2019
Page 13 of 17
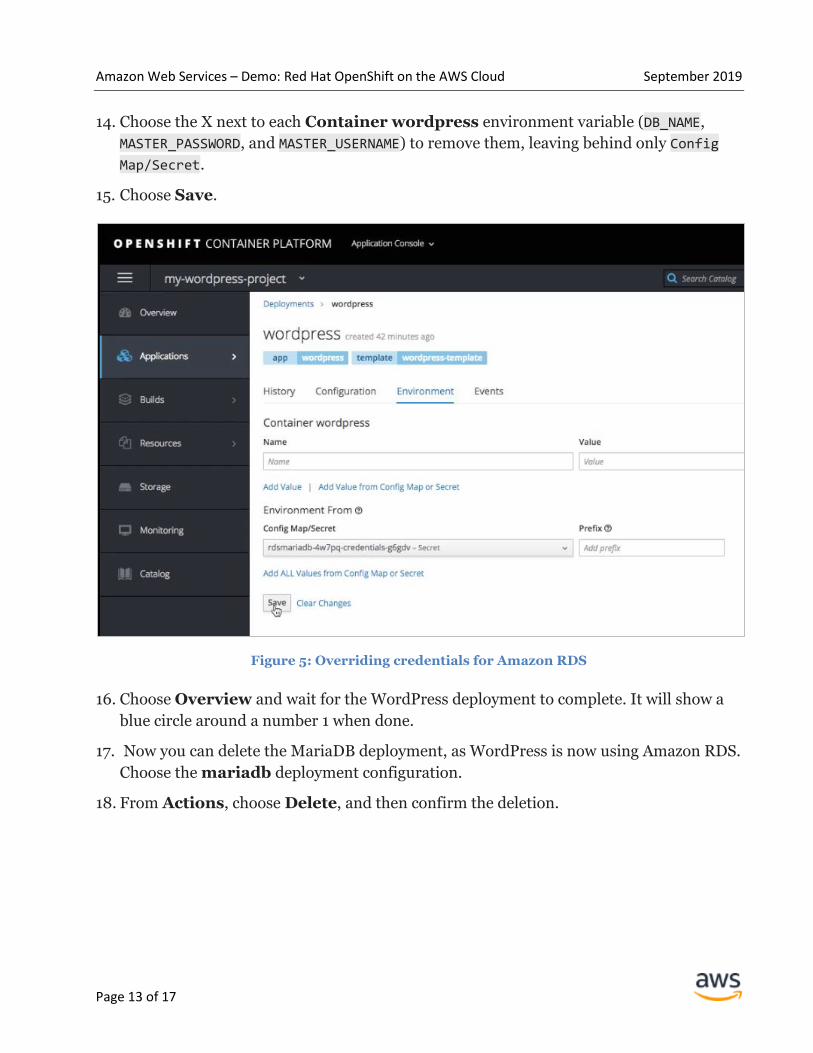
14. Choose the X next to each Container wordpress environment variable (DB_NAME,
MASTER_PASSWORD, and MASTER_USERNAME) to remove them, leaving behind only Config
Map/Secret.
15. Choose Save.
Figure 5: Overriding credentials for Amazon RDS
16. Choose Overview and wait for the WordPress deployment to complete. It will show a
blue circle around a number 1 when done.
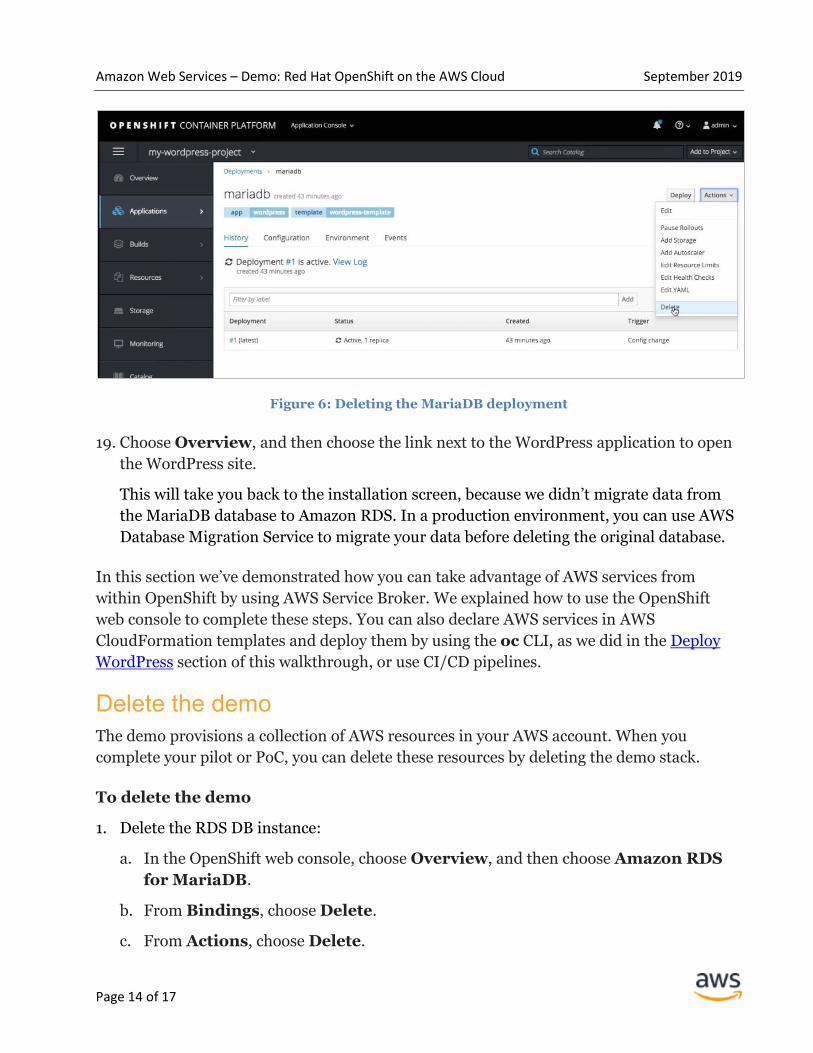
17. Now you can delete the MariaDB deployment, as WordPress is now using Amazon RDS.
Choose the mariadb deployment configuration.
18. From Actions, choose Delete, and then confirm the deletion.
Amazon Web Services – Demo: Red Hat OpenShift on the AWS Cloud September 2019
Page 14 of 17
Figure 6: Deleting the MariaDB deployment
19. Choose Overview, and then choose the link next to the WordPress application to open
the WordPress site.
This will take you back to the installation screen, because we didn’t migrate data from
the MariaDB database to Amazon RDS. In a production environment, you can use AWS
Database Migration Service to migrate your data before deleting the original database.
In this section we’ve demonstrated how you can take advantage of AWS services from
within OpenShift by using AWS Service Broker. We explained how to use the OpenShift
web console to complete these steps. You can also declare AWS services in AWS
CloudFormation templates and deploy them by using the oc CLI, as we did in the Deploy
WordPress section of this walkthrough, or use CI/CD pipelines.
Delete the demo
The demo provisions a collection of AWS resources in your AWS account. When you
complete your pilot or PoC, you can delete these resources by deleting the demo stack.
To delete the demo
1. Delete the RDS DB instance:
a. In the OpenShift web console, choose Overview, and then choose Amazon RDS
for MariaDB.
b. From Bindings, choose Delete.
c. From Actions, choose Delete.
Amazon Web Services – Demo: Red Hat OpenShift on the AWS Cloud September 2019
Page 15 of 17
2. Open the AWS CloudFormation console at
https://console.aws.amazon.com/cloudformation/.
You will see a list of the stacks that are currently running in your account.
3. Select the stack named Red-Hat-OpenShift-Demo.
4. From Actions, choose Delete stack.
5. When prompted, choose Delete.
6. Delete the Red Hat subscriptions used by the demo:
a. Open the Red Hat Customer Portal at https://access.redhat.com.
b. Choose Systems.
c. Select the eight Amazon EC2 systems that were created by the demo.
d. Choose Remove, and then confirm the deletion.
Next steps
To dig deeper into Red Hat OpenShift, you can deploy a best-practice, production-ready
cluster by using the OpenShift on AWS Quick Start. The Quick Start provides options for
custom domain names, additional persistent storage options like GlusterFS, and much
more.
Red Hat and AWS also offer an in-person, half-day workshop and hands-on lab so you can
learn how to simplify application development by using Red Hat OpenShift Container
Platform on AWS. To check the schedule and sign up, see the workshop roadshow website.
FAQ
Q. The CloudFormation stack fails to launch and rolls back.
A. There are many possible causes for this. The most common are issues with Red Hat
subscriptions, incorrect credentials, incorrect pool ID, or insufficient available
subscriptions. This demo requires eight OpenShift subscriptions or a trial license for
deployment to complete. Other causes are insufficient IAM permissions or service limits. To
troubleshoot, review the Events tab under the failed CloudFormation stacks, check your
subscriptions, credentials, and service limits, and deploy again.
Q. I can’t access the OpenShift web interface.
A. By default, this demo restricts access to the web interface to the IP that launched the
demo. If your IP changes, or if your corporate network uses multiple addresses, you should
Amazon Web Services – Demo: Red Hat OpenShift on the AWS Cloud September 2019
Page 16 of 17
manually set the Allowed external access CIDR parameter to the appropriate CIDR for
your network.
Additional resources
AWS Cloud9 IDE tutorial
AWS Quick Starts
AWS Service Broker
Get PoC credits for OpenShift on AWS
OpenShift documentation
OpenShift on AWS workshop schedule
Document revisions
Date Change In sections
September 2019 Initial publication —

Amazon Web Services – Demo: Red Hat OpenShift on the AWS Cloud September 2019
Page 17 of 17
© 2019, Amazon Web Services, Inc. or its affiliates. All rights reserved.
Notices
This document is provided for informational purposes only. It represents AWS’s current product offerings
and practices as of the date of issue of this document, which are subject to change without notice. Customers
are responsible for making their own independent assessment of the information in this document and any
use of AWS’s products or services, each of which is provided “as is” without warranty of any kind, whether
express or implied. This document does not create any warranties, representations, contractual
commitments, conditions or assurances from AWS, its affiliates, suppliers or licensors. The responsibilities
and liabilities of AWS to its customers are controlled by AWS agreements, and this document is not part of,
nor does it modify, any agreement between AWS and its customers.
The software included with this paper is licensed under the Apache License, Version 2.0 (the "License"). You
may not use this file except in compliance with the License. A copy of the License is located at
http://aws.amazon.com/apache2.0/ or in the "license" file accompanying this file. This code is distributed on
an "AS IS" BASIS, WITHOUT WARRANTIES OR CONDITIONS OF ANY KIND, either express or implied.
See the License for the specific language governing permissions and limitations under the License.