reefsys 255/326 - aqua one
TRANSCRIPT

Download the Aqua One App.Available for iOS & Android
Read and follow all Read and follow all safety instructions safety instructions
and important notices and important notices in these instructions in these instructions
as well as on the as well as on the product itself.product itself.
ReefSys 255/326
Instructions version: 20/12/2019
Australia: www.aquaone.com.au
New Zealand: www.aquaone.co.nz
United Kingdom: www.aquaone.co.uk All other countries:
www.aquaone.com.au
CUSTOMER CARECUSTOMER CAREThank you for choosing this Aqua One product.
Your Aqua One product is covered for parts and labour for 1 year from the date of purchase as detailed in the terms of the Guarantee in this instruction manual. For any inquiries or concerns regarding this product or any of our products, please do not hesitate to contact your local Aqua One Retailer or visit Aqua One Customer Care online in your country of purchase via the websites listed.
All aquatic species have specific requirements for their care. Please seek advice from
your Aqua One retailer for correct care requirements and species compatibility.
Inspiring Excellence in Fish Care!
FacebookLike us on
Before you work on your aquarium, wash your hands and arms. It is very important to
remove dirt, moisturiser and other impurities.

2
IMPORTANT SAFEGUARDS If you are in any doubt about the electrical installation or If you are in any doubt about the electrical installation or safety of this product you must consult a qualified electrician.safety of this product you must consult a qualified electrician.
Water and electricity can be dangerous. Do not attempt repairs yourself. Return the appliance to an authorised service facility for repair.
Children should be supervised when using this item.
Arrange a drip loop for ea ch cable to stop water entering the power socket. If the plug or the socket does get wet, disconnect the fuse or circuit breaker before unplugging the power plug.
Don’t operate the appliance if it has a damaged cord or plug, or if it is malfunctioning, or damaged in any manner.
Ensure your hands are dry when turning the power switch on or off and when inserting or removing the power cable from the socket.
Never yank the cable to pull it from the socket. Pull the plug carefully to disconnect.
Unplug the appliance from the electrical outlet when not in use or before any type of maintenance or cleaning.
All products are supplied with fitted plugs. This plug should not be tampered with in any way or removed. Removal or tampering with the plug invalidates our guarantee offered with this product.
Make sure any component mounted on a tank is securely installed before operating it.
If the appliance or any electrical component of the appliance (non-immersible equipment only) falls into the water or gets wet, don’t reach for it. Unplug it and then retrieve it.
If the appliance shows any sign of water leakage, unplug it from the power source. Examine the appliance after installation. It should not be plugged in if there is water on parts which are not intended to be wet.
Do not use the appliance for reasons other than the intended use.
Do not install or store the appliance where it will be exposed to weather or temperatures below freezing.
Ensure input voltage is the same voltage as your local power supply.
A G.F.C.I (Ground fault circuit interrupter) & surge protector is recommended for all electrical appliances.

Inspiring Excellence in Fish Care!
3
SPECIFICATIONS
Carefully unpack the aquarium making sure you keep all the packing material until Carefully unpack the aquarium making sure you keep all the packing material until all the parts of the product have been found and the product has been assembled. all the parts of the product have been found and the product has been assembled. This product is shipped to you in a factory sealed carton. Should the product This product is shipped to you in a factory sealed carton. Should the product malfunction in any way or if the unit is damaged and requires replacement, malfunction in any way or if the unit is damaged and requires replacement, contact the retailer where the product was purchased for inspection.contact the retailer where the product was purchased for inspection.
MODEL IMENSIONSD
RREPLACEMENT EPLACEMENT PPARTS ARTS & & FFILTER ILTER MMEDIA EDIA
AQUARIUM VOLUME
SUMP VOLUME
SYSTEM VOLUME*
REEFSYS 255
REEFSYS 326
207L
278L
48L
48L
255L
326L
90L X 55D X 53/80H120L X 55D X 53/80H
53443-FS
FilterSockMODEL
53443-FS
REEFSYS 255
REEFSYS 326
*Sump volume was calculated with *Sump volume was calculated with all baffles set to maximum height all baffles set to maximum height at a flow rate of approximately at a flow rate of approximately 3500L/h. 3500L/h.
Actual sump and total system volume will Actual sump and total system volume will vary according to flow rates, baffle settings vary according to flow rates, baffle settings and equipment used. and equipment used.
To calculate actual system volume, we To calculate actual system volume, we recommend that the system is set up with recommend that the system is set up with all equipment in place and running. After all equipment in place and running. After the water levels have stabilised, turn off the water levels have stabilised, turn off power to all equipment. power to all equipment. Once all water levels have settled (allow Once all water levels have settled (allow at least ten minutes), measure all water at least ten minutes), measure all water levels and calculate volume from these levels and calculate volume from these measurements. measurements. Alternatively, if the system is filled using Alternatively, if the system is filled using containers, it is relatively simple to containers, it is relatively simple to calculate by counting the containers used.calculate by counting the containers used.

4
WHAT’S IN THE BOX
M MAJORAJOR CCOMPONENTSOMPONENTS
33
11
22
66
44
55
77
ReefSys 255 ReefSys 326
Overflow Cover1
7
23456
Removable Support
Glass AquariumFoam BaseCabinetPlumbing AssemblySump
1010
1313
88 99
1111 1212
1414
Inspiring Excellence in Fish Care!
5
ReefSys 255 ReefSys 326
S SUMPUMP CCOMPONENTSOMPONENTSTop-Up Reservoir Lid8
91011
Sock Silencer (x2)Filter Sock (x2)Sump BaffleMovable Baffle12
1314
Baffle Screw & Nut (x8 ea)Sump Foam Base
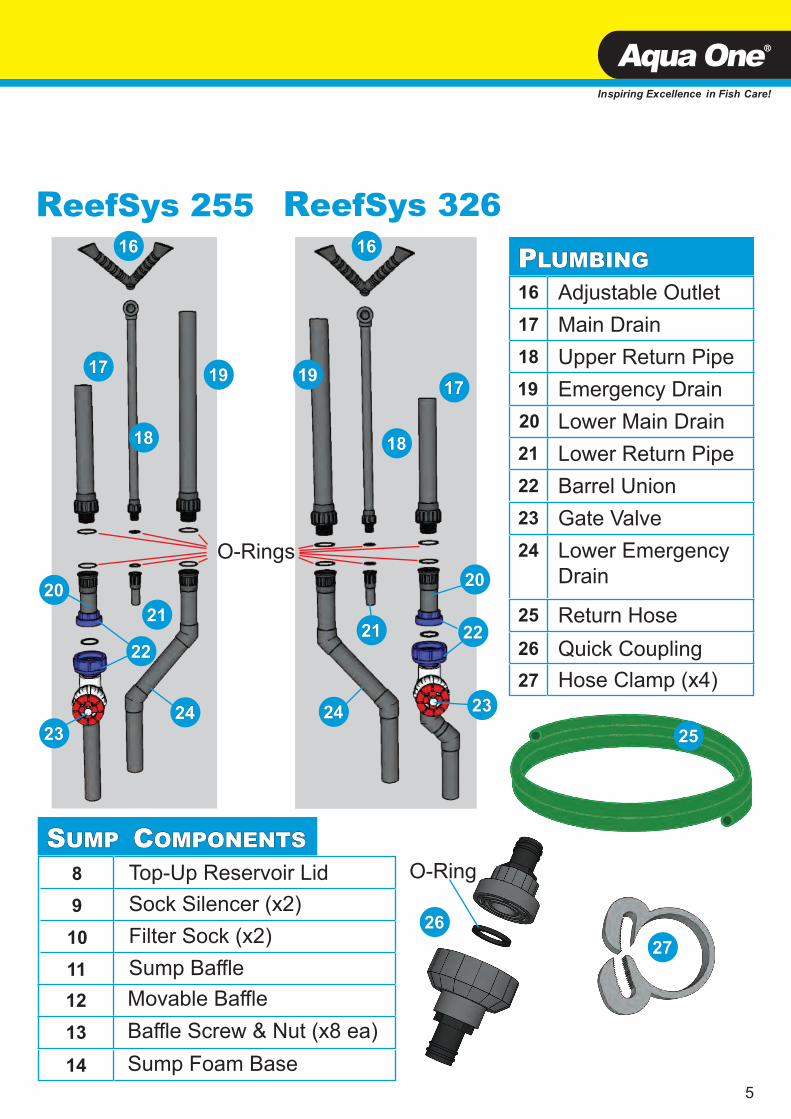
P PLUMBINGLUMBINGAdjustable Outlet16
1616
1717
1818
2020
2323
2121
2222
2424
1717
1818
1919
2020
2323
2121 2222
2424
Main Drain17Upper Return Pipe18Emergency Drain19Lower Main Drain20Lower Return Pipe21Barrel Union22
23 Gate Valve24 Lower Emergency
Drain
1919
1616
O-Rings
25 Return Hose26 Quick Coupling
2525
2626
O-Ring
27 Hose Clamp (x4)
2727
6
SETTING UP
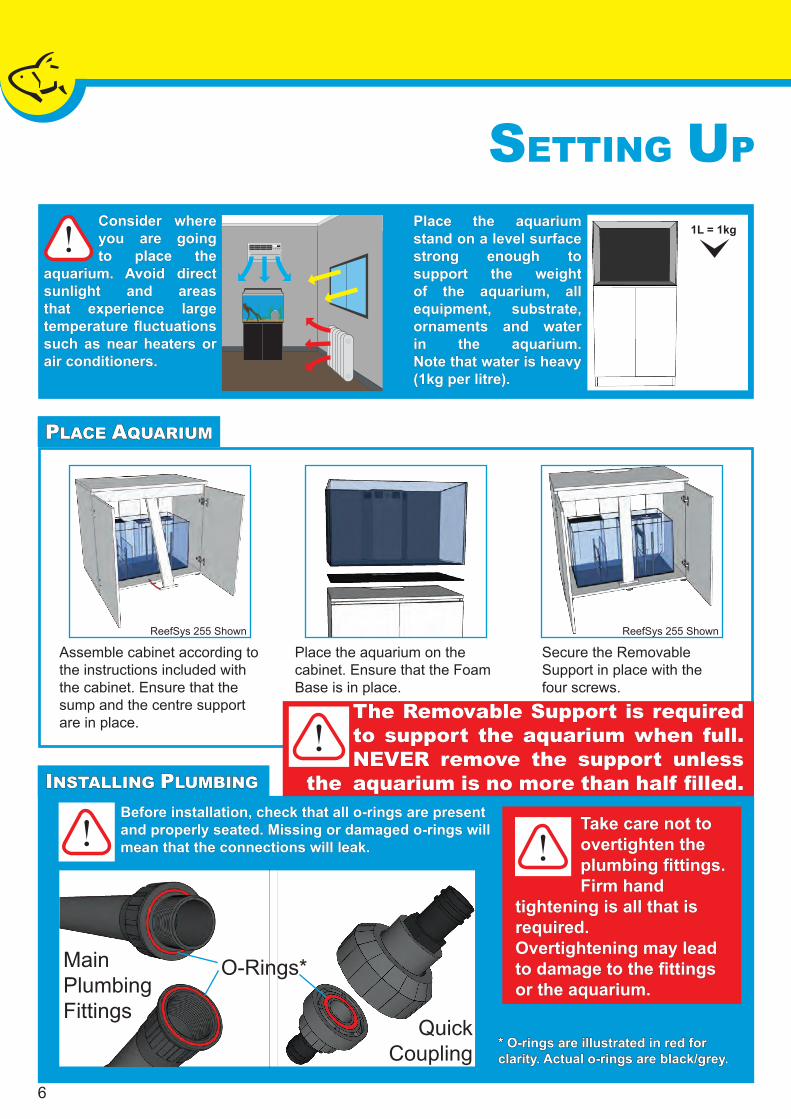
Place the aquarium Place the aquarium stand on a level surface stand on a level surface strong enough to strong enough to support the weight support the weight of the aquarium, all of the aquarium, all equipment, substrate, equipment, substrate, ornaments and water ornaments and water in the aquarium. in the aquarium. Note that water is heavy Note that water is heavy (1kg per litre).(1kg per litre).
PPLACE LACE AAQUARIUMQUARIUM
Consider where Consider where you are going you are going to place the to place the
aquarium. Avoid direct aquarium. Avoid direct sunlight and areas sunlight and areas that experience large that experience large temperature fluctuations temperature fluctuations such as near heaters or such as near heaters or air conditioners.air conditioners.
Assemble cabinet according to the instructions included with the cabinet. Ensure that the sump and the centre support are in place.
1L = 1kg
Secure the Removable Support in place with the four screws.
Place the aquarium on the cabinet. Ensure that the Foam Base is in place.
ReefSys 255 Shown
IINSTALLING NSTALLING PPLUMBINGLUMBING
Take care not to Take care not to overtighten the overtighten the plumbing fittings. plumbing fittings. Firm hand Firm hand
tightening is all that is tightening is all that is required. required. Overtightening may lead Overtightening may lead to damage to the fittings to damage to the fittings or the aquarium.or the aquarium.
ReefSys 255 Shown
Main Plumbing Fittings
QuickCoupling
Before installation, check that all o-rings are present Before installation, check that all o-rings are present and properly seated. Missing or damaged o-rings will and properly seated. Missing or damaged o-rings will mean that the connections will leak. mean that the connections will leak.
O-Rings*
* O-rings are illustrated in red for * O-rings are illustrated in red for clarity. Actual o-rings are black/grey.clarity. Actual o-rings are black/grey.
The Removable Support is required The Removable Support is required to support the aquarium when full. to support the aquarium when full. NEVER remove the support unless NEVER remove the support unless aquarium is no more than half filled.aquarium is no more than half filled.thethe

Inspiring Excellence in Fish Care!
7
IINSTALLING NSTALLING PPLUMBINGLUMBING
Place upper plumbing assemblies as shown to the right. Insert the threads into the holes in the bottom of the over-flow.
Ensure that the pipes are in the order shown according to which ReefSys aquarium you have
It is easiest to place the complete fit-tings one at a time. Position lower plumbing assemblies as shown and secure them by hand tight-ening the bulkheads as shown.
Be sure to check that they are posi-tioned correctly in relation to the sump.
Attach the flexible outlet as shown below.
Placing and tightening the plumbing fittings is Placing and tightening the plumbing fittings is best done with two people. While one person best done with two people. While one person places and holds the upper fittings in place, the places and holds the upper fittings in place, the other can attach and tighen the lower assemblies. other can attach and tighen the lower assemblies.
ReefSys 255 ReefSys 326
Connect the return hose to the quick connect coupling. Use hose clamps to secure the connection.
Connect the return hose to the lower return pipe. Secure with a hose clamp.
Straightening Hose Straightening Hose The hose included may have been The hose included may have been coiled for months in the box. coiled for months in the box. Because of this, it will tend to Because of this, it will tend to remain “curly”. remain “curly”. To reduce this, soak the hose in hot To reduce this, soak the hose in hot (not boiling) water for ten minutes. (not boiling) water for ten minutes. Then position it straight until it Then position it straight until it cools down. cools down.
Fitting hose to pipesFitting hose to pipesFill a cup with hot (not boiling) Fill a cup with hot (not boiling) water and soak the end of the hose water and soak the end of the hose for a few minutes. While for a few minutes. While the hose end is hot, push the hose end is hot, push it at least 2cm onto the it at least 2cm onto the fitting and allow to cool. fitting and allow to cool.
Preparing and Preparing and Attaching HosesAttaching Hoses
ReefSys 255 Shown
CCONNECTING ONNECTING RRETURN ETURN HHOSEOSE
8
SETTING UP cont.
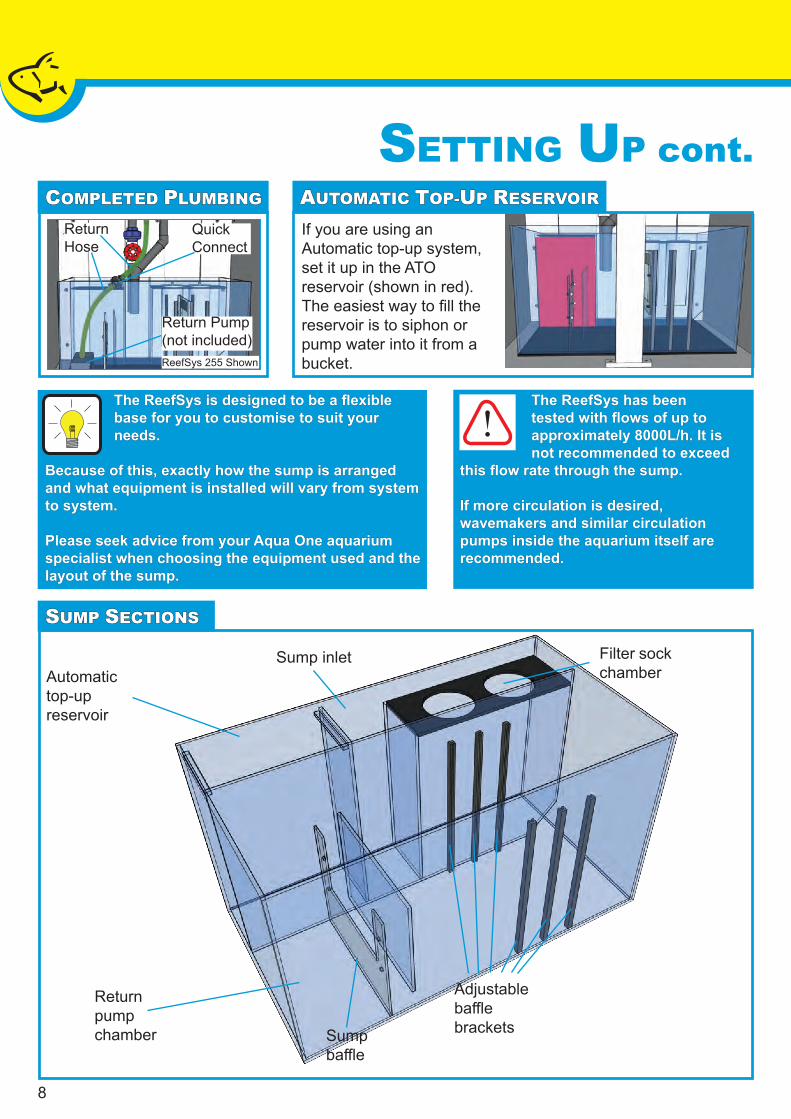
Return Hose
Quick Connect
Return Pump (not included)
CCOMPLETED OMPLETED PPLUMBINGLUMBING
ReefSys 255 Shown
SSUMP UMP SSECTIONSECTIONS
Return pump chamber
Automatic top-up reservoir
Filter sock chamber
Sump inlet
Adjustable baffle brackets
The ReefSys is designed to be a flexible The ReefSys is designed to be a flexible base for you to customise to suit your base for you to customise to suit your needs. needs.
Because of this, exactly how the sump is arranged Because of this, exactly how the sump is arranged and what equipment is installed will vary from system and what equipment is installed will vary from system to system. to system. Please seek advice from your Aqua One aquarium Please seek advice from your Aqua One aquarium specialist when choosing the equipment used and the specialist when choosing the equipment used and the layout of the sump. layout of the sump.
The ReefSys has been The ReefSys has been tested with flows of up to tested with flows of up to approximately 8000L/h. It is approximately 8000L/h. It is not recommended to exceed not recommended to exceed
this flow rate through the sump. this flow rate through the sump. If more circulation is desired, If more circulation is desired, wavemakers and similar circulation wavemakers and similar circulation pumps inside the aquarium itself are pumps inside the aquarium itself are recommended.recommended.
AAUTOMATIC UTOMATIC TTOP-OP-UUP P RRESERVOIRESERVOIR
If you are using an Automatic top-up system, set it up in the ATO reservoir (shown in red). The easiest way to fill the reservoir is to siphon or pump water into it from a bucket.
Sump baffle

Inspiring Excellence in Fish Care!
9
SETTING UP YOUR SUMPFFILTER ILTER SSOCKSOCKS
The filter sock holder will hold two filter socks to ensure efficient pre-filtering at higher flow rates. When placing the socks, ensure that the plastic frame edge is flush against the holder so that the water cannot bypass the sock. To minimise any noise from the water flowing through the socks, place the sock silencers onto the socks as shown.
UUSING THESING THE BBAFFLESAFFLES
The two baffles in the sump are designed to allow for maximum flexibility in equipment selection and placement.
To minimise any trickling To minimise any trickling sound from the sump, sound from the sump, avoid excessive height avoid excessive height differences between the differences between the
sections of the sump.sections of the sump.
To adjust the height of the baffles, simply loosen the screws and raise or lower the movable panel as shown. The movable baffle may be placed in any of the three baffle brackets. The sump baffle is fixed in place.
Sump Sections A - Return pump chamber. There should be enough water to comfortably submerge the return pump.
B - Skimmer chamber provides a constant lower water level to suit protein skimmers and similar equipment. C - Refugium section. Highest water level suitable for a refugium or equipment needing deeper water to function.
B CA If adjusting the heights of If adjusting the heights of the baffles in the sump, be the baffles in the sump, be aware that this will affect aware that this will affect the total system volume. the total system volume.
It also affects the maximum safe It also affects the maximum safe running water level. running water level.
A
B
C

10
FILLING AND ADJUSTING FLOWFFILLING THE ILLING THE AAQUARIUMQUARIUM
The first time you fill the aquarium, it is important to be sure that the system is not overfilled. To do this, first install all plumbing, equipment, and place baffles as desired. Fill the aquarium so that the water is just beginning to spill into the sump. Then fill the sump to a few centimetres from the top. Turn all equipment on and wait for the water level in the sump to stabilise - this is the maximum running water level in the current configuration. Mark the water level with a marker pen and use this as a reference for the future.
ReefSys 255 Shown ReefSys 255 Shown
AADJUSTING THE DJUSTING THE DDRAINRAIN
Set the gate valve to around the middle position (around three turns from fully closed) and start the return pump.
OPE
NCLOSE
ReefSys 255 Shown
The drain of the ReefSys is designed to run silently by minimising turbulence in the drain pipes. When running correctly, the main drain will work as a full siphon and no air will be drawn through. For it to run correctly, the plumbing will need to be tuned using the gate valve to control the flow.
The emergency drain should be able to handle the flow of water in case the main drain The emergency drain should be able to handle the flow of water in case the main drain becomes clogged. It is a good idea to test that the emergency drain can handle the flow in becomes clogged. It is a good idea to test that the emergency drain can handle the flow in your configuration if you are running a high flow rate through the sump. To do this, simply your configuration if you are running a high flow rate through the sump. To do this, simply turn the gate valve to the fully closed position and monitor the drains for ten minutes. turn the gate valve to the fully closed position and monitor the drains for ten minutes.
If the flow is too high for the emergency drain, it is strongly recommended to reduce the flow rate If the flow is too high for the emergency drain, it is strongly recommended to reduce the flow rate through the sump.through the sump.
Wait a few minutes for the water levels to stabilise, then close the gate valve a little (about a quarter turn) and wait for at least ten minutes.
Repeat this procedure until the water level in the weir is just below the emergency drain. Once the correct setting is found, it should require little attention but may need adjustment from time to time.

Inspiring Excellence in Fish Care!
11
Unplug all equipment before beginning Unplug all equipment before beginning work on any part of the aquarium.work on any part of the aquarium.
MAINTENANCEDDAILY AILY CCHECKSHECKS
NEVER NEVER clean any clean any components components with abrasive with abrasive
materials, detergents materials, detergents or other cleaning or other cleaning products. ONLY use products. ONLY use products intended for products intended for aquarium use.aquarium use.
RREGULAR EGULAR CCLEANINGLEANING
Remove and rinse filter socks in clean tap water. Turn them inside out to flush detritus out. Socks should be replaced every few months.
Rinse the silencers to remove any detritus. Use a sponge or soft brush if required.
Clean the grilles on the weir to remove any build up of materials. Use a soft brush as required.
Clean the grilles on the baffles to remove any build up of materials. Use a soft brush as required.
Clean the outlet to remove any build up of algae or other detritus. Use a soft brush as required.
Check that the drain system is functioning correctly (it should be silent) and that water is flowing through the aquarium properly.
Check that water is flowing through the filter socks correctly. If they are clogged, the water will spill over the silencer overflow shown.
Check the water level in the sump. If you are using an automatic top-up system, ensure that the ATO reservoir has enough water.
Check livestock and important Check livestock and important parameters regularly. For specific parameters regularly. For specific advice different species, seek advice advice different species, seek advice from your aquarium specialist.from your aquarium specialist.

12
Rinse in fresh water to Rinse in fresh water to remove any particles remove any particles attached. Dry the o-ring.attached. Dry the o-ring.
Put a small amount of Put a small amount of lubricant* on and smear it lubricant* on and smear it over the o-ring so that it is over the o-ring so that it is covered by a thin film. covered by a thin film.
To remove the o-ring, use a To remove the o-ring, use a plastic card, such as a credit plastic card, such as a credit card to gently lever the o-ring card to gently lever the o-ring up and over the lip of its seat. up and over the lip of its seat. Then roll it off the part.Then roll it off the part.
Cleaning and Cleaning and lubrication of o-ringslubrication of o-rings
For extended life and ease of assembly and For extended life and ease of assembly and disassembly, it is recommended that o-rings disassembly, it is recommended that o-rings are lubricated with an aquarium safe o-ring are lubricated with an aquarium safe o-ring lubricant such as AquaLube*. Lubricating the lubricant such as AquaLube*. Lubricating the o-rings will also minimise the o-rings will also minimise the chance of parts chance of parts seizing leading seizing leading to accidental to accidental breakages.breakages.
MAINTENANCE - PLUMBING
Unscrew the bulkheads and remove the bottom plumbing. Disconnect the flexible outlet. Remove the top plumbing. Before reassembly, wipe the glass and clean the fittings to remove any salt or other materials.
The plumbing of the ReefSys should require almost no maintenance. The gate valve is able to be fully disassembled as required. Generally the only instance that would require disassembly of the rest of the plumbing would be in case of a blockage.
Before removing Before removing the hard the hard plumbing, it is plumbing, it is recommended recommended
that the water in the weir is that the water in the weir is siphoned out. Otherwise, siphoned out. Otherwise, water will be splashed water will be splashed around the cabinet as the around the cabinet as the weir drains. weir drains. It is helpful to have a It is helpful to have a second person to assist second person to assist with unscrewing and with unscrewing and replacing the bulkheads.replacing the bulkheads.
To remove the return pump for maintenance, first disconnect the quick coupling as shown.
DDISCONNECTING THE ISCONNECTING THE RRETURN ETURN PPUMPUMP
RREMOVING THE EMOVING THE HHARD ARD PPLUMBINGLUMBING

Inspiring Excellence in Fish Care!
13
SSERVICING THE ERVICING THE GGATE ATE VVALVEALVE
Unscrew the locking ring on the barrel union.
Remove the gate valve assembly
Unscrew the cap as shown.
Remove the valve assembly from the valve body.
Remove o-ring from the valve body.
Remove o-ring from the barrel union body.
Wipe out the o-ring channels (highlighted in red) of all fittings to remove any particles.
Lubricate the internal thread and o-ring of the gate valve.
Rinse the o-ring with clean tap water.
Once you are satisfied with the movement and cleanliness of the gate valve, reassemble it by following the first six steps in reverse order. Reconnect the valve to the rest of the plumbing assembly. The drain will need to be adjusted again as described on page 10.

14
TROUBLESHOOTING
If you are having a problem that you can’t solve by following these steps, contact your If you are having a problem that you can’t solve by following these steps, contact your Aqua One retailer for advice as many issues may be resolved with a replacement part or Aqua One retailer for advice as many issues may be resolved with a replacement part or an adjustment.an adjustment.
GGURGLING URGLING SSOUND OUND FFROM ROM DDRAINRAIN
Check the water level in the weir. If the level is too low, air will be drawn into the main drain creating the sound. Adjust the drain.
If adjusting the gate valve doesn’t affect the water level, there may be a blockage in the main drain. Remove the gate valve and check the plumbing for a blockage. (See Page 13)
If the level is too high, water will spill into the emergency drain, drawing air into it creating the sound. Adjust the drain.
GGATE ATE VVALVE IS ALVE IS HHARD TO ARD TO AADJUSTDJUST
Remove and service the gate valve as described on page 13. Be sure to lubricate the internal thread and o-rings.
Remove and clean the leaking fitting. Check for damage to the fitting, paying attention to the o-ring. Be sure to lubricate the o-ring or replace it if it shows signs of damage.
QQUICK UICK CCOUPLING, OUPLING, BBARREL ARREL UUNION NION OR OR GGATE ATE VVALVEALVE IS IS LLEAKINGEAKING
Because of the constant pressure of the water, acrylic can bend over time in some circumstances. Reverse the orientation of the baffles to correct this.
BBAFFLES ARE AFFLES ARE BBENDINGENDING

Inspiring Excellence in Fish Care!
15
FFILTER ILTER SSOCK OCK CCHAMBER HAMBER OOVERFLOWINGVERFLOWING
Filter socks or the sock silencers may be clogged. Clean the filter socks and sock silencers. The socks may be due to be replaced.
If the flow rate is very high, it may be too high to allow the water to pass through the silencers fast enough. Remove the silencers or reduce the flow rate.
TTRICKLING RICKLING SSOUND IN THE OUND IN THE SSUMPUMP
Check the relative heights of the baffles. If there is a large drop, the water falling can be noisy. Adjust the heights of the baffles.
Flow rate in the sump may be too high to allow a silent flow. While the system will work correctly, the solution may be to reduce the water flow through the sump.
Check the grille on the movable baffle for blockages. If only part of the grille allows water through, it can become noisy. Clean the grille if required.
TTANK MAY BE ANK MAY BE LLEAKINGEAKING
If the water level has dropped, there may be a leak in the tank body itself. To find a leak, it may be necessary to remove the tank, dry it and place it on newspaper to find the leak.
Turn off all pumps and mark the water level with a marker. Leave the tank for at least a few hours and see if the water level has dropped.
Check all plumbing fittings and all equipment. Watch for any splashing of water. Clean any salt buildup from all surfaces.

Inspiring Excellence in Fish Care!
Australian Consumer Law.In Australia the Aqua One guarantee applies in addition to the guarantees that can not be excluded under the Australian Consumer Law. You are entitled to a replacement or refund for a major failure and for compensation for any other reasonably foreseeable loss or damage. You are also entitled to have the goods repaired or replaced if the goods fail to be of acceptable quality and the failure does not amount to a major failure.
About this GuaranteeThe Manufacturer or Distributor, of Aqua One goods, is collectively known herein as “Aqua One”. Please refer to contact details for Aqua One below or on the applicable Aqua One website. Any product that is covered by its own guarantee (as enclosed with the product) is subject to the conditions of that guarantee.
The benefits given to the purchaser, under guarantee, are in addition to all other statutory rights and remedies which the purchaser has in respect of products under legislation in the applicable country of purchase. This guarantee shall not affect any such rights and should be read subject to such legislation.
Terms and conditions of your Aqua One Guarantee1. The Aqua One guarantee becomes effective from the date of purchase.2. You must provide the proof of purchase before any repair or replacement of your Aqua one product are considered when requesting a guarantee service. 3. All products subject to guarantee service should be prepared for transportation in the original packaging or other comparable packaging which offers the same degree of protection.4. Where products are repaired or replaced under guarantee, these products are guaranteed for the remainder of the original guarantee period, where permitted by local law.5. Where claims on inspection reveal goods are in normal working order, Aqua One will request reimbursement of all reasonable costs incurred.6. Where Aqua One determines the products are being used in a manner contrary to the intended purpose/use, instructions, specifications or this Guarantee, Aqua One reserves the right to terminate the guarantee and will provide written notice to the purchaser.
What is covered:1. Aqua One warrants to the purchaser, for 1 Year from date of original purchase, to repair or replace products where fault is found due to defective materials or faulty workmanship and where goods do not operate in accordance with the instructions.2. The guarantee covers any other products as enclosed with the product unless those products are provided with their own guarantee.3. The guarantee covers the Aquarium against gluing breakdown resulting in leakage.
What is not coveredWhere permitted by local law, the following exclusions and limitations apply in regard to the guarantee:1. Glass or Acrylic scratching, for whatever reason caused after purchase.2. Glass breakage for whatever reason after purchase unless it is established that the breakage was caused prior to purchase.3. Product guarantee service where fault is due to, but not limited by a) misuse b) neglect c) abuse d) fire or flood e) normal wear and tear f ) accidental breakage g) Acts of God h) mains voltage fluctuation or supply problems i) connection to any voltage other than what is stated on the rating plate j) modification or tampering to electrical cord or plug, k) vermin, insects or foreign objects l) liquid spillage or submersion of goods not designed to sustain such use or duress.4. Where inspections reveal the products are in normal working order including where noise or vibration is consistent with normal product operation.5. Attempted repairs or modifications by unauthorised persons, including but not limited to the drilling of holes in the aquarium glass by unauthorised persons.6. Where the product’s factory rating plate has been removed, altered, damaged or is rendered illegible.7. Where products are not installed, operated or maintained in accordance with Aqua One’s product instructions, specifications or this guarantee.8. Replacement or repair of worn consumables such as: filter socks.9. Replacement of lost products, parts or components.10. Costs associated with products transportation, removal, installation, postage or cost of insurance.11. Any damage incurred whilst installing, transporting or moving the goods.12. Subject to certain local statutory rights and obligations to the contrary, and this guarantee shall not affect those rights or obligations, where, to the full extent permitted by law: 1. all express and implied warranties and conditions under statute or general law, are expressly excluded and Aqua One, where permitted, will limit liability as follows and at Aqua One’s option to: in regard to products either a) the replacement of goods or supply of equivalent goods b) the repair of products or the cost of replacing the products OR of acquiring equivalent products OR in regard to services either c) the re-supply of services d) the cost to re-supply services. 2. Aqua One will not be liable for any loss or damage, including consequential loss or damage either directly or indirectly, or for any incidental expenses, of any kind, and in any way whatsoever.
Aqua One may be contacted in:Australia Hong Kong New Zealand United KingdomKong’s (Aust.) Pty. Limited Kong’s Aquarium Supplies Co., Ltd Kong’s (NZ) Limited Kong’s (UK) Limited,PO Box 863, Ingleburn No 31, 3/F Thriving Industrial Centre PO Box 15 - 183, Tauranga C/O Aqua Pacific UK Ltd.1890 NSW Australia 26-38 Sha Tsui Road, Tsuen Wan, 3015 New Zealand PO Box 268www.aquaone.com.au Hong Kong www.aquaone.co.nz Romsey Hampshire, SO51 0WW www.aquaone.co.hk United Kingdom www.aquaone.co.uk
AQUA ONE 1 YEAR GUARANTEE
Australia: www.aquaone.com.au
New Zealand: www.aquaone.co.nz
United Kingdom: www.aquaone.co.uk All other countries:
www.aquaone.com.au
CUSTOMER CARECUSTOMER CAREThank you for choosing this Aqua One product.
Your Aqua One product is covered for parts and labour for 1 year from the date of purchase as detailed in the terms of the Guarantee below. For any inquiries or concerns regarding this product or any of our products, please do not hesitate to contact your local Aqua One Retailer or visit Aqua One Customer Care online in your country of purchase via the websites listed.