reference series acceptor pocket guide - … · 330.pock.gb.2 : gen.pock.clean.acc.none.gb.2 black...
TRANSCRIPT
330.POCK.GB.2 : 330.POCK.FPAGE.NONE.NONE.GB.2 Black i
23072 G3 143910044
The
REFERENCE SERIES
ACCEPTOR
POCKET GUIDE
ROUTINE MAINTENANCE,SAFETY, INSTALLATION &
TROUBLESHOOTING
CashFlow®CashFlow®CashFlow®CashFlow®CashFlow®CashFlow®CashFlow®CashFlow®CashFlow®CashFlow®CashFlow®CashFlow®CashFlow®CashFlow®CashFlow®CashFlow®CashFlow®CashFlow®CashFlow®CashFlow®CashFlow®CashFlow®
CashFlow®CashFlow®CashFlow®CashFlow®CashFlow®CashFlow®CashFlow®CashFlow®CashFlow®CashFlow®CashFlow®CashFlow®CashFlow®CashFlow®CashFlow®CashFlow®CashFlow®CashFlow®CashFlow®CashFlow®CashFlow®CashFlow®
CashFlow®CashFlow®CashFlow®CashFlow®CashFlow®CashFlow®CashFlow®CashFlow®CashFlow®CashFlow®CashFlow®CashFlow®CashFlow®CashFlow®CashFlow®CashFlow®CashFlow®CashFlow®CashFlow
330®
330.POCK.GB.2 : 330.POCK.FPAGE.NONE.NONE.GB.2 Black ii
CashFlow® 330 acceptor Pocket Guide
ii , MEI., 1994
Published by :
MEI
Internet: http://www.meigroup.com
For information on translations in your country, please write to theTechnical Communications Manager at the above address.
CashFlow® 330 acceptor Pocket Guide
©, MEI UK International Ltd., 1994. All rights reserved.
Except as permitted under the relevant local legislation, no part of thispublication may be copied, transmitted, transcribed, or distributed in anyform or by any means, or stored in a database or retrieval system, ortranslated into any language (natural or computer), without the prior writtenpermission of MEI.
MEI ®, CashFlow® and the MEI device are registered trademarks.©,MEI., 1994.
MEI reserves the right to change the product or the product specifications at any time. While every effort has been made to ensure that the information in this publication is accurate, MEI disclaims any liability for any direct or indirect losses (howsoever caused) arising out of use or reliance on this information.
This document does not necessarily imply product availability.
Part Number : 143910044
This Edition ( November 1994)
330.POCK.GB.2 : 330.POCK.CONT.NONE.NONE.GB.2 Black iii
, MEI., 1994 iii
CashFlow® 330 acceptor Pocket Guide
CONTENTS
Routine Maintenance
Troubleshooting the CashFlow® 330
Using the MMI Switches and theMEI Route Alpha 250 Terminal
Address Settings for theMEI Route Alpha 250 Terminal
Fitting a Unit into aMini, Midi or Maxi Front Plate
Fitting a Unit into a Top EntryAdaptor
Starting and Testing a Unit
Product Manuals andProduct Technical Training
Addresses of Regional Offices

330.POCK.GB.2 : 330.POCK.CONT.NONE.NONE.GB.2 Black iv
CashFlow® 330 acceptor Pocket Guide
iv , MEI., 1994
330.POCK.GB.2 : GEN.POCK.SUB_SAF.NONE.NONE.GB.3 Black 1
, MEI., 1994 1
CashFlow® 330 acceptor Pocket Guide
User Safety Notices
WARNINGBefore cleaning, servicing, removing or replacingCashFlow® units, ALWAYS SWITCH OFF orISOLATE the ELECTRICITY SUPPLY to the hostmachine.
CAUTIONThis guide is for use only by personnel trained tocarry out electrical installation.
Maximum Operating Voltage
Do not apply more than the voltage specified on theunit.
Dangerous Environments
Do not operate the unit in the presence offlammable gases or fumes, or after the entry of fluidinto the machine.
Disposal of Product
If necessary, always dispose of defective unitsaccording to local regulations.
Conformance toInternational Standards
When installed and operated according to theinstructions provided for the particular unit,CashFlow® products meet the applicableinternational and national Safety and ElectroMechanical Compatibility standards for any countryin which they are used.
330.POC
K.G
B.2 : 330.PO
CK
.OV
IEW
.NO
NE
.NO
NE
.GB
.2 Black 2
CashF
low®
330 accepto
r Po
cket Gu
ide
2
, ME
I., 1994
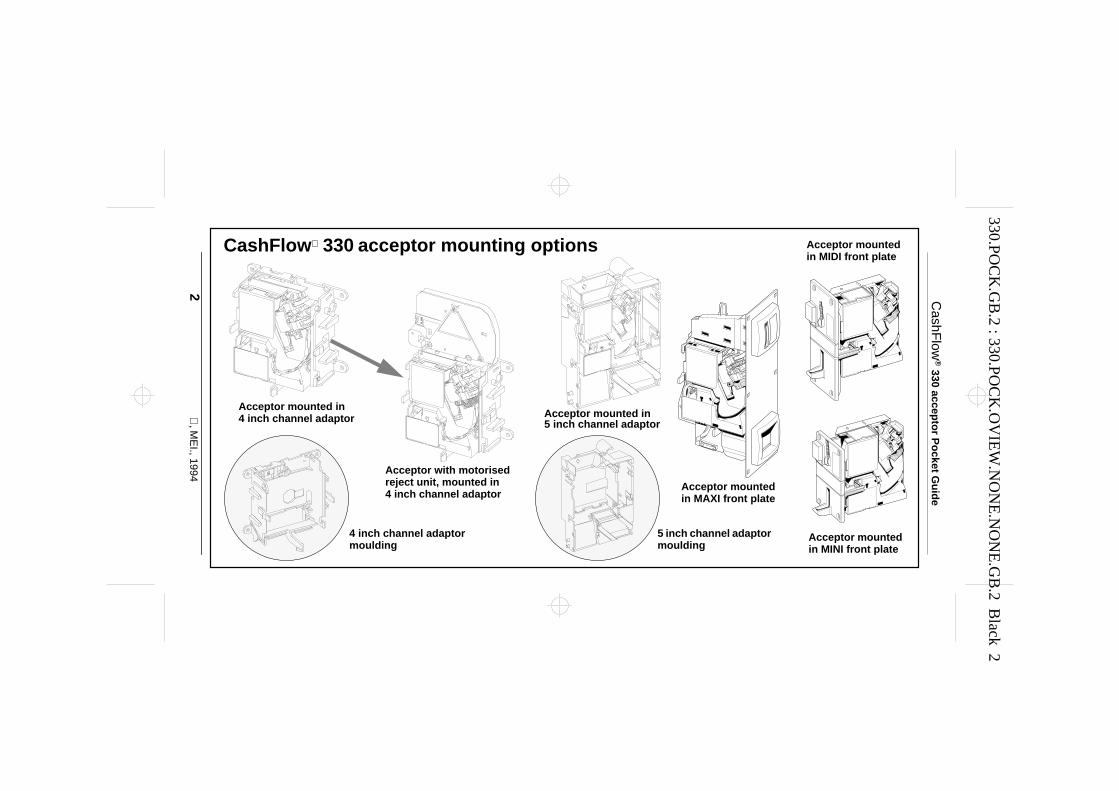
CashFlow 330 acceptor mounting options
Acceptor mounted in4 inch channel adaptor
Acceptor mountedin MAXI front plate
Acceptor mountedin MINI front plate
Acceptor mountedin MIDI front plate
4 inch channel adaptormoulding
Acceptor mounted in5 inch channel adaptor
5 inch channel adaptormoulding
Acceptor with motorisedreject unit, mounted in4 inch channel adaptor
330.POCK.GB.2 : GEN.POCK.CLEAN.ACC.NONE.GB.2 Black 3
CashFlow® 330 acceptor Pocket Guide
, MEI., 1994 3
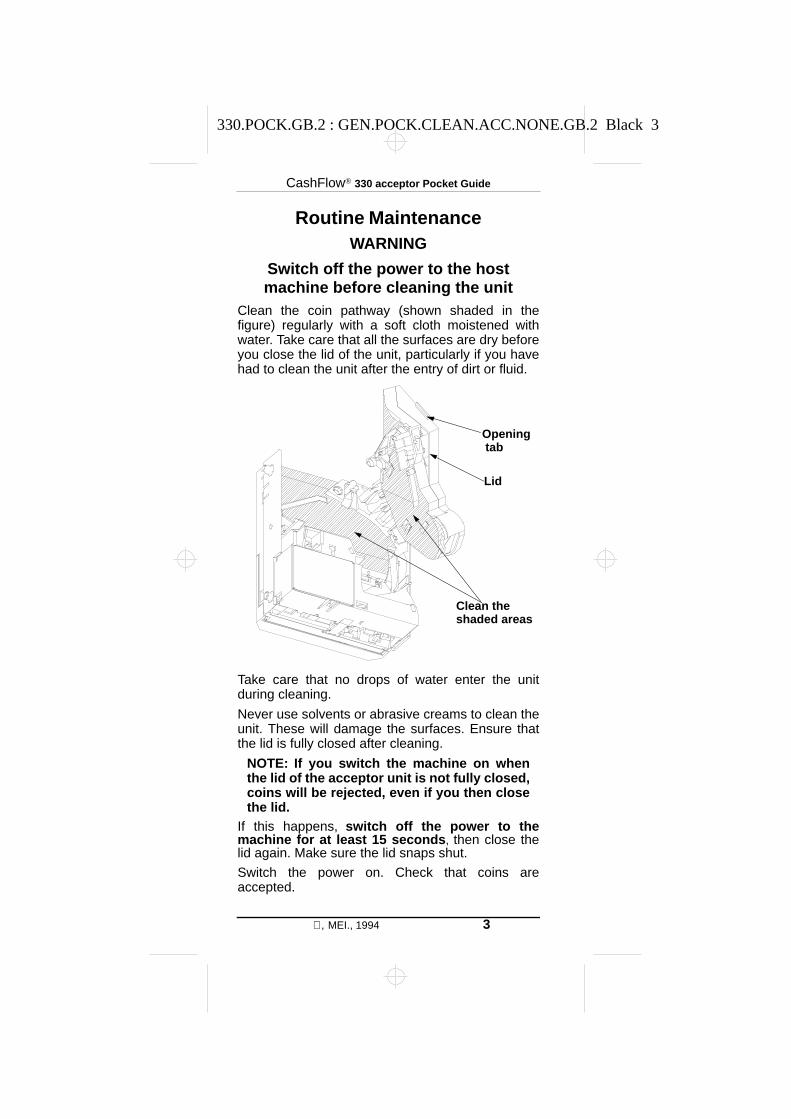
Routine MaintenanceWARNING
Switch off the power to the hostmachine before cleaning the unit
Clean the coin pathway (shown shaded in thefigure) regularly with a soft cloth moistened withwater. Take care that all the surfaces are dry beforeyou close the lid of the unit, particularly if you havehad to clean the unit after the entry of dirt or fluid.
Take care that no drops of water enter the unitduring cleaning.
Never use solvents or abrasive creams to clean theunit. These will damage the surfaces. Ensure thatthe lid is fully closed after cleaning.
NOTE: If you switch the machine on whenthe lid of the acceptor unit is not fully closed,coins will be rejected, even if you then closethe lid.
If this happens, switch off the power to themachine for at least 15 seconds, then close thelid again. Make sure the lid snaps shut.
Switch the power on. Check that coins areaccepted.
Lid
Opening tab
Clean theshaded areas
330.POC
K.G
B.2 : 330.PO
CK
.FFIND
.AC
C.N
ON
E.G
B.2 B
lack,White 4
CashF
low®
330 accepto
r Po
cket Gu
ide
4
, ME
I., 1994
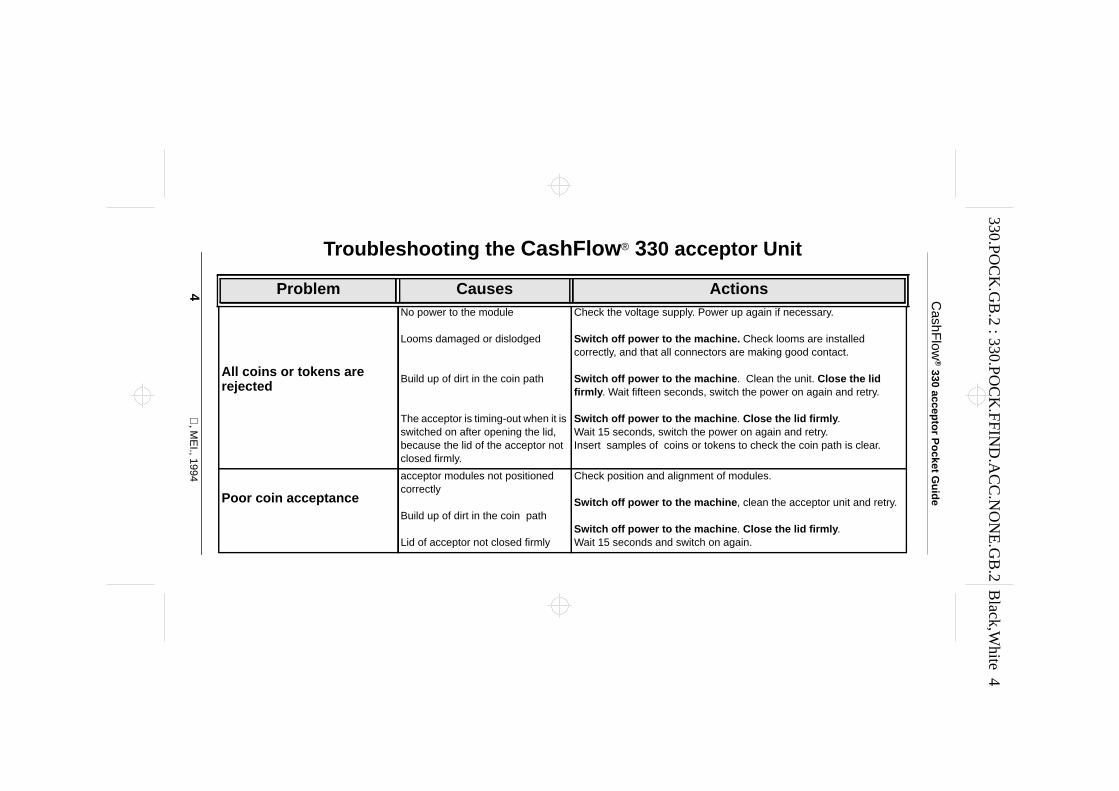
Problem Causes Actions
All coins or tokens arerejected
No power to the module
Looms damaged or dislodged
Build up of dirt in the coin path
The acceptor is timing-out when it isswitched on after opening the lid,because the lid of the acceptor notclosed firmly.
Check the voltage supply. Power up again if necessary.
Switch off power to the machine. Check looms are installedcorrectly, and that all connectors are making good contact.
Switch off power to the machine. Clean the unit. Close the lidfirmly. Wait fifteen seconds, switch the power on again and retry.
Switch off power to the machine. Close the lid firmly.Wait 15 seconds, switch the power on again and retry.Insert samples of coins or tokens to check the coin path is clear.
Poor coin acceptance
acceptor modules not positionedcorrectly
Build up of dirt in the coin path
Lid of acceptor not closed firmly
Check position and alignment of modules.
Switch off power to the machine, clean the acceptor unit and retry.
Switch off power to the machine. Close the lid firmly.Wait 15 seconds and switch on again.
Troubleshooting the CashFlow® 330 acceptor Unit
330.POC
K.G
B.2 : 330.PO
CK
.FFIND
.AC
C.N
ON
E.G
B.2 B
lack,White 5
, M
EI., 1994 5
CashF
low®
330 accepto
r Po
cket Gu
ide
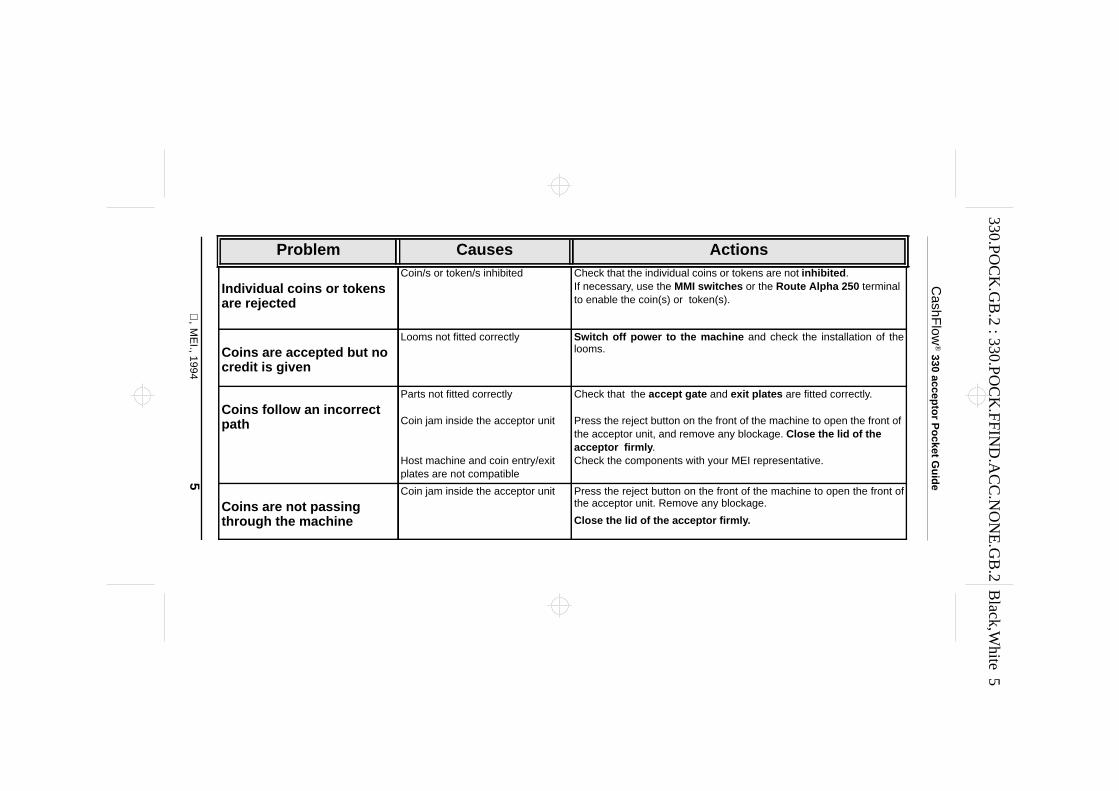
Individual coins or tokensare rejected
Coin/s or token/s inhibited Check that the individual coins or tokens are not inhibited.If necessary, use the MMI switches or the Route Alpha 250 terminalto enable the coin(s) or token(s).
Coins are accepted but nocredit is given
Looms not fitted correctly Switch off power to the machine and check the installation of thelooms.
Coins follow an incorrectpath
Parts not fitted correctly
Coin jam inside the acceptor unit
Host machine and coin entry/exitplates are not compatible
Check that the accept gate and exit plates are fitted correctly.
Press the reject button on the front of the machine to open the front ofthe acceptor unit, and remove any blockage. Close the lid of theacceptor firmly.Check the components with your MEI representative.
Coins are not passingthrough the machine
Coin jam inside the acceptor unit Press the reject button on the front of the machine to open the front ofthe acceptor unit. Remove any blockage.
Close the lid of the acceptor firmly.
Problem Causes Actions
330.POCK.GB.2 : 330.POCK.CONFIG.MMI.NONE.GB.2 Black 6
CashFlow® 330 acceptor Pocket Guide
6 , MEI., 1994
Setting a Unit’s Functions withthe MMI Switches
Switch off the power to the hostmachine before removing a unit
Use the Man-Machine Interface (MMI) switches toset the unit to accept or reject individual coins ortokens.
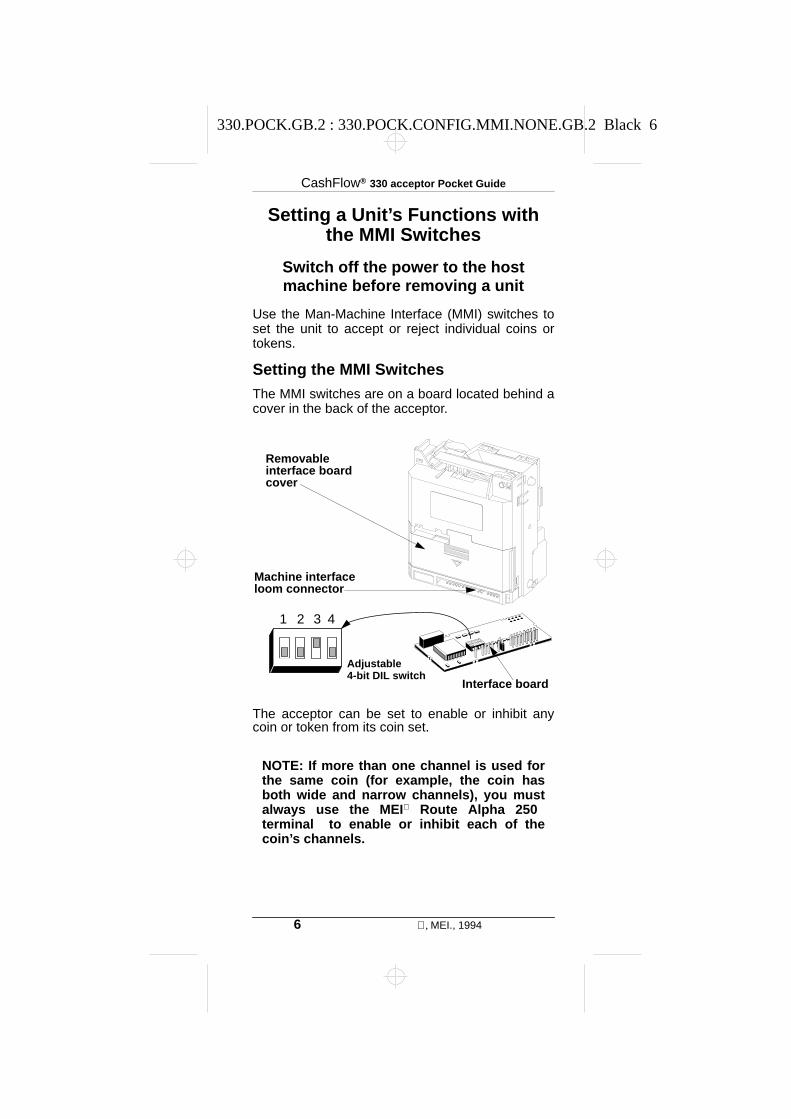
Setting the MMI SwitchesThe MMI switches are on a board located behind acover in the back of the acceptor.
The acceptor can be set to enable or inhibit anycoin or token from its coin set.
NOTE: If more than one channel is used forthe same coin (for example, the coin hasboth wide and narrow channels), you mustalways use the MEI Route Alpha 250terminal to enable or inhibit each of thecoin’s channels.
Adjustable4-bit DIL switch
1 2 3 4
Removableinterface boardcover
Machine interfaceloom connector
Interface board
330.POCK.GB.2 : 330.POCK.CONFIG.MMI.NONE.GB.2 Black 7
, MEI., 1994 7
CashFlow® 330 acceptor Pocket Guide
Enabling or Inhibiting a Coin or a Token
1. Switch off power and disconnect the looms.
2. Remove the acceptor from its mounting, followingthe instructions in this guide.
Handle a unit with care when it is out of the machine.
3. Remove the interface board cover by pressing itdownward, then reconnect the looms.
4. Switch on power to the acceptor.
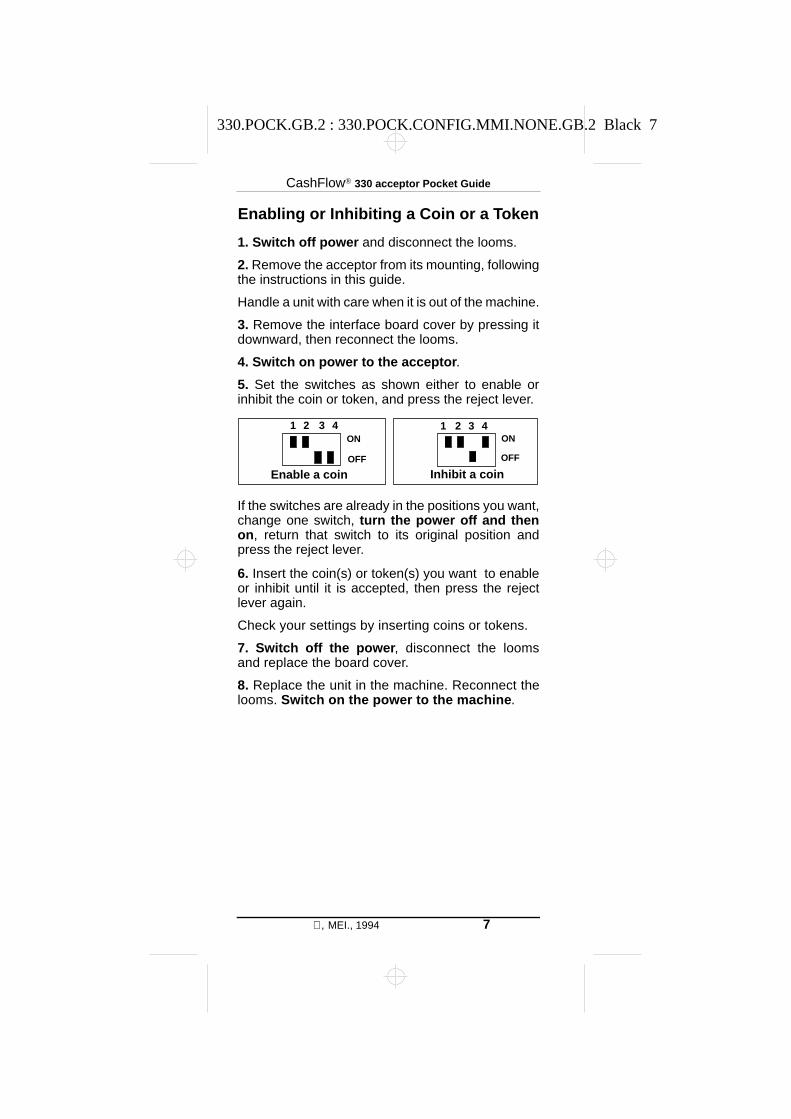
5. Set the switches as shown either to enable orinhibit the coin or token, and press the reject lever.
If the switches are already in the positions you want,change one switch, turn the power off and thenon, return that switch to its original position andpress the reject lever.
6. Insert the coin(s) or token(s) you want to enableor inhibit until it is accepted, then press the rejectlever again.
Check your settings by inserting coins or tokens.
7. Switch off the power, disconnect the loomsand replace the board cover.
8. Replace the unit in the machine. Reconnect thelooms. Switch on the power to the machine.
Enable a coin
1 2 3 4 1 2 3 4
OFF
ON
OFF
ON
Inhibit a coin

330.POCK.GB.2 : 330.POCK.CONFIG.ACC.NONE.GB.2 Black 8
CashFlow® 330 acceptor Pocket Guide
8 ,MEI., 1994
Setting a Unit’s Functions with aMEI Route Alpha 250 Terminal
Each piece of data which determines the unit’sfunctions is stored in a separate address. Use theterminal to read an address and to check or set theunit’s functions.
Setting FunctionsInsert the plug on the Route Alpha 250 terminalinto the six-way connector in the acceptor unit.
Switch on power to the acceptor, as the RouteAlpha 250 terminal takes its power through theunit. A half-size zero is displayed when the terminalpowers up, followed by the software versionnumber and then the first address number with adot, or a dot and dash (1. or 1.-)Functions can be changed only if a dash showsafter the address number.
Press UP or DOWN slowly to display addressesone after the other. Hold down a key to displayaddresses at an increasing speed. Press a keytwice quickly to jump large blocks of addresses.To set a function, display its address and pressENTER to show its current value. Change the valueby pressing UP or DOWN.Press ENTER again to display the address, thenpress RESET to store the new value.
NOTE: If an error occurs, four half-size zerosappear. Press RESET to clear this displayand to return to the current address.
LEFT UPRIGHT
DOWN
ENTERSix-wayconnector
RESETDisplay
330.POCK.GB.2 : 330.POCK.CONFIG.ACC.NONE.GB.2 Black 9
, MEI., 1994 9
CashFlow® 330 acceptor Pocket Guide
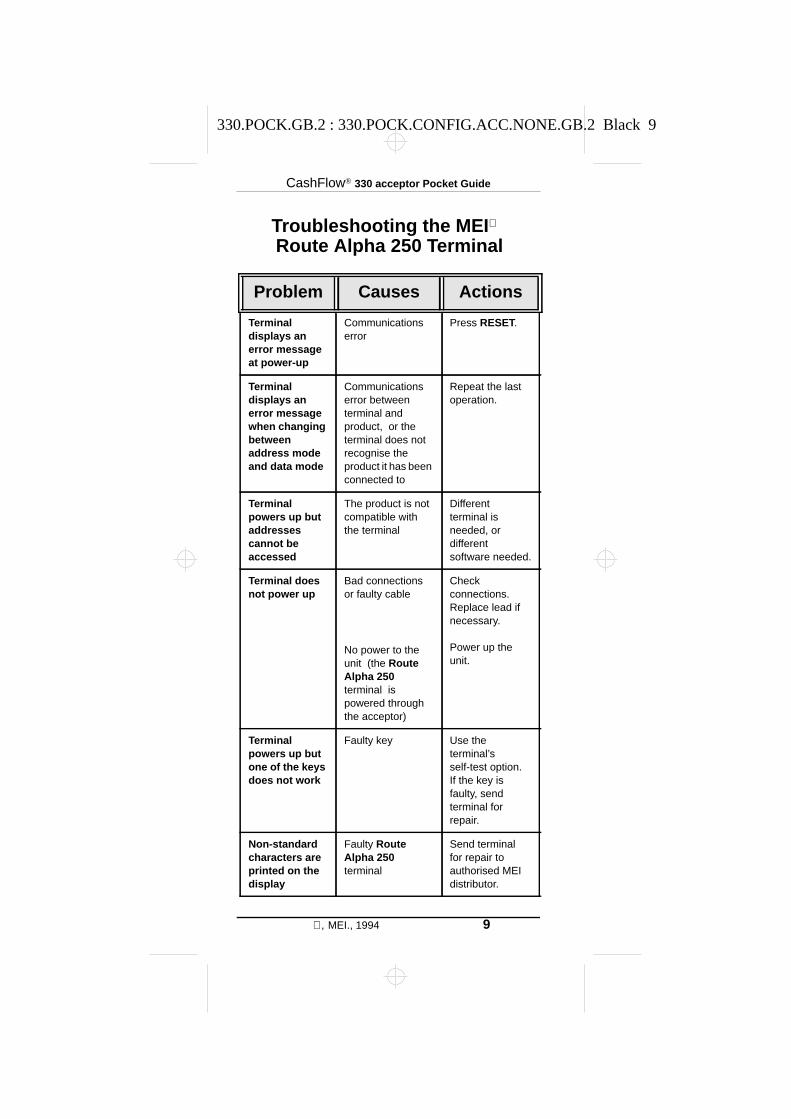
Problem Causes Actions
Terminaldisplays anerror messageat power-up
Communicationserror
Press RESET.
Terminaldisplays anerror messagewhen changingbetweenaddress modeand data mode
Communicationserror betweenterminal andproduct, or theterminal does notrecognise theproduct it has beenconnected to
Repeat the lastoperation.
Terminalpowers up butaddressescannot beaccessed
The product is notcompatible withthe terminal
Differentterminal isneeded, ordifferentsoftware needed.
Terminal doesnot power up
Bad connectionsor faulty cable
No power to theunit (the RouteAlpha 250terminal ispowered throughthe acceptor)
Checkconnections.Replace lead ifnecessary.
Power up theunit.
Terminalpowers up butone of the keysdoes not work
Faulty key Use theterminal’sself-test option.If the key isfaulty, sendterminal forrepair.
Non-standardcharacters areprinted on thedisplay
Faulty RouteAlpha 250terminal
Send terminalfor repair toauthorised MEIdistributor.
Troubleshooting the MEI
Route Alpha 250 Terminal
330.POC
K.G
B.2 : 330.PO
CK
.CO
NFIG
.AC
C.N
ON
E.G
B.2 B
lack 10
CashF
low®
330 accepto
r Po
cket Gu
ide
10
, ME
I., 1994
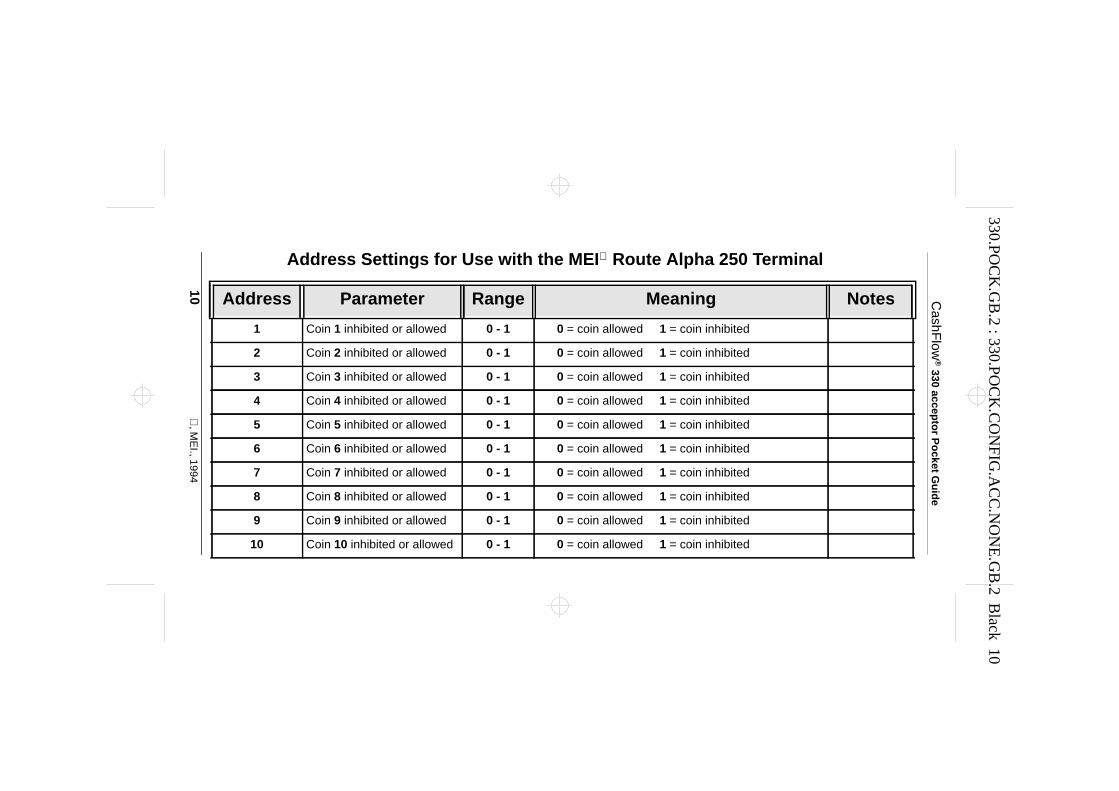
Address Parameter Range Meaning Notes
1 Coin 1 inhibited or allowed 0 - 1 0 = coin allowed 1 = coin inhibited
2 Coin 2 inhibited or allowed 0 - 1 0 = coin allowed 1 = coin inhibited
3 Coin 3 inhibited or allowed 0 - 1 0 = coin allowed 1 = coin inhibited
4 Coin 4 inhibited or allowed 0 - 1 0 = coin allowed 1 = coin inhibited
5 Coin 5 inhibited or allowed 0 - 1 0 = coin allowed 1 = coin inhibited
6 Coin 6 inhibited or allowed 0 - 1 0 = coin allowed 1 = coin inhibited
7 Coin 7 inhibited or allowed 0 - 1 0 = coin allowed 1 = coin inhibited
8 Coin 8 inhibited or allowed 0 - 1 0 = coin allowed 1 = coin inhibited
9 Coin 9 inhibited or allowed 0 - 1 0 = coin allowed 1 = coin inhibited
10 Coin 10 inhibited or allowed 0 - 1 0 = coin allowed 1 = coin inhibited
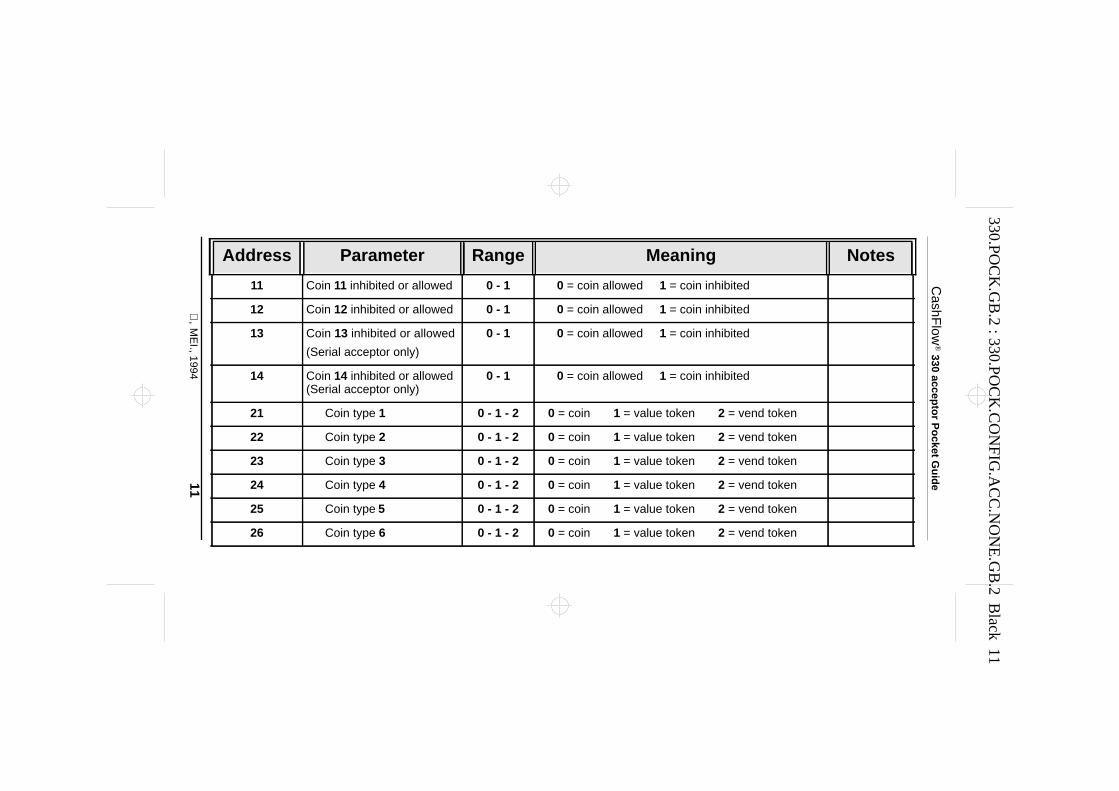
Address Settings for Use with the MEI Route Alpha 250 Terminal
330.POC
K.G
B.2 : 330.PO
CK
.CO
NFIG
.AC
C.N
ON
E.G
B.2 B
lack 11
, M
EI., 1994 11
CashF
low®
330 accepto
r Po
cket Gu
ide
11 Coin 11 inhibited or allowed 0 - 1 0 = coin allowed 1 = coin inhibited
12 Coin 12 inhibited or allowed 0 - 1 0 = coin allowed 1 = coin inhibited
13 Coin 13 inhibited or allowed
(Serial acceptor only)
0 - 1 0 = coin allowed 1 = coin inhibited
14 Coin 14 inhibited or allowed(Serial acceptor only)
0 - 1 0 = coin allowed 1 = coin inhibited
21 Coin type 1 0 - 1 - 2 0 = coin 1 = value token 2 = vend token
22 Coin type 2 0 - 1 - 2 0 = coin 1 = value token 2 = vend token
23 Coin type 3 0 - 1 - 2 0 = coin 1 = value token 2 = vend token
24 Coin type 4 0 - 1 - 2 0 = coin 1 = value token 2 = vend token
25 Coin type 5 0 - 1 - 2 0 = coin 1 = value token 2 = vend token
26 Coin type 6 0 - 1 - 2 0 = coin 1 = value token 2 = vend token
Address Parameter Range Meaning Notes
330.POC
K.G
B.2 : 330.PO
CK
.CO
NFIG
.AC
C.N
ON
E.G
B.2 B
lack 12
CashF
low®
330 accepto
r Po
cket Gu
ide
12
, ME
I, 1994
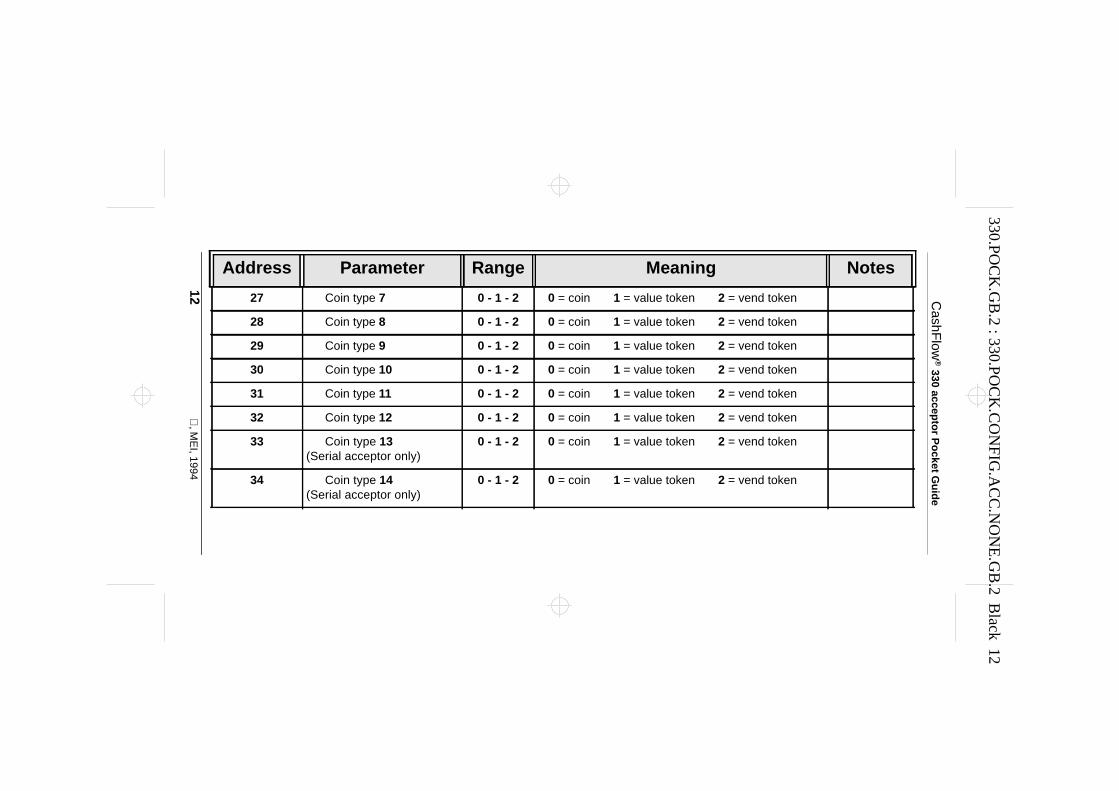
27 Coin type 7 0 - 1 - 2 0 = coin 1 = value token 2 = vend token
28 Coin type 8 0 - 1 - 2 0 = coin 1 = value token 2 = vend token
29 Coin type 9 0 - 1 - 2 0 = coin 1 = value token 2 = vend token
30 Coin type 10 0 - 1 - 2 0 = coin 1 = value token 2 = vend token
31 Coin type 11 0 - 1 - 2 0 = coin 1 = value token 2 = vend token
32 Coin type 12 0 - 1 - 2 0 = coin 1 = value token 2 = vend token
33 Coin type 13(Serial acceptor only)
0 - 1 - 2 0 = coin 1 = value token 2 = vend token
34 Coin type 14(Serial acceptor only)
0 - 1 - 2 0 = coin 1 = value token 2 = vend token
Address Parameter Range Meaning Notes
330.POCK.GB.2 : 330.POCK.FPLAT.NONE.NONE.GB.2 Black,White 13
, MEI., 1994 13
CashFlow® 330 acceptor Pocket Guide
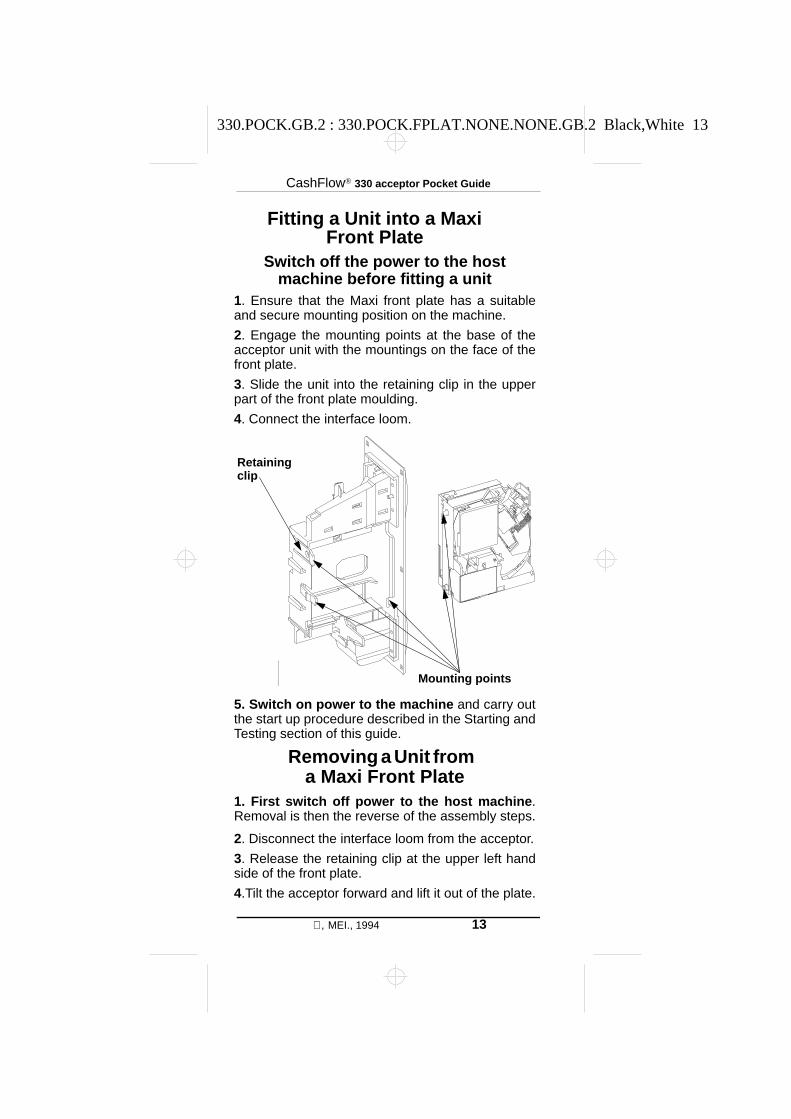
Fitting a Unit into a MaxiFront Plate
Switch off the power to the hostmachine before fitting a unit
1. Ensure that the Maxi front plate has a suitableand secure mounting position on the machine.
2. Engage the mounting points at the base of theacceptor unit with the mountings on the face of thefront plate.
3. Slide the unit into the retaining clip in the upperpart of the front plate moulding.
4. Connect the interface loom.
5. Switch on power to the machine and carry outthe start up procedure described in the Starting andTesting section of this guide.
Removing a Unit froma Maxi Front Plate
1. First switch off power to the host machine.Removal is then the reverse of the assembly steps.
2. Disconnect the interface loom from the acceptor.
3. Release the retaining clip at the upper left handside of the front plate.
4.Tilt the acceptor forward and lift it out of the plate.
Mounting points
Retainingclip
330.POCK.GB.2 : 330.POCK.FPLAT.NONE.NONE.GB.2 Black,White 14
CashFlow® 330 acceptor Pocket Guide
14 , MEI., 1994
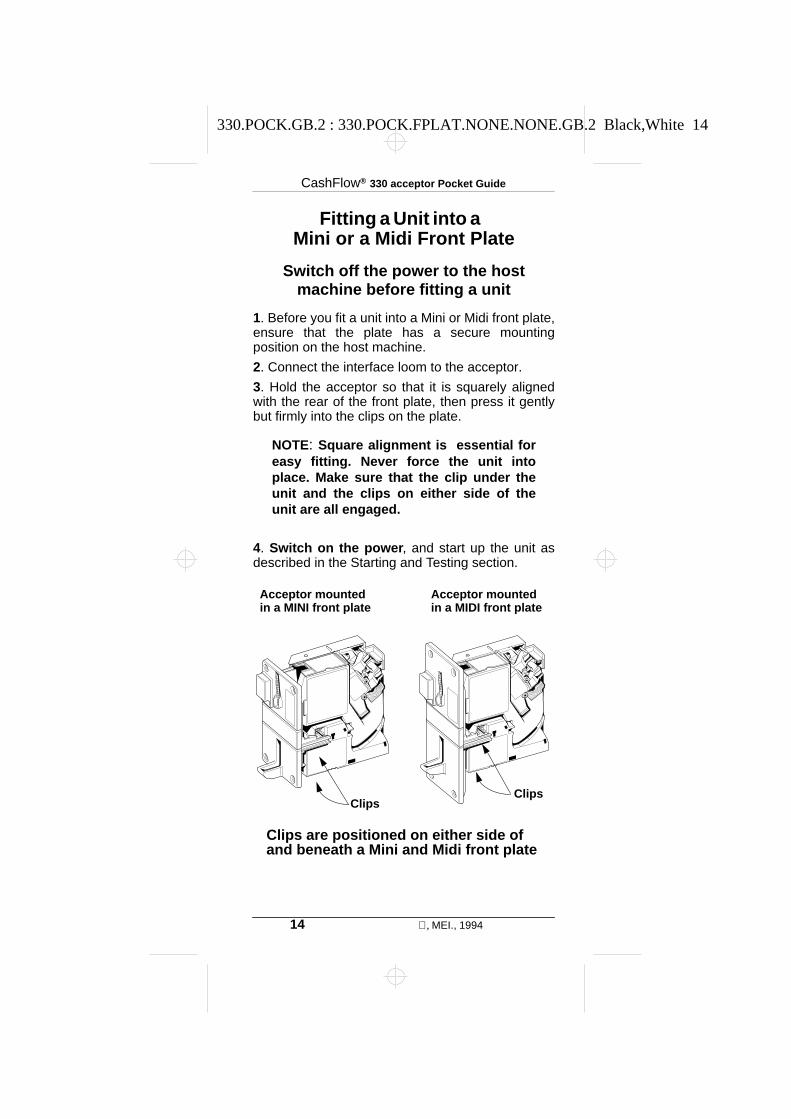
Fitting a Unit into aMini or a Midi Front Plate
Switch off the power to the hostmachine before fitting a unit
1. Before you fit a unit into a Mini or Midi front plate,ensure that the plate has a secure mountingposition on the host machine.
2. Connect the interface loom to the acceptor.
3. Hold the acceptor so that it is squarely alignedwith the rear of the front plate, then press it gentlybut firmly into the clips on the plate.
NOTE: Square alignment is essential foreasy fitting. Never force the unit intoplace. Make sure that the clip under theunit and the clips on either side of theunit are all engaged.
4. Switch on the power, and start up the unit asdescribed in the Starting and Testing section.
Acceptor mountedin a MINI front plate
Acceptor mountedin a MIDI front plate
Clips are positioned on either side ofand beneath a Mini and Midi front plate
ClipsClips
330.POCK.GB.2 : 330.POCK.FPLAT.NONE.NONE.GB.2 Black,White 15
, MEI., 1994 15
CashFlow® 330 acceptor Pocket Guide
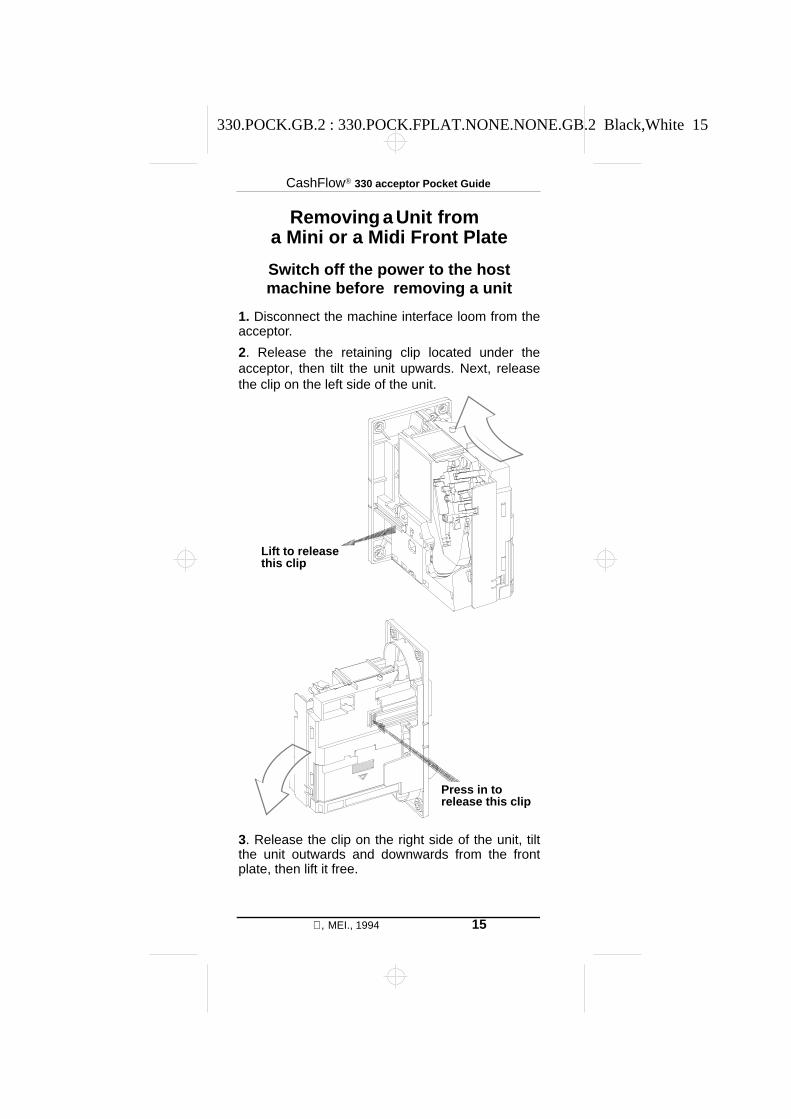
Removing a Unit froma Mini or a Midi Front Plate
Switch off the power to the hostmachine before removing a unit
1. Disconnect the machine interface loom from theacceptor.
2. Release the retaining clip located under theacceptor, then tilt the unit upwards. Next, releasethe clip on the left side of the unit.
3. Release the clip on the right side of the unit, tiltthe unit outwards and downwards from the frontplate, then lift it free.
Lift to releasethis clip
Press in torelease this clip
330.POCK.GB.2 : 330.POCK.FPLAT.NONE.NONE.GB.2 Black,White 16
CashFlow® 330 acceptor Pocket Guide
16 , MEI., 1994
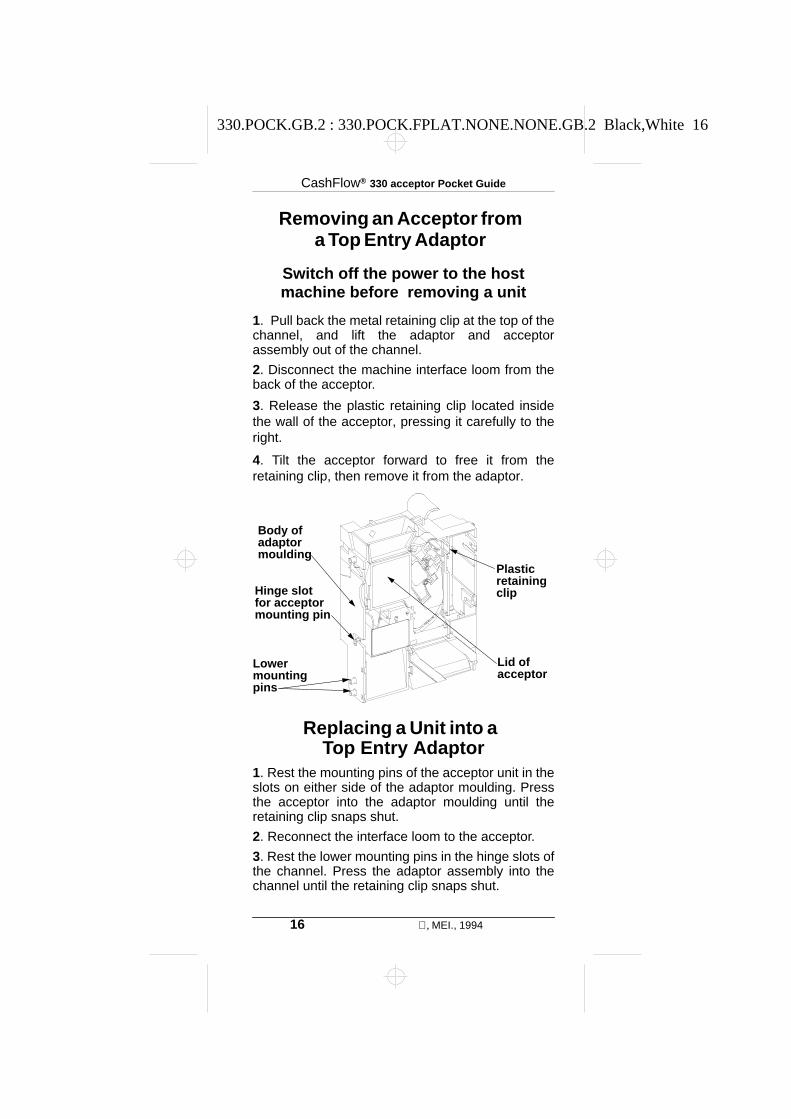
Removing an Acceptor froma Top Entry Adaptor
Switch off the power to the hostmachine before removing a unit
1. Pull back the metal retaining clip at the top of thechannel, and lift the adaptor and acceptorassembly out of the channel.
2. Disconnect the machine interface loom from theback of the acceptor.
3. Release the plastic retaining clip located insidethe wall of the acceptor, pressing it carefully to theright.
4. Tilt the acceptor forward to free it from theretaining clip, then remove it from the adaptor.
Replacing a Unit into aTop Entry Adaptor
1. Rest the mounting pins of the acceptor unit in theslots on either side of the adaptor moulding. Pressthe acceptor into the adaptor moulding until theretaining clip snaps shut.
2. Reconnect the interface loom to the acceptor.
3. Rest the lower mounting pins in the hinge slots ofthe channel. Press the adaptor assembly into thechannel until the retaining clip snaps shut.
Hinge slotfor acceptormounting pin
Plasticretainingclip
Lid ofacceptor
Body ofadaptormoulding
Lowermountingpins
330.POCK.GB.2 : 330.POCK.CH_MT.NONE.NONE.GB.2 Black 17
, MEI., 1994 17
CashFlow® 330 acceptor Pocket Guide
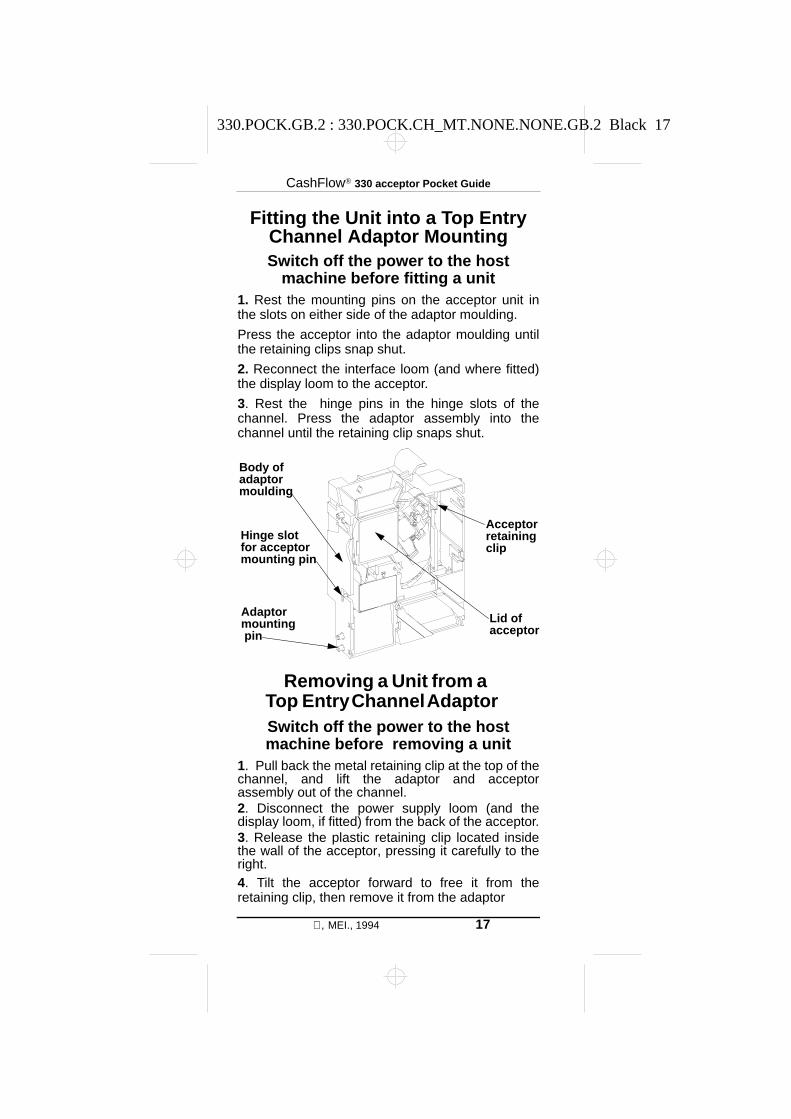
Fitting the Unit into a Top EntryChannel Adaptor MountingSwitch off the power to the host
machine before fitting a unit1. Rest the mounting pins on the acceptor unit inthe slots on either side of the adaptor moulding.
Press the acceptor into the adaptor moulding untilthe retaining clips snap shut.
2. Reconnect the interface loom (and where fitted)the display loom to the acceptor.
3. Rest the hinge pins in the hinge slots of thechannel. Press the adaptor assembly into thechannel until the retaining clip snaps shut.
Removing a Unit from aTop Entry Channel AdaptorSwitch off the power to the hostmachine before removing a unit
1. Pull back the metal retaining clip at the top of thechannel, and lift the adaptor and acceptorassembly out of the channel.2. Disconnect the power supply loom (and thedisplay loom, if fitted) from the back of the acceptor.3. Release the plastic retaining clip located insidethe wall of the acceptor, pressing it carefully to theright.4. Tilt the acceptor forward to free it from theretaining clip, then remove it from the adaptor
Hinge slotfor acceptormounting pin
Acceptorretainingclip
Lid ofacceptor
Body ofadaptormoulding
Adaptormounting pin

330.POCK.GB.2 : 330.POCK.INIT_TST.NONE.NONE.GB.2 Black 18
CashFlow® 330 acceptor Pocket Guide
18 , MEI., 1994
Testing and Starting a UnitAfter It is Installed
1. Check that the machine interface loom is insertedcorrectly in the back of the acceptor.
2. Check that the lid of the acceptor opens andcloses fully when you press the reject button on thehost machine.
3. Check that the mains power supply is connectedcorrectly to the host machine.
4. Check that the power supply to the acceptor is atthe correct voltage.
5. Switch on power to the host machine. Insert atleast one of every coin or token from the acceptor’scoin set. Check that all the coins or tokens areaccepted and routed correctly.
6. Check that the vend prices are correct. Insertcoins and make a trial vend for each price. Use theMMI switches to adjust the prices if necessary.
7. Check that all the looms are free from kinks andobstructions, and close the door of the machine.
The unit is now ready for use
LidReject lever
Hostintelligentinterfaceconnector Machine interface
loom connector
330.POCK.GB.2 : GEN.POCK.APPDX.NONE.NONE.GB.3 Black 19
, MEI., 1994 19
CashFlow® 330 acceptor Pocket Guide
MEI Product ManualsFull technical details of this product areincluded in the CashFlow 330 acceptorProduct Maintenance Handbook, acopy of which is available, with otherhandbooks related to the product, fromyour MEI Approved Distributor, or yourregional MEI sales office.
MEI Product TrainingProduct training courses are available forCashFlow and other MEI products.
The courses cover the technical featuresand the maintenance of the product, andgive you hands-on experience inservicing CashFlow products quicklyand efficiently.Contact your regional MEI Sales OfficeIfor more information.

330.POCK.GB.2 : GEN.POCK.OFF.NONE.NONE.GB.3 Black 20
CashFlow® 330 acceptor Pocket Guide
20 , MEI., 1994
REGIONAL OFFICES
WWW.MEIGROUP.COM
330.POCK.GB.2 : GEN.POCK.BPAGE.NONE.NONE.GB.4 Black,White 21
™
YO
UR
ME
I RE
PR
ES
EN
TAT
IVE