refretting a vintage yamaha fg - yamaha vintage fg
TRANSCRIPT
DWF GUITARS
REFRETTING A VINTAGE YAMAHA FG
v2020.6
Dave Fengler
6/28/2020
The diary of a Yamaha madman.
REFRETTING A VINTAGE YAMAHA FG v2020.6 i
REFRETTING A VINTAGE YAMAHA FG v2020.6 by Dave Fengler
Table of Contents
1.0 REFRETTING A VINTAGE YAMAHA FG ............................................................................................................................. 1
1.1 What Are Frets? ........................................................................................................................................................... 1
1.2 Fret Terminology .......................................................................................................................................................... 2
1.3 Fret Wire Sizes .............................................................................................................................................................. 2
1.3.1 Fret Heights ........................................................................................................................................................... 2
1.3.2 Fret Widths ............................................................................................................................................................ 3
1.4 Fret Size Impact On Tone ............................................................................................................................................. 3
1.5 Fret Wire Materials ...................................................................................................................................................... 3
1.6 Fret Material Impact On Tone ...................................................................................................................................... 3
1.7 Why Do You Need To Replace Some or All of the Frets? ............................................................................................. 3
2.0 EVALUATING THE FRETS: Level vs. Replace. Some, All or Nothing?? ........................................................................... 4
2.1 Tools Required ............................................................................................................................................................. 4
2.2 Evaluate the Frets......................................................................................................................................................... 4
3.0 FRET REMOVAL ................................................................................................................................................................ 5
3.1 Tool Required ............................................................................................................................................................... 5
3.2 Procedure ..................................................................................................................................................................... 5
4.0 LEVELING THE FRETBOARD ............................................................................................................................................. 6
4.1 Tools Required ............................................................................................................................................................. 6
4.2 Procedure ..................................................................................................................................................................... 6
5.0 PREPPING THE SLOTS ...................................................................................................................................................... 7
5.1 Tools Required ............................................................................................................................................................. 7
5.2 Procedure ..................................................................................................................................................................... 8
6.0 INSTALLING THE FRETS .................................................................................................................................................... 8
6.1 Tools Required ............................................................................................................................................................. 8
6.2 Procedure ..................................................................................................................................................................... 9
7.0 PROTECTING THE FRETBOARD ........................................................................................................................................ 9
7.1 Tools Required ............................................................................................................................................................. 9
7.2 Procedure ................................................................................................................................................................... 10
8.0 FILE AND BEVEL THE FRET ENDS ................................................................................................................................... 10
8.1 Tools Required ........................................................................................................................................................... 10
8.2 Procedure ................................................................................................................................................................... 10

REFRETTING A VINTAGE YAMAHA FG v2020.6 ii
9.0 LEVELING THE FRETS ...................................................................................................................................................... 10
9.1 Tools Required ........................................................................................................................................................... 10
9.2 Procedure ................................................................................................................................................................... 11
10.0 CROWNING THE FRETS ................................................................................................................................................ 12
10.1 Tools Required ......................................................................................................................................................... 12
10.2 Procedure ................................................................................................................................................................. 12
11.0 ROUNDING THE FRET ENDS ......................................................................................................................................... 12
11.1 Tools Required ......................................................................................................................................................... 12
11.2 Procedure ................................................................................................................................................................. 13
12.0 REPLACING JUST A FEW FRETS ……………………………………………………………………………………………………………………………. 13
YOU’RE DONE!! ..................................................................................................................................................................... 13
FINAL NOTE ………………………………………………………………………………………………………………………………………………………………..… 13
REFRETTING A VINTAGE YAMAHA FG v2020.6 Page 1
1.0 REFRETTING A VINTAGE YAMAHA FG v2020.6 by Dave Fengler
While refretting an acoustic guitar isn’t as hard as a neck reset, there is a certain level of unknown when refretting a
vintage Yamaha FG acoustic guitar. While the .020” fret tang is the same as today’s frets, they used a different method
for fret retention. Until approx. 1977 they crushed the end of the fret tang, vs. today’s diamonds on the sides of the fret
tang. This made the vintage Yamaha frets much harder to install. They also crushed the frets into the fretboard,
sometimes making removal difficult because there is no space under them.
There is another unknown, typical of vintage Yamaha FG’s. For approximately 2 years, from the beginning of 1969 to
early 1971 (with some overlap) they used .030” fret tangs. They require less common frets with .024” tangs to have a
chance of staying in the fretboard.
I use LMII FW74 for fret replacement or complete refrets for vintage Yamaha’s that have .020” tang frets. I use LMII
FW75 for complete refrets .030” tang frets. Replacing individual .030” tang frets is a bit harder. There isn’t one perfect
fret. Dunlop’s 6S6200 is a good upper dimensional match (and a .045” fret tang stud width), but is a softer 12% nickel
silver. Dunlop’s 6260 and 6S6260 are also a good upper dimensional match and 18% nickel silver, but the fret tang studs
are only .037” and may not hold well in the wide fret slots.
I originally created this document for myself to record the steps I took to replace the frets on a few vintage Yamaha FG’s,
based on what I’ve read and watched online and a few discussions with luthiers. It is not the only way to do it. I
sometimes overcomplicate things. If you have a better method feel free to share it in the forum or send me an email at
[email protected]. I’m always looking to learn new ways to do things. I will sometimes update this
document if I get new ideas, learn from the one I just did, or get new information.
1.1 WHAT ARE FRETS?:
The purpose of frets are to have a fixed hard point to create a musical note. The position of each fret is calculated to
change the length of the string, changing the frequency that it vibrates at. They are spaced as required to be able to
play modern 12 tone music.
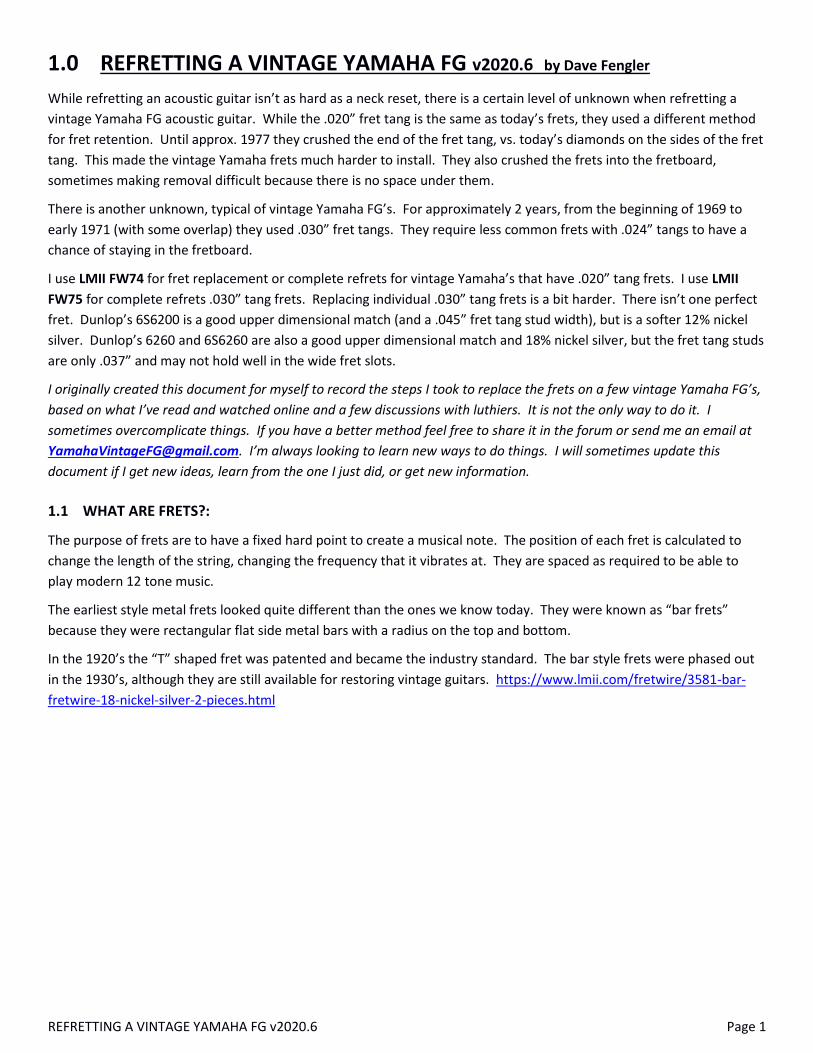
The earliest style metal frets looked quite different than the ones we know today. They were known as “bar frets”
because they were rectangular flat side metal bars with a radius on the top and bottom.
In the 1920’s the “T” shaped fret was patented and became the industry standard. The bar style frets were phased out
in the 1930’s, although they are still available for restoring vintage guitars. https://www.lmii.com/fretwire/3581-bar-
fretwire-18-nickel-silver-2-pieces.html
REFRETTING A VINTAGE YAMAHA FG v2020.6 Page 2
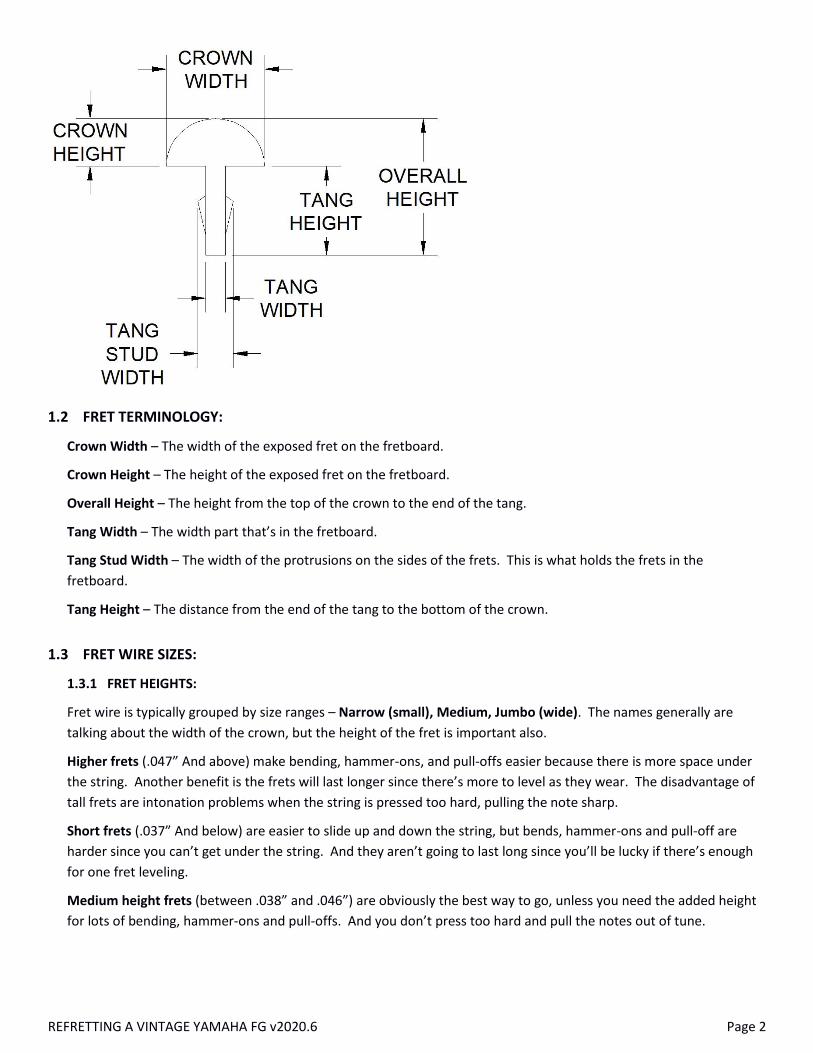
1.2 FRET TERMINOLOGY:
Crown Width – The width of the exposed fret on the fretboard.
Crown Height – The height of the exposed fret on the fretboard.
Overall Height – The height from the top of the crown to the end of the tang.
Tang Width – The width part that’s in the fretboard.
Tang Stud Width – The width of the protrusions on the sides of the frets. This is what holds the frets in the
fretboard.
Tang Height – The distance from the end of the tang to the bottom of the crown.
1.3 FRET WIRE SIZES:
1.3.1 FRET HEIGHTS:
Fret wire is typically grouped by size ranges – Narrow (small), Medium, Jumbo (wide). The names generally are
talking about the width of the crown, but the height of the fret is important also.
Higher frets (.047” And above) make bending, hammer-ons, and pull-offs easier because there is more space under
the string. Another benefit is the frets will last longer since there’s more to level as they wear. The disadvantage of
tall frets are intonation problems when the string is pressed too hard, pulling the note sharp.
Short frets (.037” And below) are easier to slide up and down the string, but bends, hammer-ons and pull-off are
harder since you can’t get under the string. And they aren’t going to last long since you’ll be lucky if there’s enough
for one fret leveling.
Medium height frets (between .038” and .046”) are obviously the best way to go, unless you need the added height
for lots of bending, hammer-ons and pull-offs. And you don’t press too hard and pull the notes out of tune.
REFRETTING A VINTAGE YAMAHA FG v2020.6 Page 3
1.3.2 FRET WIDTHS:
But when talking about frets you also have to consider the width – Narrow, Medium, Wide.
Wide frets (Jumbo) (.100” And wider) are usually taller than medium frets. Wider frets tend to wear slower, but as
they wear they develop flat spots, possibly causing intonation problems as the point of contact shifts forward. Wide
frets are most common on electric guitars, rarely on acoustics.
Narrow frets (.080” and narrower) are rare these days. They’re seen mostly on vintage acoustic guitars and other
instruments such as banjos and mandolins. They can give a good clean tone but have slightly shorter lifespans.
Again, Medium frets (between .081” & .099”) are the best way to go, unless you absolutely have to have a different
width for some reason.
1.4 FRET SIZE IMPACT ON TONE:
Different size (height & width) can have an impact on tone, although it is minimal. Taller or wider frets have more
mass and can give slightly more sustain. Narrow/shorter frets can sound cleaner or a little more defined. But you’d
probably be lucky to tell the difference between 2 identical guitars with different frets.
1.5 FRET WIRE MATERIALS:
Brass – Many vintage (before the 1950’s) used brass frets. It is an alloy of copper and zinc, which is a soft material
and will wear more quickly than any other fret material. They are still available in limited sizes, but the modern alloy
frets last much longer.
Nickel Silver - Frets are normally made of a material called nickel silver, which ironically contains no silver and never
did. It is actually an alloy of copper and zinc (essentially brass) with a percentage of nickel added for durability, as
well as adding the silver color. Sometimes there is a percentage associated with nickel silver frets. This percentage is
the amount of nickel, typically 12% or 18%. Frets with 18% nickel will last longer.
EVO Gold – This is JESCAR’s proprietary nickel free hypoallergenic alloy, originally designed to make eyeglass frames
for people with nickel allergies. Like nickel silver, it contains no gold, but it makes a great looking fret wire. It’s
composed of copper, tin, iron, and titanium. Another advantage of EVO Gold wire is it’s harder than nickel silver.
It’s somewhere between nickel silver and stainless steel.
Stainless Steel (SS) – Stainless steel is an alloy of iron, chromium and nickel. While stainless steel frets are much
harder than nickel silver, they are much harder to install and destroy the tools installing them. For that reason,
installing stainless steel frets is much more expensive than nickel silver.
1.6 FRET MATERIAL IMPACT ON TONE:
Like with different fret sizes, different fret materials can make a very minor difference in tone. Brass frets tend to be
warmer, and stainless steel frets a little brighter. Nickle silver would be in the middle. EVO would be between nickel
silver and stainless steel.
1.7 WHY DO YOU NEED TO REPLACE SOME OR ALL OF THE FRETS?:
Guitar strings are set at a fixed height at both ends, at the nut & saddle. The height (the action) is required so when
the string is pressed, the angle of the string changes, preventing the string from contacting other frets.
REFRETTING A VINTAGE YAMAHA FG v2020.6 Page 4
But, for them to work properly they all need to be at the same height otherwise, the string may contact another fret
than the one you intended, cause a buzz or another tone. These problems can be caused by high frets or low frets.
Low frets are typically caused by lots of playing, wearing down the fret material causing a divot. Or commonly with
vintage guitars, they’ve been leveled once or twice. Leveling the frets creates a new flat plane. But they can only be
leveled so far. You need to have a slight rounding, or crown, on the tops of the frets so the string only contacts at
one small point. Otherwise, the fret will contact the front edge of the fret and possibly cause a very minor change in
intonation as the distance from the saddle shifts forward. If the frets are too low you won’t be able to crown the top.
2.0 EVALUATING THE FRETS: LEVEL vs. REPLACE. SOME, ALL or NOTHING??
If you’re noticing some buzzing or dead frets with some divots, you probably need fret work. But, check your setup first!
Low action or neck relief can also cause buzzing. Always be sure your setup is correct before evaluating frets. See my
Acoustic Guitar Setup Guide.
2.1 TOOLS REQUIRED:
1. 24” Straight edge (to verify the fret plane is flat). I made mine from a Harbor Freight 40” ruler. https://www.harborfreight.com/40-in-aluminum-ruler-69366.html Place 2 of them on edge against each other and be sure there isn’t any gap. You want them to be as straight as possible.
2. Notched straight edge – optional (to verify the fretboard is flat). These are insane money. https://www.stewmac.com/Luthier_Tools/Types_of_Tools/Straightedges/Precision_Notched_Straightedge.html I made mine from aluminum Harbor Freight 40” rulers, cutting the notches on my table saw. I made PDF drawings for all common scale lengths. I can send them to you if you request.
3. Fret Rocker (to find high frets). Stew Mac https://www.stewmac.com/Luthier_Tools/Types_of_Tools/Straightedges/Fret_Rocker.html
4. Dial/digital caliper (to measure fret height). You can get a cheap one at Harbor Freight. Stew Mac sells a digital “luthier” caliper with a notch in the end that makes measuring fret heights much easier. https://www.stewmac.com/luthier-tools-and-supplies/types-of-tools/calipers/luthiers-digital-caliper.html
5. Your eyes and ears (listen for buzzing, look for high/low frets).
6. I built a neck support for inspecting frets.
2.2 EVALUATE THE FRETS:
Mark any divoted frets, typically the first 5.
Use your dial/digital calipers to measure any divots or frets that look low. I’d replace any frets under .030” high. If all
or most of them are about .030” or lower I’d replace them all. There’s no sense sanding new frets down that low.
Many vintage FG’s have already been leveled once and don’t have any life left in them. I’ve seen many that the frets
were leveled and never crowned, probably because there wasn’t enough left to use the crowning file.
Another problem can be heavily beveled fret ends. I’ve seen some guitars with such a low angle bevel it lost 1/8” on
each side. That might not be a problem with the standard narrow 1.38” nut string spacing, but I like to open that up
to 1.44”, sometimes more depending on the width of the neck. I’ve seen some very early FG’s with 1.75” vs. the
more common 1.72”. Taylor uses a 1.50” nut string spacing with their 1.75” wide necks. That works great as long as
the fret ends aren’t beveled much.
REFRETTING A VINTAGE YAMAHA FG v2020.6 Page 5
If there are buzzing frets that don’t have obvious divots, use your straight edge and fret rocker to find high or low
frets and mark them. Look for the “14th fret hump”, typical of vintage guitars. The 12th thru 16th frets tend to be
higher than the rest. This may not be visible if the neck angle is bad and there’s a visible bend in the fretboard at the
body, or the straight edge hits on the first & last frets. But it’s noticeable once the neck is off and must be fixed if
you’re going to lower the action.
At this point, you should have an idea of how bad your frets are. Now you have to decide if you’re going to level or
replace some or all the frets. You could even just live with it if they aren’t too bad.
Obviously, replacing all the frets is more work than doing a partial refret. But it’s not as bad as you’d think. Leveling
a few new frets to existing frets is difficult. Some people have a minimum charge of $100 for the first fret and $20 for
each additional fret, just to cover the time to level them. Once you have to replace more than 10 it’s cheaper to just
do them all. Replacing them all also allows you to level the fretboard and remove the 14th fret hump. Otherwise,
leveling the frets will cause the frets in this area to become very low. Leveling the fretboard and replacing all the
frets gives you essentially a new neck.
3.0 FRET REMOVAL:
Fret removal is fairly simple, but using the right tools and some precautions will make the difference between a clean
job and a chipped disaster.
3.1 FRET REMOVAL - TOOLS REQUIRED:
1. Small chisel – to initially get under the frets.
2. Fret removal pliers – I recommend Stew Mac … https://www.stewmac.com/Luthier_Tools/Tools_by_Job/Tools_for_Fretting/Pullers_nippers_sizing/StewMac_Precision_Fret_Pullers.html
3. Chip stoppers (optional) – Stew Mac … https://www.stewmac.com/Luthier_Tools/Tools_by_Job/Tools_for_Necks_and_Fingerboards/Chip_Stoppers_Set_of_2.html I no longer use this, I haven’t had a chipping problem in a long time.
4. Water (optional) - to moisten the fretboard, which will reduce chipping. I no longer do this, I haven’t had a chipping problem in a long time, and this will cause the fret slots to swell closed slightly.
5. Soldering iron with notched tip – (optional) - Will soften the glue, if it was used to hold frets in. I no longer do this.
3.2 FRET REMOVAL - PROCEDURE:
Start with a small chisel to get under the sides of the fret, about 1/16” from the treble end. Yamaha must have pressed the frets in, many times the frets are below the surface of the wood and the fret pullers can’t get under them without chewing up the fret. Be very careful with the chisel, it can cause lots of damage to you and the guitar if it slips. I put a piece of 2” masking tape on the fretboard on the side opposite of the chisel in case it slips.
Once the end of the fret is lifted slightly, use the fret removal pliers, moving 1/4” with each bite.
If the slot chips use Stew Mac’s Chip Stoppers. I only use them if I have to. Or wet the area where the frets will be
removed. Be sure it’s on both sides of the fret, along the whole length.
REFRETTING A VINTAGE YAMAHA FG v2020.6 Page 6
4.0 LEVELING THE FRETBOARD:
If you’re doing a complete refret you should level the fretboard with a radiused sanding block. As mentioned earlier,
vintage guitars tend to have a hump at the 14th fret. And you can sand out some minor divots. The Yamaha fretboards
have a 16” radius.
4.1 LEVELING THE FRETBOARD - TOOLS REQUIRED:
1. 16” Radius Sanding Blocks. I recommend Stew Mac https://www.stewmac.com/Luthier_Tools/Tools_by_Job/Tools_for_Sanding/4_Radius_Blocks.html and https://www.stewmac.com/Luthier_Tools/Tools_by_Job/Tools_for_Sanding/8_Radius_Blocks.html 4” long for spot leveling, 8” long for leveling a larger area. They also sell longer aluminum sanding beams for much more money. I made one using (2) 4” blocks (14” & 16” radii) taped to a piece of 1.5” x 3” x 18” aluminum extrusion, or you could use a 2x3. The 16” radius block has the 80 grit sandpaper taped to it, the 14” block has tape on it as a smooth surface.
2. Sandpaper. 80 grit for rough sanding (I use it on my 18” sanding beam), 220 & 320 grit for finish sanding. Stew Mac sells 2-3/4” self-adhesive sandpaper https://www.stewmac.com/Materials_and_Supplies/Sanding_and_Polishing/Sandpaper_and_Finishing_Papers/3M_Stikit_Gold_Abrasives_2-3_4_inch_Roll.html Or you can buy the same stuff on Amazon for less. You can also just use regular sandpaper and hold it to the block with your hand. Just be sure to keep firm pressure on the block or the sandpaper rolling around the sides will take more off the outer edges of the fretboard than the middle.
3. 24” Straight edge (to verify the fretboard is flat).
4. Feeler Gages (optional) to check the gaps under the 24” straight edge
5. A good light source and a white background. To check for gaps under the straight edge.
6. I built this neck support for inspecting frets. It’s much easier than trying to hold the neck steady in your hand, hold the straight edge on the fretboard, and look carefully for gaps.
7. Painters tape – Top protect the headstock, tuners and guitar top.
8. Razor blade or scalpel – to remove the nut if you’re doing a complete refret.
4.2 LEVELING THE FRETBOARD - PROCEDURE:
It’s easier to do a refret if the neck is off the guitar. Most vintage Yamaha’s need neck resets. Doing the refret while
the neck is off makes it much easier to handle. The refret should be done BEFORE the neck reset to have a flat
plane to check your numbers from.
BEFORE DOING ANYTHING, adjust the truss rod to get the neck as flat as possible!! Especially in the 1st thru 5th fret
area. You want to take off as little wood as possible.
Remove the nut, if doing a complete refret. To remove the nut first put a piece of painters tape on the headstock
behind the nut to protect it from accidental slips. Then carefully score the 3 exposed sides where the nut meets the
headstock. Then carefully keep cutting deeper until the nut is free. I used to score, then use a hammer and a block of
wood to knock it free on the fretboard side, but that normally left some of the wood stuck to the bottom of the nut
which had to be scraped off and reglued it to the neck. That was ugly and unnecessary damage.
Removing the tuners makes the neck much lighter and easier to handle. Put the tuners and screws in a plastic bag to
not lose anything.
Cover most of the headstock with painters tape to not sand it by accident.
REFRETTING A VINTAGE YAMAHA FG v2020.6 Page 7
Cover the area around the fretboard and sound hole with painters tape if refretting with the neck attached to the
guitar.
Identify any high or low spots. You want to bring down the high spots first, like the 14th fret hump.
To take down high spots, use the longer radius block or sanding beam with 80 grit sandpaper only on one end, put tape
on the other end for a smooth surface on the fretboard. The longer block/beam keeps the sandpaper level, making it
easier to take the high spot down without the smaller block rolling over it and possibly creating low spots. Be sure to
use even pressure to not sand the radius deeper on the top or bottom of the fretboard.
Check your progress often with the 24” straight edge. Check in many places across the width of the fretboard. A
high/low spot may not be across the whole fretboard.
Once the high spots are gone you can use the 4” block with 220 grit to slowly level the whole fretboard. Start with the
block partially on the first fret area and draw it completely across the whole fretboard in one pass. Don’t reverse,
always go in the same direction. The idea is to take an even cut across the whole fretboard. Keep an even pressure to
not take more off on the top or bottom of the fretboard.
Check your progress often with the 24” straight edge. Check in many places across the width of the fretboard.
This will take some time. You want to get the fretboard as flat as possible. That should reduce the amount of sanding of
the fret tops when leveling them. And a clean level fretboard looks great too. But, you don't need to sand out all the
divots in the fretboard, they add "character".
You can fill any remaining divots with rosewood sanding dust and thin superglue. Put the rosewood dust in the hole
and add the glue, mixing and flattening it quickly. This will need to be scraped and sanded flush. Beware the repair will
be darker than the fretboard. You can use a fine sharp edge to draw some “grain lines” in it to somewhat hide it.
Once the fretboard is flat, take a few passes with the 320 grit sandpaper.
5.0 PREPPING THE SLOTS:
The Yamaha slots are .018”/.020” wide. Modern frets require a .023” slot. If your guitar had .030 tang frets, you do not
have to open the slots. Skip to the last step and break the edges on the slots.
5.1 PREPPING THE SLOTS – TOOLS REQUIRED:
1. Fret slot saw with depth stop. I used to use the LMII saw and made my own wood depth stop. https://www.lmii.com/fretting-tools/2695-fret-saw-beech-handle.html Or you can use the Stew Mac saw with their stop. https://www.stewmac.com/Luthier_Tools/Types_of_Tools/Saws/Fret_Saw.html The .023” fret slot saw WILL bind in the slot, and slipping will damage the fretboard. Lately I’ve using the Stew Mac .020” saw just to be sure the slot is clear to the bottom. https://www.stewmac.com/luthier-tools-and-supplies/types-of-tools/saws/pull-stroke-gauged-saw.html I haven’t had a problem with the neck back bowing from fret slot interference, so I only use the .020 Stew Mac saw to clean out the slot.
2. Small triangular file.
REFRETTING A VINTAGE YAMAHA FG v2020.6 Page 8
5.2 PREPPING THE SLOTS – PROCEDURE:
Firmly hold the neck in your left hand.
Place the fret slot saw in the far side of the fret slot, on a slight upward angle, and pull towards you. The saw will
probably bind in the slot and get stuck. OR use the .020” saw. You MUST be sure the slots are at least .020” wide. Too
much interference can cause a back bow in the neck, although I haven’t had any problem just installing modern .020”
tang frets in the old Yamaha slots.. Do not cut the slot deeper unless you sanded down a high spot in the fretboard, like
the 14th fret area. Then be careful not to go too deep.
Be careful to keep the saw lined up in the slot.
DO NOT let the saw teeth reach the other side of the slot! It will pull a chunk of the side of the fretboard out, requiring
it to be filled.
Keep cutting on an angle until the depth stop hits the fretboard, then lower the angle until the teeth almost reach the
far side of the slot.
When all the slots are done, turn the neck around and repeat.
This time you can, and should, let the saw cut the full depth all the way across.
***After cutting/cleaning all the slots, use the small triangular file to break the edges of the slots .01”/.02”. This will
make installing the frets easier.
6.0 INSTALLING THE FRETS:
I use a 4 foot length of LMII FW74 (.020” tang), or FW75 (.024” tang), depending on if the guitar had .020” or .030” fret
tangs. This fret wire comes in a coil and you don’t have to bend a radius in it. Or you can use pre-cut & pre-radiused
frets. You’ll need slightly more than 4 feet if refretting a 12 string guitar unless you cut them very close to length. If the
neck is off for a neck reset, do the steps thru fret level, saving the crowning and final sanding for just before you glue
the neck on. Otherwise, the shiny frets will get scratched up by your straight edge.
6.1 INSTALLING THE FRETS – TOOLS REQUIRED:
1. Fret cutters (end nippers). Stew Mac https://www.stewmac.com/Luthier_Tools/Types_of_Tools/Pliers_and_Cutters/StewMac_Fret_Cutter.html
2. Fretting hammer. I prefer an 8 ounce plastic “dead blow” hammer. It doesn’t bounce, and won’t make flats in the frets like a metal hammer. Some people use a brass tipped hammer. Stew Mac https://www.stewmac.com/Luthier_Tools/Tools_by_Job/Tools_for_Fretting/Hammering/Deadblow_Fretting_Hammer.html OR https://www.stewmac.com/Luthier_Tools/Tools_by_Job/Tools_for_Fretting/Hammering/Fretting_Hammer.html
3. Fret Press/pliers (optional). Stew Mac or LMII.
4. Thin super glue (CA). BSI 103 https://www.amazon.com/Bob-Smith-Insta-Cure-Super-Thin/dp/B001NI4JWI/ref=asc_df_B001NI4JWI/ This isn’t the stuff you find at Home Depot or Walmart, it’s only available at good hobby shops. Use a thin “whip tip” to control the amount of CA applied. Or you can get it from Stew Mac https://www.stewmac.com/Materials_and_Supplies/Glues_and_Adhesives/Glues/StewMac_Super_Glues/StewMac_Super_Glue.html Get it in the smallest container possible. It goes bad with time, and the cap eventually builds up with glue and becomes impossible to remove.
REFRETTING A VINTAGE YAMAHA FG v2020.6 Page 9
5. Renaissance Wax. https://www.amazon.com/Renaissance-Wax-Polish-200-ml/dp/B0012S1XBO/ref=asc_df_B0012S1XBO/ They sell a smaller container, but I figured I’m going to use this stuff for many things.
6.2 INSTALLING THE FRETS - PROCEDURE:
You can cut the frets one at a time, or cut them all. I prefer to cut them one at a time and install them. It’s easier on
the hands to not make so many cuts at once and there’s less chance for error. Some people will hold the coil of fret wire
in one hand, lay it in the fret slot, tap it in, and cut it off. This will save time, fret wire and the amount of cuts, but I find
it very difficult to hold the coil to line up the fret in the slot.
Measure the fret slot and cut the fret wire ¼” to ½” longer. The extra length makes it easier to hold when tapping
them in, but don’t go too long or you’re run out of fret wire.
Place the fret wire in the fret slot.
Tap the fret wire in, starting at one end and moving across.
After you think it’s in, tap it harder to be sure it’s fully seated.
Be careful to not hit too close to the end of the fret or it will bend over the edge of the fretboard. Your only option is to
remove the fret and straighten it or replace it. It will look bad otherwise.
Be sure ALL the frets are fully seated all the way across.
IF you had to open up the fret slots and the saw probably bound up a lot and may have wandered, some of the slots may
be a little oversize. It would be best to glue them in.
IF YOU HAVE TO GLUE ANY FRETS IN - Using a paper towel, apply Renaissance Wax lightly to the whole fretboard, or
around the frets that need to be glued. If you skip this step, the clean up after the next step requires a lot of scraping
and sanding. Not fun! Be sure all the frets are still fully seated.
Put the “whip tip” on the thin CA bottle and carefully wick the CA under only one side of the frets, immediately wiping
up any excess. 2 sides if the fret was loose in the slot. It is thinner than water and runs quickly. Keep the tip about ¼”
away from the ends of the frets to not have the glue run off the fretboard onto the finish. If the fret won’t stay seated
you can use your radiused sanding block to clamp it down while the glue dries. Don’t forget to put some wax paper on it
to prevent it from possibly being glued to the fret.
After gluing in all the frets, put the neck aside for 10-15 minutes to be sure all the CA sets.
Place the end nippers vertically against the side of the fretboard and cut off the excess fret wire.
7.0 PROTECTING THE FRETBOARD:
Before sanding and filing the frets you need to protect the fretboard from the metal dust and accidental damage from
files and sandpaper.
7.1 PROTECTING THE FRETBOARD – TOOL REQUIRED:
Painters tape, 1” & ¾”. Stew Mac’s Orange tapes are great and come in ¾”, ½” ¼” widths.
https://www.stewmac.com/Materials_and_Supplies/Glues_and_Adhesives/Tapes_and_Adhesives/Orange_Multi-
Purpose_Tape.html Highly recommended. It’s much easier than tearing or cutting ¾” tape to narrower widths.

REFRETTING A VINTAGE YAMAHA FG v2020.6 Page 10
I recently bought (2) of Stew Mac’s Tape Decks to hold all my tapes.
https://www.stewmac.com/Materials_and_Supplies/Glues_and_Adhesives/Tapes_and_Adhesives/StewMac_Guitar_Sh
op_Tape_Deck.html It saves a lot of time picking up the rolls and searching for the end. Especially when taping the
whole fretboard. I bought them on sale, but you can find the same thing on Amazon for slightly less.
7.2 PROTECTING THE FRETBOARD - PROCEDURE:
Tear off pieces of tape as required to cover the fretboard, wrapping a bit around the neck. Be sure to cover ALL of the
fretboard, don’t leave any small gaps. If the neck is off for a neck reset, between frets 14 and 20 cut the tape shorter
than the sides of the fretboard extension. You don’t want the tape to wrap around and affect how the neck seats.
8.0 FILE AND BEVEL THE FRET ENDS:
Obviously, you don’t want sharp fret ends to cut your hand or catch on stuff.
8.1 FILE AND BEVEL THE FRET ENDS – TOOLS REQUIRED:
Large flat file. I cut the tang off of a file and belt sanded a slight taper on the ends so it didn’t catch the fret ends. Or
you can buy one from Stew Mac.
https://www.stewmac.com/Luthier_Tools/Types_of_Tools/Files/Fret_Beveling_File.html I don’t use a holder, I prefer to
hold the file in my hand.
8.2 FILE AND BEVEL THE FRET ENDS - PROCEDURE:
Hold the large flat file vertically against the edge of the fretboard. Carefully file the sharp points left by the end
cutters.
Once the file starts biting the masking tape, angle the file inward between 15 and 30 degrees, depending on how
much you want. If you’re opening the string spacing I’d keep this angle to a minimum. Hold the file consistently at that
angle and bevel all the frets. The bevel should go down to the start of the tang without digging into the fretboard.
9.0 LEVELING THE FRETS:
Just because you leveled the fretboard doesn’t meet the frets will automatically be level. They will need to be leveled
using the radius block and sandpaper.
9.1 LEVELING THE FRETS – TOOLS REQUIRED:
1. 16” Radius Sanding Blocks. I recommend Stew Mac https://www.stewmac.com/Luthier_Tools/Tools_by_Job/Tools_for_Sanding/4_Radius_Blocks.html and https://www.stewmac.com/Luthier_Tools/Tools_by_Job/Tools_for_Sanding/8_Radius_Blocks.html 4” long for spot leveling, 8” long for leveling a larger area.
9. 320 grit Sandpaper. Stew Mac sells 2-3/4” self-adhesive sandpaper https://www.stewmac.com/Materials_and_Supplies/Sanding_and_Polishing/Sandpaper_and_Finishing_Papers/3M_Stikit_Gold_Abrasives_2-3_4_inch_Roll.html Or you can buy the same stuff on Amazon for less. You can also just use regular sandpaper and hold it to the block with your hand. Just be sure to keep firm pressure on

REFRETTING A VINTAGE YAMAHA FG v2020.6 Page 11
the block or the sandpaper rolling around the sides will take more off the outer edges of the fretboard than the middle.
2. 24” Straight edge (to verify the frets are level).
3. Notched straight edge (to verify the fretboard is flat after fret installation). These are insane money. https://www.stewmac.com/Luthier_Tools/Types_of_Tools/Straightedges/Precision_Notched_Straightedge.html I made mine from aluminum Harbor Freight 40” rulers, cutting the notches on my table saw. I made PDF drawings for all common scale lengths. I can send them to you if you request.
4. Fret Rocker. Stew Mac https://www.stewmac.com/Luthier_Tools/Types_of_Tools/Straightedges/Fret_Rocker.html Very useful for finding high frets.
5. Flat file.
6. Black permanent marker.
7. Feeler Gages (optional) to check the gaps under the 24” straight edge.
8. A good light source and a white background. To check for gaps under the straight edge.
9. I built this neck support for inspecting frets. It’s much easier than trying to hold the neck steady in your hand, hold the straight edge on the fretboard, and look carefully for gaps.
9.2 LEVELING THE FRETS - PROCEDURE:
If you have one, use the notched straight edge to verify the fretboard is still flat AFTER fret installation. If you don’t
have a notched straight edge, use the regular straight edge to see if the first 5 frets are low. There’s a chance if the slots
were tight the neck could be slightly back bowed. Adjust the truss rod if necessary.
Use the side of the black marker to mark the tops of all the frets.
Using the radius block (the one you used to level the fretboard) with 320 grit sandpaper, start on the first fret and
make one full pass across all the frets. Don’t reverse. Always go in the same direction.
After 2 or 3 passes, you should visually have an idea where your high frets are.
Use the 24” straight edge to see the overall flatness of the frets. Check in many places across the width of the
fretboard. A high/low spot may not be across the whole fretboard.
Use the fret rocker to find individual high frets. Check in many places across the width of the fretboard.
You can carefully use the flat file to lower any frets more than .010” too high. Check often. You want to bring down
the high spots first.
You can also take down high areas use the longer radius block or sanding beam with the 320 grit sandpaper only on
one end, put tape on the other end for a smooth surface on the fretboard. The longer block/beam keeps the sandpaper
level, making it easier to take the high spot down without the smaller block rolling over it and possibly creating low
spots. Be sure to use even pressure to not sand the radius deeper on the top or bottom of the fretboard.
Check your progress often with the 24” straight edge and fret rocker. Check in many places across the width of the
fretboard.
This will take some time. You want to get the frets as level as possible. Otherwise, you’ll end up with buzzes or dead
spots.
REFRETTING A VINTAGE YAMAHA FG v2020.6 Page 12
10.0 CROWNING THE FRETS:
Frets are crowned to have a small central single point of contact with the string. Too much contact will change the
contact point and alter the intonation.
10.1 CROWNING THE FRETS – TOOLS REQUIRED:
1. Fret crowning file. Stew Mac https://www.stewmac.com/Luthier_Tools/Types_of_Tools/Files/Double-edge_Fret_File.html But that tends to leave a rougher finish than Stew Mac’s 300 grit diamond file, which is what I use. https://www.stewmac.com/Luthier_Tools/Types_of_Tools/Files/Offset_Diamond_Fret_File.html
1. LMII’s 3 corner “cant” file (optional) https://www.lmii.com/fretting-tools/26464-3-corner-cant-file-for-fretwork.html This file works great to add a bevel to the fret before crowning, especially frets with very flat tops. I recommend sanding and smoothing the sharp corners on the file to keep them from cutting thru the tape.
2. 320, 600 & 1500 grit sandpaper.
3. 0000 steel wool. You can go farther with finer grits but I don't.
4. Black permanent marker.
10.2 CROWNING THE FRETS - PROCEDURE:
Using the side of the black marker, mark the tops of all the frets.
If you have it, use LMII’s “cant” file to taper the sides of the frets, leaving about 1/16” of marker in the middle.
Use the crowning file to take off all but a thin line of the marker in the middle of the fret. That thin line is the contact
point of the string.
Use the 320 & 600 grit sandpapers to smooth the lines on the sides of the frets. Then sand the top of the frets to just
remove the 320 grit sanding marks.
Do the same with the 1500 grit sandpaper and 0000 steel wool to make the fret shiny.
Take a close look at the frets and be sure you’ve removed all the sanding & filing marks.
11.0 ROUNDING THE FRET ENDS:
You want the fret ends to be smooth to not catch your finger or other stuff.
11.1 ROUNDING THE FRET ENDS – TOOLS REQUIRED:
1. Fret end dressing file. Stew Mac’s https://www.stewmac.com/Luthier_Tools/Types_of_Tools/Files/Fret_End_Dressing_File.html This is a great tool for cleaning up the sharp edges. Highly recommended.
2. 0000 Steel Wool.

REFRETTING A VINTAGE YAMAHA FG v2020.6 Page 13
11.2 ROUNDING THE FRET ENDS - PROCEDURE:
Use the fret end dressing file to round over and blend the bevel into the fret end. Also use it to break any sharp edges,
checking if any fret tangs are sticking out of the side of the fretboard.
Run your hand back and forth over the sides of the fretboard a few times to find any sharp or rough edges and hit them
with the file again.
Once you’re satisfied with the frets, remove all the tape from the neck and admire your work. You may have worn or
nicked thru the tape in a few spots.
Check the fret ends again. The tape can hide some sharp edges.
Use the 0000 steel wool all over the fretboard & frets to make everything look uniform. Pay close attention to any
super glue residue from gluing in the frets. It will be easily removed with the steel wool (if you used the Renaissance
Wax) if you press it tightly into the corner of the fret with your nail.
12.0 REPLACING JUST A FEW FRETS:
Replacing a few frets (typically the first 5) requires the same tools and steps, but you’ll have to take more material off of
the tops of the new frets to level them to the old frets. You should also level ALL of the frets at the same time to have a
new flat fret plane, especially if you’re going to do a neck reset. This is not easy. Sometimes it’s easier to just replace
them all, especially if the old frets are uneven.
YOU’RE DONE!! CONGRATS!!!
FINAL NOTE - As you may have noticed, there are many expensive tools required. It will cost $250 to $350 to have
someone do a complete refret for you. The cost of the tools can far exceed this. A few of the tools can be bought at
Harbor Freight or made, but many of them are specific to the job and can only be bought from a luthier supply store
such as Stew Mac or LMII.