refrigerator - samsung · refrigerator rb195bssw, rb195bssb rb195bsvq, rb195bsbb rb215bssw,...
TRANSCRIPT

REFRIGERATORRB195BSSW, RB195BSSBRB195BSVQ, RB195BSBBRB215BSSW, RB215BSSBRB215BSVQ, RB215BSBB
OWNER’S MANUAL
DA99-00926A REV(0.0)
In the U.S. for questions about features, operation/performance, parts, accesories or service, call:
1-800-726-7864 (1-800-SAMSUNG)www.samsung.com
Register your product at www.samsung.com/global/register
2
FEATURES
High-energy efficiency with twin cooling system• Optimized power consumption with twin cooling
system.
Humidity controlled drawers• This is suitable for storing dry or wrapped food
(e.g. fresh salads, vegetables and fruit).Fridge at the top, drawer-type freezer at thebottom• The highly ergonomic humidity controlled drawers
are placed at the waist height for frequent use.• The drawer-type freezer minimizes temperature
variations and stores food cleanly and conveniently.
Digital temperature control display• The display shows all functions of the appliance,
allowing easy control.
• Fridge and freezer temperatures can be adjusted separately.
Super Freeze• Speeds up the freezing process in the freezer.
Super Cool• Speeds up the cooling process in the fridge.
Door alarm• When the refrigerator door is left open for more
than two minutes, a musical alarm is automaticallytriggered. This feature helps you save electricity andpreserve stored foods as a reminder to close thedoor.
Automatic defrosting in fridge/freezer CONTENTSFEATURESWARNINGS / SAFETY PRECAUTIONSINSTALLING THE FRIDGE / FREEZER PREPARING THE FRIDGE / FREEZERVIEW OF YOUR FRIDGE / FREEZERUSING THE CONTROL FEATURESCONTROLLING THE FREEZER AND FRIDGE TEMPERATURESSTORING FOOD IN THE FRIDGE OR FREEZERICE STORAGE BINREMOVING AND CLEANING ACCESSORIESREPLACING INTERIOR LIGHTSINSTALLATION OF THE WATER LINEREVERSING THE DOOR SWINGPROBLEMS AND SOLUTIONSUSAGE PRECAUTIONS
These operating instructions cover various models.The characteristics of your appliance may differslightly from those described in this manual.
235667
8
910111213141919
3
WARNINGS / SAFETY PRECAUTIONS
Warning
To avoid any risk of personal injury, material damage or incorrect use of the appliance, be sure to observe the followingsafety precautions. (After reading these owner’s instructions, please keep them in a safe place for reference.) Remember tohand them over to any subsequent owner.
Indicates that a danger of death orserious injury exists.
Caution
Indicates that a risk of personalinjury or material damage exists.
WarningDo not plug several appliances into the same socket.• This could cause overheating and the risk of fire.
Keep the power plug away from the rear of thefridge/freezer.• A damaged power plug may cause fire due to overheating.
Do not directly spray water inside or outside thefridge/freezer.• There is a risk of fire or electric shock.
Do not spray inflammable gas near the fridge/freezer.• There is a risk of explosion or fire.
Do not bend the power cord excessively or place heavyarticles on it.• This constitutes a fire hazard. If the power cord is
damaged, have it replaced immediately by themanufacturer or its service agent.
Do not insert the power plug with wet hands.• You may receive an electric shock.
Do not put a container filled with liquid on top of theappliance.• If the water spills on to any electrical parts, it may lead to
fire or electric shock.
Do not install the fridge/freezer in a damp place, whereit may come into contact with water.• Incorrect insulation of the electrical parts may cause an
electric shock or fire.
Do not store volatile and inflammable substances in therefrigerator.• The storage of benzene, thinner, alcohol, ether, LP gas or
other such substances may cause an explosion.
Do not disassemble, repair or alter the appliance.• It may cause fire or abnormal operation, which may lead to
injury.
Pull the power plug out of the socket before replacingthe interior light in the refrigerator.• Otherwise, there is a risk of electric shock.
Be sure to ground the appliance.• Otherwise, it may cause material damage or electric shock.
If you wish to dispose of the fridge/freezer, throw it awayafter removing the door or its seals.• In this way, it is not possible for a child to remain trapped
inside it.• Keep ventilation openings in the appliance enclosure or
mounting structure clear of obstruction.• Do not use mechanical devices or any other means to
accelerate the defrosting process, other than thoserecommended by the manufacturer.
• Do not damage the refrigerant circuit.• Do not use electrical appliances inside the fridge/freezer,
unless they are of a type recommended by themanufacturer.
The appliance must be positioned so that the plug isaccessible after installation.
The gases in the insulation material required specialdisposal procedure.
Warning
4
WARNINGS / SAFETY PRECAUTIONS
Do not store too much food in the appliance.• When you open the door, an item may fall out and cause
personal injury or material damage.
Do not put bottles or any kinds of glass in the freezer.• The container may break and cause personal injury.
If the wall socket is loose, do not insert the power plug.• It could be cause electric shock or fire.Do not disconnect the power cord by pulling on it.• You may disconnect a wire and cause a short circuit.
Do not store articles on top of the appliance.• When you open or close the door, the articles may fall and
cause personal injury or material damage.
Do not store pharmaceutical products, scientificmaterials or other temperature-sensitive products in therefrigerator.• Products that require strict temperature controls must not
be stored in the refrigerator.
Do not let a child hang from the door.
Do not allow children to climb, stand or hang on theshelves in the refrigerator.• They could damage the refrigerator and seriously injure
themselves.
Allow an adequate space and install the fridge/freezeron a firm, level floor.• If the appliance is not level, there may be unusual noises
and poor cooling.• Wait for at least one hour before plugging the appliance in.
Clean the fridge/freezer.• Wipe and clean the appliance inside and outside with adamp cloth and dry completely.
Plug the fridge/freezer into a wall socket usedexclusively by this appliance.• This appliance must be properly grounded.
CautionDo not store pharmaceutical products, scientificmaterials or other temperature-sensitive products in therefrigerator.• Products that require strict temperature controls must not
be stored in the refrigerator.
Do not touch any containers or food in the freezer withwet hands.• It may cause frostbite.
Remove any foreign matter or dust from the power plugpins.• Otherwise there is a risk of fire.
Do not insert your hand into the bottom area of theappliance.• Any sharp edges may cause personal injury.
After unplugging the appliance, wait for at least fiveminutes before plugging it in again to the wall socket.• Abnormal operation of the freezer may cause material
damage.
If the appliance is not to be used for a long period oftime, pull out the power plug.• Any deterioration in the insulation may cause fire.
Do not let children touch or play with the control panelon the front of the appliance.• Do not stand or lean on the base panel, pull-out parts,
doors and so on.• Repairs and maintenance of the appliance should only be
performed by a qualified technician. Incorrect repairs by anunqualified person are a potential source of danger thatmay have critical consequences for the user of theappliance.
• Never put ice cubes or ice pops straight from the freezerinto your mouth. (The low temperature may cause “freezerburns”.)
Do not place the equipment directly under the sunlight,etc.
The refrigerator must be grounded.• You must ground the refrigerator to prevent any power
leakages or electric shocks caused by current leakagefrom the refrigerator.
Never use gas pipes, telephone lines or other potentiallightening rods as ground.• Improper use of the ground plug can result in a risk of
electric shock. If it is necessary to use an extension cord,use only a 3-wire extension cord that has a 3-blade groundplug and a 3-slot receptacle that will accept the plug on theappliance. The marked rating of the extension cord shouldbe AC 115V~120V, 10A, or more. If a grounding adapter isused, make sure the receptacle box is fully grounded.
5
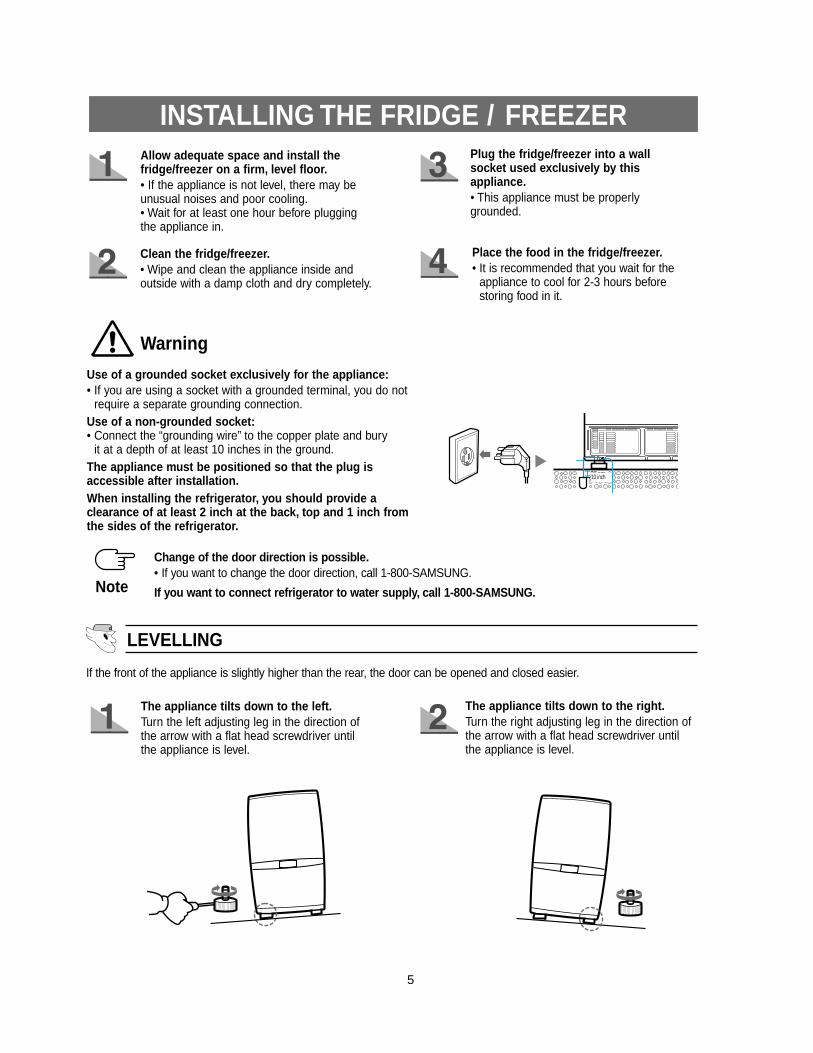
INSTALLING THE FRIDGE / FREEZERAllow adequate space and install thefridge/freezer on a firm, level floor.• If the appliance is not level, there may beunusual noises and poor cooling.• Wait for at least one hour before pluggingthe appliance in.
Clean the fridge/freezer.• Wipe and clean the appliance inside andoutside with a damp cloth and dry completely.
Plug the fridge/freezer into a wallsocket used exclusively by thisappliance.• This appliance must be properlygrounded.
Use of a grounded socket exclusively for the appliance:• If you are using a socket with a grounded terminal, you do not
require a separate grounding connection.Use of a non-grounded socket:• Connect the “grounding wire” to the copper plate and bury
it at a depth of at least 10 inches in the ground.The appliance must be positioned so that the plug isaccessible after installation.When installing the refrigerator, you should provide aclearance of at least 2 inch at the back, top and 1 inch fromthe sides of the refrigerator.
If the front of the appliance is slightly higher than the rear, the door can be opened and closed easier.
Place the food in the fridge/freezer.• It is recommended that you wait for the
appliance to cool for 2-3 hours beforestoring food in it.
LEVELLING
The appliance tilts down to the left.Turn the left adjusting leg in the direction ofthe arrow with a flat head screwdriver untilthe appliance is level.
The appliance tilts down to the right.Turn the right adjusting leg in the direction ofthe arrow with a flat head screwdriver untilthe appliance is level.
10 inch
Warning
Change of the door direction is possible.• If you want to change the door direction, call 1-800-SAMSUNG.
If you want to connect refrigerator to water supply, call 1-800-SAMSUNG.Note

6
PREPARING THE FRIDGE / FREEZER
Install all shelves and compartmentsremoved during transport and place them inthe correct position.
You are advised to clean the appliance andaccessories before switching the applianceon for the first time to remove any dust thataccumulated during packing and shipping.
Switch on the appliance for approximately 2hours before loading it with frozen food forthe first time. Do not load with frozen fooduntil the freezer temperature is at least 0°F.If you want to store frozen food as rapidlyas possible, set the temperature control tothe coldest temperature (-14°F) and let theappliance operate for one hour.The appliance is preset for normaloperation. We recommend temperatures of38°F in the fridge and -2°F in the freezer.
The interior light of the appliance will lightup when the door is open.This interior light will go out when the dooris closed.
Your appliance is operated by a compressorwhich switches “on and off” to maintain theinternal temperature. When the compressoris new, it requires running for a period of upto five months. During this period, it may beslightly noisy. This is quite normal and doesnot represent a fault.
Store food once the temperature in therefrigerator is sufficiently low. It takes a fewhours after starting the refrigerator to reachthe proper temperature.If the appliance does not operate correctly,check the electricity supply. If the problempersists, contact your dealer.
To prepare your appliance for use and check that it is running correctly, take the following steps.
VIEW OF YOUR FRIDGE / FREEZERFridge Light
Fridge
Fridge Shelves
Humidity ControlledDrawer
Ice Maker andIce Storage Bin
Wire Drawer
Multi-Purpose Door Bins
Bottle Bins
Freezer Light
Deli Drawer
Door Switch

7
USING THE CONTROL FEATURES
Freezer Temperature buttonSets the freezer temperature.Press this button repeatedly to change thetemperature in sequence between -14°F and 8°F.
Fridge Temperature buttonSets the fridge temperature.Press this button repeatedly to change the temperature in sequence between 34°F and46°F
Super Cool buttonSpeeds up the cooling process in the fridge.
Super Freeze buttonSpeeds up the freezing process in the freezer.
Ice Off buttonPress Ice Off button tostop making Ice.
Child Lock buttonWhen this button is pressed for 3sec.,all functions are locked and can not bemodified.

8
CONTROLLING THE FREEZER AND FRIDGE TEMPERATURES
Temperature DisplayDisplays the current and selected freezer temperatures.Freezer DisplayIndicates that you are setting the freezer temperature or have opened the freezer door.
Temperature DisplayDisplays the current and selected fridge temperatures.Fridge DisplayIndicates that you are setting the fridge temperature or have opened the fridge door.
Freezer• The freezer can be set to a temperature between
-14°F and 8°F.• Press the Freezer button repeatedly until the desired
temperature is shown in the temperature display.• The temperature display changes in sequence between -14°F
and 8°F. When the display reaches -14°F, it returns to 8°F.• After five seconds, the display reverts to the average freezer
temperature, which changes as the freezer reaches the newtemperature.
Fridge • The fridge can be set to a temperature between 34°F and 46°F.• Press the Fridge button repeatedly until the desired
temperature is shown in the temperature display.• The temperature display changes in sequence and reverts to the
average temperature in the same way as the freezer.
Super Freeze • This light goes on when you press the Super Freeze button.• Press this button to quickly return the freezer to its set temperature.• This feature is useful if the freezer door has been left open for a long time.• Press this button again to cancel the Super Freeze mode.• Press this button to make ice quicker.
Temperaturedisplay
• The temperatures displayed for the freezer and fridge are the actual temperaturesof each compartment.
• There may be a slight difference between the set temperature and the actualtemperature.
Super Cool • This light goes on when you press the Super Cool button.• Press this button to quickly return the fridge to its set temperature.• This feature is useful if the fridge door has been left open for a long time.• Press this button again to cancel the Super Cool mode.
Ice Off • Press Ice off button to stop making Ice.• If you don’t want to make ice, press this Ice Off button. Then the indicator of “Ice Off”
button will turn on. It means, the making of ice is stopped.
INDICATORS

9
STORING FOOD IN THE FRIDGE OR FREEZER
When storing food in the appliance, follow therecommendations below.• Allow warm food and beverages to cool down before
storing them in the appliance.• Ensure that food is well-wrapped or covered before it is
stored. This will prevent food from dehydrating,deteriorating in color or losing flavor and will helpmaintain freshness. Fruits and vegetables do not needto wrapped, provided that they are stored in the fridgevegetable drawers.You are advised not to wrap the food with paper andstore it in the fridge and freezer.It could be the cause of odor generation.
• Never let any oil or grease come into contact with theplastic fittings or door seals, as these materials easilybecome porous.
• Never store any explosive substances inside theappliance. High-proof alcohol should only be storedupright in tightly sealed containers.
• Please keep the space between the shelf and the rearwall of the enclosed space of the cabinet a 1/2 inchapart for air circulation.
A. Fridge
Transparent, unbreakable shelves• Place food in storage containers and lay the items out at suitable
intervals.• The storage shelf is made from an unbreakable, transparent material,
so that you can safely use it .
Humidity controlled drawers• Fruit and Vegetables can be stored in these compartments.• The drawers can be removed if you need more space to store fruit and
vegetables.• To maintain the high humidity, slide the humidity control lever to the
“HIGH” side.
Multi-purpose door guard and egg bin• The fridge is the warmest in the front, at the top and in the door.• You can store small packaged foods, like milk, yogurt and beverages
here.
Bottle door guard• You can store small bottles, cartons of beer, milk and juice in the upper
area and large bottles and gallon cartons in the lower area.

10
STORING FOOD IN THE FRIDGE OR FREEZER
Freezer drawer• You can store packed frozen foods, such as ice cream
and bacon.• You can store meat and fish or dried foods divided into
suitably sized portions.• Can be used to store meat and dry foods. Stored food
should be wrapped securely using foil or other suitablewrapping materials or containers.
B. Freezer
Wrapping foodPack the food in suitably sized portions for your household.Vegetable and fruit portions should be no heavier than 2 pounds, while meat portions can be up to 5.5 lbs.Smaller portions freeze quickly and the quality is better maintained when defrosting and preparing the food.It is important to seal food in airtight bags or containers before freezing to prevent it from losing its taste or dehydrating.Wrap the food, then press out any air and seal it airtight.
Suitable wrapping materials:Plastic bags, cling-film, aluminium foil and freezer containers. These items are available from any dealer.
Unsuitable wrapping materials:Wrapping paper, wax paper, cellophane, bin bags or used carrier bags.These can cause the generation of odors.
Suitable sealing materials:Rubber bands, plastic clips, string, freezer tape or similar.Plastic film and bags may be heat-sealed using a special sealing iron or press.
Before placing a package in the freezer, it should be clearly labelled with the contents and the date of freezing.
Note
Upper freezer drawerLower freezer drawer
ICE MAKERThe ice maker will produce 8 cubes per cycle – approximately 100~130 cubes in a24-hour period, depending on freezer compartment temperature, room temperature,number of door openings and other use conditions.Throw away the first few batches of ice to allow the water line to clear.Be sure nothing interferes with the sweep of the feeler arm.When the bin fills to the level of the feeler arm, the icemaker will stop producing ice.After the icemaker has been turned on again, there will be a delay of time before theicemaker resumes operations.It is normal for several cubes to be joined together.If ice is not used frequently, old ice cubes will become cloudy, taste stale and shrink.So if you don't want to make ice, press the Ice Off button.
• The refrigerator can only use ice makers which are made by Samsung Electronics.• The ice-maker can only be installed by Samsung or its service agent.
Note
Feeler Arm
Danger of explosion• Glass bottles containing liquids that can freeze should never be stored in the freezer as the glass will explode.Warning
11
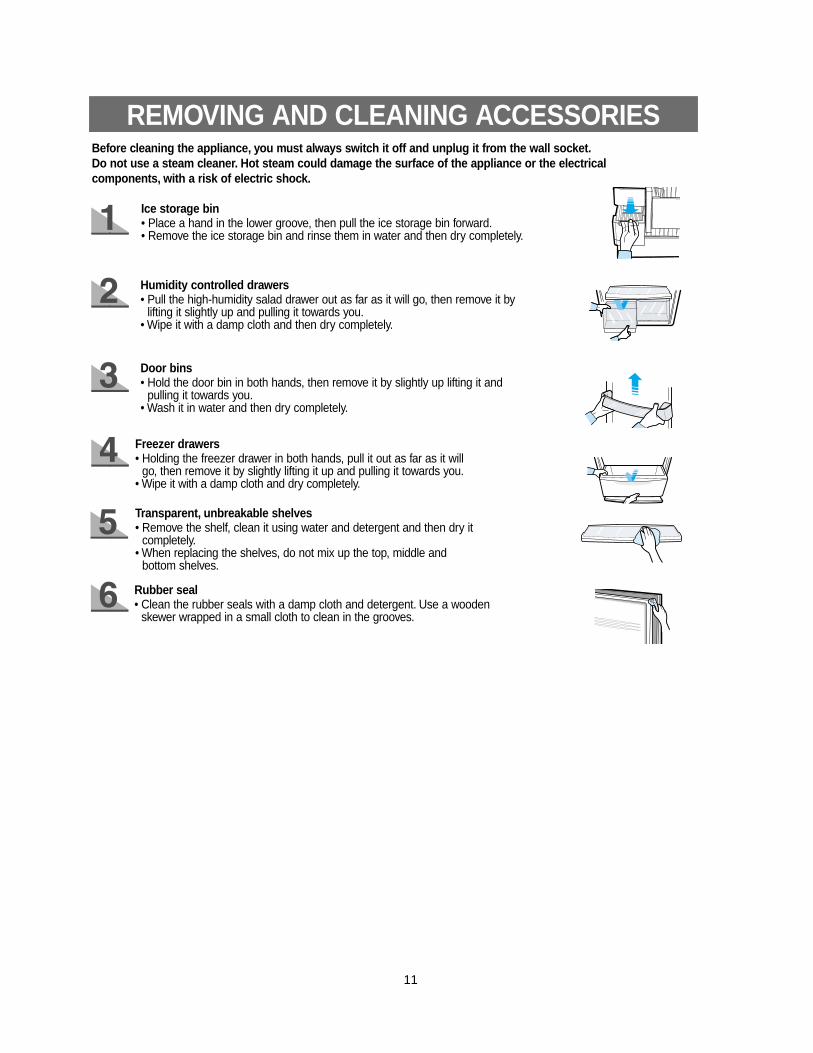
REMOVING AND CLEANING ACCESSORIES
Ice storage bin• Place a hand in the lower groove, then pull the ice storage bin forward.• Remove the ice storage bin and rinse them in water and then dry completely.
Humidity controlled drawers• Pull the high-humidity salad drawer out as far as it will go, then remove it by
lifting it slightly up and pulling it towards you.• Wipe it with a damp cloth and then dry completely.
Door bins• Hold the door bin in both hands, then remove it by slightly up lifting it and
pulling it towards you.• Wash it in water and then dry completely.
Freezer drawers• Holding the freezer drawer in both hands, pull it out as far as it will
go, then remove it by slightly lifting it up and pulling it towards you.• Wipe it with a damp cloth and dry completely.
Transparent, unbreakable shelves• Remove the shelf, clean it using water and detergent and then dry it
completely.• When replacing the shelves, do not mix up the top, middle and
bottom shelves.
Rubber seal• Clean the rubber seals with a damp cloth and detergent. Use a wooden
skewer wrapped in a small cloth to clean in the grooves.
Before cleaning the appliance, you must always switch it off and unplug it from the wall socket.Do not use a steam cleaner. Hot steam could damage the surface of the appliance or the electricalcomponents, with a risk of electric shock.
12
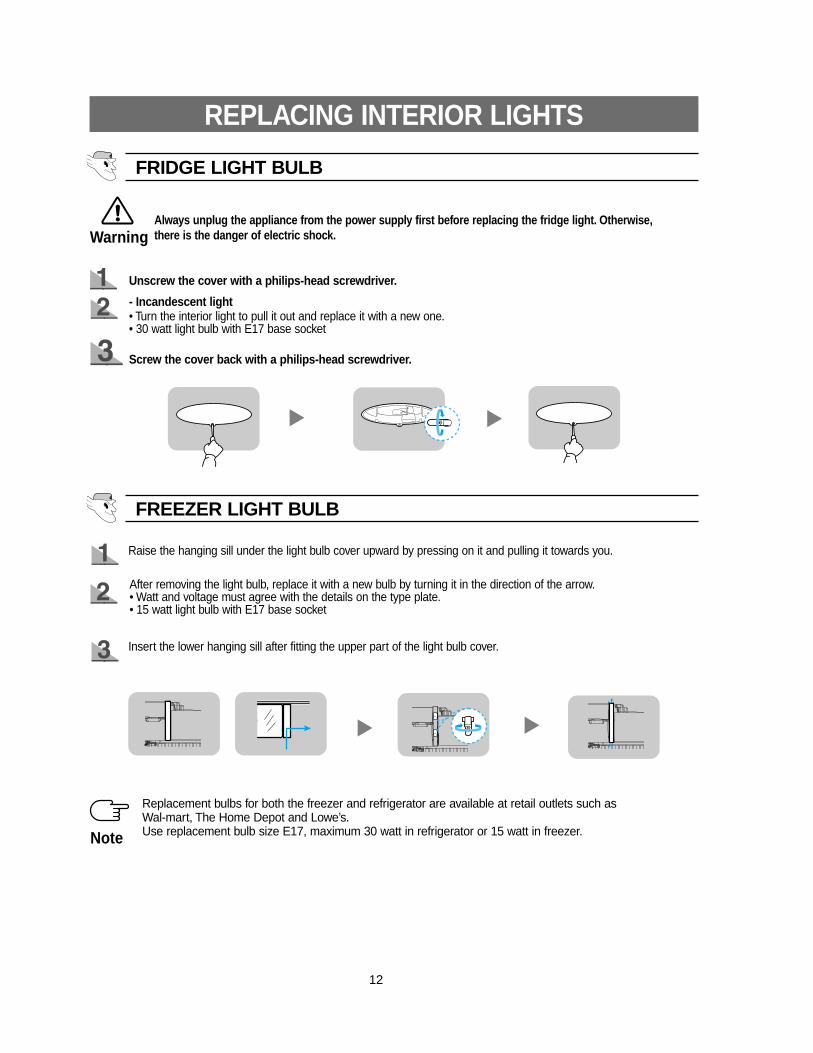
REPLACING INTERIOR LIGHTS
Unscrew the cover with a philips-head screwdriver.
Always unplug the appliance from the power supply first before replacing the fridge light. Otherwise,there is the danger of electric shock.
- Incandescent light• Turn the interior light to pull it out and replace it with a new one.• 30 watt light bulb with E17 base socket
Screw the cover back with a philips-head screwdriver.
Raise the hanging sill under the light bulb cover upward by pressing on it and pulling it towards you.
After removing the light bulb, replace it with a new bulb by turning it in the direction of the arrow.• Watt and voltage must agree with the details on the type plate.• 15 watt light bulb with E17 base socket
Insert the lower hanging sill after fitting the upper part of the light bulb cover.
Note
Replacement bulbs for both the freezer and refrigerator are available at retail outlets such asWal-mart, The Home Depot and Lowe’s.Use replacement bulb size E17, maximum 30 watt in refrigerator or 15 watt in freezer.
Warning
FRIDGE LIGHT BULB
FREEZER LIGHT BULB

INSTALLATION OF THE WATER DISPENSER LINE
13
- Shut off the main water supply line and turn theIce maker to the off position.
- Locate the nearest cold drinking water line.- Follow the instructions in the ice maker
installation kit.- After connecting the water supply with water
filter, turn on water supply and flush 4 or moregallons into bucket to clear the water filter
• This water line installation is not warranted by the refrigerator or icemaker manufacturer. Follow theseinstructions carefully to minimize the risk of expensive water damage.
• Banging pipes (water banging in the pipes) in house plumbing can cause damage to refrigerator parts andlead to water leakage or flooding. Call a qualified plumber to correct the problem before installing the watersupply line to the refrigerator.
• To prevent burns and product damage, do not hook up the water line to the hot water line.• Do not install the icemaker tubing in areas where temperatures fall below freezing.• When using any electrical device (such as a power drill) during installation, be sure the device is insulated or
wired in a manner to prevent electric shock.• All installations must be in a accordance with local plumbing code requirements.
- Slip the compression nut through the plastic tube.- After inserting the compression nut into plastic tube,
tighten the compres-sion nut onto 1/4” compressionfitting(union).
- You can purchase the necessary parts through BEST BUY.- Waterline must be connected to drinkable water only- Compression fitting and nut will be given inside of ice bucket.
NOTE
Do not overtighten the compression nut.NOTE
- Slip the compression ferrule and nut on copper(or plastic) tubingas shown.After inserting the sleeve, tighten the comperssion nut onto thecom-pression fitting(union).
- Turn water on and check for any leakege.
CompressionNut
Sleeve
Compressionfitting
Ferrule
CompressionNut
1. Cold Water line2. Pipe Clamp.3.Copper (or Plastic) line4.Compression Nut5.Compression Sleeve6.Shut Off Valve7.Packing Nut.
Before You Install the water line
Connecting to water supply line
Connect the water line to the refrigerator
14
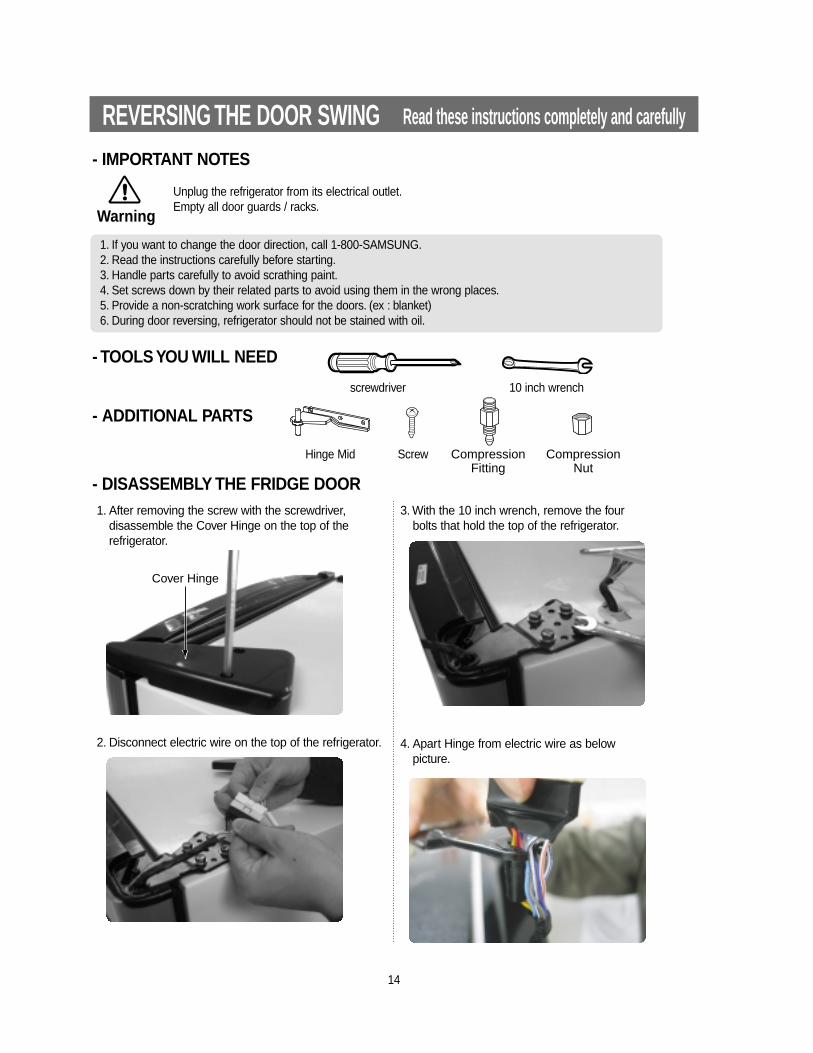
REVERSING THE DOOR SWING Read these instructions completely and carefully
- IMPORTANT NOTES
- TOOLS YOU WILL NEED
- DISASSEMBLY THE FRIDGE DOOR
Unplug the refrigerator from its electrical outlet.Empty all door guards / racks.
1. After removing the screw with the screwdriver,disassemble the Cover Hinge on the top of therefrigerator.
3. With the 10 inch wrench, remove the fourbolts that hold the top of the refrigerator.
2. Disconnect electric wire on the top of the refrigerator.
Warning
1. If you want to change the door direction, call 1-800-SAMSUNG.2. Read the instructions carefully before starting.3. Handle parts carefully to avoid scrathing paint.4. Set screws down by their related parts to avoid using them in the wrong places.5. Provide a non-scratching work surface for the doors. (ex : blanket)6. During door reversing, refrigerator should not be stained with oil.
screwdriver 10 inch wrench
- ADDITIONAL PARTS
Hinge Mid Screw CompressionFitting
CompressionNut
Cover Hinge
4. Apart Hinge from electric wire as belowpicture.

15
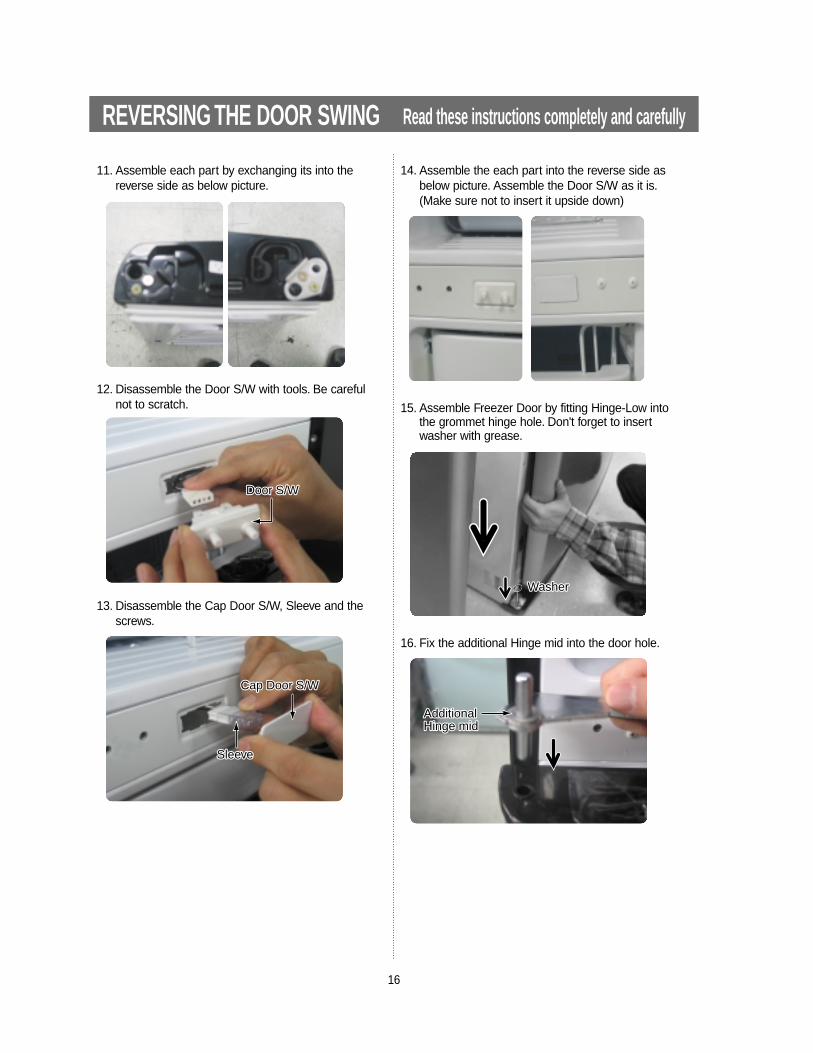
REVERSING THE DOOR SWING Read these instructions completely and carefully
- ASSEMBLY OF FREEZER DOOR
6. After removing the screw and two bolts,disassemble Hinge Mid.
9. Assemble each part by exchanging its intothe reverse side.
7. Disassemble the Freezer Door by lifting it upward.Be careful not to drop and scratch the Freezerdoor.
10. After removing the left and right sidescrews, disassemble the Grommet, StopperDoor and Stopper-Mid of the right bottom offreezer-door.
8. After removing the screw, disassemble theCover Hinge and the Hinge as below picture.
5. Disassemble the fridge door by lifting it upward.Be careful not to drop and scratch the fridge door.
Hinge MidHinge Mid
Cover HingeCover Hinge
HingeHinge
Stopper MidStopper Mid
Stopper DoorStopper Door
GrommetGrommet
- DISASSEMBLY OF FREEZER DOOR
16
REVERSING THE DOOR SWING Read these instructions completely and carefully
12. Disassemble the Door S/W with tools. Be carefulnot to scratch.
14. Assemble the each part into the reverse side asbelow picture. Assemble the Door S/W as it is.(Make sure not to insert it upside down)
15. Assemble Freezer Door by fitting Hinge-Low intothe grommet hinge hole. Don't forget to insertwasher with grease.
16. Fix the additional Hinge mid into the door hole.
Door S/WDoor S/W
13. Disassemble the Cap Door S/W, Sleeve and thescrews.
Cap Door S/WCap Door S/W
SleeveSleeve
WasherWasher
AdditionalHinge midAdditionalHinge mid
11. Assemble each part by exchanging its into thereverse side as below picture.

17
- ASSEMBLY OF FRIDGE DOOR
18. Confirm openning and closing of the door.
19. After removing the screws, disassemblethe Stopper Door and Grommet.
20. Assemble each part by exchanging itsinto the reverse side as below picture.
REVERSING THE DOOR SWING Read these instructions completely and carefully
22. After removing the screw, dissemble theCover-Cap Door and Cover Hinge.
Cover HingeCover Hinge
Cover Cap DoorCover Cap Door
17. Assemble the assembled hinge and door to therefrigerator as below picture. Don't forget to insertwasher with grease.
WasherWasher
GrommetGrommet
Stopper DoorStopper Door
21. Fit the fridge door into the fixed hinge mid.

18
REVERSING THE DOOR SWING Read these instructions completely and carefully
25. Assembling Hinge on the top of therefrigerator with the bolts. And then connectthe electric wire.
23. After disassembling Grommet and Cap wire atthe left side, assemble them into the right side.
26. Assemble the Cover Hinge with thescrews as below picture.
27. Finally, confirm openning and closing ofthe fridge door.
24. Assemble the parts to the reverse side.Electric wires must be sealed in covers.
After door reversing, it is necessary to check and
adjust the gasket whether it is entirely contact the
cabinet or not.
GrommetGrommet Cap wireCap wireCover HingeCover Hinge

19
USAGE PRECAUTIONS
PROBLEMS AND SOLUTIONS
• Please note that this noise is caused by the refrigerant circuit and is not a problem.
You can hear a liquid bubbling in the appliance
• Do not wrap food with paper.• Store foods covered and clean the cold inlet.
There is a bad smell inside the appliance
• Space the food out as much as possible to improveventilation.• Is the door fully closed?
There is a layer of frost on the surface of storedfood.
• Food with a high water content is stored uncoveredwith a high humidity level or the door has been leftopen for a long time.
• Store the food with a cover or in sealed containers.
Condensation forms on the inside wall of the applianceand around vegetables
• Check that the power plug is correctly connected.• Is the temperature control on the front panel correctly
set?• Does the sun shine on the appliance or are there heat
sources nearby?• Is the back of the appliance too close to the wall?
The appliance is not operating at all or thetemperature is too high
• Is the temperature control on the front panel set to thecoldest temperature 34°F?
• Is the surrounding temperature too low?• Did you put food with a high water content in the
fridge?
The food in the fridge is frozen
• Check that the appliance is installed on a stable,leveled floor.
• Is the back of the appliance too close to the wall?• Have any foreign objects fallen behind or under the
appliance?• Is the noise coming from the compressor in the
appliance? Call 1-800-SAMSUNG• A ticking sound may be heard inside the appliance; this
is normal. This sound occurs when the variousaccessories contract or expand.
There are unusual noises
• Heat-proof pipes are installed in the front corners ofthe appliance to prevent condensation from forming.When the surrounding temperature rises, this may notalways be effective. However, this is not abnormal.
• In very humid weather, condensation may form on theouter surface of the appliance when moisture in the aircomes into contact with the cool surface of theappliance.
The front corners and sides of the appliance arewarm and condensation starts to form
Store food with a high water content at the front ofa refrigerator shelf.
• If you store cold food, you save on electricity andimprove refrigeration.
Do not store hot food in the appliance until it hascooled.
Power Saving Tips
• Install the appliance in a cool, dry room with adequate ventilation.Ensure that it is not exposed to direct sunlight and never put it near a direct source of heat (radiator, for example).
• Never block any vents or grilles on the appliance.• Allow warm food to cool down before placing it in the appliance.• Put frozen food in the refrigerator to thaw.
You can then use the low temperatures of the frozen products to cool food in the refrigerator.• Defrost the freezer when ice builds up. A thick coat of ice will impair the transfer of cold to the frozen products, thereby
increasing power consumption.• Do not keep the door of the appliance open for too long when putting food in or taking food out.
The shorter time the door is opened, the less ice will form in the freezer.• When freezing food or storing it in the freezer, place the food directly on the freezer elements in the top container.
Tips
20
LIMITED WARRANTY TO ORIGINAL PURCHASER
SAMSUNG REFRIGERATOR(18 Cubic Feet and Larger Capacity)
This SAMSUNG brand product, as supplied and distributed by Samsung Electronics America, Inc. (SAMSUNG) and delivered new, in the original carton to the original consumer purchaser, is warranted by SAMSUNG against manufacturing defects in materials and workmanship for a limited warranty period of:
One (1) Year Parts and Labor on RefrigeratorFive (5) Years Parts and Labor on Sealed Refrigeration System Only*
(*Compressor, evaporator, condenser, drier, connecting tubing)
This limited warranty begins on the original date of purchase, and is valid only on products purchased and used in the United States. To receive warranty service, the purchaser must contact SAMSUNG for problem determination and service procedures.Warranty service can only be performed by a SAMSUNG authorized service center. The original dated bill of sale must be presented upon request as proof of purchase to SAMSUNG or SAMSUNG's authorized service center.
SAMSUNG will repair or replace any part found to be defective, at our option and at no charge as stipulated herein, with new or reconditioned parts during the limited warranty period specified above. All replaced parts and products become the property of SAMSUNG and must be returned to SAMSUNG. Replacement parts and products assume the remaining original warranty, or ninety (90) days, whichever is longer.
In-home service will be provided during the warranty labor period subject to availability within the contiguous United States. In-home service is not available in all areas. To receive in-home service, the product must be unobstructed and accessible from floor level to service personnel. If during in-home service repair cannot be completed, it may be necessary to remove, repair and return the product. If in-home service is unavailable, SAMSUNG may elect, at our option, to provide for transportation of our choice to and from a SAMSUNG authorized service center. Otherwise, transportation to and from the SAMSUNG authorized service center is the responsibility of the purchaser.
This limited warranty covers manufacturing defects in materials and workmanship encountered in normal, noncommercial use of this product, and shall not apply to the following, including, but not limited to: damage which occurs in shipment; delivery and installation; applications and uses for which this product was not intended; altered product or serial numbers; cosmetic damage or exterior finish; accidents, abuse, neglect, fire, water, lightning or other acts of nature; use of products, equipment, systems, utilities, services, parts, supplies, accessories, applications, installations, repairs, external plumbing and leaks, external wiring, circuit breakers, fuses or connectors not supplied and authorized by SAMSUNG, or which damage this product or result in service problems; incorrect electrical line voltage, fluctuations and surges; customer adjustments and failure to follow operating instructions, cleaning, maintenance and environmental instructions that are covered and prescribed in the instruction book; loss of food due to spoilage; consumable items including filters and light bulbs.
THERE ARE NO EXPRESS WARRANTIES OTHER THAN THOSE LISTED AND DESCRIBED ABOVE, AND NO WARRANTIES WHETHER EXPRESS OR IMPLIED, INCLUDING, BUT NOT LIMITED TO, ANY IMPLIED WARRANTIES OF MERCHANTABILITY OR FITNESS FOR A PARTICULAR PURPOSE, SHALL APPLY AFTER THE EXPRESS WARRANTY PERIODS STATED ABOVE, AND NO OTHER EXPRESS WARRANTY OR GUARANTY GIVEN BY ANY PERSON, FIRM OR CORPORATION WITH RESPECT TO THIS PRODUCT SHALL BE BINDING ON SAMSUNG. SAMSUNG SHALL NOT BE LIABLE FOR LOSS OF REVENUE OR PROFITS, FAILURE TO REALIZE SAVINGS OR OTHER BENEFITS, OR ANY OTHER SPECIAL, INCIDENTAL OR CONSEQUENTIAL DAMAGES CAUSED BY THE USE, MISUSE OR INABILITY TO USE THIS PRODUCT, REGARDLESS OF THE LEGAL THEORY ON WHICH THE CLAIM IS BASED, AND EVEN IF SAMSUNG HAS BEEN ADVISED OF THE POSSIBILITY OF SUCH DAMAGES. NOR SHALL RECOVERY OF ANY KIND AGAINST SAMSUNG BE GREATER IN AMOUNT THAN THE PURCHASE PRICE OF THE PRODUCT SOLD BY SAMSUNG AND CAUSING THE ALLEGED DAMAGE. WITHOUT LIMITING THE FOREGOING, PURCHASER ASSUMES ALL RISK AND LIABILITY FOR LOSS, DAMAGE OR INJURY TO PURCHASER AND PURCHASER’S PROPERTY AND TO OTHERS AND THEIR PROPERTY ARISING OUT OF THE USE, MISUSE OR INABILITY TO USE THIS PRODUCT SOLD BY SAMSUNG NOT CAUSED DIRECTLY BY THE NEGLIGENCE OF SAMSUNG. THIS LIMITED WARRANTY SHALL NOT EXTEND TO ANYONE OTHER THAN THE ORIGINAL PURCHASER OF THIS PRODUCT, IS NONTRANSFERABLE AND STATES YOUR EXCLUSIVE REMEDY.
Some states do not allow limitations on how long an implied warranty lasts, or the exclusion or limitation of incidental or consequential damages, so the above limitations or exclusions may not apply to you. This warranty gives you specific legal rights, and you may also have other rights, which vary from state to state.
To obtain warranty service, please contact SAMSUNG at:
SAMSUNG CUSTOMER CARE CENTER400 Valley Road, Suite 201, Mt. Arlington, NJ 07856
1-800-SAMSUNG (1-800-726-7864) and www.samsung.com 061002

MEMO

MEMO

MEMO

ADDRESS : SAMSUNG ELECTRONICS AMERICA, INC.SERVICE DIVISION400 VALLEY ROAD, SUITE 201, MT. ARLINGTON, NJ 078561-800-SAMSUNG(1-800-726-7864)