registering bi applications data sources in biacm
TRANSCRIPT
Registering BI Applications Data Sources
BI Applications 11.1.1.7.1 introduced a number of changes; adding new components and processes and enhancing
others. As a result many customers and partners are re-learning how to install, configure and manage the application
and naturally a number of questions have arisen. This post walks through the steps of registering a source
application system in BI Applications, and then looks a little deeper into what has actually been setup behind the
scenes and how to troubleshoot those connections.
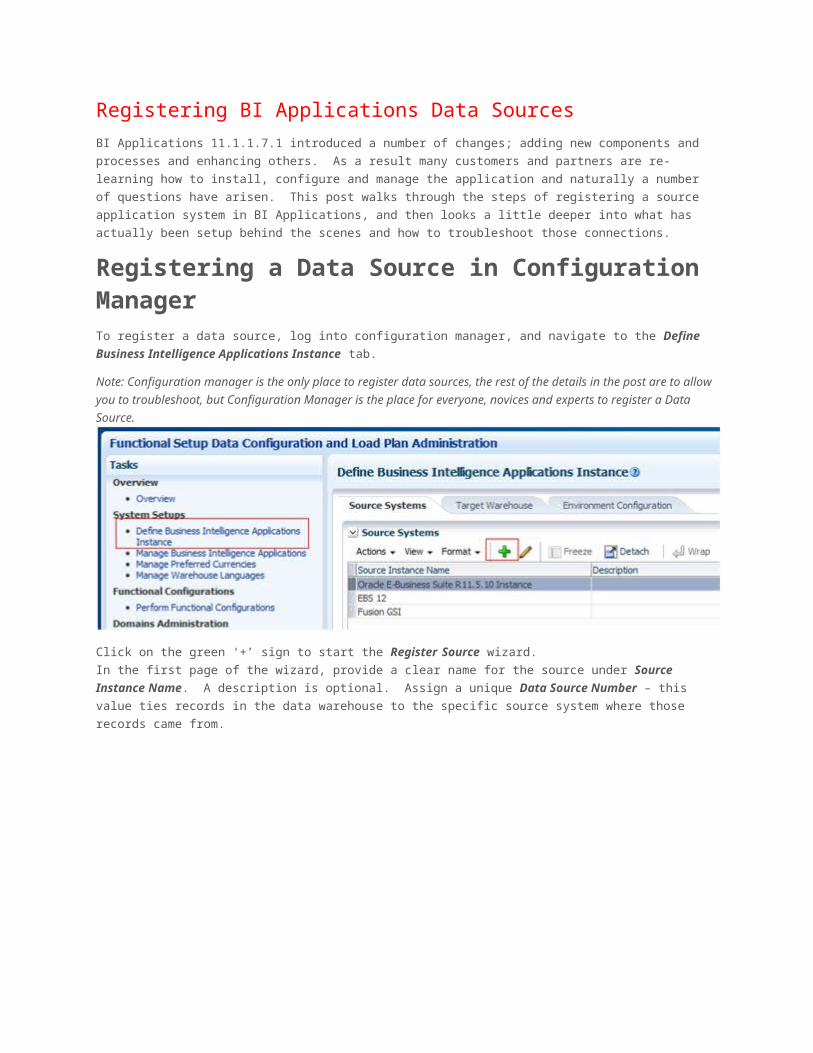
Registering a Data Source in Configuration ManagerTo register a data source, log into configuration manager, and navigate to the Define Business Intelligence
Applications Instance tab.
Note: Configuration manager is the only place to register data sources, the rest of the details in the post are to allow
you to troubleshoot, but Configuration Manager is the place for everyone, novices and experts to register a Data
Source.
Click on the green ‘+’ sign to start the Register Source wizard.
In the first page of the wizard, provide a clear name for the source under Source Instance Name. A description is
optional. Assign a unique Data Source Number – this value ties records in the data warehouse to the specific
source system where those records came from.
In the second page of the wizard the physical connections for the source are setup. Each source system has both a
relational and a flat file technology associated with it. Most ETL tasks extract from the source database but several
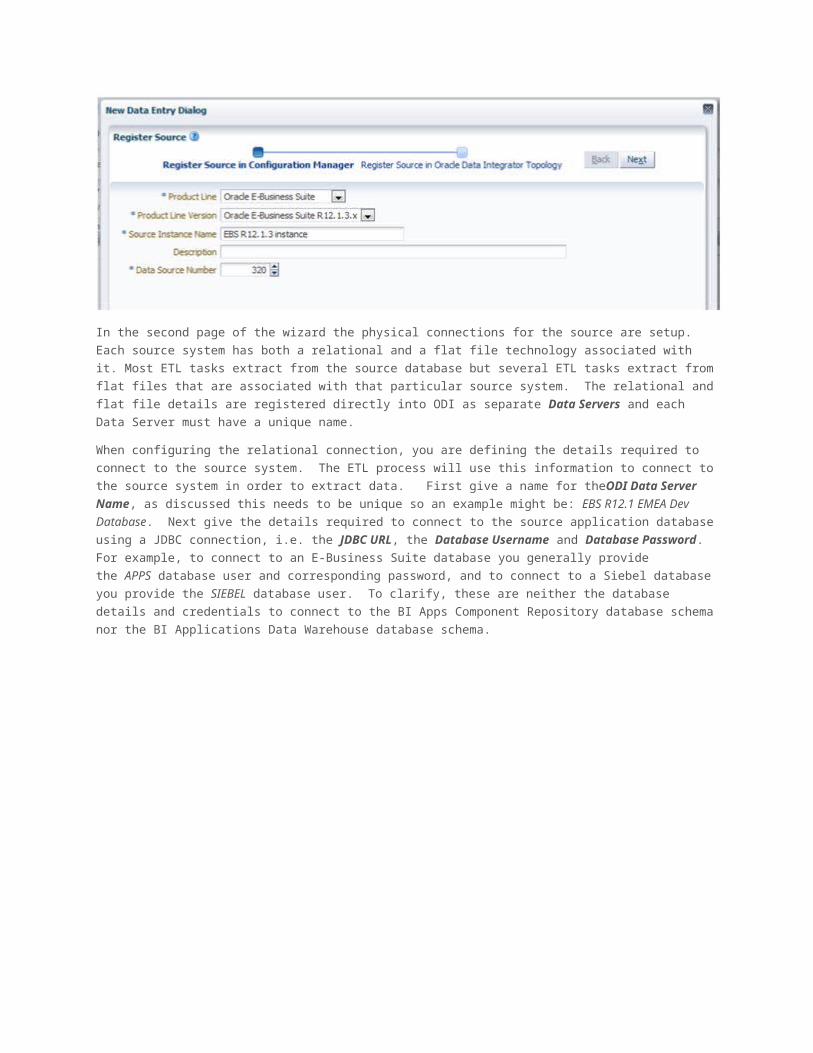
ETL tasks extract from flat files that are associated with that particular source system. The relational and flat file
details are registered directly into ODI as separate Data Servers and each Data Server must have a unique name.
When configuring the relational connection, you are defining the details required to connect to the source system.
The ETL process will use this information to connect to the source system in order to extract data. First give a name
for theODI Data Server Name, as discussed this needs to be unique so an example might be: EBS R12.1 EMEA
Dev Database. Next give the details required to connect to the source application database using a JDBC
connection, i.e. the JDBC URL, the Database Username and Database Password. For example, to connect to an
E-Business Suite database you generally provide the APPS database user and corresponding password, and to
connect to a Siebel database you provide the SIEBEL database user. To clarify, these are neither the database
details and credentials to connect to the BI Apps Component Repository database schema nor the BI Applications
Data Warehouse database schema.
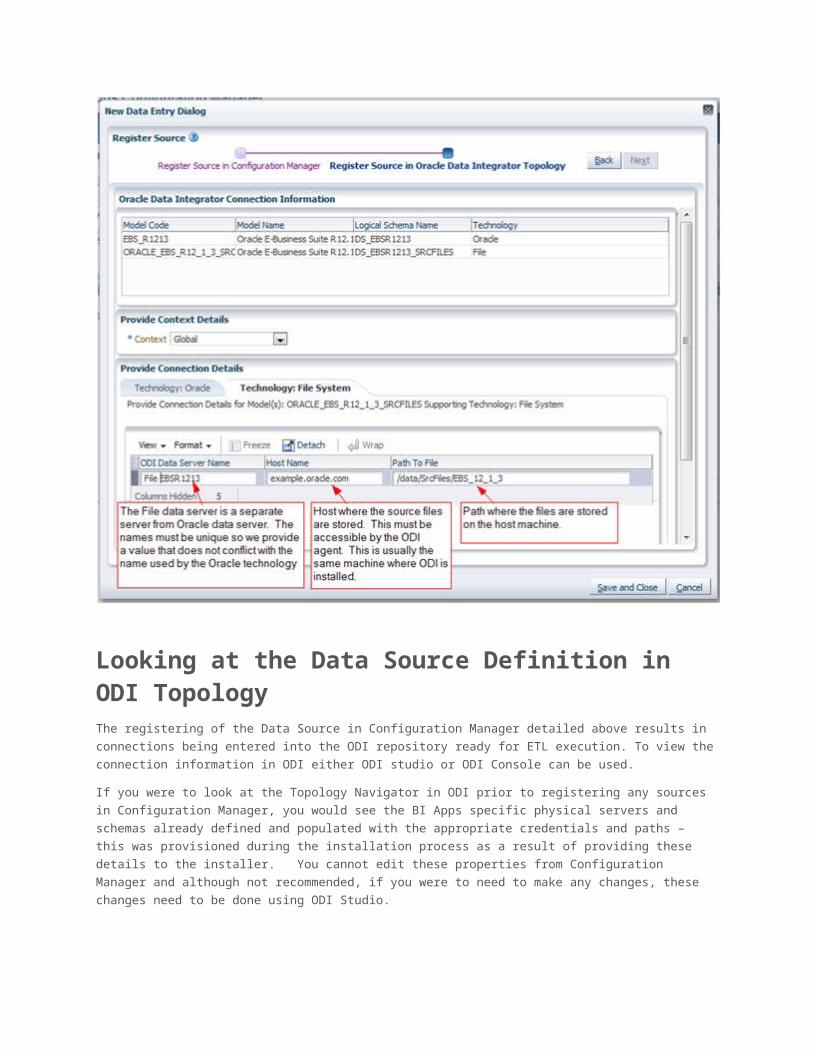
You must also define the details for the Flat File connection. A value for the ODI Data Server Name must be
provided, this must be distinct from the the relational connection an example for this connection might be: EBS R12.1
EMEA Dev Source Files. The Host Name is the machine where the flat files are stored – this host must be
accessible by the ODI agent. This is generally the same machine where ODI Agent is deployed or a network path
accessible from that machine. Path to file is a relative or absolute path to the location where the files associated
with the source system can be found. Each source system needs to have its own dedicated subfolder under the
SrcFiles folder.

Looking at the Data Source Definition in ODI TopologyThe registering of the Data Source in Configuration Manager detailed above results in connections being entered into
the ODI repository ready for ETL execution. To view the connection information in ODI either ODI studio or ODI
Console can be used.
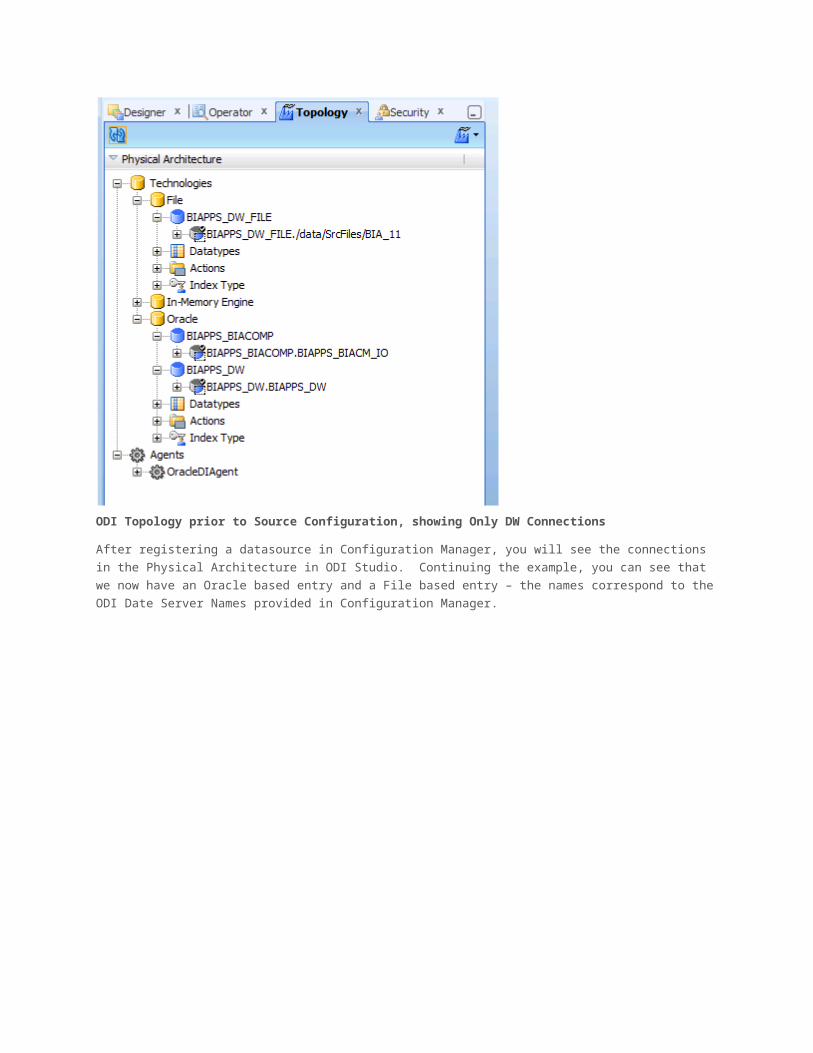
If you were to look at the Topology Navigator in ODI prior to registering any sources in Configuration Manager, you
would see the BI Apps specific physical servers and schemas already defined and populated with the appropriate
credentials and paths – this was provisioned during the installation process as a result of providing these details to
the installer. You cannot edit these properties from Configuration Manager and although not recommended, if you
were to need to make any changes, these changes need to be done using ODI Studio.
ODI Topology prior to Source Configuration, showing Only DW Connections
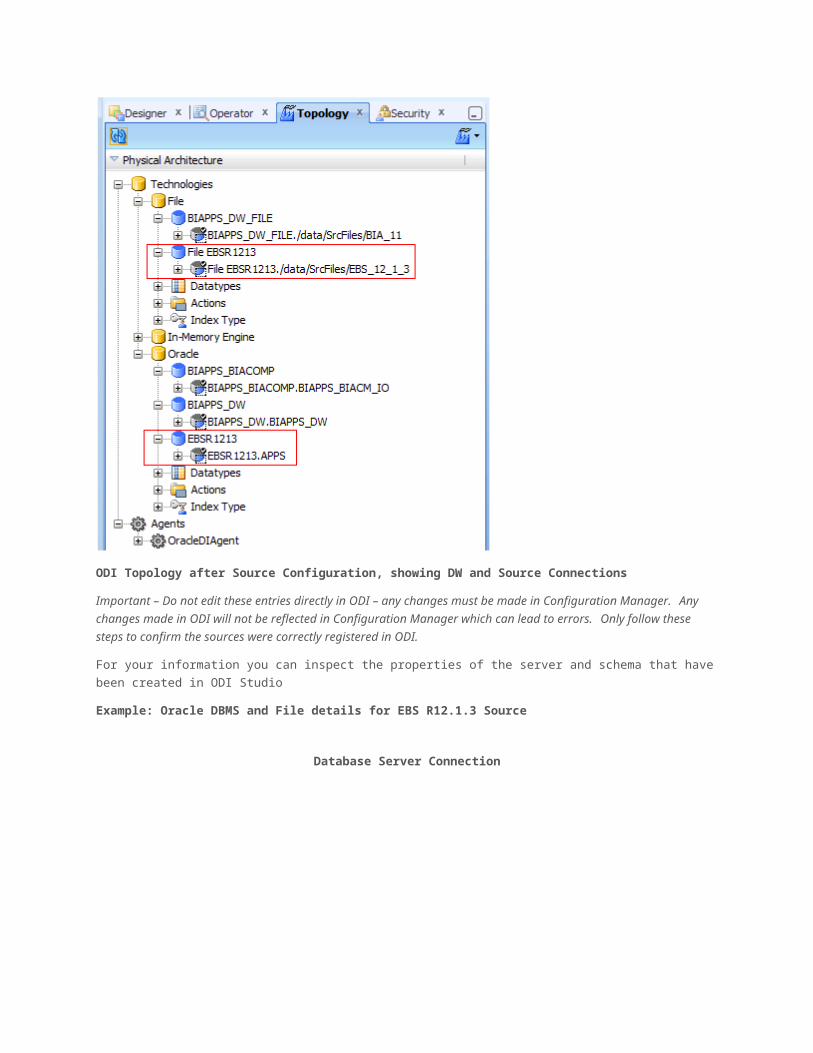
After registering a datasource in Configuration Manager, you will see the connections in the Physical Architecture in
ODI Studio. Continuing the example, you can see that we now have an Oracle based entry and a File based entry –
the names correspond to the ODI Date Server Names provided in Configuration Manager.
ODI Topology after Source Configuration, showing DW and Source Connections
Important – Do not edit these entries directly in ODI – any changes must be made in Configuration Manager. Any
changes made in ODI will not be reflected in Configuration Manager which can lead to errors. Only follow these
steps to confirm the sources were correctly registered in ODI.
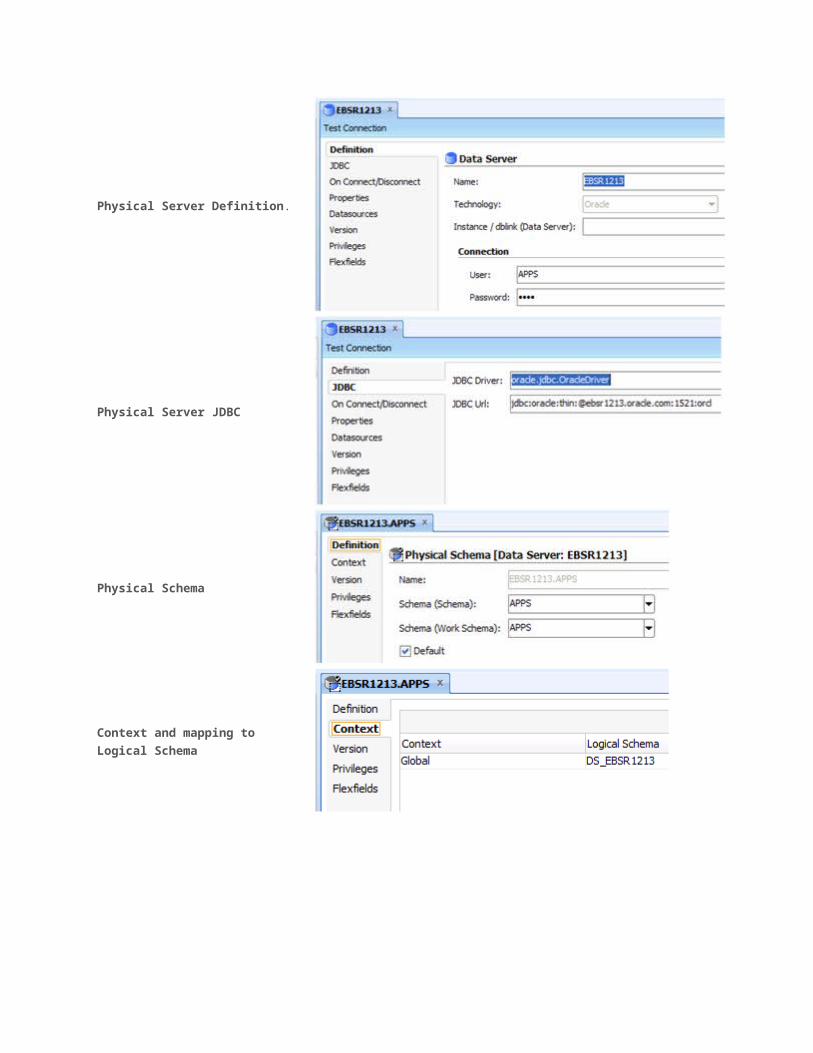
For your information you can inspect the properties of the server and schema that have been created in ODI Studio
Example: Oracle DBMS and File details for EBS R12.1.3 Source
Database Server Connection
Physical Server Definition.
Physical Server JDBC
Physical Schema
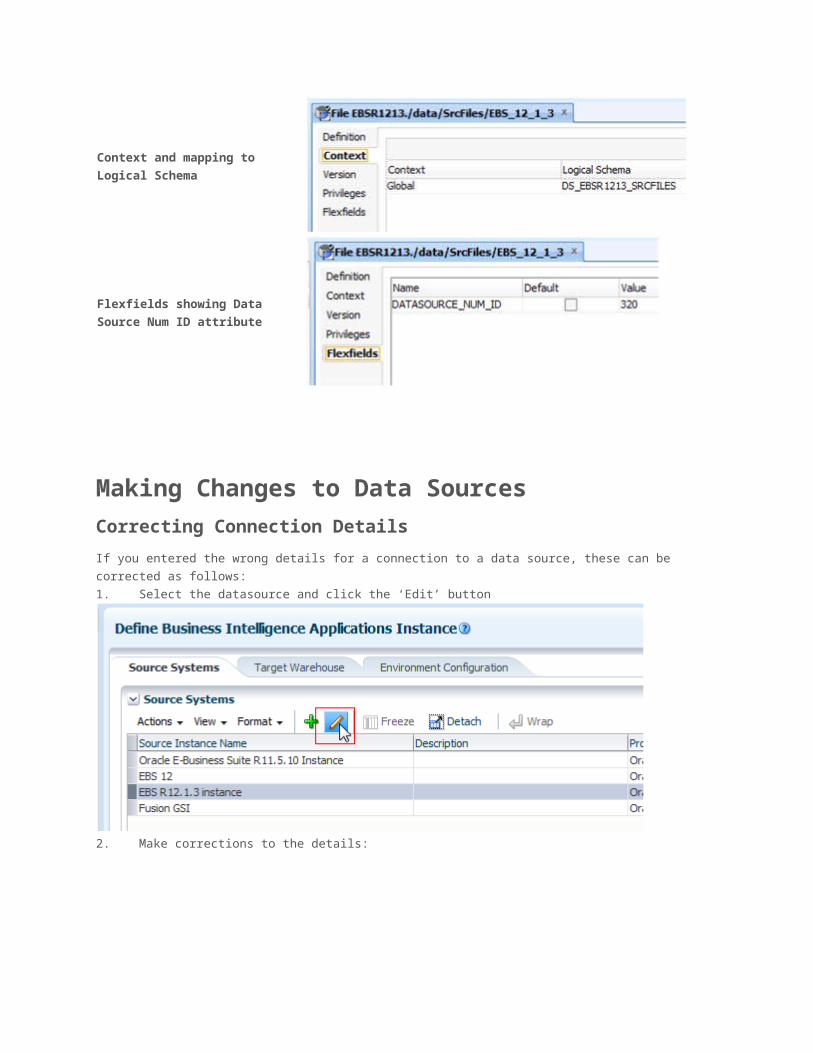
Context and mapping to Logical
Schema
Flexfields showing Data Source Num
ID attribute
File Server Connection
Physical Server Definition.
Physical Server JDBC
Physical Schema
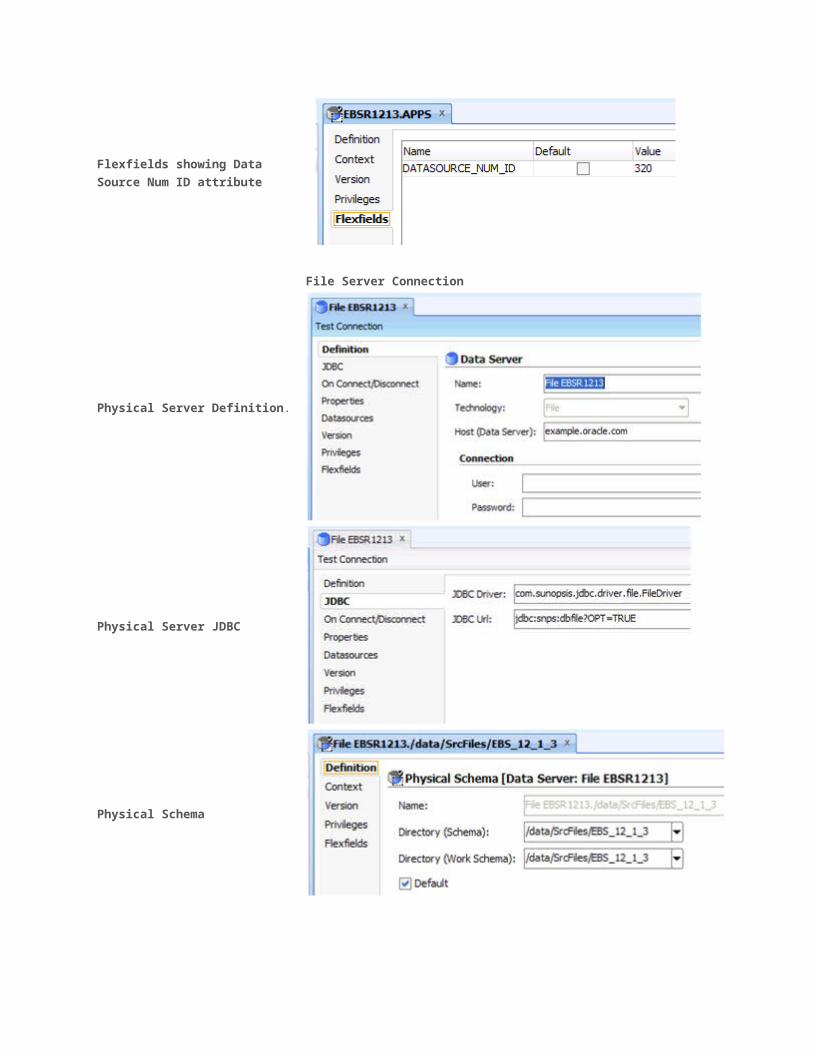
Context and mapping to Logical
Schema
Flexfields showing Data Source
Num ID attribute
Making Changes to Data Sources Correcting Connection Details
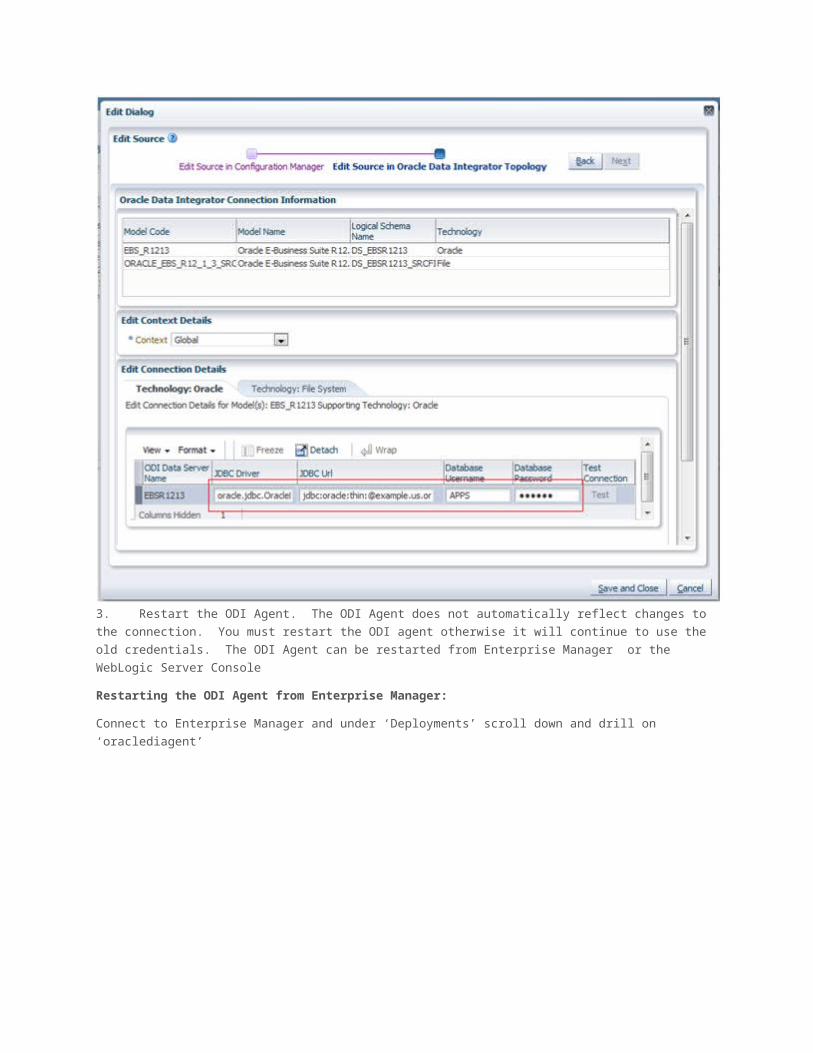
If you entered the wrong details for a connection to a data source, these can be corrected as follows:
1. Select the datasource and click the ‘Edit’ button
2. Make corrections to the details:
3. Restart the ODI Agent. The ODI Agent does not automatically reflect changes to the connection. You must
restart the ODI agent otherwise it will continue to use the old credentials. The ODI Agent can be restarted from
Enterprise Manager or the WebLogic Server Console
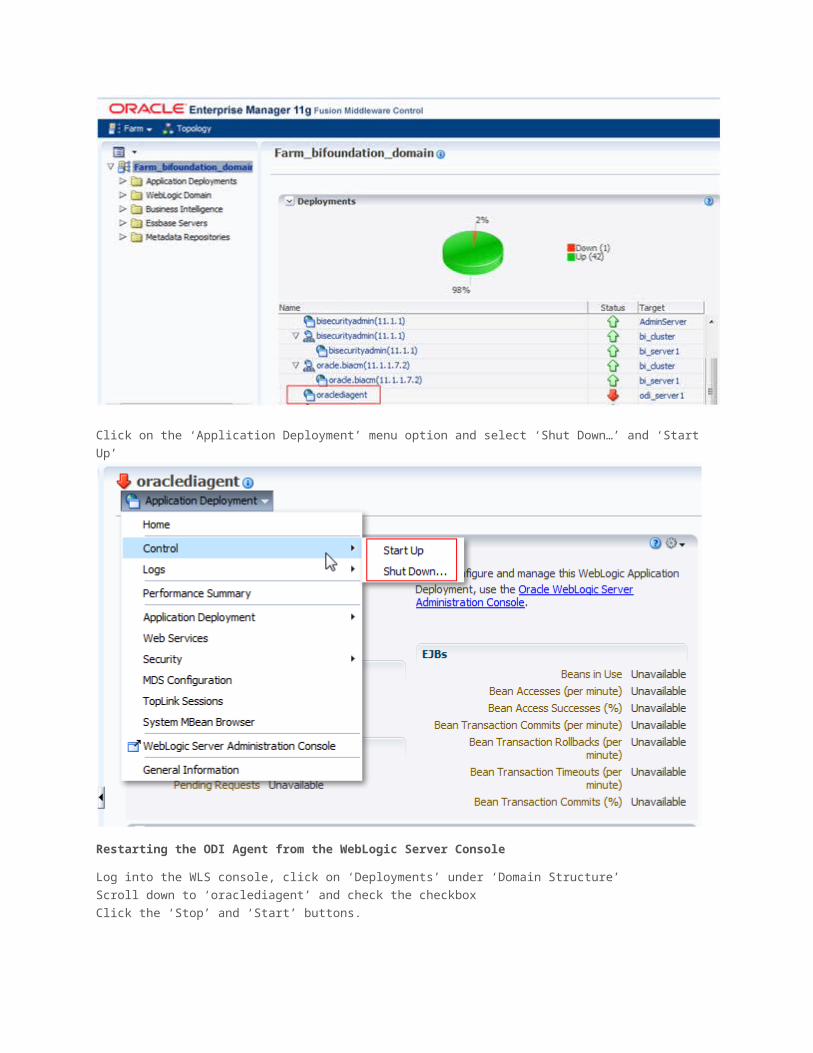
Restarting the ODI Agent from Enterprise Manager:
Connect to Enterprise Manager and under ‘Deployments’ scroll down and drill on ‘oraclediagent’
Click on the ‘Application Deployment’ menu option and select ‘Shut Down…’ and ‘Start Up’
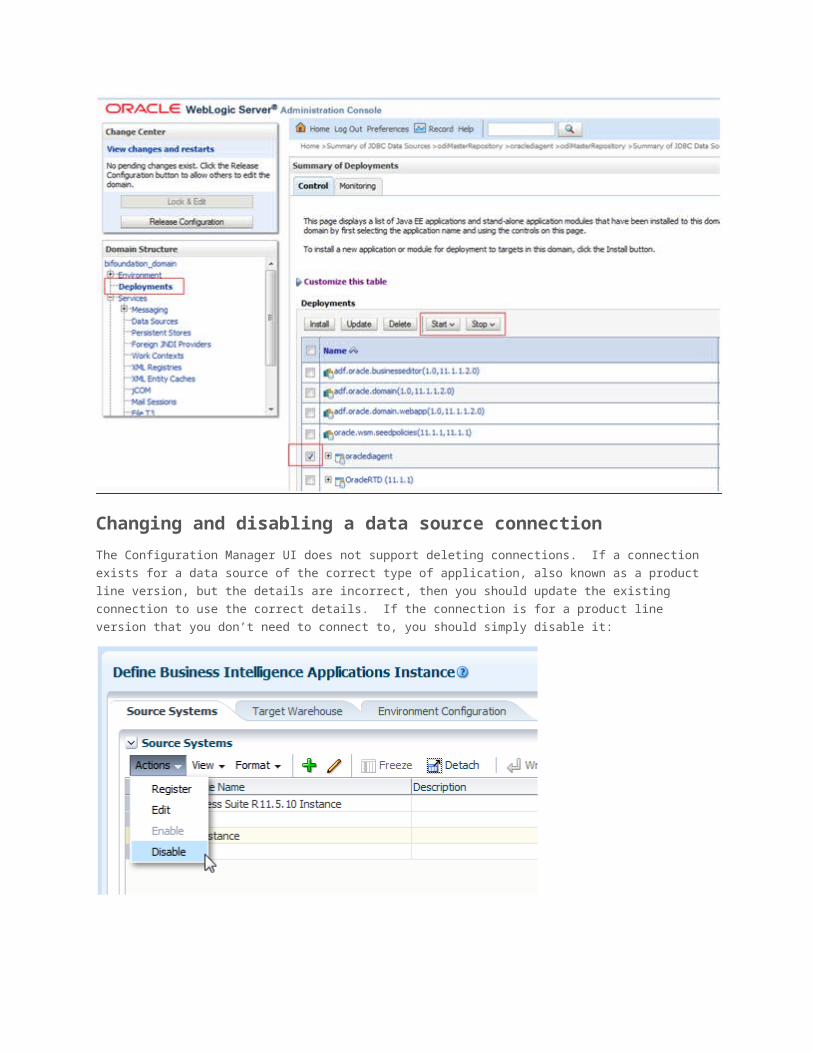
Restarting the ODI Agent from the WebLogic Server Console
Log into the WLS console, click on ‘Deployments’ under ‘Domain Structure’
Scroll down to ‘oraclediagent’ and check the checkbox
Click the ‘Stop’ and ‘Start’ buttons.
Changing and disabling a data source connection
The Configuration Manager UI does not support deleting connections. If a connection exists for a data source of the
correct type of application, also known as a product line version, but the details are incorrect, then you should update
the existing connection to use the correct details. If the connection is for a product line version that you don’t need to
connect to, you should simply disable it:
Using a ‘Read-Only’ or other alternate user to access the OLTP tables
When registering a source in BIACM, we assume the database user defined is the owner of the OLTP tables or at
least the user’s schema is populated with objects that can be selected from. ODI will generate SQL in the form:
SELECT … FROM <Database User Defined in BIACM>.TABLE
If you define a read-only user that has select privileges on the OLTP tables but there are no objects in this user’s
schema, the SQL will fail with ‘Table or View not found’ errors. You must populate this user’s schema with objects
that can be selected from – either replicas of the actual tables that are populated with data else with synonyms or
views that point to the actual tables in the base schema. Otherwise, you must go into the ODI Studio and update the
physical schema under the OLTP data server definition and provide the schema name where the tables can be
found. This will allow ODI to log on with the alternate ETL user but generate SQL in the following form:
SELECT … FROM <Base Schema>.TABLE
A future blog article will provide more information on how to configure an alternate ETL user. The most important
thing to be aware of is that in some cases, ETL tasks may execute packages or procedures on the OLTP database
(this is most commonly done when extracting from an Oracle eBusiness Suite database) – you must be sure to grant
Execute privileges on these to your ETL user.