regular usb device electrical compliance test …testusb.com/moi/usb20 typec device electrical moi...
TRANSCRIPT
P a g e | 1
USB2.0 Type-C™ &
Regular USB Device Electrical
Compliance test procedure Version 0.87 – 6 August 2017

P a g e | 2
Contents 1. Reference....................................................................................................................... 3
2. Background .................................................................................................................... 3
3. Required equipment and software .................................................................................. 5
3.1 Oscilloscope, Software, and Accessories ................................................................ 5
3.2 High-Speed Electrical Test Bed Computer USBHSET ............................................. 5
3.3 USB 2.0 Test fixtures .............................................................................................. 6
3.3.1 USB 2.0 Device with standard USB connector ................................................. 6
3.3.2 USB 2.0 Device with Type-C™ connector ........................................................ 6
3.4 USB Cables............................................................................................................. 7
3.5 Miscellaneous Cables and Devices ......................................................................... 7
4. Test procedure ............................................................................................................... 8
4.1 Device High Speed Signal Quality ........................................................................... 8
4.1.1 Equipment Used ............................................................................................... 8
4.1.2 Setup Diagram if DUT has Type-C™ receptacle and is self-powered ............... 9
4.1.3 Setup Diagram for other Type-C™ devices .....................................................10
4.1.4 Test Instructions ..............................................................................................11
4.2 Device Test J/K, SE0NAK ......................................................................................13
4.2.1 Equipment Used ..............................................................................................13
4.2.2 Setup Diagram ................................................................................................13
4.2.3 Test Instructions ..............................................................................................14
4.3 Device Packet Parameters .....................................................................................18
4.3.1 Equipment Used ..............................................................................................18
4.3.2 Setup Diagram ................................................................................................18
4.3.3 Test Instructions ..............................................................................................19
4.4 Device CHIRP Timing ............................................................................................22
4.4.1 Equipment Used ..............................................................................................22
4.4.2 Setup Diagram ................................................................................................22
4.4.3 Test Instructions ..............................................................................................23
4.5 Device Suspend/Resume/Reset Timing .................................................................25
4.5.1 Equipment Used ..............................................................................................25
4.5.2 Setup Diagram ................................................................................................25
4.5.3 Test Instructions ..............................................................................................26
4.6 Device Receiver Sensitivity ....................................................................................31
4.6.1 Equipment Used ..............................................................................................31
4.6.2 Setup Diagram ................................................................................................31

P a g e | 3
4.7 Upstream Full Speed Signal Quality Test ...............................................................32
4.7.1 Equipment Used ..............................................................................................32
4.7.2 Setup Diagram ................................................................................................33
4.7.3 Test Instructions ..............................................................................................34
4.8 Low Speed Signal Quality Test ..............................................................................36
4.8.1 Equipment Used ..............................................................................................36
4.8.2 Setup Diagram ................................................................................................36
4.8.3 Test Instructions ..............................................................................................37
4.9 Inrush Current ........................................................................................................39
4.9.1 Equipment Used ..............................................................................................39
4.9.2 Setup Diagram ................................................................................................40
4.9.3 Test Instructions ..............................................................................................40
4.10 Back Voltage ..........................................................................................................42
4.10.1 Equipment Used ..............................................................................................42
4.10.2 Test Instructions ..............................................................................................42
1. Reference
Standard Description Revision Status
USB 2.0 Spec USB 2.0 Specification with ECN 2.0 Released
USB 2.0 Electrical
Test Specification
1.06 Released
2. Background
USB 2.0 Compliance Committee under the direction of USB-IF, Inc develops the USB-IF High-speed
Electrical Test Procedures. This document covers the method of measuring the USB 2.0 electrical
tests for devices. Hub, Host and Embedded Host are covered in another document.
The High-speed Electrical Compliance Test Procedures verify the electrical requirements of high-
speed USB operation of these devices designed to the USB 2.0 specification. In addition to passing
the high-speed test requirements, high-speed capable device must also complete and pass the
applicable legacy compliance tests identified in this document.
The document covers only the USB 2.0 electrical tests but are applicable for all devices including USB
2.0 Full/Low/High Speed Device. But also, USB 3.1 Super Speed (5Gb or 10Gb) devices, since they
need to be backward compatible with USB 2.0.

P a g e | 4

P a g e | 5
3. Required equipment and software 3.1 Oscilloscope, Software, and Accessories
Check with scope vendor.
3.2 High-Speed Electrical Test Bed Computer USBHSET
In order to perform USB 2.0 High Speed electrical tests a High Speed product must support test
modes as defined in section 7.1.20 of the USB 2.0 specification.
To activate a test mode, the USB 2.0 Specification defines the SetFeature() command as the desired
interface. The USB-IF offers for free a High Speed electrical Test Tool (USBHSET) which is Windows
based, to activate the various test modes and operations.
The high-speed electrical test bed computer hosts a USB 2.0 compliance host controller for hi-speed
hub or device electrical test, or serves as a test bed host for a USB 2.0 host controller under test. For
instructions on configuring this computer, refer to the High-Speed Electrical Test Toolkit Setup
Instruction document which comes with the High-Speed Electrical Test Tool Kit software. You can
download the High-Speed Electrical Test Tool Kit software (USBHSET) from the developers tools page
at the USB Implementers Forum web site, http://www.usb.org/developers/tools
The High-Speed Electrical Test Tool Kit software contains a proprietary EHCI or xHCI driver stack. The
Hi-speed Electrical Test Tool software requires the use of a proprietary EHCI or xHCI driver stack. The
use of this proprietary EHCI or xHCI driver stack facilitates the electrical testing that requires direct
control of the command registers of the USB EHCI host controllers. The end result much more robust
test bed environment. Since the proprietary EHCI or xHCI driver stack is designed for debug and test
validation purposes, this driver stack does not support the normal functionality as found in the EHCI
or xHCI drivers from Microsoft (or the device vendor). An automatic driver stack switching function
has been implemented into the Hi-speed Electrical Test Tool for easy switching between the
proprietary EHCI or xHCI driver stack and that from Microsoft. Upon invocation of the HS Electrical
Test Tool software, the driver stack will automatically switch to the Intel proprietary EHCI or xHCI
driver stack. Upon exit of the HS Electrical Test Tool software, the driver stack will automatically
switch to the Microsoft EHCI or xHCI driver stack.
USBHSET XHCI
Is used for USB 3.1 host controllers
USBHSET EHCI
Is used for USB 2.0 host controllers

P a g e | 6
3.3 USB 2.0 Test fixtures
3.3.1 USB 2.0 Device with standard USB connector
Devices with Standard-B; Mini-B; Micro-B and A-plug with captive cable are considered being devices
with standard USB connector.
The USB-IF High Speed fixture only require connecting SMA cables that are connected directly to the
scope. Do note that the USB-IF fixture is only able in measuring the High Speed Eye diagram and
therefore it is still required to use the TestUSB FS-HUCR for the remaining high speed electrical tests.
The USB-IF fixtures can be purchased via the USB-IF eStore at:
http://www.usb.org/developers/estoreinfo/
Test fixture Description Part number High-Speed
Device
Full/Low Speed
Device
High Speed USB-IF Device Eye diagram fixture USB-IF
Device test Fixture
1 n/a
USB2.0 Type-C Signal Quality Test Fixture (Receptacle) TestUSB.com
FS-HUCR
1 1
Back-Voltage fixture TestUSB.com
FS-BV
1 1
This document covers the high speed signal quality measurement for devices with Type-C™
receptacles and plugs. It not cover the measurement for device with standard USB receptacles or
plugs. Remaining high speed tests beside signal quality are however covered in this document and
require the FS-HUCR fixture.
The FS-HUCR and FS-BV fixture can be purchase via:
http://testusb.com/TypeC20.html
3.3.2 USB 2.0 Device with Type-C™ connector
Test fixture Description Part number High-Speed
Device
Full/Low Speed
Device
USB2.0 Type-C Signal Quality Test Fixture (Receptacle) TestUSB.com
FS-HUCR
1 1
USB2.0 Type-C Signal Quality Test Fixture (Plug) TestUSB.com
FS-HUCP
1 (*) n/a
Back-Voltage fixture TestUSB.com
FS-BV
1 1
USB2.0 Type-C Receiver fixture 1 n/a
(*) If high speed device is self-powered
P a g e | 7
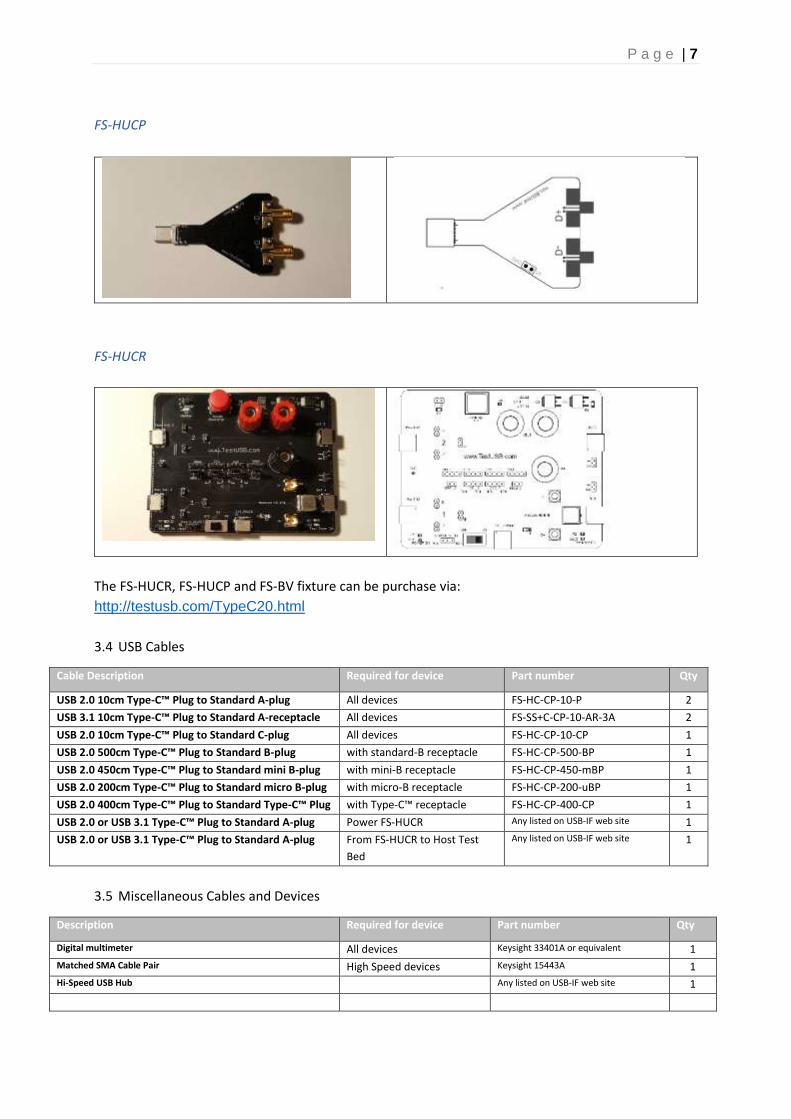
FS-HUCP
FS-HUCR
The FS-HUCR, FS-HUCP and FS-BV fixture can be purchase via:
http://testusb.com/TypeC20.html
3.4 USB Cables
Cable Description Required for device Part number Qty
USB 2.0 10cm Type-C™ Plug to Standard A-plug All devices FS-HC-CP-10-P 2
USB 3.1 10cm Type-C™ Plug to Standard A-receptacle All devices FS-SS+C-CP-10-AR-3A 2
USB 2.0 10cm Type-C™ Plug to Standard C-plug All devices FS-HC-CP-10-CP 1
USB 2.0 500cm Type-C™ Plug to Standard B-plug with standard-B receptacle FS-HC-CP-500-BP 1
USB 2.0 450cm Type-C™ Plug to Standard mini B-plug with mini-B receptacle FS-HC-CP-450-mBP 1
USB 2.0 200cm Type-C™ Plug to Standard micro B-plug with micro-B receptacle FS-HC-CP-200-uBP 1
USB 2.0 400cm Type-C™ Plug to Standard Type-C™ Plug with Type-C™ receptacle FS-HC-CP-400-CP 1
USB 2.0 or USB 3.1 Type-C™ Plug to Standard A-plug Power FS-HUCR Any listed on USB-IF web site 1
USB 2.0 or USB 3.1 Type-C™ Plug to Standard A-plug From FS-HUCR to Host Test
Bed
Any listed on USB-IF web site 1
3.5 Miscellaneous Cables and Devices
Description Required for device Part number Qty
Digital multimeter All devices Keysight 33401A or equivalent 1
Matched SMA Cable Pair High Speed devices Keysight 15443A 1
Hi-Speed USB Hub Any listed on USB-IF web site 1

P a g e | 8
4. Test procedure 4.1 Device High Speed Signal Quality
This document covers the high speed signal quality measurement for devices with Type-C™
receptacles and plugs. It not covers the measurement for device with standard USB receptacles or
plugs.
This test is measuring the high speed upstream Signal Quality (EYE diagram). For this test the device
need to send out the Test_Packet as defined in section 7.1.20 of the USB 2.0 specification. The USB-IF
tool USBET will make the required analyses.
4.1.1 Equipment Used Quantity Item Description/ Model
1 Oscilloscope
1 USB software USBET
2 BNC - SMA Keysight 54855-67604
2 SMA Cables Matched SMA Cable Pair
1 Cable between Device under test and
Device Hi-Speed Signal Quality Type-C™
test fixture
10cm Type-C™ plug to Type-C™ plug cable
FS-HC-CP-10-CP
1 Host test bed computer Any computer with hi-speed or super speed USB ports
1 Device Hi-Speed Signal Quality Type-C™
test fixture
For devices with Type-C™ plug or devices with Type-C™ receptacle and
bus-powered use:
TestUSB.com
FS-HUCR
For device with Type-C™ receptacle and self-powered use:
TestUSB.com
FS-HUCP
1 5V power supply Any Type-C™ plug to A-plug cable that can take 5V from any USB host.
1 Cable between USBHSET PC and FS-
HUCR Signal Quality Type-C™ test fixture
Any Type-C™ plug to A-plug cable
1 USBHSET for EHCI software application
OR
USBHSET for XHCI software application
http://www.usb.org/developers/tools/usb20_tools/#usbhset
OR
http://www.usb.org/developers/tools/

P a g e | 9
4.1.2 Setup Diagram if DUT has Type-C™ receptacle and is self-powered
If the DUT has a Type-C™ receptacle and is self-powered the setup is as followed:
Connecting the Equipment – DUT has Type-C™ receptacle and is self-powered (Test fixture FS-HUCP)
1. Connect the DUT to the Test Bed Computer running USBHSET, using a USB
cable.
2. Follow Test Instructions below from step 5. to 8. in order to let the DUT send
continuously TEST_PACKET.
3. Detach the DUT from Test Bed Computer running USBHSET. Since the device
is self-powered the device keep sending TEST_PACKET till power cycle.
4. Attach the SMA cables to the SMA connectors D+ and D- on the USB2.0
Type-C™ plug test fixture FS-HUCP. In default D+ = Ch1 and D- = Ch3.
5. Connect the test fixture to the DUT and you should see the following.

P a g e | 10
6. Follow the oscilloscope vendor steps in acquiring the signal eye diagram and
calculating the below signal quality compliance test items
EL_6 Rise Time
EL_6 Fall Time
EL_2 EL_4 EL_5 Data Eye and Mask Test
EL_7 Non-Monotonic Edge Test
7. For Type-C™ products the measurement need to be done in both positions
so flip the fixture and repeat the above step 5 and 6.
4.1.3 Setup Diagram for other Type-C™ devices
If the DUT not has a Type-C™ receptacle and is bus-powered the setup is as followed:
Connecting the Equipment
1. Attach the external power to EXT_POWER of the USB2.0 Type-C™ receptacle
fixture. Leave the TEST switch ‘S1’ at the OFF position. Verify the red POWER
ON LED is lit and the Test Mode ON LED is not lit.
2. Connect the DUT to DUT 1 side of the fixture.
a. If device has captive Type-C™ plug directly connect DUT to DUT1 (*)
b. If device has a Type-C™ receptacle and is bus-powered use the
corresponding short cable to connect DUT to DUT1
3. Connect the Host Init 1 of the test fixture to a port of the Test Bed Computer
running USBHSET, using a using the appropriated USB cable.
4. Attach the SMA cables to the SMA connectors D+ and D- on the test fixture.
In default D+ = Ch1 and D- = Ch3
(*) Measurements to be performed using the far end eye template.

P a g e | 11
4.1.4 Test Instructions
5. Invoke the HS Electrical Test Tool software on the Hi-Speed Electrical Test
Bed computer.
6. Select Device and click the [TEST] button to enter the Device Test menu.
7. The device under test should be enumerated with the device's VID shown
together with the root port in which it is connected.
8. Select TEST_PACKET from the Device Command drop down menu and click
[EXECUTE]. This forces the device under test to continuously transmit test
packets.
9. Place the Test Switch (S1) in the ON position. Verify the red Test Mode ON
LED is lit. You should see the transmitted test packet on the oscilloscope as
below.

P a g e | 12
10. Follow the oscilloscope vendor steps in acquiring the signal eye diagram and
calculating the below signal quality compliance test items
EL_6 Rise Time
EL_6 Fall Time
EL_2 EL_4 EL_5 Data Eye and Mask Test
EL_7 Non-Monotonic Edge Test
8. For Type-C™ products the measurement need to be done in both positions
so flip the cable at the DUT1 side of the fixture and repeat step 6 till 10.
P a g e | 13
4.2 Device Test J/K, SE0NAK
All high speed devices must undergo this test. The following test can also be executed on devices
with standard USB connectors.
4.2.1 Equipment Used Quantity Item Description/ Model
1 Oscilloscope
1 Oscilloscope USB software
2 BNC – SMA Keysight 54855-67604
2 SMA Cables Matched SMA Cable Pair
1 Cable between Device under test and Device
Hi-Speed Signal Quality Type-C™ test fixture
10cm Type-C™ plug to Type-C™ plug cable
FS-HC-CP-10-CP
1 Host test bed computer Any computer with hi-speed or super speed USB ports
1 Device Hi-Speed Signal Quality Type-C™ test
fixture
TestUSB.com FS-HUCR
1 5V power supply Any Type-C™ plug to A-plug cable that can take 5V from any
USB host.
1 USBHSET for EHCI software application
OR
USBHSET for XHCI software application
http://www.usb.org/developers/tools/usb20_tools/#usbhset
OR
http://www.usb.org/developers/tools/
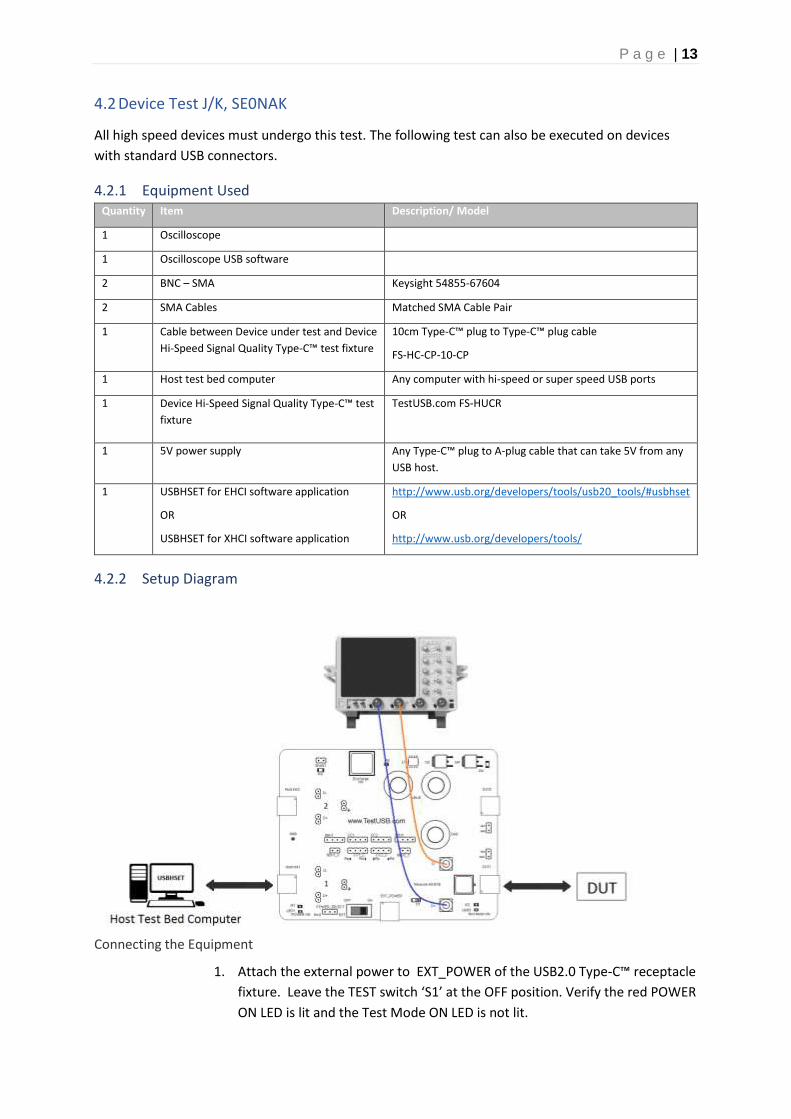
4.2.2 Setup Diagram
Connecting the Equipment
1. Attach the external power to EXT_POWER of the USB2.0 Type-C™ receptacle
fixture. Leave the TEST switch ‘S1’ at the OFF position. Verify the red POWER
ON LED is lit and the Test Mode ON LED is not lit.
P a g e | 14
2. Connect the DUT to DUT 1 side of the fixture.
a. If device has captive Type-C™ plug directly connect DUT to DUT1
b. If device has a receptacle use the corresponding short as possible
cable to connect DUT to DUT1.
3. Connect the Host Init 1 of the test fixture to a port of the Test Bed Computer
running USBHSET, using a using the appropriated USB cable.
4. Attach the SMA cables to the SMA connectors D+ and D- on the test fixture.
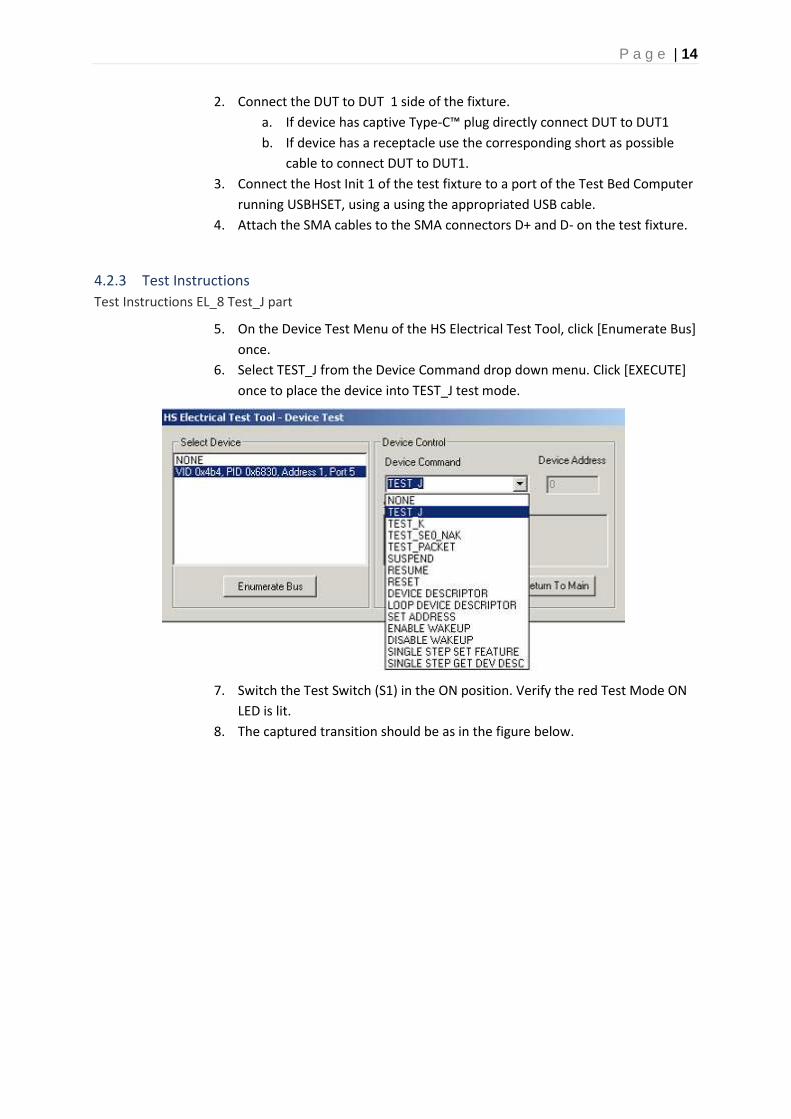
4.2.3 Test Instructions
Test Instructions EL_8 Test_J part
5. On the Device Test Menu of the HS Electrical Test Tool, click [Enumerate Bus]
once.
6. Select TEST_J from the Device Command drop down menu. Click [EXECUTE]
once to place the device into TEST_J test mode.
7. Switch the Test Switch (S1) in the ON position. Verify the red Test Mode ON
LED is lit.
8. The captured transition should be as in the figure below.

P a g e | 15
9. Follow the oscilloscope vendor steps in measuring the below compliance test
items
EL_8 Test_J
10. Power Cycle USB Device Under Test and flip/ reverse attach USB Type-C™
connection
11. Repeat Test Instructions from step 5.
12. Power Cycle USB Device Under Test
Test Instructions EL_8 Test_K Part
13. On the Device Test Menu of the HS Electrical Test Tool, click [Enumerate Bus]
once.
14. Select TEST_K from the Device Command drop down menu. Click [EXECUTE]
once to place the device into TEST_K test mode.

P a g e | 16
15. Switch the Test Switch (S1) in the ON position. Verify the red Test Mode ON
LED is lit.
16. The captured transition should be as in the figure below.
17. Follow the oscilloscope vendor steps in measuring the below compliance test
items
EL_8 Test_K
18. Power Cycle USB Device Under Test and flip/ reverse attach USB Type-C™
connection
19. Repeat Test Instructions from step 13.
20. Power Cycle USB Device Under Test
Test Instructions EL_8 Test_SE0 Part
21. On the Device Test Menu of the HS Electrical Test Tool, click [Enumerate Bus]
once.
22. Select SE0_NAK from the Device Command drop down menu. Click
[EXECUTE] once to place the device into SE0_NAK test mode.

P a g e | 17
23. Switch the Test Switch (S1) in the ON position. Verify the red Test Mode ON
LED is lit.
24. The captured transition should be as in the figure below.
25. Follow the oscilloscope vendor steps in measuring the below compliance test
items
EL_9 Test_SE0_NAK
26. Power Cycle USB Device Under Test and flip/ reverse attach USB Type-C™
connection
27. Repeat Test Instructions from step 21.
28. Power Cycle USB Device Under Test

P a g e | 18
4.3 Device Packet Parameters
All high speed devices must undergo this test. The following test can also be executed on devices
with standard USB connectors.
4.3.1 Equipment Used Quantity Item Description/ Model
1 Oscilloscope
1 Oscilloscope USB software
1 Differential probe
1 Cable between Device
under test and Device Hi-
Speed Signal Quality Type-
C™ test fixture
10cm Type-C™ plug to Type-C™ plug cable
FS-HC-CP-10-CP
1 Host test bed computer Any computer with hi-speed or super speed USB ports
1 Device Hi-Speed Signal
Quality Type-C™ test
fixture
TestUSB.com FS-HUCR
1 5V power supply Any Type-C™ plug to A-plug cable that can take 5V from any
USB host.
1 USBHSET for EHCI software
application
OR
USBHSET for XHCI software
application
http://www.usb.org/developers/tools/usb20_tools/#usbhset
OR
http://www.usb.org/developers/tools/#sigHSETT
4.3.2 Setup Diagram
Connecting the Equipment

P a g e | 19
1. Attach the external power to EXT_POWER of the USB2.0 Type-C™ receptacle
fixture. Leave the TEST switch ‘S1’ at the OFF position. Verify the red POWER
ON LED is lit and the Test Mode ON LED is not lit.
2. Connect the DUT to DUT 1 side of the fixture.
a. If device has captive Type-C™ plug directly connect DUT to DUT1
b. If device has a receptacle use the corresponding short as possible
cable to connect DUT to DUT1.
3. Connect the Host Init 1 of the test fixture to a port of the Test Bed Computer
running USBHSET, using the appropriated USB cable.
4. If needed apply power to the device.
5. Attach the differential probe to D+/D- of “1” on the test fixture.
4.3.3 Test Instructions
Test Instructions part1 1. Invoke the HS Electrical Test Tool software on the Hi-Speed Electrical Test
Bed computer.
2. Select Device and click the [TEST] button to enter the Device Test menu.
3. The device under test should be enumerated with the device's VID shown
together with the root port in which it is connected.
4. Select SINGLE STEP SET FEATURE from the Device Command drop down
menu and click [EXECUTE].

P a g e | 20
5. You should see the transmitted test packet on the oscilloscope as below.
6. Follow the oscilloscope vendor steps in the below compliance test items
EL_21 Sync Field Length Test
EL_25 EOP Length Test
EL_22 Measure Interpacket Gap Between Second and Third Packets
Test Instructions, Part 2
7. In the Device Test menu of the HS Electrical Test Tool, click [STEP] once again. This is the second step of the two-step Single Step Set Feature command.

P a g e | 21
8. You should see the transmitted test packet on the oscilloscope as below.
9. Follow the oscilloscope vendor steps in the below compliance test items
EL_22 Measure Interpacket Gap Between First and Second Packets
10. Power Cycle USB Device Under Test and flip/ reverse attach USB Type-C™
connection
11. Repeat Test Instructions Part 1; Part 2 and Part 3
P a g e | 22
4.4 Device CHIRP Timing
All high speed devices must undergo this test. The following test can also be executed on devices
with standard USB connectors.
4.4.1 Equipment Used Quantity Item Description/ Model
1 Oscilloscope
1 Oscilloscope USB software
2 Active probes
1 Cable between Device under test and Device
Hi-Speed Signal Quality Type-C™ test fixture
1 Host test bed computer Any computer with hi-speed or super speed USB ports
1 Device Hi-Speed Signal Quality Type-C™ test
fixture
TestUSB.com FS-HUCR
1 5V power supply Any Type-C™ plug to A-plug cable that can take 5V from any
USB host.
1 USBHSET for EHCI software application
OR
USBHSET for XHCI software application
http://www.usb.org/developers/tools/usb20_tools/#usbhset
OR
http://www.usb.org/developers/tools/#sigHSETT
4.4.2 Setup Diagram
Connecting the Equipment
1. Attach the external power to EXT_POWER of the FS-HUCR. Leave the TEST
switch at the OFF position. Verify the red Power LED is lit and the Test Mode
LED is not lit.
2. Connect the DUT to DUT 1 side of the fixture.

P a g e | 23
a. If device has captive Type-C™ plug directly connect DUT to DUT1
b. If device has a receptacle use the corresponding short cable to
connect DUT to DUT1.
3. Connect the Host Init 1 of the FS-HUCR to a Hi-speed capable port of the Test
Bed Computer, using a USB cable.
4. Connect the active probe on Channel 2 to the D- pin at “1” of the FS-HUCR.
Make sure the probe position is set properly.
5. Connect the active probe on Channel 3 to the D+ pin at “1” of the FS-HUCR.
Make sure the probe position is set properly.
4.4.3 Test Instructions
6. Invoke the HS Electrical Test Tool software on the Hi-Speed Electrical Test
Bed computer.
7. Select Device and click the [TEST] button to enter the Device Test menu.
8. The device under test should be enumerated with the device's VID shown
together with the root port in which it is connected.
9. On the HS Electrical Test Tool software, click [Enumerate Bus] once. You
should capture the CHIRP handshake as in the below figure.

P a g e | 24
10. Follow the oscilloscope vendor steps in the below compliance test items
EL_28 Measure Device CHIRP-K Latency
EL_29 Measure Device CHIRP-K Duration
EL_31 Hi-Speed Terminations Enable and D+ Disconnect Time
11. Flip/reverse attach USB Type-C™ connection
12. Repeat Test Instructions 9. and 10.

P a g e | 25
4.5 Device Suspend/Resume/Reset Timing
All high speed devices must undergo this test. The following test can also be executed on devices
with standard USB connectors.
4.5.1 Equipment Used Quantity Item Description/ Model
1 Oscilloscope
2 Active probes
1 Keysight Oscilloscope USB software
1 Cable between Device under test and Device
Hi-Speed Signal Quality Type-C™ test fixture
1 Host test bed computer Any computer with hi-speed or super speed USB ports
1 Device Hi-Speed Signal Quality Type-C™ test
fixture
TestUSB.com FS-HUCR
1 5V power supply Any Type-C™ plug to A-plug cable that can take 5V from any
USB host.
1 USBHSET for EHCI software application
OR
USBHSET for XHCI software application
http://www.usb.org/developers/tools/usb20_tools/#usbhset
OR
http://www.usb.org/developers/tools/#sigHSETT
4.5.2 Setup Diagram
Connecting the Equipment
1. Attach the external power to EXT_POWER of the FS-HUCR. Leave the TEST
switch at the OFF position. Verify the red Power LED is lit and the Test Mode
LED is not lit.

P a g e | 26
2. Connect the DUT to DUT 1 side of the fixture.
a. If device has captive Type-C™ plug directly connect DUT to DUT1
b. If device has a receptacle use the corresponding short cable to
connect DUT to DUT1.
3. Connect the Host Init 1 of the FS-HUCR to a Hi-speed capable port of the Test
Bed Computer, using a USB cable.
4. Connect the active probe on Channel 2 to the D- pin at “1” of the FS-HUCR.
Make sure the probe position is set properly.
5. Connect the active probe on Channel 3 to the D+ pin at “1” of the FS-HUCR.
Make sure the probe position is set properly.
4.5.3 Test Instructions
Test Instructions part1 6. Invoke the HS Electrical Test Tool software on the Hi-Speed Electrical Test
Bed computer.
7. Select Device and click the [TEST] button to enter the Device Test menu.
8. The device under test should be enumerated with the device's VID shown
together with the root port in which it is connected.
9. Select SUSPEND from the Device Command drop down menu and click
[EXECUTE].

P a g e | 27
10. You should see the transmitted test packet on the oscilloscope as below.
11. Follow the oscilloscope vendor steps in the below compliance test items
EL_38 Suspend Timing
12. On the Device Test Menu of the HS Electrical Test Tool, select RESUME from the Device Command drop down menu. Click [EXECUTE] once to resume the hub from suspend.
13. The captured transition should be as in the figure below.

P a g e | 28
14. Follow the oscilloscope vendor steps in the below compliance test items
EL_40 Resume Timing Response
15. On the Device Test Menu of the HS Electrical Test Tool, select RESET from
the Device Command drop down menu. Click [EXECUTE] once to reset the device operating in high speed. The captured
16. transition should be as in the figure below.

P a g e | 29
17. Follow the oscilloscope vendor steps in the below compliance test items
EL_27 Response time Reset
18. On the Device Test Menu of the HS Electrical Test Tool software, select SUSPEND from the Device Command drop down menu. Click [EXECUTE] once to place the device into suspend.
19. On the Device Test Menu of the HS Electrical Test Tool, select RESET from
the Device Command drop down menu. Click [EXECUTE] once to reset the device operating in high speed.

P a g e | 30
20. The captured transition should be as in the figure below.
21. Follow the oscilloscope vendor steps in the below compliance test items
EL_28 Device CHIRP Response to Reset from Suspend
22. Repeat Test Instructions Part 1; Part 2

P a g e | 31
4.6 Device Receiver Sensitivity
4.6.1 Equipment Used Quantity Item Description/ Model
1 Oscilloscope
2 Active probes
1 Keysight Oscilloscope USB software
1 Cable between Device under test and Device
Hi-Speed Signal Quality Type-C™ test fixture
1 Host test bed computer Any computer with hi-speed or super speed USB ports
1 Device Hi-Speed Receiver Sensitivity Type-
C™ test fixture
TestUSB.com
1 5V power supply Any Type-C™ plug to A-plug cable that can take 5V from any
USB host.
1 USBHSET for EHCI software application
OR
USBHSET for XHCI software application
http://www.usb.org/developers/tools/usb20_tools/#usbhset
OR
http://www.usb.org/developers/tools/#sigHSETT
4.6.2 Setup Diagram

P a g e | 32
4.7 Upstream Full Speed Signal Quality Test
All USB 3.1 and USB 2.0 devices must go through this this. Note that the tier of 5 hubs is not required
anymore. All high and full speed devices must undergo this test. The following test can also be
executed on devices with standard USB connectors.
4.7.1 Equipment Used Qty Item Description/ Model
1 Oscilloscope
1 Oscilloscope USB software USBET
3 Active probes
1 Oscilloscope USB software
1 Adjacent Device Any certified USB2.0 Full Speed Device
1 Cable between Device under test and
Device Hi-Speed Signal Quality Type-C™
test fixture
Cable to select depends on the device under test USB connector
for:
- Standard-B receptacle use
5m Type-C plug to B-plug cable (FS-HC-CP-500-BP)
- Mini-B receptacle use
4.5m Type-C plug to Mini B-plug cable (FS-HC-CP-450-mBP)
- Micro-B receptacle use
2m Type-C plug to Micro B-plug cable (FS-HC-CP-200-uBP)
- Type-C
4m Type-C plug to Type-C plug cable (FS-HC-CP-400-CP-1A)
- Product with captive cable use
10cm Type-C plug to A-receptacle (FS-SS+C-CP-10-AR-3A)
1 Host test bed computer Any computer with hi-speed or super speed USB ports
1 Device Hi-Speed Signal Quality Type-C™
test fixture
TestUSB.com FS-HUCR
1 5V power supply Any Type-C™ plug to A-plug cable that can take 5V from any USB
host.
1 USBHSET for EHCI software application OR
USBHSET for XHCI software application
http://www.usb.org/developers/tools/usb20_tools/#usbhset
OR
http://www.usb.org/developers/tools/#sigHSETT
(*) USB Hub (*) check configurations in setup diagram
2 Cable between HUB/Host and FS-HUCR FS-HC-CP-10-AP

P a g e | 33
4.7.2 Setup Diagram
Note that the tier of 5 hubs is not required anymore.
Connecting the Equipment
1. Attach the external power to EXT_POWER of the FS-HUCR. Leave the TEST
switch at the OFF position. Verify the red Power LED is lit and the Test Mode
LED is not lit.
2. Connect the Adjacent Device to DUT 1 side of the fixture
3. Connect the DUT to DUT 2 side of the fixture. Cable to select between DUT
and the fixture depend on the USB connector on the DUT:
a. Standard-B receptacle use
5m Type-C plug to B-plug cable (FS-HC-CP-500-BP)
b. Mini-B receptacle use
4.5m Type-C plug to Mini B-plug cable (FS-HC-CP-450-mBP)
c. Micro-B receptacle use
2m Type-C plug to Micro B-plug cable (FS-HC-CP-200-uBP)
d. Type-C
4m Type-C plug to Type-C plug cable (FS-HC-CP-400-CP-1A)
e. Product with captive cable use
10cm Type-C plug to A-receptacle (FS-SS+C-CP-10-AR-3A)
4. Make the connection as defined in the above setup diagram (*) depending
on DUT speed and USBHSET version.
5. Connect with the 10cm cable FS-HC-CP-10-AP to the fixture FS-HUCR at Host
P a g e | 34
Init 1 and Host Init 2
6. Connect the active probe on Channel 2 to the D- pin at “2” of the FS-HUCR.
Make sure the probe position is set properly.
7. Connect the active probe on Channel 3 to the D+ pin at “2” of the FS-HUCR.
Make sure the probe position is set properly.
8. Connect the active probe on Channel 1 to the D+ pin at “1 “of the FS-HUCR.
Make sure the probe position is set properly.
4.7.3 Test Instructions
9. Invoke the HS Electrical Test Tool software on the Hi-Speed Electrical Test
Bed computer.
10. Select Device and click the [TEST] button to enter the Device Test menu.
11. The device under test should be enumerated with the device's VID shown
together with the root port in which it is connected.
12. Select LOOP DEVICE DESCRIPTOR from the Device Command drop down
menu and click [EXECUTE]. This forces the device under test to continuously
transmit test packets.
13. You should see the transmitted test packet on the oscilloscope as below.
P a g e | 35
14. Follow the oscilloscope vendor steps in acquiring the signal eye diagram and
calculating the below signal quality compliance test items
EL_6 Rise Time
EL_6 Fall Time
EL_2 EL_4 EL_5 Data Eye and Mask Test
EL_7 Non-Monotonic Edge Test
15. If device has USB Type-C™ connection flip/ reverse attach
16. Repeat Test Instructions step 9. till 14.

P a g e | 36
4.8 Low Speed Signal Quality Test
All low speed devices must undergo this test. The following test can also be executed on devices with
standard USB connectors.
4.8.1 Equipment Used Quantity Item Description/ Model
1 Oscilloscope Keysight
1 Oscilloscope USB software USBET
3 Probes
1 Adjacent Device Any certified USB2.0 Low Speed Device
1 Host test bed computer Any computer with hi-speed or super speed USB ports
1 Device Hi-Speed Signal Quality Type-C™
test fixture
TestUSB.com FS-HUCR
1 5V power supply Any Type-C™ plug to A-plug cable that can take 5V from any
USB host.
1 USBHSET for EHCI software application OR
USBHSET for XHCI software application
http://www.usb.org/developers/tools/usb20_tools/#usbhset
OR
http://www.usb.org/developers/tools/#sigHSETT
1 If the low speed device has a Type-C plug just directly connect
to FS-HUCR. If the low speed device has a A-Plug put the 10cm
Type-C plug to A-receptacle (FS-SS+C-CP-10-AR) in between
HUB
2 Cable between HUB and FS-HUCR FS-HC-CP-10-AP-R1.0B1
4.8.2 Setup Diagram
Note that the tier of 5 hubs is not required anymore.

P a g e | 37
Connecting the Equipment
1. Attach the external power to EXT_POWER of the FS-HUCR. Leave the TEST
switch at the OFF position. Verify the red Power LED is lit and the Test Mode
LED is not lit.
2. Connect the Adjacent Device to DUT 1 side of the fixture
3. Connect the DUT to DUT 2 side of the fixture.
4. Make the connection as defined in the above setup diagram (*) depending
on DUT speed and USBHSET version.
5. Connect with the 10cm cable FS-HC-CP-10-AP to the fixture FS-HUCR at Host
Init 1 and Host Init 2
6. Connect the active probe on Channel 2 to the D- pin at “2” of the FS-HUCR.
Make sure the probe position is set properly.
7. Connect the active probe on Channel 3 to the D+ pin at “2” of the FS-HUCR.
Make sure the probe position is set properly.
8. Connect the active probe on Channel 1 to the D- pin at “1 “of the FS-HUCR.
Make sure the probe position is set properly.
4.8.3 Test Instructions
9. Invoke the HS Electrical Test Tool software on the Hi-Speed Electrical Test
Bed computer.
10. Select Device and click the [TEST] button to enter the Device Test menu.
11. The device under test should be enumerated with the device's VID shown
together with the root port in which it is connected.
12. Select LOOP DEVICE DESCRIPTOR from the Device Command drop down
menu and click [EXECUTE]. This forces the device under test to continuously
transmit test packets.
P a g e | 38
13. You should see the transmitted test packet on the oscilloscope as below.
14. Follow the oscilloscope vendor steps in acquiring the signal eye diagram and
calculating the below signal quality compliance test items
EL_6 Rise Time
EL_6 Fall Time
EL_2 EL_4 EL_5 Data Eye and Mask Test
EL_7 Non-Monotonic Edge Test
15. If device has USB Type-C™ connection flip/ reverse attach
16. Repeat Test Instructions step 9. till 14.

P a g e | 39
4.9 Inrush Current
All devices must undergo this test. The following test can also be executed on devices with standard
USB connectors.
The purpose of the test is to ensure that the current consumed due to bulk capacitance and peripheral startup does not cause a voltage drop below valid levels that causes other devices to drop out. For this measurement a current probe, scope and Inrush Current Test Fixture is needed. The scope should have a record time of 100ms at 1 Mega sample per second. The calculation of the Inrush can be made with USBET by saving the Inrush waveform as *.csv or *.tsv. Inrush current is measured for a minimum of 100 milliseconds after attach. Attach is defined as voltage rising to a valid level on the peripherals USB power line. Any current exceeding 100 mA during the 100ms interval is considered part of the inrush current event. The inrush current is divided into regions. A region is an interval where the current exceeds 100 mA until the time the current falls below 100 mA for at least 100 us. There can be multiple inrush regions during the 100 ms period. Pass/Fail determination is done by the region having the highest charge value. The failures for Inrush mostly occur due to a too large capacity between Vbus and GND. The USB 2.0 Spec allows a maximum capacity of 10uF and therefore a maximum Inrush of 50uC. Therefore, the total sum of capacity may not be higher that 10uF. Also, the device under test cannot consume more that 100mA during this 100ms of the start up. Common failures are that there is somewhere a to high capacitance on Vbus or that the device start consuming to much current in unconfigured state . Note that it is required to have at least a 1uF of capacity this in order to make ADP detection possible. When doing the measurement make sure that you calibrate the current probe to 0mA before doing the measurement since a current probe will get quickly a DC offset that will result in a wrong measurement. It's also advisable to use the high resolution acquisition modes to reduce "the noise" on the signal
4.9.1 Equipment Used Quantity Item Description/ Model
1 Oscilloscope Keysight
1 Oscilloscope USB software Keysight N5416A/N5416B USB
1 Current probe Current clamp
OR diff probe over the 10mOhm shunt
1 Host test bed computer Any computer with hi-speed or super speed USB ports
1 Device Hi-Speed Signal
Quality Type-C™ test fixture
TestUSB.com FS-HUCR
1 USB Cable
1 5V power supply Any Type-C™ plug to A-plug cable that can take 5V from any
USB host.
P a g e | 40
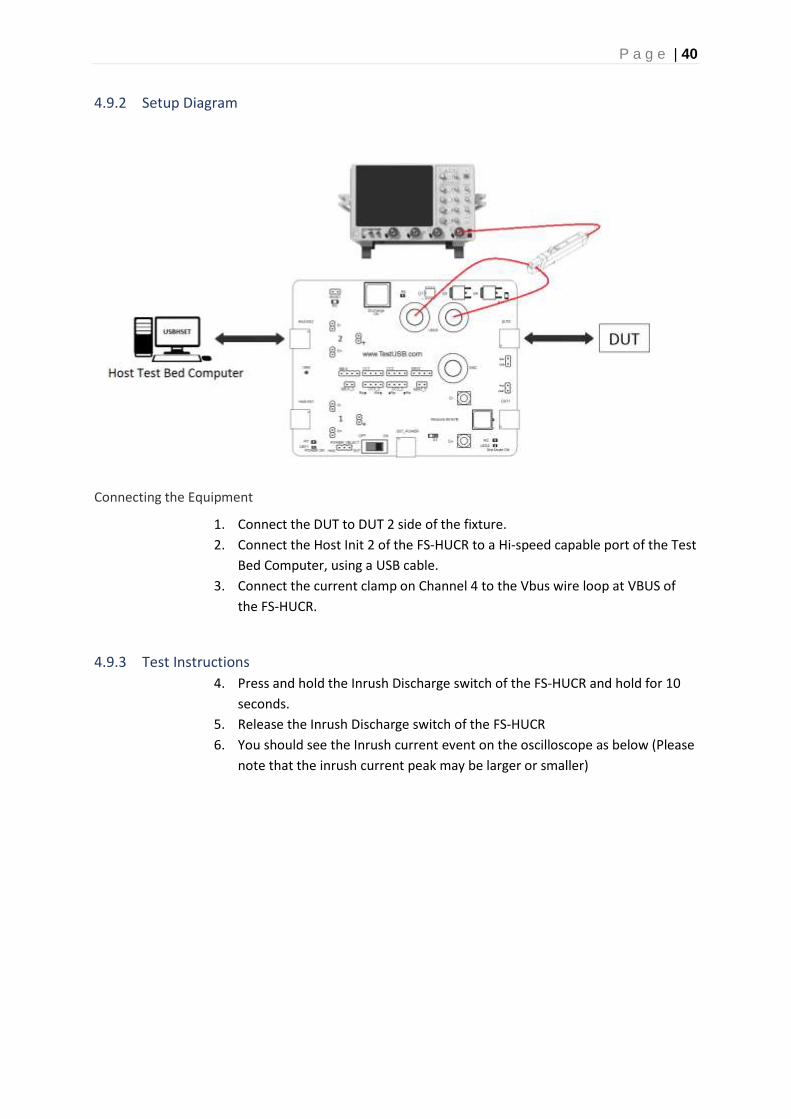
4.9.2 Setup Diagram
Connecting the Equipment
1. Connect the DUT to DUT 2 side of the fixture.
2. Connect the Host Init 2 of the FS-HUCR to a Hi-speed capable port of the Test
Bed Computer, using a USB cable.
3. Connect the current clamp on Channel 4 to the Vbus wire loop at VBUS of
the FS-HUCR.
4.9.3 Test Instructions
4. Press and hold the Inrush Discharge switch of the FS-HUCR and hold for 10
seconds.
5. Release the Inrush Discharge switch of the FS-HUCR
6. You should see the Inrush current event on the oscilloscope as below (Please
note that the inrush current peak may be larger or smaller)

P a g e | 41
7. Follow the oscilloscope vendor steps in acquiring Inrush current event and
calculating the below compliance test item
Inrush Current
8. Flip/ reverse attach DUT USB Type-C™ connection on the DUT2 side of the
FS-HUCR
9. Repeat Test Instructions from step 4.

P a g e | 42
4.10 Back Voltage
All devices must undergo this test. The following test can also be executed on devices with standard
USB connectors.
No USB device shall supply current on VBUS at its upstream facing port at any time, a USB device may
only draw current. The pull-up resistor D+ or D- may only become present when VBUS is High. This
can be verified by measuring the Voltage over Vbus and GND, D+ and GND, D- and GND when the
device is not connected with the Back Voltage fixture. This test must be performed twice, first before
the device under test is enumerated and the second time after it has been enumerated. All values
should remain below 400mV. A common failure is that self-powered devices put their pull-up resistor
active even when Vbus is not detected. This will result in failure where the voltage is ~3V on the D+
for Full Speed and High Speed devices or on D- for a Low Speed device.
Another common mistake is that some device that are self powered or battery powered drive back
voltage on Vbus.
4.10.1 Equipment Used Quantity Item Description/ Model
1 Digital Multimeter
1 Cable between Device under test
and back voltage fixture
Any USB cable that fit the device and back voltage fixture
1 Host test bed computer Any computer with hi-speed or super speed USB ports
1 Device Back-Voltage test fixture TestUSB.com
FS-BV
4.10.2 Test Instructions
Test Instructions part1 1. Apply power to the DUT
2. Connect the DUT to the Back Voltage fixture FS-BV with the corresponding
USB Cable.
3. Using a DMM measure and record DC voltages between GND and Vbus, D+
and D-
Back Voltage before Enumeration – Type-C™ default position
USB pin DC Voltage Before
enumeration
Expected Value
(VDC)
Vbus ≤ 400mV
D+ ≤ 400mV
D- ≤ 400mV
4. Flip/ reverse attach DUT USB Type-C™ connection on the Back Voltage
fixture FS-BV if the device use USB Type-C™ connection.

P a g e | 43
5. Repeat Test Instructions Part 1 step 3 and record DC voltages between GND
and Vbus, D+ and D-
Back Voltage before Enumeration – Type-C™ flip/ reverse attach
position
USB pin DC Voltage Before
enumeration
Expected Value
(VDC)
Vbus ≤ 400mV
D+ ≤ 400mV
D- ≤ 400mV
Test Instructions part 2 6. Connect the DUT into a known good host and verify proper enumeration.
7. Detach the DUT from the known good host and connect the DUT to the Back
Voltage fixture FS-BV.
8. Using a DMM measure and record DC voltages between GND and Vbus, D+
and D-
Back Voltage after Enumeration – Type-C™ default position
USB pin DC Voltage Before
enumeration
Expected Value
(VDC)
Vbus ≤ 400mV
D+ ≤ 400mV
D- ≤ 400mV
9. Flip/ reverse attach DUT USB Type-C™ connection on the Back Voltage
fixture FS-BV
10. Repeat step 6. Till 8 .and record DC voltages between GND and Vbus, D+ and
D-
Back Voltage after Enumeration – Type-C™ flip/ reverse attach
position
USB pin DC Voltage Before
enumeration
Expected Value
(VDC)
Vbus ≤ 400mV
D+ ≤ 400mV
D- ≤ 400mV