reiki master course · 2017-11-22 · reiki 2 attunement 29 reiki ... will be guided through an...
TRANSCRIPT

1
Reiki Master Course
REIKI ENERGY

2

3
CONTENTS
Introduction 04
Section 1: Symbols Symbols 05 Usui Master Symbol 08 Tibetan Master Symbol 10 Fire Dragon Symbol 11 Additional Symbols 12 Heart Chakra Symbol 13 Taoist Grace Symbol 14 Emotional Butterfly 15 Spirit Column 16 Mental Spiral 17 Aum Symbol 18 Section 2: Attunements & Empowerments Microcosmic Orbit 20 Violet Breath 21 Reiki 1 (4-stage) Attunement 22 Reiki 1 (1-stage) Attunement 26 Reiki 2 Attunement 29 Reiki Master Attunement 33 Learning the Attunements 38 Reiju Empowerments 39 Self Empowerment 39 Individual Empowerments 39 Reiki 2 Empowerments 41 Reiki Master Empowerments 41 Kotodama 42 Empowerment Diagrams 43
Section 3: Appendices 1 Medical Research 44 2 Reiki-2 Symbols Summary 47 3 Meditation and Hatsu Rei Ho 48

4
Introduction
Welcome to the Reiki Master’s course. You already have the gift of being able to heal others; once attuned as a Master, you will also have the gift of being able to attune others so that they can use this gentle therapy for their own benefit and that of others.
On Day 1 of the course you will be attuned to the Reiki Master symbols and to several other symbols (see opposite) which will help you on your Reiki journey. The attunement process will consist of two Reiki Attunements. The rest of the day will be taken up with discussion and healing practice (using the new symbols).
On Day 2 of the course you will learn to attune others. You will practice carrying out western-style attunements and also Japanese empowerments.
There will be no need to take notes as the course requirements are all covered in this manual. For the course, you must be able to draw/visualise the Usui Master symbol, the Tibetan Master symbol, the Fire Dragon symbol and the Aum symbol. For Day 2 you should also have revised the Reiki-2 symbols as you will be practicing by giving a Reiki-2 attunement.
It is not necessary to memorise the attunement process or the kotodama as you will be guided through an attunement and empowerment on the course; however, you should read and be familiar with the attunement sections.
If you have any problems, we can be contacted at the following email addresses:
[email protected] You can find more information on Reiki on the Reiki Energy website (www.reikienergy.org.uk). There is also a Masters Area on the website; more details on this will be provided during the course.

5
Symbols
Symbols are an integral part of western Reiki. However, they were not part of Usui’s original system; he used a variety of methods including Kotodama (discussed later) to represent the energies and only taught the symbols to three of his master students who were having trouble connecting to the energy. One of these masters was Hayashi and since he attuned Takata, he obviously passed on the symbols to her and she in turn passed them onto all her students and that is how the symbols are so widely used in western Reiki.
Although there are now quite a number of symbols used in Reiki they are not all traditional Reiki symbols. On this course you will be attuned to:
the four Usui symbols: Master symbol (Dai-Ko-Myo), Distance symbol (Hon-Sha-Ze-Sho-Nen, Mental/Emotional symbol (Sei-He-Ki) and the Power symbol (Cho-Ku-Rei)
The two Tibetan symbols: Tibetan Master symbol (Dai-Ko-Myo) and Fire Dragon symbol
You will also be attuned to some additional symbols: Heart Chakra symbol (Shi-Ke-Sei-Ki), the Grace symbol, the Aum symbol, the Spirit Column symbol, the Mental Spiral and Emotional Butterfly symbols. The Tibetan symbols were late additions to Reiki and are also unlikely to be Tibetan; they are more likely to be Shamanic but they work. The Heart Chakra symbol is from the Radiance Technique (a Reiki offshoot). The Grace, Spirit Column, Mental Spiral and Emotional Butterfly symbols are Taoist Karmic symbols. The Aum (also called 'Om') symbol is well known and is a Sanskrit symbol. All of these symbols are shown in reduced size over the next two pages.
Please note that it is up to you, as the Master, whether to include these symbols when attuning your own students. We attune out students to the Heart Chakra symbol and the Grace symbol at Reiki-2 level because we believe them to be very useful 'healing' tools. They are discussed further in the 'Attunement' section.
Usui Memorial

6
Usui Master Symbol (Dai-Ko-Myo)
Tibetan Master Symbol (Dai-Ko-Myo)
Fire Dragon
Heart Chakra Symbol (Shi-Ka-Sei-Ki)

7
Emotional Butterfly Mental Spiral
Spirit Column
Taoist Grace Symbol
Aum Symbol

8
Usui Master symbol (DaiKoMyo)
There are a number of variations of the master symbol but they all appear to have the same effect as regards healing and attunements. There are also a number of different translations of the symbol (Great Being of the Universe, shine on me; Treasure house of the Great Beaming Light; and Praise be to the Great Universal Light). The symbol is also related to the Japanese Buddhist deity Dainichi Nyorai.
Dainichi Nyorai, in Japanese teaching, is the supreme being (the Great Shining One or Supreme Buddha). He is everywhere and everything; he is literally the Universe and all it contains. Dainichi Nyorai is the God-Force that created the Universe, maintains it, and is it. Does this concept sound familiar?
The Usui Master symbol is the key to giving attunements (described later) and has the effect of producing a very high frequency energy.
Though the most common use of this symbol is in attunements, it can be used in treatments; it would not however be used routinely and its use would be restricted to specific situations or conditions. Since this symbol works at the soul or spirit level it would be used for dealing with problems that originated at this level (e.g. anger, envy, bitterness, low self-esteem, self-destructive behaviour such as anorexia). You would not use the symbol in the same way as ChoKuRei, or SeiHeKi, to channel energy into specific parts of the body; it would be used to for an entire treatment. One possible method of using the DaiKoMyo is described below:
Charge the hands by drawing or visualising the Master symbol over the palm of each hand and stating the name of the symbol (DaiKoMyo) three times for each hand in order to activate it. Visualise a large Master symbol over the crown of your head and state its name three times to activate it.
Imagine that you are drawing down energy from the symbol that that the energy is flowing into your head, down through your neck and shoulders and out of your hands into the recipient. Continue this throughout the treatment. When you change hand-position, say to yourself ‗DaiKoMyo On‟.
If you have difficulty maintaining this visualisation then don’t bother with the symbol above the head and concentrate on just the hands. However, you should still use this symbol for the whole treatment and carry on saying ‘DaiKoMyo On’ when you change
The symbol is pronounced: Die – Coe (Sebastian Coe) – Mee-Oh.
**********************

9

10
Tibetan Master symbol (DaiKoMyo)
This symbol is not one of the traditional Usui symbols; it is also highly unlikely that it is Tibetan. This symbol was introduced into Reiki by Arthur Robinson, whose background was ‘shamanism’, thus it is likely that it is a shamanic symbol. However, no matter where it originated, this symbol works and is very powerful.
This symbol, like the Usui Master symbol, is also called DaiKoMyo and is pronounced exactly the same. This symbol is a cleanser; in attunements, it clears any blockages to the Usui attunement energy that follows it. It is also used in treatments where it works at the soul or spirit level; the energy channelled via this symbol clears blockages at the soul/spirit level and it brings a feeling of deep peace. It, like the Usui symbol, would be used on the whole body and its use would be appropriate for self-destructive behaviour, low self-esteem, etc.; it can also be used to clear negative energy from rooms or other spaces.
11
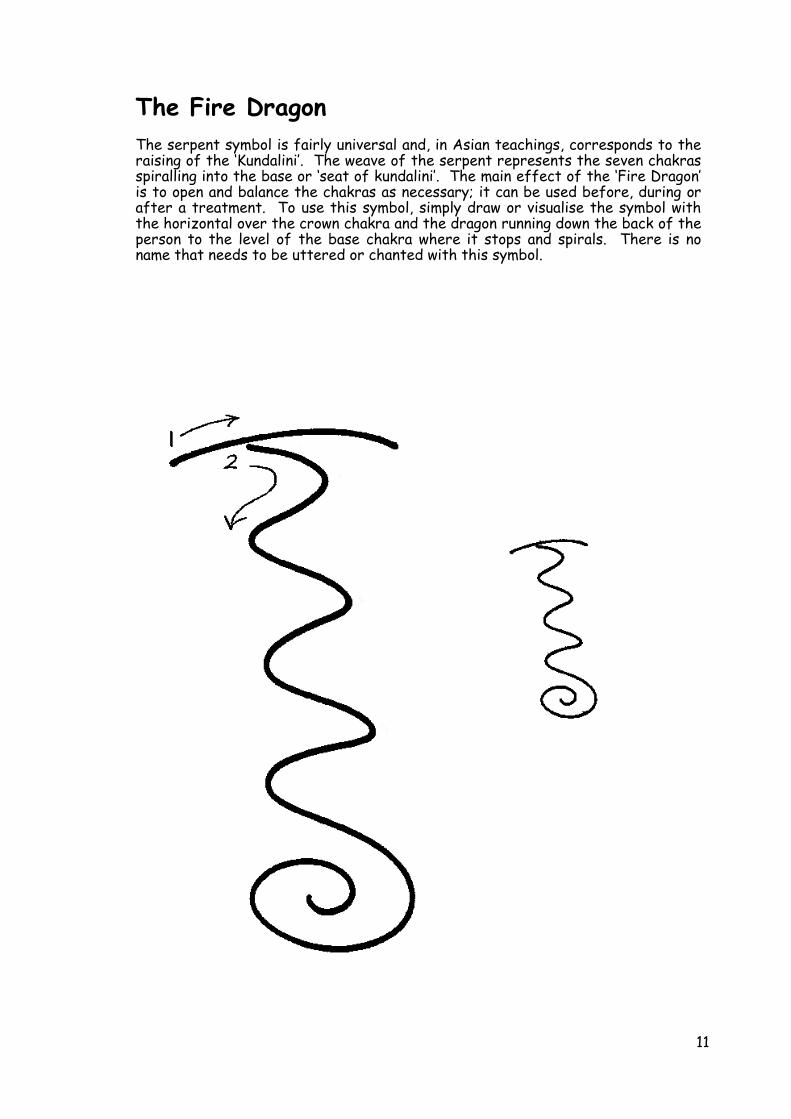
The Fire Dragon
The serpent symbol is fairly universal and, in Asian teachings, corresponds to the raising of the ‘Kundalini’. The weave of the serpent represents the seven chakras spiralling into the base or ‘seat of kundalini’. The main effect of the ‘Fire Dragon’ is to open and balance the chakras as necessary; it can be used before, during or after a treatment. To use this symbol, simply draw or visualise the symbol with the horizontal over the crown chakra and the dragon running down the back of the person to the level of the base chakra where it stops and spirals. There is no name that needs to be uttered or chanted with this symbol.

12
Additional Symbols
The Emotional Butterfly, Spirit Column and Mental Spirial symbols are not traditional Reiki symbols; they are 12th Century Taoist symbols. Like the Fire Dragon and the Grace symbol, these symbols do not have an associated name that has to be repeated as a mantra. The information I have is that:
A Chinese monk caused a serious problem with his karmic field and was given these symbols (Spirit Column, Mental Spiral, Emotional Butterfly) to cleanse his karmic field following a period of meditation. The symbols had such a profound effect on him that he took the signs from village to village across China.
The symbols are now found in Hinduism, Taoism, Zen Buddhism and other forms of Buddhism.
These symbols are not meant to be used in a routine way; they are used in treatments when our intuition tells us that it is the right thing to do. Follow your feelings.
Please note that these are NOT Reiki symbols and it is up to you whether you attune your clients to these symbols or not — and which symbols you attune them to. If you do decided to attune your clients to some or all of these symbols then:
In each section of the attunement, after attuning to the Sei-He-Ki symbol, visualise or draw each symbol passing into the Crown Chakra down into the base of the brain, through the hands down into the base of the brain, through the third-eye into the base of the brain, and through the hands. Tap them into the third-eye and hands. With the exception of the Aum and Heart Chakra symbols, there is no mantra to repeat. The mantras to repeat, along with pronounciation, for the Aum and Heart Chakra symbols are detailed on the pages for these symbols.
At Reiki Energy, we attune our clients to the Heart Chakra and Grace symbols at Reiki-2 level. The reasons for this are that we believe them to be powerful and useful healing tools for the Reiki Practitioner and it also reduces the load on both us and the clients at Master Level (less symbols in the attunement).

13
The Heart Chakra Symbol (Shi-Ka-Sei-Ki)
The ‘Heart Chakra’ symbol is from the ‘Radiance Technique’, a Reiki variation started by Barbara Weber-Ray. The story behind the ’Radiance Technique’ is that Weber-Ray was Takata’s ‘senior’ student and, as such, was taught things that were not taught to her other Master students. Weber-Ray supposedly used this extra knowledge to develop her own system of Reiki which has become known as the ‘Radiance Technique’.
The symbol focuses on the heart and can be seen as flooding a person with love. It focuses energy that deals with the emotional aspect of our being allowing the recipient to be open to the giving and receiving of love. This symbol can also be viewed as splitting the energy of the mental/emotional symbol (SeiHeKi) so that only the emotional energy is allowed through.
PRONOUNCIATION
Shi as in ship Ka as in cup
Sei as in 'say' Ki as in 'key'

14
Taoist Grace Symbol This symbol is an old Taoist symbol used for karmic cleansing and is useful for situations where a person is not learning the lesson (e.g. repeated behaviours such as overeating, or going through a non-stop series of abusive relationships). The symbol neutralizes the negative energy in the body/aura and works at the root cause. The symbol is normally visualised over a person’s body; there is no name to repeat.
The information on this symbol comes from a Chinese lady who grew up in a Buddhist monastery in Singapore and learned this symbol during her training there.

15
Emotional Butterfly The Emotional Butterfly is described as a Karmic Cleanser. The symbol affects the emotional side of things by making a person alert to their problem, cleansing the Heart Chakra and helping a person to realise deep down in their heart what they need to do to move on in life. The Heart part of the symbol represents 'hearing' and information that is stored in the mind; the top circle represents the higher consciousness storing information about the karmic field and physical body; the blobs on either side represent the auric field and the physical body.
In practice, it is visualised over the whole body — it is often used in conjunction with the Grace symbol; use the Emotional Butterfly first and follow a little while later with the Grace symbol.

16
Spirit Column
The ‘Spirit Column’ symbol is used to balance the spiritual, physical and auric field, putting them all in tune with each other. It produces instant balance. In practice, it could be used at the beginning and end of every treatment. Though it is not part of Reiki, it is capable of producing very useful effects. The symbol is drawn from the top.

17
Mental Spiral
This symbol works on the mental aspect, but penetrates far deeper than SeiHeKi. It would, for example, be suitable for dealing with paranoia and hearing voices. In use, you would draw the first part of the symbol over the forehead, and trace the remainder over the crown to the back of the head.
The top spiral represents the higher consciousness, the bottom spiral represents the subconscious. It is drawn starting with the top spiral.
18
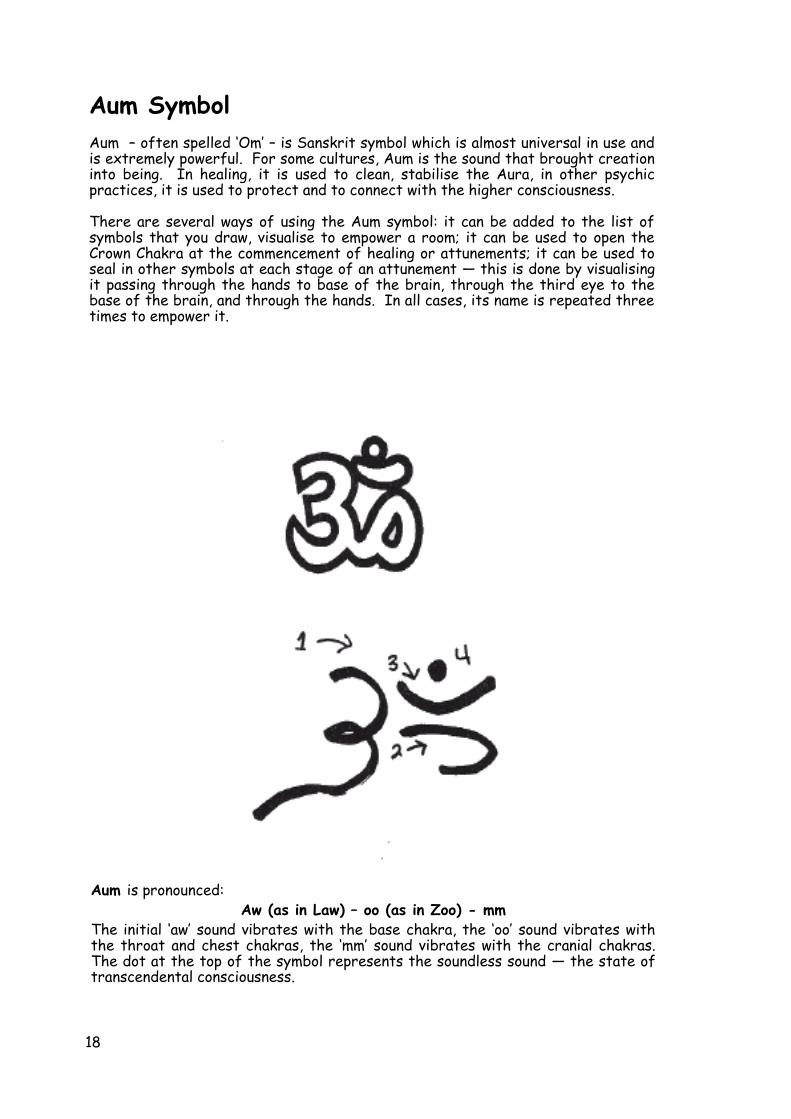
Aum Symbol
Aum – often spelled ‘Om’ – is Sanskrit symbol which is almost universal in use and is extremely powerful. For some cultures, Aum is the sound that brought creation into being. In healing, it is used to clean, stabilise the Aura, in other psychic practices, it is used to protect and to connect with the higher consciousness.
There are several ways of using the Aum symbol: it can be added to the list of symbols that you draw, visualise to empower a room; it can be used to open the Crown Chakra at the commencement of healing or attunements; it can be used to seal in other symbols at each stage of an attunement — this is done by visualising it passing through the hands to base of the brain, through the third eye to the base of the brain, and through the hands. In all cases, its name is repeated three times to empower it.
Aum is pronounced:
Aw (as in Law) – oo (as in Zoo) - mm The initial ‘aw’ sound vibrates with the base chakra, the ‘oo’ sound vibrates with the throat and chest chakras, the ‘mm’ sound vibrates with the cranial chakras. The dot at the top of the symbol represents the soundless sound — the state of transcendental consciousness.

19
20
Attunements
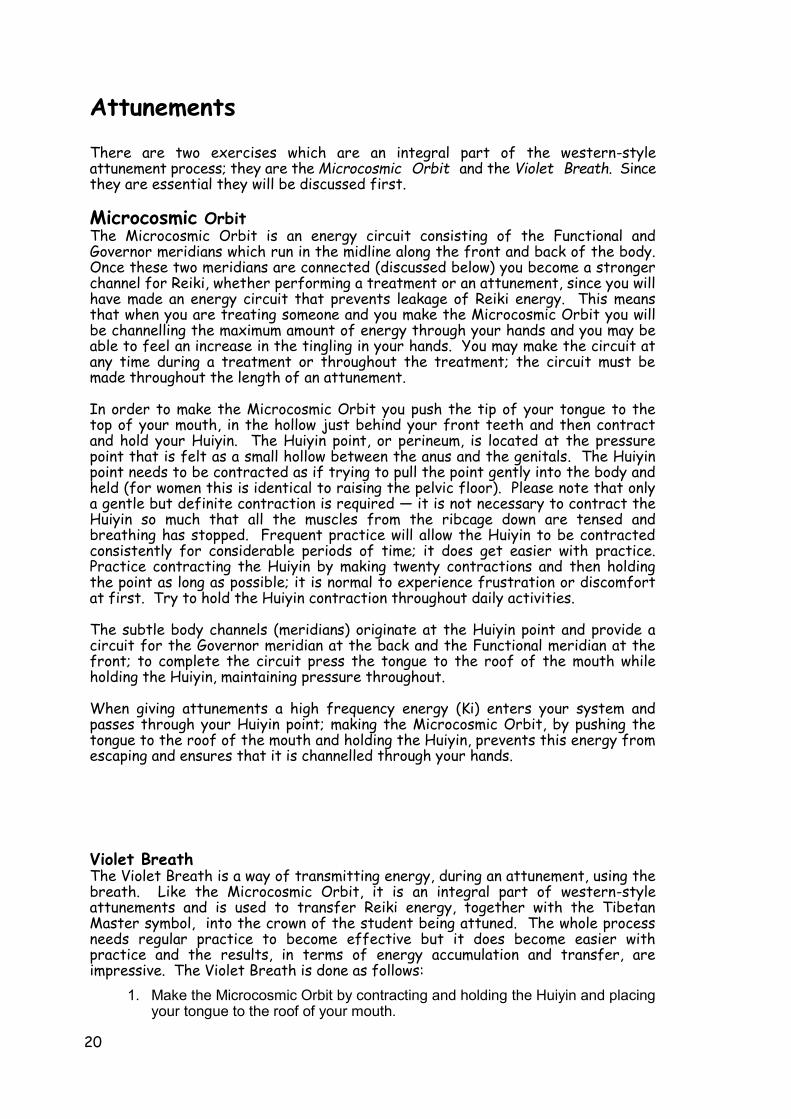
There are two exercises which are an integral part of the western-style attunement process; they are the Microcosmic Orbit and the Violet Breath. Since they are essential they will be discussed first.
Microcosmic Orbit The Microcosmic Orbit is an energy circuit consisting of the Functional and Governor meridians which run in the midline along the front and back of the body. Once these two meridians are connected (discussed below) you become a stronger channel for Reiki, whether performing a treatment or an attunement, since you will have made an energy circuit that prevents leakage of Reiki energy. This means that when you are treating someone and you make the Microcosmic Orbit you will be channelling the maximum amount of energy through your hands and you may be able to feel an increase in the tingling in your hands. You may make the circuit at any time during a treatment or throughout the treatment; the circuit must be made throughout the length of an attunement.
In order to make the Microcosmic Orbit you push the tip of your tongue to the top of your mouth, in the hollow just behind your front teeth and then contract and hold your Huiyin. The Huiyin point, or perineum, is located at the pressure point that is felt as a small hollow between the anus and the genitals. The Huiyin point needs to be contracted as if trying to pull the point gently into the body and held (for women this is identical to raising the pelvic floor). Please note that only a gentle but definite contraction is required — it is not necessary to contract the Huiyin so much that all the muscles from the ribcage down are tensed and breathing has stopped. Frequent practice will allow the Huiyin to be contracted consistently for considerable periods of time; it does get easier with practice. Practice contracting the Huiyin by making twenty contractions and then holding the point as long as possible; it is normal to experience frustration or discomfort at first. Try to hold the Huiyin contraction throughout daily activities.
The subtle body channels (meridians) originate at the Huiyin point and provide a circuit for the Governor meridian at the back and the Functional meridian at the front; to complete the circuit press the tongue to the roof of the mouth while holding the Huiyin, maintaining pressure throughout.
When giving attunements a high frequency energy (Ki) enters your system and passes through your Huiyin point; making the Microcosmic Orbit, by pushing the tongue to the roof of the mouth and holding the Huiyin, prevents this energy from escaping and ensures that it is channelled through your hands.
Violet Breath The Violet Breath is a way of transmitting energy, during an attunement, using the breath. Like the Microcosmic Orbit, it is an integral part of western-style attunements and is used to transfer Reiki energy, together with the Tibetan Master symbol, into the crown of the student being attuned. The whole process needs regular practice to become effective but it does become easier with practice and the results, in terms of energy accumulation and transfer, are impressive. The Violet Breath is done as follows:
1. Make the Microcosmic Orbit by contracting and holding the Huiyin and placing your tongue to the roof of your mouth.

21
2. Inhale deeply, expanding the lower abdomen, and imagine air as a white mist
entering the Crown Chakra, moving down through the tongue and down the Functional channel (along the front of the body) to collect at the Huiyin point.
3. While you pause before exhaling, see the breath rise up the spine along the Governor channel (along the back of the body) to the centre of the head.
4. Imagine the white mist spinning clockwise in the head.
5. As you exhale, allow the white mist to turn blue, and then a clear violet, while still spinning clockwise
6. Hold this image.
7. Repeat Instructions 2 – 6 twice more, at least.
8. Within the violet light, visualise the Tibetan Master symbol and say its name three times to empower it.
Practice this as often as possible as it is an essential part of western-style attunements.
It is interesting that although it seems quite common in Western attunements, not many people seem to have used breath as a way of conveying Reiki during treatments, though we now know that this is a technique that turns up in original Usui Reiki.
While the Microcosmic Orbit may seem a little silly to western ears, it should be remembered that this technique is used by Yogis to build up energy and that Chi Kung masters have been using this method for thousands of years to build up vast reservoirs of energy which they then use to cure some very serious diseases. In the present day, at demonstrations, Chi Kung masters knock people over by just targeting them with the stored energy they have amassed.
Although the Violet Breath is an essential part of western-style attunements, it is rare in the west to use the breath as a way of conveying Reiki energy during treatments yet we know that it is one of the original Reiki techniques developed by Mikao Usui.

22
Reiki 1 Attunement — 4-stage version
Most people who have been attuned to Reiki will have received four Reiki-1 attunements whereas only three attunements are described here. The reason for this is that the fourth attunement is simply a repeat of the third attunement given to make doubly sure that the student is well and truly connected to the Reiki source — not essential but most masters do it and most students expect it.
Before beginning the attunement, instruct your students to sit with their hands in their lap but that each one is to raise the hands to the prayer position in front of the heart when you place your hands on the shoulders and that each one is to raise the hands above the head, still keeping the prayer position, when you squeeze the left-shoulder. Play some soft music and possibly guide the students through a short relaxation routine before beginning the attunements. The procedure for carrying out the attunements is described below:
Attunement 1
1. Stand a few feet behind the sitted student(s). Say a silent prayer asking whatever Deity you believe in (e.g. God, Buddha, Brahma, Great Spirit or just the Universe) for the energy to perform the attunement. You can also, depending on your beliefs, ask for the help of angels, saints, spiritual guides and Reiki guides. Follow this by silently stating that this is to be a Reiki 1 attunement.
2. Draw or visualise the Usui Master symbol on the palm of a hand silently chanting its name (DaiKoMyo) three times to empower it; draw or visualise the Power symbol on the palm of the same hand and silently chant its name (ChoKuRei) three times to empower it. Repeat this on the other palm.
3. Draw or visualise the Power symbol on each of your own major Chakra chanting its name (ChoKuRei) silently three times for each Chakra in order to empower it; finally visualise the Power symbol over your whole body and chant its name three times. This serves to empower and open yourself.
4. Draw or visualise the following seven symbols, in violet, in the air in this order: Tibetan Master symbol (DaiKoMyo), Fire Dragon, Usui Master symbol (DaiKoMyo), Distance symbol (HonShaZeShoNen), Mental/Emotional symbol (SeiHeKi), Power symbol (ChoKuRei). As you finish drawing or visualise each symbol chant its name silently three times to empower it and intend that that the power of the symbol fills the room.
5. Make the Microcosmic Orbit by contracting and holding the Huiyin and placing the tongue at the roof of the mouth. Remember, this is to be maintained throughout the attunement process. Position yourself a few feet behind the first student.
6. Draw or visualise the Fire Dragon with the horizontal part just above the student‘s crown, the weave of the dragon running down the spine ending at the Root Chakra. Move towards the student and place both hands on the shoulders and close your eyes to gain rapport with the student.
7. Produce the Violet Breath, visualise the Tibetan Master symbol within the violet light. Place your hands on the student‘s crown, opening them to breathe the Violet light and Tibetan Master symbol into the student‘s crown Chakra — you lean down towards the head and blow the light and symbol gently into the crown Chakra. Using your right-hand as a guide, picture the Tibetan Master symbol moving down through the head to the base of the

23
brain while chanting the name DaiKoMyo silently to yourself three times, in order to empower the symbol.
8. Draw or visualise the Usui Master symbol over the head and, using your right hand as a guide, picture the symbol moving into the crown Chakra and down through the head to the base of the brain, while repeating the name DaiKoMyo three times to yourself (mantra style) in order to empower the symbol.
9. Squeeze the student's left shoulder, which is the cue to raise their hands to the top of their head. If they don't respond to the signal, then reach forwards and guide their hands to the right position yourself.
10. Hold the student's hands with your left hand and draw or visualise the Power symbol in the air over the hands. Using your right hand as a guide, picture the symbol moving down through the hands, into the crown Chakra, and down through the head to the base of the brain while repeating the symbol-name (ChoKuRei) three times to yourself (mantra style) in order to empower the symbol. Move the student‘s hands from the top of the head back down to the heart.
At this point you move to the next student and stand a few feet behind him/her. You then repeat steps 6 to 10 for this student. You do this until all students have had this stage completed at which point you return to the first student and carry on with step 11.
11. Move to the student‘s front and open his/her hands out flat so that they are overlapping each other. Support the student‘s hands with your left hand. Draw or visualise the Power symbol in front of the Third Eye Chakra and tap towards the student‘s Third Eye three times while visualising the symbol moving into the Third Eye and saying its name (ChoKuRei) three times to yourself in order to empower the symbol.
12. Draw or visualise the Power symbol in the air above the student‘s hands. Visualise the symbol moving into the hands while repeating the symbol name (ChoKuRei) three times to yourself, mantra style, in order to empower the symbol. Tap the hands three times and then press both palms with your thumbs.
13. Place the student's hands back together, in the prayer position, in front of the heart. Blow from the hands down to the Root Chakra, up the body to the Crown Chakra, down the body to the Root Chakra, and up to the hands again.
Move to the next student and repeat steps 11 to 13 for that student; do this until all students have had this stage completed at which point you return to the first student and continue with step 14.
14. Move to the student's back and place your hands on his/her shoulders for a few moments in order to regain rapport. Look down through the Crown Chakra and see a ball of white light moving into the Heart Chakra. State a positive affirmation to yourself intending the affirmation to be accepted by the subconscious mind. An example of the type of affirmation would be ―You are a successful and confident Reiki healer‖.
15. Place your thumbs at the base of the student‘s skull and say to yourself ―I now seal this process with divine love and wisdom‖ while picturing a door with the Power symbol on it being closed and locked. Intend that the process is sealed and complete and that the student is permanently connected to the Reiki source. Place your hands on the student‘s shoulders and say to yourself ―We are both blessed by this process‖.

24
Move to the next student and repeat steps 14 and 15 for that student; do this until all students have had this stage completed at which point you return and carry on with step 16.
16. Move to the front of the student and place his/her hands on their legs, palms down. Repeat this for the rest of the students.
17. Move back so that you are facing all the students and thank the Deity that you asked for the attunement energy and also the spirits, guides, etc. that you invited to help with the attunement. Hold your hands at waist level with your palms facing the students, exhale and release the Huiyin and tongue.
18. Ask the students to take a few long breaths and to come back slowly and open their eyes. The first Reiki 1 attunement has now been completed.
Attunement 2 The preparatory work (e.g. instructing students, relaxation, music) for the second attunement is exactly the same as for the first attunement and the attunement itself is almost exactly the same. The only difference is that after step 8 (where you visualised the Usui Master symbol moving down into the head) another step is added before carrying on with step 9. We will call this step 8a and it is described below:
Draw or visualise the Mental/Emotional symbol over the head and, using your right hand as a guide, picture the symbol moving into the Crown Chakra and down through the head to the base of the brain while repeating the name SeiHeKi three times to yourself (mantra style) in order to empower the symbol.
That is the only difference between the two attunements. So to carry out the second attunement you go through all the steps in the first attunement but add the above between steps 8 and 9.
Attunement 3 This again is identical in preparation to Attunements 1 and 2 and, again, the attunement is almost identical to the first attunement. The only difference this time is that two steps are added between steps 8 and 9. They are described below:
Draw or visualise the Distance symbol over the head and, using your right hand as a guide, picture the symbol moving into the Crown Chakra and down through the head to the base of the brain while repeating the name HonShaZeShoNen three times to yourself (mantra style) in order to empower the symbol.
Draw or visualise the Mental/Emotional symbol over the head and, using your right hand as a guide, picture the symbol moving into the Crown Chakra and down through the head to the base of the brain while repeating the name SeiHeKi three times to yourself (mantra style) in order to empower the symbol.
That is the only difference between the third attunement and the first attunement. So to carry out the third attunement you go through all the steps in the first attunement but add the above between steps 8 and 9.
Attunement 4 is an exact copy of Attunement 3
Once the four attunements have been given your student(s) has/have been attuned to Reiki Level 1.

25
Mikao Usui (1865 – 1926)

26
Reiki 1 Attunement — 1-stage version
There is no difference in the end result between a 4-stage and a 1-stage attunement. However, if you are attuning someone who is completely new to these practices, you should use the 4-stage attunement as it opens the energy in stages (i.e. it is gentler). If the recipient is used to energy (e.g. is a spiritual healer, medium, practices meditation, yoga, etc.) then you can use the 1-stage attunement without problem. If you were attuned to ‘Reiki 1’ by Reiki Energy then it is likely that you received two 1-stage attunements from each Master; the second attunement is just to make doubly sure that you are well connected to the energy. The process is as described below (the preparatory stages are the same as for the 4-stage attunement).
Attunement
1. Stand a few feet behind the student(s) who are sitted. Say a silent prayer asking whatever Deity you believe in (e.g. God, Buddha, Brahma, Great Spirit or just the Universe) for the energy to perform the attunement. You can also, depending on your beliefs, ask for the help of angels, saints, spiritual guides and Reiki guides. Follow this by silently stating that this is to be a Reiki 1 attunement.
2. Draw or visualise the Usui Master symbol on the palm of a hand silently chanting its name (DaiKoMyo) three times to empower it; draw or visualise the Power symbol on the palm of the same hand and silently chant its name (ChoKuRei) three times to empower it. Repeat this on the other palm.
3. Draw or visualise the Power symbol on each of your own major chakras chanting its name (ChoKuRei) silently three times for each chakra in order to empower it; finally visualise the Power symbol over your whole body and chant its name three times. This serves to empower and open yourself.
4. Draw or visualise the following six symbols, in violet, in the air in this order: Tibetan Master symbol (DaiKoMyo), Fire Dragon, Usui Master symbol (DaiKoMyo), Distance symbol (HonShaZeShoNen), Mental/Emotional symbol (SeiHeKi), Power symbol (ChoKuRei). As you finish drawing or visualise each symbol chant its name silently three times to empower it and intend that that the power of the symbol fills the room.
5. Make the Microcosmic Orbit by contracting and holding the Huiyin and placing the tongue at the roof of the mouth. Remember, this is to be maintained throughout the attunement process. Position yourself a few feet behind the first student.
6. Draw or visualise the Fire Dragon with the horizontal part just above the student‘s crown, the weave of the dragon running down the spine ending at the Root Chakra. Move towards the student and place both hands on the shoulders and close your eyes to gain rapport with the student.
7. Produce the Violet Breath, visualise the Tibetan Master symbol within the violet light. Place your hands on the student‘s crown, opening them to breathe the Violet light and Tibetan Master symbol into the student‘s crown chakra — you lean down towards the head and blow the light and symbol gently into the crown chakra. Using your right-hand as a guide, picture the Tibetan Master symbol moving down through the head to the base of the brain while chanting the name DaiKoMyo silently to yourself three times, in order to empower the symbol.
8. Draw or visualise the Usui Master symbol over the head and, using your right hand as a guide, picture the symbol moving into the crown chakra and down

27
through the head to the base of the brain, while repeating the name DaiKoMyo three times to yourself (mantra style) in order to empower the symbol.
9. Draw or visualise the Mental/Emotional symbol over the head and, using your right hand as a guide, picture the symbol moving into the Crown Chakra and down through the head to the base of the brain while repeating the name SeiHeKi three times to yourself (mantra style) in order to empower the symbol.
10. Draw or visualise the Distance symbol over the head and, using your right hand as a guide, picture the symbol moving into the Crown Chakra and down through the head to the base of the brain while repeating the name HonShaZeShoNen three times to yourself (mantra style) in order to empower the symbol.
11. Squeeze the student's left shoulder, which is the cue to raise their hands to the top of their head. If they don't respond to the signal, then reach forwards and guide their hands to the right position yourself.
12. Hold the student's hands with your left hand and draw or visualise the Power symbol in the air over the hands. Using your right hand as a guide, picture the symbol moving down through the hands, into the Crown Chakra, and down through the head to the base of the brain while repeating the symbol-name (ChoKuRei) three times to yourself (mantra style) in order to empower the symbol. Move the student‘s hands from the top of the head back down to the heart.
At this point you move to the next student and stand a few feet behind him/her. You then repeat steps 6 to 12 for this student. You do this until all students have had this stage completed at which point you return to the first student and carry on with step 13.
13. Move to the student‘s front and open his/her hands out flat so that they are overlapping each other. Support the student‘s hands with your left hand. Draw or visualise the Power symbol in front of the Third Eye Chakra and tap towards the student‘s Third Eye three times while visualising the symbol moving into the Third Eye and saying its name (ChoKuRei) three times to yourself in order to empower the symbol.
14. Draw or visualise the Power symbol in the air above the student‘s hands. Visualise the symbol moving into the hands while repeating the symbol name (ChoKuRei) three times to yourself, mantra style, in order to empower the symbol. Tap the hands three times and then press both palms with your thumbs.
15. Place the student's hands back together, in the prayer position, in front of the heart. Blow from the hands down to the Root Chakra, up the body to the Crown Chakra, down the body to the Root Chakra, and up to the hands again.
Move to the next student and repeat steps 13 to 15 for that student; do this until all students have had this stage completed at which point you return to the first student and continue with step 16.
16. Move to the student's back and place your hands on his/her shoulders for a few moments in order to regain rapport. Look down through the Crown Chakra and see a ball of white light moving into the Heart Chakra. State a positive affirmation to yourself intending the affirmation to be accepted by the subconscious mind. An example of the type of affirmation would be ―You are a successful and confident Reiki healer‖.

28
17. Place your thumbs at the base of the student‘s skull and say to yourself ―I
now seal this process with divine love and wisdom‖ while picturing a door with the Power symbol on it being closed and locked. Intend that the process is sealed and complete and that the student is permanently connected to the Reiki source. Place your hands on the student‘s shoulders and say to yourself ―We are both blessed by this process‖.
Move to the next student and repeat steps 16 and 17 for that student; do this until all students have had this stage completed at which point you return and carry on with step 18.
18. Move to the front of the student and place his/her hands on their legs, palms down. Repeat this for the rest of the students.
19. Move back so that you are facing all the students and thank the Deity that you asked for the attunement energy and also the spirits, guides, etc. that you invited to help with the attunement. Hold your hands at waist level with your palms facing the students, exhale and release the Huiyin and tongue.
20. Ask the students to take a few long breaths and to come back slowly and open their eyes. The Reiki-1 attunement is now complete.
Although only one attunement is necessary, most Masters would give two attunements.

29
Reiki 2 Attunement
Most of you will have had two Reiki 2 attunements whereas only one is described below; the reason for this is that the second attunement is an exact duplicate of the first attunement. The second attunement is given to make doubly sure that the student is well and truly attuned to Level 2. The preparatory stages and the first 8 steps of the attunement are almost identical to the Reiki 1 attunements but they are repeated here in order to make the process easier to follow.
As with the Reiki 1 attunement, instruct your students to sit with their hands in their laps, but that each of them is to raise his/her hands to the prayer position in front of their hearts when you place your hands on the shoulders, and that each of them is to raise his/her hands above the head (still holding the prayer position) when you squeeze the left-shoulder. Play some soft music in the background and possibly guide the students through a short relaxation routine before starting the attunements. The procedure for the attunements is described below:
The Attunement
1. Stand a few feet behind the student(s) who are sitted. Say a silent prayer asking whatever Deity you believe in (e.g. God, Buddha, Brahma, Great Spirit or just the Universe) for the energy to perform the attunement. You can also, depending on your beliefs, ask for the help of angels, saints, spiritual guides and Reiki guides. Follow this by silently stating that this is to be a Reiki 2 attunement.
2. Draw or visualise the Usui Master symbol on the palm of a hand silently chanting its name three times to empower it; draw or visualise the Power symbol (ChoKuRei) on the palm of the same hand and silently chant its name three times to empower it. Repeat this on the other palm.
3. Draw or visualise the Power symbol on each of your own major chakras chanting its name silently three times for each chakra in order to empower it; finally visualise the Power symbol over your whole body and chant its name three times. This serves to empower and open yourself.
4. Draw or visualise the following six symbols, in violet, in the air in this order: Tibetan Master symbol (DaiKoMyo), Fire Dragon, Usui Master symbol (DaiKoMyo), Distance symbol (HonShaZeShoNen), Mental/Emotional symbol (SeiHeKi), Power symbol (ChoKuRei). As you finish drawing or visualise each symbol chant its name silently three times to empower it and intend that that the power of the symbol fills the room.
5. Make the Microcosmic Orbit by contracting and holding the Huiyin and placing the tongue at the roof of the mouth. Remember, this is to be maintained throughout the attunement process. Position yourself a few feet behind the first student.
6. Draw or visualise the Fire Dragon with the horizontal part just above the student‘s crown, the weave of the dragon running down the spine ending at the Root Chakra. Move towards the student and place both hands on the shoulders and close your eyes to gain rapport with the student.
7. Produce the Violet Breath, visualise the Tibetan Master symbol within the violet light. Place your hands on the student‘s crown, opening them to breathe the Violet light and Tibetan Master symbol into the student‘s crown chakra — you lean down towards the head and blow the light and symbol gently into the crown chakra. Using your right-hand as a guide, picture the Tibetan Master symbol moving down through the head to the base of the

30
brain while chanting the name DaiKoMyo silently to yourself three times, in order to empower the symbol.
8. Draw or visualise the Usui Master symbol over the head and, using your right hand as a guide, picture the symbol moving into the crown chakra and down through the head to the base of the brain, while repeating the name DaiKoMyo three times to yourself (mantra style) in order to empower the symbol.
9. Squeeze the student's left shoulder, which is the cue to raise their hands to the top of their head. If they don't respond to the signal, then reach forwards and guide their hands to the right position yourself.
10. Hold the student's hands with your left hand and draw or visualise the Distance symbol in the air over the hands. Using your right hand as a guide, picture the symbol moving down through the hands, into the crown chakra, and down through the head to the base of the brain while repeating the symbol-name HonShaZeShoNen three times to yourself (mantra style) in order to empower the symbol.
11. Draw or visualise the Mental/Emotional symbol in the air over the hands. Using your right hand as a guide, picture the symbol moving down through the hands, into the crown chakra, and down through the head to the base of the brain while repeating the symbol-name SeiHeKi three times to yourself (mantra style) in order to empower the symbol.
12. Draw or visualise the Power symbol in the air over the hands. Using your right hand as a guide, picture the symbol moving down through the hands, into the crown chakra, and down through the head to the base of the brain while repeating the symbol-name ChoKuRei three times to yourself (mantra style) in order to empower the symbol. Move the student‘s hands from the top of the head back down to the heart.
At this point you move to the next student and stand a few feet behind him/her. You then repeat steps 6 to 12 for this student. You do this until all students have had this stage completed at which point you return to the first student and carry on with step 13.
Optional
Draw or visualise the Heart Chakra symbol in the air above the hands. Using your right hand as a guide, picture the symbol moving down through the hands in to the Crown Chakra and down through the head to the base of the brain while repeating the symbol name ShiKaSeiKi three times to yourself (mantra style) in order to empower the symbol.
Draw or visualise the Taoist Grace symbol in the air above the hands. Using your right hand as a guide, picture the symbol moving down through the hands in to the Crown Chakra and down through the head to the base of the brain; there is no mantra to repeat with this symbol.

31
13. Move to the student‘s front and open his/her hands out flat so that they are
overlapping each other. Support the student‘s hands with your left hand. Draw or visualise the Distance symbol in front of the Third Eye Chakra and tap towards the student‘s Third Eye three times while visualising the symbol moving into the Third Eye and saying its name (HonShaZeShoNen) three times to yourself in order to empower the symbol.
14. Draw or visualise the Mental/Emotional symbol in front of the Third Eye Chakra and tap towards the student‘s Third Eye three times while visualising the symbol moving into the Third Eye and saying its name (SeiHeKi) three times to yourself in order to empower the symbol.
15. Draw or visualise the Power symbol in front of the Third Eye Chakra and tap towards the student‘s Third Eye three times while visualising the symbol moving into the Third Eye and saying its name (ChoKuRei) three times to yourself in order to empower the symbol.
16. Draw or visualise the Distance symbol in the air above the student‘s hands. Visualise the symbol moving into the hands while repeating the symbol name (HonShaZeShoNen) three times to yourself, mantra style, in order to empower the symbol. Tap the hands three times.
17. Draw or visualise the Mental/Emotional symbol in the air above the student‘s hands. Visualise the symbol moving into the hands while repeating the symbol name (SeiHeKi) three times to yourself, mantra style, in order to empower the symbol. Tap the hands three times.
18. Draw or visualise the Power symbol in the air above the student‘s hands. Visualise the symbol moving into the hands while repeating the symbol name (ChoKuRei) three times to yourself, mantra style, in order to empower the symbol. Tap the hands three times and then press both palms with your thumbs.
Optional
Draw or visualise the Heart Chakra symbol in the air above the hands. Visualise the symbol moving into the hands while repeating the symbol name ShiKaSeiKi to yourself three times (mantra style) in order to empower the symbol. Tap the hands three times.
Draw or visualise the Taoist Grace symbol in the air above the hands. Visualise the symbol moving into the hands. Tap the hands three times. There is no mantra to repeat.
Optional
Draw or visualise the Heart Chakra symbol in front of the Third Eye Chakra and tap towards the student's Third Eye three times whilst visualising the symbol moving into the Third Eye and saying the symbol name ShiKaSeiKi three times in order to empower it.
Draw or visualise the Taoist Grace symbol in front of the Third Eye Chakra and tap towards the student's Third Eye three times whilst visualising the symbol moving into the Third Eye. There is no mantra to repeat.

32
19. Place the student's hands back together, in the prayer position, in front of the
heart. Blow from the hands down to the Root Chakra, up the body to the Crown Chakra, down the body to the Root Chakra, and up to the hands again.
Move to the next student and repeat steps 13 to 19 for that student; do this until all students have had this stage completed at which point you return to the first student and continue with step 20.
20. Move to the student's back and place your hands on his/her shoulders for a few moments in order to regain rapport. Look down through the Crown Chakra and see a ball of white light moving into the Heart Chakra. State a positive affirmation to yourself intending the affirmation to be accepted by the subconscious mind. An example of the type of affirmation would be ―You are a successful and confident Reiki healer‖.
21. Place your thumbs at the base of the student‘s skull and say to yourself ―I now seal this process with divine love and wisdom‖ while picturing a door with the Power symbol on it being closed and locked. Intend that the process is sealed and complete and that the student is permanently connected to the Reiki source. Place your hands on the student‘s shoulders and say to yourself ―We are both blessed by this process‖.
Move to the next student and repeat steps 20 and 21 for that student; do this until all students have had this stage completed at which point you return and carry on with step 22.
22. Move to the front of the student and place his/her hands on their legs, palms down. Repeat this for the rest of the students.
23. Move back so that you are facing all the students and thank the Deity that you asked for the attunement energy and also the spirits, guides, etc. that you invited to help with the attunement. Hold your hands at waist level with your palms facing the students, exhale and release the Huiyin and tongue.
24. Ask the students to take a few long breaths and to come back slowly and open their eyes.
The Reiki 2 attunement is now complete. The second attunement is an exact copy of the first attunement.

33
Reiki Master Attunement
The preparatory work (i.e. instructing students, etc.) is exactly the same for the Master attunement as for the Reiki 1 and Reiki 2 attunements. Also, the first seven steps of the Master attunement are almost identical to the Reiki 1 and Reiki 2 attunements; they are however covered here in order to make the process easier to follow. Like Reiki 2, the Master attunement is carried out twice in order to ensure that the student is well and truly connected to the Master symbols. The procedure for carrying out the attunement is described below.
The Attunement
1. Stand a few feet behind the student(s) who are sitted. Say a silent prayer asking whatever Diety you believe in (e.g. God, Buddha, Brahma, Great Spirit or just the Universe) for the energy to perform the attunement. You can also, depending on your beliefs, ask for the help of angels, saints, spiritual guides and Reiki guides. Follow this by silently stating that this is to be a Reiki Master attunement.
2. Draw or visualise the Usui Master symbol on the palm of a hand silently chanting its name three times to empower it; draw or visualise the Power symbol (ChoKuRei) on the palm of the same hand and silently chant its name three times to empower it. Repeat this on the other palm.
3. Draw or visualise the Power symbol on each of your own major chakras chanting its name silently three times for each chakra in order to empower it; finally visualise the Power symbol over your whole body and chant its name three times. This serves to empower and open yourself.
4. Draw or visualise the following six symbols, in violet, in the air in this order: Tibetan Master symbol (DaiKoMyo), Fire Dragon, Usui Master symbol (DaiKoMyo), Distance symbol (HonShaZeShoNen), Mental/Emotional symbol (SeiHeKi), Power symbol (ChoKuRei). As you finish drawing or visualise each symbol chant its name silently three times to empower it and intend that that the power of the symbol fills the room.
5. Make the Microcosmic Orbit by contracting and holding the Huiyin and placing the tongue at the roof of the mouth. Remember, this is to be maintained throughout the attunement process. Position yourself a few feet behind the first student.
6. Draw or visualise the Fire Dragon with the horizontal part just above the student‘s crown, the weave of the dragon running down the spine ending at the Root Chakra. Move towards the student and place both hands on the shoulders and close your eyes to gain rapport with the student.
7. Produce the Violet Breath, visualise the Tibetan Master symbol within the violet light. Place your hands on the student‘s crown, opening them to breathe the Violet light and Tibetan Master symbol into the student‘s crown chakra — you lean down towards the head and blow the light and symbol gently into the crown chakra. Using your right-hand as a guide, picture the Tibetan Master symbol moving down through the head to the base of the brain while chanting the name DaiKoMyo silently to yourself three times, in order to empower the symbol.
8. Squeeze the student's left shoulder, which is the cue to raise their hands to the top of their head. If they don't respond to the signal, then reach forwards and guide their hands to the right position yourself.
9. Hold the student's hands with your left hand and draw or visualise the Tibetan Master symbol in the air over the hands. Using your right hand as a

34
guide, picture the symbol moving down through the hands, into the crown chakra, and down through the head to the base of the brain while repeating the symbol-name DaiKoMyo three times to yourself (mantra style) in order to empower the symbol.
10. Draw or visualise the Fire Dragon symbol in the air over the hands. Using your right hand as a guide, picture the symbol moving down through the hands, into the crown chakra, and down through the head to the base of the brain while repeating the symbol-name Fire Dragon three times to yourself (mantra style) in order to empower the symbol.
11. Draw or visualise the Usui Master symbol in the air over the hands. Using your right hand as a guide, picture the symbol moving down through the hands, into the crown chakra, and down through the head to the base of the brain while repeating the symbol-name DaiKoMyo three times to yourself (mantra style) in order to empower the symbol.
12. Draw or visualise the Distance symbol in the air over the hands. Using your right hand as a guide, picture the symbol moving down through the hands, into the crown chakra, and down through the head to the base of the brain while repeating the symbol-name HonShaZeShoNen three times to yourself (mantra style) in order to empower the symbol.
13. Draw or visualise the Mental/Emotional symbol in the air over the hands. Using your right hand as a guide, picture the symbol moving down through the hands, into the crown chakra, and down through the head to the base of the brain while repeating the symbol-name SeiHeKi three times to yourself (mantra style) in order to empower the symbol.
Optional
Draw or visualise the Heart Chakra symbol in the air over the hands. Using your right hand as a guide, picture the symbol moving down through the hands, into the crown chakra, and down through the head to the base of the brain while repeating the symbol-name ShiKaSeiKi three times to yourself (mantra style) in order to empower the symbol.
Draw or visualise the Taoist Grace symbol in the air over the hands. Using right hand as a guide, visualise the symbol moving down through the hands, into the Crown Chakra and down through the head to the base of the brain. There is no mantra to repeat.
Draw or visualise the Aum symbol in the air over the hands. Using your right hand as a guide, picture the symbol moving down through the hands, into the crown chakra, and down through the head to the base of the brain while repeating the symbol-name Aum three times to yourself (mantra style) in order to empower the symbol.
Draw or visualise each of the Karmic symbols (Mental Spiral, Spirit Column, Emotional Butterfly) over the hands and using your right hand as a guide, picture each symbol moving down through the hands, into the Crown Chakra and down through the head to the base of the brain. There is no mantra to repeat with any of these symbols.

35
14. Draw or visualise the Power symbol in the air over the hands. Using your
right hand as a guide, picture the symbol moving down through the hands, into the crown chakra, and down through the head to the base of the brain while repeating the symbol-name ChoKuRei three times to yourself (mantra style) in order to empower the symbol. Move the student‘s hands from the top of the head back down to the heart.
At this point you move to the next student and stand a few feet behind him/her. You then repeat steps 6 to 14 for this student. You do this until all students have had this stage completed at which point you return to the first student and carry on with step 15.
15. Move to the student‘s front and open his/her hands out flat so that they are overlapping each other. Support the student‘s hands with your left hand. Draw or visualise the Tibetan Master symbol in front of the Third Eye Chakra and tap towards the student‘s Third Eye three times while visualising the symbol moving into the Third Eye and saying its name (DaiKoMyo) three times to yourself in order to empower the symbol.
16. Draw or visualise the Fire Dragon symbol in front of the Third Eye Chakra and tap towards the student‘s Third Eye three times while visualising the symbol moving into the Third Eye and saying its name (Fire Dragon) three times to yourself in order to empower the symbol.
17. Draw or visualise the Usui Master symbol in front of the Third Eye Chakra and tap towards the student‘s Third Eye three times while visualising the symbol moving into the Third Eye and saying its name (DaiKoMyo) three times to yourself in order to empower the symbol.
18. Draw or visualise the Distance symbol in front of the Third Eye Chakra and tap towards the student‘s Third Eye three times while visualising the symbol moving into the Third Eye and saying its name (HonShaZeShoNen) three times to yourself in order to empower the symbol.
19. Draw or visualise the Mental/Emotional symbol in front of the Third Eye Chakra and tap towards the student‘s Third Eye three times while visualising the symbol moving into the Third Eye and saying its name (SeiHeKi) three times to yourself in order to empower the symbol.
Optional
Draw or visualise the Heart Chakra symbol in front of the Third Eye Chakra and tap towards the student‘s Third Eye three times while visualising the symbol moving into the Third Eye and saying its name (ShiKaSeiKi) three times to yourself in order to empower the symbol.
Draw or visualise the Taoist Grace symbol in front of the Third Eye Chakra and tap towards the student‘s Third Eye three times while visualising the symbol moving into the Third Eye. There is no mantra to repeat.
Draw or visualise the Aum symbol in front of the Third Eye Chakra and tap towards the student‘s Third Eye three times while visualising the symbol moving into the Third Eye and saying its name (Aum) three times to yourself in order to empower the symbol.
Draw or visualise each of the Karmic symbols (Mental Spiral, Spirit Column, Emotional Butterfly) in front of the Third Eye Chakra and visualise each symbol moving into the Third Eye whilst tapping three times towards the Third Eye for each symbol. There is no mantra to repeat.
36
20. Draw or visualise the Power symbol in front of the Third Eye Chakra and tap
towards the student‘s Third Eye three times while visualising the symbol moving into the Third Eye and saying its name (ChoKuRei) three times to yourself in order to empower the symbol.
21. Draw or visualise the Tibetan Master symbol in the air above the student‘s hands. Visualise the symbol moving into the hands while repeating the symbol name (DaiKoMyo) three times to yourself, mantra style, in order to empower the symbol. Tap the hands three times.
22. Draw or visualise the Fire Dragon symbol in the air above the student‘s hands. Visualise the symbol moving into the hands while repeating the symbol name (Fire Dragon) three times to yourself, mantra style, in order to empower the symbol. Tap the hands three times.
23. Draw or visualise the Usui Master symbol in the air above the student‘s hands. Visualise the symbol moving into the hands while repeating the symbol name (DaiKoMyo) three times to yourself, mantra style, in order to empower the symbol. Tap the hands three times.
24. Draw or visualise the Distance symbol in the air above the student‘s hands. Visualise the symbol moving into the hands while repeating the symbol name (HonShaZeShoNen) three times to yourself, mantra style, in order to empower the symbol. Tap the hands three times.
25. Draw or visualise the Mental/Emotional symbol in the air above the student‘s hands. Visualise the symbol moving into the hands while repeating the symbol name (SeiHeKi) three times to yourself, mantra style, in order to empower the symbol. Tap the hands three times.
26. Draw or visualise the Power symbol in the air above the student‘s hands. Visualise the symbol moving into the hands while repeating the symbol name (ChoKuRei) three times to yourself, mantra style, in order to empower the symbol. Tap the hands three times.
Optional
Draw or visualise the Heart Chakra symbol in the air above the student‘s hands. Visualise the symbol moving into the hands while repeating the symbol name (ShiKaSeiKi) three times to yourself, mantra style, in order to empower the symbol. Tap the hands three times.
Draw or visualise the Taoist Grace symbol in the air above the student‘s hands. Visualise the symbol moving into the hands and tap the hands three times. There is no mantra to repeat.
Draw or visualise the Aum symbol in the air above the student‘s hands. Visualise the symbol moving into the hands while repeating the symbol name (Aum) three times to yourself, mantra style, in order to empower the symbol. Tap the hands three times.
Draw or visualise each of the Karmic symbols (Mental Spiral, Spirit Column, Emotional Butterfly) in the air above the student‘s hands. Visualise each symbol moving into the hands and tap the hands three times for each symbol. There is no mantra to repeat.

37
The Advanced Reiki attunement, provided by some masters, is an intermediate stage between Reiki 2 and Master levels. The only difference between the Advanced attunement and the Master attunement is that the student is not taught how to attune others; and you state at the beginning that it is to be a master attunement.
27. Place the student's hands back together, in the prayer position, in front of the heart. Blow from the hands down to the Root Chakra, up the body to the Crown Chakra, down the body to the Root Chakra, and up to the hands again.
Move to the next student and repeat steps 15 to 27 for that student; do this until all students have had this stage completed at which point you return to the first student and continue with step 31.
28. Move to the student's back and place your hands on his/her shoulders for a few moments in order to regain rapport. Look down through the Crown Chakra and see a ball of white light moving into the Heart Chakra. State a positive affirmation to yourself intending the affirmation to be accepted by the subconscious mind. An example of the type of affirmation would be ―You are a successful and confident Reiki healer‖.
29. Place your thumbs at the base of the student‘s skull and say to yourself ―I now seal this process with divine love and wisdom‖ while picturing a door with the Power symbol on it being closed and locked. Intend that the process is sealed and complete and that the student is permanently connected to the Reiki source. Place your hands on the student‘s shoulders and say to yourself ―We are both blessed by this process‖.
Move to the next student and repeat steps 28 and 29 for that student; do this until all students have had this stage completed at which point you return and carry on with step 30.
30. Move to the front of the student and place his/her hands on their legs, palms down. Repeat this for the rest of the students.
31. Move back so that you are facing all the students and thank the Deity that you asked for the attunement energy and also the spirits, guides, etc. that you invited to help with the attunement. Hold your hands at waist level with your palms facing the students, exhale and release the Huiyin and tongue.
32. Ask the students to take a few long breaths and to come back slowly and open their eyes.
The Master attunement is now complete. The second Master attunement is an exact copy of the first attunement.

38
Learning the Attunements
Although the procedures for giving attunements may look daunting at first sight they can, for learning purposes, be broken down into simpler steps as follows:
Steps 2 to 7 are exactly identical for all attunements and the only difference in Step 1 is the statement of which attunement it is (i.e. Reiki1, Reiki 2, Advanced or Master). This means that Steps 1 to 7 can be learned as a separate block and can be applied to all attunements. Practice these steps on an empty chair or teddy-bear until you are completely familiar with them.
The last five steps are also exactly identical for all attunements and can be practiced on an empty chair or teddy-bear. When you have finished Step 7 (above) move straight to the last five steps and do this until you are completely familiar with the steps.
This only leaves the actual attunement to the different symbols to be learned. Again, this can be broken down in several ways — learn the Reiki 1 attunements first since you have less symbols to deal with and even this can be broken down into smaller chunks since, using your chair or teddy-bear, you can practice on just attuning the head or third-eye, or hands. You would only move on to the next stage when completely ready. When you are confident that you can carry out all of the Reiki 1 attunements, try it on a person. Initially you should stick to family and friends until you have developed confidence in your ability to give the attunements. The process for learning the Reiki 2 and Master attunements is exactly the same — break into small blocks and learn the blocks. When you have mastered all the blocks, put it all together to carry out the full attunement.

39
Reiju empowerments
Reiju is the Japanese version of attunements; Reiju empowerments were used by Usui to give people the ability to channel Reiki. These empowerments are based on rituals from Tendai Buddhism. A Reiju empowerment:
connects the student to the Reiki energy and continually reinforces that connection, increasing the strength of the student‘s Reiki.
enhances the student‘s spiritual development, moving the student along his/her spiritual path.
Reiju is enhanced by the regular practice of Hatsu-Rei-Ho. Reiju empowerments consist of a stage where the Master opens him/herself to the energy which is followed by the individual empowerments for each student (opening to the energy is only carried out once, no matter how many students are being empowered).
Self-Empowerment Stage This opening to the energy stage is carried out as follows:
1. Raise hands to connect to Reiki in the way that you learned as part of Hatsu-Rei-Ho.
2. Feel energy, or light, cascading down into your hands, through your arms and down into your Dantien (Hara, Sacral Chakra).
3. Bring your hands slowly out to the sides, imagining that as you do this you are bringing energy through your crown, flooding the energy over your body and passing this energy through your body to your Dantien point as you lower your hands. Finish this movement by hovering your hands in front of your Dantien, with the dominant hand closest, and the non-dominant hand hovering further away.
You have now surrounded yourself with energy and brought the energy into your Dantien. Hold this position until you feel a real sense of connectedness with the energy. Maybe you can feel a strong bolt of energy through your crown, your hands may heat up or fill with energy, or you may feel changes in your Dantien.
Steps 4 and 5 are repeated three times:
4. Move your hands away from your Dantien, straight out in front of you, moving your hands forwards and upwards to above your head, to achieve the same 'connecting position' that you learned in Hatsu-Rei-Ho (see Fig 1 at end of Section).
5. Bring your hands slowly out to the sides, just like before, this time imagining that as you do so you are expanding your energy to engulf the people you will be empowering. Return your hands to your Dantien point as before.
The above seems to be the reverse of a closing-down exercise used at the end of Qigong thus it can be looked on as an opening-up exercise.
Individual Empowerments The recipient should sit on a chair, relaxed and with eyes closed. The Master then proceeds as follows:
1. Stand in front of the recipient; in Japan you would do Gassho and bow to the recipient.
2. Touch the recipient‘s shoulder to indicate that he/she should place hands in Gassho (if they have not already done so).
3. Move your hands high up above you, as shown in illustration (illustrations at end of this section), and feel the energy coming down into your hands from above (see Fig 1).

40
4. Move you hands down a little and join together the first two joints of you index
fingers; the other fingers should be floppy and relaxed. 5. In one continuous movement, move your hands down in front of the recipient,
and draw down a line of light which enters the crown, and trace an energy path down the centre of the body, intending that you are opening the energy centres as you do so. Keep on tracing the energy path until you are pointing at the base of the spine, at which time your hands will be close to the recipient's knees. Part your hands and, with your palms face down, move your hands sideways past the knees and move them downwards towards the floor, ritually grounding the energy without touching the floor. Move your hands to the sides as you stand up straight (see Fig 2).
You are now going to hold a number of hand positions where you will flood an area with energy; each position should be held for at least half a minute.
6. Stand beside, or behind, the recipient and hold you hands in the aura above the Crown Chakra (place the dominant hand nearest to the Crown and the non-dominant one above it). Direct energy down the energy path from the Crown to the Base Chakra (see Fig 3).
7. Slide you hands round so that one is on each side of the head; each palm faces a temple. Visualise the recipient‘s entire body being flooded with energy.
8. Again, following the outline of the aura, move hour hands round to the front of the recipient‘s face and make a triangle with your index finger and thumb tips (see Fig 4); the other fingers should be splayed out (this is said to be the symbol of the sun). Hold the centre of the triangle in front of the recipient‘s third eye and flood the third eye with energy (through the centre of the triangle)
9. Move hands round and down so that one is in front and one is behind the throat; flood the throat with energy.
10. Slide the hands down so that one is front and one behind the heart; flood the heart area with energy.
11. Move your hands so that the tips of the first three fingers, of each hand are in contact; cup the recipient‘s hands in you hands and flood his/her hands with energy (see Fig 5).
12. Move you hands back over the recipient‘s fingertips and bring you hands down towards his/her knees (your three fingertips are still touching at this stage). Smoothly separate your hands, and with palms face down, move you hands sideways past the knees down towards the floor (as you did when you grounded the energy earlier).
13. With the intention that you are scooping up excess energy, bring your hands together with your palms facing upwards and making contact along the edges of the little fingers and palms. Quickly move your hands up with you fingers pointing towards the centre of the recipient‘s body as if you were scooping up the energy and returning it to the sky; you are returning the energy along the energy path that you traced earlier. As your hands reach towards the sky, open your arms and release the energy back to the universe (see Fig 6).
14. Bring the recipient back.
Some Masters use this Empowerment as an alternative to the Reiki-1 attunement; most, that I have heard of, give three empowerments instead of attunements. It is a matter of personal preference and what you feel most confident with; we do a mixture.
Reiki-2 Empowerments At Reiki-2 level, there would be three empowerments with each empowerment representing each of the three energies that are taught at this level. However, instead of using symbols, kotodama would be used for each empowerment; the Master would intone the proper kotodama silently to himself whilst carrying out the empowerment. This has the effect of giving the empowerment the ‗flavour‘ of that energy and ensures

41
that the recipient has a strong connection to that energy. For the first empowerment, the Master would intone the Focus kotodama to represent the ‗ChoKuRei‘ energy; for the second empowerment he/she would intone the Harmony kotodama to represent the ‗SeiHeKi‘ energy; and for the third empowerment he would intone the Connection kotodama to represent the ‗HonShaZeShoNen‘ energy.
Master Empowerments At Master level, two empowerments are carried out and the Master intones the Empowerment kotodama whilst carrying out each empowerment.
*********************

42
Kotodama
The word ‗Kotodama‘ means ‗word spirit‘ or ‗the soul of the language‘. Kotodama are from ancient Shintoism, the indigenous animist religion of Japan, and are phrases or vowel sounds; they represent the forces of the universe. Japanese people of earlier times believed that words had mystical power and that the fact of saying something could make it so since each syllable or Kotodama could be thought of as divine aspects of creation. There are about 75 Kotodama that appear in Shintoism and Buddhism as meditation mantras, in martial arts as a way of focussing ‗chi‘, and in Reiki. Legend has it that Kotodama can be used to stop armies, to heal or to kill.
Within Reiki, Kotodama predate the use of symbols. Kotodama were one of the ways that Usui taught his students to connect with the different energies. The symbols were only introduced by Usui to help a few of his students — three naval officers, including Hayashi — who were having trouble connecting with the energies using meditation or Kotodama. The intention was that, in time, they would leave the symbols behind and work directly with the Reiki energies. The Kotodama used in Reiki represent the energies that we, in the west, use symbols to represent; they can obviously be used instead of symbols.
The Kotodama can be used as an alternative to the Reiki symbols when giving a treatment. So instead of using energy from ChoKuRei, for example, you could repeat the 'focus' Kotodama three times — or endlessly — to represent the energy. Use the 'harmony' Kotodama to represent the energy of SeiHeKi. Only one energy (or Kotodama) would be used at any one time. The Kotodama are said to access the energies in a more focused way than the symbols.
The basic sounds are: ‗a‘ pronounced aaah; ‗o‘ pronounced as in rose; ‗u‘ pronounced as in true; ‗e‘ pronounced as in grey; and ‗I‘ pronounced eeeee.
Focus: ho ku ei (pronounced: hoe koo ey eeee)
ho rhymes with so, dough, go
ku rhymes with too, loo, moo
Harmony: ei ei ki (pronounced: ey eeee ey eeee keee)
ki rhymes with knee, see, tree
Connection: ho a ze ho ne (pronounced: hoe aaah zay hoe neigh)
ho rhymes with so, dough, flow, go ze and ne rhyme with day, say, play, may
Empowerment: a i ko yo (pronounced: aaah eeee coe yo)
ko rhymes with so, dough, go yo as in yo-yo, rhyming with so, dough, go

43
Fig 1 Fig 2
Fig 3
Fig 4
Fig 5 Fig 6
Empowerment Diagrams
44
Appendix 1 — Medical Research
The research quoted below was carried out at hospitals and clinics by doctors and nurses working with healers and has been published in reputable journals or books. It is not limited to just Reiki but includes research on Reiki-like therapies such as Spiritual healing as well. This is only a very small sample of what is available; there are literally hundreds, if not thousands, of research studies on energy-healing therapies.
Bullock, M; Reiki: a complementary therapy for life; Am J Hosp Palliat Care 1997 Jan-Feb; Vol 14(1), pages 31-33. Tom was diagnosed with a very aggressive cancer and was receiving only palliative radiation and medication; his symptoms suggested a very limited life-expectancy. With the aid of Reiki and his intent he was able to achieve his goal of long-term stability with freedom from immobilising pain and swelling; his comfort and quality of life improved dramatically and he is living well with his cancer. General trends seen with Reiki include periods of stabilisation where there is time to enjoy the last days of one‘s life; a peaceful and calm passing if death is imminent; plus relief from pain and anxiety. Reiki is a valuable complement in supporting patients in their end-of-life journey, enhancing the quality of their remaining days.
Olson K, Hanson J; Using Reiki to manage pain: a preliminary report; Cancer Prev Control 1997 Jun; Vol 1(2) pages 108-113. This study, carried out at the Cross Cancer Institute in Edmonton, looked at the usefulness of Reiki as an adjuvant to Opiate therapy in pain management. The study involved 20 volunteers experiencing pain at 55 sites for a variety of reasons, including cancer. Reiki treatments were provided by a Reiki practitioner (level 2) and pain was measured using both a Visual Analogue Scale (VAS) and a Likert Scale immediately before and after treatment. Both instruments showed a highly significant (p<0.00001) reduction in pain following a Reiki treatment.
Alandydy, Patricia and Kristen; Using Reiki to support surgical patients; Journal of Nursing Care Quality 1999 Apr; Vol 13(4) pages 89-91. Surgical patients at Columbia/HCA Portsmouth Regional Hospital in Portsmouth, New Hampshire are given the option of a 15-minute pre-surgery and post-surgery Reiki treatment. In 1998, more than 870 patients took advantage of this offer and, as a result, there was less use of pain medications, shorter lengths of stay in hospital and increased patient satisfaction.
Brewitt, Vittetoe, Hartwell; The Efficacy of Reiki Hands-On Healing: Improvements in spleen and nervous system function as quantified by electrodermal screening; Alternative Therapies July 1997; Vol 3(4) page 89. This study used Electrodermal Screening to quantify the effect of Reiki treatments on five patients suffering from Multiple Sclerosis, Lupus, Fibromyalgia or Thyroid Goiter. The patients were given three one-hour Reiki treatments in the first week, followed by weekly one-hour treatments for a further eight weeks. The healers systematically placed their hands over holding points of neurovascular regions on the cranium, neurolymphatic regions on the trunk, and minor chakras on the limbs. The patients did not receive any other conventional or alternative treatments during the 9-week time period of the study. Over the period of the study, the patients reported increased relaxation, reduced pain, and more mobility. However, what was really significant was that the Electrodermal Screening method was able to measure improvements in Spleen, Immune and Nervous System function; and the study concluded that this method could be used to quantify improvement

45
for therapies, like Reiki, whose effects are difficult to measure by more conventional methods.
Rein, G; Role of consciousness on holoenergetic energetic healing: a new experimental approach; Proceedings of International Society for the Study of Subtle Energies and Energy Medicine; June 1992(b). This study looked at mental focus and cancer growth. The healer, Laskow, while focussing on specific states of mind, gave healing to cancerous cell tissue samples in a laboratory. The rates of cell-growth for each mental state were measured with the following results — allowing the cells to return to their natural order and harmony produced 39% inhibition; allowing God‘s will to manifest produced 21% inhibition; circulating the Microcosmic Orbit produced 41% inhibition. No effects were found for unconditional love.
Motz, Julie; Hands of Life; Bantam Books, New York, 1998. The New York Times magazine reported on the use of Reiki during open-heart surgeries and heart transplants at the Columbia Presbyterian Medical Centre in New York. The operations were performed by Dr Mehmet Oz, Julie Motz (a Reiki master) gave the Reiki treatments. None of the 11 heart patients treated with Reiki experienced the usual post-operative depression, the bypass patients had no post-operative pain or leg weakness; and the transplant patients experienced no organ rejection.
Wetzel, W; Reiki Healing: a physiologic perspective; Journal of Holistic Nursing 1989; Vol 7(1) pages 47-54. This study, which involved 58 people, looked at how Reiki affected Haemoglobin and Haematocrit values — Heamoglobin is the part of red blood cells that carries oxygen, Haematocrit is the ratio of red blood cells to total blood volume. The 58 people were divided into two groups; 48 in the experimental group and 10 in the control group. Both groups blood samples taken at the beginning and end of the experiment. The experimental group were given Reiki-1 training and then started self-healing. Those in the experimental group (who had received Reiki training) experienced significant changes in Haemoglobin and Haematocrit values; 28% experienced an increase and the remainder experienced a decrease — it is thought that the changes, whether increase or decrease, were consistent with the purpose of Reiki which is to bring balance on an individual basis. The control group (who had not received Reiki training) did not experience any significant change. One individual, from the experimental group, experienced a 20% increase in Haemoglobin and Haematocrit values; she continued to self-treat and after 3 months, her increase had been maintained and she had continued to improve — this was appropriate for her as she had been experiencing iron-deficiency anaemia.
Wirth, D; Research in Parapsychology 1999:pages 47-52 This tightly controlled study involved 44 students, split into two groups of 23 and 21, having identical minor wounds inflicted by a doctor on their forearms. The experimental group received healing, the control group did not. The treatments were administered in such a way that there was no possibility of a placebo effect — all 44 students had to extend their wounded arm through a hole in the wall into another room, if the student belonged to the experimental group then he/she received non-contact healing from a healer present in the room; there was no healer present if the student was from the control group. Both the students and the doctor who later evaluated the healing rate were told that the experiment was about the electrical conductivity of the body. After eight days, the healed wounds had shrunk by 93.5% compared with 67.3% for the non-healed wounds; after sixteen days, the figures were 99.3% shrinkage for the healed group and 90.9% for the non-healed group.
46
Brown CK; Spiritual Healing in a General Practice: Using a Quality-of-life Questionnaire to Measure Outcome; Complementary Therapies in Medicine 1995, Vol 3 : pages 230-233. In this study, 35 patients with chronic health problems were invited to attend healing sessions with two healers at the surgery. 33 of the 35 patients completed the healing sessions. 11 of the patients had suffered from anxiety/stress for an average of 12 years; 6 of the patients had been suffering from depression for an average of 6 years; and the remainder were suffering from physical problems. Initially, the mean mental health score of the group was 49.6 (average for general population = 73.7) and they scored considerably lower than the general population on emotional and social functioning as well. At the end of the trial, the mean mental health score of the group had risen to 63.5 with comparable improvements in emotional and social functioning. 23 of the patients elected to continue with healing and a follow-up questionnaire was sent to them after 6 months. Nineteen patients answered and the results showed that the improvements in mental health had been maintained.
As mentioned at the beginning of this Appendix, this is only a tiny sample of the research that is available on these therapies. You will never be able to convince the sceptics that these therapies are of benefit but then accepting therapies like Reiki would mean that they were taking responsibility for their own health — maybe this is what they are really against.
******************

47
Cho Ku Rei
Sei He Ki
Hon Sha Ze Sho Nen
Shi-Ka-Sei-Ki
Taoist Grace Symbol
Appendix 2 — Reiki-2 Symbols Summary

48
Appendix 3 — Meditation and Hatsu Rei Ho
This was first introduced in Reiki-1 but is covered here as an Appendix to stress its importance. The aim of meditation is:
To quieten and persuade the mind to relinquish the upper-hand so that a connection can be made with the higher-self/soul;
To rediscover our true self and step away from our fears;
To reach a state of inner peace and harmony;
To be able give out unconditional love to all.
By moving towards a quieter mind, the healer can attune more easily to the higher-self and to the healing source. Through practising meditation regularly, the healer can become more centred, balanced and harmonious at all levels of being and therefore become a better channel of healing energy.
The main difference between relaxation and meditation is that during relaxation, the mind is allowed to wander; we are not in control. Meditation is when the body is relaxed but the mind is focussed. It is when we drop our thoughts aside and we are at one with the sensations of the moment.
In the meditative state the left side of the brain becomes subdued and the right side of the brain is activated allowing us to use our natural intuitive ability. We are able to link more easily to our spiritual aspect, we are more in harmony with the universe and more aware of guidance.
Meditation is a gentle but powerful tool for self-development. Remember that inspiration can, sometimes, be immediate and fresh insights can come during or at the end of a meditation. However, more often, meditation will assist us to live more creatively and receive inspiration at all times.
Meditation changes the energy around ourselves and, in turn, it changes the energy around others — we are all connected. In time it will spread like ripples on a pond to change the energy of the world. Remember, we cannot change other people — we can only change ourselves and that, in turn, will change our perception of others.
Don‘t meditate for long periods of time at the beginning. Balance is the prime object. Ten to twenty minutes of quality time is better than trying for hours; what is developed slowly, and resolutely, will last.
Techniques To Reach The Meditative State There are a number of techniques and we must find the one we like best and not hesitate to change, if necessary, as we grow in awareness:
Concentration on the breath. Being aware of it, deciding on a point of attention (nostrils, abdomen). Counting the breaths to help with the concentration.
Concentration on an object either visually or mentally (candle, flower, picture etc.)
Concentration on the third eye
Mental repetition of prayer, mantra, word or phrase
Watching the body, allow your awareness to sweep the body slowly in minute details trying to feel from both the inside and the outside
Watching the emotions and thoughts as they arise and allow them to pass with the same calm and objective attention that you use when watching the breath.

49
Visualisation for spiritual purposes, visualising archetypes or inner guides and
their spiritual qualities.
Movement exercises ( Hatha Yoga, Tai Chi etc.)
Your mind may wander but no thought can stay in the mind unless given active support. Be gentle but firm with yourself. The thoughts are like hungry birds, they plague you because they are used to being fed. Day by day, close your window, keep silent and they will soon stop pestering you. Recording impressions in a diary and sharing experiences can be useful.
Grounding is important and before starting to meditate we must make sure that we have a good connection with the earth, so that awareness can be expanded whilst the body is grounded. The energies will want to move up as you relax. This may make you light-headed. At the end use a technique that will return the consciousness to a state compatible with everyday living. This can be moving the feet, rubbing the hands, stretching or having a drink of water.
Remind yourself often that the journey into meditation is a journey into yourself, a journey of self-discovery and feel how wonderful it is to be alive, to be you.
Hatsu Rei Ho It is now known that Takata did not pass on certain spiritual exercises to her masters and we are only now learning these exercises from the Usui Reiki Ryoho Gakkai (Usui‘s association). One of these exercises, actually a series of meditations, is known as Hatsu Rei Ho — it means to ‗start up‘ or strengthen energy; in this case Reiki energy. These meditations were practiced by Usui and his students, and are still practiced by the Gakkai. ‗Hatsu Rei Ho‘ originated in Tendai Buddhism and is also similar to energy exercises carried out in Chi Kung and Tibetan Buddhist purification rituals. A description of how to perform Hatsu Rei Ho is given below.
Stage 1: Relax Sit down and make yourself comfortable, place your hands in your lap, relax and close your eyes. Focus your attention on your Sacral Chakra (or Hara) which is about 2 inches below the navel.
Stage 2: Focus (Mokunen) Say to yourself: “I am going to do Hatsu Rei Ho now”.
Stage 3: Brushing Off (Kenyoku) Place fingertips of right hand near top of left shoulder where collarbone meets bulge of shoulder; the hand is lying flat on chest. While exhaling, sweep flat hand down and across chest so that it crosses the base of the sternum and down to the right hip. Repeat this with the left hand sweeping from right shoulder to left hip while exhaling. Repeat again but with right hand sweeping from left shoulder to right hip while exhaling (i.e. the movement will have been carried out twice with the right hand and once with the left hand). Outstretch your left arm straight in front of you and place fingertips of right hand at outer edge of left shoulder (hand is flat with fingers point sideways from body). While exhaling, sweep flat right hand along left arm all the way to the fingertips and beyond — keep left arm straight. Repeat on right side with right arm outstretched and left hand starting on outer edge of right shoulder. Repeat again with right hand sweeping along left shoulder (i.e. the movement will have been carried out twice with the right hand and once with the left hand).
Stage 4: Connect to Reiki Raise your hands high above your head with palms facing upwards and fingers pointing towards midline. Connect to Reiki by visualising energy (possibly as white light) cascading into your hands and running down your arms into your body; feel the energy flowing. As you become aware of the energy, slowly lower your hands back down into your lap but with the palms facing upwards (this exercise is from Qigong).

50
Stage 5: Joshin Kokkyu Ho (Purifying the Spirit) Keep your hands in your lap with palms facing upward. Focus on your Sacral Chakra (Hara) and relax. When you inhale, visualise energy or light flooding into your Crown Chakra and flowing down your body to the Sacral Chakra (Hara). As you pause before exhaling, feel the energy expand through your body. As you exhale, visualise the energy expanding out of your body in all directions to infinity. As this meditation progresses you will feel the energy tingling in your hands and possibly in your feet.
Stage 6: Gassho Gassho means „hands together‟ and for this meditation you should place your hands together (in a prayer position) in front of you (a little above the level of your heart); they should be positioned so that you could breathe onto your fingertips if desired. Focus your attention on the point where your middle fingers meet.
Stage 7: Sieshin Toitsu Keep hands in Gassho position. When you inhale, visualise light flooding into your hands, travelling along your arms and going down your body to the Hara or Sacral Chakra. When you breath out visualise the energy stored in the Hara flooding out through your hands.
Stage 8: Gokai Sansho Say the Reiki principles aloud three times:
Just for today do not worry.
Just for today do not anger.
Honour your parents, teachers and elders.
Earn your living honestly.
Show gratitude to everything.
Think about the principles and what they mean to you.
Stage 9: Focus (Mokunen) Place your hands in your lap, palm down. Say to yourself: ―I‘ve finished Hatsu Rei Ho now‖. Open your eyes and shake your hands for a few seconds.
Spend about 3 minutes each (longer if desired) on Stages 5, 6 and 7. Although some of these exercises may seem a little silly when you first come across them, bear in mind that some of them (Kenyoku, Joshin Kokkyu Ho and Sieshin Toitsu) have been used by Chi Kung masters for thousands of years to build up vast amounts of energy. Practice Hatsu Rei Ho regularly and you will notice that your ability to channel energy will improve.
You can use a variation of the Stage 5 technique, Joshin Kokkyu Ho, on it‘s own in order to get the energy flowing before doing a treatment. Do the meditation as above but instead of breathing the energy out to infinity, visualise that you are exhaling the energy out through your hands.
********************

51

52