release 8.0 installation and licensing guide installation and...i contents chapter 1 1g etting...
TRANSCRIPT

Captaris Inc., 6025 South Quebec Street, Suite 260, Englewood, CO 80111Phone +1 303.930.4600, www.captaris.com
Alchemy Content Management Suite
Release 8.0Installation and Licensing Guide

Alchemy is a registered trademark of Captaris, Inc. All rights reserved. All other trademarks or registered trademarks are the property of theirrespective companies. Other products and company names mentioned herein may be the trademarks of their respective owners.
© 1992-2005, Captaris Inc. All rights reserved

i
CONTENTS
CHAPTER 11GETTING STARTED................................................................................................................ 1-1
1.1 WELCOME TO ALCHEMY® CONTENT MANAGEMENT SUITE...................................................... 1-11.2 ABOUT THIS GUIDE ................................................................................................................ 1-21.3 WHAT THIS GUIDE ASSUMES ................................................................................................... 1-21.4 DOCUMENTATION CONVENTIONS ............................................................................................. 1-21.5 CONTACTING CAPTARIS.......................................................................................................... 1-3
1.5.1 ENGLEWOOD OFFICE .................................................................................................... 1-31.5.2 EDUCATIONAL SERVICES................................................................................................ 1-41.5.3 TECHNICAL SUPPORT .................................................................................................... 1-41.5.4 PROFESSIONAL SERVICES.............................................................................................. 1-61.5.5 SALES .......................................................................................................................... 1-61.5.6 DOCUMENTATION FEEDBACK.......................................................................................... 1-7
1.6 ANNUAL MAINTENANCE PROGRAM.......................................................................................... 1-71.7 SUPPORTED HARDWARE......................................................................................................... 1-71.8 MINIMUM SYSTEM REQUIREMENTS .......................................................................................... 1-8
1.8.1 ALCHEMY LICENSE MANAGER (ALM) ............................................................................. 1-81.8.2 ALCHEMY CONTENT MANAGEMENT SUITE (ACMS) ........................................................ 1-8
CHAPTER 22INSTALLATION NOTES AND UPGRADE INFORMATION ............................................................... 2-1
2.1 INSTALLATION NOTES ............................................................................................................. 2-12.2 UPGRADE INFORMATION ......................................................................................................... 2-2
2.2.1 ALCHEMY CONTENT MANAGEMENT SUITE (ACMS) ........................................................ 2-22.2.2 ALCHEMY AUDIT LOGGING SERVICE ............................................................................... 2-4
CHAPTER 33INSTALLING PREREQUISITE SOFTWARE ................................................................................. 3-1
3.1 INSTALLING MICROSOFT MESSAGE QUEUING (MSMQ)............................................................ 3-13.2 INSTALLING MICROSOFT .NET FRAMEWORK ........................................................................... 3-23.3 INSTALLING THE MICROSOFT SQL SERVER DESKTOP ENGINE (ALCHEMY) ............................... 3-33.4 CREATING THE ALCHEMY SQL DATABASE............................................................................... 3-5
Contents
ii
CHAPTER 44INSTALLING THE ALCHEMY CONTENT MANAGEMENT SUITE (ACMS)...................................... 4-1
4.1 INSTALLING ALCHEMY SERVER ............................................................................................... 4-14.1.1 CREATING THE ALCHEMY SERVER ADMINISTRATOR GROUP............................................. 4-24.1.2 INSTALLING THE ALCHEMY SERVER SERVICE .................................................................. 4-2
4.2 INSTALLING ALCHEMY CONTENT MANAGEMENT SUITE CLIENTS, CAPTURE MODULES AND SERVER OP-TIONS .......................................................................................................................................... 4-84.3 INSTALLING ALCHEMY SEARCH ............................................................................................. 4-12
4.3.1 SINGLE-USER AND CONCURRENT-USER ALCHEMY SEARCH ........................................... 4-124.3.2 INSTALLING ALCHEMY SEARCH .................................................................................... 4-124.3.3 INSTALLING ALCHEMY SEARCH FROM REMOVABLE STORAGE MEDIA............................... 4-154.3.4 RUNNING ALCHEMY SEARCH FROM REMOVABLE STORAGE MEDIA.................................. 4-16
CHAPTER 55MANAGING YOUR ALCHEMY SOFTWARE INSTALLATIONS ........................................................ 5-1
5.1 VERIFYING ALCHEMY COMPONENT INSTALLATION .................................................................... 5-15.2 MODIFYING AN ALCHEMY INSTALLATION .................................................................................. 5-25.3 REPAIRING AN ALCHEMY INSTALLATION................................................................................... 5-35.4 UNINSTALLING ALCHEMY PRODUCTS, CLIENTS, MODULES AND OPTIONS.................................... 5-35.5 UNINSTALLING MICROSOFT SQL SERVER DESKTOP ENGINE (ALCHEMY).................................. 5-4
CHAPTER 66LICENSING ALCHEMY CONTENT MANAGEMENT SUITE (ACMS).............................................. 6-1
6.1 ALCHEMY PRODUCT LICENSING OVERVIEW .............................................................................. 6-26.2 ACTIVATING A TRIAL LICENSE.................................................................................................. 6-36.3 USING AUTOMATED LICENSING................................................................................................ 6-5
6.3.1 LICENSING THE ALCHEMY CONTENT MANAGEMENT SUITE (ACMS)................................. 6-56.3.2 UPDATING PRODUCT LICENSING FOR THE ALCHEMY CONTENT MANAGEMENT SUITE ........ 6-8
6.4 USING MANUAL LICENSING.................................................................................................... 6-126.4.1 LICENSING THE ALCHEMY CONTENT MANAGEMENT SUITE (ACMS)............................... 6-126.4.2 UPDATING PRODUCT LICENSING FOR THE ALCHEMY CONTENT MANAGEMENT SUITE ...... 6-15
6.5 USING E-MAIL RECOVERY ..................................................................................................... 6-186.6 USING CALL-IN LICENSING..................................................................................................... 6-186.7 TRANSFERRING A PRODUCT LICENSE .................................................................................... 6-19
6.7.1 TRANSFERRING A LICENSE DIRECTLY ACROSS THE NETWORK........................................ 6-196.7.2 TRANSFERRING A LICENSE ON A FLOPPY DISK .............................................................. 6-22
6.8 VERIFYING LICENSING STATUS .............................................................................................. 6-25
APPENDIX AAEASY CLIENT DEPLOYMENT.................................................................................................. A-1
A.1 INSTALLING ALCHEMY CLIENT USING EASY CLIENT DEPLOYMENT..............................................A-1
GLOSSARY............................................................................................................ GLOSSARY-1
GLOSSARY............................................................................................................ GLOSSARY-1

Contents
iii
INDEX............................................................................................................................ INDEX-1

Contents
iv

1-1
CHAPTER 1GETTING STARTED
WHAT THIS CHAPTER COVERS
This chapter gives you important information that you should review before installing and licensing Alchemy Premium. It includes the following topics:
• Welcome to Alchemy® Content Management Suite• About this guide• What this guide assumes• Documentation conventions• Contacting Captaris• Annual Maintenance Program• Supported hardware• Minimum system requirements
1.1 WELCOME TO ALCHEMY® CONTENT MANAGEMENT SUITE
Alchemy software manages all of the documents and data that your organization must retain. It acts as an electronic file cabinet for your organization, where you can securely file and find every document, no matter its original source. Got paper documents? Capture and manage it with Alchemy – any size, any form. Mainframe reports? No problem. Microsoft Office documents? Bring them on. Adobe Acrobat files or email? Alchemy can.Alchemy will manage from 1 to 1 billion documents. Every document is indexed for lightning-fast retrieval; including the full text inside documents. You can store the document repository on a single CD-ROM, on a server hard disk, or on a huge networked optical library. There is no other document management software that can start so small and grow so big. Alchemy’s search engine is legendary for resolving index field and full text queries within seconds, regardless of the repository’s size or the age of the documents.The best part about Alchemy is how it delights everyday users and administrators. It is quite simply the easiest document management software to deploy and to use! When software is easy to use, you save time and money.

About this guide
1-2
The Alchemy Content Management Suite (ACMS) is a scalable, multi-user, Windows server solution. It's perfect for small enterprises and departments within medium or large companies. And it's easy to integrate with Windows server security. Alchemy's security model supports Microsoft’s Active Directory and a wide range of applications. The ACMS supports multiple workstations so several users can add documents and perform other tasks with multiple repositories. It also supports hundreds of clients with read-only access. With the Alchemy Server console, you can control user access and limit functionality when necessary to ensure maximum performance. As your organization grows, you can easily add client licenses to handle increased data volume. All of the Alchemy extensions can be added to broaden ACMS’s functionality.
1.2 ABOUT THIS GUIDE
This guide contains information about installing and licensing Alchemy Content Management Suite services, clients, and modules.
1.3 WHAT THIS GUIDE ASSUMES
This guide assumes that you are familiar with the following concepts and procedures:• The Microsoft operating system environment for both client-and-server-based operating
systems.• Windows-based HTML and WinHelp help systems.• The ability to install and operate supported storage and scanning devices.• The administration and operation of Microsoft SQL Server and Microsoft SQL Server databases.
1.4 DOCUMENTATION CONVENTIONS
THIS MANUAL USES THE FOLLOWING CONVENTIONS:Menu and dialog box options, including buttons, appear in bold as depicted in the application. Instructions and descriptions for the options are formatted in regular text. For example:Name - Type the name of the user, or user ID, in this box. For example, an administrator might just type “admin” in this field.Consecutive menu selections are formatted in bold and are separated by the pipe symbol. For example, File | Print means you should click on the File option on the menu bar, and then select Print from the drop-down menu. File names and extensions appear in bold, e.g., alchemy.ini, or “the INI file.”Key-strokes, i.e., the instruction to press a specific key on the keyboard, appear as follows: ALT, which represents the “Alt” key on the keyboard. If you need to press two or more keys simultaneously, the keys are connected with a plus sign (+). For example:Press ALT+F4 to close the window.

Contacting Captaris
1-3
NOTES, TIPS AND CAUTIONS APPEAR USING THE FOLLOWING FORMAT:This is a Note:
This is a note. Notes are used for clarifications, or in special cases, to qualify important points.
This is a Tip:
This is a tip. Tips are used for positive suggestions that help users apply information described in the documentation to meet their specific needs.
This is a Caution:
This is a caution message. Cautions use negative alerts that inform software users and administrators that a particular action can result in data loss, data corruption, security problems, or performance problems.
1.5 CONTACTING CAPTARIS
This section provides you with information for contacting Captaris about issues and services related to your purchase of Captaris Alchemy products. Please feel free to contact the following departments with any questions, issues or suggestions you may have related to your Captaris Alchemy product:
• Englewood office• Educational services• Technical support• Professional services• Sales• Documentation feedback
1.5.1 ENGLEWOOD OFFICE
The offices for Captaris Alchemy are located in Englewood, Colorado, USA. For over 10 years, Captaris Alchemy has been the document management software that people love to use. In fact, we have more than 10,000 delighted customers in over 40 countries. Our software is installed in organizations of all sizes and across every industry. Our customers benefit from immediate cost savings and long-term peace of mind.Captaris Alchemy provides the foundation for software solutions that give people the tools they need to manage the finished documents they must keep. This is especially vital for any organization that must:
• comply with government regulations for records keeping.• support vital business processes with archived documents, such as customer service, accounting,
human resources, project management, records management and more.

Contacting Captaris
1-4
We’re really good at helping the world get control of the paper document problem. And our people are absolutely the best at creating solutions to retrieve your archived documents quickly, easily and inexpensively!How can we help you?Englewood officeCaptaris, Inc.6025 South Quebec Street, Suite 260Englewood, CO 80111 USAVoice: +1 303.930.4600Fax: +1 303.689.0055E-mail: [email protected] site: www.captaris.comInternational Sales OfficeGabriel WeitznerVice President of InternationalE-mail: [email protected]: +1 905.820.8820For more information, visit the “About US” area of the Captaris Web site or call +1 303.930.4600.
1.5.2 EDUCATIONAL SERVICES
Wouldn’t it be wise to invest in a few days of training for a solution you will be using so extensively? Learn more about our Software products from Captaris Alchemy Certified Instructors at our Englewood, Colorado office, or at your facility. Our course offerings focus on individualized skill sets and are an excellent source for maximizing your productivity.
Educational Services GuaranteeCaptaris Alchemy Certified Instructors inspire innovative solutions focused on helping you exceed expectations and achieve maximum productivity with entire Captaris Alchemy feature set. If you feel you did not gain a thorough understanding of the curriculum while attending one of our courses, you may attend the same course again, tuition free, during the 6 month period following your first attendance. This is on a space available basis to scheduled courses and does not include travel, expenses or books. Simply call 15 days prior to a class to check availability and bring your original books.For information regarding our software product training program, courses, and schedules, please call, e-mail, or visit us online.Educational ServicesVoice: +1 303.930.4600E-mail: Alchemy Training RegistrationWeb site: www.captaris.com/services/training.html
1.5.3 TECHNICAL SUPPORT
Product technical support is always available to customers who have purchased an Annual Maintenance Program (AMP). Customers without AMP can receive support on an as-needed basis at a rate of $200 per hour (with 1 hr. minimum and billed in 15 minutes increments thereafter, credit card required).USA and Canada

Contacting Captaris
1-5
Voice: +1 520.320.7070Fax: +1 520.321.7461E-Mail: Technical SupportOur hours are 6 A.M. to 6 P.M. mountain time.Asia, Australia and New ZealandVoice: +61 29 315 1222Fax: +61 29 315 1122E-mail: Technical SupportEurope, Middle East and AfricaVoice: +31 30 602 0899Fax: +31 30 608 7009E-mail: Technical SupportJapanEnd user support services are provided locally by the reseller.Reseller support services are provided locally by your distributor or master VAR.Please do not contact Captaris Alchemy USA Support.Please provide the following information with your technical support question to ensure optimum speed and efficiency:
• Your contact information:• Name• Company name• Mailing address• Telephone number• Fax number• Email address• Product name
• Product release and build number• For core Captaris Alchemy® applications, this is listed under Help | About (Product
Name) on the main menu• For Captaris Alchemy Standard or Advanced Server, listed on the License tab on the
Alchemy Server Properties dialog box• Product serial number
• For Alchemy Content Management Suite (ACMS), Alchemy Web, Records Care, and Compliance products, serial numbers are listed under the Server tab of the Alchemy License Manager module
• Operating system• Scanner make and model number (if applicable)• CD-R, CD-RW, MO, Zip or Jaz drive - make and model number (if applicable)• SCSI card - make and model (if applicable)• Description of problem (what steps led up to the error message?)• Any error messages• Does the database span CDs?

Contacting Captaris
1-6
1.5.4 PROFESSIONAL SERVICES
Captaris, Inc. offers a wide variety of professional services. We work closely with over 300 Service Bureaus and 2500 end user companies worldwide. Our Professional Services Group has a thorough understanding of what it takes to implement the Alchemy document management solution. These processes include imaging, archival, retrieval, database management, network access and hardware setup. In today's world, quick and accurate access to important information is critical to a company's success. Implementing a data archival solution can be time consuming and full of setbacks if not done correctly. The Captaris Alchemy Professional Services Group can help you bypass the challenges associated with designing, implementing and maintaining a data archival and document management solution.Consultation will include:
• New business implementation • Initial needs analysis • Detailed estimate prior to consultation • Workflow analysis (including scanning, OCR, building and searching) • Hardware recommendations, setup and configuration (Recorders, Jukeboxes, scanners, SCSI
cards) • Creation and implementation of databases and DataGrabber definition files • Creation and implementation of command line interface• Optimization of all Alchemy build and search processes • Database customization • Creation of Alchemy "ini" files including Path statements for network/jukebox access • Installation and configuration of Jukebox management application(s) • Detailed post consultation and workflow report • Image-enabling relational databases on UNIX, AS-400, etc. by linking the images via API
Please contact us for more information about Captaris Alchemy Professional Services.Tel: +1 303.224.7650Fax: +1 303.689.0055E-mail: [email protected]
1.5.5 SALES
The Captaris Alchemy professional sales staff is ready to answer your sales questions Monday to Friday from 8:00 A.M. to 5:00 P.M. mountain time.Contact your account representative for information about the latest Captaris Alchemy products, the Captaris Alchemy Annual Maintenance Program (AMP), upgrade options and prices, and more. If you have a technical question or problem, please contact Technical Support.Contact your Captaris Alchemy sales representative:Tel: +1 303.930.4600Fax: +1 303.689.0055E-mail: [email protected] site: www.captaris.com

Annual Maintenance Program
1-7
1.5.6 DOCUMENTATION FEEDBACK
At Captaris, we strive to produce the highest quality documentation products and welcome your feedback. If you have comments or suggestions about our Alchemy online Help or PDF guides, you can email us.Please include the following information with your feedback:
• Product name and version number• Name of PDF manual or online help• Topic title (for online help)• Page number (for PDF manual)• Brief description of content (for example, are you reviewing step-by-step instructions that are
inaccurate, grammatical errors in a specific paragraph, information that requires clarification or more details, etc.)
• Your suggestion for how to correct/improve documentationPlease send e-mail messages to the Alchemy Documentation Group.Keep in mind, this email address is only for documentation feedback; you will not receive a reply. If you have a technical question, please contact Technical Support.
1.6 ANNUAL MAINTENANCE PROGRAM
Captaris offers free technical support for the first 30 days for Captaris Alchemy products, starting when you register the product with Captaris or call us for the first time. Before your complimentary support period expires, call Sales at +1 303.930.4600 or your authorized reseller to subscribe to an Annual Maintenance Program (AMP).The AMP is an annual, renewable program that entitles the user to technical support via phone, FAX, e-mail, the Internet and FTP. Support is offered Monday to Friday, from 6 A.M. to 6 P.M. Mountain time. In addition to technical support, the AMP provides all maintenance releases, and all new releases and upgrades of the product or module purchased, for a 12-month period.Technical support is offered for the currently shipping release as well as for the two (2) previous releases. International technical support is provided by a Captaris Partner in each country and hours of support will vary.
When you upgrade your product license, you must also upgrade your Annual Maintenance Program.
1.7 SUPPORTED HARDWARE
For the latest information about the hardware that this release supports, contact Technical Support at 303-224-7650 or [email protected], or visit the Captaris Web site.

Minimum system requirements
1-8
1.8 MINIMUM SYSTEM REQUIREMENTS
1.8.1 ALCHEMY LICENSE MANAGER (ALM)• Internet Explorer 5.5 or above
1.8.2 ALCHEMY CONTENT MANAGEMENT SUITE (ACMS)
ALCHEMY STANDARD SERVER
• Microsoft Windows NT 4.0 SP6a with NT 4.0 Option Pack, 2000 Server or Advanced Server, 2003 Server with the latest service packs
• 1 GHz Pentium III Intel or Intel compatible processor• 512 MB Memory• 100 MB disk space for Alchemy Server software, if Alchemy client applications are installed on
the same machine more space is required• Winsock 2.0• Microsoft Management Console 2.0 for MMC snap-ins• Microsoft SQL Server Desktop Engine (MSDE) (included), or Microsoft SQL Server Standard
or Enterprise Edition
ALCHEMY ADVANCED SERVER
• Minimum system requirements for Alchemy Standard Server• Microsoft Message Queuing (MSMQ), (required for Audit Logging)• Microsoft .NET Framework 1.1 with the latest service pack
ALCHEMY CLIENTS (ADMINISTRATOR, SEARCH, INDEX STATION, DOCUMENT MANAGER)• Windows NT 4.0 SP6a with NT 4.0 Option Pack, Windows 2000 Professional or Windows XP
Professional with the latest Service Packs• 300 MHz Pentium III Intel or Intel compatible processor• 128 MB Memory (256 MB recommended for Library Services and Records Management)• 60 MB-90 MB of disk space for clients and capture modules depending on what clients and
capture modules are installed• Internet Explorer (IE) 5.5 with the latest service pack (required for Document Management
client)• Free temporary drive space (at least twice the size of the database buffer setting) for building
databases• A supported CD writer or other media drive for building databases to removable media• SCSI adapter (if applicable) recommended by drive vendor• Minimum resolution: 800 x 600 x 256 colors for images, 800 x 600 x 16 colors for text• If scanning, an ISIS or TWAIN compliant scanner

Minimum system requirements
1-9
• 512 MB minimum recommended memory for batch OCR operations
ALCHEMY DOCUMENT MANAGEMENT CLIENT
• Microsoft Office 2000 or XP• Supported Microsoft Office applications:
• Microsoft Outlook• Microsoft Word• Microsoft Excel• Microsoft PowerPoint
EXCHANGE ARCHIVE LINK FOR ALCHEMY
Alchemy Server• 750 MHz Pentium IV or Intel compatible processor• 800 x 600 minimum recommended resolution
MailStore for Exchange• Microsoft Exchange Server 5.5 (SP4 recommended) or Microsoft Exchange Server 2000 (SP3
recommended)• A dedicated local or domain account for the administration of the MailStore for Exchange
Archive service.• 750 MHz Pentium IV or Intel compatible processor• 256 MB RAM minimum (512 MB or greater RAM recommended)• 10MB free disk space for Alchemy Server, MailStore for Exchange and Alchemy License
Manager components
For Exchange 2000, the Administrator account must be a member of the Exchange Domain Server Group.
• 800 x 600 minimum recommended resolution• To enable Exchange Message Journaling for Microsoft Exchange 5.5 you must install at least
SP1. Exchange Message Journaling for Microsoft Exchange 2000 does not require any additional service packs.

Minimum system requirements
1-10

2-1
CHAPTER 2INSTALLATION NOTES AND UPGRADE INFORMATION
WHAT THIS CHAPTER COVERS
This chapter covers important installation and version upgrade information that you should review before installing your Alchemy software. It contains the following sections:
• Installation notes• Upgrade information
2.1 INSTALLATION NOTES
MICROSOFT .NET FRAMEWORK
You must install Microsoft .NET Framework 1.1 on each computer where you intend to install and run the following Alchemy components:
• Alchemy Audit Logging serviceIf you do not currently have .NET Framework 1.1 on your computers, you can install .NET Framework 1.1 from the Prerequisites installation CD.If you have an earlier version of .NET Framework (1.0) on your computer, following installation, you will have two versions of .NET Framework on your computer. Both versions of .NET Framework will run side-by-side and will not interfere with each other. You do not need to uninstall your previous version of .NET Framework unless you no longer need the service.
Since Microsoft .NET Framework does not support Brazilian-Portuguese, the default installation language for a .NET Framework installation on a server computer running a Brazilian-Portuguese version of Microsoft Windows is English.
MICROSOFT SQL SERVER DESKTOP ENGINE (ALCHEMY)Alchemy uses SQL databases to store security, logging, and other information important to the Alchemy Content Management Server operations. Before you can use these features you must already have installed and use Microsoft SQL Server (Enterprise or Standard Edition) or Microsoft SQL Server Desktop Engine (Alchemy), which we supply on the Prerequisites Installation CD.

Upgrade information
2-2
When installing MSDE on Windows XP, you may receive a file protection error. If you receive a file protection error, close the error message, insert your Windows XP installation CD into the CD ROM drive, and click Retry to continue the installation.When installing MSDE on Windows NT, you may receive an error message from the InstallShield wizard telling you that you should close the InstallShield wizard before continuing with the installation. Click Ignore to continue with the installation.
MICROSOFT MESSAGE QUEUING (MSMQ)You must install Microsoft Message Queuing (MSMQ) on the computer where you install Alchemy Content Management Server before you can configure and run the Audit Logging Service. The Audit Logging service works with MSMQ to generate log information from your Alchemy client applications and capture modules.
MICROSOFT MANAGEMENT CONSOLE (MMC)The following components use the Microsoft Management Console (MMC) for access to administrative functions and the online help system:
• Alchemy ServerThe earliest version of MMC that you can use and still access the online help system for these components is version 1.2. Please see the appropriate Microsoft documentation if you need to install the appropriate version of Microsoft Management Console.
MMC 1.2 is included in Windows 2000 Server and Advanced Server. MMC 2.0 is included in Windows 2003 Server.
2.2 UPGRADE INFORMATION
2.2.1 ALCHEMY CONTENT MANAGEMENT SUITE (ACMS)
ALCHEMY CONTENT MANAGEMENT SERVERS
If you are upgrading from Alchemy Server version 7.3x or higher to Alchemy Standard or Advanced Content Management Server, you do not need to uninstall your previous version of Alchemy Server before installing the Alchemy Content Management Server.If you are upgrading from Alchemy Server 7.2x or earlier to Alchemy Standard or Advanced Content Management Server, you MUST uninstall your previous version of Alchemy Server before installing the Alchemy Content Management Server.To avoid possible problems when upgrading from Alchemy Server 7.3x or higher to the Alchemy Content Management Server, do the following:
• If installed and running, stop the Alchemy Audit Logging service• Stop the Alchemy Server service

Upgrade information
2-3
To upgrade Alchemy Server to Alchemy Content Management Server:
1. Insert the Alchemy Prerequisite installation CD into your CD-ROM drive.The autorun program opens the ACMS Installation Welcome page.
2. Do the following:• If necessary, install or update your current version of Microsoft .NET Framework to the
version of .NET Framework contained on the Prerequisite installation CD.See “Installing Microsoft .NET Framework” on page 3-2 for more information about installing Microsoft .NET Framework.
• If necessary, install Microsoft SQL Server Desktop Engine (MSDE).You will need to install MSDE if you do not already use Microsoft SQL Server or do not plan to use Microsoft SQL Server.See “Installing the Microsoft SQL Server Desktop Engine (Alchemy)” on page 3-3 for more information about installing MSDE.
• Run the SQL Configurator.The SQL Configurator creates the AuServer database, which is used to store information required by several Alchemy features, including Role Based Access Control and database encryption.See “Creating the Alchemy SQL database” on page 3-5 for more information about running the SQL Configurator.
3. Insert the Alchemy Content Management Suite installation CD into your CD-ROM drive.The autorun program opens the ACMS Installation Welcome page.
If you installed your Alchemy client applications on the same computer as the Alchemy Content Management Server, you must upgrade your client applications before you can upgrade your Alchemy Content Management Server. If you attempt to upgrade your Alchemy Server before you upgrade your client applications, a warning message appears stating that you must upgrade your client applications first. Click Yes, to automatically upgrade your client applications. Following the client application upgrade process, if you are prompted, restart your computer and then restart the upgrade of your Alchemy Server.
4. Do the following:• Upgrade your existing Alchemy client applications and install any new ACMS client
applications.See “Installing Alchemy Content Management Suite clients, capture modules and server options” on page 4-8 for more information about installing ACMS client applications.
• Upgrade your Alchemy Server.See “Installing Alchemy Server” on page 4-1 for more information about installing Alchemy Server.
ALCHEMY CLIENTS AND CAPTURE MODULES
If you are upgrading version 7.3x or higher Alchemy clients and extensions, you do not need to uninstall your previous Alchemy clients and extensions before installing the Alchemy clients and capture modules included in the ACMS.

Upgrade information
2-4
If you are upgrading version 7.2x or earlier Alchemy clients and extensions, you MUST uninstall your Alchemy clients and extensions before installing the Alchemy clients and capture modules included in the ACMS.
Captaris does not support the installation of any Alchemy client or capture module on the computer where you install Alchemy Web Engine.
To upgrade version 7.3x or higher Alchemy clients and extensions:
1. Insert the Alchemy Content Management Suite installation CD into your CD-ROM drive.The autorun program opens the ACMS Installation Welcome page.
2. Upgrade your existing Alchemy client applications and install any new ACMS client applications.See “Installing Alchemy Content Management Suite clients, capture modules and server options” on page 4-8 for more information about installing ACMS client applications.
2.2.2 ALCHEMY AUDIT LOGGING SERVICE
The Audit Logging service is included as part of the Alchemy Content Management Server in the ACMS. You do not need to separately install the Audit Logging Service on the computer where you install the Alchemy Content Management Server. The Audit Logging Service, however, is only available through the Alchemy Advanced Content Management Server. If you purchased a license and are running a previous version of the Audit logging service, when you upgrade to the ACMS, the Audit Logging service will still be available and your settings will be preserved.Before you can run the Audit Logging service after upgrading to the AMCS, however, you will need to enable the service from the Audit Logging MMC console. For more information about enabling the Audit Logging service, see the Alchemy Server Administrator Guide.
3-1
CHAPTER 3INSTALLING PREREQUISITE SOFTWARE
WHAT THIS CHAPTER COVERS
This chapter gives you important information about installing software that you should install before installing and running the Alchemy Content Management Suite (ACMS). It contains the following sections:
• Installing Microsoft Message Queuing (MSMQ)• Installing Microsoft .NET Framework• Installing the Microsoft SQL Server Desktop Engine (Alchemy)• Creating the Alchemy SQL database
3.1 INSTALLING MICROSOFT MESSAGE QUEUING (MSMQ)
Microsoft Message Queuing (MSMQ) must be installed on the server computer prior to configuring and running the Alchemy Audit Logging service, Alchemy Web, or Alchemy WebEngine Platform. The Alchemy Audit Logging service, Alchemy Web, and Alchemy WebEngine Platform work with MSMQ to generate log information.The following instructions describe a first-time installation of MSMQ for a single-computer installation of Alchemy Web or Alchemy WebEngine Platform. The steps are slightly different for Windows 2003 and Windows 2000. If MSMQ is already installed on the server computer on which you are installing the Alchemy Audit Logging service, Alchemy Web, or Alchemy WebEngine Platform, select the proper mode for MSMQ based on your existing settings. The two modes you can choose from are:
• Message Queuing will access a directory service (Domain Mode)• Message Queuing will not access a directory service (Local Mode)
Please consult the appropriate Microsoft documentation for more detailed information about installing and configuring MSMQ for other installation configurations.
To install MSMQ (Server 2003):
1. Open Control Panel | Add/Remove Programs.
2. Click Add/Remove Windows Components.
3. Select Application Server and click Details.
4. Select Message Queuing and click Details.

Installing Microsoft .NET Framework
3-2
5. Select Common and click OK.
6. Click OK again to close the Application Server dialog box.
7. Follow the prompts to complete the installation.
To install MSMQ (Server 2000):
1. Open Control Panel | Administrative Tools | Configure Your Server.
2. Click the Advanced link.
3. Click the Message Queuing link.
4. Click the Start link to set up MSMQ.
5. Select Message Queuing Server and click Next.
6. Select Message Queuing will not access a directory service and click Next.
7. Follow the prompts to complete the installation.
3.2 INSTALLING MICROSOFT .NET FRAMEWORK
Microsoft .NET Framework 1.1 is required in order to install and run the following Alchemy applications, clients, modules and components:
• Alchemy Audit Logging service (included with the Alchemy Content Management Server installation)
• Alchemy Records ManagementThe the Prerequisites installation CD includes the most current version of Microsoft .NET Framework. If Microsoft .NET Framework is not installed on your computer, you should install the version of Microsoft .NET Framework included on the PRerequisites installation CD. If an older version of Microsoft .NET Framework is installed on your computer, we recommend that you upgrade your version of Microsoft .NET Framework to the version included on the Prerequisites installation CD.To install or upgrade your version of Microsoft .NET Framework:
1. Insert the Prerequisites installation CD into your CD-ROM drive.The autorun program opens the Alchemy Prerequisites Welcome page.

Installing the Microsoft SQL Server Desktop Engine (Alchemy)
3-3
Alchemy Prerequisites Welcome page
Hovering over a component on the Alchemy Prerequisites Welcome page displays an installation recommendation or minimum system requirements for the component.
Components that cannot be installed under the current computer conditions appear in a lighter-colored text. Hovering over the component will display the action required to activate the component for installation.
Click View Install Documentation to locate the installation documentation for the Alchemy product(s) you are installing.
2. Click Install .NET Framework.
3. On the message box, click Yes to continue the installation.
4. After reviewing the Microsoft .NET Framework License Agreement, select I agree and then click Install.Following installation, a message appears informing you that the installation completed successfully.
5. Click OK to close the message box.
3.3 INSTALLING THE MICROSOFT SQL SERVER DESKTOP ENGINE (ALCHEMY)
The Microsoft SQL Server Desktop Engine (Alchemy) is used to administer SQL databases used for storing security, logging, and other information important to Alchemy Server operations.

Installing the Microsoft SQL Server Desktop Engine (Alchemy)
3-4
If Microsoft .NET Framework 1.1 is not installed on your computer, you cannot install MSDE.
1. Insert the Prerequisites installation CD into your CD-ROM drive.The autorun program opens the Alchemy Prerequisites Welcome page.
ACMS Welcome page, Alchemy Prerequisite installation CD
Hovering over a component on the Alchemy Prerequisites Welcome page displays an installation recommendation or minimum system requirements for the component.
Components that cannot be installed under the current computer conditions appear in a lighter-colored text. Hovering over the component will display the action required to activate the component for installation.
2. Click Install MSDE.The Choose Setup Language page appears.
3. Select the appropriate language for your location from the drop-down listThe InstallShield wizard for the Microsoft SQL Server Desktop Engine installs MSDE on your computer.
4. Following the installation, if prompted, restart your computer.

Creating the Alchemy SQL database
3-5
3.4 CREATING THE ALCHEMY SQL DATABASE
Alchemy uses SQL databases to store security, logging, and other information important to the Alchemy Content Management Server operations. Before you can use these features, you need to create the Alchemy SQL database (AuServer) using the Alchemy SQL Configurator. You run the Alchemy SQL configurator to create the AuServer SQL database when you first install Alchemy or to update the database when you upgrade your Alchemy product.
You need to run the Alchemy SQL Configurator on the computer where you installed MSDE or the instance of SQL Server that you want Alchemy Server to use.
CONSIDERATIONS FOR AUTHENTICATING ALCHEMY SERVER WITH SQL SERVER
The method you use to authenticate SQL Server on the computer where you are creating the AuServer database will determine what additional steps you will need to complete in order to authenticate Alchemy Server to use with your instance of SQL Server. The two methods most commonly used to authenticate SQL Server are mixed authentication (Windows and SQL authentication) and Windows only authentication.If you use mixed authentication for your instance of SQL Server, you do not need to complete any additional steps prior to using the Alchemy SQL Configurator to create the AuServer database. If, however, you want Alchemy Server to use Windows authentication, you should delete the AuServerUser and then follow the instructions for Windows-only authentication.If you use Windows-only authentication for your instance of SQL Server, you will need to do the following in order to use Alchemy Server with you instance of SQL Server:
• Start Alchemy Server as a Windows user (not system account).• In SQL Server, map the Windows user that you assigned as the Alchemy Server to a SQL user.• Add the SQL user to the AuServerRole located in the AuServer database.
For more information about using SQL Server, consult the appropriate SQL Server documentation.
To run the Alchemy SQL Configurator:
1. Insert the Alchemy Prerequisite installation CD into your CD-ROM drive.The autorun program opens the Alchemy Prerequisites Welcome page.

Creating the Alchemy SQL database
3-6
ACMS Welcome page, Alchemy Prerequisite installation CD
Hovering over a component on the Alchemy Prerequisites Welcome page displays an installation recommendation or minimum system requirements for the component.
Components that cannot be installed under the current computer conditions appear in a lighter-colored text. Hovering over the component will display the action required to activate the component for installation.
2. Click SQL Configurator.The Alchemy SQL Configurator appears.

Creating the Alchemy SQL database
3-7
Alchemy SQL Configurator
If you are installing Alchemy for the first time, you will need to create the AuServer database. If you are upgrading your Alchemy product, running the Alchemy SQL Configurator will update the AuServer database with the appropriate SQL scripts. The process you will follow to create or update the AuServer database will depend on whether you are using MSDE or SQL Server.
• If you are using MSDE, do the following:If you use MSDE, the Alchemy SQL Configurator automatically uses the instance of MSDE that you installed on the computer and assigns the standard SQL user name and password.
• If necessary, enter the path for the following files in the appropriate box:• AuServer database data file (AuServer_Data.mdf)• AuServer database log file (AuServer_Log.ldf• SQL scripts log file (AuServerConfig.log)
You can also click Browse to locate the appropriate file on the computer where you installed MSDE.
• If you are using SQL Server, do the following:If you use SQL Server, the Alchemy SQL Server will attempt to connect to an instance of SQL Server installed on your computer. If the Alchemy SQL Configurator is unable to connect to an instance of SQL Server, you will need to supply the necessary information for the following:
SQL Server InstancesSelect an instance of SQL Server that you want Alchemy Server to use for the AuServer database.User NameEnter the user name for the instance of SQL Server that you are using.PasswordEnter the password for the instance of SQL Server that you are using.

Creating the Alchemy SQL database
3-8
• Click Connect.• If necessary, enter the path for the following files in the appropriate box:
• AuServer database data file (AuServer_Data.mdf)• AuServer database log file (AuServer_Log.ldf• SQL scripts log file (AuServerConfig.log)
You can also click Browse to locate the appropriate file on the computer where you installed MSDE.
3. Click Run.A message box appears telling you that the AuServer database was successfully configured. For more information, see the AuAspenConfig.log file.
4. Click OK.
5. If prompted, restart your computer.

4-1
CHAPTER 4INSTALLING THE ALCHEMY CONTENT MANAGEMENT SUITE (ACMS)
WHAT THIS CHAPTER COVERS
This chapter details the steps necessary to install the Alchemy Content Management Suite (ACMS). It contains the following sections:
• Installing Alchemy Server• Installing Alchemy Content Management Suite clients, capture modules and server options• Installing Alchemy Search
4.1 INSTALLING ALCHEMY SERVER
Alchemy Server, in conjunction with the Microsoft Management Console (MMC), gives Alchemy Administrators the ability to manage Alchemy databases through the Alchemy Server service. See the appropriate Microsoft documentation regarding the installation of the MMC (version 1.2 minimum) if is not already installed on the server computer.Before installing Alchemy Server, the system administrator should create a domain or local group whose members will be responsible for administering Alchemy Server service functionality. This group, which is chosen as the Alchemy Server Administrator group during Alchemy Server installation, will be able to configure the Alchemy Server service, e.g., monitor Alchemy Server service statistics, add/remove databases to/from Alchemy Server service control, enable/disable access to databases under Alchemy Server service control, enable Alchemy Server security, etc.In order to be able to start and stop the Alchemy Server service, members of the Alchemy Server Administrator group must also be added to a local computer group with sufficient rights on the computer on which Alchemy Server is installed. The system administrator can either add the Alchemy Server Administrator group or individual members from this group to the local group, thus controlling administrative access to the Alchemy Server service.
Installing Alchemy Server
4-2
If installing Alchemy Server to the domain controller server, the system administrator should add members from the Alchemy Server Administrator group to the Server Operator group to allow them to start and stop the Alchemy Server service.
If installing Alchemy Server to a member server, the system administrator should add members from the Alchemy Server Administrator group to the local Power Users group to allow them to start and stop the Alchemy Server service.
Captaris recommends that you install Alchemy Server on a dedicated domain server.
4.1.1 CREATING THE ALCHEMY SERVER ADMINISTRATOR GROUP
The following outlines the steps necessary to create a domain or local group to administer the Alchemy Server service. For more complete information concerning this, please consult the Microsoft documentation for your server operating system.
To create an Alchemy Server administrator group:
1. Create a new domain or local group dedicated for Alchemy Server service administration.
2. Add domain or local users to the Alchemy Server Administrators group who will be responsible for administering the Alchemy Server service.
3. To give members of the Alchemy Server Administrator group the ability to start and stop the Alchemy Server service, add the Alchemy Server Administrator group or members from this group to a local computer group with sufficient rights on the server on which Alchemy Server is installed.
• Use the Server Operator group if Alchemy Server will be installed on the domain controller server.
• Use the Power Users group if Alchemy Server will be installed on a member server.
If the Alchemy Server Administrator group is a local group rather than a domain group, you cannot add the group as a whole to the Power Users group. Instead, you must individually add members from the Alchemy Server Administrator group to the Power Users group.
4. When finished, install Alchemy Server.
4.1.2 INSTALLING THE ALCHEMY SERVER SERVICE
Following installation, you may be prompted to restart the server computer.
The account under which the Alchemy Server service runs must have local administrative rights on the server computer.
1. Insert the Alchemy Content Management Suite (ACMS) installation CD into your CD-ROM drive.

Installing Alchemy Server
4-3
The autorun program opens the ACMS Installation Welcome page.
ACMS installation Welcome page
Hovering over a component on the Installation Welcome page displays an installation recommendation or minimum system requirements for the component.
Components that cannot be installed under the current computer conditions appear in a lighter-colored text. Hovering over the component will display the action required to activate the component for installation.
Click View Install Documentation to locate the installation documentation for the Alchemy product(s) you are installing.
2. Click Install Alchemy Server.If Microsoft .NET Framework 1.1 is not installed on your computer, a message appears informing you that you will need to install Microsoft .NET Framework in order to use Alchemy Audit Logging, which is installed with the Alchemy Content Management Server. If you will be licensing Alchemy Standard Server or will not be using Alchemy Audit Logging you do not need to install Microsoft .NET Framework 1.1 included on the Prerequisite installation CD.
3. Do one of the following:• To abort the installation and install Microsoft .NET Framework 1.1 before continuing,
click No.• To continue the installation without Alchemy Audit Logging, click Yes.

Installing Alchemy Server
4-4
If you later decide that you want to use Alchemy Audit Logging, you will need to install Microsoft .NET Framework 1.1 from the Prerequisite installation CD and then repair your Alchemy Server installation. For information about repairing an Alchemy installation, see “Repairing an Alchemy installation” on page 5-3.
Please note that Alchemy Audit Logging is only available with Alchemy Advanced Server
The Choose Setup Language page appears.
Choose Setup Language page
4. Select the appropriate language from the drop-down list.
5. Click OK.The InstallShield Wizard appears. After the InstallShield Wizard completes the preparation for installation, the InstallShield Wizard for Alchemy Server Welcome page appears.
6. Click Next to continue.The Alchemy Server End User License Agreement (EULA) page appears.
7. Review the EULA.
8. Click Yes to continue.The Select Domain Group page appears.
Select Domain Group page

Installing Alchemy Server
4-5
9. In the Windows Domain list, select the domain or local computer name to display the available groups in the Available Groups list.
10.In the Available Groups list, select the domain or local group that will be used for administrative access to the Alchemy Server service and click OK.
The user you are logged in as must have inherent rights to the domain in order to view the groups/users displayed in the Available Groups list. If authentication to a remote domain is needed, the list will be blank.
The Customer Information page appears.
11.In the User Name and Company Name boxes, type your user and company names.
12.Click Next.The Choose Destination Location Page appears.
If you are upgrading Alchemy Server from a previous version (version 7.3 or higher), the Choose Destination Location page does not appear. Instead, the Alchemy Services Account page appears.
13.Click Next to accept the default destination folder for Alchemy Server, or click Browse to choose new a destination folder.The Alchemy Services Account page appears.
Alchemy Services Account page
14.Choose one of the following options:• System account (Used with no integrated security AND repositories are local to server.)
• Click Next.The SQL Server for Alchemy page appears.

Installing Alchemy Server
4-6
SQL Server for Alchemy page
• In the SQL Server box, select the SQL Server instance that you want to use with Alchemy Server from the drop-down list. If the instance of SQL Server that you want to use is not listed in the drop-down list, enter the name of the SQL Server in the Select SQL Server for Alchemy box using the format:SQLServerName\Alchemy
• Click Next.• Select account (Used with integrated security OR repositories on remote computers.)
Choose Select account only if you are or will be using Alchemy integrated security or if your databases are located on a different computer than the Alchemy Server service. In this case, you must select a domain account for Alchemy services to use as a logon account.
• Click Next.The Select Domain User page appears.

Installing Alchemy Server
4-7
Select Domain User page
• In the Windows Domain list, select the domain account to be used by Alchemy services.
• In the Available Users list, select a user.• In the Password box, type the password for the domain user account.• In the Verify Password box, retype the domain user account password.• Click Next.
The SQL Server for Alchemy page appears.
SQL Server for Alchemy page

Installing Alchemy Content Management Suite clients, capture modules and server options
4-8
• In the SQL Server box, select the SQL Server instance that you want to use with Alchemy Server from the drop-down list. If the instance of SQL Server that you want to use is not listed in the drop-down list, enter the name of the SQL Server in the Select SQL Server for Alchemy box using the format:SQLServerName\ALCHEMY
• Click Next.The Start Copying Files page appears.
15.Verify your installation settings.
16.Click Next.The Setup Status page appears.Following successful completion of the installation, the InstallShield Wizard Complete page appears.
17.Click Finish.
18.If prompted, restart the computer before running the Alchemy Server service.
Although it is not required, Captaris recommends that you do the following prior to installing your remaining Alchemy applications and services:
- License Alchemy Server and any additional Alchemy applications, components and services you will be installing.
- If necessary, enable and configure integrated security and role-based access control.
- Add your databases to the Alchemy Server service.
Please refer to the Alchemy Server Administrator Guide for more information about configuring and using the Alchemy Server service.
4.2 INSTALLING ALCHEMY CONTENT MANAGEMENT SUITE CLIENTS, CAPTURE MOD-ULES AND SERVER OPTIONS
If you have a software distribution program, you can install Alchemy Content Management Suite (ACMS) clients and capture modules over a network from a central location. See “Easy client deployment” on page A-1 for more information.
1. Insert the Alchemy Content Management Suite installation CD into your CD-ROM drive.The autorun program opens the ACMS Installation Welcome page.

Installing Alchemy Content Management Suite clients, capture modules and server options
4-9
ACMS Welcome page
Hovering over a component on the ACMS Installation Welcome page displays an installation recommendation or minimum system requirements for the component.
Components that cannot be installed under the current computer conditions appear in a lighter-colored text. Hovering over the component will display the action required to activate the component for installation.
Click View Install Documentation to locate the installation documentation for the Alchemy product(s) you are installing.
2. Click Install Alchemy Clients.The Choose Setup Language page appears.
Choose Setup Language page
3. Select your language from the drop-down list.
4. Click OK.

Installing Alchemy Content Management Suite clients, capture modules and server options
4-10
The InstallShield wizard appears. After the InstallShield completes the preparation for installation, the Installshield Wizard for Alchemy welcome page appears.
5. Click Next to continue.The Alchemy End User License Agreement (EULA) page appears.
6. Review the EULA.
7. Click Yes to continue.The Customer Information page appears.
8. Enter your user and company name in the appropriate fields.
9. Click Next.The Choose Destination Location page appears.
If you are upgrading your Alchemy clients and/or extensions from a previous version (version 7.3 or higher), the Choose Destination Location page does not appear. Instead, the Select Features page appears.
10.Click Next to accept the default destination location for your Alchemy clients, capture modules and/or server options, or click Browse to choose a new destination location.The Select Features page appears.
Select Features page
11.Select the Alchemy clients, capture modules and server options that you want to install.Alchemy clients are:
• Search• Administrator• Index Station
Alchemy capture modules are:

Installing Alchemy Content Management Suite clients, capture modules and server options
4-11
• Scan• DataGrabber
Alchemy Server options are:• Records Manager• Document Management
If you are installing Alchemy Administrator you should clear the Search option. Alchemy Administrator contains a single-user version of Alchemy Search. The Search option installs concurrent-user search clients, which should be installed on separate client computers.
You should not install Index Station and Administrator on the same computer. Index Station contains a subset of Administrator features, and might limit the functionality of your Alchemy installation.
12.Click Next.The Edit Data page appears.
Edit Data page
13.If necessary, type the name of the server computer where you installed the Alchemy Server service in the Server box, or click Browse to locate the name of the server computer.
14.If you assigned a different port number for the Alchemy Server service, click Change and type that port number in the Port box.
The default port number for the Alchemy Server service is 3234. Unless absolutely necessary, Captaris strongly recommends that you do not change the default port number.
15.Click Next to continue.

Installing Alchemy Search
4-12
The Start Copying Files page appears.
16.Verify your installation settings.
17.Click Next.The Setup Status page appears.Following successful completion of the installation operation, the InstallShield Wizard Complete page appears.
18.Click Finish.
4.3 INSTALLING ALCHEMY SEARCH
You can install/run Alchemy Search in two ways:• From your Alchemy installation CD
Use this method to install Alchemy Search on computers that are to used exclusively as search clients.
• From removable storage mediaEnd users use this method to install an instance of single-user Alchemy Search from supported removable storage media that contains an Alchemy database and the Alchemy Search installation program.
This method also allows you to run Alchemy Search from your removable media without first installing the Search program to your hard drive.
4.3.1 SINGLE-USER AND CONCURRENT-USER ALCHEMY SEARCH
Alchemy Search is available in single- or concurrent-user (client/server) mode. Single-user mode allows only exclusive searching, that is, only one user at a time can search a database. Concurrent-user mode allows shared searching, that is, several users can simultaneously search multiple databases or the same database.Single-user mode is the default for Alchemy Search clients that are installed or run from supported removable media that contain databases. You do not need a product license in order to install and run Alchemy Search in single-user mode.Concurrent-user mode is the default for ACMS Search clients installed from the Alchemy Content Management Suite installation CD. You can also install concurrent-user mode Alchemy Search with Alchemy Gold from the Alchemy Gold installation CD. In order to use concurrent-user mode Alchemy Search in either an ACMS or Alchemy Gold environment, you must first obtain a valid Alchemy Search license.For more information about licensing your Alchemy components, see the Licensing Alchemy components section of this guide.
4.3.2 INSTALLING ALCHEMY SEARCH
1. Insert the Alchemy Content Management Suite (ACMS) installation CD into your CD-ROM drive.

Installing Alchemy Search
4-13
The autorun program opens the ACMS Installation Welcome page.
ACMS Installation Welcome page
Hovering over a component on the ACMS Installation Welcome page displays an installation recommendation or minimum system requirements for the component.
Components that cannot be installed under the current computer conditions appear in a lighter-colored text. Hovering over the component will display the action required to activate the component for installation.
Click View Install Documentation to locate the installation documentation for the Alchemy product(s) you are installing.
2. Click Install Alchemy Clients.The Choose Setup Language page appears.
Choose Setup Language page
3. Select your language from the drop-down list.
4. Click OK.

Installing Alchemy Search
4-14
The InstallShield Wizard appears. After the InstallShield completes the preparation for the installation, the InstallShield Wizard for Alchemy welcome page appears.
5. Click Next to continue.The Alchemy End User License Agreement (EULA) page appears.
6. Review the EULA.
7. Click Yes to continue.The Customer Information page appears.
8. In the User Name and Company Name boxes, type your user and company names.
9. Click Next to continue.The Choose Destination Location page appears.
If you are upgrading to the Alchemy Content Management Suite from a previous version of Alchemy Premium (version 7.3 or higher), the Choose Destination Location page does not appear. Instead, the Select Features page appears.
10.Click Next to accept the default destination location, or click Browse to choose new a destination location.The Select Features page appears.
Select Features page
11.Select Search from the list of Alchemy components.
12.If necessary, clear all other Alchemy component selections.
13.Click Next.The Edit Data page appears.

Installing Alchemy Search
4-15
Edit Data page
14.If necessary, type the name of the server computer where you installed the Alchemy Server service in the Server box, or click Browse to locate the name of the server computer.
15.If you assigned a different port number for the Alchemy Server service, click Change and type that port number in the Port box.
The default port number for the Alchemy Server service is 3234. Unless absolutely necessary, Captaris strongly recommends that you do not change the default port number.
16.Click Next to continue.The Start Copying Files page appears.
17.Verify your installation settings and click Next.The Setup Status page appears, which displays the status of the installation.Following completion of the installation operation, the InstallShield Wizard Complete page appears.
18.Click Finish.
4.3.3 INSTALLING ALCHEMY SEARCH FROM REMOVABLE STORAGE MEDIA
When you build a database to supported removable storage media, you can choose to copy the CDsetup.exe and Search.exe files to the root of the media as part of the build process. Using these files, your end users can choose to install an instance of single-user Alchemy Search to their computers, or run an instance of single-user Alchemy Search from the supported storage media.To install Alchemy Search from supported removable storage media:
1. Insert the removable media that contains the built database into the appropriate removable storage device connected to your computer.
2. Open the removable storage medium.

Installing Alchemy Search
4-16
3. Double-click CDsetup.exe.
4. Follow the instructions in the wizard to complete the installation.
4.3.4 RUNNING ALCHEMY SEARCH FROM REMOVABLE STORAGE MEDIA
You can run an instance of single-user Alchemy Search to view your databases from any supported removable media type that also includes a copy of the Alchemy Search executable file.
You do not need to license Alchemy Search when you run the application from a supported removable media type.
To run Alchemy Search from a supported removable media type:
1. Insert the removable media that contains the built database into the appropriate removable storage device connected to your computer.
2. Open the removable storage medium.
3. Double-click Search.exe.
5-1
CHAPTER 5MANAGING YOUR ALCHEMY SOFTWARE INSTALLATIONS
WHAT THIS CHAPTER COVERS
This chapter covers information about managing your installation of the Alchemy Content Management Suite and any prerequisite software you may have also installed. It contains the following sections:
• Verifying Alchemy component installation• Modifying an Alchemy installation• Repairing an Alchemy installation• Uninstalling Alchemy products, clients, modules and options• Uninstalling Microsoft SQL Server Desktop Engine (Alchemy)
5.1 VERIFYING ALCHEMY COMPONENT INSTALLATION
You can verify which Alchemy components are installed on a computer in one of two ways:• From within Alchemy Administrator• Using the InstallShield Wizard
Verifying Alchemy component installation from Alchemy Administrator:
1. On the client computer, open Alchemy Administrator.
2. On the Help menu, click About Alchemy Administrator.The About Alchemy Administrator dialog box appears.
3. Click Components.The Alchemy components installed on the computer are listed in the Components window on the Alchemy Components dialog box.
4. Click OK to close the Alchemy Components dialog box.
5. Close the About Alchemy Administrator dialog box.Verifying Alchemy component installation with the InstallShield Wizard:
1. Open Control Panel | Add or Remove Programs.
2. In the Currently installed programs list, select Alchemy.

Modifying an Alchemy installation
5-2
3. Click Change/Remove.The InstallShield Wizard Welcome page appears.
4. Select Modify.
5. Click Next.Alchemy components currently installed on the computer are displayed on the InstallShield Wizard Select Features page with a checkmark next to each installed selection.
6. Click Cancel.
7. Click Yes to quit the setup.
8. Click Finish to close the InstallShield Wizard.
9. Close the Add or Remove Programs and the Control Panel windows.
5.2 MODIFYING AN ALCHEMY INSTALLATION
Before modifying the installation of the Alchemy Content Management Suite (ADMC), you must first stop any services that are running.
Before removing the Alchemy Document Management Client (Office Integration for Records Management) you must first close any instances of Microsoft Office applications that are running, including Internet Explorer.
You should perform the Transfer License procedure prior to removing an Alchemy component if you intend to reinstall the application on another computer.
Modifying an installation adds (installs) or removes (uninstalls) Alchemy components from your computer.To modify the installation of Alchemy components:
1. Open Control Panel | Add or Remove Programs.
2. In the Currently installed programs list, select the Alchemy product installation you want to modify.
3. Click Change/Remove.The InstallShield Wizard Welcome page appears.
4. Select Modify.
5. Click Next.The InstallShield Wizard Select Features page appears.
6. In the component list, select or clear the check boxes next to the components you want to add or remove.
7. Click Next.The InstallShield Wizard displays the progress of the operation.
Repairing an Alchemy installation
5-3
Upon completion, the InstallShield Wizard Maintenance Complete page appears.
8. Click Finish.
5.3 REPAIRING AN ALCHEMY INSTALLATION
Before repairing an Alchemy Content Management Suite (ACMS) installation, you must first stop any services that are running.
Before uninstalling the Alchemy Document Management Client (Office Integration for Records Management, ADMC)) you must first close any instances of Microsoft Office applications that are running, including Internet Explorer.
To repair an Alchemy product installation:
1. Open Control Panel | Add or Remove Programs.
2. In the Currently installed programs list, select the Alchemy component that you want to repair.
3. Click Change/Remove.The InstallShield Wizard Welcome page appears.
4. Select Repair.
5. Click Next.The InstallShield Wizard displays the progress of the operation.Upon completion, the InstallShield Wizard Maintenance Complete page appears.
6. Click Finish.
5.4 UNINSTALLING ALCHEMY PRODUCTS, CLIENTS, MODULES AND OPTIONS
Before uninstalling an Alchemy Content Management Suite (ADMS) component, you must first stop any services that are running.
Before uninstalling the Alchemy Document Management Client (Document Management, ADMC) you must first close any instances of Microsoft Office applications that are running, including Internet Explorer.
You should perform the Transfer License procedure prior to uninstalling an Alchemy component if you intend to reinstall the application on another computer.
To uninstall Alchemy components:
1. Open Control Panel | Add or Remove Programs.

Uninstalling Microsoft SQL Server Desktop Engine (Alchemy)
5-4
2. In the Currently installed programs list, select the Alchemy component that you want to uninstall.
3. Click Change/Remove.The InstallShield Wizard Welcome page appears.
4. Select Remove.
5. Click Next.
6. Click OK to continue.The InstallShield Wizard displays the progress of the uninstallation.Upon completion, the InstallShield Wizard Maintenance Complete page appears.
7. Click Finish.
5.5 UNINSTALLING MICROSOFT SQL SERVER DESKTOP ENGINE (ALCHEMY)
To uninstall Microsoft SQL Server Desktop Engine (Alchemy):
1. Open Control Panel | Add or Remove Programs.
2. In the Currently installed programs list, select Microsoft SQL Server Desktop Engine (Alchemy).
3. Click Remove.A confirmation message appears.
4. Click Yes to continue.The InstallShield Wizard displays the progress of the operation.Upon completion, the InstallShield Wizard closes automatically.

6-1
CHAPTER 6LICENSING ALCHEMY CONTENT MANAGEMENT SUITE (ACMS)
WHAT THIS CHAPTER COVERS
This chapter details the process you must follow to license your Alchemy Premium clients, extensions and modules, including:
• Alchemy Advanced Server• Alchemy Standard Server• Alchemy Clients
• Administrator• Index Station• Document Management• Search
• Capture• SCAN• DataGrabber
• Server Modules• Alchemy Records Manager• Database Encryption• Alchemy Web
You must purchase an Alchemy Advanced Server product license in order to license and use the Document Management client and the Alchemy Records Manager server module.
It contains the following sections:• Alchemy product licensing overview• Activating a trial license• Using automated licensing• Using manual licensing• Using e-mail recovery• Using call-in licensing

Alchemy product licensing overview
6-2
• Transferring a product license• Verifying licensing status
6.1 ALCHEMY PRODUCT LICENSING OVERVIEW
For the Alchemy Content Management Suite (ACMS), Alchemy Web, Alchemy WebEngine Platform, and MailStore for Exchange, server products, clients and client extensions are licensed individually through the computer on which you install the Alchemy Server service, which also installs the Alchemy License Manager module. You must first license your installation of Alchemy Server and any server product, client, client extension, and/or server module before you can use Alchemy.Using the Alchemy License Manager (ALM), you can activate a 30-day trial license for evaluation copies of Alchemy products, permanently license your Alchemy products for first-time installations, update your existing product licenses, or transfer your existing licenses to another location on the same computer or to another computer.Evaluation copies of Alchemy products will stop working when the 30-day trial license period ends. To continue using your Alchemy product, you must purchase a permanent product license. Please contact your Alchemy reseller, service bureau, or Captaris sales representative for information about how to purchase a permanent Alchemy product license.The ALM, which is installed with either Alchemy Gold Administrator or Alchemy Server, uses your product serial numbers and specific computer site code to generate valid user licenses for the Alchemy products and product extensions that you purchased. Alchemy product serial numbers are located on the Certificate of Authenticity you received with your software package and specify the number of authorized users for each Alchemy product and product extension purchased. The ALM generates Alchemy site codes for each Alchemy product and product extension installed. These site codes are specific to the computer on which you install Alchemy Gold Administrator or Alchemy Server.Alchemy Administrator and Alchemy Search are available in single-user or concurrent-user mode.
• Single-User Mode: Single-user mode allows only exclusive (single-user) access to Alchemy databases. For example, a single-user Alchemy Administrator license would allow only one user at a time to “write” to a database. Similarly, a single-user Alchemy Search license permits only one user to search a database at a time.
• Concurrent-User (Client/Server) Mode: Concurrent-user Alchemy Search is available in Alchemy Gold and ACMS.Concurrent-user Alchemy Administrator and Alchemy Search require the Alchemy Content Management Suite, which includes the Alchemy Content Management Server. The Alchemy Content Management Server allows shared access to Alchemy databases, and allows a number of Alchemy users, based on the limits of your hardware, to access databases simultaneously.The Alchemy Content Management Server is divided into Alchemy Standard Server and Alchemy Advanced Server. Alchemy Standard Server includes the Alchemy Server service and Integrated Security. Alchemy Advanced Server extends the functionality of Alchemy Standard Server by including the following features:
• Role Based Access Control• Audit Logging• Library Services

Activating a trial license
6-3
Alchemy Standard Server and Alchemy Advanced Server are licensed separately. If you purchase an Alchemy Standard Server license and later find that you want or need the additional functionality of Alchemy Advanced Server, you will need to purchase the appropriate product license.
There are four methods you can use to permanently license your Alchemy document management products:
• Automated licensingUse this licensing method if the computer on which you install Alchemy Gold Administrator or Alchemy Server has Internet access and can connect to the Captaris Web site. Captaris strongly recommends that you always use automated licensing to license your Alchemy document management products.
• Manual licensingOnly use this licensing method if the computer on which you install Alchemy Gold Administrator or Alchemy Server cannot connect to the Internet.
• Email recoveryOnly use this licensing method to recover an Alchemy component license if for some reason, after using manual licensing, your Alchemy component was not licensed and you did not receive an email containing the license number for the component.
• Call-in licensingOnly use this licensing method if the previous licensing methods failed.
6.2 ACTIVATING A TRIAL LICENSE
1. From the Programs menu, select Alchemy | Alchemy License Manager.The License Selection page appears.
Alchemy License Selection page

Activating a trial license
6-4
2. Select the items you wish to license.
To select individual product extensions, click the plus (+) sign beside the appropriate product selection to expand the product selection tree.
3. Click OK.The Alchemy License Manager© License Information page appears.
Alchemy License Manager© License Information page
4. Select the items you wish to license.
Use CTRL+CLICK or SHIFT+CLICK to select multiple items to license.
5. Under New Licenses, click Activate Trial License.A confirmation message appears asking you to confirm your selection.
6. Click Yes to activate your trial license.The ALM displays a message box that informs you that the 30-day trial license period has been activated.
If you activate a trial license and then later purchase a permanent license before your trial license expires, you must use the “Updating a Product License” procedure to apply your permanent license.
7. Click OK to close the message box.
8. Click Close to exit the ALM.

Using automated licensing
6-5
6.3 USING AUTOMATED LICENSING
To use automated licensing, the computer from which you are licensing your Alchemy document management product(s) must be connected to the Internet and must be able to access the Alchemy licensing Web site.
If the computer from which you are licensing your Alchemy document management product(s) cannot connect to the Internet or cannot access the Web site, please refer to the manual licensing procedure to license your Alchemy product(s).
Alchemy product serial numbers are located on your Certificate of Authentication and are case-sensitive.
6.3.1 LICENSING THE ALCHEMY CONTENT MANAGEMENT SUITE (ACMS)1. From the Programs menu, select Alchemy | Alchemy License Manager.
The License Selection page appears.
Alchemy License Selection page
2. Select the items you wish to license.
To select individual product extensions, click the plus (+) sign beside the appropriate product selection to expand the product selection tree.
3. Click OK.The Alchemy License Manager© License Information page appears.

Using automated licensing
6-6
Alchemy License Manager© License Information page
4. Select the items that you wish to license.
Use CTRL+CLICK or SHIFT+CLICK to select multiple items.
5. Under New Licenses, click Get License.The User Registration page appears.
User Registration page
6. Type your user and company information into the appropriate fields.
7. Click Next.The Licensing page appears.

Using automated licensing
6-7
ALM Licensing page
The product site code generated by the ALM that appears in the Site Code box is unique to the computer where Alchemy Server is installed and cannot be used to license Alchemy products or product extensions on another computer.
8. Double-click the Serial Number box for the item that you wish to license.
9. Type the item’s serial number into the box exactly as it appears on your Certificate of Authenticity.
10.Repeat this process for each item listed on the License page.
11.Click Finish.The Alchemy License Manager (ALM) contacts the Alchemy License Generator (ALG) on the Web site through your Internet connection. The ALG generates a license number for each serial number that you typed into the applicable Serial Number box. After the ALG generates a valid license number for each item, it automatically populates the appropriate License Number box with the license number for that item.If during installation, the Alchemy License Generator (ALG) Web site link was not added to the licensing computer’s registry, the ALG Web Site Address page appears.Do the following:
• Type the address of the ALG Web site into the ALG Web Site link box.• Click Save & Use This URL to save the ALG Web site address to the computer’s registry.
The address for the ALG Web site is http://customerhub.imrgold.com/alg/application.asp.
If the ALM is unable to retrieve the license number for an item from the ALG, an error message appears informing you of the problem and that you must attempt to manually license the component.Do the following:
• Click OK to close the error message and proceed with manual licensing.The ALG Web page appears.
• Select your product and language from the Product Type and Language drop-down lists.

Using automated licensing
6-8
• Click Continue.• Type the ALM site code and serial number for the component in the appropriate fields.• Click Apply for Alchemy License Number.
A results page appears informing you that your component license number has been sent to the e-mail address you typed on the User Information page.
• Copy the license number from your confirmation e-mail and paste it into the License Number field for the component you are licensing.
• Repeat this procedure for each item as necessary.The ALG also sends an email containing the license number for your product(s) and product extensions to the e-mail address you typed on the User Registration page. Keep this e-mail for reference in case you need to reinstall and license your product(s) at a later date.A message appears informing you that your product and/or product extension licenses have been successfully applied.
12.Click OK to close the message.The ALM updates the current licensing status of your products in the License Information page.
13.Click Close to exit the ALM.
If the ALG does not automatically populate a License Number box, you should use the Manual Licensing method to license your item.
Please contact your system administrator if you are unable to connect to the ALG Web site.
6.3.2 UPDATING PRODUCT LICENSING FOR THE ALCHEMY CONTENT MANAGEMENT SUITE
When you upgrade your licensing, you need to update your licensing information through the Alchemy License Manager. License upgrades can include converting a trial license to a permanent license or adding more users to an existing product.
1. From the Programs menu, select Alchemy | Alchemy License Manager.The License Selection page appears.

Using automated licensing
6-9
Alchemy License Selection page
2. Click OK.
Items that were previously licensed remain selected when the License Selection page is closed and then re-opened.
The Alchemy License Manager© License Information page appears.
Alchemy License Manager© License Information page
3. Select the items whose licenses you wish to update.

Using automated licensing
6-10
Use CTRL+CLICK or SHIFT+CLICK to select multiple items.
4. Under Existing Licenses, click Update License.The User Registration page appears.
User Registration page
The ALM displays your user and company information you entered when you initially licensed your products and product extensions.
5. If necessary, update your user and company information.
6. Click Next.The ALM Licensing page appears.
ALM Licensing page
The product site code generated by the ALM that appears in the Site Code box is unique to the computer where Alchemy Server is installed and cannot be used to license Alchemy products or product extensions on another computer.

Using automated licensing
6-11
7. Double-click the Serial Number box for the item whose license you wish to update.
8. Type the item’s serial number into the box exactly as it appears on your Certificate of Authenticity.
9. Repeat this process for each item listed on the License page.
10.Click Finish.The Alchemy License Manager (ALM) contacts the Alchemy License Generator (ALG) on the Web site through your Internet connection. The ALG generates a license number for each serial number that you typed into the applicable Serial Number box. After the ALG generates a valid license number for each item, it automatically populates the appropriate License Number box with the license number for that item.If during installation, the Alchemy License Generator (ALG) Web site link was not added to the licensing computer’s registry, the ALG Web Site Address page appears.Do the following:
• Type the address of the ALG Web site into the ALG Web Site link box.• Click Save & Use This URL to save the ALG Web site address to the computer’s registry.
The address for the ALG Web site is http://customerhub.imrgold.com/alg/application.asp.
If the ALM is unable to retrieve the license number for an item from the ALG, an error message appears informing you of the problem and that you must attempt to manually license the component.Do the following:
• Click OK to close the error message and proceed with manual licensing.The ALG Web page appears.
• Select your product and Language from the Product Type and Language drop-down lists.• Click Continue.• Type the ALM site code and serial number for the component in the appropriate fields.• Click Apply for Alchemy License Number.
A results page appears informing you that your component license number has been sent to the e-mail address you typed on the User Information page.
• Copy the license number from your confirmation e-mail and paste it into the License Number field for the component you are licensing.
• Repeat this procedure for each item as necessary.The ALG also sends an email containing the license number for your product(s) and product extensions to the e-mail address you typed on the User Registration page. Keep this e-mail for reference in case you need to reinstall and license your product(s) at a later date.A message appears informing you that your product and/or product extension licenses have been successfully applied.
11.Click OK to close the message.The ALM updates the current licensing status of your products in the License Information page.
12.Click Close to exit the ALM.

Using manual licensing
6-12
If the ALG does not automatically populate a License Number box, you should use the Manual Licensing method to license your item.
Please contact your system administrator if you are unable to connect to the ALG Web site.
6.4 USING MANUAL LICENSING
Use the manual licensing method only if the computer where you installed the Alchemy License Manager (ALM) does not have Internet access. When using this method to license your Alchemy products and product extensions, you will need the following information:
• User and appropriate company information• Company name, address, and phone number• Valid e-mail address• Applicable Alchemy product and product extension serial numbers• The ALM site code number generated for each item selected to be licensed.
Product serial numbers appear on your Certificate of Authentication and are case-sensitive.
6.4.1 LICENSING THE ALCHEMY CONTENT MANAGEMENT SUITE (ACMS)1. From the Programs menu, select Alchemy | Alchemy License Manager.
The License Selection page appears.
Alchemy License Selection page

Using manual licensing
6-13
2. Select the items you wish to license.
To select individual product extensions, click the plus (+) sign beside the appropriate product selection to expand the product selection tree.
3. Click OK.The Alchemy License Manager© License Information page appears.
Alchemy License Manager© License Information page
4. Select the items that you wish to license.
Use CTRL+CLICK or SHIFT+CLICK to select multiple items to license.
5. Under New Licenses, click Get License.The User Registration page appears.
User Registration page

Using manual licensing
6-14
6. Type your user and company information into the appropriate fields.
7. Click Next.The Licensing page appears.
ALM Licensing page
The product site code generated by the ALM that appears in the Site Code box is unique to the computer where Alchemy Server is installed and cannot be used to license Alchemy products or product extensions on another computer.
8. Double-click the Serial Number box for the item that you wish to license.
9. Type the item’s serial number into the box exactly as it appears on your Certificate of Authenticity.
10.Repeat this process for each item listed on the License page.
11.Record the site code for each item you are licensing.
12.On a computer that has browser access to the Internet, navigate to the following URL: http://www.imrgold.com/ALG/
13.Select your product and language from the Product Type and Language drop-down lists.
14.Click Continue.The Alchemy License Generator Web page appears.
15.Enter the following into the appropriate fields:• user and company information• a valid email address• your Alchemy Gold Administrator serial number• the serial numbers for any additional product extensions (if applicable)• the ALM Site Code
You must enter information into fields marked with a red asterisk.

Using manual licensing
6-15
16.Click Apply for Alchemy License Number.
17.When you receive your licensing e-mail, return to the licensing computer and type each license number into the appropriate License Number box on the ALM Licensing page.
18.Click Finish.A message appears informing you that your product licenses have been successfully applied.
19.Click OK to close the message box.
20.Repeat this procedure for each item you wish to license.
21.When finished, click Close to close the ALM.
6.4.2 UPDATING PRODUCT LICENSING FOR THE ALCHEMY CONTENT MANAGEMENT SUITE
When you upgrade your licensing, you need to update your licensing information through the Alchemy License Manager. License upgrades can include converting a trial license to a permanent license or adding more users to an existing product.
1. From the Programs menu, select Alchemy | Alchemy License Manager.The License Selection page appears.
Alchemy License Selection page
2. Click OK.
Items that were previously licensed remain selected when the License Selection page is closed and then re-opened.
The Alchemy License Manager© License Information page appears.

Using manual licensing
6-16
Alchemy License Manager© License Information page
3. Select the items whose licenses you wish to update.
Use CTRL+CLICK or SHIFT+CLICK to select multiple items.
4. Under Existing Licenses, click Update License.The User Registration page appears.
User Registration page
The ALM displays your user and company information you entered when you initially licensed your products and product extensions.
5. If necessary, update your user and company information.
6. Click Next.

Using manual licensing
6-17
The ALM Licensing page appears.
ALM Licensing page
The product site code generated by the ALM that appears in the Site Code box is unique to the computer where Alchemy Server is installed and cannot be used to license Alchemy products or product extensions on another computer.
7. Double-click the Serial Number box for the item that you wish to license.
8. Type the item’s serial number into the box exactly as it appears on your Certificate of Authenticity.
9. Repeat this process for each item listed on the License page.
10.Record the site code for each item you are licensing.
11.On a computer that has browser access to the Internet, navigate to the following URL: http://www.imrgold.com/ALG/
12.Select your product and language from the Product Type and Language drop-down lists.
13.Click Continue.The Alchemy License Generator Web page appears.
14.Enter the following into the appropriate fields:• user and company information• a valid email address• your Alchemy Gold Administrator serial number• the serial numbers for any additional product extensions (if applicable)• the ALM Site Code
You must enter information into fields marked with a red asterisk.
15.Click Apply for Alchemy License Number.
16.When you receive your licensing e-mail, return to the licensing computer and type each license number into the appropriate License Number box on the ALM Licensing page.

Using e-mail recovery
6-18
17.Click Finish.A message appears informing you that your product licenses have been successfully applied.
18.Click OK to close the message box.
19.Repeat this procedure for each item you wish to license.
20.When finished, click Close to close the ALM.
6.5 USING E-MAIL RECOVERY
You use the e-mail recovery method to recover your Alchemy product license numbers if for some reason, after using the manual licensing method, your Alchemy product was not licensed and you did not receive an e-mail containing the license number for your Alchemy product.
1. Open your Web browser and navigate to the ALG main Web page at:http://www.imrgold.com/ALG/
2. Under E-mail Recovery near the bottom of the Web page, click the please click here link.
3. Type your original ALM site code and valid email address in the appropriate fields and click Look up License Number.The ALG will search the database for the site code that matches the one you entered, correct the email address and email your license number to you.
4. When you receive your licensing email, enter the license number from the email into the License Number field on the Web Licensing Server dialog box for your Alchemy product and click Finish.
5. A message appears informing you that your product license has been applied. Click OK to close the message box.
6. When you complete the licensing of your Alchemy Products, click Close to close the ALM.
6.6 USING CALL-IN LICENSING
Use the call-in licensing method to license your Alchemy products and optional components only if the Automatic, Manual, and Email Recovery licensing methods fail.
Your Alchemy product license number(s) will be sent to you using this address.
The site code generated by the ALM is unique to the computer on which Alchemy is installed and cannot be used to license Alchemy on another computer.
1. Before calling Technical Support to license your Alchemy products and optional components, you should collect the following information:
• Name• Company name• Phone number• A valid email address

Transferring a product license
6-19
• Applicable Alchemy product and optional component serial numbers• The ALM site code generated for the computer on which you installed Alchemy products
and optional components
2. After you have collected this information, call Captaris Technical Support at 303-224-7650.
6.7 TRANSFERRING A PRODUCT LICENSE
When you intend to move your licensed Alchemy product or product extension to a different computer from the computer where you originally installed it, you need to first transfer the product license using the Alchemy License Manager (ALM). Using the ALM, you can either transfer the license directly across the network or on a floppy disk.
The Alchemy Content Management Suite (ACMS), Alchemy Web and MailStore for Exchange use separate licenses for each service, client, capture and server module. Because of this, you can select individual or multiple licenses.
You must first install the Alchemy Content Management Server on the target machine before you can transfer an ACMS, Alchemy Web, or MailStore for Exchange server module, client, or capture module license across the network using the Direct Transfer method.
You must first install the necessary Alchemy or MailStore for Exchange server modules, clients, and/or capture modules on the target computer before you can transfer a server module, client, and/or capture module license using the Floppy Disk Transfer method.
6.7.1 TRANSFERRING A LICENSE DIRECTLY ACROSS THE NETWORK
When you select this option, the ALM allows you to transfer your product and product extension licenses to a new location directly across your network.To transfer a license directly across the network:
1. From the Programs menu, select Alchemy | Alchemy License Manager.The License Selection page appears.

Transferring a product license
6-20
ALM License Selection page
2. Click OK.The Alchemy License Manager appears.
Alchemy License Manager
3. Select the product and/or product extension license(s) that you want to transfer.
Use CTRL+Click to select multiple licenses to transfer.
4. Under Existing Licenses, click Transfer License.

Transferring a product license
6-21
The Transfer license page appears.
ALM Transfer license page
5. Under Transfer Type, select the Direct Transfer option.
When you select the Direct Transfer option, the license transfer wizard automatically selects the Transfer Out option under Transfer Mode. The remaining transfer mode options are disabled.
6. Click Next.The License Transfer Location page appears.
ALM License Transfer Location page
7. Enter the location where you want to transfer your product license(s) in the Enter Transfer Location box, or click Browse to find the location.
8. Click Finish to complete the product license transfer.A confirmation message appears to inform you of a successful product license transfer.
9. Click OK to close the message box.
10.Close the ALM.
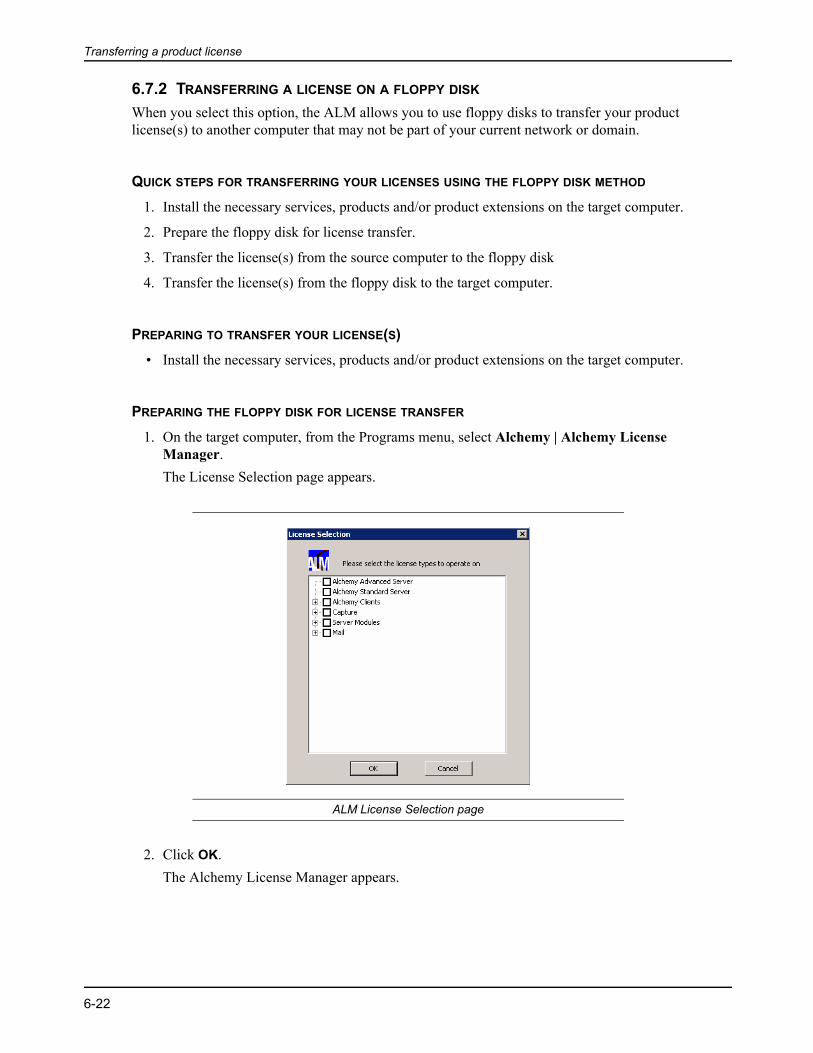
Transferring a product license
6-22
6.7.2 TRANSFERRING A LICENSE ON A FLOPPY DISK
When you select this option, the ALM allows you to use floppy disks to transfer your product license(s) to another computer that may not be part of your current network or domain.
QUICK STEPS FOR TRANSFERRING YOUR LICENSES USING THE FLOPPY DISK METHOD
1. Install the necessary services, products and/or product extensions on the target computer.
2. Prepare the floppy disk for license transfer.
3. Transfer the license(s) from the source computer to the floppy disk
4. Transfer the license(s) from the floppy disk to the target computer.
PREPARING TO TRANSFER YOUR LICENSE(S)• Install the necessary services, products and/or product extensions on the target computer.
PREPARING THE FLOPPY DISK FOR LICENSE TRANSFER
1. On the target computer, from the Programs menu, select Alchemy | Alchemy License Manager.The License Selection page appears.
ALM License Selection page
2. Click OK.The Alchemy License Manager appears.

Transferring a product license
6-23
Alchemy License Manager
3. Select the service, product and/or product extension license(s) that you want to transfer.
Use CTRL+Click to select multiple licenses to transfer.
4. Under Existing Licenses, click Transfer License.The Transfer license page appears.
ALM Transfer license page
5. Select the following options:• Floppy Disk Transfer• Prepare Disk
6. Insert a floppy disk into the disk drive.
7. Click Prepare the floppy diskette (drive A:\).A message appears to verify that you inserted a floppy disk into the disk drive.

Transferring a product license
6-24
8. Click OK to prepare the disk for license transfer.A message appears to confirm the successful preparation of the license transfer disk.
9. Click OK.
10.Remove the floppy disk from the target computer.
TRANSFERRING YOUR LICENSE(S) TO THE FLOPPY DISK
1. Insert the prepared disk into the disk drive on the source computer.
2. On the source computer, open the ALM.
3. Select the service, product and/or product extension licenses that you want to transfer.
4. Under Existing Licenses, click Transfer License.The Transfer license page appears.
ALM Transfer license page
5. Select the following options:• Floppy Disk Transfer• Transfer Out
6. Click Transfer out to floppy diskette (drive A:\).A message appears to verify that you inserted a floppy disk into the disk drive.
7. Click OK to transfer the selected license(s) from the source computer to the floppy disk.A message appears to confirm successful completion of the license transfer from the source computer to the floppy disk.
At this point, a valid Alchemy license no longer exists on the source computer.
8. Click OK.
9. Remove the floppy disk from the source computer.
10.On the Transfer license page, click Close.
11.On the ALM, click Close.
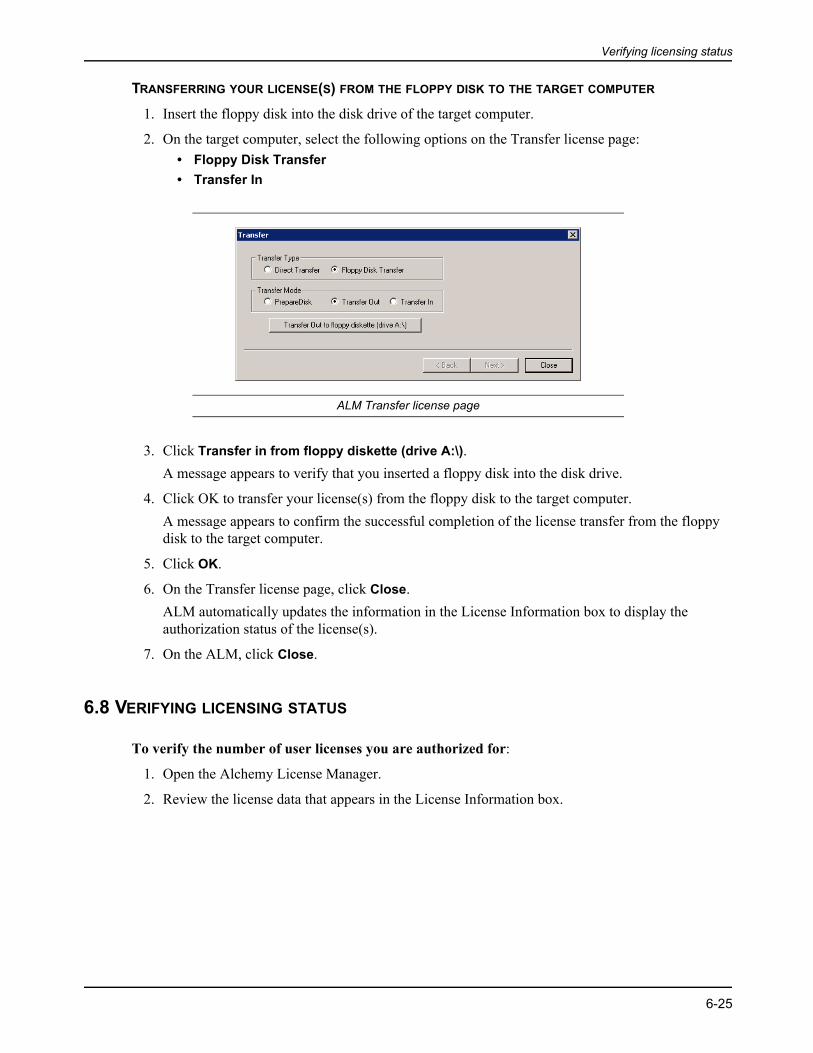
Verifying licensing status
6-25
TRANSFERRING YOUR LICENSE(S) FROM THE FLOPPY DISK TO THE TARGET COMPUTER
1. Insert the floppy disk into the disk drive of the target computer.
2. On the target computer, select the following options on the Transfer license page:• Floppy Disk Transfer• Transfer In
ALM Transfer license page
3. Click Transfer in from floppy diskette (drive A:\).A message appears to verify that you inserted a floppy disk into the disk drive.
4. Click OK to transfer your license(s) from the floppy disk to the target computer.A message appears to confirm the successful completion of the license transfer from the floppy disk to the target computer.
5. Click OK.
6. On the Transfer license page, click Close.ALM automatically updates the information in the License Information box to display the authorization status of the license(s).
7. On the ALM, click Close.
6.8 VERIFYING LICENSING STATUS
To verify the number of user licenses you are authorized for:
1. Open the Alchemy License Manager.
2. Review the license data that appears in the License Information box.

Verifying licensing status
6-26

A-1
APPENDIX AEASY CLIENT DEPLOYMENT
WHAT THIS APPENDIX COVERS
Using a software distribution program, you can install Alchemy Premium clients and extensions over a network from a central location. You can create an answer file to use with your distribution program so that installations can run without requiring any user interaction.
Captaris does not provide support for your particular software distribution program. Easy client deployment ONLY supports the creation of an answer file, which can be used by a software distribution program to deploy installation packages over networks. Please consult the documentation provided with your software distribution program for any questions related to using the software.
A.1 INSTALLING ALCHEMY CLIENT USING EASY CLIENT DEPLOYMENT
To run easy client deployment, use the following steps.
1. Using your software distribution program, create a package that will install Alchemy Client on a remote location.
Captaris does not support the creation of packages. Please consult your software’s documentation for assistance.
2. Create an answer file for the Alchemy installation by typing the following at the MS-DOS command prompt:"PathToSetupFile\alchemy\setup.exe" /r /f1"PathToAnswerFileLocation\setup.iss"
3. Go through the InstallShield Wizard steps and select the options you want to record in the answer file.
4. Browse to the path where you stored the answer file and open the setup.iss file.

A-2
5. At the end of this file, several lines appear to complete the last response required by the client-side installation, which will either prompt to restart the machine or to click OK to complete the installation. Which option appears will depend on the client’s operating system. The generated answer file will only provide the response requested by the computer on which you created the file. We recommend adding the alternate response that is missing from the file. At the end of the response file, you will see either:[{FC89B753-A580-4AE1-BCA5-94A399552615}-SdFinish-0]Result=1bOpt1=0bOpt2=0- OR -[{FC89B753-A580-4AE1-BCA5-94A399552615}-SdFinishReboot-0]Result=6bootOption=3Add the missing lines to the response file and save the file.
6. To perform an installation with the answer file, type the following at the MS-DOS command prompt:"PathToSetupFile\alchemy\setup.exe" /s /f1"PathToAnswerFileLocation\setup.iss" /f2"PathToLogFile\log.txt"
If you are performing multiple installations at the same time, do not use the same log file because some will fail due to the file being locked. To do so, replace:
/f2"PathToLogFile\log.txt"
with:
/f2"c:\alchemysetup.log"
This will write the log file to the local machine.

Glossary-1
GLOSSARY
GLOSSARY
Access Control List (ACL)List of databases under Alchemy Server control that have been mapped to a security role to restrict access. See also authorized databases.
adjacency searchA search technique that allows you to retrieve only those documents where the specified search words appear next to each other, even if one or all of the words are unindexed in the database(s).
advanced searchThis is when the Document Contents, Document Profile, Folder Profile, and Settings tabs are displayed in the Search dialog box. Click the binocular icon in the Search dialog box to toggle between Advanced Search and Simple Search.
AlbatchAlchemy’s built-in console application for writing batch programs. With Albatch, users can write batch programs in the DOS shell to automate Alchemy procedures.
Alchemy Advanced ServerThe basis for applications requiring integrated document management, records management, compliance and workflow, along with fixed content management.
Alchemy database definitionSee ALD.
Alchemy Standard Server

Glossary-2
The basis for fixed content management applications such as imaging and COLD.
ALDAlchemy database definition. The file extension used for Alchemy databases.
ANDA Boolean connector used in search criteria. When AND is used between search words, only documents containing all words are retrieved. For example, a search for CD-ROM AND Mul-timedia would result in all documents containing both terms.
archiveThe process of selecting and moving files and documents from on-line storage (hard disks and file servers) to near-line or off-line storage (tape or optical drives).
authorized databasesDatabases under Alchemy Server control that have been mapped to a security role. See also ACL
authorized license typesAlchemy license types that you assign to security roles to restrict user access to Alchemy applications and functionality. See also License Control List.
batch profileThis feature makes it possible for you to attach identical search words to multiple documents for rapid search and retrieval from databases. This can be done when files are added, or after they are already in a database.
Binary Large ObjectSee BLOB
BLOBBinary large object.
Boolean logic operatorsA system of logic that uses a set of variables to combine separate search elements into a single search string. Alchemy Administrator, Search and Web applications support the Boolean oper-ators “AND”, “OR” and “NOT”. When creating a search query, you can use “AND”, “OR” and “NOT” in different combinations to combine words entered into search fields into a search string. For instance, if you enter ADDITION OR (ABILITY AND STATEMENT) into a search field, the application locates documents that contain the word “addition” or documents that contain both “ability and statement”. You can also use the Boolean operators “AND” and “OR” to combine individual search fields into a single search string in Simple and Advanced Search Views.
bufferAn area of memory set aside for temporary storage of data, often until some external event completes.
buffer underrunA condition that can occur when a recording device has to stop recording due to an empty data buffer. These once common errors are now rare due to advanced recording hardware and soft-ware.

Glossary-3
buildThe process of indexing and copying files within a database to your selected media.
check inAllows users to add revised documents back into the database. See also Library Services.
check outAllows users to edit documents in a database. You can only check out an original document or the most recent version of a document. See also Library Services.
cloneAn exact duplicate of an existing database. The duplicate database uses the stop list, templates, fields, indexing methods, lookup tables, and folder structure of the source database. Files, however, are not copied to the new database.
close sessionTo write information to the end of a track so that the removable medium is readable on another PC’s device. The removable medium can be written to again, space permitting. Closing the session adds approximately 26 MB of overhead data the first time it is performed. Each time you close a session thereafter on the same removable medium, an additional 14 MB of over-head data is added.
COLD (Computer Output to Laser Disc)Replacement for COM (Computer Output to Microform) that sends output data directly to a WORM or CD Recorder optical disc. Commonly used to refer to the act of archiving data from large computers to optical media instead of tape, microfiche, or paper.
COM (Computer Output to Microform)The process of converting text and digital data to images on microfiche or microfilm. The data is often in the form of printed reports created on a large computer.
compressionSee Data Compression.
compound documentA file that has another file linked to it. Files are linked by dragging and dropping one file on top of another.
Computer Output to Laser DiscSee COLD
data compressionWith this feature activated, the Build application writes more data to a smaller segment of the build destination.
data port numberThe specific communication channel that Alchemy Server uses to communicate with client computers. The default data port number that Alchemy Server uses is 3234.
databaseOrganized collection of information grouped together for ease and speed of search and retrieval.

Glossary-4
database groupsLimits user access to specific folders within a database by limiting user access to specific folders within the databases assigned to the security role.
database settingsControls what Alchemy functions and features are available to users assigned to a security role for spe-cific databases mapped to that same security role. See also Role Based Access Control.
default templateIn form overlays, use this template for the middle pages of a multi-page form document where the first and last pages are different; or for a multi-page form document where all the pages are identical.
delete document versionsAllows users to delete all versions of a document from the published version and below in the docu-ment version hierarchy, including the original. Unlike the Roll back versions feature, deleting docu-ment versions does not rescind (cancel) the version of the document. See also Library Services.
document profileDocument profiles are defined at the document level for an individual document, or for a group of documents with a “batch profile.” A document’s profile may contain different infor-mation than the profile of the folder where it resides.
document titleA way for you to reference your files. The document title is identical to the file name unless you change it.
document typeContain settings that are specific to a certain kind of document that you commonly scan. Doc-ument types allow you to save settings such as the scanner profile to use, where to store the scanned document, its output format, and the OCR template to apply.
document type separator pageDuring batch scans, identifies that the documents following the separator page are of the spec-ified document type. The separator page includes a bar code that is specific to the document type.
enhance degraded imagesThis feature attempts to sharpen images that are blurred or faded. This option should be enabled when scanning images of poor quality, such as faxes.
fieldsThere are two groups of fields available for use with profiles: system fields and user-defined fields. Fields are a key component of profiles; they are used for entering data, displaying infor-mation, and searching databases.
file detailsThe file creation/modification date and time, the file size, and the file attributes. You can choose to display the file details in the Viewer pane.
first template

Glossary-5
In form overlays, Use this template for the first page of a form document where the first page is different than the middle or last pages.
floating point numberA numeric field type, on which a precision level can be set to allow rounding. Max 15 digits.
folder profileFolder profiles are defined at the folder level to associate the same profile information with a group of documents contained in the same folder. A document’s folder profile can contain dif-ferent information than the individual profiles of the documents it contains.
form overlayWith form overlays you can produce documents that appear as though they were preprinted on a form, such as an invoice or statement.
full text searchTo locate documents stored in a system by searching for text that appears in their contents, rather than by searching for them by file name or other indexing techniques.
fuzzy searchingA search setting that allows for finding words or names for which the correct spelling is not known.
indexingThe process of building data structures for a database that contain the location of every word or other data item. Indexes allow searchers to locate items rapidly without searching through the entire body of data.
indexing charactersThe character set used to recognize indexable words (e.g., A - Z, 0 - 9).
inherited roleAllows managers to possess or inherit the security roles of their employees without having to actually assign themselves to their employees’ security roles or map specific databases or database groups to the security role in which the manager is a member. When inheriting a security role, the manager inher-its the databases mapped to the security role and any custom Database FCL settings associated with the databases mapped to the inherited security role.. See also Role Based Access Control.
integer numberA numeric field type. A number between -2,147,483,648 & 2,147,483,647. Allows for enter-ing whole numbers.
Integrated SecurityFeature of Alchemy Server that allows administrators to control user and group access to data-bases based on the organizational model of a company or other organization.
ISO 9660 (International Standards Organization 9660)An international standard that specifies the logical format of files and directories stored on a CD-ROM. ISO 9660 replaces the older High Sierra proposal and is directly derived from it. The standard strives to achieve a high level of portability and platform independence.
last template

Glossary-6
In form overlays, use this template for the last page of a form document where the last page is different than the middle or first pages.
Library ServicesFeature in Alchemy Advanced Server that allows users to edit the content and metadata of files contained in databases under Alchemy Server control.
License Control List (LCL)List of Alchemy license types that have been assigned to a security role to restrict access to Alchemy applications and functionality. See also authorized license types.
lookup fieldA field containing data from a lookup table. You might want to use a lookup table to index a field if the number of possible values are small, or for consistent data entry. Documents can then be indexed by selecting a keyword from the drop-down list for that field.
lookup tableA table containing values for lookup fields. For example, if documents were indexed by department, a Department lookup table would contain values like Sales, Marketing, Engineer-ing, and Admin. When indexing the documents, the user could choose from these values, or enter a different value.
maximum concurrent threadsThe maximum number of active threads that the Alchemy Server service attempts to maintain. The default maximum is equal to the number of processors installed on the server machine. If you leave this option set to zero (0), the server uses the automatically calculated setting.
multi-sessionThe ability to record data to the removable medium multiple times. Each session requires 14MB of overhead. A CD-ROM can contain up to 99 sessions.
NOTA Boolean connector used in search criteria. The query, CD-ROM NOT MULTIMEDIA, retrieves all documents mentioning CD-ROM except for documents that also mention MUL-TIMEDIA.
OCR(Optical character recognition) This process converts words displayed on an image file into a separate text file.
ODBC(Open Database Connectivity) The ODBC driver translates the database hierarchical data structure to a relational tabular form (using rows and columns), and makes this tabular form accessible to SQL. Additionally, the ODBC driver provides extensions to SQL, making fea-tures such as full-text indexed searching available through any ODBC-compliant application.
open database connectivitySee ODBC.
optical character recognitionSee OCR.
OR

Glossary-7
A Boolean connector used in search criteria. When OR is used between two search words in a query, it retrieves of all documents that mention either of the two words.
overwrite documentAllows the user to overwrite (replace) the original document or previous version when the modified document is checked in. See also Library Services.
page map sizeDetermines the limit amount of change/update tracking Alchemy Server performs on each file in each database that the server controls. The default value is to track the last 1000 changes/updates made to each file in the database.
page map deltaDetermines the percentage of the page map that the server clears when the server reaches the page map size limit. The default page map delta is 20%. This value means that the server deletes 20% of the old-est changes/updates from the page map when the server reaches the limit.
parenthesesAn element of a Boolean logic search criteria used to group search criteria together and alter their precedence. For example, the query CAR AND (BOAT OR PLANE) is distinct from (CAR AND BOAT) OR PLANE.
precisionA setting for Floating Point Number fields types that allows for rounding numbers to the spec-ified number of decimal places. Numbers greater than or equal to five are rounded up to the next number.
profileSummarized data used to attach search retrieval keywords to folders and files contained in databases. The data is displayed in fields, which are viewed with their associated folders and/or files.
profile cardA configurable dialog box which is used to display and edit profile information associated with documents and folders in the database.
profile designerA configurable dialog box template which is used to display and edit profile data. Databases have document and folder profiles, and the same profile design may be used by multiple data-bases. Also known as a profile card.
Profile paneWindow located by default in the lower portion of the workspace used to view information about open databases, folders and documents.
proximity searchA search method that allows you to search on words that appear within a certain range using the following syntax: <word1> within n <word2>, where <word1> represents a word, n repre-sents a numeric value and <word2> represents a word.
publish document versionAllows users to designate (declare) the original or any version of a document in a database as the final draft of the document for use. See also Library Services.

Glossary-8
queryTo search a database for files that match a given criteria.
query profileDatabase designers can create a custom Query Profile that includes only specific fields for searching. When the Query Profile is displayed in the Search dialog box, the Document Con-tents, Document Profile, Folder Profile, and Settings Tabs are hidden. A searcher only sees the Query Profile and the fields it contains. A well designed Query Profile can help to simplify the search process by limiting a searcher’s choices in the Search dialog box.
Role Based Access ControlAlchemy Advanced Server feature that allows administrators to set user specific access to over 140 unique end user functions in Alchemy.
role settingsControls what Alchemy functions and features are available to users assigned to a security role.
roll back document versionAllows users to rescind or cancel a version of a document in the database. When you roll back a ver-sion of a document, you remove that version from the version hierarchy for the document. The remain-ing versions of the document are renumbered accordingly. See also Library Services.
saved queryThe Saved Query feature in Alchemy Web allows you to save up to ten search queries and their associated settings for queries that you use frequently to search files contained within Alchemy databases. The Saved Search Query feature also allows you to edit your saved search queries to accommodate your changing needs and delete and save different search queries as your needs dictate. You access the Saved Query feature in the Search pane in the Simple and Advanced Search Views.
scanner profileDescribes configuration settings such as paper size, color depth, paper sidedness, and paper orientation for a Alchemy SCAN-supported scanner. Multiple scanner profiles can be created for the same scanner for use with different document types.
search field(Also known as profile fields) Search fields are used in Simple Search and Advanced Search Views to enter search words for an item search.
search resultsThe list of documents found to match a query.
service port numberThe specific communication channel used to remotely communicate with the Alchemy Server MMC console, the Performance Monitor, and server COM API.
simple searchIn addition to document and folder profiles, database designers can create a custom Query Pro-file that includes only specific fields for searching. When the Query Profile is displayed in the Search dialog box, the Document Contents, Document Profile, Folder Profile, and Settings Tabs are hidden. A searcher only sees the Query Profile and the fields it contains. A well

Glossary-9
designed Query Profile can help to simplify the search process by limiting a searcher’s choices in the Search dialog box.
stop listA list of words that are ignored while documents are indexed. Stop words normally include English prepositions, conjunctions, articles and certain verbs. OF, AND, IS, THE, WITH are typical stop words. Alchemy Administrator, Search and Web applications contain a default list of stop words, which may be modified by the user. The stop list is used to keep the index from becoming cluttered with multiple occurrences of words with little or no information content. By not indexing these common words, the index is smaller and retrieval is faster.
thread pool sizeDetermines the number of worker threads the Alchemy Server creates. The default thread pool size is twice the number of processors installed in the server machine. If you leave this option set to zero (0), the server uses the automatically calculated setting.
Tree View paneWindow located by default in the left-hand side of the workspace that displays open databases and their contents, which are distinguished as either built or unbuilt items.
undo document check outAllows users to cancel their document check out. When you undo a check out, any changes you made to the document are lost and the document is returned to its previous state before it was checked out. See also Library Services.
view document versionsAllows users to view all versions of a document in the Alchemy client Tree view. See also Library Ser-vices.
Viewer paneWindow located by default in the right-hand side of the workspace used to display a read-only version of the contents of an open database, database folder, or an open document located in an open database.
wildcardA character that represents one or more other characters. In file names, you can used the ques-tion mark (?) to represent any single character and the asterisk (*) to represent any character or group of characters that might match that position in other file names.
word matchingSee fuzzy searching.
Word WheelSee lookup table

Glossary-10
Index-1
AACMS
overview 1-1ACMS installing 4-1Alchemy Advanced Server system requirements 1-8Alchemy Audit Logging 3-1Alchemy Content Management Suite 1-1Alchemy Content Management Suite, installing 4-1Alchemy Premium
installing 4-8Alchemy Search
installing 4-12installing from removable media 4-15
Alchemy Search installing 4-12Alchemy Search, running from removable media 4-16Alchemy Server administrator group 4-2Alchemy Server installation 4-1Alchemy Server service
installing 4-2Alchemy SQL database, creating 3-5Alchemy Standard Server system requirements 1-8Alchemy Web 3-1Alchemy Web Engine Platform 3-1ALM system requirements 1-8AMP 1-7Annual Maintenance Program See AMPautomated licensing 6-3, 6-5
Ccall-in licensing 6-3, 6-18Captaris
consulting services 1-6contacting 1-3documentation feedback 1-7educational services 1-4Englewood office, contacting 1-3sales 1-6technical support 1-4
client deployment A-1clients and extensions, installing 4-8component installation, verifying 5-1component removal 5-3components, repairing 5-3
configuring MSDE 3-5consulting services, contacting 1-6contacting Captaris 1-3creating Alchemy SQL database 3-5creating SQL database 3-5
Ddirect transfer license 6-19documentation conventions 1-2documentation feedback 1-7
EEALA system requirements 1-9easy client deployment A-1educational services, contacting 1-4e-mail recovery, licensing 6-3
Ffeedback, documentation 1-7floppy disk license transfer 6-22
Ggetting started 1-1
Hhardware, supported 1-7
Iinstallation
modifying 5-2repairing 5-3
installation notes 2-1installation, repairing 5-3installing
.NET 3-2ACMS 4-1Alchemy Content Management Suite 4-1Alchemy Premium 4-8Alchemy Search 4-12Alchemy Server 4-1
INDEX

Index
Index-2
Alchemy Server service 4-2clients and extensions 4-8Microsoft Management Console (MMC), see Mi-
crosoft documentation 2-2, 4-1MSDE 3-3MSMQ 3-1over a network A-1prerequisite applications 3-1
installing Alchemy Search 4-12
Llicense transfer 6-19license transfer, floppy disk 6-22license, direct transfer 6-19license, network transfer 6-19licensing
automated 6-3, 6-5call-in 6-3, 6-18concurrent-user (client/server) 6-2e-mail recovery 6-3manual 6-3, 6-12overview 6-2single-user 6-2verify 6-25
Mmanual licensing 6-3, 6-12Microsoft .NET, installing 3-2minimum system requirements 1-8MMC
installing, see Microsoft documentation 2-2, 4-1modifying an installation 5-2MSDE
configuring 3-5updating 3-5
MSDE installation 3-3MSDE removal 5-4MSMQ
installing 3-1
Nnetwork transfer license 6-19notes, installation 2-1
Ooverview, ACMS 1-1
Pprerequisite applications installing 3-1prerequisites 1-2product license number recovery 6-18product license transfer 6-19product licensing overview 6-2product licensing, automated 6-5product licensing, manual 6-12product upgrades 2-2
Rrecovering product license numbers 6-18removing components 5-3repairing an installation 5-3repairing installation 5-3running Alchemy Search 4-16
Ssales, contacting 1-6Search installation 4-12, 4-15SQL database, creating 3-5supported hardware 1-7system requirements
Alchemy Advanced Server 1-8Alchemy License Manager 1-8Alchemy Standard Server 1-8Exchange Archive Link for Alchemy 1-9
system requirements, minimum 1-8
Ttechnical support, contacting 1-4transferring licenses 6-19
Uuninstalling components 5-3uninstalling MSDE 5-4updating MSDE 3-5upgrading products 2-2
Vverifying component installation 5-1
Wwelcome to Alchemy Content Management Suite 1-1what this guide assumes 1-2