release notes for web protection solutions, v8 release notes for web protection solutions release...
TRANSCRIPT
v8.3.0 Release Notes for Web Protection Solutions
Release Notes | TRITON AP-WEB and Web Filter & Security |14-Dec-2016
Use the Release Notes to find information about what’s new and improved for TRITON® AP-WEB and Web Filter & Security in version 8.3.0.
● New in Web Protection Solutions, page 3
● Resolved and known issues, page 25
For information about endpoint client software, please refer to the Release Notes for TRITON AP-ENDPOINT.
Refer to the following when installing or upgrading to v8.3.
● Installing TRITON AP-WEB
● Installing Web Filter & Security
● When upgrading Web Security Gateway/Anywhere (v7.8.4) or TRITON AP-WEB (v8.0.x, 8.1.x, or v8.2.x), see Upgrade Instructions for TRITON AP-WEB
● When upgrading Web Filter or Web Security (v7.8.4) or Web Filter & Security (v8.0.x, 8.1.x, or v8.2.x), see Upgrade Instructions for Web Filter & Security
● Deployment and Installation Center
NoteThe Content Gateway component is not included in Web Filter & Security deployments. Content Gateway information applies only to TRITON AP-WEB.
ImportantV-Series appliance users:
Some older V10000 and V5000 appliances are not supported with version 8.0.0 and higher.
See V-Series appliances supported with version 8.0
© 2016 Forcepoint LLC
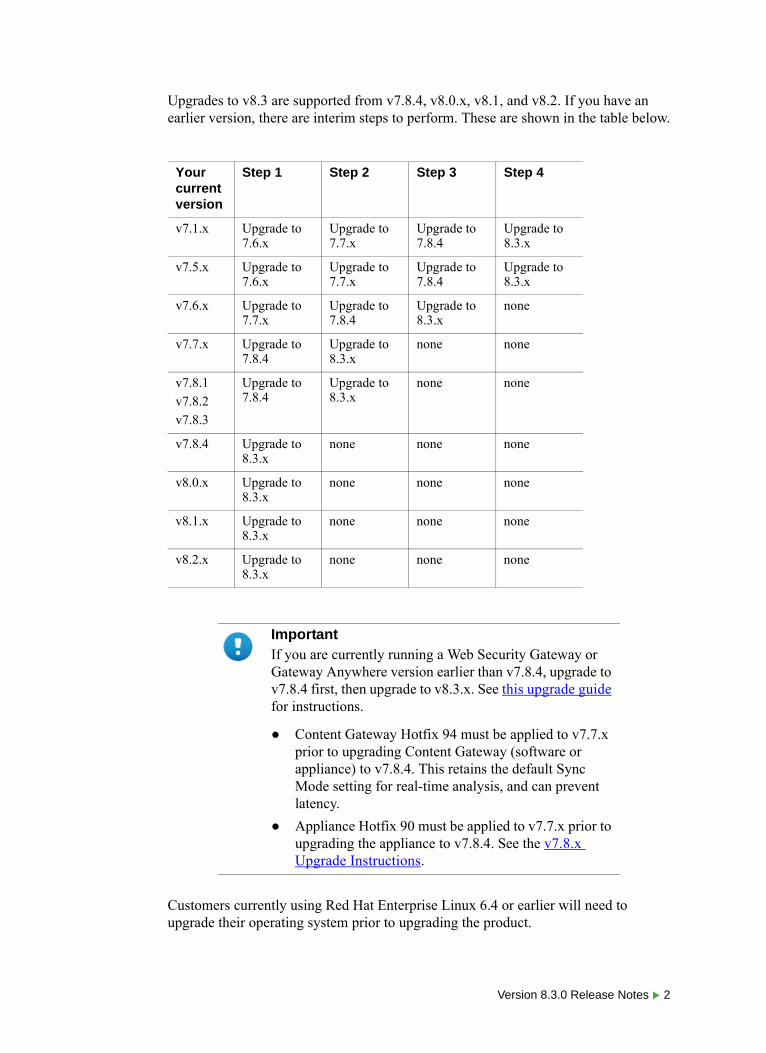
Upgrades to v8.3 are supported from v7.8.4, v8.0.x, v8.1, and v8.2. If you have an earlier version, there are interim steps to perform. These are shown in the table below.
Customers currently using Red Hat Enterprise Linux 6.4 or earlier will need to upgrade their operating system prior to upgrading the product.
Your current version
Step 1 Step 2 Step 3 Step 4
v7.1.x Upgrade to 7.6.x
Upgrade to 7.7.x
Upgrade to 7.8.4
Upgrade to 8.3.x
v7.5.x Upgrade to 7.6.x
Upgrade to 7.7.x
Upgrade to 7.8.4
Upgrade to 8.3.x
v7.6.x Upgrade to 7.7.x
Upgrade to 7.8.4
Upgrade to 8.3.x
none
v7.7.x Upgrade to 7.8.4
Upgrade to 8.3.x
none none
v7.8.1
v7.8.2
v7.8.3
Upgrade to 7.8.4
Upgrade to 8.3.x
none none
v7.8.4 Upgrade to 8.3.x
none none none
v8.0.x Upgrade to 8.3.x
none none none
v8.1.x Upgrade to 8.3.x
none none none
v8.2.x Upgrade to 8.3.x
none none none
ImportantIf you are currently running a Web Security Gateway or Gateway Anywhere version earlier than v7.8.4, upgrade to v7.8.4 first, then upgrade to v8.3.x. See this upgrade guide for instructions.
● Content Gateway Hotfix 94 must be applied to v7.7.x prior to upgrading Content Gateway (software or appliance) to v7.8.4. This retains the default Sync Mode setting for real-time analysis, and can prevent latency.
● Appliance Hotfix 90 must be applied to v7.7.x prior to upgrading the appliance to v7.8.4. See the v7.8.x Upgrade Instructions.
Version 8.3.0 Release Notes 2

New in Web Protection SolutionsRelease Notes | TRITON AP-WEB and Web Filter & Security | 14-Dec-2016
● TRITON APX
● Security enhancements
● Reporting on cloud app use
● Management API (Appliance or Linux deployments)
● Certificate Verification Engine enhancements (Content Gateway)
● SSL Decryption port mirroring (Content Gateway)
● Client Certificate Authentication (Content Gateway)
● Server Name Indication (SNI) Support in Network Agent
● HTTP referer information in reporting
● New left navigation pane
● Block files that exceed the size limit
● New MRTG graphs (Content Gateway)
● Reporting Optimizations
● Upgrade improvements
● Browser support
● Logon application support
● Replaced in this version
● Third-party platform and product support
TRITON APX
Version 8.0 was the first product release that used a new, simplified product naming and grouping of the familiar TRITON product line.
New Name Original Name
Web Filter & Security Web Filter
Web Filter & Security Web Security
TRITON AP-WEB TRITON Web Security Gateway
TRITON AP-WEB with:
● Web Hybrid Module
● Web DLP Module
● Web Sandbox Module (if purchased)
TRITON Web Security Gateway Anywhere
Version 8.3.0 Release Notes 3

Security enhancements
Forcepoint Security Labs Analysts continually assess potential security vulnerabilities, which can be introduced by third-party libraries. Security improvements have been made in several areas in version 8.3.
Reporting on cloud app use
Forcepoint has entered into a partnership with Imperva Skyfence™ to provide visibility into the use of cloud applications by users in your networks, as well as hybrid users, and the potential risks associated with their use.
Access the new report on cloud app use by selecting the Cloud Apps tab from the Main > Reporting > Applications page.
Use the options at the top of the page to filter the data that is displayed:
● The Time period for the report.
Select Today, 2 days, 7 days (the default), 14 days, 30 days, 60 days, or 90 days from the drop down.
If you are using Microsoft SQL Express, the maximum time period is 30 days.
The calculated “from date” is provided next to the selection.
● The App risk levels to be reported.
Check the box next to High, Medium, or Low to include data for applications that have been assigned the selected risk level.
Click Update to display a new report that uses your selected filters or to include more recent data in the report.
Data above the table shows the number of Cloud apps used, the number of Users accessing cloud apps, and the total Traffic volume associated with cloud app usage.
The results that match your filter are included in a columnar table.
Viewing cloud application use
A View by option is provided to change the report contents. Select Cloud app to produce a report on use of the applications. Select Cloud app user to generate a report about users of cloud applications.
When Cloud app is selected, the following columns are included:
● Risk Level: an assessment of the level of threat (High, Medium, or Low) associated with each cloud application.
By default, the table is sorted by Risk Level, using the risk value assigned to each threat level. The values are 1, 2, and 3 for High, Medium, and Low, respectively.
Version 8.3.0 Release Notes 4
Click the link provided in this column to open a window with information about the application and the associated risk.
● Cloud App: the application name.
Click a link in this column to open a User Summary Report for the selected application.
● Type: the type of application being accessed.
● Users: the number of users who have accessed the application.
● Requests: the total number of requests made to the application.
● Bytes Sent: the total number of bytes sent by requests to the application.
● Bytes Received: the total number of bytes received from the responses to requests for an application.
● Last Accessed: the date and time the application was last accessed.
When the View by selection is Cloud app user, the following columns are included:
● User: the user or IP address of the user accessing cloud applications.
Click a link in this column to open a summary of cloud application use by the user. See Cloud App Summary.
● Cloud Apps Accessed: the total number of cloud applications accessed by the user.
● Requests: the total number of requests made to cloud applications.
● Bytes Sent: the total number of bytes sent by requests to cloud applications.
● Bytes Received: the total number of bytes received from the responses to requests for the applications.
● Last Accessed: the date and time a cloud application was last accessed by the user.
By default, the table is sorted on the last accessed date.
Using Cloud app reports
Controls are provided with each table, including the User Summary Report and the Cloud App Summary.
● Use the Find feature to restrict the information in the table.
Enter up to 50 characters (special characters are not supported) and click Search to filter on:
■ Cloud App: application name or type.
■ Cloud App User: user information.
NoteIf a user accesses the same cloud app through both the hybrid service and on-premises components (Filter Service and Content Gateway), the user appears twice in the report.
Version 8.3.0 Release Notes 5

■ User Summary Report: user information.
■ Cloud App Summary: application name, application type, or risk level.
Click Clear to remove your entry.
● Click Export to CSV to generate a comma-separated table (maximum of 10,000 rows) of the data. The Time Period and Find values become part of the query used by the export, even if the filters were not used to update the table.
Exports from the Cloud App table or the Cloud Apps Accessed by table will include the application information provided by the Risk Level link.
When selected on the main Cloud app page, an export will create a file called cloudapps.csv. From the Cloud app user page, an export will create cloudappusers.csv.
From the summary pages, an export will create cloudapps_<app name>.csv (User Summary) or cloudappusers_<user name>.csv (Cloud App Summary).
● Use the paging options below the table to navigate to other report pages.
● Use the arrows next to column headings to change the sort order of each report.
● Click the icon in the upper right of each chart to expand it and display it on it’s own page.
● Click and drag the edge of table column headers to manually adjust the default column width.
Delegated administrator access to the Cloud Apps report is included in the Access application reports option in the Reporting Permissions section of Delegated Administration > Edit Roles. Administrators with “Access application reports” permissions automatically receive access to the new Cloud Apps tab.
The time period established by the Keep data for setting on the Settings > Reporting > Log Database page applies to data collected for cloud apps as well as the statistical data for application reports.Cloud application log data is processed by the Advanced Malware Threat (AMT) ETL Log Database job. Once data is processed and moved to the database tables used by the Cloud Apps reports, the daily maintenance job deletes data that is more than 2 days old from temporary log database tables.
To support the ability to report on cloud applications, a Cloud Apps database is downloaded on a regular basis. The schedule defined for the Master Database
NoteDelegated administrators with permission to Report on managed clients only, and assigned to multiple roles, will be able to view data only for their managed clients.
Version 8.3.0 Release Notes 6

download on the Settings > General > Database Download page is also used for the Cloud Apps database download process.
User Summary Report
When you click a cloud application name on the Cloud Apps report, a User Summary Report is displayed, with information about the use of the application.
● The Time period selected on the Cloud Apps report is provided, with the option to select a different Time Period for the summary report.
● A Top 10 Users chart displays the number of requests made by each user.
Change the default Column chart by selecting a different Chart type.
● The Usage Trend chart shows the bandwidth used by the application.
Select a new Chart type to change the default Multi-series line chart to a type of your choice.
● Information about Users Accessing the application is provided at the bottom of the page. This columnar report includes:
■ User: each user that has accessed the application.
■ Requests: the number of times the application has been requested by the user.
■ Bytes Sent: the total number of bytes sent by the user’s requests to the application.
■ Bytes Received: the total number of bytes received from the responses to the user’s requests.
■ Last Accessed: the date and time the user last used the application.
Click Close to close the page and return to the Cloud App report.
Cloud App Summary
When you click a user name on the Cloud App Users report, a Cloud App Summary report is displayed, with information about that user’s cloud application use.
NoteIf you make changes on the Settings > Reporting > Log Server page of TRITON Manager, you must restart the Websense Cloud Apps Service to update the database connection to Cloud Apps reports.
NoteIf a user accesses the same cloud app through both the hybrid service and on-premises components (Filter Service and Content Gateway), the user appears twice in the report.
Version 8.3.0 Release Notes 7

● The Time period selected on the Cloud App Use by report is provided, with the option to select a different Time Period for the user report.
● A Top 10 Cloud Apps chart displays the number of requests made to each application.
Change the default Column chart by selecting a different Chart type.
● The Usage Trend chart shows the bandwidth used by the user when accessing cloud applications.
Select a new Chart type to change the default Multi-series line chart to a different type.
● Information about Cloud Apps Accessed by the user is provided at the bottom of the page. This columnar report includes:
■ Risk Level: an assessment of the level of threat (High, Medium, or Low) associated with cloud application.
By default, the table is sorted by Risk Level, using the risk value assigned to each threat level. The values are 1, 2, and 3 for High, Medium, and Low, respectively. A secondary sort on the date and time in the Last Accessed column is then applied.
Click the link provided in this column to open a window with information about the application and the associated risk.
■ Cloud App: the application name.
■ Type: the type of application being accessed.
■ Requests: the number of times the application has been requested.
■ Bytes Sent: the total number of bytes sent by requests to the application.
■ Bytes Received: the total number of bytes received from the responses to requests for an application.
■ Last Accessed: the date and time the application was last used.
Click Close to close the page and return to the Cloud App User report.
Management API (Appliance or Linux deployments)
Administrators can now create scripts to import threat intelligence from third-party sources into AP-WEB. If you have linked your AP-EMAIL channel with AP-WEB, then both can benefit directly from this new functionality.
Available on an appliance or Linux deployment, a new application program interface (API) is provided to create categories and populate them with URLs and IP addresses for use in policy enforcement.
Use any data feed mechanism to send JSON-formatted data over HTTPS to TRITON AP-WEB. Once categories, URLS, and IP addresses are added via this mechanism, Filtering Service and reporting tools are able to use them for policy enforcement and reporting.
Version 8.3.0 Release Notes 8

Manual steps are required to use this feature. See the Management API Guide for details on using the Management API. For details on deploying the Management API, see the Management API Deployment & Installation Guide.
Before you can use the API, you must define a basic authentication account that will be used to send data to the API. Only one account may be defined per deployment. The account must include a password.
1. Navigate to Settings > General > Account and click Advanced Options at the bottom of the page.
Note that the advanced options are available only to Super Administrators and is not displayed if the API is not installed.
2. Enter a User name for the account.
Use only alphanumeric characters.
A default user name, apiadmin, is provided but will not be saved until a valid password is entered and confirmed.
3. Enter and confirm a Password for the account.
Passwords must be a minimum of 8 characters and include at least one:
■ Uppercase character
■ Lowercase character
■ Number
■ Special character
Supported characters include:
! # % & ' ( ) * + , - . / ; < = > ? @ [ ] ^ _ { | } ~
The following special characters are not supported:
Space $ : ` \ "
4. Click OK and then Save and Deploy to save your changes.
Use this information to authenticate each connection to the Policy API Server.
Categories that are added using the API appear in the Web module of TRITON Manager with “(Restricted)” next to the category name. Administrators can use the TRITON Manager to assign actions (like block and permit) to these API-managed categories, but the URLs and IP addresses associated with them can be added, viewed, and deleted only via the API.
The following pages in the Web module of TRITON Manager have been updated with “(Restricted)” for API-managed categories. Some pages have also been changed to disable specific functionality.
● The Selective Category Logging list on the Settings > General > Logging page.
● The Category Filter contents on Main > Policy Management > Policies > Edit Policy.
When an API-managed category is selected in the Category Filter pane, the Block keywords option, included as an Advanced option, is disabled.
Version 8.3.0 Release Notes 9

● The Categories list on the Main > Policy Management > Filters > Edit Category Filter page.
In addition, the Block keywords option is disabled when a restricted category is selected in the Categories list.
● The Categories list on the Main > Policy Management > Filter Components > Edit Categories page.
Also, when a API-managed category is selected, the right pane will provide text in place of the category description indicating that the category was added by an external utility. None of the options normally available in the right pane are provided.
Also, the Add, Rename, and Delete buttons are disabled for API-managed categories.
● The Add to list on the Main > Policy Management > Filter Components > Edit Categories > Add Category page will not include API-managed categories.
● The Categories list on Main > Policy Management > Filter Lock > Categories.
On this page, the Lock keywords option is disabled for restricted categories.
In addition, API-managed categories are automatically added to the Security Risk class on the Settings > General > Risk Classes page, and become part of the default list of categories for that risk class
Certificate Verification Engine enhancements (Content Gateway)
Enhancements have been made to the Certificate Verification Engine, including a reconsideration of the default values for the feature. As of v8.3:
● On the Configure > SSL > Validation > General page:
■ Enable the certificate verification engine is enabled by default.
A warning displays if the feature is disabled.
■ The validation of self-signed certificates has been added as a new setting and removed from the processing done as of part the No expired or not yet valid certificates option.
When Deny self-signed certificates is enabled, self-signed certificates (certificates without an official certificate authority) are considered invalid. This setting is enabled by default.
■ The Verify entire certificate chain and Deny self-signed certificates options are the only CVE options now enabled by default.
NoteFor those with the Web Hybrid module, Sync Service does not forward URLs or IP addresses for API-managed categories to the hybrid service.
Version 8.3.0 Release Notes 10

● On the Configure > SSL > Validation > Verification Bypass page, the Permit users to visit sites with certificate failure after confirmation option is on by default.
SSL Decryption port mirroring (Content Gateway)
The Content Gateway proxy decrypts HTTPS traffic for analysis. A new feature has been added that delivers all decrypted HTTPS traffic to a physical network interface. This allows a trusted service device to inspect and analyze the decrypted data for its own purpose, without adding extra decryption products or redundant SSL decryption policies.
Note that the trusted device cannot modify the decrypted traffic and inject it back into the data steam.
Available only when the proxy is hosted on a V10000 appliance, the feature can be enabled and configured using CLI commands.
These CLI commands edit the following variables in records.config:
proxy.config.ssl_decryption.mirror_enabled INT 0
ImportantAs a result of these enhancements, during an upgrade to v8.3, the CVE setting will be changed to ON for any customer who does not already have the feature enabled.
ImportantThe mirror port interface should not be connected to a live network.
Configure Port Mirroring
set decrypt_port_mirror
--status <off>
--interface < >
--header <X-Proxy-HTTPS:1>
Use status to enable Port Mirroring. By default, the feature is OFF.
Assign an available appliance Ethernet interface. Enter ‘set decrypt_port_mirror -- interface’ and press <tab> to identify available interfaces. Available interfaces are n, e1, or e2. The default interface value is NULL.
Use the header variable to define the custom header name and value that Port Mirroring inserts into each HTTP request header sent to the monitor network interface. By default, the value is X-Proxy-HTTPS:1.
Version 8.3.0 Release Notes 11

proxy.config.ssl_decryption.mirror_interface STRING NULL
proxy.config.ssl_decryption.custom_request_header STRING X-Proxy-HTTPS:1
By default, port mirroring is disabled (0), the interface value is set to NULL and the header is X-Proxy-HTTPS:1.
Use the show CLI command to check the current settings:
show decrypt_port_mirror
Changes to the mirror_interface or custom_request_header variables requires a restart of Content Gateway.
This feature is supported:
● If SSL decryption is enabled.
● Using one of the interfaces on the Content Gateway V10000 appliance.
● For both IPv4 and IPv6.
● For both transparent and explicit proxy deployments.
Only decrypted HTTPS traffic is delivered to the mirrored interface. The following SSL traffic is not delivered:
● Traffic that is set to bypass decryption
● Blocked traffic
● Tunneled traffic
See the TRITON Appliances CLI Guide for additional information.
Client Certificate Authentication (Content Gateway)
Certificate authentication has been added to Content Gateway for use with mobile and other personal devices.
When client certificate authentication is enabled, unauthenticated users are redirected to an HTTPS page where they are prompted to select the certificate to send to Content Gateway. The user is considered authenticated if the certificate is signed by a trusted
NoteDo not manually edit records.config to set these values. Edit the values by using the CLI.
NoteWhen IPv6 is enabled, mirrored traffic using IPv4 will appear in IPv6 format but is handled properly.
Version 8.3.0 Release Notes 12
Certificate Authority (CA). The user name is extracted from the appropriate certificate field.
Client certificate authentication can also be configured to fall back to the domains list and Captive Portal for authentication. Users who cannot be authenticated using a certificate will then be authenticated using a different method.
Used with rule-based authentication, this feature is configured for each proxy and:
Supports basic, LDAP, NTLM, and IWA authentication.
If the fallback option is enabled, however, and Captive Portal is enabled for fallback, the Captive Portal limitations apply. See the details in Content Gateway Manager Help under Rule-Based Authentication.
Supports credential and cookie caching.
Requires a Client Certification Authentication Profile that explains where to extract user names from the certificates and includes a list of the CA Certificates valid for use by clients.
Requires enabling SSL decryption.
Access to HTTPS sites are not authenticated if HTTPS is not enabled on the Configure > My Proxy > Basic page.
Client Certificate Authentication rules
When you are adding an authentication rule (see Rule-Based Authentication in Content Gateway Manager Help for details), new options are available to enable client certificate authentication. In addition, the page has been separated into logical sections to facilitate adding or editing a rule.
Navigate to Configure > Security > Access Control > Authentication Rules and, below Authentication Methods:
Click Enabled next to Client Certificate to enable client certificate authentication. Click Disabled to disable the feature.
In the drop-down box next to Enabled, select a Client Certificate Authentication profile. See Client Certificate Authentication profiles below.
For the v8.3 feature, only one profile is allowed.
Check the box next to Use the next selected authentication method if Client Certificate authentication fails to use one of the other authentication methods if certificate authentication fails for a user.
If this option is not selected, no further authentication is attempted for users who fail certificate authentication.
If the fallback option is enabled,
The Domain Sequence list cannot be empty.
Enable HTTP Authentication Page for Captive Portal is not supported and the option is disabled when the fallback option is selected.
Complete the remaining options as necessary and click Add to add the rule.
Be sure that:
Version 8.3.0 Release Notes 13
A client certificate profile has been selected.
There are entries in the Domain Sequence list if the fallback option was selected.
The fallback option was not subsequently selected if Captive Portal was configured for HTTP Authentication.
Adjust the position of the rule in the rule list at the top of the page as necessary.
Click Apply and restart Content Gateway to put the rule into effect.
The Authentication Rule List has also been updated to provide information for the new options.
Client Certificate Authentication profiles
When client certificate authentication is enabled, a client certificate authentication profile must be selected. Configure Client Certificate Authentication profiles on the new Client Cert Auth Profile tab of the Configure > Security > Access Control page.
NOTE: For v8.3, you can have only one profile.
On the Client Certificate Authentication Profile page:
1. Enter a Profile Name. This name will appear in the drop-down list on the Authentication Rules page.
2. Select an entry from the User Name Mapping drop-down.
Valid selections are Common Name (CN), Email, or Distinguished Name. This entry tells the authentication process how to extract the user name from the certificate.
3. In the Certificate Authorities section, add, view, or delete certificates.
The certificates used for authentication are manipulated the same way that SSL certificates are manipulated on the Configure > SSL > Certificates pages. Refer to the “Adding new certificate authorities”, “View a certificate”, and “Delete a certificate” sections of Managing Certificates for assistance.
4. Click Apply to save your profile.
Server Name Indication (SNI) Support in Network Agent
Network Agent has been enhanced to detect the hostname from the TLS Server Name Indication (SNI) in the Client Hello packet when available. The hostname of the server is then included in the data forwarded to Filtering Service for HTTPS sites.
In previous versions of the product, if Network Agent was installed as standalone, server hostnames for secure sites were not available in log data. With this
Version 8.3.0 Release Notes 14
enhancement, secure sites can be categorized by hostname, and access to secure sites can be blocked by hostname.
HTTP referer information in reporting
Data specific to exceptions that include approved referer URLs has been added to log records.
If access to a specific site is permitted by an exception that includes approved referer URLs:
● The referer header is included in data forwarded to a SIEM integration.
● A new Action code, “Permitted by Referer” is included in presentation and investigative reports.
New left navigation pane
As part of an ongoing effort to improve user experience with the Web module of the TRITON Manager, the left navigation pane has been streamlined. A single set of menus replaces the two-tab format used in previous versions.
The new navigation pane uses the same groupings as the original tabs. Main contains status, reporting, and policy management features. Settings contains configuration options.
Click an icon in the pane to open a menu of available pages. Click an option in the menu to open that page in the content pane.
For ease of use for those upgrading to v8.3, the options within each of these new menus match those on the Main and Settings tabs in prior versions.
Block files that exceed the size limit
A new option is available that will allow you to block access to files sent for scanning but whose size exceeds the maximum.
The Scan Size Limit is configured on the Settings > Scanning > Scanning Options page of the Web module of TRITON Manager. In previous versions of TRITON AP-
ImportantSome browsers and HTTP servers do not support SNI. In those cases, Network Agent is not able to get the server hostname.
Version 8.3.0 Release Notes 15
WEB, scanning would be done until the size limit was met. Unless scanning was able to determine the file was malicious, access was permitted.
Add the following to the records.config file (in /opt/WCG/config, by default) to specify how Content Gateway should handle files that exceed this limit:
CONFIG wtg.config.fail_open_analytic_scan_size_exceeded INT 0
Setting the value to 1 permits access to the files if their size exceeds the configured limit.
Log records created for files blocked because they exceed the maximum size include the new action “File blocked because it exceeds max allowable size”. This new action appears on reports and dashboard charts. It is also included in data forwarded to a SIEM solution.
New MRTG graphs (Content Gateway)
Six new graphs have been added to the Content Gateway Manager. These new graphs report latency issues, and five of them are included in two new sections on the Monitor > Performance > Daily, Weekly, Monthly and Yearly pages.
● URL Policy Lookup & Analysis Latency
■ URL Policy Lookup Latency: reports the average time to complete a URL policy lookup
■ Analytic Response Latency: shows the average time to receive an inbound or outbound response from the Analytics (Ant) Server
■ Outbound Analysis Latency: displays the average time to complete an outbound data loss (DLP or DICE) analysis request
● Integrated Windows Authentication Statistics
■ IWA Basic & NTLM Latency: shows the average time to complete a Basic Authentication or NTLM request via Integrated Windows Authentication (IWA)
■ IWA Negotiate Latency: reports the average time to complete an IWA Negotiate request
The sixth graph was added to the System Highlights section:
● Origin Server Connection Latency: shows the average time to fulfill an origin server connection request
Reporting Optimizations
Changes have been made to some of the reporting components, including the Log Database and Log Server, to provide improved functionality for logging and reporting.
Version 8.3.0 Release Notes 16
Note that customers who currently use custom reporting tools may be impacted by the Log Database schema changes.
Enhancements to the Advanced File Analysis report
Enhancements have been made to the Advanced File Analysis report introduced in Version 8.2.
● Delegated administrator access to the report is now determined solely by the Report on all clients option in the Reporting Permissions section of the Delegated Administration > Edit Roles page. The Access investigative reports option is no longer also required. The Advanced File Analysis option under Main > Reporting is not available to administrators whose role does not have Report on all clients selected.
The Source IP link that appears on the report and opens Investigative Reports is not available to delegated administrators whose role does not also have the Access investigative reports option enabled.
● The Threats tab of the Status > Dashboard includes the number of requests processed by Advanced File Analysis. This number is now generated based on the time period selected for the Threats data, rather than the time period on the Advanced File Analysis report page, ensuring that the number corresponds to the data included on the Threats tab.
● A fourth threat type, No analysis available, has been added, which means that all files sent for analysis can be included on the report. Check the box to include files for which no results have been returned. Either these files are an unsupported file type, or an error occurred during the analysis.
● URL hostnames and file names that contain foreign characters now display properly in the report.
Application reporting redesign
The reports on the Browser and Source Platform tabs of Main > Reporting > Applications have been redesigned to better handle the way user agent strings are being forwarded from browsers and other web applications.
● The overall usability of the pages has been improved.
● The Browser tab has been renamed Client Apps, the Source Platform tab has been renamed Operating Systems, and the Search tab has been renamed User Agents. The new names are more indicative of the tab contents.
● The Device Type options have been removed from both pages.
● The Time Period default has been changed from 30 day to 7 days.
● The tables on the Client Apps and Operating System tab are now limited to 100 rows of data.
● The Type column has been removed from the summary and detail tables that list browser or platform information.
Version 8.3.0 Release Notes 17

● The links in the Lowest Version and Highest Version columns have been removed. Click the link under Browser or Platform to view additional information about the selected browser or platform.
If the version number is not identifiable, a blank is displayed in the version column.
● Sort options and paging have been added to the tables.
● The Browser Family and Platform Comparison charts have been replaced by “Top 5” charts that show the top 5 most used browsers and platforms.
● The Use Trend charts now contain information for only the top 5 browsers or platforms.
● In-app browsers, such as Facebook and Twitter, are included in the Browser list.
● User agent strings are now handled more efficiently in the Log Database.
See Application Reporting in Administrator Help for complete details on the feature.
Support for multiple Log Servers
In addition to the existing distributed logging functionality, which configures multiple Log Servers to send data to a single Log Server, which then sends data to the Log Database, v8.3 allows for multiple Log Servers to process and send data to the same Log Database.
Multiple Log Servers can now be deployed, one per Policy Server, all configured to send data to the same Log Database. This eliminates the need to configure distributed logging.
Log data processing enhancements
The way log data is handled after it is forwarded by Filtering Service has been enhanced to accommodate the new cloud applications data, the additional information forwarded to a SIEM solution, and to enhance the processing of logging data from Filtering Service and Sync Service.
Multiplexer during upgrade
When web protection software is integrated with a supported SIEM product, the Multiplexer is used to pass logging data from Filtering Service to a specified SIEM solution and to Log Server.
In earlier versions of the software, one Multiplexer instance was installed for each Policy Server in your deployment. It was needed only to support sending data to a SEIM solution. In addition, Multiplexer could be installed off-box from the associated Policy Server.
With v8.3, each Policy Server is required to have an on-box Multiplexer. To accomplish that, during upgrade:
Version 8.3.0 Release Notes 18

● If Policy Server and Multiplexer reside on the same machine, both are upgraded as usual.
● Instances of Multiplexer that do not have Policy Server on the same machine are automatically uninstalled.
Note that any other components on the same machine are upgraded.
● Multiplexer is added to any Policy Server machine that did not previously include a Multiplexer instance.
If Policy Server was associated with an off-box Multiplexer (on Windows), the off-box Multiplexer instance is removed and a local instance is installed.
If the off-box Multiplexer is on Linux, you will need to run the upgrade on that Linux machine to make sure that Multiplexer instance is removed.
Upgrade improvements
Improvements have been made to the upgrade process.
● A change has been made to correct upgrade problems when Microsoft SQL Server is on-box with TRITON AP-WEB components.
● The upgrade logic has been improved to better ensure that services start properly.
Version 8.3.0 Release Notes 19

Browser support
See the Certified Product Matrix for the latest list of supported browsers.
Logon application support
Logon Agent communicates with the logon application (LogonApp) on client machines to identify users as they log onto or off of Windows domains.
The logon application supports the following operating systems:
● Mac OS X 10.10 (64-bit)
● Microsoft Windows 8.1 Update 1 (32-bit and 64-bit; Windows 8.1 RT is not supported)
● Microsoft Windows 10
For more information about Logon Agent and the logon application, see the Using Logon Agent for Transparent User Identification white paper.
Replaced in this version
In version 8.3, the following features have been replaced with new functionality or better configuration methods.
● Skype (Content Gateway)
The Tunnel Skype section of the Configure > Protocols > HTTPS page of Content Gateway manager has been removed.
You can tunnel Skype by including Internet Telephony and Collaboration - Office (and its subcategories) in the list of Categories selected for SSL decryption bypass on the Web > Settings > Scanning > SSL Decryption Bypass page of TRITON Manager. See this article for more information.
When you upgrade to v8.3, the variables stored in the records.config file that apply to Skype are removed.
● Low-memory mode (Content Gateway)
The Content Gateway installer now requires memory sufficient for content analysis, eliminating the need for the settings on the Configure > Networking > Connection Management > Low Memory Mode page of Content Gateway manager.
When you upgrade to v8.3, the corresponding variables stored in the records.config file are removed.
Version 8.3.0 Release Notes 20

● The Content Gateway ARM
The Adaptive Redirection Module (ARM) has been improved.
The ARM provides several essential functions. One is to send device notifications for cluster communication interface failover. Another is to inspect incoming packets before a routing decision is made and redirect the packets to Content Gateway for processing.
The ARM component now utilizes iptables, policy routing, and transparent sockets which are configured during product installation. The installation program also creates redirection rules to intercept packets.
The Content Gateway Manager has been changed to reflect these improvements.
■ The Network Address Translation (NAT) section of the Configure > Networking > ARM > General page has been renamed to Redirection Rules to better reflect the contents of the table.
■ Text on that page has also been updated.
The ARM module now uses a firewall. To facilitate interception and redirection of traffic:
■ IPTables rules are configured during installation and upgrade of Content Gateway.
○ Forcepint IPTables chains are inserted.○ Forcepoint IPTables rules are also inserted into existing chains.○ Forcepoint chains and rules use “NC_” as a prefix for identification
purposes.
■ IPTables rules configured outside of Content Gateway Manager must
○ Be inserted after Forecepoint rules.○ Never be added to Forcepoint chains.
■ Forcepoint chains and rules should never be edited.
■ If customized chains or rules impact the Forcepoint configuration, navigate to /opt/WCG/bin and execute the following to re-establish the Forcepoint IPTables chains and rules.:
netcontrol.sh -r
For some customers, the GRE Packet Return Method (GRE return) may not be as expected. In all cases, GRE return, as documented by Cisco (see this site), is fully functional. However, tunneling back through a router (enhanced GRE tunnel return) now requires a specific kernel module. This module is only available on a Forcepoint appliance. Contact Forcepoint Technical Support to enable this functionality on a software deployment.
To provide more appropriate statistical data for the new ARM, the Bypass Statistics now provide information for:
■ Total Packets Bypassed
■ Packets Dynamically Bypassed
■ DNS Packets Bypassed
■ Packets Shed
Version 8.3.0 Release Notes 21

● “Show Me How” Tutorials (TRITON Manager)
Find Answers topics, found in the right navigation pane of the Web module of TRITON Manager, have been changed. Show Me How tutorial links, previously provided for some pages, have been replaced with links to documents that provide the same information.
Note that the New Admin Tutorial is still available from the Help menu.
● SSL cipher list options (Content Gateway)
As a security enhancement, the LOW encryption cipher suites setting previously available on the Configure > SSL > Decryption/Encryption > Inbound and Outbound pages of Content Gateway manager has been removed. With the 8.3 implementation, select:
■ DEFAULT to use the default cipher list configured by Forcepoint. The Content Gateway DEFAULT setting is the OpenSSL Default list, excluding those that Forcepoint believes provide the least security or encryption strength.
■ HIGH to use the OpenSSL high cipher list: those with key lengths larger than 128 bits, and some cipher suites with 128-bit keys.
■ MEDIUM to use both the OpenSSL medium and high cipher list: the high cipher list plus some of those using 128 bit encryption algorithms.
Note that, during upgrade, any existing LOW setting is upgraded to MEDIUM.
● Connection Management (Content Gateway)
The default value for Throttling Net Connections, configurable on the Configure > Networking > Connection Management > Throttling page of Content Gateway manager, has been increased to 60,000. This change was made to improve performance for large deployments.
Third-party platform and product support
All components
This version adds support for:
● Red Hat Enterprise Linux 6.8, 7.0, 7.1, and 7.2 (and corresponding CentOS versions)
● Microsoft SQL Server 2016
Version 8.3.0 Release Notes 22

See the Certified Product Matrix for the latest list of supported browsers.
Note that installing web protection components on Windows Server 2012 or 2012 R2 requires Microsoft .NET Framework v.35 and v4.5. Install both and turn them both on before running the TRITON Unified Installer.
Content Gateway
This version is supported on:
● Red Hat Enterprise Linux 7.0, 7.1, and 7.2 (and corresponding CentOS versions)
● Red Hat Enterprise Linux 6 series, 64-bit, Basic Server (and the corresponding CentOS versions)
■ Version 6.8
■ Version 6.7
■ Version 6.6
NoteNewer versions of Chrome block Flash content. In order to successfully use TRITON AP-WEB or Web Filter & Security, you will need to disable the blocking or use a different supported browser.
ImportantTRITION AP-WEB customers with a Red Hat Enterprise Linux or CentOS 7.x software deployment of Content Gateway with the Web DLP module must do the following in order to successfully deploy Policy Engine.
On the Content Gateway machine:
1. Stop IPTables:
service iptables stop
2. Stop and disable FirewallD:
service firewalld stop
systemctl disable firewalld
3. Run the following:
sysctl -w net.ipv4.tcp_tw_recycle=0
4. Deploy Policy Engine.
5. Restart IPTables:
/opt/WCG/bin/netcontrol.sh -i
Version 8.3.0 Release Notes 23

■ Version 6.5
● V-Series appliances
“Best effort” support for the version of Red Hat Enterprise Linux and CentOS listed above is provided. Under “best effort” support, Technical Support makes a best effort to troubleshoot cases in standard fashion until the issue is deemed a Red Hat Enterprise Linux- or CentOS-specific issue, at which point you must contact Red Hat directly for assistance.
As a best practice, Red Hat Enterprise Linux systems that host Content Gateway should be registered with Red Hat Network and kept up-to-date with the latest security patches.
For a complete platform requirements information, see System requirements for this version in the Deployment and Installation Center.
NoteProduct testing encountered a kernel bug in version 2.6.32-431 that can impact performance. However, Content Gateway features were tested on this version of the OS and passed the certification tests.
ImportantCustomers currently using Red Hat Enterprise Linux 6.3 or 6.4 will need to upgrade their operating system prior to upgrading the product.
ImportantYou can update packages on your Red Hat Enterprise Linux installations and patch kernels if the underlying kernel upgrade does not change the kernel API.
ImportantContent Gateway is designed to run on a dedicated machine and is not guaranteed to be compatible with other server applications installed on the same machine.
Version 8.3.0 Release Notes 24

Resolved and known issuesRelease Notes | TRITON AP-WEB and Web Filter & Security | 14-Dec-2016
A list of resolved and known issues in this release is available to TRITON AP-WEB and Web Filter & Security customers.
Version 8.3.0 Release Notes 25

Version 8.3.0 Release Notes 26