release notes medtech evolution australia · medtech evolution version 10.0.1 build 5031 is a...
TRANSCRIPT
Copyright © Medtech Healthcare Pty Ltd Page 1 of 110
Release Notes
Medtech Evolution Australia
Version 10.0.1 Build 5031
June 2016
These Release Notes contain important information for Medtech Evolution users. Please ensure
that they are circulated amongst all your relevant staff. We suggest that they are filed safely for
future reference.
Copyright © Medtech Healthcare Pty Ltd Page 2 of 110
Table of Contents
Introduction ................................................................................................................................... 7
Overview .................................................................................................................................... 8
Functional and Interface Enhancements ................................................................................. 9
Splash Screen ................................................................................................................................ 9
Medtech Icon ............................................................................................................................. 10
Actions Menu .............................................................................................................................. 11
Cascading Windows .................................................................................................................. 11
Tiling Windows ............................................................................................................................. 12
Column Rearrange Remembrance ......................................................................................... 13
Screen Position & Size Remembrance ..................................................................................... 13
Grid Column Sorting ................................................................................................................... 14
Patient Palette Enhancements ................................................................................................. 15
One Click Access ....................................................................................................................... 15
ATSI Status 15
Patient Phone Number on Palette ........................................................................................... 16
ManageMyHealthTM ................................................................................................................... 17
Patient Email ID Auto-populates .............................................................................................. 17
Medicare Number Auto-populates ......................................................................................... 17
Accounting Enhancements ...................................................................................................... 18
Payment Level ............................................................................................................................ 18
Group Invoice window .............................................................................................................. 20
Group Invoice Management ................................................................................................... 21
Company Register window .................................................................................... 22
Associated Insurer .................................................................................................... 23
Compile Periodic Invoice ........................................................................................ 25
Make Payment for Group Invoice ......................................................................... 25
Add a Credit Note for Group Invoice ................................................................... 28
Add a Refund for Group Invoice ........................................................................... 30
Allocate Credit ......................................................................................................... 31
Copyright © Medtech Healthcare Pty Ltd Page 3 of 110
Patient Account ......................................................................................................................... 33
New Payment ........................................................................................................... 33
New Credit Note ...................................................................................................... 35
New Refund .............................................................................................................. 36
Allocate Credit ......................................................................................................... 38
Accounting Report Changes ................................................................................................... 40
Outstanding Accounts Report ............................................................................... 40
Print Activity Report .................................................................................................. 40
Aged Balance Summary Report ............................................................................ 41
GST Report ................................................................................................................. 42
Transaction Report ................................................................................................... 42
Transaction Payments Report ................................................................................. 42
External Reference Number ...................................................................................................... 42
Configuration to enable External Reference No. ................................................ 43
Query Builder Search ............................................................................................... 45
Patient Search .......................................................................................................... 45
Scanning Enhancements .......................................................................................................... 46
Image Compression Types ........................................................................................................ 46
Scan in PDF Format .................................................................................................................... 47
View Scan Window .................................................................................................................... 48
Print Scan Window ...................................................................................................................... 51
Assign ‘Subject’ to the Scanned Images / Documents ........................................................ 52
Immunisation Enhancement ..................................................................................................... 56
Immunisation Schedule Screen ................................................................................................ 56
Immunisation Status Screen ...................................................................................................... 58
Schedule Selection tab ........................................................................................... 58
Immunisations Schedule tab .................................................................................. 60
All Immunisations tab ............................................................................................... 61
New/View Immunisation Term screen ..................................................................................... 61
ACIR Enhancement.................................................................................................................... 63
Copyright © Medtech Healthcare Pty Ltd Page 4 of 110
Submit to ACIR .......................................................................................................... 63
Medicare Ancillary Number ................................................................................... 63
General Enhancements ............................................................................................................ 65
Inbox/Outbox Documents Print Preview ................................................................................. 65
Patient Contact .......................................................................................................................... 69
Add a new Contact ................................................................................................ 70
Emergency Contact Icon on the Patient Palette ............................................... 73
Next of Kin fields in Query Builder ........................................................................... 74
Merge Fields for Next of Kin and Emergency Contact ....................................... 74
Patient Name Validation in Patient Register window ........................................................... 75
Screen Numbering ..................................................................................................................... 75
MediSecure – DrShop ................................................................................................................. 76
Configuration to enable MediSecure and DrShop ............................................................... 77
MediSecure Site Setup ............................................................................................................... 77
Staff Setup ................................................................................................................. 77
New/View Health Specialty Setup ........................................................................................... 78
Health Specialty Mapping Setup ............................................................................................. 79
DrShop Alert Pop Up on Prescribing Medicine with Addiction Potential ........................... 79
Patient Medication Printout ...................................................................................................... 82
Usability Improvements .............................................................................................................. 84
Query Builder ............................................................................................................................... 84
Message Transfer Utility .............................................................................................................. 85
Icon Changes ............................................................................................................................. 87
Medtech KIOSK ........................................................................................................................... 92
ManageMyHealthTM Integrated with Health Engine ............................................................. 93
Resolved Items ............................................................................................................................ 94
Scanning Fixes ............................................................................................................................. 94
Scanning Resolution Issue .......................................................................................................... 94
Grid Column Sorting ................................................................................................................... 94
Query Builder – Size mismatch error ......................................................................................... 94
Consultation window – Scrolling Issue ..................................................................................... 95
Copyright © Medtech Healthcare Pty Ltd Page 5 of 110
Patient Information Sheets ........................................................................................................ 95
Patient Claims – Sent Claims remains selected...................................................................... 95
Task Manager .............................................................................................................................. 95
Patient Medication – ‘Please wait a moment’ Issue ............................................................. 96
Error Message Redefined .......................................................................................................... 96
Error when Microsoft Word not installed ............................................................... 96
Error when Adobe Acrobat (PDF) not installed ................................................... 96
Access Violation / Out of Memory Error ................................................................ 97
Fully paid IMC batches no longer displayed in “Outstanding Batches Tab” .................... 97
Quick Bill amount no longer shown as ‘zero’ in Invoice ....................................................... 98
SMS Compose Window no longer retains previous message .............................................. 98
SMS Failure 98
Outbox Document Formatting loss .......................................................................................... 98
Provider Banking Utility ............................................................................................................... 98
Error while saving Health Record .............................................................................................. 98
Error while saving New Web Form ............................................................................................ 99
Performance delay when repeating Medications ................................................................ 99
Inbox – ‘Out of Memory’ errors ................................................................................................. 99
CDA Document Wizard – Attestation ...................................................................................... 99
Shared Health Summary –Preview ....................................................................... 100
Event Summary- Preview ....................................................................................... 100
eReferral- Preview .................................................................................................. 101
New Refund Window ............................................................................................................... 102
View Medication Screen ......................................................................................................... 102
NSW Medical Certificate form ................................................................................................ 103
CDA Bridge 103
Preview of Event Summary document .................................................................................. 103
e-Referral document - Citrix .................................................................................................... 104
Location Selection failed error ............................................................................................... 104
Invoice Annotation ................................................................................................................... 104
Third party group invoice ........................................................................................................ 104
Copyright © Medtech Healthcare Pty Ltd Page 6 of 110
Scanning a PDF File .................................................................................................................. 104
IMC Retrieved Payments in Patient Accounts Window ...................................................... 105
Health Engine – DLL not getting replaced ............................................................................ 105
Appointment Book ................................................................................................................... 105
Appointment Pad ..................................................................................................................... 105
Dictionary for spell check ........................................................................................................ 105
Consultation Window ............................................................................................................... 105
Uninvoiced services report ...................................................................................................... 105
New Payment Screen .............................................................................................................. 106
New Credit note screen .......................................................................................................... 106
Work cover certificate ............................................................................................................. 106
Accounting Reports ................................................................................................................. 106
Technical Fixes .......................................................................................................................... 107
Diagnostic Services .................................................................................................................. 107
Audit in SMS ............................................................................................................................... 107
Out of Memory Error ................................................................................................................. 107
Access Violation Error ............................................................................................................... 108
DB Error 108
EIB InterBase Error ...................................................................................................................... 108
Component error ...................................................................................................................... 109
Printing Error ............................................................................................................................... 109
Mad Except Error Message ..................................................................................................... 109
Copyright © Medtech Healthcare Pty Ltd Page 7 of 110
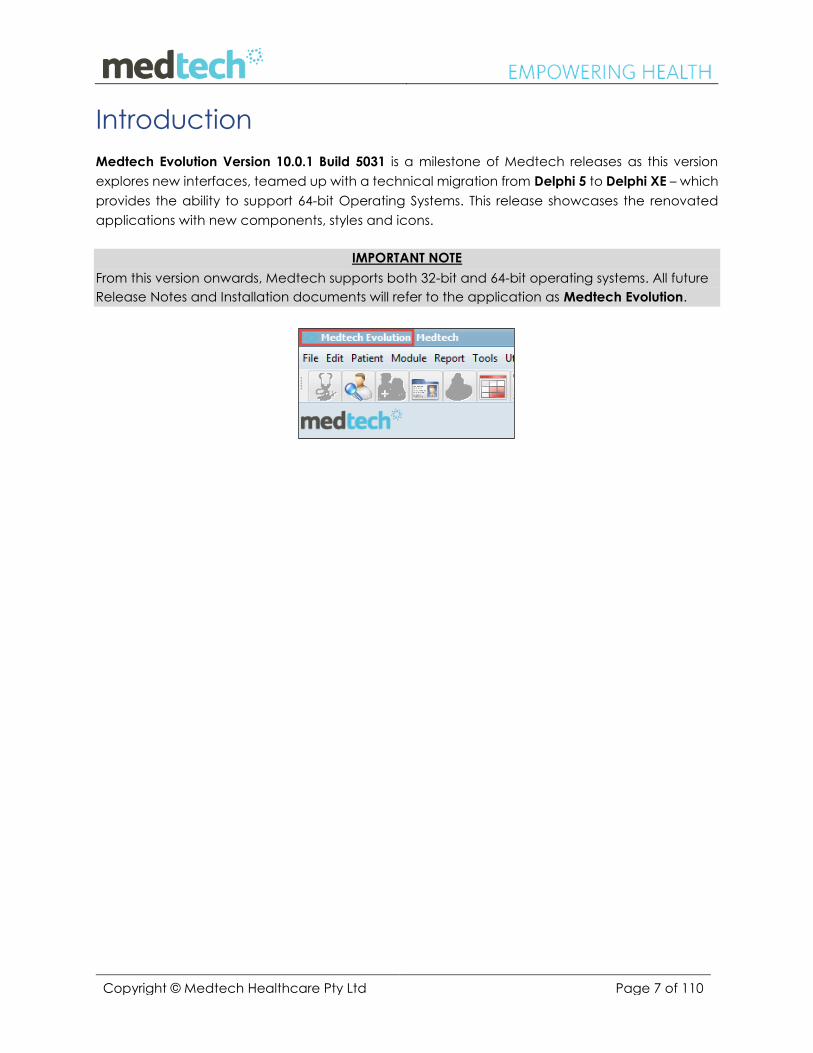
Introduction Medtech Evolution Version 10.0.1 Build 5031 is a milestone of Medtech releases as this version
explores new interfaces, teamed up with a technical migration from Delphi 5 to Delphi XE – which
provides the ability to support 64-bit Operating Systems. This release showcases the renovated
applications with new components, styles and icons.
IMPORTANT NOTE
From this version onwards, Medtech supports both 32-bit and 64-bit operating systems. All future
Release Notes and Installation documents will refer to the application as Medtech Evolution.
Copyright © Medtech Healthcare Pty Ltd Page 8 of 110
Overview Medtech Evolution Version 10.0.1 Build 5031 is a key release from Medtech. This document
provides information on the new features: Dr Shop, Accounting enhancements, Scanning
enhancements, User Interface enhancements such as Screen Numbering, as well as several items
resolved since the last Medtech Evolution release.
Please ensure that this document is read and circulated amongst the Practice staff.
NOTE: Please ONLY run the upgrade at a time when your site is not required to be up and running
in a short amount of time. It is recommended that you run the upgrade after hours or on the
weekend where you would have adequate time to complete the upgrade.
NOTE: The amount of time required to run the upgrade is dependent on the specification of your
server and the size of ALL databases.
IMPORTANT NOTE
WARNING: It is HIGHLY recommended to employ ONLY qualified system engineers when
performing ANY installation and upgrade. The consequences of ruining a database during
upgrade could possibly lead to data corruptions and, as a result, data loss and systems downtime.
If in doubt, please consult with your qualified IT technician/service provider or contact one of
the Medtech Channel Partners listed on our website:
http://www.medtechglobal.com/au/support-au/channel-partners-au/
Copyright © Medtech Healthcare Pty Ltd Page 9 of 110
Functional and Interface Enhancements This chapter details the functional and user interface enhancements that have been
implemented in this release.
Splash Screen The initial Splash screen that appears while opening the Medtech Evolution application has been
redesigned, as shown below:
Previous versions of Medtech32
Copyright © Medtech Healthcare Pty Ltd Page 10 of 110
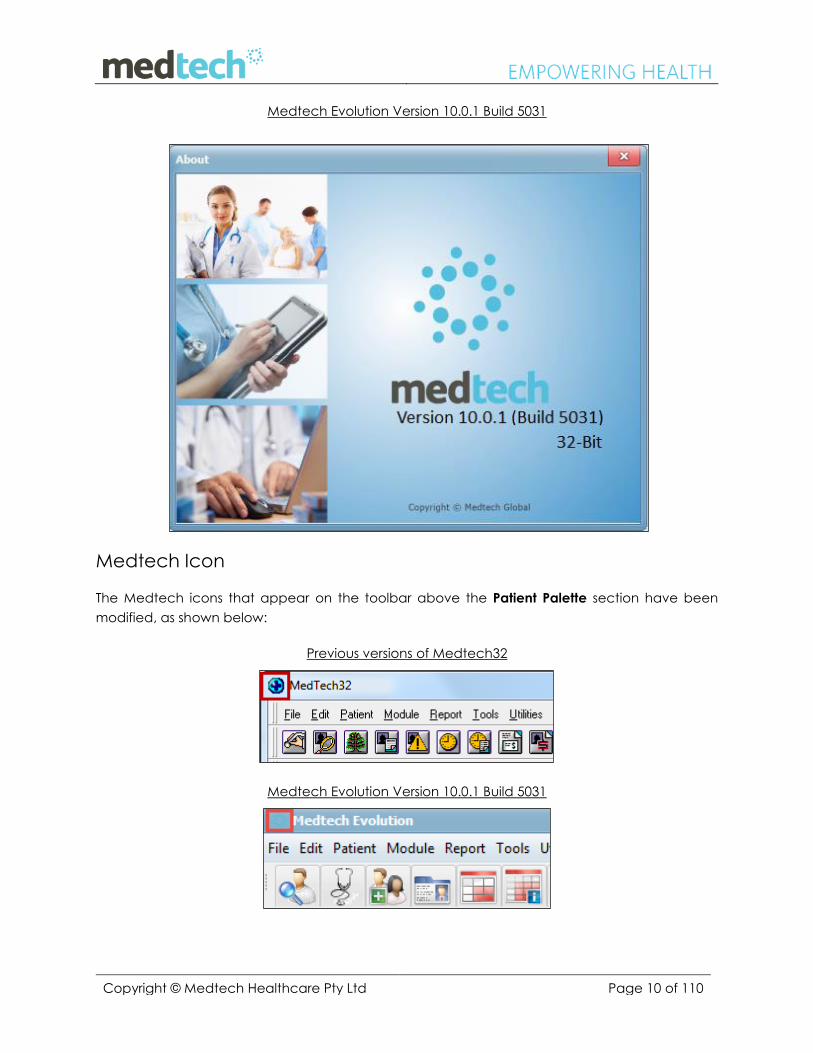
Medtech Evolution Version 10.0.1 Build 5031
Medtech Icon The Medtech icons that appear on the toolbar above the Patient Palette section have been
modified, as shown below:
Previous versions of Medtech32
Medtech Evolution Version 10.0.1 Build 5031
Copyright © Medtech Healthcare Pty Ltd Page 11 of 110
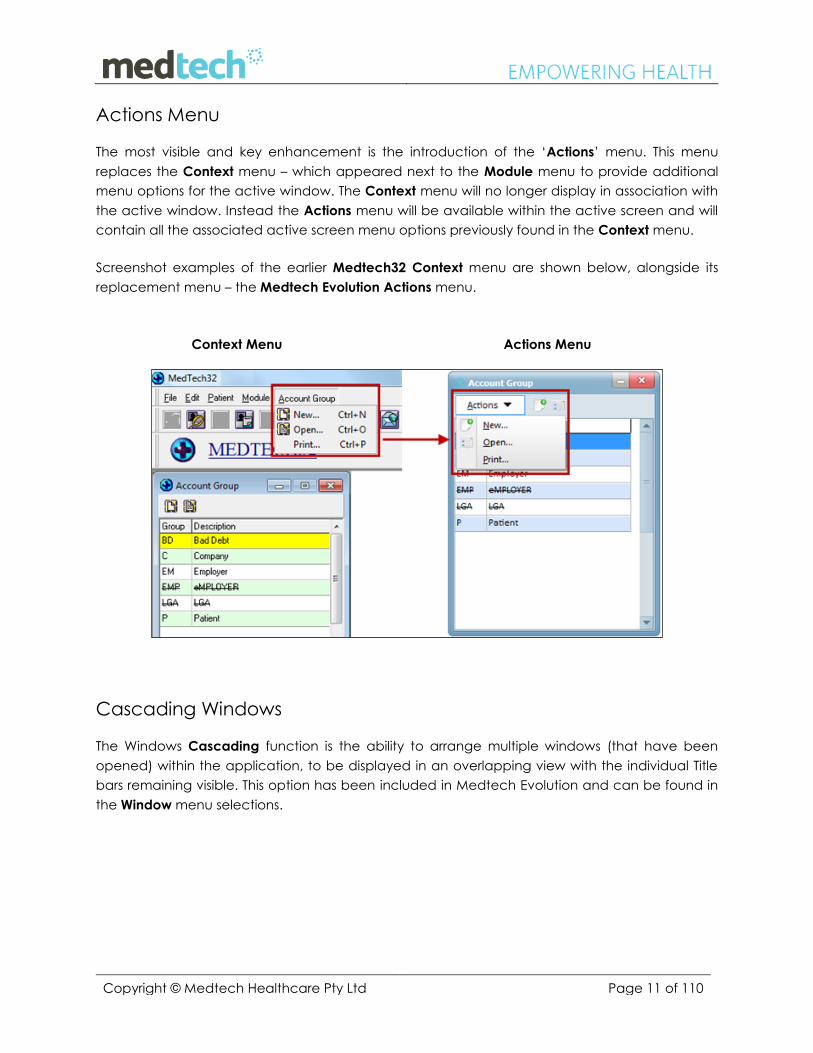
Actions Menu The most visible and key enhancement is the introduction of the ‘Actions’ menu. This menu
replaces the Context menu – which appeared next to the Module menu to provide additional
menu options for the active window. The Context menu will no longer display in association with
the active window. Instead the Actions menu will be available within the active screen and will
contain all the associated active screen menu options previously found in the Context menu.
Screenshot examples of the earlier Medtech32 Context menu are shown below, alongside its
replacement menu – the Medtech Evolution Actions menu.
Context Menu Actions Menu
Cascading Windows The Windows Cascading function is the ability to arrange multiple windows (that have been
opened) within the application, to be displayed in an overlapping view with the individual Title
bars remaining visible. This option has been included in Medtech Evolution and can be found in
the Window menu selections.
Copyright © Medtech Healthcare Pty Ltd Page 12 of 110
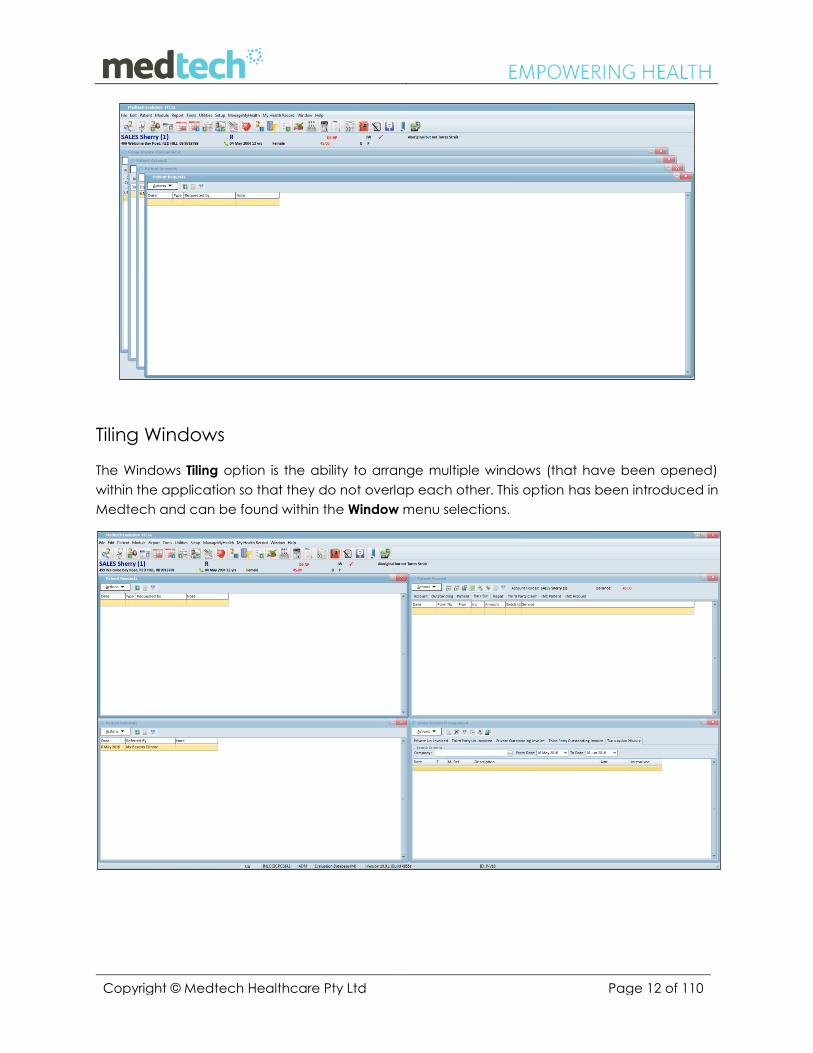
Tiling Windows
The Windows Tiling option is the ability to arrange multiple windows (that have been opened)
within the application so that they do not overlap each other. This option has been introduced in
Medtech and can be found within the Window menu selections.
Copyright © Medtech Healthcare Pty Ltd Page 13 of 110
Column Rearrange Remembrance Similar to the Screen Position & Size configuration settings, Medtech Evolution Version 10.0.1
provides the ability to remember the column positions (if rearranged) of the individual screens (for
instance, Provider Inbox, Patient Inbox). No configuration is required for implementation of this
feature.
If the columns in any of the screens in Medtech Evolution are rearranged by the ‘drag and drop’
feature, then the required columns will be remembered and displayed as they have been set up,
when the screen is reopened again.
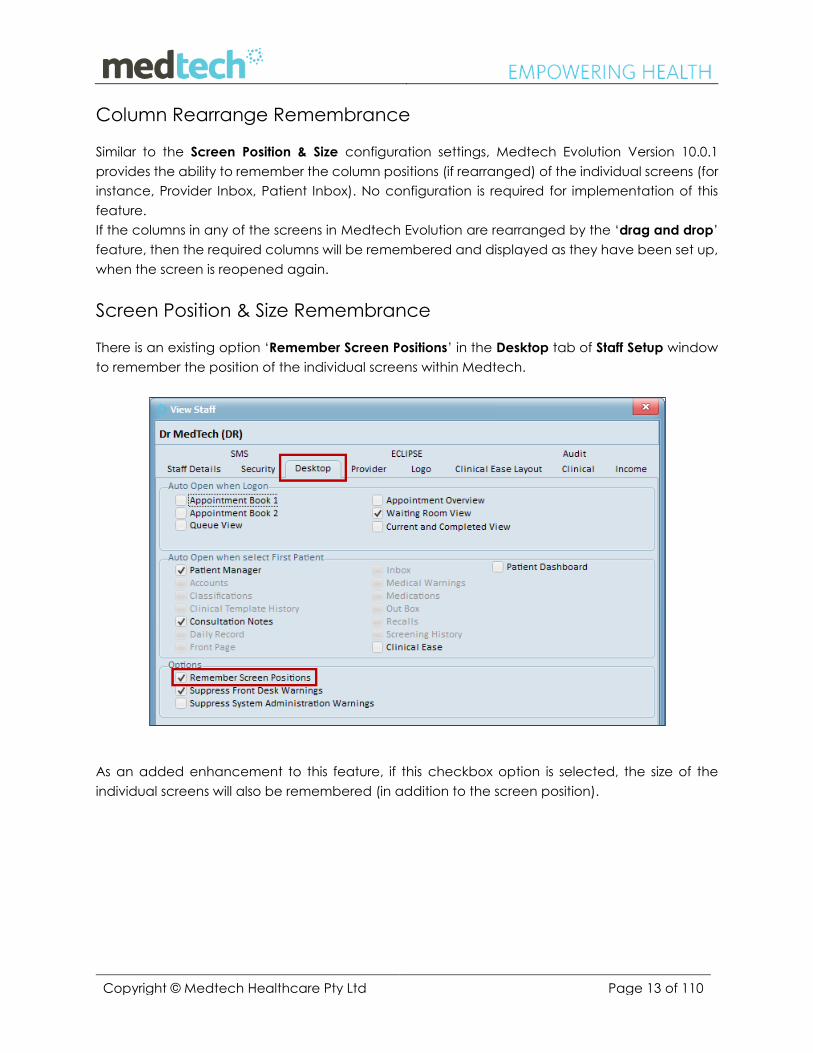
Screen Position & Size Remembrance There is an existing option ‘Remember Screen Positions’ in the Desktop tab of Staff Setup window
to remember the position of the individual screens within Medtech.
As an added enhancement to this feature, if this checkbox option is selected, the size of the
individual screens will also be remembered (in addition to the screen position).
Copyright © Medtech Healthcare Pty Ltd Page 14 of 110
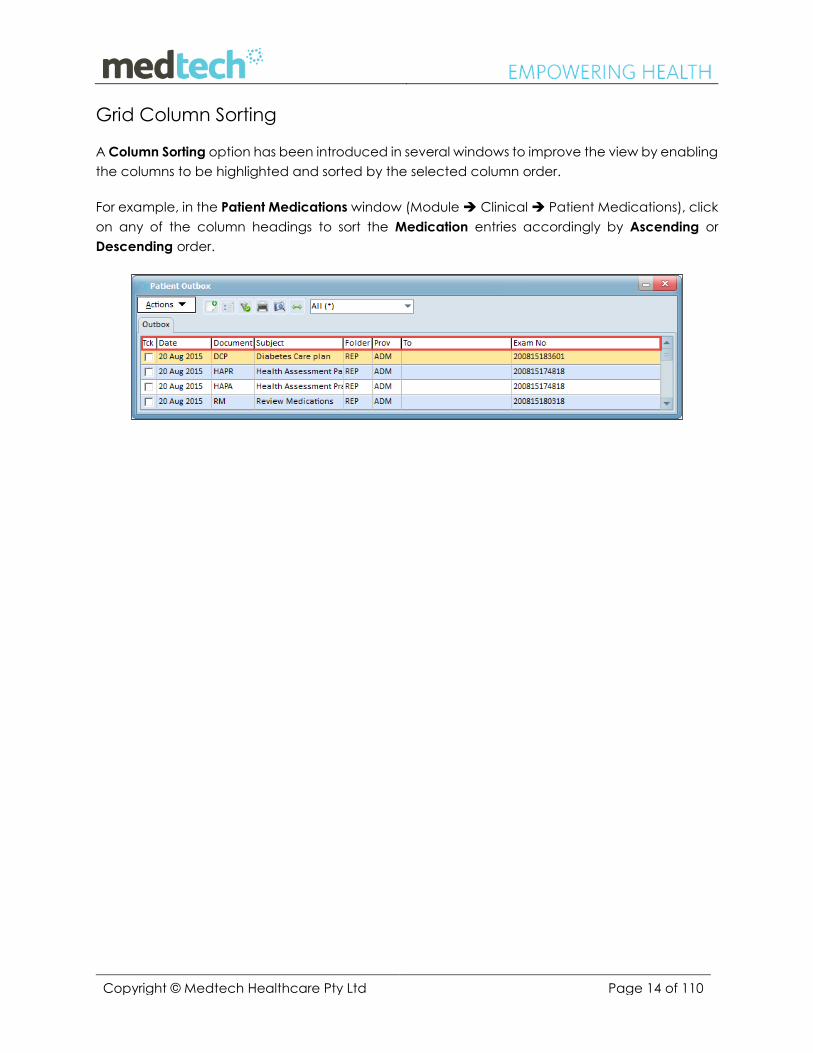
Grid Column Sorting A Column Sorting option has been introduced in several windows to improve the view by enabling
the columns to be highlighted and sorted by the selected column order.
For example, in the Patient Medications window (Module Clinical Patient Medications), click
on any of the column headings to sort the Medication entries accordingly by Ascending or
Descending order.
Copyright © Medtech Healthcare Pty Ltd Page 15 of 110
Patient Palette Enhancements
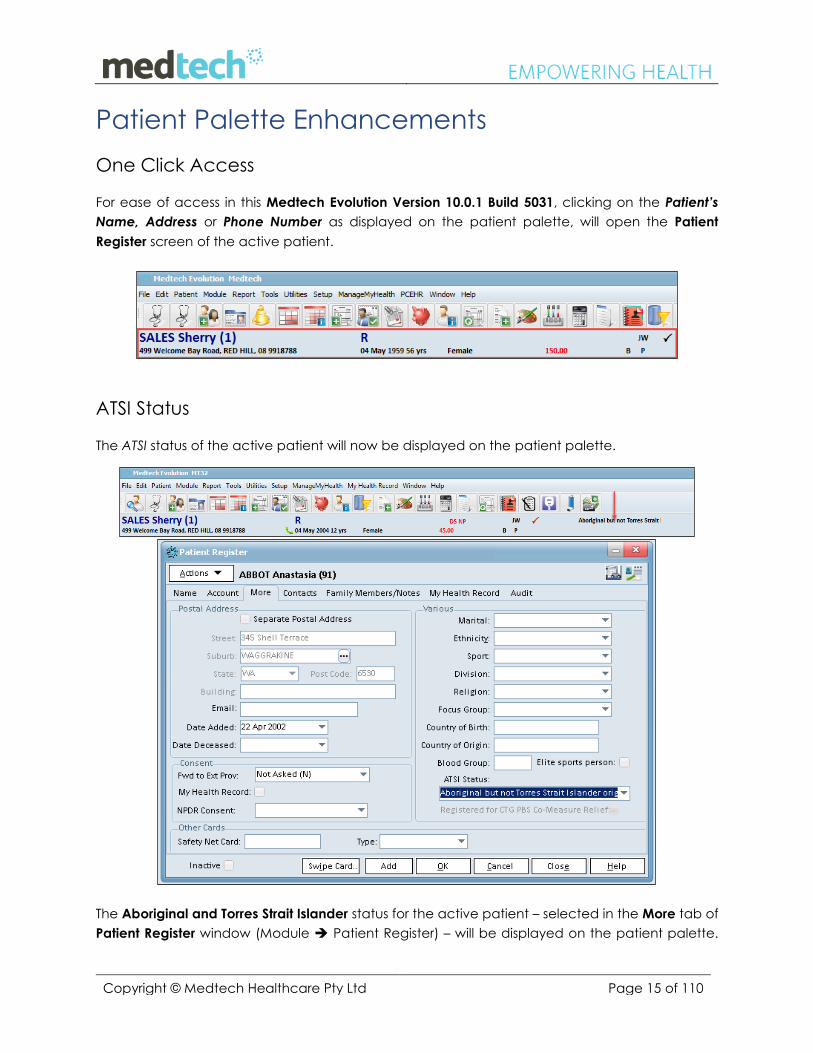
One Click Access For ease of access in this Medtech Evolution Version 10.0.1 Build 5031, clicking on the Patient’s
Name, Address or Phone Number as displayed on the patient palette, will open the Patient
Register screen of the active patient.
ATSI Status
The ATSI status of the active patient will now be displayed on the patient palette.
The Aboriginal and Torres Strait Islander status for the active patient – selected in the More tab of
Patient Register window (Module Patient Register) – will be displayed on the patient palette.
Copyright © Medtech Healthcare Pty Ltd Page 16 of 110
Since the length of the ATSI status descriptions are quite long, the description will be displayed in
an abbreviated format.
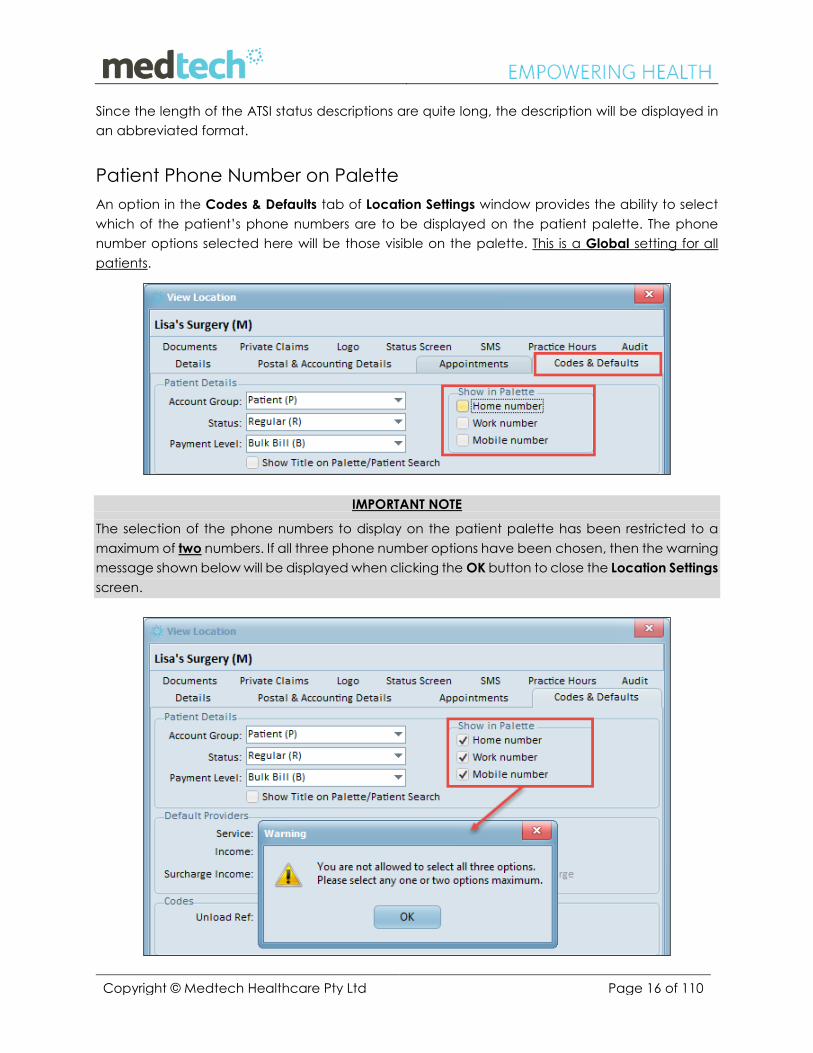
Patient Phone Number on Palette
An option in the Codes & Defaults tab of Location Settings window provides the ability to select
which of the patient’s phone numbers are to be displayed on the patient palette. The phone
number options selected here will be those visible on the palette. This is a Global setting for all
patients.
IMPORTANT NOTE
The selection of the phone numbers to display on the patient palette has been restricted to a
maximum of two numbers. If all three phone number options have been chosen, then the warning
message shown below will be displayed when clicking the OK button to close the Location Settings
screen.
Copyright © Medtech Healthcare Pty Ltd Page 17 of 110
ManageMyHealthTM
Patient Email ID Auto-populates When registering a patient in ManageMyHealthTM (MMH) from within the Medtech Evolution
application, if the patient record in Medtech Evolution’s Patient Register screen has the patient’s
email address details recorded there, then those email details will be automatically populated
into the ManageMyHealthTM Patient Registration Advanced Form.
Medicare Number Auto-populates When registering a patient in ManageMyHealthTM from within the Medtech Evolution application,
and the Identification Type selected is the patient’s Medicare Card details, then the Medicare
Card No field in the ManageMyHealthTM Patient Registration Advanced Form will be populated
automatically from the Medtech Evolution Patient Register.
Copyright © Medtech Healthcare Pty Ltd Page 18 of 110
Accounting Enhancements
Payment Level
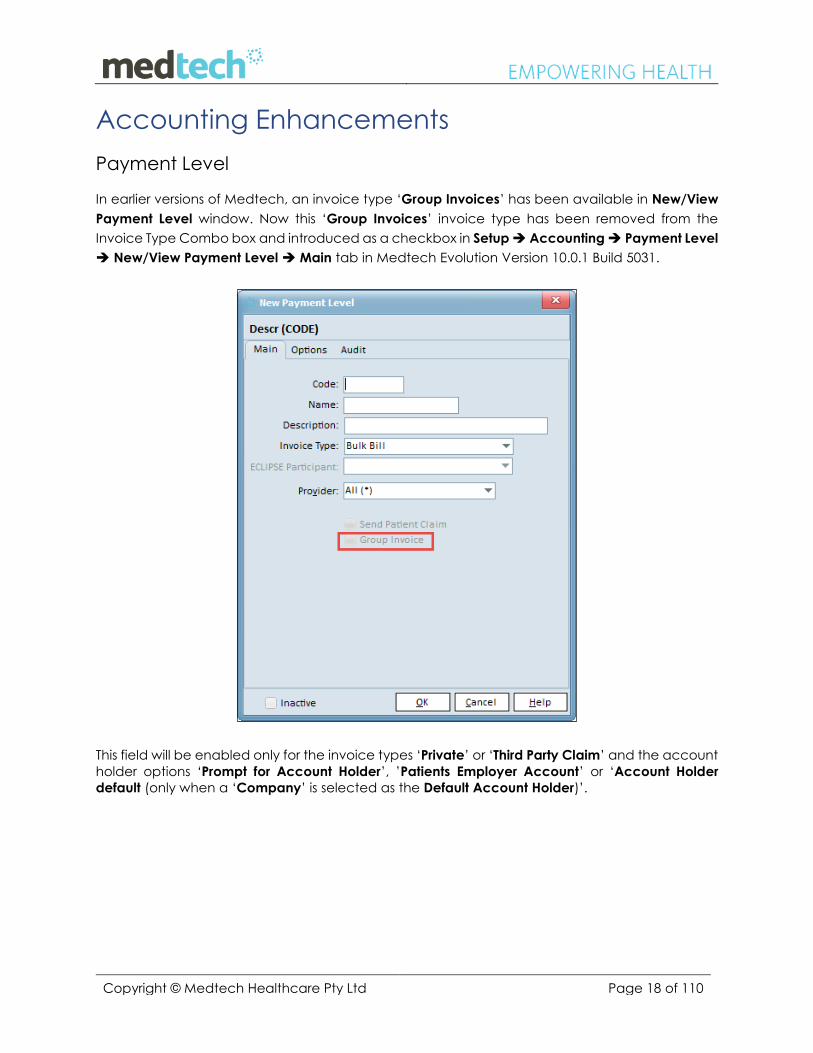
In earlier versions of Medtech, an invoice type ‘Group Invoices’ has been available in New/View
Payment Level window. Now this ‘Group Invoices’ invoice type has been removed from the
Invoice Type Combo box and introduced as a checkbox in Setup Accounting Payment Level
New/View Payment Level Main tab in Medtech Evolution Version 10.0.1 Build 5031.
This field will be enabled only for the invoice types ‘Private’ or ‘Third Party Claim’ and the account
holder options ‘Prompt for Account Holder’, ’Patients Employer Account’ or ‘Account Holder
default (only when a ‘Company’ is selected as the Default Account Holder)’.
Copyright © Medtech Healthcare Pty Ltd Page 19 of 110
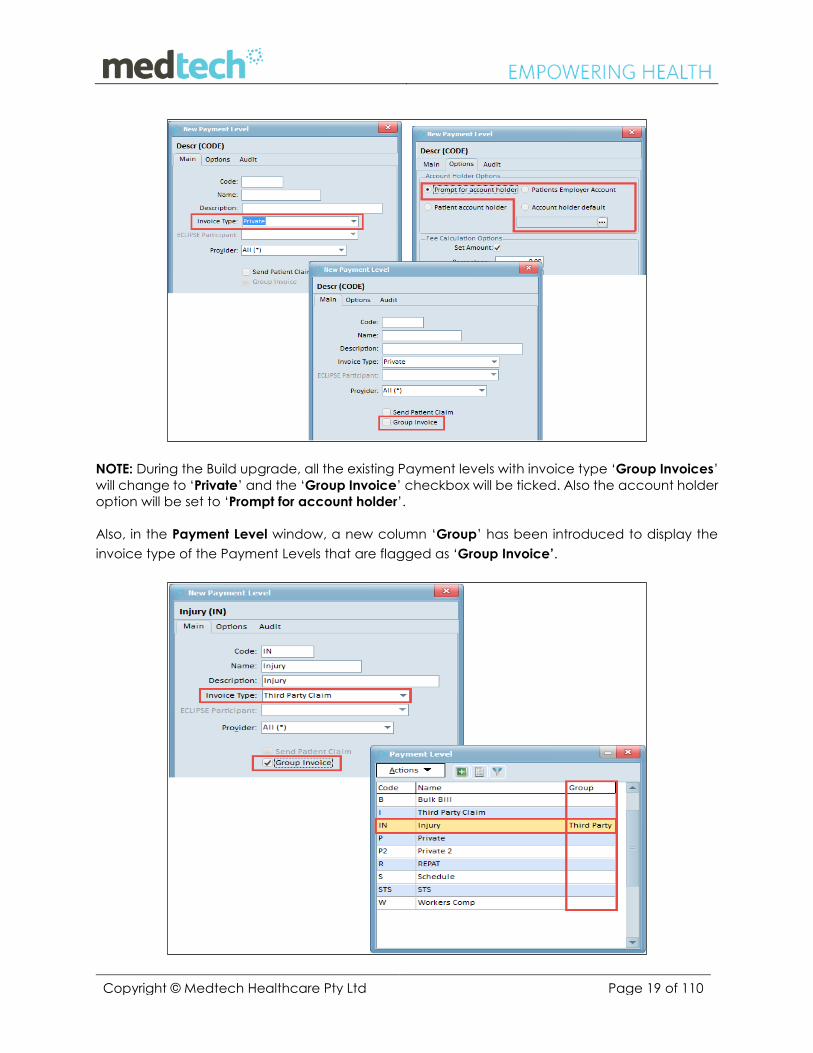
NOTE: During the Build upgrade, all the existing Payment levels with invoice type ‘Group Invoices’
will change to ‘Private’ and the ‘Group Invoice’ checkbox will be ticked. Also the account holder
option will be set to ‘Prompt for account holder’.
Also, in the Payment Level window, a new column ‘Group’ has been introduced to display the
invoice type of the Payment Levels that are flagged as ‘Group Invoice’.
Copyright © Medtech Healthcare Pty Ltd Page 20 of 110
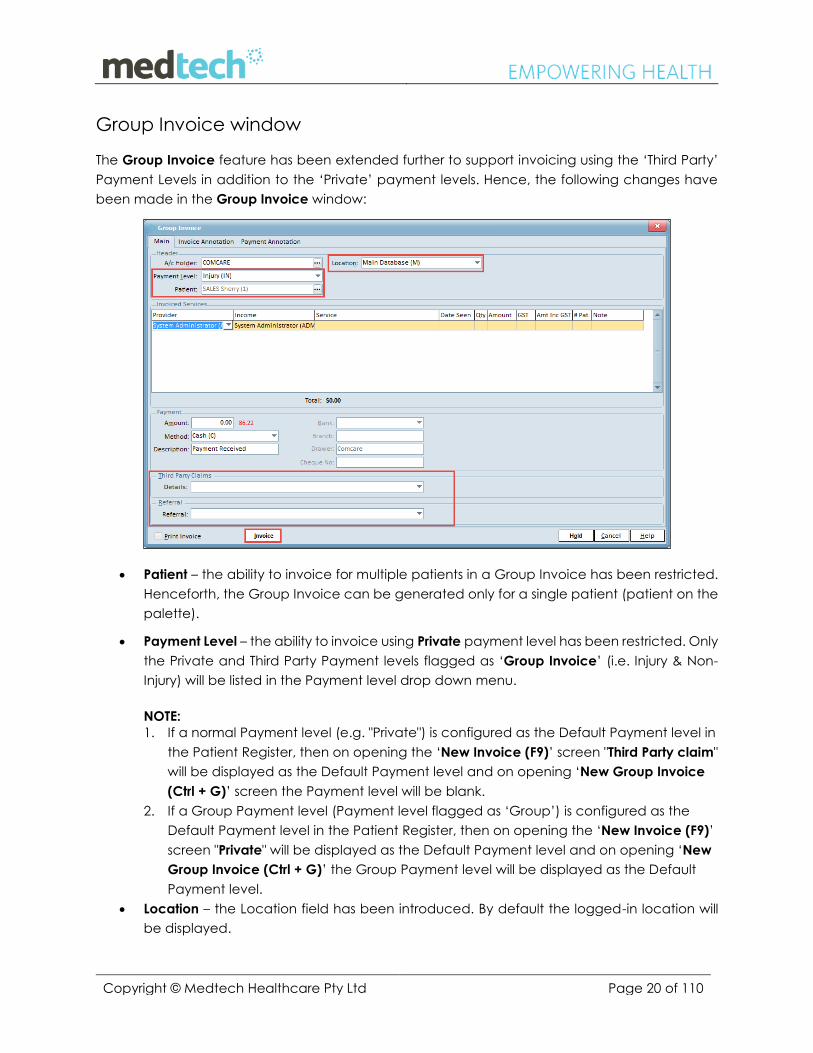
Group Invoice window
The Group Invoice feature has been extended further to support invoicing using the ‘Third Party’
Payment Levels in addition to the ‘Private’ payment levels. Hence, the following changes have
been made in the Group Invoice window:
Patient – the ability to invoice for multiple patients in a Group Invoice has been restricted.
Henceforth, the Group Invoice can be generated only for a single patient (patient on the
palette).
Payment Level – the ability to invoice using Private payment level has been restricted. Only
the Private and Third Party Payment levels flagged as ‘Group Invoice’ (i.e. Injury & Non-
Injury) will be listed in the Payment level drop down menu.
NOTE:
1. If a normal Payment level (e.g. "Private") is configured as the Default Payment level in
the Patient Register, then on opening the ‘New Invoice (F9)’ screen "Third Party claim"
will be displayed as the Default Payment level and on opening ‘New Group Invoice
(Ctrl + G)’ screen the Payment level will be blank.
2. If a Group Payment level (Payment level flagged as ‘Group’) is configured as the
Default Payment level in the Patient Register, then on opening the ‘New Invoice (F9)’
screen "Private" will be displayed as the Default Payment level and on opening ‘New
Group Invoice (Ctrl + G)’ the Group Payment level will be displayed as the Default
Payment level.
Location – the Location field has been introduced. By default the logged-in location will
be displayed.
Copyright © Medtech Healthcare Pty Ltd Page 21 of 110
Third Party Claims – the Third Party Claims field will be displayed only for the Payment Level
‘Third Party Claim’ flagged as ‘Group Invoice’ (i.e. Injury) and it is mandatory to select the
respective Third Party Claim.
Referral – the Referral field will be displayed for all Payment Levels. Select the referrer from
the drop down menu.
Invoice button – the Invoice button has been moved to the left side of the window.
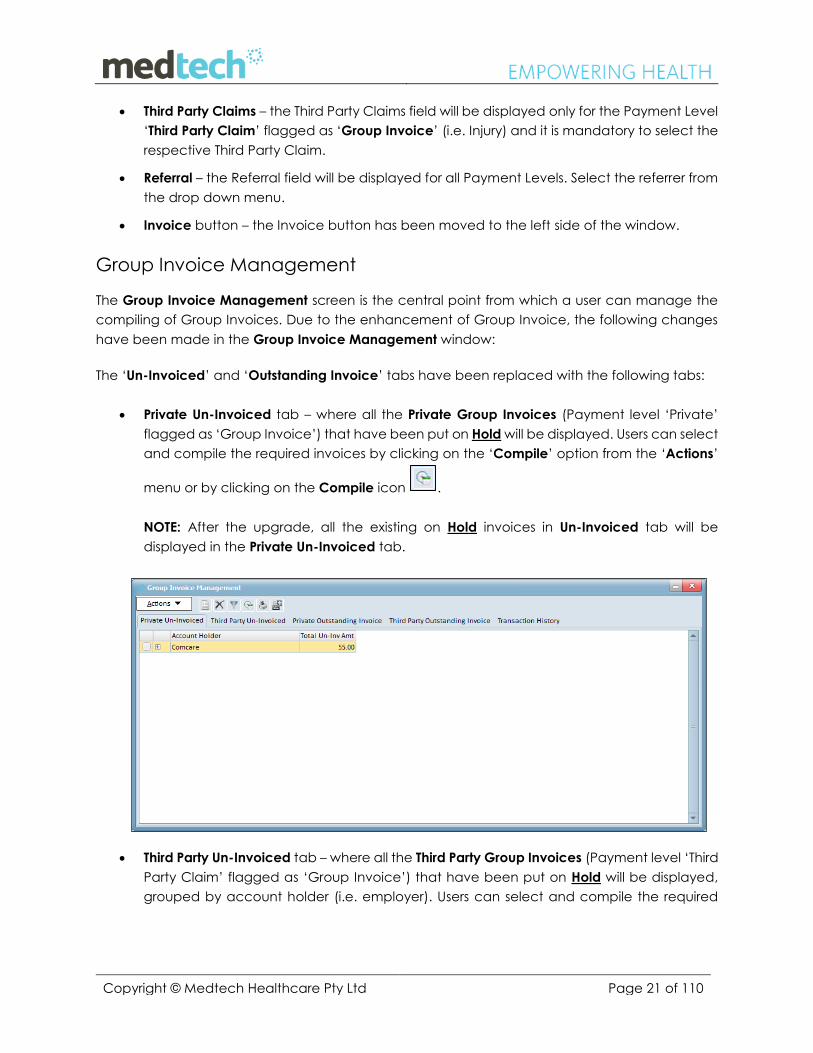
Group Invoice Management
The Group Invoice Management screen is the central point from which a user can manage the
compiling of Group Invoices. Due to the enhancement of Group Invoice, the following changes
have been made in the Group Invoice Management window:
The ‘Un-Invoiced’ and ‘Outstanding Invoice’ tabs have been replaced with the following tabs:
Private Un-Invoiced tab – where all the Private Group Invoices (Payment level ‘Private’
flagged as ‘Group Invoice’) that have been put on Hold will be displayed. Users can select
and compile the required invoices by clicking on the ‘Compile’ option from the ‘Actions’
menu or by clicking on the Compile icon .
NOTE: After the upgrade, all the existing on Hold invoices in Un-Invoiced tab will be
displayed in the Private Un-Invoiced tab.
Third Party Un-Invoiced tab – where all the Third Party Group Invoices (Payment level ‘Third
Party Claim’ flagged as ‘Group Invoice’) that have been put on Hold will be displayed,
grouped by account holder (i.e. employer). Users can select and compile the required
Copyright © Medtech Healthcare Pty Ltd Page 22 of 110
invoices by clicking the ‘Compile’ option from the ‘Actions’ menu or by clicking on the
Compile icon .
Private Outstanding Invoice tab – where all the Private Group compiled invoices will be
displayed. From this tab users can make a new payment, credit note, refund or can
allocate a credit.
NOTE: After the upgrade, all the existing outstanding invoices in the Outstanding Invoices
tab will be displayed in the Private Outstanding tab.
Third Party Outstanding Invoice tab – where all the Third Party Group compiled invoices will
be displayed. From this tab users can make a new payment, credit note, refund or allocate
a credit.
Transaction History tab – where users can search for the account holder (Company) and
view the transactions of the selected account holder for a selected date range.
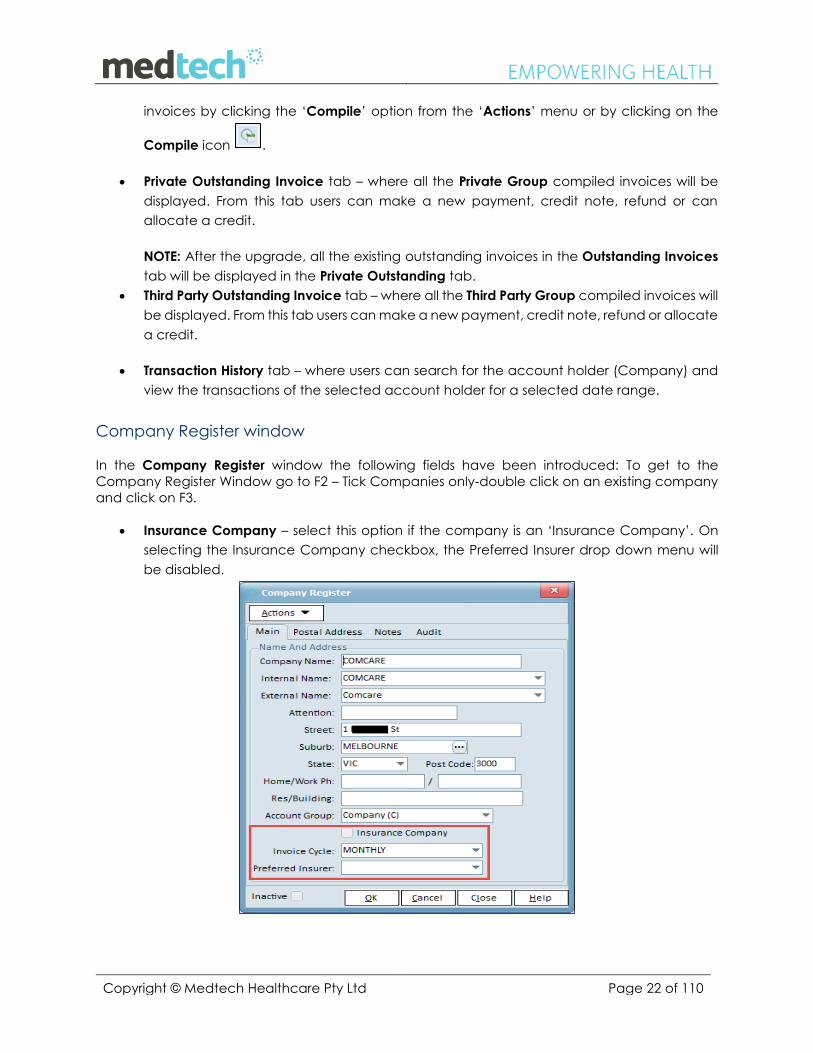
Company Register window
In the Company Register window the following fields have been introduced: To get to the
Company Register Window go to F2 – Tick Companies only-double click on an existing company
and click on F3.
Insurance Company – select this option if the company is an ‘Insurance Company’. On
selecting the Insurance Company checkbox, the Preferred Insurer drop down menu will
be disabled.
Copyright © Medtech Healthcare Pty Ltd Page 23 of 110
Invoice Cycle – select the Invoice Cycle for the company. This field contains the following
values:
o Daily
o Weekly
o Monthly
By default ‘Monthly’ will be displayed in the Company Register.
Preferred Insurer – select the Preferred Insurer for the company. Companies that are
flagged as ‘Insurance Company’ will be listed in this drop down field.
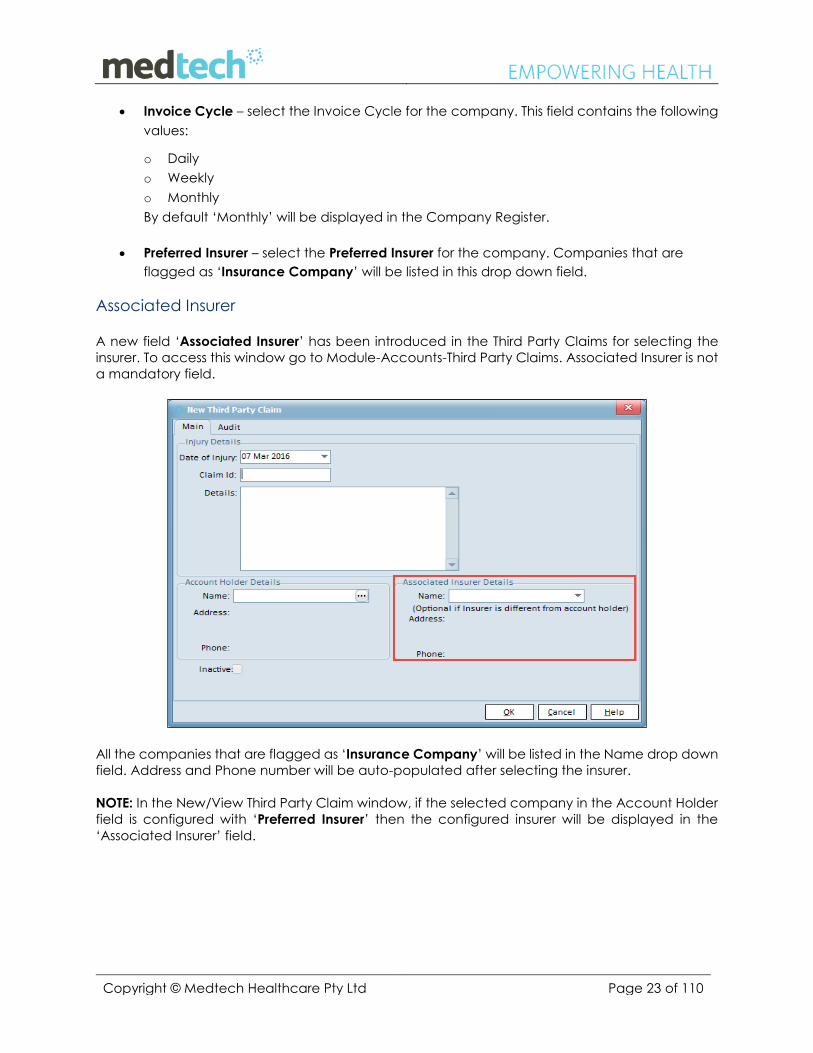
Associated Insurer A new field ‘Associated Insurer’ has been introduced in the Third Party Claims for selecting the
insurer. To access this window go to Module-Accounts-Third Party Claims. Associated Insurer is not
a mandatory field.
All the companies that are flagged as ‘Insurance Company’ will be listed in the Name drop down
field. Address and Phone number will be auto-populated after selecting the insurer.
NOTE: In the New/View Third Party Claim window, if the selected company in the Account Holder
field is configured with ‘Preferred Insurer’ then the configured insurer will be displayed in the
‘Associated Insurer’ field.
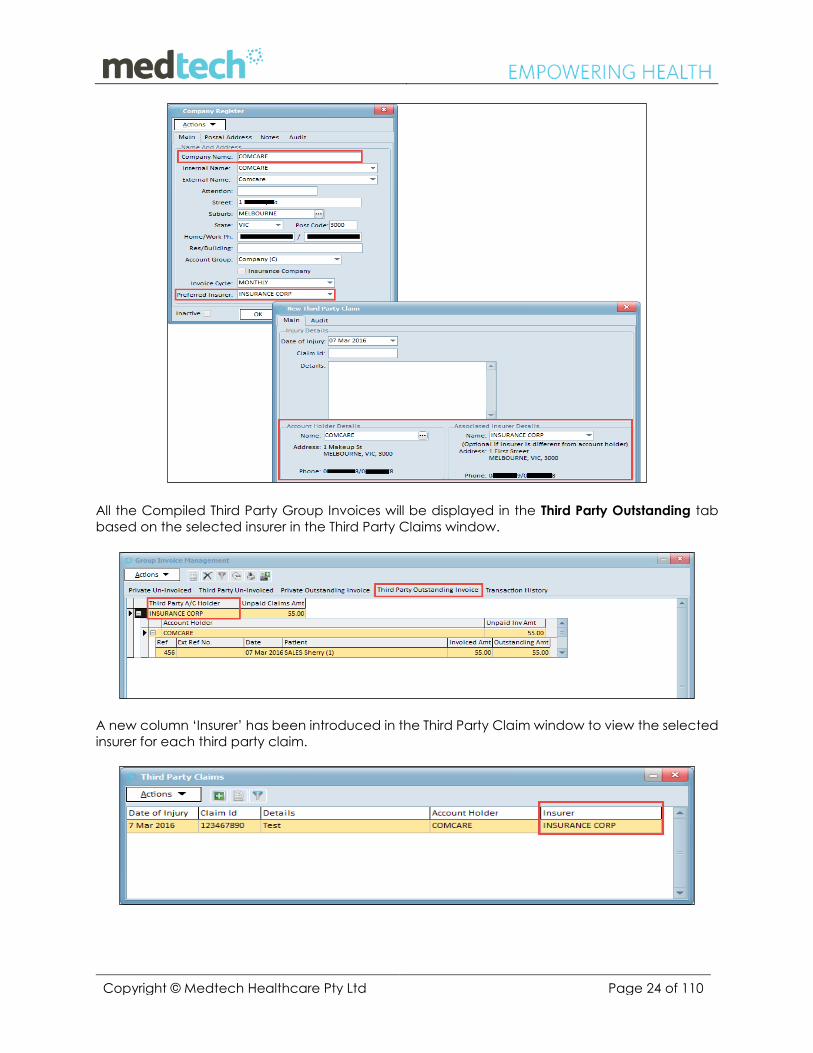
Copyright © Medtech Healthcare Pty Ltd Page 24 of 110
All the Compiled Third Party Group Invoices will be displayed in the Third Party Outstanding tab
based on the selected insurer in the Third Party Claims window.
A new column ‘Insurer’ has been introduced in the Third Party Claim window to view the selected
insurer for each third party claim.
Copyright © Medtech Healthcare Pty Ltd Page 25 of 110
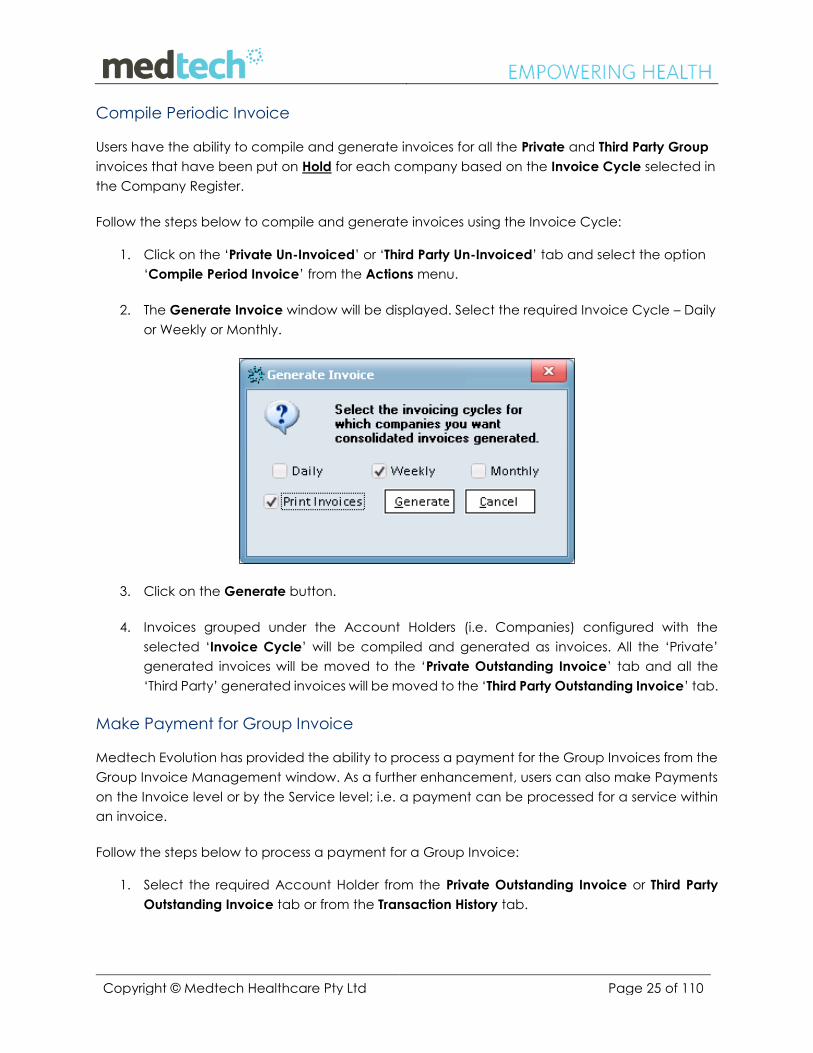
Compile Periodic Invoice
Users have the ability to compile and generate invoices for all the Private and Third Party Group
invoices that have been put on Hold for each company based on the Invoice Cycle selected in
the Company Register.
Follow the steps below to compile and generate invoices using the Invoice Cycle:
1. Click on the ‘Private Un-Invoiced’ or ‘Third Party Un-Invoiced’ tab and select the option
‘Compile Period Invoice’ from the Actions menu.
2. The Generate Invoice window will be displayed. Select the required Invoice Cycle – Daily
or Weekly or Monthly.
3. Click on the Generate button.
4. Invoices grouped under the Account Holders (i.e. Companies) configured with the
selected ‘Invoice Cycle’ will be compiled and generated as invoices. All the ‘Private’
generated invoices will be moved to the ‘Private Outstanding Invoice’ tab and all the
‘Third Party’ generated invoices will be moved to the ‘Third Party Outstanding Invoice’ tab.
Make Payment for Group Invoice
Medtech Evolution has provided the ability to process a payment for the Group Invoices from the
Group Invoice Management window. As a further enhancement, users can also make Payments
on the Invoice level or by the Service level; i.e. a payment can be processed for a service within
an invoice.
Follow the steps below to process a payment for a Group Invoice:
1. Select the required Account Holder from the Private Outstanding Invoice or Third Party
Outstanding Invoice tab or from the Transaction History tab.
Copyright © Medtech Healthcare Pty Ltd Page 26 of 110
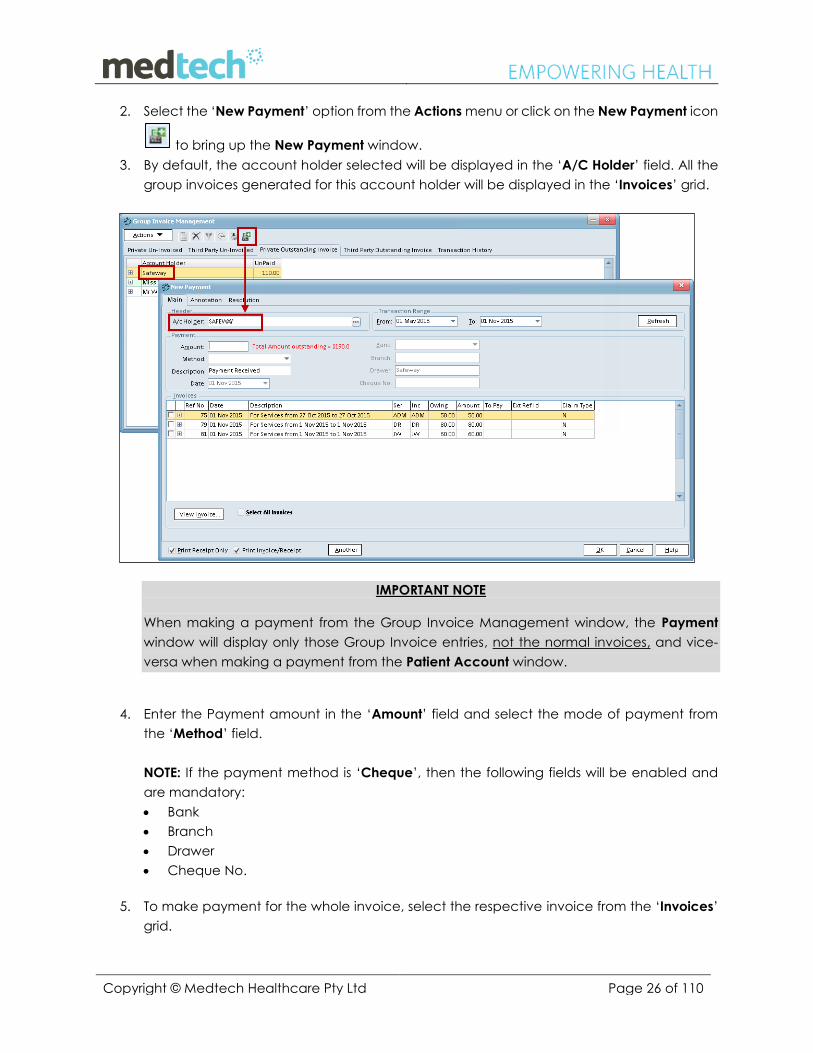
2. Select the ‘New Payment’ option from the Actions menu or click on the New Payment icon
to bring up the New Payment window.
3. By default, the account holder selected will be displayed in the ‘A/C Holder’ field. All the
group invoices generated for this account holder will be displayed in the ‘Invoices’ grid.
IMPORTANT NOTE
When making a payment from the Group Invoice Management window, the Payment
window will display only those Group Invoice entries, not the normal invoices, and vice-
versa when making a payment from the Patient Account window.
4. Enter the Payment amount in the ‘Amount’ field and select the mode of payment from
the ‘Method’ field.
NOTE: If the payment method is ‘Cheque’, then the following fields will be enabled and
are mandatory:
Bank
Branch
Drawer
Cheque No.
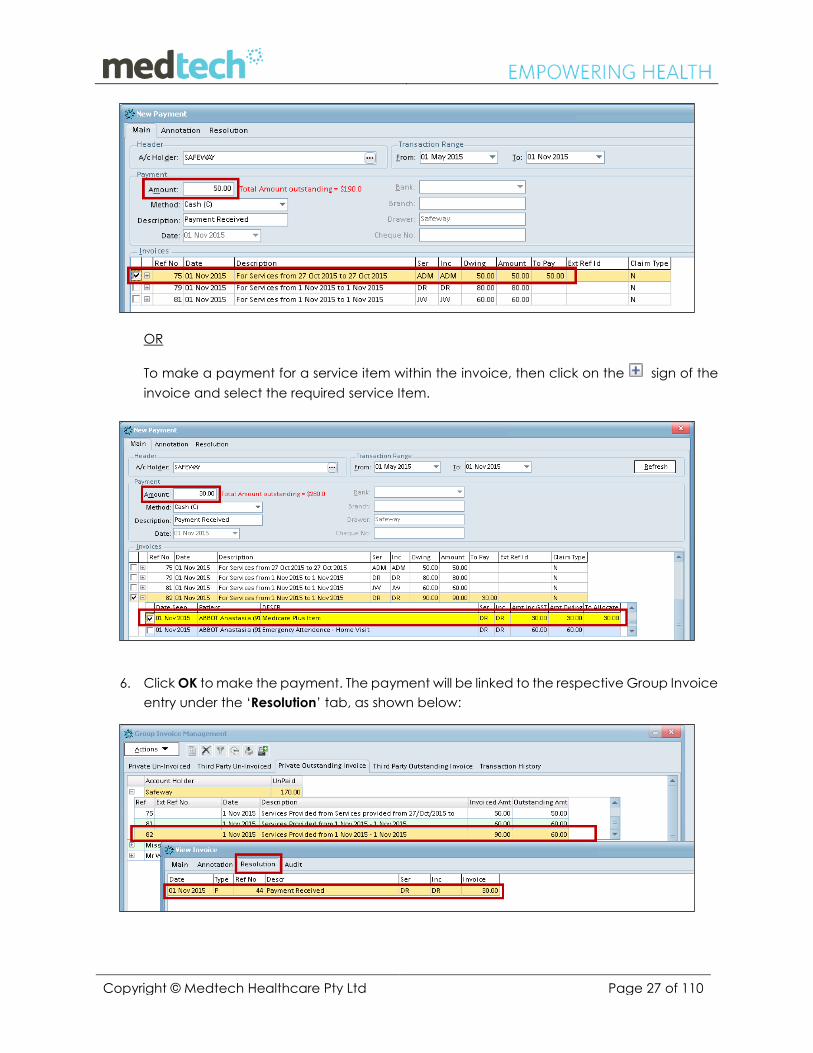
5. To make payment for the whole invoice, select the respective invoice from the ‘Invoices’
grid.
Copyright © Medtech Healthcare Pty Ltd Page 27 of 110
OR
To make a payment for a service item within the invoice, then click on the sign of the
invoice and select the required service Item.
6. Click OK to make the payment. The payment will be linked to the respective Group Invoice
entry under the ‘Resolution’ tab, as shown below:
Copyright © Medtech Healthcare Pty Ltd Page 28 of 110
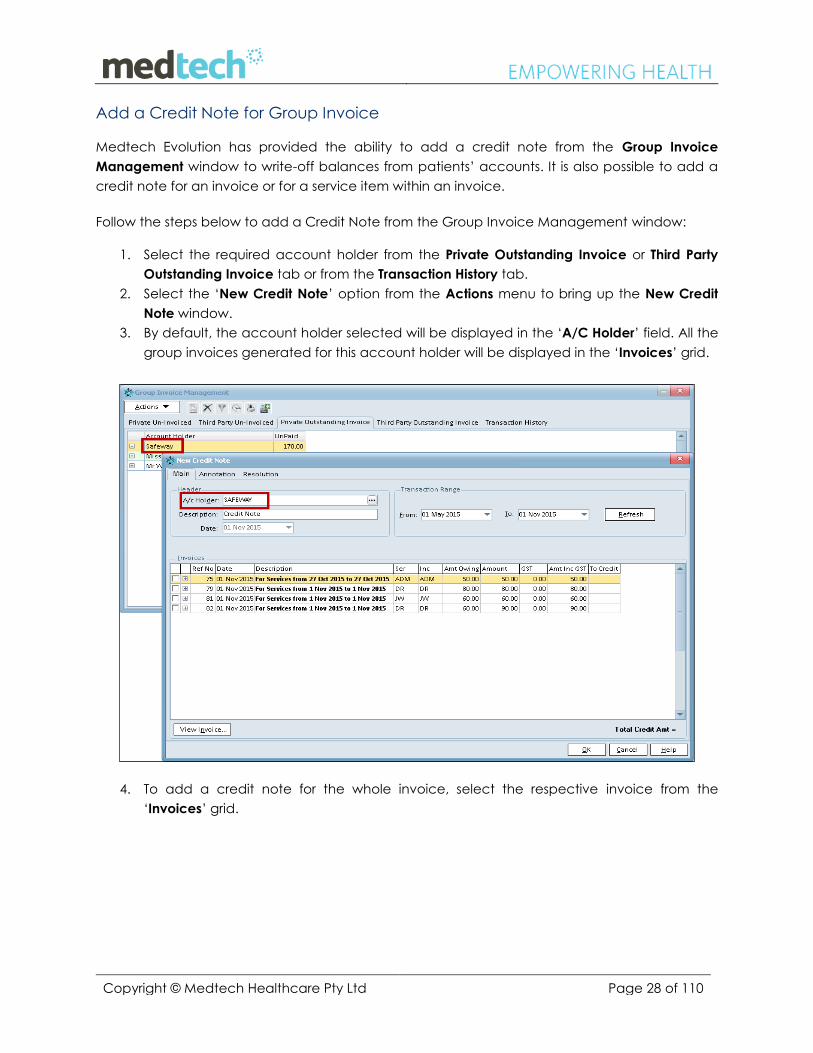
Add a Credit Note for Group Invoice
Medtech Evolution has provided the ability to add a credit note from the Group Invoice
Management window to write-off balances from patients’ accounts. It is also possible to add a
credit note for an invoice or for a service item within an invoice.
Follow the steps below to add a Credit Note from the Group Invoice Management window:
1. Select the required account holder from the Private Outstanding Invoice or Third Party
Outstanding Invoice tab or from the Transaction History tab.
2. Select the ‘New Credit Note’ option from the Actions menu to bring up the New Credit
Note window.
3. By default, the account holder selected will be displayed in the ‘A/C Holder’ field. All the
group invoices generated for this account holder will be displayed in the ‘Invoices’ grid.
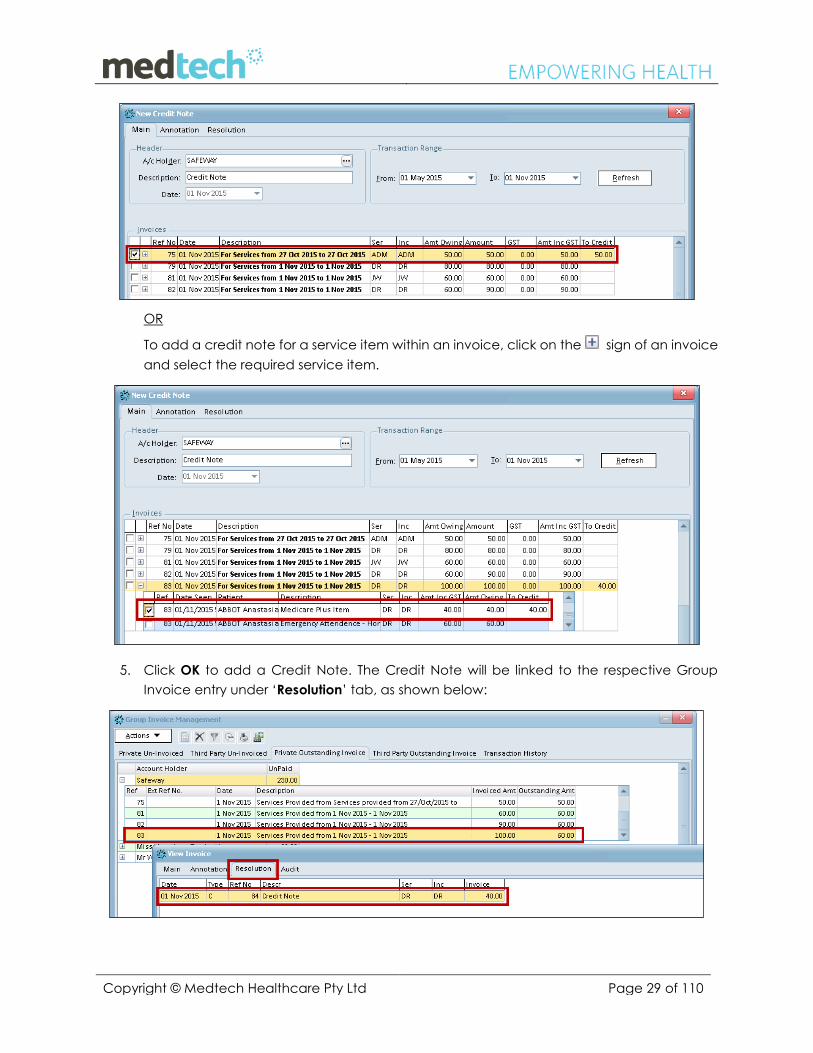
4. To add a credit note for the whole invoice, select the respective invoice from the
‘Invoices’ grid.
Copyright © Medtech Healthcare Pty Ltd Page 29 of 110
OR
To add a credit note for a service item within an invoice, click on the sign of an invoice
and select the required service item.
5. Click OK to add a Credit Note. The Credit Note will be linked to the respective Group
Invoice entry under ‘Resolution’ tab, as shown below:
Copyright © Medtech Healthcare Pty Ltd Page 30 of 110
Add a Refund for Group Invoice
Medtech Evolution also provides the ability to add a refund from the Group Invoice Management
window.
Follow the steps below to add a refund from the Group Invoice Management window:
1. Select the required account holder from the Private Outstanding Invoice or Third Party
Outstanding Invoice tab or from the Transaction History tab.
2. Select the ‘New Refund’ option from the Actions menu to bring up the New Refund
window.
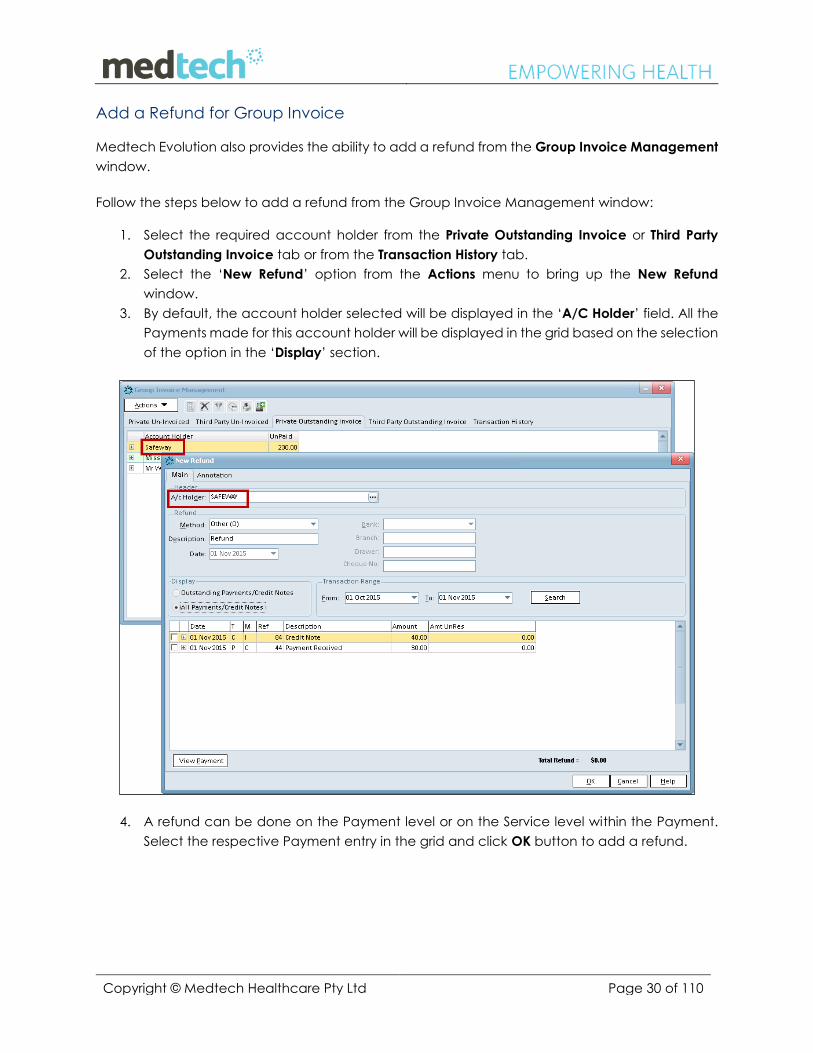
3. By default, the account holder selected will be displayed in the ‘A/C Holder’ field. All the
Payments made for this account holder will be displayed in the grid based on the selection
of the option in the ‘Display’ section.
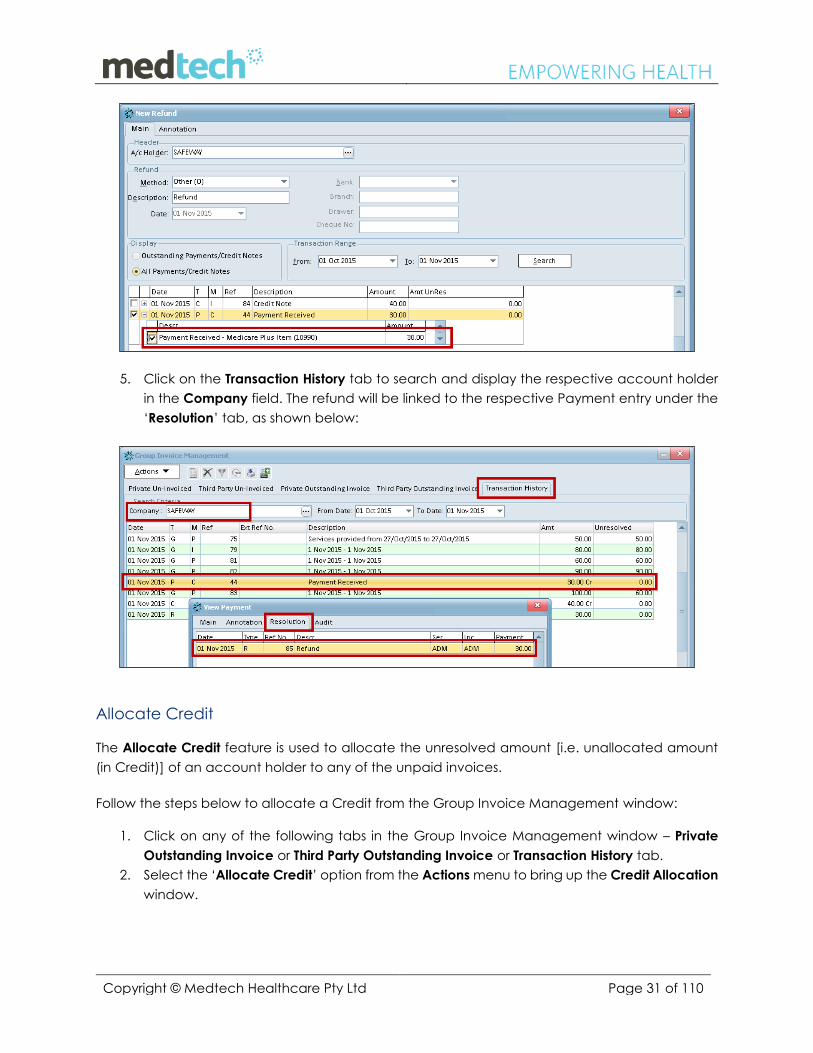
4. A refund can be done on the Payment level or on the Service level within the Payment.
Select the respective Payment entry in the grid and click OK button to add a refund.
Copyright © Medtech Healthcare Pty Ltd Page 31 of 110
5. Click on the Transaction History tab to search and display the respective account holder
in the Company field. The refund will be linked to the respective Payment entry under the
‘Resolution’ tab, as shown below:
Allocate Credit
The Allocate Credit feature is used to allocate the unresolved amount [i.e. unallocated amount
(in Credit)] of an account holder to any of the unpaid invoices.
Follow the steps below to allocate a Credit from the Group Invoice Management window:
1. Click on any of the following tabs in the Group Invoice Management window – Private
Outstanding Invoice or Third Party Outstanding Invoice or Transaction History tab.
2. Select the ‘Allocate Credit’ option from the Actions menu to bring up the Credit Allocation
window.
Copyright © Medtech Healthcare Pty Ltd Page 32 of 110
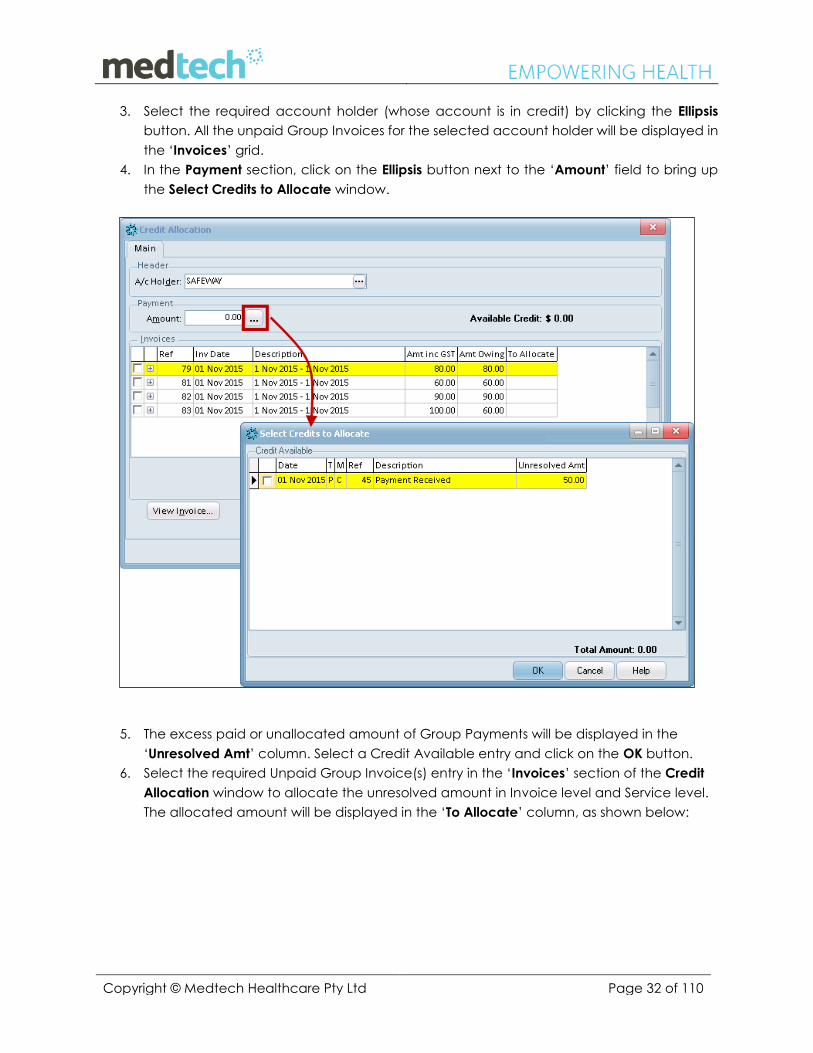
3. Select the required account holder (whose account is in credit) by clicking the Ellipsis
button. All the unpaid Group Invoices for the selected account holder will be displayed in
the ‘Invoices’ grid.
4. In the Payment section, click on the Ellipsis button next to the ‘Amount’ field to bring up
the Select Credits to Allocate window.
5. The excess paid or unallocated amount of Group Payments will be displayed in the
‘Unresolved Amt’ column. Select a Credit Available entry and click on the OK button.
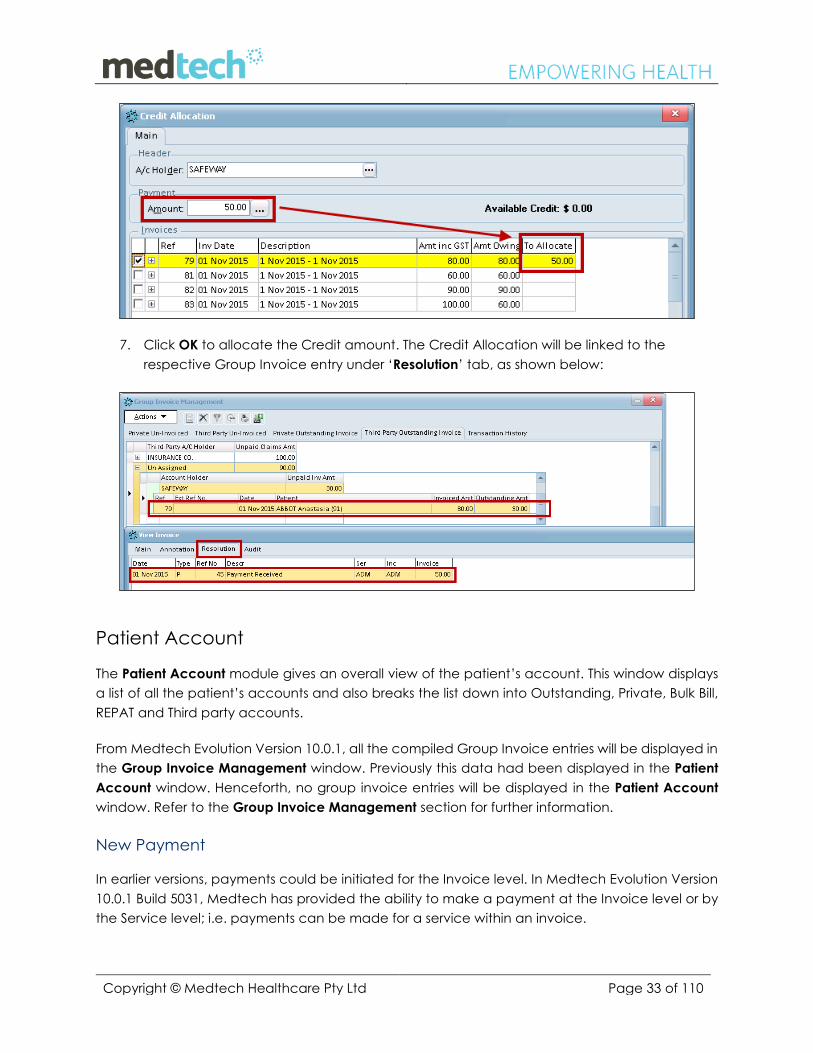
6. Select the required Unpaid Group Invoice(s) entry in the ‘Invoices’ section of the Credit
Allocation window to allocate the unresolved amount in Invoice level and Service level.
The allocated amount will be displayed in the ‘To Allocate’ column, as shown below:
Copyright © Medtech Healthcare Pty Ltd Page 33 of 110
7. Click OK to allocate the Credit amount. The Credit Allocation will be linked to the
respective Group Invoice entry under ‘Resolution’ tab, as shown below:
Patient Account
The Patient Account module gives an overall view of the patient’s account. This window displays
a list of all the patient’s accounts and also breaks the list down into Outstanding, Private, Bulk Bill,
REPAT and Third party accounts.
From Medtech Evolution Version 10.0.1, all the compiled Group Invoice entries will be displayed in
the Group Invoice Management window. Previously this data had been displayed in the Patient
Account window. Henceforth, no group invoice entries will be displayed in the Patient Account
window. Refer to the Group Invoice Management section for further information.
New Payment
In earlier versions, payments could be initiated for the Invoice level. In Medtech Evolution Version
10.0.1 Build 5031, Medtech has provided the ability to make a payment at the Invoice level or by
the Service level; i.e. payments can be made for a service within an invoice.
Copyright © Medtech Healthcare Pty Ltd Page 34 of 110
Follow the steps below to make payment for an invoice:
1. Go to Module-Accounts-Patient Account (Shift+F9) to open Patient Account window.
Select the ‘New Payment’ option from the Actions menu or click on the New Payment icon
to bring up the New Payment window.
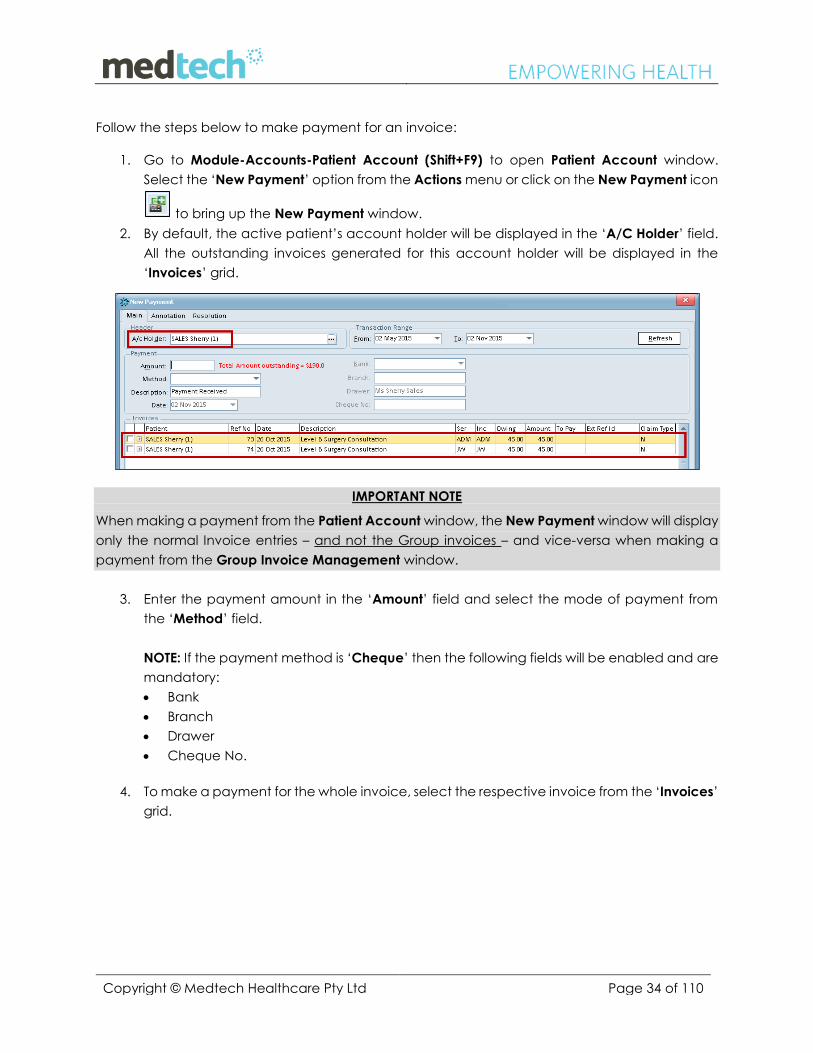
2. By default, the active patient’s account holder will be displayed in the ‘A/C Holder’ field.
All the outstanding invoices generated for this account holder will be displayed in the
‘Invoices’ grid.
IMPORTANT NOTE
When making a payment from the Patient Account window, the New Payment window will display
only the normal Invoice entries – and not the Group invoices – and vice-versa when making a
payment from the Group Invoice Management window.
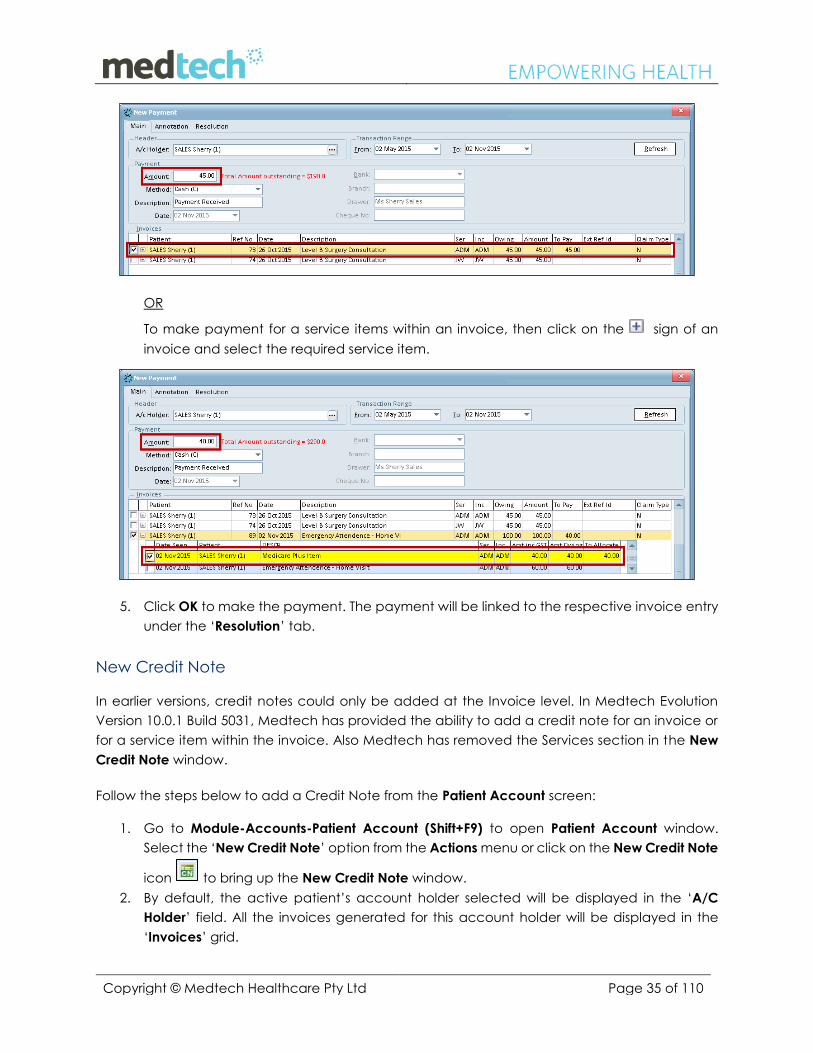
3. Enter the payment amount in the ‘Amount’ field and select the mode of payment from
the ‘Method’ field.
NOTE: If the payment method is ‘Cheque’ then the following fields will be enabled and are
mandatory:
Bank
Branch
Drawer
Cheque No.
4. To make a payment for the whole invoice, select the respective invoice from the ‘Invoices’
grid.
Copyright © Medtech Healthcare Pty Ltd Page 35 of 110
OR
To make payment for a service items within an invoice, then click on the sign of an
invoice and select the required service item.
5. Click OK to make the payment. The payment will be linked to the respective invoice entry
under the ‘Resolution’ tab.
New Credit Note
In earlier versions, credit notes could only be added at the Invoice level. In Medtech Evolution
Version 10.0.1 Build 5031, Medtech has provided the ability to add a credit note for an invoice or
for a service item within the invoice. Also Medtech has removed the Services section in the New
Credit Note window.
Follow the steps below to add a Credit Note from the Patient Account screen:
1. Go to Module-Accounts-Patient Account (Shift+F9) to open Patient Account window.
Select the ‘New Credit Note’ option from the Actions menu or click on the New Credit Note
icon to bring up the New Credit Note window.
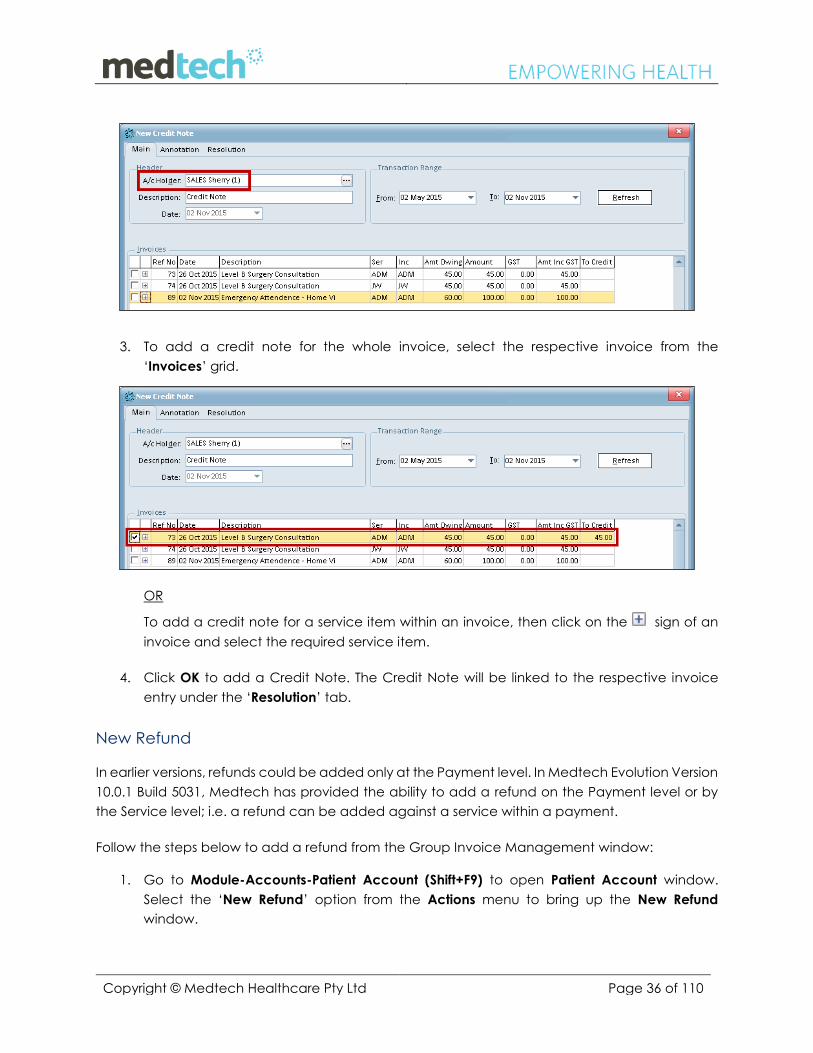
2. By default, the active patient’s account holder selected will be displayed in the ‘A/C
Holder’ field. All the invoices generated for this account holder will be displayed in the
‘Invoices’ grid.
Copyright © Medtech Healthcare Pty Ltd Page 36 of 110
3. To add a credit note for the whole invoice, select the respective invoice from the
‘Invoices’ grid.
OR
To add a credit note for a service item within an invoice, then click on the sign of an
invoice and select the required service item.
4. Click OK to add a Credit Note. The Credit Note will be linked to the respective invoice
entry under the ‘Resolution’ tab.
New Refund
In earlier versions, refunds could be added only at the Payment level. In Medtech Evolution Version
10.0.1 Build 5031, Medtech has provided the ability to add a refund on the Payment level or by
the Service level; i.e. a refund can be added against a service within a payment.
Follow the steps below to add a refund from the Group Invoice Management window:
1. Go to Module-Accounts-Patient Account (Shift+F9) to open Patient Account window.
Select the ‘New Refund’ option from the Actions menu to bring up the New Refund
window.
Copyright © Medtech Healthcare Pty Ltd Page 37 of 110
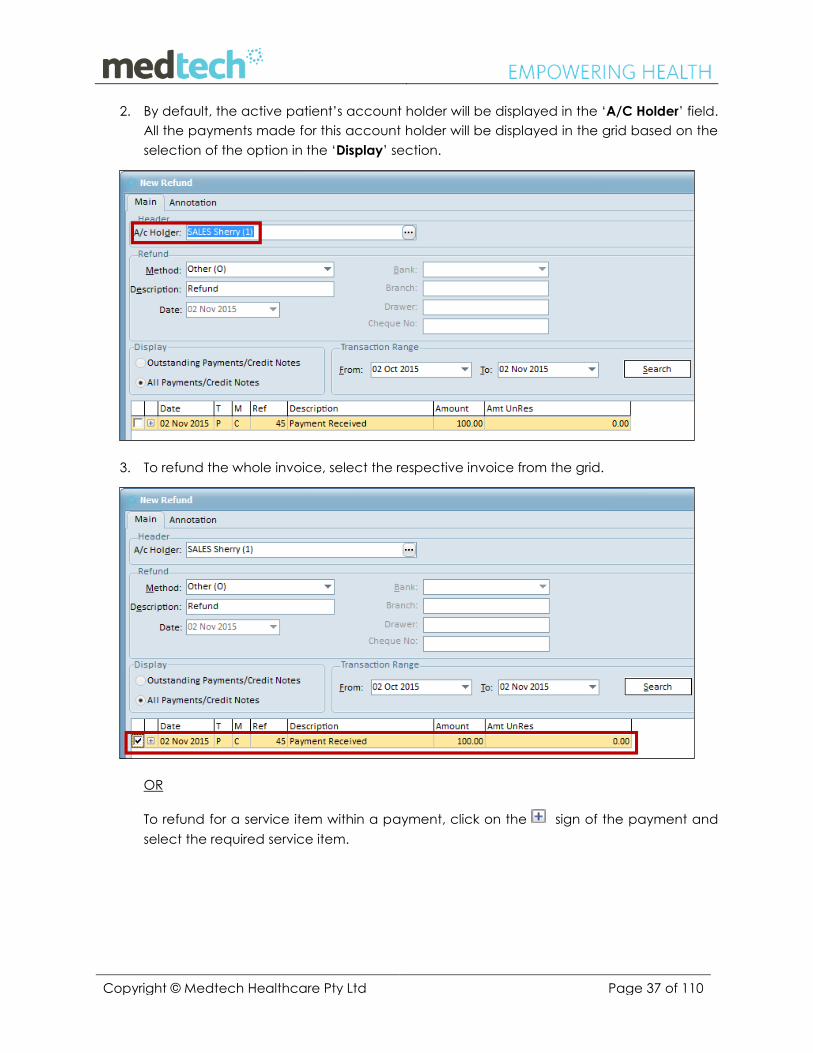
2. By default, the active patient’s account holder will be displayed in the ‘A/C Holder’ field.
All the payments made for this account holder will be displayed in the grid based on the
selection of the option in the ‘Display’ section.
3. To refund the whole invoice, select the respective invoice from the grid.
OR
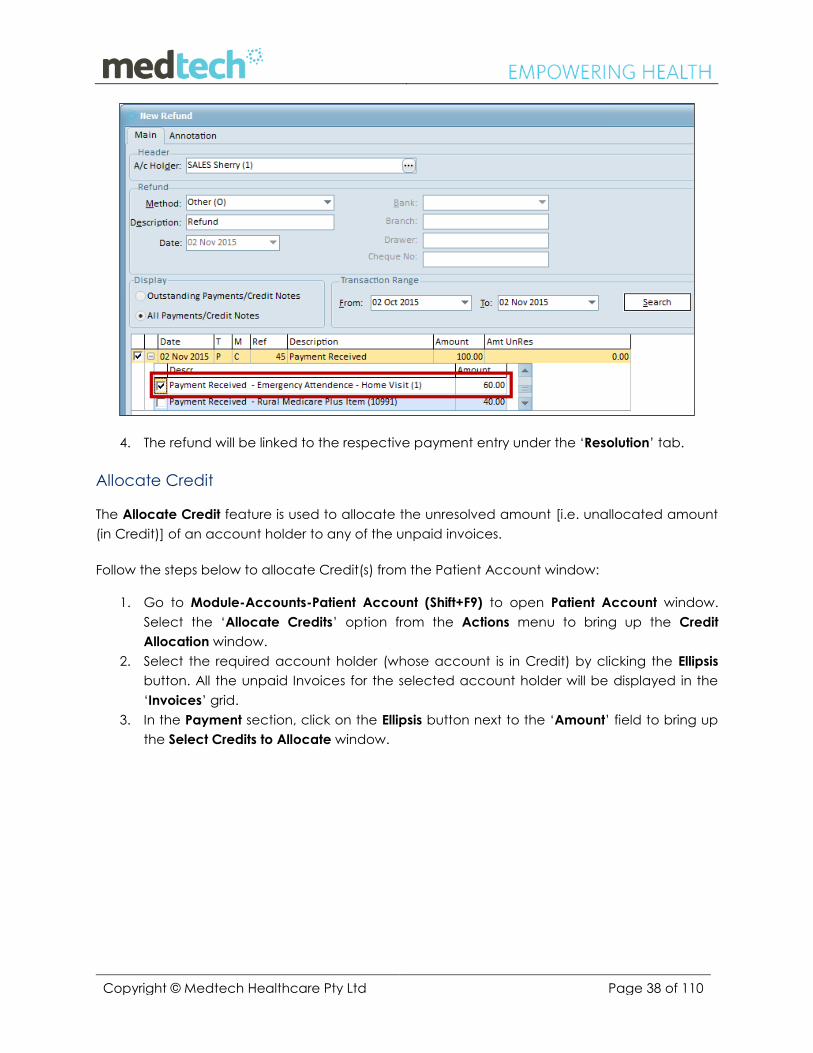
To refund for a service item within a payment, click on the sign of the payment and
select the required service item.
Copyright © Medtech Healthcare Pty Ltd Page 38 of 110
4. The refund will be linked to the respective payment entry under the ‘Resolution’ tab.
Allocate Credit
The Allocate Credit feature is used to allocate the unresolved amount [i.e. unallocated amount
(in Credit)] of an account holder to any of the unpaid invoices.
Follow the steps below to allocate Credit(s) from the Patient Account window:
1. Go to Module-Accounts-Patient Account (Shift+F9) to open Patient Account window.
Select the ‘Allocate Credits’ option from the Actions menu to bring up the Credit
Allocation window.
2. Select the required account holder (whose account is in Credit) by clicking the Ellipsis
button. All the unpaid Invoices for the selected account holder will be displayed in the
‘Invoices’ grid.
3. In the Payment section, click on the Ellipsis button next to the ‘Amount’ field to bring up
the Select Credits to Allocate window.
Copyright © Medtech Healthcare Pty Ltd Page 39 of 110
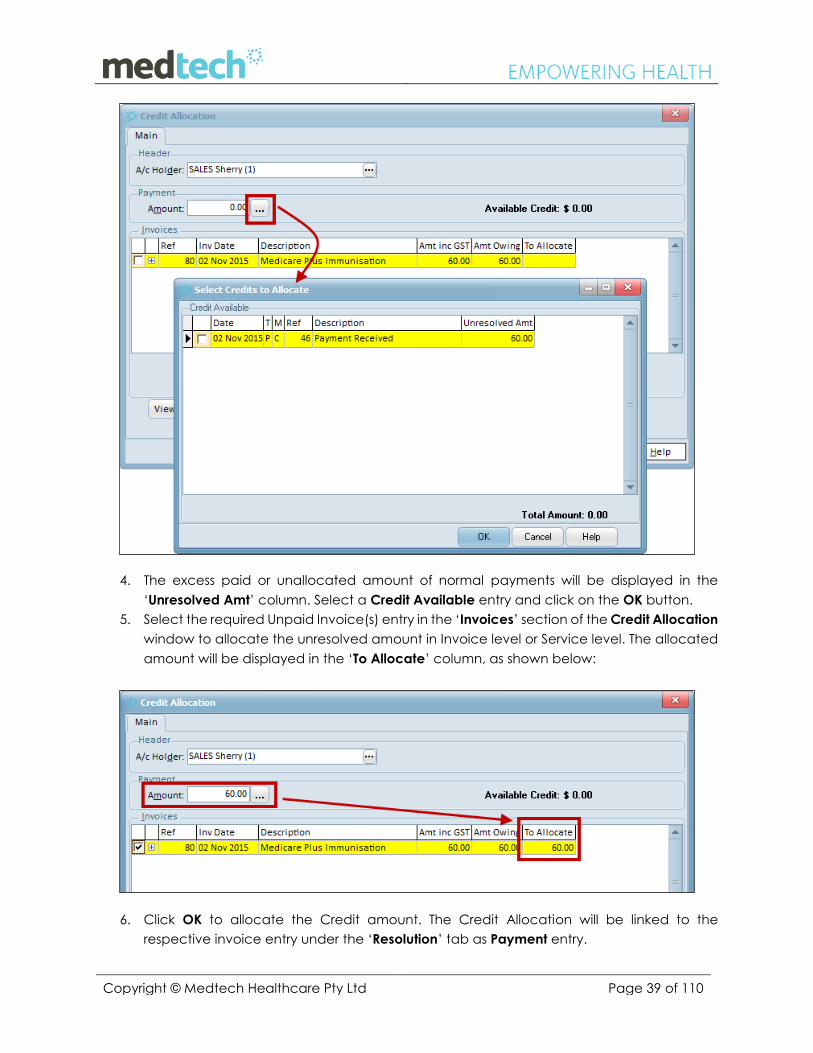
4. The excess paid or unallocated amount of normal payments will be displayed in the
‘Unresolved Amt’ column. Select a Credit Available entry and click on the OK button.
5. Select the required Unpaid Invoice(s) entry in the ‘Invoices’ section of the Credit Allocation
window to allocate the unresolved amount in Invoice level or Service level. The allocated
amount will be displayed in the ‘To Allocate’ column, as shown below:
6. Click OK to allocate the Credit amount. The Credit Allocation will be linked to the
respective invoice entry under the ‘Resolution’ tab as Payment entry.
Copyright © Medtech Healthcare Pty Ltd Page 40 of 110
Accounting Report Changes
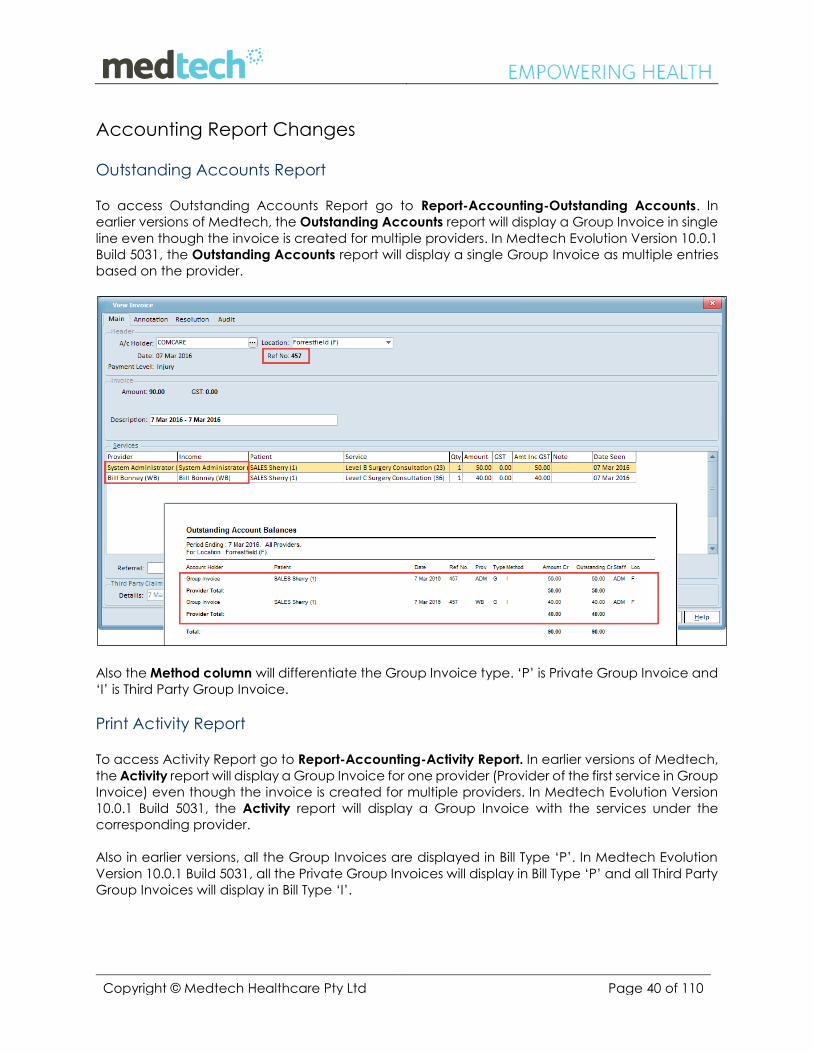
Outstanding Accounts Report To access Outstanding Accounts Report go to Report-Accounting-Outstanding Accounts. In
earlier versions of Medtech, the Outstanding Accounts report will display a Group Invoice in single
line even though the invoice is created for multiple providers. In Medtech Evolution Version 10.0.1
Build 5031, the Outstanding Accounts report will display a single Group Invoice as multiple entries
based on the provider.
Also the Method column will differentiate the Group Invoice type. ‘P’ is Private Group Invoice and
‘I’ is Third Party Group Invoice.
Print Activity Report To access Activity Report go to Report-Accounting-Activity Report. In earlier versions of Medtech,
the Activity report will display a Group Invoice for one provider (Provider of the first service in Group
Invoice) even though the invoice is created for multiple providers. In Medtech Evolution Version
10.0.1 Build 5031, the Activity report will display a Group Invoice with the services under the
corresponding provider.
Also in earlier versions, all the Group Invoices are displayed in Bill Type ‘P’. In Medtech Evolution
Version 10.0.1 Build 5031, all the Private Group Invoices will display in Bill Type ‘P’ and all Third Party
Group Invoices will display in Bill Type ‘I’.
Copyright © Medtech Healthcare Pty Ltd Page 41 of 110
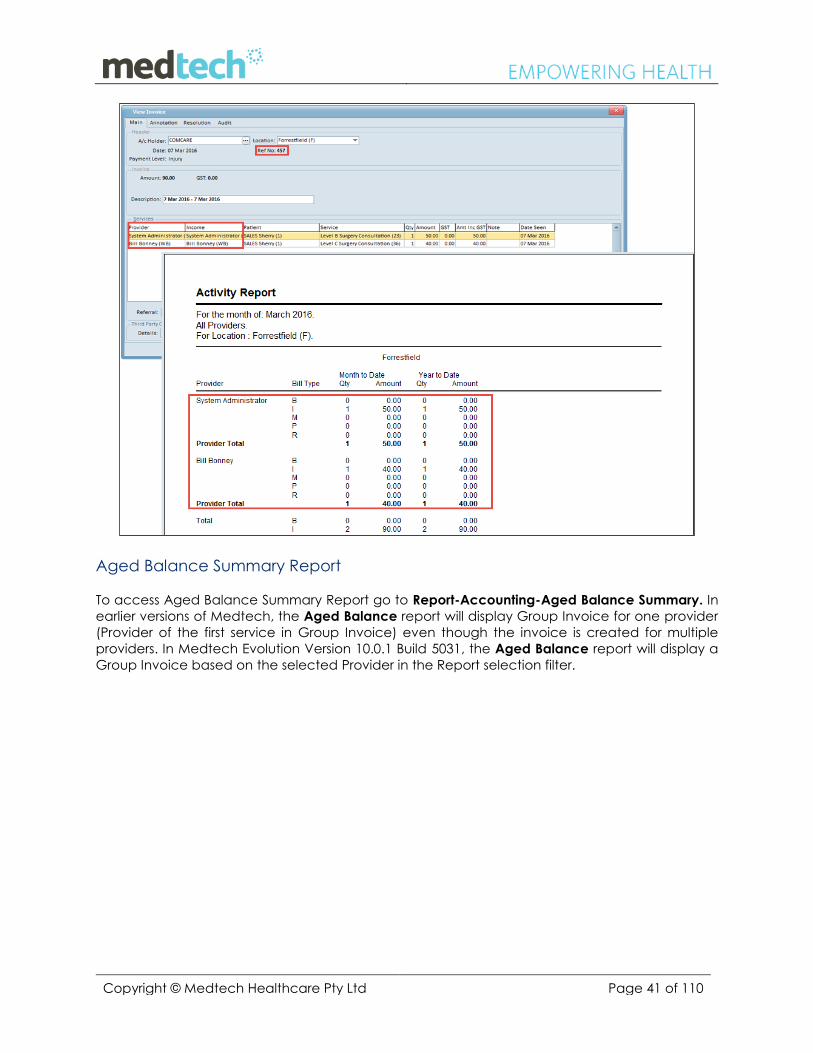
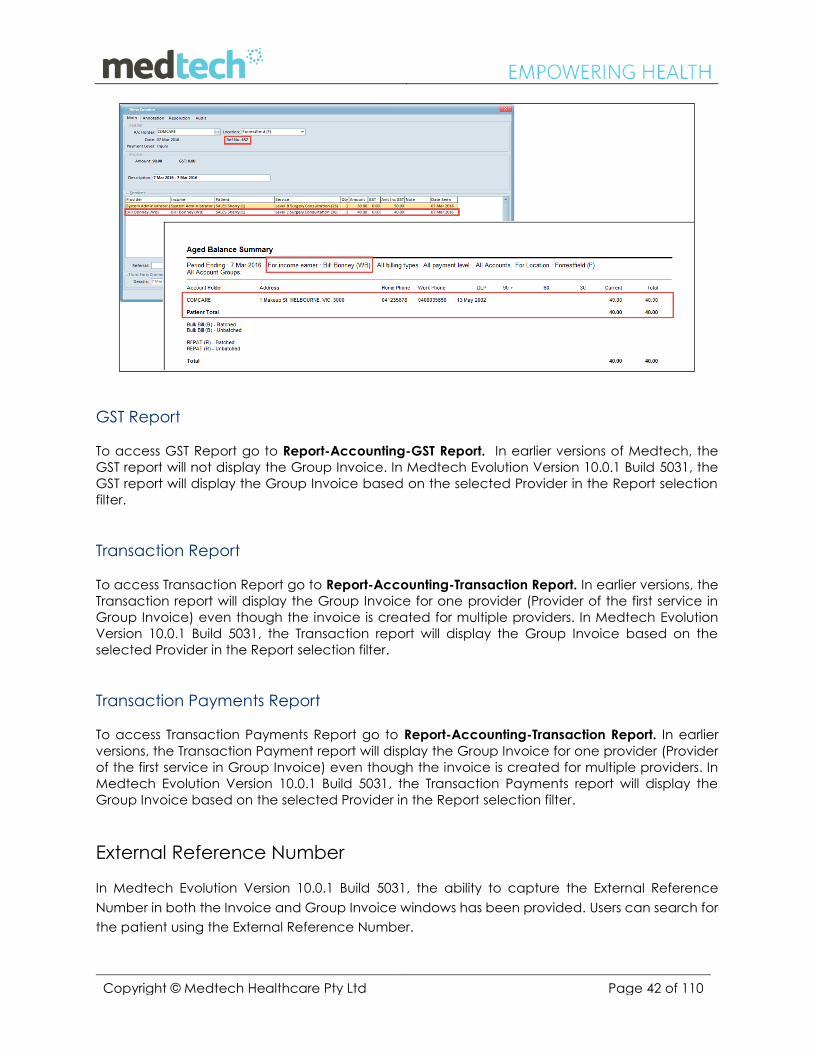
Aged Balance Summary Report
To access Aged Balance Summary Report go to Report-Accounting-Aged Balance Summary. In
earlier versions of Medtech, the Aged Balance report will display Group Invoice for one provider
(Provider of the first service in Group Invoice) even though the invoice is created for multiple
providers. In Medtech Evolution Version 10.0.1 Build 5031, the Aged Balance report will display a
Group Invoice based on the selected Provider in the Report selection filter.
Copyright © Medtech Healthcare Pty Ltd Page 42 of 110
GST Report
To access GST Report go to Report-Accounting-GST Report. In earlier versions of Medtech, the
GST report will not display the Group Invoice. In Medtech Evolution Version 10.0.1 Build 5031, the
GST report will display the Group Invoice based on the selected Provider in the Report selection
filter.
Transaction Report
To access Transaction Report go to Report-Accounting-Transaction Report. In earlier versions, the
Transaction report will display the Group Invoice for one provider (Provider of the first service in
Group Invoice) even though the invoice is created for multiple providers. In Medtech Evolution
Version 10.0.1 Build 5031, the Transaction report will display the Group Invoice based on the
selected Provider in the Report selection filter.
Transaction Payments Report
To access Transaction Payments Report go to Report-Accounting-Transaction Report. In earlier
versions, the Transaction Payment report will display the Group Invoice for one provider (Provider
of the first service in Group Invoice) even though the invoice is created for multiple providers. In
Medtech Evolution Version 10.0.1 Build 5031, the Transaction Payments report will display the
Group Invoice based on the selected Provider in the Report selection filter.
External Reference Number
In Medtech Evolution Version 10.0.1 Build 5031, the ability to capture the External Reference
Number in both the Invoice and Group Invoice windows has been provided. Users can search for
the patient using the External Reference Number.

Copyright © Medtech Healthcare Pty Ltd Page 43 of 110
Configuration to enable External Reference No.
The field ‘Enable External Ref No. Invoicing’ has been introduced to the Location Settings, under
the ‘Postal & Accounting’ tab, to enable the External Reference No. field in Invoices, Group
Invoices and the Patient Search ‘Advanced’ tab.
Once the above configuration has been enabled, the field Ext Ref No. will be displayed in both
the Invoice and Group Invoice windows, as shown below:
Invoice window
Group Invoice
This is a non-mandatory field, and allows for both alpha and numeric characters. The maximum
field length is of 20 characters and will be displayed for all the Payment Levels with the exception
of the Invoice Type – ‘REPAT’, ‘Bulk Bill’ and ‘In-Patient Medical Claim’.
When opening the compiled Group Invoice from the Group Invoice Management window, the
External Reference Number captured in the Group Invoice window will be displayed under the
‘Ext Ref No’ column (for each service item) in the ‘View Invoice’ window:
Copyright © Medtech Healthcare Pty Ltd Page 44 of 110
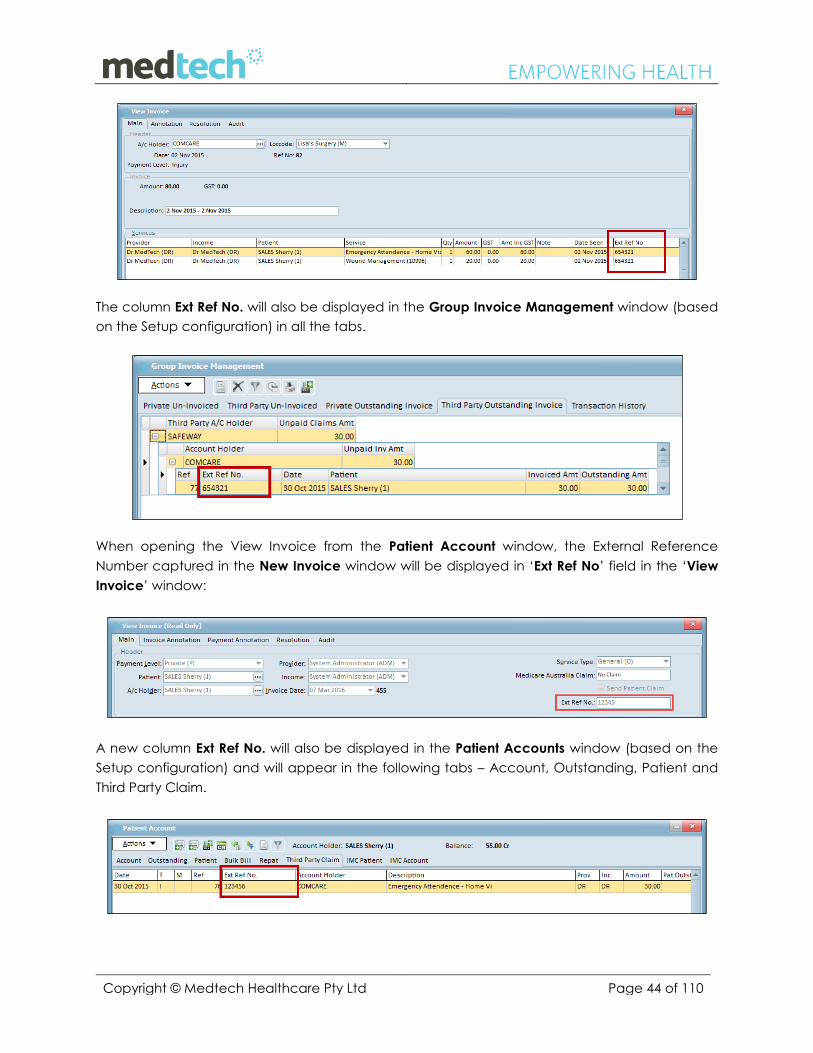
The column Ext Ref No. will also be displayed in the Group Invoice Management window (based
on the Setup configuration) in all the tabs.
When opening the View Invoice from the Patient Account window, the External Reference
Number captured in the New Invoice window will be displayed in ‘Ext Ref No’ field in the ‘View
Invoice’ window:
A new column Ext Ref No. will also be displayed in the Patient Accounts window (based on the
Setup configuration) and will appear in the following tabs – Account, Outstanding, Patient and
Third Party Claim.
Copyright © Medtech Healthcare Pty Ltd Page 45 of 110
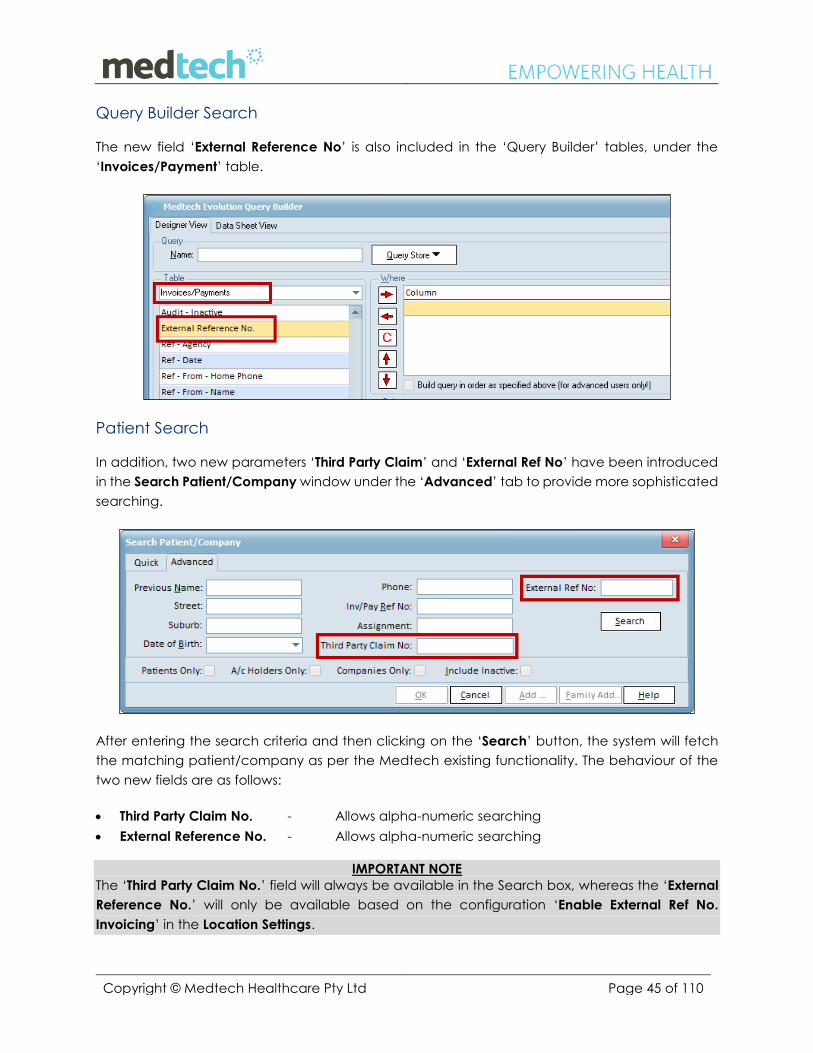
Query Builder Search
The new field ‘External Reference No’ is also included in the ‘Query Builder’ tables, under the
‘Invoices/Payment’ table.
Patient Search
In addition, two new parameters ‘Third Party Claim’ and ‘External Ref No’ have been introduced
in the Search Patient/Company window under the ‘Advanced’ tab to provide more sophisticated
searching.
After entering the search criteria and then clicking on the ‘Search’ button, the system will fetch
the matching patient/company as per the Medtech existing functionality. The behaviour of the
two new fields are as follows:
Third Party Claim No. - Allows alpha-numeric searching
External Reference No. - Allows alpha-numeric searching
IMPORTANT NOTE
The ‘Third Party Claim No.’ field will always be available in the Search box, whereas the ‘External
Reference No.’ will only be available based on the configuration ‘Enable External Ref No.
Invoicing’ in the Location Settings.
Copyright © Medtech Healthcare Pty Ltd Page 46 of 110
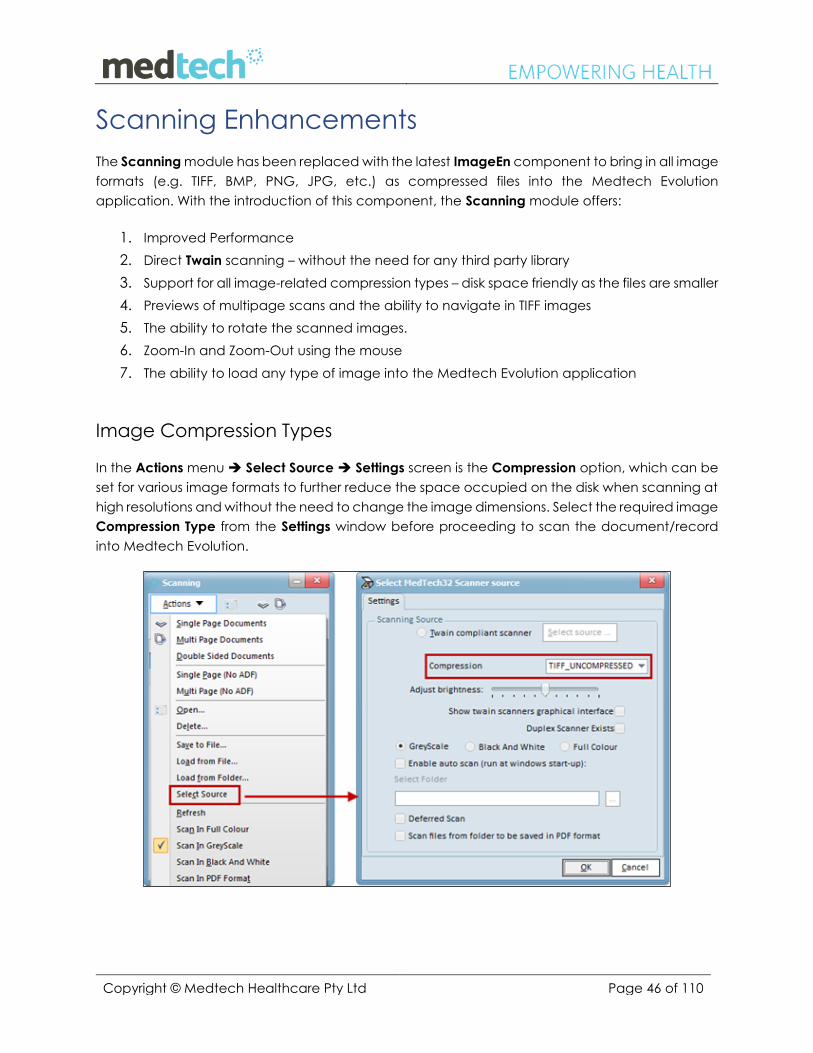
Scanning Enhancements The Scanning module has been replaced with the latest ImageEn component to bring in all image
formats (e.g. TIFF, BMP, PNG, JPG, etc.) as compressed files into the Medtech Evolution
application. With the introduction of this component, the Scanning module offers:
1. Improved Performance
2. Direct Twain scanning – without the need for any third party library
3. Support for all image-related compression types – disk space friendly as the files are smaller
4. Previews of multipage scans and the ability to navigate in TIFF images
5. The ability to rotate the scanned images.
6. Zoom-In and Zoom-Out using the mouse
7. The ability to load any type of image into the Medtech Evolution application
Image Compression Types In the Actions menu Select Source Settings screen is the Compression option, which can be
set for various image formats to further reduce the space occupied on the disk when scanning at
high resolutions and without the need to change the image dimensions. Select the required image
Compression Type from the Settings window before proceeding to scan the document/record
into Medtech Evolution.

Copyright © Medtech Healthcare Pty Ltd Page 47 of 110
Scan in PDF Format
Medtech has provided an ability to scan records/documents in as a PDF format. Previously,
records/documents could only be scanned in using image formats (e.g. TIFF, JPEG, etc.).
A new menu option ‘Scan In PDF Format’ has been introduced in the Scanning window under the
Actions menu. When selecting this option, all the scanned documents will be stored and displayed
in PDF format.
Similarly, the option ‘Scan files from folder to be saved in PDF format’ has also been included in
the Select Source window to process, store and display the image files that are loaded from the
disk in PDF format, using the option ‘Load from File’ or ‘Load from Folder’.

Copyright © Medtech Healthcare Pty Ltd Page 48 of 110
This field will be selected/unselected by default if you have turned On/Off the option ‘Scan In PDF
Format’ from the Scanning window Actions menu and vice-versa.
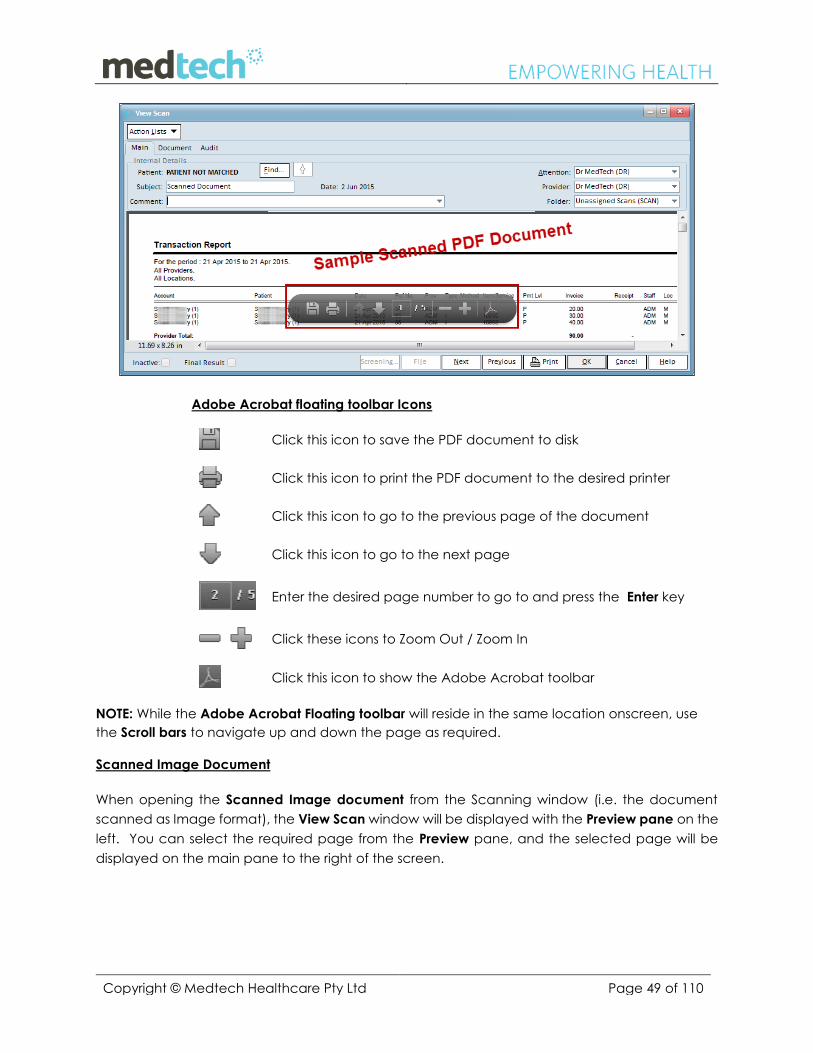
View Scan Window The interface of the View Scan window has been renovated and displayed accordingly for the
scanned image and PDF documents.
Scanned PDF Document
When opening the Scanned PDF document from the Scanning window (i.e. the document
scanned as PDF format), the Adobe Acrobat floating toolbar will appear when placing the cursor
over the PDF document in the View Scan window.
Copyright © Medtech Healthcare Pty Ltd Page 49 of 110
Adobe Acrobat floating toolbar Icons
Click this icon to save the PDF document to disk
Click this icon to print the PDF document to the desired printer
Click this icon to go to the previous page of the document
Click this icon to go to the next page
Enter the desired page number to go to and press the Enter key
Click these icons to Zoom Out / Zoom In
Click this icon to show the Adobe Acrobat toolbar
NOTE: While the Adobe Acrobat Floating toolbar will reside in the same location onscreen, use
the Scroll bars to navigate up and down the page as required.
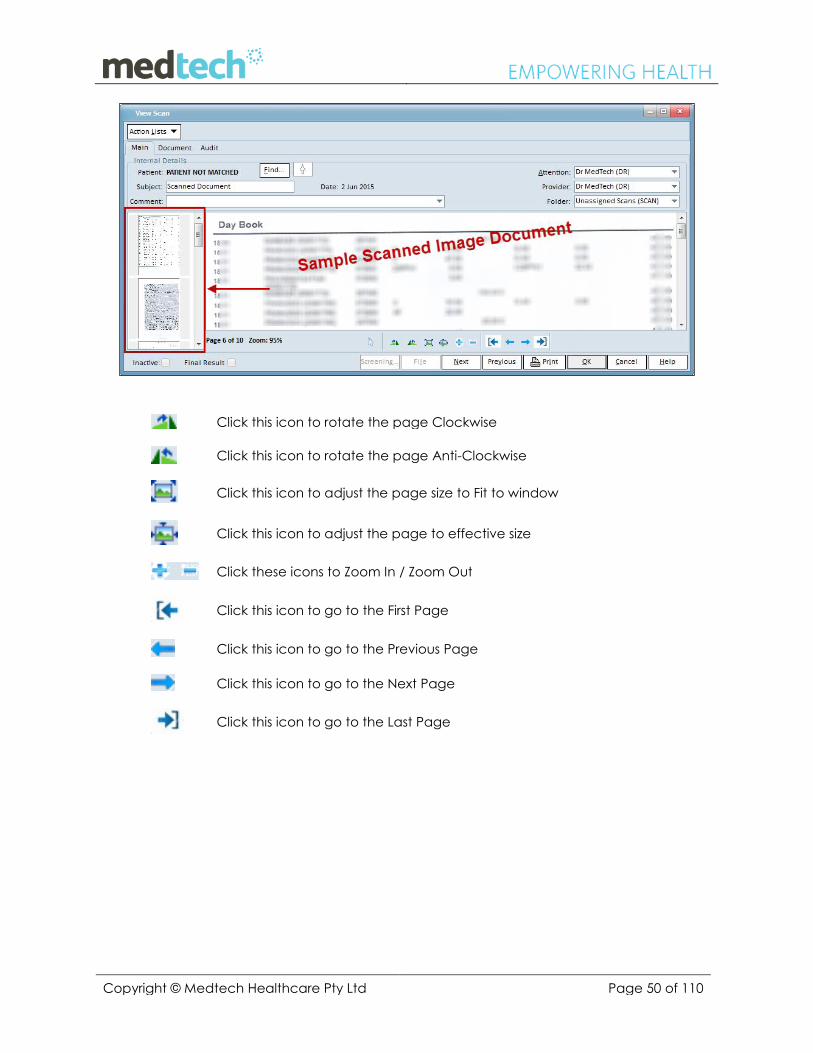
Scanned Image Document
When opening the Scanned Image document from the Scanning window (i.e. the document
scanned as Image format), the View Scan window will be displayed with the Preview pane on the
left. You can select the required page from the Preview pane, and the selected page will be
displayed on the main pane to the right of the screen.
Copyright © Medtech Healthcare Pty Ltd Page 50 of 110
Click this icon to rotate the page Clockwise
Click this icon to rotate the page Anti-Clockwise
Click this icon to adjust the page size to Fit to window
Click this icon to adjust the page to effective size
Click these icons to Zoom In / Zoom Out
Click this icon to go to the First Page
Click this icon to go to the Previous Page
Click this icon to go to the Next Page
Click this icon to go to the Last Page
Copyright © Medtech Healthcare Pty Ltd Page 51 of 110
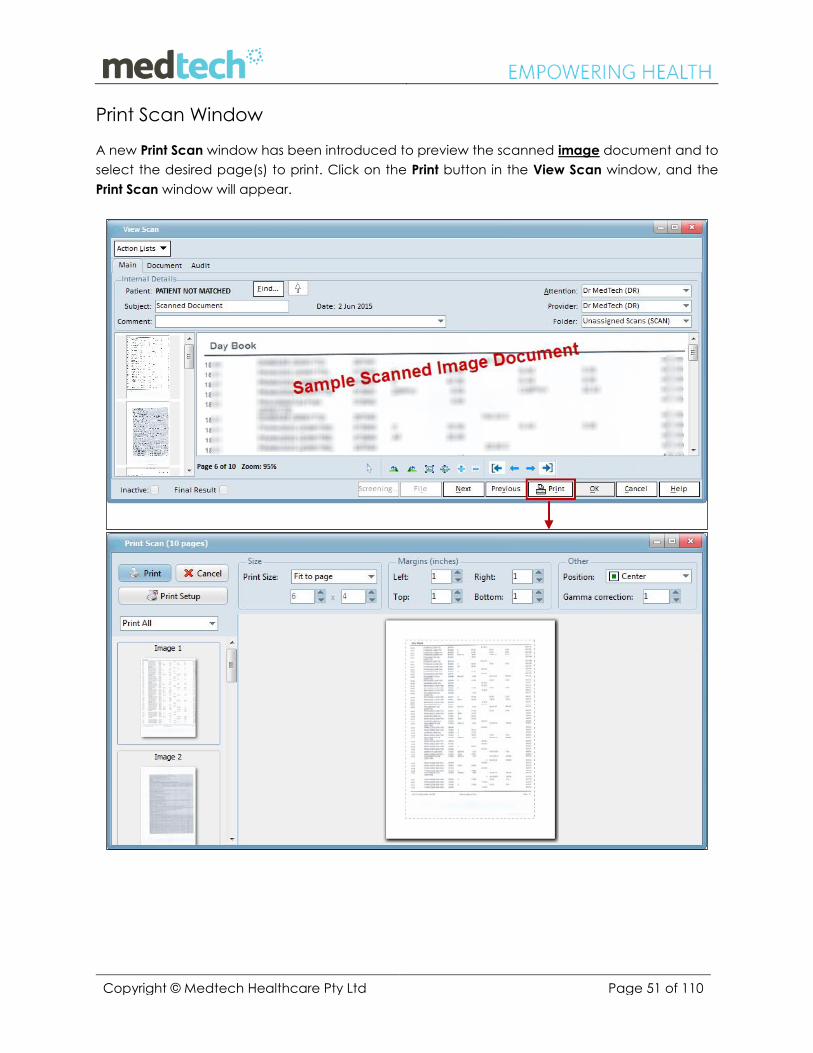
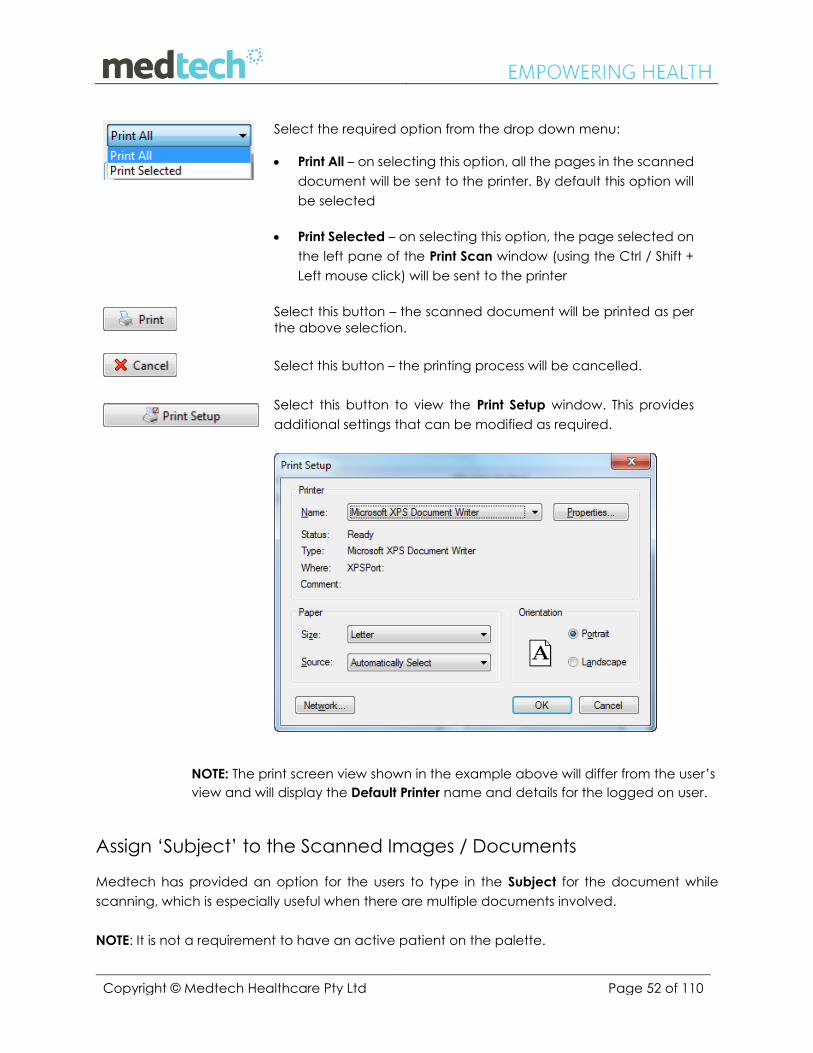
Print Scan Window
A new Print Scan window has been introduced to preview the scanned image document and to
select the desired page(s) to print. Click on the Print button in the View Scan window, and the
Print Scan window will appear.
Copyright © Medtech Healthcare Pty Ltd Page 52 of 110
Select the required option from the drop down menu:
Print All – on selecting this option, all the pages in the scanned
document will be sent to the printer. By default this option will
be selected
Print Selected – on selecting this option, the page selected on
the left pane of the Print Scan window (using the Ctrl / Shift +
Left mouse click) will be sent to the printer
Select this button – the scanned document will be printed as per
the above selection.
Select this button – the printing process will be cancelled.
Select this button to view the Print Setup window. This provides
additional settings that can be modified as required.
NOTE: The print screen view shown in the example above will differ from the user’s
view and will display the Default Printer name and details for the logged on user.
Assign ‘Subject’ to the Scanned Images / Documents
Medtech has provided an option for the users to type in the Subject for the document while
scanning, which is especially useful when there are multiple documents involved.
NOTE: It is not a requirement to have an active patient on the palette.
Copyright © Medtech Healthcare Pty Ltd Page 53 of 110
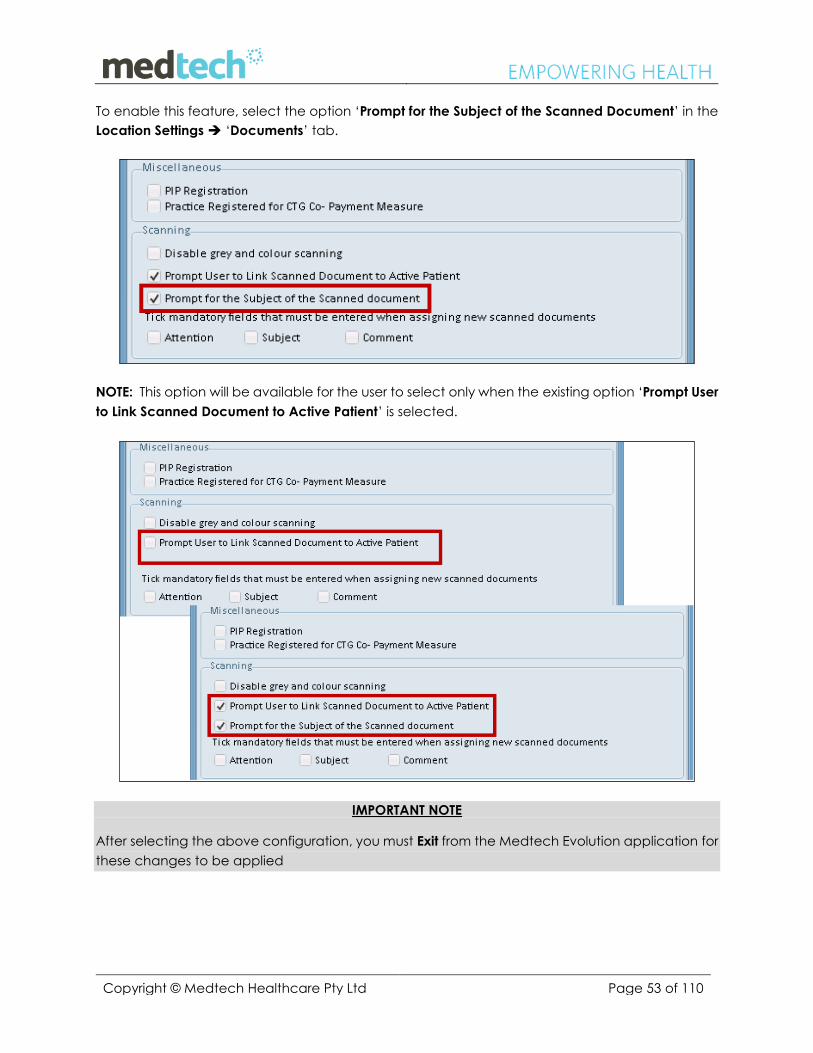
To enable this feature, select the option ‘Prompt for the Subject of the Scanned Document’ in the
Location Settings ‘Documents’ tab.
NOTE: This option will be available for the user to select only when the existing option ‘Prompt User
to Link Scanned Document to Active Patient’ is selected.
IMPORTANT NOTE
After selecting the above configuration, you must Exit from the Medtech Evolution application for
these changes to be applied
Copyright © Medtech Healthcare Pty Ltd Page 54 of 110
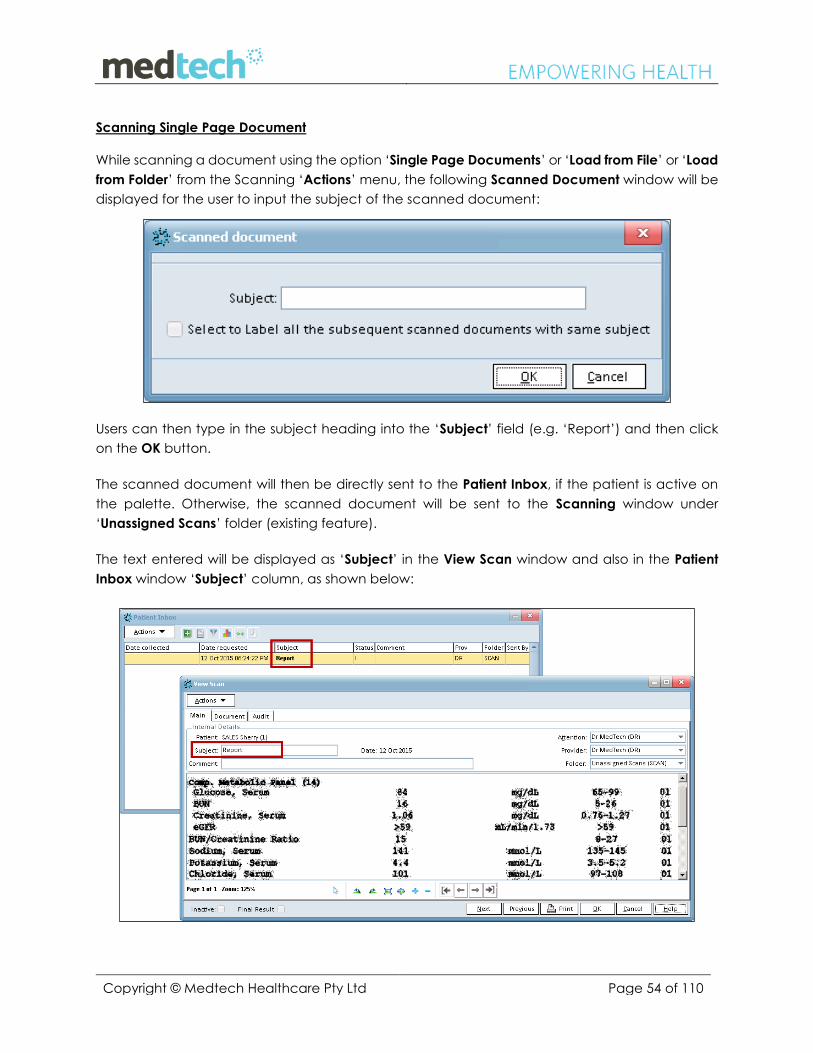
Scanning Single Page Document
While scanning a document using the option ‘Single Page Documents’ or ‘Load from File’ or ‘Load
from Folder’ from the Scanning ‘Actions’ menu, the following Scanned Document window will be
displayed for the user to input the subject of the scanned document:
Users can then type in the subject heading into the ‘Subject’ field (e.g. ‘Report’) and then click
on the OK button.
The scanned document will then be directly sent to the Patient Inbox, if the patient is active on
the palette. Otherwise, the scanned document will be sent to the Scanning window under
‘Unassigned Scans’ folder (existing feature).
The text entered will be displayed as ‘Subject’ in the View Scan window and also in the Patient
Inbox window ‘Subject’ column, as shown below:
Copyright © Medtech Healthcare Pty Ltd Page 55 of 110
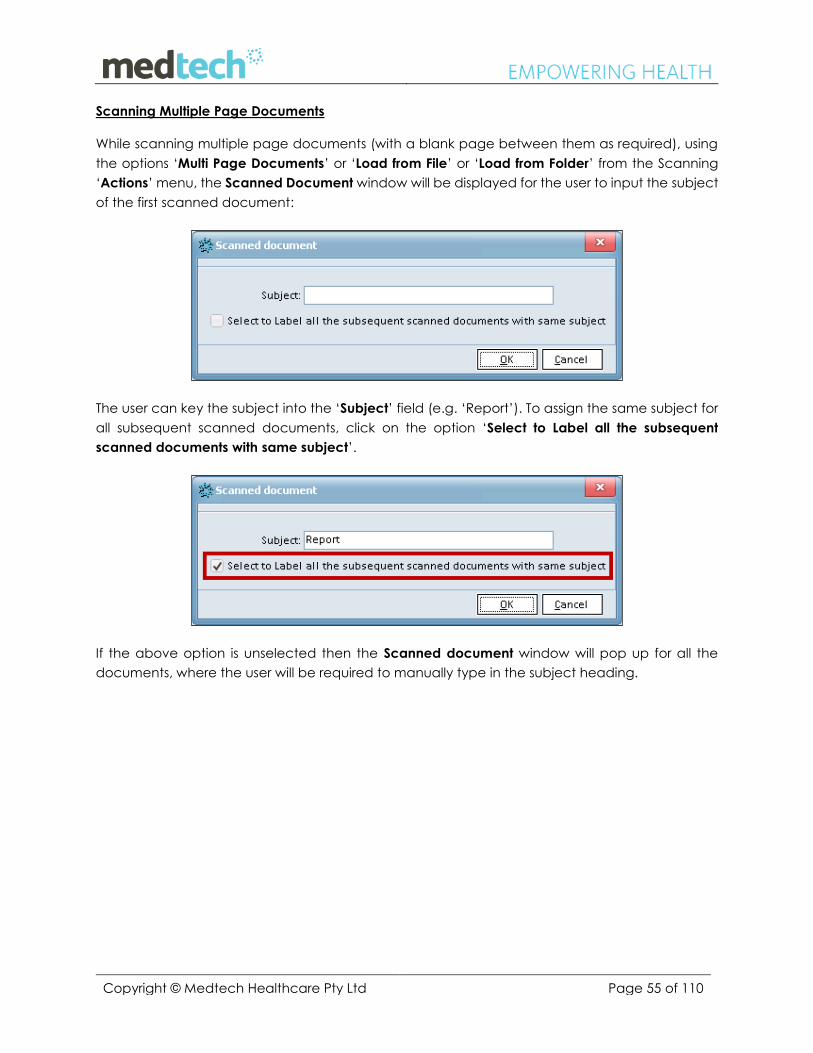
Scanning Multiple Page Documents
While scanning multiple page documents (with a blank page between them as required), using
the options ‘Multi Page Documents’ or ‘Load from File’ or ‘Load from Folder’ from the Scanning
‘Actions’ menu, the Scanned Document window will be displayed for the user to input the subject
of the first scanned document:
The user can key the subject into the ‘Subject’ field (e.g. ‘Report’). To assign the same subject for
all subsequent scanned documents, click on the option ‘Select to Label all the subsequent
scanned documents with same subject’.
If the above option is unselected then the Scanned document window will pop up for all the
documents, where the user will be required to manually type in the subject heading.
Copyright © Medtech Healthcare Pty Ltd Page 56 of 110
Immunisation Enhancement This release has provided an enhancement that allows clinicians to select multiple Immunisation
Schedule for Patients and also to Change the Sequence number for Non Standard Vaccines at
the time of Vaccination. In the previous versions, only one Schedule can be selected at a time
and option to change the sequence number of the vaccine was available only from vaccine
group Setup.
In the Immunisation screen, Vaccines will be displayed with the sequence number and a provision
to modify the sequence number while adding an Immunisation will be available. This would ensure
that the right sequence of the vaccine currently being administered is recorded in the system.
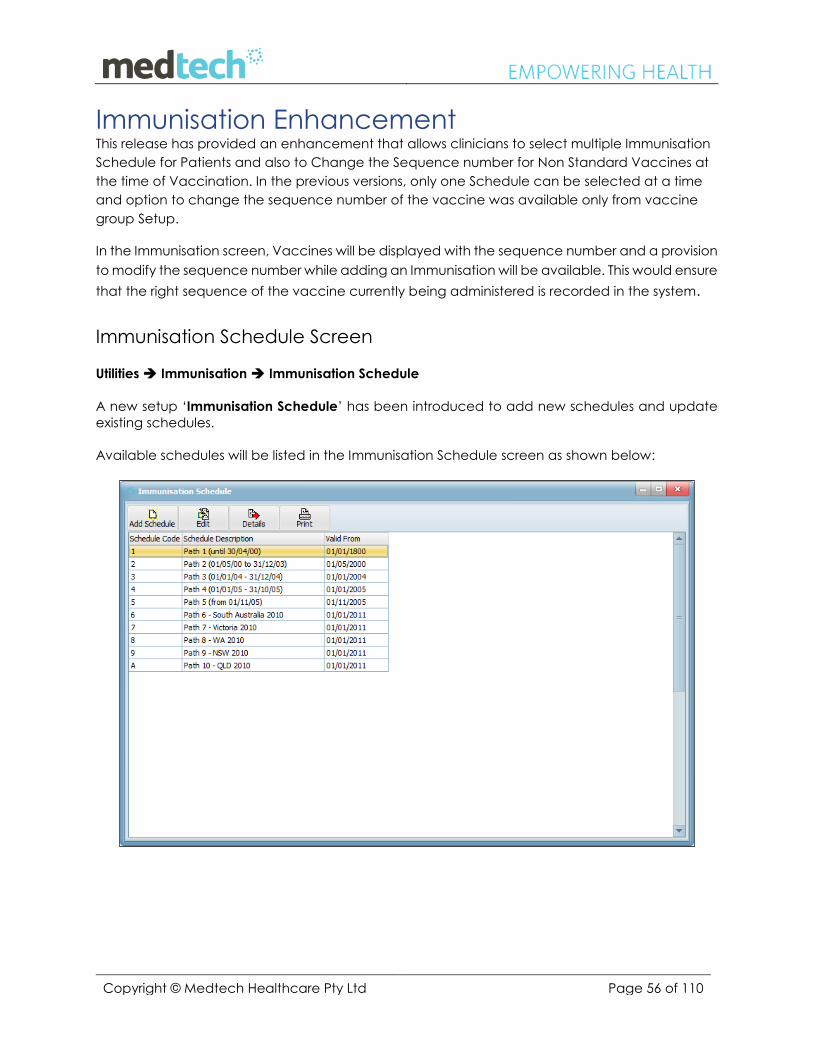
Immunisation Schedule Screen Utilities Immunisation Immunisation Schedule
A new setup ‘Immunisation Schedule’ has been introduced to add new schedules and update
existing schedules.
Available schedules will be listed in the Immunisation Schedule screen as shown below:
Copyright © Medtech Healthcare Pty Ltd Page 57 of 110
NOTE: A clinician can add maximum of 34 schedules in the ‘Immunisation Schedule’ screen
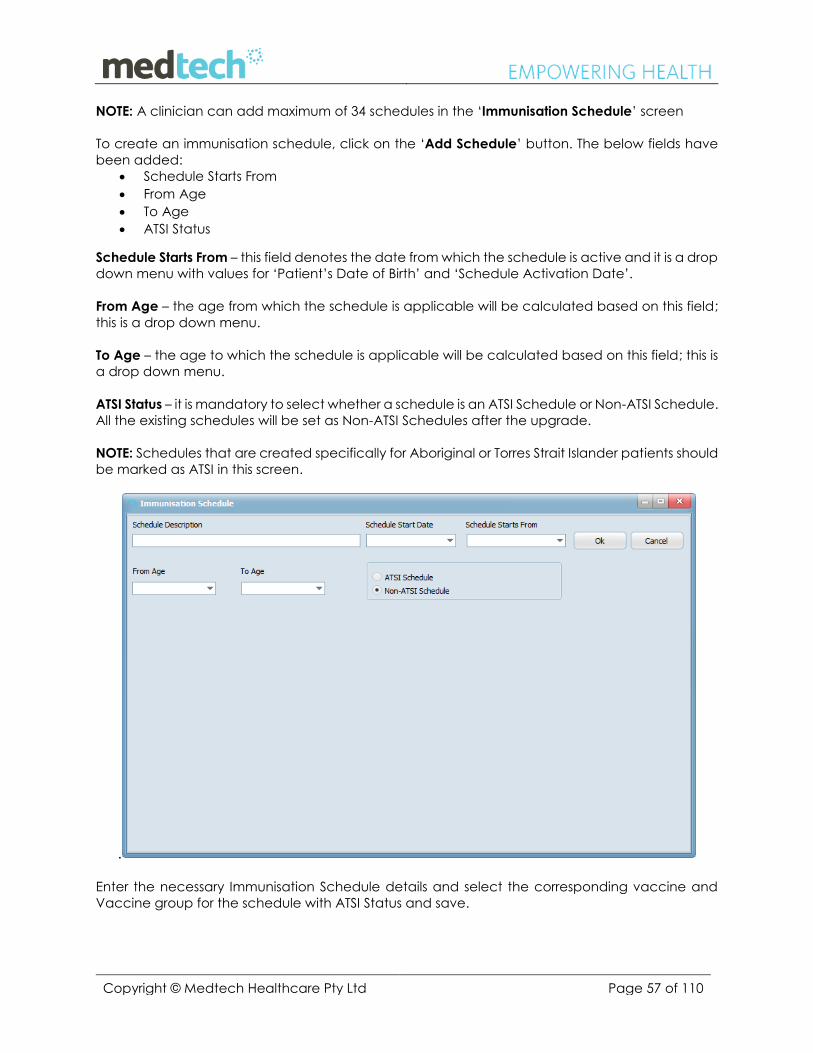
To create an immunisation schedule, click on the ‘Add Schedule’ button. The below fields have
been added:
Schedule Starts From
From Age
To Age
ATSI Status
Schedule Starts From – this field denotes the date from which the schedule is active and it is a drop
down menu with values for ‘Patient’s Date of Birth’ and ‘Schedule Activation Date’.
From Age – the age from which the schedule is applicable will be calculated based on this field;
this is a drop down menu.
To Age – the age to which the schedule is applicable will be calculated based on this field; this is
a drop down menu.
ATSI Status – it is mandatory to select whether a schedule is an ATSI Schedule or Non-ATSI Schedule.
All the existing schedules will be set as Non-ATSI Schedules after the upgrade.
NOTE: Schedules that are created specifically for Aboriginal or Torres Strait Islander patients should
be marked as ATSI in this screen.
.
Enter the necessary Immunisation Schedule details and select the corresponding vaccine and
Vaccine group for the schedule with ATSI Status and save.
Copyright © Medtech Healthcare Pty Ltd Page 58 of 110
Immunisation Status Screen
Schedule Selection tab
Module Immunisations
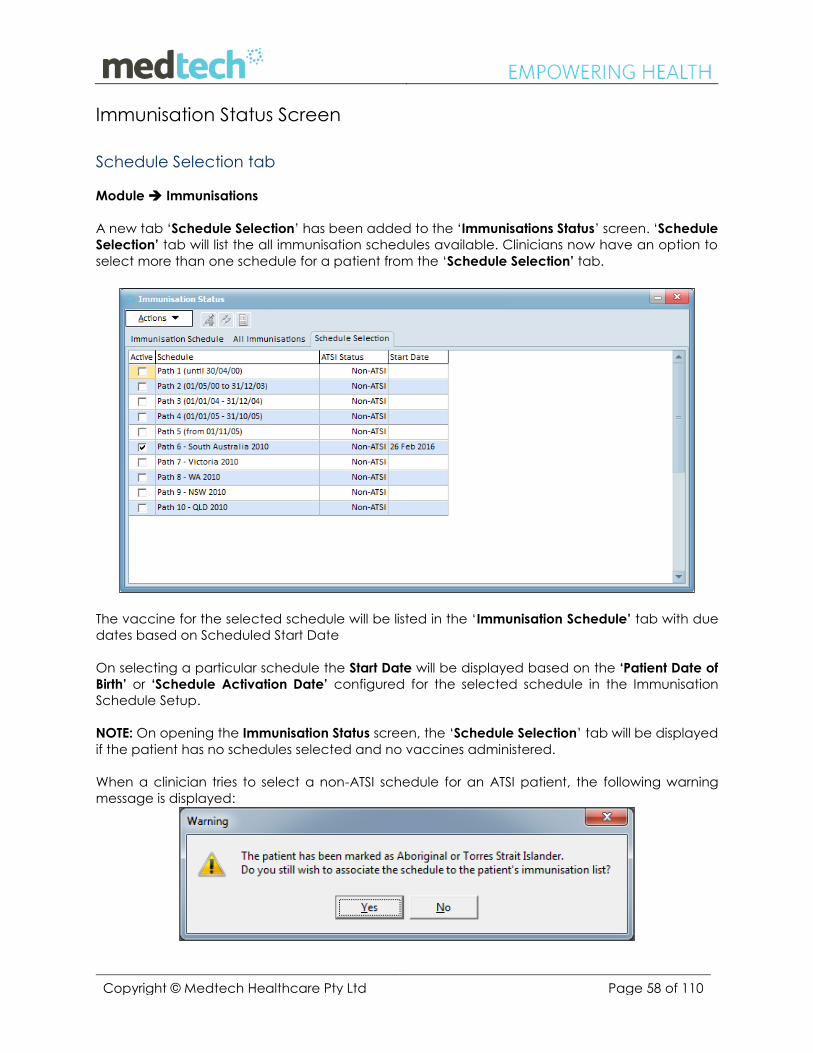
A new tab ‘Schedule Selection’ has been added to the ‘Immunisations Status’ screen. ‘Schedule
Selection’ tab will list the all immunisation schedules available. Clinicians now have an option to
select more than one schedule for a patient from the ‘Schedule Selection’ tab.
The vaccine for the selected schedule will be listed in the ‘Immunisation Schedule’ tab with due
dates based on Scheduled Start Date
On selecting a particular schedule the Start Date will be displayed based on the ‘Patient Date of
Birth’ or ‘Schedule Activation Date’ configured for the selected schedule in the Immunisation
Schedule Setup.
NOTE: On opening the Immunisation Status screen, the ‘Schedule Selection’ tab will be displayed
if the patient has no schedules selected and no vaccines administered.
When a clinician tries to select a non-ATSI schedule for an ATSI patient, the following warning
message is displayed:
Copyright © Medtech Healthcare Pty Ltd Page 59 of 110
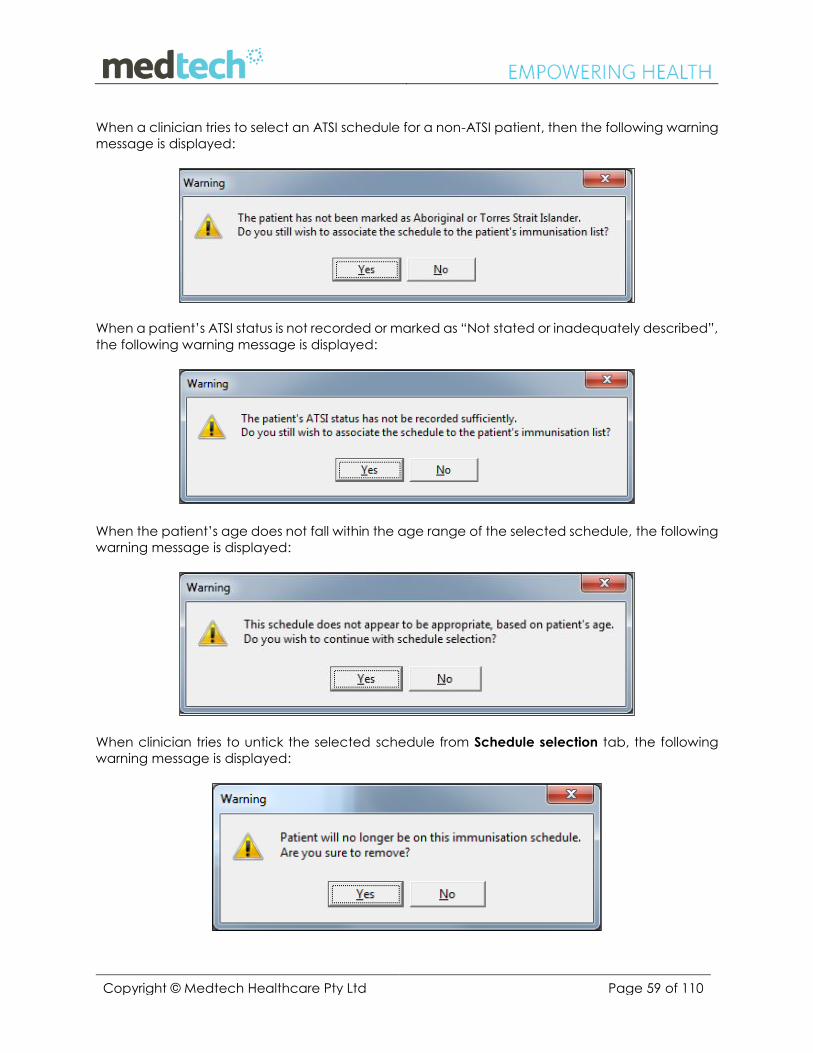
When a clinician tries to select an ATSI schedule for a non-ATSI patient, then the following warning
message is displayed:
When a patient’s ATSI status is not recorded or marked as “Not stated or inadequately described”,
the following warning message is displayed:
When the patient’s age does not fall within the age range of the selected schedule, the following
warning message is displayed:
When clinician tries to untick the selected schedule from Schedule selection tab, the following
warning message is displayed:
Copyright © Medtech Healthcare Pty Ltd Page 60 of 110
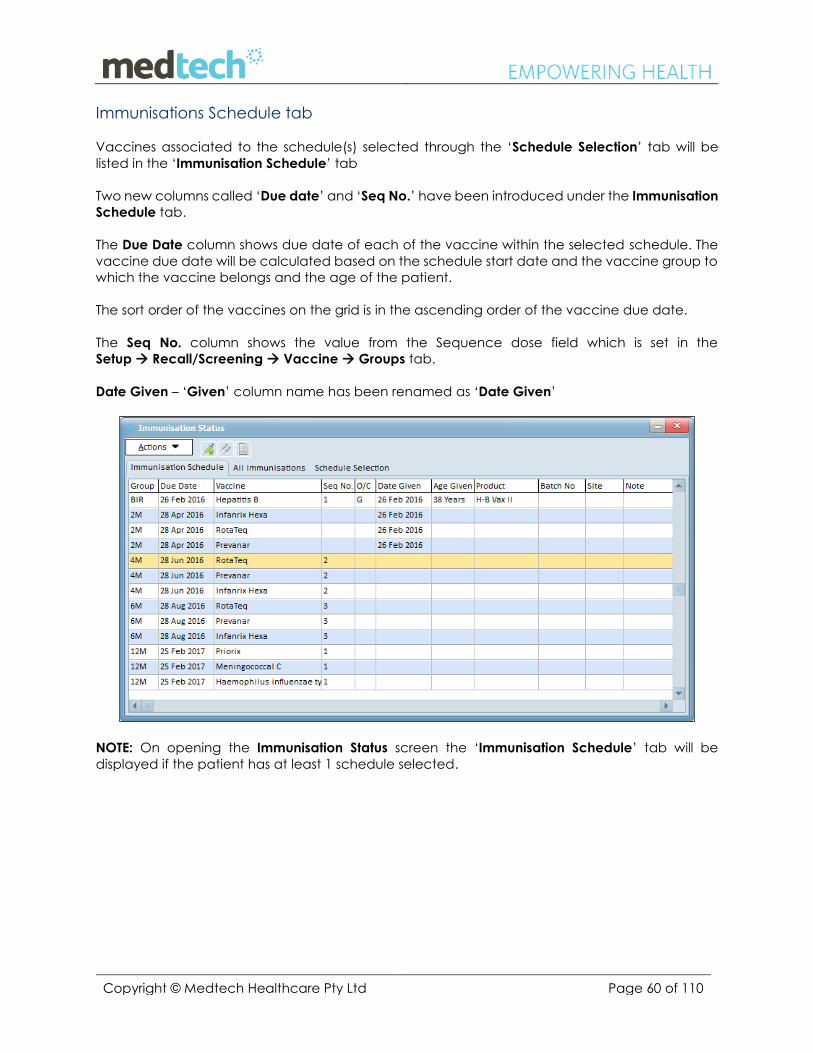
Immunisations Schedule tab
Vaccines associated to the schedule(s) selected through the ‘Schedule Selection’ tab will be
listed in the ‘Immunisation Schedule’ tab
Two new columns called ‘Due date’ and ‘Seq No.’ have been introduced under the Immunisation
Schedule tab.
The Due Date column shows due date of each of the vaccine within the selected schedule. The
vaccine due date will be calculated based on the schedule start date and the vaccine group to
which the vaccine belongs and the age of the patient.
The sort order of the vaccines on the grid is in the ascending order of the vaccine due date.
The Seq No. column shows the value from the Sequence dose field which is set in the
Setup Recall/Screening Vaccine Groups tab.
Date Given – ‘Given’ column name has been renamed as ‘Date Given’
NOTE: On opening the Immunisation Status screen the ‘Immunisation Schedule’ tab will be
displayed if the patient has at least 1 schedule selected.
Copyright © Medtech Healthcare Pty Ltd Page 61 of 110
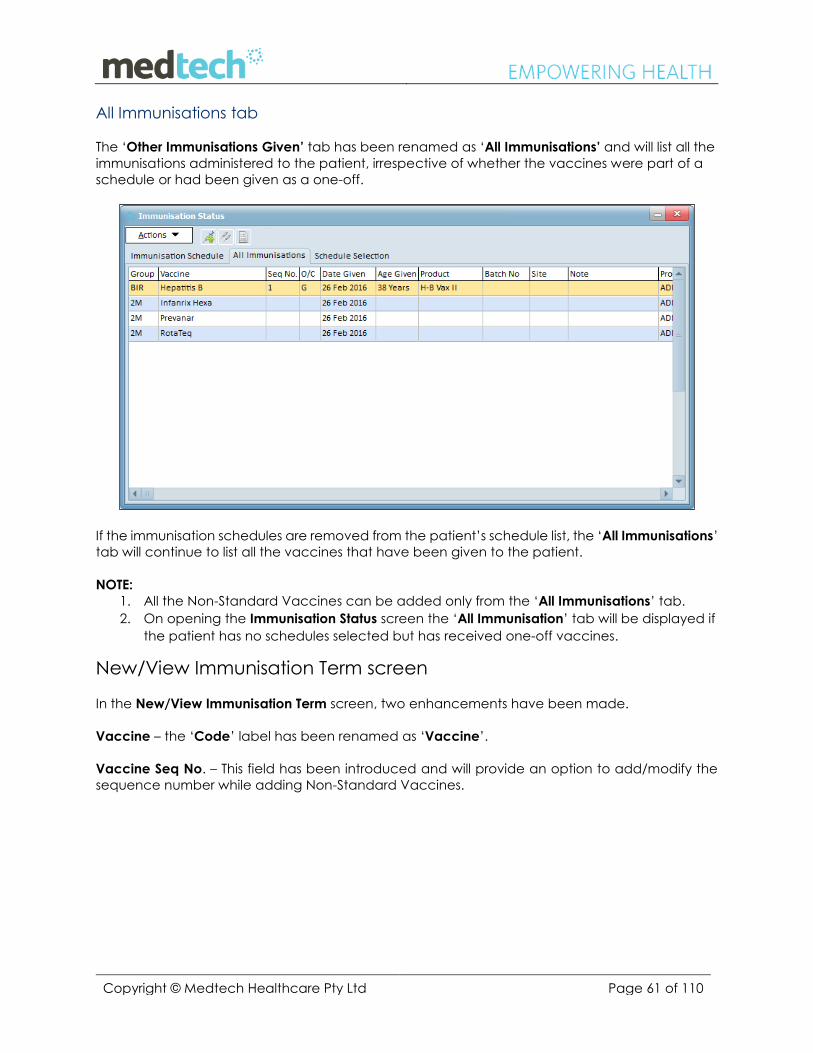
All Immunisations tab
The ‘Other Immunisations Given’ tab has been renamed as ‘All Immunisations’ and will list all the
immunisations administered to the patient, irrespective of whether the vaccines were part of a
schedule or had been given as a one-off.
If the immunisation schedules are removed from the patient’s schedule list, the ‘All Immunisations’
tab will continue to list all the vaccines that have been given to the patient.
NOTE:
1. All the Non-Standard Vaccines can be added only from the ‘All Immunisations’ tab.
2. On opening the Immunisation Status screen the ‘All Immunisation’ tab will be displayed if
the patient has no schedules selected but has received one-off vaccines.
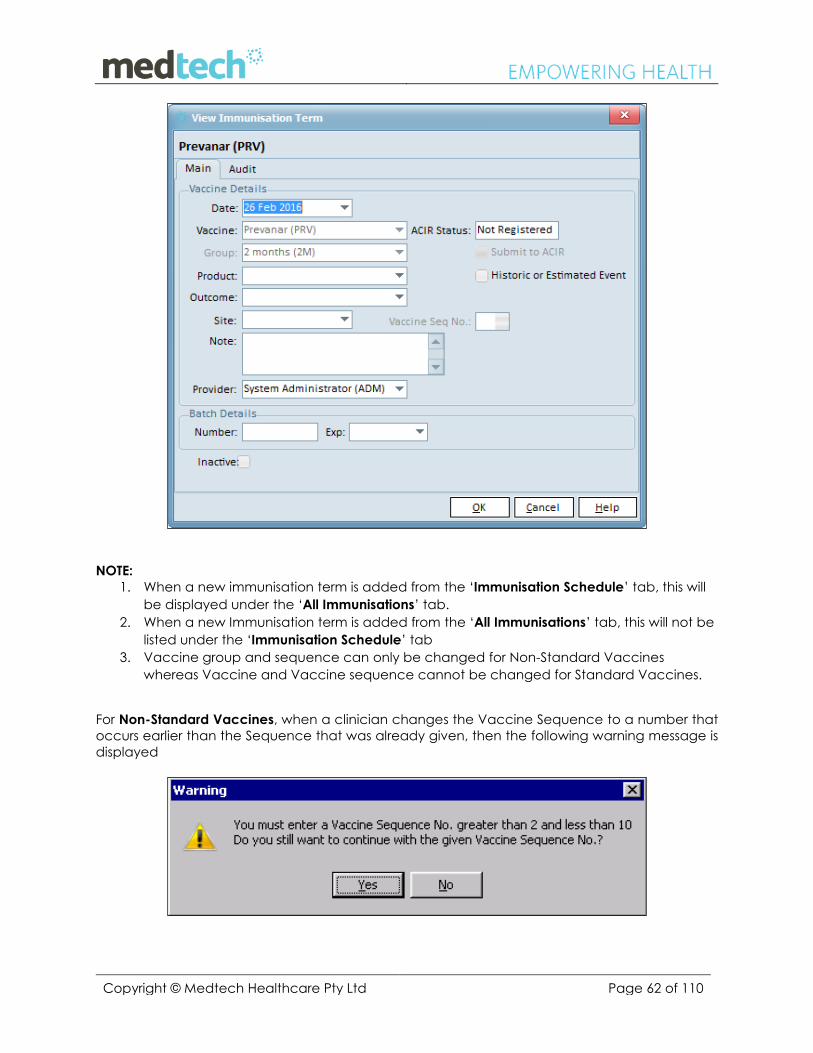
New/View Immunisation Term screen
In the New/View Immunisation Term screen, two enhancements have been made.
Vaccine – the ‘Code’ label has been renamed as ‘Vaccine’.
Vaccine Seq No. – This field has been introduced and will provide an option to add/modify the
sequence number while adding Non-Standard Vaccines.
Copyright © Medtech Healthcare Pty Ltd Page 62 of 110
NOTE:
1. When a new immunisation term is added from the ‘Immunisation Schedule’ tab, this will
be displayed under the ‘All Immunisations’ tab.
2. When a new Immunisation term is added from the ‘All Immunisations’ tab, this will not be
listed under the ‘Immunisation Schedule’ tab
3. Vaccine group and sequence can only be changed for Non-Standard Vaccines
whereas Vaccine and Vaccine sequence cannot be changed for Standard Vaccines.
For Non-Standard Vaccines, when a clinician changes the Vaccine Sequence to a number that
occurs earlier than the Sequence that was already given, then the following warning message is
displayed
Copyright © Medtech Healthcare Pty Ltd Page 63 of 110
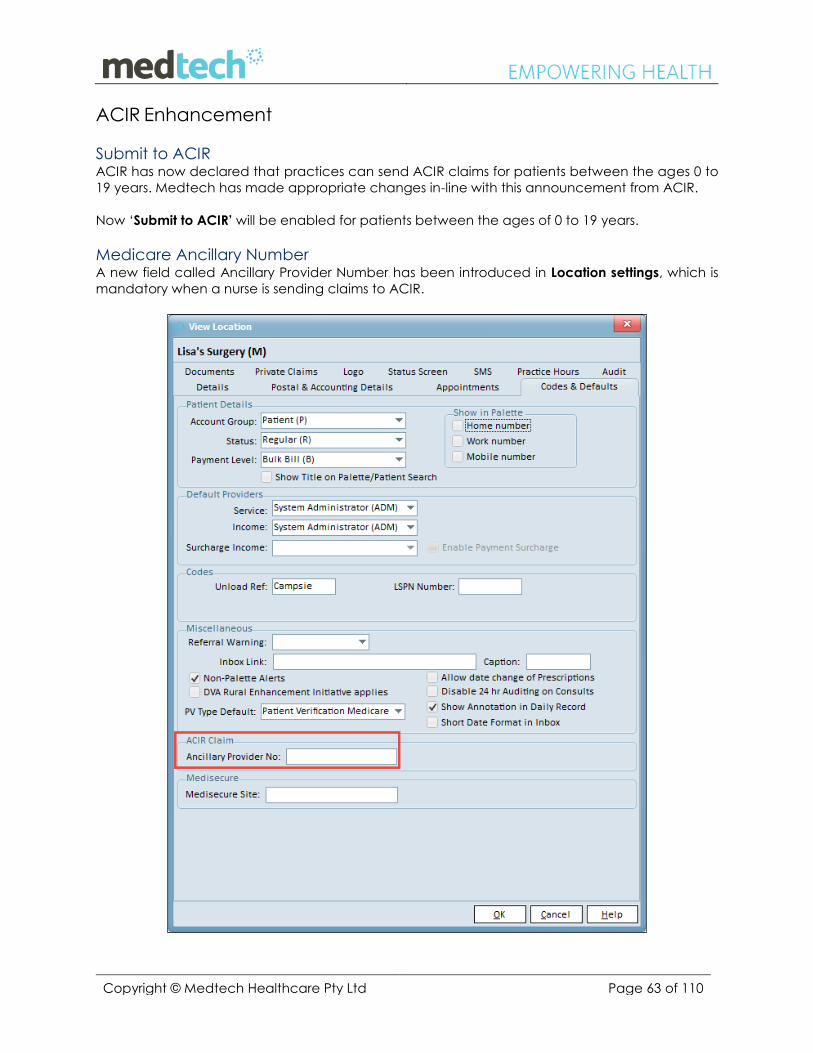
ACIR Enhancement
Submit to ACIR ACIR has now declared that practices can send ACIR claims for patients between the ages 0 to
19 years. Medtech has made appropriate changes in-line with this announcement from ACIR.
Now ‘Submit to ACIR’ will be enabled for patients between the ages of 0 to 19 years.
Medicare Ancillary Number A new field called Ancillary Provider Number has been introduced in Location settings, which is
mandatory when a nurse is sending claims to ACIR.

Copyright © Medtech Healthcare Pty Ltd Page 64 of 110
NOTE: When a nurse or provider tries to send an ACIR claim without a Provider No. or Ancillary
Provider No., then the warning given below will be displayed:
Copyright © Medtech Healthcare Pty Ltd Page 65 of 110
General Enhancements
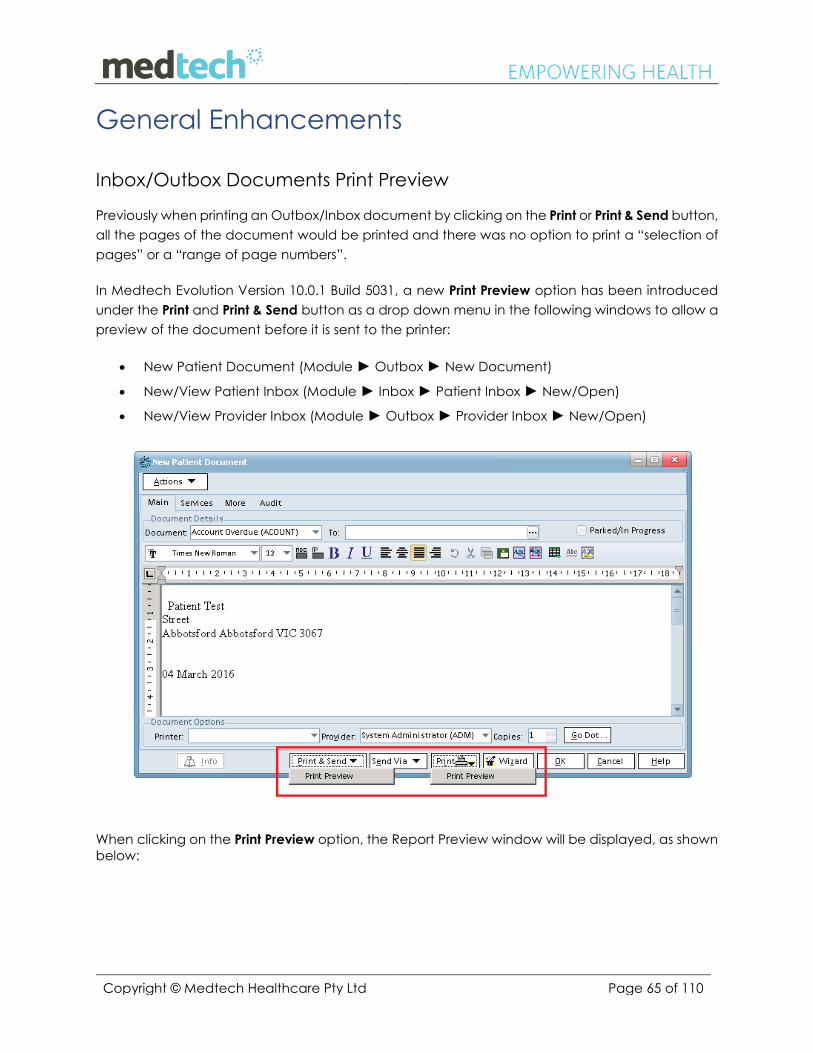
Inbox/Outbox Documents Print Preview
Previously when printing an Outbox/Inbox document by clicking on the Print or Print & Send button,
all the pages of the document would be printed and there was no option to print a “selection of
pages” or a “range of page numbers”.
In Medtech Evolution Version 10.0.1 Build 5031, a new Print Preview option has been introduced
under the Print and Print & Send button as a drop down menu in the following windows to allow a
preview of the document before it is sent to the printer:
New Patient Document (Module ► Outbox ► New Document)
New/View Patient Inbox (Module ► Inbox ► Patient Inbox ► New/Open)
New/View Provider Inbox (Module ► Outbox ► Provider Inbox ► New/Open)
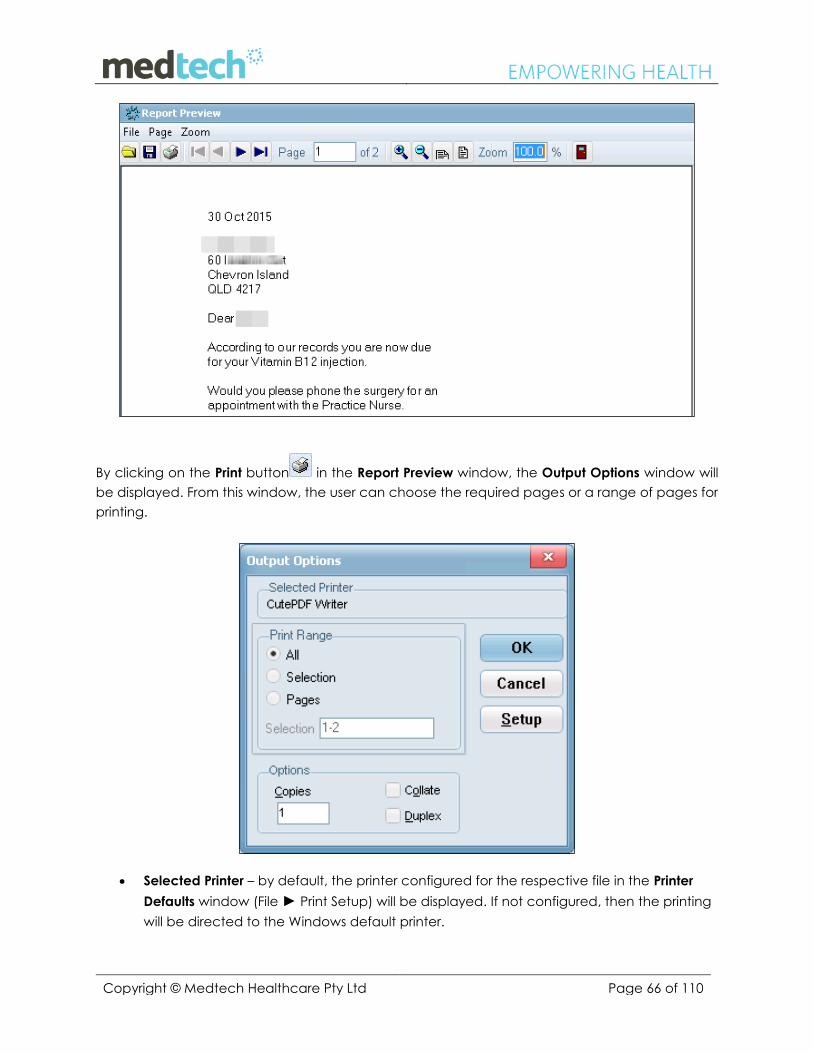
When clicking on the Print Preview option, the Report Preview window will be displayed, as shown
below:
Copyright © Medtech Healthcare Pty Ltd Page 66 of 110
By clicking on the Print button in the Report Preview window, the Output Options window will
be displayed. From this window, the user can choose the required pages or a range of pages for
printing.
Selected Printer – by default, the printer configured for the respective file in the Printer
Defaults window (File ► Print Setup) will be displayed. If not configured, then the printing
will be directed to the Windows default printer.
Copyright © Medtech Healthcare Pty Ltd Page 67 of 110
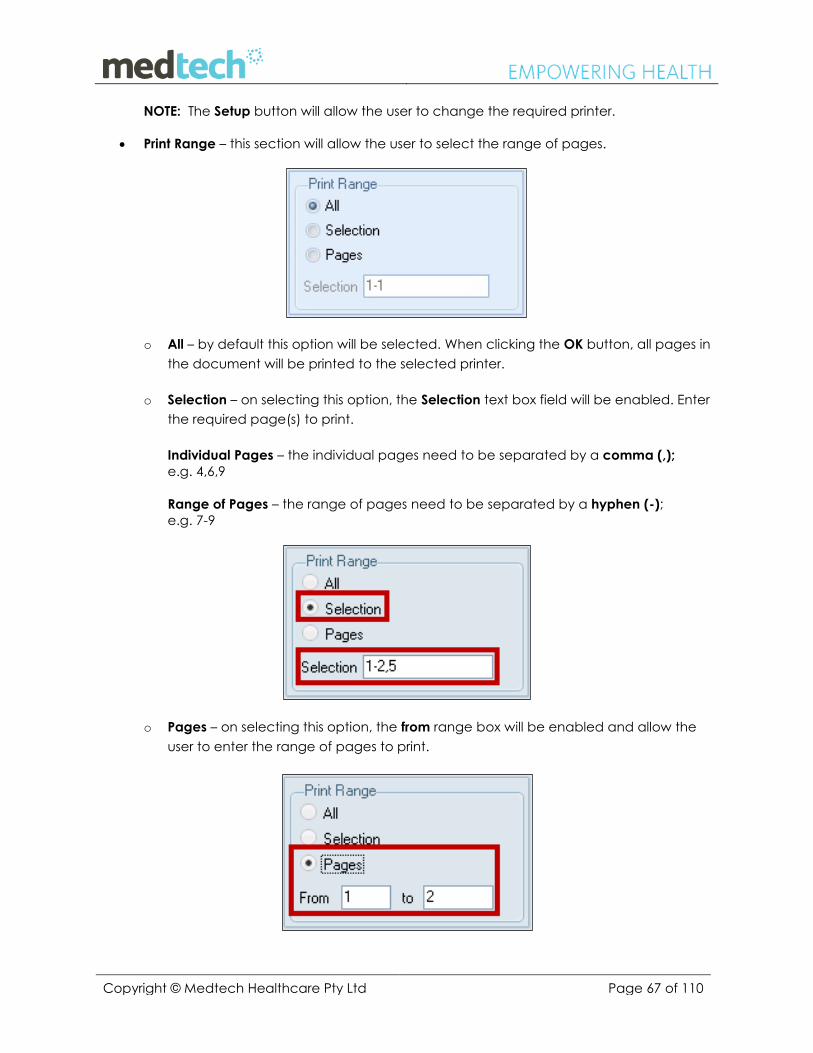
NOTE: The Setup button will allow the user to change the required printer.
Print Range – this section will allow the user to select the range of pages.
o All – by default this option will be selected. When clicking the OK button, all pages in
the document will be printed to the selected printer.
o Selection – on selecting this option, the Selection text box field will be enabled. Enter
the required page(s) to print.
Individual Pages – the individual pages need to be separated by a comma (,);
e.g. 4,6,9
Range of Pages – the range of pages need to be separated by a hyphen (-);
e.g. 7-9
o Pages – on selecting this option, the from range box will be enabled and allow the
user to enter the range of pages to print.
Copyright © Medtech Healthcare Pty Ltd Page 68 of 110
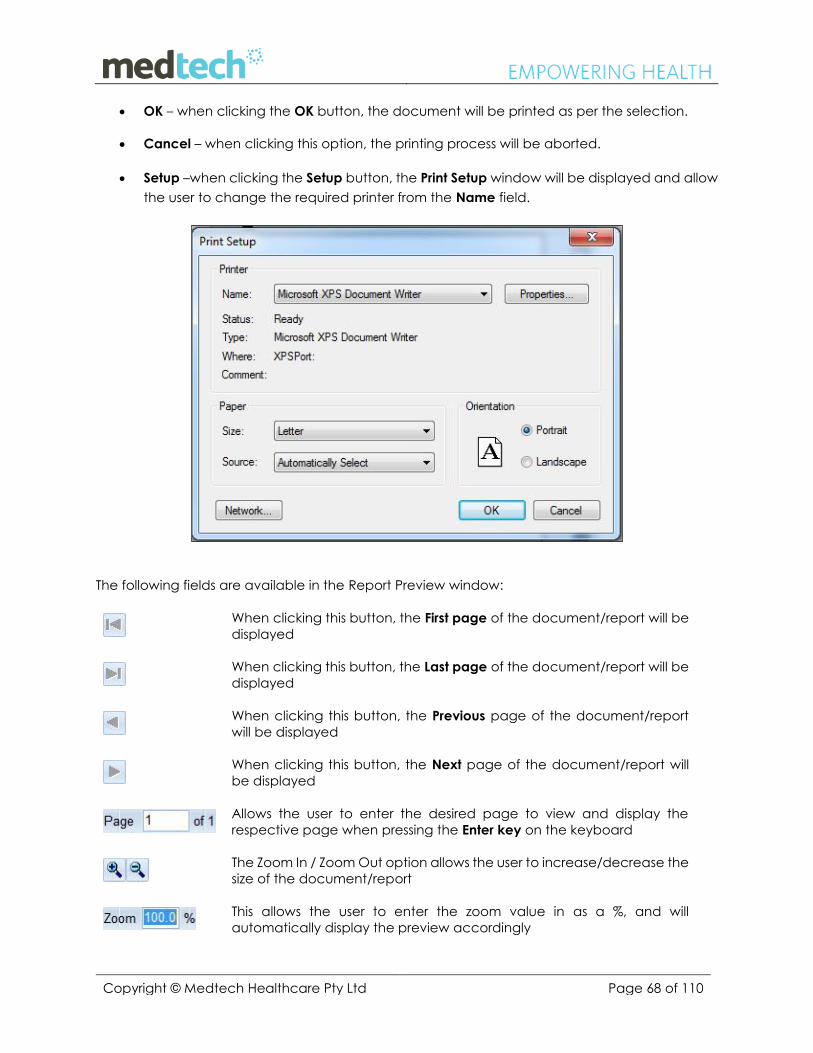
OK – when clicking the OK button, the document will be printed as per the selection.
Cancel – when clicking this option, the printing process will be aborted.
Setup –when clicking the Setup button, the Print Setup window will be displayed and allow
the user to change the required printer from the Name field.
The following fields are available in the Report Preview window:
When clicking this button, the First page of the document/report will be
displayed
When clicking this button, the Last page of the document/report will be
displayed
When clicking this button, the Previous page of the document/report
will be displayed
When clicking this button, the Next page of the document/report will
be displayed
Allows the user to enter the desired page to view and display the
respective page when pressing the Enter key on the keyboard
The Zoom In / Zoom Out option allows the user to increase/decrease the
size of the document/report
This allows the user to enter the zoom value in as a %, and will
automatically display the preview accordingly
Copyright © Medtech Healthcare Pty Ltd Page 69 of 110
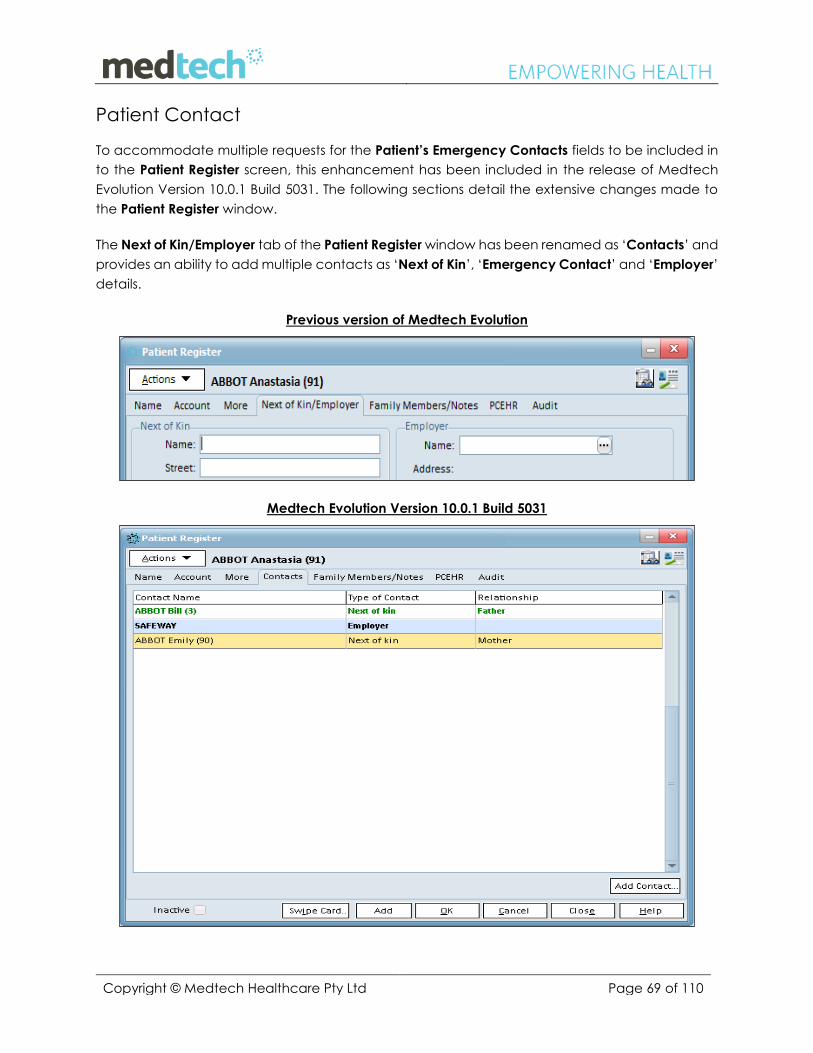
Patient Contact
To accommodate multiple requests for the Patient’s Emergency Contacts fields to be included in
to the Patient Register screen, this enhancement has been included in the release of Medtech
Evolution Version 10.0.1 Build 5031. The following sections detail the extensive changes made to
the Patient Register window.
The Next of Kin/Employer tab of the Patient Register window has been renamed as ‘Contacts’ and
provides an ability to add multiple contacts as ‘Next of Kin’, ‘Emergency Contact’ and ‘Employer’
details.
Previous version of Medtech Evolution
Medtech Evolution Version 10.0.1 Build 5031
Copyright © Medtech Healthcare Pty Ltd Page 70 of 110
The consolidated grid view lists all the available contact types for the patient – Next of Kin,
Emergency contact, Employer contact as well as a Default contact. The user can also set a
default contact each for Next of Kin, as well as for the Employer.
Contact Name – Name of the added contact. Applicable colour coding represents:
o Green – Emergency contact
o Green + Bold – Emergency contact; also the default contact
o Black – Next of Kin/ Employer
o Black + Bold – Next of Kin/Employer; also the default contact
Type of Contact – Types of contact; e.g. Next of Kin, Employer
Relationship – Relationship of the person with the patient. For example, for Next of Kin, it
could be Father, Family Friend. For an Employer the column will remain blank.
Add Contact – Add a new Next of Kin/ Emergency/Employer contact for the patient.
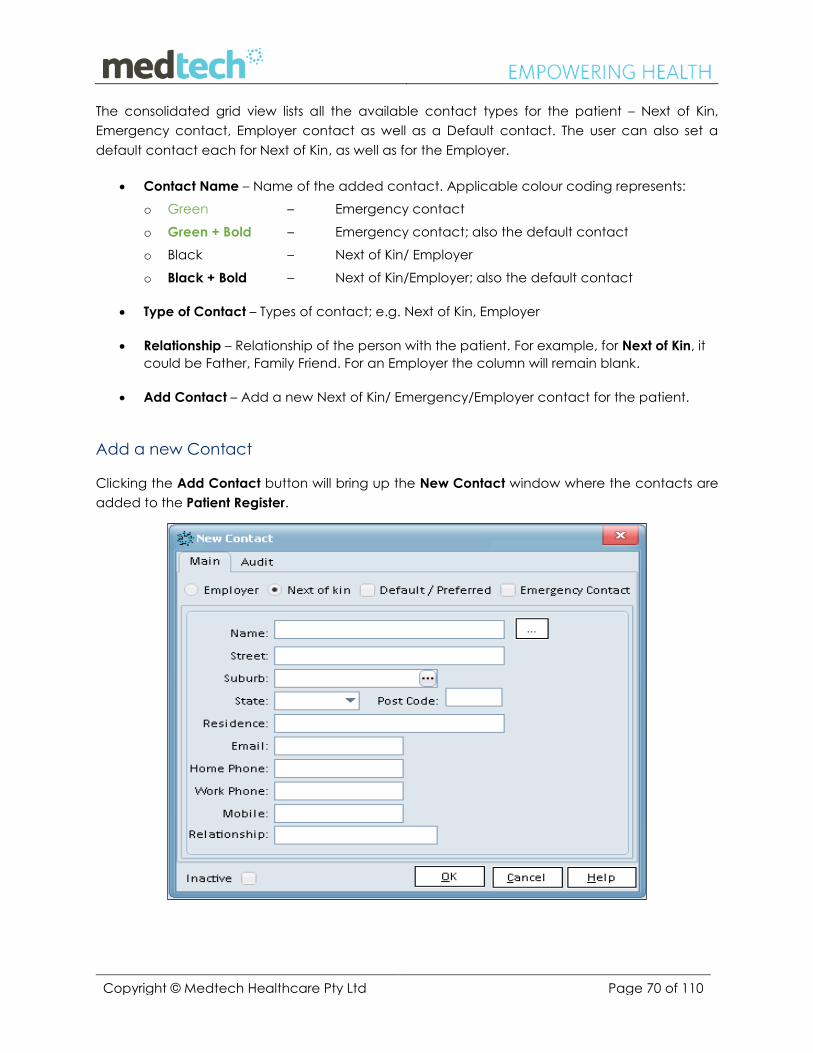
Add a new Contact
Clicking the Add Contact button will bring up the New Contact window where the contacts are
added to the Patient Register.
Copyright © Medtech Healthcare Pty Ltd Page 71 of 110
Based on the selection of the Contact Type (Employer or Next of Kin), the fields in the New Contact
window will vary.
Employer – Select Employer for adding a new Employer contact. An employer could also
be set as default contact type by selecting the Default/Preferred checkbox.
Next of Kin – Select the Next of Kin to add a new Next of Kin contact for the patient.
Default/Preferred Contact – Select this option if the particular contact type has to be set
as preferred contact type.
NOTE: If the patient previously had no Next of Kin (NOK) or Employer details, then when
adding a new NOK or Employer details, the ‘Default/Preferred Contact’ checkbox option
will be selected by default.
Emergency contact – A Next of Kin or Employer contact could be set as the Emergency
contact for the patient. Tick this checkbox if the particular contact has to be marked as
Emergency contact.
The following fields will be available for the Contact Type – Next of Kin:
Name – Type in the name of the NOK. Click on the ellipsis button to search for and to add
an existing patient as NOK. If an existing patient is chosen as NOK, all the other fields would
automatically be filled in as available.
Street – NOK’s street address; e.g. 123 George Street.
Suburb – The suburb where the NOK resides. If unsure of the spelling, enter part of the word
and press the tab key or click the ellipsis button. The Find Suburb window will be displayed
allowing the correct suburb to be chosen from the list (highlight the correct suburb and
click on the OK or press the Enter key).
State – The state will default automatically after the suburb has been selected. This can be
updated manually if required.
Post Code – The postcode will default after the suburb has been selected. This can be
updated manually if required.
Residence – Information entered in this field will appear between the NOK’s Name and
Street in address details printed on documents.
E-mail – The NOK’s E-mail address.
Home Phone – The NOK’s home phone number.
Work Phone – The NOK’s work phone number.
Mobile – The NOK’s mobile number
NOTE: A warning message will appear if the user doesn’t enter the minimum of at least one
contact number, and will advise the user that ‘You must select at least one contact
number’.
Relationship – The NOK’s relationship to the patient.
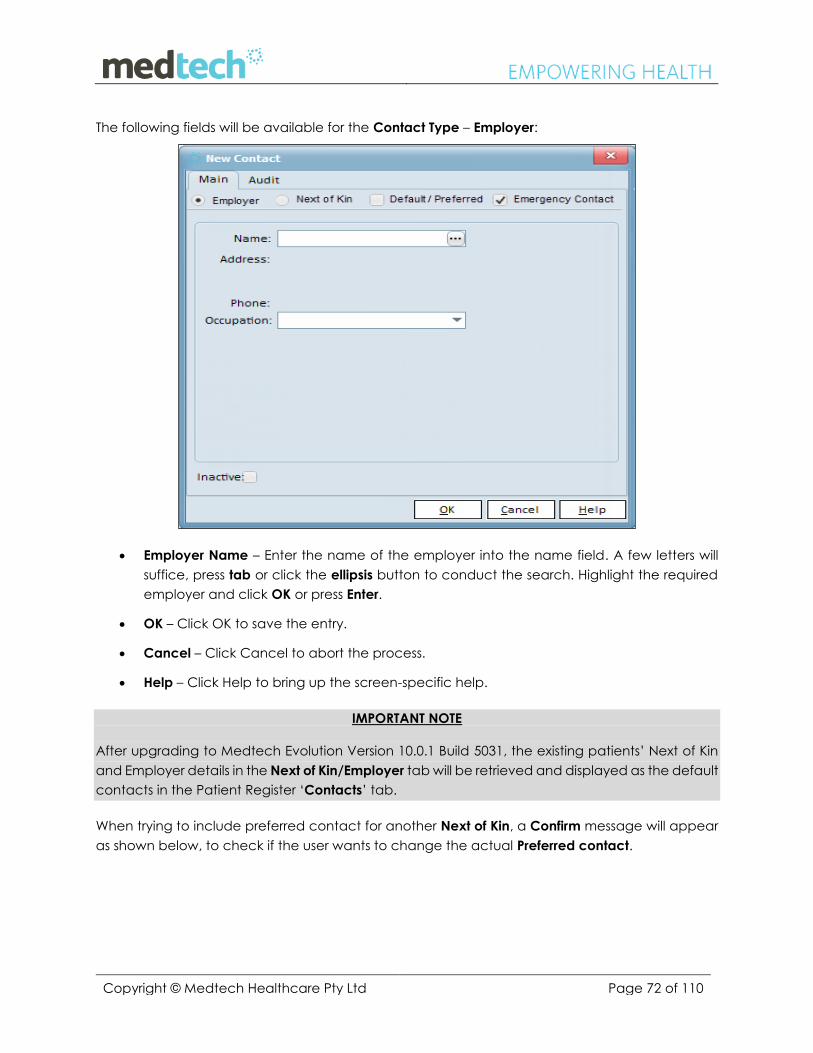
Copyright © Medtech Healthcare Pty Ltd Page 72 of 110
The following fields will be available for the Contact Type – Employer:
Employer Name – Enter the name of the employer into the name field. A few letters will
suffice, press tab or click the ellipsis button to conduct the search. Highlight the required
employer and click OK or press Enter.
OK – Click OK to save the entry.
Cancel – Click Cancel to abort the process.
Help – Click Help to bring up the screen-specific help.
IMPORTANT NOTE
After upgrading to Medtech Evolution Version 10.0.1 Build 5031, the existing patients’ Next of Kin
and Employer details in the Next of Kin/Employer tab will be retrieved and displayed as the default
contacts in the Patient Register ‘Contacts’ tab.
When trying to include preferred contact for another Next of Kin, a Confirm message will appear
as shown below, to check if the user wants to change the actual Preferred contact.
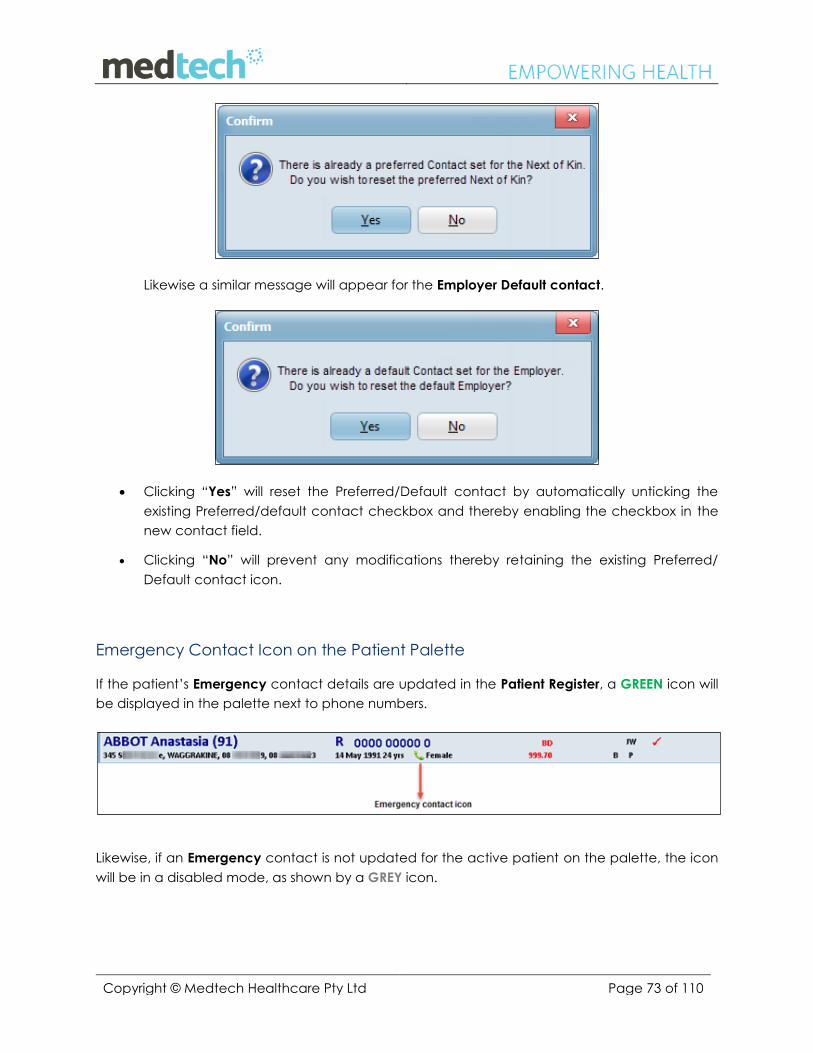
Copyright © Medtech Healthcare Pty Ltd Page 73 of 110
Likewise a similar message will appear for the Employer Default contact.
Clicking “Yes” will reset the Preferred/Default contact by automatically unticking the
existing Preferred/default contact checkbox and thereby enabling the checkbox in the
new contact field.
Clicking “No” will prevent any modifications thereby retaining the existing Preferred/
Default contact icon.
Emergency Contact Icon on the Patient Palette
If the patient’s Emergency contact details are updated in the Patient Register, a GREEN icon will
be displayed in the palette next to phone numbers.
Likewise, if an Emergency contact is not updated for the active patient on the palette, the icon
will be in a disabled mode, as shown by a GREY icon.
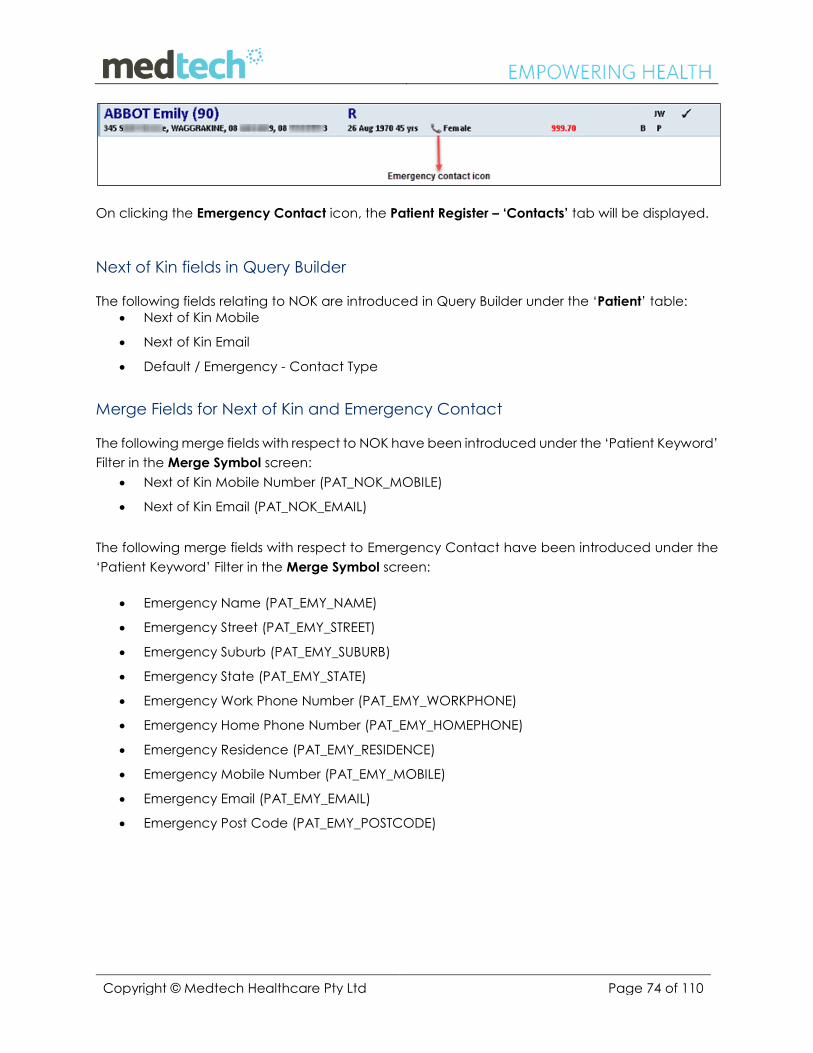
Copyright © Medtech Healthcare Pty Ltd Page 74 of 110
On clicking the Emergency Contact icon, the Patient Register – ‘Contacts’ tab will be displayed.
Next of Kin fields in Query Builder
The following fields relating to NOK are introduced in Query Builder under the ‘Patient’ table:
Next of Kin Mobile
Next of Kin Email
Default / Emergency - Contact Type
Merge Fields for Next of Kin and Emergency Contact
The following merge fields with respect to NOK have been introduced under the ‘Patient Keyword’
Filter in the Merge Symbol screen:
Next of Kin Mobile Number (PAT_NOK_MOBILE)
Next of Kin Email (PAT_NOK_EMAIL)
The following merge fields with respect to Emergency Contact have been introduced under the
‘Patient Keyword’ Filter in the Merge Symbol screen:
Emergency Name (PAT_EMY_NAME)
Emergency Street (PAT_EMY_STREET)
Emergency Suburb (PAT_EMY_SUBURB)
Emergency State (PAT_EMY_STATE)
Emergency Work Phone Number (PAT_EMY_WORKPHONE)
Emergency Home Phone Number (PAT_EMY_HOMEPHONE)
Emergency Residence (PAT_EMY_RESIDENCE)
Emergency Mobile Number (PAT_EMY_MOBILE)
Emergency Email (PAT_EMY_EMAIL)
Emergency Post Code (PAT_EMY_POSTCODE)
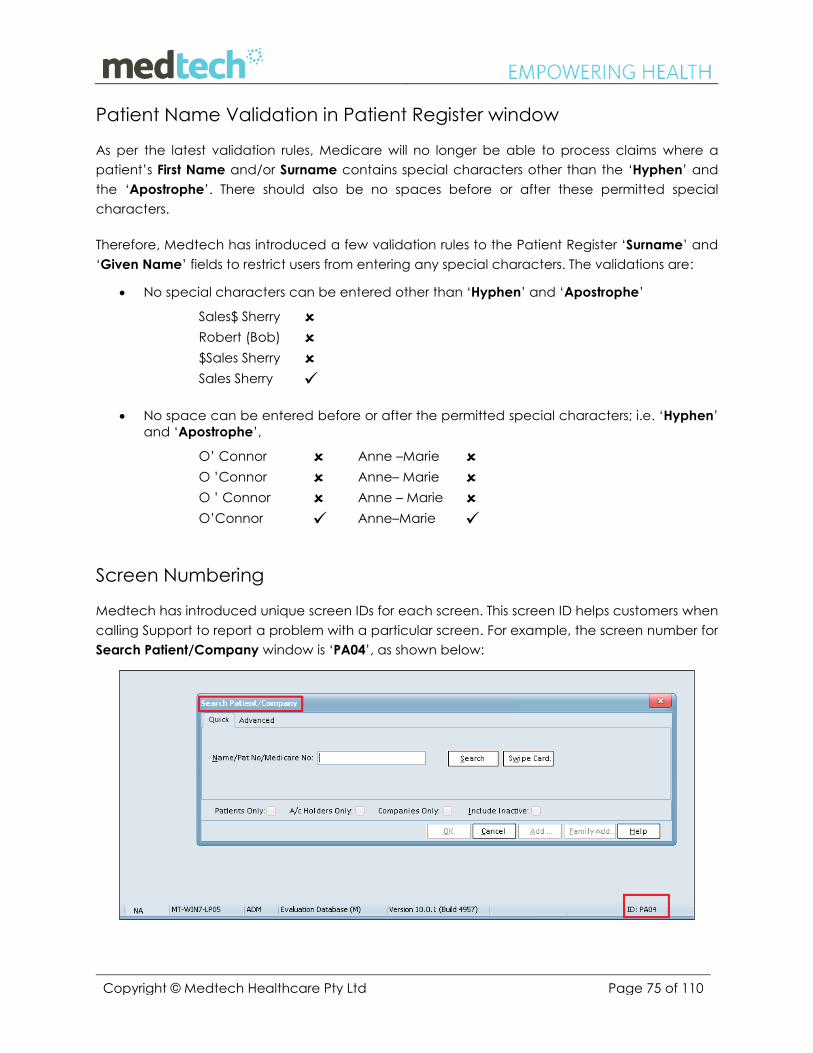
Copyright © Medtech Healthcare Pty Ltd Page 75 of 110
Patient Name Validation in Patient Register window
As per the latest validation rules, Medicare will no longer be able to process claims where a
patient’s First Name and/or Surname contains special characters other than the ‘Hyphen’ and
the ‘Apostrophe’. There should also be no spaces before or after these permitted special
characters.
Therefore, Medtech has introduced a few validation rules to the Patient Register ‘Surname’ and
‘Given Name’ fields to restrict users from entering any special characters. The validations are:
No special characters can be entered other than ‘Hyphen’ and ‘Apostrophe’
Sales$ Sherry Robert (Bob) $Sales Sherry Sales Sherry
No space can be entered before or after the permitted special characters; i.e. ‘Hyphen’
and ‘Apostrophe’,
O’ Connor Anne –Marie O ’Connor Anne– Marie O ’ Connor Anne – Marie O’Connor Anne–Marie
Screen Numbering
Medtech has introduced unique screen IDs for each screen. This screen ID helps customers when
calling Support to report a problem with a particular screen. For example, the screen number for
Search Patient/Company window is ‘PA04’, as shown below:
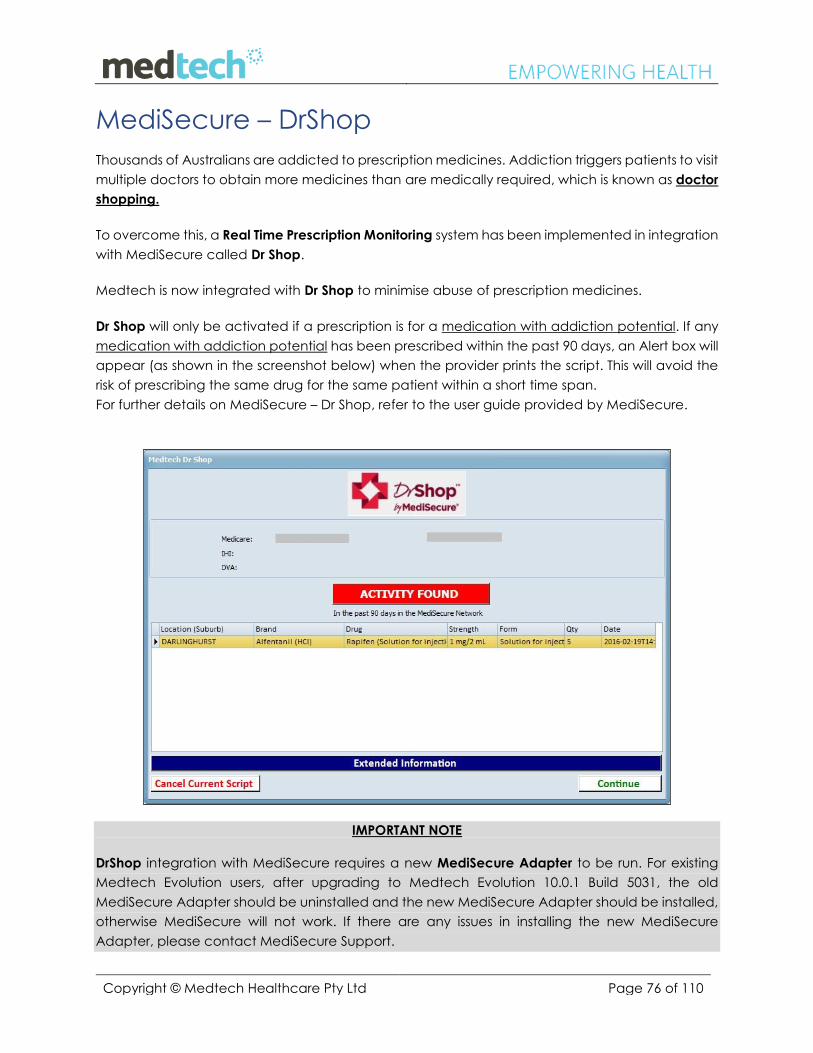
Copyright © Medtech Healthcare Pty Ltd Page 76 of 110
MediSecure – DrShop
Thousands of Australians are addicted to prescription medicines. Addiction triggers patients to visit
multiple doctors to obtain more medicines than are medically required, which is known as doctor
shopping.
To overcome this, a Real Time Prescription Monitoring system has been implemented in integration
with MediSecure called Dr Shop.
Medtech is now integrated with Dr Shop to minimise abuse of prescription medicines.
Dr Shop will only be activated if a prescription is for a medication with addiction potential. If any
medication with addiction potential has been prescribed within the past 90 days, an Alert box will
appear (as shown in the screenshot below) when the provider prints the script. This will avoid the
risk of prescribing the same drug for the same patient within a short time span.
For further details on MediSecure – Dr Shop, refer to the user guide provided by MediSecure.
IMPORTANT NOTE
DrShop integration with MediSecure requires a new MediSecure Adapter to be run. For existing
Medtech Evolution users, after upgrading to Medtech Evolution 10.0.1 Build 5031, the old
MediSecure Adapter should be uninstalled and the new MediSecure Adapter should be installed,
otherwise MediSecure will not work. If there are any issues in installing the new MediSecure
Adapter, please contact MediSecure Support.
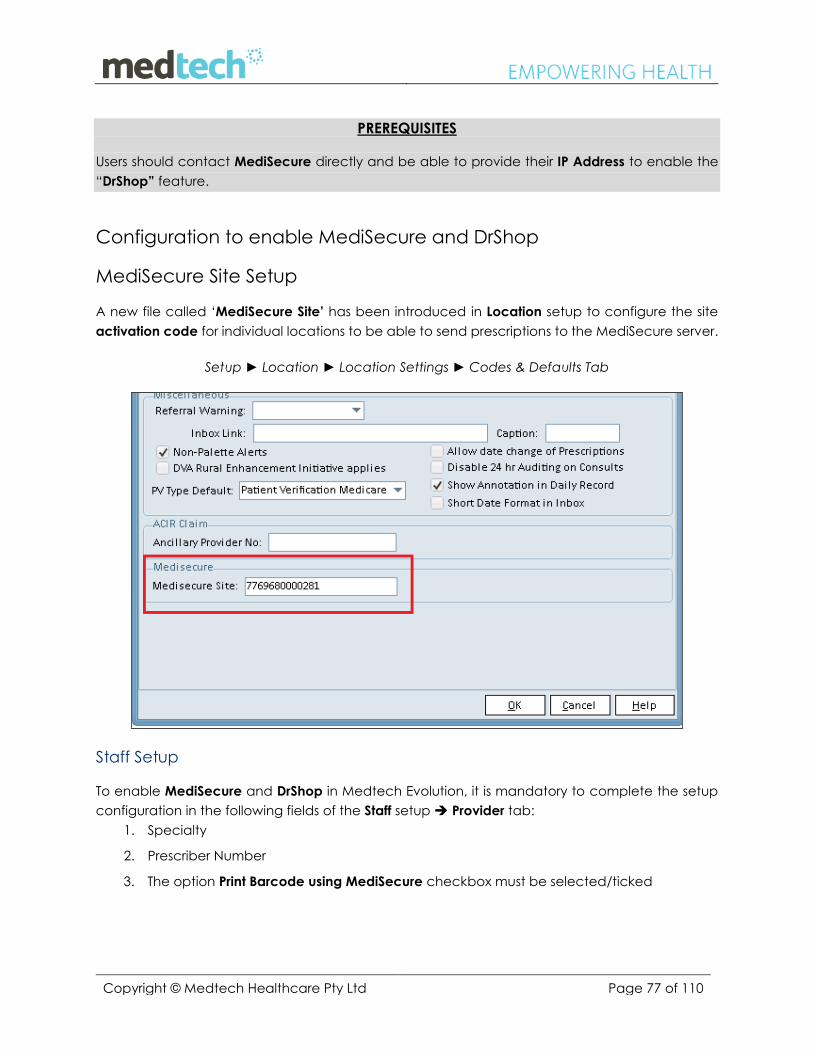
Copyright © Medtech Healthcare Pty Ltd Page 77 of 110
PREREQUISITES
Users should contact MediSecure directly and be able to provide their IP Address to enable the
“DrShop” feature.
Configuration to enable MediSecure and DrShop
MediSecure Site Setup
A new file called ‘MediSecure Site’ has been introduced in Location setup to configure the site
activation code for individual locations to be able to send prescriptions to the MediSecure server.
Setup ► Location ► Location Settings ► Codes & Defaults Tab
Staff Setup
To enable MediSecure and DrShop in Medtech Evolution, it is mandatory to complete the setup
configuration in the following fields of the Staff setup Provider tab:
1. Specialty
2. Prescriber Number
3. The option Print Barcode using MediSecure checkbox must be selected/ticked
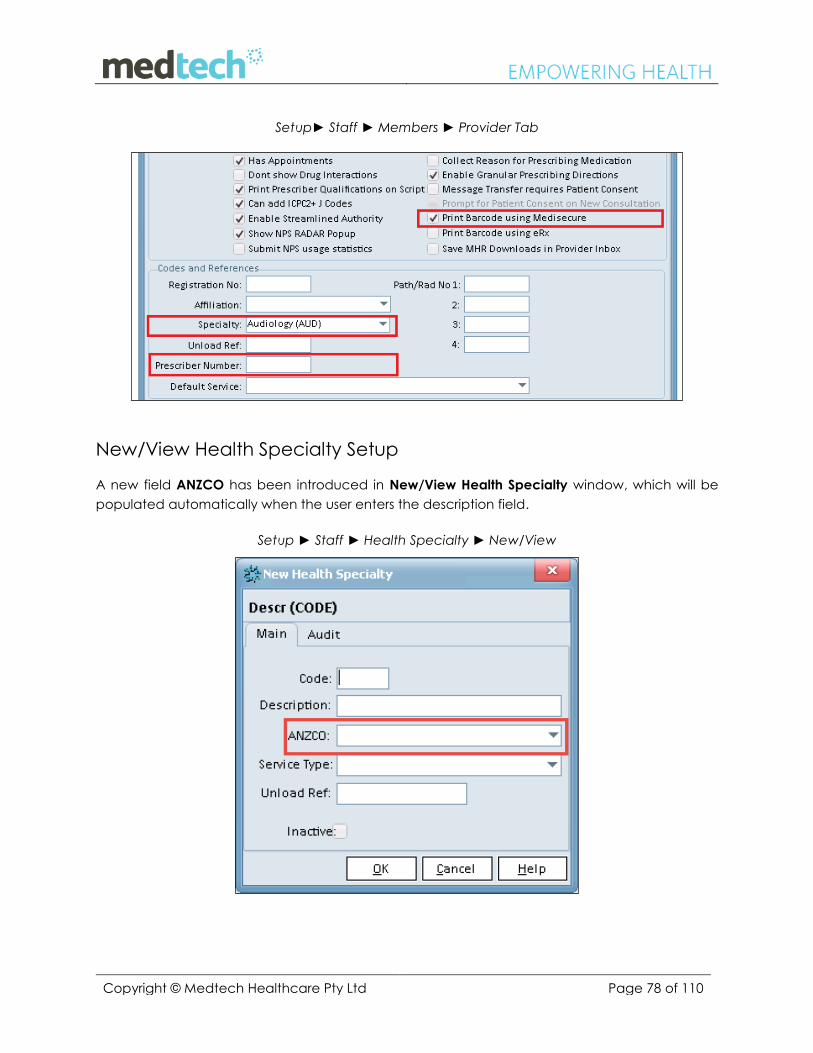
Copyright © Medtech Healthcare Pty Ltd Page 78 of 110
Setup► Staff ► Members ► Provider Tab
New/View Health Specialty Setup
A new field ANZCO has been introduced in New/View Health Specialty window, which will be
populated automatically when the user enters the description field.
Setup ► Staff ► Health Specialty ► New/View

Copyright © Medtech Healthcare Pty Ltd Page 79 of 110
Health Specialty Mapping Setup
A new ‘Health Specialty Mapping’ window has been introduced to view the following details –
Health Specialty unmapped with ANZSCO, Staff(s) not mapped with Specialty, Staff(s) mapped
with Specialty but Specialty unmapped with ANZCO and complete list of ANZCO Health Specialty.
Setup ► Staff ► Health Specialty Mapping
DrShop Alert Pop Up on Prescribing Medicine with Addiction
Potential
When a medication with addiction potential (e.g. Alfentanil Hydrochloride) is prescribed for a
patient and after clicking the Print the selected Prescribed Medications icon in the Consultation
window, a DrShop Alert window will be displayed based on the scenarios below:
1. When a clinician prescribes any medication with addiction potential and no activity is
found in the MediSecure Network by the same prescriber or another prescriber in the past
90 days, then the following DrShop Alert window will display:
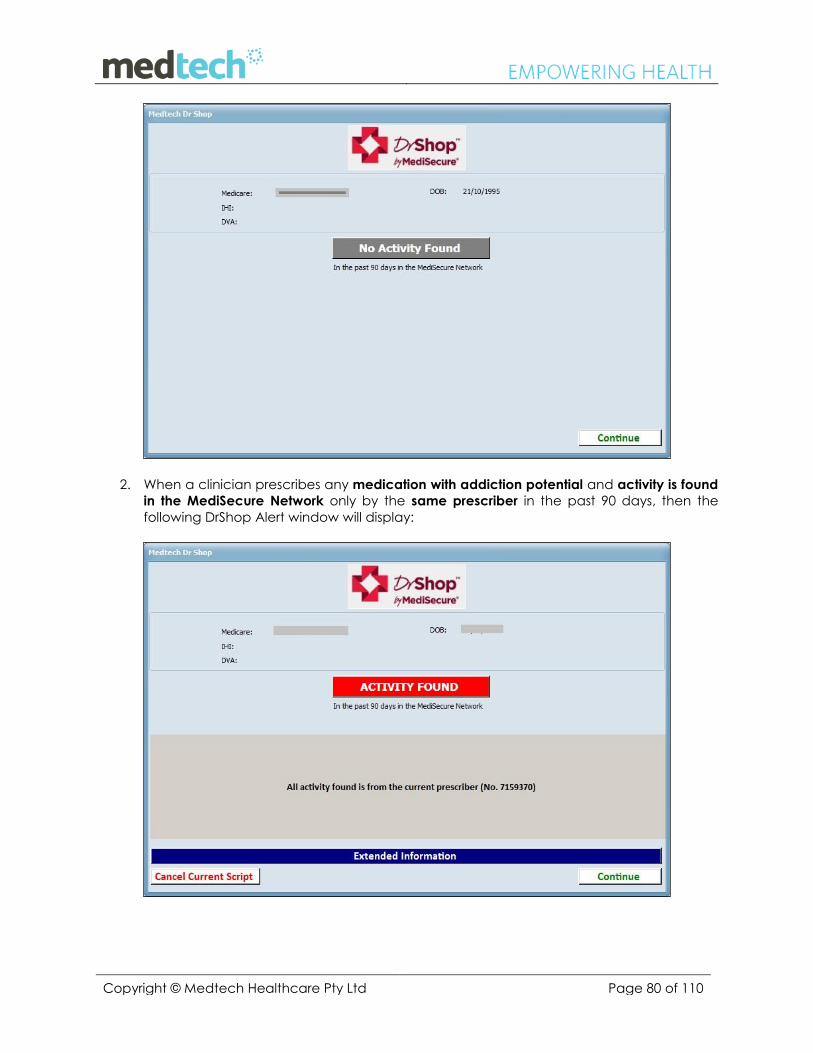
Copyright © Medtech Healthcare Pty Ltd Page 80 of 110
2. When a clinician prescribes any medication with addiction potential and activity is found
in the MediSecure Network only by the same prescriber in the past 90 days, then the
following DrShop Alert window will display:
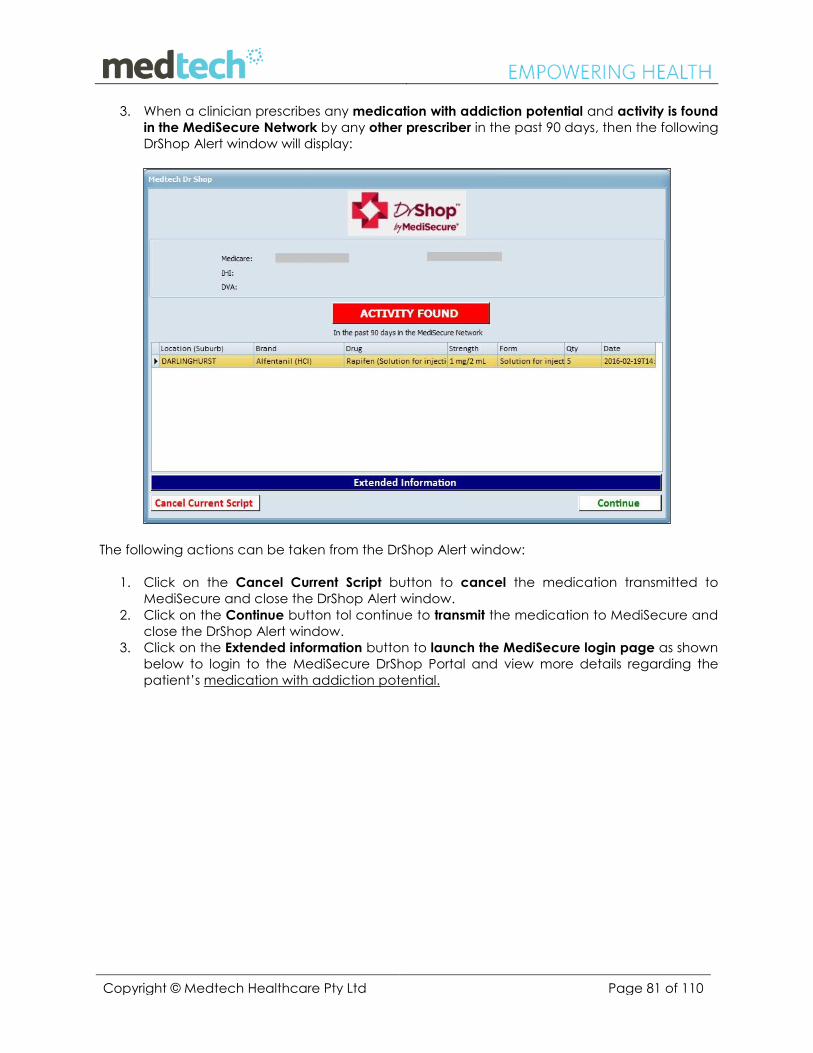
Copyright © Medtech Healthcare Pty Ltd Page 81 of 110
3. When a clinician prescribes any medication with addiction potential and activity is found
in the MediSecure Network by any other prescriber in the past 90 days, then the following
DrShop Alert window will display:
The following actions can be taken from the DrShop Alert window:
1. Click on the Cancel Current Script button to cancel the medication transmitted to
MediSecure and close the DrShop Alert window.
2. Click on the Continue button tol continue to transmit the medication to MediSecure and
close the DrShop Alert window.
3. Click on the Extended information button to launch the MediSecure login page as shown
below to login to the MediSecure DrShop Portal and view more details regarding the
patient’s medication with addiction potential.
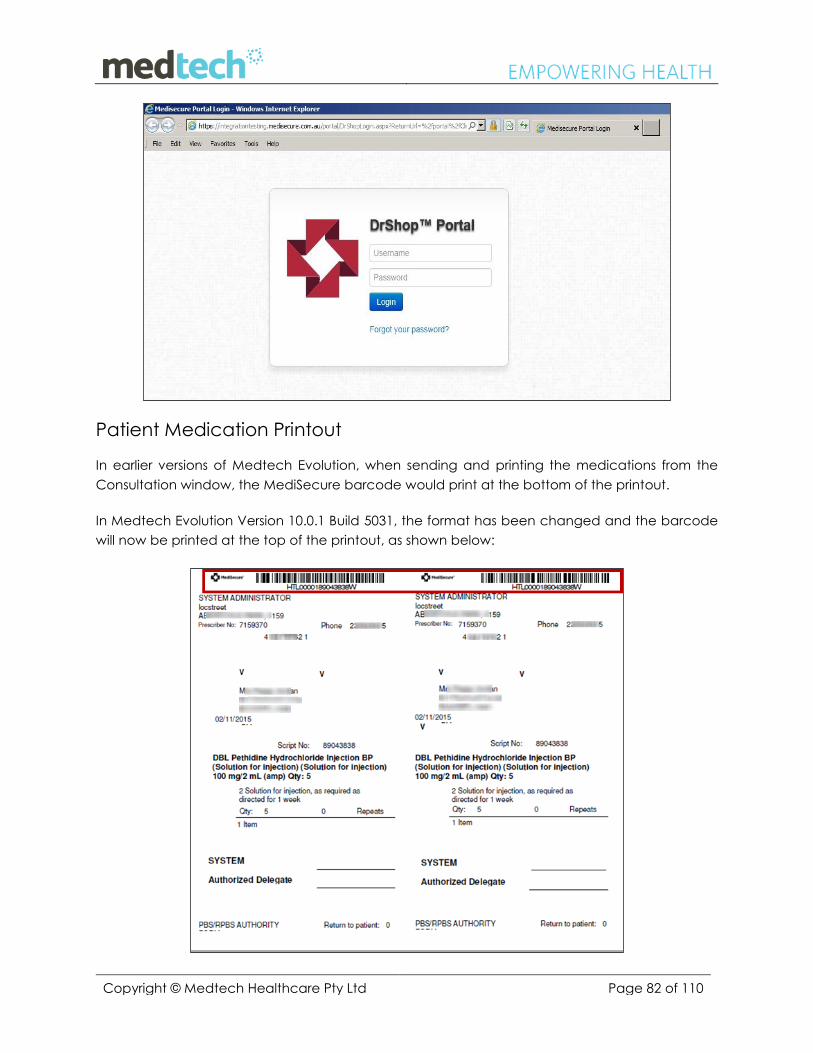
Copyright © Medtech Healthcare Pty Ltd Page 82 of 110
Patient Medication Printout
In earlier versions of Medtech Evolution, when sending and printing the medications from the
Consultation window, the MediSecure barcode would print at the bottom of the printout.
In Medtech Evolution Version 10.0.1 Build 5031, the format has been changed and the barcode
will now be printed at the top of the printout, as shown below:
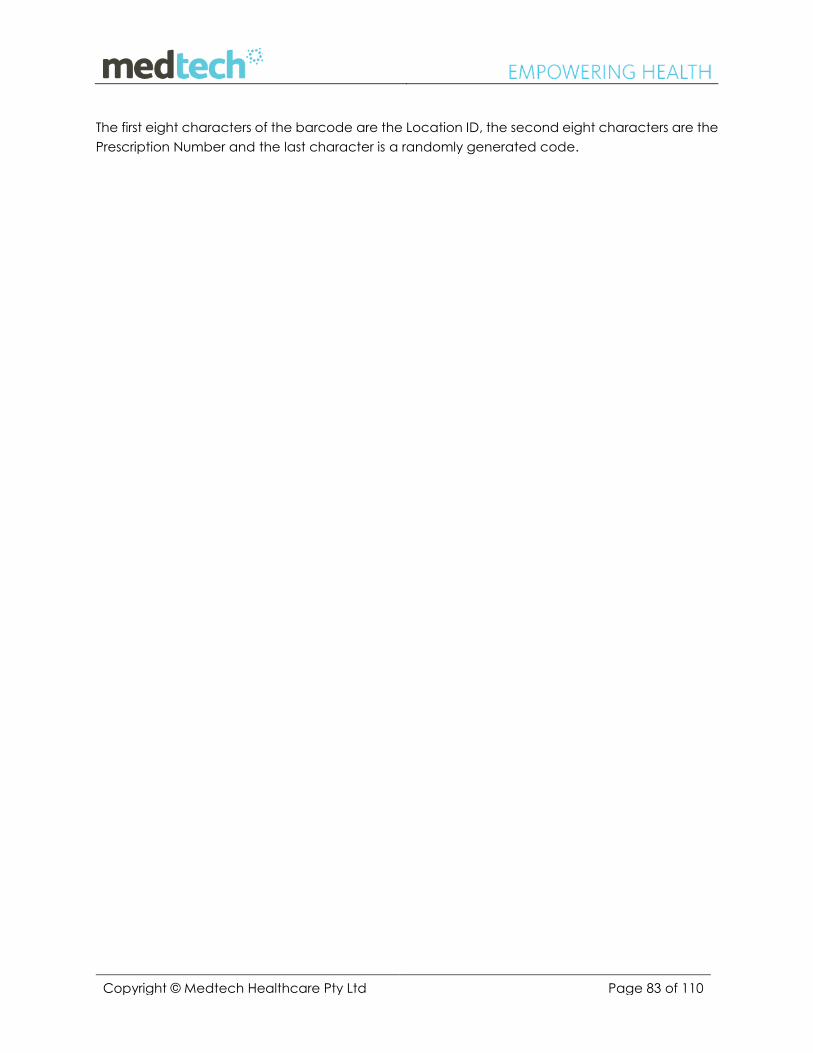
Copyright © Medtech Healthcare Pty Ltd Page 83 of 110
The first eight characters of the barcode are the Location ID, the second eight characters are the
Prescription Number and the last character is a randomly generated code.
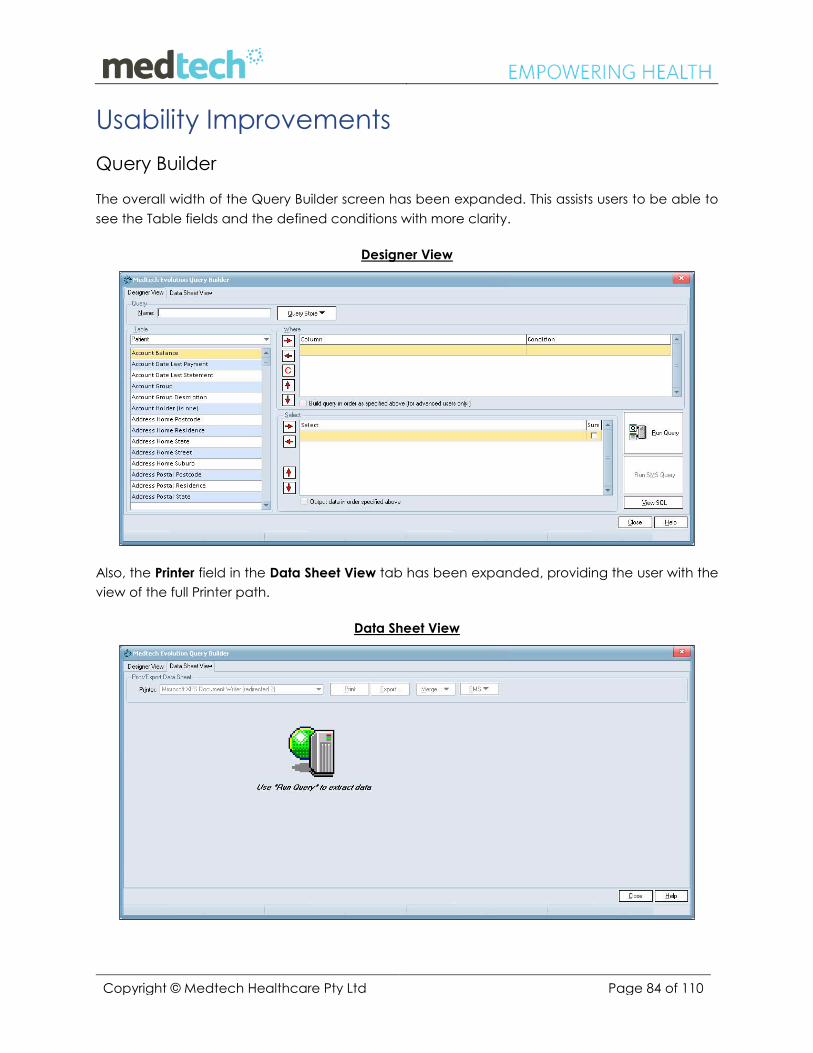
Copyright © Medtech Healthcare Pty Ltd Page 84 of 110
Usability Improvements
Query Builder
The overall width of the Query Builder screen has been expanded. This assists users to be able to
see the Table fields and the defined conditions with more clarity.
Designer View
Also, the Printer field in the Data Sheet View tab has been expanded, providing the user with the
view of the full Printer path.
Data Sheet View
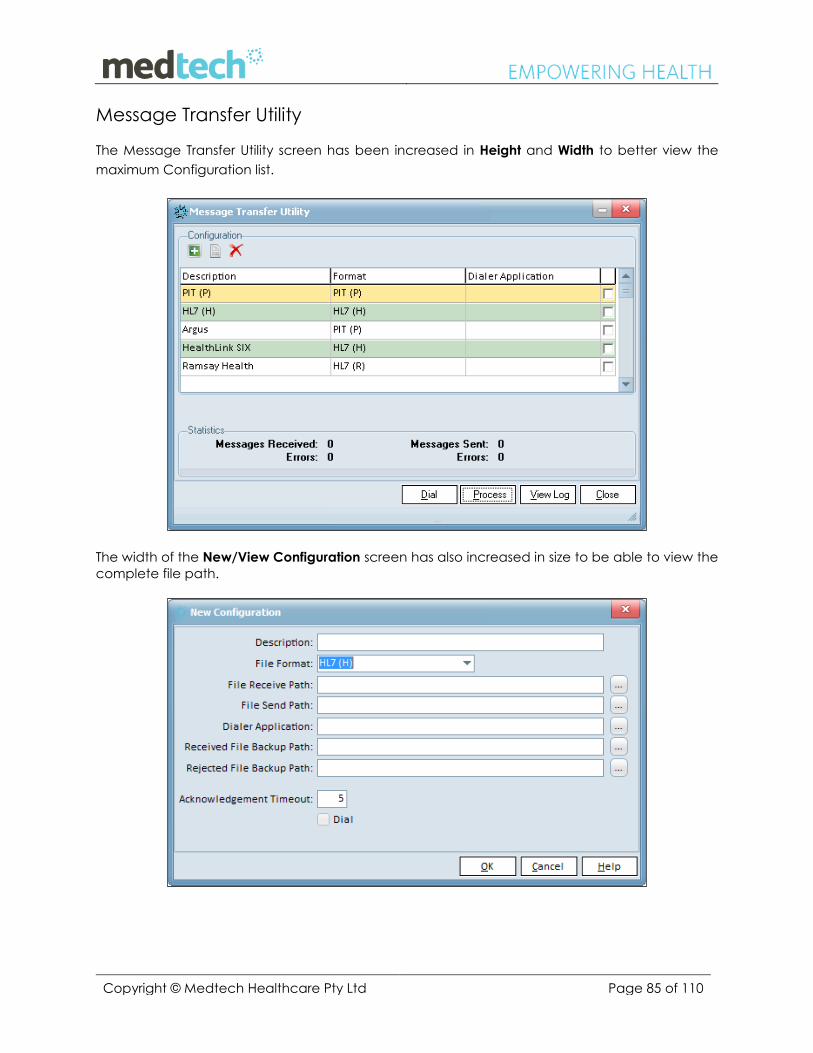
Copyright © Medtech Healthcare Pty Ltd Page 85 of 110
Message Transfer Utility
The Message Transfer Utility screen has been increased in Height and Width to better view the
maximum Configuration list.
The width of the New/View Configuration screen has also increased in size to be able to view the
complete file path.
Copyright © Medtech Healthcare Pty Ltd Page 86 of 110
IMPORTANT NOTE
After upgrading to Medtech Evolution Version 10.0.1 Build 5031, the old Message Transfer utility will
be deprecated. If the Practice is using Old Message Transfer ensure the configuration/
settings/Scheduled Task is done against the New Message Transfer utility.

Copyright © Medtech Healthcare Pty Ltd Page 87 of 110
Icon Changes
All icons across the Medtech Evolution application have been renovated to an enhanced look
and to also adhere to the latest trend. The following pages will provide a comparison of the icons
in the Medtech32 Version 9.3.3 Build 4620 and the new icons now displayed in the Medtech
Evolution Version 10.0.1 Build 5031:
Icon Name Old Icon New Icon
New
Open
Filter
Expand
Go to Previous day
Today
Go to Next day
Find Patient
Find Family
Patient Register
Appointment Book
Appointment Pad
Appointment Overview
Waiting Room
Queue View
New Quick Bill
New Invoice
New IMC Invoice
New Group Invoice
Group Invoice Management
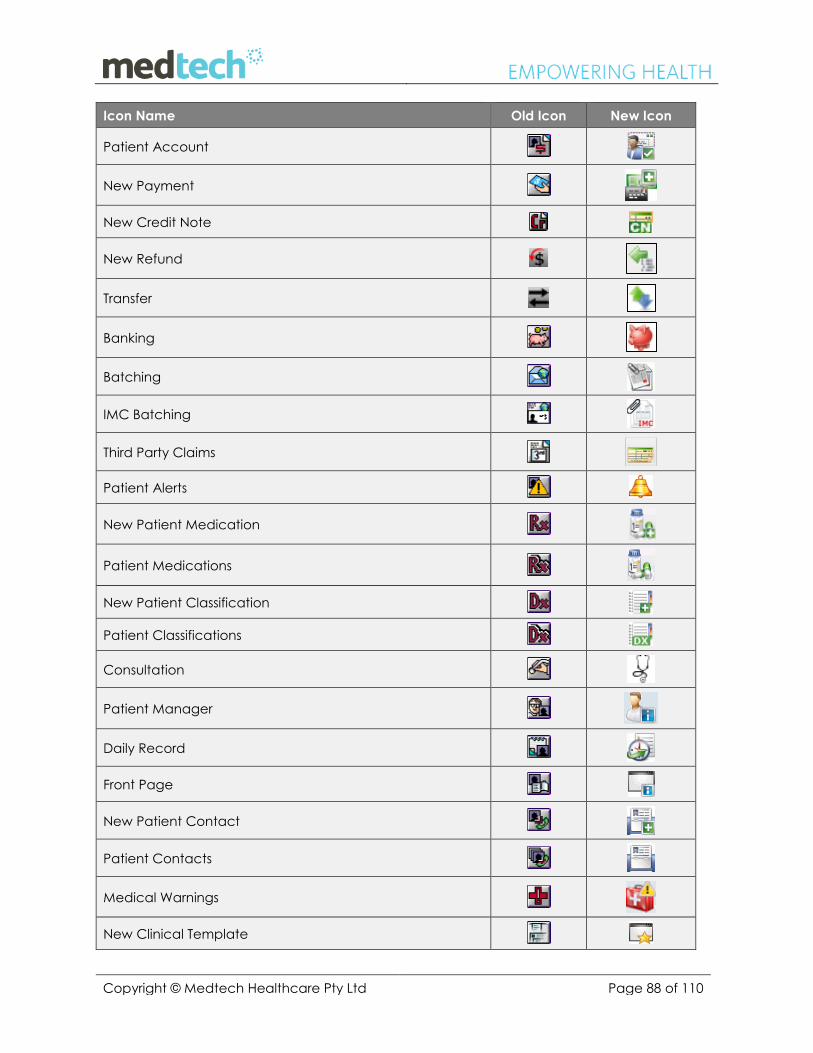
Copyright © Medtech Healthcare Pty Ltd Page 88 of 110
Icon Name Old Icon New Icon
Patient Account
New Payment
New Credit Note
New Refund
Transfer
Banking
Batching
IMC Batching
Third Party Claims
Patient Alerts
New Patient Medication
Patient Medications
New Patient Classification
Patient Classifications
Consultation
Patient Manager
Daily Record
Front Page
New Patient Contact
Patient Contacts
Medical Warnings
New Clinical Template
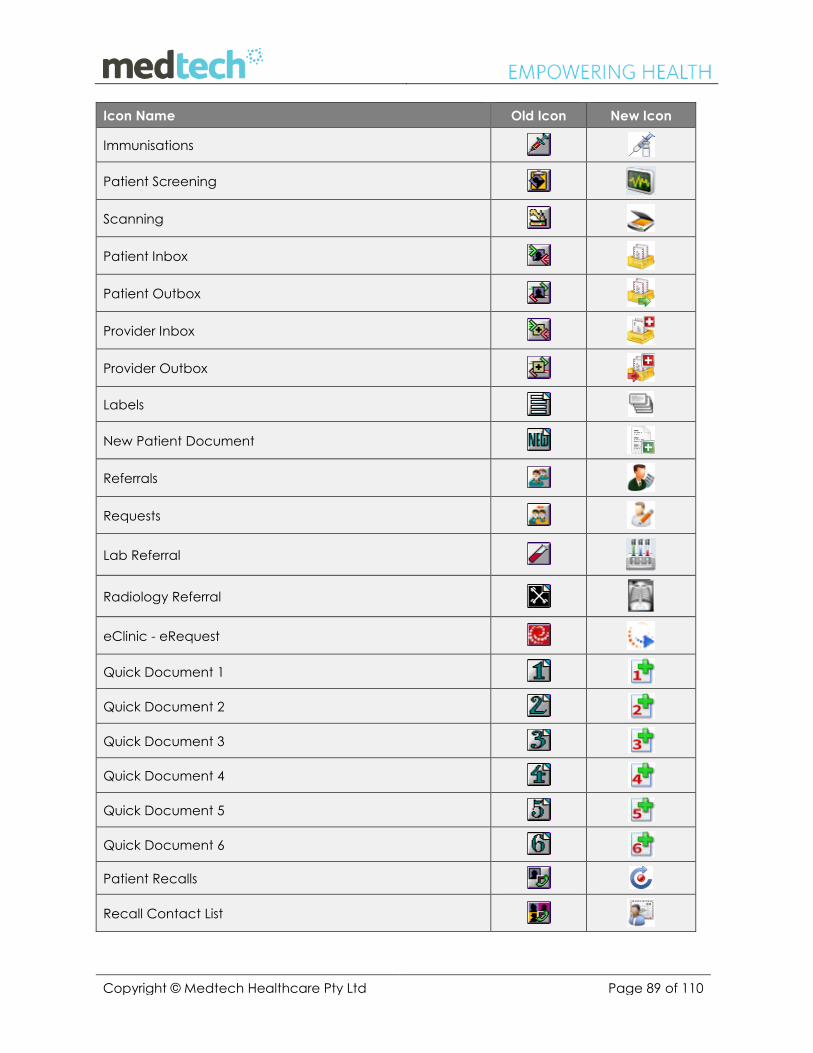
Copyright © Medtech Healthcare Pty Ltd Page 89 of 110
Icon Name Old Icon New Icon
Immunisations
Patient Screening
Scanning
Patient Inbox
Patient Outbox
Provider Inbox
Provider Outbox
Labels
New Patient Document
Referrals
Requests
Lab Referral
Radiology Referral
eClinic - eRequest
Quick Document 1
Quick Document 2
Quick Document 3
Quick Document 4
Quick Document 5
Quick Document 6
Patient Recalls
Recall Contact List
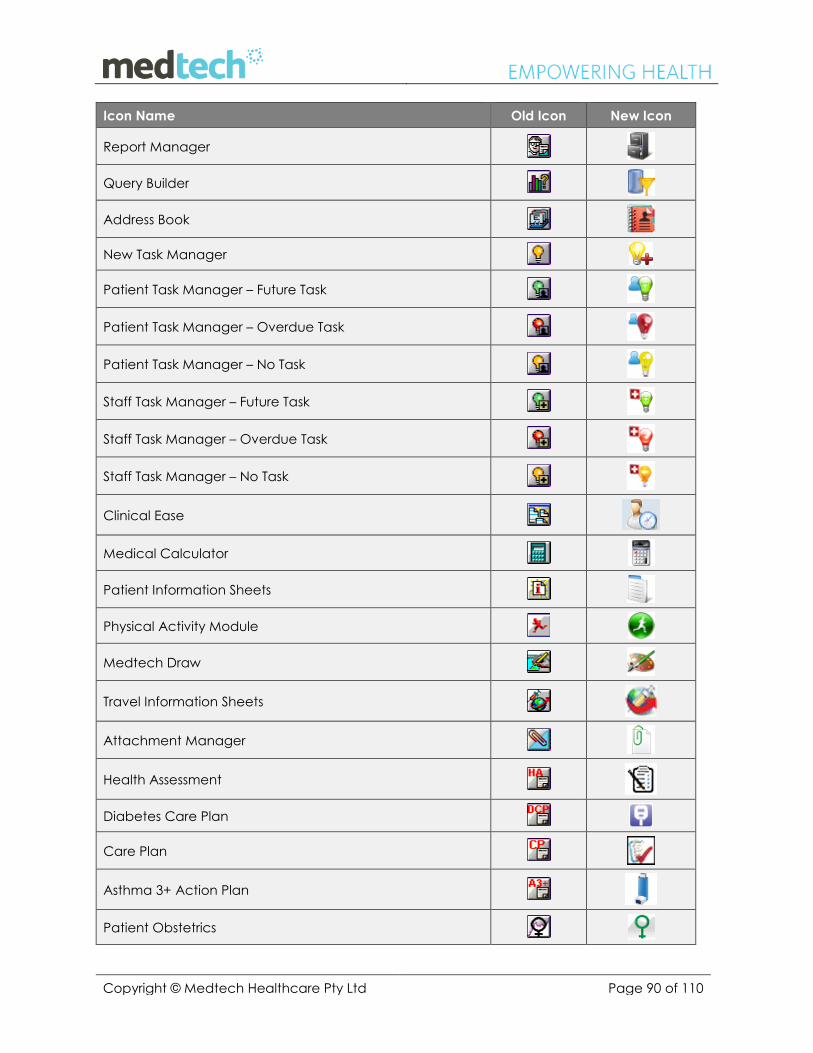
Copyright © Medtech Healthcare Pty Ltd Page 90 of 110
Icon Name Old Icon New Icon
Report Manager
Query Builder
Address Book
New Task Manager
Patient Task Manager – Future Task
Patient Task Manager – Overdue Task
Patient Task Manager – No Task
Staff Task Manager – Future Task
Staff Task Manager – Overdue Task
Staff Task Manager – No Task
Clinical Ease
Medical Calculator
Patient Information Sheets
Physical Activity Module
Medtech Draw
Travel Information Sheets
Attachment Manager
Health Assessment
Diabetes Care Plan
Care Plan
Asthma 3+ Action Plan
Patient Obstetrics
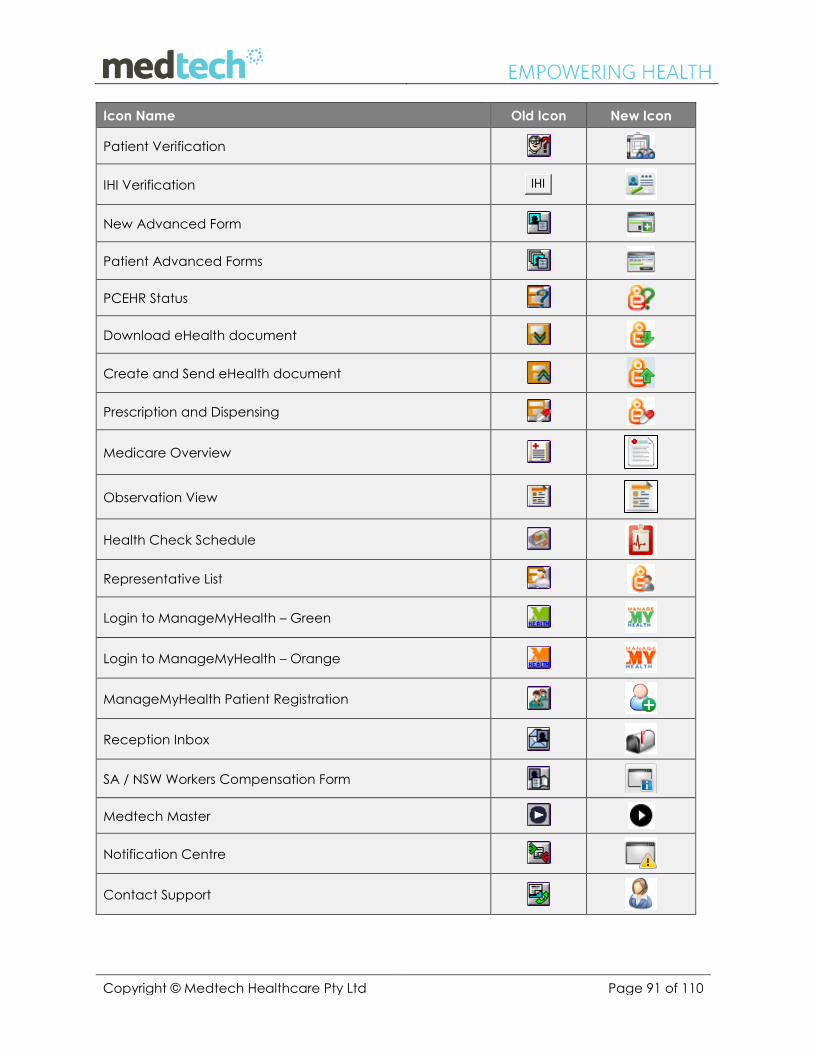
Copyright © Medtech Healthcare Pty Ltd Page 91 of 110
Icon Name Old Icon New Icon
Patient Verification
IHI Verification
New Advanced Form
Patient Advanced Forms
PCEHR Status
Download eHealth document
Create and Send eHealth document
Prescription and Dispensing
Medicare Overview
Observation View
Health Check Schedule
Representative List
Login to ManageMyHealth – Green
Login to ManageMyHealth – Orange
ManageMyHealth Patient Registration
Reception Inbox
SA / NSW Workers Compensation Form
Medtech Master
Notification Centre
Contact Support
Copyright © Medtech Healthcare Pty Ltd Page 92 of 110
Medtech Kiosk One of the most important features of this release is the Medtech Kiosk. The Medtech Kiosk is a
front-desk kiosk application that allows patients to “self-serve” the common activities within the
reception/waiting room of a primary healthcare clinic.
The Kiosk is provided on a stand with a touch sensitive screen that allows patients to interact with
the application via screen touches. The Self–Check-in Kiosk can reduce the queues at the clinic’s
reception, thereby saving administration costs and valuable time.
Patients will be able to use the Kiosk to check-in for a pre-booked appointment and have their
encounter slip printed, update their demographic and Emergency contact details via the Kiosk
and have the details saved against their Medtech record. The updated details will be transmitted
to the Medtech Evolution application and approved by the Front Desk staff after validation.
Copyright © Medtech Healthcare Pty Ltd Page 93 of 110
ManageMyHealthTM Integrated with Health
Engine
ManageMyHealthTM has been extended and Health Engine Appointment Settings are now
included under My Practice module for each practice location in order to enable users to be able
to choose whether to provide Health Engine integration for a location.
This feature will enable guest users to book appointments with ManageMyHealthTM, the request of
which will be received by the doctors in Medtech Evolution under Reception Inbox with the
Patient name mentioned as “Guest Patient”. This way the doctor can differentiate between
registered patients and guest users.
Copyright © Medtech Healthcare Pty Ltd Page 94 of 110
Resolved Items
Scanning Fixes
In Medtech Evolution Version 10.0, the following issues had been reported in the Scanning module:
Slowness in performance while scanning
Twain Scan window stays open for a long time after scanning
Scanning in Colour mode continued, even after changing the mode to ‘Greyscale’
These issues have been resolved in Medtech Evolution Version 10.0.1 Build 5031.
Scanning Resolution Issue
There was an issue in Medtech Evolution Version 10.0, where the resolution of the scanned
document was not the best quality.
The cause for the scanning resolution issue has been identified as the ‘Compression Type’ not
being configured in the ‘Select Source’ window.
This issue has now been resolved in Medtech Evolution Version 10.0.1 Build 5031. The ‘Compression
Type’ will be a configured default for the following scanning types:
Scan as Tiff – the compression type will be ‘TIFF_LZW’
Scan as PDF – the compression type will be ‘PDF_LZW’
Grid Column Sorting
A Column Sorting option has been enabled in the ‘Folder’ column of Scanning window to provide
an ability to sort the scanned records by the Folder name.
Query Builder – Size mismatch error
When defining multiple conditions for the ‘Service Code’ field (under ‘Invoiced Services’ Table) in
the Query Builder, the ‘Size mismatch error’ was being displayed.
This issue has now been resolved in Medtech Evolution Version 10.0.1 Build 5031. No such error
message will be displayed when defining multiple conditions in Query Builder.
Copyright © Medtech Healthcare Pty Ltd Page 95 of 110
Consultation window – Scrolling Issue
There was a Scrolling issue reported in the Consultation window, when clicking the option Other
Documents ► Document.
This issue has now been resolved in Medtech Evolution Version 10.0.1 Build 5031.
Patient Information Sheets
The following issues in the Patient Information Sheets have been identified in earlier versions of
Medtech Evolution:
When printing the required patient information (i.e. PDF) from the Patient Information
Sheets, the entries were not being recorded in the Consultation and Daily Record window.
This issue has now been resolved in Medtech Evolution Version 10.0.1 Build 5031; the
information printed from the Patient Information Sheet will be recorded in the Consultation
and Daily Record window.
When searching for the information ‘Heartburn’ in the Patient Information Sheet, the PDF
content was only partially visible, as some of the text was missing.
This issue has now been resolved in Medtech Evolution Version 10.0.1 Build 5031; the
content in the Heartburn information sheets will be fully visible to the users.
Patient Claims – Sent Claims remains selected
There was an issue in Patient Claims window, where the Sent claims remained unselected even
after submitting the claims to Medicare.
This issue has now been resolved in Medtech Evolution Version 10.0.1 Build 5031.
Task Manager
When searching through the Keyword from the Filter Tasks window, the tasks were not being
displayed in the Staff/Patient Task Manger window.
This issue has now been resolved in Medtech Evolution Version 10.0.1 Build 5031; the tasks will now
be displayed in the Staff/Patient Task Manger window when searching via a Keyword entry from
the Filter Tasks window.
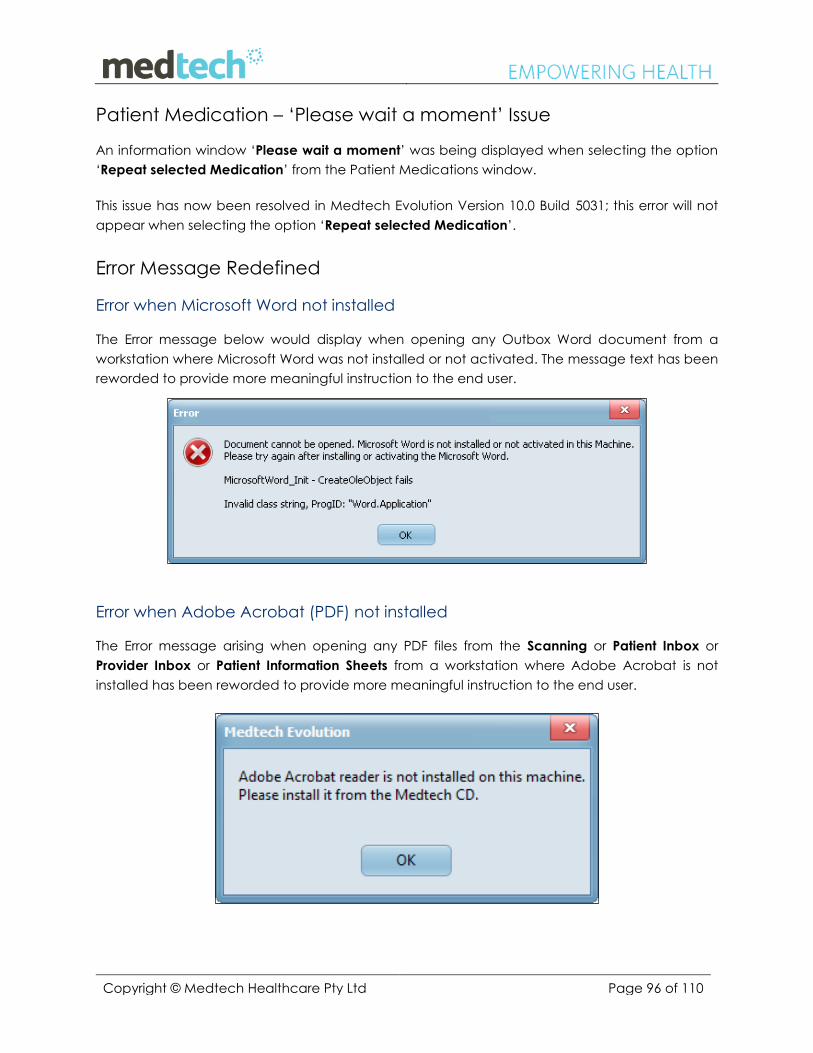
Copyright © Medtech Healthcare Pty Ltd Page 96 of 110
Patient Medication – ‘Please wait a moment’ Issue
An information window ‘Please wait a moment’ was being displayed when selecting the option
‘Repeat selected Medication’ from the Patient Medications window.
This issue has now been resolved in Medtech Evolution Version 10.0 Build 5031; this error will not
appear when selecting the option ‘Repeat selected Medication’.
Error Message Redefined
Error when Microsoft Word not installed
The Error message below would display when opening any Outbox Word document from a
workstation where Microsoft Word was not installed or not activated. The message text has been
reworded to provide more meaningful instruction to the end user.
Error when Adobe Acrobat (PDF) not installed
The Error message arising when opening any PDF files from the Scanning or Patient Inbox or
Provider Inbox or Patient Information Sheets from a workstation where Adobe Acrobat is not
installed has been reworded to provide more meaningful instruction to the end user.
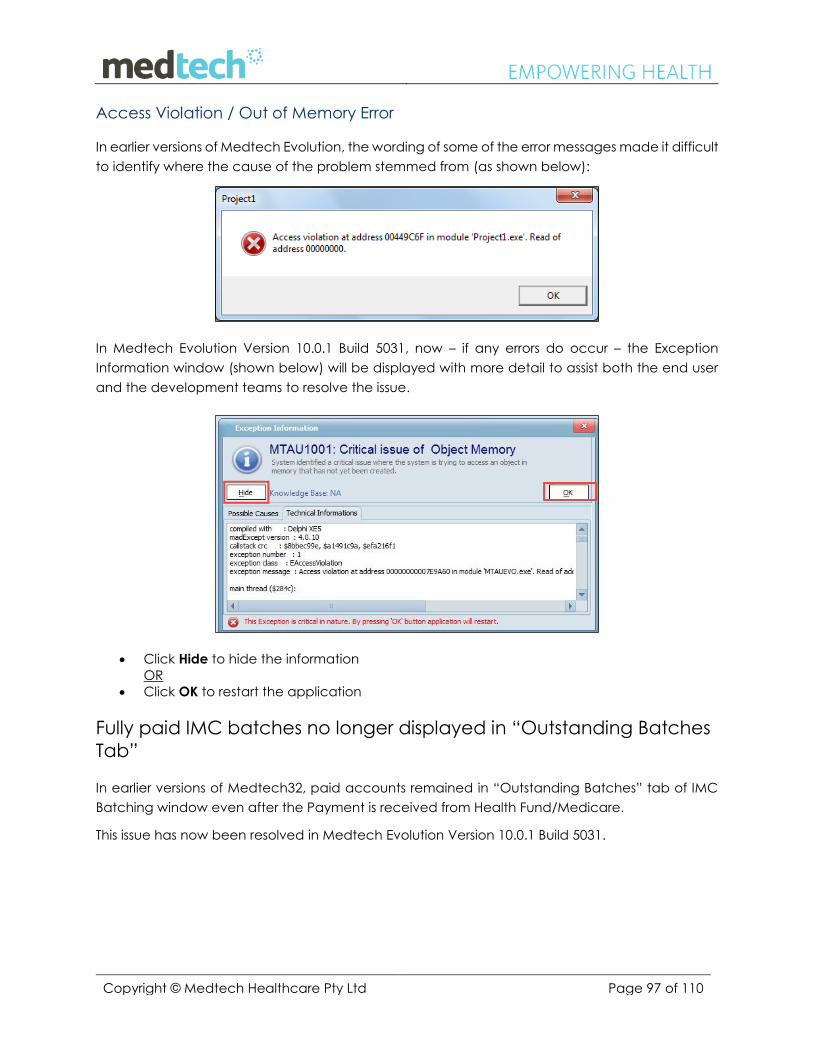
Copyright © Medtech Healthcare Pty Ltd Page 97 of 110
Access Violation / Out of Memory Error
In earlier versions of Medtech Evolution, the wording of some of the error messages made it difficult
to identify where the cause of the problem stemmed from (as shown below):
In Medtech Evolution Version 10.0.1 Build 5031, now – if any errors do occur – the Exception
Information window (shown below) will be displayed with more detail to assist both the end user
and the development teams to resolve the issue.
Click Hide to hide the information
OR
Click OK to restart the application
Fully paid IMC batches no longer displayed in “Outstanding Batches
Tab” In earlier versions of Medtech32, paid accounts remained in “Outstanding Batches” tab of IMC
Batching window even after the Payment is received from Health Fund/Medicare.
This issue has now been resolved in Medtech Evolution Version 10.0.1 Build 5031.
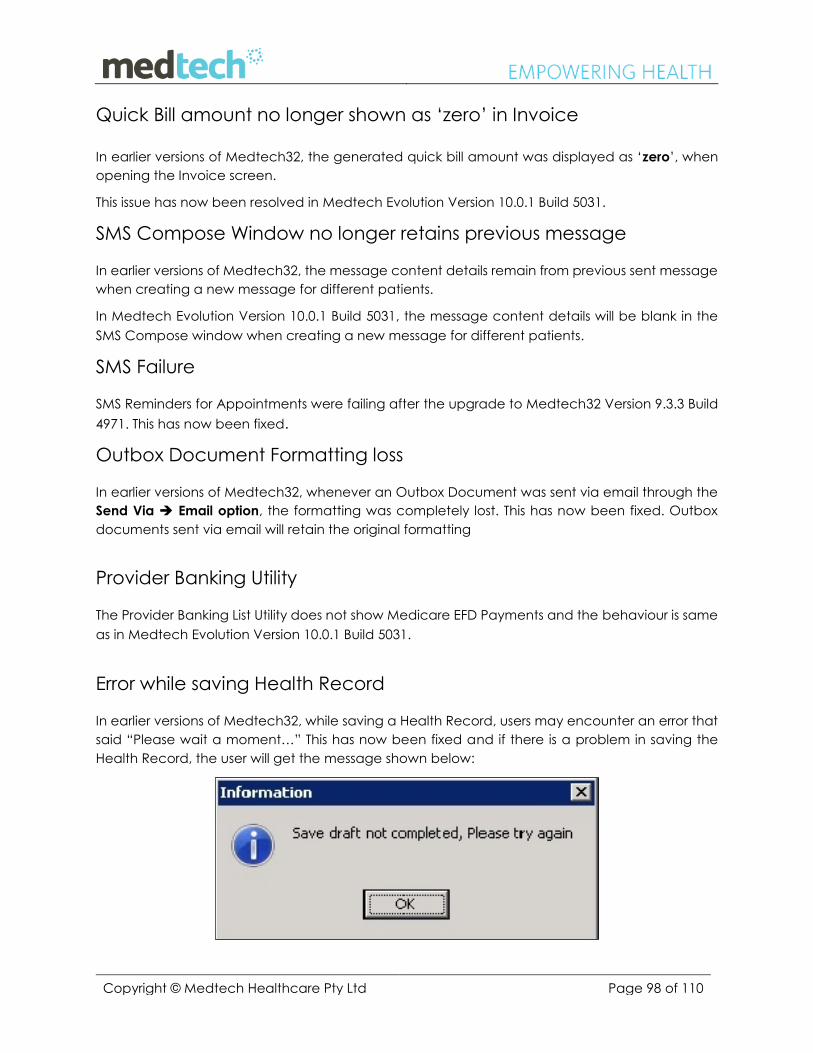
Copyright © Medtech Healthcare Pty Ltd Page 98 of 110
Quick Bill amount no longer shown as ‘zero’ in Invoice
In earlier versions of Medtech32, the generated quick bill amount was displayed as ‘zero’, when
opening the Invoice screen.
This issue has now been resolved in Medtech Evolution Version 10.0.1 Build 5031.
SMS Compose Window no longer retains previous message In earlier versions of Medtech32, the message content details remain from previous sent message
when creating a new message for different patients.
In Medtech Evolution Version 10.0.1 Build 5031, the message content details will be blank in the
SMS Compose window when creating a new message for different patients.
SMS Failure SMS Reminders for Appointments were failing after the upgrade to Medtech32 Version 9.3.3 Build
4971. This has now been fixed.
Outbox Document Formatting loss In earlier versions of Medtech32, whenever an Outbox Document was sent via email through the
Send Via Email option, the formatting was completely lost. This has now been fixed. Outbox
documents sent via email will retain the original formatting
Provider Banking Utility The Provider Banking List Utility does not show Medicare EFD Payments and the behaviour is same
as in Medtech Evolution Version 10.0.1 Build 5031.
Error while saving Health Record In earlier versions of Medtech32, while saving a Health Record, users may encounter an error that
said “Please wait a moment…” This has now been fixed and if there is a problem in saving the
Health Record, the user will get the message shown below:
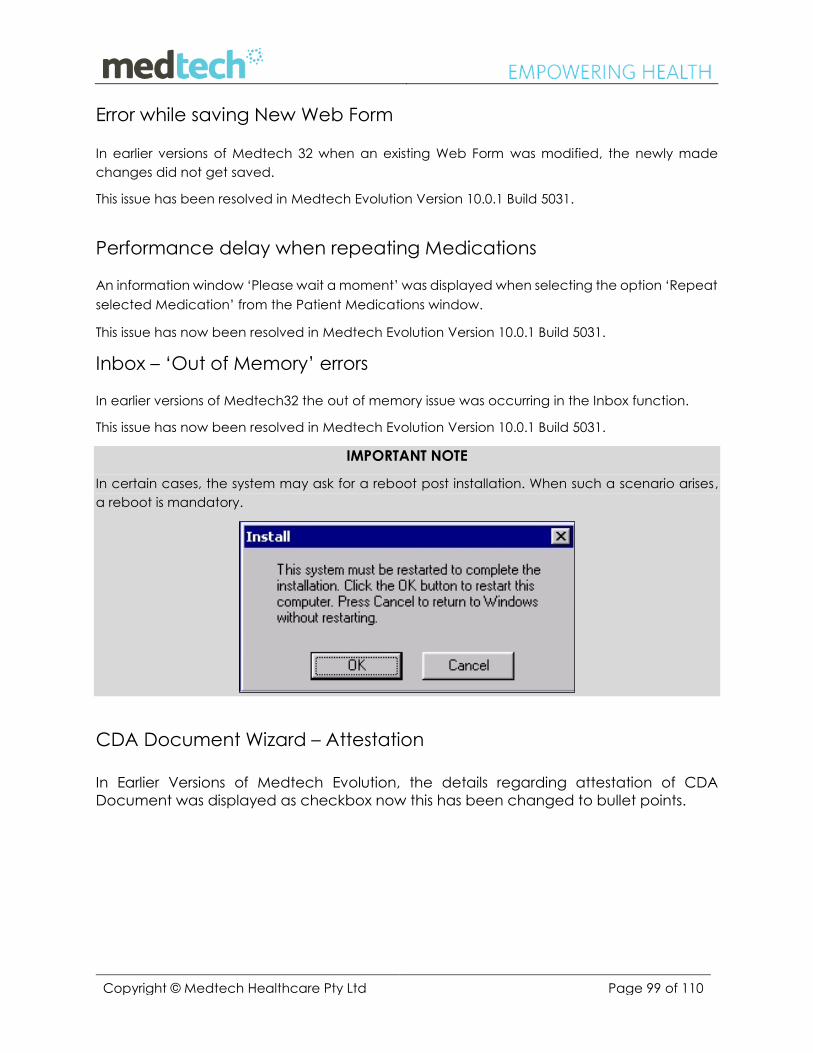
Copyright © Medtech Healthcare Pty Ltd Page 99 of 110
Error while saving New Web Form In earlier versions of Medtech 32 when an existing Web Form was modified, the newly made
changes did not get saved.
This issue has been resolved in Medtech Evolution Version 10.0.1 Build 5031.
Performance delay when repeating Medications An information window ‘Please wait a moment’ was displayed when selecting the option ‘Repeat
selected Medication’ from the Patient Medications window.
This issue has now been resolved in Medtech Evolution Version 10.0.1 Build 5031.
Inbox – ‘Out of Memory’ errors In earlier versions of Medtech32 the out of memory issue was occurring in the Inbox function.
This issue has now been resolved in Medtech Evolution Version 10.0.1 Build 5031.
IMPORTANT NOTE
In certain cases, the system may ask for a reboot post installation. When such a scenario arises,
a reboot is mandatory.
CDA Document Wizard – Attestation
In Earlier Versions of Medtech Evolution, the details regarding attestation of CDA
Document was displayed as checkbox now this has been changed to bullet points.
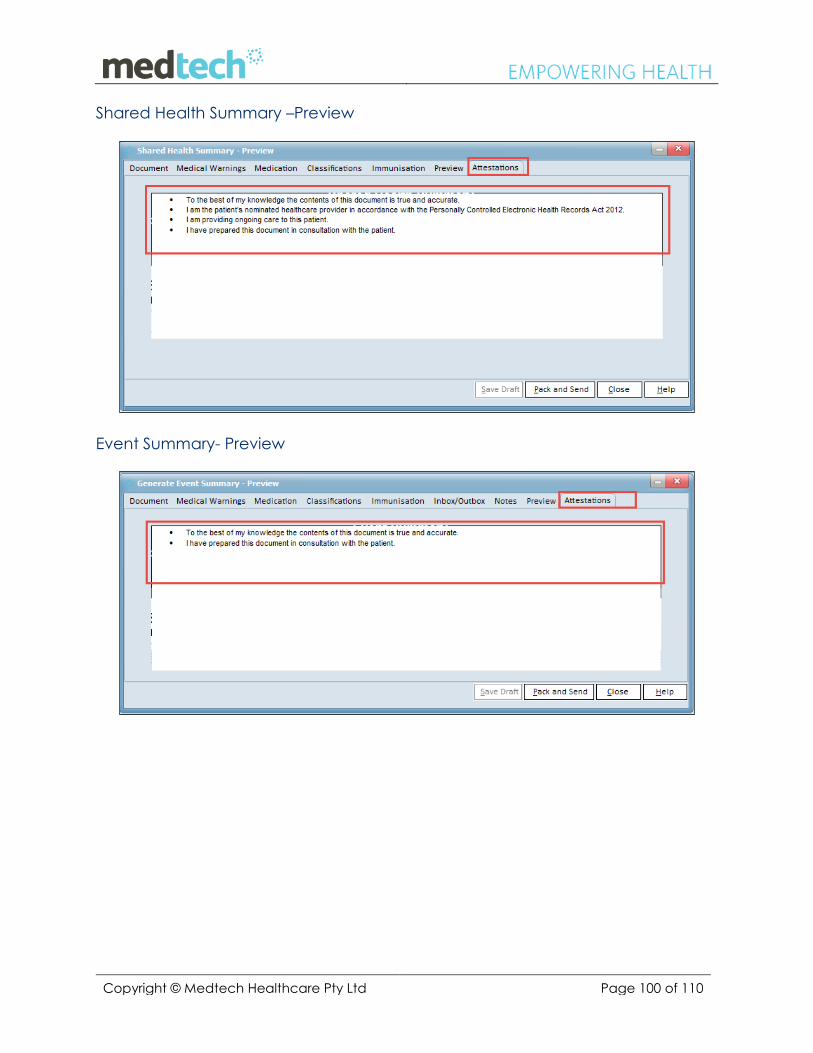
Copyright © Medtech Healthcare Pty Ltd Page 100 of 110
Shared Health Summary –Preview
Event Summary- Preview
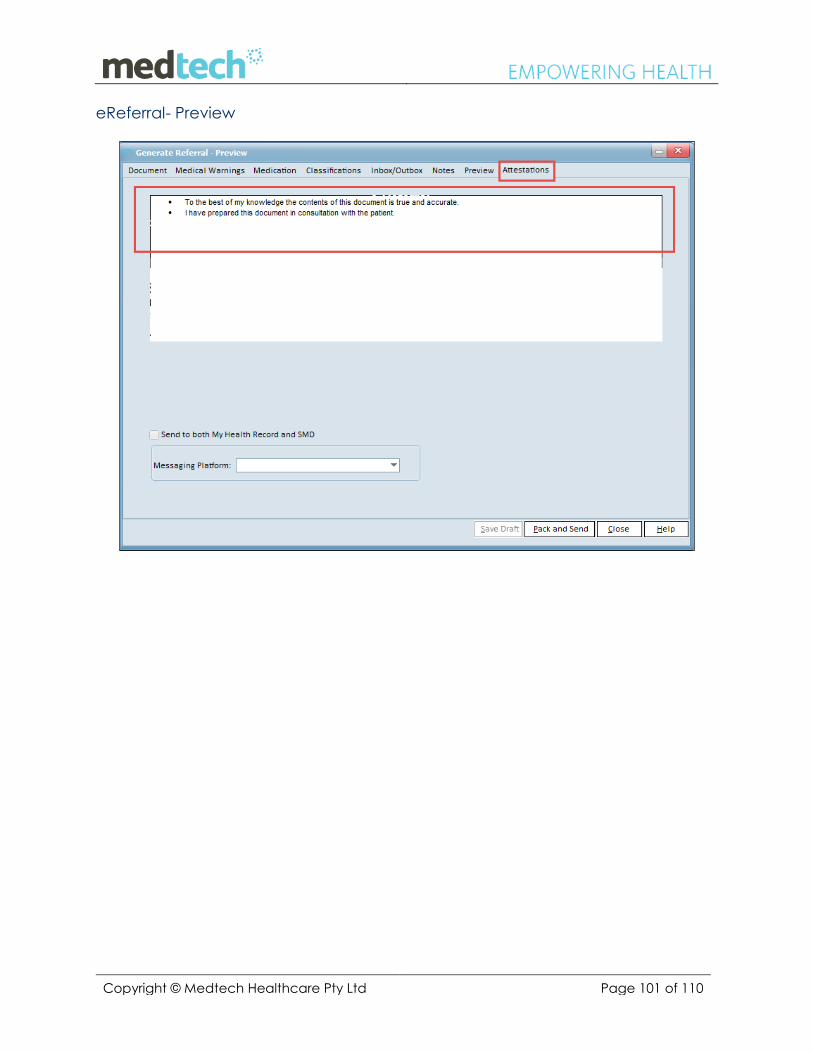
Copyright © Medtech Healthcare Pty Ltd Page 101 of 110
eReferral- Preview
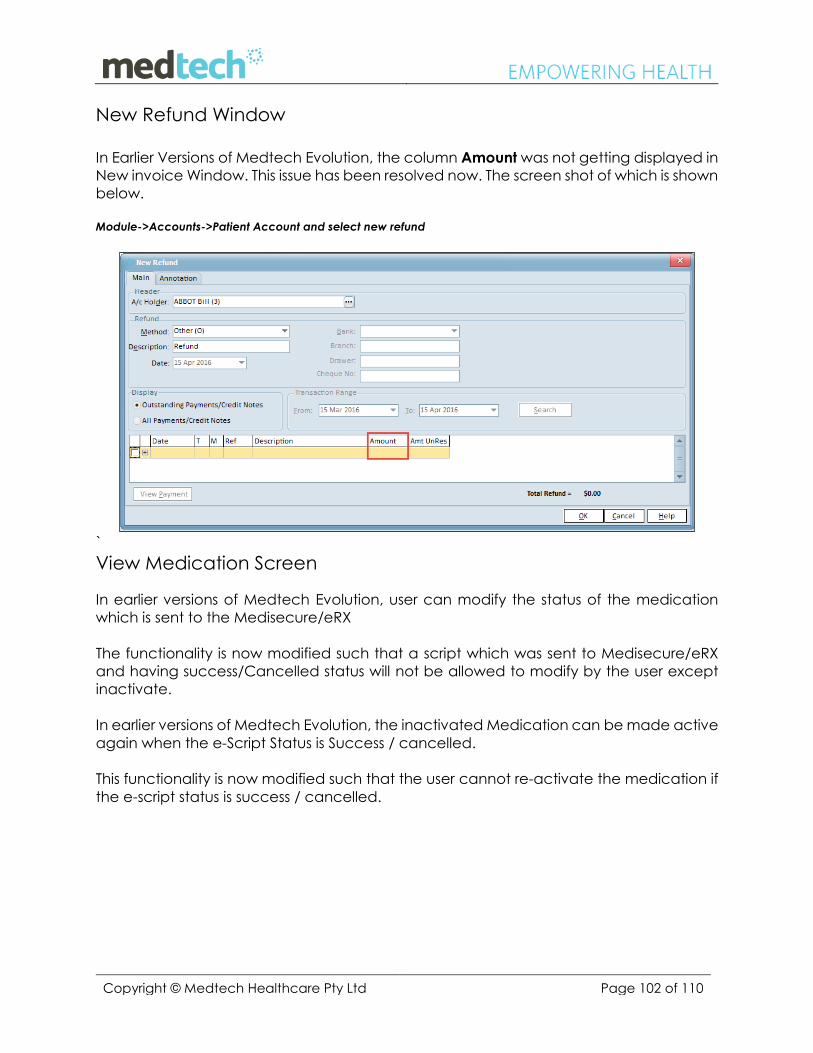
Copyright © Medtech Healthcare Pty Ltd Page 102 of 110
New Refund Window
In Earlier Versions of Medtech Evolution, the column Amount was not getting displayed in
New invoice Window. This issue has been resolved now. The screen shot of which is shown
below.
Module->Accounts->Patient Account and select new refund
`
View Medication Screen
In earlier versions of Medtech Evolution, user can modify the status of the medication
which is sent to the Medisecure/eRX
The functionality is now modified such that a script which was sent to Medisecure/eRX
and having success/Cancelled status will not be allowed to modify by the user except
inactivate.
In earlier versions of Medtech Evolution, the inactivated Medication can be made active
again when the e-Script Status is Success / cancelled.
This functionality is now modified such that the user cannot re-activate the medication if
the e-script status is success / cancelled.
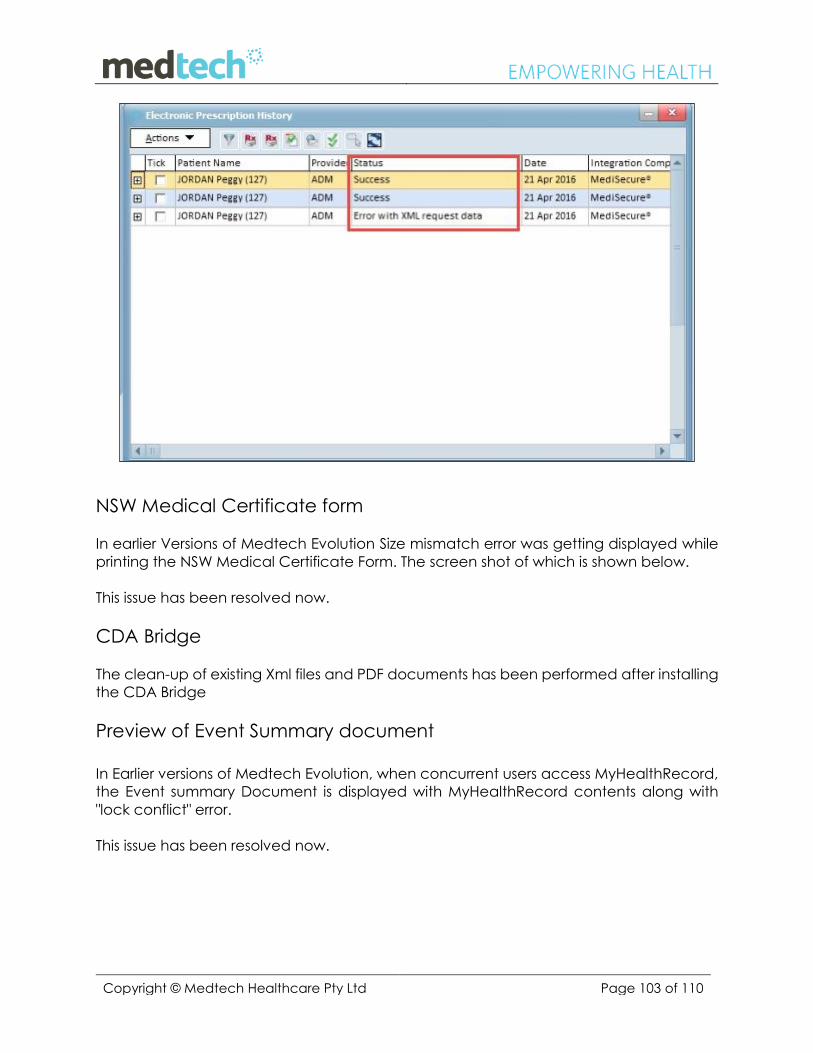
Copyright © Medtech Healthcare Pty Ltd Page 103 of 110
NSW Medical Certificate form
In earlier Versions of Medtech Evolution Size mismatch error was getting displayed while
printing the NSW Medical Certificate Form. The screen shot of which is shown below.
This issue has been resolved now.
CDA Bridge
The clean-up of existing Xml files and PDF documents has been performed after installing
the CDA Bridge
Preview of Event Summary document
In Earlier versions of Medtech Evolution, when concurrent users access MyHealthRecord,
the Event summary Document is displayed with MyHealthRecord contents along with
"lock conflict" error.
This issue has been resolved now.
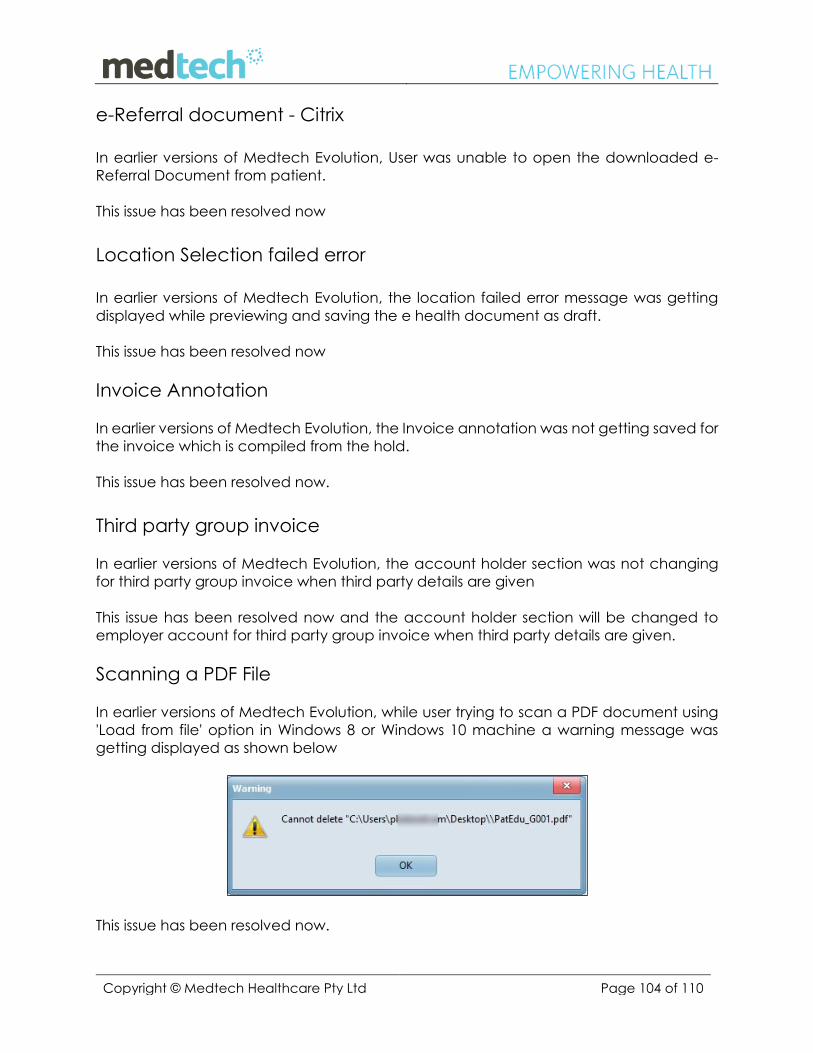
Copyright © Medtech Healthcare Pty Ltd Page 104 of 110
e-Referral document - Citrix
In earlier versions of Medtech Evolution, User was unable to open the downloaded e-
Referral Document from patient.
This issue has been resolved now
Location Selection failed error
In earlier versions of Medtech Evolution, the location failed error message was getting
displayed while previewing and saving the e health document as draft.
This issue has been resolved now
Invoice Annotation
In earlier versions of Medtech Evolution, the Invoice annotation was not getting saved for
the invoice which is compiled from the hold.
This issue has been resolved now.
Third party group invoice
In earlier versions of Medtech Evolution, the account holder section was not changing
for third party group invoice when third party details are given
This issue has been resolved now and the account holder section will be changed to
employer account for third party group invoice when third party details are given.
Scanning a PDF File
In earlier versions of Medtech Evolution, while user trying to scan a PDF document using
'Load from file' option in Windows 8 or Windows 10 machine a warning message was
getting displayed as shown below
This issue has been resolved now.
Copyright © Medtech Healthcare Pty Ltd Page 105 of 110
IMC Retrieved Payments in Patient Accounts Window
In earlier versions of Medtech Evolution, the payment retrieved from the Medicare for
eclipse claims was not getting populated in Patient’s Account window.
This issue has been resolved now.
Health Engine – DLL not getting replaced
Medtech Services DLLs were not replaced during the upgrade. This issue has now been
resolved.
Appointment Book
When user copy/paste/drag an appointment from one diary to another, the location of
the original booking was also getting copied.
This issue has been resolved now.
Appointment Pad
An exception message was getting displayed when eight providers are in the
appointment pad.
This issued has been resolved now.
Dictionary for spell check
In 9.3.3 Version of Medtech32 , dictionary for spell check was not working.
This issues has been resolved now.
Consultation Window The New consultation window was not retaining the resize length/width/position.
This issue has been resolved now
Uninvoiced services report
The unvoiced services report was getting generated with Inactivated Services in the
report.
This issue has been resolved now.
Copyright © Medtech Healthcare Pty Ltd Page 106 of 110
New Payment Screen
In New payment screen user was unable to fetch 'NextPayRef.
This issue has been resolved now.
New Credit note screen
In New Credit Note screen user was unable to fetch NextInvRef.
This issue has been resolved now.
Work cover certificate
While trying to reprint the work cover certificate, the details default to whoever is logged
into the session at that time and only that user detail is getting displayed instead of
displaying the provider details.
This issue has been resolved now.
Accounting Reports
Lot of discrepancies were present in Accounting reports and Aged Balanced Summary
before and after the upgrade.
This issue has been resolved now
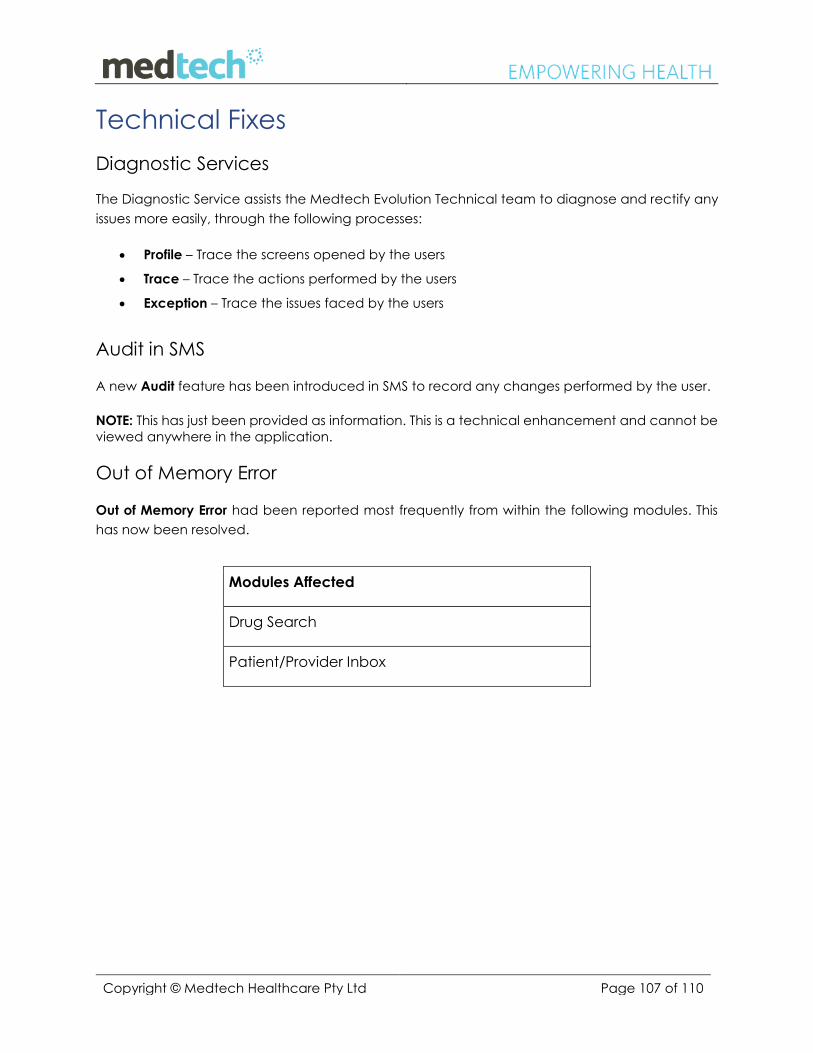
Copyright © Medtech Healthcare Pty Ltd Page 107 of 110
Technical Fixes
Diagnostic Services
The Diagnostic Service assists the Medtech Evolution Technical team to diagnose and rectify any
issues more easily, through the following processes:
Profile – Trace the screens opened by the users
Trace – Trace the actions performed by the users
Exception – Trace the issues faced by the users
Audit in SMS A new Audit feature has been introduced in SMS to record any changes performed by the user.
NOTE: This has just been provided as information. This is a technical enhancement and cannot be
viewed anywhere in the application.
Out of Memory Error Out of Memory Error had been reported most frequently from within the following modules. This
has now been resolved.
Modules Affected
Drug Search
Patient/Provider Inbox
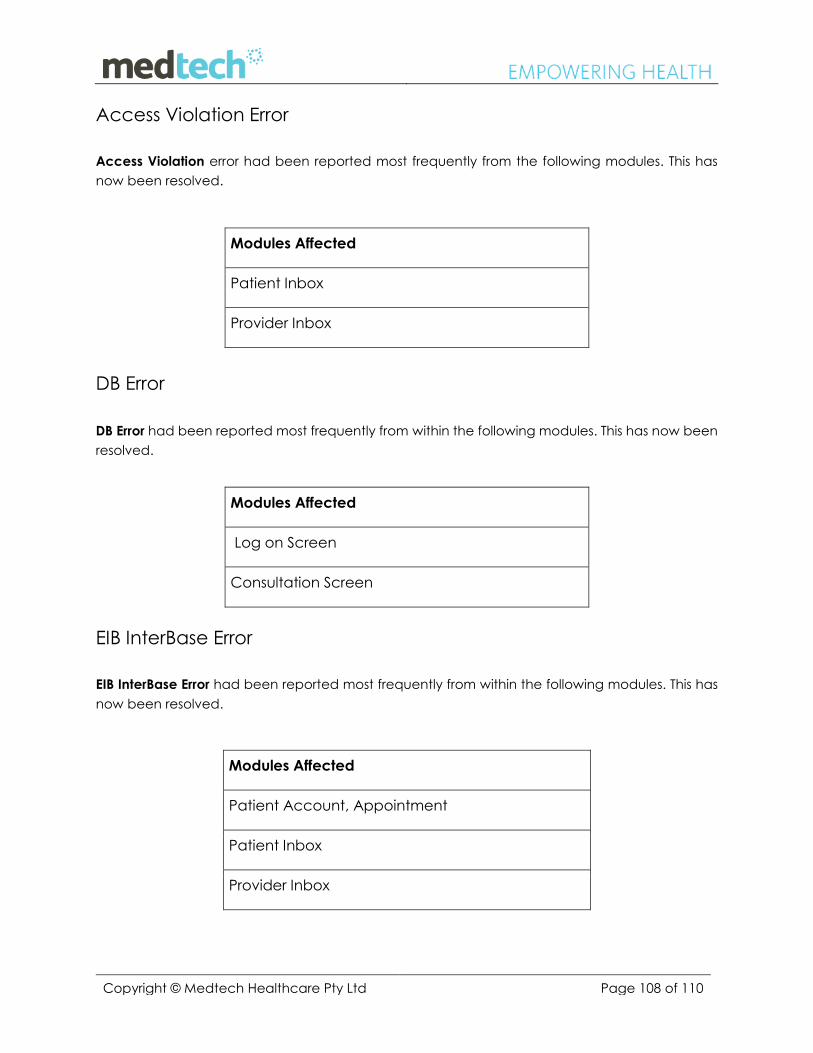
Copyright © Medtech Healthcare Pty Ltd Page 108 of 110
Access Violation Error
Access Violation error had been reported most frequently from the following modules. This has
now been resolved.
Modules Affected
Patient Inbox
Provider Inbox
DB Error
DB Error had been reported most frequently from within the following modules. This has now been
resolved.
Modules Affected
Log on Screen
Consultation Screen
EIB InterBase Error
EIB InterBase Error had been reported most frequently from within the following modules. This has
now been resolved.
Modules Affected
Patient Account, Appointment
Patient Inbox
Provider Inbox

Copyright © Medtech Healthcare Pty Ltd Page 109 of 110
Component error
Component Error had been reported most frequently from within the following modules. This has
now been resolved.
Modules Affected
Patient Inbox
Provider Inbox
Printing Error
Printing Error had been reported most frequently from within the following modules. This has now
been resolved.
Modules Affected
Patient Inbox
Provider Inbox
Mad Except Error Message
In earlier versions of Medtech Evolution, the Mad Except error messages displayed with various
tabs, each with a log file being created with all the details available in the various tabs. The size
of the log files were huge, hence the information window “please wait a moment” was displayed.
While this message being displayed, users were unable to continue working in the application.
This issue has now been fixed in Medtech Evolution Version 10.0.1 Build 5031; the Mad Except Error
message will now be displayed with two tabs only. The log file will be created with less detail for
the two tabs of information, therefore the file size will be minimal and there should be no repeat
occurrences of the “please wait a moment” error.
NOTE: Before deploying this patch, please save the ME log files to a different folder location and
clear the log files to evaluate the difference in file sizes.
Copyright © Medtech Healthcare Pty Ltd Page 110 of 110
For further information on this release, or any other queries regarding Medtech Evolution
Version 10.0.1 Build 5031, please contact the Medtech Helpdesk on 1800 148 165, or email