release v1.0-rc1 siddhartha dhiman, joshua teves, kayti keith
TRANSCRIPT
PyDesignerRelease v1.0-RC1
Siddhartha Dhiman, Joshua Teves, Kayti Keith
Mar 16, 2021

INSTALLATION
1 Welcome to the official PyDesigner project! 3
2 Notable Features 5
3 References 7
4 Indices and tables 35
i

ii

PyDesigner, Release v1.0-RC1
INSTALLATION 1

PyDesigner, Release v1.0-RC1
2 INSTALLATION
CHAPTER
ONE
WELCOME TO THE OFFICIAL PYDESIGNER PROJECT!
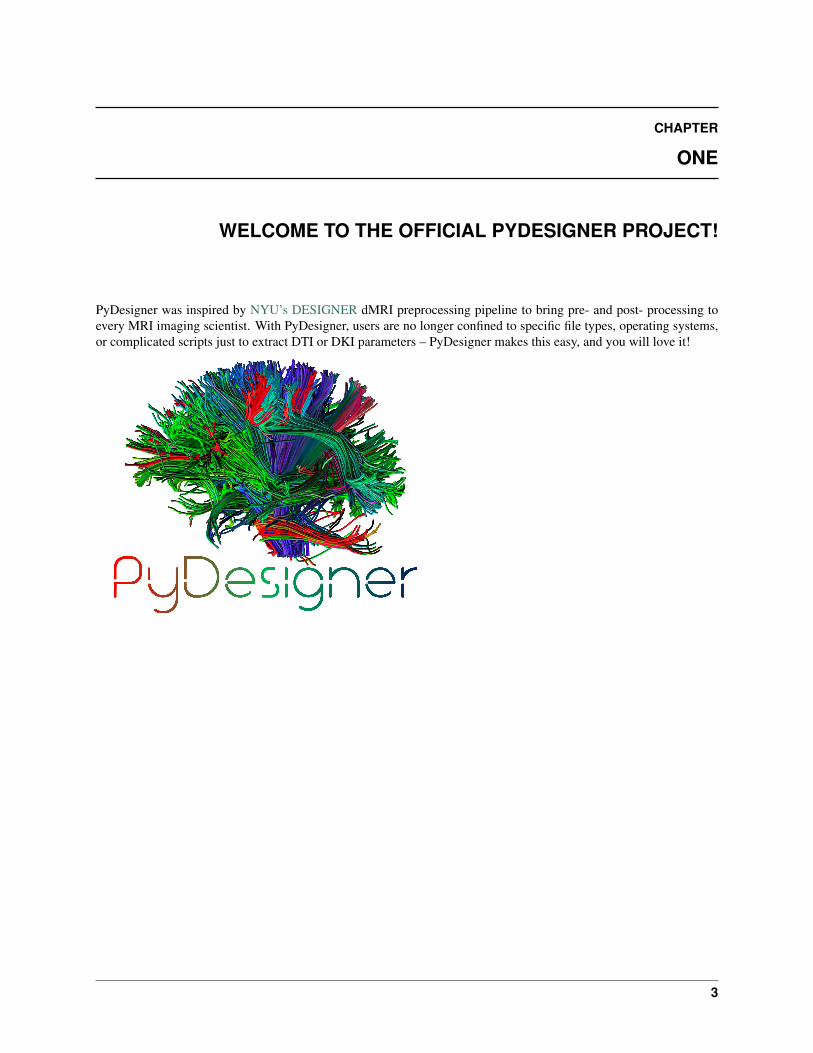
PyDesigner was inspired by NYU’s DESIGNER dMRI preprocessing pipeline to bring pre- and post- processing toevery MRI imaging scientist. With PyDesigner, users are no longer confined to specific file types, operating systems,or complicated scripts just to extract DTI or DKI parameters – PyDesigner makes this easy, and you will love it!
3
PyDesigner, Release v1.0-RC1
4 Chapter 1. Welcome to the official PyDesigner project!
CHAPTER
TWO
NOTABLE FEATURES
• 100% Python-based scripts
• Minimized package dependencies for small package footprint
• Preprocessing designed to boost SNR
• Accurate and fast DTI and DKI metrics via cutting-edge algorithms
• One-shot preprocessing to parameter extraction
• Cross-platform compatibility between Windows, Mac and Linux using Docker
• Highly flexible and easy to use
• Parallel processing for quicker preprocessing and parameterization
• Easy install with pip
• Input file-format agnostic – works with .nii, .nii.gz, .mif and dicoms
• Quality control metrics to evaluate data integrity – SNR graphs, outlier voxels, and head motion
• Uses the latest techniques from DTI/DKI/FBI literature
• Works with DTI, DKI, WMTI, FBI, or FBWM datasets
We welcome all DTI/DKI researchers to evaluate this software and pass on their feedback or issues through the Issuespage of this project’s GitHub repository. Additionally, you may join the M-AMA Slack channel for live support.
System Requirements Parallel processing in PyDesigner scales almost linearly with the nummber of CPU corespresent. The application is also memory-intensive due to the number of parameter maps being computed.
Based on this evaluation, for processing a single DWI using PyDesigner, we recommend the following minimumsystem specifications:
• Ubuntu 18.04
• Intel i7-9700 or AMD Ryzen 1800X [8 cores]
• 16 GB RAM
• 12 GB free storage
• Nvidia CUDA-enabled GPU
5

PyDesigner, Release v1.0-RC1
6 Chapter 2. Notable Features
CHAPTER
THREE
REFERENCES
The PyDesigner software packages is based upon the the references listed below. Please be sure to cite them ifPyDesigner was used in any publications.
1. Jensen JH, Helpern JA, Ramani A, Lu H, Kaczynski K. Diffusional kurtosis imaging: the quantification of non-Gaussian water diffusion by means of MRI. Magn Reson Med 2005;53:1432-1440. doi: 10.1002/mrm.20508
2. Jensen JH, Helpern JA. MRI Quantification of non-Gaussian water diffusion by kurtosis analysis. NMR Biomed2010;23:698-710. doi: 10.1002/nbm.1518
3. Fieremans E, Jensen JH, Helpern JA. White matter characterization with diffusional kurtosis imaging. Neuroim-age 2011;58:177-188. doi: 10.1016/j.neuroimage.2011.06.006
4. Tabesh A, Jensen JH, Ardekani BA, Helpern JA. Estimation of tensors and tensor-derived measures in diffusionalkurtosis imaging. Magn Reson Med 2011;65:823-836. doi: 10.1002/mrm.22655
5. Glenn GR, Helpern JA, Tabesh A, Jensen JH. Quantitative assessment of diffusional kurtosis anisotropy. NMRBiomed 2015;28:448-459. doi: 10.1002/nbm.3271
6. Jensen JH, Glenn GR, Helpern JA. Fiber ball imaging. Neuroimage 2016; 124:824-833. doi:10.1016/j.neuroimage.2015.09.049
7. McKinnon ET, Helpern JA, Jensen JH. Modeling white matter microstructure with fiber ball imaging. Neuroim-age 2018;176:11-21. doi: 10.1016/j.neuroimage.2018.04.025
8. Ades-Aron B, Veraart J, Kochunov P, McGuire S, Sherman P, Kellner E, Novikov DS, Fieremans E. Evaluationof the accuracy and precision of the diffusion parameter EStImation with Gibbs and NoisE removal pipeline.Neuroimage. 2018;183:532-543. doi: 10.1016/j.neuroimage.2018.07.066
9. Moss H, McKinnon ET, Glenn GR, Helpern JA, Jensen JH. Optimization of data acquisition and analysis forfiber ball imaging. Neuroimage 2019;200;690-703. doi: 10.1016/j.neuroimage.2019.07.005
10. Moss HG, Jensen JH. Optimized rectification of fiber orientation density function. Magn Reson Med. 2020 Jul25. doi: 10.1002/mrm.28406. Online ahead of print.
3.1 Changelog
All notable changes to this project will be documented in this file or page
7
PyDesigner, Release v1.0-RC1
3.1.1 v1.0-RC9
Mar 16, 2021
Added:
• None
Changed
• B-values are first rounded to a float insted of integer directly to prevent errors in preprocessing
Removed
• None
3.1.2 v1.0-RC8
Feb 15, 2021
Added:
• Added missing Rician preprocessing to -s, –standard preprocessing
Changed
• Potential sources of errors in FBWM have been mitigated with error-handling
Removed
• None
3.1.3 v1.0-RC7
Feb 11, 2021
Added:
• Missing Docker figures in RTD documentation
Changed
• Added error mitigation when FBI cost function fails to converge to a minimum cost
• Updated WMTI calculation to follow DKE outputs
Removed
• Unnecessary WMTI calculations
3.1.4 v1.0-RC6
Dec 22, 2020
Added:
• None
Changed
8 Chapter 3. References
PyDesigner, Release v1.0-RC1
• Replaced preprocessing.util.bvec_is_fullsphere() and preprocessing.util.vecs_are_fullsphere() with preprocessing.mrinfoutil.is_fullsphere(). Eventhough datasets may be half-shelled, it is inaccurate to label them as such because distortion relative to b-valueis not linear. As such, the slm=linear makes no sense. This new method performs the proper checksrequired before labelling a DWI as fully-shelled. A DWI is half-shelled iff max B-value is less than 3000 ANDthe norm of the mean direction vector is more than 0.3.
Removed
• See above
3.1.5 v1.0-RC5
Oct 26, 2020
Added:
• Check for b-value scaling so .bval file so values specified as either 2.0 or 2000 can be processed.
• fitting.dwipy() can now be pointed to user-defined bvec and bval paths. It previously required bvec andbval files to have the same name and path as DWI.
• DSI Studio tractography for FBI. Processing FBI dataset now produces an fbi_tractography_dsi.fibfile that can be loaded into DSI Studio to perform tractography.
Changed:
• Fixed issue where eddy correction would attempt
to QC and fail despite parsing the --noqc flag.
• SNR plotting works in very specific scenarious when input DWIs are of the same same dimensions. A try/exceptloop now ensure that the entire pipeline doesn’t halt due to errors in plotting.
Removed:
• None
3.1.6 v1.0-RC4
Sep 22, 2020
Added:
• Reslicing compatibility udpated for new MRTrix3 version where mrrelice has been changed to mrgrid.PyDesigner will work with either versions.
Changed:
• Fixed a bad indent in tensor reordering function that produced an error in DTI protocols.
Removed:
• None
3.1. Changelog 9
PyDesigner, Release v1.0-RC1
3.1.7 v1.0-RC3
Sep 21, 2020
Added:
• FBI fODF map for FBI tractography. Users may use MRTrix3 to further process this file.
• Variable maximum spherical harmonic degree to improve robustness of FBI fit. This was fixed at 6 previous, buthas been defaulted to 6 now. Users may change l_max with the -l_max n flag. This is based on informationfound at https://mrtrix.readthedocs.io/en/dev/concepts/sh_basis_lmax.html
Changed:
• None
Removed:
• None
3.1.8 v1.0-RC2
Aug 25, 2020
Added:
• References to README.rst
Changed:
• The minimum B-value required for FBI (4000) is now inclusive instead of exclusive. This would allow execu-tiong of FBI/FBWM for datasets with b=4000 mm/s^2
• Convert variable nthreads to string so subproces.run can recognize the flag
• Updated Slack permalink in README.rst
Removed:
• None
3.1.9 v1.0-RC1
Aug 19, 2020
Added:
• Methods to perform tensor only with compatible B-values. PyDesigner previously use all B-values in a DWI todo so. This behavior has been updated to use only B-values less than 2500
• FBI and FBWM calculations
• Brief documentation on how to run PyDesigner
Changed:
• Automatically issues dwipreproc or dwifslpreproc for compatibility with MRtrix3 >= 3.0.1
• Updated minimum version for required Python modules
Removed:
• None
10 Chapter 3. References
PyDesigner, Release v1.0-RC1
3.1.10 v0.32
Apr 21, 2020
Added:
• Intrinsic inter-axonal and mean extra-axonal diffusivity calculation to WMTI
Changed:
• Method json2fslgrad converted from class method to function definition
• json2fslgrad now transposes B0s in BVAL file in accordance with FSL’s gradient scheme
• Documentation update
• Extras directory renamed to extras
• DKE conversion scripts modified to correctly create ft and dke parameter files
Removed:
• None
3.1.11 v0.31
Apr 9, 2020
Added:
• NaN check in AWF calculculation that prevents further errors in intra-axonal and extra-axonal WMTI metricscomputation
Changed:
• designer.fitting.dwipy input file detection method
• Dockerfile_release now deletes the correct temporary file to prevent build error
Removed:
• None
3.1.12 v0.3
Apr 8, 2020
Added:
• Head motion plot from on eddy_qc outputs
• Outlier plot from IRRLS outlier detection
• Updated documentation
• Option to reslice DWI with --reslice [x,y,z]
Changed:
• Flag --epiboost [index] changed to --epi [n], where users can specify the number of reverse phaseencoded B0 pairs to use in EPI correction. Non-indexed B0s were previously destructively removed from DWI,leading to incorrect weighing of B0s in tensor estimation. The new method now preserves all B0s, therebyallowing faster EPI distortion correction without degrading DTI/DKI maps.
• Documentation moved to ReadTheDocs
3.1. Changelog 11
PyDesigner, Release v1.0-RC1
• Moved B0 production module from designer.preprocessing.brainmask to a separate function at designer.preprocessing.extractmeanbzero() that gets called by PyDesigner main. This allows a B0.nii to beproduced regardless of the --mask flag.
Removed:
• Documentation inconsistencies
3.1.13 v0.2 [The Cupid Release]
Feb 26, 2020
Added:
• Installer for setup with pip install .
• Multiple file support: .nii, .nii.gz, .dcm, .mif
• reStructuredText styled documentation
• Ability to use --resume flag for DWI concatenation
• SNR plot to depict signal changes before and after preprocessing
• Full utilization of AVX instruction set on AMD machines
• WMTI parameters
Changed:
• Fixed topup series not being denoised
Removed:
• CSF masking; feature failed to work consistently
3.1.14 dev-0.11
Dec 2, 2019
Added:
• None
Changed:
• Fixed bug in Dockerfile that prevented pydesigner.py from being found
Removed:
• None
12 Chapter 3. References
PyDesigner, Release v1.0-RC1
3.1.15 0.1-dev
Oct 22, 2019
Initial port of MATLAB code to Python. 200,000,000,000 BCE
3.2 PyDesigner Requirements
PyDesigner, currently, only requires the following three dependencies:
1. Python 3.6, or above
2. FSL 6.0.2, or above
3. MRtrix3, 3.0_RC3 or above
3.2.1 Linux and Mac Users
Unix-based system users are able to natively run all dependencies. Please proceed with the installation steps to con-figure PyD.
3.2.2 Windows Users
FSL and MRtrix3 are currently not available on the Microsoft Windows platform. Users running Windows are recom-mended to run the Docker image NeuroDock these interdependencies at near-native speed.
You may still proceed with the installation of PyDesigner Python modules to perform tensor fitting and map extraction.
3.3 FSL
FSL is a collection of tools and software used to process fMRI, MRI and DWI data. Visit their installation page fordownload and installation guide.
FSL 6.0.2 and above are recommended. All testing has been done with FSL 6.0.2. PyDesigner has not been testedwith other versions of FSL.
To check your FSL version:
$ flirt -version
A return value of at least FLIRT version 6.0 indicates successful installation of FSL, and that meets the PyDrequirement.
3.2. PyDesigner Requirements 13
PyDesigner, Release v1.0-RC1
3.4 MRtrix3 Installation
MRTRIX3 is another software suite aimed at analysis of DWI data. Here are some of their helpful pages.
1. Homepage
2. Download and Install
Confirm the success of installation with mrinfo -version. A valid output indicates successful installation.
3.5 Python
PyDesigner was built and tested on Python 3.7, so we enourage all users to adopt this version as well. While youmay use the Python supplied by default on your OS, we highly enocurage users to adopt a Conda-based Python likeMiniconda or Anaconda. Conda is a command line tool that allows the creation of separated environments withdifferent python versions and packages. This of it as running multiple virtual machines on the a single host - you caneasily switch between any for different needs, or run them simultaneously.
3.5.1 Download and Insall
Refer to either of these distributions’ page for installation. This guide assumes a conda (Miniconda) installation forsetting up Python. If you already have conda, or prefer using the default Python supplied by your OS, skip PyDesignerinstallation.
3.5.2 Update Conda
First, update conda with
$ conda update conda
3.5.3 Create new environment
Creating a conda environment is recommended as this will keep all of the dependencies required for this projectisolated to just the conda environment called dmri. For more information about conda environments, see The DefinitiveGuide to Conda Environments. Next, create a conda environment specifically for dMRI preprocessing, called dmri.You can choose any name, but be sure to replace dmri in this guide with any name of your choice.
Next, execute the following two line to create a Python environment ready for PyD installation.
$ conda create -n dmri python=3.7$ conda install -n dmri pip
The first line create an environment with Python v3.7, while the second line installs the PyPi package manager.
Once this is all set, you may proceed with the installation of PyD.
14 Chapter 3. References
PyDesigner, Release v1.0-RC1
3.6 PyDesigner
PyD is an installable Python package deisgned to perform pre- and post- processing of dMRI acquisitions.
3.6.1 Download
You may clone the main PyDesigner repository for the latest build, or download the build version of your choice fromthe Releases tab.
To clone the PyDesigner repository, in terminal, run:
$ git clone https://github.com/m-ama/PyDesigner.git
3.6.2 Install
PyDesigner can be automatically installed with all dependencies by opening a CLI and changing directory to rootPyDesigner directory, followed by
$ pip install .
Note: Remember to switch to your conda environement before parsing this command.
This will execute the setup.py script in root directory to automatically configure your Python environment forPyDesigner. When running the automated methods, PyDesigner can simply be called with the commad pydesigner.
Note: If you need a stable, tested and versioned build, download the most recent release from the Release tab. Clickon Source code (zip) link and decompress (unzip) to any folder you desire.
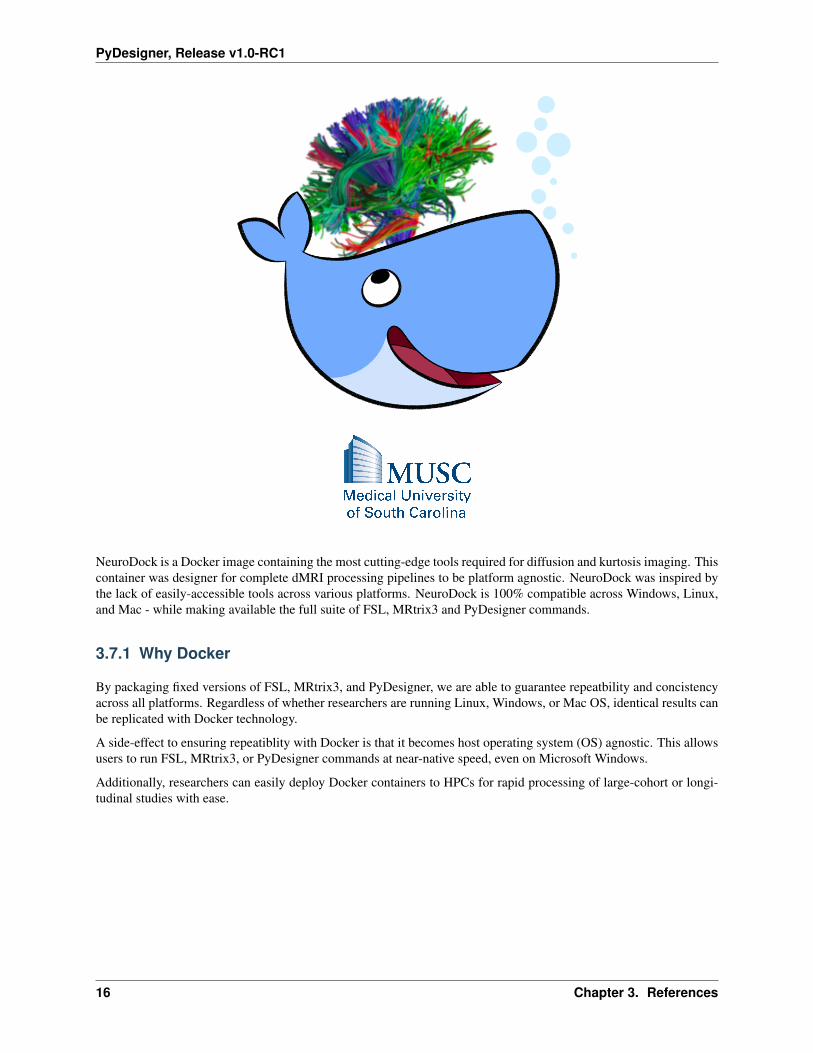
3.7 NeuroDock
Docker is a contaner technology desgned to package an application and all its needs, such as libraried and otherdependencies, into one package. We adapted PyDesigner and its dependencies for compatibility with the DockerEngine to bring DTI/DKI analyses to every one.
We bring you, NeuroDock
3.6. PyDesigner 15
PyDesigner, Release v1.0-RC1
NeuroDock is a Docker image containing the most cutting-edge tools required for diffusion and kurtosis imaging. Thiscontainer was designer for complete dMRI processing pipelines to be platform agnostic. NeuroDock was inspired bythe lack of easily-accessible tools across various platforms. NeuroDock is 100% compatible across Windows, Linux,and Mac - while making available the full suite of FSL, MRtrix3 and PyDesigner commands.
3.7.1 Why Docker
By packaging fixed versions of FSL, MRtrix3, and PyDesigner, we are able to guarantee repeatbility and concistencyacross all platforms. Regardless of whether researchers are running Linux, Windows, or Mac OS, identical results canbe replicated with Docker technology.
A side-effect to ensuring repeatiblity with Docker is that it becomes host operating system (OS) agnostic. This allowsusers to run FSL, MRtrix3, or PyDesigner commands at near-native speed, even on Microsoft Windows.
Additionally, researchers can easily deploy Docker containers to HPCs for rapid processing of large-cohort or longi-tudinal studies with ease.
16 Chapter 3. References
PyDesigner, Release v1.0-RC1
3.7.2 Docker vs Virtual Machines
Okay, so you may ask, “why not just load up a VM?”. You have a point. While the two technologies appear to bebehaving the same way, at least on the surface level, their inner mechanisms are differ vastly.
Unlike a VM, rather than creating a whole virtual OS loaded with dependencies and other applications, Docker allowsapplications to share the same OS kernel, thereby providing a significant performance uplift while saving up storagespace. With the removal of an entire guest OS in VMs, Docker containers save tons of computational resources thatcan be diverted towards better performance.
Now that you know some differences, it is time to move on to preparing the Docker image!
3.8 Docker Installation
Docker is relatively straightforward to install and run. Windows and Mac users are able to install Docker like anyother GUI-based software package installtion. The installation is not dependent on console arguments, like Linux.
Please efer to the instructions below for links and guide.
3.8.1 Linux
Users may refer to the Docker Engine installation guide located here, for installation instructions on their Linuxdisribution. the steps covered below are targeted for Debian-based or Ubuntu distributions.
Uninstall Docker
1. Uninstall older version or any traces of existing Docker installations
$ sudo apt-get remove docker docker-engine docker.io containerd runc
Don’t panic if apt-get returns an a warning about missing packages. It’s good they are missing, since we’re tryingto purge existing installations of Docker
Install Docker Engine
Once all taces of existing Docker installation and dependencies have been purged, you may proceed with the followingsteps to install the Docker Engine - Community.
1. Update the debian package list with:
$ sudo apt-get Update
2. Install basic packages that enable installation of Docker Engine and its dependencies with:
$ sudo apt-get install \apt-transport-https \ca-certificates \curl \gnupg-agent \software-properties-common
3. Add the Docker official GNU Privacy Guard (GPG) key to enable encryption and decryption of communicationwith the Docker server:
3.8. Docker Installation 17
PyDesigner, Release v1.0-RC1
$ curl -fsSL https://download.docker.com/linux/ubuntu/gpg | sudo apt-key add -
You may verify this key by following the full guide on official Docker documentation, the link to which is located atthe beginning of this page.
4. Add the stable Docker Engine repository to your package list with the command:
$ sudo add-apt-repository \"deb [arch=amd64] https://download.docker.com/linux/ubuntu \$(lsb_release -cs) \stable"
Adding a repository to your Linux distribution allows the OS to pull software packages from the developers’ servers.It directs the OS to the location where these packages are stored.
Then, update your package manager repository with the command:
$ sudo apt-get update
This updates the list of softwares your OS can fetch from various repositories.
5. Once your Debian-based system becomes aware of the Docker Engine, you may install it simply via the command:
$ sudo apt-get install docker-ce docker-ce-cli containerd.io
6. Verify your Docker Engine installation with the command:
$ sudo docker run hello-world
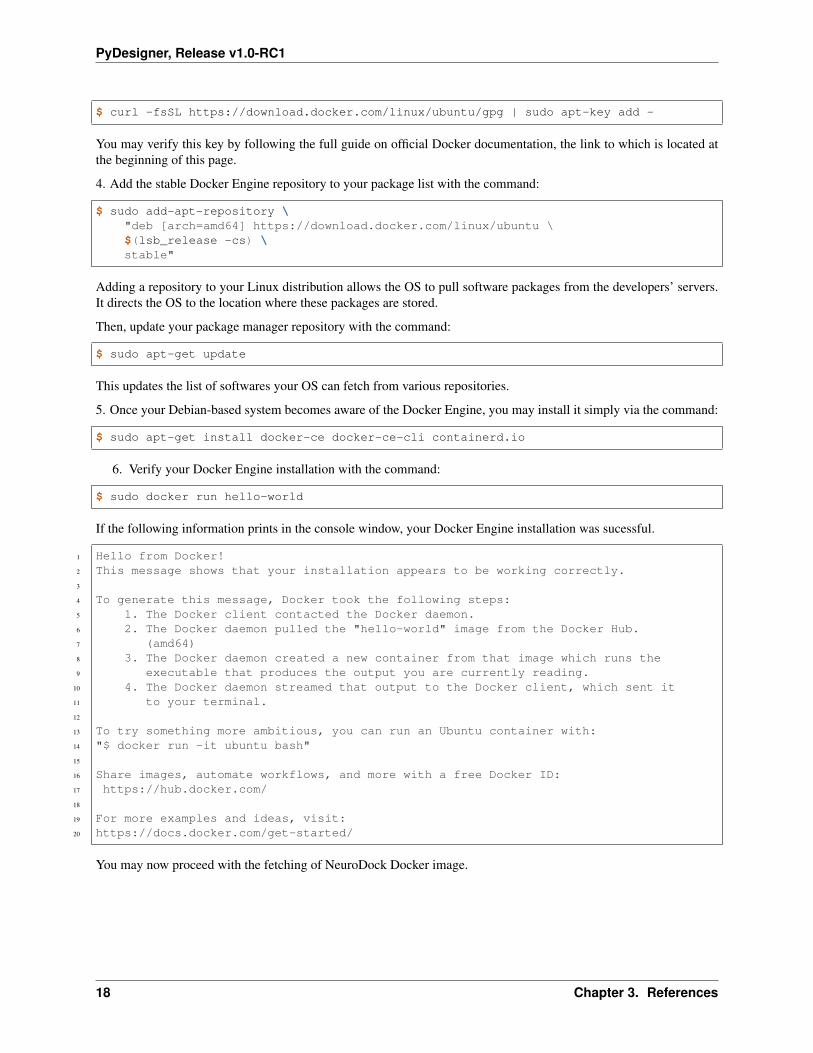
If the following information prints in the console window, your Docker Engine installation was sucessful.
1 Hello from Docker!2 This message shows that your installation appears to be working correctly.3
4 To generate this message, Docker took the following steps:5 1. The Docker client contacted the Docker daemon.6 2. The Docker daemon pulled the "hello-world" image from the Docker Hub.7 (amd64)8 3. The Docker daemon created a new container from that image which runs the9 executable that produces the output you are currently reading.
10 4. The Docker daemon streamed that output to the Docker client, which sent it11 to your terminal.12
13 To try something more ambitious, you can run an Ubuntu container with:14 "$ docker run -it ubuntu bash"15
16 Share images, automate workflows, and more with a free Docker ID:17 https://hub.docker.com/18
19 For more examples and ideas, visit:20 https://docs.docker.com/get-started/
You may now proceed with the fetching of NeuroDock Docker image.
18 Chapter 3. References
PyDesigner, Release v1.0-RC1
3.8.2 Mac OS
1. Download Docker Docker Desktop for Mac.
2. Double-click on the downloaded Docker.dmg to start the install process. Follw all on-screen instrcutions andprompts.
3. Docker should start automatically, indicated by the whale icon in the status bar. Alternatively, you may verfiywhether Docker is running by parsing the following command in Terminal:
$ docker version
Or you may run the hello-world container to verify the installation:
$ docker run hello-world
If you information text being printed into the PowerShell windows, then Docker has been installed successfully.
3.8.3 Windows
1. Download Docker Desktop for Windows.
2. Double-click the Docker for Windows Installer to run the installer.
3. Docker should start automatically, indicated by the whale icon in the taskbar. Alternatively, you may verfiy whetherDocker is running by parsing the following command in PowerShell.
$ docker version
Or you may run the hello-world container to verify the installation:
$ docker run hello-world
If you information text being printed into the PowerShell windows, then Docker has been installed successfully.
3.9 Docker Configuration
Docker can be configured in a wide-varietry of ways based on hardware resources available. Parameters such as CPUcores, RAM and storage can be assigned to Docker for running NeuroDock.
For validations purposes, the NeuroDock image was tested to work as intended on the following three systems:
Part Machine A Machine B Machine CBuild Apple iMac Pro Custom CustomOS Mac OS X Mojave Ubuntu 18.04 Microsoft Windows 10 ProCPU Intel Xeon W [8C/16T] AMD Ryzen R9 2700X [8C/16T] AMD Ryzen R9 2700X [8C/16T]Memory 64 GB 16 GB 16 GBVideo Raden Pro Vega 56 8 GB Nvidia GTX 1080 8 GB Nvidia GTX 1080 8 GB
We found identical results across the three operating systes on all these configurations.
3.9. Docker Configuration 19
PyDesigner, Release v1.0-RC1
3.9.1 Docker Preferences
Based on Docker’s system requirements, we recommend assigning the following sysem resources to Docker:
Parameter ValueCPUs 8Memory 16.00 GBDisk image size 32.00 GB
By default, Docker assigns itself half the number of available CPU cores and 2 GB of memory. Considering that theentire NeuroDock image is ~14.5 GB, we recommend at least double in disk image size. You may configure yourDocker Engine to run on this configuration, or input your own values based on your processing needs. The followingsections detail how to set these parameters.
Linux
CPU and memory access to Docker containers on Linux machines is manipulated via CFGS scheduler flags at runtime. These flags are:
Flag Description--cpus=<value> specify how many CPU cores to use-m or --memory specify the maximum amount of memory available to containers
For a more comprehensive list of manupulable system parameters for for Linux, please visit the Runtime options withMemory, CPUs, and GPUs page on Docker documentation.
Mac OS
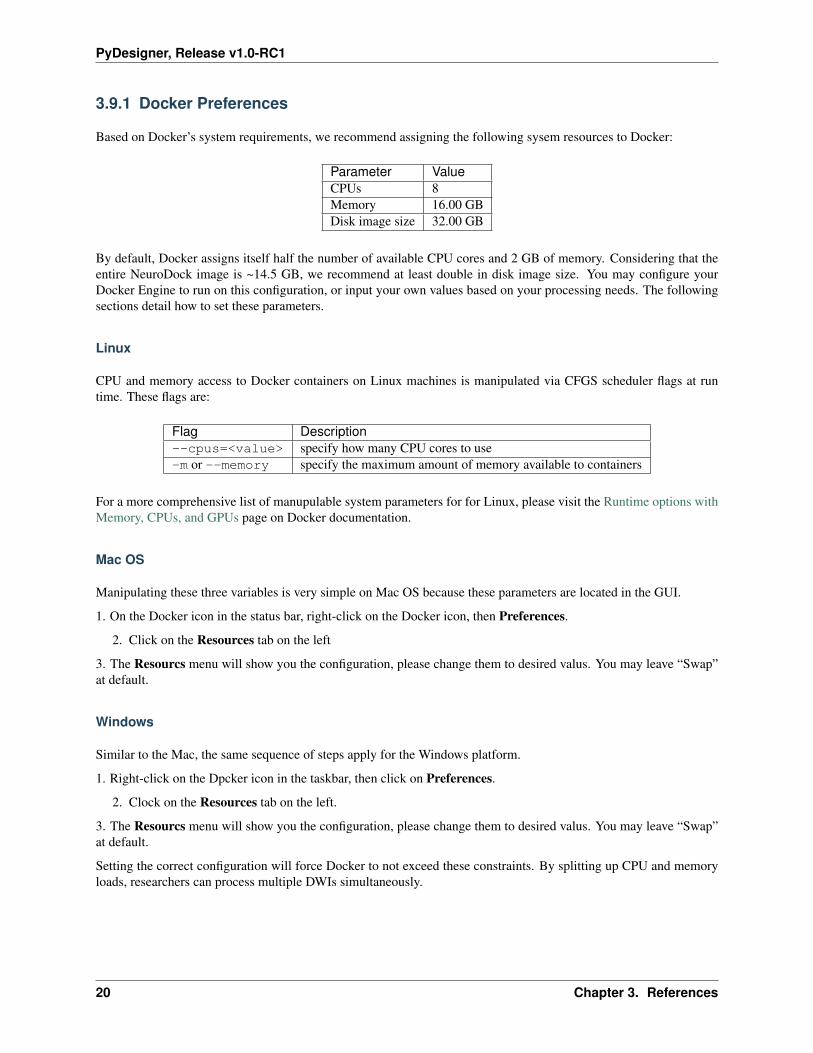
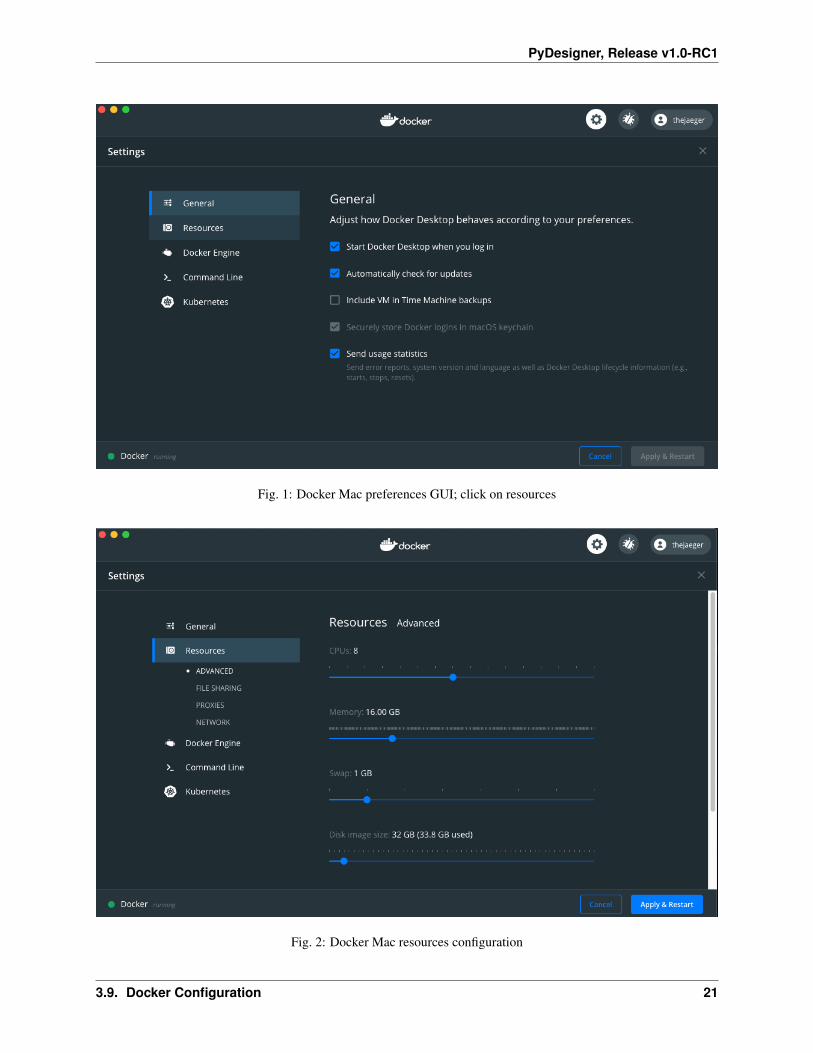
Manipulating these three variables is very simple on Mac OS because these parameters are located in the GUI.
1. On the Docker icon in the status bar, right-click on the Docker icon, then Preferences.
2. Click on the Resources tab on the left
3. The Resourcs menu will show you the configuration, please change them to desired valus. You may leave “Swap”at default.
Windows
Similar to the Mac, the same sequence of steps apply for the Windows platform.
1. Right-click on the Dpcker icon in the taskbar, then click on Preferences.
2. Clock on the Resources tab on the left.
3. The Resourcs menu will show you the configuration, please change them to desired valus. You may leave “Swap”at default.
Setting the correct configuration will force Docker to not exceed these constraints. By splitting up CPU and memoryloads, researchers can process multiple DWIs simultaneously.
20 Chapter 3. References
PyDesigner, Release v1.0-RC1
Fig. 1: Docker Mac preferences GUI; click on resources
Fig. 2: Docker Mac resources configuration
3.9. Docker Configuration 21
PyDesigner, Release v1.0-RC1
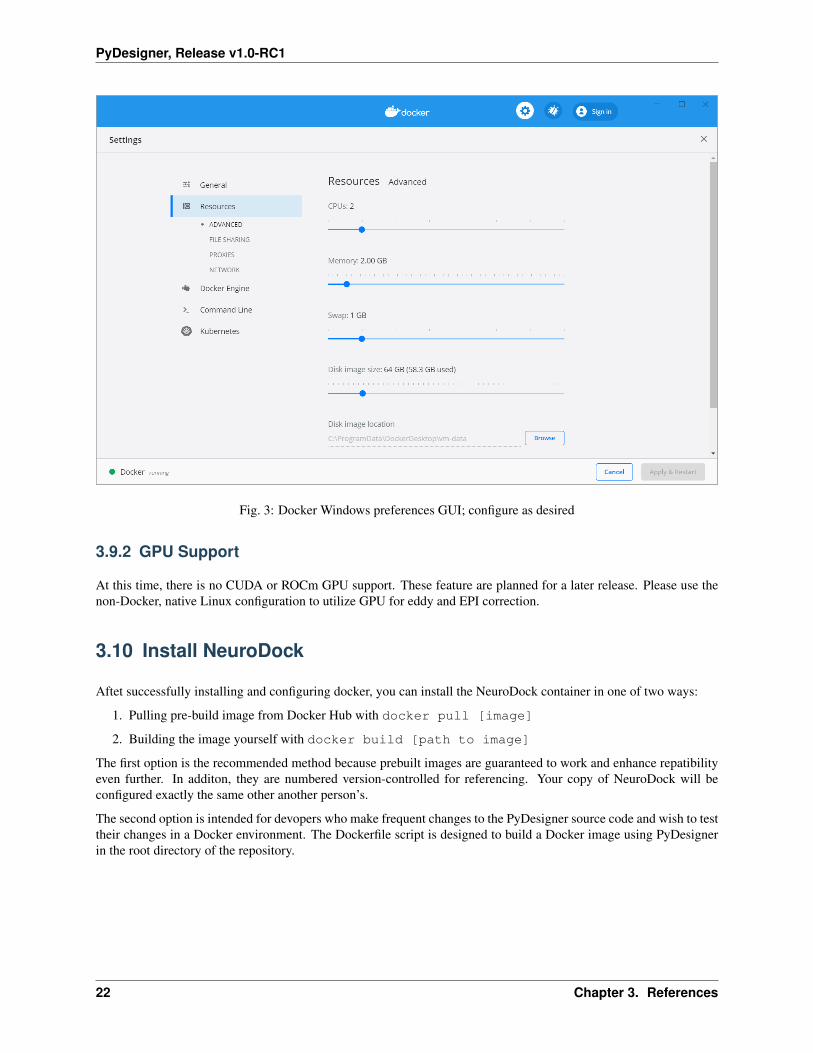
Fig. 3: Docker Windows preferences GUI; configure as desired
3.9.2 GPU Support
At this time, there is no CUDA or ROCm GPU support. These feature are planned for a later release. Please use thenon-Docker, native Linux configuration to utilize GPU for eddy and EPI correction.
3.10 Install NeuroDock
Aftet successfully installing and configuring docker, you can install the NeuroDock container in one of two ways:
1. Pulling pre-build image from Docker Hub with docker pull [image]
2. Building the image yourself with docker build [path to image]
The first option is the recommended method because prebuilt images are guaranteed to work and enhance repatibilityeven further. In additon, they are numbered version-controlled for referencing. Your copy of NeuroDock will beconfigured exactly the same other another person’s.
The second option is intended for devopers who make frequent changes to the PyDesigner source code and wish to testtheir changes in a Docker environment. The Dockerfile script is designed to build a Docker image using PyDesignerin the root directory of the repository.
22 Chapter 3. References
PyDesigner, Release v1.0-RC1
3.10.1 Docker Hub
Pulling pre-built NeuroDock is incredibly straight forward. Run the following command to pull NeuroDock.
$ docker pull docker pull dmri/neurodock:tagname
where tagname is the version you’d like to pull. To install NeuroDock v0.2, you would run the command
$ docker pull dmri/neurodock:v0.2
And that’s it! All you have to do now is to wait for the NeuroDock image to finish downloading.
3.10.2 Local Build
Disclaimer It must be reiterated that this option is preserved for developoers; regular users are encoruaged to stayaway from this method because there is no sematic versioning to referece.
1. Open up a command line interface and change directory to your PyDesigner repository
$ cd [PyDesginer Repo Path]
2. To build a Docker image using your local PyDesigner copy, run the command:
$ docker build -t [tagname] .
Here, tagname can be any name you wish to give this image. If you wish to build an image called neurodock, runthe command:
$ docker build -t neurodock .
This will build a Docker image called NeuroDock based on your local Pyesigner repository.
3.11 Run NeuroDock
Congratulations, you’ve come this far. You’ve installed Docker and NeuroDock, and are probably wondering howwhat else to do. . .
You’re done. Not even kidding! You can now start processing data with PyDesigner and NeuroDock. It’s almost asif FSL, MRtrix3 and PyDesigner commands are built natively into your OS - be it Linux, Mac OS, or even Windows!
3.11.1 Intro to Docker Run
Use the following form of docker run command to call all command made availble by NeuroDock:
$ docker run [OPTIONS] IMAGE [COMMAND] [ARG...]
where,
Flag Definition[OPTIONS] docker options to use when running the container; common options are -it, -v, -dIMAGE image name to run; in this instance, this is dmri/neurodock[COMMAND] specify which NeuroDock commands to run; these can be FSL, MRtrix3 or PyDesigner commands[ARG] arguments for [COMMAND]
3.11. Run NeuroDock 23
PyDesigner, Release v1.0-RC1
Users are encouraged to visit the Docker run reference documentation for more information on controlling the:code:`docker run ` command.
3.11.2 Practical Run
The section above convered a generic way to use the docker run command. For actual data analysis, we use thefollowing options.
1. -it --rm to run docker in interative TTY mode. What this implies is that your NeuroDock command will runlike any other OS commands such as ipconfig, watch, ls etc.
2. -v to mount the file system or folder to processing
Bind Mount
The second flag. -v, makes visible the host’s local filesystem to a Docker container, which otherwise runs in acompletely isolated system. By mounting a folder for NeuroDock, you are able to make it process data in said folder.The general guideline is to mount one subject folder at a time. It is advisable that users read through Docker’s bindmounts to understand how Docker containers handle storage.
The correct syntax for the -v flag is:
-v [HOST PATH TO MOUNT]:[v]
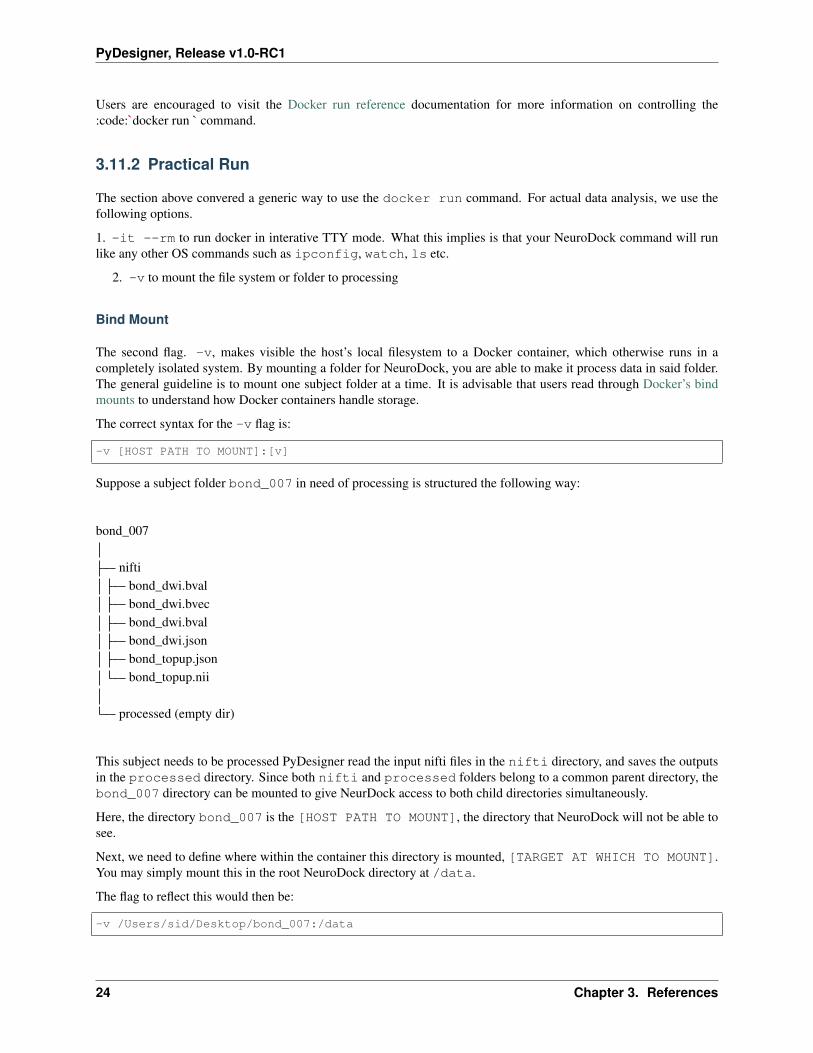
Suppose a subject folder bond_007 in need of processing is structured the following way:
bond_007
niftibond_dwi.bvalbond_dwi.bvecbond_dwi.bvalbond_dwi.jsonbond_topup.jsonbond_topup.nii
processed (empty dir)
This subject needs to be processed PyDesigner read the input nifti files in the nifti directory, and saves the outputsin the processed directory. Since both nifti and processed folders belong to a common parent directory, thebond_007 directory can be mounted to give NeurDock access to both child directories simultaneously.
Here, the directory bond_007 is the [HOST PATH TO MOUNT], the directory that NeuroDock will not be able tosee.
Next, we need to define where within the container this directory is mounted, [TARGET AT WHICH TO MOUNT].You may simply mount this in the root NeuroDock directory at /data.
The flag to reflect this would then be:
-v /Users/sid/Desktop/bond_007:/data
24 Chapter 3. References
PyDesigner, Release v1.0-RC1
This would make the contents of host directory bond_007 available in the NeuroDock at \data. Say, for example,the nifti file bond_dwi.nii, is located in the host system at /Users/sid/Desktop/bond_007/nifti/bond_dwi.nii. If the above mounting scheme is used, the NeuroDock container will see this file in /data/nifti/bond_dwi.nii
This filesystem transformation is particularly important when writing scripts for automatic or batch processing ofsubject directories using the NeuroDock container.
Put it all together
Considering everything on this page, it becomes incredibly easy to process a subject using the NeuoDock container.Sticking to bond_007 example above, and combining everthing so far, one could process Mr. Bond’s DWI with thecommand:
$ docker run -it --rm -v /Users/sid/Desktop/bond_007:/data \dmri/neurodock pydesigner --standard \--output /data/processed \/data/nifti/bond_dwi.nii,/data/nifti/bond_topup.nii
This command runs the --standard PyDesigner pipeline on the input files /Users/sid/Desktop/bond_007/nifti/bond_dwi.nii and /Users/sid/Desktop/bond_007/nifti/bond_topup.nii, and saves all outputs into the directory Users/sid/Desktop/bond_007/processed
3.12 Dataset Requirements
PyDesigner can process input DWIs in NifTi (.nii), compressed NifTi (.nii.gz), MRTrix3 file format (.mif), and DI-COM (.dcm) file formats. With the exception of .mif and .dcm filetypes, all other input formats are required to beaccompanied with .bval, .bvec, and .json files.
Note: With the exception of extensions, all files additional accompanying a DWI need to have the same name as DWI.For example, the input DWI file DKI_64_dir.niiwill be accompanied by DKI_64_dir.bval, DKI_64_dir.bvec and DKI_64_dir.json files
3.12.1 Separate or Combined Shells
Having B-value shells in separate or single 4D volumes doesn’t matter as long as each 4D DWI has it’s own accom-panying files.
3.12.2 JSON File
Every DWI will NEED a .json file of the same name; PyDesigner will refuse to process any input that fails to meetthis criterion. This behavior is intentional to prevent unintentional corrections from being exectuted when they areincompatible. Users must create a JSON file if their DICOM to NifTi conversion software fails to create it.
PyDesigner primarily looks for partial Fourier information within a JSON information. This information if encodedin the fields PartialFourier; or PhaseEncodingSteps and AcquisitionMatrixPE. Users need to havehave these fields at the bare minimum to process DWIs.
3.12. Dataset Requirements 25
PyDesigner, Release v1.0-RC1
3.13 PyDesigner Syntax
PyDesigner has a simple syntax:
$ pydesigner [OPTIONS] DWI1,DWI2,DWI3...
Mutiple DWIs may be combined by separating their paths with just a comma. For example, one may run PyDesignerwith standard processing using the command:
$ pydesigner -s --verbose \~/Dataset/DKI_B0.nii,~/Dataset/DKI_B1000.nii,~/Dataset/DKI_B2000.nii
Simple as that!
3.13.1 DTI, DKI, FBI, or FBWM?
Now that you are ready to process, you may be wondering how to get various metrics from your DWIs. It’s verysimple, PyDesigner figures this out for you. It analyzes input dataset’s B-value shells to extract as much informationas possible. All you, the user, have to do is to just load your DWIs in and grab a drink. Cheers and welcome!
3.14 List of Flags
PyDesigner is extremely flexible when it comes to dMRI processing. Users can easily enable or disable variouspreprocessing steps without changing the overall sequence.
The list below covers all these flags.
3.14.1 IO Control
These flags allow control of the pipeline’s I/O handling
-o DIR, --output DIR PyDesigner output directory
3.14.2 Preprocessing Control
Preprocessing contol flags allow users to tweak certain parts of the preprocessing pipeline, to accomodate all types ofdatasets.
-s, --standard Runs the recommended preprocessing pipeline in order: denoise, degibbs, undis-tort, brain mask, smooth, rician
-n, --denoise Denoises input DWI
--extent Shape of denoising extent matrix, defaults to 5,5,5
--reslice Reslices input DWI and outputs to a specific resolution in mm or output dimen-sions
--interp The interpolation method to use when resizing
-g, --degibbs Corrects Gibb’s ringing
26 Chapter 3. References
PyDesigner, Release v1.0-RC1
-u, --undistort Undistorts image using a suite of EPI distortion correction, eddy current correc-tion, and co-registration. Does not run EPI correction if reverse phase encodingDWI is absent.
--rpe_pairs n Speeds up topup if a reverse PE is present; specify the number (integer) of reversePE direction B0 pairs to use
--mask Computes a brain mask at 0.20 threshold by default
--maskthr Specify FSL bet fractional intensity threshold for brain masking, defaults to 0.20
--user_mask Provide path to user-generated brain mask in NifTi (.nii) format
-z, --smooth Smooths DWI data at a default FWHM of 1.25
--fwhm Specify the FWHM at which to smooth, defaults to 1.25
-r, --rician Corrects Rician bias
3.14.3 Diffusion Tensor Control
Users may also tweak computations in estimating DTI or DKI parameters with the following flags.
--nofit Performs preprocessing only, disables DTI/DKI parameter extraction
--noakc Disables brute forced kurtosis tensor outlier rejection
--nooutliers Disables IRLLS outlier detection
--fit_constraints Specify fitting constraints to use, defaults to 0,1,0
--noqc Disables saving of quality control (QC) metrics
--median Performs post processing median filter of final DTI/DKI maps. WARNING:Use on a case-by-case basis for bad data only. When applied, the filter altersthe values of most voxels, so it should be used with caution and avoided whendata quality is otherwise adequate. While maps appear visually soother withthis flag on, they may nonetheless be less accurate
3.14.4 Fiber Ball Imaging (FBI) Control
FBI parameters may be fine-tuned with the following flags.
--l_max n Maximum spherical harmonic degree used in spherical harmonic expansion forfODF calculation
3.14.5 Pipeline Control
These are more general pipeline flags that interface directly with the user or machine.
--nthreads n Specify number of CPU workers to use in processing, defaults to all physicallyavailable workers
--resume Resumes preprocessing from an aborted or partial previous run
--force Forces overwrite of existing output files
--verbose Displays console output
3.14. List of Flags 27

PyDesigner, Release v1.0-RC1
--adv Diables safety check to force run certain preprocessing steps WARNING: Thisflag is for advanced users only who fully understand the MRI system andits outputs. Running with this flag could potentially yield inaccuracies inresulting DTI/DKI metrics
3.15 List of Output Files
The number of output files generated by PyDesigner may seem very daunting at first. However, once a certain level offamiliarity is achieved, it becomes very easy.
There are generally three types of outputs:
1. Preocessing files: files used in preprocessing; stored in root output directory 2. Metric files: DTI/DKI parametersmaps, stored in /metrics folder 3. QC Metrics: files that enable data quality control; stored in /metrics_qc
The list of ever possible output file is given in the table below.
Filename DescriptionRoot DirectoryB0.nii mean b0 image extracted from processed DWI (exists only if:code:–mask is used)brain_mask.nii brain mask extracted from B0.nii (exists only if --mask is used)dwi_preprocessed.nii fully preprocessed DWI NifTi filedwi_preprocessed.bval fully preprocessed DWI’s BVAL file in FSL formatdwi_preprocessed.bvec fully preprocessed DWI’s BVEC file in FSL formatdwi_preprocessed.json fully preprocessed DWI’s BIDS sidecardwi_raw.nii raw DWI NifTi file before preprocessingdwi_raw.bval raw DWI’s BVAL file in FSL formatdwi_raw.bvec raw DWI’s BVEC file in FSL formatdwi_raw.json raw DWI’s BIDS sidecarnoisemap.nii noisemap NifTi file produced from denoising (exists only if --denoise is used)working.mif MRtrix3 file formatted DWI that is being preprocessedlog_command.json history of preprocessing steps and commands run of DWIQC Metrics root_dir/metrics_qchead_motion.png estimated head motion plotted from displacement field computed by EPI and eddy current correction (exists if --undistort is used)outliers plot of percentage outliers detected by IRLLS outlier detectionSNR.png snr plots of dwi_raw.nii and dwi_preprocessed.nii/fitting/outliers_akc.nii outliers detected by brute forced kurtosis tensor outlier rejection algorithm (3d nifti)/fitting/outliers_irlls.nii outliers voxels detected by irlls outlier detection (4d nifti)/eddy all outputs of the eddy correction (exists if --undistort is used)DTI/DKI Metrics root_dir/metricsdti_ad.nii axial diffusivity map (3d nifti)dti_rd.nii radial diffusivity map (3d nifti)dti_md.nii mean diffusivity map (3d nifti)dti_fa.nii fractional anisotropy map (3d nifti)dti_fe.nii first eigenvalues; represents the principal direction of water (4d nifti)dti_trace.nii sum of diagnols of in diffusion tensor (3d nifti); the mean diffusivity (MD) is three times the trace [MD 3 * trace ]dki_ak.nii axial kurtosis map (3 nifti)dki_rk.nii radial kurtosis map (3d nifti)dki_mk.nii mean kurtosis map (3d nifti)dki_kfa.nii kurtosis fractional anisotropy map (3d nifti)dki_mkt.nii mean kurtosis tensor (3d nifti); alternative calculation for mean kurtosis
continues on next page
28 Chapter 3. References

PyDesigner, Release v1.0-RC1
Table 1 – continued from previous pageDT.nii diffusion tensor (4d nifti; 6 three-dimensional volumes)KT.nii kurtosis tensor (4d nifti; 15 three dimensional volumes)FBI/FBWM Metrics root_dir/metricsfbi_zeta.nii zeta (3d nifti)fbi_faa.nii axonal fractional anisotropy (3d nifti)fbi_fodf.nii FBI fODFs from spherical harmonic expansion (4d nifti)fbi_tractography_dsi.fib FBI fODFs prepared for DSI Studio’s tractography (fib)fbwm_awf.nii axonal water fraction (3d nifti)fbwm_Da.nii intra-axonal diffusivity (3d nifti)fbwm_De_ax.nii axial extra-axonal diffusivity (3d nifti)fbwm_De_rad.nii radial extra-axonal diffusivity (3d nifti)fbwm_De_mean.nii mean radial extra-axonal diffusivity (3d nifti)fbwm_fae.nii extra-axonal fractional anisotropy (3d nifti)fbwm_minCost.nii minimum cost computed by cost function (3d nifti)fbwm_minCost.nii all costs computed by cost function (4d nifti; 100 three dimensional volumes)WMTI Metrics root_dir/metricswmti_awf.nii axonal water fraction (3d nifti)wmti_eas_ad.nii extra-axonal axial diffusivity (3d nifti)wmti_eas_rd.nii extra-axonal radial diffusivity (3d nifti)wmti_eas_tort.nii extra-axonal tortuosity (3d nifti)wmti_ias_da.nii intra-axonal intrinsic diffusivity (3d nifti)
All other files in folder /intermediate_nifti are used by PyDesigner for preprocessing flow control, especiallyto allow --resume or --force flags to work as intended.
3.16 Grants
The PyDesigner project is a result of effort from several contributors and support from grants. This section acknowl-edges all contributions to the project.
Table 2: List of supporting grantsSpon-sor
GrantNum-ber
Title
NIH 1R01AG054159Quantitative Neuroimaging Assessment of White Matter Integrity in the Context of Agingand AD
NIH P20GM109040Institutional Award (IDeA) Center of Biomedical Research ExcellenceNIA 1R01AG057602Assessing Brain Microstructure in Alzheimer’s Disease with Advanced Diffusion MRINIDCD R01DC014021Brain Connectivity Supporting Language Recovery in AphasiaNINDS R01NS110347Predicting Epilepsy Surgery Outcomes Using Neural Network Architecture
3.16. Grants 29
PyDesigner, Release v1.0-RC1
3.17 Contributors
Fig. 4: Siddhartha Dhiman,MSc
Research Specialist
The Center for BiomedicalImagingDepartment of NeuroscienceMedical University of SouthCarolina
Fig. 5: Joshua Teves, BScSystems Programmer
The Center for BiomedicalImagingDepartment of NeuroscienceMedical University of SouthCarolina
Fig. 6: Kayti Keith, BScResearch Specialist
The Center for BiomedicalImagingDepartment of NeuroscienceMedical University of SouthCarolina
30 Chapter 3. References
PyDesigner, Release v1.0-RC1
Fig. 7: Benjamin Ades-Aron, MSc
PhD Student
Center for Biomedical ImagingDepartment of RadiologyNYU School of MedicineNew York University
Fig. 8: Jens Jensen, PhDProfessor
The Center for BiomedicalImagingDepartment of NeuroscienceMedical University of SouthCarolina
3.17. Contributors 31

PyDesigner, Release v1.0-RC1
Fig. 9: Els Fieremans, PhDAssistant Professor
Center for Biomedical ImagingDepartment of RadiologyNYU School of MedicineNew York University
Fig. 10: Jelle Veraart, PhDAssistant Professor
Center for Biomedical ImagingDepartment of RadiologyNYU School of MedicineNew York University
32 Chapter 3. References
PyDesigner, Release v1.0-RC1
Fig. 11: Vitria Adisetiyo,PhD
Staff Scientist
The Center for BiomedicalImagingDepartment of NeuroscienceMedical University of SouthCarolina
3.17. Contributors 33

PyDesigner, Release v1.0-RC1
34 Chapter 3. References

CHAPTER
FOUR
INDICES AND TABLES
• genindex
• modindex
• search
35