remote deposit servicetraining.works.com/direct/media/rds start guide 5.1.pdfif you are using live...
TRANSCRIPT

Remote Deposit Service
Start Up Guide


*Screen shots are shown for illustrative purposes only and may vary based on the version of Windows you are currently using.
Step 1:
Confirm your PC meets system requirements and you have administrator rights.
The following instructions are for PCs running Microsoft Windows XP. The steps for other
operating systems may vary. Before installation, verify that your PC has the minimum system
requirements. If it does not meet the minimum requirements, please upgrade your PC.
You must have high speed broadband internet access.
Check to see if you have an open USB Port.
To check the processor, RAM and operating system, right click on
the My Computer icon and select the Properties option. The
System Properties window will then display.
Confirm that you have:
2GHz Processor or more
1GB RAM or more
Windows XP (Service Pack 2 or higher) or Windows Vista
Click OK.
To check the amount of free space on
your hard drive, double click on the My Computer icon. Then right
click on the Local Disk Drive icon where the scanner software will
be installed. Select Properties. The Disk Properties window will
then display.
Confirm that you have:
3GB of free disk space.
Click OK.
In order to install the software, you must have administrator rights.
To confirm that you have administrator rights, double click on the
System Clock in the lower right corner of the taskbar.
1

Step 1: Cont’d.
If the system clock does not appear and the following
window displays, you do not have the proper
privileges. Contact your system administrator for
technical support.
Step 2:
Install Digital Certificate
Install digital certificates for all users, including those who will review and approve deposits.
Follow the instructions outlined in the e-mail you received from Bank of America – Remote
Deposit Service ([email protected]).
To confirm the installation of your digital certificates, open Microsoft Internet Explorer from your
desktop, click Tools, click Internet Options, select the Content tab, click Certificates.
All of the digital certificates installed on the PC will appear.
Click Close, then click Cancel.
Step 3:
Check Components in the Scanner Welcome Kit
Note: This guide references the TS230 scanner as an example. Instructions may vary slightly for
other scanner models.
a. DCC TS230 scanner
b. Power supply cord
c. Power supply w/scanner cord
d. Inkjet cartridge
e. USB 2.0 cable
Not pictured:
• Cleaning cards
• Test checks (for training purposes)
• Remote Deposit Service CD-Rom
• Remote Deposit Service user guide
Step 4:
Install the Remote Deposit Service Software
Note: Before beginning the installation process, please disconnect the scanner from the
computer. Failure to do so will prevent the scanner from operating properly upon completion.
Note: Your version of RDS may be different (i.e.-5.1.XXX). Version “5.1” is used in this document for illustrative purposes.
a.
b.c.
d.
e.
2
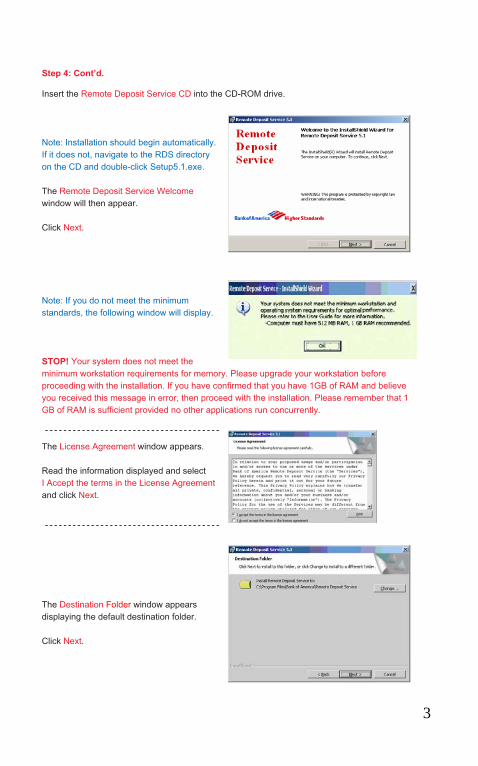
Insert the Remote Deposit Service CD into the CD-ROM drive.
Step 4: Cont’d.
Note: Installation should begin automatically.
If it does not, navigate to the RDS directory
on the CD and double-click Setup5.1.exe.
The Remote Deposit Service Welcome
window will then appear.
Click Next.
Note: If you do not meet the minimum
standards, the following window will display.
STOP! Your system does not meet the
minimum workstation requirements for memory. Please upgrade your workstation before
proceeding with the installation. If you have confirmed that you have 1GB of RAM and believe
you received this message in error, then proceed with the installation. Please remember that 1
GB of RAM is sufficient provided no other applications run concurrently.
The License Agreement window appears.
Read the information displayed and select
I Accept the terms in the License Agreement
and click Next.
The Destination Folder window appears
displaying the default destination folder.
Click Next.
3

The Capture Gateway Host Name Address window
appears pre-filled with the Host Name and Port
configuration for RDS. DO NOT modify these settings.
Host Name: check21pln.bankofamerica.eds.com
Port: 443
Click Next.
The Configure Scanner window appears displaying a
list of supported scanners.
Select Digital Check.
Click Next.
Note: A warning message will appear reminding you to
unplug your scanner from the computer or turn off your
scanner before proceeding.
The Remote Deposit Service Install window displays
the setup summary. Review the settings.
Click Install.
Wait while the Remote Deposit Service
files are copied to your computer.
When the setup is complete, the
InstallShield Wizard Complete
window appears.
Click Finish.
The installation is now complete.
4

Step 5:
Scanner Placement & Setup (TS230 shown)
• Remove the center cover of the scanner by lifting vertically
• Open the inkjet cartridge pouch and remove the tape seal on
the cartridge
• Carefully insert the cartridge at a slight downward angle and
snap into place
• Replace the center cover
• Press down firmly on the entry tray to ensure proper positioning
• Pull out exit wire stop approximately 3 inches (7.6 cm) to
accommodate business size checks
• Set the scanner in a position at least 6 inches (15.2 cm)
away from the computer and any power supply to prevent
magnetic interference
• With the scanner turned off, connect the power supply
cord to the scanner and then plug the power supply cord into an electrical outlet
• Connect the USB 2.0 cable from the back of the scanner to the PC
Step 6:
Power On The Scanner
Turn the scanner on. The LED in
the center of the scanner will illuminate.
Step 7:
Pick A Mode
Double click the RDS Icon located on your
computer desktop.
Note: Do not log in at this time.
Click Setup button to change configurable options.
Click on System tab.
Select Live Mode to make your first live deposit.
Click OK and proceed to Step 8.
- or -
Select Demo Mode if you want to practice or demonstrate
the system. Click OK and skip to Step 9 to log in. The
application will restart.
Exit Wire
Stop
Entry
Tray
5

Step 8:
Configure the Application
Click on Reports tab.
• Select any Print/Save/Display options you want to
enable.
Enter the following (case sensitive):
Host Name:
check21pln.bankofamerica.eds.com
Service Name:
BankofAmericaRemoteDepositServiceReporting
Port: 443
Click Apply.
Click on History tab.
Select the number of days you prefer.
Click Apply.
Note: Between 10 and 30 is recommended.
Depending upon your volume and free space
on your computer, saving more than 15 days of data
may impact system performance.
Click on Print Text tab.
Select the information you want the scanner to print on
the back of the physical item. This is NOT an
endorsement, and is used for your information only (to
note store number etc.).
Click Apply.
6

Step 8: Cont’d.
Click on Connection tab.
The following information will be populated in the
CG Host Name Address. Do Not Edit this Information:
Host Name:
check21pln.bankofamerica.eds.com
Service Name: CG
Port: 443
Connection Timeout: 15
Check the Server Requires User Certificate box.
Note: If you use a proxy server, then the
proxy server section must be completed.
Click OK.
The application will shut down.
Step 9:
Logging Into the Remote Deposit Application
Double click on RDS Icon .
Enter your User ID in the User Name field. (This is
the user ID that was e-mailed by Bank of America)
and Password into the log in screen.
Select the digital certificate for Remote Deposit
Service from the drop down list on the log in screen.
Click OK.
After a successful log in you will see this screen.
7

Step 10:
Aligning & Inserting Deposit Items
Compute the expected total amount of your deposit before continuing. This amount will be used
as your Control Balance and will be needed in step 11.
If you are using Live mode, use live checks. If you are in
Demo mode, use the test checks provided.
Align the bottom and left edges of the deposit items.
Remove all staples, paper clips etc and straighten any bent
corners before loading.
Place as many items as will comfortably fit into the entry
tray on the left side of the scanner. Items should be right
side up with the front of the item facing left, away from the output slot. Additional items can be
added later in the process.
Note: The following steps vary by scanner model.
If a deposit slip is used, place the deposit slip before any debit items.
Slide the item(s) up to the line on the body of the scanner.
Note: DO NOT push or insert items past the line.
Step 11:
Scanning Deposit Items
Click the Scan Icon at the upper left corner of the
screen to initiate communication between the scanner
and the RDS application. After a few seconds, the “ON”
light will change from red to green indicating the scanner
is ready to operate.
If using multiple accounts, select the account for your
deposit from the Select Account window and click OK.
This screen will not appear if only one account is
available.
Enter your deposit total in the Control Balance window.
Click OK.
Your deposit items will begin scanning.
8

Step 12:
Verifying and Editing Scanned Items
When items are scanned, they appear in the scan
window. The scanned item’s MICR data populates the
item grid below the image, one row per item scanned.
• Validate the amounts of the items
scanned and correct any errors.
• A green check mark in the item status column
indicates successful scan, no correction is needed.
• A yellow warning “!” in the item status column indicates further user action
is required.
• A red Custom Fields tab or Payment Fields tab indicates further user action
is required.
Click on the row with the warning to display the messages in the lower window.
• If the information in the pink field is correct, double click and press Enter.
• If the information in the pink field is incorrect, double click to Edit the Data, correct the item,
and then press Enter.
Step 13:
Completing the Deposit
Ensure the control balance in the lower right corner
equals the check totals. If your control balance is
incorrect, use the Control Balance button to change
the amount. Once all errors have been corrected and
the control balance equals the check totals, the
Complete button will become enabled.
Click Complete to send deposit to the bank. If a
deposit review is required as per your set-up, this
screen will appear.
The reviewer will need to login, then review and/or
submit the deposit.
9

Step 14:
Check Deposit Transmission Status
The Reports Icon is on the top right corner of the
screen.
Use this icon to navigate to the reports window.
The reports window allows you to review transmission
status, review and print deposit reports, as well as item
images.
The top pane displays deposit summary information.
Click on the Deposit to display items associated with that deposit. In order to view the images of
the associated items, double click on the item from the lower pane.
Refer to the Deposit Transfer Status column to verify that the deposit has been ‘sent’ to the bank.
10

Scanner Maintenance
Cleaning:
Use the specially designed cleaning card to perform a simple cleaning cycle once a month or
every 5,000 checks, whichever comes first. Follow these steps to clean the scanner:
1. Remove the cleaning card from the sealed pouch and insert
into the entry feeder as shown to the right.
2. Select Scan from the deposit application and create a dummy
deposit while grasping the trailing edge of the cleaning card.
This action will create the desired scrubbing” condition with the
feed rollers. Repeat this action 3-4 times while rotating the
cleaning card each time.
3. Next, perform 3-4 additional scan cycles with the cleaning card, but do not grasp the trailing
edge of the card. Rotate the cleaning card each time to ensure that the cleanest part of the
card is being used.
4. Abort the dummy deposit.
Use Compressed Air:
Use compressed air to clean the scanner frequently. This will eliminate dust, paper fragments,
and other foreign bodies that may damage the scanner.
Remove Ink Smudges:
Check the ink-jet cartridge for leaks. If it has leaked, remove the cartridge and clean it off, then
insert it back in the scanner.
Replace Ink Jet Cartridge:
Periodically check the condition of the ink jet cartridge and replace it when the ink begins to fade
in density on the printed items.
Scanner supplies may be obtained by contacting the Help Desk.
Help Desk:
1.888.367.2521 toll-free or
1.804.553.6252 outside of the United States
Bank of America, N.A. Member FDIC.
©2007 Bank of America Corporation
00-35-2673NSB
11
