remote keyless entry features - chevrolet system features remote keyless entry features while most...
TRANSCRIPT
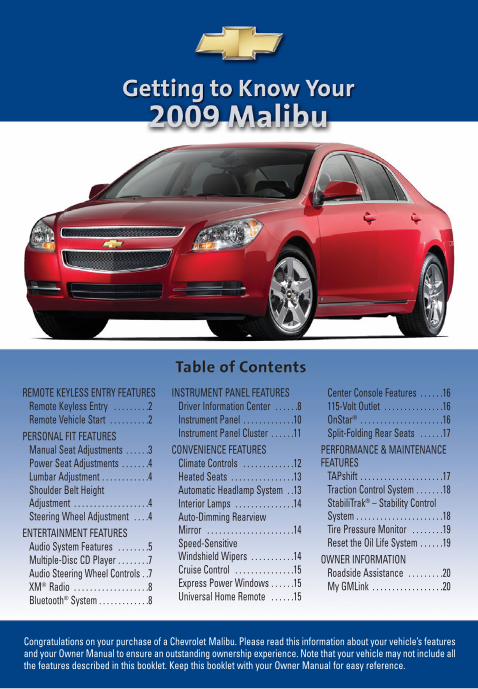
Congratulations on your purchase of a Chevrolet Malibu. Please read this information about your vehicle’s featuresand your Owner Manual to ensure an outstanding ownership experience. Note that your vehicle may not include allthe features described in this booklet. Keep this booklet with your Owner Manual for easy reference.
REMOTE KEYLESS ENTRY FEATURESRemote Keyless Entry . . . . . . . . .2Remote Vehicle Start . . . . . . . . . .2
PERSONAL FIT FEATURESManual Seat Adjustments . . . . . .3Power Seat Adjustments . . . . . . .4Lumbar Adjustment . . . . . . . . . . . .4Shoulder Belt Height Adjustment . . . . . . . . . . . . . . . . . . .4Steering Wheel Adjustment . . . .4
ENTERTAINMENT FEATURESAudio System Features . . . . . . . .5Multiple-Disc CD Player . . . . . . . .7Audio Steering Wheel Controls . .7XM® Radio . . . . . . . . . . . . . . . . . . .8Bluetooth® System . . . . . . . . . . . . .8
INSTRUMENT PANEL FEATURESDriver Information Center . . . . . .8Instrument Panel . . . . . . . . . . . . .10Instrument Panel Cluster . . . . . .11
CONVENIENCE FEATURESClimate Controls . . . . . . . . . . . . .12Heated Seats . . . . . . . . . . . . . . . .13Automatic Headlamp System . .13Interior Lamps . . . . . . . . . . . . . . .14Auto-Dimming Rearview Mirror . . . . . . . . . . . . . . . . . . . . . .14Speed-Sensitive Windshield Wipers . . . . . . . . . . .14Cruise Control . . . . . . . . . . . . . . .15Express Power Windows . . . . . .15Universal Home Remote . . . . . .15
Center Console Features . . . . . .16115-Volt Outlet . . . . . . . . . . . . . . .16OnStar® . . . . . . . . . . . . . . . . . . . . .16Split-Folding Rear Seats . . . . . .17
PERFORMANCE & MAINTENANCEFEATURES
TAPshift . . . . . . . . . . . . . . . . . . . . .17Traction Control System . . . . . . .18StabiliTrak® – Stability ControlSystem . . . . . . . . . . . . . . . . . . . . . .18Tire Pressure Monitor . . . . . . . .19Reset the Oil Life System . . . . . .19
OWNER INFORMATIONRoadside Assistance . . . . . . . . .20My GMLink . . . . . . . . . . . . . . . . . .20

2
REMOTE KEYLESS ENTRY FEATURES
Remote Vehicle Start(if equipped)
The Remote Keyless Entry (RKE) transmitter allows you to lock andunlock your vehicle and perform otherfunctions while up to approximately65 feet away from the vehicle (196 feetif equipped with Remote Vehicle Start).RKE functions include:
(Lock): Press this button to lock allthe doors. RKE feedback (light flashand/or horn chirp) can be programmedusing the Driver Information Center(DIC).
(Unlock): Press this button to un lockthe driver’s door. Press it again withinfive seconds to unlock all remainingdoors. RKE feedback (light flash and/orhorn chirp) can be programmed usingthe DIC.
(Trunk Release): Press and holdthis button for approximately one sec-ond to unlatch the trunk. The trunk also may be opened by pressing the Trunk Release button onthe driver’s door.
(Vehicle Locator/PanicAlarm): Press and release this buttonto locate your vehicle. The turn signallamps will flash and the horn will soundthree times.
Press and hold the button for approxi-mately three seconds to activate thepanic alarm. The headlamps and parking lamps will flash and the hornwill sound for 30 seconds. Press thebutton again or turn the ignition to Onto cancel the alarm.
(Remote Vehicle Start)(if equipped): This feature can be usedto start the engine from outside thevehicle. (See Remote Vehicle Start.)See Section 2 of your Owner Manual.
Remote Keyless Entry
This feature allows you to start theengine from outside the vehicle byusing the Remote Keyless Entry (RKE)transmitter. The remote start capabilitymust be turned on using the DriverInformation Center.During a remote start, the manual climate control system will operate atits last setting before the vehicle wasturned off. With automatic climate control (if equipped), the system willdefault to a heating or cooling mode,and may activate the rear defogger,based on outside temperature.Starting the Vehicle1. Aim the RKE transmitter at the
vehicle. (Transmitter range is withinapproximately 196 feet of the vehicle.)
2. Press and release the (Lock) button on the transmitter.

Seat Adjustment• To adjust the position of the front
seat, lift the bar (A) locatedunder the front of the seat andmove the seat fore or aft; thenrelease the bar.
Seat Height Adjustment• To raise or lower the driver’s seat,
press the height adjustment button(B) located on the outboard side ofthe driver’s seat cushion.
Seatback Adjustment• To adjust the position of the front
seatback, lift the recline lever (C)located on the outboard side of theseat and recline or raise the seat-back; then release the lever.
See Section 1 of your Owner Manual.
3
PERSONAL FIT FEATURES
Owne
rIn
form
ation
Perfo
rman
ce &
Maint
enan
ce Fe
atures
Conv
enien
ceFe
atur
esIn
strum
ent P
anel
Feat
ures
Ente
rtain
men
tFe
atur
esPe
rson
al Fi
tFe
atur
esRe
mot
e Key
less
Entry
Feat
ures
3. Immediately press and hold the (Remote Start) button for about fourseconds. When the vehicle starts,the parking lamps will light andremain on while the engine is running. The engine will continuerunning for 10 minutes.
4. Repeat these steps for a 10-minutetime extension. Only two consecu-tive remote starts are allowed.
When you enter the vehicle after aremote start, the ignition must beturned to the On position before driving.
Canceling a Remote StartTo turn off the engine instead of drivingafter a remote start:• Press and hold the (Remote Start)
button until the parking lamps turnoff.
• Press and release the HazardWarning Flashers button. Press itagain to turn off the flashers.
• Turn the key in the ignition switch tothe On position and then off.
See Section 2 of your Owner Manual.
Note: The Remote Vehicle Start featurewill not operate if the key is in the ignition, the hood is open, or theCheck Engine light is illuminated onthe instrument panel cluster.
Manual Seat Adjustments
BA C

4
PERSONAL FIT FEATURES
Lumbar Adjustment
The lumbar adjustment lever is locatedon the outboard side of the seatback. • To increase the lumbar support,
ratchet the lever down repeatedly.To decrease the support, ratchet thelever up repeatedly.
See Section 1 of your Owner Manual.
Shoulder Belt Height Adjustment
• Push the two release buttons tomove the front seat shoulder beltheight adjuster up or down. Once ina comfortable position, try to movethe height adjuster to make sure itis locked in place.
See Section 1 of your Owner Manual.
Steering Wheel Adjustment
Adjust the driver’s seat to a comfort-able position before adjusting thesteering wheel. To tilt and telescopethe position of the steering wheel:1. Push down the lever on the left side
of the steering column.2. Adjust the wheel to a comfortable
position by moving it up or downas well as in or out.
3. Pull up the lever to lock the wheelin place.
See Section 3 of your Owner Manual.
Power Seat Adjustments(if equipped)
A B
The power seat controls are located onthe outboard side of the seat cushion.Seat Adjustment• Use the horizontal control (A) to
move the seat fore or aft as well asto raise or lower the front or rear ofthe seat cushion.
Seatback Adjustment• Use the vertical control (B) to recline
or raise the seatback.See Section 1 of your Owner Manual.
5
ENTERTAINMENT FEATURES
Owne
rIn
form
ation
Perfo
rman
ce &
Maint
enan
ce Fe
atures
Conv
enien
ceFe
atur
esIn
strum
ent P
anel
Feat
ures
Ente
rtain
men
tFe
atur
esPe
rson
al Fi
tFe
atur
esRe
mot
e Key
less
Entry
Feat
ures
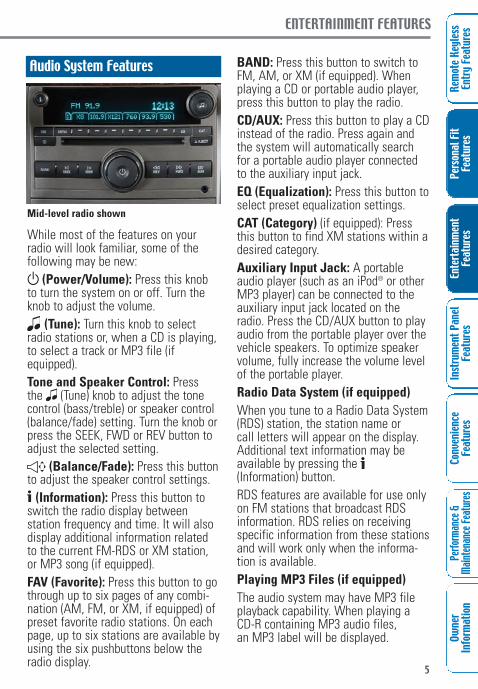
Audio System Features
While most of the features on yourradio will look familiar, some of the following may be new:
(Power/Volume): Press this knobto turn the system on or off. Turn theknob to adjust the volume.
(Tune): Turn this knob to selectradio stations or, when a CD is playing,to select a track or MP3 file (ifequipped). Tone and Speaker Control: Pressthe (Tune) knob to adjust the tonecontrol (bass/treble) or speaker control(balance/fade) setting. Turn the knob orpress the SEEK, FWD or REV button toadjust the selected setting.
(Balance/Fade): Press this buttonto adjust the speaker control settings.
(Information): Press this button toswitch the radio display between station frequency and time. It will alsodisplay additional information relatedto the current FM-RDS or XM station,or MP3 song (if equipped).FAV (Favorite): Press this button to gothrough up to six pages of any combi-nation (AM, FM, or XM, if equipped) ofpreset favorite radio stations. On eachpage, up to six stations are available byusing the six pushbuttons below theradio display.
BAND: Press this button to switch toFM, AM, or XM (if equipped). Whenplaying a CD or portable audio player,press this button to play the radio.CD/AUX: Press this button to play a CDinstead of the radio. Press again andthe system will automatically searchfor a portable audio player connectedto the auxiliary input jack.EQ (Equalization): Press this button toselect preset equalization settings.CAT (Category) (if equipped): Pressthis button to find XM stations within adesired category.Auxiliary Input Jack: A portableaudio player (such as an iPod® or otherMP3 player) can be connected to theauxiliary input jack located on theradio. Press the CD/AUX button to playaudio from the portable player over thevehicle speakers. To optimize speakervolume, fully increase the volume levelof the portable player.Radio Data System (if equipped)When you tune to a Radio Data System(RDS) station, the station name orcall letters will appear on the display.Additional text information may beavailable by pressing the (Information) button.RDS features are available for use onlyon FM stations that broadcast RDSinformation. RDS relies on receivingspecific information from these stationsand will work only when the informa-tion is available.Playing MP3 Files (if equipped)The audio system may have MP3 fileplayback capability. When playing aCD-R containing MP3 audio files,an MP3 label will be displayed.
Mid-level radio shown

6
ENTERTAINMENT FEATURES
Setting Favorite StationsBefore setting your favorite stations,shift the vehicle into Park.
You can set up to six pages of any com-bination (AM, FM, or XM, if equipped)of favorite radio stations, with up to sixstations stored on each page.To set the number of favorite stationpages:1. Press the MENU button to display
the radio setup menu.2. Press the pushbutton below the FAV
1–6 label on the radio display.
3. Select the desired number offavorite station pages.
4. Press the FAV button. You may nowbegin storing your favorite stationsfor the chosen number of pages.
To store favorite stations:1. Tune in the desired radio station.
2. Press the FAV button to display thepage where the station is to bestored.
3. Press and hold one of the six push-buttons until a beep sounds to storethe station.
4. Repeat the steps for each push -button on each page.
Setting the TimeTo set the time:1. Turn on the radio.2. Press the (Clock) button. Or,
if equipped, press the MENU buttonuntil the clock option is displayed;and then press the pushbuttonunder the clock option label. TheHR, MIN, MM, DD, YYYY labelswill appear on the display.
3. Press the pushbutton under any ofthe labels to be changed.
4. Press the pushbutton again, theright SEEK arrow or the FWD buttonto increase the numbers. Press theleft SEEK arrow or the REV button todecrease the numbers. Rotating the
(Tune) knob also will increase ordecrease the selected label.
5. Press the Clock or MENU buttonagain to set the currently displayedtime and date.
See Section 3 of your Owner Manual.
Note: Engaging in extended searchingfor specific audio stations or songs byusing buttons and knobs — or givingextended attention to entertainmenttasks — can lead you to look awayfrom the road frequently or for prolonged periods, which may causeyou to miss seeing things on the roadthat you need to see. Avoid engaging inextended searching for specific itemswhile driving.
7
ENTERTAINMENT FEATURES
Owne
rIn
form
ation
Perfo
rman
ce &
Maint
enan
ce Fe
atures
Conv
enien
ceFe
atur
esIn
strum
ent P
anel
Feat
ures
Ente
rtain
men
tFe
atur
esPe
rson
al Fi
tFe
atur
esRe
mot
e Key
less
Entry
Feat
ures
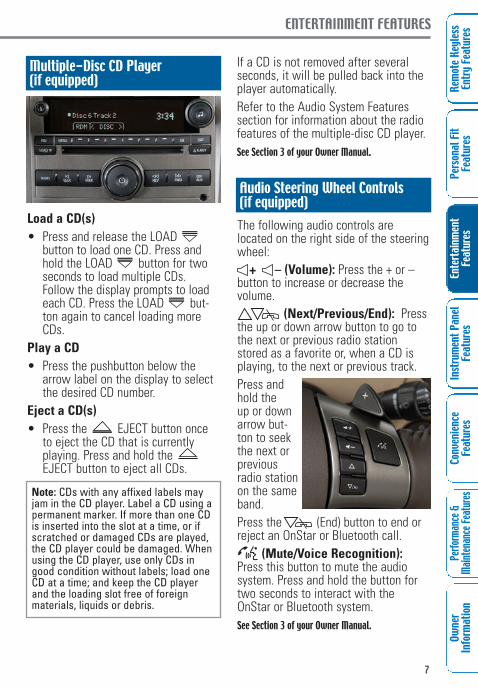
Multiple-Disc CD Player(if equipped)
Load a CD(s)• Press and release the LOAD
button to load one CD. Press andhold the LOAD button for twoseconds to load multiple CDs.Follow the display prompts to loadeach CD. Press the LOAD but-ton again to cancel loading moreCDs.
Play a CD• Press the pushbutton below the
arrow label on the display to selectthe desired CD number.
Eject a CD(s)• Press the EJECT button once
to eject the CD that is currentlyplaying. Press and hold theEJECT button to eject all CDs.
Note: CDs with any affixed labels mayjam in the CD player. Label a CD using apermanent marker. If more than one CDis inserted into the slot at a time, or ifscratched or damaged CDs are played,the CD player could be damaged. Whenusing the CD player, use only CDs ingood condition without labels; load oneCD at a time; and keep the CD playerand the loading slot free of foreign materials, liquids or debris.
If a CD is not removed after severalseconds, it will be pulled back into theplayer automatically.Refer to the Audio System Featuressection for information about the radiofeatures of the multiple-disc CD player.See Section 3 of your Owner Manual.
Audio Steering Wheel Controls(if equipped)The following audio controls are located on the right side of the steeringwheel:
+ – (Volume): Press the + or –button to increase or decrease the volume.
(Next/Previous/End): Pressthe up or down arrow button to go tothe next or previous radio stationstored as a favorite or, when a CD isplaying, to the next or previous track.Press andhold theup or downarrow but-ton to seekthe next orpreviousradio stationon the sameband.Press the (End) button to end orreject an OnStar or Bluetooth call.
(Mute/Voice Recognition):Press this button to mute the audio system. Press and hold the button fortwo seconds to interact with theOnStar or Bluetooth system.See Section 3 of your Owner Manual.
8
ENTERTAINMENT FEATURES
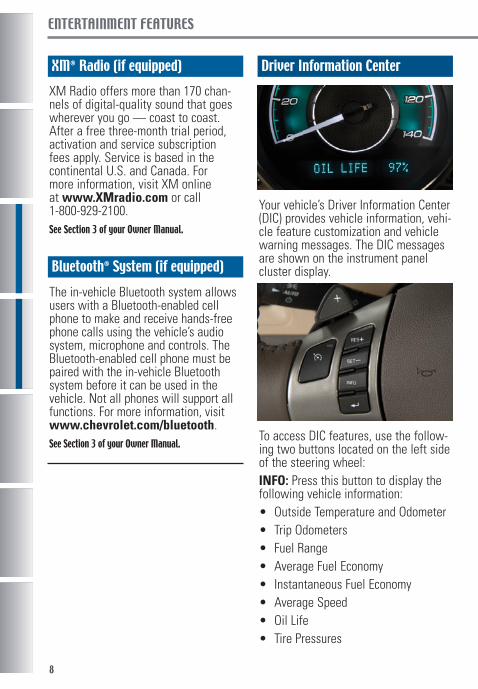
Driver Information Center
Your vehicle’s Driver Information Center(DIC) provides vehicle information, vehi-cle feature customization and vehiclewarning messages. The DIC messagesare shown on the instrument panelcluster display.
To access DIC features, use the follow-ing two buttons located on the left sideof the steering wheel:INFO: Press this button to display thefollowing vehicle information:• Outside Temperature and Odometer• Trip Odometers• Fuel Range• Average Fuel Economy• Instantaneous Fuel Economy• Average Speed• Oil Life • Tire Pressures
XM® Radio (if equipped)XM Radio offers more than 170 chan-nels of digital-quality sound that goeswherever you go — coast to coast.After a free three-month trial period,activation and service subscriptionfees apply. Service is based in the continental U.S. and Canada. Formore information, visit XM onlineat www.XMradio.com or call 1-800-929-2100.See Section 3 of your Owner Manual.
Bluetooth® System (if equipped)The in-vehicle Bluetooth system allowsusers with a Bluetooth-enabled cellphone to make and receive hands-freephone calls using the vehicle’s audiosystem, microphone and controls. TheBluetooth-enabled cell phone must bepaired with the in-vehicle Bluetoothsystem before it can be used in thevehicle. Not all phones will support all functions. For more information, visitwww.chevrolet.com/bluetooth.See Section 3 of your Owner Manual.

9
INSTRUMENT PANEL FEATURES
Owne
rIn
form
ation
Perfo
rman
ce &
Maint
enan
ce Fe
atures
Conv
enien
ceFe
atur
esIn
strum
ent P
anel
Feat
ures
Ente
rtain
men
tFe
atur
esPe
rson
al Fi
tFe
atur
esRe
mot
e Key
less
Entry
Feat
ures
(Reset): Press this button to set orreset DIC information while it is dis-played or to acknowledge a warningmessage.Vehicle Feature CustomizationA variety of your vehicle’s features canbe customized to your preference. Tocustomize features:1. With the vehicle in Park, turn on
the ignition. (Access to the cus-tomization features is not available,except for Units, while the vehicleis moving.)
2. Press and hold both the INFO buttonand the (Reset) button to enterthe customization menu.
3. Press the INFO button to scrollthrough the available customizationfeatures.
4. With the desired feature displayed,press the (Reset) button forone second to scroll through eachsetting.
5. With the desired setting displayed,press the INFO button to recordyour choice and move on to thenext feature.
6. To exit the customization menu,press the INFO button until the endof the menu is reached.
Customization features may include:• Oil Life Reset• Units (English/Metric)• Remote Start (if equipped)
Note: System may require use of atleast one tank of fuel to correctly reportAverage Fuel Economy and AverageSpeed.
• Lock Horn (during Remote KeylessEntry (RKE) locking)
• Unlock Horn (during RKE unlocking)• Light Flash (during RKE locking or
unlocking)• Delay Lock• Auto Unlock• Exterior Lights (during RKE unlocking)• Language (English, French, Spanish
or German)
Warnings and MessagesThe DIC provides a variety of vehiclewarning messages (depending onoptional equipment) if a problem issensed in a vehicle system. To acknowl-edge a message and clear it from thedisplay, press the (Reset) button.Some urgent messages cannot becleared from the DIC display. If you have a current OnStar subscrip-tion, and a warning message appears,you can press the OnStar button andspeak to an OnStar Advisor. In manyvehicles, OnStar Advisors can accesscertain diagnostic information and cantell you how serious the problem is andwhat you should do about it.
See Section 3 of your Owner Manual.
Note: Your vehicle’s warnings and mes-sages provide critical information thatcan prevent damage to your vehicle.Review your Owner Manual to becomefamiliar with the information displayedand the action required.
Note: Depending on equipment, not allcustomization features may be availableon your vehicle.

10
INSTRUMENT PANEL FEATURES
Instrument Panel
The main features of the instrumentpanel include:A. Air OutletsB. Turn Signal/Multifunction LeverC. Instrument Panel ClusterD. Windshield Wipers LeverE. Upper Storage CompartmentF. Audio SystemG. Instrument Panel Brightness ControlH. Fog Lamps ButtonI. Hood ReleaseJ. Cruise Control ButtonsK. Driver Information Center Buttons
L. Tilt and Telescopic Steering WheelLever
M. HornN. Audio Steering Wheel ControlsO. Ignition SwitchP. Hazard Warning Flashers ButtonQ. Passenger Airbag Status IndicatorR. Shift LeverS. Accessory Power OutletT. Traction Control ButtonU. Climate ControlsV. Glove BoxSee Section 3 of your Owner Manual.
A B C D E A F
G H I J K L M N O P Q R S T U V

11
INSTRUMENT PANEL FEATURES
Owne
rIn
form
ation
Perfo
rman
ce &
Maint
enan
ce Fe
atures
Conv
enien
ceFe
atur
esIn
strum
ent P
anel
Feat
ures
Ente
rtain
men
tFe
atur
esPe
rson
al Fi
tFe
atur
esRe
mot
e Key
less
Entry
Feat
ures
Instrument Panel Cluster
Your vehicle’s instrument panel isequipped with this cluster or one verysimilar to it. The instrument panel cluster includes these key features:A. TachometerB. SpeedometerC. Fuel GaugeD. Engine Coolant Temperature GaugeE. Security LightF. Antilock Brake System Warning
LightG. Driver Information CenterH. Safety Belt Reminder Light
I. StabiliTrak Warning LightJ. Malfunction Indicator Lamp
(Check Engine Light)K. Tire Pressure Warning Light
See Section 3 of your Owner Manual.
A B C D
E F G H I J K
Note: The instrument panel cluster isdesigned to let you know about manyimportant aspects of your vehicle’s oper-ation. It is important to read your OwnerManual and become familiar with theinformation being relayed to you by thelights, gauges and indicators, as well aswhat action can be taken to ensuresafety and to prevent damage.

12
CONVENIENCE FEATURES
Climate Controls
Your vehicle may have a manual climate control system or the availableautomatic climate control system.Both systems include the followingfunctions:
(Fan): Turn the fan control knob (A)to increase or decrease the fan speed.
(Off): Turn the fan control knob tothe Off position to turn off the system.Only the rear defogger will operatewhen the system is off.Temperature Control: Turn the temperature control knob or pressthe temperature control buttons (B)(if equipped) to raise or lower the temperature setting.
(Air Conditioning): Press this button to turn the air conditioning system on or off.
(Recirculation): Press this but-ton to recirculate air inside the vehicle.This mode helps heat or cool the vehi-cle more quickly and prevents outsideair and odors from entering the vehicle.The recirculation mode will not operatewhen the airflow control knob is in thedefog or defrost mode.
(Outside Air): Press this buttonto allow outside air to enter the vehicle.
Airflow Mode: Turn the airflow modecontrol knob (C) to change the directionof the airflow to the vent, bi-level,floor, defog or defrost mode.
(Defog): Select this mode todirect air to the windshield, side window outlets and floor outlets.
(Defrost): Select this mode todirect most of the air to the windshieldand some air to the side window out-lets and floor outlets.
(Rear Window Defogger): Pressthis button to activate the rear windowdefogger and the heated outsiderearview mirrors (if equipped). Thedefogger and heated mirrors will turnoff automatically or can be turned offby pressing the button again.Maximum Air ConditioningTo cool the vehicle quickly on hot days,open the windows just long enough tolet the hot inside air escape; then, formaximum cooling:1. Select (Vent) mode.2. Select the highest fan speed.3. Select (Air Conditioning).4. Select (Recirculation).5. Select the coolest temperature.Automatic Climate ControlOperation (if equipped)The automatic climate control systemadjusts the airflow mode, fan speed,air conditioning and recirculation func-tions to reach the set temperature asquickly as possible.To set the automatic system:1. Turn the fan control knob (A) and the
airflow mode control knob (C) to theAUTO position.
BA C

13
CONVENIENCE FEATURES
Owne
rIn
form
ation
Perfo
rman
ce &
Maint
enan
ce Fe
atures
Conv
enien
ceFe
atur
esIn
strum
ent P
anel
Feat
ures
Ente
rtain
men
tFe
atur
esPe
rson
al Fi
tFe
atur
esRe
mot
e Key
less
Entry
Feat
ures
The followingheated seatcontrols arelocated on theoutboard cornerof the driverand front pas-senger seats:High: Press the | (On) switch onceto turn on the heated seat to the highsetting (indicator light #2).Low: Press the | (On) switch twiceto turn on the heated seat to the lowsetting (indicator light #1).Off: Press the (Off) switch once toturn off the heated seat.See Section 1 of your Owner Manual.
Heated Seats (if equipped)
The Automatic Headlamp System turnson the Daytime Running Lamps in thedaytime, and the headlamps and otherexterior lamps at night or when neces-sary. The headlamps also will turn onif the wipers are on for more than 15seconds.
Automatic Headlamp System
The system uses a light sensor, locatedon top of the instrument panel, todetermine light conditions. For properoperation, avoid placing any objects onor near the sensor.Exterior Lamps ControlThe exterior lamps can be operatedusing the control switch on the multi-function lever, which is located on theleft side of the steering column. Theswitch can be rotated to the followingpositions:AUTO (Automatic HeadlampSystem): This position enables theAutomatic Headlamp System.
(Off/On): Turn the switch to thisposition to turn the AutomaticHeadlamp System off or back on.The system is always turned on whenthe vehicle is started.
(Parking Lamps): This positionturns on the parking lamps and taillamps.
(Headlamps): This position turnson the headlamps, parking lamps andtaillamps.
(Fog Lamps) (if equipped): Pressthis button on the left side of theinstrument panel to turn the fog lampson or off.See Section 3 of your Owner Manual.
2. Set the temperature. Allow time forthe system to reach the desiredtemperature.
Air Outlet Adjustments• The instrument panel air outlets can
be adjusted up, down, and side-to-side. To close an air outlet, slide theadjustment lever sideways.
See Section 3 of your Owner Manual.

14
CONVENIENCE FEATURES
Interior LampsInstrument Panel Brightness• The (Instrument Panel Bright -
ness) control knob is located on theleft side of the instrument panel.Turn theknob toadjusttheintensityof theinstrument panel lights.
Dome Lamp• Turn the control knob completely
clockwise to turn on the dome lamp.Reading Lamps• The front reading lamps are located
in the overhead console and therear reading lamps (if equipped) arelocated in the dome lamp. Press thedesired lamp to turn it on or off.
See Section 3 of your Owner Manual.
Auto-Dimming Rearview Mirror(if equipped)The interior rearview mirror sensesnighttime glare from vehicle headlampsand automatically dims to reduce theglare. Automatic dimming turns oneach time the vehicle is started. • Press and hold the (On/Off)
button on the mirror to turn the dimming feature off or back on.
See Section 2 of your Owner Manual.
The windshield wipers and washerlever, located on the right side of thesteering column, includes the followingsettings:
(Mist): Move the lever down tothis position to turn the wipers on forone wipe.
(Off): Move the lever to this posi-tion to turn off the wipers.
(Delay): Move the lever up tothis position to have the wipers adjustwith vehicle speed. Rotate the controlband (A) to adjust the sensitivity level.The wipers activate more often as theband is rotated upward.
(Low): Move the lever up to thisposition for low-speed, steady wipes.
(High): Move the lever up to thisposition for high-speed, rapid wipes.
(Washer Fluid): Push the buttonon the end of the lever to spray washerfluid on the windshield.See Section 3 of your Owner Manual.
Speed-Sensitive Windshield Wipers
A
15
CONVENIENCE FEATURES
Owne
rIn
form
ation
Perfo
rman
ce &
Maint
enan
ce Fe
atures
Conv
enien
ceFe
atur
esIn
strum
ent P
anel
Feat
ures
Ente
rtain
men
tFe
atur
esPe
rson
al Fi
tFe
atur
esRe
mot
e Key
less
Entry
Feat
ures
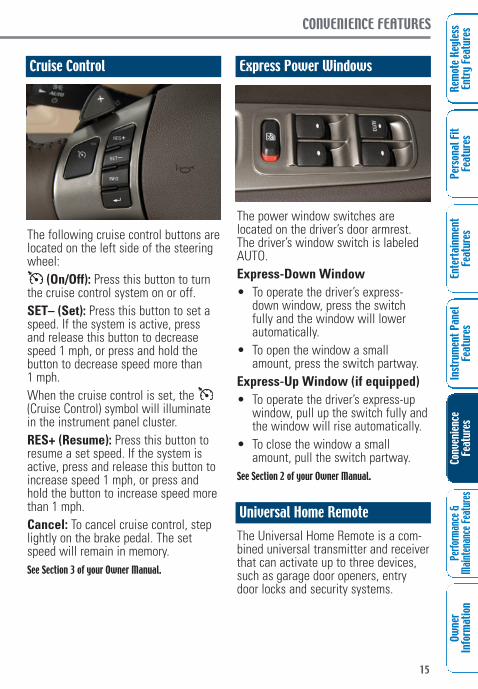
The following cruise control buttons arelocated on the left side of the steeringwheel:
(On/Off): Press this button to turnthe cruise control system on or off.SET– (Set): Press this button to set aspeed. If the system is active, pressand release this button to decreasespeed 1 mph, or press and hold thebutton to decrease speed more than1 mph.When the cruise control is set, the (Cruise Control) symbol will illuminatein the instrument panel cluster.RES+ (Resume): Press this button toresume a set speed. If the system isactive, press and release this button toincrease speed 1 mph, or press andhold the button to increase speed morethan 1 mph.Cancel: To cancel cruise control, steplightly on the brake pedal. The setspeed will remain in memory.See Section 3 of your Owner Manual.
Cruise Control
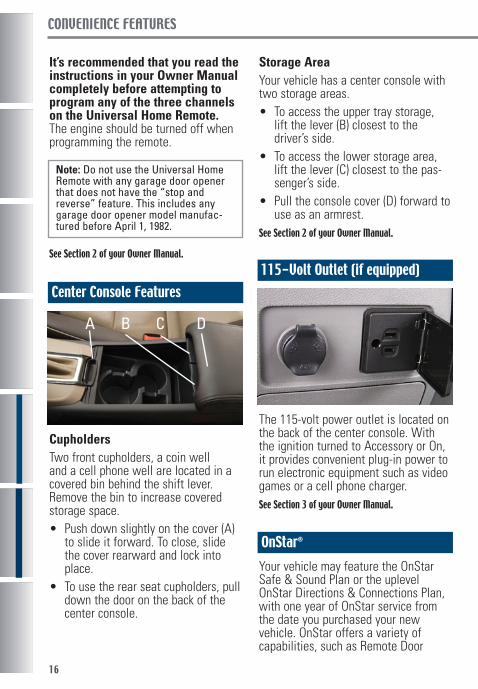
The power window switches are located on the driver’s door armrest.The driver’s window switch is labeledAUTO.Express-Down Window• To operate the driver’s express-
down window, press the switchfully and the window will lowerautomatically.
• To open the window a smallamount, press the switch partway.
Express-Up Window (if equipped)• To operate the driver’s express-up
window, pull up the switch fully andthe window will rise automatically.
• To close the window a smallamount, pull the switch partway.
See Section 2 of your Owner Manual.
Express Power Windows
Universal Home RemoteThe Universal Home Remote is a com-bined universal transmitter and receiverthat can activate up to three devices,such as garage door openers, entrydoor locks and security systems.
16
CONVENIENCE FEATURES
Center Console Features
CupholdersTwo front cupholders, a coin welland a cell phone well are located in acovered bin behind the shift lever.Remove the bin to increase coveredstorage space.• Push down slightly on the cover (A)
to slide it forward. To close, slidethe cover rearward and lock intoplace.
• To use the rear seat cupholders, pulldown the door on the back of thecenter console.
BA C D
The 115-volt power outlet is located onthe back of the center console. Withthe ignition turned to Accessory or On,it provides convenient plug-in power torun electronic equipment such as videogames or a cell phone charger.See Section 3 of your Owner Manual.
115-Volt Outlet (if equipped)
OnStar®
Your vehicle may feature the OnStarSafe & Sound Plan or the uplevelOnStar Directions & Connections Plan,with one year of OnStar service fromthe date you purchased your new vehicle. OnStar offers a variety of capabilities, such as Remote Door
It’s recommended that you read theinstructions in your Owner Manualcompletely before attempting toprogram any of the three channelson the Universal Home Remote.The engine should be turned off whenprogramming the remote.
See Section 2 of your Owner Manual.
Storage AreaYour vehicle has a center console withtwo storage areas. • To access the upper tray storage,
lift the lever (B) closest to the driver’s side.
• To access the lower storage area,lift the lever (C) closest to the pas-senger’s side.
• Pull the console cover (D) forward touse as an armrest.
See Section 2 of your Owner Manual.
Note: Do not use the Universal HomeRemote with any garage door openerthat does not have the “stop andreverse” feature. This includes anygarage door opener model manufac -tured before April 1, 1982.
17
PERFORMANCE & MAINTENANCE FEATURES
Owne
rIn
form
ation
Perfo
rman
ce &
Maint
enan
ce Fe
atures
Conv
enien
ceFe
atur
esIn
strum
ent P
anel
Feat
ures
Ente
rtain
men
tFe
atur
esPe
rson
al Fi
tFe
atur
esRe
mot
e Key
less
Entry
Feat
ures
Either side of the rear seatback canbe folded for additional cargo space.When folding the seatback, make surethe front seat is not reclined or the rearseatback will not fold down completely.To fold the rear seatback:1. Pull up on the seatback release loop
located behind the top of the out-board side of the seatback torelease the seatback latch.
2. Grip the center top of the seatbackand fold it down.
To unfold the rear seatback, lift up theseatback; make sure it latches and thatthe safety belts are properly stowedover the seatback in all three positions.See Section 1 of your Owner Manual.
Split-Folding Rear Seats
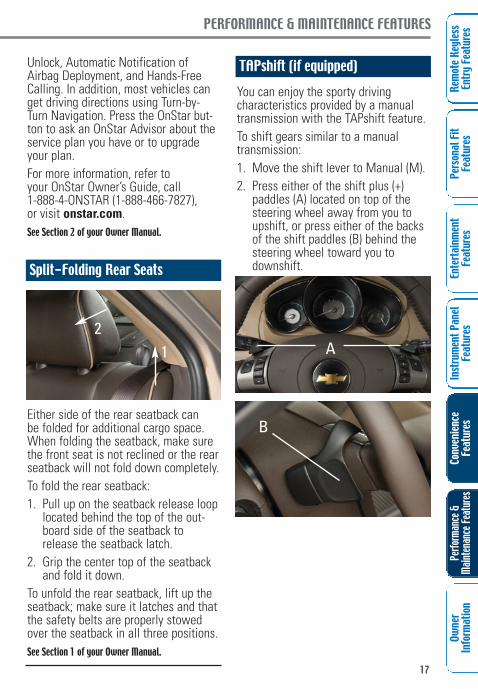
You can enjoy the sporty driving characteristics provided by a manualtransmission with the TAPshift feature.To shift gears similar to a manualtransmission:1. Move the shift lever to Manual (M).2. Press either of the shift plus (+)
paddles (A) located on top of thesteering wheel away from you toupshift, or press either of the backsof the shift paddles (B) behind thesteering wheel toward you to downshift.
TAPshift (if equipped)
A
B
12
Unlock, Automatic Notification ofAirbag Deployment, and Hands-FreeCalling. In addition, most vehicles canget driving directions using Turn-by-Turn Navigation. Press the OnStar but-ton to ask an OnStar Advisor about theservice plan you have or to upgradeyour plan.For more information, refer toyour OnStar Owner’s Guide, call 1-888-4-ONSTAR (1-888-466-7827),or visit onstar.com.See Section 2 of your Owner Manual.

18
PERFORMANCE & MAINTENANCE FEATURES
The Driver Information Center (DIC)in the instrument panel cluster will display the letter M for manualposition and a number indicating theselected gear.
While using the TAPshift feature, thetransmission will have firmer shiftingand sportier performance. The trans-mission will allow you to shift only intogears appropriate for the vehicle speedand engine revolutions per minute(rpm).While driving in the manual mode, thetransmission will remain in the driver-selected gear unless a shift is requiredto protect the engine or transmission. Ifthe vehicle slows almost to a stop, anautomatic downshift will occur.See Section 2 of your Owner Manual.
When one or more of the drive wheelsbegin to spin from traction loss, theTraction Control system will reduceengine power and may apply the frontbrakes and shift the transmission tohelp regain traction.To limit wheelspin and help maintaindirectional control, you should alwaysleave the system on. However, if yourvehicle becomes stuck and rocking thevehicle is required, the system shouldbe turned off.
Traction Control System
• To turn off the Traction Control sys-tem, press the (Traction Control)button located on the center consolein front of the shift lever.
When the system is turned off, theTraction Control light will illuminate.See Section 4 of your Owner Manual.
StabiliTrak is an advanced computer-controlled vehicle stability system thatassists with directional control of thevehicle in difficult driving conditions. Itturns on automatically every time youstart your vehicle.When the system senses a discrepancybetween your intended path and thedirection the vehicle is actually travel-ing, it selectively applies brake pres-sure at any one of the wheels to helpsteer the vehicle in the direction inwhich you are steering.In addition, the system monitors howthe driver applies the brakes andincreases the braking force during apanic stop.See Section 4 of your Owner Manual.
StabiliTrak® – Stability ControlSystem (if equipped)
19
PERFORMANCE & MAINTENANCE FEATURES
Owne
rIn
form
ation
Perfo
rman
ce &
Maint
enan
ce Fe
atures
Conv
enien
ceFe
atur
esIn
strum
ent P
anel
Feat
ures
Ente
rtain
men
tFe
atur
esPe
rson
al Fi
tFe
atur
esRe
mot
e Key
less
Entry
Feat
ures
The Tire Pressure Monitor alerts youwhen a significant reduction in pres-sure occurs in one or more of your vehicle’s tires by illuminating the(Low Tire Pressure) warning light on theinstrument panel cluster. The low tirepressure warning light will remain onuntil you correct the tire pressure. ACHECK TIRE PRESSURE message willalso appear on the DIC.• To view the tire pressures on the
DIC, press the INFO button until thecurrent tire pressures are displayed;left front (LF), for example, is thedriver’s side front tire.
Correcting the Tire PressureWhen the low tire pressure warninglight illuminates, you must inflate thetire to the proper tire pressure (just asyou must refuel the vehicle when thelow fuel warning light illuminates). TheTire and Loading Information label,located on the center pillar below thedriver’s door latch, shows the correcttire pressure for the tires when they’recold. “Cold” means your vehicle hasbeen sitting for at least three hours ordriven no more than one mile.You can temporarily clear the DIC message by acknowledging it with yourDIC controls. However, at the next vehicle start-up, the DIC message willreappear if the tire pressure has notbeen corrected.During cooler conditions, the low tirepressure warning light may appearwhen the vehicle is first started andthen turn off as you start to drive. Thiscould be an early indicator that yourtire pressures are getting low and thetires need to be inflated to the properpressure.
Tire Pressure Monitor
See Section 5 of your Owner Manual.
Note: The Tire Pressure Monitor canalert you about low tire pressure, but itdoesn’t replace normal monthly tiremaintenance.
Reset the Oil Life SystemThe Oil Life System calculates engineoil life based on vehicle use and dis-plays CHANGE OIL SOON in the DriverInformation Center (DIC) when it’s necessary to change your oil and filter.The Oil Life System should be reset to100% only following an oil change.To reset the Oil Life System:1. Turn on the ignition, with the
engine off.2. Press and hold the INFO button and
the (Reset) button at the sametime to access the customizationmenu.
3. Oil Life Reset will be displayed.4. Press and hold the (Reset)
button for at least one second. AnACKNOWLEDGED message willappear when the system has beenreset.
5. Turn off the ignition.See Section 5 of your Owner Manual.
20
OWNER INFORMATION
15898477 D
Roadside Assistance1-800-CHEV-USA (1-800-243-8872)TTY Users: 1-888-889-2438As the proud owner of a new Chevrolet,you are automatically enrolled in theChevrolet Roadside Assistance program.This value-added service is intended toprovide you with peace of mind as youdrive in the city or travel the open road. Chevrolet’s Roadside Assistance toll-freenumber is staffed by a team of technicallytrained advisors who are available 24hours a day, 365 days a year, to provideminor repair information or make arrange-ments to tow your vehicle to the nearestChevrolet dealer.Chevrolet will provide the following servic-es for 5 years/100,000 miles at no expenseto you:• Fuel delivery• Lockout service (identification required)• Tow to nearest dealer for warranty
service• Flat tire assistance• Jump startsIn many instances, mechanical failures arecovered under Chevrolet’s comprehensivewarranty. However, when other servicesare utilized, our advisors will explain anypayment obligations you might incur.
For prompt and efficient assistance whencalling, please provide the following information to the advisor:• Location of the vehicle• Telephone number and your location• Vehicle model, year and color• Vehicle mileage• Vehicle Identification Number (VIN)• Vehicle license plate numberChevrolet reserves the right to limit servic-es or reimbursement to an owner or driverwhen, in Chevrolet’s judgment, the claimsbecome excessive in frequency or type ofoccurrence.Roadside Assistance and OnStar (if equipped)If you have a current OnStar subscription,press the OnStar button and the vehiclewill send your current GPS location to anOnStar Advisor who will speak to you,assess your problem, contact RoadsideAssistance and relay your exact locationso you will get the help you need.
My GMLinkThe Chevrolet Owner Center at My GMLinkis a complimentary service for Chevroletowners, a one-stop resource to enhanceyour Chevrolet ownership experience.Exclusive member benefits include onlineservice reminders, vehicle maintenancetips, online owner manual, special privi-leges and more. Sign up today atwww.mygmlink.com.
Certain restrictions, precautions and safety procedures apply to your vehicle. Please read your Owner Manualfor complete instructions. All information contained herein is based on the latest information available at thetime of printing and is subject to change without notice. Copyright 2008 by GM Corp. All rights reserved.
!15898477=D!