removal of factory headlights - yahoolib.store.yahoo.net/lib/gomiata/gomiata.flush.headlight... ·...
TRANSCRIPT

www.GoMiata.com www.MiataCommunity.com
NA Miata Flush Mount Install Guide
90-97 Mazda Miata NA Flush Mount Headlight Kit
To View online Visit: www.AdvancedAutomotiveConcepts.com/AACstyle.com%20MIATA%
20FLUSH%20HEADLIGHT%20INSTRUCTIONS.pdf
Contents: Basic Kit
(2) CF Headlight Buckets
(2) Aluminum Brackets
(2) Clear Lexan Covers
(2) Bolts (4) nuts (4) washers
(14) Metal Clips
+Contents: Complete Kit
(2) Hella 90mm Low Beam
(2) Hella 90mm Hi Beam
(4) Sets of Hella Levelers
PNP Wiring Harness

www.GoMiata.com www.MiataCommunity.com
NA Miata Flush Mount Install Guide
Removal of factory headlights
Basic Summary
Each factory headlight is bolted to the car by only (3) nuts. Once the (3) nuts are
unscrewed the headlight will be able to be removed from where it is bolted. In order to
completely remove the headlight from the car you will have to unplug the factory wiring
harness from the back of the headlight. To accomplish this remove the 4 screws holding
the black plastic surround while the headlight is up. Loosen the four bolts holding the
headlight lid on the assembly. Once removed, you will be able to gain access to the
headlight to unplug the socket and associated clips. Now you can remove the headlight
from the car. Below I will walk you through this entire process.
Passenger side
Step 1) In order to reach one of the bolts to remove the factory headlight on the passenger
side you will have to temporarily remove the radiator overflow bottle. This consists of
removing (3) 10mm bolts and moving the entire bottle while the factory headlights are
removed
Step 2) with the overflow bottle out of the way it is now time to remove the first nut.
This nut is positioned horizontal in relation to the car and was hidden behind the
overflow bottle. With a socket wrench remove this 14mm nut.

www.GoMiata.com www.MiataCommunity.com
NA Miata Flush Mount Install Guide
Step 3) Now it is time to remove the first vertical 14mm nut. It is located right behind the
headlight while the headlight is in the closed position. Use a socket wrench with an
extension on it to reach it,
Step 4) The last nut is located right behind the one that was just taken off. It is very hard
to see as it is located just under the motor used to raise and lower the headlight. In order
to remove this nut, a 14mm open end wrench is necessary to reach it. Because of tight
space I have found that in order to give some more room, first remove the relay held by
the 10 mm bolt next to the blue arrow. After that is out of the way remove the 10 mm
bolt shown by the red arrow. After the bolt is removed gently push the metal bracket and
pipe out of the way. Remember to reinstall this bolt once the light is removed.
Step 5) now that you have some more room to work, removing the last nut is now
possible. If you are having a hard time finding the last nut, look at the picture below to
see an open view of where the nut was.
www.GoMiata.com www.MiataCommunity.com
NA Miata Flush Mount Install Guide
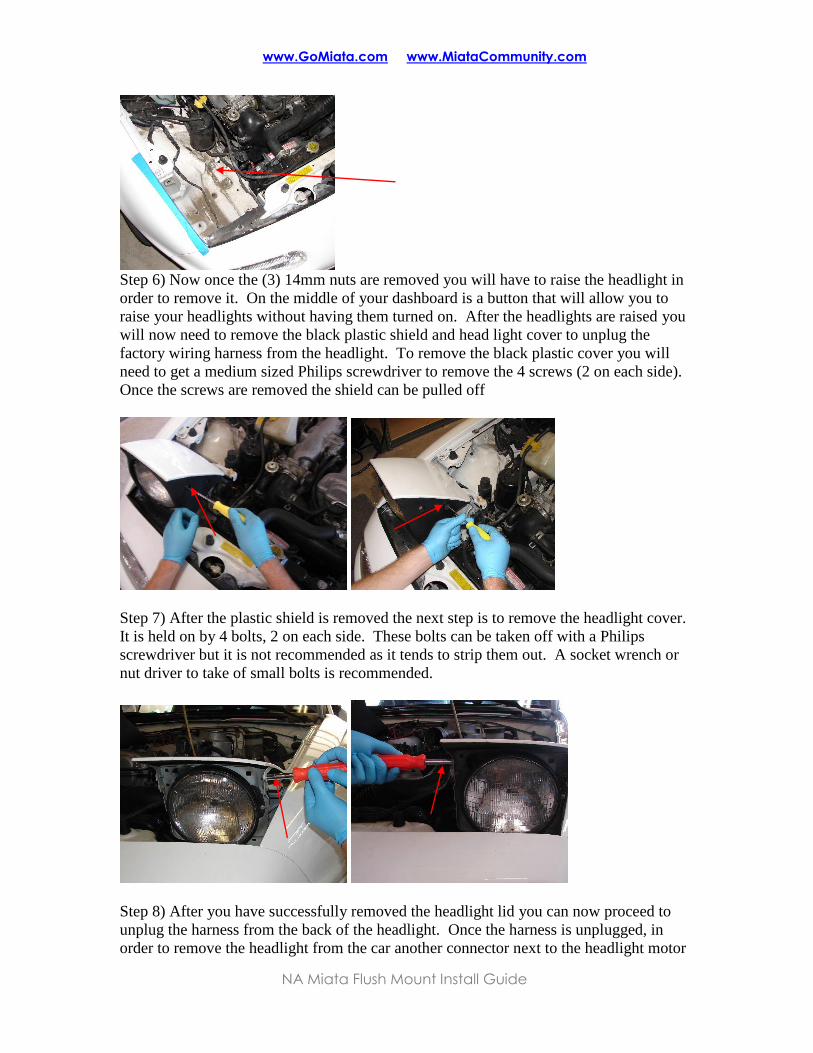
Step 6) Now once the (3) 14mm nuts are removed you will have to raise the headlight in
order to remove it. On the middle of your dashboard is a button that will allow you to
raise your headlights without having them turned on. After the headlights are raised you
will now need to remove the black plastic shield and head light cover to unplug the
factory wiring harness from the headlight. To remove the black plastic cover you will
need to get a medium sized Philips screwdriver to remove the 4 screws (2 on each side).
Once the screws are removed the shield can be pulled off
Step 7) After the plastic shield is removed the next step is to remove the headlight cover.
It is held on by 4 bolts, 2 on each side. These bolts can be taken off with a Philips
screwdriver but it is not recommended as it tends to strip them out. A socket wrench or
nut driver to take of small bolts is recommended.
Step 8) After you have successfully removed the headlight lid you can now proceed to
unplug the harness from the back of the headlight. Once the harness is unplugged, in
order to remove the headlight from the car another connector next to the headlight motor

www.GoMiata.com www.MiataCommunity.com
NA Miata Flush Mount Install Guide
will need to be unplugged also. A flathead screwdriver can be used to press on the tab to
loosen the plug.
Steps 9) After both plugs have been removed unsnap the factory harness, which is held
by small clips to the headlight assembly itself. Once those are removed the entire
assembly can picked up and removed from the car. The end result will look like this.
Driver Side
The driver side headlight removal is very similar to the passenger side. There are a few
differences though so I will walk you through these as well. In order to reach the third
mounting point with an open end wrench, the air filter box will need to be slightly moved
in order to gain access.
Step 1) The removal of the air filter box requires the removal of (3) 12mm bolts.

www.GoMiata.com www.MiataCommunity.com
NA Miata Flush Mount Install Guide
Step 2) After the bolts are removed you can now unscrew the hose clamp and move the
plastic intake elbow out of the way.
Step 3) Now that the elbow and box itself are out of the way, there is plenty of room to
use a 14mm open or box end wrench to remove the last vertical nut.
The rest of the driver side removal is the same as the passenger side. If any issues arise
please follow the passenger side directions for assistance. Once both sets of headlight are
removed you are ready to move onto the next step of the kit.

www.GoMiata.com www.MiataCommunity.com
NA Miata Flush Mount Install Guide
Installation of the wiring harness
Summary:
The picture above of the wiring harness shows what each piece of the harness is. The
harness is mounted to the driver side of the car and the long set of wires is run against the
firewall to the passenger side of the car. I will go through a step by step process of how
to install the harness. Please look over the wiring schematics before you try and install it.
Step1) Find the two relays that are attached to one another. It is time to bolt this to the
chassis of the car. There is a 10mm bolt on top of the fender well hump. Loosen the bolt
and mount your relay assembly in its place. Now remove the fuses from the fuse holders.

www.GoMiata.com www.MiataCommunity.com
NA Miata Flush Mount Install Guide
Step 2) Now it is time to connect the 12v power source. With the fuses removed, find the
blue plug on the driver side of the engine compartment. Unplug the cover and insert the
yellow power plug over the connector.
Step 3) Find the ground wire, it is a black loom with an o-ring terminal on the end. Right
below the blue connector there is a 10mm bolt on the bottom portion of the fender well
hump. Unbolt this bolt and ground the wire here. In order to assure a good ground you
should use sandpaper to remove the paint and grease where the terminal will contact the
chassis.
www.GoMiata.com www.MiataCommunity.com
NA Miata Flush Mount Install Guide
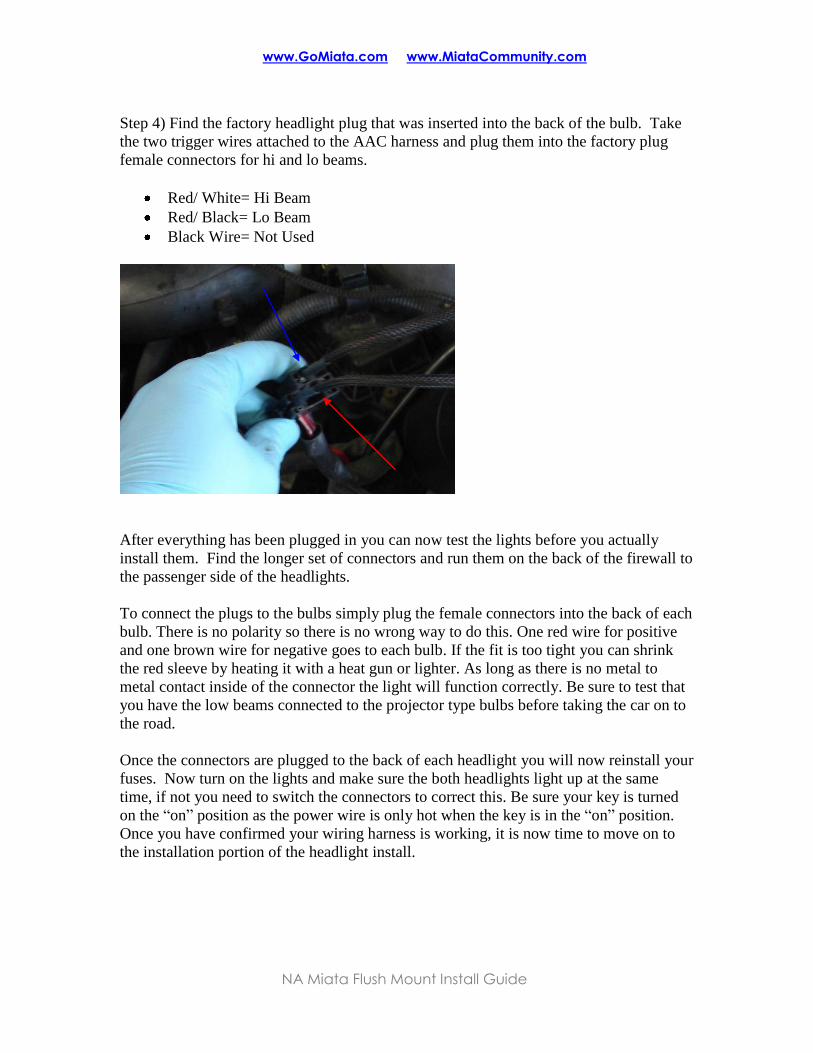
Step 4) Find the factory headlight plug that was inserted into the back of the bulb. Take
the two trigger wires attached to the AAC harness and plug them into the factory plug
female connectors for hi and lo beams.
Red/ White= Hi Beam
Red/ Black= Lo Beam
Black Wire= Not Used
After everything has been plugged in you can now test the lights before you actually
install them. Find the longer set of connectors and run them on the back of the firewall to
the passenger side of the headlights.
To connect the plugs to the bulbs simply plug the female connectors into the back of each
bulb. There is no polarity so there is no wrong way to do this. One red wire for positive
and one brown wire for negative goes to each bulb. If the fit is too tight you can shrink
the red sleeve by heating it with a heat gun or lighter. As long as there is no metal to
metal contact inside of the connector the light will function correctly. Be sure to test that
you have the low beams connected to the projector type bulbs before taking the car on to
the road.
Once the connectors are plugged to the back of each headlight you will now reinstall your
fuses. Now turn on the lights and make sure the both headlights light up at the same
time, if not you need to switch the connectors to correct this. Be sure your key is turned
on the “on” position as the power wire is only hot when the key is in the “on” position.
Once you have confirmed your wiring harness is working, it is now time to move on to
the installation portion of the headlight install.

www.GoMiata.com www.MiataCommunity.com
NA Miata Flush Mount Install Guide
Installation of headlights
Summary:
In order to install the headlights in the car, you will have to first mount the headlights to
the metal bracket with the Hella supplied levelers. The metal brackets are bolted to the
car using the existing hardware and mounting points as your factory headlights. After the
headlights are bolted into the car you will need to further adjust the lights to make sure
they are level and give enough clearance to install the carbon fiber buckets. Once the
buckets are installed you now have the ability to attach the clear covers and clips. After
everything is fitted, drill your two mounting holes for the bucket and bolt it in place.
How to install the lights on the metal brackets:
Hella 90mm Lamp modules are designed for custom applications. The mounting system
comprises of three adjuster screws with captive nuts. The nuts have a tri-lobular locking
feature that engage the ears and lock in with a 30 degree rotation. The instructions that
come with the adjustors explain how they are installed. The ball on the end of the adjuster
screw snaps into the black plastic Ball Socket. The Ball Sockets snap into the round holes
on the metal bracket. Install the Ball Sockets into the mounting surface FIRST and
THEN snap the ball end of the adjusting screw into the Ball Socket. The Ball Sockets
have slots in them to allow them to collapse when being installed in the mounting plate.
If you install the ball into the Ball Socket, the Ball Socket can not collapse and most
likely you will shear the barbs off when it is inserted into the mounting surface. If you
need to remove the Ball Sockets from the mounting surface, remove the ball end of the
adjuster screw from the Ball Socket FIRST and then remove the Ball Socket from the
mounting surface. Try to avoid doing this as every time you snap the ball in and out of
the ball socket, additional wear to the ball socket is created.
Make sure when you install the lights that the low beam is mounted to the inside of the
metal bracket. Because of clearance issues with the larger projector it is mounted to the
portion of the bracket that is stepped up from the other side. The red arrow below shows
where the projector should be mounted. Also make sure the word Hella on the front
lenses of each light is right side up when the light is mounted.

www.GoMiata.com www.MiataCommunity.com
NA Miata Flush Mount Install Guide
How to install the metal bracket to the car
Step 1) Before you install your metal brackets it is now a good time to ensure the best
possible fitment of the carbon fiber buckets and clear covers. I have opted to slight bend
the inner part of the fender. As you will see the inside of the fender was made with a
wavy pattern to it. With a rubber hammer I very gently hit back this part of the metal so
it was bent back and straight.
Step 2) The metal bracket attaches to the same mounting points and uses the same nuts as
your factory headlights. First find one of the bolts that were included in your kit and
thread it through your horizontal mounting point as shown below. Take one of the
factory nuts and thread it on this bolt and tighten it.
Step 3) Position your metal bracket over the two vertical studs. I have found that sliding
the metal bracket as far back as it will go is the ideal location. Thread both of the factory
nuts back over the factory studs.
Step 4) Find one of the included locking washers and nuts. First screw the nut on the bolt
as far as it will go and then install the locking washer. It is now time to slide the last
mounting hole through the bolt until it reaches the locking washer. Install another
locking washer and then the last nut. You will need to tighten down the bolts with a
13mm socket and wrench.

www.GoMiata.com www.MiataCommunity.com
NA Miata Flush Mount Install Guide
At this time your headlights have been mounted to the car. This is an ideal time to begin
to level your lights. Plug in both of the connectors to the back of each headlight and find
a level surface with a flat wall to project the light onto. Use the adjusting screws to level
out the light output, the lower screws are for horizontal adjustment and upper is for
vertical adjustment. The lights might need to be adjusted again to get the carbon fiber
buckets on but this will give you a good baseline to work with.
Installing the clear covers and carbon fiber buckets
Summary:
Once the headlights have been adjusted and are in working order you can now install the
carbon fiber buckets, clear covers and metal retaining clips. Please do not drill holes in
the buckets until everything has been fitted exactly the way you want them. You can
install the clear cover on the bucket first then install the entire unit or install them after
the buckets have been installed. I will walk you though the step of making sure
everything fits the way it should.
Step 1) Before the bucket can be installed the removal of the two bolts that will be used
to secure the bucket will be necessary.
Step 2) The Carbon Fiber buckets have 3 mounting points. The addition of the front “leg”
is used for support and is not bolted to anything. When you try and install the bucket
make sure to slide the rear of the cover on first and then push the leg of the bucket into
place. The fit is tight so take your time and make sure it is done right. In order to get

www.GoMiata.com www.MiataCommunity.com
NA Miata Flush Mount Install Guide
proper fitment the lights might need to be readjusted. Remember that once everything is
installed you will have to remove the bucket in order to readjust the light so doing it
while it is still off is crucial.
Step 3) After the carbon fiber bucket has been installed it is now time to put the clear
cover on. In order to put the maximum number of retaining clips on it is necessary to
install the carbon fiber bucket with the clear cover already attached to it. The cover can
still be installed after the bucket has been placed in the car but retaining clips will only be
able to be on the rear and one side of the bucket. To install the clips the curved portion of
the clip goes on the inside of the bucket and the flat piece is the part that rests on the clear
cover. The clips can be bent in either direction to get the desired fitment.
Step 4) In order to get the hood to close properly the removal of the plastic rain guard
will have to be removed on both sides. The plastic clips are held on by plastic Philip
head screws. Three pieces will be removed in all.
Step 5) Now it is important to check for fitment of all pieces. After everything is fitted to
your desired result you are now able to drill the holes for your bucket. I would
recommend either drilling the holes while the bucket is on the car or to take careful
measurement. If you do not plan to ever run the clear covers your measurement will be
slightly different then if you want to run the covers.
Step 6) Once your holes have been drilled you are now able to bolt down the (2) factory
bolts used to secure the buckets. The carbon Fiber is very durable so you can make sure
to tighten both bolts down securely.
www.GoMiata.com www.MiataCommunity.com
NA Miata Flush Mount Install Guide
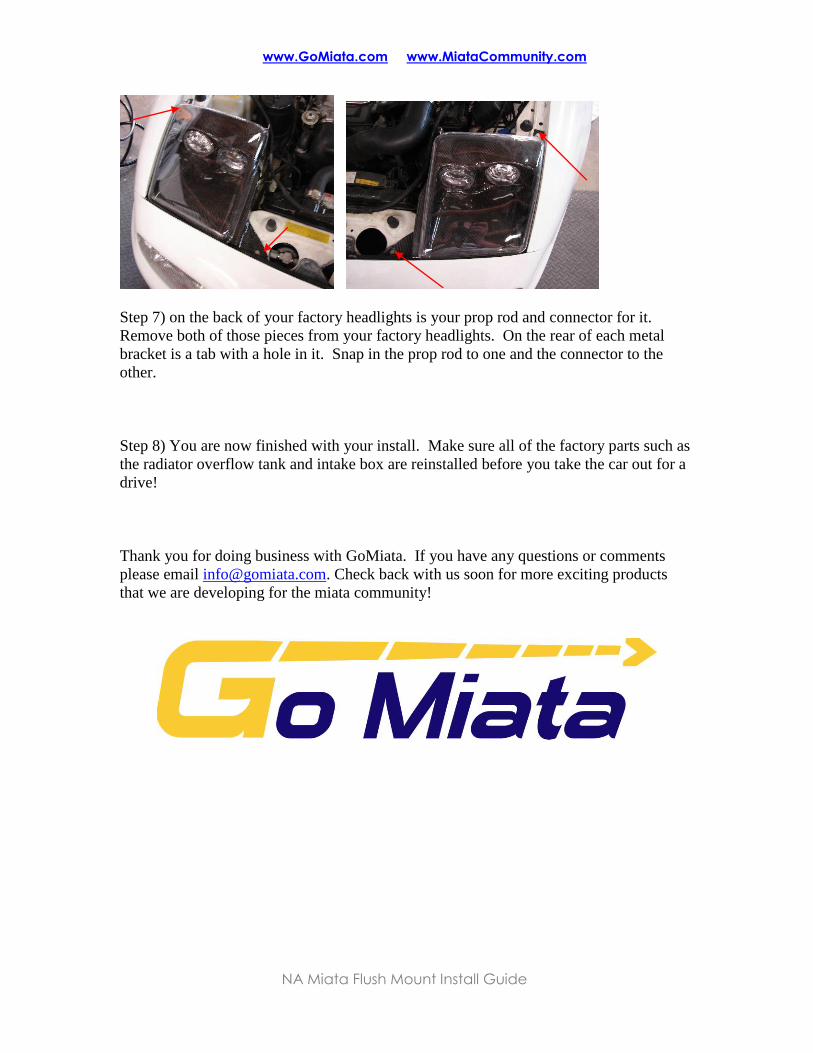
Step 7) on the back of your factory headlights is your prop rod and connector for it.
Remove both of those pieces from your factory headlights. On the rear of each metal
bracket is a tab with a hole in it. Snap in the prop rod to one and the connector to the
other.
Step 8) You are now finished with your install. Make sure all of the factory parts such as
the radiator overflow tank and intake box are reinstalled before you take the car out for a
drive!
Thank you for doing business with GoMiata. If you have any questions or comments
please email [email protected]. Check back with us soon for more exciting products
that we are developing for the miata community!