repair tips 2 - ken's clock clinic repair tips 2-- overhaul...ken’s clock clinic clock...
TRANSCRIPT
Ken’s Clock ClinicClock Restorations, Vintage Dry Cells, Synchronizers
1
Repair Tips 2: Overhaul and Motor Adjustments
F Style Self Winding Clocks
Ken ReindelNAWCC Chapter 15
Ken’s Clock ClinicClock Restorations, Vintage Dry Cells, Synchronizers
2
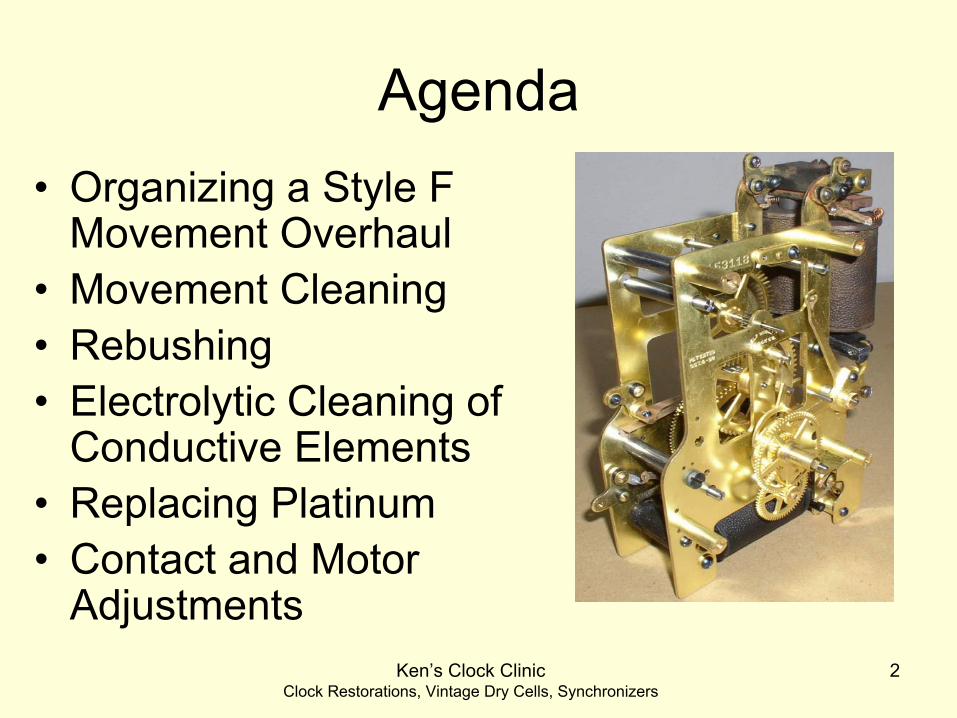
Agenda•
Organizing a Style F Movement Overhaul
•
Movement Cleaning•
Rebushing
•
Electrolytic Cleaning of Conductive Elements
•
Replacing Platinum•
Contact and Motor Adjustments
Ken’s Clock ClinicClock Restorations, Vintage Dry Cells, Synchronizers
3
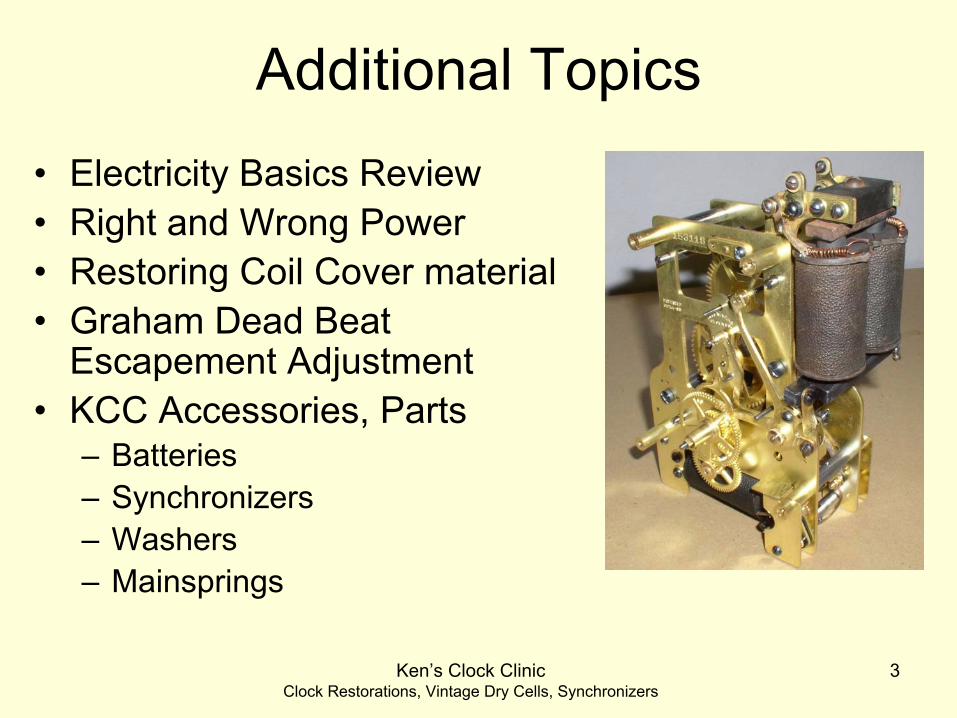
Additional Topics•
Electricity Basics Review
•
Right and Wrong Power•
Restoring Coil Cover material
•
Graham Dead Beat Escapement Adjustment
•
KCC Accessories, Parts–
Batteries
–
Synchronizers–
Washers
–
Mainsprings

Ken’s Clock ClinicClock Restorations, Vintage Dry Cells, Synchronizers
4
What we WON’T Cover•
In Depth Electrical Basics (covered in Tips Part 1)
•
Details on Style A and C Restoration–
Topic for Advanced Class
•
Synchronizer Adjustments–
Topic for Advanced Class
•
Details of Clock Case Wiring–
Covered in Marybess’ documentation in past Bulletins

Ken’s Clock ClinicClock Restorations, Vintage Dry Cells, Synchronizers
5
Basic Skill Level
•
Basic Clock Repair skills and Equipment–
Assembly, disassembly, cleaning
–
Pivots, bushings•
Adept at Miniature Lathe (eg
Sherline, Unimat,
Prazi)–
Ability to make simple bushings, washers on lathe
–
Ability to polish pivots and re-pivot occasionally•
M Grisham class—complementary–
Advantage if you have taken this class previously
Ken’s Clock ClinicClock Restorations, Vintage Dry Cells, Synchronizers
6
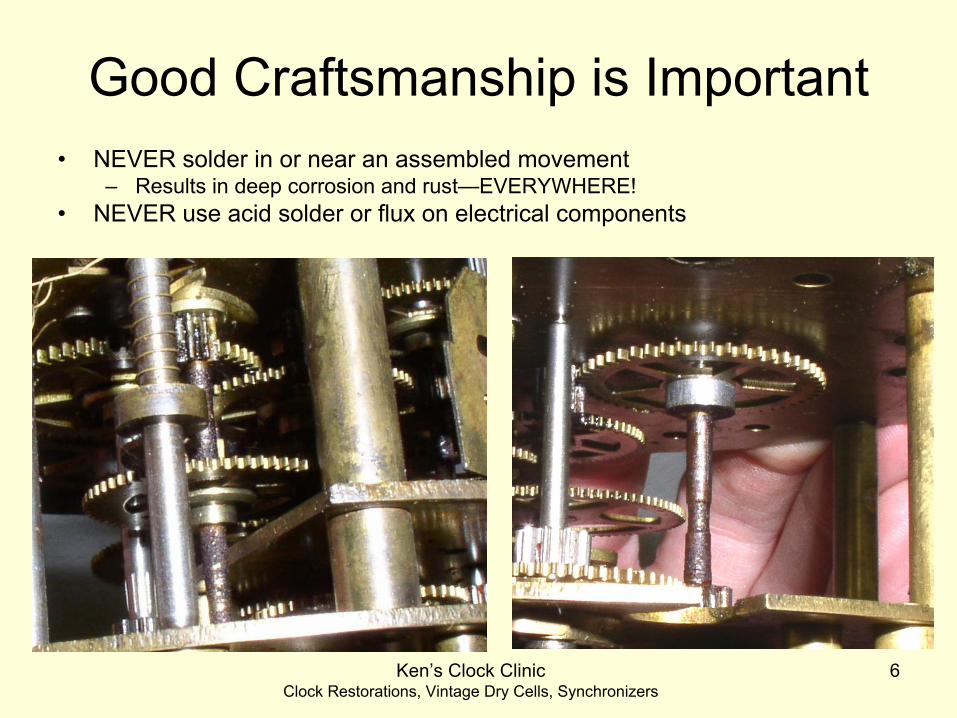
Good Craftsmanship is Important•
NEVER solder in or near an assembled movement–
Results in deep corrosion and rust—EVERYWHERE!•
NEVER use acid solder or flux on electrical components

Ken’s Clock ClinicClock Restorations, Vintage Dry Cells, Synchronizers
7
Review of Electricity Basics

Ken’s Clock ClinicClock Restorations, Vintage Dry Cells, Synchronizers
8
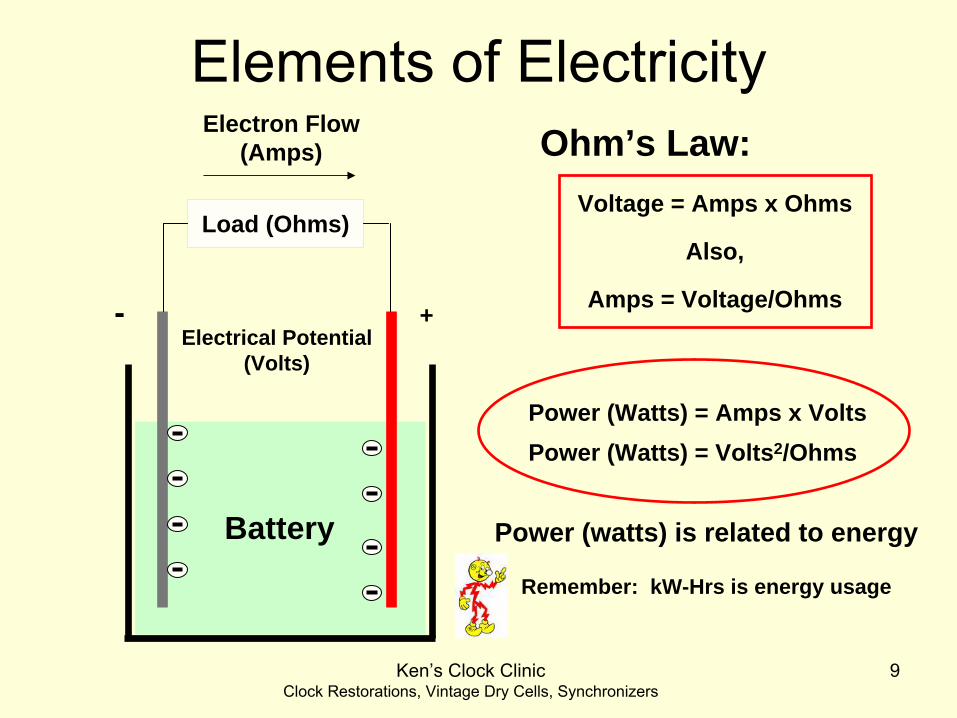
Elements of Electricity
•
Voltage–
Electrical Pressure or Potential
–
Batteries are an example of a voltage source•
Current–
A measure of the FLOW of electricity
–
Measured in Amps •
Resistance–
A measure of the restriction to FLOW
–
Measured in Ohms
Ken’s Clock ClinicClock Restorations, Vintage Dry Cells, Synchronizers
9
Elements of Electricity
Load (Ohms)
Battery
- +
Electron Flow(Amps)
Electrical Potential(Volts)
Power (Watts) = Amps x Volts
Voltage = Amps x Ohms
Also,
Amps = Voltage/Ohms
Ohm’s Law:
Power (Watts) = Volts2/Ohms
Power (watts) is related to energy
Remember: kW-Hrs is energy usage

Ken’s Clock ClinicClock Restorations, Vintage Dry Cells, Synchronizers
10
Series Circuits
•
Batteries in SERIES add:
•
Resistors in SERIES also add:
+
+
Clock Motor
1.5 volt 1.5 volt
Clock motor “sees” 3 volts
6Ω 6ΩTotal Resistance = 12Ω

Ken’s Clock ClinicClock Restorations, Vintage Dry Cells, Synchronizers
11
Parallel Circuits•
Batteries in PARALLEL of same voltage will output that voltage, but increase Amperage capacity
Clock Motor
+ +
1.5V 1.5V Clock motor “sees” 1.5 volts
If each battery can supply 2 amps, two in parallel can
supply 4 amps.
6Ω 6Ω
N like value resistors in parallel reduce by:
Rp
= R/N
6Ω// 6Ω
= 3Ω

Ken’s Clock ClinicClock Restorations, Vintage Dry Cells, Synchronizers
12
Example Application of Ohm’s Law
Coil resistance = 6ΩBattery voltage = 3 volts
How many amps will be needed from battery?
Answer:Amps = Volts/Ohms
= 3 volts/ 6Ω= ½ Amp
6Ω
coil+
3 V
Amps = ?

Ken’s Clock ClinicClock Restorations, Vintage Dry Cells, Synchronizers
13
Let’s keep going…..
•
For the same circuit:
How much power is dissipated in the coil?
Answer:
Power = Voltage2/Ohms= 32
volts/6Ω
= 1.5 watts
6Ω
coil+
3 V
½ Amp
Power = ??
Ken’s Clock ClinicClock Restorations, Vintage Dry Cells, Synchronizers
14
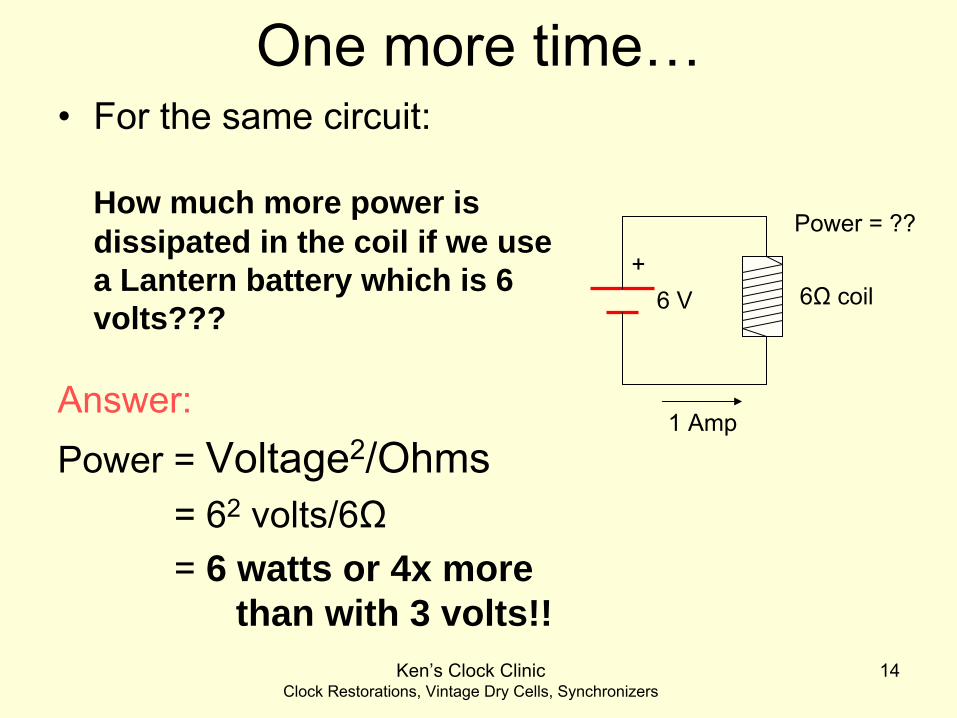
One more time…•
For the same circuit:
How much more power is dissipated in the coil if we use a Lantern battery which is 6 volts???
Answer:Power = Voltage2/Ohms
= 62
volts/6Ω
= 6 watts or 4x more than with 3 volts!!
6Ω
coil+
6 V
Power = ??
1 Amp

Ken’s Clock ClinicClock Restorations, Vintage Dry Cells, Synchronizers
15
Which brings us to our first tip…..
•
Double the voltage (6V) forces 4x the energy into the electrical components
•
DO NOT USE
in 3V clocks –
Unless you use a voltage converter (eg, Model 1000)

Ken’s Clock ClinicClock Restorations, Vintage Dry Cells, Synchronizers
16
Damage Done by 6 Volts

Ken’s Clock ClinicClock Restorations, Vintage Dry Cells, Synchronizers
17
More Damage Done by 6 Volts

Ken’s Clock ClinicClock Restorations, Vintage Dry Cells, Synchronizers
18
Style F Restoration

Ken’s Clock ClinicClock Restorations, Vintage Dry Cells, Synchronizers
19
Preliminary Thoughts: Style F Restoration
•
To do the job right is TIME CONSUMING–
No short cuts
•
Many of these clocks have never been cleaned–
Intimidating and unfamiliar to many
–
You’ll find many of them in sorry shape•
Many problems that spring wound clocks do not have
•
High Quality movements deserve the best craftsmanship
Ken’s Clock ClinicClock Restorations, Vintage Dry Cells, Synchronizers
20
Before the Movement Arrives
•
Due to weight and size, many customers will only send (or bring) the movements
•
Make sure you have hand nut and hands–
M problems are hand-fit related
–
If you are repairing the synch mechanism you need to adjust the hand bushing
–
Second hand is essential to synch adjustments•
Make up some test stands with various pendulum lengths

Ken’s Clock ClinicClock Restorations, Vintage Dry Cells, Synchronizers
21
Organizing the Restoration (A trip to Container Store is a must!)
•
Container for small brass parts–
Brass Washers–
Terminals–
Nuts, studs
•
Container for: –
Steel parts and screws
•
Container for:–
Movement wheels, levers, Plates and plate extensions
•
Safe storage for Rubber insulators (DO NOT SOAK)•
Safe storage for coils/resistor assembly

Ken’s Clock ClinicClock Restorations, Vintage Dry Cells, Synchronizers
22
Getting ReadyMovement 175133 Movement 50946

Ken’s Clock ClinicClock Restorations, Vintage Dry Cells, Synchronizers
23
Movement 175133 Description•
120 Beat movement•
Customer: “Circa 1927”•
24 Volt Winding Coils–
Damping resistor missing•
Bell System central office LD billing timer –
Switch missing•
Minute cam, notched hour wheel for hourly sync out–
Switch missing•
Hourly and minute synchronized–
Coils, levers missing•
Double thick insulators
Ken’s Clock ClinicClock Restorations, Vintage Dry Cells, Synchronizers
24
Disassembly Tips--Fasteners
•
Make careful notes of which screws go where–
Wrong LENGTH screws will cause problems
–
Compare to reference table•
Keep track of where brass washers go–
Under screws holding coil yokes
–
Under screw head above insulator, if there is a wire lug involved
–
Between nuts and insulators–
NOT under screws holding ONLY insulators

Ken’s Clock ClinicClock Restorations, Vintage Dry Cells, Synchronizers
25
Screw Sizes SWCC Style FLocation OD (inch) Thread
(TPI)Screw Size
Hand Nut 0.097 56 3-56
Sync & Minute 0.085 56 2-56
Electrical Connections, Dial Screws
0.110 40 4-40
Verge Bridge (front and rear)
0.124 40 5-40
Bosses, Pillars 0.138 40 6-40
Motor Coils 0.136 32 6-32
Sync Second Bit Escape Arbor
0.047 110(est)
00-110

Ken’s Clock ClinicClock Restorations, Vintage Dry Cells, Synchronizers
26
Screws•
Keep an eye on threads–
Years of heavy tightening damages them
–
Rethread or clean up per table•
Be careful of screw sizes–
Many different types on these clocks
–
Some look the same but don’t interchange•
Some are shoulder screws–
Upper right pillar front (spacers) and rear

Ken’s Clock ClinicClock Restorations, Vintage Dry Cells, Synchronizers
27
Starting the Disassembly1.
Remove Motion Works
•
Synchronizer levers2.
Remove Verge
•
Let down train slowly3.
Remove Coils
•
Disconnect wires first!•
Winding Coils with Damping Resistor
•
Synchronizing Coils4.
Remove contacts
•
Hourly Contactor•
Both motor contacts

Ken’s Clock ClinicClock Restorations, Vintage Dry Cells, Synchronizers
28
Finalize Disassembly
1.
Remove top plate spacers and screws
•
Note differences!
2.
Remove top plate3.
Remove all wheels and set aside
4.
Main Wheel disassembly

Ken’s Clock ClinicClock Restorations, Vintage Dry Cells, Synchronizers
29
Note Rear Plate Shoulder Screw
Note distress

Ken’s Clock ClinicClock Restorations, Vintage Dry Cells, Synchronizers
30
Main Wheel Disassembly
•
Note mainspring is wound too tight!
•
Counted 6 turns pre- wind on this one
–
Spring is .220” x .010” x 84”–
Would work with 3 turns prewind!
•
Will eat batteries and wear out movement–
Note tooth wear, inset

Ken’s Clock ClinicClock Restorations, Vintage Dry Cells, Synchronizers
31
Removing Center Arbor Pin
1.
Use Vise as 3rd hand2.
Bench block to support rear arbor near pin
3.
Drive out pin with drift punch
4.
Remove nuts on barrel and remove driven wheel
5.
Use same approach for mainspring collet, too

Ken’s Clock ClinicClock Restorations, Vintage Dry Cells, Synchronizers
32
Removing Mainspring
1.
Unhook center of spring from pin
2.
Grasp mainspring with fingers
3.
Pull up and out4.
Slowly allow spring to unwind
Clean off heavy grease

Ken’s Clock ClinicClock Restorations, Vintage Dry Cells, Synchronizers
33
Cleaning•
Separate parts into baskets–
Small brass parts–
Wheels–
Steel parts
•
Clean plates and large parts separately
•
DO NOT CLEAN INSULATORS

Ken’s Clock ClinicClock Restorations, Vintage Dry Cells, Synchronizers
34
Brushing•
Use brass bristle brush
•
Cleans oxide away–
Better electrical contact
•
Better appearance–
Pride of Craftsmanship–
Makes it easier to see what you are working on later
•
Cost: $7.00 per 4 movements
Ken’s Clock ClinicClock Restorations, Vintage Dry Cells, Synchronizers
35
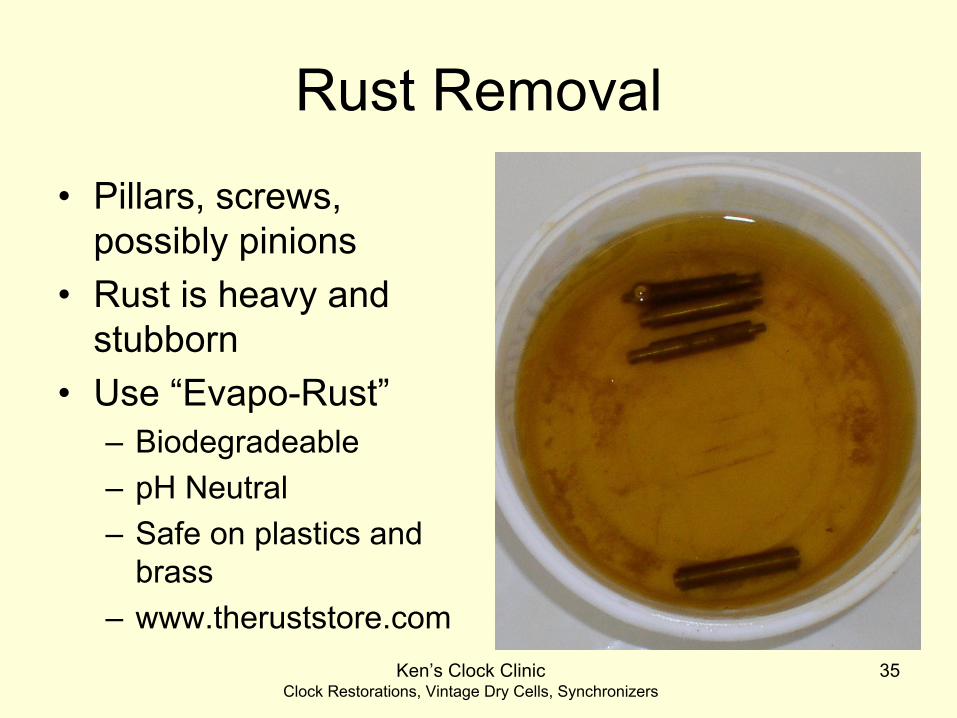
Rust Removal
•
Pillars, screws, possibly pinions
•
Rust is heavy and stubborn
•
Use “Evapo-Rust”–
Biodegradeable
–
pH Neutral–
Safe on plastics and brass
–
www.theruststore.com

Ken’s Clock ClinicClock Restorations, Vintage Dry Cells, Synchronizers
36
Electrolytic Cleaning•
Removes corrosion
•
Removes tarnish•
Optimizes electrical connections
•
Process:–
Clock Cleaning Solution
–
Water Rinse–
Dip 10 seconds
–
Rinse–
Neutralize with Clock Cleaning Solution
–
Water Rinse and dry

Ken’s Clock ClinicClock Restorations, Vintage Dry Cells, Synchronizers
37
Next Steps
•
Restore screws•
Restore pillars
•
Assemble and lube spring in cage
•
Restore Center Arbor Pin•
Restore Ratchet Wheel and Winding Lever
•
Restore Armature•
Clean up Coils
Ken’s Clock ClinicClock Restorations, Vintage Dry Cells, Synchronizers
38
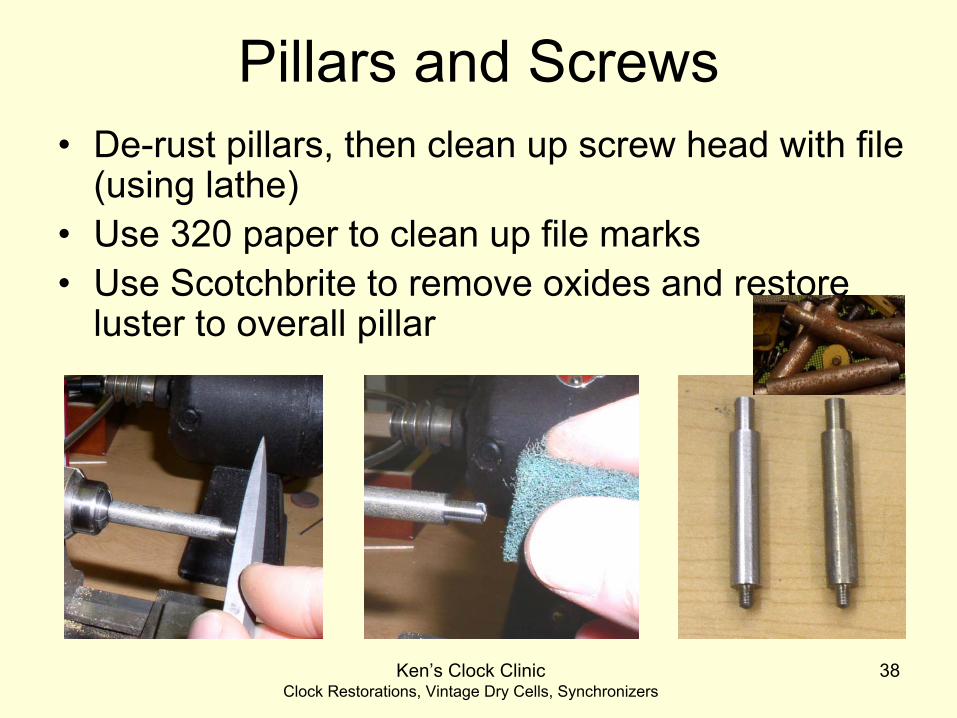
Pillars and Screws•
De-rust pillars, then clean up screw head with file (using lathe)
•
Use 320 paper to clean up file marks•
Use Scotchbrite
to remove oxides and restore
luster to overall pillar

Ken’s Clock ClinicClock Restorations, Vintage Dry Cells, Synchronizers
39
Main Wheel Repairs•
Polish out wear from center arbor and pivot–
Cut with pivot file, finish arbor with 400 Wet-or-dry, polish with 1200–
Burnish pivot then polish with rouge•
If necessary, replace winding wheel and cage bushings
Ken’s Clock ClinicClock Restorations, Vintage Dry Cells, Synchronizers
40
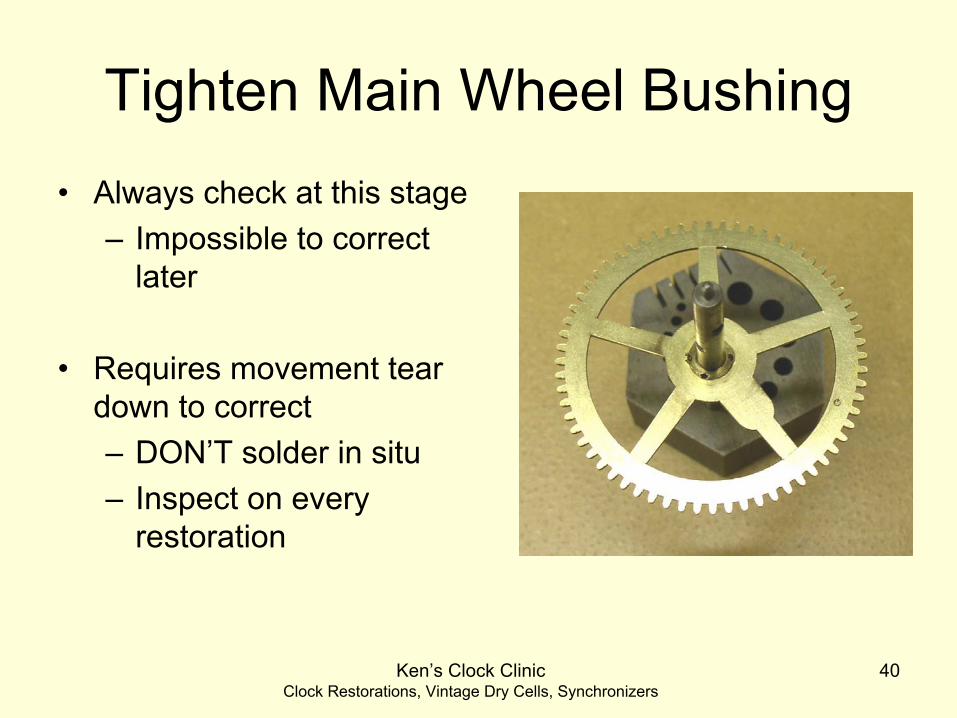
Tighten Main Wheel Bushing•
Always check at this stage–
Impossible to correct later
•
Requires movement tear down to correct–
DON’T solder in situ
–
Inspect on every restoration
Ken’s Clock ClinicClock Restorations, Vintage Dry Cells, Synchronizers
41
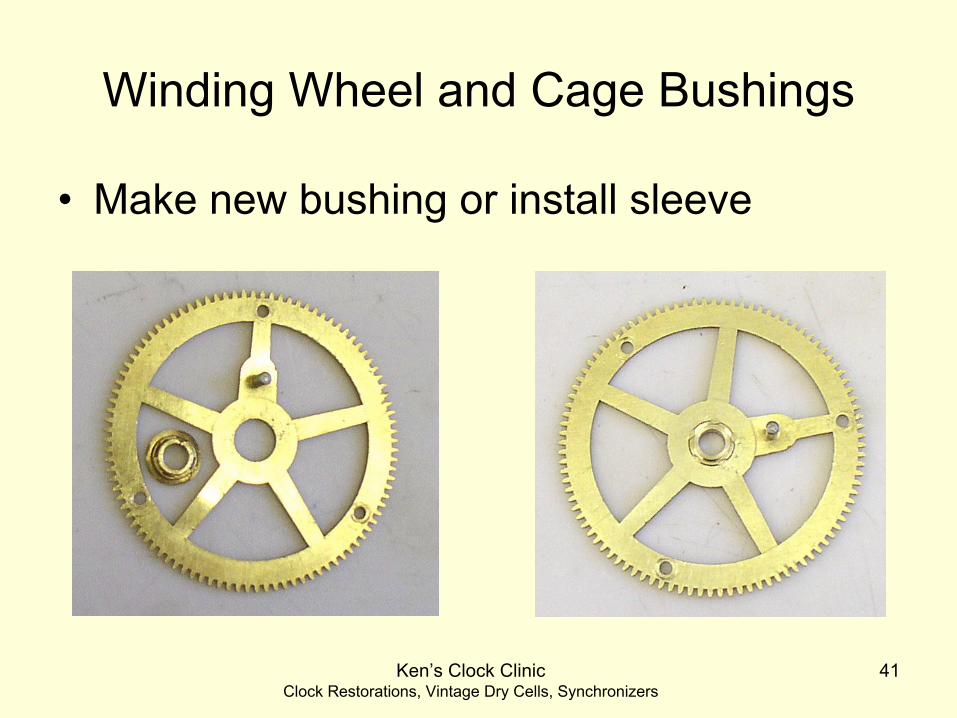
Winding Wheel and Cage Bushings
•
Make new bushing or install sleeve
Ken’s Clock ClinicClock Restorations, Vintage Dry Cells, Synchronizers
42
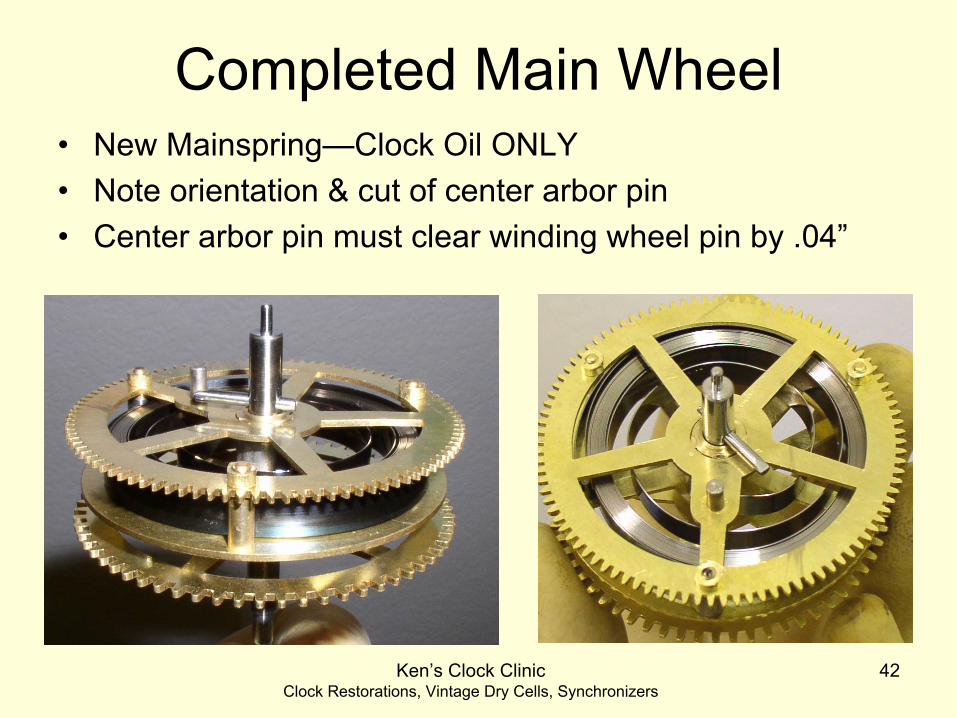
Completed Main Wheel•
New Mainspring—Clock Oil ONLY
•
Note orientation & cut of center arbor pin•
Center arbor pin must clear winding wheel pin by .04”
Ken’s Clock ClinicClock Restorations, Vintage Dry Cells, Synchronizers
43
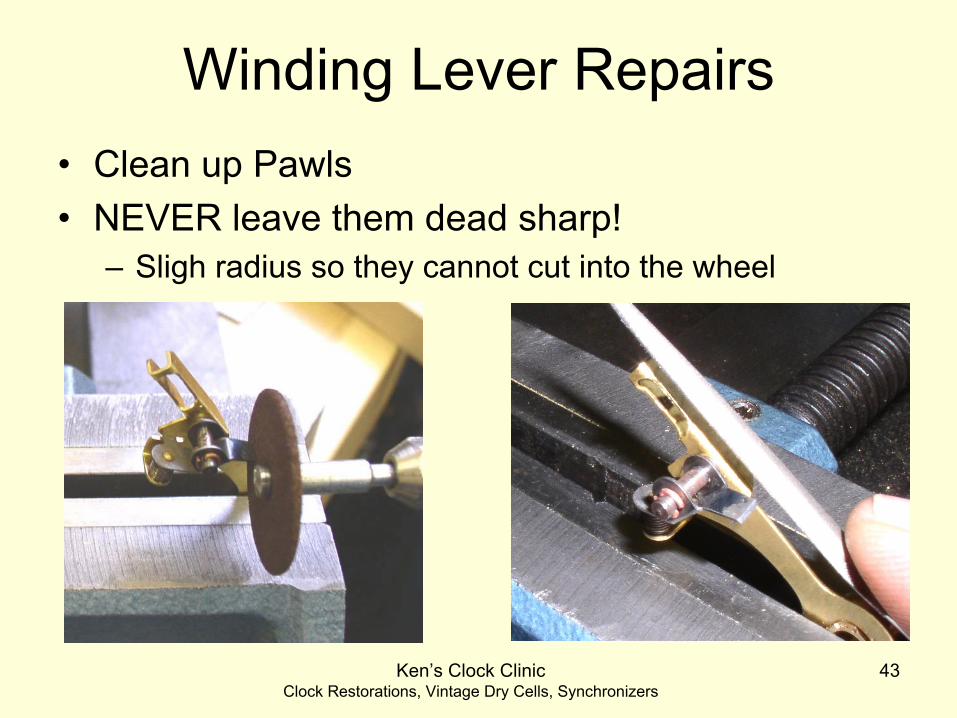
Winding Lever Repairs•
Clean up Pawls
•
NEVER leave them dead sharp!–
Sligh
radius so they cannot cut into the wheel
Ken’s Clock ClinicClock Restorations, Vintage Dry Cells, Synchronizers
44
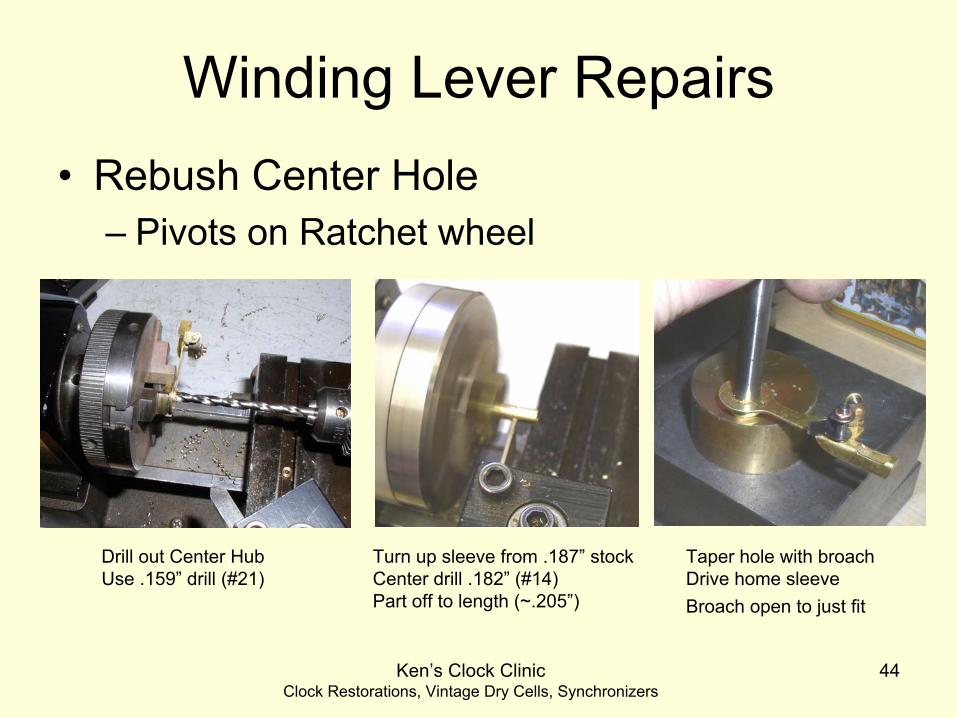
Winding Lever Repairs•
Rebush
Center Hole
–
Pivots on Ratchet wheel
Drill out Center Hub Use .159” drill (#21)
Turn up sleeve from .187” stockCenter drill .182” (#14)Part off to length (~.205”)
Taper hole with broach Drive home sleeveBroach open to just fit
Ken’s Clock ClinicClock Restorations, Vintage Dry Cells, Synchronizers
45
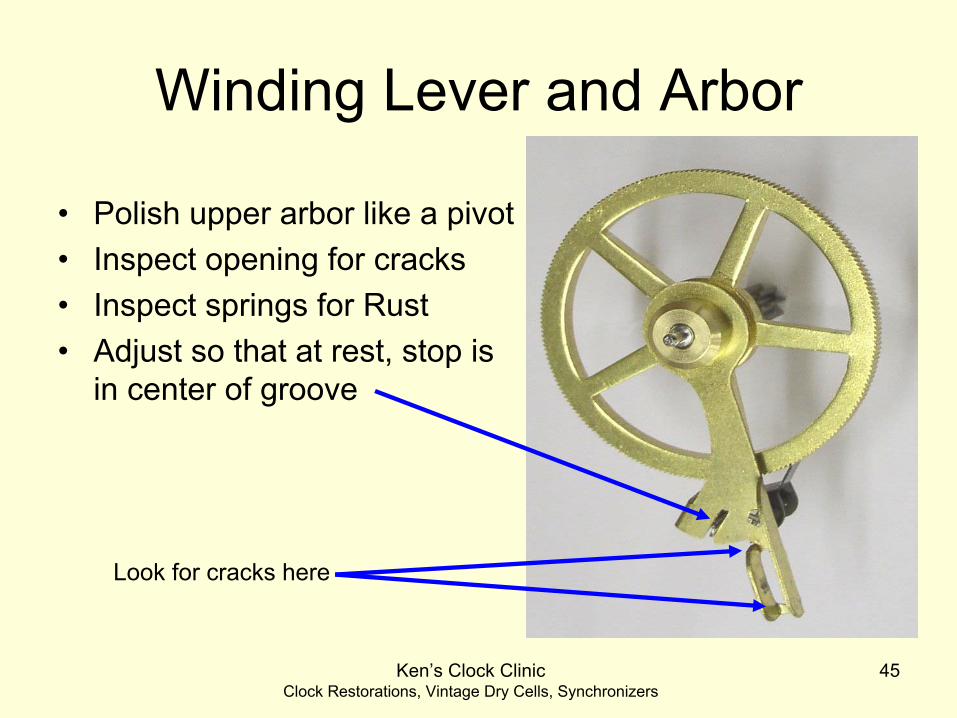
Winding Lever and Arbor
•
Polish upper arbor like a pivot•
Inspect opening for cracks
•
Inspect springs for Rust •
Adjust so that at rest, stop is in center of groove
Look for cracks here

Ken’s Clock ClinicClock Restorations, Vintage Dry Cells, Synchronizers
46
Completed Winding Lever•
Lever is snug fit but turns freely
•
End shake at pawl tip <.020”
•
Sleeve is invisible
Stop in center of groove

Ken’s Clock ClinicClock Restorations, Vintage Dry Cells, Synchronizers
47
Armature Repairs
•
Pivot wear is serious–
Bushing will quickly wear once pivot is scored
–
Must be addressed•
Pivot is difficult to access–
If wear is minor, use rouge wheels to clean up
–
If step is evident, it must be disassembled
•
Bumpers must be removed with proper size screwdriver–
…OR THEY WILL CRACK
Ken’s Clock ClinicClock Restorations, Vintage Dry Cells, Synchronizers
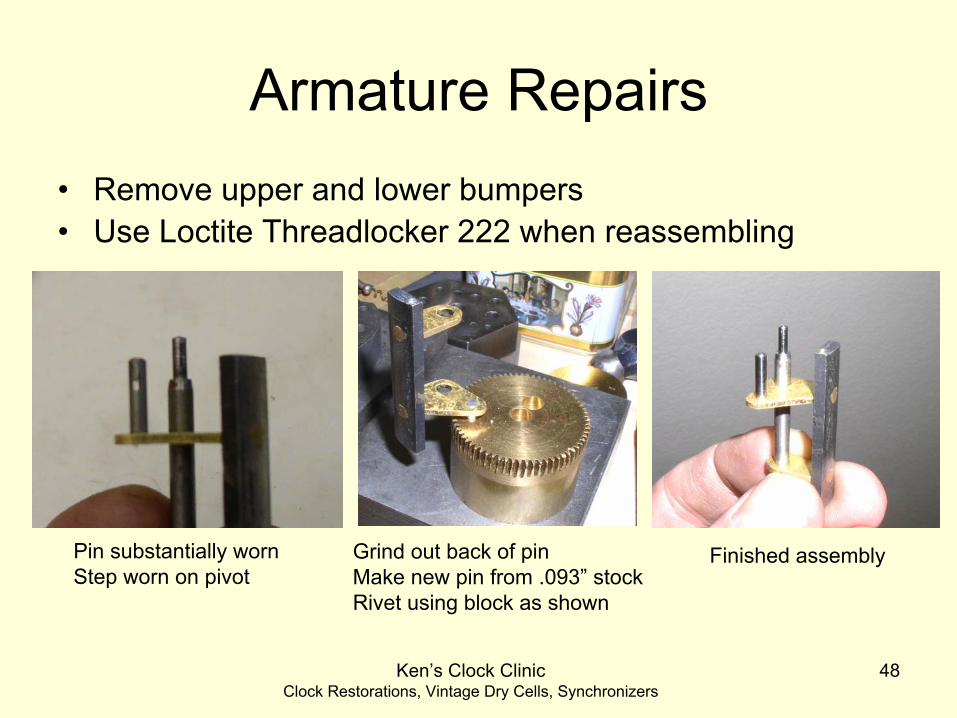
48
Armature Repairs•
Remove upper and lower bumpers
•
Use Loctite
Threadlocker
222 when reassembling
Pin substantially wornStep worn on pivot
Grind out back of pinMake new pin from .093” stockRivet using block as shown
Finished assembly

Ken’s Clock ClinicClock Restorations, Vintage Dry Cells, Synchronizers
49
Accessing Armature Pivots
•
Must remove arbor•
Make tool from Cannon Pinion punch (Timesavers 20879)
•
Acts as spacer as you drive out arbor

Ken’s Clock ClinicClock Restorations, Vintage Dry Cells, Synchronizers
50
Restoring Coils and Connections
•
If lead wire breaks off at coil bobbin–
Don’t panic—this can be repaired easily
•
To repair:–
Thread wire out of bobbin hole
–
Unwrap 3 turns (unwraps easily)–
Rethread through bobbin hole
–
Clean off insulation, solder resistors and lugs on

Ken’s Clock ClinicClock Restorations, Vintage Dry Cells, Synchronizers
51
Restoring Coils and Connections•
Clean connections are critical–
Use Scotchbrite
or Scotchbrite
wheels (#320)–
Hold lugs and wires with pliers while cleaning (DO NOT STRESS WIRES)
Coil in original state Soldering resistor in place Cleaned up spade lugWire termination cleaned
Ken’s Clock ClinicClock Restorations, Vintage Dry Cells, Synchronizers
52
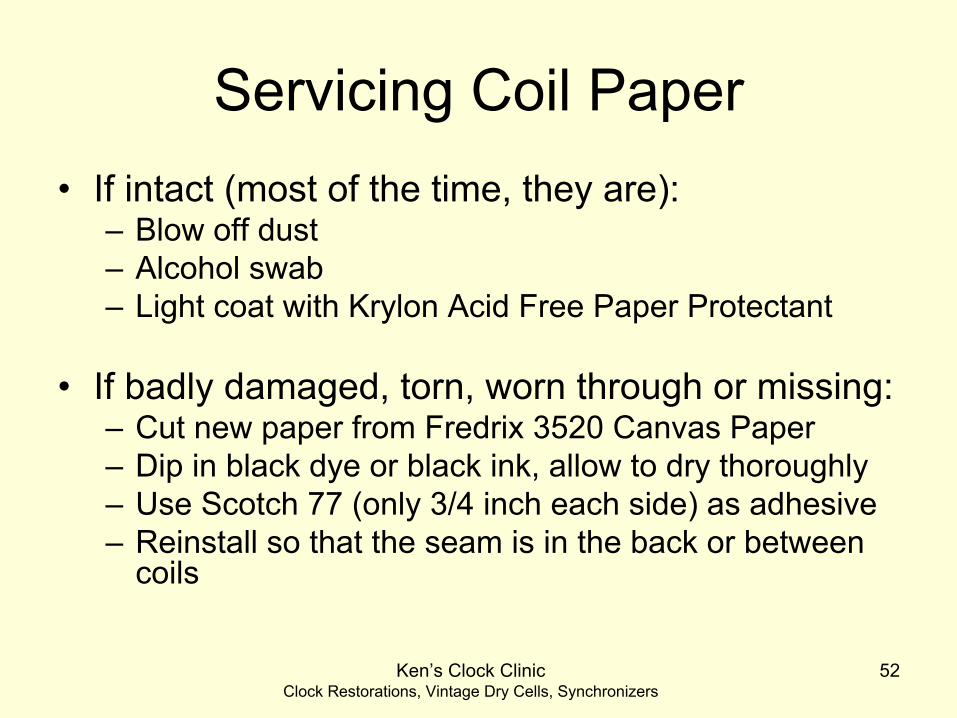
Servicing Coil Paper•
If intact (most of the time, they are): –
Blow off dust
–
Alcohol swab –
Light coat with Krylon
Acid Free Paper Protectant
•
If badly damaged, torn, worn through or missing:–
Cut new paper from Fredrix
3520 Canvas Paper
–
Dip in black dye or black ink, allow to dry thoroughly–
Use Scotch 77 (only 3/4 inch each side) as adhesive
–
Reinstall so that the seam is in the back or between coils
Ken’s Clock ClinicClock Restorations, Vintage Dry Cells, Synchronizers
53
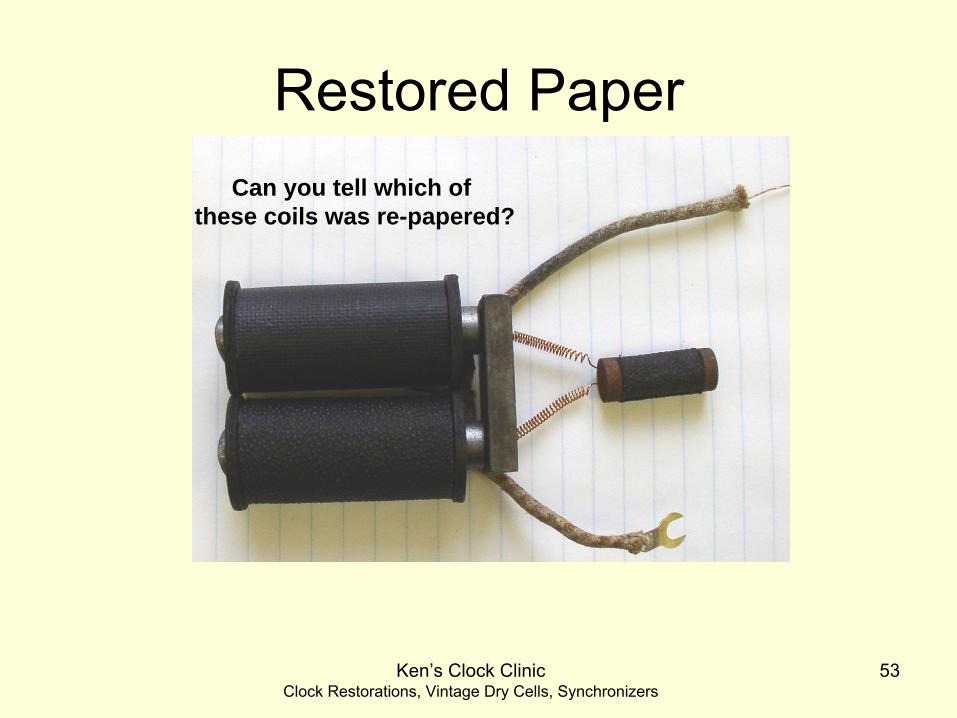
Restored PaperCan you tell which of
these coils was re-papered?

Ken’s Clock ClinicClock Restorations, Vintage Dry Cells, Synchronizers
55
Coils and Electromagnets
•Winding multiple turns around a core will concentrate the magnetic field as shown.
•All coils have some winding resistance resulting from the copper
•Amps = V/(coil R)
Ken’s Clock ClinicClock Restorations, Vintage Dry Cells, Synchronizers
57
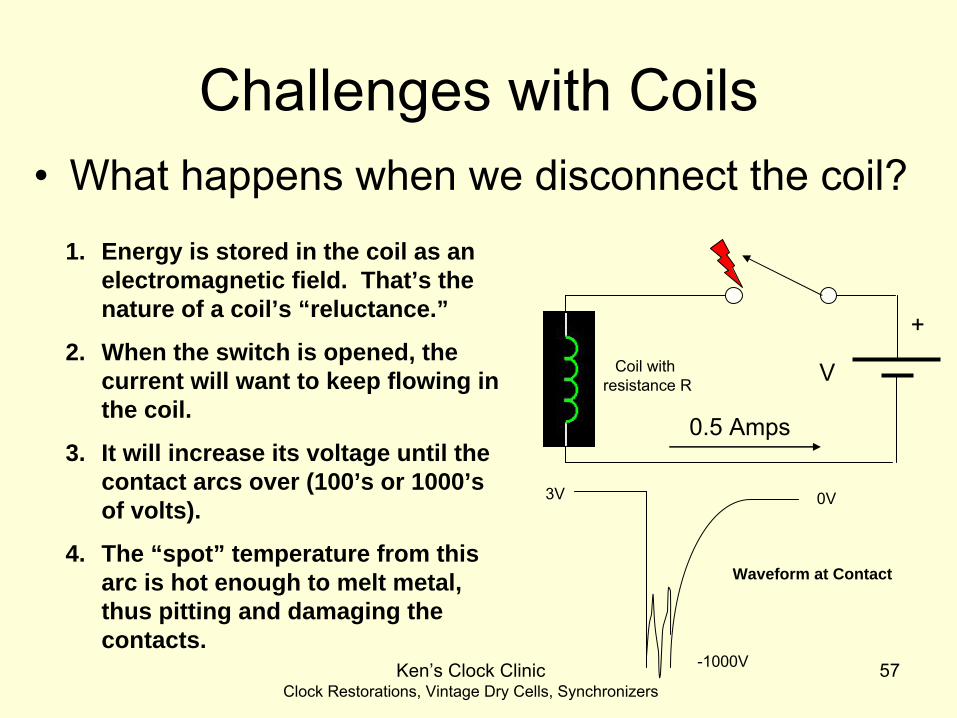
Challenges with Coils•
What happens when we disconnect the coil?
Coil with resistance R V
0.5 Amps
1. Energy is stored in the coil as an electromagnetic field. That’s the nature of a coil’s “reluctance.”
2. When the switch is opened, the current will want to keep flowing in the coil.
3. It will increase its voltage until the contact arcs over (100’s or 1000’s of volts).
4. The “spot” temperature from this arc is hot enough to melt metal, thus pitting and damaging the contacts.
-1000V
3V 0V
Waveform at Contact
+
Ken’s Clock ClinicClock Restorations, Vintage Dry Cells, Synchronizers
58
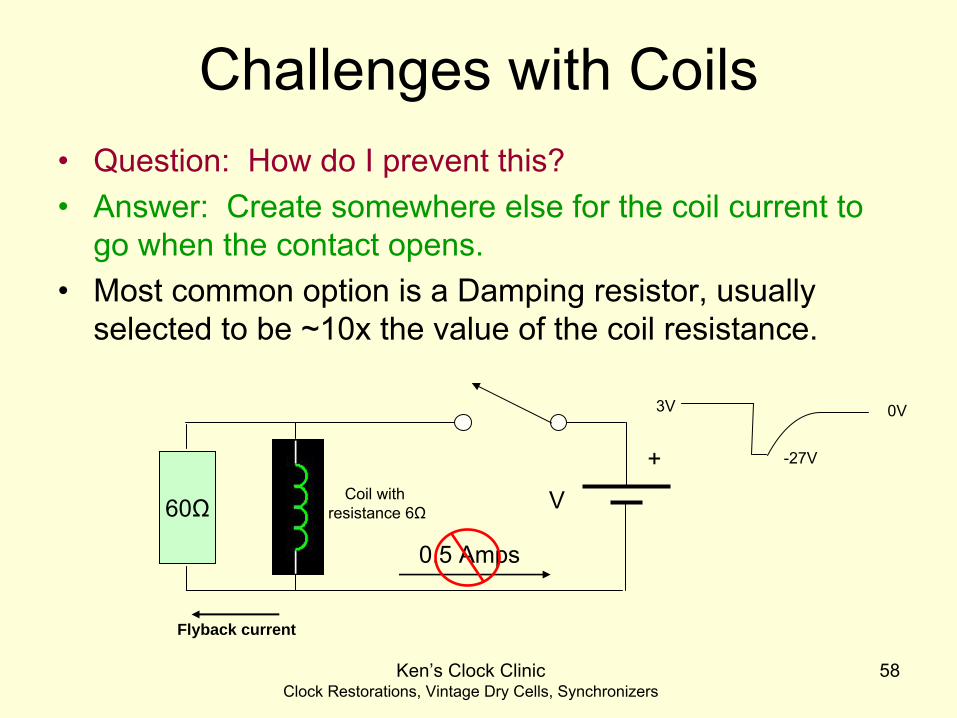
Challenges with Coils•
Question: How do I prevent this?
•
Answer: Create somewhere else for the coil current to go when the contact opens.
•
Most common option is a Damping resistor, usually selected to be ~10x the value of the coil resistance.
Coil with resistance 6Ω V
0.5 Amps
60Ω
Flyback current
-27V
3V 0V
+

Ken’s Clock ClinicClock Restorations, Vintage Dry Cells, Synchronizers
59
Challenges with Coils•
Another option is a diode, but this was obviously not used in vintage days.
•
NEVER use a diode on a Style A or F Motor coil!–
Interferes with proper operation of the motor–
Drags out release time of electromagnet and slows armature
Coil with resistance 6Ω V
0.5 Amps
Flyback current
-0.7V
3V 0V
cathode
Diode
+

Ken’s Clock ClinicClock Restorations, Vintage Dry Cells, Synchronizers
60
SWCC Damping Resistors
Note strain relief on lead wires
Ken’s Clock ClinicClock Restorations, Vintage Dry Cells, Synchronizers
61
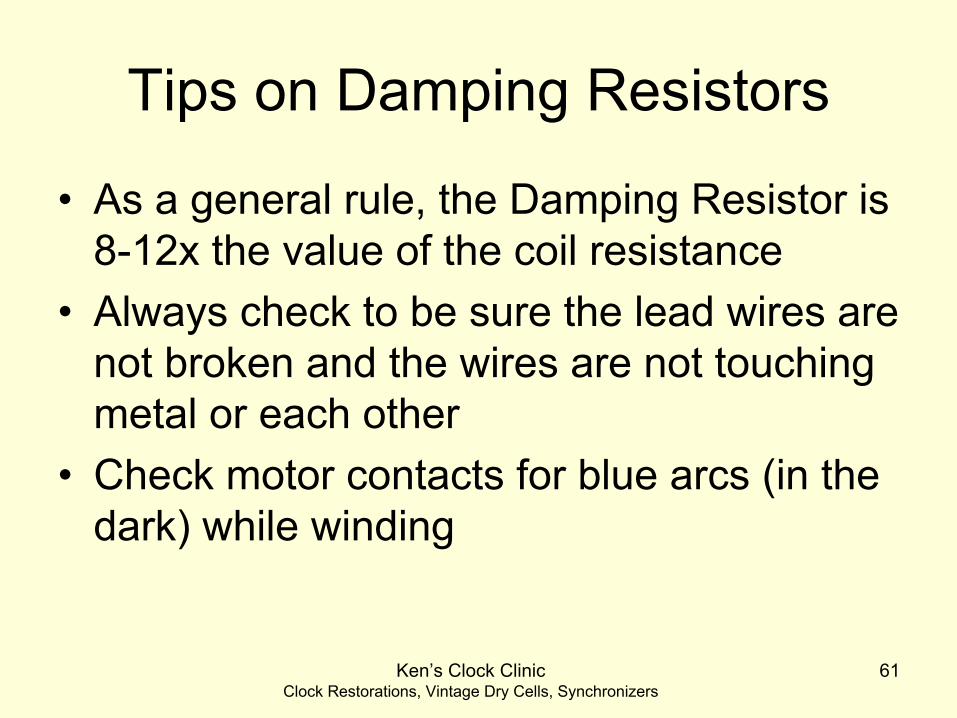
Tips on Damping Resistors
•
As a general rule, the Damping Resistor is 8-12x the value of the coil resistance
•
Always check to be sure the lead wires are not broken and the wires are not touching metal or each other
•
Check motor contacts for blue arcs (in the dark) while winding

Ken’s Clock ClinicClock Restorations, Vintage Dry Cells, Synchronizers
62
Tips on Damping Resistors (cont’d)
•
NEVER remove them from clock permanently•
Don’t put a cheap Radio Shack resistor in a 100 year old clock
•
They can be restored–
Use 7ft of #32 NiCr
wire wound non-inductively on the
original wood spool (yields ~68Ω)•
Available from WireTronic, Inc–
www.wiretron.com
–
Make a new wood spool in about 5 minutes from 0.5” dowel rod if missing
–
Cover with Fredrix
canvas as described previously

Ken’s Clock ClinicClock Restorations, Vintage Dry Cells, Synchronizers
64
Plate WorkBushings
Ken’s Clock ClinicClock Restorations, Vintage Dry Cells, Synchronizers
65
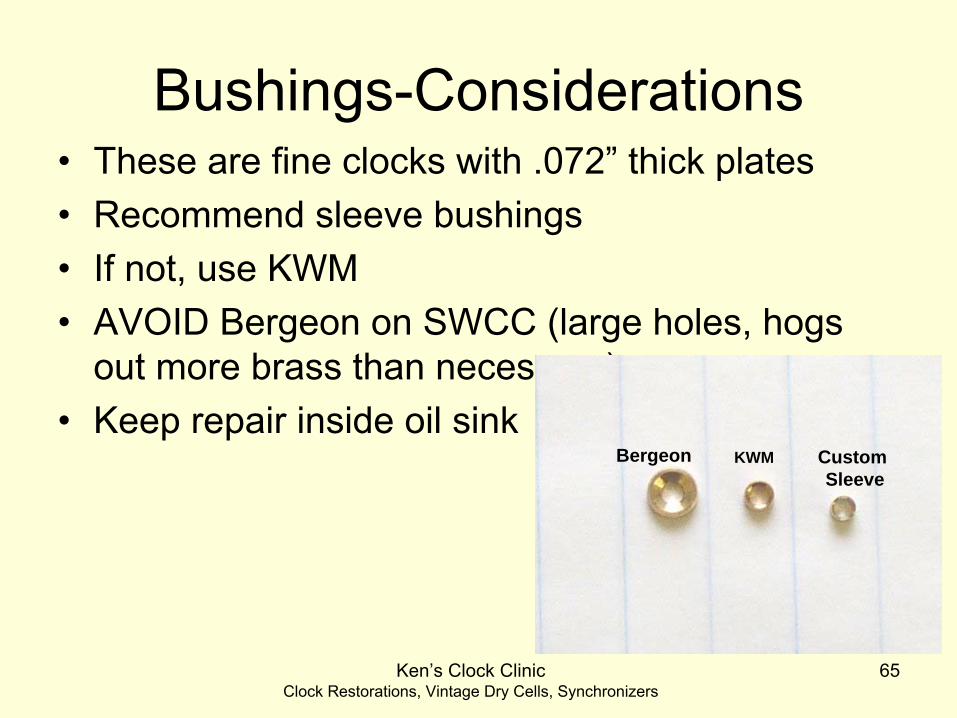
Bushings-Considerations•
These are fine clocks with .072” thick plates
•
Recommend sleeve bushings•
If not, use KWM
•
AVOID Bergeon
on SWCC (large holes, hogs out more brass than necessary)
•
Keep repair inside oil sinkBergeon Custom
SleeveKWM

Ken’s Clock ClinicClock Restorations, Vintage Dry Cells, Synchronizers
66
Why custom sleeves?•
Movements are high quality
•
Work hardens hole•
Bushing is firmly held in place
•
Replicates original oil sink•
Oldest, tried and true method of bushing
•
Provides cosmetically excellent repair•
Reflects Seth Thomas Standard of Craftsmanship

Ken’s Clock ClinicClock Restorations, Vintage Dry Cells, Synchronizers
67
Bushing Second Wheel Front Hole

Ken’s Clock ClinicClock Restorations, Vintage Dry Cells, Synchronizers
68
Bushing Second Wheel Front Hole Close up

Ken’s Clock ClinicClock Restorations, Vintage Dry Cells, Synchronizers
69
Hole Filed to Center and Broached

Ken’s Clock ClinicClock Restorations, Vintage Dry Cells, Synchronizers
70
Turning up Sleeve on Lathe
Ken’s Clock ClinicClock Restorations, Vintage Dry Cells, Synchronizers
71
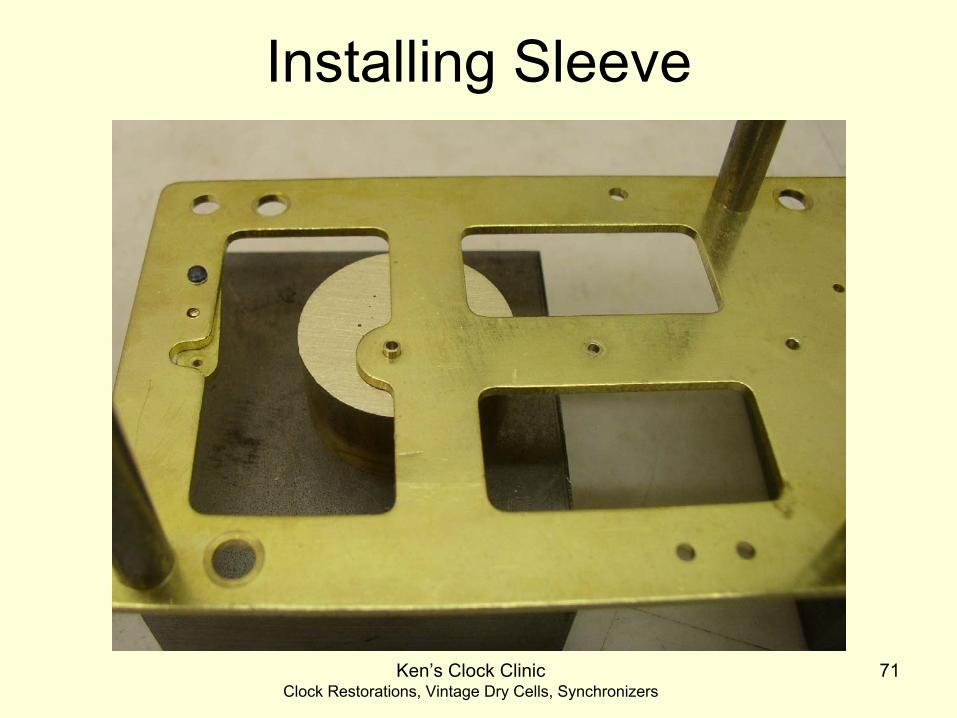
Installing Sleeve
Ken’s Clock ClinicClock Restorations, Vintage Dry Cells, Synchronizers
72
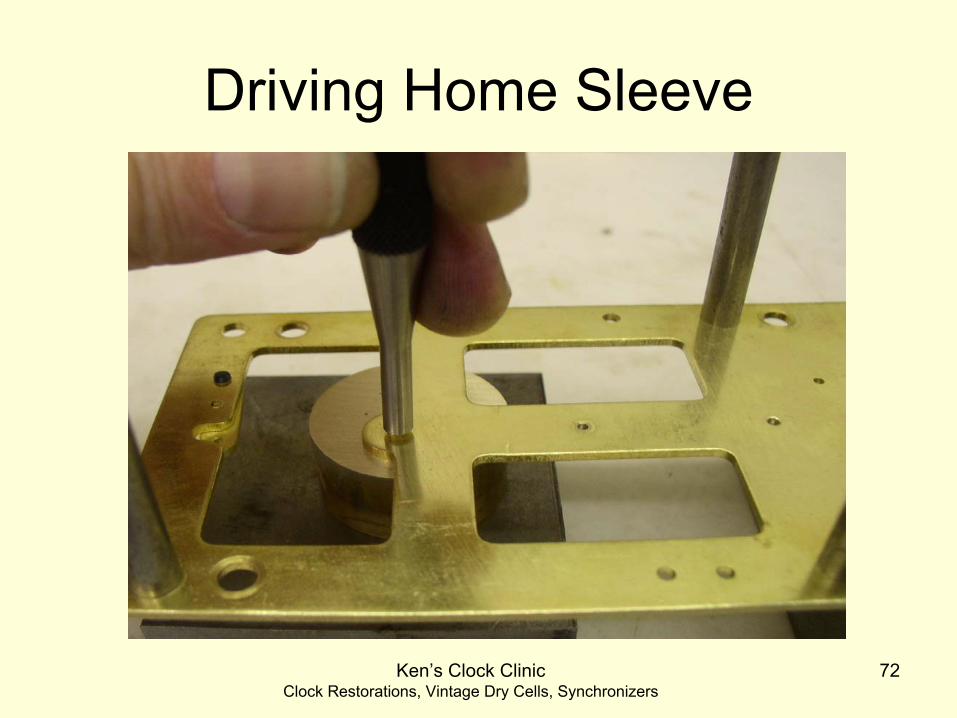
Driving Home Sleeve
Ken’s Clock ClinicClock Restorations, Vintage Dry Cells, Synchronizers
73
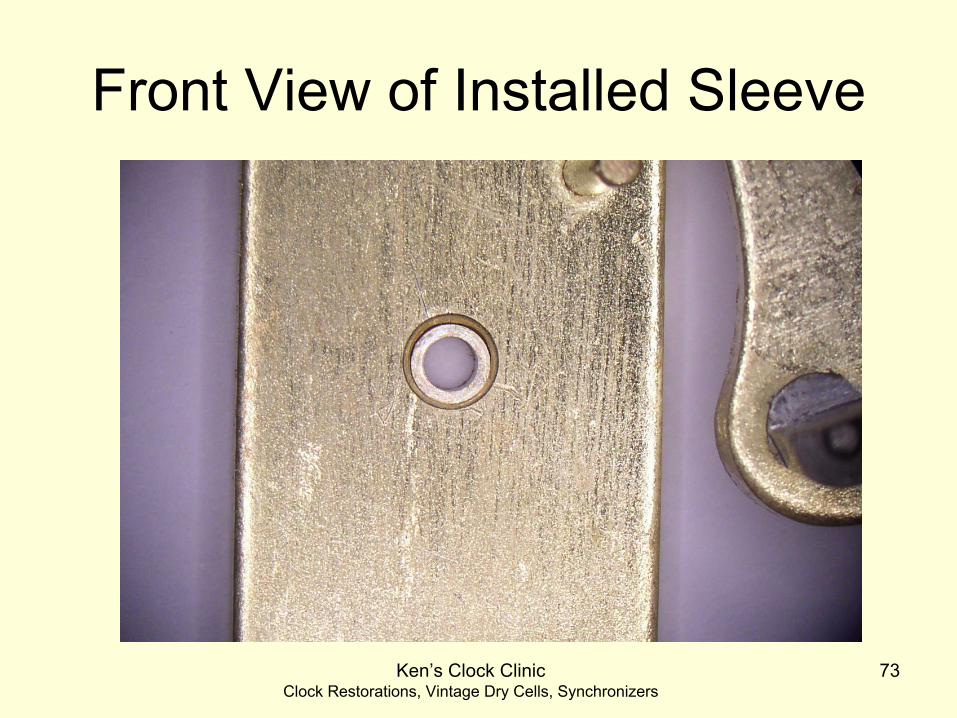
Front View of Installed Sleeve

Ken’s Clock ClinicClock Restorations, Vintage Dry Cells, Synchronizers
74
Shaping Oil Sink

Ken’s Clock ClinicClock Restorations, Vintage Dry Cells, Synchronizers
75
Finishing the Job
After conical punch After fitting, finishing with Burnisher/Countersink
(Timesavers 13888)
Ken’s Clock ClinicClock Restorations, Vintage Dry Cells, Synchronizers
76
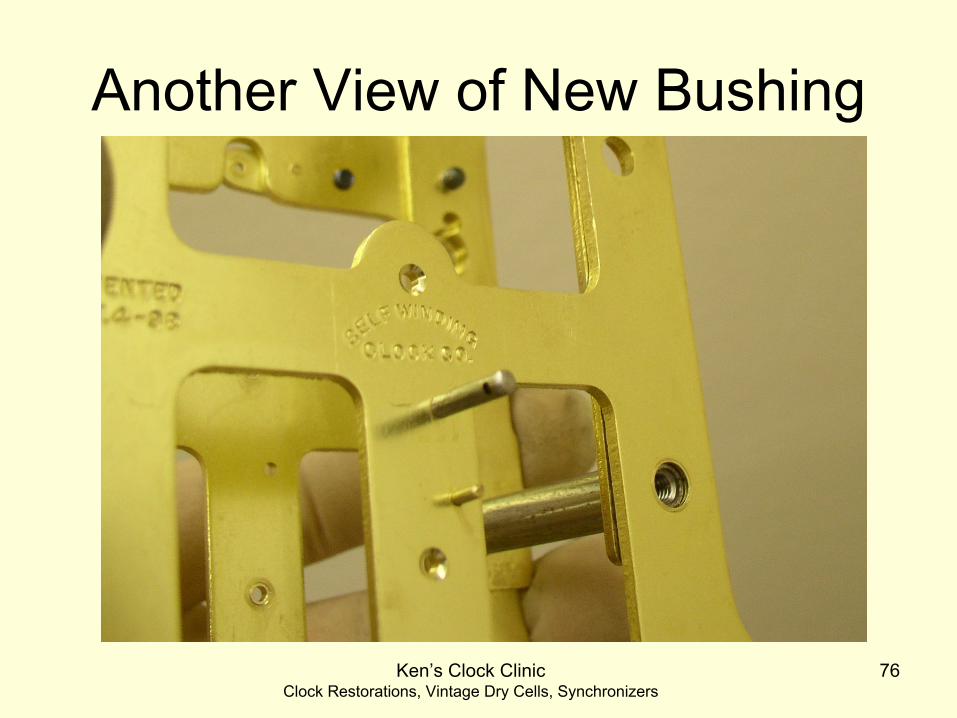
Another View of New Bushing

Ken’s Clock ClinicClock Restorations, Vintage Dry Cells, Synchronizers
77
Style A Front Plate, Bushed
Ken’s Clock ClinicClock Restorations, Vintage Dry Cells, Synchronizers
78
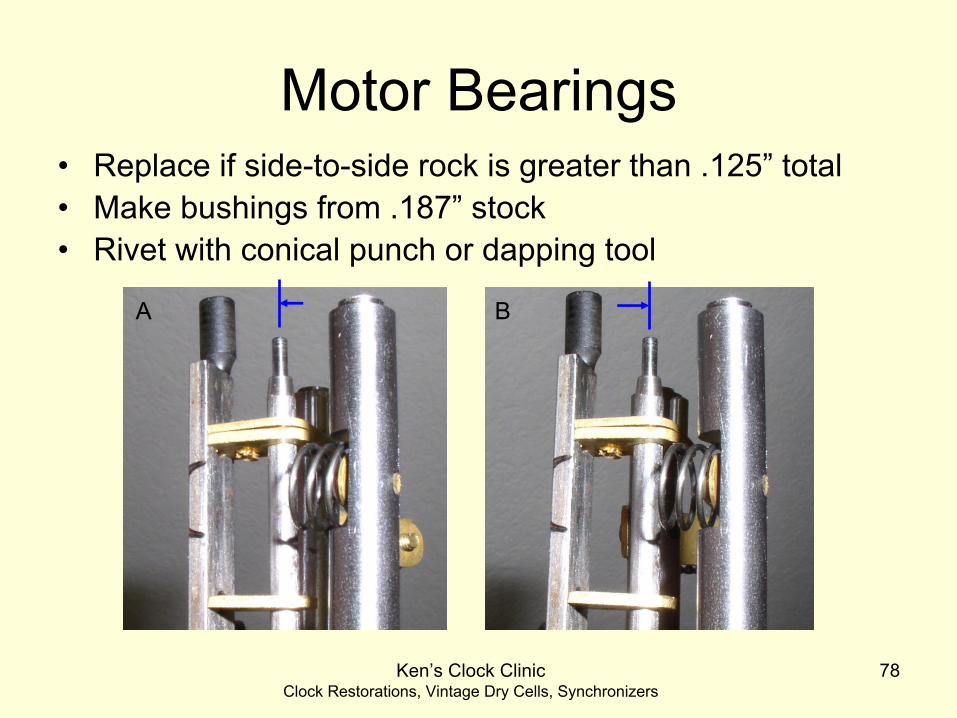
Motor Bearings•
Replace if side-to-side rock is greater than .125” total
•
Make bushings from .187” stock•
Rivet with conical punch or dapping tool
A B

Ken’s Clock ClinicClock Restorations, Vintage Dry Cells, Synchronizers
79
Graham Escapement
Ken’s Clock ClinicClock Restorations, Vintage Dry Cells, Synchronizers
80
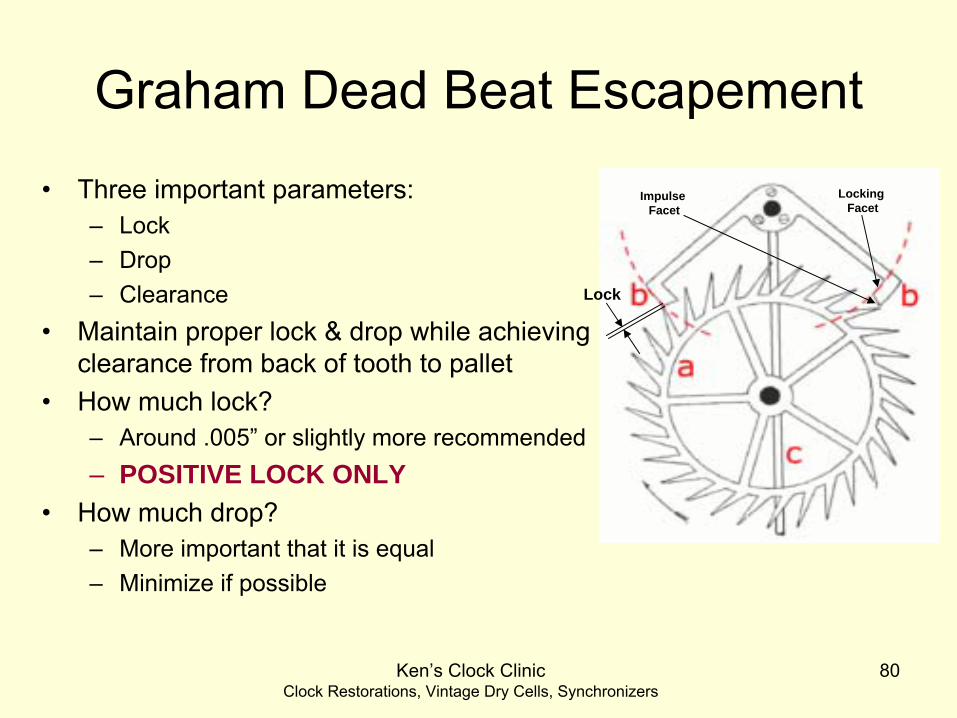
Graham Dead Beat Escapement
•
Three important parameters: –
Lock–
Drop–
Clearance•
Maintain proper lock & drop while achieving clearance from back of tooth to pallet
•
How much lock?–
Around .005” or slightly more recommended–
POSITIVE LOCK ONLY•
How much drop? –
More important that it is equal–
Minimize if possible
Lock
Locking Facet
Impulse Facet

Ken’s Clock ClinicClock Restorations, Vintage Dry Cells, Synchronizers
81
Considerations•
No adjustment till pallets, pivots polished, holes bushed
•
Escape wheel must be true for low beat error–
May have to top wheel (but no more than .005” diameter reduction)•
Most escape wheels will already be undersize due to wear–
Teeth straight•
SWCC pallets soft enough for MINOR span adjustments
•
Aggressive polishing or excessive wear increase drop–
Original design performance may be lost•
Adjustments to pallet are geometric approximations –
No practical alternative, and they do work
•
Under NO circumstances is negative lock ok!!
Ken’s Clock ClinicClock Restorations, Vintage Dry Cells, Synchronizers
82
Adjusting Grahams1.
Test escapement for lock and drop
2.
Increase depth to increase lock•
Adjust depthing
until sufficient lock achieved (target .005”)
•
If interference, close in pallets .002”3.
Reinstall pallet and repeat 2 until sufficient lock and drop
•
No more than .004” cumulative 4.
Final check:
•
Equal drop•
Lock approximately .005” (more ok if lead bob pendulum)
•
Beat error 5% or less is optimum
Reduce .004” max

Ken’s Clock ClinicClock Restorations, Vintage Dry Cells, Synchronizers
83
Example 120 Beat Graham (175133)
Entry Pallet Lock Exit Pallet Lock

Ken’s Clock ClinicClock Restorations, Vintage Dry Cells, Synchronizers
84
Brass Verges
•
Watch out for hard chrome plated brass verges •
Found on newer 120b Broadcast Studio models–
Chrome will be worn through
–
Polishing out will result in brass on brass•
Replace w/steel verge from older clock–
Or fabricate new one
Ken’s Clock ClinicClock Restorations, Vintage Dry Cells, Synchronizers
85
Contacts
Ken’s Clock ClinicClock Restorations, Vintage Dry Cells, Synchronizers
86
Contacts
•
What makes a good contact???–
Largely depends on the application, but for us….
•
Low contact resistance–
With light contact force
•
Resistant to oxidation and arcing–
High melting temp and resilience to burning
–
Fairly inert (does not grow an oxide in normal environments)
•
Good hardness—wears well over time
Ken’s Clock ClinicClock Restorations, Vintage Dry Cells, Synchronizers
87
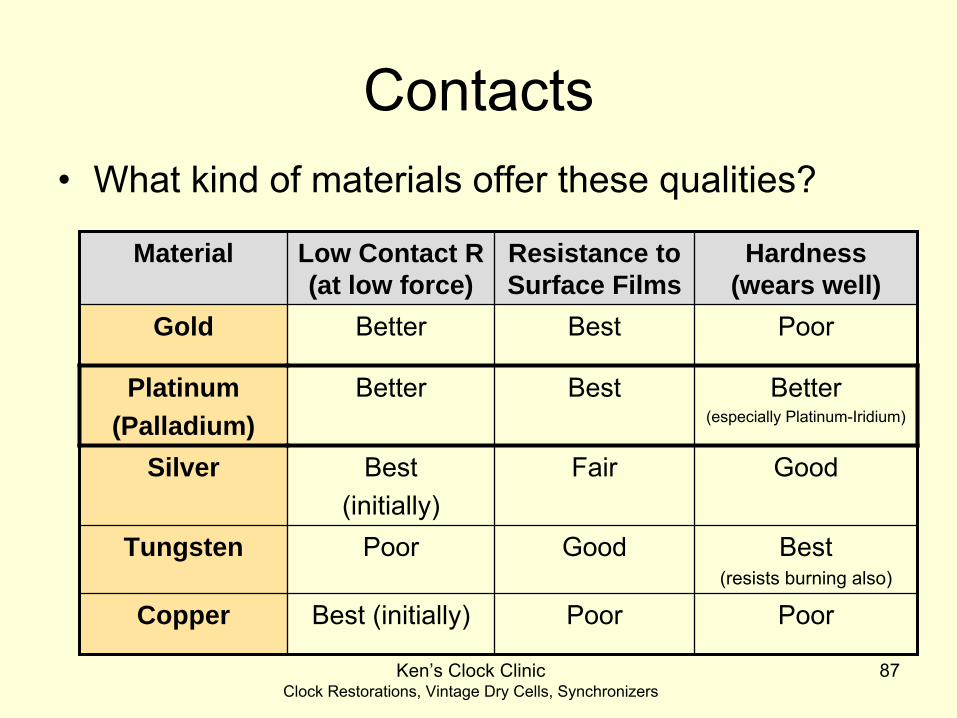
Contacts•
What kind of materials offer these qualities?
Material Low Contact R (at low force)
Resistance to Surface Films
Hardness (wears well)
Gold Better Best Poor
Platinum(Palladium)
Better Best Better(especially Platinum-Iridium)
Silver Best(initially)
Fair Good
Tungsten Poor Good Best(resists burning also)
Copper Best (initially) Poor Poor
Ken’s Clock ClinicClock Restorations, Vintage Dry Cells, Synchronizers
88
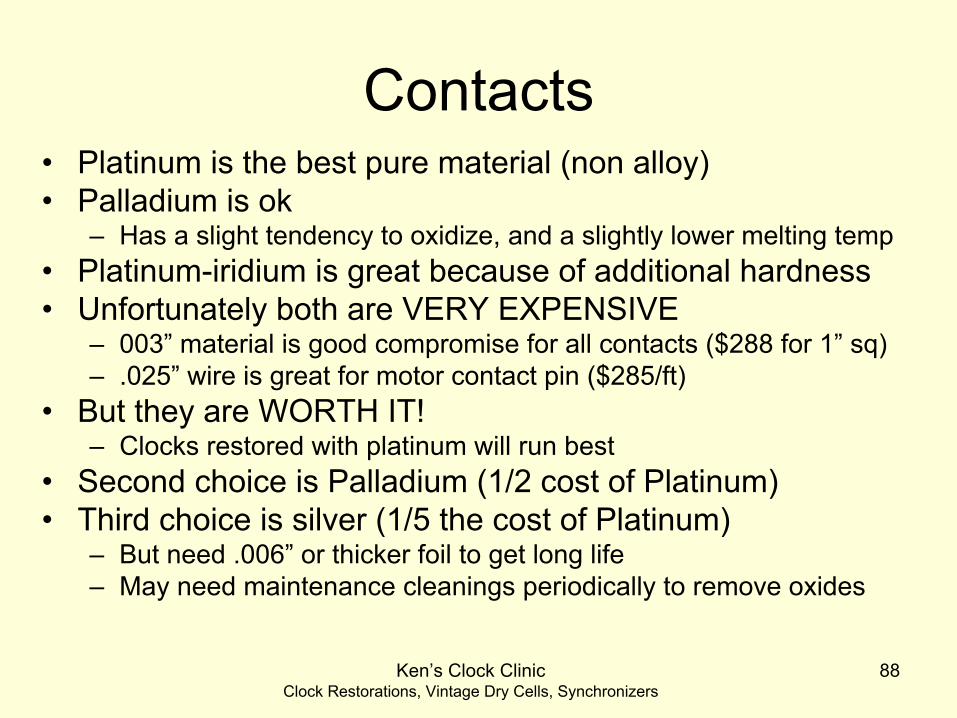
Contacts•
Platinum is the best pure material (non alloy)
•
Palladium is ok–
Has a slight tendency to oxidize, and a slightly lower melting temp•
Platinum-iridium is great because of additional hardness
•
Unfortunately both are VERY EXPENSIVE–
003” material is good compromise for all contacts ($288 for 1” sq)–
.025” wire is great for motor contact pin ($285/ft)•
But they are WORTH IT!–
Clocks restored with platinum will run best•
Second choice is Palladium (1/2 cost of Platinum)
•
Third choice is silver (1/5 the cost of Platinum)–
But need .006” or thicker foil to get long life–
May need maintenance cleanings periodically to remove oxides
Ken’s Clock ClinicClock Restorations, Vintage Dry Cells, Synchronizers
90
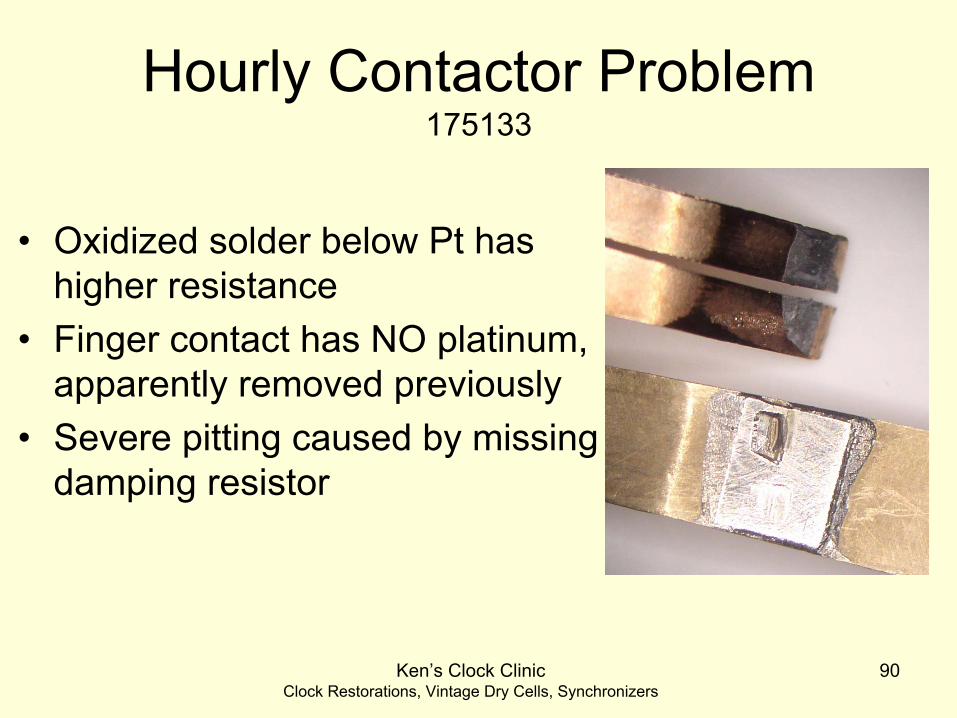
Hourly Contactor Problem 175133
•
Oxidized solder below Pt has higher resistance
•
Finger contact has NO platinum, apparently removed previously
•
Severe pitting caused by missing damping resistor

Ken’s Clock ClinicClock Restorations, Vintage Dry Cells, Synchronizers
91
Motor Contacts and Pins 175133
•
Among the worst ever seen
•
Again, damping resistor previously removed

Ken’s Clock ClinicClock Restorations, Vintage Dry Cells, Synchronizers
92
Repairing Hourly Contactor
•
Procure Platinum sheet 0.002-0.003” thick–
0.004” thick preferred for large pad
•
Cut into strip 0.060” x 0.156”•
Fold onto end of contactor
•
Flux with Rosin flux•
Solder with Rosin core solder (0.032” dia)–
Heat with soldering pencil until solder flows
•
Trim with small file and fine paper–
Do NOT abrade working surface

Ken’s Clock ClinicClock Restorations, Vintage Dry Cells, Synchronizers
93
Sizing the Platinum Strips

Ken’s Clock ClinicClock Restorations, Vintage Dry Cells, Synchronizers
94
Repaired Hourly Contactor

Ken’s Clock ClinicClock Restorations, Vintage Dry Cells, Synchronizers
95
Reassembly
Ken’s Clock ClinicClock Restorations, Vintage Dry Cells, Synchronizers
96
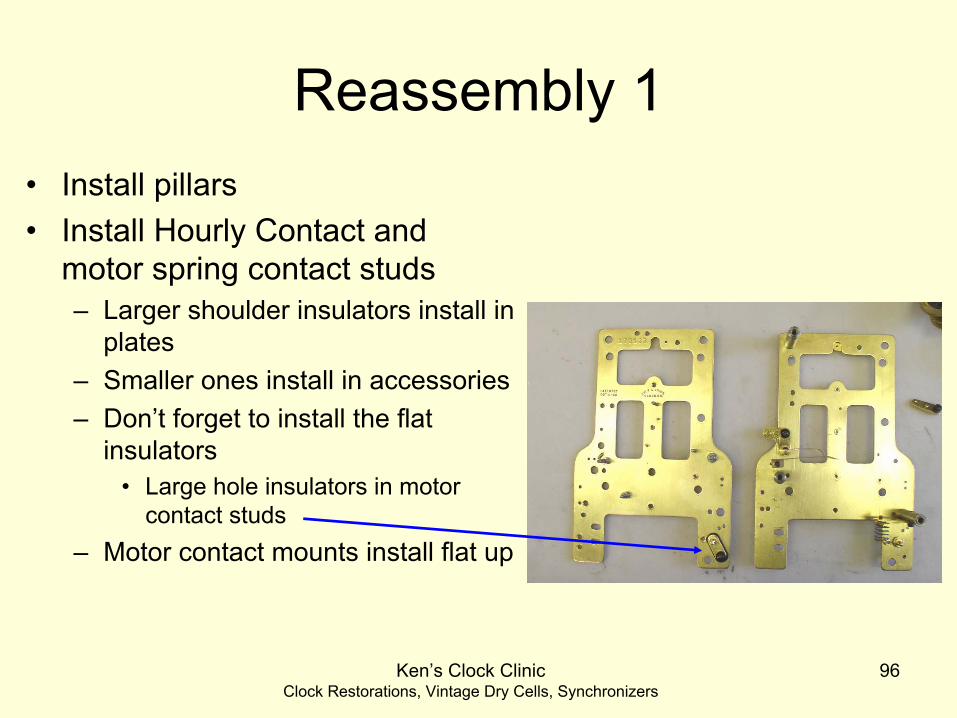
Reassembly 1•
Install pillars
•
Install Hourly Contact and motor spring contact studs–
Larger shoulder insulators install in plates
–
Smaller ones install in accessories–
Don’t forget to install the flat insulators
•
Large hole insulators in motor contact studs
–
Motor contact mounts install flat up

Ken’s Clock ClinicClock Restorations, Vintage Dry Cells, Synchronizers
97
Broken or Missing Shoulder Washers
•
Broken washers should be replaced
•
Use 0.25” black Acetal (Delrin)
•
Readily available from:–
www.onlinemetals.com
–
www.interstateplastics.com–
Costs about $.70/ft and works well

Ken’s Clock ClinicClock Restorations, Vintage Dry Cells, Synchronizers
98
Reassembly 2
•
Install front and rear synchronizer extension–
Remember shoulder screws and spacer
Ken’s Clock ClinicClock Restorations, Vintage Dry Cells, Synchronizers
99
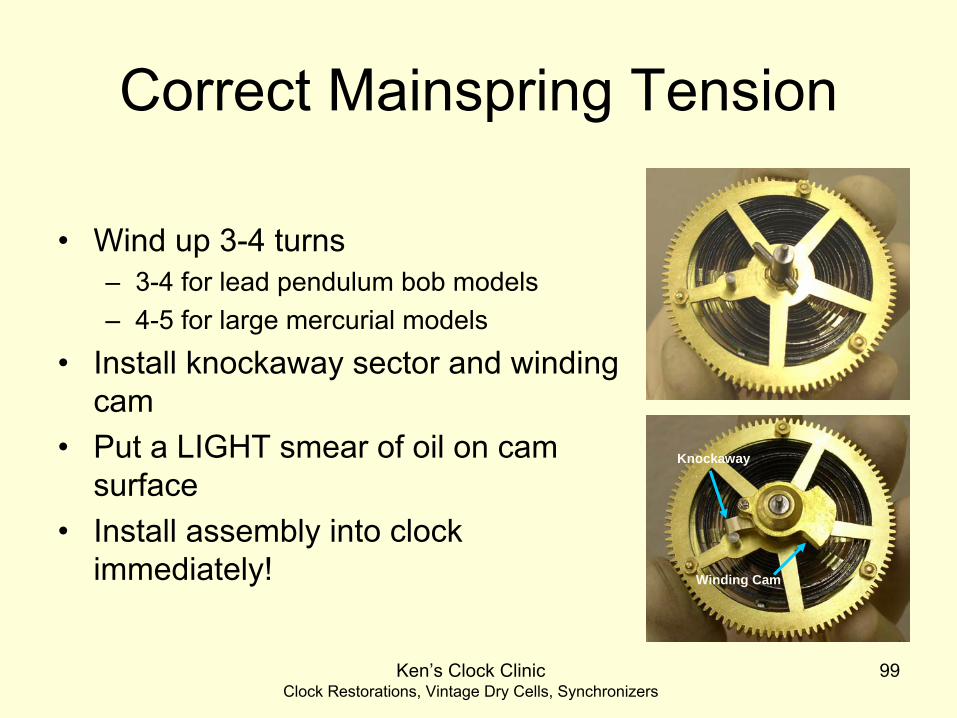
Correct Mainspring Tension
•
Wind up 3-4 turns–
3-4 for lead pendulum bob models–
4-5 for large mercurial models
•
Install knockaway
sector and winding cam
•
Put a LIGHT smear of oil on cam surface
•
Install assembly into clock immediately!
Knockaway
Winding Cam

Ken’s Clock ClinicClock Restorations, Vintage Dry Cells, Synchronizers
100
Reassembly 3
•
Install Wheels–
Main wheel first
•
Drop of oil on each pivot before installing
•
Install Winding Lever–
Oil arbor pivot!!
•
Install armature–
Grease pin

Ken’s Clock ClinicClock Restorations, Vintage Dry Cells, Synchronizers
101
Reassembly 4
•
Install top plate–
Check end shake on all wheels
•
Install pillar screws and spacers –
Shoulder spacer
•
Install motor coil –
Washers under screws
–
Do not tighten yetShort spacer

Ken’s Clock ClinicClock Restorations, Vintage Dry Cells, Synchronizers
102
Reassembly 5•
Install resistor
•
Install lower terminal–
Insulator under assembly–
Brass washer under upper shoulder spacer
–
Coil spade lug under shoulder insulator
–
NO brass washer under lower shoulder insulator
•
Install terminal screw and brass washer
Ken’s Clock ClinicClock Restorations, Vintage Dry Cells, Synchronizers
103
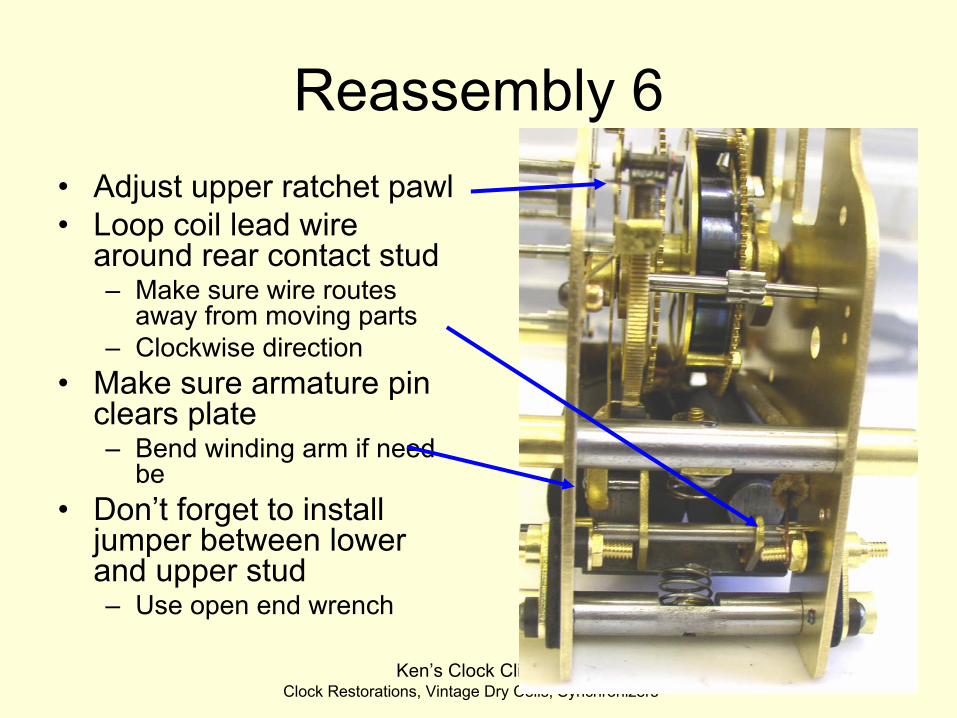
Reassembly 6•
Adjust upper ratchet pawl
•
Loop coil lead wire around rear contact stud–
Make sure wire routes away from moving parts
–
Clockwise direction•
Make sure armature pin clears plate–
Bend winding arm if need be
•
Don’t forget to install jumper between lower and upper stud–
Use open end wrench

Ken’s Clock ClinicClock Restorations, Vintage Dry Cells, Synchronizers
104
Reassembly 7
•
Install motor contacts–
Adjust until the spring contact is in center of coil yoke
–
Pin in center of platinum pad
–
When spring placed underneath pin, it clears by .04”
Ken’s Clock ClinicClock Restorations, Vintage Dry Cells, Synchronizers
105
Motor Tune Up
Ken’s Clock ClinicClock Restorations, Vintage Dry Cells, Synchronizers
106
Winding Motor Tune-Up•
Goal: Optimize winding motor efficiency
•
Benefits:–
Best battery life, most efficient
–
Quieter, faster wind–
Minimize annoyance during favorite TV show
•
Measure:–
Winding time between 6 and 15 seconds
–
Will depend on mainspring tension and battery voltage—so use fresh batteries or Model 1900R
•
ALL adjustments are important; don’t skip steps!!
Ken’s Clock ClinicClock Restorations, Vintage Dry Cells, Synchronizers
107
Preliminary Checks
•
Remove and clean all contacts–
Replace burnt platinum if it cannot be polished out
•
Reinstall all contacts•
Oil all friction points in clock and motor
Ken’s Clock ClinicClock Restorations, Vintage Dry Cells, Synchronizers
108
The Process1.
Adjust Coil Yoke position
–
Look to minimize gap: Shoot for .01” gap but full armature swing
2.
Set motor contact spring to center of coil yoke–
Adjust so pin is at center of pad–
Adjust so BOTH contacts open at same time3.
Set contact spring tension by moving spring to lower side of pin
–
Should be about .020” under pin at this point4.
Adjust upper banking spring so that it contacts armature .062” after the contact disconnects
5.
Adjust lower banking spring so the upper tip of the armature aligns with the bottom of the coil yoke
Ken’s Clock ClinicClock Restorations, Vintage Dry Cells, Synchronizers
109
1. Adjusting Coil Yoke Position
1.
Swing upper banking spring temporarily out of the way
2.
Insert double thickness of paper between yoke and armature
• Align armature to center of yoke
3.
Adjust front screws, then rear screws for tight fit4.
Remove paper and check armature swing
5.
Readjust if necessary•
Requires full travel of armature past yoke without interference
Ken’s Clock ClinicClock Restorations, Vintage Dry Cells, Synchronizers
110
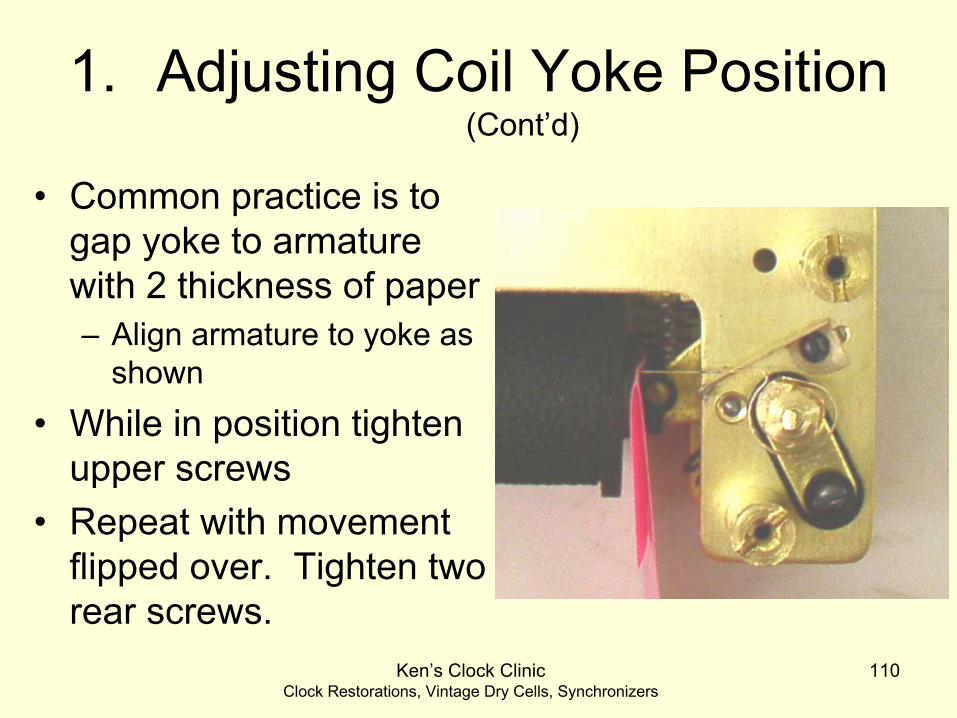
1. Adjusting Coil Yoke Position
(Cont’d)
•
Common practice is to gap yoke to armature with 2 thickness of paper–
Align armature to yoke as shown
•
While in position tighten upper screws
•
Repeat with movement flipped over. Tighten two rear screws.

Ken’s Clock ClinicClock Restorations, Vintage Dry Cells, Synchronizers
111
2. Set Spring Contact to Yoke Center
•
Both front and Back contacts to yoke center
•
When contact is lifted and dropped under pin, adjust to .04”.–
This will provide sufficient spring force for return travel

Ken’s Clock ClinicClock Restorations, Vintage Dry Cells, Synchronizers
112
Proper Adjustment: Motor Spring Contact
Tip of spring at center of coil yoke

Ken’s Clock ClinicClock Restorations, Vintage Dry Cells, Synchronizers
113
Setting Hourly Contactor and Banking Springs Motor Diagram and Detail
From Tran Duy
LyAmerican Clocks
Volume 2 Pg. 196

Ken’s Clock ClinicClock Restorations, Vintage Dry Cells, Synchronizers
116
Testing Winding Efficiency1.
Connect battery to upper and lower contacts
2.
With verge removed, turn center wheel until winding starts.
•
Hold escape wheel during wind•
Allow to wind until it stops3.
Release escape wheel until hourly contactor just engages.
4.
Time winding. •
6-9 seconds excellent•
9-12 seconds very good•
12-15 seconds acceptable (very good with .01” mainspring)•
>15 seconds unacceptable

Ken’s Clock ClinicClock Restorations, Vintage Dry Cells, Synchronizers
117
Completing Assembly
•
Reinstall motion works•
Do not forget to install star tension spring
•
Check movement visually •
Touch up oil
•
Test run
Ken’s Clock ClinicClock Restorations, Vintage Dry Cells, Synchronizers
118
Synchronizing
Full coverage in Advanced class
Ken’s Clock ClinicClock Restorations, Vintage Dry Cells, Synchronizers
119
Synchronizing Components•
Don’t remove them–
Destroys the heritage (and value) of the clock
–
They are cool to put back in service!•
Future class on restoring and adjusting them
•
Many SWCC models are only fair timekeepers w/o synchronization
•
We have a nice kit that will power and synchronize your clock to seconds/month–
Looks like a pair of No. 6 cells
•
If you don’t want the kit, use M. Grisham’s manual synchronization method–
Just don’t remove the parts!!
Ken’s Clock ClinicClock Restorations, Vintage Dry Cells, Synchronizers
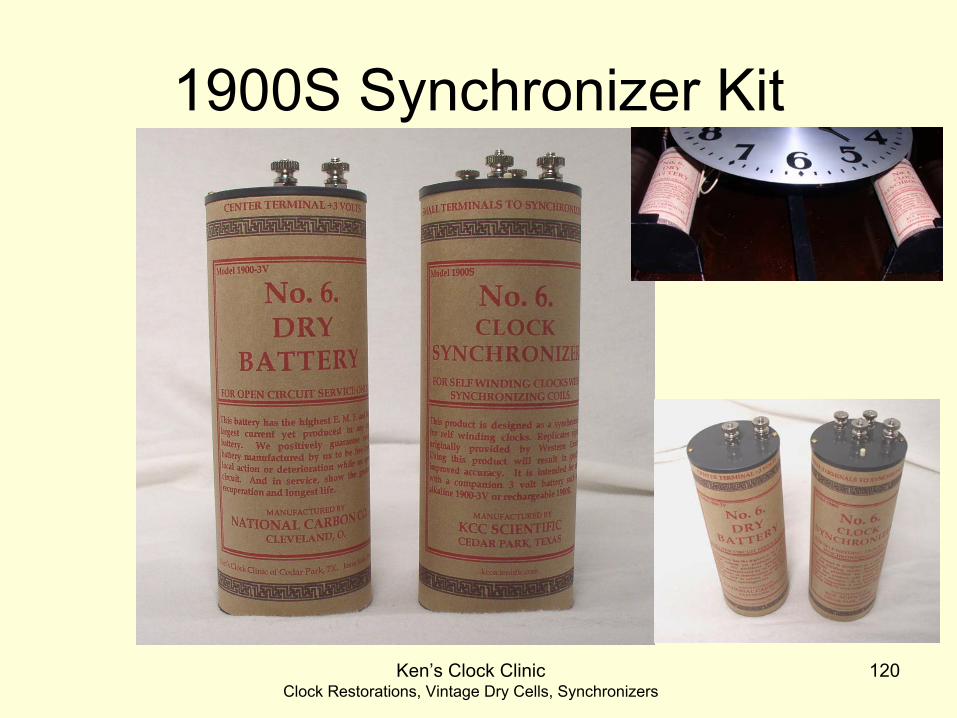
120
1900S Synchronizer Kit