replacing the blower motor lr3 - disco3.co.uk - index word - replacing the blower motor lr3.docx...
TRANSCRIPT
Replacing the blower motor LR3
http://landroverforums.com/forum/lr3-28/installed-new-heater-ac-blower-module-relay-
79499/#post568869
This all started when I began to smell something electrical. That concerned me as the
activated carbon air filter in the HVAC system pretty much keeps all odors out of the
cabin. As such, the burning smell must have been coming from something inside - not
good, I figured.
After some fooling around, I determined that the front blower fan while sort of working,
was not responding to any sort of speed control. That was, the fan seemed to run at a
slow speed but would not speed up when the manual fan speed knob was rotated.
The rear HVAC seemed to be working - that is blowing cold or hot air at an appropriate
rate, but the front, not.
After doing some reading on the various forums, I determined that the odds were one or
all of three fan control items might be defective.
The easy and cheap fix was to remove 40 amp relay R16 in the engine compartment
fuse/relay box. That I did and I thought I had resolved the concern as for about a day,
all seemed normal again. While I did not smell any more burning, I ultimately
determined the problem still existed as I did not have manual speed control, nor I
suppose automatic either.
Plan B involved buying a new blower, part number JGC500050, a new blower control
module, part number LR031677, and a new relay, part number YWB500060.
Given the expense of the fan and module, I did not want to gamble with reuse of the
previous ten dollar relay, as perhaps even with only one day of use, perhaps it had
suffered.
From reading the forums, it appeared that the fan could be removed without removing
the lower glove box door or really without removing much of anything. This turned out
to be true and the overall task was easier than I had anticipated. The total fix took me
about two hours and for a second time around, I am pretty certain that I could now do it
in less than an hour – more like a half hour.
Mine is a LHD North America spec, LR3 so on the passenger right side, first remove
that insulated sound shield that holds the footwell light - basically two cross type Phillips
screws and then disconnect the power lead to the footwell light - just pull back on
it. Once removed, you may as well check to see if the AC drain is connected to the
cowling drain. Mine was, but the jpg below shows it disconnected. The rubber hose
just slides over the drain nipple - but I digress.
Also remove the contents of the lower glove box and review how you release the two
curved arms so the door can flop down as if you were going to replace the blower
system filter. Now by the way is a good time to replace the filter. I use the carbon
activated filter, part number JKR500020 / LR023977, as it eliminates smells like cattle
trucks as well as keeping dust from entering the cabin.
With the footwell shield removed and the lower glovebox door fully open, you can now
proceed to remove the fan.
Start with removing the rectangular blower control module resistor first, part number
LR031677. It is held in with two Phillips head screws. One screw is a bit hard to get at
but with the lower glove box door fully opened, you can see both screws and hence
where to stick the Phillips screwdriver. I was able to pull the existing unit out and then
release the electrical connector, but when I went to install the new one, it was easier to
insert and screw in the module first and then push on the electrical connector.
Removing the module first gives you more room to get the fan out. There are three
Torx 25 screws to be released. Two you can get at with a regular length Torx 25
screwdriver, but the hidden screw at the rear requires a short Torx 25 screw
driver. Fortunately each torx head screw also has a slot for a blade type screwdriver so
the stubby blade screwdriver I had worked fine.
With the three screws removed, the fan unit will drop down a bit. I then disconnected
the black fan electrical connector; also removed a clip that was friction clipped to the
rear of the fan that held the wiring harness from falling down. There is also a larger
white connector to the right of the fan that can be pulled down and hence unclips from a
bracket just to provide more access. That connector is the blurred one on the right of
the wiring harness jpg. The white on the left is the fan speed module connector and
the back one is to the fan. The orange bit is that retaining clip I was referring to.
Once the wiring is disconnected and pushed aside, then the tricky bit of dropping out
the fan assembly is next. This does not require any force, just lots of jiggling, rotating,
and rocking about of the fan unit. The problem is an air duct that parallels the glove box
door hinge. This duct will move, rotate slightly such that one fan will eventually slide
out.

You have the same problem getting the fan back up in - well it seemed a bit more
difficult as you do not want to squash/damage the squirrel cage.
Note that the both the removed fan and the new one have balance weights attached to
the fan verticals - something you do not see very often, hence one of the reasons the
fan seems a bit more expensive than one have hoped. Also the fan itself is quite heavy
and yes, the squirrel cage does rotate smoothly but even new, there is more drag than I
would have anticipated. The removed fan had drag as well, but I assumed that was old
age however the new unit seemed about the same.
The fan went back up OK so I reinstalled the electrical and then installed the new R16
40 amp relay.
I then started up the vehicle and to my relief, the fan started right up and the manual
speed control worked as it used to. As such, I think the fix worked. I the put the filter
back in the filter area, and generally closed things back up. I would say I had more
difficulty reinstalling the footwell shield than I did installing the blower unit. Also
remember to connect the footwell light wiring back up.
This is what the blower control module, part number LR031677, looks like.
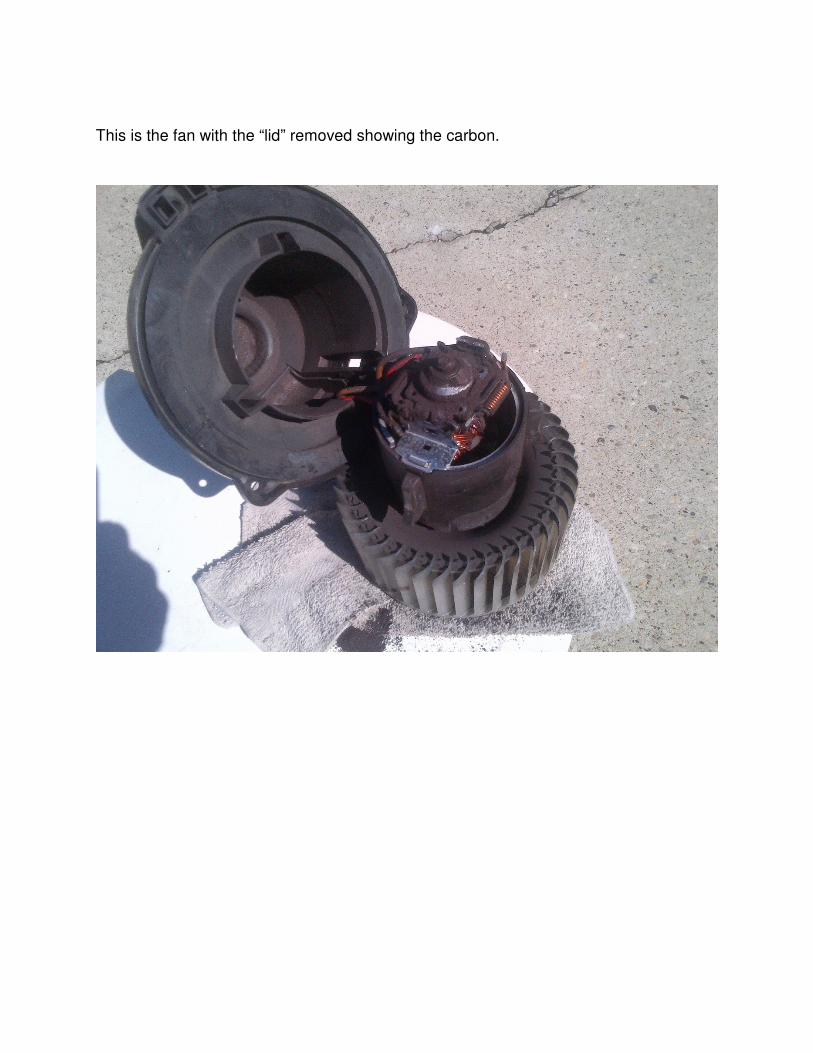
This is the fan with the “lid” removed showing the carbon.
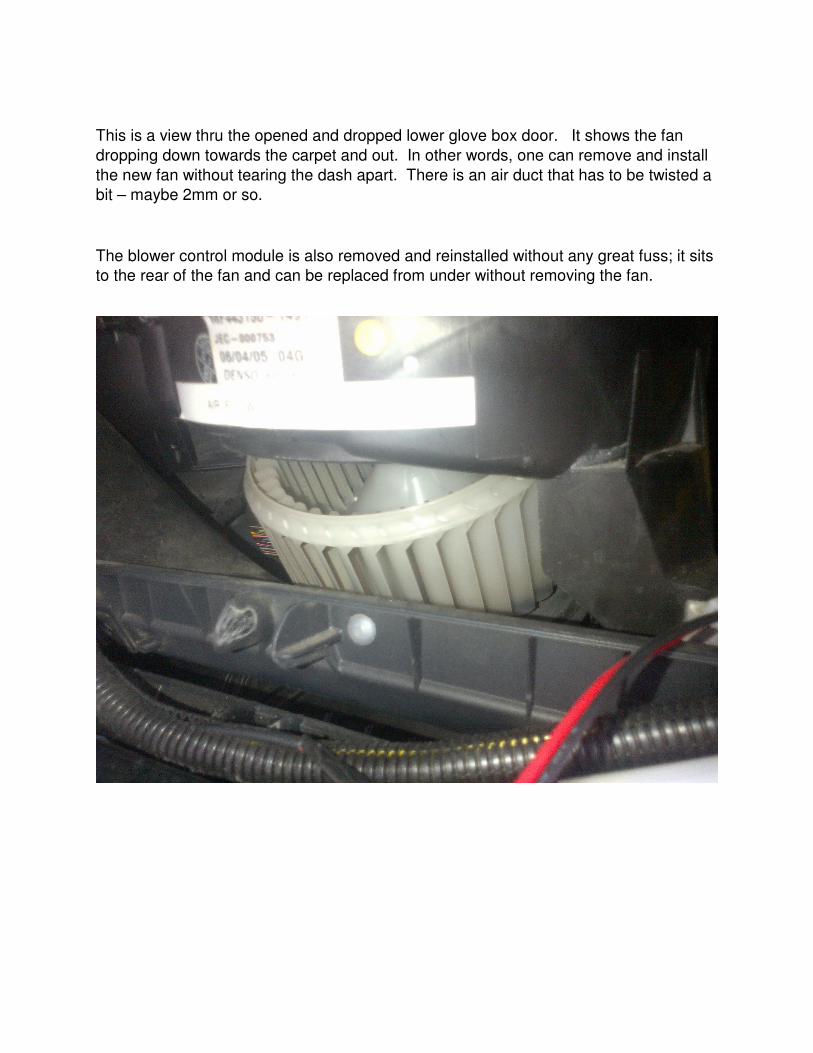
This is a view thru the opened and dropped lower glove box door. It shows the fan
dropping down towards the carpet and out. In other words, one can remove and install
the new fan without tearing the dash apart. There is an air duct that has to be twisted a
bit – maybe 2mm or so.
The blower control module is also removed and reinstalled without any great fuss; it sits
to the rear of the fan and can be replaced from under without removing the fan.
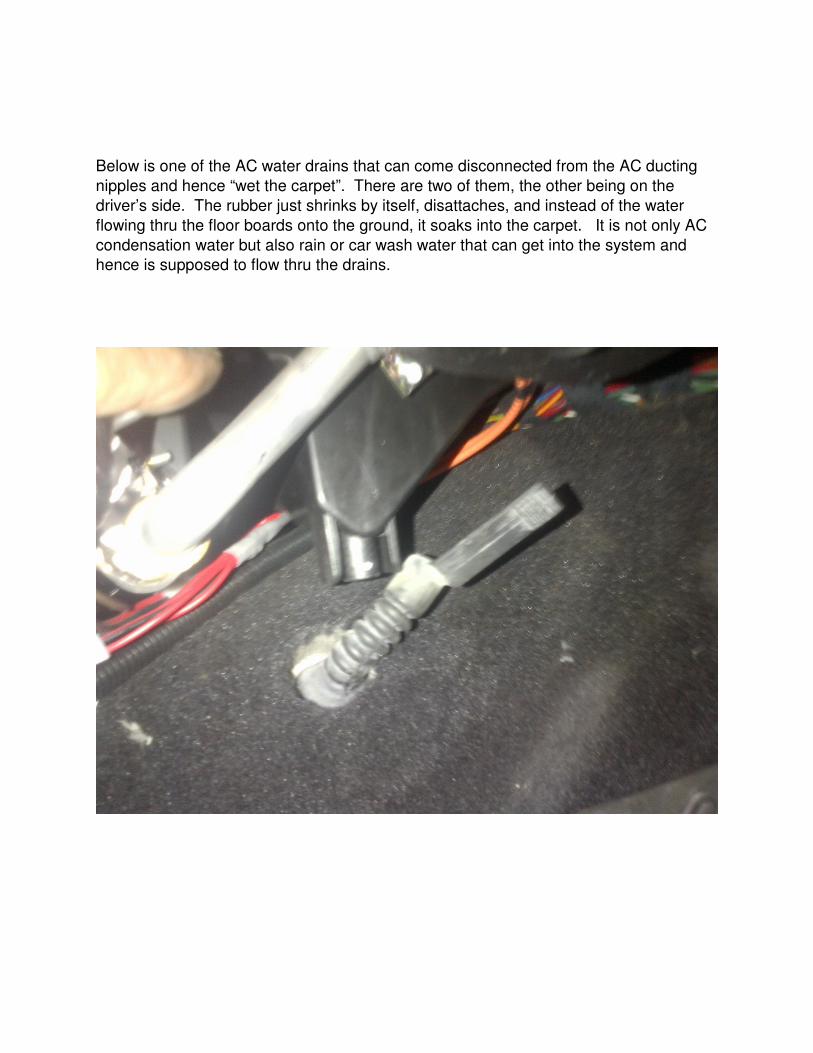
Below is one of the AC water drains that can come disconnected from the AC ducting
nipples and hence “wet the carpet”. There are two of them, the other being on the
driver’s side. The rubber just shrinks by itself, disattaches, and instead of the water
flowing thru the floor boards onto the ground, it soaks into the carpet. It is not only AC
condensation water but also rain or car wash water that can get into the system and
hence is supposed to flow thru the drains.