report studio developer training part 2 ibm cognos ... studio 2_ucar... · 1 chapter 1 – crosstab...
TRANSCRIPT

Report Studio Developer Training Part 2
IBM Cognos
September 2011

i
This training documentation is the sole property of Infolink Consulting. All rights are reserved. No part of this document may be reproduced. Exception: The University Corporation for Atmospheric Research (UCAR) has the right to reuse these materials internally, including the right to further modify these materials and to train additional users. Any other use of these materials is not authorized. These materials were customized for UCAR on IBM Cognos 10.


iii
Table of Contents Chapter 1 – Crosstab Reports .............................................................................. 1
Review – Create a Simple Crosstab .................................................................. 1 Add Additional Dimensions and Measures ........................................................ 3 Sort .................................................................................................................... 7
Chapter 2 – Conditional Formatting .................................................................... 11 Highlighting Exceptional Data (Boolean Variable Review) .............................. 11 Highlighting Exceptional Data (String Variable) ............................................... 13 Conditional Formatting (Hide/Show Objects) .................................................. 16
Chapter 3 – Enhancing Report Layout ................................................................ 21 Report Design Tips .......................................................................................... 21 Viewing Page Structures ................................................................................. 23 Combine Two Reports ..................................................................................... 28 Utilizing Bookmarks/Modifying Report Structures ............................................ 30 Singletons ....................................................................................................... 34
Chapter 4 – Auto Group & Summarize ............................................................... 37 Auto Group & Summarize ............................................................................... 37 Auto Group & Summarize without “Total” on Fact Item ................................... 41 Review ............................................................................................................ 44
Chapter 5 – Designing Effective Prompts ........................................................... 45 Creating an Effective Prompt for Selection ...................................................... 45 Prompts for Performance & Large Lists .......................................................... 51 Cascading Prompts ......................................................................................... 56 Prompts that Allow Users to Determine Formatting ......................................... 62 Dynamically Display Prompt Selections .......................................................... 67
Chapter 6 – Working with Multiple Queries ......................................................... 73 Creating Relationships between Queries ........................................................ 73 Creating Discontinuous Crosstab Reports ...................................................... 80 Creating an Inner Join between Queries ......................................................... 83
Chapter 7 – Advanced Reports ........................................................................... 89 Creating Dynamic Headers and Titles that Reflect Report Data ..................... 89 Creating a Form .............................................................................................. 93 Creating Drill-Through Relationships between Reports ................................... 98 The Report Specification ............................................................................... 103 Enhancing User Interaction with HTML ......................................................... 104
Chapter 8 – Bursting ......................................................................................... 107 Creating Burst Keys ...................................................................................... 107 Identify Report Recipients using Directory Entries ........................................ 109 Distributing Reports Using IBM Cognos Connection ..................................... 112
***Notes pages are in the back of this binder for your use.
1
Chapter 1 – Crosstab Reports
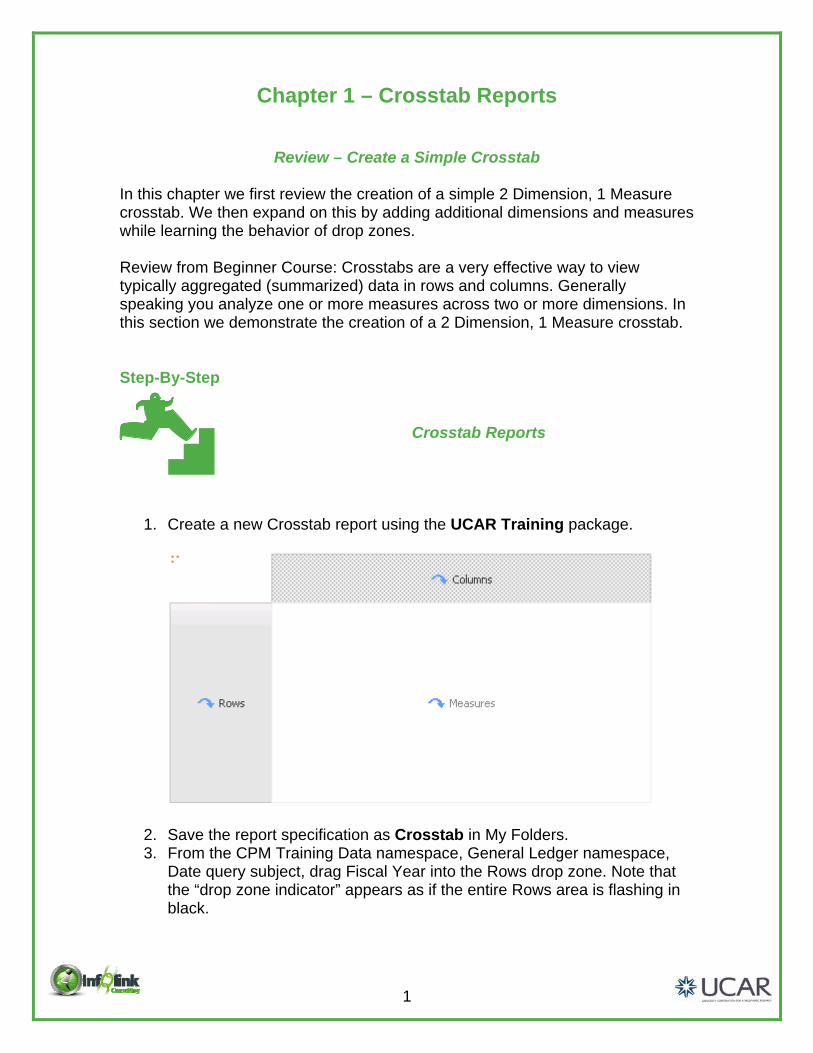
Review – Create a Simple Crosstab In this chapter we first review the creation of a simple 2 Dimension, 1 Measure crosstab. We then expand on this by adding additional dimensions and measures while learning the behavior of drop zones. Review from Beginner Course: Crosstabs are a very effective way to view typically aggregated (summarized) data in rows and columns. Generally speaking you analyze one or more measures across two or more dimensions. In this section we demonstrate the creation of a 2 Dimension, 1 Measure crosstab. Step-By-Step
Crosstab Reports
1. Create a new Crosstab report using the UCAR Training package.
2. Save the report specification as Crosstab in My Folders. 3. From the CPM Training Data namespace, General Ledger namespace,
Date query subject, drag Fiscal Year into the Rows drop zone. Note that the “drop zone indicator” appears as if the entire Rows area is flashing in black.

Chapter 1 – Crosstab Reports
2
4. From the Account query subject, drag Entity Code into the Columns drop zone. The “drop zone indicator” again flashes black when you reach the Columns area of the crosstab.
5. Drag Net Amount from the General Ledger Details query subject into the flashing black Measures drop zone.
6. Highlight the Net Amount measures area, click on the Data Format icon, and format it as Currency with 0 decimal places.
7. Add borders to the report by Ctrl-clicking all cells. Select Border from the Properties pane, set Border properties as follows, and then click OK:
8. Sort both the Fiscal Year and the Entity Code ascending using the Sort
icon in the Toolbar. 9. Add the following Advanced Detail filters:

Chapter 1 – Crosstab Reports
3
10. Run the report as it stands:
11. From the menu, choose Structure, Swap Rows and Columns. Note that
Fiscal Year and Entity Code have changed position. 12. Swap Rows and Columns again to return them to their original positions,
this time using the icon in the Toolbar.
Add Additional Dimensions and Measures
Next we add a second measure to our Crosstab.
13. Use the Query Explorer to open Query1. 14. From the Toolbox, drag a new Data Item object into your query.
15. Complete the expression as follows:
16. In the Data Item properties, change the Name to “Travel Expense Record Count”.

Chapter 1 – Crosstab Reports
4
17. Change the Aggregate Function and the Roll-up Aggregate properties to Total.
18. Return to the report page. 19. Cut the existing measure (use the Select Ancestor arrow to highlight the
Crosstab Fact Cells). 20. From the Data Items tab, Ctrl-click first the new Travel Expense Record
Count item, then the Net Amount item, and drag them into the Measures drop zone.
Note that both measures are nested underneath Entity Code:
21. Run your report:

Chapter 1 – Crosstab Reports
5
22. Change the Font size and Borders for the entire Crosstab: a. Click the three red dots in the Crosstab Corner to select the
Crosstab object.
b. From the Toolbar, change the Font Size to 9 pt.
c. In the Border property, apply the Maroon border around the entire Crosstab.
23. Select the Net Amount measure cells and click on the Data Format icon in the Toolbar to set the data format to Currency with no decimal places and then use the Missing Value Character property to reflect any blank cells as zero (include a dollar sign for consistency).
24. Select the Travel Expense Record Count measure cells and change the Data Format type to Number; then again use the Missing Value Characters property to reflect any blank cells as zero.
25. Add the maroon border, as in Step 7 above, around the Travel Record Expense Count and Net Amount headers.

Chapter 1 – Crosstab Reports
6
26. Select the Travel Expense Record Count and Net Amount cells and add a dark border to the bottom and top. This will make the crosstab easier to read.
27. Disable the Entity Code Filter as shown:
28. Run your report to verify that the row headings sort properly and that the borders and data formatting have been applied:
Chapter 1 – Crosstab Reports
7
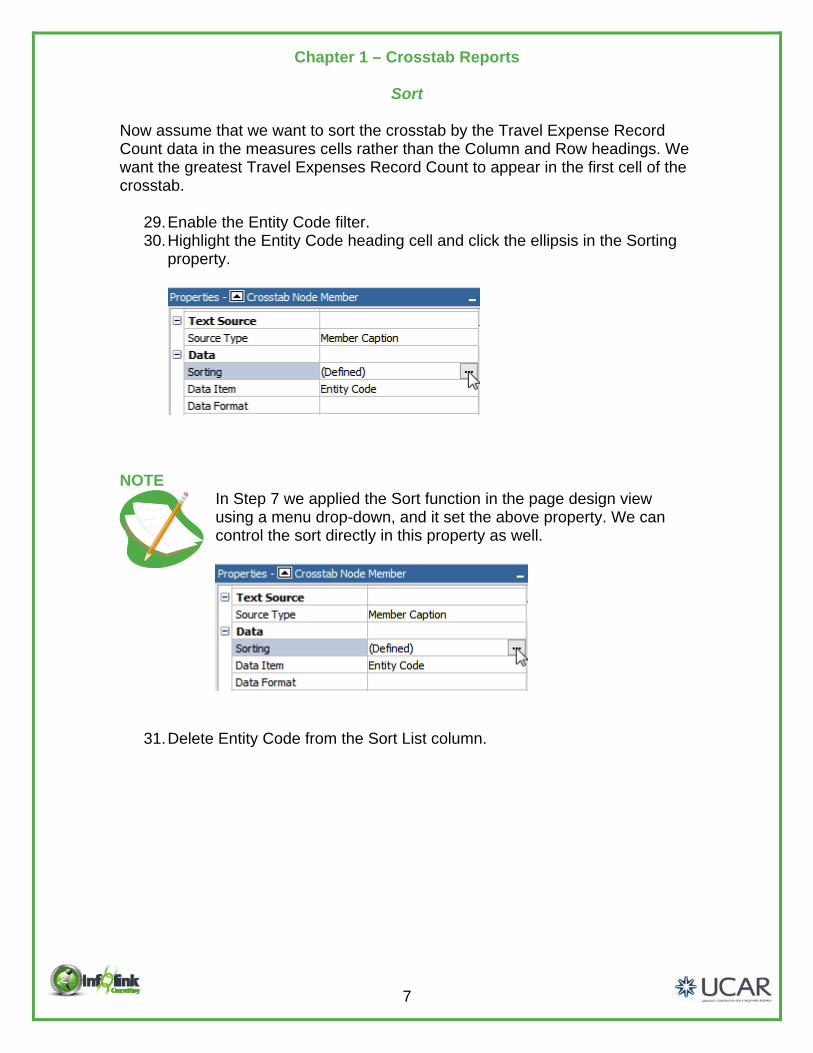
Sort Now assume that we want to sort the crosstab by the Travel Expense Record Count data in the measures cells rather than the Column and Row headings. We want the greatest Travel Expenses Record Count to appear in the first cell of the crosstab.
29. Enable the Entity Code filter. 30. Highlight the Entity Code heading cell and click the ellipsis in the Sorting
property.
NOTE
In Step 7 we applied the Sort function in the page design view using a menu drop-down, and it set the above property. We can control the sort directly in this property as well.
31. Delete Entity Code from the Sort List column.

Chapter 1 – Crosstab Reports
8
32. Drag Travel Expense Record Count into the Sort List, and toggle the Sort
icon to select descending. Click OK.
33. Run your report. Note that the Crosstab is not sorted by Travel Expense Record Count because the sort on Fiscal Year has overridden the Measure sort.
34. Highlight Fiscal Year and click the ellipsis in the Sorting property.

Chapter 1 – Crosstab Reports
9
35. Again, delete Fiscal Year from the Sort List, drag Travel Expense Record Count into the Sort List, and toggle the Sort icon to select Descending.
36. Run your report again.
Note that we now have the sort we want on Travel Expense Record Count in the first cell of the crosstab, showing the greatest number of travel records with Net Amount in the NCAR entity code, Fiscal Year 2010.
37. Click Save. 38. In My Folders, create a new folder called Report Studio Part 2 Training. 39. Save the report specification as Crosstab.


11
Chapter 2 – Conditional Formatting In the beginner course we examined how to use a simple Boolean expression to highlight exceptional data. Specifically we configured a Crosstab to display data with a Green background when the Average Travel Expense was greater than 1500. In this exercise, we use our nested Crosstab from the last exercise. We review the application of Boolean variables for conditional formatting of data, introduce the String variable and its usage, and show some additional techniques utilizing conditional formatting. Step-By-Step
Highlighting Exceptional Data (Boolean Variable Review)
We first review the creation of a Boolean variable and its application to a simple conditional format on one of our crosstab cells.
1. Return to the crosstab created in the first lesson, Crosstab, and using Save As, change to a different report name - Conditional Formatting - Boolean Variable.
2. Using the Condition Explorer, navigate to the Variables folder. 3. Drag a new Boolean Variable into the Variables panel.
4. In the expression window, complete the following expression:

Chapter 2 – Conditional Formatting
12
5. Change the Name property to “HighNetAmounts”. 6. Return to the crosstab report page and select the Net Amount measure
cell (use the Select Ancestor arrow to make sure you have selected the Crosstab Intersection object). Set the Style Variable property of the measure cell by choosing your new variable from the available drop-down. Recall that this action “ties” the report object (the crosstab measure) to the variable and allows us to then change other properties of this object based on the variable’s outcome.
7. Click OK. 8. Using the Condition Explorer, navigate to your variable’s Yes condition.
Recall that the Condition Explorer allows us to simulate a given outcome for a variable so that we can indicate on the report layout what type of changes are desired in this state.
9. Change the Background Color of Net Amount to Blue and the Foreground Color to White.
10. Double-click the explorer bar to turn off the condition explorer. 11. Save your Conditional Formatting - Boolean Variable report
specification. 12. Run your report.
We next examine the use of a String Variable to highlight exceptional data. String variables allow the report author to provide for more conditions than a Boolean variable. Boolean variables, of course, only allow for two possible outcomes, True or False. String variables, by the use of Case statements or nested If/Then statements, allow for an infinite number of potential outcomes.

Chapter 2 – Conditional Formatting
13
Step-By-Step
Highlighting Exceptional Data (String Variable)
In this example, we use a string variable to highlight the Net Amount column when it falls into certain ranges.
1. Continue with the report from the example above, but save as Conditional Formatting – String Variable.
2. From the menu, choose View, Variables… 3. Drag a new String Variable into the Variables panel.
4. Create the following expression for your new variable and note that the use of the simple case statement allows for the “bracketing” of outcomes into user defined levels.
5. Name the new variable “CountRange”.
Chapter 2 – Conditional Formatting
14
NOTE
You must SPECIFICALLY list the possible outcomes of your Case statement in the Values area of your variable definition, using the Add icon. Note that you must list them exactly as they were typed in your case statement, including case sensitivity. If you add possible values after you associate the conditional style, you need to re-associate the condition.
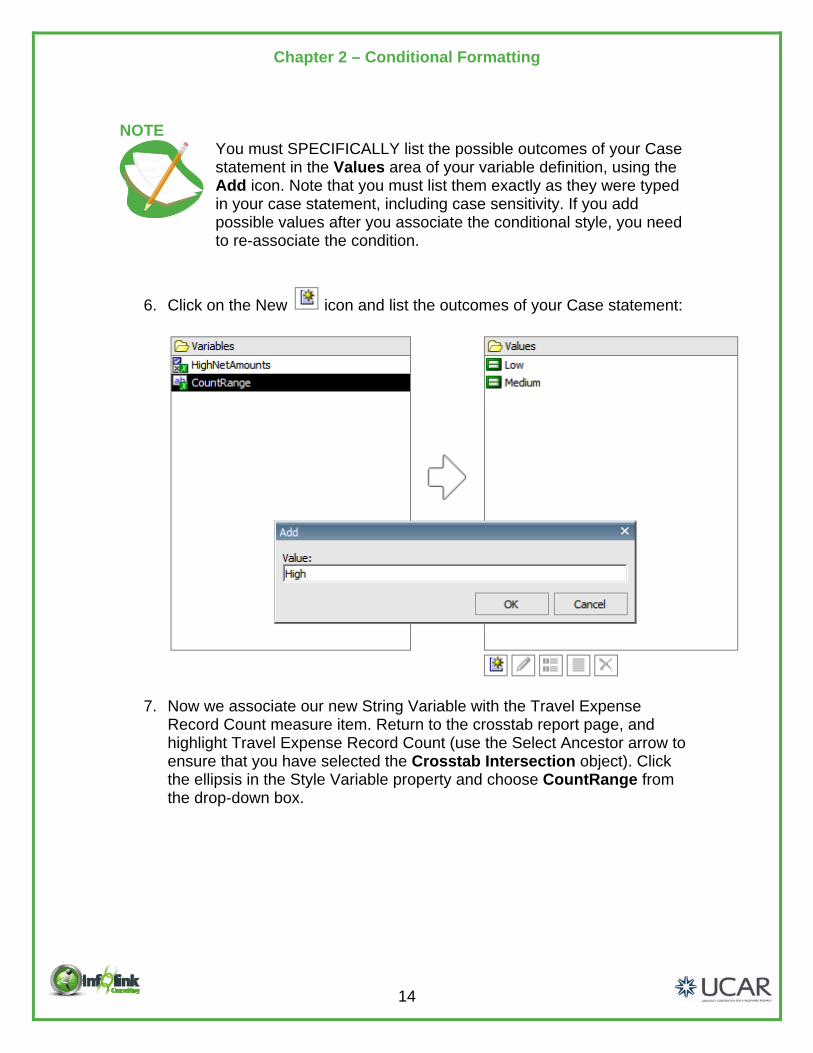
6. Click on the New icon and list the outcomes of your Case statement:
7. Now we associate our new String Variable with the Travel Expense
Record Count measure item. Return to the crosstab report page, and highlight Travel Expense Record Count (use the Select Ancestor arrow to ensure that you have selected the Crosstab Intersection object). Click the ellipsis in the Style Variable property and choose CountRange from the drop-down box.

Chapter 2 – Conditional Formatting
15
8. Using the Condition Explorer, we navigate to each variable outcome in turn, and set the color of the Foreground Color for Travel Expense Record Count, so that it changes for each outcome. Set the Foreground Color to Red for Low, Blue for Medium, and Green for High:
9. Double-click the explorer bar to turn off the condition explorer. 10. Save your Conditional Formatting – String Variable report specification. 11. Run your report. We have provided a 3 “bracket” conditional format that
highlights Travel Expense Record Count based on a case statement.

Chapter 2 – Conditional Formatting
16
Demo
Conditional Formatting (Hide/Show Objects)
In this instructor demonstration, we use conditional formatting to Hide and Show page objects based on a user’s prompt choice.
1. Continue with the previous report specification and save it as Demo - Hide/Show.
2. We first add a Prompt by highlighting the Entity Code Crosstab Node
Member and clicking on the Build Prompt page icon in the Toolbar.
Note that this creates a prompt page, the default prompt type for alphanumeric characters (Value Prompt), a query to populate the value prompt, and a parameterized filter.
3. Next, add an additional Value Prompt to your prompt page and allow the Prompt Wizard to create a new parameter called “ShowNamePrompt”.
4. Click Next. 5. Click Finish.

Chapter 2 – Conditional Formatting
17
6. This new prompt will have two Static Choices, Yes and No, which you add manually in the Properties of the prompt. In the Properties pane, click on the ellipsis next to Static Choices to add the two new values.
7. Return to your report page.
8. Use the Unlock icon in the Toolbar to unlock your crosstab. 9. Add a Text Item (a dash with a space on either side) to the right of your
Entity Code data item. Note that unlocking the crosstab allows us to place this text item inside the cell.
10. In the Entity Code row cell, drag in Entity Long Description from the Account query subject to the right of the “dash” text item. Now we have both a code and description displaying in the first row heading cell of our crosstab.
We now create a Boolean Variable called “ShowName” that monitors the user’s selection for this prompt. This variable is “Yes” if the user chooses “Yes” for the ShowName prompt and “No” otherwise.

Chapter 2 – Conditional Formatting
18
11. Using Condition Explorer, click on the Variables folder and add a new Boolean variable. Create the following expression from the Parameters tab:
The result of this combination of Prompt and Variable is that the user can then choose whether or not to show the Entity Long Description listed in the crosstab row headers.
12. Name this new variable “ShowName”. 13. We next tie our variable to two very specific objects on the Report Page.
Set the Style Variable property for Entity Long Description and then for the “dash” text object, by selecting our new variable from the available drop-down for that property.
14. Using the Condition Explorer, navigate to the “No” condition for our ShowName variable.
15. For each of the objects associated with our variable, set the Box Type property to None. This effectively hides the descriptions when the user would rather not see them.
16. Disable the Advanced filter on Entity Code (not the parameter). 17. Save as Demo - Hide/Show.

Chapter 2 – Conditional Formatting
19
18. Run the report twice selecting all options for the Entity Code, once with Yes and once with No at the ShowName prompt to verify your conditional prompt is working.
Yes
No


21
Chapter 3 – Enhancing Report Layout In this chapter we demonstrate techniques that enhance report layout, including report design tips, how to add additional report pages, insert page breaks, modify report structures, and add bookmarks to HTML reports. In the following exercise we expand our knowledge of report design aesthetics by studying some basic alignment techniques for lists and crosstabs, and by adding a background image to the report. Step-By-Step
Report Design Tips
1. Open the Crosstab report from Chapter 1, save as Report Design. 2. On the report page, select the Page Body by clicking outside of your list or
crosstab object, but not in the header or footer.
3. Use the Center Alignment icon in the Toolbar to center your report
horizontally and the Middle alignment icon to center vertically on the page. Horizontally centering objects on the page is quite common in report design, but the default horizontal orientation for objects on a page is left aligned.
4. Now re-set your Vertical Alignment to Top, this time using the Properties of the Page Body.
5. Add a 2 row, 1 column table by clicking on the Insert Table icon. 6. Select the top table cell of the new table. We are going to add a
background image to the top cell of the new table. 7. Using the Background Image property of the Table Cell, click the ellipsis
and type the following address into the Image URL box:
https://fagrand.fanda.ucar.edu/cpmimages/ucar-logo-spellout-med.jpg NOTE
You can add images from the Web as well as from the IBM Cognos server.

Chapter 3 – Enhancing Report Layout
22
8. Choose from a variety of Position and Tiling settings to find one that is appropriate for the report.
Note that the background image may not display in Report Studio but will always display properly when the report is run. Also note that for this example, we selected Tile in horizontal direction and set the Position to be top left.
9. For the top table cell, set the Size and Overflow property to a height of 75 px.
10. Select the crosstab and drag it into the bottom table cell. 11. Set the bottom table cell Horizontal Alignment to Center. 12. Set the bottom table cell Vertical Alignment to Top. 13. Save your report specification as Report Design. 14. Run the report.

Chapter 3 – Enhancing Report Layout
23
NOTE
Sometimes it is difficult to click on the correct report object to complete a task. The Select Ancestor arrow in the Properties pane is a useful tool to ensure you have chosen the correct object with which to work. If you select an object and do not find the property you expected to find in the Properties pane, check the object displayed by the Select Ancestor arrow. Click the arrow to find the correct object.
Demo
Viewing Page Structures
As with most development and report writing tools, the developer/author designs by way of adding “objects” to a page or form, arranging objects in certain ways, and setting the properties or behavior of those objects. Although we have not examined it yet, a report page in Report Studio contains an Object Hierarchy. Each object that you place on a page is “contained” within some higher level object, with the Page residing at the top of the hierarchy.
1. Let’s examine the object hierarchy of the report we completed in the first chapter. Open the report Crosstab (from Chapter 1) and recall that one of the “lowest level” objects on the page happens to be the column heading Net Amount. Make sure that you have “unlocked” your report design,
using the button. 2. Save your report specification as Crosstab – Page Structure.

Chapter 3 – Enhancing Report Layout
24
3. Select the Net Amount column heading item with your mouse. Click the Select Ancestor button on the Properties pane on the left. Note that the Net Amount object is a Text Item, which is contained by the Crosstab Node Member, which itself is contained by a higher level object, and so on all the way up to the Page, which is the highest level object.
4. Select the Page Body object. 5. Select Page Structure from the View menu as an alternative means for
viewing the report’s object hierarchy or structure. (The default view is the Page Design view.)
6. You are shown an “Object Tree” type of layout as shown below:

Chapter 3 – Enhancing Report Layout
25
7. By expanding the levels, navigate the tree until you are able to select the Net Amount item as shown below:
Note that the Properties pane is still available on the left as it is when you are in the Page Design view. You are free to edit an object’s properties in this view in the same fashion as you would in the Design view. Let’s make a change and see how the report responds.
8. Expand Crosstab Node > Net Amount. 9. Click the Member Caption under Crosstab Member Fact Cells.

Chapter 3 – Enhancing Report Layout
26
10. In the Properties pane, change the Text Source Type to Text and type the following for the Text property:
11. Notice how the Page Structure reflects the change.
12. Select Page Design in the View menu to see your change.
13. Save your report specification as Crosstab – Page Structure.

Chapter 3 – Enhancing Report Layout
27
NOTE
You can right-click on an object in the metadata tree in Report Studio, Business Insight Advanced, Query Studio, and Analysis Studio to access lineage information for query items and model filters. For example, here we right-click on Fiscal Year and select Lineage in the context menu.
Another window opens with both a Business and a Technical View of the model lineage for Fiscal Year.

Chapter 3 – Enhancing Report Layout
28
In the Technical View you can also review model filter information included by technical users (none in this training model).
Step-By-Step
Combine Two Reports
We learn in this exercise how to create one report specification that combines two existing reports. This exercise also demonstrates that multiple reports can be in one report, and examines the behavior of a report with multiple report objects on a page.
1. Open two report specifications from Public Folders > IBM Cognos Training > Report Studio Part 2 Training > Chapter 3 in separate browsers:
List Sample Crosstab Sample
You can do this by clicking the Open with Report Studio icon in IBM Cognos Connection.
2. Add a table to your List Sample report page with 1 column and 2 rows.

Chapter 3 – Enhancing Report Layout
29
3. Drag your List report, using the Select Ancestor arrow if necessary to find the List object, into the first row of the table.
4. From the Crosstab Sample report, copy the Crosstab Query from Query Explorer to the Query Explorer of your List Sample report. (Click on the Queries folder and right-click on the Crosstab Query to copy it.)
5. Again from the Crosstab Sample report, copy the Crosstab from the Page Explorer to your List Sample report and paste it in the second row of your table.
6. Save your report specification as Combined Report. 7. Run your report, and click on to review the results.
We now have two unrelated reports on one report page. These report objects could be on separate pages if you want the bottom report to start a new page after the other report object displays all its data.

Chapter 3 – Enhancing Report Layout
30
Step-By-Step
Utilizing Bookmarks/Modifying Report Structures
The Bookmark functionality of Report Studio provides the report consumer the ability to “jump” from one area of a report (a summary table for example) to another area of a report (the corresponding detail for the summary information). Bookmarks are effective only in saved HTML versions of reports, and those on which the output is entirely on one HTML page. In this example, we begin with the report from the last exercise and modify it to allow the report consumer to hyperlink from the summary crosstab directly to the supporting detail for that crosstab row.
1. Begin by opening the report from the prior example (Combined Report) and Save As under a new report name, Bookmarks.
2. Navigate to Page1 of the report. Click in the bottom row of the table. 3. From the Table menu, select Insert, then Rows Below…, and add 1
additional row. 4. Move the existing list that is in the first table row into the lowest cell of the
table (Use the Select Ancestor arrow to select and drag the list.). 5. Center-align all table cells horizontally. 6. Verify that the filters are the same for both reports. 7. Add 25 pixels of lower margin to your crosstab.
8. Ensure that your page design is Unlocked . 9. From the Toolbox tab in Insertable Items, drag a Bookmark
item into your List (into the first list row, not the header), and drop it beside the Fiscal Year data item.
10. Select the Bookmark item, and set its Source Type to Data Item Value and the Data Item Value to Fiscal Year.
11. Run your report. Note that although we have placed a Bookmark into the list, it does not display.
12. Return to Report Studio.

Chapter 3 – Enhancing Report Layout
31
13. In your crosstab, select the Fiscal Year row item (Crosstab Node Member object).
14. Right-click with the mouse and select Drill Through Definitions… from the pop-up menu.
A Drill Through dialog box appears.
15. Use the Add button to add a Drill Through. First select the Bookmark tab.
16. Select Data Item Value from the Source type drop-down. 17. Select Fiscal Year as the Data Item.
18. Click OK.
Note that the Fiscal Year row headings change and that Fiscal Year appears as a blue hyperlink.
19. Select your List again, using the Select Ancestor arrow to ensure that you have the entire list object selected.
20. Set the Rows Per Page property to “5000”. 21. Save your report specification as Bookmarks, and return to IBM Cognos
Connection. 22. Navigate to your newly saved Bookmarks report, and select Run with
options from the Actions menu.
Chapter 3 – Enhancing Report Layout
32
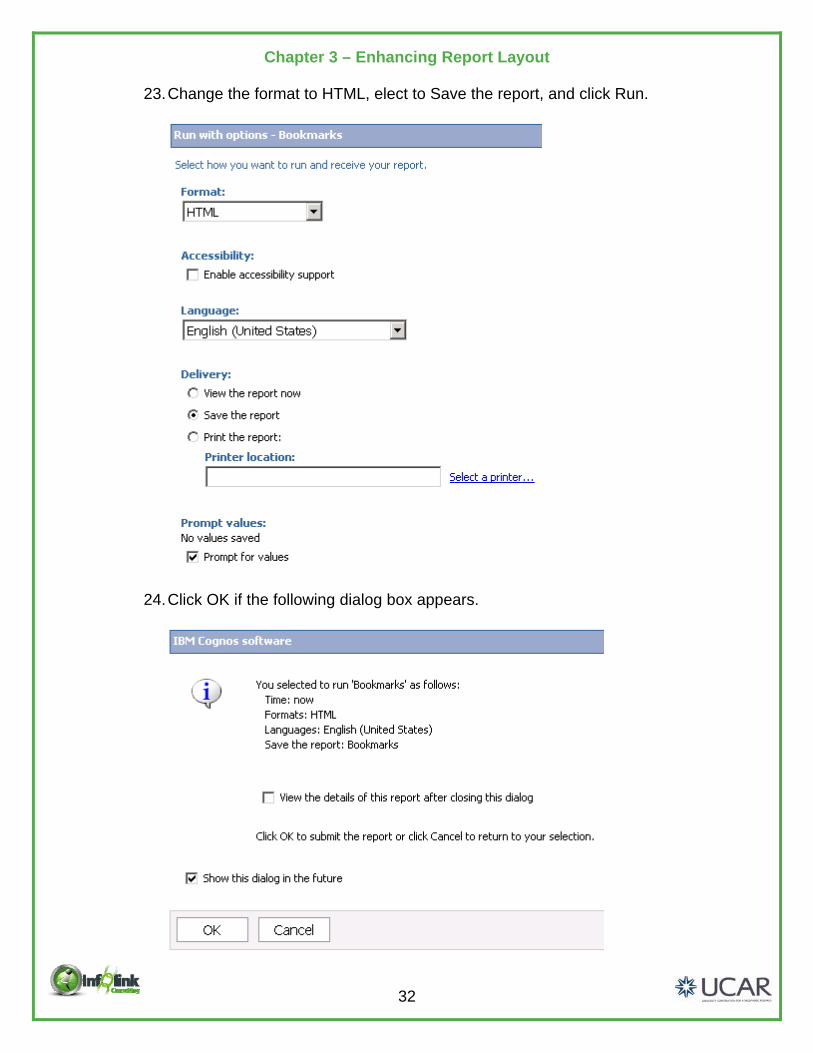
23. Change the format to HTML, elect to Save the report, and click Run.
24. Click OK if the following dialog box appears.

Chapter 3 – Enhancing Report Layout
33
25. Click the Refresh button until the Output icon shows up in the Actions menu.
26. Click on the Output icon, then the HTML link to view the output. 27. Click on 2009 in your summary crosstab and you are automatically taken
to the corresponding detail for that row.
NOTE
You could add a second bookmark to take the user back to the top of the report.

Chapter 3 – Enhancing Report Layout
34
Step-By-Step
Singletons
Singletons allow for a single value to be added to a report without having to set the page-query association. When you place a Singleton into a report, it creates a new query and returns data from the first row of that query. Singletons can be used anywhere on the page where you can place a block.
1. Open your Bookmarks report and save the report specification as Singletons.
2. Ensure that your report is Unlocked 3. Working with the crosstab report, drag a Singleton from the Toolbox, to
the right of the Label in the crosstab corner as shown:
4. From the Source tab, drag Net Amount into the Singleton from the General Ledger Details query subject.
5. In Query Explorer, open the new Query2 that was created by inserting the Singleton.
6. Highlight the Net Amount data item, and click on the ellipsis to edit the Expression property.

Chapter 3 – Enhancing Report Layout
35
7. In the window, edit the expression as follows:
This expression returns the total Net Amount for the entire report.
8. Since the Singleton query is totally unrelated to our crosstab report’s query, we have to apply the same filters to Query1 in order to reflect a comparable scope for the Total Net Amount:
9. Back on the report page, highlight the label (text item) in the crosstab corner.
10. In the Properties, change the Source Type to Text. 11. Click on the ellipsis in the Text property to change it to “Total Net Amount:
”. 12. Select the Net Amount data item in the singleton and change the Data
Format to Currency with 0 decimal places.

Chapter 3 – Enhancing Report Layout
36
13. Save the report specification as Singletons and run the report.
NOTE
Singleton queries are not supported when producing report output in CSV format.

37
Chapter 4 – Auto Group & Summarize We looked at the Auto Group & Summarize functionality in the Part 1 course. It is extremely useful to be able to aggregate a report automatically at the appropriate level of detail. However, there are situations where a combination of the Aggregation property, in conjunction with the Auto Group & Summarize setting, may not produce accurate results. The following exercises demonstrate possible pitfalls you may encounter. Step-By-Step
Auto Group & Summarize
1. Create a new List report using the UCAR Training package. 2. From the Source tab, CPM Training Data namespace, General Ledger
namespace, Account query subject, insert Account Number into your report page.
3. From the Object Code query subject, add Object Code. 4. From the General Ledger Details query subject, add Net Amount. 5. Sort Account Number descending. 6. Group on Account Number and Object Code. 7. Click the Net Amount cells and format the data as a Currency with 0
decimal places.
8. Use the Aggregate icon in the Toolbar to Total the Net Amount. 9. Create the following Advanced Detail filters:

Chapter 4 – Auto Group & Summarize
38
10. From Query Explorer, click on Query1 and note the Auto Group & Summarize property is set to Yes.
11. Save the report specification as Auto Group & Summarize.
12. Click Run Report from the Toolbar. Navigate to the bottom to see the Summary at the Account Number level and the overall report.

Chapter 4 – Auto Group & Summarize
39
13. Use Query Explorer to return to Query1 and ensure that the Query properties are displayed by clicking anywhere in the white space between the Explorer Bar and the Data Items.
14. In the Properties of the Query, change the Auto Group & Summarize property to No:
15. Save the report specification as No Auto Group & Summarize.
16. Click Run Report from the Toolbar:

Chapter 4 – Auto Group & Summarize
40
There are now several more pages of records since we are seeing the detail rows from the database. Click Bottom to see the Summary level. Notice that the totals at the summary levels are the same as those in the previous report.
This will be the case IF the fact item in your query is set to an aggregate such as Average or Total. This can be the default setting in Framework Manager, or you may need to set this in your report manually. With Auto Group & Summarize set to Yes and the fact item set to an aggregate of None, you’ll get the wrong totals as we’ll see next.
Detail rows

Chapter 4 – Auto Group & Summarize
41
Step-By-Step
Auto Group & Summarize without “Total” on Fact Item
1. Start with your No Auto Group & Summarize. 2. Set the Aggregate Function for Net Amount to None.
3. Save the report specification as Auto Group & Summarize without Fact Total.

Chapter 4 – Auto Group & Summarize
42
4. Click Run Report from the Toolbar and examine the records for the Account Number 160001 Object Codes ‘5450’ and ‘5451’.

Chapter 4 – Auto Group & Summarize
43
5. Now, Set the Auto Group & Summarize property for Query1 back to Yes and run your report again.
Note that the report shows incorrect totals for the Account Number (as well as the overall Summary) because it is aggregating by each unique Net Amount rather than each distinct record. For example, note now that we have only one record for the two $50 amounts and one record for the two $4 amounts for Object Code 5450 and 5441 with an Account Number of 160001.

Chapter 4 – Auto Group & Summarize
44
Review
Now that we’ve done the exercises in Report Studio, let’s review. Assume you have a table with three records as shown below and the Auto Group & Summarize property and the Net Amount Aggregate Function property is set as shown. Which will produce the correct results? What will the result set look like? Data:
Account Number/Object Code Total Amount 160001/5420 106 160001/5420 160 160001/5420 106
Auto Group & Summarize
Aggregate Function Correct Result?
Yes Total Yes No Total Yes No None Yes Yes None No
Why will the last one not produce valid results? Because it will bring back distinct values for all fields, which will only return one record for 106 and one for 160. If you happen to have a data set without any “duplicates” in an aggregated column, you will get the correct result. We mention this so you’re careful to include this case when testing.
In summary, Auto Group & Summarize on numeric fact fields when the aggregation on the fact is set to Total is very useful and unique to IBM Cognos. If the aggregation on the numeric fact field is set to None, then Auto Group & Summarize will produce inaccurate results and should be turned off.
45
Chapter 5 – Designing Effective Prompts In this chapter we examine several ways to effectively use prompts in a report to maximize flexibility, increase functionality, and enhance the user-interface. We learn how to use prompts to control the display of a report by showing or hiding objects, controlling conditional formatting, and how to sort data. Step-By-Step
Creating an Effective Prompt for Selection
In this exercise we create a user prompt that contains both a code and a description so that the report consumer can more easily select the desired conditions.
1. Create a new List report using the UCAR Training package. Save your report specification as Effective Prompts – Example 1.
2. From the Source tab, add the following data items from the CPM Training Data namespace, General Ledger namespace, General Ledger Details query subject:
Account Key Object Code Post Date Net Amount
3. From the Account query subject, insert Medium Title after Account Key. 4. From the Object Code query subject, insert Medium Description after
Object Code. 5. Group on Account Key and Object Code. 6. Group Span Medium Title based on Account Key and Medium Description
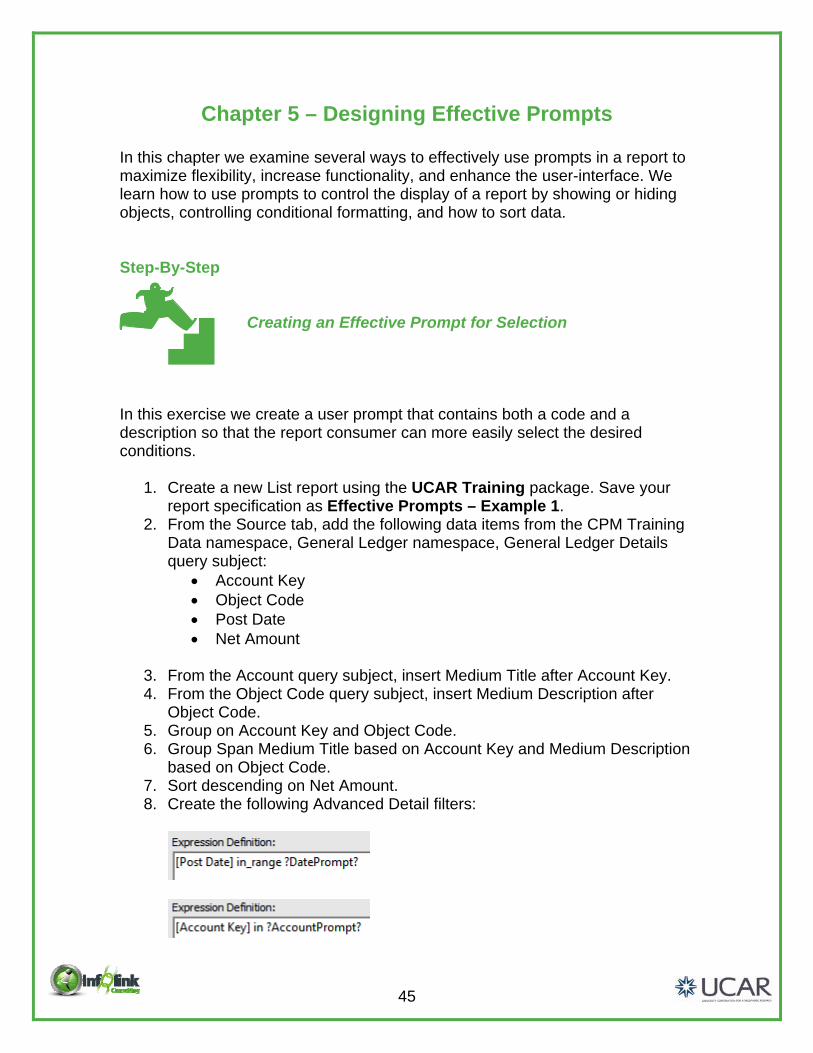
based on Object Code. 7. Sort descending on Net Amount. 8. Create the following Advanced Detail filters:
Chapter 5 – Designing Effective Prompts
46
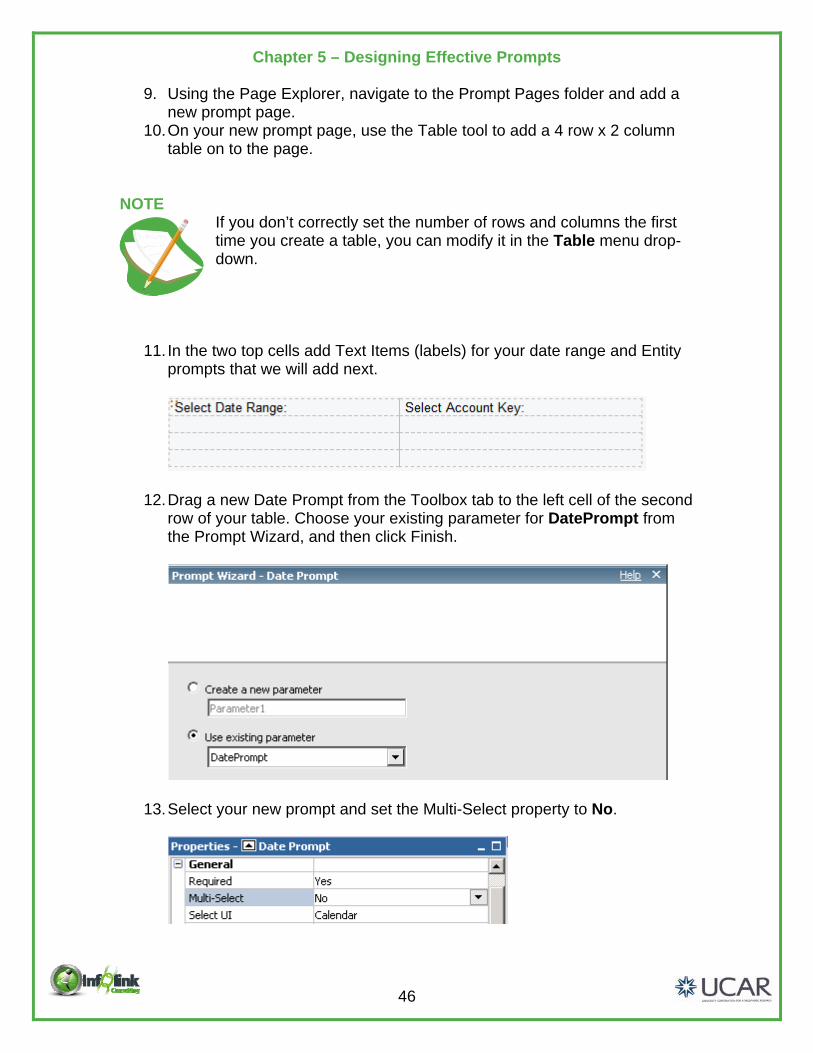
9. Using the Page Explorer, navigate to the Prompt Pages folder and add a new prompt page.
10. On your new prompt page, use the Table tool to add a 4 row x 2 column table on to the page.
NOTE
If you don’t correctly set the number of rows and columns the first time you create a table, you can modify it in the Table menu drop- down.
11. In the two top cells add Text Items (labels) for your date range and Entity
prompts that we will add next.
12. Drag a new Date Prompt from the Toolbox tab to the left cell of the second row of your table. Choose your existing parameter for DatePrompt from the Prompt Wizard, and then click Finish.
13. Select your new prompt and set the Multi-Select property to No.

Chapter 5 – Designing Effective Prompts
47
14. Change the Select UI property to Edit box.
NOTE
The Select UI property for prompts offers space-saving alternatives dependent on the type of prompt and Multi-Select option chosen. For example, the Edit Box prompt for choosing date ranges provides the same capability as the calendar, but conserves space on the prompt page (which will become important as your reports become more complex and you have many user prompts).
15. Next, drag a Value Prompt from the Toolbox into the second row right cell. In this example we utilize several steps of the Prompt Wizard as follows:
16. Choose your existing AccountPrompt parameter in the first step of the wizard and then choose Next to proceed.

Chapter 5 – Designing Effective Prompts
48
17. In the next step of the wizard, we allow Report Studio to create a new, separate query that provides the list of values for this prompt. Name this query “Account Query”, and in this case, we select Account Key (from the General Ledger Details query subject) and Medium Title (from the Account query subject) for the Values to use and Values to display drop-downs, respectively. The Values to use property indicates the data item that is submitted as the actual parameter value to Report Studio. The Values to display property indicates which data the users will actually see in the prompt when making their selection.
18. Click Finish in the wizard. 19. Run your prompt page. 20. Examine the Account prompt. Note that the Account descriptions are
displayed in the list even though we are actually filtering on the Account Key:
21. Return to the prompt page.

Chapter 5 – Designing Effective Prompts
49
22. Change the Account Key Multi-Select to No, and change the Select UI property to Radio button group. The List Box and Radio Button styles are options for a single selection prompt that are visually superior to the drop-down, and that hide the name of the data item that underlies the prompt.
Next we improve this prompt to include both the Account Key and the Medium Title.
23. Using the Query Explorer, navigate to your new query, Account Query. 24. Drag a new Data Item from the Toolbox into the Data Items panel of your
query, and define it as shown below:
The above expression concatenates the Account Key and the Medium Title.
25. Change the Name property of this new Data Item to “Account Key and Title”.
26. Return to your prompt page, select your Account Key Prompt, and re-set the Display Value property of your Account prompt to your new Account Key and Title data item.
27. In the Sorting property, click on the ellipsis to open the Sorting window and drag Account Key into the Sort List.
28. Save your report specification as Effective Prompts – Example 1.

Chapter 5 – Designing Effective Prompts
50
29. Run your report using December 1 through 31, 2010 and the 000001 – Cash Fund Account Key. Note that the prompt now contains both the Account Key and Medium Title, and that entries are sorted by Account Key in ascending order.
If you were querying on a data item with a large number of selections, further filtering may be added to your query to reduce the number of selections and to “weed out” certain selections that may appear to be unnecessary.
When using Value Prompts, there is a default limit to the number of choices that Report Studio can display of 5000. There is a Rows Per Page property on the Value Prompt where that can be changed.

Chapter 5 – Designing Effective Prompts
51
Prompts for Performance & Large Lists
Step-By-Step
Creating Prompts for Performance and Large LOVs Is it your Data Source?
Using Reference / Alias (Dimension) tables to populate prompt pages instead of Fact tables will generally improve performance because there are usually fewer records in Reference tables. In addition, the response time of the report itself can decrease dramatically when the prompt is executing a SELECT query on a Dimension table to retrieve the list of Programs as opposed to a Fact table.
Options to change a Fact prompt to a Dimension prompt include:
Delete the existing prompt; add a new one, creating a new query to use data items from the reference table instead of the fact table.
Edit the existing query to select data items from the reference table, then edit the properties of the prompt to reflect the new data items.
Please be careful to ensure the prompt values returned are a complete and accurate representation of the data you’d like the user to filter on in the report.
1. In this exercise, we will continue with the Effective Prompts – Example 1 report. Save your report specification as Effective Prompts – Example 2.
2. Open the Account query. 3. From the CPM Training Data namespace, General Ledger namespace,
Account query subject, add Account Number.
4. Change the Account Key and Title data item to read.

Chapter 5 – Designing Effective Prompts
52
5. Change the Name of this Data Item to “Account and Title”. 6. Delete Account Key from the Account query. 7. Back on the Prompt page, change the Text item above the Account
prompt to “Select Account:”. 8. Select the current prompt for Account and change the Use Value property
to Account Number and the Display Value to Account and Title.
9. Click on the ellipsis in the Size and Overflow property to change the width to 300 pixels.
10. Add Account Number to the sort list in the Sorting property (ascending). 11. Preview the report and notice that the prompt page loads somewhat
faster. 12. Return to Page Explorer. 13. On your Prompt Page1, right click the existing prompt for the Account
Prompt.

Chapter 5 – Designing Effective Prompts
53
14. Select Convert to Select and Search Prompt from the dropdown.
15. Preview your report, again using December 1 – 30, 2010.
Note that you may now search for an Account Number to find a potential match for your desired selection.

Chapter 5 – Designing Effective Prompts
54
16. You may also use the “Options” link to enhance the type of search that is conducted.
When there is a significant amount of data in the Fact tables, you will notice that the response time will improve dramatically. Next we will further enhance this report, by allowing for more than one Account Number selection to be made by the user.
17. Return to your Prompt Page, select the Account Prompt, and set the Multi-Select property to Yes. Note that the Prompt control will change slightly and that this is possible because in the previous steps we used “in” instead of “=” as the operator in the parameterized filter.

Chapter 5 – Designing Effective Prompts
55
18. Preview your report.
Note that you can repeatedly search for and select Account Numbers and insert them into the “Choices” box for submission to the ?AccountPrompt? parameter.
19. Save your report as Effective Prompts – Example 2. NOTE
The technique to use a “reference” table to pass prompt values to the main query is standard (best) practice and important to emphasize.

Chapter 5 – Designing Effective Prompts
56
Cascading Prompts
Step-By-Step
Create a Prompting Hierarchy
The Search & Select prompt that we created in the previous exercise provides a lot of flexibility for users to find the specific parameter to use for a report. There are situations, however, when it may be useful to add another level of filtering, or a prompting “hierarchy”, that allows the user to first filter at a higher level, and then pass this parameter to a lower level of detail in order to return a smaller, more focused subset of options.
1. Start with the Effective Prompts – Example 2 exercise, save the report specification as Effective Prompts - Cascading and open the report page.
2. Ungroup Object Code and Account Key. 3. From the CPM Training Data namespace, General Ledger namespace,
Account query subject, insert Division_Program Code to the beginning (far left) of your report.
4. Group Division_Program Code, Account Key, and Object Code. 5. Group span Medium Title based on Account Key and Medium Description
based on Object Code. 6. Open the prompt page and delete the existing Search and Select Prompt
and the “Select Account” text item. 7. Drag a new Value Prompt into the bottom left cell of the table. 8. In the Wizard, create new Parameter, “DivisionPrompt”, and click Next.

Chapter 5 – Designing Effective Prompts
57
9. Create a parameterized filter, selecting Division_Program Code from the Account query subject, and click Next.
10. Create a new query as shown, leaving the defaulted Division_Program Code as the Values to use and click Finish.
11. Select your new Value prompt, and in the Properties, change Select UI to
Radio button group, and the Auto-Submit property to Yes.

Chapter 5 – Designing Effective Prompts
58
12. Add Division_Program Code to the sort list in the Sorting property.
13. In the table cell above your new prompt, add a text item, “Select Division Code:”
14. Next, add a second Value prompt in the bottom right cell of your table and create a new parameter for Account Number. Click Next.
15. Set the Package Item to the Account Number from the Account query subject. Change the Operator to “in” and click Next.
16. Select Query1 as the query to filter and click Next.

Chapter 5 – Designing Effective Prompts
59
17. Create a new query as shown, leaving the defaulted Account Number as the Values to use, and selecting Medium Title from the Account query subject in the Values to display. Note the drop-down box to select a Cascading source. Select DivisionPrompt, and click Finish.
18. Using the Query Explorer, navigate to your new query, Account Number Query.
19. Drag a new Data Item from the Toolbox into the Data Items panel of your query, and define it as shown below:
20. Change the Name property of this new Data Item to “Account Number and Title”.
21. Return to your prompt page, select your Account Number Prompt, and re-set the Display Value property to your new Account Number and Title data item.
22. Add Account Number to the sort list in the Sorting property (ascending).

Chapter 5 – Designing Effective Prompts
60
23. Add a text item for the “Select Account Number:” prompt. 24. Add 20 pixels of padding to the bottom of the Date Range prompt table
cell.
25. Back on the report page (or in Query1) change the Usage property of the
AccountPrompt parameter to Disabled. 26. Save your report specification as Effective Prompts – Cascading. 27. Run your report, selecting the month of December 2010 for the date
range, and select 20 in the Division prompt. Note that the Account Number prompt then fills with only those accounts that are part of the Division item selected.

Chapter 5 – Designing Effective Prompts
61
28. Click in the Account Number prompt, type “202” to move more quickly to the selections of the list that start with “202”, and then shift-select all names starting with “202”.
29. Click Finish.

Chapter 5 – Designing Effective Prompts
62
Prompts that Allow Users to Determine Formatting
Step-By-Step
Designing Prompts for Conditional Formatting
In this exercise we demonstrate how prompts can be used to control conditional formatting, such as hiding and showing report objects or controlling other formatting options.
1. Create a new List report using the UCAR Training package. 2. Save your report specification as Effective Prompts – Conditional
Formatting. 3. From the CPM Training Data namespace, General Ledger namespace,
Account query subject, add the following data items to the report: Entity Code Lab Code IFAS Fund Source Code IFAS Fund Source Medium Description
4. From the General Ledger Details query subject, add Net Amount to the
end of the report. 5. Using the Query Explorer, navigate to your Query1. 6. Drag a new Data Item from the Toolbox into the Data Items panel of your
query, and define it as shown below:
7. Change the Name property of this new Data Item to “% of Lab Total”. 8. Return to your report page, add % of Lab Total from the Data Items tab to
your report. 9. Group Entity Code and Lab Code. 10. Highlight the Net Amount column and format the data as Currency type. 11. Highlight the % of Lab Total and format the data as Percent type with 2
decimal places. 12. Aggregate (Automatic Summary) on Net Amount and % of Lab Total.

Chapter 5 – Designing Effective Prompts
63
13. Add two parameterized Advanced Detail filters:
14. Create a new Prompt Page. 15. Add a 4 rows x 2 column table to the prompt page. 16. In the top left cell add a Text Item (label) “Select Post Date Range:”. 17. In the second row left cell, add a Date Prompt for your ?PostDatePrompt?
parameter. 18. Highlight the new prompt, and change the Multi –Select property to No
and the Select UI property to Edit Box. 19. In the 2nd column, top cell, add a Text Item “Select IFAS Fund Source:” 20. In the 2nd column, second cell, add a Select & Search Prompt using your
?IFASPrompt? parameter. Click Next. 21. Create a new Query (IFAS Query), using the default IFAS Fund Source
Code as the Values to use property (IFAS Fund Source Code will automatically display as the Values to display property). Click Finish.
22. In the 3rd row cells of the table, add two Text Items: “Show IFAS Fund Source Code?” and “Highlight Percentages?”
23. Drag a Value Prompt from the Toolbox into the bottom left cell, and use the Prompt Wizard to create a new Parameter “Show IFAS Code”.
24. Click Finish.

Chapter 5 – Designing Effective Prompts
64
25. Highlight your new prompt, click the ellipsis in the Static Choices property, and enter static values for this prompt (Yes/No). (Use the Add button on the lower left of the Static Choices dialog box to enter values)
26. Using the Condition Explorer, navigate to the Variables folder and create a new Boolean Variable with the expression shown below. Name it “Show IFAS Code”.
Note that in the above step, we used the Parameters tab, and dragged our Show IFAS Code parameter into the expression.
27. Navigate to the report page and, after selecting each subtotal and Summary line (List cell) for IFAS Fund Source Code, click on the Split Cell
at the top. You will need to do each summary line separately.
Note that splitting the cell allows for separate formatting of each column of the summary row.

Chapter 5 – Designing Effective Prompts
65
28. Set the Style Variable property for the IFAS Fund Source Code column title, column body, and all summary cells by associating them one by one with this new variable.
29. Using the Condition Explorer, navigate to the “No” condition for this new variable.
30. Set the Box Type property for the IFAS Fund Source Code column title, column body, and all summary cells (Ctrl-click) to None.
31. Run your report selecting December 1 through 31, 2010; search for and select all IFAS Fund Sources beginning with NSF for the IFAS Fund Source prompt.
32. Choose No in the Show IFAS Fund Source Code prompt. Note that the column will not be shown.
Next we add a prompt to allow the user to optionally highlight % of Lab Total by color choice.
33. Return to your prompt page. Drag a new Value Prompt into the empty table cell.
34. Allow the Prompt Wizard to create a new parameter, “HighlightPercent”, and click Finish.
35. Highlight the new prompt and set its Static Choices property as shown below:
36. Using the Condition Explorer, navigate to the Variables folder.

Chapter 5 – Designing Effective Prompts
66
37. Create a new String Variable with the following expression. Name it “Highlight Percent”.
38. Recall you must also manually add the possible Prompt choices into the Values area of your variable definition as shown below:
39. Return to the report page and associate the Summary(% of Lab Total) summary rows with this new variable by setting the Style Variable property.
40. Using the Condition Explorer, navigate to each of the possible variable outcomes in turn, and set the Foreground Color property appropriately for the % of Lab Total.

Chapter 5 – Designing Effective Prompts
67
Your prompt page should now look like this:
41. Save your report as Effective Prompts - Conditional Formatting. 42. Run your report (December 1 through 31, 2010; search for and select all
fund sources beginning with the ‘NSF’), choose to show or not show the IFAS Fund Source Code, and choose a color to display. Note that the % of Lab Total summary rows are shown in the chosen color.
Dynamically Display Prompt Selections Step-By-Step
Using Prompts to Sort Data
In this example we use a prompt to allow the user to choose a sort order for a list report.
1. Create a new List report using the UCAR Training package and save the report specification as Effective Prompts – Sort.
2. Add the following fields from the CPM Training Data namespace, General Ledger namespace, Person query subject:
Person Entity Identifier - PEID Name
3. From the Date query subject add Fiscal Year.

Chapter 5 – Designing Effective Prompts
68
4. From the General Ledger Details query subject, add the following fields: Account Key Net Amount
5. Add Advanced Detail filters as shown:
6. Create a new prompt page. 7. Drop a 2 row x 1 column table onto your prompt page. 8. In the top cell of the table, create a Text Item (label) “Sort By:” 9. In the bottom cell of the table, drag a Value Prompt from the Toolbox. 10. Allow the Prompt Wizard to create a new parameter, “SortField”, and click
Finish. 11. Create static values for your prompt as shown below:
12. Using the Page Explorer, navigate to your Page1.

Chapter 5 – Designing Effective Prompts
69
13. Drag a new Query Calculation into the list, select Other Expression, name it “SortField”, and define it as shown below:
14. Select the SortField list item, and click the Sort icon in the Toolbar, and select Ascending.
15. Run your report several times and prove that the report is sorted based upon the prompt choice.
16. Hide the SortField column by Ctrl-clicking the List Column Title and the List Column Body and changing the Box Type Property to None.
Note that you can control the visibility of hidden items on your report page by selecting the Visual Aids icon in the Toolbar.
17. Return to your report page. 18. Set the report title to “Sorted by: ”.

Chapter 5 – Designing Effective Prompts
70
19. Drag a new Layout Calculation from the Toolbox, dropping it just to the right of your report title.
20. In the Expression Editor, drag your SortField parameter into the expression as shown below:
21. Click OK. 22. Set the Classes property (Global Class) for your new calculation to Report
title text.
23. Save your report specification as Effective Prompts - Sort.

Chapter 5 – Designing Effective Prompts
71
24. Run your report, selecting Net Amount as the SortField, and note that your parameter choice is displayed as part of the report title.


73
Chapter 6 – Working with Multiple Queries As you build more and more advanced reports, you frequently have the need to use multiple queries in a report. We saw before the ability to combine several reports and report types on one page. You may also discover the need to override a join that is inherited from the Framework Manager package, or establish new joins for a particular format. This chapter demonstrates some of the techniques available in Report Studio to accommodate these requirements. Step-By-Step
Creating Relationships between Queries
In this example, we create a “Master – Detail” relationship between two queries. Let’s set up a report to first return information for Account Numbers, with the total Net Amount for expenses. We then want to follow each Account Number’s information with details about the expense categories.
1. Create a new List report using the UCAR Training package and save as Relationships.
2. Navigate to the Queries folder using Query Explorer. 3. Using the Name property, rename the default Query1 to “Account”. 4. Double-click your Account query. 5. From the CPM Training Data namespace, General Ledger namespace,
Account query subject, drag the following query items into your new Account query’s Data Items panel.
6. From the General Ledger Details query subject, add Net Amount.

Chapter 6 – Working with Multiple Queries
74
7. Add the Advanced Detail filters as follows:
8. Add a parameterized filter for Fiscal Month Number.
9. Using Query Explorer, navigate to the Queries folder and drag in a new
query from the Toolbox. Name this query “Details”. 10. Double-click the Details query. 11. Drag the following query items into the Data Items panel from the Account
query subject, Object Code query subject, and General Ledger Details query subject:

Chapter 6 – Working with Multiple Queries
75
12. Add the following Advanced Detail filters:
13. Next, navigate to your Report Page1. 14. From the Data Items tab, shift-click and drag the items from the Account
query into your list report. 15. Group your existing list by Account Number. 16. Select the Net Amount data item and change the Data Format property to
Currency with 0 decimal places. 17. Add an Account footer by using the Structure, Headers & Footers, List
Headers & Footers menu selection.
18. Unlock your report and delete the Account Number text item (object) that was placed in your new footer by default.
19. From the Data Items tab, drag your Details query into your new footer. 20. Lock your report. 21. Sort Ascending on Object Code. 22. Select the Net Amount data item in the second list and change the Data
Format property to Currency with 0 decimal places. 23. Add a Total aggregate from the Toolbar on Net Amount .
Note that we have created a “List within a list”, which is one way to display Master/Detail data in Report Studio.

Chapter 6 – Working with Multiple Queries
76
24. Run the report (select 12 as the Fiscal Month Number):
When your report is displayed you see only information for a specific Account Number in the first list, but the detail report is displaying information for all Account Numbers in each Account Number footer. You may also notice that the time to display this report is rather long. This is because we have not yet specified a relationship between these two queries. In this scenario we must specify a relationship between our two queries in order for the report to work properly.
25. On your Report page, highlight a column in the bottom list, and use the Select Ancestor arrow to select the “nested” List object.

Chapter 6 – Working with Multiple Queries
77
26. Click on the ellipsis in the Master Detail Relationships property.
27. In the Master Detail Relationships window, click on New Link, and establish the JOIN between your two queries using Account Number by highlighting the field in both the Master and the Detail.
28. Click OK. 29. Run your report again using 12 as the Fiscal Month Number.
Now the detail is displaying information for the correct Account Number; however, note that the Net Amount in the main list does not reflect the correct totals in the detail.

Chapter 6 – Working with Multiple Queries
78
30. Click in the Details list, and add a parameterized filter to match the Fiscal Month Number query filter:
31. Save your report specification as Relationships. 32. Run the report again.
Note that the report now displays all Account Numbers, followed by pertinent information about each Expense by Account Number. It is important to consider that when you have a master-detail relationship design for your report, filters can and should be applied carefully to ensure that you are getting the correct results. When the filters are not applied to both queries the results can be invalid. Note also that several queries can utilize the same prompt as long as the parameter is identical.

Chapter 6 – Working with Multiple Queries
79
NOTE
In this exercise we created a report that displays detail information for each Account Number AND displays expense information detail if that data exists for the Account Number. This is not exactly the same as if we had used a single List object that contained data items from both query subjects and was simply grouped by Account Number. The reason behind this is that the join type defined between the two query subjects in the single list example controls the output, whereas with the “list within a list” approach the report author controls the output.
In other words, you will come across situations where the defined join (defined in the Framework Manager model) between two query subjects, “A” and “B” for example, is a “left inner join”, meaning data from query subject A is only shown when there is associated data from query subject B. In these cases, the report author can avoid the join restriction of the model by creating a master-detail query.

Chapter 6 – Working with Multiple Queries
80
Step-By-Step
Creating Discontinuous Crosstab Reports
Discontinuous Crosstabs are those in which the row or column dimension contains a combination of more than one dimension in the same level. In this example we create a crosstab that contains Net Amounts by Fiscal Year. The rows dimension display by Fiscal Year, but the column dimension displays by both Entity Code and Lab Code. This type of Crosstab report is generated by using a “Union” object in Report Studio.
1. Create a new Crosstab Report using the UCAR Training package and save it as Union.
2. Using Query Explorer, navigate to Query1. 3. Insert the following items from the CPM Training Data namespace,
General Ledger namespace, Date, Account, and General Ledger Details query subjects respectively:
4. Add the following Advanced Detail filters:
5. Using Query Explorer, click on Queries and add a new query, Query2. 6. Double-click on the Query2 icon, and add the following items from the
Date, Account, and General Ledger Details query subjects respectively:

Chapter 6 – Working with Multiple Queries
81
7. Add the following Advanced Detail filters:
8. Again using Query Explorer, click on Queries and add a Union item.
9. Drag Query1 into the top dotted line box of the Union Query, and Query2 into the bottom.
10. Double-click on Query3. Note that the second data item in Insertable Objects is Entity Code. This is the same behavior as with an SQL union in that the column names in the result set are taken from the first query executed by the Union. This data item actually contains both Entity Code and Lab Code.
11. Drag the three Union1 Insertable Objects into the Data Items panel.

Chapter 6 – Working with Multiple Queries
82
12. Mouse over your Query Explorer. The Query structure should now look like this:
13. Return to your Crosstab Report Page1. 14. Click in the Crosstab (use the Select Ancestor arrow to ensure that you
have selected the Crosstab object). 15. Change the Query property to Query3. 16. From the Data Items tab, drag Entity Code from Query3 into the Columns
drop zone. 17. Drag Fiscal Year into the Rows drop zone. 18. Drag Net Amount into the Measures drop zone. 19. Sort ascending on the Fiscal Year row headings and the Entity Code
column headings.
20. Highlight the Net Amount measures area, click on the Data Format icon, and format it as Currency with 0 decimal places.
21. Save your report specification as Union. 22. Run your report:
We now have two dimensions shown in our columns that are not nested dimensions.

Chapter 6 – Working with Multiple Queries
83
NOTE
You could sort this crosstab by the separate dimensions in the column heading (first by Entity, then by Lab) by adding a new data item into both Query1 and Query2, with the text “’Group1’” and “’Group 2’”, respectively. Use the Pre-Sort property for Entity in Query1 and for Lab in Query2. Add the new data item to your Union query (Query3); then add the new Group data item to the Sorting property of the Entity column heading in your Crosstab. The result would look like this:
Step-By-Step
Creating an Inner Join between Queries
In this exercise, we learn another technique to create relationships between multiple queries in order to more precisely control the report output, and utilize an “inner join”.
1. Create a new List report using the UCAR Training package and save as Join.
2. Use Query Explorer to open the Query1. 3. Drag the following items from the CPM Training Data namespace, General
Ledger namespace, Account query subject: Entity Code Entity Medium Description Lab Code Lab Medium Description Division_Program Medium Description
4. Add Document Id from the General Ledger Details query subject into the
end of your list.

Chapter 6 – Working with Multiple Queries
84
5. Add the following Advanced detail filter:
6. Change the Aggregate Function of Document Id to Count and the Rollup Aggregate Function to Total.
7. Change the Name property of the Document Id data item to “2009”. 8. Again using Query Explorer, click on the Queries folder. 9. Right-click on Query1 and select Copy.
10. Click anywhere on the page, right-click again, and select Paste.
11. Double-click on the new Query2.

Chapter 6 – Working with Multiple Queries
85
12. Edit the Fiscal Year filter as follows:
13. Modify the Name property of the 2009 data item to “2010”. 14. Using Query Explorer, click on Queries. 15. From Insertable Objects, add a Join object to the page.
16. Drag Query1 into the top dotted line box of the Join query, and Query2 into the bottom.
17. Double-click on the Join icon to open the Join Relationships window.
18. Click on New Link to establish a relationship between Entity Code in both queries.
19. Click on New Link again to establish a relationship between Lab Code (click on the data item in both queries).
20. Establish a third relationship between Division_Program Medium Description.

Chapter 6 – Working with Multiple Queries
86
21. Change the Cardinality settings to 1..1 on both sides, but note the options to change the Operator, or the type of join (i.e., left or right outer join).
22. Click OK. 23. Double-click on Query3. 24. From Query1, drag Entity Code, Entity Medium Description, Lab Code,
Lab Medium Description, Division_Program Medium Description, and 2009 into the Data Items panel.
25. Select the 2009 data item and change the Aggregate Function and the Roll-up Aggregate Function to Total.
26. Change the Label property to “2009”. 27. From Query2, add 2010. 28. Select the 2010 data item and change the Aggregate Function and the
Roll-up Aggregate Function to Total. 29. Change the Label property to “2010”. 30. Add a new Data Item from the Toolbox, and complete the expression as
follows:
31. Name the new item “Variance”. 32. Return to the report page. 33. Use the Ancestor button to change the Query property of the List object to
Query3.
34. From the Data Items tab, add all of the items from Query3 to your List. 35. Group on Entity Code and Lab Code. 36. Group span Entity Medium Description based on Entity Code and Lab
Medium Description based on Lab Code.

Chapter 6 – Working with Multiple Queries
87
37. Sort ascending on Division_Program Medium Description.
38. Select the Variance data item and change the Data Format property to Percent with 0 decimal places.
39. Ctrl-click to select both 2009 and 2010 and change the Data Format property to Number with a thousands separator.
40. Save the report specification as Join. 41. Run the report:
NOTE If your report requires an Outer Join, you must also ensure that the Outer Join Allowed property of the Query is set to Yes.

89
Chapter 7 – Advanced Reports In this chapter we examine a variety of additional miscellaneous techniques and tips that you might call upon to enhance your reports. Step-By-Step
Creating Dynamic Headers and Titles that Reflect Report Data
1. Create a new List report using the UCAR Training package. 2. Add the following columns to the report from the CPM Training Data
namespace, General Ledger namespace, Account query subject: Lab Code Lab Medium Description Division_Program Code Division_Program Medium Description IFAS Fund Source Code
3. Add Net Amount from the General Ledger Details query subject. 4. Group on Lab Code and Group Span Lab Medium Description on Lab
Code. 5. Group Division_Program Code and Group Span Division_Program
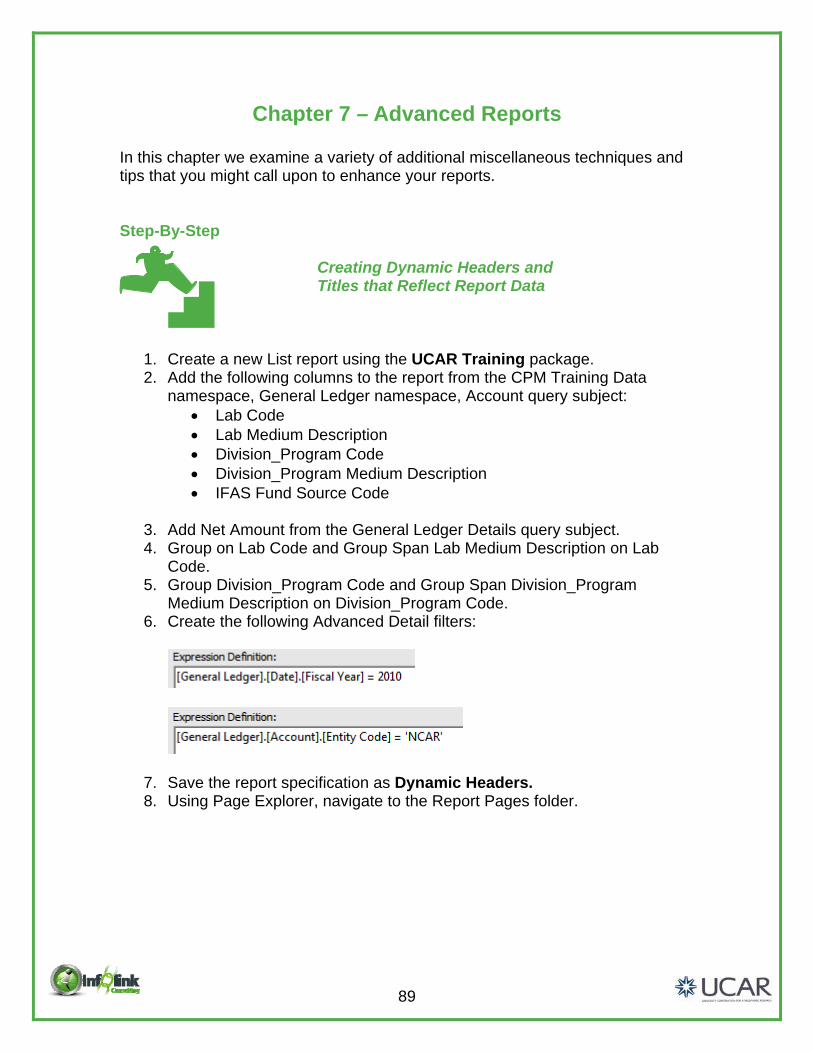
Medium Description on Division_Program Code. 6. Create the following Advanced Detail filters:
7. Save the report specification as Dynamic Headers. 8. Using Page Explorer, navigate to the Report Pages folder.

Chapter 7 – Advanced Reports
90
9. Add a Page Set from Insertable Objects.
10. Highlight the new PageSet1, and in the Properties pane, change the Query property to Query1.
11. Click on the ellipsis in the Grouping & Sorting property. 12. Drag Lab Code into the Groups folder in the right pane and click OK.
13. On the Report Pages, drag Page1 into the Detail Pages folder.
14. Return to Page1.

Chapter 7 – Advanced Reports
91
15. Select the report Title. Change the Source Type property from Text to Report Expression.
16. Define the following expression for the report title:
17. Run your report and notice your title. Note that the defined page break is what provides the necessary context for Report Studio to display data in the header in this fashion.
18. Drag a new Block from the Toolbox into the report header, beneath the current title block.
19. Change the Classes property (Global Class) of this new block to Report title area.
20. Drag a Text Item from the Toolbox into your new block, and type “Run on: ”.
Chapter 7 – Advanced Reports
92
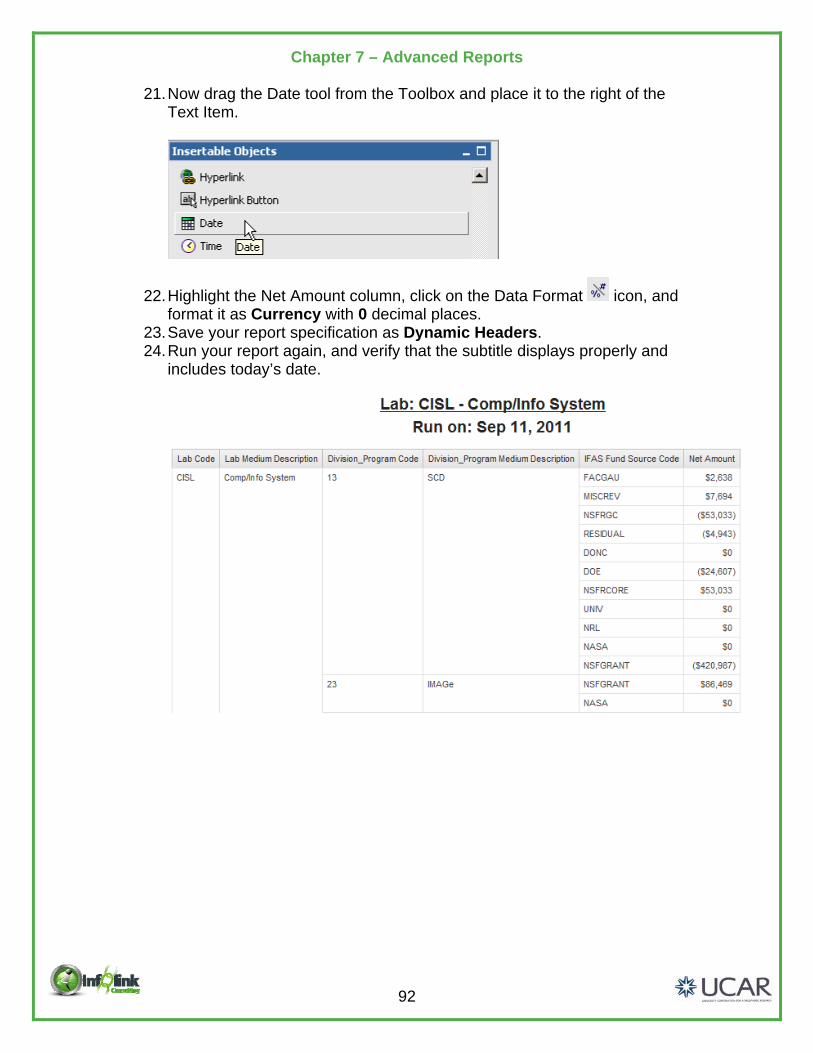
21. Now drag the Date tool from the Toolbox and place it to the right of the Text Item.
22. Highlight the Net Amount column, click on the Data Format icon, and format it as Currency with 0 decimal places.
23. Save your report specification as Dynamic Headers. 24. Run your report again, and verify that the subtitle displays properly and
includes today’s date.

Chapter 7 – Advanced Reports
93
Step-By-Step
Creating a Form
1. Open the Dynamic Headers report, and save it as Forms.
We next modify this list report and use the underlying data to create a form (form letter).
2. Since the Lab Code and Lab Medium Description are in the title, we can
cut them from the report. 3. Click in the Page Body. Use the Select Ancestor arrow to select the Page
object. 4. Connect your Page object to Query1, using the Query property. 5. Select a list cell and use the Ancestor arrow to open the List properties. 6. In the Data section of the List object, click the ellipsis in the Properties
property, and check the boxes for Lab Code and Lab Medium Description as shown.
NOTE
When a Data Item exists in a query, but is not referenced in the page layout, the Query must be associated with the Page and the item(s) must be added to the Properties associated with the report. After we cut Lab Code and Lab Medium Description from the List, these steps must be taken in order for the Report Expression in the header to work properly.
Chapter 7 – Advanced Reports
94
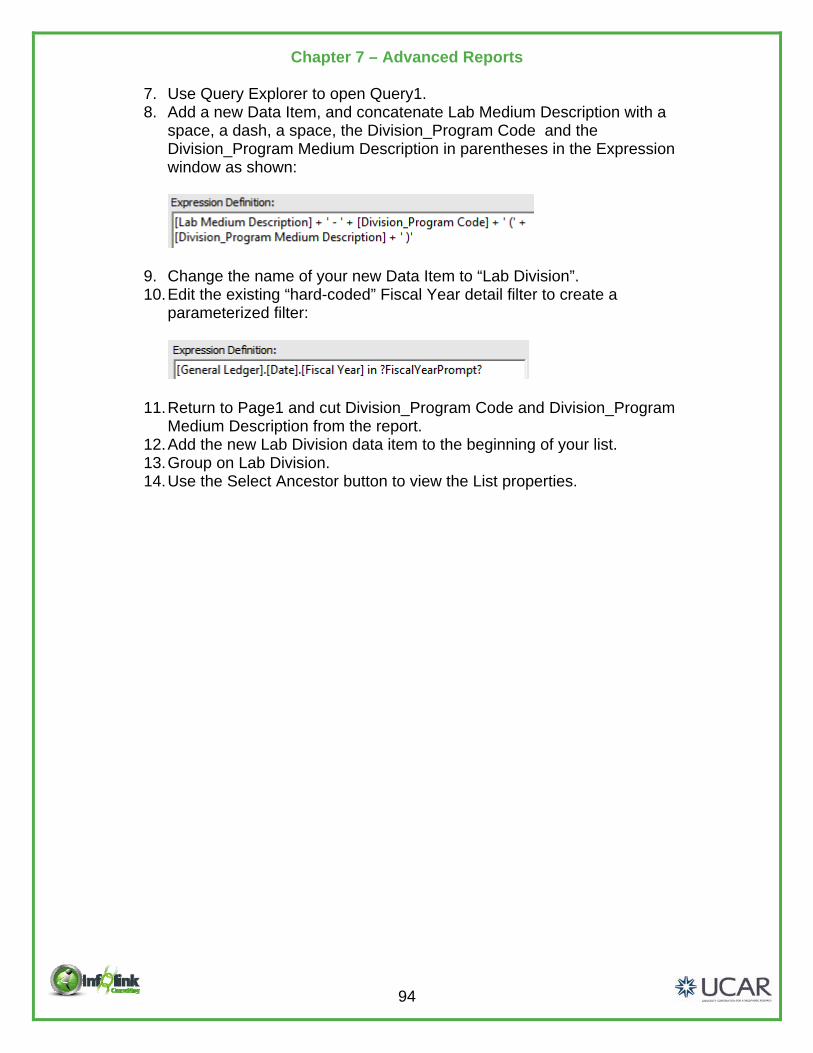
7. Use Query Explorer to open Query1. 8. Add a new Data Item, and concatenate Lab Medium Description with a
space, a dash, a space, the Division_Program Code and the Division_Program Medium Description in parentheses in the Expression window as shown:
9. Change the name of your new Data Item to “Lab Division”. 10. Edit the existing “hard-coded” Fiscal Year detail filter to create a
parameterized filter:
11. Return to Page1 and cut Division_Program Code and Division_Program Medium Description from the report.
12. Add the new Lab Division data item to the beginning of your list. 13. Group on Lab Division. 14. Use the Select Ancestor button to view the List properties.

Chapter 7 – Advanced Reports
95
15. In the Grouping & Sorting property, delete Division_Program Code from the Groups list.
In the next steps we add a second page break to the report.
16. Using Page Explorer, return to the Report Pages folder, and view the Page Set.
17. Right click on Lab Code and then select Edit.
Chapter 7 – Advanced Reports
96
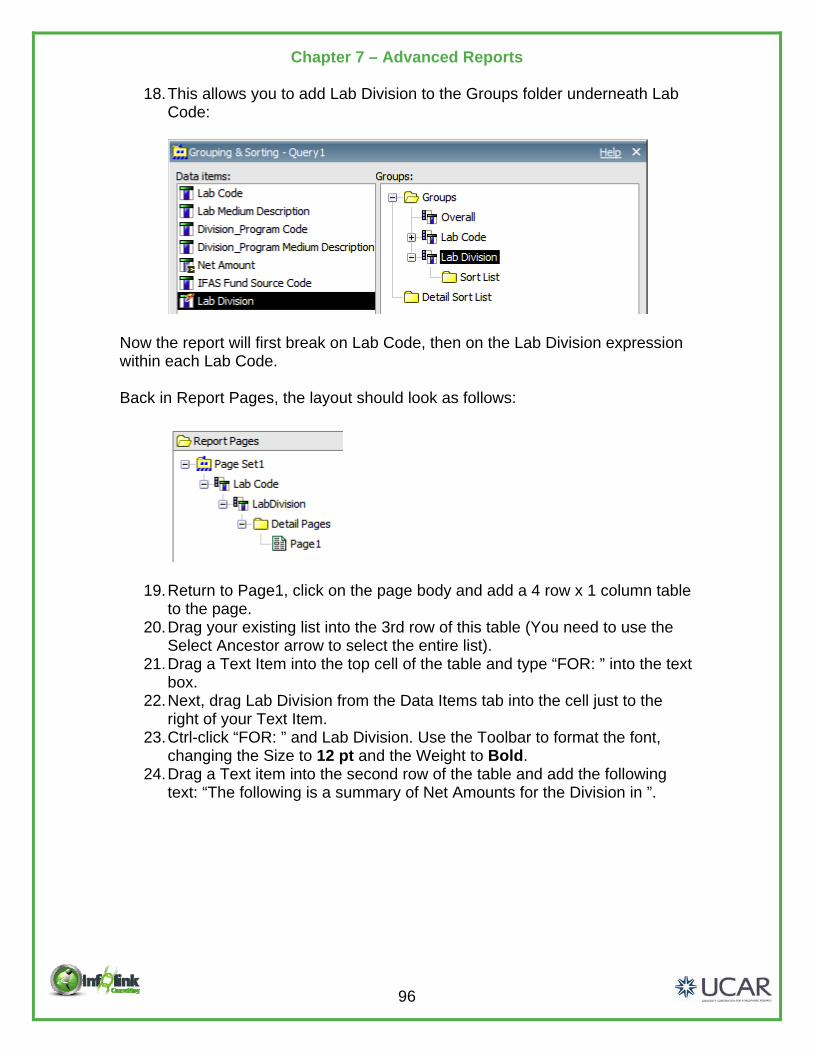
18. This allows you to add Lab Division to the Groups folder underneath Lab Code:
Now the report will first break on Lab Code, then on the Lab Division expression within each Lab Code.
Back in Report Pages, the layout should look as follows:
19. Return to Page1, click on the page body and add a 4 row x 1 column table to the page.
20. Drag your existing list into the 3rd row of this table (You need to use the Select Ancestor arrow to select the entire list).
21. Drag a Text Item into the top cell of the table and type “FOR: ” into the text box.
22. Next, drag Lab Division from the Data Items tab into the cell just to the right of your Text Item.
23. Ctrl-click “FOR: ” and Lab Division. Use the Toolbar to format the font, changing the Size to 12 pt and the Weight to Bold.
24. Drag a Text item into the second row of the table and add the following text: “The following is a summary of Net Amounts for the Division in ”.
Chapter 7 – Advanced Reports
97
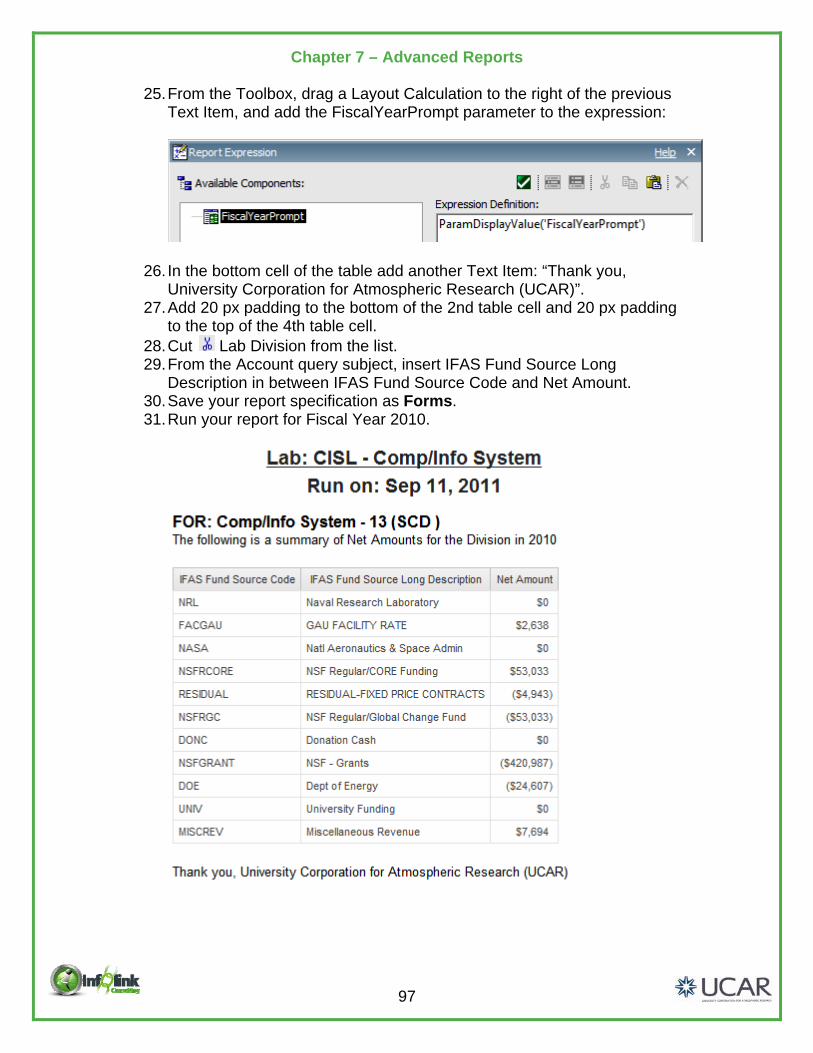
25. From the Toolbox, drag a Layout Calculation to the right of the previous Text Item, and add the FiscalYearPrompt parameter to the expression:
26. In the bottom cell of the table add another Text Item: “Thank you, University Corporation for Atmospheric Research (UCAR)”.
27. Add 20 px padding to the bottom of the 2nd table cell and 20 px padding to the top of the 4th table cell.
28. Cut Lab Division from the list. 29. From the Account query subject, insert IFAS Fund Source Long
Description in between IFAS Fund Source Code and Net Amount. 30. Save your report specification as Forms. 31. Run your report for Fiscal Year 2010.

Chapter 7 – Advanced Reports
98
In the following exercise we examine how to set up a “Drill Through” from one report to view related data in a second report. Step-By-Step
Creating Drill-Through Relationships between Reports
1. Create a new Crosstab report using the UCAR Training package. 2. Drag the Account Number from the CPM Training Data namespace,
General Ledger namespace, Account query subject into the Rows drop zone.
3. Drag Month Name from the Date query subject into the Columns drop zone.
4. Drag Net Amount from the General Ledger Details query subject into the Measures drop zone.
5. Sort the rows and columns ascending. 6. Add a Total aggregate on the measure. 7. Control-click the Net Amount crosstab measure and Total measures, and
change the Data Format to Currency with 0 decimal places. 8. Add the following Advanced Detail filters:

Chapter 7 – Advanced Reports
99
9. Run your report to note that the months are not sorted properly.
10. Navigate to Query1, and add Fiscal Month Number from the Date query subject to the Data Items pane.
11. Navigate back to the report page, highlight the Month Name columns, and click on the ellipsis next to the Sorting property.
12. Delete Month Name from the Sort List, and instead insert Fiscal Month Number and sort ascending.
13. Save this report specification as Source Report. 14. Create a new List report using the UCAR Training package. 15. Add the following data items from the CPM Training Data namespace,
General Ledger namespace, General Ledger Details query subject: Document Id Object Code Post Date Person Entity Identifier – PEID Check Number Batch Id Units Primary Reference Net Amount
16. Insert Account Number to the beginning of the report (from the Account
query subject).

Chapter 7 – Advanced Reports
100
17. Add the following Advanced Detail filters:
18. Sort the Document Id column ascending. 19. Add a Total aggregate (from the Toolbar) to Net Amount. 20. Ctrl-click the Net Amount column and the Summary row and change the
Data Format property to Currency with 0 decimal places. 21. Add the following filter (bring it in from your Data Items tab, not the Source
tab):
22. Save this report specification as Target Report. 23. Return to the Source Report. 24. Click on the Row Item (Crosstab Node Member). Right-click and select
Drill-Through Definitions from the pop-up menu. 25. Add a new Drill-Through Definition using the Add button. 26. In the Target Report tab, select your Target Report from the list of
reports. 27. In the Action drop-down, select Run the report. 28. Leave the Format drop-down as Default. 29. Check the Open in new window box.

Chapter 7 – Advanced Reports
101
30. Under Parameters, click on the Edit icon.
31. Change the Method drop-down to Pass data item value and the Value to Account Number. Leave the Property to Pass as the Default.
32. Click OK twice.
Note that the row items in your report are now highlighted as a live link:
33. Save your report specification as Drill Through.
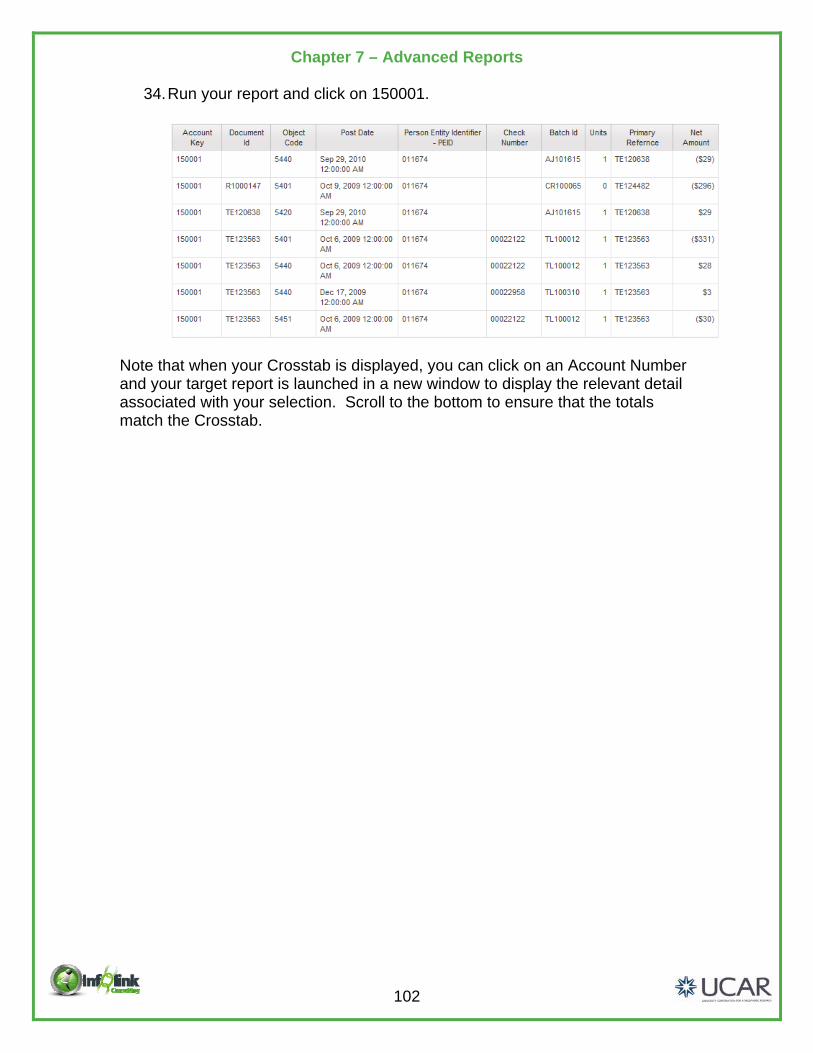
Chapter 7 – Advanced Reports
102
34. Run your report and click on 150001.
Note that when your Crosstab is displayed, you can click on an Account Number and your target report is launched in a new window to display the relevant detail associated with your selection. Scroll to the bottom to ensure that the totals match the Crosstab.

Chapter 7 – Advanced Reports
103
The Report Specification The IBM Cognos Report Studio report specification refers to the report design information that is stored in the content store when you design and save a report. These specifications are stored in XML format. Although it is not common for the beginning report developer to edit the XML report specification directly, the XML can be viewed, saved locally, and edited if desired.
While it is possible, it is not suggested that you attempt to hand edit the XML specification of a report unless you have an extensive knowledge of both XML and the specific format of XML required by Report Studio. If you are comfortable with your understanding of these requirements, the capability to copy a report specification to a file and reload from a file can be used to migrate a report from one Report Studio environment to another. For example, you could migrate a report from a Development environment to a Production environment in this fashion.
The XML specification is useful if you wish to manually promote a report from one IBM Cognos instance to another (such as development to test). The same idea can be applied when submitting IBM tickets for IBM Cognos support; if support receives an XML report specification that is showing an issue against their sample data (Great Outdoors) then they have a much easier time resolving those issues.

Chapter 7 – Advanced Reports
104
Step-By-Step
Enhancing User Interaction with HTML
In this exercise, we examine how to improve on your report by utilizing HTML to add items that allow users to send emails or navigate to web sites by clicking links in a report. We also examine how to create tool tips to clarify report data.
1. Open your Target Report and Save As HTML. 2. Insert the Medium Title from the CPM Training Data namespace, General
Ledger namespace, Account query subject to the beginning of the list. 3. Group on Account Number.
Let’s begin by adding an email link to the footer of our report.
4. Select a cell in the 1 X 3 table that exists in the report footer. 5. Select Table, Insert, Rows Above from the Menu and add 1 row. 6. In the top left cell, add a Text Item: “Report Authored By:”.
7. In the middle cell, drag an HTML Item , from the Toolbox. 8. Select the HTML Item, and set its HTML property as shown below,
(substituting your name and email)
9. Run your report (use 000001 as your Account Number). Note that the HTML item is active and will generate an email “send to” action when clicked.
10. Next, drag another HTML Item into the top right cell of the table and define it as below:
<a href="http://www2.ucar.edu/">UCAR Web Site</a>
11. Right justify the HTML Item within the cell using the Toolbar.
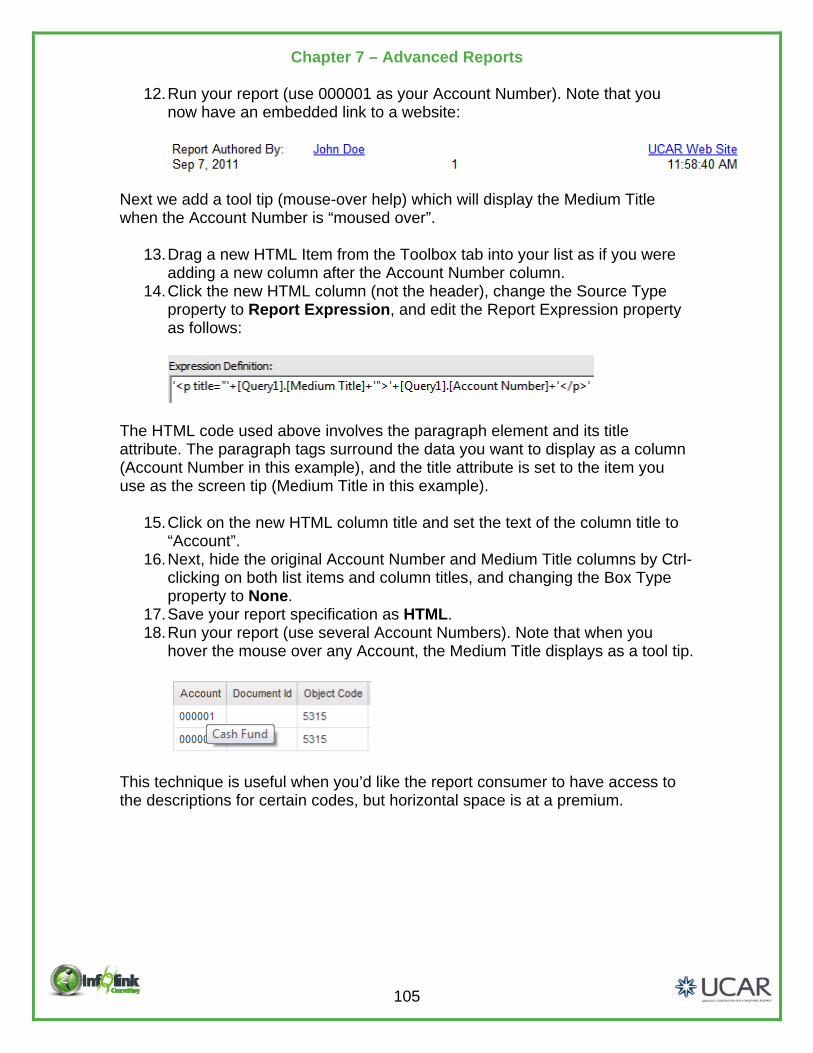
Chapter 7 – Advanced Reports
105
12. Run your report (use 000001 as your Account Number). Note that you now have an embedded link to a website:
Next we add a tool tip (mouse-over help) which will display the Medium Title when the Account Number is “moused over”.
13. Drag a new HTML Item from the Toolbox tab into your list as if you were adding a new column after the Account Number column.
14. Click the new HTML column (not the header), change the Source Type property to Report Expression, and edit the Report Expression property as follows:
The HTML code used above involves the paragraph element and its title attribute. The paragraph tags surround the data you want to display as a column (Account Number in this example), and the title attribute is set to the item you use as the screen tip (Medium Title in this example).
15. Click on the new HTML column title and set the text of the column title to “Account”.
16. Next, hide the original Account Number and Medium Title columns by Ctrl-clicking on both list items and column titles, and changing the Box Type property to None.
17. Save your report specification as HTML. 18. Run your report (use several Account Numbers). Note that when you
hover the mouse over any Account, the Medium Title displays as a tool tip.
This technique is useful when you’d like the report consumer to have access to the descriptions for certain codes, but horizontal space is at a premium.

Chapter 7 – Advanced Reports
106
NOTE
Recall that when you hide objects, you can find them again by selecting the Visual Aids icon in the Toolbar, and enabling Show Hidden Objects. There are also other useful options to be aware of below:
HTML Items only work in HTML. Nothing appears if you run the report in any other output format including PDF and Excel.

107
Chapter 8 – Bursting Bursting is a capability of IBM Cognos 10 that allows the author to create a large report which is divided, typically with a page break, and sent or delivered to different recipients. The most common bursting scenario is a report that contains a page break on some key value, and which is emailed to the individuals who are interested in that particular chapter of the report. The prerequisites for bursting a report are:
The report must have a Burst Key, which usually corresponds to the data item on which the page break is set up.
The report must have a Burst Recipient, which can be an email address, or a directory address to which that the section of the report will be sent. (“Burst” reports can also be sent to folders in IBM Cognos Connection).
The report must be scheduled to run or can be run immediately.
Demo
Creating Burst Keys
In this example we create a simple list report, with a Burst Key and a Page Break, and set it up for bursting.
1. Create a new List report using the UCAR Training package. 2. From the CPM Training Data namespace, General Ledger namespace,
Account query subject, insert the following data items into the list: Entity Code Account Number Medium Title
3. Add the following columns to the report from the Object Code query
subject: Object Code Medium Description
4. Add the following columns to the report from the General Ledger Details
query subject: Post Date Net Amount

Chapter 8 – Bursting
108
5. Save the report specification as Burst. 6. Group the report on Entity Code and Account Number. 7. Group span Medium Title based on Account Number. 8. Sort descending on Net Amount. 9. Add the following Advanced Detail filters to restrict the data:
10. Highlight the list object and click on the ellipsis to open the Grouping & Sorting property.
NOTE
Recall that Grouping and Sorting is controlled here in the Properties even though you may have used the Group icon in the Page Design view.
11. Click OK to exit that pop-up. 12. Mouse over the Page Explorer, click on Report Pages, and add a Page
Set from Insertable Objects.
13. Highlight the new PageSet1, and in the Properties pane, set the Query
property to Query1. 14. Click on the ellipsis in the Grouping & Sorting property.

Chapter 8 – Bursting
109
15. Drag Entity Code into the Groups folder in the right pane and click OK.
16. Back in Report Pages, drag Page1 into the Detail Pages folder.
17. Run the report. Note that your report begins a new page with the change in Entity Code.
Identify Report Recipients using Directory Entries In this example, we manually add a Burst Recipient through the use of a Case statement. In this example, we use the IBM Cognos “CAMID” as the Burst Recipient and burst reports to folders in IBM Cognos Connection. Burst Recipients can also be contained in the database (and the model) and would commonly be an Email ID field that contains the email address of the appropriate recipient for the group of data.
18. From the Toolbox, drag a new Query Calculation onto the report page, as
the first column of the report, select Other expression, and name it “Burst Recipient.”

Chapter 8 – Bursting
110
19. Define the expression of this new calculation as follows:
20. Select the Burst Recipient column and column title, then change the Box Type property to None.
21. From the File menu, choose Burst Options. 22. In the Burst Options dialog box, first check Make report available for
bursting.
The Burst Groups properties indicate to Report Studio how the report should be broken apart (on which query, which data item in the query, and how the break point should be labeled if desired).
23. Select Query1 as the Query and Entity Code as the Label.
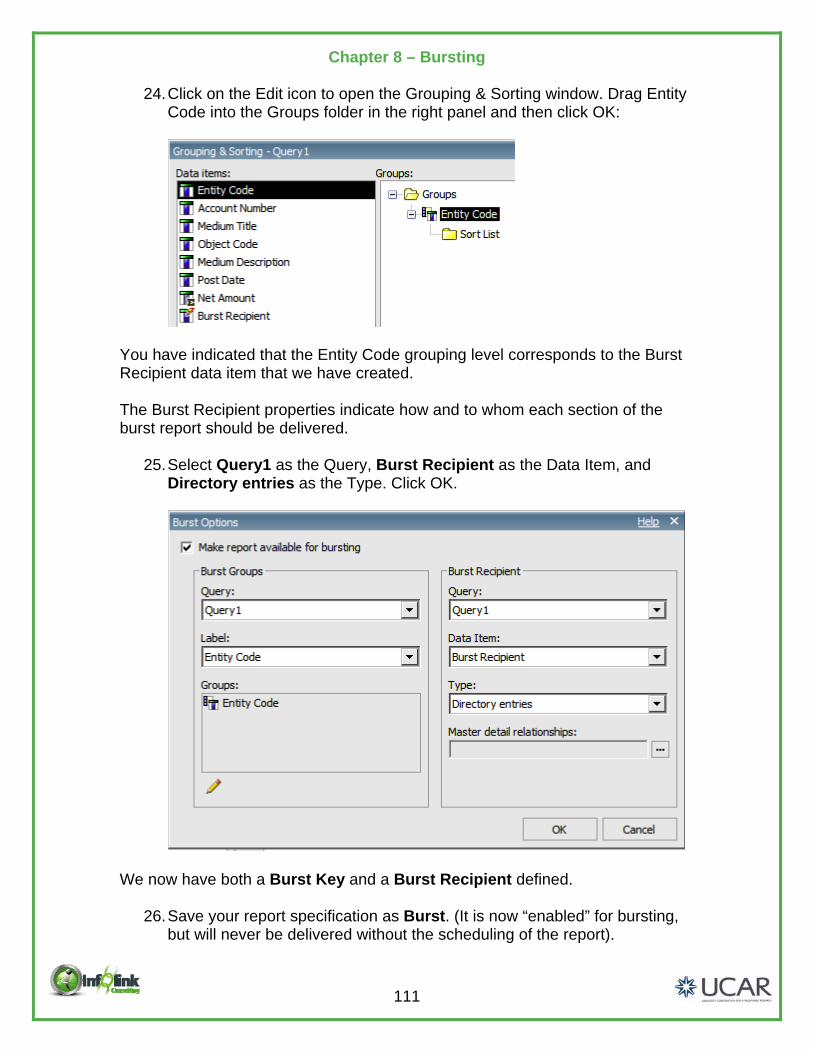
Chapter 8 – Bursting
111
24. Click on the Edit icon to open the Grouping & Sorting window. Drag Entity Code into the Groups folder in the right panel and then click OK:
You have indicated that the Entity Code grouping level corresponds to the Burst Recipient data item that we have created. The Burst Recipient properties indicate how and to whom each section of the burst report should be delivered.
25. Select Query1 as the Query, Burst Recipient as the Data Item, and Directory entries as the Type. Click OK.
We now have both a Burst Key and a Burst Recipient defined.
26. Save your report specification as Burst. (It is now “enabled” for bursting, but will never be delivered without the scheduling of the report).

Chapter 8 – Bursting
112
Distributing Reports Using IBM Cognos Connection
27. To burst the report, return to IBM Cognos Connection to the report folder where your report is saved.
28. Select the Run with options icon for your report in IBM Cognos Connection; select advanced options.
29. Check the Run in the background option, the HTML option, the PDF
option, and choose to Save the report. 30. Check the Burst the Report option (you may have to scroll down).

Chapter 8 – Bursting
113
31. Click Run and click OK.
32. Refresh IBM Cognos Connection. 33. You will now see a new icon in the Actions menu to “View the output
versions for the report”.
34. Click on it to see that the report has been burst with HTML and PDF versions for NCAR and UCAR.
As we discussed earlier, you can burst via directory address or email. When sending the report by email, you have the option to include a link to the report or attach the report. In many IBM Cognos 10 implementations, organizations create tables to store the burst recipient (Email or CAMID) and burst key. This database table can feed the report and provide an easy way for organizations to maintain the distribution lists. Some organizations also use either email aliases for grouping email addresses or security groups for CAMIDs (directory address) to reduce the amount of data in these “burst tables”. Burst tables, email aliases and security groups are not required for bursting. However, these are common approaches used to make bursting distribution list maintenance easier.
Sending a report LINK to a burst recipient is a secure mechanism because, in order to view the report contents, the recipient will have to click the link and be validated into the reporting environment before viewing the contents. Sending the report as an attachment would allow the recipient to view (and forward) the report without any security being enforced and therefore does not require a Report Studio license.

Notes
114

Notes
115