report: the lake merritt pergola - muller & caulfield
TRANSCRIPT
Lake Merritt Pergola page 1 of 14
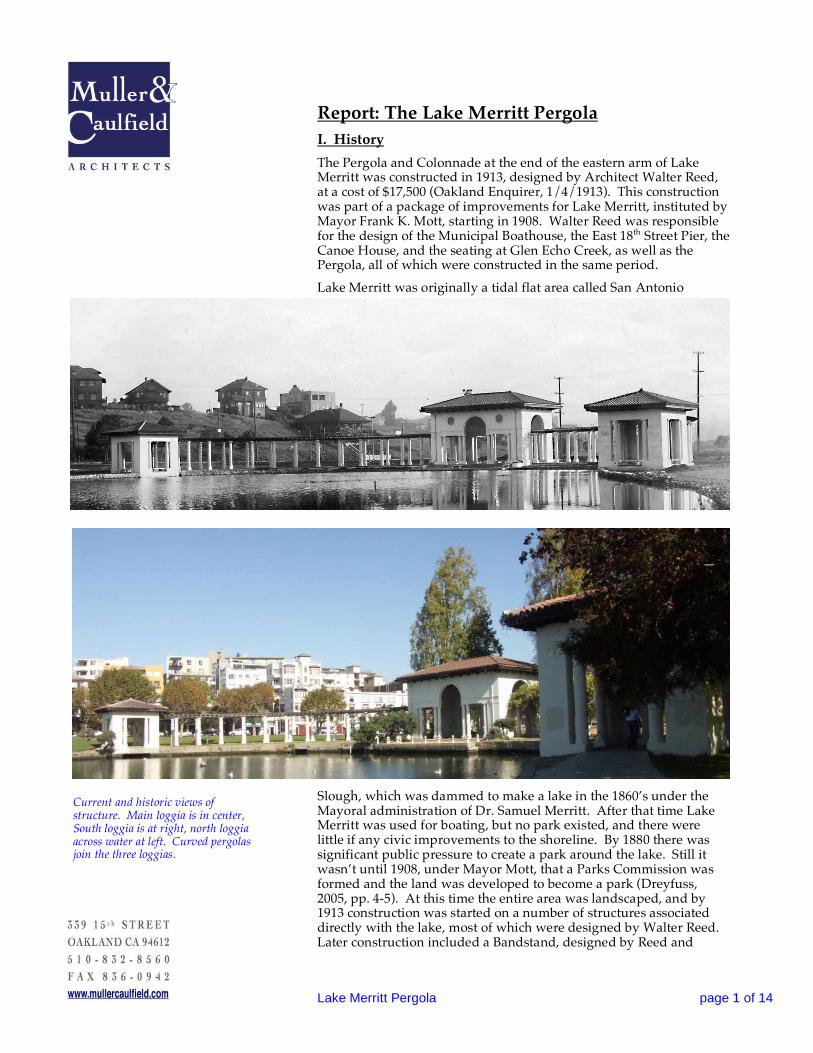
Report: The Lake Merritt Pergola I. History The Pergola and Colonnade at the end of the eastern arm of Lake Merritt was constructed in 1913, designed by Architect Walter Reed, at a cost of $17,500 (Oakland Enquirer, 1/4/1913). This construction was part of a package of improvements for Lake Merritt, instituted by Mayor Frank K. Mott, starting in 1908. Walter Reed was responsible for the design of the Municipal Boathouse, the East 18th Street Pier, the Canoe House, and the seating at Glen Echo Creek, as well as the Pergola, all of which were constructed in the same period. Lake Merritt was originally a tidal flat area called San Antonio
Slough, which was dammed to make a lake in the 1860’s under the Mayoral administration of Dr. Samuel Merritt. After that time Lake Merritt was used for boating, but no park existed, and there were little if any civic improvements to the shoreline. By 1880 there was significant public pressure to create a park around the lake. Still it wasn’t until 1908, under Mayor Mott, that a Parks Commission was formed and the land was developed to become a park (Dreyfuss, 2005, pp. 4-5). At this time the entire area was landscaped, and by 1913 construction was started on a number of structures associated directly with the lake, most of which were designed by Walter Reed. Later construction included a Bandstand, designed by Reed and
Current and historic views of structure. Main loggia is in center, South loggia is at right, north loggia across water at left. Curved pergolas join the three loggias.

Lake Merritt Pergola page 2 of 14
Corlett, Bowling Greens with Clubhouse, and a string of lights ringing the lake, which were built during the 1920’s (Longstreth, 1974, p. 15-16). Soon after its construction, the Pergola structure acquired the name ‘El Embarcadero’ due to a suggestion by Mr. R.T. Stratton, who wrote a letter to the Oakland Park directors in November 1912. Mr. Stratton wrote that his father told him that “sloops and freight boats received and delivered cargoes for the early settlers” at that location (Oakland Tribune, 2/15/1914, available at Oakland Library, History Room), and that the landing was called by the Spanish ‘embarcadero.’ The small cross street where the pergola now stands still bears the name El Embarcadero, in honor of this structure.
Original design sketch by Walter Reed, from drawing in Parks and Recreation department files. North is to the left on the plan.
Lake Merritt Pergola page 3 of 14
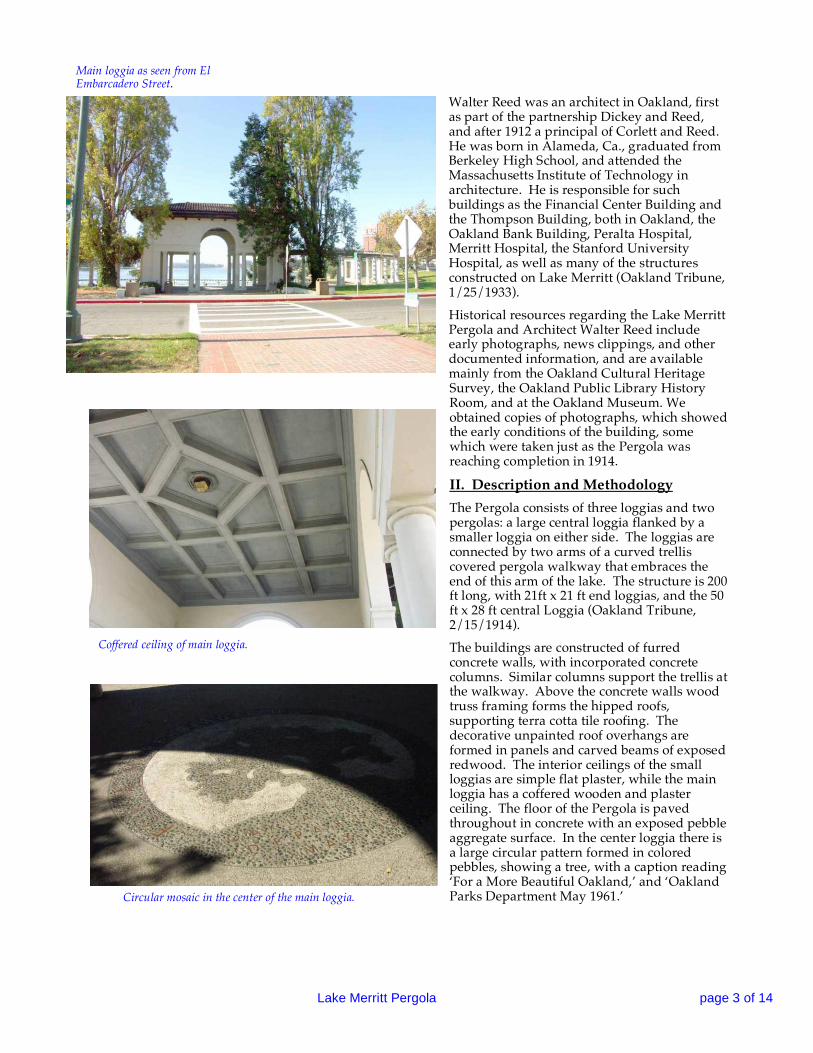
Coffered ceiling of main loggia.
Walter Reed was an architect in Oakland, first as part of the partnership Dickey and Reed, and after 1912 a principal of Corlett and Reed. He was born in Alameda, Ca., graduated from Berkeley High School, and attended the Massachusetts Institute of Technology in architecture. He is responsible for such buildings as the Financial Center Building and the Thompson Building, both in Oakland, the Oakland Bank Building, Peralta Hospital, Merritt Hospital, the Stanford University Hospital, as well as many of the structures constructed on Lake Merritt (Oakland Tribune, 1/25/1933). Historical resources regarding the Lake Merritt Pergola and Architect Walter Reed include early photographs, news clippings, and other documented information, and are available mainly from the Oakland Cultural Heritage Survey, the Oakland Public Library History Room, and at the Oakland Museum. We obtained copies of photographs, which showed the early conditions of the building, some which were taken just as the Pergola was reaching completion in 1914.
II. Description and Methodology The Pergola consists of three loggias and two pergolas: a large central loggia flanked by a smaller loggia on either side. The loggias are connected by two arms of a curved trellis covered pergola walkway that embraces the end of this arm of the lake. The structure is 200 ft long, with 21ft x 21 ft end loggias, and the 50 ft x 28 ft central Loggia (Oakland Tribune, 2/15/1914). The buildings are constructed of furred concrete walls, with incorporated concrete columns. Similar columns support the trellis at the walkway. Above the concrete walls wood truss framing forms the hipped roofs, supporting terra cotta tile roofing. The decorative unpainted roof overhangs are formed in panels and carved beams of exposed redwood. The interior ceilings of the small loggias are simple flat plaster, while the main loggia has a coffered wooden and plaster ceiling. The floor of the Pergola is paved throughout in concrete with an exposed pebble aggregate surface. In the center loggia there is a large circular pattern formed in colored pebbles, showing a tree, with a caption reading ‘For a More Beautiful Oakland,’ and ‘Oakland Parks Department May 1961.’
Main loggia as seen from El Embarcadero Street.
Circular mosaic in the center of the main loggia.
Lake Merritt Pergola page 4 of 14
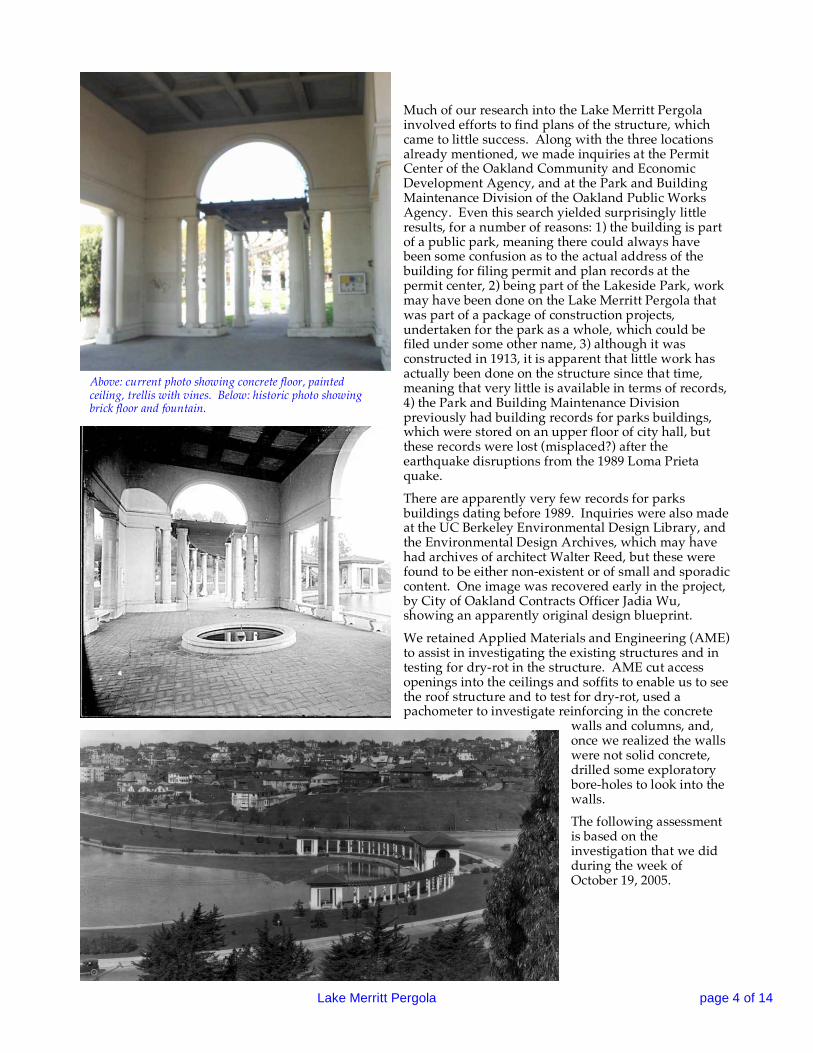
Above: current photo showing concrete floor, painted ceiling, trellis with vines. Below: historic photo showing brick floor and fountain.
Much of our research into the Lake Merritt Pergola involved efforts to find plans of the structure, which came to little success. Along with the three locations already mentioned, we made inquiries at the Permit Center of the Oakland Community and Economic Development Agency, and at the Park and Building Maintenance Division of the Oakland Public Works Agency. Even this search yielded surprisingly little results, for a number of reasons: 1) the building is part of a public park, meaning there could always have been some confusion as to the actual address of the building for filing permit and plan records at the permit center, 2) being part of the Lakeside Park, work may have been done on the Lake Merritt Pergola that was part of a package of construction projects, undertaken for the park as a whole, which could be filed under some other name, 3) although it was constructed in 1913, it is apparent that little work has actually been done on the structure since that time, meaning that very little is available in terms of records, 4) the Park and Building Maintenance Division previously had building records for parks buildings, which were stored on an upper floor of city hall, but these records were lost (misplaced?) after the earthquake disruptions from the 1989 Loma Prieta quake. There are apparently very few records for parks buildings dating before 1989. Inquiries were also made at the UC Berkeley Environmental Design Library, and the Environmental Design Archives, which may have had archives of architect Walter Reed, but these were found to be either non-existent or of small and sporadic content. One image was recovered early in the project, by City of Oakland Contracts Officer Jadia Wu, showing an apparently original design blueprint. We retained Applied Materials and Engineering (AME) to assist in investigating the existing structures and in testing for dry-rot in the structure. AME cut access openings into the ceilings and soffits to enable us to see the roof structure and to test for dry-rot, used a pachometer to investigate reinforcing in the concrete
walls and columns, and, once we realized the walls were not solid concrete, drilled some exploratory bore-holes to look into the walls. The following assessment is based on the investigation that we did during the week of October 19, 2005.

Lake Merritt Pergola page 5 of 14
Main loggia with missing hip tiles. South loggia showing missing roof tiles and potential damage from vines.
III. Condition a. The roof It is obvious from the ground that numerous roof tiles are missing or broken and that one of the downspouts has come lose. The City retained us to determine what other damage has been caused by the poor condition of the roof and to make recommendations for repair of the damage. We retained Applied Materials Engineering to provide access to the structure by opening up some holes in the ceilings and soffits and to test for dry rot in the wood. We expected to find a lot of damage in the concealed attic spaces of the three loggias. However, to our surprise the interior of the attics revealed little to no wood rot or damage, and not even staining from water intrusion. The boards in the attics appear to be original, from 1913, with small knots and tight, old-growth grain. Some of the straight sheathing boards were
Small loggia on North side, showing missing roof tiles and stream outlet below floor.
Attic of main loggia at left; small loggia attic above.
Lake Merritt Pergola page 6 of 14
previously used as concrete form boards, as was common at the time of construction. The main loggia structure has four small brass soffit vents installed in the unpainted wood overhangs. These vents look like standard interior furnace vents, with a relatively small free area. The attics of the two small loggias have no discernable ventilation. No light is visible from the attic, and there are no soffit vents in the plaster ceilings or in the wood overhangs. Once again, it is remarkable that there are no obvious problems with the structures due to insufficient or no ventilation. It may be that the entire structure can “breathe” through the unpainted wood overhangs and through the roof
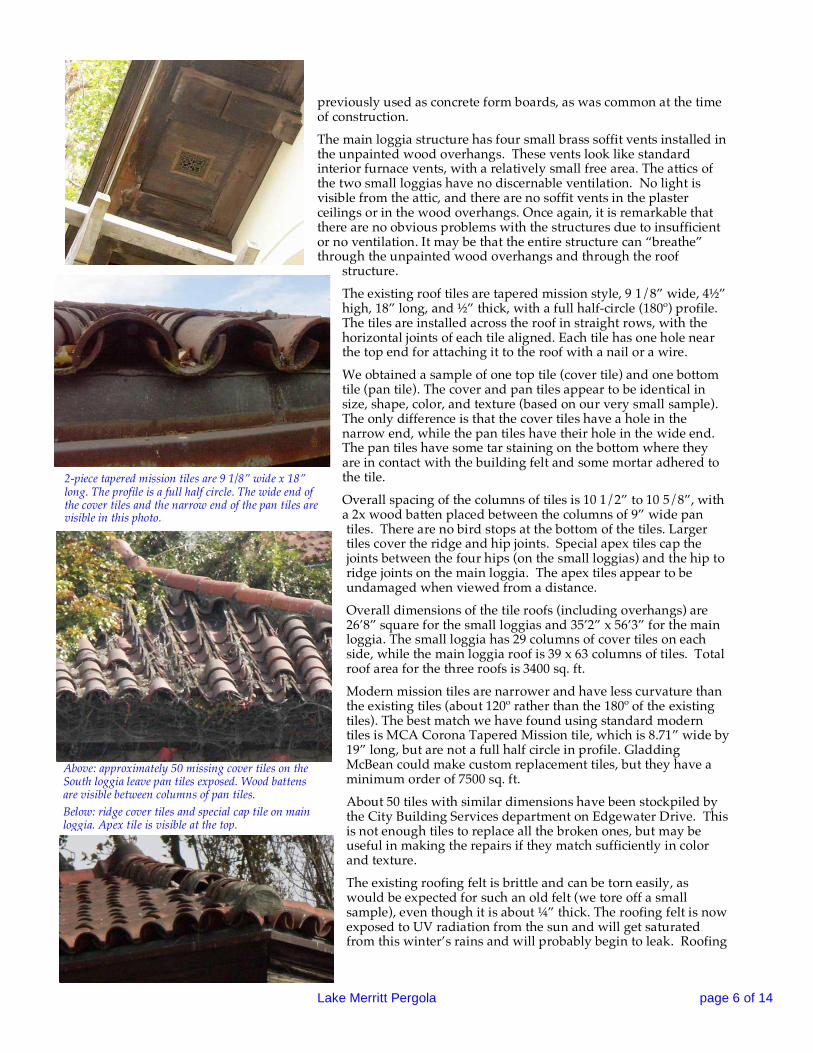
structure. The existing roof tiles are tapered mission style, 9 1/8” wide, 4½” high, 18” long, and ½” thick, with a full half-circle (180º) profile. The tiles are installed across the roof in straight rows, with the horizontal joints of each tile aligned. Each tile has one hole near the top end for attaching it to the roof with a nail or a wire. We obtained a sample of one top tile (cover tile) and one bottom tile (pan tile). The cover and pan tiles appear to be identical in size, shape, color, and texture (based on our very small sample). The only difference is that the cover tiles have a hole in the narrow end, while the pan tiles have their hole in the wide end. The pan tiles have some tar staining on the bottom where they are in contact with the building felt and some mortar adhered to the tile. Overall spacing of the columns of tiles is 10 1/2” to 10 5/8”, with a 2x wood batten placed between the columns of 9” wide pan tiles. There are no bird stops at the bottom of the tiles. Larger tiles cover the ridge and hip joints. Special apex tiles cap the joints between the four hips (on the small loggias) and the hip to ridge joints on the main loggia. The apex tiles appear to be undamaged when viewed from a distance. Overall dimensions of the tile roofs (including overhangs) are 26’8” square for the small loggias and 35’2” x 56’3” for the main loggia. The small loggia has 29 columns of cover tiles on each side, while the main loggia roof is 39 x 63 columns of tiles. Total roof area for the three roofs is 3400 sq. ft. Modern mission tiles are narrower and have less curvature than the existing tiles (about 120º rather than the 180º of the existing tiles). The best match we have found using standard modern tiles is MCA Corona Tapered Mission tile, which is 8.71” wide by 19” long, but are not a full half circle in profile. Gladding McBean could make custom replacement tiles, but they have a minimum order of 7500 sq. ft. About 50 tiles with similar dimensions have been stockpiled by the City Building Services department on Edgewater Drive. This is not enough tiles to replace all the broken ones, but may be useful in making the repairs if they match sufficiently in color and texture. The existing roofing felt is brittle and can be torn easily, as would be expected for such an old felt (we tore off a small sample), even though it is about ¼” thick. The roofing felt is now exposed to UV radiation from the sun and will get saturated from this winter’s rains and will probably begin to leak. Roofing
2-piece tapered mission tiles are 9 1/8” wide x 18” long. The profile is a full half circle. The wide end of the cover tiles and the narrow end of the pan tiles are visible in this photo.
Above: approximately 50 missing cover tiles on the South loggia leave pan tiles exposed. Wood battens are visible between columns of pan tiles. Below: ridge cover tiles and special cap tile on main loggia. Apex tile is visible at the top.

Lake Merritt Pergola page 7 of 14
Unpainted redwood soffit in excellent condition on the North loggia.
felts are known to deteriorate rapidly when exposed to sun and large amounts of water. The felt was not tested, but is likely to contain asbestos. The small loggias have no gutters or downspouts. The main loggia has flat sheet metal gutters, which show a significant amount of rust and should be replaced The gutters are concealed above a redwood gutter and lead to four downspouts. One downspout is disconnected from the gutter on the central building.
b. Ceilings and Soffits The plaster is a smooth, 2-coat cement (?) plaster system applied directly to the roughened concrete or applied over expanded metal lath. The lath is lightly rusted, but in basically good condition and the plaster itself is in excellent condition with few visible cracks. The plaster and wood ceilings are currently painted with a multi-color grey and white speckled paint (Zolatone). This finish was invented in the 1940’s. It is our guess that the paint was applied in 1961, when the work on the floors was done. The historic photographs show the original coffered ceiling in the main loggia with contrasting light and dark colors. We assume that the wood was originally unpainted (currently grain wear can be observed under the paint of the coffers), while the plaster panels between were originally either integrally colored or painted in a light color. The unpainted redwood soffits are in good to excellent condition in most areas, although the corner of the main loggia with the missing downspout shows some water damage. The fact that the wood was unpainted may have helped the whole attic to dry after any moisture was introduced.
c. Walls and Columns The concrete walls and columns are in good condition, with very few visible cracks or damage in the plaster surface. The plaster is currently painted white except for the zolatone paint on the plaster ceilings. The historic photographs show that the columns were originally painted with a faux marble finish.
Zolatone ceiling paint detail
Enlargement of historic photograph, showing faux marble paint on columns and base of wall.
Stained soffit and missing downspout
at SE corner of main loggia.

Lake Merritt Pergola page 8 of 14
Our investigation revealed that large parts of the loggia walls are furred on the interior side, rather than solid concrete, and are finished with plaster and metal lath. The large loggia has a system of solid concrete beams around the openings, and beams at the top of the wall, and at the 12’6” level, but the rest of the wall is furred. The concrete wall at the furred sections is only six inches thick, compared to the fourteen to eighteen inches at the solid sections. The walls of the small loggias have only small furred sections, at the top of each wall.
d. Trellises Large vines are evident along the south trellis walkway, and extensive growth now encroaches on the roof and building of the southern loggia. The northern trellis was apparently completely rebuilt in 2004, by the City Maintenance Department. Vines were removed (if there were any) and new bolted connections were added to tie the main members together.
e. Floors and site furniture The historical photographs show that the original paving of the Pergola was done in brick, and a layer of brick can still be seen under the current concrete paving, at both of the small loggias. The early photographs also show a number of pieces of site equipment that are no longer in evidence: a small fountain in the main central loggia, drinking fountains in center of the small loggias, and a number of concrete or stone benches. Similar benches also appeared in photographs of the Boat Landing at Eighteenth Street on Lake Merritt, which was constructed around the same time as the Pergola, and was also designed by Walter Reed. It is speculated that the benches were
first placed at the Pergola, and then moved to the Boat Landing.
f. Medallions There are round medallions on two sides of the main loggia, which are currently painted the same white as the walls of the building. Historic photos show a darker color in these circles. There is no evidence in the photos we have found that there was ever a decorative motif inside these circles. However, the two circles that face El Embarcadero currently are covered with metal panels that are painted white. The panels are held in place with four protruding nails. We did not remove a panel to see what is behind it. Further investigation is needed. All of the existing framing, sheathing, tile and plaster appear to be original, as built in 1913. We did not see any evidence that any of the structure has been reconstructed or re-roofed except for the work on the floor and the trellis over the North pergola.
Historic photos show brick floor and concrete benches.
Round medallions on main loggia are currently painted white.
Section through main loggia SOLID CONCRETE BEAM FURRED AREA
Lake Merritt Pergola page 9 of 14
f. Structural Condition In general, the five structures that make up the Lake Merritt Pergola complex are in good structural condition, with no major visible cracking or other deterioration. However, like other structures of its age, there are deficiencies in how the structures may be able to resist a seismic event. The structural report by R. P. Gallagher appended to this report summarizes the structural condition of the five structures as we currently understand them. The report, which is focused primarily on seismic vulnerability, lists a number of “serious” deficiencies having to do with the roof diaphragm and the anchoring between the roof and the walls. The following paragraphs summarize the structural findings. (1) Main Loggia: The wood roof diaphragm and the
connection of the roof to the concrete walls are seriously deficient. The roof has straight sheathing that is very flexible because of the weight of the heavy Spanish roof tile. It is very weakly connected to the walls in shear and also lacks adequate anchorage to the walls in tension. The concrete walls were found to have sufficient strength in shear, but are very lightly reinforced and therefore damageable. It is not expected, however, that these will collapse in the design earthquake, although they could experience cracking. (2) Small loggias: In both loggias, the connection of the roof structure to the concrete walls is a serious deficiency. The roof potentially may slide off the walls during the design earthquake. The concrete walls have sufficient strength in shear, but they have very light reinforcement and could be extensively damaged in the design earthquake. However, it seems unlikely that these will collapse. (3) Pergolas: The concrete columns of the pergolas may be under-reinforced for bending. However, we did not get a definitive measurement of the reinforcing in the columns. On the south pergola, the connection of the trellis to the tops of the concrete columns is deficient. Parts of the trellis could fall off the pergola columns in the design earthquake. Neither pergola allows for sufficient differential movement between the pergola and the adjacent small loggia. On the north pergola, the longitudinal beams of the trellis are embedded into the concrete walls; these beams may separate and fall. At the south pergola, the longitudinal wood beams rest loosely on the concrete walls of the south loggia. At both locations, there is no adequate provision for relative movement between the structures.
g. Electrical Condition Electric Service: Underground electric service is provided to the central loggia at the northeast corner of the structure. Service consists of a 100amp 120/240volt single phase meter and main disconnect, and panel. Equipment is in good repair. The new service replaced the original service equipment and panel that was recessed into the interior wall of the loggia. Adjacent to the meter is an enclosure that contains the lake pump control, which is working properly. The existing time switch that controls the lights is not working and needs replacement. Anecdotally, information was mentioned that suggested that the underground service was damaged when the sewer work was being
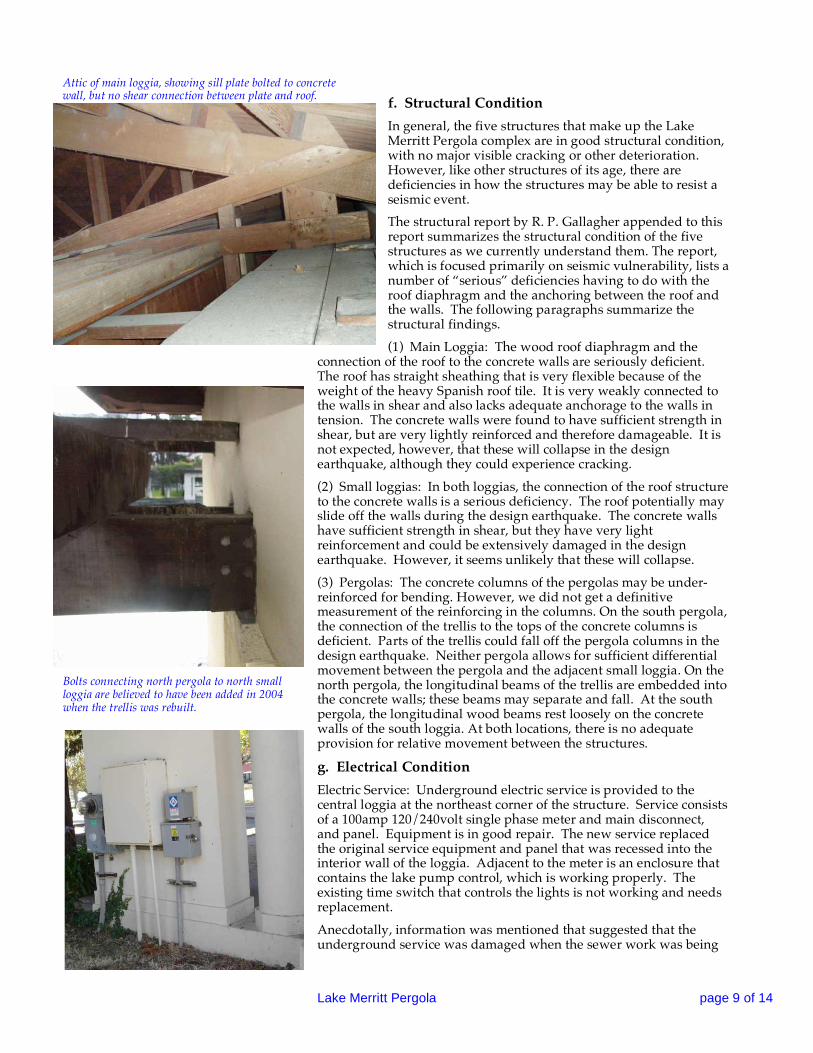
Attic of main loggia, showing sill plate bolted to concrete wall, but no shear connection between plate and roof.
Bolts connecting north pergola to north small loggia are believed to have been added in 2004 when the trellis was rebuilt.

Lake Merritt Pergola page 10 of 14
Historic light fixture is barely visible in this historic photograph of the interior of the main loggia.
done on El Embarcadero. We have been able to verify with Mr. Jonathan Chang, City of Oakland Facilities Maintenance, that all such damage has been repaired. Lighting: The central loggia and two outer loggias each have a single light fixture at center of their ceilings. The original historic light fixtures have been replaced with vandal resistant types using high pressure sodium lamps. Electrical consultant Ron Zeiger reports seeing two historic fixtures that may be identical to the fixtures shown in the historic photo above the existing ceiling in the boat house. These fixtures could be renovated and moved to the loggia or could be used as a model for new, more historically appropriate fixtures for the loggias. The original pergolas apparently did not have light fixtures. Presently the pergolas have light fixtures attached to the underside of the trellis, mounted to boards and centered between columns. Conduit is run exposed on the sides of the trellis; a junction box is provided from which another conduit runs to the light fixture. The
existing light fixtures are similar to those in the loggias.
IV. Recommendations a. Structural Recommendations
The existing roof has lasted over 90 years before needing to be re-done. The re-installed roof is likely to last for many additional years. Thus, the re-roofing that we will do now gives a once-in-many-lifetimes opportunity to also upgrade the aspect of the structure that is most likely to fail in an earthquake: the connection between the walls and the roof. We recommend improvements in the connection between the roof and the walls of the structures. This could be done with wooden stud framing and plywood sheathing, or an alternate form of bracing. The bracing is best installed while the roofing is off, so that access to the connections can be made through the roof.
The following is a description of the upgrade that was assumed for the purposes of the cost estimate.
(1) Remove a 2’ wide slot of sheathing directly above the walls around the entire perimeter of each loggia to facilitate access.
(2) On the small loggias, install sill bolts and blocking. (3) On the main loggia, install a cripple wall with plywood
sheathing and metal ties around the existing trusses. (4) On all 3 loggias, add anchor bolts at 4’ oc. To the existing sill
plate on top of the walls. (5) Add plywood sheathing on top of the existing sheathing for
all 3 loggias: assume 1/2” ply with 6” oc edge nailing. (6) There will be no work on the pergola columns or trellises.
b. Electrical Recommendations All of the existing light fixtures (26 for the pergolas, and 3 for the loggias, 29 total), have been in place for the past fifteen to twenty years, and although they are not visibly damaged, they should be
Existing light fixtures in the pergola (top) and small loggia.
Lake Merritt Pergola page 11 of 14
replaced due to basic deterioration and obsolescence. Those in the loggias should be replaced with a more aesthetic fixture to complement the architecture, such as a round style fixture with vandal resistance construction. For the pergolas the fixtures could remain in their present locations, with the exposed conduits and support boards. Alternatively, the existing fixtures and wiring could be removed, and new lights and wiring installed above the trellis making the wiring nearly invisible from below. The new pergola lights could also be a more aesthetic fixture to complement the architecture.
c. Roofs While it is remarkable that the original roof has lasted for 92 years, and that the entire structure, which is continuously exposed to weather, is in such excellent condition, it seems obvious that the damaged roofs will soon begin to leak extensively, probably with this year’s rainy season. A leaking roof could result in considerable damage to the metal lath (which will rust) as well as the plaster on the ceilings and the furred sections of the interior walls. The wood framing and furring would get wet in areas where it has never before been exposed to moisture, with potential damage from dryrot and mold. In light of this possibility we recommend that the three loggia structures be made watertight as soon as possible, before the winter rainy season. If the
plaster becomes damaged, the cost to repair it later will be an order of magnitude higher. The following sections discuss the scope of work to make permanent repairs to the building, followed by a discussion of possible temporary repairs to be made immediately.
d. Permanent repairs The re-roofing process involves, at a minimum, removing the existing tiles, battens, and felts down to the existing sheathing, applying new underlayment (such as 30 pound felt) and new battens above the felt, and then reinstalling the tiles. About 400 new tiles will be required to replace the many tiles that are either broken or missing. Additional new tiles will be needed to replace the tiles that will break in the process of removing and re-installing them.
Since the existing pan tiles appear to be identical to the cover tiles in color, shape and texture, the tiles could be re-installed using the unbroken historic pan tiles as cover tiles and new, replacement tiles as the less-visible pan tiles. If there are enough historic tiles they should also be used as the bottom row of pan tiles, where the edge is visible at the eaves. In addition each tile must be fastened to the roof structure to prevent it sliding off the roof in an earthquake. This is usually done by threading a wire through the hole in the tile and connecting to the roof sheathing. It may be necessary, as well, to devise a method for fixing the bottom row of tiles in place on the structure. Since the old tiles are dirty, and may have a substantially darker
appearance than replacement tiles, the original tiles should be cleaned by a normally accepted method prior to reinstallation. A more detailed description of the process is as follows:
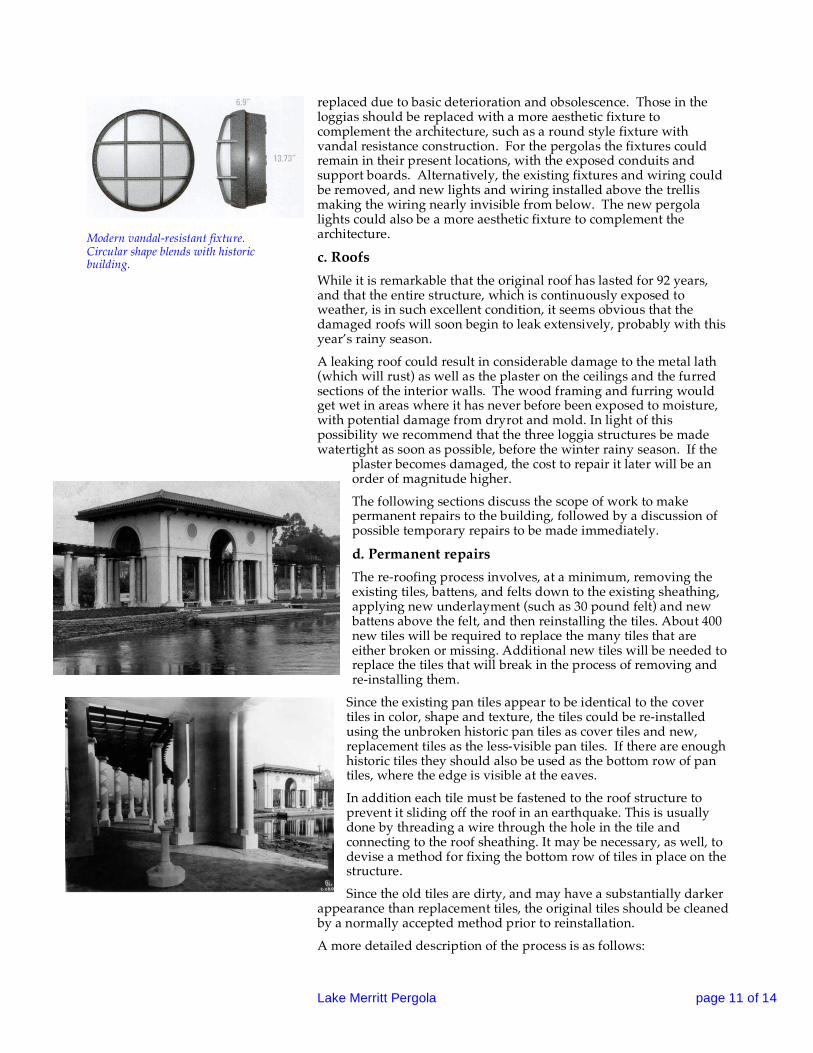
Modern vandal-resistant fixture. Circular shape blends with historic building.

Lake Merritt Pergola page 12 of 14
1. Remove and stockpile the existing tiles, using care not to break them. Verify the quantities of tiles available and the quantities of new tile that will be required.
2. Clean the tiles to make them ready for re-installation. Convert approximately 400 existing pan tiles to cover tiles. This requires scrubbing the exposed surface of the tile to remove (small amounts) of tar and mortar, filling in the existing hole at the bottom of the tile with sealant and drilling a new hole at the top of the tile.
3. Store the tiles in a protected location until they are ready to be reinstalled.
4. Order samples of new replacement pan tiles. Create a mock-up of installation with existing pan tiles converted to cover tiles and new pan tiles to verify fit and compatibility.
5. Remove all battens and the metal gutters. 6. Remove the existing felt to expose the existing wood
sheathing. Note that the felt may contain asbestos. 7. Remove about 2’ of sheathing along each perimeter
wall to provide access for the installation of new structural connections between the walls and the roof.
8. Add anchors, ties, and shear transfer wall as described in the structural report.
9. Add ceiling vents (?) 10. Repair any dry rot that is exposed. 11. Replace the light fixtures in the center of each loggia
ceiling (3 in all) with historically compatible fixtures. 12. Install new shear plywood (probably ½” or ¾”,
depending on the structural requirements) on top of the existing sheathing.
13. Install new 30# felt or other membrane underlayment.
14. Add vertical battens and ridge and hip battens to support and space the columns of tile.
15. Install new copper or zinc gutters on the main loggia. 16. Re-install the stockpiled tile, with new tile as needed. 17. Repair the holes made for testing. This includes one
hole in each of the three plaster ceilings, 18. Paint all the concrete and plaster elements, as well as
the currently painted wood ceiling beams.
e. Temporary repairs If it is not possible to re-roof right away, due to logistical problems in locating a sufficient number of matching or compatible tiles and the time needed to verify the work that needs to be done, the roofs should
Historic tile on left. New, less curved tile on right. New tile is also thinner and more uniform in texture.
Historic cover tile on left. Historic pan tile, shown upside-down, on right. Both tiles are identical in shape, but the attachment hole is at the narrow (top) end of the cover tile and the wide (bottom) end of the pan tile. Note tar and mortar stains on the pan tile. These two tiles differ somewhat in texture and color, but further evaluation is needed to determine if this variation is typical of all the tiles.

Lake Merritt Pergola page 13 of 14
be protected until next spring. This could be accomplished in three different ways:
(1) Install tarps over the existing roofs. Note that tarps could be unsightly will require frequent checking for integrity. Tarps could need to be replaced with new tarps before next spring.
(2) Remove and carefully stockpile the tiles. Remove wood nailers and felt to expose clean sheathing, then install an inexpensive temporary waterproofing membrane (such as
WR Grace Ice and Water Shield) directly onto the sheathing. The temporary membrane should be protected with plywood sheathing, which could be painted for better appearance over the winter. If a marine grade plywood is used and nailed to the roof with temporary nails, the plywood could be reused as part of the permanent roof repair.
(3) On the main loggia and the north loggia only, use the City’s current stockpile of tiles to temporarily repair the missing and broken cover tiles so that the roofs will keep the water out this winter. The south loggia would still have to be protected using method 1 or 2.
A reasonable combination of temporary protection would be to temporarily replace missing tile on the main loggia and repair the downspout, temporarily repair the tile on the north small loggia, and remove all the vines and tile
from the south loggia in order to repair with a temporary membrane. The permanent repairs could then be made in the summer of 2006. Note that clay tiles are notoriously fragile, and will break if walked on. An experienced roofer needs to make any temporary repairs in order to avoid causing additional damage to the tiles.
V. Budget The enclosed cost estimate by Don Todd Associates sets a probable construction cost for repairs as described, not including the temporary protection, of $297,530. This total includes a 25% design and estimating contingency for elements that will be needed but are not yet documented and so cannot be estimated. The total also includes about $40,000 (with mark-ups) for the seismic upgrade of the roofs, $32,000 for electrical work, and an allowance of about $28,000 for the removal of asbestos. The budget total includes approximately $64,000 to protect, clean, convert, and re-use the existing historic roof tiles. As part of the process of producing construction documents it may be appropriate to investigate the cost of having new matching tiles made instead. VI. The Team Investigation was conducted by Rosemary Muller of Muller & Caulfield Architects, assisted by Shizue Seo and Charles Bucher and by the following team:
(1) Applied Materials and Engineering, testing and investigation (2) Ron Zeiger of Zeiger Engineers, electrical engineer (3) Ron Gallagher and Jerry Quinn, structural engineers, R. P.
Gallagher Associates
Lake Merritt Pergola page 14 of 14
(4) Emil Vinuya, Don Todd & Associates, cost estimator
VII. Appendices
(A) AME Report: Materials Testing and Investigation (B) R. P. Gallagher report: ASCE31 Tier 1 Seismic Evaluation of
Lake Merritt Loggia and Pergola (C) Don Todd & Associates: cost estimate