reportadapter for smartplant® 3d - caxperts.com edit and... · all warranties given by axperts...
TRANSCRIPT

Contact & information:
CAXperts GmbH
Carl-Zeiss-Ring 4
85737 Ismaning – Germany
P.: +49 89 96 97 72 0
F.: +49 89 96 97 72 11
ENG
INEE
RED
EFF
ICIE
NC
Y
ReportAdapter for Smart® 3D Manual

CAXperts ReportAdapter for SmartPlant® 3D – Manual
2
Copyright
Copyright © 2002 CAXperts GmbH. All Rights Reserved.
Including software, file formats, and audiovisual displays; may be used pursuant to applicable software licence agree-
ment; contains confidential and proprietary information of CAXperts and/or third parties which is protected by copy-
right law, trade secret law, and international treaty, and may not be provided or otherwise made available without
proper authorization.
Restricted Rights Legend
Rights reserved under the copyright laws of the Federal Republic of Germany.
Warranties and Liabilities
All warranties given by CAXperts about equipment or software are set forth in your purchase contract, and nothing
stated in, or implied by, this document or its contents shall be considered or deemed a modification or amendment
of such warranties. CAXperts believes the information in this publication is accurate as of its publication date.
The information and the software discussed in this document are subject to change without notice and are subject to
applicable technical product descriptions. CAXperts is not responsible for any error that may appear in this document.
The software discussed in this document is furnished under a licence and may be used or copied only in accordance
with the terms of this licence. THE USER OF THE SOFTWARE IS EXPECTED TO MAKE THE FINAL EVALUATION AS TO THE
USEFULNESS OF THE SOFTWARE IN HIS OWN ENVIRONMENT.
Trademarks
CAXperts is a registered trademark of CAXperts GmbH. Intergraph, the Intergraph logo, SmartSketch, FrameWorks,
Smart, INtools, MARIAN, PDS, IGDS, RIS and IntelliShip are registered trademarks of Intergraph Corporation. IGDS file
formats ©1987-1994 Intergraph Corporation. Microsoft and Windows are registered trademarks of Microsoft Corpo-
ration. Bentley, the Bentley logo “B,” and MicroStation are registered trademarks of Bentley Systems, Inc. ISOGEN is a
registered trademark of Alias Limited. Other brands and product names are trademarks of their respective owners.
Introduction
3
Contents
1.1 General conventions .................................................................................................. 4 Typefaces ................................................................................................................... 4 Symbols ..................................................................................................................... 4 Uninstall ..................................................................................................................... 5 Setup command line (for administrators) ................................................................. 5
2.1 Licence ....................................................................................................................... 5 Site licence (local) ...................................................................................................... 5 Floating (server) licence ............................................................................................ 6
3.1 Setting up ReportAdapter for Smart® 3D .................................................................. 8 Select plant ................................................................................................................ 8 Select filter ................................................................................................................. 8 Select output ............................................................................................................. 9
3.2 Configure attributes ................................................................................................... 9 Add new table.......................................................................................................... 10 Attribute set ............................................................................................................. 10 Add new attribute set .............................................................................................. 10 Add new attribute.................................................................................................... 10 Edit attribute set properties .................................................................................... 11 Extended attribute settings ..................................................................................... 11 Find .......................................................................................................................... 13
3.3 Extraction Geometry ............................................................................................... 13 Prerequisites ............................................................................................................ 13
3.4 Extraction ................................................................................................................. 14 3.5 Additional SQL statements ...................................................................................... 14
Create additional SQL statements ........................................................................... 14 Use query builder .................................................................................................... 15 Create new SQL query template .............................................................................. 16
3.6 Settings .................................................................................................................... 16 General .................................................................................................................... 17 Surface style rules .................................................................................................... 18 Drawings .................................................................................................................. 19 Piping Catalog .......................................................................................................... 20 Check objects in filter .............................................................................................. 20 Load settings from file ............................................................................................. 21 Save settings to file .................................................................................................. 21
3.7 Command line mode ............................................................................................... 22

CAXperts ReportAdapter for SmartPlant® 3D – Manual
4
1 Introduction ReportAdapter for Smart® 3D is designed to export a Smart 3D attributes and grafic into a SQL
Lite database, containing one table per task. The resulting records are compressed and internally
resolved by code lists.
1.1 General conventions This document contains many visual cues to help you understand the meaning of certain words
or phrases. The use of different fonts for different types of information allows you to scan the
document for key concepts or commands. Symbols help abbreviate and identify commonly used
words, phrases, or groups of related information
Typefaces
Italic Indicates a system response, which is an explanation
of what the software is doing. For example,
The text is placed in the viewing plane.
Bold Indicates a command name, parameter name, or dia-
log box title. Command paths are shown using an ar-
row between command names. For example,
Choose File → Open to load a new file.
Normal
typewriter
Indicates an actual file or directory name. For exam-
ple,
The ASCII report is stored in the layout.rpt file.
Bold type-writer
Indicates what you literally type in. For example,
Key in original.dat to load the ASCII file.
Symbols
This document uses the following symbols to identify special information:
Note – important supplemental information.
Map or path – shows you how to get to a specific command or form.
More information – indicates there is additional or related information.
2 Installation Requirements:
▪ Supported operating systems:
▪ Microsoft Windows Server 2008, 2012

Installation
5
▪ Microsoft Windows 7, 8
▪ Intergraph Smart 3D 2009 SP5 or later
Administrator rights are required on each computer to install CAXperts ReportAdapter for
Smart® 3D. “Run as” is not supported.
Uninstall
To uninstall the software, select Control panel from the start menu. Then on in large or small
icon view, click Programs and features. If you're using category view, under Programs, click Un-
install a program.
Select the program you want to remove, and click Uninstall/Remove. Alternatively, right-click the
program and select Uninstall.
Setup command line (for administrators)
The following command line options are supported by the installer:
/S:<<optional ini file>>
Allow an install to be run in silent mode. As a result, no screens or dialogs will be shown.
This command line option also has an optional INI file that can be passed containing session
variable values. For example:
"C:\output\setup.exe" "/S:C:\setupvars.ini"
This will cause the session variables in the INI file to be used for the setup. The INI file should be
in the format:
[SetupValues]
%AppFolder%=C:\Program Files\MyProduct
/U:<<XML config file>>
This command line option must be used when calling the uninstall program from the command
line. This command also has an optional XML file that can be passed containing session variable
values. For example:
"C:\Program Files\MyProduct\uninstall.exe" "/U:C:\Program Files\MyProd-
uct\irunin.xml"
2.1 Licence CAXperts software supports two types of licences:
Site licence (local)
Domain based licences are restricted to machines within a 5 miles (8 kilometres) radius at a spe-
cific geographic location (building) for which the licence key file was issued for. There is no limi-
tation regarding the number of users or machines.
CAXperts will need your Current domain name to issue a licence file (.lic).

CAXperts ReportAdapter for SmartPlant® 3D – Manual
6
The licence file has to be stored on a local or network location accessible by the machine running
the CAXperts product; a licence server is not required.
The location of the licence file should be defined on every machine with the CAXperts product installed, which can be done
Either by setting the environment variable CAXPERTS_LICENSE_FILE=C:\Program Files (x86)\CAXperts\Licensing\
Or by setting the registry key HKEY_CURRENT_USER\Software\FLEXlm License Manager\CAXPERTS_LICENSE_FILE=C:\Program Files (x86)\CAXperts\Licensing\
Multiple licence key file locations should be separated by semicolons (“;”).
Note: If the licence key file location is not defined, “C:\Program Files (x86)\CAXperts\Li-censing\” is used
Note: The licence key file may be renamed (including the extension). The CAXperts prod-uct will check the content of all files in the licence folder(s) for valid keys.
Note: Changes to the key path (in the environment variable or registry key) are read dur-ing the next start of the CAXperts product.
Floating (server) licence
Floating licences require a FlexNET server (lmadmin or lmgrd) accessible by the machine running
the CAXperts product. The licence key file is typically located on the FlexNET server machine. The
licence key file defines the maximum number of seats which can be used at the same time.
Note: Every running instance of the CAXperts software product will require one seat, no matter if the application is running multiple times on the same or different machine(s).
New instances can only be started as long as seats are available and the FlexNET server is acces-sible.
The location of the licence server must be defined on every machine with the CAXperts product installed, which can be done
Either by setting the environment variable CAXPERTS_LICENSE_FILE=@YourServerName
Or by setting the registry key HKEY_CURRENT_USER\Software\FLEXlm License Manager\CAXPERTS_LI-CENSE_FILE=@YourServerName
Every computer name must be preceded by the @ symbol. Multiple licence server locations
should be separated by semicolons (“;”).
YourServerName is the Windows computer name of the machine running lmadmin (FlexNET
server). If lmadmin is running on a non-default port, the port number should be defined like this:
port@ YourServerName.
Note: Changes to the server path (in the environment variable or registry key) are read during the next start of the CAXperts product.

Installation
7
Borrowed licences
Licence seats can be borrowed for a period of time from the server and saved to the local ma-
chine. Once the seat has been borrowed the CAXperts application can be used without any con-
nection to the FlexNET server.
To borrow a licence seat press the Borrow seat button, define the loan period (up to 7 days) and
press OK. When the borrowed seat expires it gets automatically returned back to the FlexNET
server.
The seat can be returned earlier by pressing the Return borrowed seat button.
Note: Without a valid licence file the software will run in demo mode.

CAXperts ReportAdapter for SmartPlant® 3D – Manual
8
3 ReportAdapter for Smart® 3D The ReportAdapter for Smart® 3D is used to extract attributes and graphics from Smart 3D. The
extraction of all data can be done without any knowledge of SP3D specific Report Creation. The
philosophy is to use the
Smart 3D Workspace Filters for creation of discipline specific reports.
Note: ReportAdapter for Smart® 3D requires Smart 3D and a Smart 3D (S3D) licence seat on a Smart Licence Server.
3.1 Setting up ReportAdapter for Smart® 3D
Select plant
Start ReportAdapter for Smart® 3D and select your Model Plant from the Plant Combo Box:
Note: Only plants of the current site are displayed.
Select filter
To select a filter, click on the Filter Combo Box and select More filters….
A window will open where all filters are listed, please select filter and click OK.

ReportAdapter for Smart® 3D
9
Select output
Browse with the Browse… button to select a location to create a Microsoft Access (.*mdb) or
SQLite Database (*.db) in which the results will be shown.
All the settings are stored automatically in the configuration file which is found under Tools →
Settings.
3.2 Configure attributes ReportAdapter for Smart® 3D contains a predefined set of attributes which are reported by de-
fault. Additionally customer can define and configure own attributes. No database specific or
programming knowledge is required for customization of reportable Smart Plant 3D attributes.
A table is a combination of attribute sets, columns with identical names will be vertically aligned.

CAXperts ReportAdapter for SmartPlant® 3D – Manual
10
Add new table
To add a new table, right click in right panel and click New table
Attribute set
Each table consists of one or more attribute sets. Each attribute set holds the data for a specific
top node. The result of one or more attribute sets is grouped together in the table they belong
to in the output database.
Add new attribute set
To add a new table, right click on a table and click New attribute set
Add new attribute
From here user can ac-
cess all attributes from
Smart 3D
Right side contains the al-
ready predefined attributes
per discipline

ReportAdapter for Smart® 3D
11
Drag and drop an attribute to the table on the right side. The attribute will then appear under
the Attribute set.
Edit attribute set properties
To set the properties of a table, right click on the attribute set and select Properties.
The type selected here defines the main item used for reporting, e.g. pipe component → run:
pipe component selected → only runs that belong to the component are listed; run selected →
also empty runs get listed.
Press OK to finish the configuration.
Note: The changes will be applied on the next extraction
Note: Smart 3D labels can be used similar to the direct object attributes.
Extended attribute settings
Click with the right mouse button on a code listed attribute to open extended attribute configu-
ration form:

CAXperts ReportAdapter for SmartPlant® 3D – Manual
12
Code listed attributes can be extracted as:
▪ Numeric values
▪ Values decoded by short description
▪ Values decoded by long description (default)
For Values with Units, the Units can be chosen:
Note: The changes will be applied on the next extraction.

ReportAdapter for Smart® 3D
13
Note: By default all attributes have common units configuration as defined in Menu->Unit settings. Here you can select custom unit for a specific attribute.
Find
Select Find… from the Edit menu to search for the available attributes:
Enter the search text in Find what and define the task name in Look in to search for the attribute
in the given task:
3.3 Extraction Geometry ReportAdapter for Smart® 3D allows extraction of geometry from Smart 3D, which is used by
CAXperts Universal Plant Viewer and CAXperts S3D2PDS software.
Tick on Extract Geometry option and select existing 3D DGN drawing.
Prerequisites
1. Bentley MicroStation J (V7) has to be installed on the Workstation.
2. Empty 3D DGN-drawing has to be created through the Smart 3D Drawing Console, e.g.
like this:

CAXperts ReportAdapter for SmartPlant® 3D – Manual
14
This 3D DGN Drawing is by ReportAdapter for Smart® 3D for the geometry extraction.
The user needs the permission to update this drawing.
3. Permission to create new filter in the folder (“Plant filters\3D ReportAdapter” by default).
4. Write permissions on Shared Content (Drawings\Catalog\Rules) to able create new
View/Style rules.
Technical Hint regarding MicroStation limitation: The extraction of geometry using ReportAdapter for Smart® 3D is based on Intergraph Smart 3D export to 3D DGN file and has the same limitations: only graphical model data in a range of -26843 m to 26843 m in XYZ direction (for M/MM dgn-seed-file) and from -88069 ' to 88069 ' in XYZ direction (for '/" dgn-seed.file) are exported into MicroStation-files. Model data out of this range are not exported.
3.4 Extraction To start extraction of attributes and geometry if enabled click on Extract.
3.5 Additional SQL statements
Create additional SQL statements
SQL statements to extend standard output tables with user defined attributes or to perform
some other tasks (like creating additional tables, queries) can be defined using Tools → Addi-
tional SQL statements. They will be executed automatically after the extraction process has been
completed.
The additional SQL statements can be typed in the Additional SQL statements to be processed
after extraction field. They have to look like the following examples
SQL1=ALTER TABLE Equipment ADD COLUMN [MyAttribute] VARCHAR(255)
SQL2=UPDATE [Equipment] SET [MyAttribute] = 'Test'

ReportAdapter for Smart® 3D
15
Tables that can be used in the queries are those that will be created during extraction. Additional
tables (if needed) have to be copied before extraction to the Template.mdb database which can
be found in the application folder.
Use query builder
The included query builder can assist to create the SQL statements. Create a new statement with
the Add button and add one of the Available SQL query templates to it. Add query or double-
click on a list item will add the query at the cursor position or replace the selected text.
The Available SQL query templates look like:
UPDATE [%TABLE1%] SET [%TABLE1%].[%COLUMN1%]=
When the template is used, the %TABLE1% and %COLUMN1% fields will be filled with the table
name and column name selected in the %TABLE1% and %COLUMN1% fields.
Note: The %TABLE1% and %COLUMN1% fields are filled from the Access database defined for extraction output, which also includes the tables from Template.mdb. This means, the fields are only filled after the extraction was performed once.

CAXperts ReportAdapter for SmartPlant® 3D – Manual
16
With the Show hidden tables field checked, all tables of the database can be selected to build
the query. If it is not checked, only tables that will be displayed in UniversalReporter are available
and tables created for internal use are hidden.
Create new SQL query template
User defined SQL query templates can be created. To add a new template, click the Add button
and enter the template name.
Fill in the text of SQL statement and the Placeholders for Tables and columns to be used by
query textboxes by using the %TABLE"1% and %COLUMN1% buttons.
User defined templates can be deleted or modified using the Remove or Edit buttons.
Note: The SQL text boxes support syntax highlighting.
Note: Depending on output database format: Microsoft Access (*.mdb) or SQLite (*.db) SQL syntax may be different.
3.6 Settings All program settings (selected tasks and filters, attributes, units of measure …) are stored auto-
matically for each plant in the configuration file located by default in the user profile folder. The
location of the configuration file can be changed by using menu Tools>Settings.

ReportAdapter for Smart® 3D
17
General
Add manual extract info: if enabled shows following dialog before extraction where the user can
provide additional information evaluated by CAXperts UniversalReporter.
Clean-up style rules and filter before extraction (don’t use for parallel extractions): if geometry
extraction is enabled this option removes all temporary style-rules and filters might left from last
run of the software. In normal case You must not use this option when you run more the one
extraction of ReportAdapter for Smart® 3D on your project at the same time.

CAXperts ReportAdapter for SmartPlant® 3D – Manual
18
Extract interferences: if geometry extraction is enabled this option extracts interference bubbles
(graphic) with their attributes.
Custom coordinate system: to report coordinates using custom coordinate system (CS) instead
of a global one (by default) click “more” and select CS to use.
Note: Custom coordinate system is applied only for attributes extraction (reporting) and has no effect for extracted geometry.
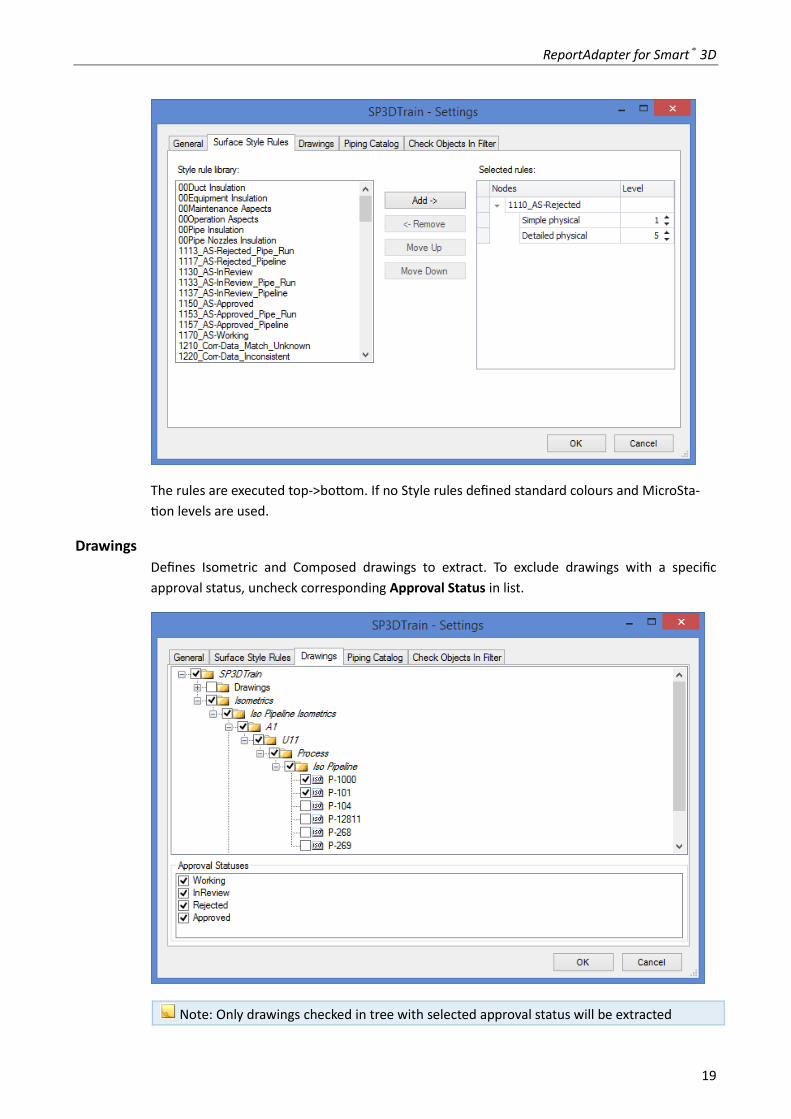
Surface style rules
The colour is set in a standard S3D Surface Rule Style that is preconfigured from S3D Surface Rule
Style settings. You can define here for the different aspects of the particular object type the Mi-
croStation levels.
Select the rules to apply from the list of available Surface Rule Style on left hand side and press
Add button.
ReportAdapter for Smart® 3D
19
The rules are executed top->bottom. If no Style rules defined standard colours and MicroSta-
tion levels are used.
Drawings
Defines Isometric and Composed drawings to extract. To exclude drawings with a specific
approval status, uncheck corresponding Approval Status in list.
Note: Only drawings checked in tree with selected approval status will be extracted
CAXperts ReportAdapter for SmartPlant® 3D – Manual
20
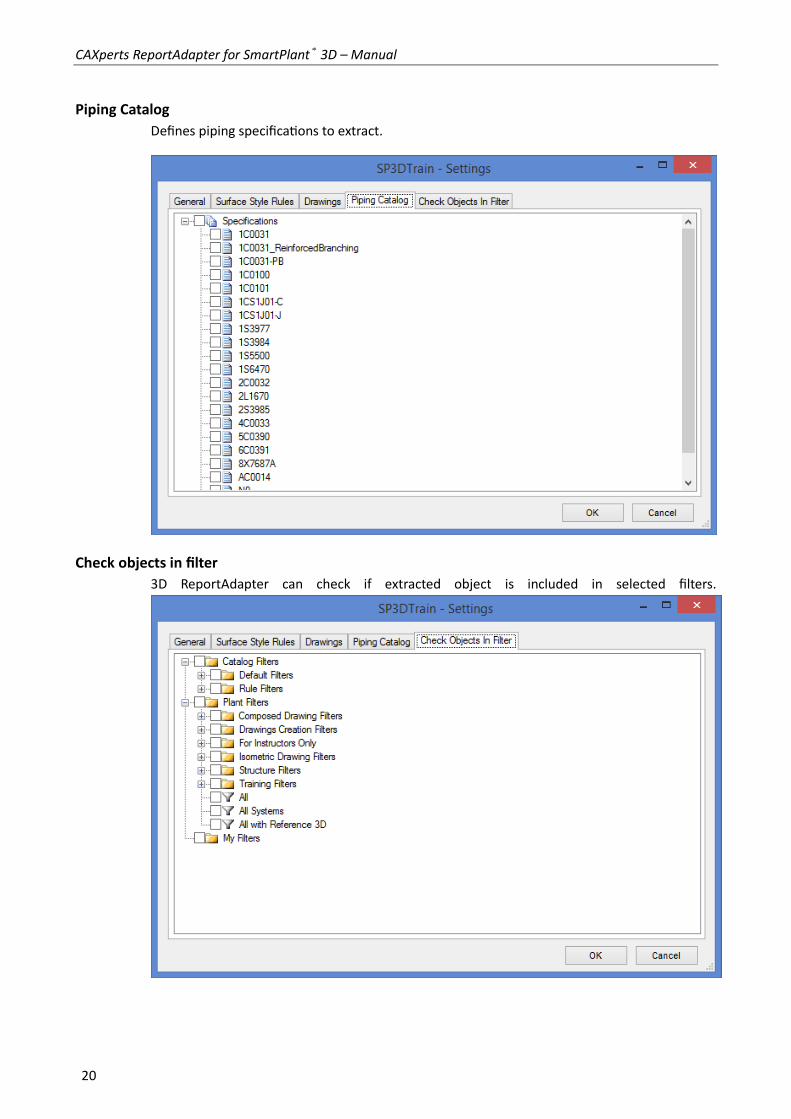
Piping Catalog
Defines piping specifications to extract.
Check objects in filter
3D ReportAdapter can check if extracted object is included in selected filters.

ReportAdapter for Smart® 3D
21
If at least one filter is selected, the software creates in resulting database ObjectsInFolter table
with two columns Object OID and Filter Name. This functionality is useful to report for example
volumes which includes the object.
Load settings from file
To import the settings into the plant configuration file use menu File → Load settings from file.
Note: The location of the plant configuration file is not affected, only the content of the file will be overwritten
Save settings to file
To export the settings from the plant configuration file use menu File → Save settings to file.
Note: The location of the plant configuration file is not affected

CAXperts ReportAdapter for SmartPlant® 3D – Manual
22
3.7 Command line mode The ReportAdapter for Smart® 3D can be used from the command line to automate the expor-
tation of a Smart 3D data.
To then open the ReportAdapter batch mode help type in the installation path of ReportAdapter
followed by “\3D ReportAdapter.exe” /?
C:\ ”C:\Program Files\CAXperts\3D ReportAdapter\3D ReportAdapter.exe” /?
"3D ReportAdapter.exe" [-plant:ExamplePlant] [-config:c:\config_file.ini]
[-filter:My Filters\Filter1] [-output:output_file.mdb] [-cleanrules]
[-drawing:Plant\New 3D DGN Drawings\Drawing-0001] [-extractgeometry]
-plant plant_name Smart 3D plant to process
-config config_file.ini Config file which contains the settings for the extrac-tion. If a configuration file is not defined, the last con-figuration will be used
-filter filter_name Filter name from S3D Plant. Can be a Plant Filter or from My Filters. If a filter is not defined, the last config-uration will be used
-output output_file.mdb Output database. If Output database is not defined, the last configuration will be used
-cleanrules Clean leftover temporary S3D3PDS-specific rules. This is an optional setting.
-drawing Path to the 3D DGN-Drawing from S3D Drawing con-sole
-extractgeometry If this switch is set, S3D2PDS generates a PD_XPDA Backup file.
4 Technical support Need more help? Contact CAXperts support by email, online, or phone:
mailto:[email protected]
http://www.caxperts.com/contact/