reports 13 calendar (menu entry) 20 manage 25 · o excel - view current temps in excel format o...
TRANSCRIPT
2 SMART Temps, LLC. © 2007-20010. All rights reserved. This document may not be not be copied, modified, distributed
or otherwise disseminated, in whole or part, without express written permission from SMART Temps, LLC. “SMART TEMPS” is a trademark of SMART Temps, LLC.
TABLE OF CONTENTS
Logging In To SMART Temps ____________________________________________ 3
Opening Screen & User Options _______________________________________________ 4
Alerts _________________________________________________________________ 7
Default Levels ______________________________________________________________ 7
Temperatures __________________________________________________________ 8
SMART Guards ____________________________________________________________ 8 Equipment Details ________________________________________________________________ 11
SMART Shields ____________________________________________________________ 12
Reports ______________________________________________________________ 13
Alert History ______________________________________________________________ 13
Notes _____________________________________________________________________ 14
Alert Level And Actions _____________________________________________________ 16
SMART Guard logs ________________________________________________________ 17
InRange __________________________________________________________________ 18
SMART Shield Calibration __________________________________________________ 19
Calendar (Menu Entry) _________________________________________________ 20
Assigning Weeks (for cycle menus) ____________________________________________ 20
Daily Menu Items __________________________________________________________ 21
Creating a New Item ________________________________________________________ 22
All Weeks Items ___________________________________________________________ 24
Manage ______________________________________________________________ 25
Setting Alerts ______________________________________________________________ 26
Site Profiles _______________________________________________________________ 28
Food Levels _______________________________________________________________ 29
Vendors __________________________________________________________________ 30
SMART Shields ____________________________________________________________ 31
Users _____________________________________________________________________ 32
Login History _____________________________________________________________ 33
3 SMART Temps, LLC. © 2007-2010. All rights reserved. This document may not be not be copied, modified, distributed or
otherwise disseminated, in whole or part, without express written permission from SMART Temps, LLC. “SMART TEMPS” is a trademark of SMART Temps, LLC.
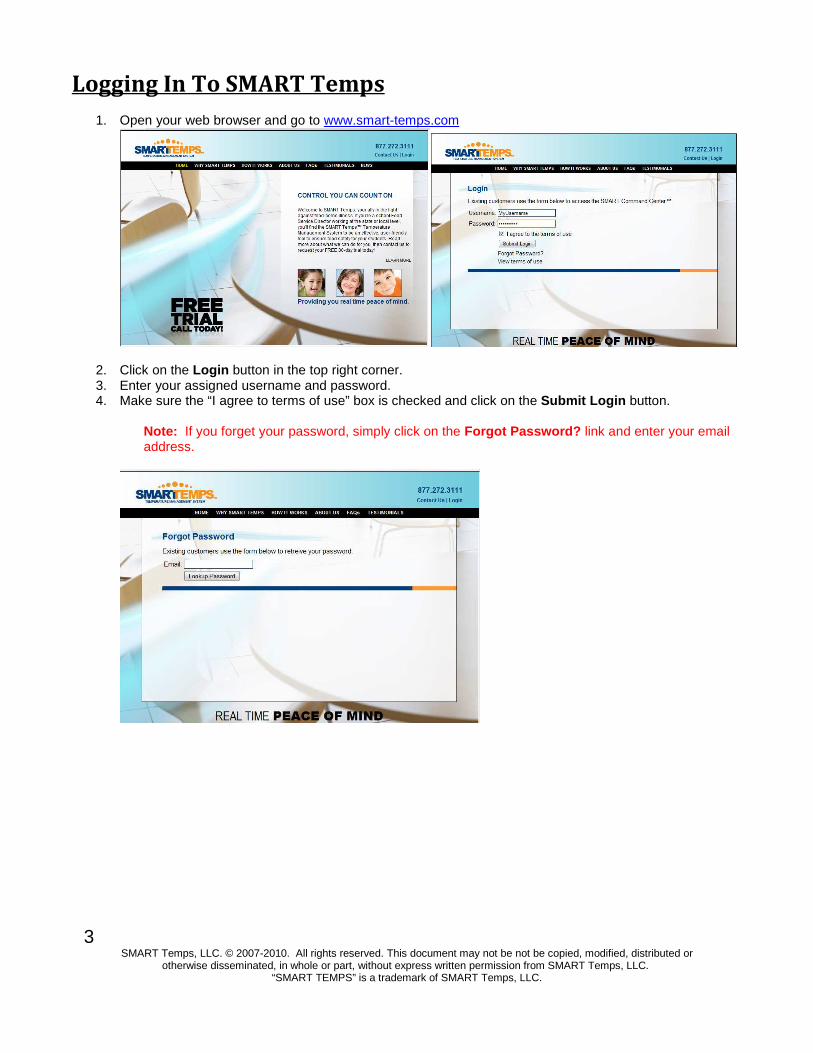
Logging In To SMART Temps
1. Open your web browser and go to www.smart-temps.com
2. Click on the Login button in the top right corner. 3. Enter your assigned username and password. 4. Make sure the “I agree to terms of use” box is checked and click on the Submit Login button.
Note: If you forget your password, simply click on the Forgot Password? link and enter your email address.

4 SMART Temps, LLC. © 2007-20010. All rights reserved. This document may not be not be copied, modified, distributed
or otherwise disseminated, in whole or part, without express written permission from SMART Temps, LLC. “SMART TEMPS” is a trademark of SMART Temps, LLC.
Opening Screen & User Options
• Locate your full name on the top left of the Web site screen, and click to activate the drop down box.
o Logout - logs you out of your user account
and out of the SMART Temps system.
o Options - is where you edit your log in and contact information.
Once you select Options from the drop down box, a User Options pop-up box will appear.
• Modify User tab allows you to modify your user information.
o Title - The user’s work title. (Ex.
Director).
o Name - Type the user’s full name
o Short Name - Type the name the user would like to see on the Shield (Typically first name only)
o Username - Edit your username for logging in.
o Password - Select a password to be used for the user’s SMART Temps account.
o Confirm - Re-type your selected password for verification.
o Weekly Report - Check this box if you would like to receive a weekly summary of Guard and Shield Temperatures. (Director Only)
o Shield Only - Check this box if the user is to have access to the SMART Temps Shield device ONLY. If you would like the user to have access to the Web site as well, do not check this box.
o Delete User - Select this command only if you wish to terminate the user from having access to the SMART Temps account. (This will remove the user from all alerts and Shields also)
o Save Changes - Important! Remember to select this command after making any and all changes to insure your edits are saved.

5 SMART Temps, LLC. © 2007-2010. All rights reserved. This document may not be not be copied, modified, distributed or
otherwise disseminated, in whole or part, without express written permission from SMART Temps, LLC. “SMART TEMPS” is a trademark of SMART Temps, LLC.
Contacts tab allows you to edit your list of user contacts.
o Remove Selected - Allows you to remove unwanted contact information.(ie. Old email addresses and phone numbers)
o Create – Allows you to create a new email address or new phone number.
o Modify - Allows you to make changes to current contact information. For example, changing an email address or phone number.
o Set Alert Timeframe for Selected - You will be able to view this command after you create a new contact and check back. This window allows you to set the times that the contact methods will be used.(red = user will not be contacted, green = user will be contacted)
• Roles tab: o Used to assign additional roles or privileges
to SMART Temps users.
o Remove Selected - Once you check the box located next to the Group name, you can select this command to remove the user from an assigned role.
o Create New - Allows you to create a new role for the user.
• Logs tab: o By selecting the drop down menu, Send
Logs you can opt to choose when, or if, you would like to have a hard copy of the temperature logs emailed to you in a comma delimited (CSV) format at the end of each month.
o Next, check the box(es) corresponding to the site(s) you wish to receive logs for.
o Once you have made the necessary changes, please click Save Changes to insure that your edits will be made.

6 SMART Temps, LLC. © 2007-20010. All rights reserved. This document may not be not be copied, modified, distributed
or otherwise disseminated, in whole or part, without express written permission from SMART Temps, LLC. “SMART TEMPS” is a trademark of SMART Temps, LLC.
Group Displays the name of the school district currently being viewed.
Site Enables you to select the school in which you would like to retrieve information about. (Managers will only be able to view sites they are assigned to; directors will be able to see all sites)
Note: “ View All” will let you view all temps at once (Director Only)

7 SMART Temps, LLC. © 2007-2010. All rights reserved. This document may not be not be copied, modified, distributed or
otherwise disseminated, in whole or part, without express written permission from SMART Temps, LLC. “SMART TEMPS” is a trademark of SMART Temps, LLC.
ALERTS
The AleAleAleAlertsrtsrtsrts section will display all units outside the designated safe range (at the current time).
Note:Note:Note:Note: You will not receive a phone call, email, or other alert unless you specified and assigned to receive alerts.
The SMART Guards tab provides a listing of the equipment that is currently out of range. (This does not mean an alert will be sent, unless the average is out of range for over two hours, batteries are below desired level, or there has been inactivity over the acceptable time period). Default Levels
Low High Warmers 135 200 Refrigerators 33 41 Milk Coolers 33 41 Freezers 0 10
The SMART Shields tab displays all the activity alerts from use of the Shield(s) at the selected site(s).
Default Levels Low High Cooking (Hot) 165 200 Holding (Hot) 135 200 Serving (Hot) 135 200 Receiving (Hot) 135 200 Prepping (Cold) 33 41 Holding (Cold) 33 41 Serving (Cold) 33 41 Receiving (Cold) 33 41 Receiving (Frozen) 0 10

8 SMART Temps, LLC. © 2007-20010. All rights reserved. This document may not be not be copied, modified, distributed
or otherwise disseminated, in whole or part, without express written permission from SMART Temps, LLC. “SMART TEMPS” is a trademark of SMART Temps, LLC.
TEMPERATURES
The SMART GuSMART GuSMART GuSMART Guardsardsardsards tab provides real time temperatures of the equipment. It allows you to monitor the temperature online, and keep track anytime equipment is not within the required range.

9 SMART Temps, LLC. © 2007-2010. All rights reserved. This document may not be not be copied, modified, distributed or
otherwise disseminated, in whole or part, without express written permission from SMART Temps, LLC. “SMART TEMPS” is a trademark of SMART Temps, LLC.
Search Options and Button Description:
• Description - Allows you to search by description name given to equipment. • All Categories - Provides a drop down list of categories to filter. • Refresh - Select this command to refresh the screen to reflect the most current
temperatures. • Export/Print - Provides a drop-down screen that allows you to print the temperatures in a
variety of formats. o Print - Print out the current temps. o Excel - View current temps in Excel format o History - Allows to you to print out past temperatures of all equipment.
• Status - Provides a drop down list of options to view the status of different temperatures at your sites. Choose from the following:
o Show All - View all logged temperatures for your registered sites. o High Temperatures - View all of the equipment with high temperature status only. o Low Temperatures - View all of the equipment with low temperatures status only. o No Activity - View all of the equipment where there has been no recorded
temperature activity. o Low Battery - View of the equipment where there is a low battery warning for your
SMART Guard devices. • Active Only - Provides a drop down menu that allows you to view the status of all of your
SMART Guard Devices. Choose from the following: o Active Only - View all of the current temperature monitoring equipment. (This
selection is the default) o InActive Only - Select this option to view inactive SMART Guard devices. (Any
Guard that is present in a site but not currently in use and turned off) o Show All - Select this option to view both active and inactive equipment. o Archived Equipment - Select this option to view previous pieces of equipment that
are no longer in use.
Category Descriptions:
• Active - Notes whether the equipment is active or inactive. • Site - Name of the site where the equipment being monitored is located. • Category - Describes the equipment being monitored. • Description - Unique description of the equipment being monitored. • Temp - Current temperature for the equipment being monitored. • Time - Last time the current temperature was taken. • 24h High - The highest temperature the equipment has reached within the last 24-hours. • 24h Low - The lowest temperature the equipment has reached within the last 24-hours. • Batt - Status of the SMART Guard device’s battery.

10 SMART Temps, LLC. © 2007-20010. All rights reserved. This document may not be not be copied, modified, distributed
or otherwise disseminated, in whole or part, without express written permission from SMART Temps, LLC. “SMART TEMPS” is a trademark of SMART Temps, LLC.
Bottom of the Screen (Directors Only):
• Sites o Lists the total number of sites selected. o Lists the total number of active sites. o Lists the total number of inactive sites.
• Guards o Lists the total number of monitors listed. o Lists the total number of active monitors. o Lists the total number of inactive monitors.
• Shields - Lists the total number of Shields devices in use.
Note : Temperatures in blue font signify the temperatures read by the SMART Guard were too cold.
Temperatures in red font signify the temperatures read by the SMART Guard were too hot. Temperatures in black font signify that no temperatures were received by the SMART Guard device for over two hours.
Possible reasons include: -Power could be out/dead battery -Network could be down
*All temperatures are logged and recorded in real time.

11 SMART Temps, LLC. © 2007-2010. All rights reserved. This document may not be not be copied, modified, distributed or
otherwise disseminated, in whole or part, without express written permission from SMART Temps, LLC. “SMART TEMPS” is a trademark of SMART Temps, LLC.
Equipment DetailsEquipment DetailsEquipment DetailsEquipment Details ---- To view more details on an individual piece of equipment, simply double click on the equipment name.
The Summary tab shows you a 24 hour graph and Alerts Levels.
The Reports tab shows you the records of temperatures taken according to the frequency you choose. The Graphs tab displays a graph of recorded temperatures. (The graph may be customized to a date range you select) Note : Reports and Graphs are limited to the last 30 days The Modify tab displays the description, category, record rate, and send rate. (Certain fields can only be changed by Directors) The Alert Times tab allows you to set the times that the alert methods will be used. Red = users will not be contacted, Green = users will be contacted (Only directors may edit times in this section)
The Notes tab allows you to view notes / alerts from a selected time frame for the equipment. You may also add notes manually in this section to keep track of maintenance on the equipment.

12 SMART Temps, LLC. © 2007-20010. All rights reserved. This document may not be not be copied, modified, distributed
or otherwise disseminated, in whole or part, without express written permission from SMART Temps, LLC. “SMART TEMPS” is a trademark of SMART Temps, LLC.
The SMART Shields Flow SMART Shields Flow SMART Shields Flow SMART Shields Flow of Foodof Foodof Foodof Food tab logs temperatures taken manually during the SMART Shields Flow of Food process.
Search Options and Button Description:
• Item - Allows you to search a food item by name. • Start and End - Select the range of time you wish to view your Flow of Food. • The calendar icon next to the Start and End descriptors allows you to select the date from a
drop-down calendar. Alternatively, you can type the date in the Start or End fields by writing the date you would like to select in the following format: mm/dd/yyyy and then click Refresh to process the request.
• Refresh - Select this command to refresh the log to reflect the most current items added. • Flow - Allows you to filter from the following categories: Receive , Prepping , Cooking , Holding
and Serving . Select View All to see temperatures taken in all categories. • Export/Print - Provides a drop-down screen that allows you to print the most current list of items.
o Print – Allows you to print out the listed temperatures. o Excel - View current temps in Excel format.
• Batter Levels – Displays battery level of Shield(s).
Category Descriptions:
• Site - Indicates the name of the site. • Step - Flow of Food step. • Item - Indicates the name of the item. • Temp - Indicates the temperature of the item. • Time - Indicates the time the temperature was taken. • L/B - Indicates Line or Batch number for the item. • Result - Indicates if temperature passed, was high, or low. • Action - Corrective Action • User - Name of user that took the temperature

13 SMART Temps, LLC. © 2007-2010. All rights reserved. This document may not be not be copied, modified, distributed or
otherwise disseminated, in whole or part, without express written permission from SMART Temps, LLC. “SMART TEMPS” is a trademark of SMART Temps, LLC.
REPORTS
The Alert HistoryAlert HistoryAlert HistoryAlert History tab lists all pieces of equipment and how many times there has been an alert for each. (Equipment with multiple alerts may indicate need for maintenance)
Search Options and Button Description:
• All Types - Allows you to select from a drop-down menu and select which kind of site you would like to review the Alert History for.
• Start and End - Select the range of time you wish to review the alert history. The calendar icon next to the Start and End fields allow you to select the date from a drop-down calendar.
• All Categories - Select from a drop-down menu to choose the category you wish to view in the alert history.
• Print - Select this command to print the Alert History.
• Performance Report - Allows you to view a Location Summary, Equipment Summary and Flow of Food Summary for the last 30 days.

14 SMART Temps, LLC. © 2007-20010. All rights reserved. This document may not be not be copied, modified, distributed
or otherwise disseminated, in whole or part, without express written permission from SMART Temps, LLC. “SMART TEMPS” is a trademark of SMART Temps, LLC.
Category Descriptions:
• Site - Name of the site where the monitoring equipment is located. • Description - Unique description of the equipment being monitored. • Alerts - Number of Alerts recorded. • Date - Date the alert was recorded. • Type - High, Low, or N/A alert • Temp - Temperature that the device recorded for the alert. • Limit - Limit the threshold is set at
The NotesNotesNotesNotes tab displays all the alerts sent out as well as manual notes entered by users on each piece of equipment.
Notes > Notes > Notes > Notes > SMART Guard NotesSMART Guard NotesSMART Guard NotesSMART Guard Notes - Allows you to view the notes and alerts for each piece of equipment.
Search Options and Button Description:
• Search - Allows you to type in a key search term for specific results. • Start and End - Select the range of time you wish to review the notes. The calendar icon next to the Start
and End descriptors allows you to select the date from a drop-down calendar. • Export/Print - Drop-down menu allows you to print Monitor Notes or Alert Response Notes.
15 SMART Temps, LLC. © 2007-2010. All rights reserved. This document may not be not be copied, modified, distributed or
otherwise disseminated, in whole or part, without express written permission from SMART Temps, LLC. “SMART TEMPS” is a trademark of SMART Temps, LLC.
Category Descriptions:
• Location - Name of the site. • Guard - Equipment name. • Time - Time the monitor notes were added. • Author - Name of the user who wrote the Monitor Notes. • Comments - Type of notification was used.
Note : You may expand the comment to read entire message by clicking on the “+” in the far left column.
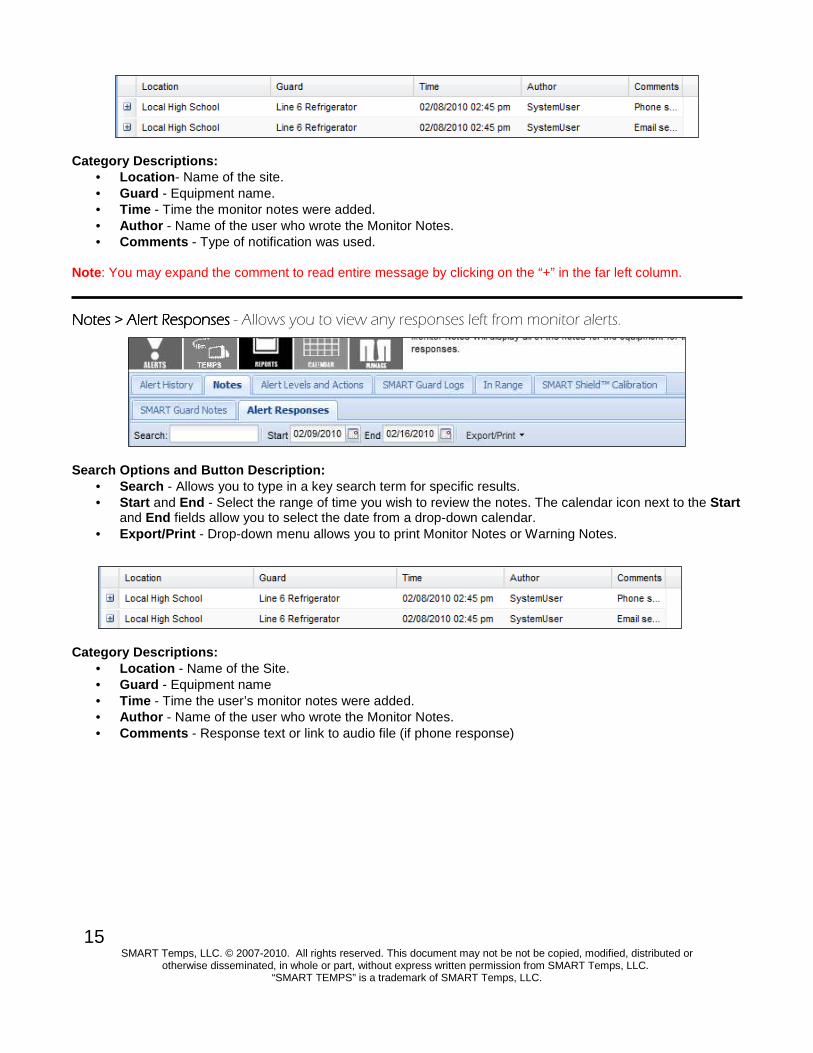
Notes > Notes > Notes > Notes > AleAleAleAlert Responsesrt Responsesrt Responsesrt Responses - Allows you to view any responses left from monitor alerts.
Search Options and Button Description:
• Search - Allows you to type in a key search term for specific results. • Start and End - Select the range of time you wish to review the notes. The calendar icon next to the Start
and End fields allow you to select the date from a drop-down calendar. • Export/Print - Drop-down menu allows you to print Monitor Notes or Warning Notes.
Category Descriptions:
• Location - Name of the Site. • Guard - Equipment name • Time - Time the user’s monitor notes were added. • Author - Name of the user who wrote the Monitor Notes. • Comments - Response text or link to audio file (if phone response)

16 SMART Temps, LLC. © 2007-20010. All rights reserved. This document may not be not be copied, modified, distributed
or otherwise disseminated, in whole or part, without express written permission from SMART Temps, LLC. “SMART TEMPS” is a trademark of SMART Temps, LLC.
The Alert Levels and ActionsAlert Levels and ActionsAlert Levels and ActionsAlert Levels and Actions tab illustrates how your alerts are currently set up.
Search Options and Button Description:
• All Types - Allows you to select, from a drop-down menu, the type of site for which you would like to view the alert history.
• All Categories - Provides a drop down list of categories by which to sort. • Print - Select to open a printable list of the Alert Levels and Actions.
Category Descriptions:
• Site - Name of the site where the monitoring equipment is located. • Description - Description of the location of the monitoring equipment. • High - The high temperature threshold for a specified device and at a specified site. • Low - The low temperature threshold for a specified device and at a specified site. • N/A - Number of minutes of inactivity before alert is sent. • L/B - Percentage battery will reach before alert will be sent • High Action - Lists number of actions assigned to high temperatures. • Low Action - Lists number of actions assigned to low temperatures. • N/A Action - Lists number of actions assigned to no activity. • L/B Action - Lists number of actions assigned to low battery.
Green signifies alerts are On Red signifies alerts are Off
Note : You can double click a piece of equipment and view the actions that will be taken under the “Summary” tab.

17 SMART Temps, LLC. © 2007-2010. All rights reserved. This document may not be not be copied, modified, distributed or
otherwise disseminated, in whole or part, without express written permission from SMART Temps, LLC. “SMART TEMPS” is a trademark of SMART Temps, LLC.
The SMART GuardSMART GuardSMART GuardSMART Guard LogsLogsLogsLogs tab allows you to choose which previous log (site and month) you would like emailed to you in an Excel format.
Search Options and Button Description:
• All Types - Allows you to select from a drop-down menu and select which kind of site you would like to review the monitoring logs for.
• Log Month - Allows you to select the logged month you wish to view. To choose, click the calendar icon. • Email - Enter the email you wish to have the monitoring logs sent. • Email Selected Sites – After selecting the site(s) you would like, click this button to send the logs to the
email address provided.
Category Descriptions:
• Type - Lists the type of the location. • Location - Name of the site where the temperature monitoring device is located.

18 SMART Temps, LLC. © 2007-20010. All rights reserved. This document may not be not be copied, modified, distributed
or otherwise disseminated, in whole or part, without express written permission from SMART Temps, LLC. “SMART TEMPS” is a trademark of SMART Temps, LLC.
The In RangeIn RangeIn RangeIn Range tab provides a graphical report, showing the percentage of time the SMART Guards are in range.
Search Options and Button Description:
• Description - Allows you to search a description within a category. • Start and End - Select the range of time you wish to review the reports. The calendar icon next to the
Start and End fields allow you to select the date from a drop-down calendar. • All Categories - Allows you to sort from a list of categories. • Print - Allows you to print the report.
Category Descriptions:
• Site - Name of the site where the monitoring equipment is located. • Category - Name of the category for the monitoring equipment. • Description - Description of the device. • % - Percentage of time temperatures were in range. • Percent - Graph of time temperatures were in range.
19 SMART Temps, LLC. © 2007-2010. All rights reserved. This document may not be not be copied, modified, distributed or
otherwise disseminated, in whole or part, without express written permission from SMART Temps, LLC. “SMART TEMPS” is a trademark of SMART Temps, LLC.
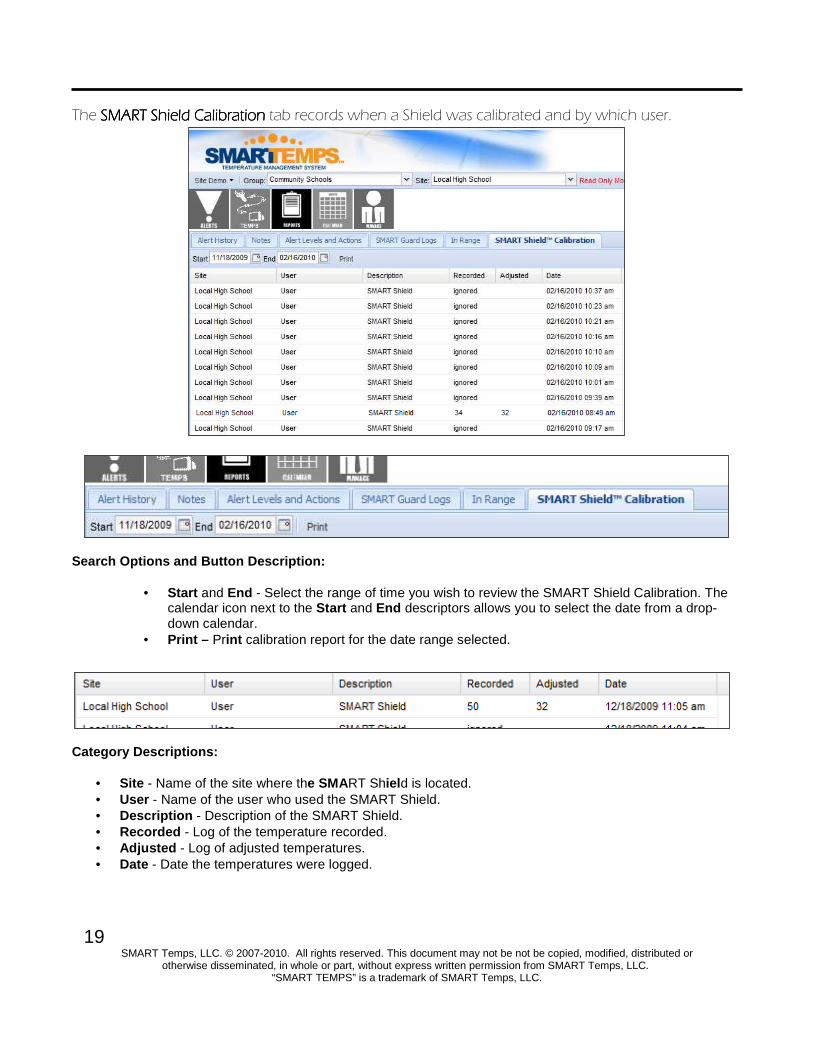
The SMART Shield CalibrationSMART Shield CalibrationSMART Shield CalibrationSMART Shield Calibration tab records when a Shield was calibrated and by which user.
Search Options and Button Description:
• Start and End - Select the range of time you wish to review the SMART Shield Calibration. The calendar icon next to the Start and End descriptors allows you to select the date from a drop-down calendar.
• Print – Print calibration report for the date range selected.
Category Descriptions:
• Site - Name of the site where the SMART Shield is located. • User - Name of the user who used the SMART Shield. • Description - Description of the SMART Shield. • Recorded - Log of the temperature recorded. • Adjusted - Log of adjusted temperatures. • Date - Date the temperatures were logged.

20 SMART Temps, LLC. © 2007-20010. All rights reserved. This document may not be not be copied, modified, distributed
or otherwise disseminated, in whole or part, without express written permission from SMART Temps, LLC. “SMART TEMPS” is a trademark of SMART Temps, LLC.
CALENDAR
The Assign WeeksAssign WeeksAssign WeeksAssign Weeks tab allows you to set the menu for each week on the CalendarCalendarCalendarCalendar.
Search Options and Button Description:
• Start Week – Date of beginning menu. • End Week – Date of last menu. • Refresh Weeks – Refreshes page to reflect date range selected. • Save Assignments – Saves weekly menus after they have been
assigned. • Copy to Sites – Used to duplicate and save the food menu to multiple
locations. (When you click Copy to Sites a pop-up menu will appear and prompt you to select the Type of site location. Once you choose, check the boxes of the sites you wish to duplicate and click Copy to the Selected to copy the information to your desired sites.)
Category Descriptions:
• Week - Indicates date the week starts. (Always displays the Monday of each week) • Cycle Week - Indicates which cycle you wish to run for the specified week.
o Selecting Skipped allows you to account for time when the menu is not being used, such as holiday breaks, etc.

21 SMART Temps, LLC. © 2007-2010. All rights reserved. This document may not be not be copied, modified, distributed or
otherwise disseminated, in whole or part, without express written permission from SMART Temps, LLC. “SMART TEMPS” is a trademark of SMART Temps, LLC.
The DailyDailyDailyDaily tab is used to view, add, or remove items assigned to that day (includes items from cycle week and/or all weeks). Use this tab when making a one-time change to the menu that you do not want duplicated the next time you are using the assigned week.
Search Options and Button Description:
• Date - Click the calendar icon to choose the date you wish to change your menu items. • Search Items - Use this field to search items listed under the Daily tab. • Create New Item - Select this command to create a new item to your Daily selection.
o Once you select Create New Item a pop-up screen will show to enable you to enter the new information for the item. (See create new item section)
Category Descriptions:
• Serving Line – Sort items by serving line they are assigned to.
• Food Name - The full name of the item. • Source
o (Food Cycle - Item part of cycle week entry)
o (Daily Item - item entered only for that day)
o (All weeks - Item assigned to all weeks)
• Batches - Number of batches being prepared. • Meal Period – Period food will be served. • Line – Serving line item will appear on (All
lines are checked by default).

22 SMART Temps, LLC. © 2007-20010. All rights reserved. This document may not be not be copied, modified, distributed
or otherwise disseminated, in whole or part, without express written permission from SMART Temps, LLC. “SMART TEMPS” is a trademark of SMART Temps, LLC.
Note : To remove an item that was added, place a check mark in the box to the left of the item and then click on the Remove Checked button on the bottom left of the screen.
To create a new item for the menu, simply click on the Create New ItemCreate New ItemCreate New ItemCreate New Item button. A pop up box will appear. Complete the required fields and save changes.
• Name - The full name of the new item being added. • Short Name - An abbreviated name of the new item being added. Note : This is the name that will
appear on your SMART Shield devices. (ex. Chicken Nuggets = Chix Nug) • Type - Enter if food is a hot or cold item. • Cancel Changes - Select this to cancel creating a new menu item. • Save Changes - Select this to save your new menu item. Note : Remember to save changes once
you have created a new food item. Once you save the changes, your item will become searchable.
Note : Once an item is created, it will be available to other sites throughout the district.

23 SMART Temps, LLC. © 2007-2010. All rights reserved. This document may not be not be copied, modified, distributed or
otherwise disseminated, in whole or part, without express written permission from SMART Temps, LLC. “SMART TEMPS” is a trademark of SMART Temps, LLC.
To view details of an item at any time you may double click on an individual item (and edit if you have director permissions): Name – Full name of item. Short Name – Name that will show up on Shield. Type – Whether it is a “Hot” or “Cold” Item.
The History Tab displays all the occurrences of that particular item and the temperature that was taken for it. The Temp Levels tab displays the temperature range assigned to the item. (“Cooking Defaults” refer to cooking temps assigned in the Manage>Food Levels section) You may assign an individual range exclusively for that item if preferred.

24 SMART Temps, LLC. © 2007-20010. All rights reserved. This document may not be not be copied, modified, distributed
or otherwise disseminated, in whole or part, without express written permission from SMART Temps, LLC. “SMART TEMPS” is a trademark of SMART Temps, LLC.
The All WeeksAll WeeksAll WeeksAll Weeks tab displays food items that will appear on the menu consistently every week.
Search Options and Button Description:
• All Days – Any items entered in this tab will show up every day. • Monday – Any item entered in this tab will show up every Monday. • Tuesday – Any item entered in this tab will show up every Tuesday. • Wednesday – Any item entered in this tab will show up every Wednesday. • Thursday – Any item entered in this tab will show up every Thursday. • Friday – Any item entered in this tab will show up every Friday. • Search Items - Use this field to search items listed in the database. • Create New Item – Allows you to add more items to your food database.
o Once you select Create New Item a pop-up screen will show to enable you to enter the new information for the item (See create new item section).
Category Descriptions:
• Serving Line – Sort items by serving line they are assigned to. • Food Name - The full name of the item. • Batches - Number of batches being prepared. • Meal Period – Period food will be served. • Line – Serving line item will appear on (All lines are checked by default).
25 SMART Temps, LLC. © 2007-2010. All rights reserved. This document may not be not be copied, modified, distributed or
otherwise disseminated, in whole or part, without express written permission from SMART Temps, LLC. “SMART TEMPS” is a trademark of SMART Temps, LLC.
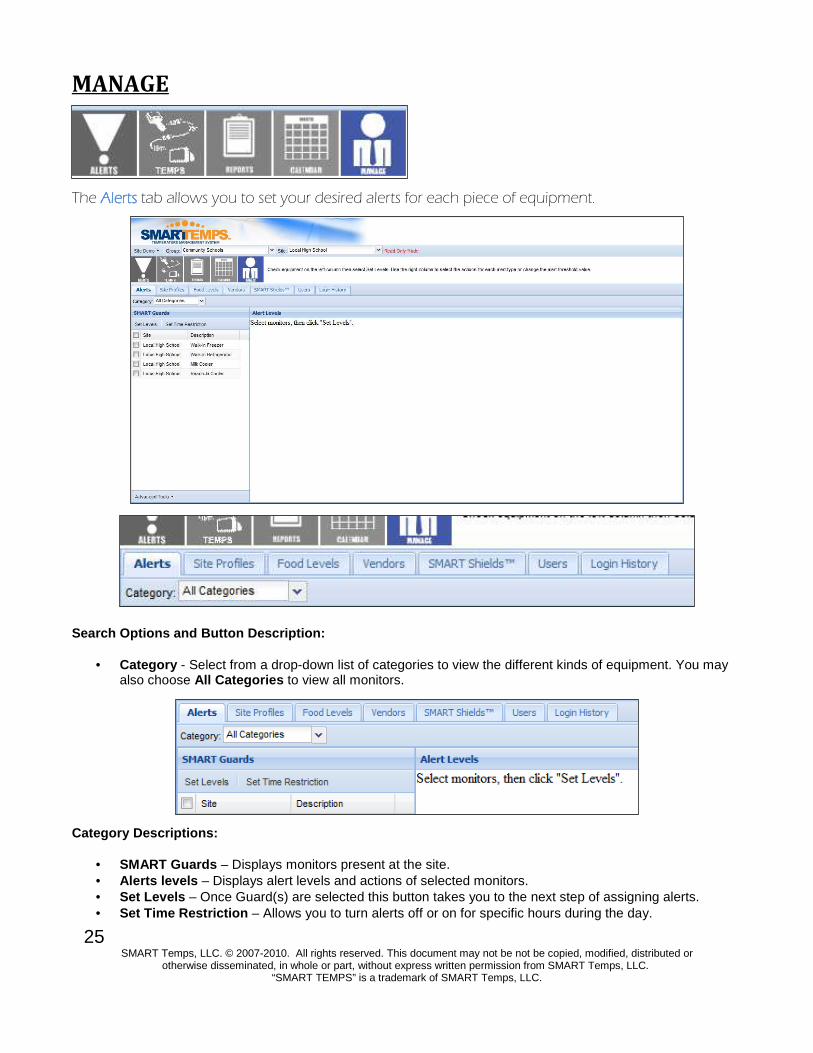
MANAGE
The AlertsAlertsAlertsAlerts tab allows you to set your desired alerts for each piece of equipment.
Search Options and Button Description:
• Category - Select from a drop-down list of categories to view the different kinds of equipment. You may also choose All Categories to view all monitors.
Category Descriptions:
• SMART Guards – Displays monitors present at the site. • Alerts levels – Displays alert levels and actions of selected monitors. • Set Levels – Once Guard(s) are selected this button takes you to the next step of assigning alerts. • Set Time Restriction – Allows you to turn alerts off or on for specific hours during the day.
26 SMART Temps, LLC. © 2007-20010. All rights reserved. This document may not be not be copied, modified, distributed
or otherwise disseminated, in whole or part, without express written permission from SMART Temps, LLC. “SMART TEMPS” is a trademark of SMART Temps, LLC.
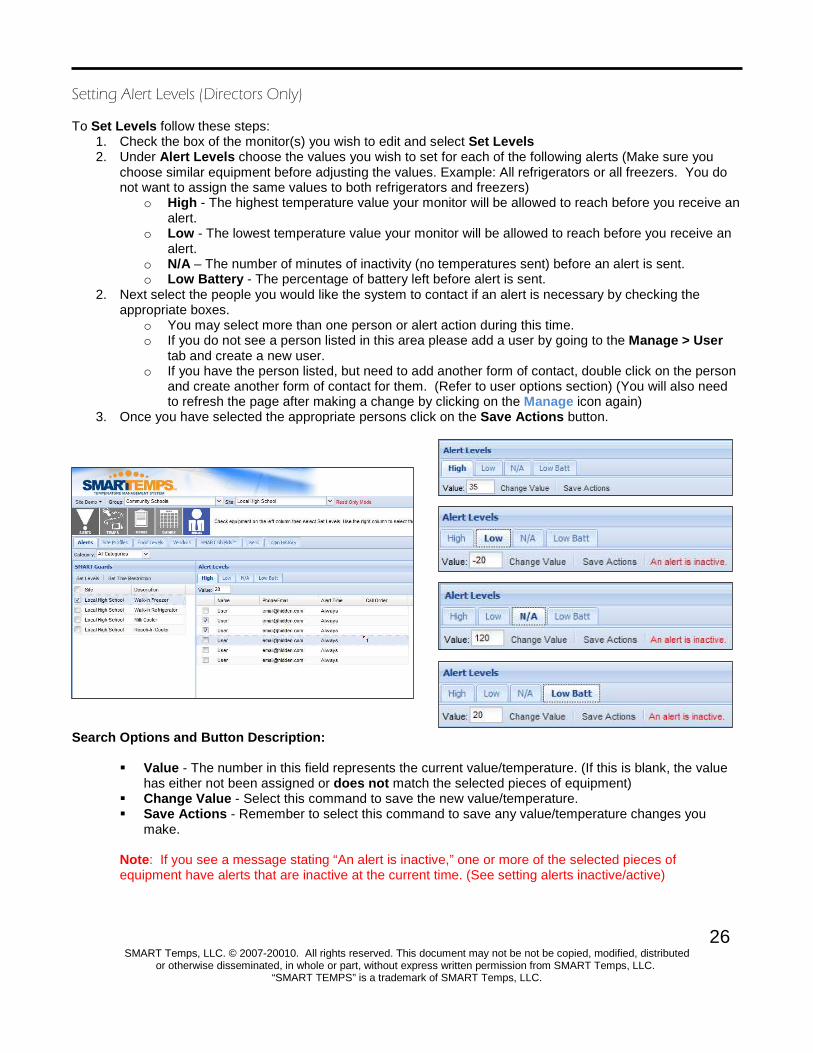
Setting Alert Levels (Directors Only)
To Set Levels follow these steps:
1. Check the box of the monitor(s) you wish to edit and select Set Levels 2. Under Alert Levels choose the values you wish to set for each of the following alerts (Make sure you
choose similar equipment before adjusting the values. Example: All refrigerators or all freezers. You do not want to assign the same values to both refrigerators and freezers)
o High - The highest temperature value your monitor will be allowed to reach before you receive an alert.
o Low - The lowest temperature value your monitor will be allowed to reach before you receive an alert.
o N/A – The number of minutes of inactivity (no temperatures sent) before an alert is sent. o Low Battery - The percentage of battery left before alert is sent.
2. Next select the people you would like the system to contact if an alert is necessary by checking the appropriate boxes.
o You may select more than one person or alert action during this time. o If you do not see a person listed in this area please add a user by going to the Manage > User
tab and create a new user. o If you have the person listed, but need to add another form of contact, double click on the person
and create another form of contact for them. (Refer to user options section) (You will also need to refresh the page after making a change by clicking on the Manage icon again)
3. Once you have selected the appropriate persons click on the Save Actions button.
Search Options and Button Description:
� Value - The number in this field represents the current value/temperature. (If this is blank, the value has either not been assigned or does not match the selected pieces of equipment)
� Change Value - Select this command to save the new value/temperature. � Save Actions - Remember to select this command to save any value/temperature changes you
make. Note : If you see a message stating “An alert is inactive,” one or more of the selected pieces of equipment have alerts that are inactive at the current time. (See setting alerts inactive/active)

27 SMART Temps, LLC. © 2007-2010. All rights reserved. This document may not be not be copied, modified, distributed or
otherwise disseminated, in whole or part, without express written permission from SMART Temps, LLC. “SMART TEMPS” is a trademark of SMART Temps, LLC.
Category Descriptions:
• Name – Name of person being contacted. • Phone/Email – Phone Number or Email address to contact. • Alert Time – Used if contact has restricted hours. • Call Order – Order of importance for call system only.
Marking alerts “Inactive” or “Active” allows you to disable or enable alerts easily during days when equipment will be shut down.
To make alerts Inactive or Active:
1) Choose the piece(s) of equipment you would like to change. 2) Click on the “Advanced Tools” button on the bottom left of the screen. 3) Choose “Set selected active status.” 4) Select the alerts you would like disabled by un-checking them and clicking the “Save Changes” button.
Note : Only the alerts that are left checked will be active for the selected pieces of equipment.
28 SMART Temps, LLC. © 2007-20010. All rights reserved. This document may not be not be copied, modified, distributed
or otherwise disseminated, in whole or part, without express written permission from SMART Temps, LLC. “SMART TEMPS” is a trademark of SMART Temps, LLC.
Setting Time Restrictions On Alerts To Set Time Restrictions follow these steps:
1. Check the box of the monitoring device(s) you wish to set time restrictions for from the Monitor List .
2. Click the Set Time Restriction button. 3. Determine the time restrictions by marking
the Equipment Alert Restriction grid. o Click on the box that pertains to the beginning
on the restriction. o Then click on the box for the end of
the restriction. o You should then notice the grid
highlighted light blue within the selected time range.
o Click the Turn Off Selected to turn alerts off for that time (Boxes will turn red).
o Click the Turn On Selected to turn alerts on for the time (Boxes will turn green). • Be sure to click on the Save Changes button when finished.
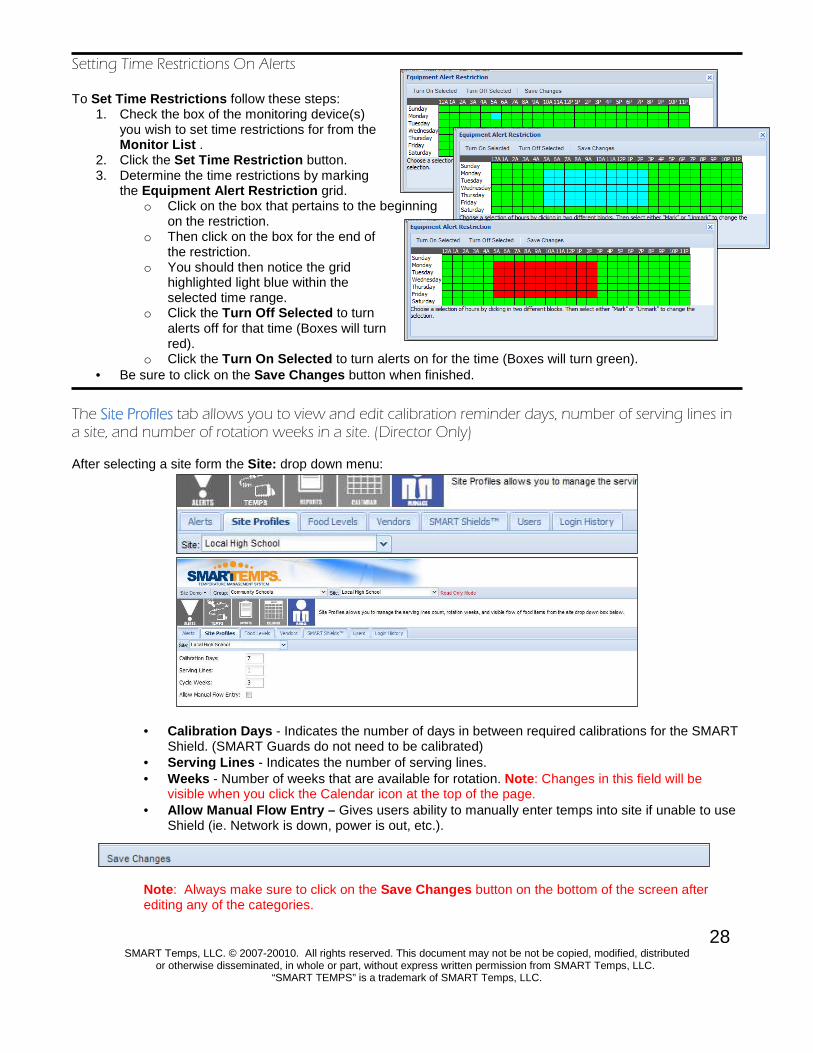
The Site ProfilesSite ProfilesSite ProfilesSite Profiles tab allows you to view and edit calibration reminder days, number of serving lines in a site, and number of rotation weeks in a site. (Director Only) After selecting a site form the Site: drop down menu:
• Calibration Days - Indicates the number of days in between required calibrations for the SMART Shield. (SMART Guards do not need to be calibrated)
• Serving Lines - Indicates the number of serving lines. • Weeks - Number of weeks that are available for rotation. Note : Changes in this field will be
visible when you click the Calendar icon at the top of the page. • Allow Manual Flow Entry – Gives users ability to manually enter temps into site if unable to use
Shield (ie. Network is down, power is out, etc.).
Note : Always make sure to click on the Save Changes button on the bottom of the screen after editing any of the categories.
29 SMART Temps, LLC. © 2007-2010. All rights reserved. This document may not be not be copied, modified, distributed or
otherwise disseminated, in whole or part, without express written permission from SMART Temps, LLC. “SMART TEMPS” is a trademark of SMART Temps, LLC.
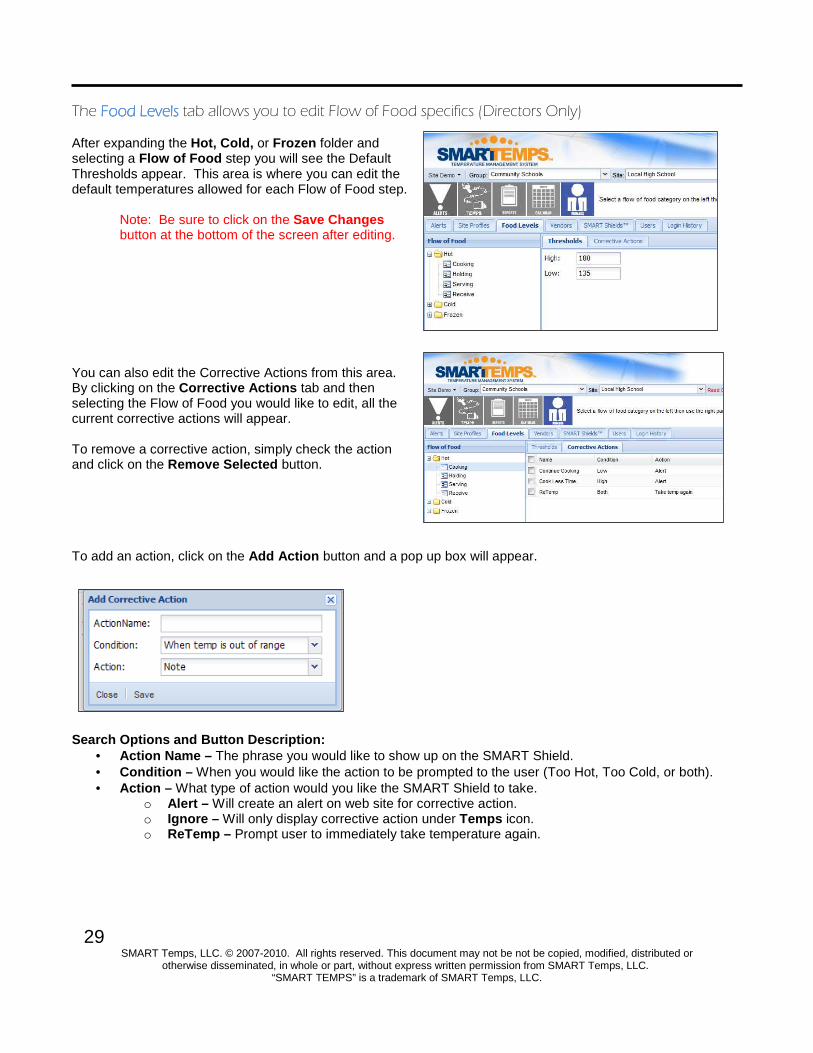
The Food LevelsFood LevelsFood LevelsFood Levels tab allows you to edit Flow of Food specifics (Directors Only) After expanding the Hot, Cold, or Frozen folder and selecting a Flow of Food step you will see the Default Thresholds appear. This area is where you can edit the default temperatures allowed for each Flow of Food step.
Note: Be sure to click on the Save Changes button at the bottom of the screen after editing.
You can also edit the Corrective Actions from this area. By clicking on the Corrective Actions tab and then selecting the Flow of Food you would like to edit, all the current corrective actions will appear. To remove a corrective action, simply check the action and click on the Remove Selected button. To add an action, click on the Add Action button and a pop up box will appear.
Search Options and Button Description:
• Action Name – The phrase you would like to show up on the SMART Shield. • Condition – When you would like the action to be prompted to the user (Too Hot, Too Cold, or both). • Action – What type of action would you like the SMART Shield to take.
o Alert – Will create an alert on web site for corrective action. o Ignore – Will only display corrective action under Temps icon. o ReTemp – Prompt user to immediately take temperature again.

30 SMART Temps, LLC. © 2007-20010. All rights reserved. This document may not be not be copied, modified, distributed
or otherwise disseminated, in whole or part, without express written permission from SMART Temps, LLC. “SMART TEMPS” is a trademark of SMART Temps, LLC.
The VendorsVendorsVendorsVendors tab is used to assign vendors to sites for the Receiving step of the Flow of Food. (Director Only)
Creating a vendor:
1. Click on the Create button in the bottom left corner 2. Fill in the required fields.
a. Type – Select whether the vendor delivers hot, cold, or frozen items.
b. Description – Name of Vendor. c. Short Name – Name to appear on Shield for vendor.
3. Click on the Create Vendor button.
Assigning a vendor:
1. Once a vendor has been created, it needs to be assigned to a location before it will show up on the Shield. Select the vendor form the Food Vendors Section.
2. Check mark the sites you would like to assign the vendor to.
3. Click on the Save Assignments button on the bottom of the screen.

31 SMART Temps, LLC. © 2007-2010. All rights reserved. This document may not be not be copied, modified, distributed or
otherwise disseminated, in whole or part, without express written permission from SMART Temps, LLC. “SMART TEMPS” is a trademark of SMART Temps, LLC.
To delete a vendor, click on the vendor name, then click on the Delete button at the bottom of the page. To rename a vendor, click on the vendor name, then click the Rename button and complete the required fields followed by clicking the save Changes button.
The SMART ShieldsSMART ShieldsSMART ShieldsSMART Shields tab displays the users and lines assigned to a SMART Shield.
To assign or remove users from a SMART Shield:
1. Choose the SMART Shield you would like to modify from the list. 2. Check or Uncheck users, under the Allowed Users tab, that you would like to add or remove from the
user list. 3. If necessary, adjust the order in which users appear on the SMART Shield by assigning order numbers in
the Order column (The system will use alphabetical order by default). 4. Click the Save Changes button when finished.
To assign SMART Shields to specific lines (when usi ng for the serving flow of food step):
1. Choose the Shield you would like to modify from the list. 2. Click on the Lines tab. 3. Check or uncheck desired lines. (The number of serving lines are determined in Manage > Site Profiles ). 4. Click the Save Changes button when finished.

32 SMART Temps, LLC. © 2007-20010. All rights reserved. This document may not be not be copied, modified, distributed
or otherwise disseminated, in whole or part, without express written permission from SMART Temps, LLC. “SMART TEMPS” is a trademark of SMART Temps, LLC.
The UsersUsersUsersUsers tab allows you create or edit users for each site. (Directors can create a user at any site in their district; Managers can only create users for their own site)
To create a new user:
1. Select the site where you would like to create the user. 2. Select which permission level you would like to assign the new user (Staff, Kitchen Manager,
etc.). 3. Click on the Create User button on the bottom of the screen. 4. Fill in the required fields from the pop up box. 5. Click on the Create User button.
To edit an existing user:
1. Select the site of the user you would like to edit. 2. Select the current permission level of the user (Staff, Kitchen Manager, etc). 3. Double click the users name. 4. Edit desired fields. 5. Click on Save Changes button when finished.

33 SMART Temps, LLC. © 2007-2010. All rights reserved. This document may not be not be copied, modified, distributed or
otherwise disseminated, in whole or part, without express written permission from SMART Temps, LLC. “SMART TEMPS” is a trademark of SMART Temps, LLC.
The Login HistoryLogin HistoryLogin HistoryLogin History tab displays the login date and time of every user who viewed the selected site.
Search Options and Button Description:
• Start and End - Select the range of time you wish to review the Login History. The calendar icon next to the Start and End descriptors allows you to select the date from a drop-down calendar.
• Print – Allows you to print the selected date range of logins.
Category Descriptions:
• Site Name – Name of site. • Login Name – Name of user that logged in. • Date – Date and time of login.