request for purchasing authority agency guide - doa … · request for purchasing authority agency...
TRANSCRIPT
Updated August 25, 2017
State of Wisconsin
Department of Administration
Request for Purchasing Authority
Agency Guide
Job Aid: RPA Website User Guide for Agencies

Job Aid: RPA Website User Guide for Agencies
2
TABLE OF CONTENTS Accessing the RPA Website ........................................................................................................................................................................ 3
Creating a New Request ............................................................................................................................................................................. 4
Editing Agency Drafts & Agency Revisions ................................................................................................................................................. 8
Searching for Requests ............................................................................................................................................................................ 14
Charts & Graphs ....................................................................................................................................................................................... 19
Note: If you have a pop-up blocker installed in your browser, be sure that it is turned off while filling out the information for the
creation of your RPA. If you click the back button in your browser with the pop-up blocker on, you may not be prompted to save
your progress, which could result in losing information you had previously entered.
Note: You will be automatically logged out after your screen has been idle for 20 minutes. Be sure to save your information often to
avoid losing anything.
Note: The process for posting to the Public Notices site has not changed and will not be impacted by this website. You must still post
notices through the same procedure you have been using up until this point.
Note: CAPS will submit all RPA requests on behalf of its supported agencies. CAPS agencies should still create user accounts in the
RPA system to track the progress of their request.
Job Aid: RPA Website User Guide for Agencies
3
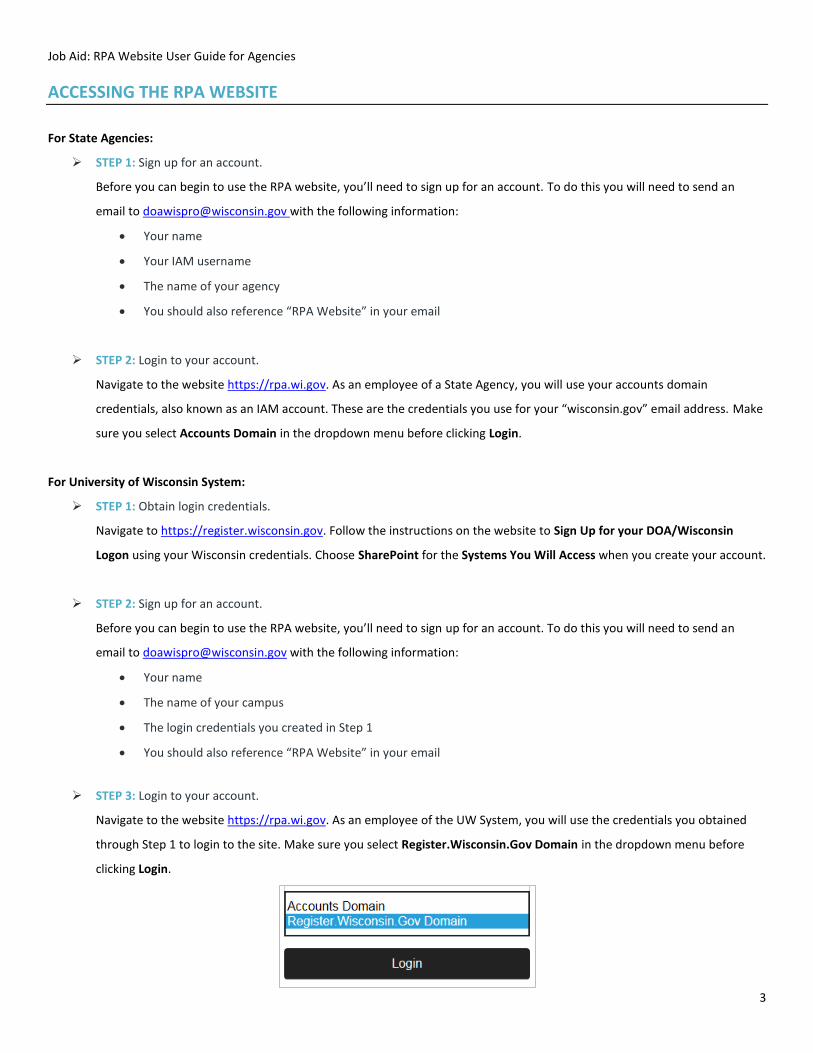
ACCESSING THE RPA WEBSITE
For State Agencies:
➢ STEP 1: Sign up for an account.
Before you can begin to use the RPA website, you’ll need to sign up for an account. To do this you will need to send an
email to [email protected] with the following information:
• Your name
• Your IAM username
• The name of your agency
• You should also reference “RPA Website” in your email
➢ STEP 2: Login to your account.
Navigate to the website https://rpa.wi.gov. As an employee of a State Agency, you will use your accounts domain
credentials, also known as an IAM account. These are the credentials you use for your “wisconsin.gov” email address. Make
sure you select Accounts Domain in the dropdown menu before clicking Login.
For University of Wisconsin System:
➢ STEP 1: Obtain login credentials.
Navigate to https://register.wisconsin.gov. Follow the instructions on the website to Sign Up for your DOA/Wisconsin
Logon using your Wisconsin credentials. Choose SharePoint for the Systems You Will Access when you create your account.
➢ STEP 2: Sign up for an account.
Before you can begin to use the RPA website, you’ll need to sign up for an account. To do this you will need to send an
email to [email protected] with the following information:
• Your name
• The name of your campus
• The login credentials you created in Step 1
• You should also reference “RPA Website” in your email
➢ STEP 3: Login to your account.
Navigate to the website https://rpa.wi.gov. As an employee of the UW System, you will use the credentials you obtained
through Step 1 to login to the site. Make sure you select Register.Wisconsin.Gov Domain in the dropdown menu before
clicking Login.

Job Aid: RPA Website User Guide for Agencies
4
Once you have successfully logged in, you will see this homepage:
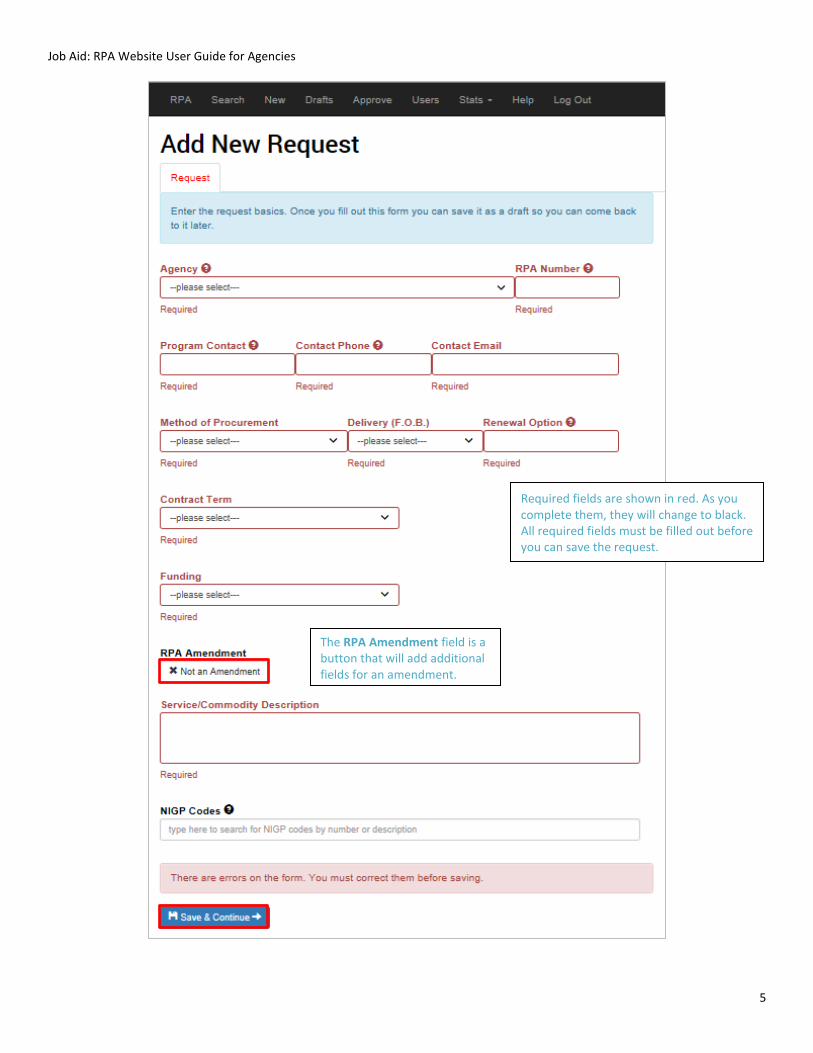
CREATING A NEW REQUEST
➢ STEP 1: Navigate to the RPA homepage.
Click the New Request button at the bottom or select the New tab at the top.
➢ STEP 2: Fill in the required information. All required fields with missing information will be initially displayed in red. As you
complete these fields, they will turn black.
Job Aid: RPA Website User Guide for Agencies
5
Required fields are shown in red. As you complete them, they will change to black. All required fields must be filled out before you can save the request.
The RPA Amendment field is a button that will add additional fields for an amendment.

Job Aid: RPA Website User Guide for Agencies
6
• Agency: Select the agency that your RPA applies to.
• RPA Number: The RPA Number must follow this format: AAA1230A1.
o Alphabetical prefix: 2 letters (e.g., AA)
o Fiscal year code: 1 letter (e.g., A)
o Number: 4 digits (e.g., 1230)
o Optional letter and amendment number (e.g., A1)
• Program Contact, Contact Phone, and Contact Email: Enter the contact information for the person who should be
contacted if there are any questions about your RPA request.
• Method of Procurement: Select the appropriate method of procurement from the list:
o A – Noncompetitive negotiation (sole source)
o B – General waiver
o C – Motor vehicle purchase
o D – Legal services
o E – Collective purchase
• Delivery (F.O.B.): Delivery Freight on Board options include:
o Destination
o Installed
o Origin
• Renewal Option: The renewal option should be specific to your request. If there is no option for renewal for your
RPA, enter None.
• Contract Term: The contract term can be entered as:
o Number of years (e.g., 1 year)
o Specific date range (e.g., 6/30/2015 to 7/1/2016)
o One time purchase
• Funding: Specific revenue sources are listed in the dropdown menu:
o GPR – General Purpose Revenue
o PR-O – Program Revenue Other
o PR-S – Program Revenue Service
o PR-F – Program Revenue Federal
o Seg-O – Segregated Revenue Other
o Seg-L – Segregated Revenue Local
o Seg-S – Segregated Revenue Service
o Seg-F – Segregated Revenue Federal
o Other: If Other is selected, you must fill the Other Description.
You will want to keep a record of your RPA Number as this will be the best way to search for your RPA once your request has been submitted.
If your RPA will require more than one source of funding, be sure to specify the percentage of funding in the Other Description field (e.g., 50% SEG-L and 50% PR-O).

Job Aid: RPA Website User Guide for Agencies
7
• RPA Amendment:
o The white RPA Amendment field is a button that is set to Not an Amendment by default.
o If your RPA is an amendment to an existing RPA, click the button and it will change color to green and will
display two additional required fields:
▪ Previous RPA Number
▪ RPA Amendment Number
• Service/Commodity Description: Include a summary of the purpose of your RPA.
• NIGP Codes: If you are attaching NIGP codes, you can search the full list of codes available by typing a number or
keyword into the field.
• Save & Continue: Click to save your work. Before you will be allowed to save, you must complete all required
fields. Once you have clicked the button, several new tabs will appear at the top of your screen, which will allow
you to complete your RPA. You don’t have to complete each step at this time – you may return to work on your
draft at a later date.

Job Aid: RPA Website User Guide for Agencies
8
EDITING AGENCY DRAFTS & AGENCY REVISIONS
If your RPA has been created but hasn’t yet been submitted for approval, it is in the Agency Draft Phase and may be accessed via the
Drafts tab. You may edit your draft multiple times before submitting it. If you have already submitted your RPA for approval and it
has been returned for revisions, it is in the Agency Revision Phase. Drafts in the Agency Revision Phase must be updated before
they can be resubmitted.
➢ STEP 1: Navigate to the RPA homepage.
To find your saved draft, click the Draft Requests button at the bottom or select the Drafts tab at the top.
➢ STEP 2: Select your draft.
Select the draft you’d like to work on by clicking anywhere within the description box.

Job Aid: RPA Website User Guide for Agencies
9
➢ STEP 3: Edit your draft.
Once you have created your initial request, you will have access to several new tabs to edit. All tabs in red must be
completed before submitting your request for approval.
• Request: Shows the information you entered when you created your request.
• Vendors: Enter the information for the vendors associated with this request and click + Add Vendor to List. You
may enter multiple vendors, a single vendor if this request is sole source, or you may leave the field blank if you
don’t know the vendors. To remove a vendor from this list, click the button to the right of the vendor’s
information. Click Save & Continue before leaving the page.
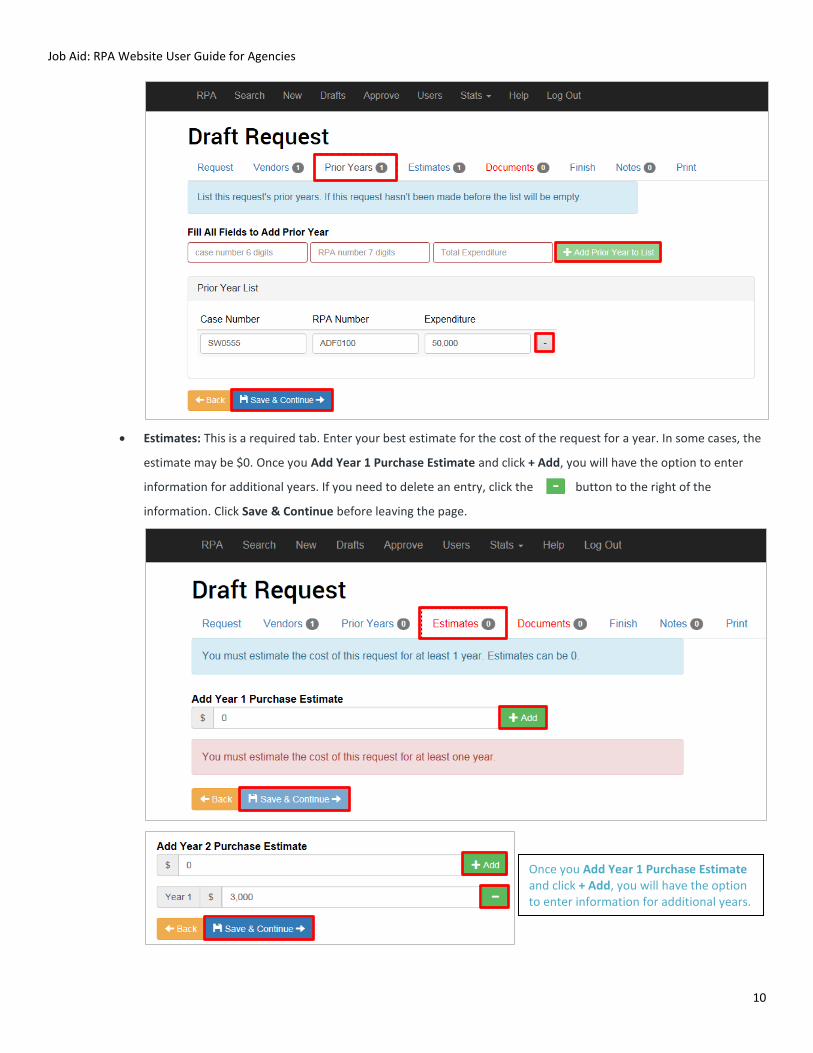
• Prior Years: Enter the requested information for prior years for this request and click + Add Prior Year to List. If
this request hasn’t been made before, the list will be empty.
o Case Number – 6 digits
o RPA Number – 7 digits
o Expenditure – total expenditure
To remove a prior year from this list, click the button to the right of the year’s information. Click Save &
Continue before leaving the page.
Job Aid: RPA Website User Guide for Agencies
10
• Estimates: This is a required tab. Enter your best estimate for the cost of the request for a year. In some cases, the
estimate may be $0. Once you Add Year 1 Purchase Estimate and click + Add, you will have the option to enter
information for additional years. If you need to delete an entry, click the button to the right of the
information. Click Save & Continue before leaving the page.
Once you Add Year 1 Purchase Estimate and click + Add, you will have the option to enter information for additional years.

Job Aid: RPA Website User Guide for Agencies
11
• Documents: This is a required tab. Click the dropdown arrow and select the document you will upload. You will
have an option of attaching a number of documents through this screen.
o *DOA_3046A_Cklist – Form DOA-3046A – Request for Purchasing Approval/Authority Checklist – required
o *Public_Notice – a copy of the Public Notice or a document that includes a statement certifying the public
notice will be placed in compliance with PRO-C-6 – required when submitting noncompetitive negotiation
(sole source) and general waiver requests.
o *RPA_DOA_3046 – Form DOA-3046 – Request for Purchasing Approval/Authority (RPA) – required
o *Transmittal_Letter – Transmittal Letter – required
o CBA – Form DOA-3821A or DOA-3821B – Cost Benefit Analysis
o Collective_DOA_3044 – Form DOA-3044 – Collective Purchasing with Other States or the Federal
Government Data Request
o Other
o Proposed_Contract
o Vehicle_DOA_3016
To add a document, select the appropriate Document Type from the dropdown menu and click on Select
Document + and locate the file you want to attach. If you’d like to delete a file after you’d added it, click on the red
Delete button to the right of the document. Once you are done adding files, click Save & Continue.
For your convenience, several blank forms are linked here. Click on them to download them to your desktop, fill them in, and upload here!
This red error message will disappear once you’ve uploaded the three required documents.

Job Aid: RPA Website User Guide for Agencies
12
• Finish: Once you are done entering all of the information into the system, clicking on the Finish tab will allow you
to submit your RPA for approval.
o If all the required information has been entered, you will see a green confirmation message and will have
the option of clicking Submit Request. When your request is submitted, you will see a confirmation
message that will include a link to view your request.
o If you have not entered all of the required information, you will see a red error message letting you know
which steps still need to be completed (and the tabs with missing information will also be shown in red).
• Notes: Allows you to include extra information not already covered within the other tabs. Enter your text into the
New Note box and click + Add to save the note. Notes will appear below the + Add button and will include date,
time, and name of the author.
Before submitting your RPA, you will want to make a note of your RPA Number as this will allow you to easily search for your RPA on the website and check the status of approvals.

Job Aid: RPA Website User Guide for Agencies
13
• Print: To print your RPA or any documents you’ve attached to the RPA, click on the Print tab. Click the link for the
item you wish to print and when the pop up window appears, click Open to open the document. You may then
print the document.
Note: The process for posting to the Public Notices site has not changed and will not be impacted by this website. You must still post
notices through the same procedure you have been using up until this point.

Job Aid: RPA Website User Guide for Agencies
14
SEARCHING FOR REQUESTS
➢ STEP 1: Navigate to the RPA homepage.
Click the Search Requests button at the bottom or select the Search tab at the top.
You may search for your RPA through the Search tab or button at any point during the RPA process. After clicking Search
Requests, you will be taken to the View Request screen.

Job Aid: RPA Website User Guide for Agencies
15
➢ STEP 2: Enter your search criteria.
Select the filters you wish to use to fine tune your search results. Search results will default to your agency and you will only
be able to see the RPAs submitted by your agency or agencies you have access to.
• Agency: Selecting an agency in the agency dropdown menu will filter your search results by the agency that
submitted the RPA. Search results will default to your agency and you will only be able to see the RPAs submitted
by your agency or agencies you have access to.
• RPA Number: If you wish to search for a specific RPA, type the RPA Number into the corresponding field (e.g.,
AAA1230). The search is not case sensitive.
• Phase: Select the current phase of the RPA. Phases include: Agency Draft, Agency Revision, Receiving, Assignment
Phase, Procurement Manager, Section Chief, Deputy Division Administrator, DOA Division Administrator, Chief
Information Officer, Governor, Contract Number, and Approved. If there is a phase that is not shown in the
dropdown menu, then there are currently no RPAs in that phase.
• Created After and Created Before: You have the ability to search for an RPA submitted before or after a particular
date. For example, you may search for RPA created sometime after January 1, 2017 or before December 15, 2017.
➢ STEP 3: Click on your RPA.
To open the desired RPA, click anywhere on the square.
Job Aid: RPA Website User Guide for Agencies
16
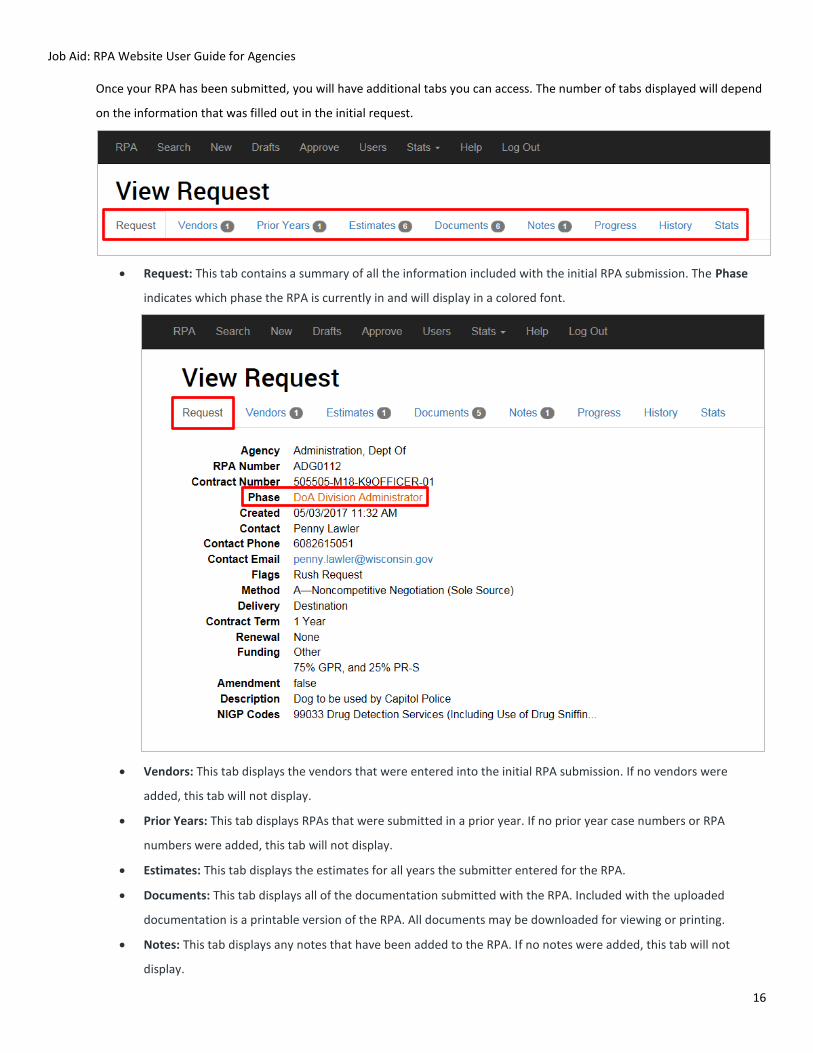
Once your RPA has been submitted, you will have additional tabs you can access. The number of tabs displayed will depend
on the information that was filled out in the initial request.
• Request: This tab contains a summary of all the information included with the initial RPA submission. The Phase
indicates which phase the RPA is currently in and will display in a colored font.
• Vendors: This tab displays the vendors that were entered into the initial RPA submission. If no vendors were
added, this tab will not display.
• Prior Years: This tab displays RPAs that were submitted in a prior year. If no prior year case numbers or RPA
numbers were added, this tab will not display.
• Estimates: This tab displays the estimates for all years the submitter entered for the RPA.
• Documents: This tab displays all of the documentation submitted with the RPA. Included with the uploaded
documentation is a printable version of the RPA. All documents may be downloaded for viewing or printing.
• Notes: This tab displays any notes that have been added to the RPA. If no notes were added, this tab will not
display.
Job Aid: RPA Website User Guide for Agencies
17
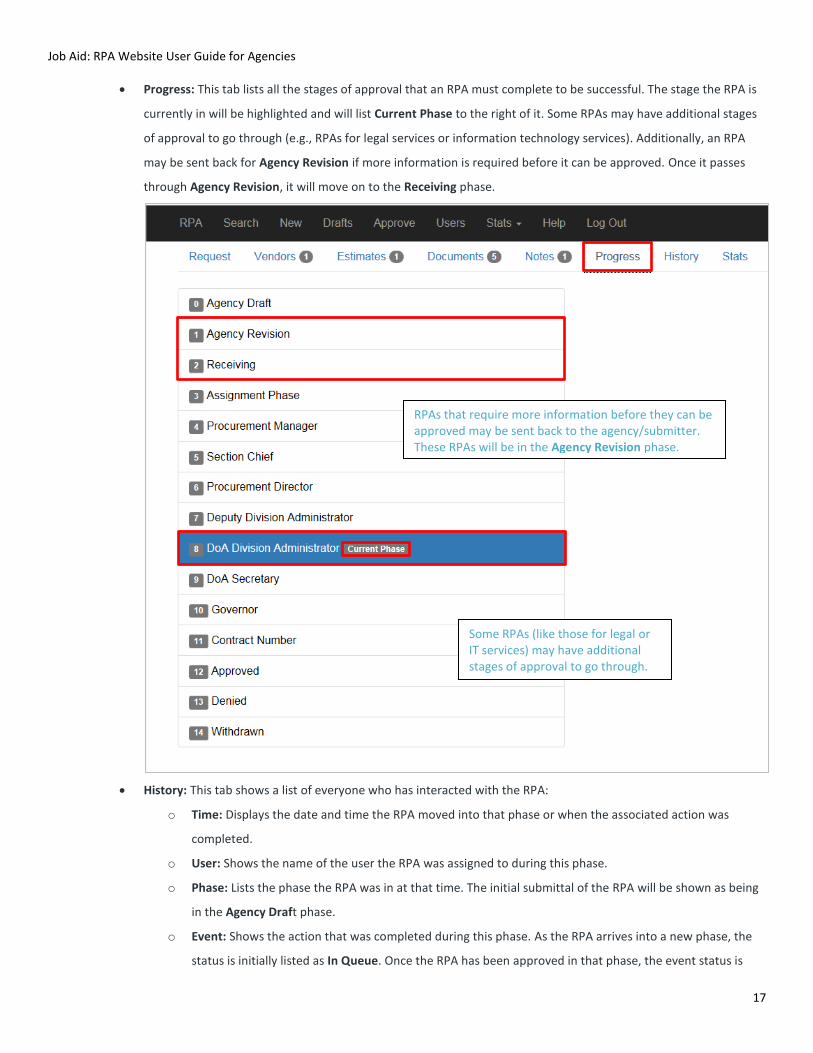
• Progress: This tab lists all the stages of approval that an RPA must complete to be successful. The stage the RPA is
currently in will be highlighted and will list Current Phase to the right of it. Some RPAs may have additional stages
of approval to go through (e.g., RPAs for legal services or information technology services). Additionally, an RPA
may be sent back for Agency Revision if more information is required before it can be approved. Once it passes
through Agency Revision, it will move on to the Receiving phase.
• History: This tab shows a list of everyone who has interacted with the RPA:
o Time: Displays the date and time the RPA moved into that phase or when the associated action was
completed.
o User: Shows the name of the user the RPA was assigned to during this phase.
o Phase: Lists the phase the RPA was in at that time. The initial submittal of the RPA will be shown as being
in the Agency Draft phase.
o Event: Shows the action that was completed during this phase. As the RPA arrives into a new phase, the
status is initially listed as In Queue. Once the RPA has been approved in that phase, the event status is
Some RPAs (like those for legal or IT services) may have additional stages of approval to go through.
RPAs that require more information before they can be approved may be sent back to the agency/submitter. These RPAs will be in the Agency Revision phase.
Job Aid: RPA Website User Guide for Agencies
18
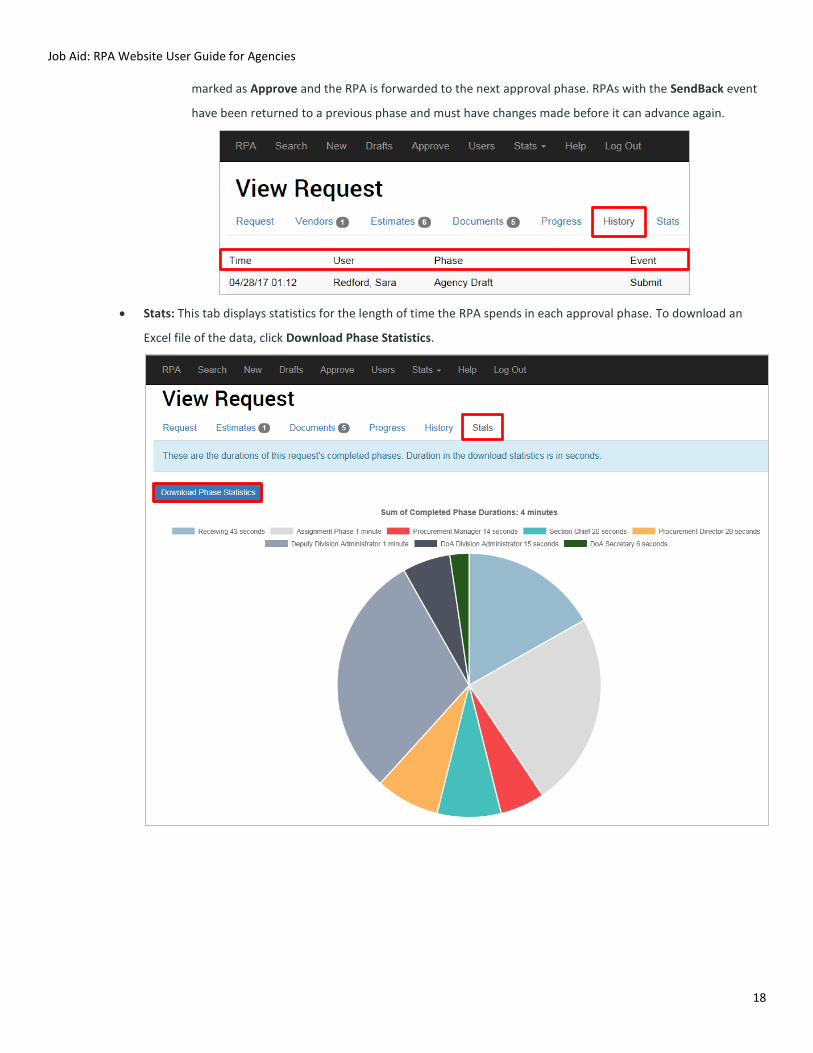
marked as Approve and the RPA is forwarded to the next approval phase. RPAs with the SendBack event
have been returned to a previous phase and must have changes made before it can advance again.
• Stats: This tab displays statistics for the length of time the RPA spends in each approval phase. To download an
Excel file of the data, click Download Phase Statistics.

Job Aid: RPA Website User Guide for Agencies
19
CHARTS & GRAPHS
Statistics may be generated to see the average time that RPAs spend in each of the approval phases. This data may be generated for
each individual RPA and may also be viewed as averages for all RPAs submitted to the site.
Stats for an Individual RPA
➢ STEP 1: Navigate to the RPA homepage.
Click the Search Requests button at the bottom or select the Search tab at the top.
➢ STEP 2: Search for and click on your RPA.
For step-by-step instructions, see the section on Searching for Requests.
➢ STEP 3: Click on the Stats tab.
You may download this information by clicking on the Download Phase Statistics button.

Job Aid: RPA Website User Guide for Agencies
20
Stats for All RPAs
➢ STEP 1: Navigate to the RPA homepage.
Click on the Stats tab and select Average Phase Duration from the dropdown menu.
Once selected, you will be taken to a page displaying a bar graph of the average length of time all RPAs spend in each
phase.

Job Aid: RPA Website User Guide for Agencies
21
➢ STEP 2: Limit the data to a particular phase, if desired.
You can limit the information shown to one or more phases, if desired.
a. At the bottom of the page, you’ll need to click on the None Selected dropdown menu under Limit statistics to
requests currently in phase(s).
b. Select the desired phase(s) and click Refresh to update the graph. Clicking anywhere on the graph will also update
the image.
➢ STEP 3: Download the data, if desired.
If you wish to download the data, it can be saved as an Excel file. Click Download Phase Statistics.