requisition processing guide
TRANSCRIPT

Requisition Processing Step by Step May 2004
1
Requisition Processing Guide Contents
CREATE A REQUISITION WITHOUT A MATERIAL MASTER (ME51) 4 CREATE A REQUISITION WITH THE MATERIAL MASTER (ME51) 15 COPY A REQUISITION (ME51) 25 DISPLAY A PURCHASE REQUISITION (ME53) 28 CHANGE A PURCHASE REQUISITION (ME52) 33 LIST DISPLAY OF PURCHASE REQUISITIONS BY ACCOUNT ASSIGNMENT: COST CENTER (ME5K) 37 CREATE A PURCHASE REQUISITION FOR ITEMS ASSIGNED TO MULTIPLE COST CENTERS (ME51) 44 DISPLAY A PURCHASE ORDER USING A REQUISITION NO. (ME53) 50 DISPLAY A PURCHASE ORDER USING A P.O. NUMBER (ME23) 52 INDIVIDUAL RELEASE OF A PURCHASE REQUISITION (ME54) 58
COLLECTIVE RELEASE OF PURCHASE REQUISITIONS (ME55 59 SINGLE POINT OF ENTRY/ STAT AND RESUPPLY (ZM10) 61

R/3: Requisition Processing Step by Step April 2004 Transaction Code Quick Reference
2
Create a Requisition without a Material Master ME51 Create a Requisition with a Material Master ME51 Copy a Requisition ME51 Display a Requisition ME53 Change a Requisition ME52 Display Requisitions by Cost Center ME5K Create Requisitions for Multiple Cost Centers ME51 Display a Purchase Order ME23 Individual Release of a Purchase Requisition ME54 Collective Release of Purchase Requisitions ME55 Single Point of Entry for ordering materials STAT ZM10

R/3: Requisition Processing Step by Step April 2004 Setting Your Plant
3
Setting Parameter Defaults (Field Default Values) 1. Follow the menu path:
System User profile Own Data (or enter SU3 in the command field), which will take you to the Maintenance screen. Note: going to the Maintenance screen will open up a second session of R/3.
On the Maintenance screen: 2. Click on the Parameters tab (the third of three tabs in the middle
of the screen). 3. Click once or twice on the inside scroll bar on the Parameters tab
to find empty spaces. 4. Enter WRK in the Parameters column. 5. Enter your Plant value (i.e., DUKE, DHSP, etc.) in the Value
column.
6. Click on the Save button. If you wish, close out the second session of R/3.
7. By setting your Plant value in the Parameters, your plant should now default in on the requisition screens, saving you keystrokes.

R/3: Requisition Processing Step by Step April 2004 New Create a Purchase Requisition (without the Material Master)—ME51
4
The requisitioning process begins when a need for a material or service is identified. You can use the Material Master for many items or services. However, you may not find the material or service you want in the Material Master. If not, you will need to create a requisition without the Material Master. Information such as a short text description of the material or service, the quantity, purchasing group, unit of measure, estimated net price, and the GL account will need to be entered for items in a purchase requisition that does not use the Material Master. A purchase requisition is a request for goods and/or services. Depending on the approval rules selected by a department, some purchase requisitions may require approval before they can be converted into purchase orders. Requisitions are: • itemized • may request multiple materials or services • procured from different vendors.
When the requisition is processed into a purchase order, the R/3 system separates items and creates multiple purchase orders by vendor. Also, a number of requisitions for materials or services from the same vendor might be consolidated into a single purchase order.

R/3: Requisition Processing Step by Step April 2004 New Create a Purchase Requisition (without the Material Master)—ME51
5
1. Key in ME51 in the white command field on the main SAP R/3 screen and press or click Enter.
The Create Purchase Requisition screen is displayed:
2. In the Document type field, click on the drop-down and enter the appropriate document type from the options. The selections below are the most commonly used types:
NB for a Purchase requisition (used for regular purchase
requisitions). This is the default.
SH for SPECIAL HANDLING (needs Procurement Services handling i.e.: attachments)

R/3: Requisition Processing Step by Step April 2004 New Create a Purchase Requisition (without the Material Master)—ME51
6
3. Make sure the Source determination box is checked. This allows the system to select a vendor, if needed.
4. In the Acct. Assignment cat. field, enter the account
assignment category: X Used for All non-asset purchases (materials for
consumption). This is the most commonly used selection. R Used for Items Goods Receipt (used when receiving activity
is expected – i.e., at RCH, DRH, Clinical Labs, etc.) Z Used for Balance Sheet Accounts (non-depreciated assets)
left blank (used for R/3 Inventory) 5. Enter a date in the Delivery date field. 6. Enter a plant in the Plant field (e.g., DHSP or DUKE). 7. Enter a purchasing group in the Purchasing Group field. 8. Click on the Enter button to go to the Create: Purchase
Requisition: Item Overview screen:

R/3: Requisition Processing Step by Step April 2004 New Create a Purchase Requisition (without the Material Master)—ME51
7
9. To search for the material in the Material Master first, click in the Material field and click on the drop-down box to the right to search for a material number from the Material Master.
Note: The Search Help box will offer different tabs - ways of sorting for material numbers. Select the “W” tab: Plant material by description). To see a list of tabs, click on the List button.
10. Check to be sure that your Plant defaulted in the Plant field. 11. Search for the desired material, using asterisks as wild cards on
the Plant material by description tab – for example: *cup*.
12. To insert the item in a Personal List, click once on the item to
highlight it and then click on the Insert in personal list button at the bottom of the search box. The cursor will jump down one.
13. The next time you click on the drop-down in the Material field, you will see the item in your Personal Value List:

R/3: Requisition Processing Step by Step April 2004 New Create a Purchase Requisition (without the Material Master)—ME51
8
14. If the material is not in the Material master, type the name of the material or service in the Short text field. Do not use invoice numbers as descriptions or descriptions that are too general (use “pen, black” instead of “office supplies”).
15. Enter the quantity in the Qty requested field (1 for services). 16. Enter the unit of measure (you can click on the drop-down
arrow in that box to see the choices, such as EA, BOX, etc.). 17. Enter the material group (click on the drop-down arrow).
18. Click on the Enter button to display the Create Purchase Requisition: Item 00001 screen:
19. Enter the estimated price (ex: 100) in the Val. Price field. You will note that this is a required field for this screen. Do not put the dollar sign or decimal point - just the estimated price.
If you wish to order from a particular vendor:
20. Click in the Des.vendor (desired vendor) field and click on the
drop-down.

R/3: Requisition Processing Step by Step April 2004 New Create a Purchase Requisition (without the Material Master)—ME51
9
Note: the first time you click on the dropdown in the Des. Vendor field, there will be several ways of searching. Click on 0 for Purchasing Vendors- Ordering Addresses.
21. Click in the Name field (see above) and search for your desired
vendor by using asterisks as wild cards (ex: *IBM*). Click on Enter to display the Vendor addresses:
Note: If you do not find your desired vendor, you can
enter a note (see pages 12 and 13 for notes). 22. Enter a catalog number (if known) in the Vendor mat. no. field. 23. If goods receipt is required (and R was not selected for the
Account Assignment category), place a check in the GR box. Note: goods receipt entries must be made for the items received.
If goods receipt is NOT required, be sure BOTH GR and GR non-val boxes are unchecked. The IR box should be checked.

R/3: Requisition Processing Step by Step April 2004 New Create a Purchase Requisition (without the Material Master)—ME51
10
24. Click on the Enter button to display the Account Assignment
for Item dialogue box. The Account Assignment for Item 00001 screen will be displayed:
25. Enter the General ledger (G/L) account (search with asterisks
on T if needed). 26. Enter the Cost center (or WBS Element) that is to be charged
for the material in the correct field. Do not use the Order field. 27. Enter the Unloading point (a specific location or room). 28. Enter the Goods recipient (first initial and last name). 29. If all items will be charged to the same cost center, Click on the
Repeat acc. ass. on button. If you have set up your messages to display in the middle of your screen, you will see the Information: Account assignment data held screen.
30. Click on the Continue button or press Enter to display the
Delivery Address for Item 00001 screen.

R/3: Requisition Processing Step by Step April 2004 New Create a Purchase Requisition (without the Material Master)—ME51
11
The following screen is displayed:
31. Enter the Address number in the Address field at the upper right or select the address via a search (click on the dropdown and use asterisks with a single noun typed in Name field).
32. Double-click on the address and the SAP R/3 address number
will be put into the Address field. 33. Press Enter to populate the screen. Check to see if the Building
Name and Address are correct (add a room number, if necessary).
34. In a blank field under Name, put the name of the person who will
receive the items as well as a contact telephone number. 35. If the address will be the same for all items on this requisition,
click on the Repeat address on button to display the “Delivery Address Held” on the Information screen.
36. Click on the Adopt button to display the Create Purchase Requisition: Item Overview screen again.

R/3: Requisition Processing Step by Step April 2004 New Create a Purchase Requisition (without the Material Master)—ME51
12
The following screen is displayed:
37. To put in a note to Purchasing or the vendor, click on the blue
button(s) to the immediate left of the desired line item(s) to highlight the item(s).
38. Click on the Text Overview button or press Shift+F6 to display the Create: Purchase Requisition Texts: Item 00001 screen.
39. Use the Item Text field for notes that the vendor should see. 40. If you are paying an existing invoice, in the Item Text screen,
type in the words “To Pay Invoice _________dated ________.” 41. Indicate in the Item note (Duke Internal Use) field if this vendor
is not already in the R/3 system. Include the Vendor’s Name, Phone Number, and Vendor Fax Number. Make note of any special shipping instructions: i.e., emergencies, rush orders.
42. To type an internal note to Purchasing or Sponsored Programs,
use Item note (Duke internal use) or the Long Text. 43. Check the boxes next to fields with notes.

R/3: Requisition Processing Step by Step April 2004 New Create a Purchase Requisition (without the Material Master)—ME51
13
The following screen is displayed:
44. Click on the Long Text button on the Application Toolbar to
write a longer note to Sponsored Programs or to Purchasing. 45. If you are buying capital equipment (GL Account 66XXXX – over
$5000), on a Federal Sponsored Project (WBS Elements in 30X – 34X in Company Code 10) the following “certification” statement MUST be entered in the Long Text field.
“To the best of my knowledge, this item of equipment or substantially similar item is not available for shared use.”

R/3: Requisition Processing Step by Step April 2004 New Create a Purchase Requisition (without the Material Master)—ME51
14
46. You may also write a note to Purchasing in one of the Text fields. For example, if the purchase is over $2500 or over $5000 for capital, you will need a justification/quote. Identify this in the Text field and fax supporting justification or quotes documentation to: 684-4344. Be sure to reference your requisition number on the fax and include a fax cover sheet with the name of the person to whom you are sending the back-up documentation.
47. Click on the Back button or press F3 to display the Create:
Purchase Requisition: Item Overview screen. 48. Click on the Save button to display the Information screen
with an SAP R/3 generated purchase requisition number. Be sure to reference this number when you send any faxes:
49. Click on the OK button or press Enter to display the Create: Purchase Requisition: Initial Screen.
50. Click on the Exit button or press Shift+F3 until the initial SAP
R/3 System screen is displayed.

R/3: Requisition Processing Step by Step May 2003 Create a Purchase Requisition using a Material Master—ME51
15
The requisitioning process begins when a need for a material or service is identified. A purchase requisition is created, which includes the material, requested quantity, cost center to be charged and the required delivery date. If you are using the Material Master, information such as the unit of measure (box, etc.), net price, storage location, and account assignment (GL account) defaults from the material master record when a purchase requisition for a material or service with a material master record is created. The purchase requisition is released and a purchase order is created. If you are not using the Material Master, you will need to provide some of the above information. A purchase requisition is a request for goods and/or services. Depending on the approval rules selected by a department, some purchase requisitions may require approval before they can be converted into purchase orders. Requisitions are: • itemized • may request multiple materials or services • may be procured from different vendors. When the requisition is processed into a purchase order, the R/3 system separates items and creates multiple purchase orders by vendor. Separate requisitions for materials or services from the same vendor can be consolidated into one purchase order. You can track your purchase requisition to see if it has been approved and/or turned into a purchase order. You can also see all the open (and closed, if necessary) purchase requisitions that have been charged to a particular cost center. The transactions in this Step-by-Step guide are designed to walk you through the basic steps in creating, copying, displaying, changing, approving and looking up requisitions. For more advanced courses, please see the SAP R/3 curriculum online at www.r3.duke.edu.

R/3: Requisition Processing Step by Step May 2003 Create a Purchase Requisition using a Material Master—ME51
16
Key ME51 in the transaction field and press Enter. The following screen is displayed:
1. In the Document Type field, click and select from the valid options below:
NB for a Purchase requisition (used for regular purchase
requisitions and is the default)
SH for SPECIAL HANDLING (needs Procurement Services handling i.e.: attachments)
2. Make sure that the Source determination box is checked. This will allow the system to select a vendor.

R/3: Requisition Processing Step by Step May 2003 Create a Purchase Requisition using a Material Master—ME51
17
3. Enter the appropriate Account Assignment category from the
valid entries (either X or R should default, depending on the area’s goods receipt policy):
X For All non-asset purchases (materials for consumption)R For Items Goods Receipt (used when receiving activity
is expected and performed consistently. This is the default for DRH and RCH)
Z For Balance Sheet Accounts (non-depreciated assets) A for Asset (reserved for future use)
left blank (used for R/3 Inventory) 4. Enter the Delivery Date. 5. Select the Plant (appropriate facility – i.e., DHSP, DUKE, etc.). 6. Select the Purchasing Group from the drop-down box. (you will
need to know your department’s Purchasing group). 7. Click on the Enter button. If you get a delivery date warning,
click OK and hit Enter on the keyboard several times to display the Create: Purchase Requisition: Item Overview screen:

R/3: Requisition Processing Step by Step May 2003 Create a Purchase Requisition using a Material Master—ME51
18
8. Click in the Material field of line item1; then click on the drop-down box to the right to search for a material number from the Material Master.
Note: The first time you click on the search, ,the Restrict Value Range box will offer several tabs for ways of searching for material numbers. Select “W”. The W should default.
9. Search for the desired material, using asterisks as wild cards on the Plant material by description screen – for example: *cup*.
10. Click on the green check to see a list of materials:
You can create a personal list of materials by using these steps: 11. Click once on the desired material to highlight it and click on the
Insert in personal list button at the bottom of the screen or press F6. The next time you click on the dropdown, the Personal

R/3: Requisition Processing Step by Step May 2003 Create a Purchase Requisition using a Material Master—ME51
19
Values list will display. If you are ordering an item not on your list, click on the All Values button to get back to the W search.
12. Note that the cursor jumped down. The next material in the list is now highlighted. To select the material you want for this current order, click it again to highlight it. Then double-click on it or click on the Copy button or press Enter to display the Create: Purchase Requisition: Item Overview screen:
13. This will put a material item number in the Material field. Tab over two fields to the Qty requested field and enter the quantity.
Note: You may have to check with Purchasing to
find out if the material you are ordering comes in boxes, sleeves, or single “each” units. However, it is not necessary to enter anything in the Unit field or the Matl group field when ordering from the Material Master.
14. Click on the Enter button or press Enter (you may have to press twice) to display the Account Assignment for Item screen.

R/3: Requisition Processing Step by Step May 2003 Create a Purchase Requisition using a Material Master—ME51
20
The following screen is displayed with the GL account defaulted:
15. Enter the Cost center (or WBS Element) that is to be charged for
the material in the correct field. Do not use the Order field. 16. Enter the unloading point in the Unloading point field (this
should be a specific location, such as Room 2468). 17. Enter the first initial and last name of the goods recipient in the
Goods recipient field. 18. If all items will be charged to the same cost center, Click on the
Repeat acc. ass. on button. If you have set up your messages to display in the middle of your screen, you will see the Information: Account assignment data held screen.
19. Press Enter or click on the Continue button to display the Delivery Address for Item screen.

R/3: Requisition Processing Step by Step May 2003 Create a Purchase Requisition using a Material Master—ME51
21
The following screen is displayed:
20. At the upper right on the screen, enter the address code number
in the Address field. If you don’t know the address number, you can use a match code search with asterisks (see next steps).
21. To search for a number, click in the Address field and click on
the drop-down. Use asterisks and a single noun in the Name field to search– the field is not case-sensitive (example: *Biology*).
22. If the delivery address is the same for all items being ordered,
click on the Repeat address on button to display the Information: delivery address held screen:
23. Click on the Continue button on the Information screen. 24. Click on the Adopt button or press F8 to display the
Item Overview screen.

R/3: Requisition Processing Step by Step May 2003 Create a Purchase Requisition using a Material Master—ME51
22
The following screen is displayed:
25. Click on the blue button(s) to the immediate left of the desired
line item(s) to highlight the entire line. 26. Click on the Details button to display the Create: Purchase
Requisition: Item NNNN screen.

R/3: Requisition Processing Step by Step May 2003 Create a Purchase Requisition using a Material Master—ME51
23
The following screen is displayed:
27. If goods receipt is required (and R was not selected as the
Accounting Assignment category on the initial Requisition screen), place a check in the GR box.
28. If goods receipt is NOT required, be sure BOTH GR and GR
non-val boxes are unchecked. Note: Invoices will not be paid if the GR box is
checked and goods receipt entries are not made for the items received.
29. Press Enter or click on the Enter button to display the Item Overview screen.

R/3: Requisition Processing Step by Step May 2003 Create a Purchase Requisition using a Material Master—ME51
24
The following screen is displayed:
30. Click on the Save button to display the Information screen: 25. Notice that you will get an SAP R/3 generated document
number. You may record it or display it in the system later. 26. Click on the OK button or press Enter to display the Create:
Purchase Requisition: Initial screen. 27. Click on the Exit button or press Shift+F3 until the initial SAP
R/3 System screen is displayed.

R/3: Requisition Processing Step by Step May 2004 Copy a Purchase Requisition—ME51
25
You may order the same items every week or month and wish to copy a previous requisition, just changing the dates and quantities.
To copy a previously used requisition, key ME51 in the command field on the main SAP R/3 screen and click on the Enter or press Enter.
1. Click on the Purchase Requisition button or press F6 to display the Copy Reference Dialog box as shown below:
3. In the Ref. Purchase Req. field, enter the number of the purchase
requisition you wish to copy. Note: If you need to search for your purchase requisition number, click on the drop-down in the Ref. Purchase Req. field. In the Search Help box, use the Forward or Back buttons to select tab E Purchase Requisitions per Purchasing Group. Enter your in the Purchasing Group field and click on the Continue/ Enter button to display all purchase requisitions placed by your purchasing group. Double-click on the correct number and click on Enter or press Enter to display the Create Purchase Requisition: Reference Requisition Overview screen.

R/3: Requisition Processing Step by Step May 2004 Copy a Purchase Requisition—ME51
26
The following screen is displayed:
2. Click on the blue button(s) to the left of each item you wish to copy to the new requisition. This will highlight the line.
3. To copy all items, click on the Select All button. If you wish to
deselect the items, click on the Deselect All button. 4. Click on the Adopt + Details button on the application toolbar. 5. Click on the Enter button or press Enter if you get a message
asking if the delivery date can be met. 6. The Create Purchase Requisition: Item 00001 screen will appear,
showing your first item to copy.

R/3: Requisition Processing Step by Step May 2004 Copy a Purchase Requisition—ME51
27
7. Make changes to the quantity, if necessary. 8. Change the delivery date to the new delivery date. 9. Check the cost center or WBS element to be charged by clicking
on the Account Assignment button. 10. Click on Repeat Acc Ass On if all new items will be charged to
the same account. 11. Click on the Delivery Address button to display the Delivery
Address for Item 00001 screen. 12. Make any changes needed to the address. 13. If all items are being delivered to the same address, click on
Repeat Address On. 14. Click on the Adopt button. 15. You may add materials to this requisition by clicking on the next
material fields and entering new items. 16. When you have finished, click on the Save button to save
your requisition and record the number if you wish.

R/3: Requisition Processing Step by Step May 2004 Display a Purchase Requisition—ME53
28
After a purchase requisition has been created, details may be reviewed by displaying the requisition. Any changes should be made before any approvals or a corresponding purchase order is created.
Enter the transaction code ME53 in the command field on the User Menu. The following screen is displayed:
1. Enter the Purchase requisition number. 2. Click on the Enter button or press Enter to display the Item
Overview screen:
3. Click on the button(s) to the immediate left of the desired line
item(s). 4. Click on the Details button to display the Item screen.

R/3: Requisition Processing Step by Step May 2004 Display a Purchase Requisition—ME53
29
The following screen is displayed:
5. To see written comments associated with the purchase
requisition, follow the menu path given below: Goto Texts Text overview
The Display Purchase Requisition Text: Item screen is shown:
6. Click on Back button to return to the Item Overview screen.

R/3: Requisition Processing Step by Step May 2004 Display a Purchase Requisition—ME53
30
7. To see what the release strategy is for this requisition, click on the
Release strategy button to display the Release Strategy Requis. NNNNNNNNN, Item screen:
8. Click on the Continue button to display the Item Overview
screen:
9. Click on the button(s) to the immediate left of the line item(s). 10. To see if a purchase requisition has been turned into a purchase
order, click on the General statistics button (or press Shift + F5) to display the Purchase Requisition Statistics: for Item screen.

R/3: Requisition Processing Step by Step May 2004 Display a Purchase Requisition—ME53
31
The following screen is displayed:
Note: If the requisition has turned into a purchase order, the Order Statistics fields will be filled in with the Order quantity, Purchase Order number, and the Purchase Order date.
11. Follow the menu path given below to display the Changes to Purchase Requisition NNNNNNNNN Item screen: Goto Statistics Changes

R/3: Requisition Processing Step by Step May 2004 Display a Purchase Requisition—ME53
32
The following screen is displayed:
12. Click on the Back button to display the Item Overview screen:
13. Click on the button(s) to the left of the desired line item(s). 14. Click on the Account assignments button (or press SHIFT +
F8)to display the Account Assignment for Item screen. The following screen is displayed:
15. Click on the Continue button to display the Item Overview
screen. 16. Click on the Exit button until the initial R/3 screen is displayed.

R/3: Requisition Processing Step by Step May 2004 Change a Purchase Requisition—ME52
33
A purchase requisition for a material subject to a release strategy should not be changed after it has been approved. A requisition that has been processed into a Purchase Order cannot be changed. Enter the transaction code ME52 in the command field on the User Menu. The following screen is displayed:
1. Enter the purchase requisition number. 2. Click on the Enter button to display the Change Purchase
Requisition: Item Overview screen:
3. Enter the new quantity (if applicable). 4. Click on the Enter button or press Enter. 5. To change other elements, click on the button(s) to the immediate
left of the desired line item(s). 6. Click on the Item details button to display the Item screen:

R/3: Requisition Processing Step by Step May 2004 Change a Purchase Requisition—ME52
34
7. Enter the new delivery date, if applicable. 8. Click on the Enter button to display the Item Overview screen:
Note: Both Quantity requested and Delivery date reflect the changes. This will reset the approval process.
9. Click on the blue buttons to the left of the desired line item(s). 10. To change text, click on the Text overview button (or Shift +
F6) to display the Purchase Requisition Texts: Item screen:

R/3: Requisition Processing Step by Step May 2004 Change a Purchase Requisition—ME52
35
11. Click in the Item note text box and enter item text or note text.
You can also click on Long text. THIS IS WHERE YOU WOULD ADD THE SPONSORED PROGRAMS CERTIFICATION IF YOU HAD NOT DONE IT BEFORE THE DEPARTMENT APPROVAL WAS GIVEN (see next step).
12. When purchasing a piece of capital equipment (GL Account 66XXXX), on a Federal Sponsored Project (WBS Elements in 30X – 34X in Company Code 10) the following “certification” statement must be entered. Use the Long Text field to enter the statement:
“To the best of my knowledge, this item of equipment or substantially similar item is not available for shared use.” 13. Click on the Enter button or press Enter. 14. Click on the Back button to display the Item Overview screen:

R/3: Requisition Processing Step by Step May 2004 Change a Purchase Requisition—ME52
36
15. Click on the Save button or press Ctrl+S to display the Information screen.
The following screen is displayed:
13. Click on the OK button or press Enter to display the
Change: Purchase Requisition: Initial screen. 14. Click on the Exit button or press Shift+F3 until the initial SAP
R/3 System screen is displayed.

R/3: Requisition Processing Step by Step May 2004 List Display of Purchase Requisitions by Account Assignment: Cost Center—ME5K
37
To see purchase requisitions in a cost center or WBS element, enter the transaction code ME5K in the command field on the User Menu and click on the Enter button or press Enter.
(Or switch to the SAP Menu and use: Logistics Materials Management Purchasing Purchase Requisition List Displays By account assignment ME5K General).
The List Display of Purchase Requisitions screen is shown below:
1. Enter the cost center or range of cost centers (or a WBS
element) in the Cost center or WBS element field. 2. Enter your purchasing group in the Purchasing group field. 3. Enter a date range in the Delivery date From and To fields. You may enter other data, as you wish, but the cost center or WBS element, purchasing group and dates are essential.
Note: If you want to view all requisitions, including those that have been turned into purchase orders, click the Closed requisitions checkbox at the bottom of the screen (you will get all requisitions charged during the time period you select).
4. Click on the Execute button or press F8 to display the Purchase Requisitions per Account Assignment screen.

R/3: Requisition Processing Step by Step May 2004 List Display of Purchase Requisitions by Account Assignment: Cost Center—ME5K
38
The following screen is displayed:
5. Click once on the desired purchase requisition number. 6. Click on the Detailed data button or press F8 to display the
Detailed Data on Requisition NNNNNNNNNN Item 00001 screen:
Note: This screen shows purchase order information (Requisition date, Order date, PO Number); if the requisition has been turned into a purchase order, these fields will be filled in.
7. Click on the Display requisition button at the bottom or press F2 to display the Purchase Requisition: Item 00001 screen.
Note: This screen will show pricing information (Val. Price).

R/3: Requisition Processing Step by Step May 2004 List Display of Purchase Requisitions by Account Assignment: Cost Center—ME5K
39
The following screen is displayed:
8. Click on the General statistics button or press Shift+F5 to
display the Display: Purchase Requisition Statistics: for Item 00001 screen.
Note: The General or Statistics screen shows information such as who created the requisition (Created by), and purchase order information (Processing stat, Order quantity, Purchase order, Order date).

R/3: Requisition Processing Step by Step May 2004 List Display of Purchase Requisitions by Account Assignment: Cost Center—ME5K
40
The following screen is displayed:
9. To see the release strategy, click on the Release strategy
button or press Shift+F1. Note: If the item is subject to approval the Release Strategy
Requis. NNNNNNNNNN, Item screen will appear and display release information. Otherwise, an Information message will state that the item is not subject to approval (example: med-surg supplies).
The following screen is displayed:
10. Click on the Cancel button or press F12 to display the
Purchase Requisition: Item 00001 screen.
R/3: Requisition Processing Step by Step May 2004 List Display of Purchase Requisitions by Account Assignment: Cost Center—ME5K
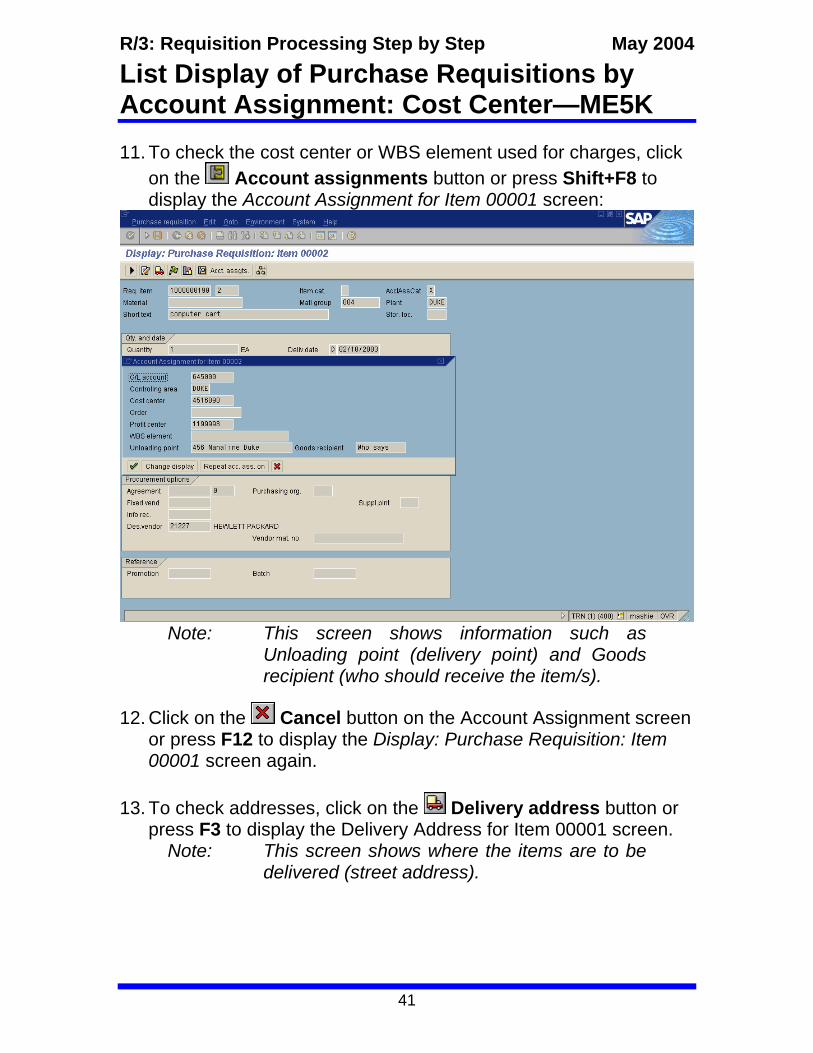
41
11. To check the cost center or WBS element used for charges, click on the Account assignments button or press Shift+F8 to display the Account Assignment for Item 00001 screen:
Note: This screen shows information such as
Unloading point (delivery point) and Goods recipient (who should receive the item/s).
12. Click on the Cancel button on the Account Assignment screen or press F12 to display the Display: Purchase Requisition: Item 00001 screen again.
13. To check addresses, click on the Delivery address button or
press F3 to display the Delivery Address for Item 00001 screen. Note: This screen shows where the items are to be
delivered (street address).

R/3: Requisition Processing Step by Step May 2004 List Display of Purchase Requisitions by Account Assignment: Cost Center—ME5K
42
The Delivery Address screen is displayed:
14. Click on the Adopt button or press F8 to display the
Display: Purchase Requisition: Item 00001 screen. 15. Click on the Back button to display the Detailed Data screen:

R/3: Requisition Processing Step by Step May 2004 List Display of Purchase Requisitions by Account Assignment: Cost Center—ME5K
43
16. Click on the Next requisn. button at the bottom of the screen or press Shift+F7 to display the Purchase Requisition per Account Assignment screen.
The following screen is displayed:
17. Repeat steps 5-16 above to see information about the other
requisitions. 18. Click on the Exit button or press Shift+F3 until the initial R/3
screen is displayed.

R/3: Requisition Processing Step by Step May 2004 Create a Purchase Requisition for Items Assigned to Multiple Cost Centers
44
Within the regular create a requisition process, an option exists to split a line item among two or more cost centers. This input can also be repeated for any additional line items in the same requisition. Enter the transaction code ME51 in the command field on the main SAP R/3 screen. The following screen is displayed:
1. Enter the appropriate document type from the valid options:
NB for a Purchase requisition (used for regular purchase
requisitions and is the default)
SH for SPECIAL HANDLING (needs Procurement Services handling i.e.: attachments)
2. Be sure that the Source determination check box defaults with a checkmark. This allows the system to select a vendor if possible.

R/3: Requisition Processing Step by Step May 2004 Create a Purchase Requisition for Items Assigned to Multiple Cost Centers
45
3. Enter the appropriate account assignment category from the valid entries: X for All non-asset prchs (materials for consumption and is the default) R for Items Goods Receipt (used when receiving activity is expected and performed consistently – may be set as the default for those areas)
4. Enter the delivery date. 5. Select the appropriate facility (plant). 6. Enter the purchasing group. 7. Click on the Enter button or press Enter to display the Create:
Purchase Requisition: Item Overview screen. The following screen is displayed:
8. If you are ordering from the Material Master, click in the Material
field and search by clicking the dropdown. Note: The first time you click on this match code search, a
Search Help Selection box will offer several ways of sorting for material numbers, select “W”.
9. Search for the material, using a single noun and asterisks (e.g., *computers*)

R/3: Requisition Processing Step by Step May 2004 Create a Purchase Requisition for Items Assigned to Multiple Cost Centers
46
10. Enter the requested quantity. 11. Click on the Enter button or press Enter to display the Create
Purchase Requisition: Item screen. If you are ordering from outside, the following screen is displayed:
11. Enter the approximate cost in the Val. Price field. 12. Enter a vendor number, if desired, in the Des. Vendor field. If you
do not know the number, do a match code search by clicking on the dropdown.
13. Select the 0 Purchasing Vendors – Ordering Addresses tab and typing the vendor name in the Name field with asterisks. Click on Enter and select the vendor by double-clicking on the correct name and ordering address.
14. Click on the Enter button to display the Account Assignment for Item screen:

R/3: Requisition Processing Step by Step May 2004 Create a Purchase Requisition for Items Assigned to Multiple Cost Centers
47
15. Enter the GL Account and the Cost center (or WBS Element). 16. Enter the Unloading point. 17. Enter the Goods recipient. 18. IMPORTANT: Click on the Change display button to display the
Account Assignment for Item screen:
19. If goods receipt is required, place a check in the GR box. If goods
receipt is NOT required, be sure BOTH GR and GR non-val boxes are unchecked.
20. Select the appropriate distribution method to charge to different cost objects in the Distribution box, either quantity or percent.
21. Enter the same choice (1 or 2) in the Partial invoice box as selected in the Distribution box.
22. Enter the appropriate quantities/percentages in the Quantity/percent fields – for example, 1,2, etc. or 50, 50. The system will accept only whole numbers, not decimals.
23. Enter the appropriate cost centers in the Cost ctr fields (or WBS Elements, if applicable).
24. Enter the unloading points (you can have delivery to different rooms in same building)
25. Enter the Recipients (goods recipients can be different).

R/3: Requisition Processing Step by Step May 2004 Create a Purchase Requisition for Items Assigned to Multiple Cost Centers
48
26. Follow the menu path given below to repeat the information on
this screen for additional items to be ordered if the information is going to be the same: Edit Repeat acct assgt Switch on. There will be a message: Repeat account assignment held.
27. Click on the Back button or press F3 to display the Delivery Address for Item screen:
28. Enter the Address number or select it via matchcode search.

R/3: Requisition Processing Step by Step May 2004 Create a Purchase Requisition for Items Assigned to Multiple Cost Centers
49
25. Click on the Repeat address on button to display the Information screen. You will get a message: “Delivery address held.”
26. Click on the Continue button to display the full address. 27. Click on the Adopt button to display the Item Overview:
28. Click on the Save button or press Ctrl+S to display the
Information screen. The following screen is displayed:
29. Click on the OK button or press Enter to see the Create:
Purchase Requisition: Initial Screen. 30. Click on the Exit button or press Shift+F3 until the initial SAP
R/3 System screen is displayed.

R/3: Requisition Processing Step by Step May 2004 Display a Purchase Order Using a Purchase Requisition Number—ME53
50
Enter ME53 in the command field on the main SAP R/3 screen.
1. Enter the purchase requisition number in the Purchase requisition field:
2. Click on the Enter button or press Enter to display the Item
Overview screen. 3. Click on the button(s) to the immediate left of the desired item(s):
4. Follow the menu path below to display the Purchase Order:
Environment Purchase Order Last Purchase Order
5. Proceed to Step 4 in the exercise on the next page (page 51):

R/3: Requisition Processing Step by Step May 2004 Display a Purchase Order Using a Purchase Order Number—ME23
51
To view a purchase order using a purchase order number, enter the transaction code ME23 on the main SAP R/3 screen. The following screen is displayed:
1. Enter the purchase order number. 2. Click on the Enter button to display the Display Purchase
order: Item Overview screen. The following screen is displayed:
3. Click on the button(s) to the immediate left of the desired item(s). [The Display a Purchase Order Using a Purchase Requisition Number resumes here.] 4. Click on the button next to the item and click on the Header
details button or go to Header Details to display the Header Data screen.

R/3: Requisition Processing Step by Step May 2004 Display a Purchase Order Using a Purchase Order Number—ME23
52
The following screen is displayed:
5. To see any text in the order, click on the Text overview button
to display the Header Texts screen. The following screen is displayed:
6. Click on the Back button to display the Item Overview screen:

R/3: Requisition Processing Step by Step May 2004 Display a Purchase Order Using a Purchase Order Number—ME23
53
7. Click on the button(s) to the immediate left of the desired line
item(s). 8. Click on the Vendor address button to display the Vendor
Address screen:
9. Follow the menu path given below to display the Header Statistics
screen: Header Statistics General

R/3: Requisition Processing Step by Step May 2004 Display a Purchase Order Using a Purchase Order Number—ME23
54
The following screen is displayed:
Note: The ID of the person who created the purchase order is in the Created by field.
10. Follow the menu path: Header Messages to display the Output screen:
11. A green light means the purchase order has been sent to the
vendor. A yellow light means a delay for some reason and a red light means there is a problem with the purchase order.

R/3: Requisition Processing Step by Step May 2004 Display a Purchase Order Using a Purchase Order Number—ME23
55
12. Click on the Back button to display the Header Data screen:
13. Click on the Overview button to display the Item Overview
screen:
14. Click on the button(s) to the immediate left of the desired line
item(s). 15. Follow the menu path given below to display the Item screen:
Item Delivery schedule
The following screen is displayed:

R/3: Requisition Processing Step by Step May 2004 Display a Purchase Order Using a Purchase Order Number—ME23
56
16. Click on the Back button to display the Item Overview screen. The following screen is displayed:
17. Click on the button(s) to the immediate left of the desired line
item(s).
18. Click on the PO History button to display the Order History for Purchase Order NNNNNNNNNN Item screen.

R/3: Requisition Processing Step by Step May 2004 Display a Purchase Order Using a Purchase Order Number—ME23
57
The following screen is displayed:
Note: if goods receipt is done, there will be information on the goods receipt in the Order History.
19. Click on the Exit button or press Shift+F3 until the initial SAP
R/3 System screen is displayed.

R/3: Requisition Processing Step by Step May 2004 Individual Release of a Purchase Requisition—ME54
58
Some purchase requisitions may require approval before they can be converted into a purchase order. The approving party may change a requisition that is subject to approval before it is released. Enter the transaction code ME54 in the command field on the main SAP R/3 screen. The following screen is displayed:
1. Enter the purchase requisition number. 2. Enter the release code. In this example, the release code is A1. 3. Click on the Enter button or press Enter to display the
Release: Purchase Requisitions: Item Overview screen:
4. Click on the button(s) to the left of the line item(s) for approval. 5. To select all items, click on Edit Selections Select All. 6. When ready to release, click on the Release + save button (not
the Release with the lock) or press F8 to display the Initial Screen. 7. Click on the Exit button or press Shift+F3 until the initial SAP
R/3 System screen is displayed.

R/3: Requisition Processing Step by Step May 2004 Collective Release of a Purchase Requisition—ME55
59
A collective release of purchase requisitions allows several purchase requisitions to be approved simultaneously and is executed when several requisitions sharing similar criteria must be released. A collective release of purchase requisitions functions similarly to list display transactions. Selection criteria, such as the release code, purchasing group and plant, are entered in the initial screen. All purchase requisitions meeting the selection criteria are displayed. Enter the transaction code ME55 in the command field on the main SAP R/3 screen. The following screen is displayed:
1. Enter the release code. 2. Enter the purchasing group.
Note: You can enter additional information in other fields such as Document type, Delivery date, etc which will narrow down your search.
3. Click on the Execute button to display the Collective Release of Purchase Requisitions screen.

R/3: Requisition Processing Step by Step May 2004 Collective Release of a Purchase Requisition—ME55
60
The following screen is displayed:
4. Click on the check box to the left of the desired purchase
requisition item(s) and press F9 to select. 5. Click on the Save button or press Ctrl + S to save the release. The following green lines (with information on additional release codes) are displayed:
6. Click on the Exit button or press Shift+F3 until the initial SAP
R/3 System screen is displayed.

R/3: Requisition Processing Step by Step May 2004 Single Point of Entry for Ordering Materials STAT and Re-supply: ZM10
61
You can use the Single Point of Entry for Ordering (ZM10 transaction) to order materials with a material number (Material Master item). The result will be either a reservation or a requisition. The system will create a reservation for the allowable quantity from inventory (the STAT room in Materials Management) if the order is marked as STAT. The system will create a requisition if you: • have ordered a quantity that exceeds the allowable quantity
stored in Materials Management, • or, if the item is not in inventory and needs to be ordered from
outside.

R/3: Requisition Processing Step by Step May 2004 Single Point of Entry for Ordering Materials STAT and Re-supply: ZM10
62
1. Enter ZM10 in the command window on the initial SAP R/3 System screen as shown. ZM10 can be in upper or lower case.
2. Click on the Enter button or press Enter to display the Single Point of Entry for Ordering Materials screen.
The following screen is displayed:
Note: The first time you log into ZM10, you will need
to set up the Recipient or person’s name who will receive the order (see step 3) and the Unit or delivery place (steps 4–19). If these fields are correct, go to step 20 to Place An Order.
3. To set up the Recipient, just type the name in the Recipient field and hit Enter on your keyboard.
4. To add or change an address, click on the Unit info button (next
to the Place an Order button) or press F5 to display the Assign the unit address for Delivery of Goods screen.
The following screen is displayed:

R/3: Requisition Processing Step by Step May 2004 Single Point of Entry for Ordering Materials STAT and Re-supply: ZM10
63
5. Click in the Restrict dropdown to units in Plant field; type in
your plant or click on the drop-down box beside it and select the appropriate plant code by double-clicking on it.
6. To lock in the selected plant on the Assign the unit address for
Delivery of Goods screen, click on either the Enter or click on the Select another Plant button. You will not get a message.
7. Click in the Unit Number for Order Delivery field (above the
Restrict dropdown field) and click on the drop-down to the right of that field to display the Unloading point screen.

R/3: Requisition Processing Step by Step May 2004 Single Point of Entry for Ordering Materials STAT and Re-supply: ZM10
64
The following screen is displayed:
8. Select the unit address for order delivery by double-clicking on it
and proceed to Step 20. OR If your unit address isn’t in the list, click the Cancel button or press F12 to return to the Assign the unit address for Delivery of Goods screen.
9. Click on the Own User Parameters button to display the Single Point of Entry for Ordering Materials screen. This will allow you to enter an address that isn’t yet included in the Unit Number for Order Delivery list.

R/3: Requisition Processing Step by Step May 2004 Single Point of Entry for Ordering Materials STAT and Re-supply: ZM10
65
The following screen is displayed:
10. Enter a specific place for delivery (i.e., Room number, floor
number) in the Unloading point field. In this example, the Unloading point is East Duke Building.
11. Click in the Address Number field and click on the drop down to display the Restrict Value Range screen:
12. Type a department name or building name or part of one with an
asterisk (*) before and after it in the Name field. For example, type *East* to find the East Duke building. The first letter in the name may need to be upper case.

R/3: Requisition Processing Step by Step May 2004 Single Point of Entry for Ordering Materials STAT and Re-supply: ZM10
66
13. Click on the Continue button or press Enter to display the Number of delivery address screen.
The following screen is displayed:
14. Select your address from the list by double-clicking on the
address line to display the Single Point of Entry for Ordering Materials screen. The address number should appear.
15. Enter the appropriate plant (for example, DUKE). 16. Enter either the cost center (or the WBS Element) in the
appropriate field.

R/3: Requisition Processing Step by Step May 2004 Single Point of Entry for Ordering Materials STAT and Re-supply: ZM10
67
17. Click on the Execute button or press F8 to display the Single Point of Entry for Ordering Materials screen.
18. Confirm that the address information is correct. 19. Click on the Exit button or press Shift+F3 until the ZM10 or
Single Point of Entry for Ordering Materials screen is displayed:
Note: The new information on this screen will be
your delivery point unless you change it.
20. Click on the Place an Order button or press F6 to display the Material Item for Order Processing screen.

R/3: Requisition Processing Step by Step May 2004 Single Point of Entry for Ordering Materials STAT and Re-supply: ZM10
68
The following screen is displayed:
21. If you know the material number, enter the number. Otherwise,
click in the Material field, then click on the drop-down box to the right to display the search box:
22. On the Plant material by description tab, type the main singular
noun of the material to be ordered with an asterisk (*) before and after in the Material description field (Ex. *cup* or *needle*).
23. Enter the appropriate plant (or select it from the dropdown box) in the Plant field.
24. Click on the Continue button or press Enter to display the Material number screen.

R/3: Requisition Processing Step by Step May 2004 Single Point of Entry for Ordering Materials STAT and Re-supply: ZM10
69
25. Remember that you can create a personal list of materials by clicking once on the desired material to highlight it and clicking on the Insert in personal list button at the bottom of the box. The cursor will jump down one item.
Note: The next time you click on the drop-down in the Material
field, you will see the item in your Personal Value List:
26. To select the material you want for the current order, click it again
to highlight it.
27. Click on the Copy button or press Enter to display the Material Item for Order Processing screen (see next page).

R/3: Requisition Processing Step by Step May 2004 Single Point of Entry for Ordering Materials STAT and Re-supply: ZM10
70
The following screen is displayed:
28. Optional: to see if this item has already been ordered today to avoid duplicating, click on the List todays Res and Reqs for this item button or press F6. To go back to the previous screen, click once on the Back button.
29. Click on the Execute button or press F8 to display the Read
material master for Order processing screen:

R/3: Requisition Processing Step by Step May 2004 Single Point of Entry for Ordering Materials STAT and Re-supply: ZM10
71
30. Enter the Quantity needed. In this example, the Quantity is 4. (Note the unit of measure information).
Note: The STAT button usually defaults (at DRHS the Resupply button defaults); if the order is a resupply, click on the Re-supply button.
30. Click on the Process all items button or press F7 to display the Place an Order for Material Items screen to view the summary.
Note: An option on this next screen is to press the Order Another item button. This action returns you to the Read material master for Order processing screen to allow additional items to be added to the order.
The following screen is displayed:
31. Click on the Generate Request for Materials button to process
the order. Note: The other options are: Add an item, Change
an item, Delete an item, Clear all items, and List todays Res and Reqs for these items. To change or delete items, you must first place a check in the box to the left of each item before clicking on the button.
The following screen is displayed:

R/3: Requisition Processing Step by Step May 2004 Single Point of Entry for Ordering Materials STAT and Re-supply: ZM10
72
32. A reservation, a requisition, or a combination of each will be
generated, depending on the request and the inventory allotment. 33. Click on the OK button or press Enter on the Information
screen. 34. Click on the Back button on the Reservation (or Requisition)
created NNNNNNNNNN screen or press Enter until the Material Item for Order Processing screen is displayed again.

R/3: Requisition Processing Step by Step May 2004 Single Point of Entry for Ordering Materials STAT and Re-supply: ZM10
73
35. If desired, another order may be placed by repeating the steps
beginning at Step 21.
Note: If you created a Personal Values list, the next time you click on the Material dropdown, the Personal Values list will display. If you are ordering an item not on your list, click on the All Values button to get to the W search.
36. After completing all orders, click on the Exit button or press
Shift+F3 until the initial R/3 screen is displayed.