res installation instructions - affordable home inspections
TRANSCRIPT
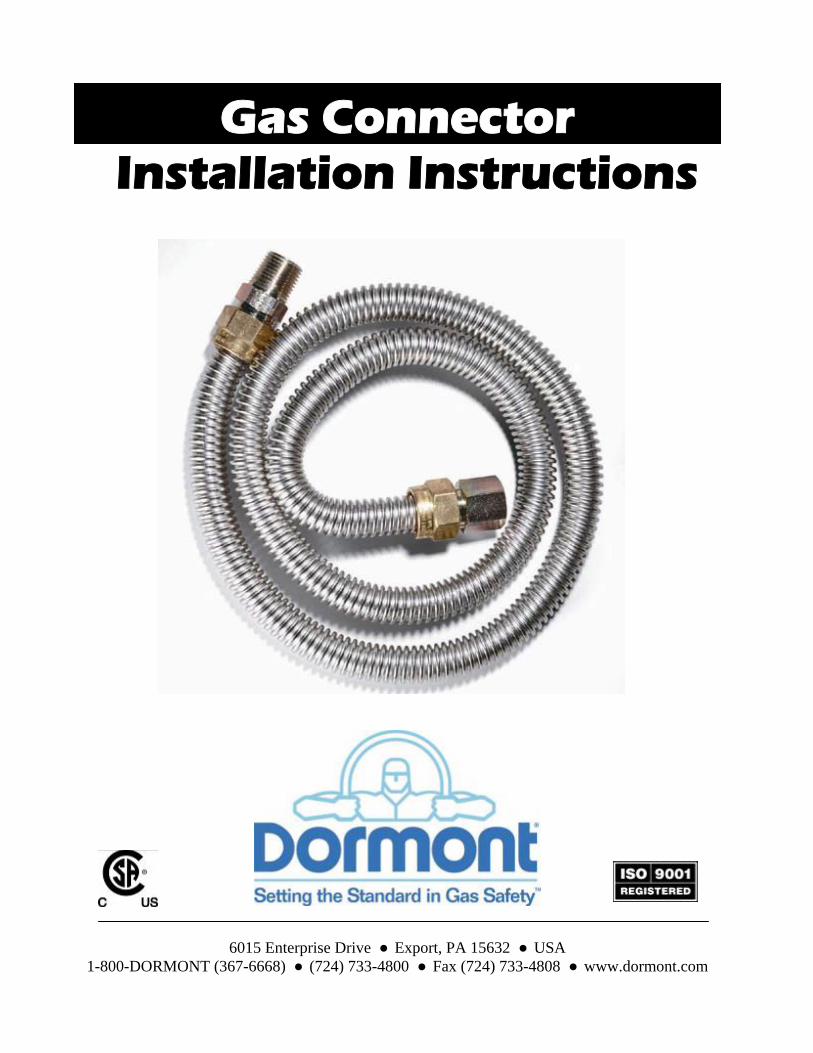
Installation Instructions Gas Connector
6015 Enterprise Drive ● Export, PA 15632 ● USA 1-800-DORMONT (367-6668) ● (724) 733-4800 ● Fax (724) 733-4808 ● www.dormont.com

Read warnings carefully before installing To avoid personal injury (including death) or property damage, read and understand this entire instruction sheet before installing your gas connector. Follow all instructions and safety precautions during installation, use and maintenance. If you do not understand any of these instructions or precautions, call a licensed plumber. Any damage to the connector or product failures that occur as a result of improper installation or neglect to follow these instructions will void this limited warranty.
1. To prevent corrosion, DO NOT allow strong cleaning solutions or chemicals to come in contact with the connector. These include acids, solvents, solder fluxes with zinc chlorides, ammonia, chlorinated chemicals, and any liquid with chlorine such as laundry bleach or dish detergent.
2. An accessible manual gas shut-off valve must be installed on the gas supply ahead of the
connector. DO NOT proceed with this installation if a shut-off valve is not installed – call a licensed plumber for assistance.
3. DO NOT assemble the connector nut directly to male pipe threads.
4. DO NOT install the gas connector so that it is concealed within or runs through any wall,
floor or other partition. The gas outlet must be in the same room as the appliance. This is so it is visible for periodic inspection.
5. The connector should be of adequate length to reach from the gas supply line to the
appliance without stretching. NEVER join two or more connectors to make a longer connector.
6. NEVER reuse a gas connector. If a new appliance is purchased or an existing appliance is
moved, a new connector must be used.
7. Only the fittings supplied with this connector or those manufactured and recommended by Dormont Manufacturing Company should be used.
8. Connectors are designed for occasional movement after installation. Not for use on castered
equipment. Repeated bending, flexing or extreme vibration will cause metal fatigue and must be avoided.
9. This flexible gas connector is to be used on natural or LP/propane gas supply systems
having internal pressures no higher than ½ lb. per square inch. .
10. DO NOT kink, twist or bend the connector smaller than 1½" internal diameter (approximately the diameter of a golf ball). Avoid sharp bends - no right angles.
Warning
Safety Precautions -

11. To avoid corrosion, DO NOT allow connector to come in contact with foreign objects such as wall studs, electrical wiring, copper or iron pipe, paneling, sheet metal, etc.
12. DO NOT use the gas connector or gas supply line for the appliance ground.
13. This product meets national building codes and the ANSI standard for gas connectors (ANSI
Z21.24). However, local codes and regulations prevail. Contact your local municipality to verify applicable codes.
14. Additional requirements for the Commonwealth of Massachusetts
a. Installations must be performed by a qualified or licensed contractor, plumber or
gasfitter qualified by the state, province or region where this appliance is being installed.
b. Only use gas shutoff valves approved for use within the state, province or region where this appliance is being installed.
c. A flexible gas connector, when used, must not exceed 3 feet. Glossary Flare: Tapered (beveled) surface of connector nut
or fitting where the seal occurs. Pipe thread sealant or Teflon® tape should never be applied to a flare surface.
Male Pipe Threads: The external pipe thread that protrudes from the fitting and fits into a female
pipe thread. (Also referred to as MIP – Male Iron Pipe)
Female Pipe Threads: The internal pipe threads that receives
a male pipe thread. (Also referred to as FIP – Female Iron Pipe)
Male Tapped Female: All male connector fittings are threaded internally
to also function as a female fitting one thread size smaller.
Flare nut with hex surface
Flare seat (internal)
Male Pipe Threads -apply pipe thread sealant or Teflon® tape here
Hex Surface
Flared End insert into the connector flare nut
-do not apply pipe thread sealant or Teflon® tape to this end
Female Pipe Threads- insert male pipe (not flared) threads Into this receptacle
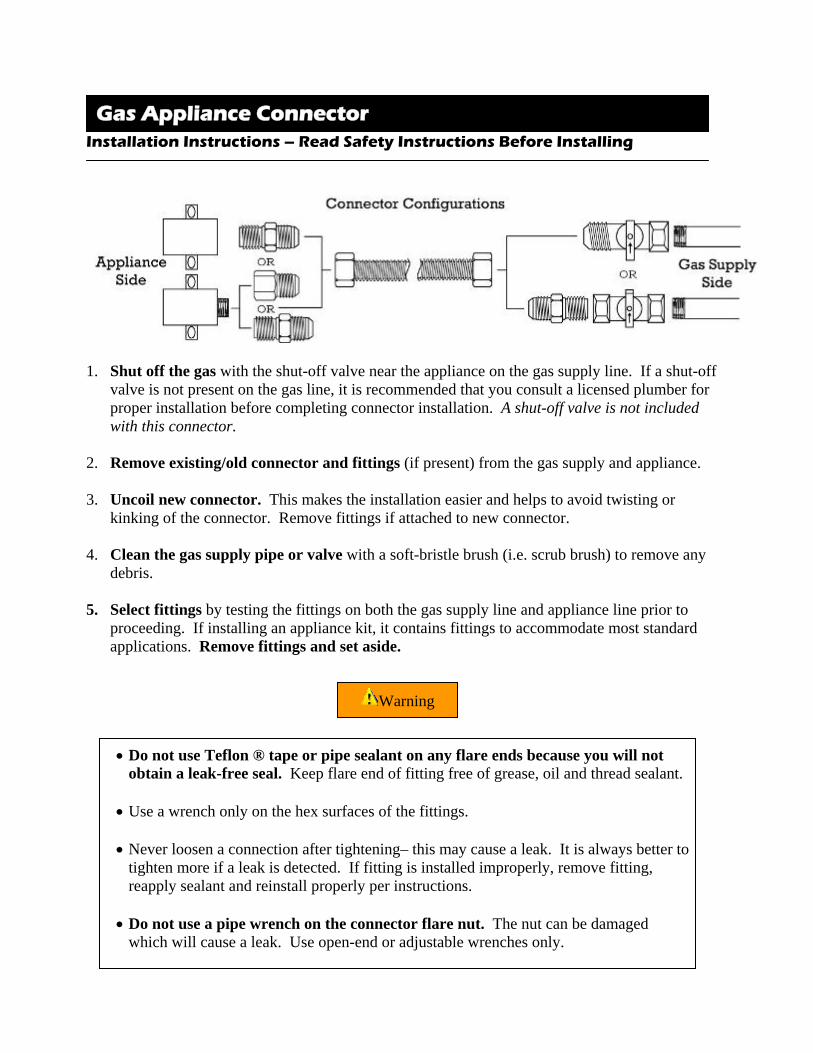
Installation Instructions – Read Safety Instructions Before Installing
1. Shut off the gas with the shut-off valve near the appliance on the gas supply line. If a shut-off
valve is not present on the gas line, it is recommended that you consult a licensed plumber for proper installation before completing connector installation. A shut-off valve is not included with this connector.
2. Remove existing/old connector and fittings (if present) from the gas supply and appliance. 3. Uncoil new connector. This makes the installation easier and helps to avoid twisting or
kinking of the connector. Remove fittings if attached to new connector. 4. Clean the gas supply pipe or valve with a soft-bristle brush (i.e. scrub brush) to remove any
debris. 5. Select fittings by testing the fittings on both the gas supply line and appliance line prior to
proceeding. If installing an appliance kit, it contains fittings to accommodate most standard applications. Remove fittings and set aside.
Gas Appliance Connector
Warning
• Do not use Teflon ® tape or pipe sealant on any flare ends because you will not obtain a leak-free seal. Keep flare end of fitting free of grease, oil and thread sealant.
• Use a wrench only on the hex surfaces of the fittings. • Never loosen a connection after tightening– this may cause a leak. It is always better to
tighten more if a leak is detected. If fitting is installed improperly, remove fitting, reapply sealant and reinstall properly per instructions.
• Do not use a pipe wrench on the connector flare nut. The nut can be damaged
which will cause a leak. Use open-end or adjustable wrenches only.
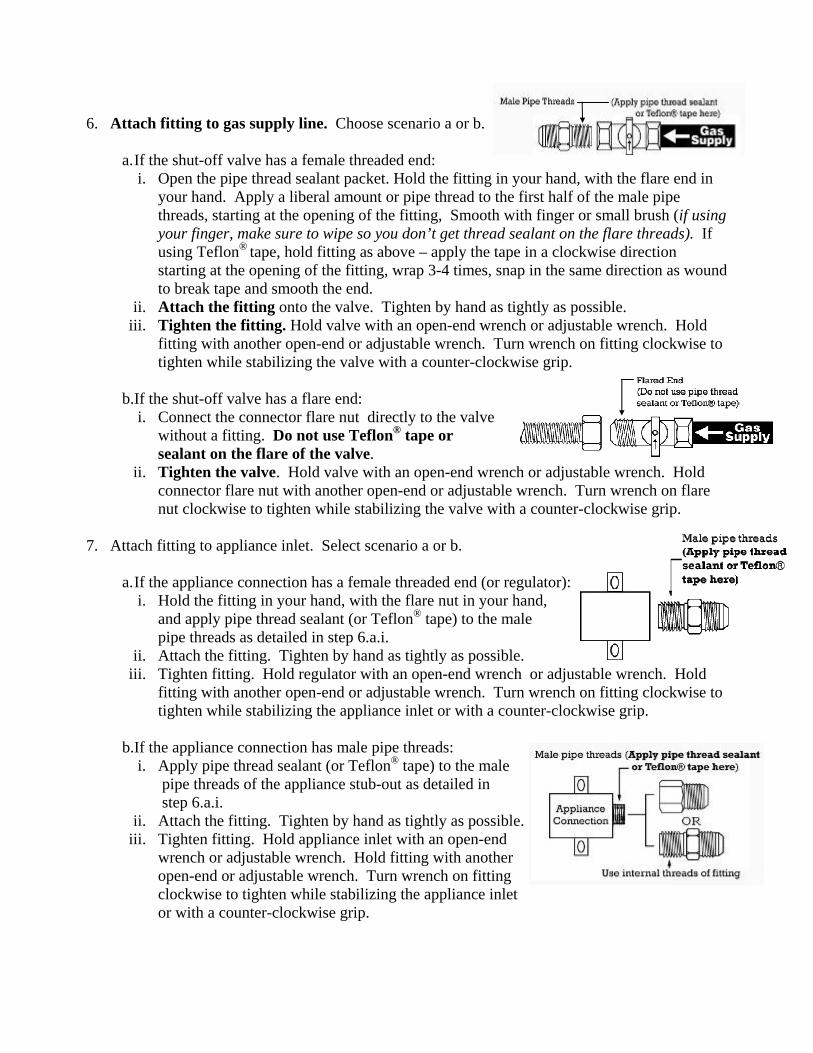
6. Attach fitting to gas supply line. Choose scenario a or b.
a. If the shut-off valve has a female threaded end:
i. Open the pipe thread sealant packet. Hold the fitting in your hand, with the flare end in your hand. Apply a liberal amount or pipe thread to the first half of the male pipe threads, starting at the opening of the fitting, Smooth with finger or small brush (if using your finger, make sure to wipe so you don’t get thread sealant on the flare threads). If using Teflon® tape, hold fitting as above – apply the tape in a clockwise direction starting at the opening of the fitting, wrap 3-4 times, snap in the same direction as wound to break tape and smooth the end.
ii. Attach the fitting onto the valve. Tighten by hand as tightly as possible. iii. Tighten the fitting. Hold valve with an open-end wrench or adjustable wrench. Hold
fitting with another open-end or adjustable wrench. Turn wrench on fitting clockwise to tighten while stabilizing the valve with a counter-clockwise grip.
b.If the shut-off valve has a flare end:
i. Connect the connector flare nut directly to the valve without a fitting. Do not use Teflon® tape or sealant on the flare of the valve.
ii. Tighten the valve. Hold valve with an open-end wrench or adjustable wrench. Hold connector flare nut with another open-end or adjustable wrench. Turn wrench on flare nut clockwise to tighten while stabilizing the valve with a counter-clockwise grip.
7. Attach fitting to appliance inlet. Select scenario a or b.
a. If the appliance connection has a female threaded end (or regulator):
i. Hold the fitting in your hand, with the flare nut in your hand, and apply pipe thread sealant (or Teflon® tape) to the male pipe threads as detailed in step 6.a.i.
ii. Attach the fitting. Tighten by hand as tightly as possible. iii. Tighten fitting. Hold regulator with an open-end wrench or adjustable wrench. Hold
fitting with another open-end or adjustable wrench. Turn wrench on fitting clockwise to tighten while stabilizing the appliance inlet or with a counter-clockwise grip.
b.If the appliance connection has male pipe threads:
i. Apply pipe thread sealant (or Teflon® tape) to the male pipe threads of the appliance stub-out as detailed in step 6.a.i.
ii. Attach the fitting. Tighten by hand as tightly as possible. iii. Tighten fitting. Hold appliance inlet with an open-end
wrench or adjustable wrench. Hold fitting with another open-end or adjustable wrench. Turn wrench on fitting clockwise to tighten while stabilizing the appliance inlet or with a counter-clockwise grip.
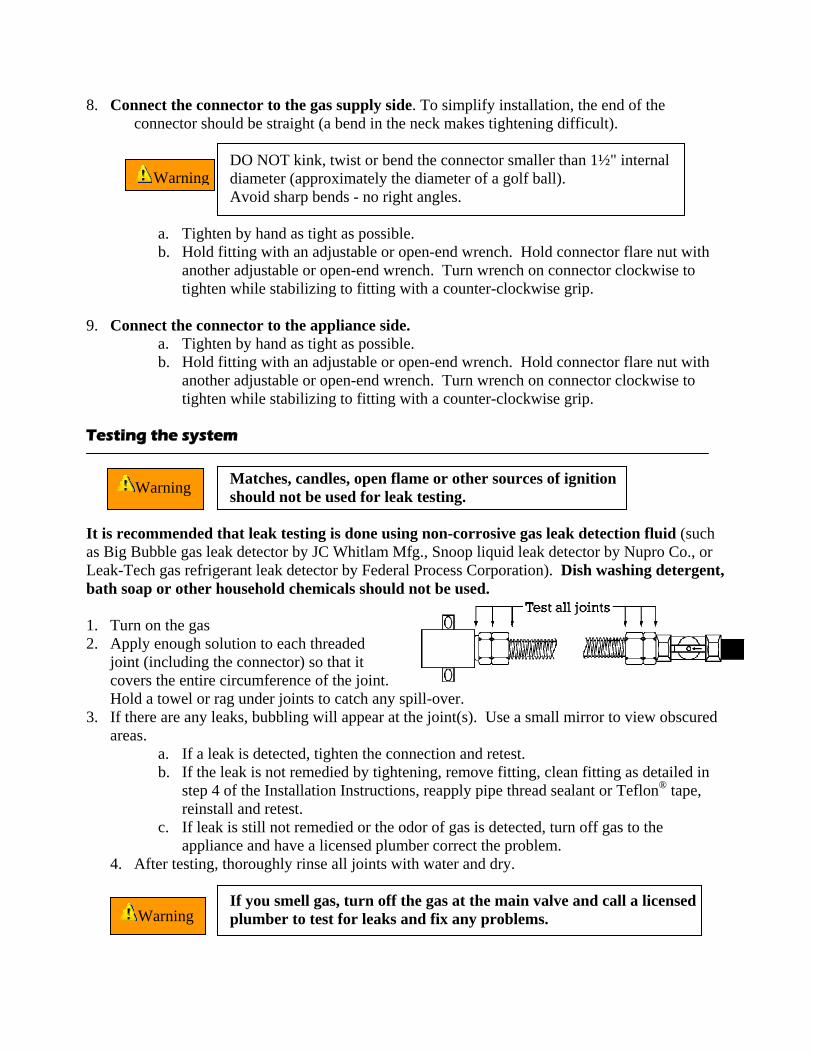
8. Connect the connector to the gas supply side. To simplify installation, the end of the connector should be straight (a bend in the neck makes tightening difficult).
DO NOT kink, twist or bend the connector smaller than 1½" internal diameter (approximately the diameter of a golf ball). Avoid sharp bends - no right angles.
a. Tighten by hand as tight as possible. b. Hold fitting with an adjustable or open-end wrench. Hold connector flare nut with
another adjustable or open-end wrench. Turn wrench on connector clockwise to tighten while stabilizing to fitting with a counter-clockwise grip.
9. Connect the connector to the appliance side.
a. Tighten by hand as tight as possible. b. Hold fitting with an adjustable or open-end wrench. Hold connector flare nut with
another adjustable or open-end wrench. Turn wrench on connector clockwise to tighten while stabilizing to fitting with a counter-clockwise grip.
Testing the system
Matches, candles, open flame or other sources of ignition should not be used for leak testing.
It is recommended that leak testing is done using non-corrosive gas leak detection fluid (such as Big Bubble gas leak detector by JC Whitlam Mfg., Snoop liquid leak detector by Nupro Co., or Leak-Tech gas refrigerant leak detector by Federal Process Corporation). Dish washing detergent, bath soap or other household chemicals should not be used. 1. Turn on the gas 2. Apply enough solution to each threaded
joint (including the connector) so that it covers the entire circumference of the joint. Hold a towel or rag under joints to catch any spill-over.
3. If there are any leaks, bubbling will appear at the joint(s). Use a small mirror to view obscured areas.
a. If a leak is detected, tighten the connection and retest. b. If the leak is not remedied by tightening, remove fitting, clean fitting as detailed in
step 4 of the Installation Instructions, reapply pipe thread sealant or Teflon® tape, reinstall and retest.
c. If leak is still not remedied or the odor of gas is detected, turn off gas to the appliance and have a licensed plumber correct the problem.
4. After testing, thoroughly rinse all joints with water and dry. If you smell gas, turn off the gas at the main valve and call a licensed plumber to test for leaks and fix any problems.
Warning
Warning
Warning

• Dormont Manufacturing warrants to the Buyer of this product that the product and components
manufactured by Dormont will be free from defects due to faulty material or workmanship for a period of two (2) years from the original date of purchase shown on Buyer's receipt and in conjunction with the original installation only. For items and components incorporated into the product and not manufactured by Dormont, the only warranty extended is that of the supplier or original manufacturer, if any.
• Dormont will replace, FREE OF CHARGE, during the warranty period, its warranted parts it
deems defective in material and/or workmanship under normal installation, use and service. Replacement can be obtained by returning the product to the original place of purchase, along with the original receipt. This warranty remedy is limited to product replacement only. Labor charges and/or damages incurred in installation, repair or replacement are excluded. This remedy is exclusive.
• Any damage to this product as a result of misuse, abuse, neglect, accident, improper installation,
or any maintenance or use in violation of instructions furnished by us, will void this limited warranty.
• OTHER THAN THE ABOVE LIMITED WARRANTY, DORMONT
MANUFACTURING COMPANY MAKES NO ADDITIONAL WARRANTY OF ANY KIND, EXPRESS OR IMPLIED (INCLUDING WARRANTY OF MERCHANTABILITY OR FITNESS FOR A PARTICULAR PURPOSE).
• Dormont disclaims responsibility for any failures due to improper installation, use or
maintenance. Product must be installed, used, repaired and maintained by the Buyer in accordance with local codes and regulations and standards set by the American National Standards Institute (ANSI).
• DORMONT SHALL NOT BE LIABLE FOR SPECIAL, INDIRECT, INCIDENTAL OR
CONSEQUENTIAL DAMAGES RESULTING FROM THIS PRODUCT WHETHER THE CLAIM IS BASED ON BREACH OF WARRANTY OR CONTRACT, NEGLIGENCE, STRICT LIABILITY OR TORT.
Limited Warranty and Disclaimers