residential installation guide - cedar siding inc. · residential installation guide 1-800-241-4402...
TRANSCRIPT

BUILDING WRAP
Residential Installation Guide
1-800-241-4402www.green-guard.com
G r e e n G u a r d M o i s t u r e M a n a G e M e n t
d e f l e c t I o n / d R a I n a G e / d R y I n G

Building wrap inSTallaTiOn
1. generalGreenGuard Building Wraps are polyolefin building wraps intended to perform as water-resistive barriers in residential applications when installed in accordance with the guidelines provided in this manual. They are intended to reduce the risk of air and bulk water infiltration when installed under exterior coverings such as brick, stucco, clay tile, etc., and various siding materials like wood, vinyl, fiber cement, etc. GreenGuard MAX, RainDrop and Ultra Wrap are also recognized as air barrier materials. When these products are installed such that they are to act as the primary air barrier in a wall assembly, then they must be installed in accordance with ICC Evaluation Report No. ESR-2906.
GreenGuard Building Wraps are available as cross-woven wraps (Value Wrap, Classic Wrap, GreenGuard® MAX™, and RainDrop®) and as a non-woven wrap (Ultra Wrap). The GreenGuard Building Wraps conform with the intent of the following building codes and industry standards:
Attention: A water-resistive barrier is now required behind all exterior coverings.
• 2009InternationalResidentialCode Section R703.6.3 Water-resistive Barrier
• 2009InternationalBuildingCode Section 1404.2 Water-resistive Barrier
• 2008OregonResidentialSpecialtyCode Amendment 918-480-0010(8)(a)(B) (GreenGuard® RainDrop)
• 2006InternationalResidentialCode Section R703.2 Water-resistive Barrier
• 2006InternationalBuildingCode Section 1404.2 Water-resistive Barrier
• ASTMD226,TypeI Equivalent to Grade D building paper • SeeICC-ESEvaluationReportESR-2906 (ICC Evaluation Services, Inc)
• SeeCCMCEvaluationReport13280-R (GreenGuard® MAX, Sheathing Membrane, Breather-Type)
• SeeCCMCEvaluationReport13290-R (GreenGuard® MAX, Air Barrier Material)
• SeeIAPMOESEvaluationReport0187 (GreenGuard® RainDrop — Air Barrier and Drainage Efficiency)
• SeeOntarioMinistersRulingNo.07-27-185(13280-R)
2. descriptionThis manual provides guidelines for installing GreenGuard Building Wraps in residential applications as a water-resistive barrier. These guidelines are not intended to address all possible combinations of construction materials that may be used in a wall system. For this reason, the installation information provided in this manual is intended only as a guide and is for the convenience of builders, specifiers, and other interested parties. The following are general descriptions of the GreenGuard Building Wraps:
GreenGuardValueWrap consists of a coated, cross-woven polyolefin scrim with micro-perforations, which allow for moisture vapor transmission.
GreenGuardClassicWrap consists of a coated, cross-woven polyolefin scrim with micro-perforations, which allow for moisture vapor transmission.
GreenGuardMAX consists of cross-woven polyolefin scrim with a breathable polyolefin coating. GreenGuardRainDrop consists of a coated, cross-woven polyolefin scrim that is manufactured with inherent properties that allow for moisture vapor transmission.
GreenGuardUltraWrap consists of a non-woven, reinforced polyolefin sheet with a breathable polyolefin coating.
1
B u i l d i n G W r a p a n d F l a s h i n G i n s t a l l a t i o n
1-800-241-4402 www.green-guard.com

2
3. usage and limitationsGreenGuard Building Wraps are intended to perform as water-resistive barriers in residential applications when installed in accordance with the guidelines provided in this manual. The following conditions apply to the use of GreenGuard Building Wraps:
•GreenGuardBuildingWrapsareexcellentwater-resistivebarriersthat help deflect water and wind-driven rain, yet are designed to breathe to assist trapped moisture vapor to escape, helping walls dry faster. GreenGuard Building Wraps are made of synthetic materials that are generally recognized as not providing a food source for insects, fungus, mold, or mildew. GreenGuard Building Wraps should always be properly installed and stored.
•GreenGuardValueWrapandClassicWrapBuildingWrapsinstalled with the print side facing outward may not be exposed to sunlight for more than 12 months.
•GreenGuardUltraWrap,GreenGuardMAXandRainDropBuildingWraps installed with the print side facing outward may not be exposed to sunlight for more than 6 months.
•GreenGuardRainDropmustbeinstalledwiththeblackstrandsinthe vertical position on the exterior wall. Installation with angled positions must be verified by Pactiv.
•GreenGuardBuildingWrapsarenotintendedtobeusedas roofing paper.
•GreenGuardBuildingWrapsarenotintendedtobeusedasa vapor retarder.
•WARNING:GreenGuard Building Wraps will ignite if exposed to fire of sufficient heat and intensity. Protect building wraps from exposure to open flame or other ignition sources during shipping, storage, and installation.
•BuildiingcodesrequiretheuseoftwolayersofGradeDbuildingpaper over wood sheathing when a cementitious covering (conventional stucco) is used. As an alternative, one layer of Grade D building paper can be used in conjunction with one layer of foam plastic insulation. Check with a local building code official to verify requirements.
4. general installation guidelines4.A. Building Wrap Installed Over Sheathing(Applies to All GreenGuard Building Wraps)
1. Install building wrap over structural sheathing board, over insulation board (see Figures 1 and 2), or directly to framing members.
2. Begin by aligning the bottom edge of the roll with the base of the wall, approximately 2 feet around a corner, folding several inches of the material under itself and fastening securely to a structural sheathing, through insulation board to a framing member, or directly to studs.
3. Unroll the building wrap with the printed side out, wrapping the entire building, including door and window openings. Common galvanized roofing nails, plastic cap nails, or staples with a minimum 1-inch crown may be used for attachment of building wrap. If smaller crown staples are used, then more fasteners must be used.
When installing building wrap over non-structural sheathing products such as insulation board or directly to studs, fasteners must penetrate the nail base a minimum of 1/2 inch. Fasteners should be spaced every 16 inches along every other stud location. 4. For best results, a modified “I” pattern should be made through the building wrap at window openings. Fold excess material inside the rough opening and fasten securely through all layers to a framing member (see Figure 3). If door frames and windows are already in place when installing the building wrap, then trim as close to them as possible and tape the building wrap edges. Use of GreenGuard flashing materials is encouraged.
5. When the end of a roll is reached, fold the edge of the building wrap under itself and attach to the structural sheathing or through the non-structural sheathing to the nearest framing member. Vertical and horizontal seams must be overlapped a minimum of 6 inches (vertical) and 2 inches (horizontal) unless otherwise specified for a particular application. Upper courses of building wrap must overlap the lower courses (in water-shedding fashion). All vertical and horizontal seams can be taped using GreenGuard Contractor Tape (“Standard” type or “Custom” type) or an equivalent tape (optional).
6. GreenGuard Building Wraps that are recognized as air barrier materials (Raindrop, Ultra Wrap and MAX) may be installed as the primary air barrier material in a wall assembly by sealing around all window and door openings, wall penetrations and building wrap seams as described in this Guide. See Section 12 on page 11 for an alternative method of sealing building wrap seams.
G u i d e F o r r e s i d e n t i a l a p p l i c a t i o n s
BUILDING WRAP
FIGURE 1: EXTERIoR WAll CRoSS-SECTIoN
FIGURE 2: EXTERIoR WAll WITh GREENGUARD BUIlDING WRAP
FIGURE 3: EXAMPlE oF MoDIFIED “I” CUT AT A WINDoW oPENING

3
4.B. Installation of Building Wrap at Window Frame Detail
Figure 4 shows an example of a window frame detail where the building wrap is installed over the sheathing and is wrapped around the window jambs to the interior of the wall. Windows should be sealed in accordance with the window manufacturer’s installation instructions.
4.C. Installation of Building Wrap at Exterior Electrical Boxes
All exterior electrical boxes and other penetrations through the building wrap should be sealed to prevent air and moisture intrusion at the openings. The building wrap must be taped to the electrical box in order to provide an adequate seal (see Figure 5).
4.D. Installation of Building Wrap at Wall Penetrations
When penetrations, such as those for pipes and ducts, breach the building wrap, they must be sealed to the building wrap using a sealant that is compatible with both the building wrap and the pipe or duct material (see Figure 6).
4.E. Installation of Building Wrap (Roof/Roof and Roof/ Wall Intersections)
GreenGuard Building Wrap should overlap the step flashing at the roof to wall intersection (see Figure 7).
1-800-241-4402 www.green-guard.com
B u i l d i n G W r a p a n d F l a s h i n G i n s t a l l a t i o n
FIGURE 4: WINDoW FRAME CRoSS-SECTIoN
FIGURE 5: INSTAllATIoN oF BUIlDING WRAPAT EXTERIoR ElECTRICAl BoXES
FIGURE 6: INSTAllATIoN oF BUIlDING WRAPAT WAll PENETRATIoNS
FIGURE 7: INSTAllATIoN oF BUIlDING WRAP/WAll INTERSECTIoN

4
FlaSHing inSTallaTiOn
1. generalGreenGuard Flashing and GreenGuard SuperStretch™ Flashing are self-adhered, waterproof flashing materials designed for sealing around openings and penetrations in exterior walls. These rubber-based materials have a butyl adhesive that enhances their ability to provide a seal against water intrusion when installed around window and door openings, roof/wall intersections, deck/porch attachmentsto walls, pipe penetrations, and other areas that require a weatherproof seal.
2. ComplianceGreenGuard Flashing and GreenGuard SuperStretch Flashing meet the requirements of the following industry standards and building codes:
• 2006InternationalResidentialCode Section R703.8: Flashing. Approved corrosion-resistive flashing shall be provided in the exterior wall envelope in such a manner as to prevent entry of water into the wall cavity or penetration of water to the building structural framing components. The flashing shall extend to the surface of the exterior wall finish and shall be installed to prevent water from reentering the exterior wall envelope. Approved corrosion-resistant flashings shall be installed at all of the following locations:
1. At top of all exterior window and door openings in such a manner as to be leakproof, except that self-flashing windows having a continuous lap of not less than 1.125 inches over the sheathing material around the perimeter of the opening, including corners, do not require additional flashing; jamb flashing may also be omitted when specifically approved by the building official.
2. At the intersection of chimneys or other masonry construction with frame or stucco walls, with projecting lips on both sides under stucco copings.
3. Under and at the ends of masonry, wood, or metal copings and sills.
4. Continuously above all projecting wood trim.
5. Where exterior porches, decks, or stairs attach to a wall or floor assembly of wood-frame construction.
6. At wall and roof intersections.
7. At built-in gutters.
•ASTME2112(StandardPracticeforInstallationofExteriorWindows,Doors,andSkylights)
3. descriptionThis manual provides guidelines for installing GreenGuard Flashing and GreenGuard SuperStretch Flashing as flashing materials in residential applications. These guidelines are not intended to address all possible combinations of construction materials that may be used in a wall system. For this reason, the installation information provided in this manual is intended only as a guide and is for the convenience of builders, specifiers, and other interested parties. The following are general descriptions of the GreenGuard Flashing Products:
GreenGuardFlashing is a rubber-based material with a rubber-modified asphalt adhesive, which is designed for sealing openings that have straight edges. It is used to seal the interface around wall penetrations such as windows, doors, pipe penetrations and other areas that may require a weatherproof seal. This flashing material is available in rolls with widths measuring 4, 6, 9 and 12 inches (100, 150, 225 and 300 mm) and lengths of 100 feet (30.5m).
GreenGuardButylFlashing is a rubber-based material with a butyl adhesive, which is designed for sealing openings that have straight edges. This flashing material is available in rolls measuring 4 inches by 66 feet (100 mm by 20 m), 6 inches by 66 feet (150 mm by 20 m) and 9 inches by 66 feet (225 mm by 20 m).
GreenGuardSuperStretchButylFlashing is a rubber-based material with a butyl adhesive, which is designed with a flexibility that enables it to conform to openings and edges that have arched or curved dimensions. This flashing material is available in rolls measuring 7 inches by 33 feet (175 mm by 10 m) and 9 inches by 33 feet (225 mm by 10 m).
4. usage and limitationsGreenGuard Flashing and GreenGuard SuperStretch Flashing are intended to provide a weatherproof seal around openings and penetrations in exterior walls when installed in accordance with the guidelines provided in this manual. The following conditions apply to the use of GreenGuard Flashing and GreenGuard SuperStretch Flashing:
• Installation: To obtain the best adhesion, GreenGuard Flashing Products should be installed when outdoor temperatures range from 25 to 120°F (-4 to 49°C) over surfaces that are free of dirt and moisture.
• EnvironmentalConditions: GreenGuard Flashing and GreenGuard SuperStretch Flashing installed with the non-adhesive surface facing the environment may remain exposed for up to 120 days.
• Storage: Store boxes containing GreenGuard Flashing Products in a clean, dry area without prolonged, direct exposure to sunlight.
• WARNING: like most commercially available flashing materials, GreenGuard Flashing Products will ignite if exposed to fire of sufficient heat and intensity (> 700°F/371°C). Protect GreenGuard Flashing Products from exposure to open flame or other ignition sources during shipping, storage, and installation.
• WARNING: The release paper of GreenGuard Flashing Products is slippery and should not be walked on at any time. Discard release paper in a designated container.
BUILDING WRAP
G u i d e F o r r e s i d e n t i a l a p p l i c a t i o n s

5
5a. installation (windows with Mounting Flanges – wrap pulled into Opening)Note: The following installation information is intended to represent a “best practices” approach and is not intended to address all possible construction scenarios. Some of the information described below for installation of building wrap and flashing materials is similar to that described in ASTM E 2112, Method A1.
1. Install GreenGuard Building Wrap over the entire exterior wall and make a modified “I” cut through the building wrap at the window opening (see Figure 1A). Cut a header flap in the building wrap and fold material above top of window and tape. Cut building wrap on sill to promote flashing to wood adhesion (see Figure 1B).
2. Optional Sill Flashing Method No. 1: Cut a piece of GreenGuard SuperStretch Flashing that is at least 12 inches (304 mm) longer than the width of the rough opening. Remove the release paper and align the flashing so that it extends 2 inches (50 mm) onto the sill and up the inside jamb (see Figures 1C and 1D).
1-800-241-4402 www.green-guard.com
B u i l d i n G W r a p a n d F l a s h i n G i n s t a l l a t i o n
FIGURE 1A: PREPARATIoN oF RoUGh oPENING
FIGURE 1C: INSTAllATIoN oF SIll FlAShING
FIGURE 1D: INSTAllATIoN oF SIll FlAShING
FIGURE 2A: INSTAllATIoN oF SloPED SIll
2. Optional Sill Flashing Method No. 2: Install a sloped sill directly over the building wrap at the sill and then install the GreenGuard SuperStretch Flashing as described in Method 1 (see Figure 2A).
FIGURE 1B: CUTTING oF WRAP oN SIll

6
Optional Sill Flashing Method No. 3: Install a sill dam directly over the building wrap at the back of the sill and then install the GreenGuard SuperStretch Flashing as described in Method 1 (see Figure 2B).
Optional Sill Flashing Method No. 4: Install a sill pan directly over the building wrap after applying a bead of sealant to the back side of the front edge of the sill pan (see Figure 2C-1). Attach the sill pan using roofing nails or panhead screws. Then install small pieces of GreenGuard SuperStretch Butyl Flashing at the sill corners so that they overlap the sill pan edges and the side jamb (see Figure 2C-2).
Optional Sill Flashing Method No. 5 (Corner Guards): A. To install the GreenGuard Corner Guards, cut back the header and
the sides of the building wrap around the rough opening. Install the corner guards with staples or roofing nails at the 4 corners.
B. After fastening the Corner Guards, install a piece of GreenGuard Flashing over the top edge of the Corner Guard.
C. Finish details – option 1 – (window flashed to sheathing). If the window unit is to be flashed directly to the sheathing, finish the flashing installation at the sill as shown. Use the appropriate width of flashing to cover the sill and at least 2 inch overlap to the face of the rough opening. once the window is installed, seal the building wrap to the window edge with GreenGuard Flashing or Seam Tape.
D. Finish details – option 2 – (window flashed to building wrap). If the window unit is to be flashed over the building wrap, install the sill flashing as shown. Fold the building wrap into the sides of the opening. Use the appropriate width of flashing to cover the sill and at least 2 inch overlap to the face of the rough opening. once the window is installed, finish the window installation by applying side and head flashing per this guide.
BUILDING WRAP
G u i d e F o r r e s i d e n t i a l a p p l i c a t i o n s
FIGURE 2B: INSTAllATIoN oF SIll DAM
FIGURE 2C-1: SIll PAN oPTIoN
FIGURE 2C-2: SIll PAN oPTIoNCoRNERS SEAlED
A.
C. D.
B.

7
1-800-241-4402 www.green-guard.com
B u i l d i n G W r a p a n d F l a s h i n G i n s t a l l a t i o n
3. Install the window in accordance with the window manufacturer’s installation instructions. Typically, this requires that a bead of sealant be applied to the back side of the window flange prior to installing the window (see Figure 3A). IMPoRTANT: Do NoT SEAl ThE BoTToM FlANGE oF ThE WINDoW. Attach the window using fasteners specified by the window manufacturer.
4. Install the jamb flashing so that it overlaps the sill flashing (see Figure 3B).
5. Install the head flashing so that it overlaps and extends beyond the jamb flashing. Fold the building wrap down at the header so that it overlaps the head flashing (see Figure 3C). Tape the diagonal cuts in the building wrap at the header (see Figure 3D).
5B. Enhanced installation (windows with Mounting Flanges – wrap Cut Back Method) Note: The following installation information is intended to represent a “best practices” approach and is not intended to address all possible construction scenarios. Some of the information described below for installation of building wrap and flashing materials is similar to that described in ASTM E 2112, Method A1.
1. Install GreenGuard Building Wrap over the entire exterior wall and make a modified “I” cut through the building wrap at the window opening (see Figure 4A). Cut a header flap in the building wrap and fold material above top of window and tape. Cut building wrap on sill to promote flashing-to-wood adhesion. on the sides of the rough opening, mark off a vertical line approximately 3 inches from the opening.
FIGURE 3C: INSTAllATIoN oF WINDoW hEAD FlAShING
FIGURE 3B: INSTAllATIoN oF WINDoW jAMB FlAShING
FIGURE 4A: PREPARATIoN oF RoUGh oPENING
FIGURE 3D: INSTAllATIoN oF WINDoWTAPE hEAD FlAShING
FIGURE 3A: INSTAllATIoN oF WINDoWNoTE: Do NoT SEAl BoTToM FlANGE oF WINDoW
prEFErrEd METHOd

8
2. Cut the building wrap along the marked vertical lines on the sides of the opening. The cut will end at the parallel point along the bottom of the rough opening. Remove wrap from the inside of the rough opening and install sill flashing (see Figure 4B). Follow sill flashing recommendations in Section 5A.
3. Install the window in accordance with the window manufacturer’s installation instructions. Typically, this requires that a bead of sealant be applied to the back side of the window flange prior to installing the window. IMPoRTANT: Do NoT SEAl ThE BoTToM FlANGE oF ThE WINDoW. Attach the window using fasteners specified by the window manufacturer.
4. Install the jamb flashing so that it overlaps the sill flashing (see Figure 4D). Notice that the flashing will now seal directly to the window flange and the sheathing, while still integrating the edge of the building wrap.
5. Install the head flashing so that it overlaps and extends beyond the jamb flashing. Fold the building wrap down at the header so that it overlaps the head flashing (see Figure 4E). As part of the enhanced installation, seal the diagonal cuts with a section of GreenGuard Flashing. Also install a 3-inch section of flashing at the center of the header flap to hold the wrap in place (see Figure 4F).
BUILDING WRAP
G u i d e F o r r e s i d e n t i a l a p p l i c a t i o n s
FIGURE 4B: INSTAllATIoN oF SIll FlAShING AND CUT BACK oF WRAP oN ThE SIDES
FIGURE 4D: INSTAllATIoN oF WINDoW jAMB FlAShING
FIGURE 4E: INSTAllATIoN oF WINDoW hEAD FlAShING
FIGURE 4F: FINIShING oF WINDoW hEAD FlAShING
FIGURE 4C: INSTAllATIoN oF WINDoW NoTE: Do NoT SEAl BoTToM FlANGE oF WINDoW
9
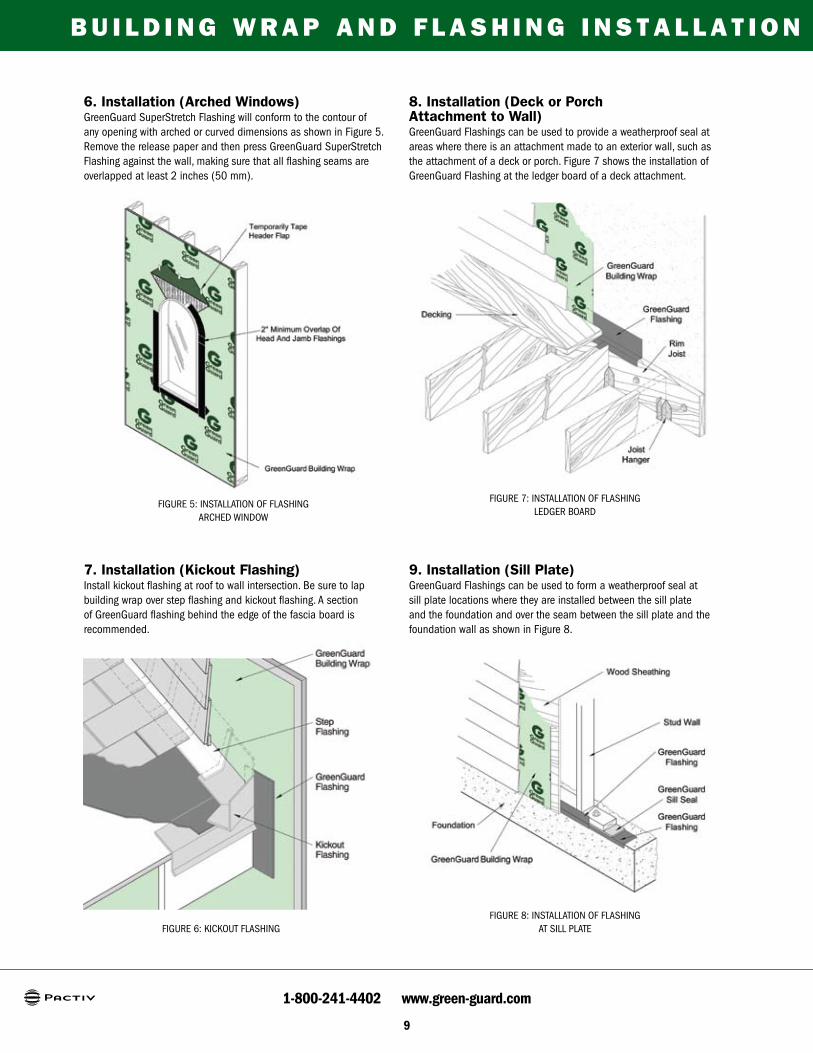
6. installation (arched windows)GreenGuard SuperStretch Flashing will conform to the contour of any opening with arched or curved dimensions as shown in Figure 5. Remove the release paper and then press GreenGuard SuperStretch Flashing against the wall, making sure that all flashing seams are overlapped at least 2 inches (50 mm).
7. installation (Kickout Flashing)Install kickout flashing at roof to wall intersection. Be sure to lap building wrap over step flashing and kickout flashing. A section of GreenGuard flashing behind the edge of the fascia board is recommended.
8. installation (deck or porch attachment to wall)GreenGuard Flashings can be used to provide a weatherproof seal at areas where there is an attachment made to an exterior wall, such as the attachment of a deck or porch. Figure 7 shows the installation of GreenGuard Flashing at the ledger board of a deck attachment.
9. installation (Sill plate)GreenGuard Flashings can be used to form a weatherproof seal at sill plate locations where they are installed between the sill plate and the foundation and over the seam between the sill plate and the foundation wall as shown in Figure 8.
1-800-241-4402 www.green-guard.com
B u i l d i n G W r a p a n d F l a s h i n G i n s t a l l a t i o n
FIGURE 7: INSTAllATIoN oF FlAShINGlEDGER BoARD
FIGURE 8: INSTAllATIoN oF FlAShINGAT SIll PlATE
FIGURE 5: INSTAllATIoN oF FlAShINGARChED WINDoW
FIGURE 6: KICKoUT FlAShING

10
10. installation (Mounting Block)GreenGuard Flashings can be used to seal a standard mounting block as shown in Figures 9A-9C.
11. installation (pipe penetrations)GreenGuard Flashings can be used to seal around penetrations in an exterior wall. Figures 10A-10C show how GreenGuard SuperStretch Flashing is applied around a pipe penetration.
BUILDING WRAP
G u i d e F o r r e s i d e n t i a l a p p l i c a t i o n s
FIGURE 9A: INSTAllATIoN oF FlAShINGMoUNTING BloCK
FIGURE 9B: INSTAllATIoN oF FlAShINGMoUNTING BloCK
FIGURE 9C: INSTAllATIoN oF FlAShINGMoUNTING BloCK
FIGURE 10A: INSTAllATIoN oF FlAShINGPIPE PENETRATIoN
FIGURE 10B: INSTAllATIoN oF FlAShINGPIPE PENETRATIoN
FIGURE 10C: INSTAllATIoN oF FlAShINGPIPE PENETRATIoN
BUILDING WRAP1-800-241-4402
www.green-guard.com
GreenGuard MAX and RainDrop (US Patent Nos. 6,869,901/6,761,006/7,196,024/6,550,212 and MX Patent Nos. 246453/241682) are registered trademarks of Pactiv Corporation. ©2011 Pactiv 7/11INSTl-MMGT
Forthemostcurrentproductinformation,gotowww.green-guard.com.
• For more information on specific building product recommendations and limitations, contact your Pactiv representative.
G r e e n G u a r d M o i s t u r e M a n a G e M e n t
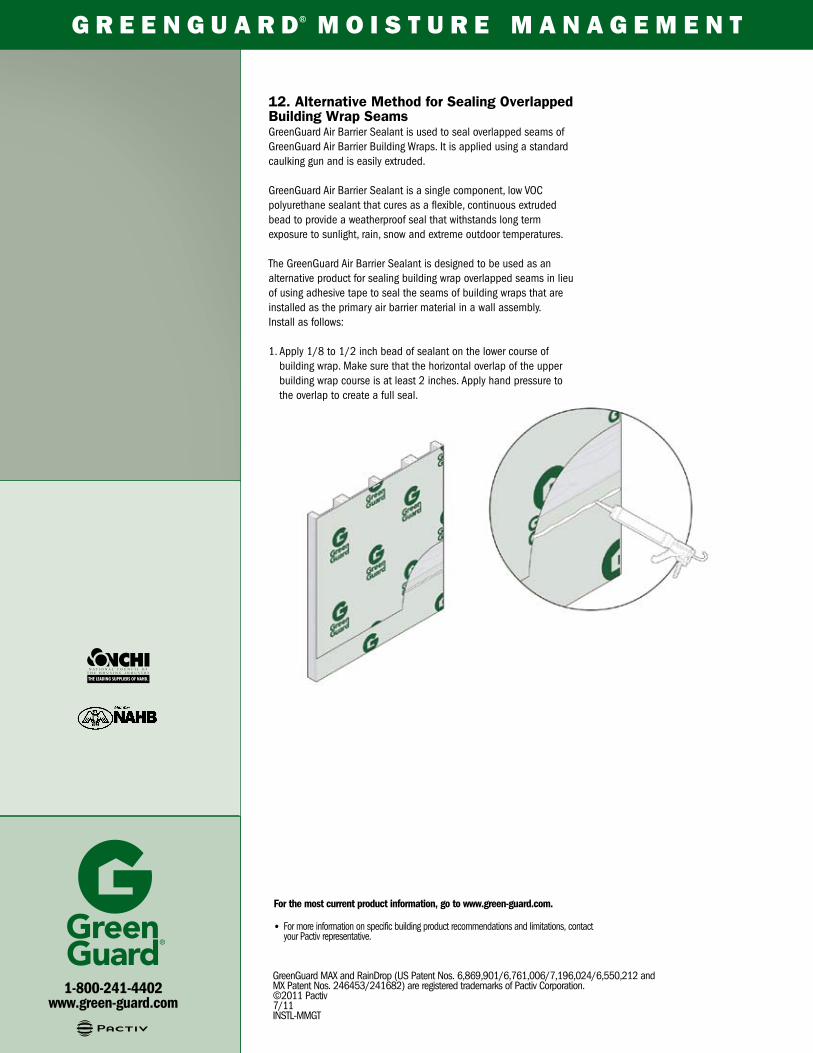
12. alternative Method for Sealing Overlapped Building wrap SeamsGreenGuard Air Barrier Sealant is used to seal overlapped seams of GreenGuard Air Barrier Building Wraps. It is applied using a standard caulking gun and is easily extruded.
GreenGuard Air Barrier Sealant is a single component, low VoC polyurethane sealant that cures as a flexible, continuous extruded bead to provide a weatherproof seal that withstands long term exposure to sunlight, rain, snow and extreme outdoor temperatures.
The GreenGuard Air Barrier Sealant is designed to be used as an alternative product for sealing building wrap overlapped seams in lieu of using adhesive tape to seal the seams of building wraps that are installed as the primary air barrier material in a wall assembly. Install as follows:
1. Apply 1/8 to 1/2 inch bead of sealant on the lower course of building wrap. Make sure that the horizontal overlap of the upper building wrap course is at least 2 inches. Apply hand pressure to the overlap to create a full seal.