resource account instructions
TRANSCRIPT

1
[email protected] is.depaul.edu
Resource Account Instructions Managing a Resource Email Account in Outlook
Contents: click to skip to a section
Overview of Resource Accounts for Owners ....................................................... 2 Email Retention and Archives ............................................................................. 2 Accessing a Resource Account: ........................................................................... 2
#1 Opening a Resource Account in a Web Browser ..................................... 3 #2 Opening a Resource Account in Outlook ................................................. 4
Sending Emails as a Resource Account ............................................................... 7 Giving Permissions to Other Users ...................................................................... 8 Assigning Access to Delegates ............................................................................ 8 For Delegates – Adding a Resource Account in Outlook ................................... 12
2
[email protected] is.depaul.edu
OVERVIEW OF RESOURCE ACCOUNTS FOR OWNERS
As the owner, you have full rights and “send as” permission for your resource account. This means
that you can send and receive messages from this account. You also have the ability to give other
users permission to access the resource account. These other users with access to the account are
known as delegates.
If your delegates only need access to read messages in the account, but will not send messages from
the account, you can assign delegate access yourself. If any of your delegates require the ability to
both read and send email from this account, also known as "send as" rights, you must request these
privileges from Netadmin at [email protected].
EMAIL RETENTION AND ARCHIVES
As the owner of a resource account, you have the choice of three email retention/archive policy
options. By default, all new resource accounts are assigned to the 90-Day Email Retention and
Archive Option. If you would like to retain email in the account longer, you may request either the
18-Month or the indefinite option.
For details about DePaul email retention policies, please refer to the Email Retention and Archives
document.
ACCESSING A RESOURCE ACCOUNT:
There are two methods for resource account owners to access their resource accounts:
1. In a web browser, using the Outlook Web App (OWA) at http://outlook.depaul.edu
2. In Outlook, as an additional mailbox from your primary profile in Outlook
3
[email protected] is.depaul.edu
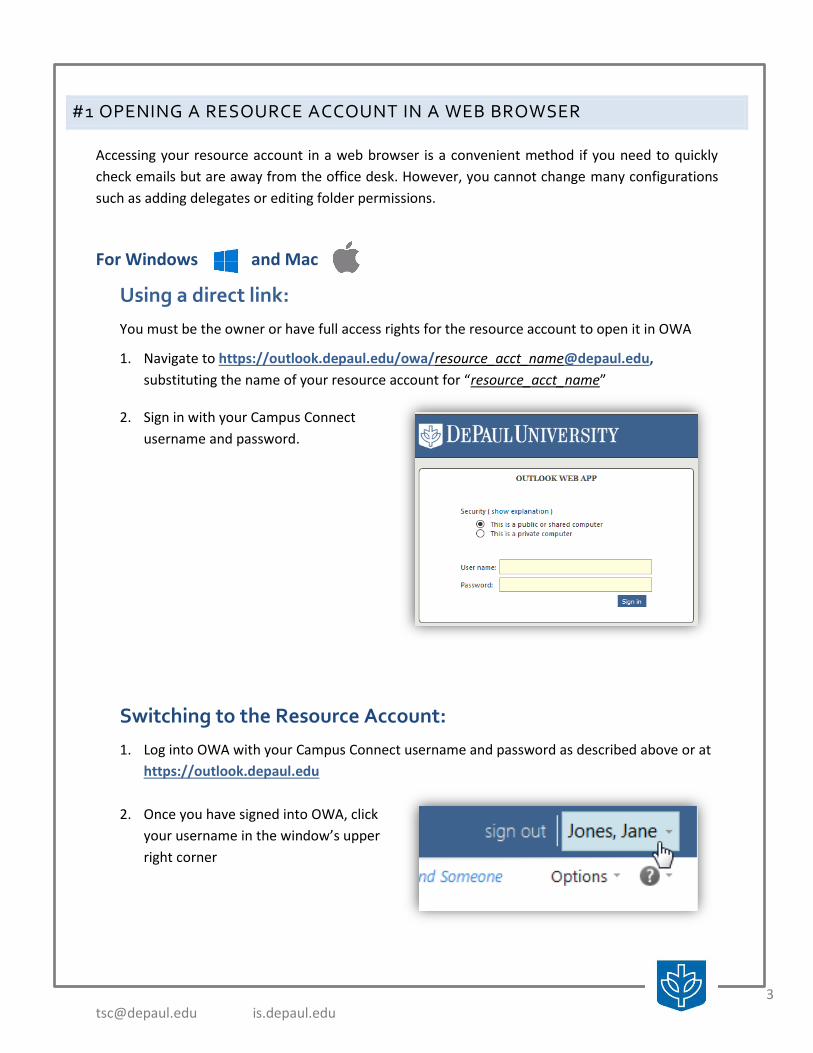
#1 OPENING A RESOURCE ACCOUNT IN A WEB BROWSER
Accessing your resource account in a web browser is a convenient method if you need to quickly
check emails but are away from the office desk. However, you cannot change many configurations
such as adding delegates or editing folder permissions.
For Windows and Mac
Using a direct link:
You must be the owner or have full access rights for the resource account to open it in OWA
1. Navigate to https://outlook.depaul.edu/owa/[email protected],
substituting the name of your resource account for “resource_acct_name”
2. Sign in with your Campus Connect
username and password.
Switching to the Resource Account:
1. Log into OWA with your Campus Connect username and password as described above or at
https://outlook.depaul.edu
2. Once you have signed into OWA, click
your username in the window’s upper
right corner

4
[email protected] is.depaul.edu
3. Type the username of the resource
account you wish to open
4. Click Open to switch to the resource
account
#2 OPENING A RESOURCE ACCOUNT IN OUTLOOK
For Windows
As an owner, you should see your resource account
beneath your primary email address inbox, after
Netadmin has granted you access.
Contact Netadmin at [email protected] if you do not
see your resource account in Outlook.
5
[email protected] is.depaul.edu
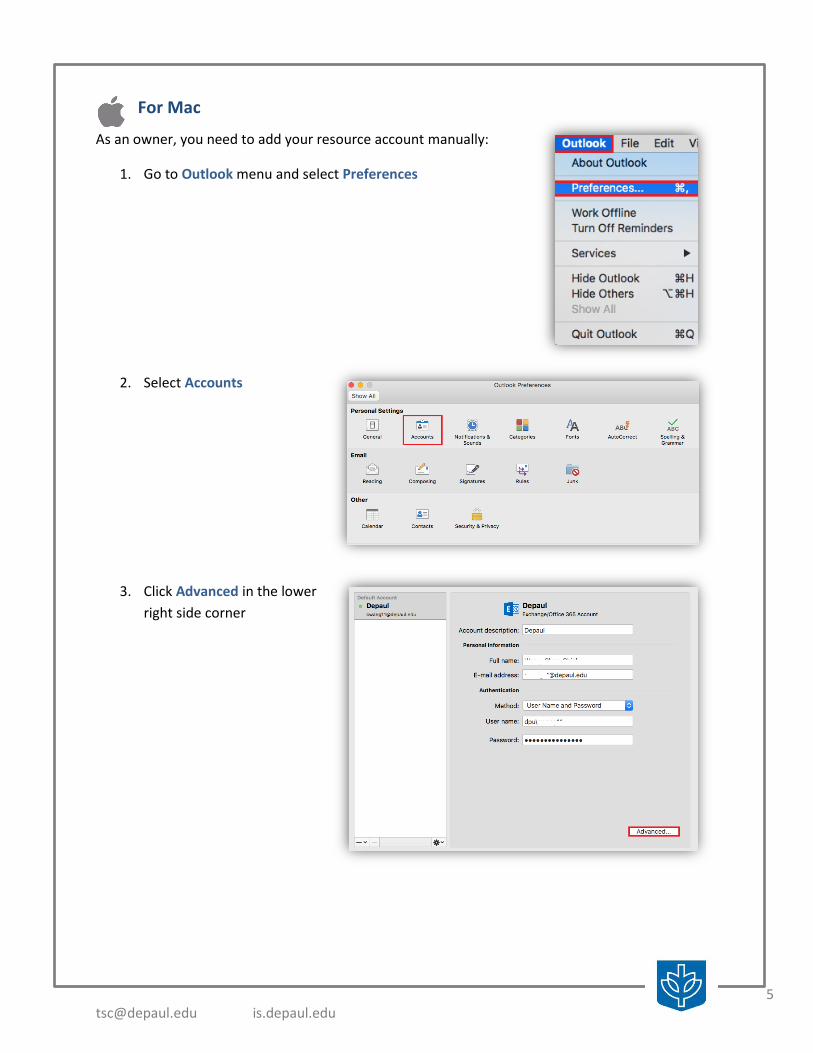
For Mac
As an owner, you need to add your resource account manually:
1. Go to Outlook menu and select Preferences
2. Select Accounts
3. Click Advanced in the lower
right side corner

6
[email protected] is.depaul.edu
4. Select Delegates tab
5. Under People I am a
delegate for, click + to add
a resource account
6. Search and select the
name of your resource
account. Click Add

7
[email protected] is.depaul.edu
ENDING EMAILS AS A RESOURCE ACCOUNT
For Windows
When you wish to send an email from the resource account address, you need to click the Options
tab and toggle the From tab in order to change to the resource account address.
For Mac
When you wish to send or respond an email from the resource account address, click the double
arrow icon as shown below to select the email address.

8
[email protected] is.depaul.edu
Giving Permissions to Other Users As the owner of a resource account, you have the ability to give other users permissions to access the Inbox and other folders of the account. These other users with access to the resource account are known as delegates. If your delegates only need access to read messages in the account, you can assign delegate access
yourself using Outlook for Windows or Mac.
If any of your delegates require the ability to read and send email from this account, also known as
"send as" rights, you must request these privileges from [email protected].
Once you have assigned delegate access to another user, be sure to provide them with the
instructions for adding an additional mailbox.
ASSIGNING ACCESS TO DELEGATES
For Windows
1. As an owner, right click your resource account and select Data File Properties

9
[email protected] is.depaul.edu
2. Select Permissions tab,
click Add to add user you wish to give permissions
3. Search the username to find the delegate username, click Add and then OK
4. Click OK to close the Add Users window
5. Select the Permission Level you wish your delegate to have.
6. Click Apply to save.
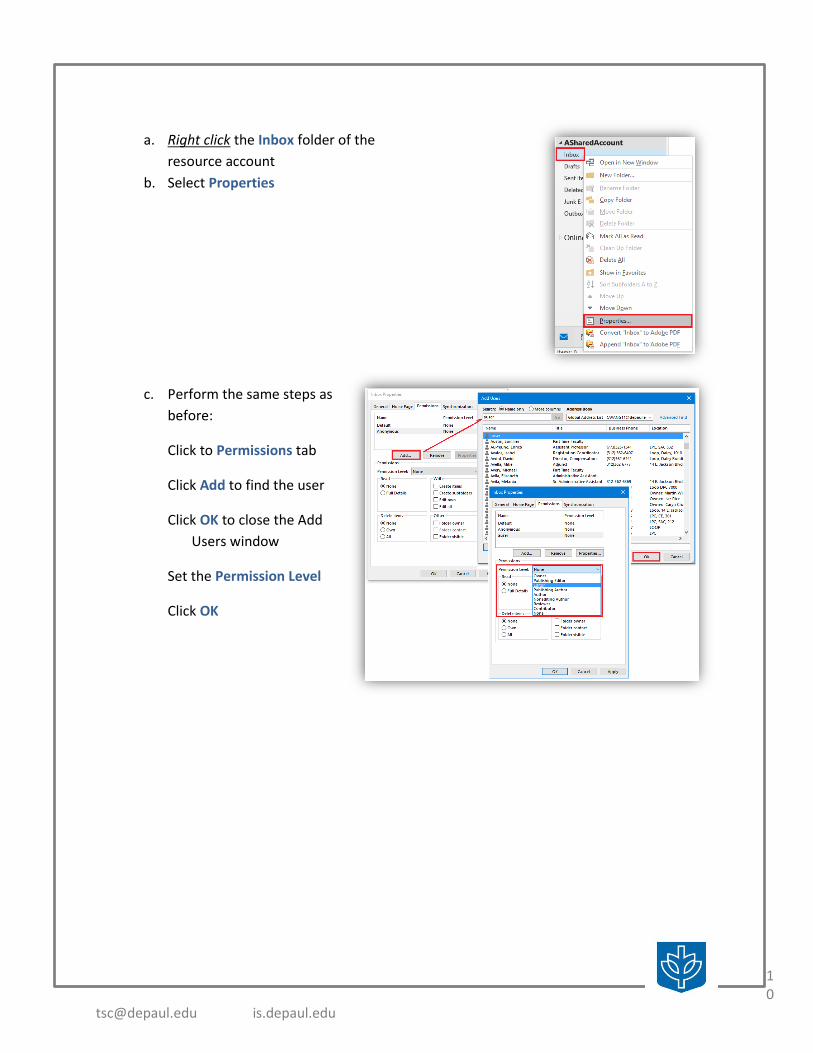
Important: You will still need to grant access for each of the resource account folders, such
as Inbox, Drafts, and Deleted Items, etc. For example, if you want to give someone
permissions to read emails in the Inbox:
10
[email protected] is.depaul.edu
a. Right click the Inbox folder of the
resource account
b. Select Properties
c. Perform the same steps as
before:
Click to Permissions tab
Click Add to find the user
Click OK to close the Add
Users window
Set the Permission Level
Click OK
11
[email protected] is.depaul.edu
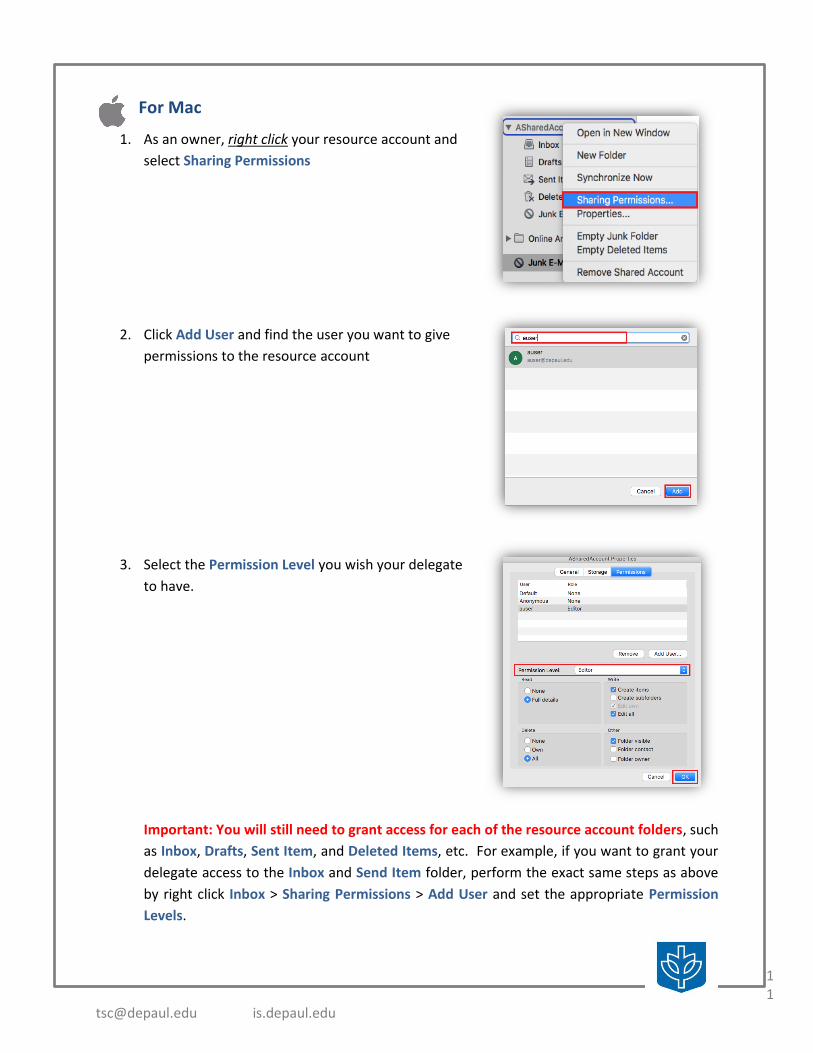
For Mac
1. As an owner, right click your resource account and
select Sharing Permissions
2. Click Add User and find the user you want to give
permissions to the resource account
3. Select the Permission Level you wish your delegate
to have.
Important: You will still need to grant access for each of the resource account folders, such
as Inbox, Drafts, Sent Item, and Deleted Items, etc. For example, if you want to grant your
delegate access to the Inbox and Send Item folder, perform the exact same steps as above
by right click Inbox > Sharing Permissions > Add User and set the appropriate Permission
Levels.
12
[email protected] is.depaul.edu
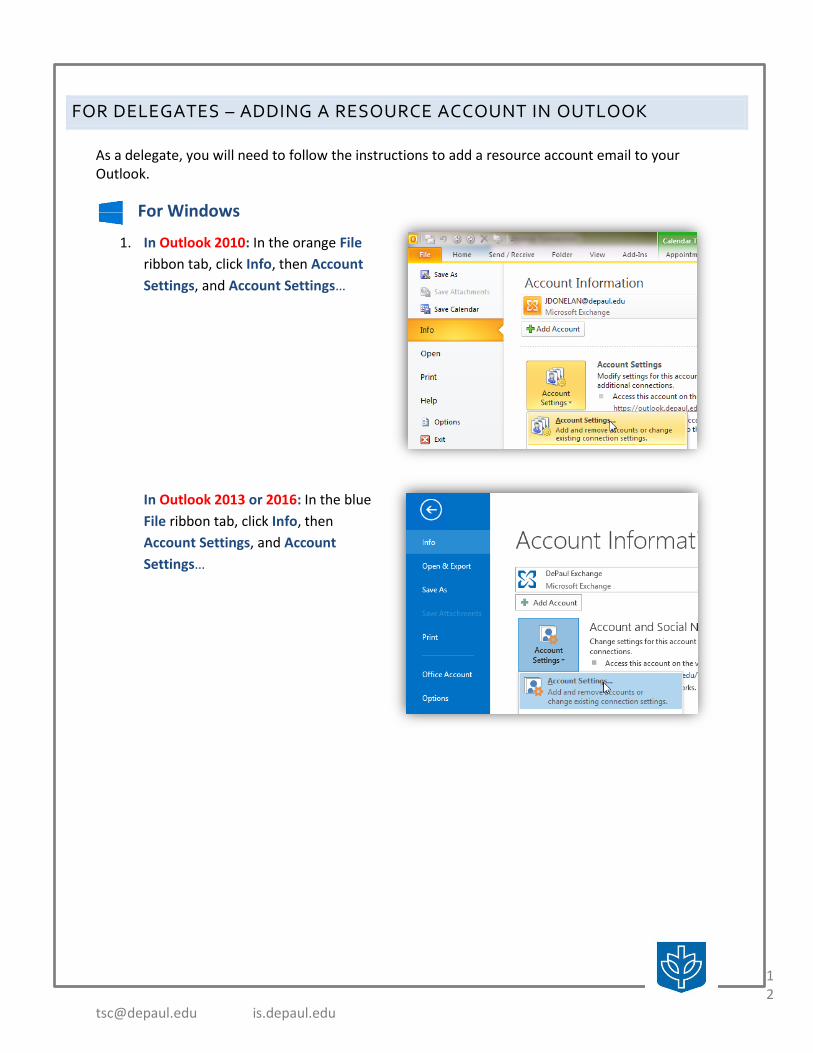
FOR DELEGATES – ADDING A RESOURCE ACCOUNT IN OUTLOOK
As a delegate, you will need to follow the instructions to add a resource account email to your Outlook.
For Windows
1. In Outlook 2010: In the orange File
ribbon tab, click Info, then Account
Settings, and Account Settings…
In Outlook 2013 or 2016: In the blue
File ribbon tab, click Info, then
Account Settings, and Account
Settings…

13
[email protected] is.depaul.edu
2. Select your default account and click
Change...
3. Click on More Settings...
4. Select the Advanced tab and then click on
Add.

14
[email protected] is.depaul.edu
5. Enter the name of the additional mailbox
into the Add mailbox field. Click OK, then
Next, and Finish.
6. The new mailbox should now be located in your Navigation
Pane beneath your main mailbox. In this example, you’ll
notice that only the Inbox, Drafts, and Deleted Items folder
are visible, and other folders such as Junk E-mail and
Outbox are missing. This is because your resource account
owner did not grant those folder permissions to you.
Contact your resource account owner if you need access to
those folders
For Mac
As a delegate, you need to add your resource account manually:
1. Select Outlook menu
2. Select Preferences

15
[email protected] is.depaul.edu
3. Select Accounts
4. Click Advanced in the lower
right side corner
16
[email protected] is.depaul.edu
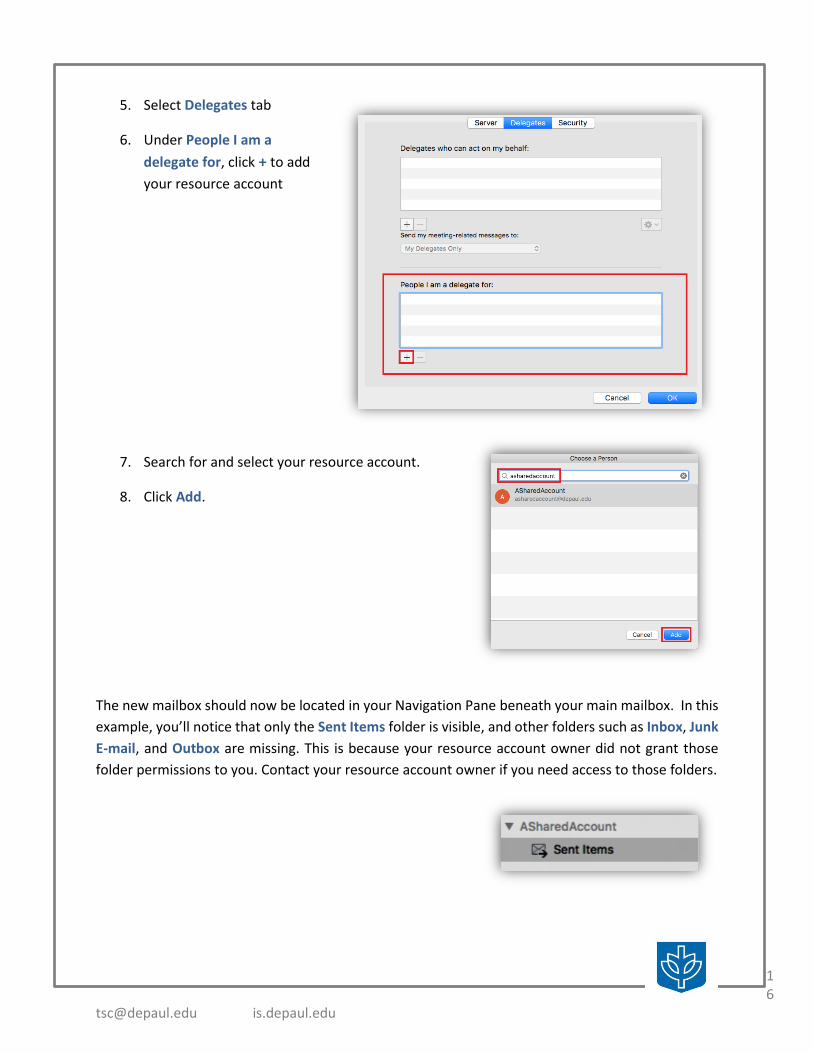
5. Select Delegates tab
6. Under People I am a
delegate for, click + to add
your resource account
7. Search for and select your resource account.
8. Click Add.
The new mailbox should now be located in your Navigation Pane beneath your main mailbox. In this
example, you’ll notice that only the Sent Items folder is visible, and other folders such as Inbox, Junk
E-mail, and Outbox are missing. This is because your resource account owner did not grant those
folder permissions to you. Contact your resource account owner if you need access to those folders.